training guide - benderstikbenderstik.com/benderstik_manual_web.pdf · training guide. table of...
TRANSCRIPT

Training Guide

Table of Contents
2
Welcome: 4Hip Turn Drill: 5Top Hands Drill: 7Backswing Drill: 9Finish Inside Drill: 11Hands Under Drill: 13Head Lift Drill: 15Weight Forward Drill: 17Impact Drill: 19Out to Inside Drill: 21Over the Top Drill: 23Punch Drill: 25


4
Welcome!
Thank you for purchasing the BenderStik!
The BenderStik golf training aid is uniquely designed to help you build a consistent golf swing that lasts for a lifetime. To improve at golf you must use either positive or negative feedback while training your swing and the BenderStik provides this all-important feedback! And with the BenderStik golf swing trainer, it doesn’t matter where you practice – only that you properly practice.
Perfect Practice Makes Perfect: no one picks up a club for the first time and swings it with a naturally proper and efficient motion. The reason we all have different golf swings is because we repeat the motion over and over until it builds a motor program in our brain and with this repeti-tion comes familiarity and comfort. In order to change and improve your current motor program you must use feedback to disrupt the old familiar movement to guarantee that a new and desired swing motion is actually occurring. This type of practice produces correct motion memory after enough repetition and ultimately transfers to the course during play.
The more you practice with feedback, the more ingrained the correct motion becomes and the more reliable the new swing. We’re all familiar with the saying, practice does not make perfect, but perfect practice makes perfect. This is especially true for golf and you must use feedback in your practice to have that picture-perfect swing. The BenderStik provides this constant feedback. It’s like having your golf instructor by your side, continually correcting and re-enforcing correct swing motion until it’s engrained through repetition.
Congratulations and enjoy your new consistent and reliable swing!
5
HIP TUrn DrILL
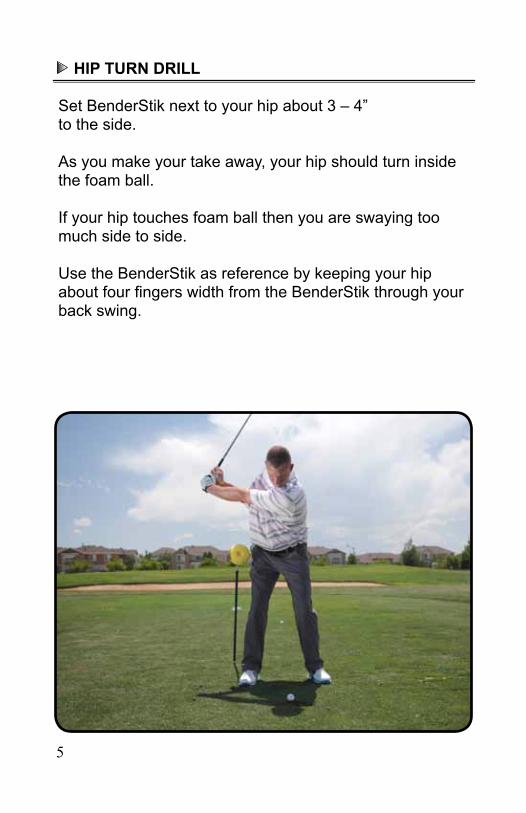
Set BenderStik next to your hip about 3 – 4”to the side.
As you make your take away, your hip should turn inside the foam ball.
If your hip touches foam ball then you are swaying too much side to side.
Use the BenderStik as reference by keeping your hip about four fingers width from the BenderStik through your back swing.

6

7
TOP HanDs DrILL
Set the BenderStik about 4 feet behind you.
Then bend the arm so that the foam ball sits about 2’ directly behind back shoulder at head level.
Setup (your stance) so that when you take your hands to the top of your backswing you just touch the Bend-erStik.
Slide your setup backwards to allow for a full turn and be careful to not go past parallel.
As you turn you should reach to have your hands set at the top of your backswing by referencing the foam ball.
The idea here is to limit your turn so that youdon’t go past parallel or overturn.
Also use the foam ball as a reference point to make a smooth transition into your downswing.

8
9
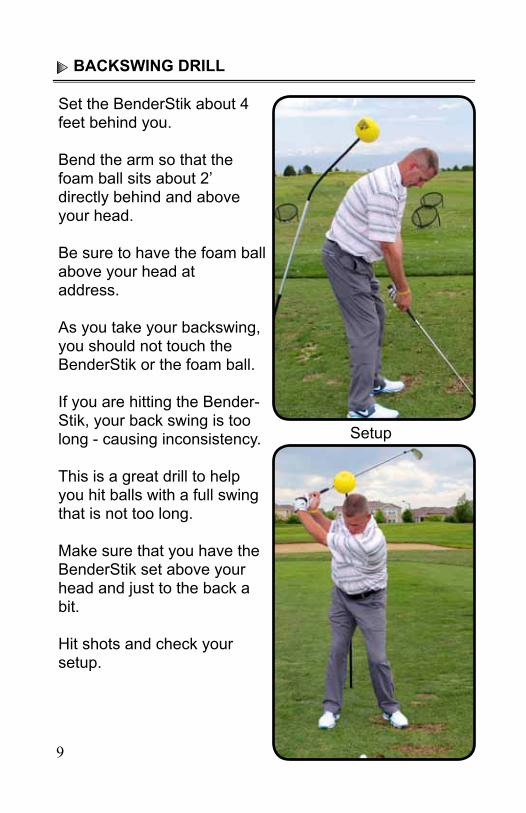
Set the BenderStik about 4 feet behind you.
Bend the arm so that the foam ball sits about 2’ directly behind and above your head.
Be sure to have the foam ball above your head at address.
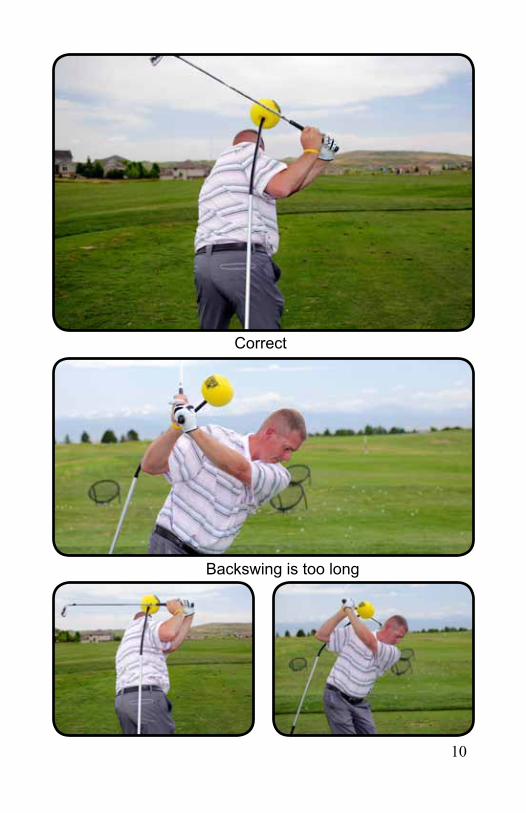
As you take your backswing, you should not touch the BenderStik or the foam ball.
If you are hitting the Bender-Stik, your back swing is too long - causing inconsistency.
This is a great drill to help you hit balls with a full swing that is not too long.
Make sure that you have the BenderStik set above your head and just to the back a bit.
Hit shots and check your setup.
Setup
BacksWInG DrILL
10
Correct
Backswing is too long

11
FInIsH InsIDe DrILL
Bend the top of the BenderStik so it is vertical just behind your shoulder.
The BenderStik should be about 2’ in front of your leading shoulder.
Take your swings slowly at first.
Try to finish by folding your arms up and past the BenderStik.
This helps you develop a high finish and avoid pulling inside.
The goal here is to start slow to develop a smooth finish and work inside the BenderStik until you’re comfortable.
You should be able to make full swings after a while with good balance and a high finish.
As you improve, move the BenderStik in to develop a consistent, high finish.

12
Setup
Finish Swing Inside Bender Stik
13
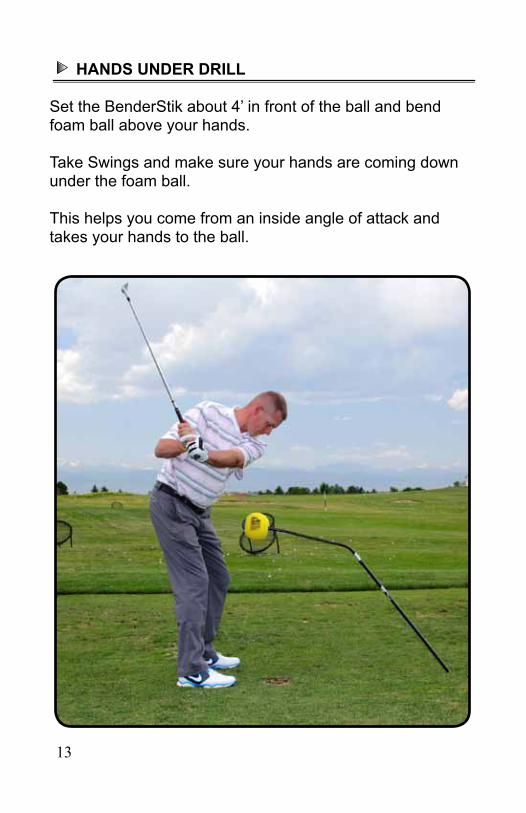
HanDs UnDer DrILL
Set the BenderStik about 4’ in front of the ball and bend foam ball above your hands.
Take Swings and make sure your hands are coming down under the foam ball.
This helps you come from an inside angle of attack and takes your hands to the ball.
14
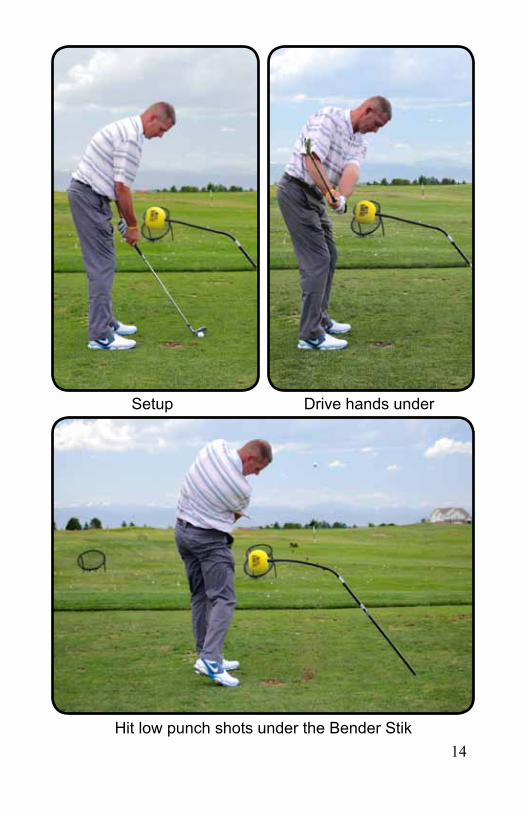
Setup Drive hands under
Hit low punch shots under the Bender Stik

15
HeaD LIFT DrILL
Set the BenderStik out front so the foam ball touches just above your forehead.
Take swings ensuring your head remains in contact with the foam ball.
Try to maintain head contact throughout your finish.
This helps maintain your spine angle throughout your full swing and leads to better ball contact and consistency.
This is a drill to engrain a steady head position.
Keep Your Head on the Ball through contact

16
Setup
Try to maintain head position to finish

17
WeIGHT FOrWarD DrILL
Set BenderStik out front so the foam ball is just four fingers off your front hip.
Take a normal swing, staying on the ball.
Try to finish through the ball and have your hip rotate around so your pelvis hits the foam ball.
This drill helps you get your weight over on your front side for a better finish.
Work on a compact take away

18Try to finish with your pelvis forward
Setup

19
ImPacT DrILL
Set the BenderStik out front so the foam ball touches your leading wrist at the address position.
The goal is to hit low punch shots so that you are hitting the foam ball and the golf ball at the same time.
This is a great drill to encourage your hands to be in front of the club head at impact and create better contact.
20
21
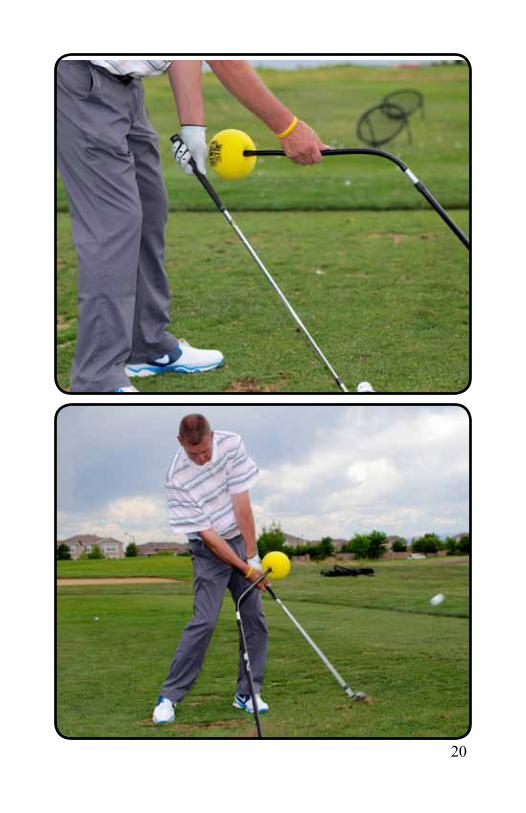
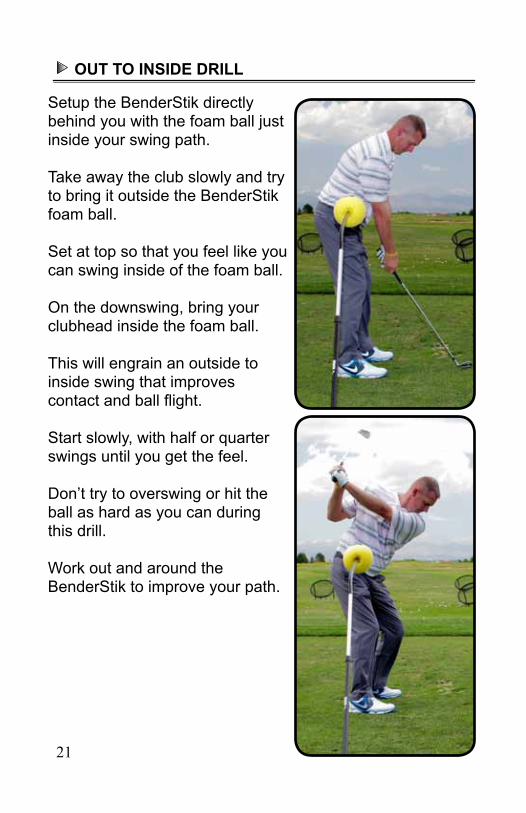
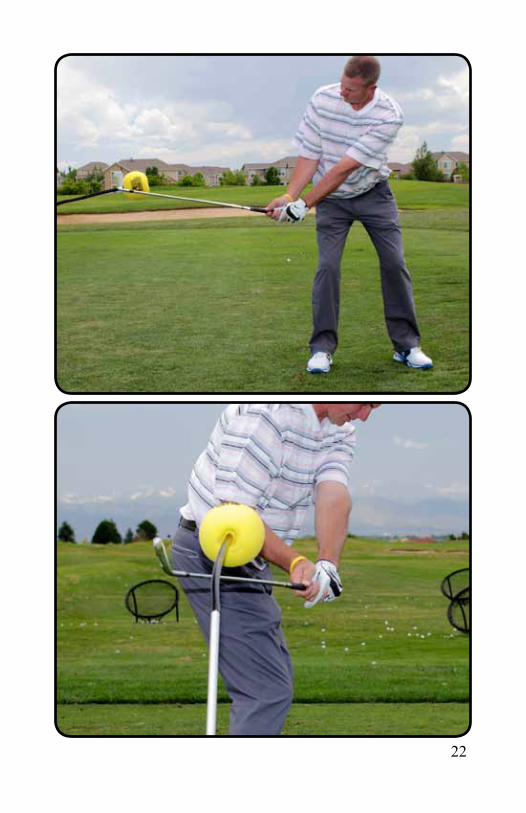
Setup the BenderStik directly behind you with the foam ball just inside your swing path.
Take away the club slowly and try to bring it outside the BenderStik foam ball.
Set at top so that you feel like you can swing inside of the foam ball.
On the downswing, bring your clubhead inside the foam ball.
This will engrain an outside to inside swing that improves contact and ball flight.
Start slowly, with half or quarter swings until you get the feel.
Don’t try to overswing or hit the ball as hard as you can during this drill.
Work out and around the BenderStik to improve your path.
OUT TO InsIDe DrILL
22
23
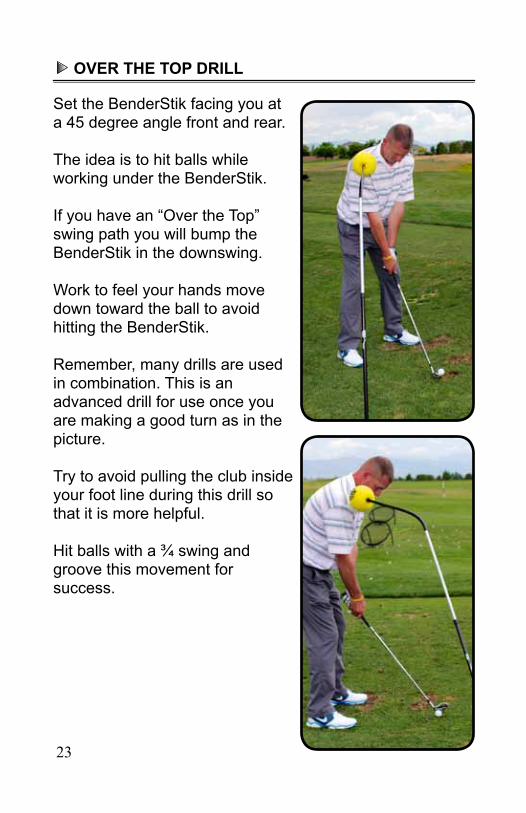
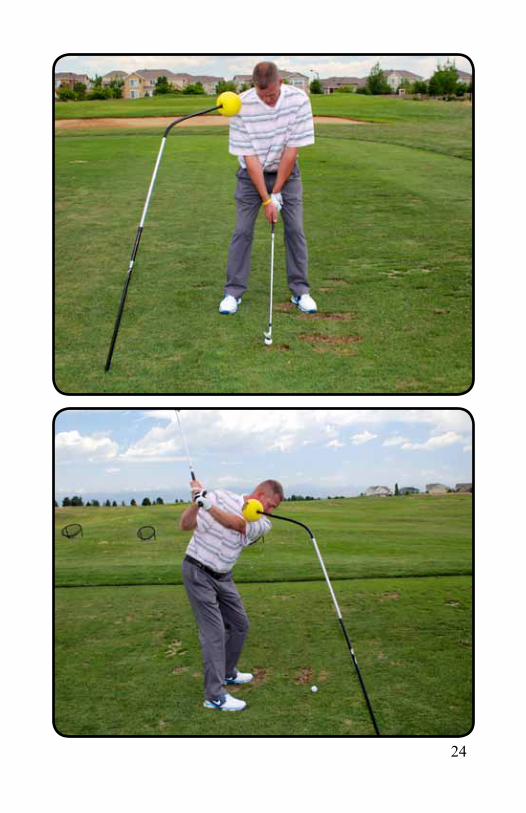
Set the BenderStik facing you at a 45 degree angle front and rear.
The idea is to hit balls while working under the BenderStik.
If you have an “Over the Top” swing path you will bump the BenderStik in the downswing.
Work to feel your hands move down toward the ball to avoid hitting the BenderStik.
Remember, many drills are used in combination. This is an advanced drill for use once you are making a good turn as in the picture.
Try to avoid pulling the club inside your foot line during this drill so that it is more helpful.
Hit balls with a ¾ swing and groove this movement for success.
Over THe TOP DrILL
24

25
Set the BenderStik out in front so that if you were to make a full swing you would hit the aluminum rod.
Go to your finish and stop so that you can feel where you might hit the BenderStik.
Make short punch shots with a compact backswing.
As you swing, stop your club so you don’t hit the Bender-Stik.
This is likely one of the most useful drills, as it teaches you to hit your irons more solidly.
Work through this drill slowly at first and then hit solid shots.
If you hit the BenderStik, reset before continuing on.
PUncH DrILL

26

© 2013 BenderStik. All rights reserved.
13-1120-01