training guide - amazon web services · star s4 ir® excimer laser training guide ... powers off...
TRANSCRIPT

STAR S4 IR® Excimer Laser Training Guide – PP2016RF0191
1 | P a g e
Training Guide STAR S4 IR® Excimer Laser
STAR S4 IR® Excimer Laser Training Guide – PP2016RF0191
2 | P a g e
TABLE OF CONTENTS
Safety…………………………………………………………………………………..……………………………………..3
Hardware ……………………………………………………………..…………………………………………………...5
System Start-up and Calibration…………………………………………..…………………….………….....9
Software ……………………………………………………..…………………………………….……………16
Environmental Conditions …………………………………………..………………………………….24
System Shutdown …..………………………………………………………………………………………24
Maintenance.....…………………………………..………………………………………………………….24
System Cleaning Instructions ………………………………………..……………………………….. 27
Indications, Contraindications, Warnings, and Precautions………………………………..28

STAR S4 IR® Excimer Laser Training Guide – PP2016RF0191
3 | P a g e
SAFETY • General Safety Precautions
• Only persons fully trained and certified by Abbott may operate the STAR S4 IR® System.
• This laser can cause injury if used improperly. It is a source of intense ultraviolet radiation and high voltages, and is a potential source of toxic gases.
• Observe all posted danger and warning labels regarding specific hazard. If an emergency situation arises, push the Laser Stop Button located on the Doctor’s Control Panel. This will shut down the system.
• Never operate the laser in the presence of flammable anesthetics or other volatile substances, such as alcohol. WARNING: The effects of electromagnetic emissions from the
excimer laser system on other devices, such as cardiac pacemakers or implanted defibrillators, are unknown. Operation of the laser in proximity to such devices is not recommended.
• Odors and Fumes • Any aromatic substance can interfere with the function of the laser. Physicians,
staff, and patients should refrain from wearing perfume or cologne while in the laser suite. No air freshener spray cleaning products, or other aromatic substances should be used in the room.
• Optical Safety • The STAR S4 IR® System contains a Class IV laser with an output at 193nm,
which is potentially hazardous to the skin and the surface layers of the cornea. The area of potential hazard (nominal hazard zone) for production of a photochemical keratitis is closer than 40 cm to the primary beam. Personnel who will be within 40 cm of the laser beam should wear the safety glasses. All healthcare personnel should avoid direct exposure to skin or eye by the primary laser beam.
Laser Stop Button Laser Stop Button

STAR S4 IR® Excimer Laser Training Guide – PP2016RF0191
4 | P a g e
Electrical Safety • The laser should always be plugged in so that gas alarms will function even
when the laser is not in use. • Never operate the laser system with any panels opened or removed. Doing so
may expose the user or others in the room to high voltage or stray laser radiation.
• Never try to defeat safety interlocks, such as those on the laser head and panel doors.
• Any service requiring access to the interior of the laser system should be performed only by Abbott-trained service personnel.
• Gas Cylinder Safety • Premix cylinder: Contains Fluorine, Argon, Helium and Neon. Premix contains
the active laser medium and is required to produce the 193 nm wavelength light. Fluorine is a highly toxic gas. It has a sharp, penetrating odor that causes
irritation to the nose, eyes, and throat at extremely low concentrations. It is nonflammable, but is a powerful oxidizing agent and should be handled with caution. Fluorine comprises less than 1% of the total premix cylinder. If there is a leak, you will smell fluorine before it reaches toxic levels.
Argon, Helium and Neon are inert, nontoxic gases, with no color, odor, or taste.
• Helium Cylinder. Helium is used to flush the laser chamber during gas fills and is added to the chamber to regulate laser output.
• Obtain Material Safety Data Sheets (MSDS) from gas vendors and post in location easily accessible to personnel.
• Occupational Safety and Health Administration (OSHA) or other applicable regulatory agencies may require safety equipment for the handling of gas or gas cylinders.
• Gas Monitor • A two-level gas monitor installed in system continuously monitors for fluorine.
It will sound an alarm, as well as send a message to computer control station, if one part-per-million or more of fluorine is detected.
• Evacuation Fan/Room Purifier • As a precaution, an emergency evacuation fan or a fluorine-absorbing room
purifier must be installed in the laser room. This fan or purifier can be used to evacuate or clean the room air in the event of fluorine gas discharge.
• Gas Leak • Abbott recommends the customer develop written safety or emergency
procedures. In some cases law may require such procedures. • Post this procedure where visible to anyone working around laser system.
STAR S4 IR® Excimer Laser Training Guide – PP2016RF0191
5 | P a g e
• Before Treatment A low-level gas leak (one part-per-million) will display a yellow warning.
As a result, scrubber action is increased. Treatment may continue, but leak should be fixed at treatment completion.
A high-level leak (seven parts-per-million) will display a red warning. It will prevent system operation and cause the system’s on-board alarm to sound.
• During Treatment Both low- and high-level leaks will display a yellow warning; however, no
alarm will engage. This condition will warrant attention upon treatment completion.
HARDWARE
For detailed information please refer the STAR S4 IR® System Operator’s Manual, under the chapter titled Using System Components.
• Laser System Control Panels • Front Control Panel- The front control panel, located to the right of the keyboard and
computer, contains the:
System Start Button System Power Key System Reset Button Alarm Reset Button. Powers off audio fluorine alarm after fluorine has been
detected. Also powers off mains power lost audio alarm if initiated.
• Doctor’s Panel Laser Stop button Suction button
Laser System Control Panel
Laser Stop Button
Front Control Panel

STAR S4 IR® Excimer Laser Training Guide – PP2016RF0191
6 | P a g e
• Doctor’s Keypad • The Doctor’s Keypad controls the patient alignment fiducial, Iris Registration
System, ActiveTrak System, Reticle and the ring and oblique illumination.
• Patient Alignment Fiducial
• When the patient is seated in the patient chair, a laser line projector reflects on the patient’s face as a Y axis alignment reference mark (fiducial) to align the head perpendicular to the system.
• Iris Registration System
• The iris registration system is used to compensate for cyclorotation and shift of the pupil centroid that occur when a patient is positioned under the laser.
• ActiveTrak Eye Tracking System
• The ActiveTrak System directs the laser beam to follow the patient’s eye movements during the surgery.
Fiducial Line
Fiducial Line
Doctor’s Keypad
STAR S4 IR® Excimer Laser Training Guide – PP2016RF0191
7 | P a g e
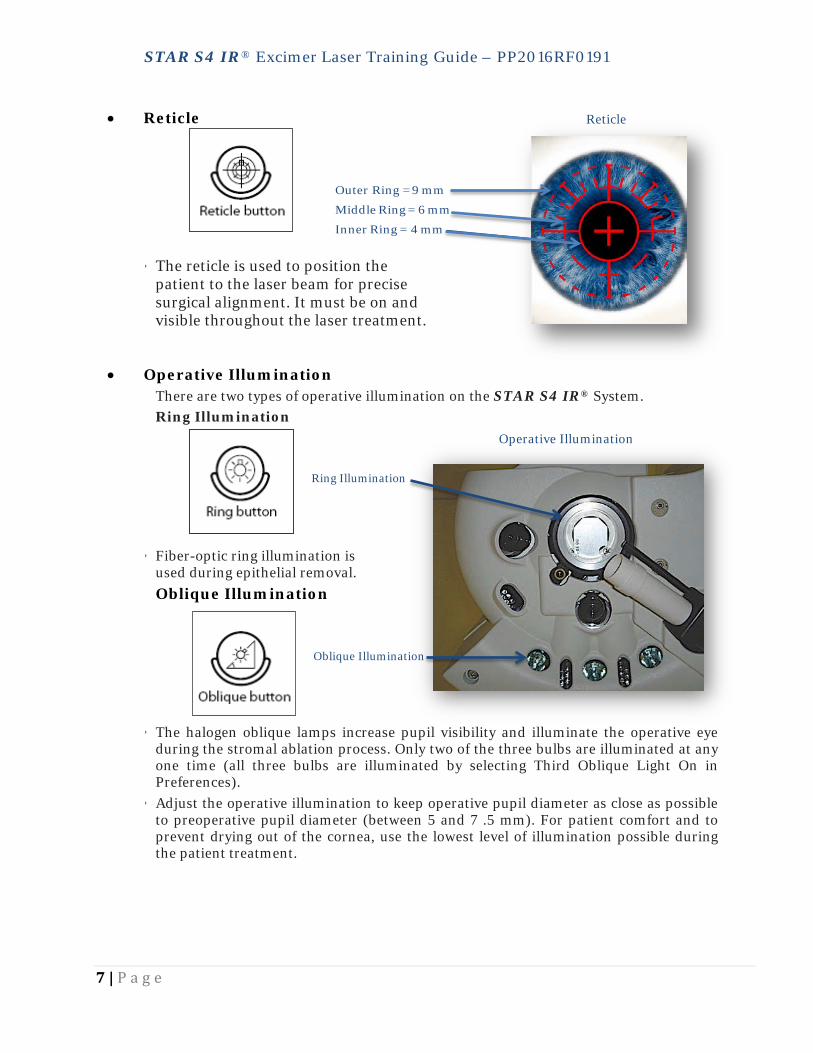
• Reticle Outer Ring = 9 mm
Middle Ring = 6 mm
Inner Ring = 4 mm
• The reticle is used to position the patient to the laser beam for precise surgical alignment. It must be on and visible throughout the laser treatment.
• Operative Illumination
There are two types of operative illumination on the STAR S4 IR® System. Ring Illumination
• Fiber-optic ring illumination is used during epithelial removal. Oblique Illumination
• The halogen oblique lamps increase pupil visibility and illuminate the operative eye
during the stromal ablation process. Only two of the three bulbs are illuminated at any one time (all three bulbs are illuminated by selecting Third Oblique Light On in Preferences).
• Adjust the operative illumination to keep operative pupil diameter as close as possible to preoperative pupil diameter (between 5 and 7 .5 mm). For patient comfort and to prevent drying out of the cornea, use the lowest level of illumination possible during the patient treatment.
Ring Illumination
Oblique Illumination
Reticle
Operative Illumination
STAR S4 IR® Excimer Laser Training Guide – PP2016RF0191
8 | P a g e
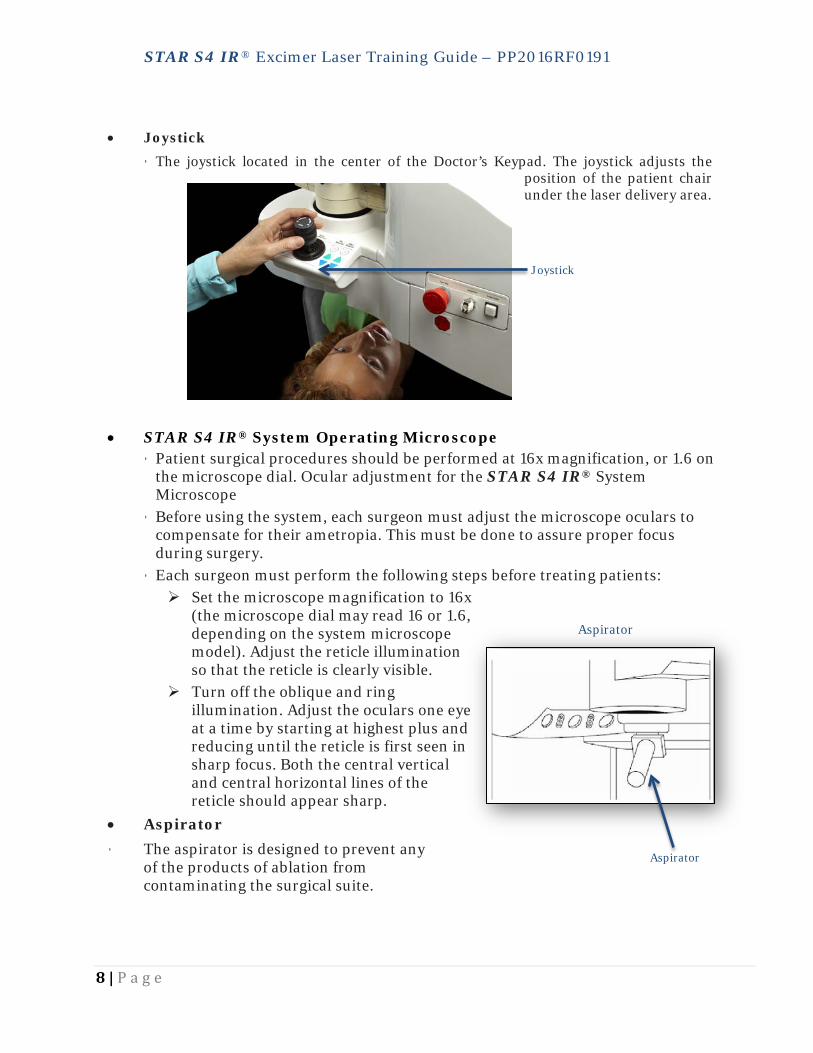
• Joystick
• The joystick located in the center of the Doctor’s Keypad. The joystick adjusts the position of the patient chair under the laser delivery area.
• STAR S4 IR® System Operating Microscope • Patient surgical procedures should be performed at 16x magnification, or 1.6 on
the microscope dial. Ocular adjustment for the STAR S4 IR® System Microscope
• Before using the system, each surgeon must adjust the microscope oculars to compensate for their ametropia. This must be done to assure proper focus during surgery.
• Each surgeon must perform the following steps before treating patients: Set the microscope magnification to 16x
(the microscope dial may read 16 or 1.6, depending on the system microscope model). Adjust the reticle illumination so that the reticle is clearly visible.
Turn off the oblique and ring illumination. Adjust the oculars one eye at a time by starting at highest plus and reducing until the reticle is first seen in sharp focus. Both the central vertical and central horizontal lines of the reticle should appear sharp.
• Aspirator • The aspirator is designed to prevent any
of the products of ablation from contaminating the surgical suite.
Aspirator
Aspirator
Joystick
STAR S4 IR® Excimer Laser Training Guide – PP2016RF0191
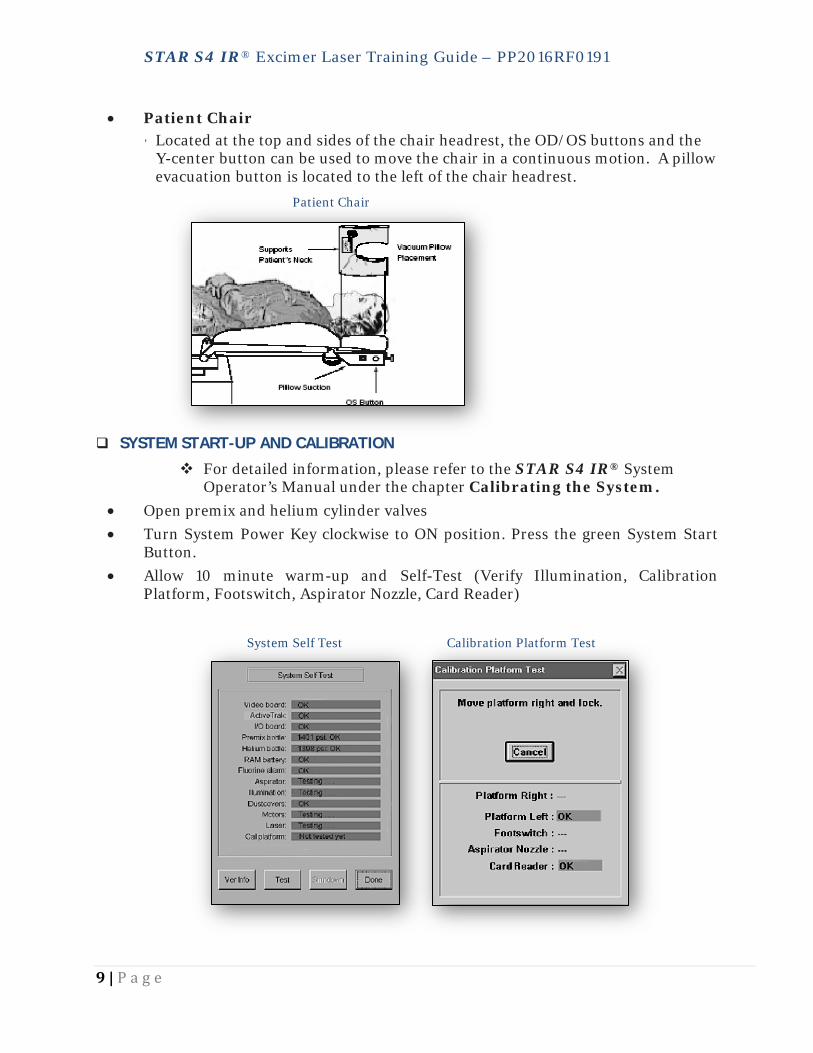
9 | P a g e
• Patient Chair • Located at the top and sides of the chair headrest, the OD/OS buttons and the
Y-center button can be used to move the chair in a continuous motion. A pillow evacuation button is located to the left of the chair headrest.
SYSTEM START-UP AND CALIBRATION
For detailed information, please refer to the STAR S4 IR® System Operator’s Manual under the chapter Calibrating the System.
• Open premix and helium cylinder valves • Turn System Power Key clockwise to ON position. Press the green System Start
Button. • Allow 10 minute warm-up and Self-Test (Verify Illumination, Calibration
Platform, Footswitch, Aspirator Nozzle, Card Reader)
Patient Chair
System Self Test Calibration Platform Test

STAR S4 IR® Excimer Laser Training Guide – PP2016RF0191
10 | P a g e
• At system startup, the Self-Test screen appears. The screen displays the status of various system components as the self-test proceeds. The system communicates status using color codes and short messages. Green indicates ready. Yellow indicates a warning, but allows operation. Light blue indicates a testing sequence that may require operator action. Red prevents operation.
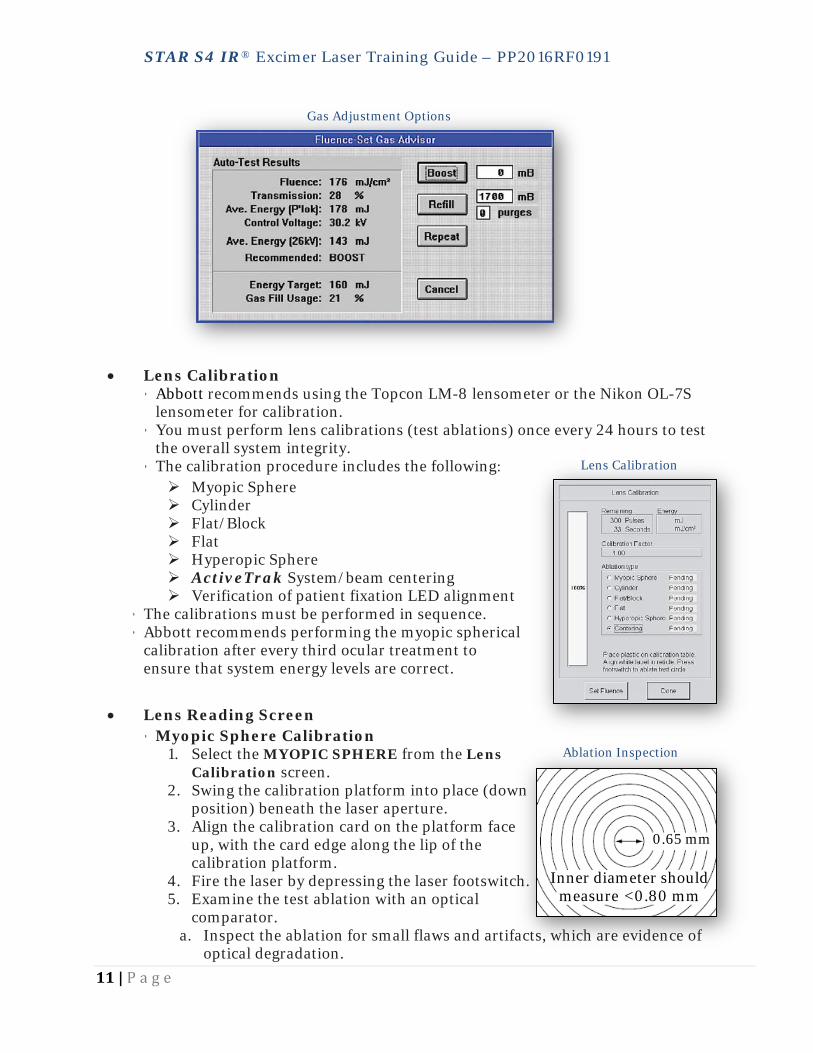
• Perform Fluence Calibration.
• Fluence calibration adjusts the laser energy to maintain a constant delivered fluence of 160 mJ/cm².
• The system performs fluence calibration: At system start-up. Before each patient treatment
procedure (with the exception of fellow eyes.)
Any time the operator selects SET FLUENCE on the LENS CALIBRATION screen.
• To set fluence following Self-Test: Select OK when the message READY to set
laser fluence? (Laser will fire automatically.)
Select CANCEL if you wish to postpone the fluence test.
• Gas Fill Options • If the fluence test fails, the system will automatically perform a gas adjustment
or require the operator to perform one depending on whether GAS BOOST DIALOG is checked active in the Service Preferences window.
• Gas Adjustment Options: Boost – Performs a partial laser cavity flush and refills the laser cavity
with new premix gas. Refill – Performs a total laser cavity gas flush and completely refills the
laser cavity with a new premix gas. Repeat – Performs another fluence calibration. The default is one repeat;
but this can be modified. Cancel – Cancels fluence calibration procedure.
Fluence Calibration
STAR S4 IR® Excimer Laser Training Guide – PP2016RF0191
11 | P a g e
• Lens Calibration • Abbott recommends using the Topcon LM-8 lensometer or the Nikon OL-7S
lensometer for calibration. • You must perform lens calibrations (test ablations) once every 24 hours to test
the overall system integrity. • The calibration procedure includes the following: Myopic Sphere Cylinder Flat/Block Flat Hyperopic Sphere ActiveTrak System/beam centering Verification of patient fixation LED alignment
• The calibrations must be performed in sequence. • Abbott recommends performing the myopic spherical
calibration after every third ocular treatment to ensure that system energy levels are correct.
• Lens Reading Screen • Myopic Sphere Calibration
1. Select the MYOPIC SPHERE from the Lens Calibration screen.
2. Swing the calibration platform into place (down position) beneath the laser aperture.
3. Align the calibration card on the platform face up, with the card edge along the lip of the calibration platform.
4. Fire the laser by depressing the laser footswitch. 5. Examine the test ablation with an optical
comparator. a. Inspect the ablation for small flaws and artifacts, which are evidence of
optical degradation.
Inner diameter should measure <0.80 mm
0.65 mm
Gas Adjustment Options
Lens Calibration
Ablation Inspection

STAR S4 IR® Excimer Laser Training Guide – PP2016RF0191
12 | P a g e
b. If the test ablation does not pass visual inspection, contact Abbott customer support. Measure the smallest ablation area (inner diameter). Confirm that the smallest ablation area is ≤ 0.80 mm.
6. Measure the power of the myopic spherical lens.
a. Set the diopter screen to -4.00 D. This is the target spherical lens power.
7. Take a lens reading, note the reading, then turn the target rotation handle to 90° and take another reading.
a. If the readings differ by < 0.25 D., average the two readings for the final result.
b. If the readings differ by > 0.25 D., contact Abbott customer support. c. Enter the results in the LENS READING screen, and then select OK. If the lens power differs from the target by more than ± 0.25 D, you must
repeat the myopic spherical calibration from the beginning.
• Calibration Factor • The system determines the calibration factor during the myopic spherical
portion of lens calibration. The calibration factor adjusts for minor variations in laser energy and optics transmission.
• For normal systems, calibration factor should be between 0.9 and 1.1. If the calibration factor falls outside this range, contact customer support.
• Cylinder Calibration
• The cylinder lens calibration verifies the mechanical integrity of the slit. • The target lens power is -4.00 cylinder and 0 (zero) D sphere. • To create a cylindrical test lens:
1. From the lens calibration screen select CYLINDER. 2. Position the card so that the laser will fire on an unused area. 3. Fire the laser. Release the footswitch when finished. 4. Follow the lensometer procedure. 5. To measure the spherical power of the cylindrical lens:
a. Set the diopter screen to -4.00 D. b. Line up the narrow green mires with the axis of the cylinder by turning
the target rotation handle until the mires are continuous. c. Turn the diopter measuring knob until the broad green mires show the
least amount of blur and note the reading in the diopter screen. d. Set the diopter screen to 0.00 D and repeat the procedure for the narrow
green mires. Note the reading in the diopter screen. 6. The difference between the two readings is the lens power.
a. If the readings are not different, contact an Abbott customer service representative.
b. Enter the results in the LENS READING screen, then select OK.
Calibration Reading

STAR S4 IR® Excimer Laser Training Guide – PP2016RF0191
13 | P a g e
• Flat Calibration • Flat calibration verifies the homogeneity of the beam by creating a test lens with
no optical power. The procedure for the STAR S4 IR® System requires cutting two lenses: one with the extension block in place, and one without the extension block in place. The first lens is cut with the extension block.
1. Select FLAT/BLOCK from the LENS CALIBRATION Screen. 2. Place the calibration platform extension block on the platform. 3. Place the calibration card on the extension block. 4. Position the card so that the laser does not fire over the top of previous
ablations. 5. Fire the laser until done. 6. Measure the lens with an optical comparator. Confirm that the diameter is
5.9 ± 0.1 mm. 7. Test the lens with the sphericity tester:
a. Place the calibration card onto the front of the sphericity tester. b. Illuminate the ablations by pressing the button on top of the viewfinder. c. Horizontal lines of the sphericity tester should appear straight through
the ablated areas on calibration card. If excessive bending or bowing of lines occurs, contact Abbott customer service.
8. Do not read the lens power of the first flat lens. 9. Enter the measured diameter into the diameter entry screen, select OK. 10. Cut the second flat lens.
a. Remove the calibration platform extension block and place the calibration card on the platform. Position the card so that the laser does not fire over the top of previous ablations.
b. Select FLAT. c. Fire the laser until done.
11. Read the lens power in the lensometer. a. Place the 4.0 mm lens table (aperture adapter) inside the 5.0 mm lens
table. b. Follow the instructions for reading the spherical lens. c. If the lens reading is <-0.50 D or >+0.25 D, call Abbott customer service.
12. Enter the lens power in the Lens Reading screen, select OK. 13. Remove the 4.0 mm lens table (aperture adapter).
OK Excessive Bending
Sphericity Test

STAR S4 IR® Excimer Laser Training Guide – PP2016RF0191
14 | P a g e
• Hyperopic Sphere Calibration 1. Select HYPEROPIC SPHERE. 2. Position calibration card on platform. 3. Fire the laser. 4. Read the test lens with the lensometer following the instructions for
myopic spherical calibration. The target lensometer reading is +2.0 D. 5. Enter the value in the LENS READING screen, select OK.
• ActiveTrak Calibration and Beam Centering • The ActiveTrak calibration aligns the treatment center as defined by the
ActiveTrak System in relation with the laser pulse. Beam centering, done in conjunction with the ActiveTrak calibration, aligns the reticle in relation with the laser pulse. This test ablation needs to be done as a part of daily calibration procedures.
1. Place the calibration card on the calibration platform using the clips on the platform to hold the card stationary. The clips must be used to ensure that the card remains stationary during and after the ablation.
2. Center the calibration card so the reticle is centered on the white portion of the card.
3. Select CENTERING and fully depress the laser footswitch. The laser fires about 300 pulses.
4. Release the laser footswitch after all pulses have fired. Do not move the plastic after the ablation is finished.
5. Turn on the ActiveTrak System by pressing the TRACK button on the Doctor’s Keypad. Observe the outside diameter of the marked circle relative to the 6.00 mm circle and the x and y coordinates of the reticle while looking through both oculars of the STAR S4 IR® System operating microscope.
6. If the reticle is not centered over the ablated circle, adjust the reticle position using the alignment knobs located to the rear of the system arm.
7. After adjusting the reticle, perform the entire procedure again. 8. If the ActiveTrak System is within calibration specifications, the
indicator message in the lower area of the computer screen will be green or yellow. If it is green, proceed to patient surgical procedures. If it is yellow, schedule a service call after completing patient surgical procedures.
Calibration Card Placement

STAR S4 IR® Excimer Laser Training Guide – PP2016RF0191
15 | P a g e
9. If the ActiveTrak System is not within calibration specifications, an interlock indicator message will appear in the lower area of the computer screen.
10. Leave the calibration card on the calibration platform and perform the verification procedure for the Patient Fixation LED.
• When all lens calibration procedures have been successfully completed, select DONE. The Main Menu screen appears. You are now ready to verify the alignment of the Patient Fixation LED.
• Verifying Alignment of Patient Fixation LED to Laser Beam • To verify that the Patient Fixation LED is properly aligned, perform the
following procedure daily: 1. Lower the room lights and the ring lights. Turn off the oblique lights. 2. Verify that the Patient Fixation LED is aligned to the test ablation area by
observing the light from the Fixation LED as it illuminates the ablated area on the calibration card. (Do not observe through the microscope.) It should surround the test ablation area completely. If it is not aligned properly or is not visible, call the Abbott Customer Response Center.
Acceptable Alignment of Patient Fixation LED
Unacceptable Alignment of Patient Fixation LED
Test Ablation
Patient Fixation LED
Patient Fixation LED
Test Ablation
STAR S4 IR® Excimer Laser Training Guide – PP2016RF0191
16 | P a g e
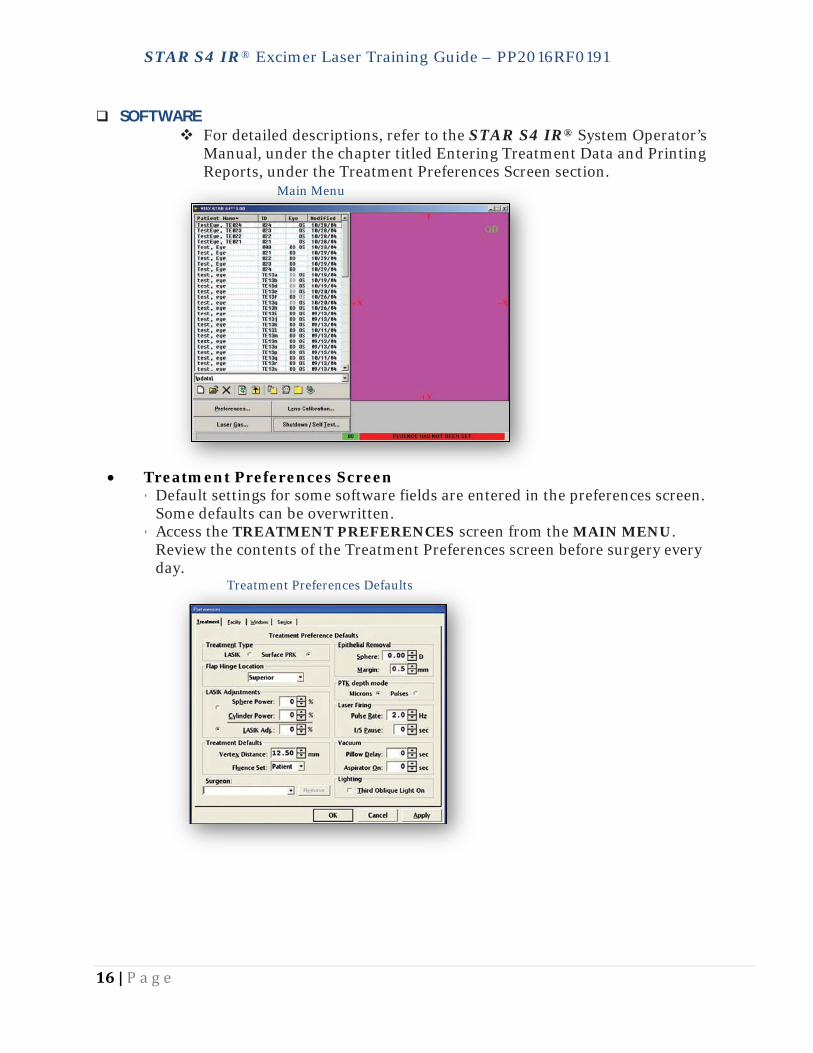
SOFTWARE For detailed descriptions, refer to the STAR S4 IR® System Operator’s
Manual, under the chapter titled Entering Treatment Data and Printing Reports, under the Treatment Preferences Screen section.
• Treatment Preferences Screen • Default settings for some software fields are entered in the preferences screen.
Some defaults can be overwritten. • Access the TREATMENT PREFERENCES screen from the MAIN MENU.
Review the contents of the Treatment Preferences screen before surgery every day.
Main Menu
Treatment Preferences Defaults

STAR S4 IR® Excimer Laser Training Guide – PP2016RF0191
17 | P a g e
• Saving and Retrieving Patient Information
• Retrieving Patient Files To retrieve a patient file: Highlight and double-click on the patient name in the MAIN MENU
screen. Alternatively, highlight the patient name and click on the Open Patient
File icon. After confirming the patient’s name in the Confirm Patient box, the
PATIENT MANAGER screen will appear with the PATIENT INFORMATION screen selected.
Button Function
Creates new patient file
Opens selected patient file
Deletes selected patient file
Refreshes the patient list
Rescans the patient files in the selected folder
Copies selected patient file(s) to folder on the hard disk, floppy disk, or USB flash drive
Allows you to move patient files to different/new folder, floppy disk, or USB flash drive
Changes selected patient folder
Select this icon and follow the on-screen instructions to safely remove the USB flash drive from the USB port
Tool Bar Interface
STAR S4 IR® Excimer Laser Training Guide – PP2016RF0191
18 | P a g e
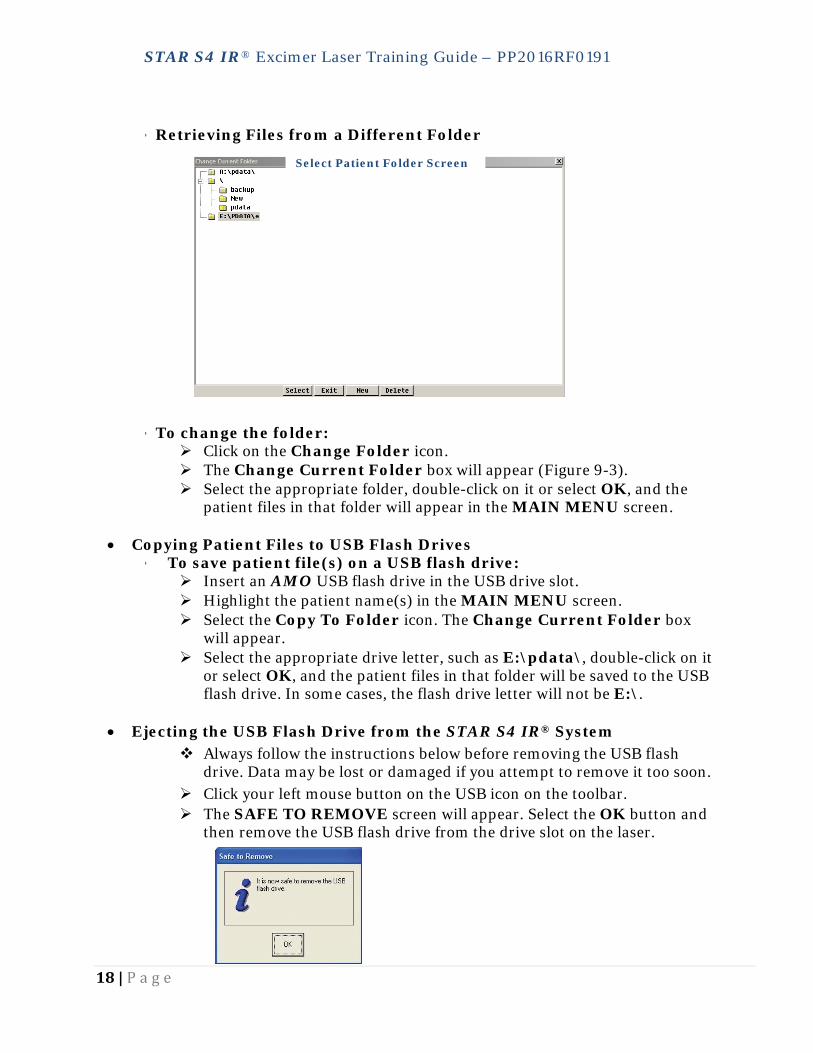
• Retrieving Files from a Different Folder
• To change the folder: Click on the Change Folder icon. The Change Current Folder box will appear (Figure 9-3). Select the appropriate folder, double-click on it or select OK, and the
patient files in that folder will appear in the MAIN MENU screen.
• Copying Patient Files to USB Flash Drives • To save patient file(s) on a USB flash drive:
Insert an AMO USB flash drive in the USB drive slot. Highlight the patient name(s) in the MAIN MENU screen. Select the Copy To Folder icon. The Change Current Folder box
will appear. Select the appropriate drive letter, such as E:\pdata\, double-click on it
or select OK, and the patient files in that folder will be saved to the USB flash drive. In some cases, the flash drive letter will not be E:\.
• Ejecting the USB Flash Drive from the STAR S4 IR® System
Always follow the instructions below before removing the USB flash drive. Data may be lost or damaged if you attempt to remove it too soon.
Click your left mouse button on the USB icon on the toolbar. The SAFE TO REMOVE screen will appear. Select the OK button and
then remove the USB flash drive from the drive slot on the laser.
Select Patient Folder Screen

STAR S4 IR® Excimer Laser Training Guide – PP2016RF0191
19 | P a g e
• Entering Treatment Data
• CustomVue or Advanced CustomVue Procedure Treatments For detailed information regarding CustomVue or Advanced
CustomVue Procedure treatments, refer to the STAR S4 IR® System Operator’s Manual, under the chapter titled CustomVue or Advanced CustomVue Procedure treatments.
• The WaveScan WaveFront® System and the iDESIGN® Advanced WaveScan Studio System includes software to calculate the desired laser vision correction treatment from the patient’s WavePrint data.
• CustomVue or Advanced CustomVue Procedure treatment data, is loaded onto the STAR S4 IR® System using the USB flash drive. CustomVue or Advanced CustomVue Procedure data without the Aberrometer image can be loaded using either a floppy disk or a USB flash drive.
• Performing the Patient Treatment
• Insert the USB flash drive into the USB flash drive load slot on the STAR S4 IR® System. On the MAIN MENU screen, select the USB flash drive (E:\).
• Procedure 1. Select the appropriate patient’s name on the MAIN MENU screen. 2. The CustomVue treatment calculated on the WaveScan System or
Advanced CustomVue Procedure treatment calculated on the iDESIGN® System will appear. The treatment parameters cannot be changed on this screen.
3. Verify the Flap Hinge Location on the OPS PARAMS screen is set as desired.
4. Prepare the patient for the laser refractive treatment. 5. Review the information on the STAR S4 IR® System computer screen to
ensure that it is correct.
Tool Bar Interface WaveScan WaveFront® System Treatment
STAR S4 IR® Excimer Laser Training Guide – PP2016RF0191
20 | P a g e
6. After verifying that this is the appropriate treatment, select TREAT to perform the patient treatment.
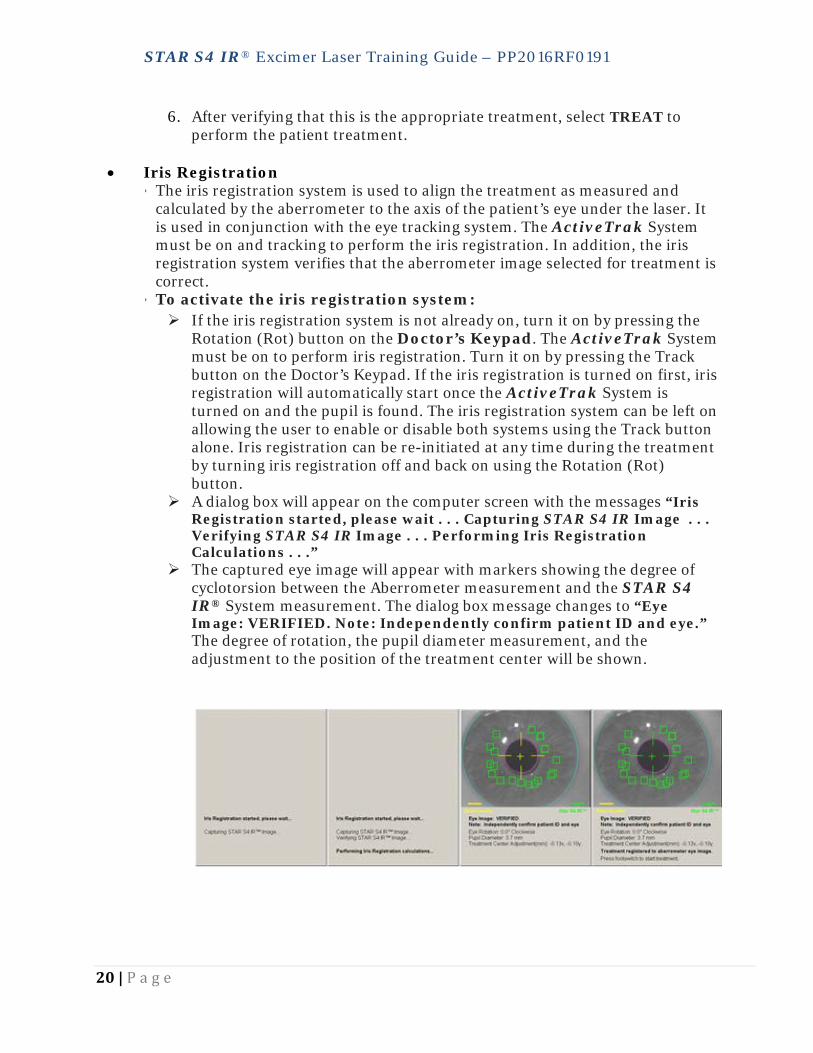
• Iris Registration • The iris registration system is used to align the treatment as measured and
calculated by the aberrometer to the axis of the patient’s eye under the laser. It is used in conjunction with the eye tracking system. The ActiveTrak System must be on and tracking to perform the iris registration. In addition, the iris registration system verifies that the aberrometer image selected for treatment is correct.
• To activate the iris registration system: If the iris registration system is not already on, turn it on by pressing the
Rotation (Rot) button on the Doctor’s Keypad. The ActiveTrak System must be on to perform iris registration. Turn it on by pressing the Track button on the Doctor’s Keypad. If the iris registration is turned on first, iris registration will automatically start once the ActiveTrak System is turned on and the pupil is found. The iris registration system can be left on allowing the user to enable or disable both systems using the Track button alone. Iris registration can be re-initiated at any time during the treatment by turning iris registration off and back on using the Rotation (Rot) button.
A dialog box will appear on the computer screen with the messages “Iris Registration started, please wait . . . Capturing STAR S4 IR Image . . . Verifying STAR S4 IR Image . . . Performing Iris Registration Calculations . . .”
The captured eye image will appear with markers showing the degree of cyclotorsion between the Aberrometer measurement and the STAR S4 IR® System measurement. The dialog box message changes to “Eye Image: VERIFIED. Note: Independently confirm patient ID and eye.” The degree of rotation, the pupil diameter measurement, and the adjustment to the position of the treatment center will be shown.

STAR S4 IR® Excimer Laser Training Guide – PP2016RF0191
21 | P a g e
These measurements are used to rotate the angle of the CustomVue or
Advanced CustomVue Procedure treatment to precisely align the treatment to the current position of the eye.
The dialog box will add the message “Treatment Registered to aberrometer eye image. Press footswitch to start treatment.”
Fully depress the laser footswitch to begin the treatment. This will automatically restore the live microscope camera image.
• Refractive Treatments For detailed information refer to the STAR S4 IR® System Operator’s
Manual, under the chapter titled Refractive Treatments. • Patient data can be stored on the computer’s hard drive, floppy disk drive, or
USB drive. To save the new patient data to the desired location, select that location on the MAIN MENU screen before clicking the NEW PATIENT FILE icon.
• PATIENT INFO SCREEN • Enter Mandatory Data: First and last name, ID (alpha, numeric or
combination), and Eye (OS or OD). Enter optional demographic data.
• PRE-OP EXAM SCREEN • The system compares the manifest information entered on the PRE-OP screen
to the treatment data and notifies the user if the two sets of data differ significantly. Enter values for manifest, cycloplegic, auto, autocycloplegic, and wavefront refractions and keratometer readings.
Patient Info Screen

STAR S4 IR® Excimer Laser Training Guide – PP2016RF0191
22 | P a g e
• OP PARAMS SCREEN • The OPERATING PARAMETERS screen allows the surgeon to override some of
the Preferences settings from within the Patient Manager. • NOTES SCREEN
• Record medical history, comments, observations, and recommendations. • TREATMENT OPTIONS
• Pressing the SELECT TREATMENT button displays a pull-down menu with treatment choices. Epithelium removal PTK circle and slit The Custom-CAP Method Refractive
Op Params Screen
Select Treatment Button
STAR S4 IR® Excimer Laser Training Guide – PP2016RF0191
23 | P a g e
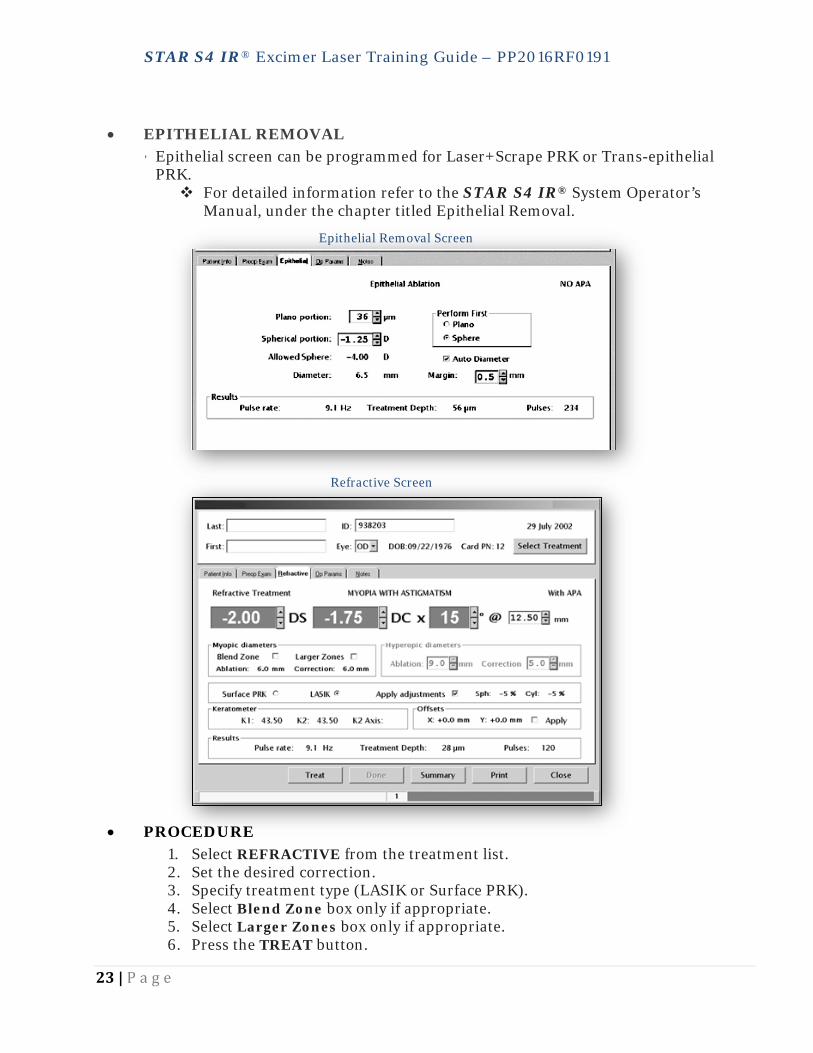
• EPITHELIAL REMOVAL • Epithelial screen can be programmed for Laser+Scrape PRK or Trans-epithelial
PRK. For detailed information refer to the STAR S4 IR® System Operator’s
Manual, under the chapter titled Epithelial Removal.
• PROCEDURE 1. Select REFRACTIVE from the treatment list. 2. Set the desired correction. 3. Specify treatment type (LASIK or Surface PRK). 4. Select Blend Zone box only if appropriate. 5. Select Larger Zones box only if appropriate. 6. Press the TREAT button.
Epithelial Removal Screen
Refractive Screen
STAR S4 IR® Excimer Laser Training Guide – PP2016RF0191
24 | P a g e
ENVIRONMENTAL CONDITIONS For detailed information please refer to the STAR S4 IR® System
Operator’s Manual, under the chapter titled Installation and Site Preparation.
• Temperature and humidity • Control and stability of environmental conditions are critically important. • For optimal CustomVue or Advanced CustomVue Procedure treatment
results, Abbott recommends adhering to the environmental conditions maintained in the FDA clinical trials: Temperature – 68˚- 72˚ F Relative humidity – 40% - 45%
• Environmental conditions in the laser suite should be within the following broader ranges required for laser functioning: Temperature – 60˚-80˚ F Relative humidity – 35%-65% (non-condensation)
SYSTEM SHUTDOWN
On the Main Menu screen, select Shutdown. The Self-Test screen will appear.
Select Shutdown on the Self-Test screen and wait until the message “It is now safe to turn off your computer” appears on the computer screen.
Turn the System Power Key counterclockwise to OFF position. (The key can be removed only in the OFF position.)
Close valves on both gas cylinders.
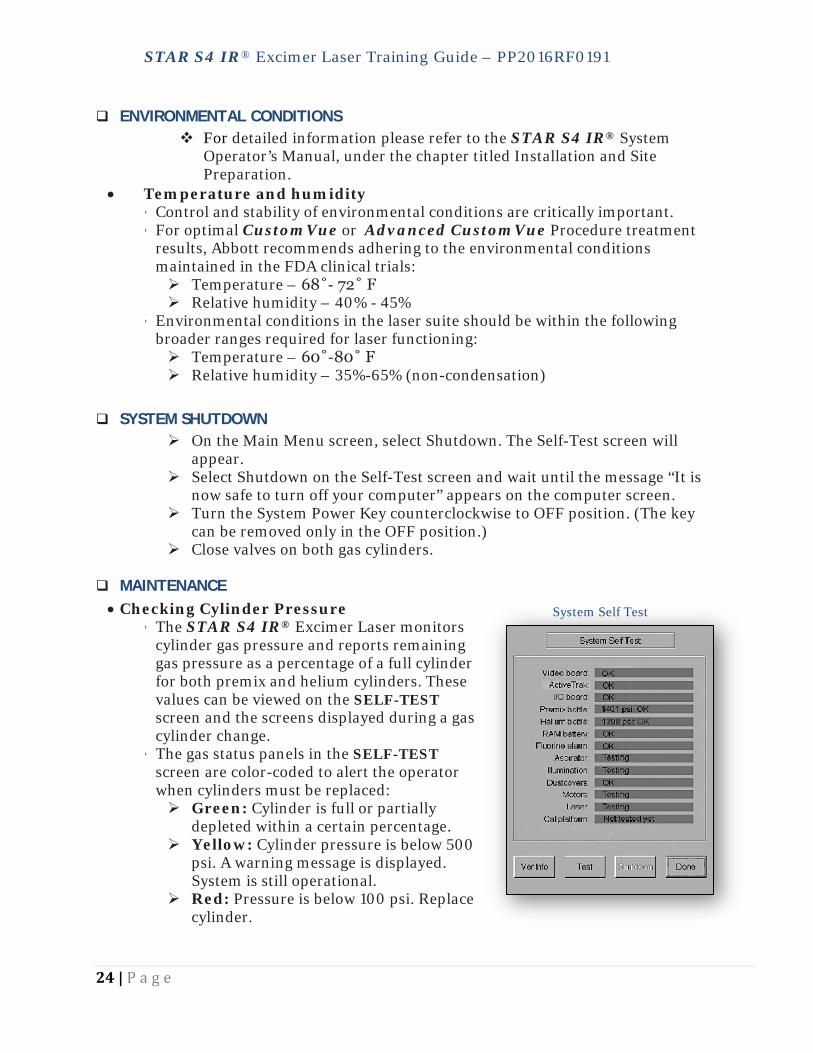
MAINTENANCE • Checking Cylinder Pressure
• The STAR S4 IR® Excimer Laser monitors cylinder gas pressure and reports remaining gas pressure as a percentage of a full cylinder for both premix and helium cylinders. These values can be viewed on the SELF-TEST screen and the screens displayed during a gas cylinder change.
• The gas status panels in the SELF-TEST screen are color-coded to alert the operator when cylinders must be replaced: Green: Cylinder is full or partially
depleted within a certain percentage. Yellow: Cylinder pressure is below 500
psi. A warning message is displayed. System is still operational.
Red: Pressure is below 100 psi. Replace cylinder.
System Self Test

STAR S4 IR® Excimer Laser Training Guide – PP2016RF0191
25 | P a g e
• Premix Cylinder Change Set-up 1. Verify the room evacuation and safety equipment are available. 2. Verify gas wrench and new cylinder are available. 3. Maintain power to the system. 4. Verify helium cylinder valve is open.
• Remove Empty Cylinder 1. Select the CHANGE PREMIX button.
The PREMIX CYLINDER CHANGE screen will open and display the message Close premix cylinder; click PROCEED when ready.
2. Select PROCEED; the screen displays the message Wait. Verify the cylinder is closed. Confirm the premix cylinder valve is closed by turning the cylinder valve fully clockwise.
3. Select PROCEED. The screen will display the active premix purge cycle. When the premix line has been purged, the window will display the message Change premix cylinder now. Select PROCEED when ready.
4. Loosen the regulator connector nut (gas line to gas cylinder attachment) with the adjustable gas wrench by turning clockwise, then remove the connector nut.
5. Replace the nut onto the empty cylinder and tighten with the adjustable wrench, then thread on the valve cover.
6. Undo the strap securing the premix cylinder. 7. Remove the empty cylinder from the gas cabinet and store accordingly.
• Install Replacement Cylinder 1. Remove the shrink-wrap covering the valve. 2. Place the replacement cylinder inside the gas cabinet; position to allow the
regulator to be reattached. 3. Tighten the strap securely around the cylinder. 4. Unscrew the gas pressure regulator nut from the cylinder. 5. Place a new lead washer inside the gas cylinder nozzle. (Verify washer is
flat) 6. Replace the gas pressure regulator by inserting the stem into the gas
cylinder nozzle. Tighten the gas pressure regulator nut with the adjustable gas wrench by turning counterclockwise, holding the gas pressure regulator securely in place while turning the nut with the wrench. Tighten the nut enough to squeeze the lead washer to form a good seal.
7. Select PROCEED. The system will purge the premix line. The PREMIX CYLINDER CHANGE screen will display the message “Slowly open premix cylinder until the gauge displays a pressure increase.”
Premix Cylinder Change

STAR S4 IR® Excimer Laser Training Guide – PP2016RF0191
26 | P a g e
8. Open the premix top valve by turning the knob 1/8 counterclockwise. When pressure begins to increase, the system will flush the premix line.
9. The PREMIX CYLINDER CHANGE screen will display the message “Open premix cylinder all the way; operation is complete”.
10. Open the premix cylinder completely when prompted by the system. The gas cylinder change operation is now complete.
• Helium Cylinder Change Procedure • Remove Empty Cylinder
1. Maintain power to the system. 2. Select the CHANGE HELIUM button. The HELIUM CYLINDER
CHANGE screen will open and display the message Close helium cylinder; click PROCEED when ready.
3. Select PROCEED. The screen will display the message “Bleeding helium line”; then “Replace helium cylinder”; leave valve closed. Click PROCEED when ready.
4. Confirm the helium cylinder valve is closed by turning the valve fully clockwise. The helium cylinder is located on the right side of the gas cabinet.
5. Loosen the regulator connector nut (gas line to cylinder attachment) with the adjustable gas wrench and turn the nut counterclockwise. Pressurized helium may be released when the nut is loosened.
6. Undo the strap securing the helium cylinder. 7. Replace the nut onto the empty cylinder and tighten with the adjustable
wrench, then thread on the valve cover. 8. Remove the empty cylinder from the gas cabinet and store accordingly.
• Remove Empty Cylinder 1. Unscrew the valve cover from the cylinder and remove the shrink-wrap
covering the valves. 2. Place the replacement cylinder inside the gas cabinet; position to allow the
mounting nut to be reattached. 3. Tighten the strap securely around the cylinder. 4. Unscrew the nut from the cylinder using the adjustable gas wrench. 5. Replace the gas pressure regulator by inserting the stem into the gas
cylinder nozzle. Tighten the gas pressure regulator nut with the adjustable wrench by turning clockwise, holding the gas pressure regulator securely in place while turning the nut with the wrench.
6. Replace the cylinder. When the new cylinder is in place, select PROCEED. The screen will display “Evacuating helium line; then Slowly open helium cylinder until the gauge displays a pressure increase.”
7. Open the helium top valve by turning the knob 1/8 counterclockwise. When pressure begins to increase, the system will start to purge the helium line (Purging helium line). Once the purge is completed, the system will display “Open helium cylinder all the way; operation is complete”.
STAR S4 IR® Excimer Laser Training Guide – PP2016RF0191
27 | P a g e
CLEANINING INSTRUCTIONS Clean the vinyl-upholstered patient chair with ordinary mild soaps,
dishwashing liquid, or Abbott approved disinfectants using a clean, soft cloth. Never use abrasive products, ammonia products, or pine cleaners on or near the patient chair. They may damage or stiffen upholstery, shorten upholstery life, or interfere with the laser action.
Clean and disinfect the debris-removal aspirator nozzle before powering the system ON.
Use caution when using alcohol or any flammable substance near the laser system.
Use only mild soap and warm water when wiping the system exterior. Use only isopropyl alcohol when wiping the microscope or debris-removal
aspirator nozzle. Make sure the laser system is powered OFF when using flammables near
the system. Do not use detergents near or on the system. Do not use or wear cosmetics near the system. Do not smoke near the system. All other system maintenance must be completed by an Abbott service
representative.

STAR S4 IR® Excimer Laser Training Guide – PP2016RF0191
28 | P a g e
INDICATIONS, CONTRAINDICATIONS, WARNINGS, & PRECAUTIONS
Indications: The STAR S4 IR® Excimer Laser and iDESIGN® Advanced WaveScan Studio (iDESIGN®) System is indicated for wavefront-guided laser assisted in situ keratomileusis (LASIK) in patients: with myopia as measured by iDESIGN® System up to -11.00 D spherical equivalent, with up to -5.00 D cylinder; with agreement between manifest refraction (adjusted for optical infinity) and iDESIGN® System refraction as follows: Spherical Equivalent: Magnitude of the difference is less than 0.625 D. Cylinder: Magnitude of the difference is less than or equal to 0.5 D; 18 years of age or older; and with refractive stability (a change of <1.0 D in sphere or cylinder for a minimum of 12 months prior to surgery). The STAR S4 IR® Excimer Laser System with Variable Spot Scanning (VSS) and the WaveScan WaveFront® System is indicated for wavefront-guided laser assisted in situ keratomileusis (LASIK): for the reduction or elimination of myopia and myopic astigmatism from -6.00 to -11.00 D MRSE, with cylinder between 0.00 and -3.00 D; in patients 21 years of age or older; and in patients with documented evidence of a change in manifest refraction of no more than 1.0 D (in both cylinder and sphere components) for at least one year prior to the date of preoperative examination. For the reduction or elimination of myopia and myopic astigmatism up to -6.00 D MRSE, with cylinder between 0.00 and -3.00 D; in patients 21 years of age or older; and in patients with documented evidence of a change in manifest refraction of no more than 0.50D (in both cylinder and sphere components) for at least one year prior to the date of preoperative examination. For the reduction or elimination of hyperopia and hyperopic astigmatism up to 3.00 D MRSE, with cylinder between 0.00 and 2.00 D; in patients 21 years of age or older; and in patients with documented evidence of a change in manifest refraction of no more than 1.0 D (in both cylinder and sphere components) for at least one year prior to the date of preoperative examination. For the reduction or elimination of naturally occurring mixed astigmatism when the magnitude of cylinder (from 1 to 5.0 D) is greater than the magnitude of sphere, and the cylinder and sphere have opposite signs; in patients 21 years of age or older; and in patients with documented evidence of a change in manifest refraction of no more than 0.5 D (in both cylinder and sphere components) for at least one year prior to the date of preoperative examination. Laser assisted in situ keratomileusis (LASIK) procedure using the STAR S4 IR® Excimer Laser System is intended for use: in patients with documented evidence of a change in manifest refraction of no more than 0.5 D (in both cylinder and sphere components for at least one year prior to the date of preoperative examination; and in patients 18 years of age or older in treatments for the reduction or elimination of myopia (nearsightedness) of no more than -14.0 D with or without refractive astigmatism from 0.5 to 5.0D*; or in patients 21 years of age or older in treatments for the reduction or elimination of naturally occurring hyperopia between +0.5 and +5.0 D sphere at the spectacle plane with or without refractive astigmatism up to +3.0 D, with a maximum manifest refraction spherical equivalent (MRSE) of +6.0 D.

STAR S4 IR® Excimer Laser Training Guide – PP2016RF0191
29 | P a g e
In patients 21 years of age or older in treatments for the reduction or elimination of naturally occurring mixed astigmatism where the magnitude of cylinder (≤6.0 D at the spectacle plane) is greater than the magnitude of sphere and the cylinder and sphere have opposite signs. Photorefractive Keratectomy (PRK) procedure using the STAR S4 IR® System is intended for use: in patients with documented evidence of a change in manifest refraction of no more than 0.5 D (in both cylinder and sphere components) for at least one year prior to the date of preoperative examination; and in patients 18 years of age or older in treatments for the reduction or elimination of myopia (nearsightedness) of no more than -6.0 D spherical equivalent at the corneal plane, with no more than 1.0 D of refractive astigmatism; or in patients 21 years of age or older in treatments for the reduction or elimination of myopia (nearsightedness) of no more than -12.0 D spherical myopia at the spectacle plane with no more than 4.0 D of refractive astigmatism; or in patients 21 years of age or older in treatments for the reduction or elimination of naturally occurring hyperopia between +1.0 and +6.0 D sphere at the spectacle plane, with no more than 1.0 D of refractive astigmatism; or in patients 21 years of age or older in treatments for the reduction or elimination of naturally occurring hyperopia between +0.5 and +5.0 D sphere at the spectacle plane with refractive astigmatism from +0.5 to +4.0 D with a maximum manifest refraction spherical equivalent (MRSE) of +6.0 D. Phototherapeutic Keratectomy (PTK) procedures using the STAR S4 IR® System are primarily indicated for subjects with decreased best corrected visual acuity and/or with disabling pain that is the result of superficial corneal epithelial irregularities or stromal scars in the anterior one-third of the cornea. The subjects must have failed alternative treatment options. For safety, the immediate post- operative corneal thickness must not be less than 250 μm. Contraindications: Laser refractive surgery is contraindicated: in patients with collagen vascular, autoimmune, or immunodeficiency diseases; in pregnant or nursing women; in patients with corneal abnormalities including signs of keratoconus, abnormal corneal topography, epithelial basement membrane disease (EBMD) and degenerations of the structure of the cornea; in patients with symptoms of significant dry eyes. If the patients have severely dry eyes, LASIK may increase the dryness. This may or may not go away. Severe eye dryness may delay healing of the flap or interfere with the surface of the eye after surgery. It may result in poor vision after LASIK; in patients whose corneal thickness would cause anticipated treatment would violate the posterior 250 microns (μm) of corneal stroma; in patients with advanced glaucoma; in patients with uncontrolled diabetes. The Phototherapeutic Keratectomy procedure should not be performed if the post-operative thickness would be less than 250 μm (excluding the epithelium and Bowman’s membrane), or if a deep scar is present that is not contained in the anterior one-third of the cornea.

STAR S4 IR® Excimer Laser Training Guide – PP2016RF0191
30 | P a g e
Warnings: LASIK is not recommended in patients who: have systemic diseases likely to affect wound healing, such as autoimmune connective tissue disease, diabetes or an immune compromised status; have a history of Herpes simplex or Herpes zoster keratitis; have severe allergies or tendency to rub their eyes often; have glaucoma, elevated IOP, ocular hypertension or being followed for possible glaucoma (glaucoma suspect); are taking the medication Isotretinoin (Accutane); are taking antimetabolites for any medical conditions; lower uncorrected visual acuity may be anticipated in the PRK treatment of higher degrees of myopia with and without astigmatism (>-5.0 D MRSE). Hyperopic shift has been a major safety issue following PTK. It is advisable to ablate only to a depth that is necessary to improve vision and/or relieve symptoms, and not to attempt to remove all scar tissue. Aggressive attempts to ablate all visible scar tissue risk hyperopic shift and corneal ectasia. Subjects should be informed concerning the possibility of hyperopia and subsequent possible induced anisometropia. Reactivation of herpes simplex keratitis has occurred after PTK. A course of oral acyclovir is recommended if there is a history of herpetic infection. If topical steroids are used post-operatively, subjects must be monitored for possible steroid side-effects, such as ocular hypertension and/or glaucoma with subsequent damage to the optic nerve, or development of posterior subcapsular cataract. Subjects with systemic disease likely to affect wound healing, such as connective tissue disease, diabetes, severe atopic disease, or an immunocompromised status should be approached cautiously, as the safety and effectiveness of the excimer system has not been established in patients with these conditions. Precautions: General Preoperative pachymetry measurement must be performed. To reduce the risk corneal ectasia, the posterior 250 microns (μm) of corneal stroma should not be violated. There is no safety and effectiveness for any Laser Vision Correction procedure in patients with progressive refractive errors, ocular disease, corneal abnormality, previous corneal or intraocular surgery, trauma in the ablation zone, residual corneal thickness less than 250 microns at the completion of ablation. There is no safety and effectiveness information for patients that are taking the medication Sumatriptan (Imitrex) and Amiodarone hydrochloride (Cordarone). Advanced CustomVue LASIK (using iDESIGN® System) The treatment of highly myopic eyes necessitates the removal of significant amounts of corneal tissue. The iDESIGN® System calculates the estimated residual bed depth using the pachymetry and intended flap thickness entered by the user. Actual flap thicknesses may vary. If the estimated residual stromal bed is ≤ 320 microns, an in-the-bed pachymetric measurement should be performed. The safety and effectiveness of the iDESIGN® System have not been established for wavefront-guided LASIK surgery in patients with corneal neovascularization within 1.0mm of the ablation zone, over the long term (more than 1 year after surgery), or with prior intraocular or corneal surgery of any kind, whose BSCVA is worse than 20/20, whose wavefront measurement diameter is <4mm, for patients who engage in activities that could endanger or damage the LASIK flap.

STAR S4 IR® Excimer Laser Training Guide – PP2016RF0191
31 | P a g e
CustomVue LASIK (using WaveScan WaveFront® System) There is no safety and effectiveness information for CustomVue LASIK (using WaveScan WaveFront® System) for more than 1 year after surgery, for prior intraocular or corneal surgery of any kind, or for retreatment. Conventional LASIK (Manifest Refraction) There is no safety and effectiveness information for the patients who have had prior incisional refractive surgery, for patients with hyperopic astigmatism, for more than 6 months after LASIK surgery for myopia with or without astigmatism, hyperopia with or without astigmatism, or mixed astigmatism. PRK There is no safety and effectiveness information for PRK refractive treatments over the long term, more than 3 years after PRK surgery for low myopia; more than 1 year after PRK surgery for high myopia with astigmatism or for hyperopia with or without astigmatism, patients with a history of keloid formation, patients taking hormone replacement therapy or antihistamines who may have delayed re-epithelialization of the cornea following surgery, PRK retreatment of hyperopic astigmatism. Of the eyes treated in the PRK trials, only 21/200 (10.5%) of highly myopic eyes had myopia between -10.0 and -12.0 diopters and only 13/275 (4.7%) of hyperopic eyes had hyperopia between +4.0 and +6.0 diopters. These populations were not sufficient to determine the level of effectiveness or the complication rates for this refractive error range with the same reliability as for eyes with less severe refractive errors. PTK The safety and effectiveness of the STAR S4 IR® System has not been established in treatment of recurrent corneal erosions, treatment of corneal disease in eyes with recurrent or active ocular disease such as iritis, uveitis, keratitis sicca, and severe blepharitis, treatment of scars and irregularities in patients with keratoconus, patients with corneal neovascularization near the ablation zone, patients with systemic disease likely to affect wound healing, patients with previous corneal surgery, pregnant women, or patients under 18 years of age. ATTENTION: Reference the Operator’s Manual for a complete listing of Indications and Important Safety Information. CAUTION: U.S. Federal Law restricts this device to sale, distribution, and use by or on the order of a physician or other licensed eye care practitioner.

STAR S4 IR® Excimer Laser Training Guide – PP2016RF0191
32 | P a g e
©2016 Abbott Medical Optics Inc. STAR S4 IR, iDESIGN, iDESIGN Advanced WaveScan Studio, Advanced CustomVue, CustomVue, ActiveTrak, Custom-CAP, WavePrint, WaveScan, WaveScan WaveFront are trademarks owned by or licensed to Abbott Laboratories, its subsidiaries, or affiliates. All other trademarks are the intellectual property of their respective owners. PP2016RF0191