tra 2016my~ with dct 085 december 2019 technical …
TRANSCRIPT

File Under: <Transmission> Circulate To: General Manager Service Manager Parts Manager
Service Advisors Technicians Body Shop Manager Fleet Repair
X X X
X X X X
SUBJECT:
GROUP MODEL
TRA 2016MY~ Multiple Models With DCT
NUMBER DATE
085 December 2019
TECHNICAL SERVICE BULLETIN
DCT ACTUATOR ROD LENGTH ADJUSTMENT
This bulletin provides the procedure to adjust the Dual Clutch Transmission (DCT) actuator rod lengths using the applicable SST on some 2016MY~ vehicles equipped with 6 speed DCT (D6KF1) or 7 speed DCT (D7UF1) in order to prevent unnecessary replacement of both the DCT clutch actuator and clutch set together. Refer to the Diagnosis and Remedy table on page 2 for guidance.
Tech Video VID024 Tech Toolbox: DCT Actuator Adjustment with SST
6-Speed (D6KF) clutch actuator and SST jig shown.

DCT ACTUATOR ROD LENGTH ADJUSTMENT
Page 2 of 10
TSB: TRA085 Multiple Models with DCT December 2019
SUBJECT:
DCT Assembly and New Clutch Actuator Reference Table
VEHICLE MODEL
ENGINE T/M
MODEL TYPE
CLUTCH ACTUATOR
P/N
RODS 1 & 2
LENGTH
DE HEV Kappa 1.6L
D6KF1 (6-Speed)
- 41470 2B000
82.0 - 83.0mm DE PHEV 41470 2B001
JFa, YDm Gamma T-GDI 1.6
D7UF1 (7-Speed)
D 41470 2D300 71.5 – 72.5mm
PS A 41470 2D011
Diagnosis and Remedy Table
New Replacement Part Rod Length Adjustment
Dual Clutch (DC) set only
Using the applicable SST, adjust both of the existing actuator rod lengths to match the rod lengths 1 & 2 specified in the DCT and New Clutch Actuator Reference Table shown above.
Clutch Actuator (CA) assembly only
Using the applicable SST, measure and note both of the existing actuator rod lengths individually. Then, adjust both of the new actuator rod lengths identical to the old actuator rod measurements.
Dual Clutch set and Clutch Actuator assembly No need to measure or adjust the DCT actuator if both DC and CA parts are replaced.
DCT Actuator Procedures Outlines
Procedure Type Page(s)
Actuator Removal and Replacement Procedure Pages 3-4
Actuator Rod Length Measurement Procedure (Existing/removed actuator)
Page 5-6
Actuator Rod Length Adjustment Procedure Page 7-9

Page 3 of 10
TSB: TRA085 Multiple Models with DCT December 2019
DCT ACTUATOR ROD LENGTH ADJUSTMENT SUBJECT:
DCT Actuator Removal Procedure using SST:
1. Remove the two (2) actuator rod cover retaining bolts (A).
2. Insert the applicable SST into the two (2) DCT bellhousing mounting holes shown.
3a. Using a ratchet/wrench tool, turn the SST bolt (B) clockwise so that the SST plate pushes the DCT clutch forks away to release the actuator rod ends.
3b. The DCT clutch forks are now pushed away and no longer holding the actuator rod ends.
A
B
A removed (D7UF1) 7-speed DCT is used in the following procedure and is intended for demonstration purpose only. This outline is also applicable for the (D6KF1) 6-speed DCT.
NOTICE

DCT ACTUATOR ROD LENGTH ADJUSTMENT
Page 4 of 10
TSB: TRA085 Multiple Models with DCT December 2019
SUBJECT:
4. Remove the six (6) DCT actuator retaining bolts (C) to remove the actuator from the DCT assembly. Bolt location will vary for 6 and 7-speed DCT Actuators. Torque specification for bolts (C): 14.5 - 19.5 Ib.ft (19.6 - 26.5 N.m, 2.0 - 2.7 kgf.m)
5a.
5b.
Refer to the Diagnosis and Remedy Table found on page 2 for the recommended procedure required before re-assembling with an existing or new DCT actuator assembly. Proceed to step 6 only after completing step 5a.
6. Replace all removed parts in the same order of removal.
7. Using KDS perform the DCT Learning Function found via the “S/W Management” in the ‘Home’ screen. Under the “Systems” tab, select “Dual Clutch Transmission”.
8. Ensure proper operation of the vehicle.
If gear shifting is not engaged after DCT Learning Function, then perform the clutch actuator rod length adjustment again. If vehicle exhibits shift shock after DCT Learning Function, drive the vehicle for more than 5 minutes and shut off the engine.
Repeat two (2) to three (3) times.
NOTICE
C
Page 5 of 10
TSB: TRA085 Multiple Models with DCT December 2019
DCT ACTUATOR ROD LENGTH ADJUSTMENT SUBJECT:
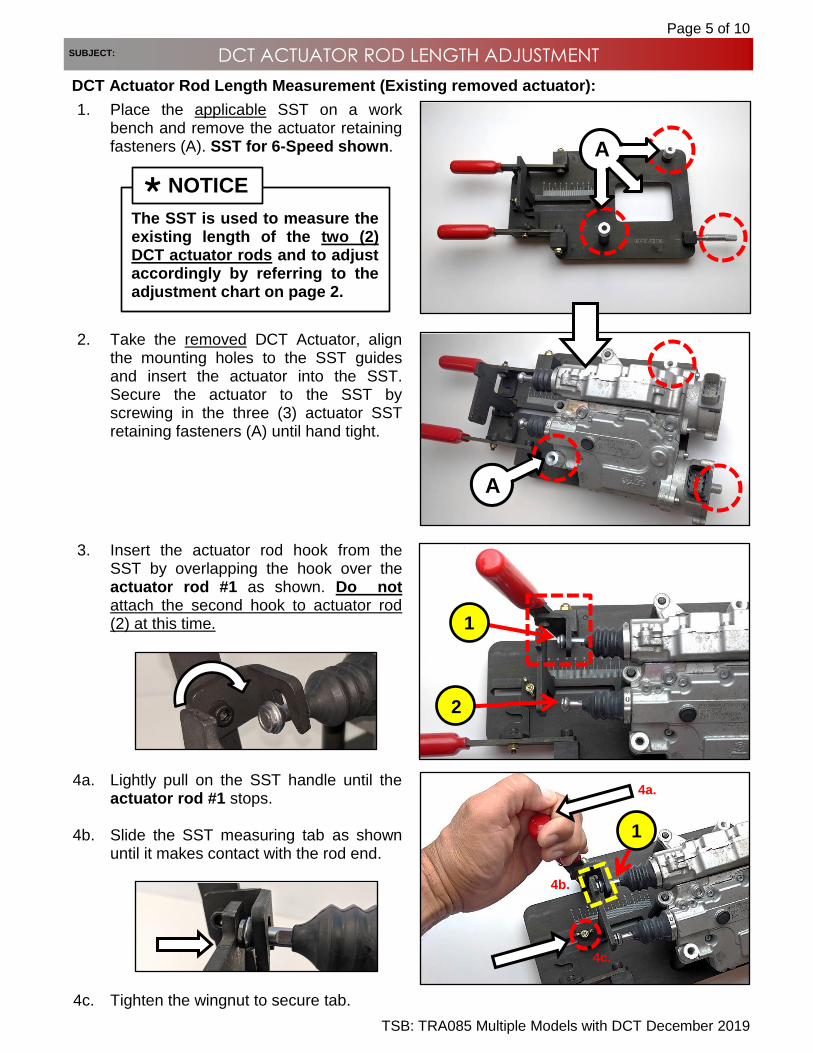
DCT Actuator Rod Length Measurement (Existing removed actuator):
1. Place the applicable SST on a work bench and remove the actuator retaining fasteners (A). SST for 6-Speed shown.
2. Take the removed DCT Actuator, align the mounting holes to the SST guides and insert the actuator into the SST. Secure the actuator to the SST by screwing in the three (3) actuator SST retaining fasteners (A) until hand tight.
3. Insert the actuator rod hook from the SST by overlapping the hook over the actuator rod #1 as shown. Do not attach the second hook to actuator rod (2) at this time.
4a.
4b.
4c.
Lightly pull on the SST handle until the actuator rod #1 stops. Slide the SST measuring tab as shown until it makes contact with the rod end.
Tighten the wingnut to secure tab.
The SST is used to measure the existing length of the two (2) DCT actuator rods and to adjust accordingly by referring to the adjustment chart on page 2.
NOTICE
1
2
1
4a.
4b.
4c.
A
A

DCT ACTUATOR ROD LENGTH ADJUSTMENT
Page 6 of 10
TSB: TRA085 Multiple Models with DCT December 2019
SUBJECT:
5. Write down the measurement shown at the bottom of the SST tab where it aligns with the ruler. Image sample: The actuator rod #1 length shown is 67mm.
6a.
6b.
Loosen the measuring tab wingnut, slide out the measuring tab and release the hook from the actuator rod #1. Repeat steps 3 through 5 to measure the length of actuator rod #2.
7a.
7b.
If replacing the Clutch Actuator only with a “new” part, REMOVE the existing DCT actuator assembly from the SST and mount the “new” clutch actuator onto the SST as outlined in steps 1 through 2. If replacing the Dual Clutch Set only with a “new” part, DO NOT REMOVE the existing clutch actuator assembly from the SST.
8. Proceed to the DCT Actuator Length Adjustment procedure outlined on the following page 7, to adjust the existing (removed) or the “new” DCT actuator assembly.
2
Measurement
Be sure to have written down two (2) measurements; one each for actuator rods 1 and 2. The measurements may differ from actuator rod 1 and rod 2.
NOTICE
Page 7 of 10
TSB: TRA085 Multiple Models with DCT December 2019
DCT ACTUATOR ROD LENGTH ADJUSTMENT SUBJECT:
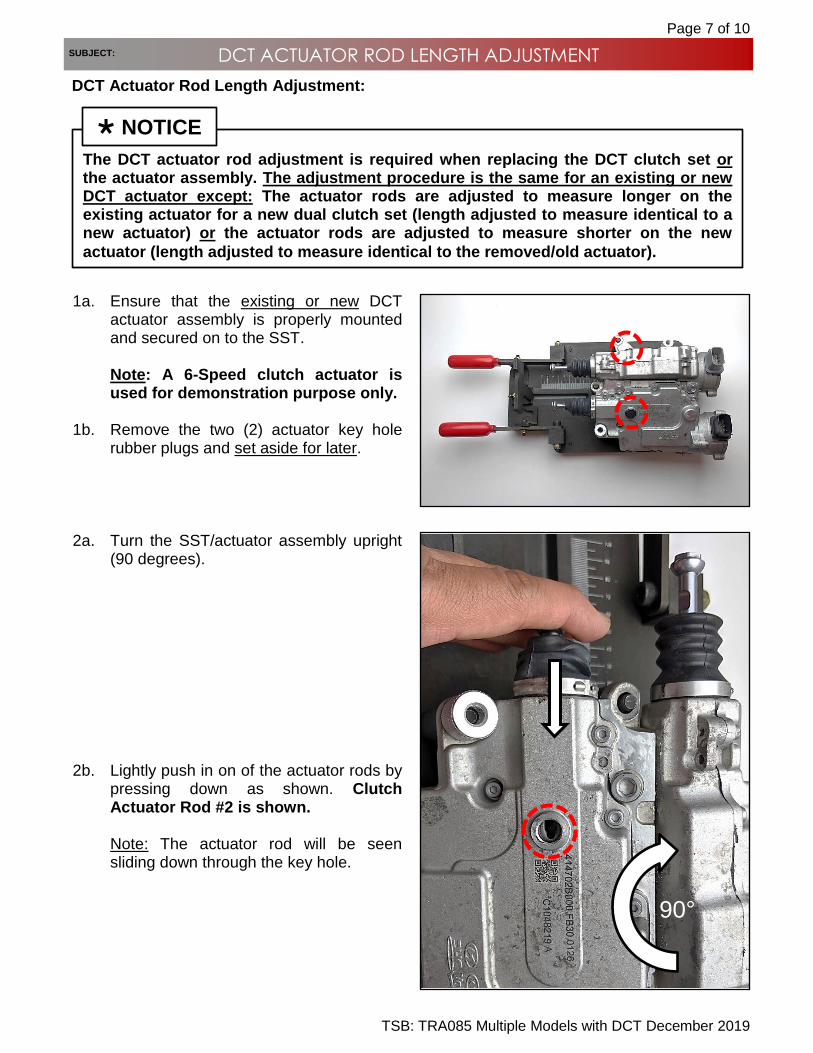
DCT Actuator Rod Length Adjustment:
1a.
1b.
Ensure that the existing or new DCT actuator assembly is properly mounted and secured on to the SST. Note: A 6-Speed clutch actuator is used for demonstration purpose only. Remove the two (2) actuator key hole rubber plugs and set aside for later.
2a. Turn the SST/actuator assembly upright (90 degrees).
2b. Lightly push in on of the actuator rods by pressing down as shown. Clutch Actuator Rod #2 is shown. Note: The actuator rod will be seen sliding down through the key hole.
The DCT actuator rod adjustment is required when replacing the DCT clutch set or the actuator assembly. The adjustment procedure is the same for an existing or new DCT actuator except: The actuator rods are adjusted to measure longer on the existing actuator for a new dual clutch set (length adjusted to measure identical to a new actuator) or the actuator rods are adjusted to measure shorter on the new
actuator (length adjusted to measure identical to the removed/old actuator).
NOTICE
90°

DCT ACTUATOR ROD LENGTH ADJUSTMENT
Page 8 of 10
TSB: TRA085 Multiple Models with DCT December 2019
SUBJECT:
3. While pushing in the actuator rod, look through the hole until the open key hole is shown open.
4. Insert the SST 09430-C1300 supplied key into the key hole and hold firmly in place.
5a. Turning the adjuster key in left or right will cause the end of the key to turn an internal boss mechanism in the actuator to adjust the length of the actuator rod.
5b. Hold the center swivel section of the SST and turn the hex end of the SST to adjust the rod length of the actuator. Turn clockwise to decrease the length of the actuator rod. Turn counter-clockwise to increase the length of the actuator rod.
One (1) full rotation of the SST adjuster key is equal to 0.25 mm
/ 0.009 in. in rod length.
NOTICE
Closed Open
Page 9 of 10
TSB: TRA085 Multiple Models with DCT December 2019
DCT ACTUATOR ROD LENGTH ADJUSTMENT SUBJECT:
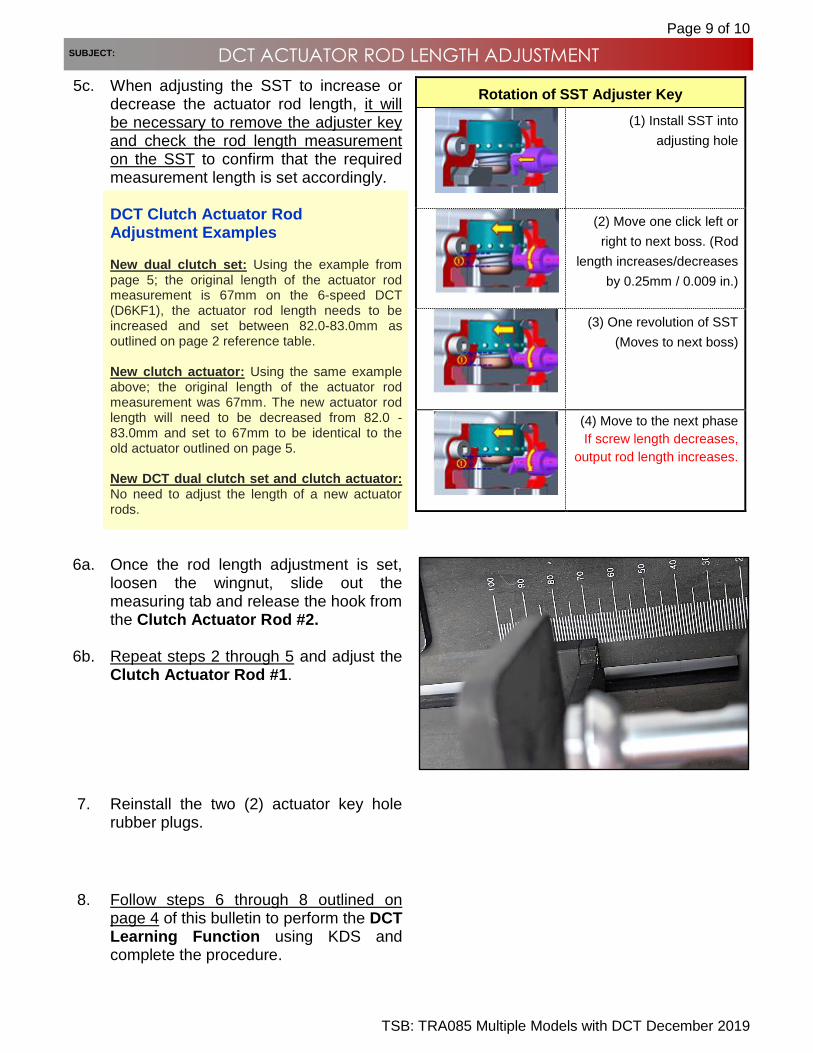
5c. When adjusting the SST to increase or decrease the actuator rod length, it will be necessary to remove the adjuster key and check the rod length measurement on the SST to confirm that the required measurement length is set accordingly. DCT Clutch Actuator Rod Adjustment Examples New dual clutch set: Using the example from page 5; the original length of the actuator rod measurement is 67mm on the 6-speed DCT (D6KF1), the actuator rod length needs to be increased and set between 82.0-83.0mm as outlined on page 2 reference table. New clutch actuator: Using the same example above; the original length of the actuator rod measurement was 67mm. The new actuator rod length will need to be decreased from 82.0 - 83.0mm and set to 67mm to be identical to the old actuator outlined on page 5. New DCT dual clutch set and clutch actuator: No need to adjust the length of a new actuator rods.
Rotation of SST Adjuster Key
(1) Install SST into
adjusting hole
(2) Move one click left or
right to next boss. (Rod
length increases/decreases
by 0.25mm / 0.009 in.)
(3) One revolution of SST
(Moves to next boss)
(4) Move to the next phase
If screw length decreases,
output rod length increases.
6a.
6b.
Once the rod length adjustment is set, loosen the wingnut, slide out the measuring tab and release the hook from the Clutch Actuator Rod #2. Repeat steps 2 through 5 and adjust the Clutch Actuator Rod #1.
7. Reinstall the two (2) actuator key hole rubber plugs.
8. Follow steps 6 through 8 outlined on page 4 of this bulletin to perform the DCT Learning Function using KDS and complete the procedure.

DCT ACTUATOR ROD LENGTH ADJUSTMENT
Page 10 of 10
TSB: TRA085 Multiple Models with DCT December 2019
SUBJECT:
AFFECTED VEHICLE RANGE:
Model Production Date Range
Niro (DE) (P/HEV) Kappa 1.6L 2017MY~
Forte (YDm) Gamma 1.6L GDI Turbo 2017-2018MY
Optima (JFa) Gamma 1.6L GDI Turbo 2016-2020MY
Soul (PS) Gamma 1.6L GDI Turbo 2017-2019MY
REQUIRED TOOL:
Tool Name P/N Figure Comments
Clutch Actuator Remover
09430 A5100
Used when removing the clutch actuator from in-vehicle DCT.
Clutch Actuator Remover
09430 G2100
Clutch Actuator Adjustment Jig
09430 F0100
6-Speed (D6KF1)
Clutch Actuator Adjustment Jig
09430 C1302
7-Speed (D7UF1)
Clutch Actuator Adjuster Key
09430 C1300
Applicable to either 6 or 7-Speed Actuators
WARRANTY INFORMATION: N Code: B18 C Code: ZZ3
Note: Double Clutch Actuator Assembly R&R, Op Time on LTS includes adjustment.
Claim Type
Causal P/N Qty. Repair
Description Labor Op
Code Op
Time Replacement
P/N Qty.
W Refer to LTS 0
DCT Actuator Adjustment (DE) 6-Speed (D6KF1)
41472R6D 1.2 M/H
Refer to EPC 0 DCT Actuator Adjustment (YDm, JFa, PS) 7-Speed
(D7UF1) 41472R7D
Refer to
LTS