touchware for windows 95 and - touch screens inc
TRANSCRIPT

TouchWare for Windows 95and Windows NT 4.0
User’s Guide

The information in this document is subject to change without notice. No part of this document may bereproduced or transmitted in any form or by any means, electronic or mechanical, for any purpose, without theexpress written permission of MicroTouch Systems, Inc. MicroTouch may have patents or pending patentapplications, trademarks, copyrights, or other intellectual property rights covering subject matter in thisdocument. The furnishing of this document does not give you license to these patents, trademarks, copyrights,or other intellectual property except as expressly provided in any written license agreement from MicroTouch.
© 1997-98 MicroTouch Systems, Inc. All rights reserved.Printed in the United States of America.
Document Title: TouchWare for Windows 95 and Windows NT 4.0 User’s GuideDocument Number: 19-224, Version 2.1
TouchWare, Version 5.0Windows Touchscreen Driver, Version 5.0
MicroTouch, the MicroTouch logo, AdLink, ClearTek, DrivePoint, Factura, FinePoint, Ibid, the Ibid logo,KeyPad, Microcal, PicturePad, PrivacyTouch, Prospector, The Public Browser, QuickPoint, ScreenWriterTablet, SimpleTouch, SurfControl, ThruGlass, TouchMate, TouchPad, TouchPen, TouchWare, TouchTek,TruePoint, TuffTouch, UnLink, UnMouse, WebStation, and WorldService are either registered trademarks ortrademarks of MicroTouch Systems Incorporated in the United States and/or other countries.
Microsoft, MS, MS-DOS, and Windows are registered trademarks of Microsoft Corporation.
Contents
About This ManualWhat You Need to Know.............................................................8MicroTouch Support Services......................................................8
MicroTouch Technical Support..............................................8MicroTouch on the World Wide Web.....................................9MicroTouch Bulletin Board System........................................9
MicroTouch Corporate Headquarters and Worldwide Offices.....10
CHAPTER 1 Installing TouchWareWhat Is TouchWare?.................................................................12
Touchscreen Drivers.............................................................12Touchscreen Control Panel...................................................13Online Help..........................................................................13TouchWare Uninstall............................................................13
Checking the ReadMe File..........................................................14Installing TouchWare.................................................................14Completing the Touchscreen Setup............................................16Uninstalling TouchWare.............................................................16
CHAPTER 2 Touchscreen Control PanelOpening the Touchscreen Control Panel.....................................18

4 TouchWare for Windows 95 and Windows NT 4.0 User's Guide
Calibrate.................................................................................... 19When to Calibrate the Touchscreen...................................... 19Calibrating the Touchscreen................................................. 20Testing the Calibration......................................................... 21
Touch Settings........................................................................... 23Touch Modes....................................................................... 24Right-click Tool................................................................... 25Touch Sound ....................................................................... 25Double-click Speed and Area............................................... 25
Cursor ....................................................................................... 27Cursor Visibility................................................................... 28Cursor Vertical Offset.......................................................... 28Edge Adjustment................................................................. 29Stabilize Cursor................................................................... 29
Pen ............................................................................................ 32Pen/Finger Mode................................................................. 33Pen Only Mode.................................................................... 33Finger Only Mode................................................................ 34Stabilize Cursor for Finger and TouchPen............................ 34Draw and Test ..................................................................... 34
Hardware................................................................................... 35Controller Information......................................................... 35Connection.......................................................................... 36About TouchWare............................................................... 37Restore Defaults.................................................................. 38
Tools ......................................................................................... 39Touchscreen Diagnostics...................................................... 39Video Diagnostics................................................................ 41Touchscreen Linearization................................................... 43
CHAPTER 3 Troubleshooting the TouchscreenTroubleshooting Overview......................................................... 45Before You Call Tech Support................................................... 46Touchscreen Status Lights......................................................... 47
Bright LED.......................................................................... 47Blinking LED....................................................................... 48Continuously Dim LED........................................................ 48

Contents 5
What to do if..............................................................................48Cursor does not appear after starting Windows 95................48Cursor does not reach out to edges of screen........................48Cursor is jittery or drawing lines not straight and smooth......48Cursor jumps or bounces suddenly across screen..................49Double-click doesn't work....................................................49Full screen DOS needed.......................................................49Operating two serial devices.................................................51Touch delayed in Windows NT.............................................52Touch not working...............................................................53Touchscreen not found.........................................................54
Error Messages ..........................................................................55Windows NT Error Messages...............................................56
APPENDIX A Multiple MonitorsDesktop Appearance..................................................................60Monitor Layout..........................................................................61Installing TouchWare for Multiple Monitors...............................62Click Mode................................................................................64Setting TouchWare Preferences for Each Touchscreen...............64Changing Your Multiple Touchscreen Configuration..................64
APPENDIX B TouchWare FilesTouchscreen Driver Settings......................................................66Direct Access to Calibration.......................................................66Touchscreen Files.......................................................................67Touchscreen Care and Cleaning..................................................68
Index

About This Manual
The MicroTouch touchscreen is the most intuitive pointing deviceavailable for the PC series of computers and monitors. Touchscreensmake using computers as simple as touching the screen.
Touchscreens are ideal for a variety of applications, includingentertainment, training systems, information and self-service kiosks,point-of-sale, factory automation, laboratory and medicalinstrumentation, interactive selling demonstrations, and educationalprograms.
This manual describes how to
x Install TouchWare, the software for your touchscreen
x Use the different tabs on the Touchscreen control panel tocustomize your work environment -- Calibrate, Touch Settings,Cursor, Pen, Hardware, and Tools
x Configure your system for multiple touchscreens
This manual assumes you have already connected the MicroTouchtouchscreen to your computer. If not, refer to the TruePoint TouchMonitor Installation Guide included with your monitor. You are nowready to install TouchWare and experience the power of touch.

8 TouchWare for Windows 95 and Windows NT 4.0 User's Guide
What You Need to Know
This document assumes you have basic PC skills. You should knowhow to use the mouse and keyboard, choose commands from menus,open and run application programs, and save files.
If you need to learn more about these tasks, refer to the manuals anddiskettes that came with your PC.
MicroTouch Support Services
MicroTouch provides extensive technical support through ourtelephone hot line, web site, and bulletin board system (BBS).
MicroTouch Technical Support
MicroTouch Technical Support is available as follows:
x 24 hours a day, Monday-Friday (excluding holidays)
x 9:00 a.m. - 5:00 p.m., EST, Saturday-Sunday (excluding holidays)
Whenever you contact Technical Support, please provide thefollowing information:
x Part number and serial number from the MicroTouch label on yourmonitor or touchscreen controller
x Type of MicroTouch touchscreen
x Version number of your MicroTouch TouchWare
x Make and model of your personal computer
x Name and version number of your operating system
x Type of mouse connected to your system
x List of other peripherals connected to your computer
x List of application software in use

About This Manual 9
To contact Technical Support:
x Technical Support Hot Line: 978-659-9200
x Technical Support Fax: 978-659-9400
x Technical Support E-Mail: [email protected]
MicroTouch on the World Wide Web
You can visit the MicroTouch Web site at the following address:
http://www.microtouch.com
You can download MicroTouch touchscreen software and drivers,obtain regularly updated technical information on MicroTouchproducts, and learn more about our company.
MicroTouch Bulletin Board System
MicroTouch also has a Bulletin Board System (BBS) that you canaccess 24 hours a day, 7 days a week. You can use the BBS todownload updates of the latest drivers and obtain regularly updatedtechnical information on MicroTouch products.
You can reach the MicroTouch BBS at the following numbers:
978-659-9250 or 978-683-0358
To connect to the BBS, you need standard communication softwareand a modem that supports 2400, 4800, 9600, 14400, or 28800 baud.
Additionally, the communication parameters must be set as follows:
No parity, 8 data bits, 1 stop bit (N81)
Once you establish a modem connection with the BBS, the systemprompts you to log in using your name. You can register withMicroTouch the first time you log in to the BBS. The menu ofavailable options is self-explanatory.
10 TouchWare for Windows 95 and Windows NT 4.0 User's Guide
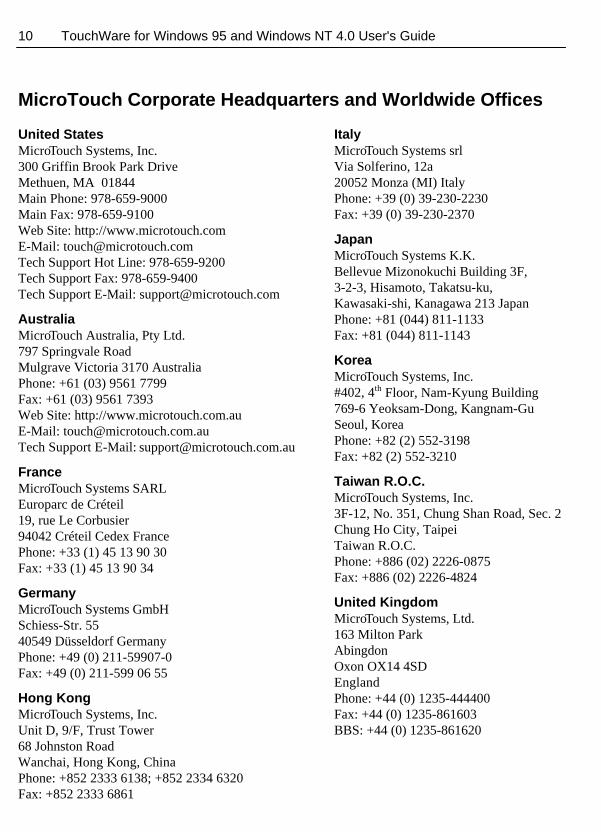
MicroTouch Corporate Headquarters and Worldwide Offices
United StatesMicroTouch Systems, Inc.300 Griffin Brook Park DriveMethuen, MA 01844Main Phone: 978-659-9000Main Fax: 978-659-9100Web Site: http://www.microtouch.comE-Mail: [email protected] Support Hot Line: 978-659-9200Tech Support Fax: 978-659-9400Tech Support E-Mail: [email protected]
AustraliaMicroTouch Australia, Pty Ltd.797 Springvale RoadMulgrave Victoria 3170 AustraliaPhone: +61 (03) 9561 7799Fax: +61 (03) 9561 7393Web Site: http://www.microtouch.com.auE-Mail: [email protected] Support E-Mail: [email protected]
FranceMicroTouch Systems SARLEuroparc de Créteil19, rue Le Corbusier94042 Créteil Cedex FrancePhone: +33 (1) 45 13 90 30Fax: +33 (1) 45 13 90 34
GermanyMicroTouch Systems GmbHSchiess-Str. 5540549 Düsseldorf GermanyPhone: +49 (0) 211-59907-0Fax: +49 (0) 211-599 06 55
Hong KongMicroTouch Systems, Inc.Unit D, 9/F, Trust Tower68 Johnston RoadWanchai, Hong Kong, ChinaPhone: +852 2333 6138; +852 2334 6320Fax: +852 2333 6861
ItalyMicroTouch Systems srlVia Solferino, 12a20052 Monza (MI) ItalyPhone: +39 (0) 39-230-2230Fax: +39 (0) 39-230-2370
JapanMicroTouch Systems K.K.Bellevue Mizonokuchi Building 3F,3-2-3, Hisamoto, Takatsu-ku,Kawasaki-shi, Kanagawa 213 JapanPhone: +81 (044) 811-1133Fax: +81 (044) 811-1143
KoreaMicroTouch Systems, Inc.#402, 4th Floor, Nam-Kyung Building769-6 Yeoksam-Dong, Kangnam-GuSeoul, KoreaPhone: +82 (2) 552-3198Fax: +82 (2) 552-3210
Taiwan R.O.C.MicroTouch Systems, Inc.3F-12, No. 351, Chung Shan Road, Sec. 2Chung Ho City, TaipeiTaiwan R.O.C.Phone: +886 (02) 2226-0875Fax: +886 (02) 2226-4824
United KingdomMicroTouch Systems, Ltd.163 Milton ParkAbingdonOxon OX14 4SDEnglandPhone: +44 (0) 1235-444400Fax: +44 (0) 1235-861603BBS: +44 (0) 1235-861620

C H A P T E R 1
Installing TouchWare
TouchWare is the software for your MicroTouch touchscreen. Itprovides full touchscreen functionality for all software applicationsrunning under Windows 95 or Windows NT 4.0.
This version of TouchWare includes support for multiple monitors andmultiple touchscreens. The number of monitors you can have islimited only by the hardware constraints of your system. Up to four ofthese monitors can have touchscreens attached. Refer to Appendix Afor additional information.
Once you install TouchWare, you can select, launch, and drag objectsusing the touchscreen. To make a selection, you touch the screen.It’s that simple and that natural – touch to select.

12 TouchWare for Windows 95 and Windows NT 4.0 User's Guide
What Is TouchWare?
Your touch product includes several software tools to help you workwith and customize the touchscreen and the TouchPen. Softwaredrivers are available for touch-based applications for use in differentenvironments.
Specifically, TouchWare includes the following programs and utilities:
x Touchscreen drivers (for Windows 95 and Windows NT 4.0)
x Touchscreen control panels
x Online help
x TouchWare Uninstall utility
Touchscreen Drivers
TouchWare includes touchscreen drivers for Windows 95 andWindows NT 4.0. The driver is the software that the system uses tocommunicate with the touchscreen.
The Windows touchscreen drivers enable you to use the MicroTouchtouchscreen with applications running in the Windows 95 or WindowsNT 4.0 environments. You can run Windows programs and use touch(finger or pen) input without any program modifications.

Chapter 1 Installing TouchWare 13
Touchscreen Control Panel
You can use the Touchscreen control panel to set your preferences forthe touchscreen. For example, you can define the followingpreferences:
x Whether the touch action occurs when you touch the screen orwhen you lift your finger (or pen) off the screen
x Whether you hear a sound when you touch the screen
x How fast you need to touch to produce a double-click
You can also use the Touchscreen control panel to calibrate thetouchscreen, to stabilize the cursor, and define where the cursorappears relative to your touch (an offset), and to run diagnosticprograms.
Online Help
TouchWare has online help for setting up and using the touchscreen.These help files use standard Windows Help, complete with hypertextand hypergraphics, to create and display available topics.
Online help provides you with information specific to a TouchWarefunction or option. You can use the online help to find answers to allyour TouchWare questions.
TouchWare Uninstall
The Uninstall utility automatically deletes all TouchWare componentsfrom your computer and removes all TouchWare entries from thesystem files.

14 TouchWare for Windows 95 and Windows NT 4.0 User's Guide
Checking the ReadMe File
After you install TouchWare, check the ReadMe file for any lastminute changes, updates, product summary information andenhancement information.
¾ To view the ReadMe file:
1. Click the Start button on the taskbar.
2. Point to Programs, and then click MicroTouch.
3. Click on ReadMe.
Installing TouchWare
When you install TouchWare, you have two installation options:
x Express Install
x Custom Install
The Express option installs all TouchWare files for either Windows 95and Windows NT, and automatically places the files in the ProgramFiles\MicroTouch\TouchWare directory. The Express option alsocreates a MicroTouch Touchscreen icon on the Windows ControlPanel and a Program group called MicroTouch, with icons for eachTouchWare program.
The Custom option also installs all TouchWare files, however, you canspecify the destination directory for the TouchWare files and the nameof the program group for the TouchWare programs. Use Custominstall to configure your system with multiple monitors. Refer toAppendix A for more details.
¾ To install TouchWare:
1. Make sure the touchscreen is properly connected. The Setupprogram cannot configure the touchscreen without it.
2. Start Windows. Make sure no other applications are open.
Chapter 1 Installing TouchWare 15
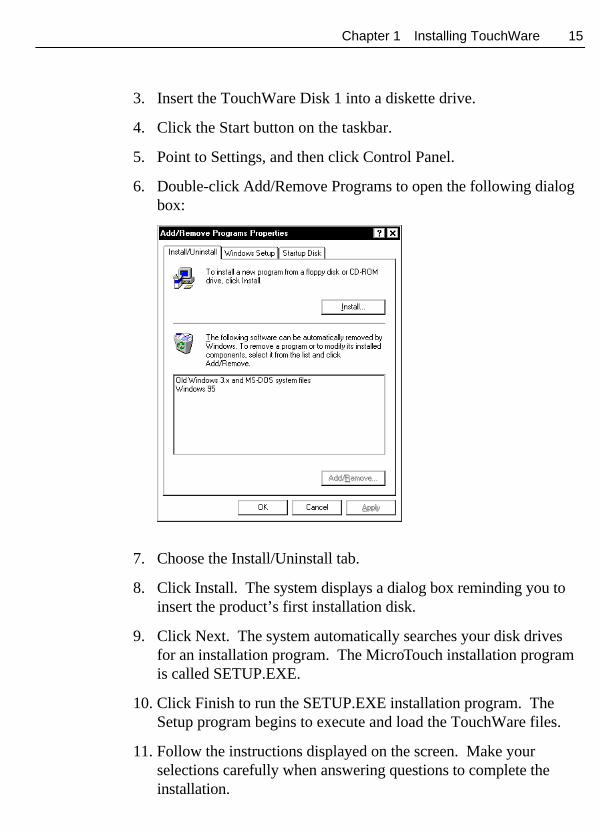
3. Insert the TouchWare Disk 1 into a diskette drive.
4. Click the Start button on the taskbar.
5. Point to Settings, and then click Control Panel.
6. Double-click Add/Remove Programs to open the following dialogbox:
7. Choose the Install/Uninstall tab.
8. Click Install. The system displays a dialog box reminding you toinsert the product’s first installation disk.
9. Click Next. The system automatically searches your disk drivesfor an installation program. The MicroTouch installation programis called SETUP.EXE.
10. Click Finish to run the SETUP.EXE installation program. TheSetup program begins to execute and load the TouchWare files.
11. Follow the instructions displayed on the screen. Make yourselections carefully when answering questions to complete theinstallation.
16 TouchWare for Windows 95 and Windows NT 4.0 User's Guide
Completing the Touchscreen Setup
Once TouchWare has been installed, you must restart the system inorder to load the touchscreen driver. TouchWare provides manyoptions for optimizing performance of the touchscreen. You canadjust settings for touch mode, touch sounds, double-click speed,double-click area, and other cursor options. Use the Touchscreencontrol panel to set your preferences and calibrate to specific screenresolution.
Uninstalling TouchWare
The Uninstall program removes all TouchWare components from yourcomputer. These components include TouchWare files, directories,program folders, and folder items. The Uninstall program alsoremoves all TouchWare entries from the system registry files.
Note: The Uninstall program may not work correctly if the controlpanel is open. Close TouchWare before running Uninstall.
¾ To uninstall TouchWare:
1. Click Start and point to Programs, and then point to MicroTouch.
2. Click on TouchWare Uninstall. The Uninstall program begins.
3. Follow the instructions displayed on the screen.
You may receive a message when the Uninstall is complete that “Someelements could not be removed. You should manually remove itemsrelated to the application.” This is perfectly normal, several files willremain in use until you reboot the system. Click on Details... to seethe remaining files.
Note: Once the Uninstall is complete, you must restart your system.The touchscreen driver is still in use until you restart the system.
C H A P T E R 2
Touchscreen Control Panel
The TouchWare control panel consists of tabs to determine the bestsettings for your touchscreen configuration. You can changeTouchWare settings for calibration, touch modes, cursor options, pensettings, hardware and diagnostic tools to suit your preferences.
x Use the Calibrate tab to calibrate the touchscreen for the currentvideo resolution
x Use the Touch Settings tab to define the touch actions that equateto mouse actions or place the right-click tool on your desktopenabling you to utilize right-click functionality using thetouchscreen
x Use the Cursor tab to stabilize the cursor and tune the controller tothe best frequency for the current monitor settings
x Use the Hardware tab to determine the basic system settings foryour touchscreen, verify the touchscreen is communicatingproperly, select baud rate, and restore system defaults.
x Use the Tools tab to run diagnostic tests from the desktop.

18 TouchWare for Windows 95 and Windows NT 4.0 User's Guide
Opening the Touchscreen Control Panel
You can open the Touchscreen control panel in one of two ways:
1. Click the Start button, and then point to Programs.
2. Point to MicroTouch and click TouchWare Control Panel to openMicroTouch Touchscreen Properties page.
OR
1. Click the Start button, and then point to Settings.
2. Click Control Panel.
3. Double-click the MicroTouch Touchscreen icon.
Chapter 2 Touchscreen Control Panel 19
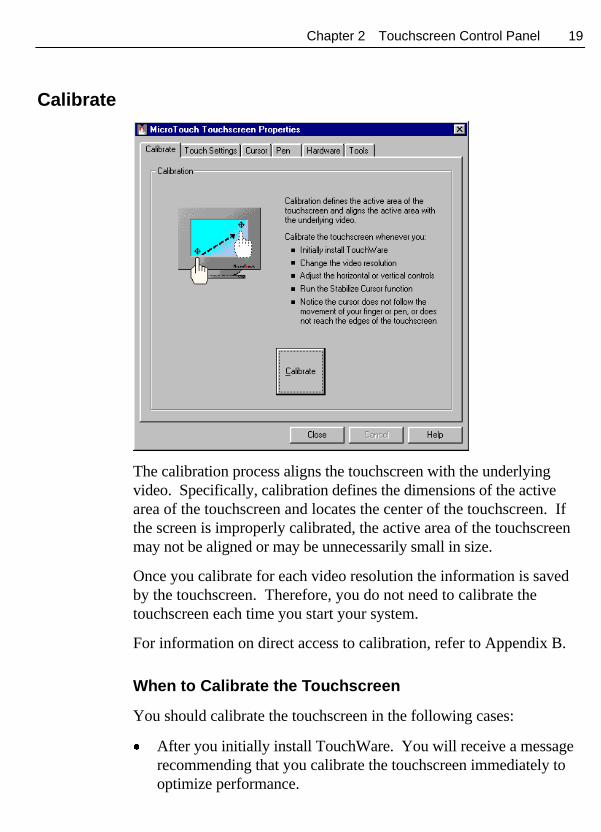
Calibrate
The calibration process aligns the touchscreen with the underlyingvideo. Specifically, calibration defines the dimensions of the activearea of the touchscreen and locates the center of the touchscreen. Ifthe screen is improperly calibrated, the active area of the touchscreenmay not be aligned or may be unnecessarily small in size.
Once you calibrate for each video resolution the information is savedby the touchscreen. Therefore, you do not need to calibrate thetouchscreen each time you start your system.
For information on direct access to calibration, refer to Appendix B.
When to Calibrate the Touchscreen
You should calibrate the touchscreen in the following cases:
x After you initially install TouchWare. You will receive a messagerecommending that you calibrate the touchscreen immediately tooptimize performance.

20 TouchWare for Windows 95 and Windows NT 4.0 User's Guide
x After you boot up your system. You will receive a messagerecommending that you calibrate the touchscreen if the presentsettings haven’t been calibrated.
x Any time you change the video resolution (for example 640x480 or800x600) or video mode of your monitor. Your monitor’s videocard determines the available resolutions.
Once you calibrate for each video resolution the information issaved by the touchscreen. Therefore, you do not need to calibratethe touchscreen each time you start your system.
x Any time you change your video card or swap in a new monitor.
x Any time you change the size of the video image by adjusting thehorizontal and vertical controls on your monitor.
x Any time you run the Stabilize Cursor function from the Cursortab.
x Any time the cursor does not follow the movement of your finger,or does not reach the edges of the touchscreen.
Calibrating the Touchscreen
1. Make sure the monitor has been powered on for at least 5 minutes.This allows the monitor to to reach its normal operatingtemperature before you calibrate.
2. Make sure the video image is centered in the screen area using thehorizontal and vertical controls.
3. Select the Calibrate tab.
4. Click Calibrate. A calibration target appears in the lower leftcorner of the screen.
If you press Escape or do not touch the screen within twentyseconds, the system automatically cancels the calibration process.In this case, there is no change to the current calibration settings.

Chapter 2 Touchscreen Control Panel 21
5. Touch the touchscreen and position your fingertip to completelycover the target. When you are satisfied that you are accuratelytouching the target, lift your finger off the screen. Remember, inthis instance, touch is recognized on liftoff.
When touching the calibration target, make sure you
x Face the monitor directly.
x Perform the calibration in the position (sitting or standing) youexpect to use the touchscreen.
x Touch the calibration targets firmly and precisely with yourfingertip. Be careful to keep your other fingers away from thetouchscreen as you touch the target.
6. The system displays a second calibration target in the upper rightcorner of the screen. Repeat the instructions in Step 3 for thiscalibration target. A dialog box prompts you to test thecalibration.
Note: On a TouchPen pen system, you must calibrate the touchscreentwice (once with your finger and once with the pen) if you are usingboth a touch pen and your finger as touch devices.
Testing the Calibration
Recalibrate the touchscreen if any of the following tests fail.
x Touch random points on the screen. The cursor should be locatedunderneath your finger or pen when you touch the screen.
x Drag your finger across the screen and check that the cursorfollows your movements. Note this option is not available inMultiple Monitor mode.
x Touch each corner and along the edges of the screen. Verify thatthe cursor reaches the full image area of the screen. Be sure youcan touch and activate all icons and menus across the entire screen.

22 TouchWare for Windows 95 and Windows NT 4.0 User's Guide
When you recalibrate the touchscreen, make sure to touch the targetscarefully. It is possible that one of your touches did not registerproperly or you accidentally touched the screen in the wrong placeduring calibration. For example, if you touch beyond the targets orinto the non-image area, you will distort the touchscreen calibration.

Chapter 2 Touchscreen Control Panel 23
Touch Settings
You can use the Touch Settings tab to set the following preferencesfor your touchscreen:
x Touch Mode – define the touch actions that equate to a mouseclick, double-click, and drag. Note this option is not available inMultiple Monitor mode.
x Right-click Tool – place the right-click tool on your desktopenabling you to utilize right-click functionality using thetouchscreen
x Touch Sound – define whether you hear a sound when you touchthe screen
x Double-click Speed and Area – define how fast you need to touchand the space in which you must touch in order to produce adouble-click
x Test – enables you to test the double-click speed and area
24 TouchWare for Windows 95 and Windows NT 4.0 User's Guide
Touch Modes
Desktop Mode
Desktop mode is most useful for general-purpose desktopapplications. In Desktop mode, a touch positions the cursor much likea mouse. Holding the touch steady is equivalent to pressing andholding the mouse button. Lifting off is equivalent to releasing themouse button.
x To click, touch the object. Lift off the screen.
x To double-click, touch the object twice quickly at the samelocation.
x To drag, touch the object. Pause. Slide your finger to the newlocation. Lift your finger off the screen.
Note: When using the Draw tool, you must pause for the systemto recognize touch before drawing.
Drawing Mode
Drawing mode is most useful for draw, paint, illustrator, and graphicsapplications. In Drawing mode, a touch is equivalent to pressing andholding down the mouse button. This is considered the easiest modeto use with immediate reaction to touch. Lifting off is equivalent toreleasing the mouse button.
x To click, touch the object. Lift off the screen.
x To double-click, touch the object twice quickly at the samelocation.
x To drag, touch the object. Slide your finger to the new location.Lift off the screen.

Chapter 2 Touchscreen Control Panel 25
Button Mode
This mode is best for button based applications (like a calculator). InButton mode, touching the screen is equivalent to pressing andreleasing the mouse button. The action occurs as soon as you touchthe screen.
x To click, touch the object.
x To double-click, touch the object twice quickly at the samelocation.
x To drag, touch the object. Pause. Slide your finger to the newlocation. Lift off the screen.
Right-click Tool
Places an icon on the desktop (always on top) that allows you to selectwhich mouse button to activate on touch. Note that this works for thenext click action only. Control returns to the left mouse button assoon as you are done.
You can position this icon anywhere on your desktop by selecting it,pausing until the four-pointed arrow appears, and dragging it whereveryou want.
Left button is typically used for normal select and normal drag. Rightbutton is typically used for applet properties such as context menu andspecial drag.
Touch Sound
Select audible beep on touchdown, liftoff, or no beep at all. Click onthe Beep button to toggle through these three choices. The defaultsetting is no beep on touch.
Double-click Speed and Area
The double-click speed defines how quickly you must touch the screenfor the system to interpret your actions as a double-click. Set thedouble-click speed in the slow to medium range for optimum

26 TouchWare for Windows 95 and Windows NT 4.0 User's Guide
performance with a touchscreen. The black line on the display showsthe default setting.
The double-click area defines the space in which you must touch thescreen for the system to interpret your actions as a double-click. Setthe double-click area in the medium to high range for optimumperformance with a touchscreen. The black line on the display showsthe default setting.
Touch the clown twice to test the double-click speed and area settings.If the clown begins to juggle (or stops juggling), the touchscreenrecognized your touch as a double-click.
Note: Altering the double-click settings for the touchscreen willchange the settings for the mouse, and vice versa.

Chapter 2 Touchscreen Control Panel 27
Cursor
After you calibrate the touchscreen, the cursor should be locateddirectly underneath your finger when you touch the screen. However,you may prefer to offset the cursor slightly above your touch so youcan see the cursor and point more easily and precisely to small objects.You can set this and other options for the cursor using this tab.
x Specify whether to display or hide the cursor
x Define the vertical distance between your touch and the position ofthe cursor on the screen
x Adjust the cursor movement on the horizontal axis
x Stabilize the cursor
28 TouchWare for Windows 95 and Windows NT 4.0 User's Guide
Cursor Visibility
The Cursor Visibility option is for Windows 95 users who do not wantto display the cursor when working with a touch application. Bydefault, the touchscreen displays the cursor in your application. Clickon the Cursor button to toggle the cursor on or off.
While this option is grayed out for Windows NT, users can access theMouse properties page to hide the cursor.
¾ To hide the cursor in Windows NT 4.0 systems:
1. Click the Start button, and then point to Settings.
2. Click Control Panel.
3. Double-click the Mouse icon to open the Mouse Properties Page
4. Click on the Pointers tab.
5. Select Touchscreen Hidden Cursors scheme and click OK.
Note: Applications can override this setting by loading their owncursors.
Cursor Vertical Offset
The Cursor Vertical Offset option lets you define the distance betweenyour fingertip and the position of the cursor on the screen. Offsettingthe cursor is helpful when selecting small items, such as single lettersin word processing, check boxes, or radio buttons.
¾ To set the Cursor Vertical Offset:
1. In the Cursor Vertical Offset box on the Cursor tab, click on theOffset button. The function is enabled (“ON”) when the greenindicator is illuminated. The Set button then becomes active.
2. Click Set.
Chapter 2 Touchscreen Control Panel 29
3. Touch the screen at the desired distance below the tip of thearrow, within the rectangular space provided. The distancebetween your liftoff position and the tip of the arrow is the offsetdistance. Thereafter, the cursor will be positioned above yourfinger or pen by a distance equal to the offset distance. As yourfinger or pen approaches the bottom edge of the screen, the cursoroffset automatically decreases so you can touch items in this area.
Edge Adjustment
There may be times when the screen image extends out to the left andright edges of the visible screen area, that is, beyond the edge of themonitor bezel. In these cases, it may be difficult to touch items at theleft and right edges of the screen. If the Edge Adjustment option ison, TouchWare automatically offsets the horizontal position of thecursor near the left and right edges, so you can easily reach the edgesof the screen image.
TouchWare only makes this adjustment at the left and right edges ofthe screen. You cannot define the horizontal offset amount.
Stabilize Cursor
The Stabilize Cursor function tunes the controller to the bestfrequency for the current monitor settings. In general, you will notneed to stabilize the cursor for the touchscreen. However, if you areexperiencing problems with a jittery cursor or ragged lines, you maywant to run the Stabilize Cursor option.
Use the Stabilize Cursor option to test the available frequency settingsand determine the best frequency. The range of frequency settings andthe default setting depends on your touchscreen controller. You canset a new operating frequency, and then check the performance of thetouchscreen at that frequency setting.

30 TouchWare for Windows 95 and Windows NT 4.0 User's Guide
When to Stabilize the Cursor
You should stabilize the cursor any time the cursor movement is veryerratic or jittery. This is NOT a subtle movement. The cursor will bevery jumpy. To test stability, use the Draw program to draw somelines on the screen. Check that they are smooth and thin. If the linesare wide and have ragged edges, the frequency setting is probably notcorrect for your controller. Run Stabilize Cursor.
Note: This test will take several minutes. Do not touch the screen,mouse or keyboard during the test. The test is measuring the amountof noise when there is no touch.
Cursor Stabilization Procedure
1. Choose Stabilize Cursor from the Cursor tab.
2. If you are using a TouchPen controller in pen/finger mode, a dialogbox appears asking if you want to adjust the frequency for pen orfinger. Specify the desired touch method.
Note: On a TouchPen pen system, you must stabilize the cursortwice (once with your finger and once with the pen) if you areusing both a touch pen and your finger as touch devices.
3. The system then does a preliminary check of all the frequencysettings.
4. The Analyzing Frequencies dialog box appears. The system testseach frequency setting and determines the optimum setting.
5. Once the test is complete, a dialog box informs you of the bestfrequency as determined by the test. You can click on Accept toswitch to this frequency setting or you may click on theAdvanced… button to test and select the frequencies for yourself.
6. The test results are displayed in descending order with therecommended frequency at the top of the list. The current selectedfrequency is also indicated.

Chapter 2 Touchscreen Control Panel 31
7. Select a different frequency and click Apply.
8. Test the touchscreen by touching the screen in several places andmove your finger around the screen. The cursor should holdsteady and cursor movement should be smooth. If you see erraticor jittery cursor movement, readjust the controller frequency.
9. Adjust the frequency until your touch test produces acceptableresults. Any time you adjust the frequency you should test how thetouchscreen is working and verify you are satisfied with theoperation of the touchscreen. It is recommended that yourecalibrate the touchscreen after using Stabilize Cursor.
Testing the Newly Selected Frequency
After stabilizing the cursor, test the touchscreen by touching the screenin several places and move your finger around the screen. The cursorshould hold steady and cursor movement should be smooth. If you seeerratic or jittery cursor movement, stabilize the cursor again. If thecursor is no longer jittery, you have successfully eliminated theproblem.
A good test is to go to the Draw program and hold your finger steadyon the screen. If the resulting pattern isn’t fuzzy, you have a goodfrequency.

32 TouchWare for Windows 95 and Windows NT 4.0 User's Guide
Pen
The Pen tab options are available only if your system has a TouchPencontroller. TouchPen Mode defines whether the touchscreenrecognizes input from both a pen and a finger, from a pen only, orfrom a finger only. The default mode is Pen/Finger, which means thatyou can use either your finger or your pen to select options.
The pen works in much the same way as a mouse regardless of theTouch mode setting. Touching the screen with a pen is equivalent topressing and holding down the left mouse button. Lifting the pen offthe screen is equivalent to releasing the mouse button. Touch Soundis disabled when using the pen (no beep on touch).
From the Pen tab, select one of the TouchPen mode buttons using themouse, a pen, your finger, or the appropriate shortcut key.
Note the TouchPen mode is immediately active. For example, if youselect Pen Only, the system recognizes only the pen as a touch device.You cannot use your finger to make a selection. You can still useshortcut keys or the mouse to select an option.
Chapter 2 Touchscreen Control Panel 33
The system saves the TouchPen mode so that the next time you powerup the system, the selected TouchPen mode is active.
Pen/Finger Mode
The system recognizes both pen and finger touches on the screen.This mode is the default mode for TouchPen controllers. If the systemdetects both pen and finger touches at the same time, it gives the penhigher priority and acknowledges only the pen touches. This priorityprevents accidental touches from your finger or hand being interpretedas input.
If you are using the pen and you lift the pen from the screen, thesystem does not recognize finger (or hand) touch until after a system-defined time delay. If a finger or hand is on the screen when the penlifts off, the system ignores the finger or hand until you lift off andtouch the screen again.
For example, if you rest your hand on the screen while you write withthe pen, you can lift the pen and put it back again without your handtouch being acknowledged.
You must calibrate the touchscreen twice (once with your finger andonce with the pen) if you are using Pen/Finger mode.
Note: Changing the TouchPen mode setting can optimize theperformance of the touchscreen. In Pen/Finger mode, the TouchPencontroller checks for input from either a pen or a finger. Thecontroller always gives priority to the pen. Therefore, if you are notcurrently using the pen for your touch application, use Finger Onlymode for optimum system performance.
Pen Only Mode
The system recognizes only pen touches on the screen. The systemignores finger touches on the screen.
34 TouchWare for Windows 95 and Windows NT 4.0 User's Guide
Finger Only Mode
The system recognizes only finger touches on the screen. The systemignores pen touches on the screen.
Stabilize Cursor for Finger and TouchPen
If you are using pen/finger mode when you select Stabilize Cursorfrom the Cursor tab, a dialog box appears asking if you want to adjustthe frequency for pen or finger. You can stabilize the cursor for usewith either a pen or finger. The recommended frequency setting maybe different for the pen and the finger; therefore you must adjust eachinput method independently. You could find that the performance ofone touch method is acceptable, while another touch method may needstabilization.
Draw and Test
Touch in the designated test area to sample draw mode and todetermine if the selected TouchPen mode is working.

Chapter 2 Touchscreen Control Panel 35
Hardware
Use the Hardware tab to determine the basic system settings for yourtouchscreen, verify the touchscreen is communicating properly, selectbaud rate, and restore system defaults.
Controller Information
Controller Type
The following controllers are supported in this version of TouchWare:
x Serial/SMT series controllers
x PC Bus controller
x TouchPen controller
Firmware Version
These digits represent the version number and the revision level of theTouchWare controller firmware.
36 TouchWare for Windows 95 and Windows NT 4.0 User's Guide
Touchscreen Status
Touchscreen status refers to whether or not the touchscreen has beenfound and is operational.
Possible Touchscreen Status messages include:
OK -- Touchscreen found and operational.
NOT FOUND – Touchscreen not found. Refer Chapter 3“Troubleshooting” for further information on this message.
Any other error messages indicate a hardware failure. ContactTechnical Support for more information.
Connection
Communication Port
Displays the COM port used for the touchscreen hardware connection.
If you have two serial devices operating together, such as atouchscreen and a mouse, be sure each device uses a unique COMport and IRQ number. For example, the mouse can use COM1/IRQ4and the touchscreen can use COM2/IRQ3. Using the same COM portor IRQ creates device conflicts. The touchscreen must have a uniqueIRQ; it cannot share an IRQ with another device.
Note: Verify that any previously loaded hardware/software (i.e.,mouse or modem) that used the same COM port as your touchscreenhas been uninstalled. Just because the hardware is disconnecteddoesn’t mean that the software isn’t claiming the port. Ensure that allcomponents are completely removed from the System files.
Use the Microsoft Hardware Conflict Troubleshooter (available inWindows Help) to try and resolve this problem.

Chapter 2 Touchscreen Control Panel 37
Find Touch screen
When you select the Find Touchscreen option, TouchWare:
x Scans the available communication ports supported by Windowsfor a touchscreen. Find Touchscreen searches the baud rates usedby the touchscreen.
Note: TouchWare will only work with COM ports configured,recognized, operational and supported by Windows at the time ofinstall.
x Tries to communicate with the touchscreen controller.
x Waits for the touchscreen controller to respond.
x Requests information about the touchscreen and its controller.
If TouchWare does not find the touchscreen, check that thetouchscreen is connected properly, and then repeat the search. Referto Chapter 3 “Troubleshooting” for more information on what to do ifyour touchscreen is not found. Note that this option cannot search anyCOM ports in use by other applications.
Select Baud Rate
The recommended standard baud rate for MicroTouch controllers is9600, which is generally acceptable for most applications. You mayalso select 19200, 4800, 2400 or 1200 baud.
About TouchWare
Lists the version of TouchWare (including Driver, Control Panel,Utility DLL, Operating System, etc.) currently installed on yoursystem. This information is particularly helpful if you need to callTechnical Support.
38 TouchWare for Windows 95 and Windows NT 4.0 User's Guide
Restore Defaults
This option is useful if you have reconfigured the software and need toget back to the original TouchWare settings. This option does notrestore calibration or frequency settings.
Restores original TouchWare settings for:
x Touch Mode (Desktop)In Multiple Monitor mode, the default is Click.
x Touch Sound (Off)
x Double-click Speed and Area (Midrange)
x Cursor Visibility (On)
x Cursor Vertical Offset (Off)
x Edge Adjustment (Off)
x TouchPen Mode (Pen/Finger)

Chapter 2 Touchscreen Control Panel 39
Tools
Use the Tools tab to perform basic touchscreen diagnostic tests withthe Draw and Terminal programs; video diagnostic tests with ColorBars and Color Purity graphs; and touchscreen linearization if youhave aTouchPen controller.
Note: You must have a keyboard attached to your system while usingthese optional tools.
Touchscreen Diagnostics
Draw
The Draw program lets you test the operation of the touchscreen andpen by checking the accuracy and speed with which the systemresponds to your touch. To draw, simply touch the screen and dragyour finger or pen. When using Desktop Mode, you must pause for thesystem to recognize touch before drawing.

40 TouchWare for Windows 95 and Windows NT 4.0 User's Guide
The following options will help you use the Draw program moreeffectively:
x Press B (blank) to clear the screen and display a blank drawingcanvas.
x Press G (grid) to clear the screen and display a grid that you canuse as a drawing guide (default setting).
x Press L (line) to draw solid lines on the screen (default setting).This option is not available in Multiple Monitor mode.
x Press D (dots) to draw dotted lines on the screen, where each dotrepresents a point reported by the touchscreen.
x Press the Space Bar to clear the screen instructions leaving the gridor a blank drawing area.
x The Draw background reflects your Desktop color scheme. Youcould experience problems if you have changed your desktop colorto a light background. The Draw grid lines are white and you willnot be able to see the test lines. Change your background color toa dark selection for best results. Use the Windows ControlPanel/Display/Appearance screen.
x Press F1 for Help or Escape to exit Draw mode.
Terminal
Terminal emulation mode lets you send firmware commands directly tothe touchscreen controller and enables you to view touch position datasent from the controller.
You do not need to use firmware commands in order to use yourtouch system. Developers and support personnel can use firmwarecommands at their discretion to initialize the controller and executediagnostic functions.
For a complete description of the available firmware commands, referto the Touch Controllers Reference Guide (19-213).

Chapter 2 Touchscreen Control Panel 41
Caution: If you are not familiar with the use of firmware commands,do not use this option. Executing some commands may alter theperformance of your touchscreen or render it inoperable. You shouldbe aware of these results before executing any firmware commands.
Video Diagnostics
The Color Bars and Color Purity options let you test the monitorvideo. These options do not test the touchscreen. Typically, you donot need to use these options unless you are assembling or repairingtouchscreen monitors.
Color Bars
When you select the Color Bars option, TouchWare displays 15 barsthat span the color spectrum from black to white.
When examining the colors, check the following items:
x Look at each color and ensure that it matches its description.
x Look at the edges of each color bar and ensure that it does notbleed at the edge or spread into other colors.
x If you notice problems, try adjusting the contrast and brightnesscontrols on the monitor.
x Press F1 for Help or Escape to exit Draw mode.
If there are still problems with the video, you can continue totroubleshoot the problem by using the Color Purity option. Rememberthat bad video indicates a hardware problem with the monitor or videocard, not the touchscreen.
Color Purity
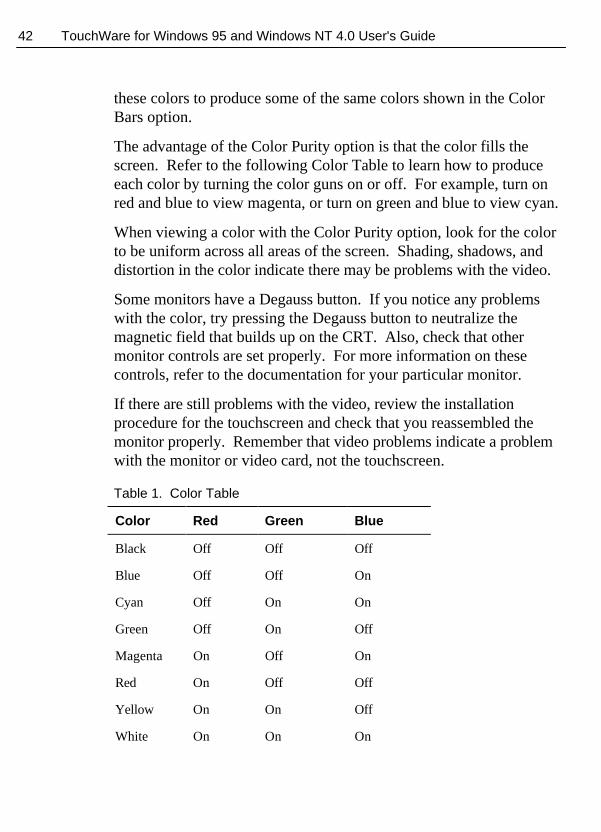
CRT monitors have three electron guns (or signals) that send theprimary colors – red, green, and blue – to the screen. (Flat paneldisplays do not use electron guns.) The Color Purity option lets youtest each primary color individually. You can also test combinations of
42 TouchWare for Windows 95 and Windows NT 4.0 User's Guide
these colors to produce some of the same colors shown in the ColorBars option.
The advantage of the Color Purity option is that the color fills thescreen. Refer to the following Color Table to learn how to produceeach color by turning the color guns on or off. For example, turn onred and blue to view magenta, or turn on green and blue to view cyan.
When viewing a color with the Color Purity option, look for the colorto be uniform across all areas of the screen. Shading, shadows, anddistortion in the color indicate there may be problems with the video.
Some monitors have a Degauss button. If you notice any problemswith the color, try pressing the Degauss button to neutralize themagnetic field that builds up on the CRT. Also, check that othermonitor controls are set properly. For more information on thesecontrols, refer to the documentation for your particular monitor.
If there are still problems with the video, review the installationprocedure for the touchscreen and check that you reassembled themonitor properly. Remember that video problems indicate a problemwith the monitor or video card, not the touchscreen.
Table 1. Color Table
Color Red Green Blue
Black Off Off Off
Blue Off Off On
Cyan Off On On
Green Off On Off
Magenta On Off On
Red On Off Off
Yellow On On Off
White On On On
Chapter 2 Touchscreen Control Panel 43
Touchscreen Linearization
Touchscreen Linearization is available only for systems using aTouchPen controller.
¾ To perform a 25-point linearization of the touchscreen surface:
1. Make sure the video image is centered in the screen area using thehorizontal and vertical controls.
2. Open the touchscreen control panel and select the Tools tab.
3. Click Linearize. This will bring up a 25-target grid. Only the topleft target will be active (yellow).
4. Starting with this target, firmly and precisely touch the center ofeach target with your pen or fingertip. As you touch, notice thatthe target blinks yellow and red. Once sufficient data has beencollected to store the touchpoint, the target will stop blinking andturn blue.
5. The next target will then become active (yellow).
6. Repeat this process until all 25 targets have been touched.
7. The 25 targets will now be replaced with a set of 16 targets usedto verify the linearization performed in steps 1 through 4.
8. Repeat the previous process for each of these targets. Thisprocess automatically resets to the control panel once complete.
To test the accuracy of the linearization process, use the Drawprogram to draw some lines on the screen. Check that they aresmooth and thin.
To exit this program at any time during the process, press ESCape.


C H A P T E R 3
Troubleshooting the Touchscreen
This chapter provides tips and strategies for problems you mayencounter with the touchscreen either during installation ornormal use.
MicroTouch is committed to helping you get the most from yourtouchscreen. MicroTouch provides extensive technical supportthrough our telephone hot line, web site, and bulletin board system(BBS). For more information on technical support, refer to the“About This Manual” section at the beginning of this document.
Troubleshooting Overview
If you are experiencing problems with the touchscreen, check that allcables are connected properly and restart your system.
For cursor adjustments, you may need to
x Calibrate your touchscreen
x Define cursor offset
x Stabilize the cursor
If your touchscreen or mouse is not working, the communicationsettings may be incorrect. If both devices are trying to use the same
46 TouchWare for Windows 95 and Windows NT 4.0 User's Guide
communication port or IRQ, a hardware device conflict will result.The touchscreen cannot share an IRQ with another device.
Verify that any previously loaded hardware/software that used thesame COM port as your touchscreen has been uninstalled. Justbecause the hardware is disconnected doesn’t mean that the softwareisn’t claiming the port. Ensure that all components are completelyremoved from the system files. Refer to manufacturer’sdocumentation for additional help.
To correct the communication settings, use the Windows HardwareConflict Troubleshooter from Windows Help.
Before You Call Tech Support
Have the following information ready and available before you calltechnical support.
x Is this a new installation? Have you ever installed TouchWarebefore?
x Has the touchscreen software worked prior to this?
x Have you added any new hardware or software to the system?
x What operating platform are you using: Windows NT 4.0 orWindows 95?
x What type of mouse are you using?
x Did the software find the touchscreen? Look on the Hardware tab.
x Can you draw on the touchscreen? Are the lines straight? If not,you may need to stabilize the cursor.
x Part number and serial number from the MicroTouch label on yourmonitor or touchscreen controller.
x Make and model of your personal computer.
x Type of MicroTouch touchscreen.
Chapter 3 Troubleshooting the Touchscreen 47
x Version number of your MicroTouch TouchWare. Go to theHardware tab – then click on the About box.
x List of peripherals connected to your computer.
x Other application software in use.
Touchscreen Status Lights
Some touchscreens have a light-emitting diode (LED) that indicatesthe status of the touchscreen unit and monitors several diagnosticfeatures in the unit. What normally happens with the LED when youpower up a touchscreen monitor is:
1. It will power up bright
2. Then it will go dim
3. When you touch the screen it should brighten again.
Note that there is no LED on a TouchPen controller.
If you are experiencing problems with the touchscreen, be sure tocheck the LED for status information. If the LED is not lit, power isnot being supplied to the controller. If this is the case,
x Check your power connections.
x Check that the monitor is turned on.
x Check that the keyboard power tap (optional) is connected.
x Check that the power supply unit (optional) is plugged in.
Bright LED
If the LED remains bright when you are not touching the screen, theremay be a problem with your hardware. Contact Technical Supportfor additional information.
48 TouchWare for Windows 95 and Windows NT 4.0 User's Guide
Blinking LED
Indicates the power-on self-test failed. A blinking status light usuallyindicates there is a problem with the controller hardware, such as aRAM error, ROM error or NOVRAM error. Refer to the TouchControllers Reference Guide for more details. Contact TechnicalSupport for additional information.
Continuously Dim LED
If the LED does not brighten when you touch the screen, there may bea problem with your hardware. Contact Technical Support foradditional information.
What to do if...
Cursor does not appear after starting Windows 95
Open the Cursor tab and make sure that Cursor Visibility is enabled.Check the Windows control panel Mouse properties page to makesure that Touchscreen Hidden Cursors is not selected. This is used tohide the cursor in Windows NT systems. Refer to Chapter 2“Touchscreen Control Panel” for more information.
Cursor does not reach out to edges of screen
Try calibrating the touchscreen. When calibrating the screen, be sureyou touch the center of each target firmly and precisely.
You may also want to turn on the Edge Adjustment in the Cursor tab.
Cursor is jittery or drawing lines not straight and smooth
You need to stabilize the cursor by adjusting the controller frequencysetting. Run the Stabilize Cursor option.

Chapter 3 Troubleshooting the Touchscreen 49
Any time you adjust the frequency you should test how thetouchscreen is working and verify you are satisfied with the operationof the touchscreen. It is a good idea to calibrate the touchscreenagain.
Cursor jumps or bounces suddenly across screen
You are most likely touching the screen in more than one spot at thesame time. Be sure to point and touch with one finger only. Keepyour other fingers away from the touchscreen. Don’t rest your otherhand on the monitor at the same time.
Double-click doesn't work
Use the Touch Settings tab to adjust the double-click speed and area.The double-click speed defines how quickly you must touch the screenfor the system to interpret your actions as a double-click. Set thedouble-click speed in the slow to medium range for optimumperformance with a touchscreen. The tick mark on the bar indicatesthe default setting.
The double-click area defines the space in which you must touch thescreen for the system to interpret your actions as a double-click. Setthe double-click area in the medium to high range for optimumperformance with a touchscreen. The tick mark on the bar indicatesthe default setting.
Click on the clown (Test) to test the double-click speed and areasettings. If the clown begins to juggle (or stop juggling), thetouchscreen recognized your touch as a double-click.
Note: Changing this setting will affect the double-click setting of themouse.
Full screen DOS needed
To run a touch application in a full screen DOS window in Windows95, you must run the MicroTouch DOS touchscreen driver
50 TouchWare for Windows 95 and Windows NT 4.0 User's Guide
DOSTOUCH.EXE before running your application. You can create abatch file that automatically loads the touchscreen driver and then runsyour application. Full screen DOS applications are not supported inWindows NT 4.0.
Note: To run DOSTOUCH from a batch file, you must include the fullpath to DOSTOUCH. By default, the MicroTouch Setup programinstalls the DOS touchscreen driver to the following directory:C:\Program Files\MicroTouch\TouchWare\DOSTOUCH.EXEIf you changed the directory during installation, make sure you specifythe correct DOSTOUCH path.
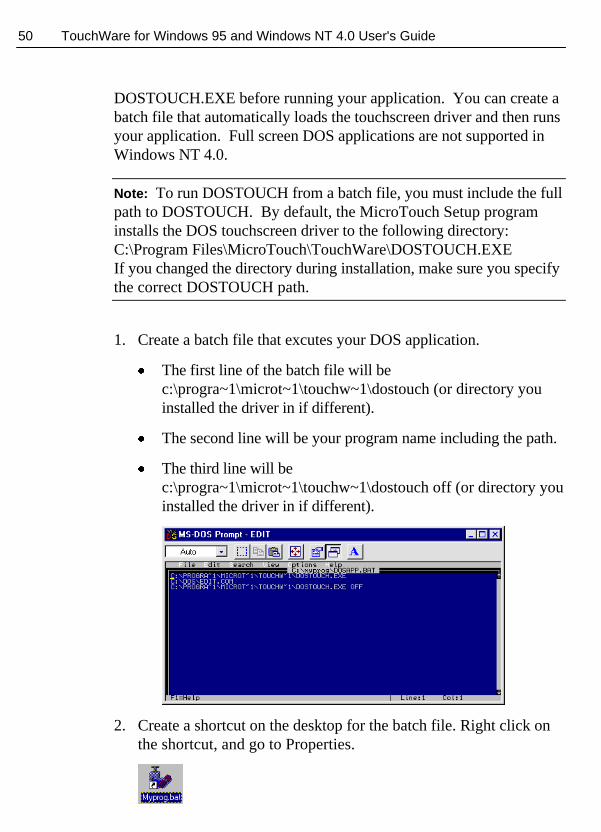
1. Create a batch file that excutes your DOS application.
x The first line of the batch file will bec:\progra~1\microt~1\touchw~1\dostouch (or directory youinstalled the driver in if different).
x The second line will be your program name including the path.
x The third line will bec:\progra~1\microt~1\touchw~1\dostouch off (or directory youinstalled the driver in if different).
2. Create a shortcut on the desktop for the batch file. Right click onthe shortcut, and go to Properties.

Chapter 3 Troubleshooting the Touchscreen 51
3. Make sure you have a check mark in the "Close on Exit" box.
4. Click on the Screen tab. Under "Usage" make sure “Full Screen”is selected.
5. Click on Apply and then click OK.
Operating two serial devices
If you have two serial devices operating together, such as atouchscreen and a mouse, be sure each device uses a unique COMport and IRQ number. For example, the mouse can use COM1/IRQ4

52 TouchWare for Windows 95 and Windows NT 4.0 User's Guide
and the touchscreen can use COM2/IRQ3. Using the same COM portaddress or IRQ creates device conflicts. The touchscreen must have aunique IRQ; it cannot share an IRQ with another device.
Verify that any previously loaded hardware/software that used thesame COM port as your touchscreen has been uninstalled. Justbecause the hardware is disconnected doesn’t mean that the softwareisn’t claiming the port. Ensure that all components are completelyremoved from the System files. Refer to manufacturer’sdocumentation for additional help.
Use the Microsoft Hardware Conflict Troubleshooter (available inWindows Help) to try and resolve this problem.
Touch delayed in Windows NT
In Windows NT 4.0 systems, TouchWare becomes active 10 to 15seconds after the cursor appears when booting up your system. Iftouch does not become active early enough to suit your application,you can manually adjust the serial device driver startup order. Theseinstructions are intended for use with a standard system. If you have acustom driver for your serial ports and know which device drivercontrols your touchscreen COM port, you can make changes at yourown discretion.
Caution: Make an Emergency Repair Disk (ERD) prior to making anychanges to your system registry. Refer to Windows NT Help forinstructions on using the Repair Disk utility to make an emergencyrepair disk.
¾ To manually adjust the serial device driver startup order:
1. Log in to an account with administrator privileges.
2. Click on the Start button and point to Settings.
3. Click on Control Panel.
4. Double-click on Devices. Scroll down through the list until youget to Serial. Check to ensure that the Status is Started.

Chapter 3 Troubleshooting the Touchscreen 53
5. Select Serial in the list window, then click Startup.
6. Change the Startup type from Automatic to System. Click OK.
7. Restart your system in order for this change to take effect.
Touch not working
The touchscreen is not communicating with the controller. Check thefollowing items:
x Make sure the touchscreen controller is connected to the correctport.
x Review the installation procedures and verify all hardware isproperly connected. Check the serial port and touchscreen cableconnections. Check that the touchscreen and controller cables donot have any kinks and that connector pins are not bent.
x If you are using the PC Bus controller, check that the controller isfirmly seated in the expansion bus slot in your computer. Checkthat the jumpers are properly set on the card.
x If your touchscreen controller is mounted externally, touch thescreen to determine if the LED brightens. If the LED is flashing,refer to the touchscreen status lights for a list of possible errors.
x Reset the touchscreen and its controller. Turn off both thecomputer and the monitor, wait a few minutes, and then turn oneach device again.
x If the touchscreen is still not communicating after checking thehardware, verify that any previously loaded hardware/software thatused the same COM port as your touchscreen has been uninstalled.Just because the hardware is disconnected doesn’t mean that thesoftware isn’t claiming the port. Ensure that all components arecompletely removed from the System files.
x If TouchWare has located the appropriate communication port, theConnection box will contain a COM port number. If thetouchscreen was not found, the Touchscreen Status line in the

54 TouchWare for Windows 95 and Windows NT 4.0 User's Guide
Controller Information box will display NOT FOUND. Check toensure that all cables are correctly fastened and click on FindTouchscreen to locate the touchscreen.
Touchscreen not found
The touchscreen is not communicating with the controller. IfTouchWare does not find the touchscreen, check that the touchscreenis connected properly, and then repeat the search. Note that thisoption cannot search any COM ports in use by other applications.
Note: Verify that any previously loaded hardware/software that usedthe same COM port as your touchscreen has been uninstalled. Justbecause the hardware is disconnected doesn’t mean that the softwareisn’t claiming the port. Ensure that all components are completelyremoved from the System files.
Check the following items:
x Make sure the touchscreen controller is connected to the correctport.
x Review the installation procedures and verify all hardware isproperly connected. Check the serial port and touchscreen cableconnections. Check that the touchscreen and controller cables donot have any kinks and that connector pins are not bent.
x If you are using the PC Bus controller, check that the controller isfirmly seated in the expansion bus slot in your computer. Checkthat the jumpers are properly set on the card.
x If your controller has an LED and you can see it, check thecontroller’s LED for power on. If the LED is flashing, refer to thecontroller status lights for a list of possible errors.
x Reset the touchscreen and its controller. Turn off both thecomputer and the monitor, wait a few minutes, and then turn oneach device again.
Chapter 3 Troubleshooting the Touchscreen 55
x If the touchscreen is still not communicating after checking thehardware, verify the correct COM port and baud rate, and run FindTouchscreen again.
x If the software has located the appropriate communication port,this field will contain a COM port number. If the touchscreen wasnot found, the Touchscreen Status line in the ControllerInformation box will display NOT FOUND. Check to ensure thatall cables are correctly fastened and click on Find Touchscreen tolocate the touchscreen.
x If you are trying to use COM 4, be aware that some older videochip sets incorrectly map I/O addresses. TouchWare will onlywork with COM ports configured, recognized, operational andsupported by Windows at the time of install.
Error Messages
Here are some error messages that you might receive when using thetouchscreen.
Possible Windows 95 and Windows NT 4.0 messages include:
OK -- Touchscreen found and operational.
A/D Error -- Touchscreen hardware error. (SMT2/TP4)
ASIC Error -- Touchscreen hardware error. (SMT2/TP4)
Hardware Error -- Touchscreen hardware error. (SMT3)
NOVRAM Error -- Checksum error in NOVRAM, using defaults.
PWM Error -- Touchscreen hardware error. (SMT3)
RAM Error -- Touchscreen hardware error.
ROM Error -- Checksum error in ROM.
Touchscreen Not Found – Touchscreen not found.

56 TouchWare for Windows 95 and Windows NT 4.0 User's Guide
Windows NT Error Messages
The following error messages are specific to Windows NT 4.0 systemsonly and will apear in the system error log:
1. Not enough memory is available for device\Device\PointerPort0
The driver failed to allocate non-paged memory. This is anindication of very low memory resources.
What to do:Configure more RAM memory. The driver does not use muchmemory so it is likely that some other driver is the culprit.
2. Too many PointerPort devices are defined. Could not createdevice: \DosDevices\MtsTch0.
There is a large upper limit (about 64) on the total number ofpointing devices (mice, tablet, touchscreens) supported by theMicroTouch driver.
What to do:Use fewer pointing devices.
3. Could not create DeviceMap entry for device\Device\PointerPort0
The driver failed to make an entry in the registry that identifies thedriver to the operating system. This may indicate a corruptregistry.
What to do:Use your Emergency Recovery Disk to restore the registry.
4. Could not create symbolic link for device \Device\PointerPort0
The driver failed to make an entry in the registry that identifies thedriver to user applications (i.e., the control panel). This mayindicate a corrupt registry.
What to do:Use your Emergency Recovery Disk to restore the registry.

Chapter 3 Troubleshooting the Touchscreen 57
5. Touchscreen was not found on communications port\DosDevices\COM1 for device \Device\PointerPort0
The indicated COM port was open correctly, but no touchscreenresponded when the driver probed the serial port. This is, by far,the most common error.
What to do:Check to make sure the touchscreen is connected and poweredcorrectly. Cycle the power on the touchscreen. Check to makesure the port number is correct. Use the Find Touchscreen buttonon the Touchscreen control panel.
6. Touchscreen was found, but failed to initialize properly fordevice \Device\PointerPort0
A touchscreen responded on the given serial port, but did not passall the initialization commands at boot time.
What to do:Reboot. Cycle touchscreen power. Call technical support withtouchscreen model number and TouchWare version number.
7. An internal error occurred in communications port for device\Device\PointerPort0
An error occurred in configuring COM port.
What to do:Check that your serial driver is working correctly.
8. Could not set timeouts on communications port\DosDevices\COM1, for touchscreen device\Device\PointerPort0
An error occurred in configuring COM port.
What to do:Check that your serial driver is working correctly.
9. Could not set baudrate on communications port\DosDevices\COM1, for touchscreen device\Device\PointerPort0

58 TouchWare for Windows 95 and Windows NT 4.0 User's Guide
An error occurred in configuring COM port.
What to do:Check that your serial driver is working correctly.
10. Could not set line control on communications port\DosDevices\COM1, for touchscreen device\Device\PointerPort0
An error occurred in configuring COM port.
What to do:Check that your serial driver is working correctly.
11. Unknown operation was requested for communications port\DosDevices\COM1, for touchscreen device\Device\PointerPort0
A bad command was issued to the COM port driver.
What to do:Check that your serial driver is working correctly.

A P P E N D I X A
Multiple Monitors
MicroTouch TouchWare can support multiple touch monitors inapplications where more than one touchscreen is required in a system.This appendix describes how to:
x Set up multiple touch monitors
x Configure your system for multiple monitors
x Use multiple touch monitors
Your multiple monitor configuration is a critical part of setting up yoursystem. Before installing TouchWare, you must install the hardwareand software (i.e., video and com cards) needed to support multiplemonitors according to manufacturer’s instructions. Refer to WindowsHelp for more information when adding new hardware. Typically, youwill need video cards for multiple monitor connections and availablecommunication ports for each touchscreen.
The number of monitors you can have is limited only by the hardwareconstraints of your system. Up to 4 touchscreen monitors can beconnected at any given time.
When you set up a system with multiple touch monitors, you may needto install additional video ports. Each standard monitor or touchmonitor is connected to a separate video port. Refer to your systemdocumentation for information about installing additional video ports.

60 TouchWare for Windows 95 and Windows NT 4.0 User's Guide
You may also need to install additional COM ports according tomanufacturer’s instructions. Only specific models of COM portexpansion cards are supported for multiple touchscreen operation.
MicroTouch has tested and evaluated multiple monitor hardware. Calltechnical support for details and an updated list. Note that you cannotuse a “Y” adapter for COM ports.
During this process, each monitor must be connected to a COM portin ascending order prior to installing TouchWare. For example, thefirst touchscreen is the lowest numbered available port, the secondtouchscreen is the next higher port, and so on.
After you have installed and connected the necessary hardware, youmust determine the multiple monitor configuration. Note that videoresolution, number of colors, and monitor size should be the same foreach monitor in a multiple monitor setup.
Note: Your hardware configuration should always match yoursoftware configuration.
Desktop Appearance
Once you have determined which configuration is appropriate to yourapplication, you must determine how you want the informationdisplayed. The number of monitors you can have is limited only by thehardware constraints of your system. You may have up to 4touchscreen monitors attached at any given time. TouchWare definestwo modes:
x Mirror Monitors – where each monitor displays the same image.
x Tile Monitors – where each monitor displays a portion of the sameimage. If you choose tiled, you must have an even number of touchmonitors (2 or 4).

Appendix A Multiple Monitors 61
Mirrored Images (rows and columns do not apply)
Tiled Images (1 row X 2 columns)
Tiled Images (2 rows X 1 column)
Tiled Images (2 rows X 2 columns)
Monitor Layout
When using tiled monitors, MicroTouch has defined the followingscenarios. If you choose tiled, you must have an even number oftouch monitors (2 or 4).
If you choose tiled, possible horizontal configurations are as follows:
�� 1 row X 2 columns
���� 1 row X 4 columns
If you choose tiled, possible vertical configurations are as follows:
�
� 2 rows X 1 column

62 TouchWare for Windows 95 and Windows NT 4.0 User's Guide
�
�
�
� 4 rows X 1 column
You may also set up a stacked configuration consisting of 4 touchmonitors in the following pattern:
�� 2 rows X 2 columns
��
Installing TouchWare for Multiple Monitors
Make sure all touchscreen monitors are connected and operationalprior to installing TouchWare software. The install program willsearch for available COM ports and touchscreens and configure onlythe number of touch monitors found during installation.
Note: If the setup program fails to find all your touchscreens, checkthe connections, reboot your system, and try loading software again.
¾ To install TouchWare for Multiple Monitors:
1. Follow the general instructions to begin the software installation.
2. On the Select Installation Type screen, select Custom Install forone or more touchscreens. Click Next.
Note: If you have previously loaded TouchWare, you mustcompletely uninstall the software and reboot your system prior toreinstalling.
3. On the Select Number of Touchscreens screen, select Multipletouchscreens. Click Next.

Appendix A Multiple Monitors 63
4. Multiple Touchscreen Search should produce details on alltouchscreens active and connected to your system. If the installprogram fails to find all your touchscreens, check the connections,reboot your system and try loading the software again.
5. On the Select Destination Location screen you can choose toinstall to a different directory. For multiple monitor setup, werecommend you accept defaults.
6. On the Multiple Touchscreen Configuration screen, you have theoption to select a Desktop Appearance of mirrored or tiled. (Referto the following sections for more information.) This should matchthe setup determined by your hardware configuration to supportmultiple monitors.
7. If you choose tiled, you must have an even number of touchmonitors (2 or 4). You then have the additional choice of monitorlayout.
8. To help you determine your best configuration, refer to “DesktopAppearance” and “Monitor Layout” earlier in this appendix.
Be sure to match your previous selections for monitor displayproperties. Identical display video modes, colors and sizes areassumed for multiple touchscreen operation (for example, allmonitors are 17 inch displays set for 800x600, 256 colors).
Remember that once you have installed TouchWare for MultipleMonitors the number of the selected touchscreen appears in the titlebar of the Control Panel positioned on the selected touchscreen. Youcan touch a monitor and determine if the screen is working as youexpected. Test each screen and confirm that you have connected themcorrectly. Reconnect as needed. Don’t forget that you need tocalibrate each screen.
64 TouchWare for Windows 95 and Windows NT 4.0 User's Guide
Click Mode
Multiple touchscreens support only a single touch mode called Click.The Touch Mode selection buttons on the Control Panel TouchscreenProperty sheet are disabled. Click mode provides button operationonly. The touchscreen sends a button-down, followed by a button-upto the operating system. No drawing or dragging is supported inmultiple screen installations.
Setting TouchWare Preferences for Each Touchscreen
Once your have set up the system to your liking, configure eachtouchscreen.
1. Open the TouchWare Control Panel.
2. When the Control Panel is opened for Multiple Monitors, a SelectTouchscreen dialog box (to select the active window) appears.Select which screen you want to control. Select the touchscreenyou want.
3. Calibrate each touchscreen.
4. Set other preferences. Each monitor can have certain individualpreferences such as: Calibration, Stabilize Cursor, Touch Sounds,Cursor Vertical Offset, Edge Adjustment, Pen Mode, COM portand baud rate. Other preferences apply to all touchscreens.
Changing Your Multiple Touchscreen Configuration
The user must uninstall, then reinstall TouchWare to change multiple-monitor configurations (COM ports, number of monitors, row/columnsettings, etc.). Some things to remember are:
x If you add or remove a touchscreen monitor, you must reconfigureyour system. You must reinstall the TouchWare software.
x Be sure to select Custom install.
x Be sure to define Desktop appearance to match display desktop.

A P P E N D I X B
TouchWare Files
This chapter defines the touch driver settings stored in the system files.It also describes other ways to access calibration in the Touchscreencontrol panel.
66 TouchWare for Windows 95 and Windows NT 4.0 User's Guide
Touchscreen Driver Settings
You can define settings for the touchscreen using the Touchscreencontrol panel. TouchWare stores the touchscreen settings in theWindows registry.
Whenever you save your changes to the Touchscreen control panel,TouchWare records the new settings in the System Registry. Thesechanges take effect immediately.
Direct Access to Calibration
You can directly access calibration without opening the Touchscreencontrol panel. The Windows calibration program is MTSCAL.EXE.
The program has a /C option that makes only the calibration screenavailable on execution. When you specify the /C option, the programimmediately opens the calibration screen, and terminates when thecalibration process is completed. This option is useful if you want toprevent users from changing other settings in the control panel.
To set up a shortcut to the Touchscreen calibration program using thisoption:
1. Click on the Start button.
2. Point to Programs, and then click Windows Explorer.
3. Open the Tools menu, point to Find, and then click Files orFolders.
4. In the Named box, type MTSCAL.EXE and press Enter to beginthe search.
5. Select MTSCAL.EXE in the list window.
6. Open the File menu and choose Create Shortcut. The systemautomatically creates a shortcut. Drag the shortcut icon onto thedesktop.
7. Right-click on the shortcut and then click Properties.

Appendix B TouchWare Files 67
8. Edit the information in the target box to include the /C option. Forexample:
“C:\Program Files\MicroTouch\TouchWare\MtsCal.exe” /C
Touchscreen Files
Table 2. Touchscreen Files
File Name Purpose
Cleanup.exe Part of uninstall
DOStouch.exe DOSTouch driver
DOStouch.ovl DOSTouch driver overlay
DOStouch.ini DOSTouch settings
IsUninst.exe TouchWare uninstall utility
MicroTouch Icon MicroTouch Systems icon
Mtsfreq.dll DLL for Stabilize Cursor
Mtstch0.vxd Win95 drivers
Mtstch1.vxd Win95 drivers
Mtstch2.vxd Win95 drivers
Mtstch3.vxd Win95 drivers
Mtstch.sys Windows NT driver
Mtstouch.cpl MicroTouch Control Panel
Mtstw40.cnt Help Contents
Mtstw40.gid Temporary help file
Mtstw40.hlp Help file
Mtsutils.dll Utilities DLL
Noisechk.dll Stabilize Cursor DLL
Readme.ico ReadMe icon
68 TouchWare for Windows 95 and Windows NT 4.0 User's Guide
File Name Purpose
Readme.lnk Shortcut to ReadMe file
Readme.txt Product information, releasenotes
Touchmgr.vxd Windows 95 driver
TouchMon.exe Touchscreen monitor program
Touchware controlpanel.lnk
Shortcut to control panel files
Touchware help.lnk Shortcut to Help files
Touchware uninst.lnk Shortcut to Uninstall program
Uninst.isu Uninstall component
Uninstall.lnk Shortcut to Uninstall program
Uninstl.dll Uninstall DLL
Upgrade.log Install log file
Touchscreen Care and Cleaning
The touchscreen does not require much maintenance.
MicroTouch does, however, recommend that you periodically clean theglass touchscreen surface.
x Use isopropyl alcohol or a non-abrasive glass cleaner. Avoid usingcleaners other than glass cleaners. Do not use any vinegar-basedsolutions.
x Apply the cleaner with a soft cloth. Avoid using gritty cloths.
x Always dampen the cloth and then clean the screen.
Always handle the touchscreen with care. Do not pull on or stresscables.
Index
AAbout TouchWare 37
BBefore You Call Tech Support 46Button Mode 25
CCalibrate 21, 48Calibrate Tab
Calibrating the Touchscreen 20Calibration Overview 19Pen Calibration 21Testing the Calibration 21When to Calibrate the
Touchscreen 19Calibrating the Touchscreen 19, 20calibration, direct access 66Changing Your Multiple Touchscreen
Configuration 64cleaning the touchscreen 68Click Mode 64Color Bars 41Color Purity 41, 42Color Table 42
Communication Port 36Control panel 18, 37Controller Type 35Cursor Jitter 30, 31Cursor Stabilization Procedure 30Cursor Tab
Cursor Vertical Offset 28Cursor Visibility 28Edge Adjustment 29Stabilize Cursor 29
Cursor Vertical Offset 28Cursor Visibility 28
DDefaults 38Desktop Appearance 60Direct Access to Calibration 66DOS, full screen 49Double-click Area 26Double-click Speed 25, 26Draw 39, 40Draw and Test 34Drawing Mode 24Driver 37

TouchWare for Windows 95 and Windows NT 4.0 User's Guide70
EEdge Adjustment 29Edge Button 29E-Mail Address 10Error Messages 55
FFind Touchscreen 37Finger Only Mode 34Firmware Commands 40Firmware Version 35Frequency 30, 31, 34Full Screen DOS Needed 49
IInstalling TouchWare 14Installing TouchWare for Multiple
Monitors 62
JJittery Cursor 31
LLEDs 47
MMonitor Layout 61Multiple Touchscreen Monitors 59
OOperating System 37
PPen and Finger Mode 33Pen Calibration 21Pen Only Mode 33Pen Tab
Draw and Test 34Finger Only Mode 34Pen and Finger Mode 33Pen Only Mode 33Stabilize Cursor for Finger and
TouchPen 34
RReadMe file 14Restore Defaults 38Right-click Tool 25
SSelect Baud Rate 37Setting TouchWare Preferences for
Each Touchscreen 64Setting Vertical Offset 28Stabilize Cursor 29Stabilize Cursor for Finger and
TouchPen 34
TTerminal 40Testing the Calibration 21Testing the Monitor Video 41Testing the Newly Selected
Frequency 31

Index 71
Touch Mode 24Button Mode 25Desktop Mode 24Drawing Mode 24
Touch Settings TabDouble-click Area 26Double-click Speed 25Right-click Tool 25Touch Sounds 25
Touch Sounds 25Touchscreen, cleaning the 68Touchscreen Calibration 19Touchscreen drivers 12Touchscreen Linearization 43Touchscreen Status 36Touchscreen Status Lights 47
Blinking LED 48Bright LED 47Continuously Dim LED 48
TouchWareInstalling 14Uninstalling 16
TouchWare Information 37Troubleshooting 45Troubleshooting Overview 45
UUninstall utility 13
VVertical Offset 28
WWhat to do if...
Cursor does not appear afterstarting Windows 95 48
Cursor does not reach out to edgesof screen 48
Cursor is jittery 48Cursor jumps or bounces suddenly
across the screen 49Double-click Doesn't Work 49Drawing lines not straight and
smooth 48Operating two serial devices 51Touch is not working 53Touchscreen not found 54
When to Calibrate the Touchscreen 19When to Stabilize the Cursor 30

MicroTouch Systems, Inc.
Corporate HeadquartersUNITED STATES 978-659-9000, Fax 978-659-9100
World Wide Web: http://www.microtouch.com E-Mail: [email protected] KIOSKS, a division of MicroTouch Systems, Inc., 716-424-4300, Fax 716-424-4335
MicroTouch Worldwide OfficesAUSTRALIA +61 (03) 9561 7799 x FRANCE +33 (1) 45 13 90 30 x GERMANY +49 (0) 211-59907-0
HONG KONG +852 2333 6138 x ITALY +39 (0) 39-230-2230 x JAPAN +81 (044) 811-1133KOREA +82 (2) 552-3198 x TAIWAN +886 (02) 2226-0875 x UNITED KINGDOM +44 (0) 1235-444400
Document Number: 19-224