toshiba satellite l305-s5946 lcd screen replacement · 2019-09-23 · this is a captive panel screw...
TRANSCRIPT

Toshiba Satellite L305-S5946 LCD ScreenReplacement
Remove the screen in your Toshiba Satellite L305-S5946.
Written By: Michael Erberich
Toshiba Satellite L305-S5946 LCD Screen Replacement Draft: 2014-01-28Guide ID: 14193 -
This document was generated on 2019-09-22 10:01:40 PM (MST).
© iFixit — CC BY-NC-SA www.iFixit.com Page 1 of 20

INTRODUCTION
Use this guide to remove or replace the screen in your Toshiba Satellite L305-S5946. This may benecessary if the screen is blank when the computer is on.
TOOLS:Phillips #00 Screwdriver (1)iFixit Opening Tools (1)Phillips #1 Screwdriver (1)Tweezers (1)
Toshiba Satellite L305-S5946 LCD Screen Replacement Draft: 2014-01-28Guide ID: 14193 -
This document was generated on 2019-09-22 10:01:40 PM (MST).
© iFixit — CC BY-NC-SA www.iFixit.com Page 2 of 20
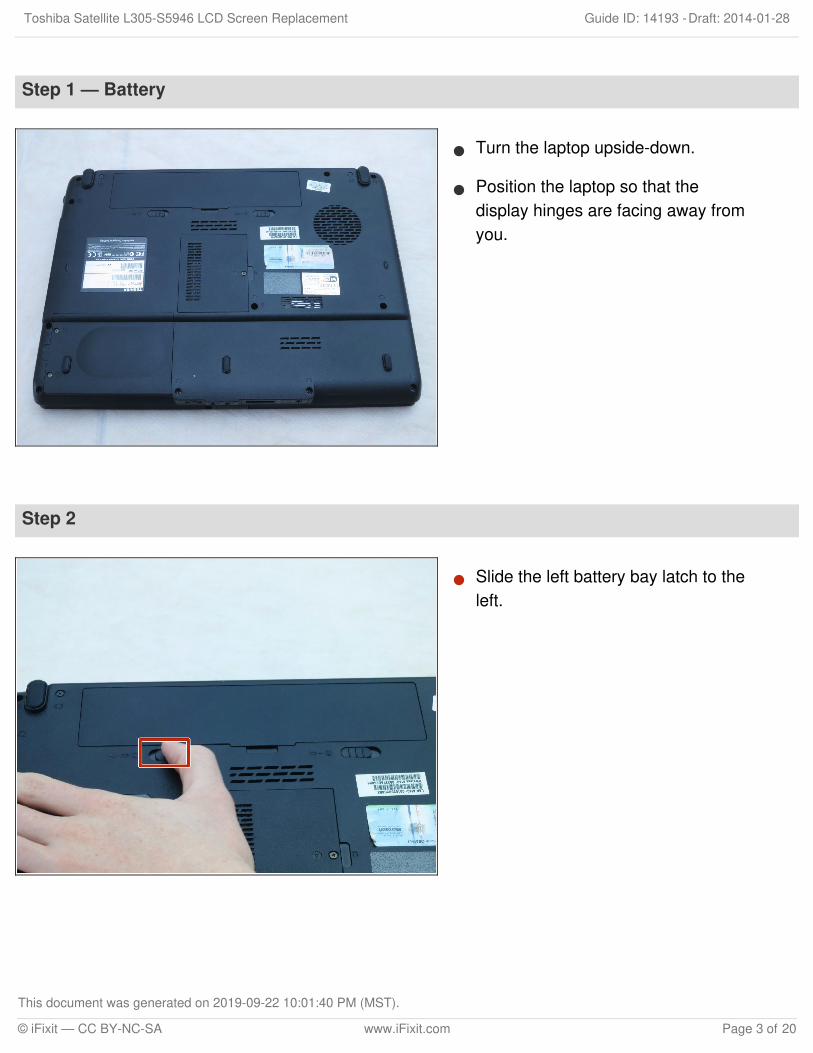
Step 1 — Battery
Turn the laptop upside-down.
Position the laptop so that thedisplay hinges are facing away fromyou.
Step 2
Slide the left battery bay latch to theleft.
Toshiba Satellite L305-S5946 LCD Screen Replacement Draft: 2014-01-28Guide ID: 14193 -
This document was generated on 2019-09-22 10:01:40 PM (MST).
© iFixit — CC BY-NC-SA www.iFixit.com Page 3 of 20

Step 3
Slide the right battery bay latch to the right and hold.
While holding onto the latch, use a plastic opening tool to lift and remove the battery bay cover.
Remove the battery.
Step 4 — Hard Drive
Use a Phillips #1 screwdriver toloosen the two screws on the bottomleft-hand side of the hard drivecover.
Turn each screw until you hear aclick.
These are captive panel screwsand remain with the cover.
Toshiba Satellite L305-S5946 LCD Screen Replacement Draft: 2014-01-28Guide ID: 14193 -
This document was generated on 2019-09-22 10:01:40 PM (MST).
© iFixit — CC BY-NC-SA www.iFixit.com Page 4 of 20
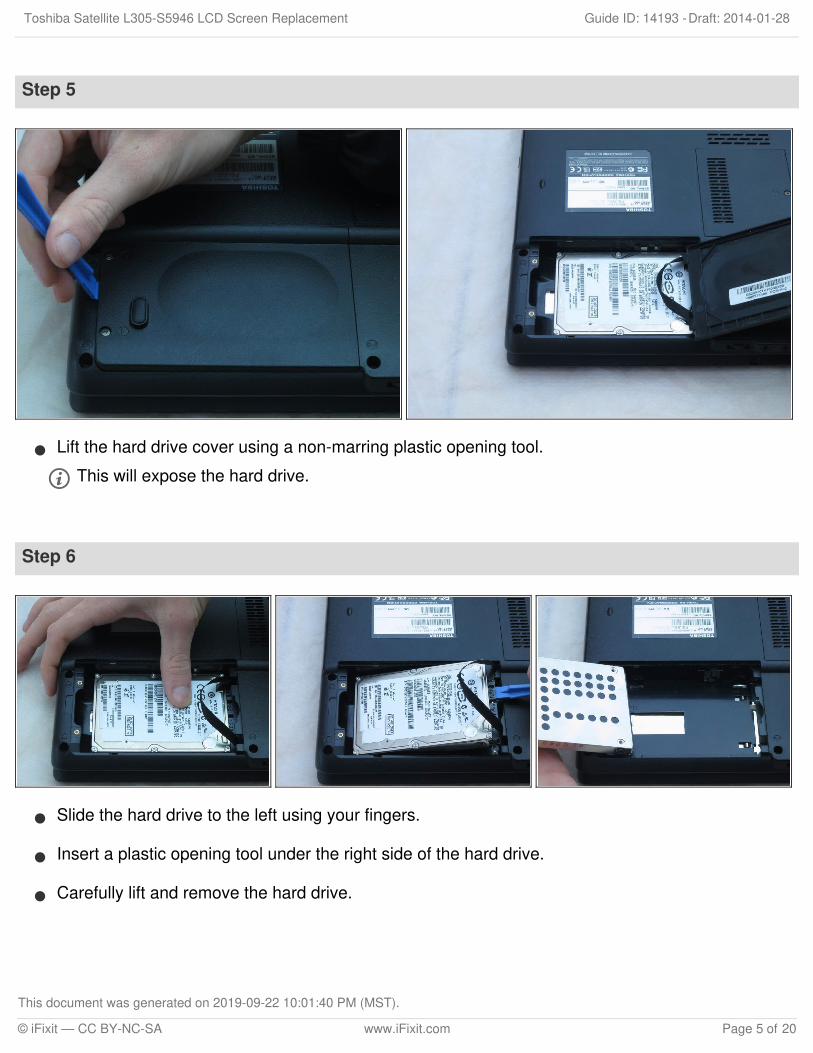
Step 5
Lift the hard drive cover using a non-marring plastic opening tool.
This will expose the hard drive.
Step 6
Slide the hard drive to the left using your fingers.
Insert a plastic opening tool under the right side of the hard drive.
Carefully lift and remove the hard drive.
Toshiba Satellite L305-S5946 LCD Screen Replacement Draft: 2014-01-28Guide ID: 14193 -
This document was generated on 2019-09-22 10:01:40 PM (MST).
© iFixit — CC BY-NC-SA www.iFixit.com Page 5 of 20

Step 7 — RAM
Use a Phillips #1 screwdriver to turnthe screw on the RAM cover.
Turn the screw until you hear a click.
This is a captive panel screw andremains with the cover.
Step 8
Insert the plastic opening tool into the indent and lift to remove the RAM cover.
This is a captive panel screw and remains with the cover.
Toshiba Satellite L305-S5946 LCD Screen Replacement Draft: 2014-01-28Guide ID: 14193 -
This document was generated on 2019-09-22 10:01:40 PM (MST).
© iFixit — CC BY-NC-SA www.iFixit.com Page 6 of 20

Step 9
Use your fingernails to push the white and silver retaining clips away from each side of the RAMcard.
The RAM card should pop up at an angle.
Step 10
Use your fingers to gently pull the RAM card away from the computer.
Repeat step 9 to remove the other RAM card that may be installed.
Toshiba Satellite L305-S5946 LCD Screen Replacement Draft: 2014-01-28Guide ID: 14193 -
This document was generated on 2019-09-22 10:01:40 PM (MST).
© iFixit — CC BY-NC-SA www.iFixit.com Page 7 of 20

Step 11 — Keyboard
Turn the laptop right-side up.
Lift open the laptop so that thescreen faces you.
Step 12
Remove the strip of plastic at the right furthermost edge of the keyboard using a plastic openingtool.
Insert the plastic opening tool at either end of the strip. Lift upwards and proceed to the other endwhile repeating this lifting process every one to two inches.
Toshiba Satellite L305-S5946 LCD Screen Replacement Draft: 2014-01-28Guide ID: 14193 -
This document was generated on 2019-09-22 10:01:40 PM (MST).
© iFixit — CC BY-NC-SA www.iFixit.com Page 8 of 20

Step 13
Use a Philips #00 screwdriver toloosen and remove the two 3-mmscrews at the top edge of thekeyboard.
These are not captive panelscrews and, once loosened, willbe free to move about theassembly.
Be careful not to allow eitherfastener into the CPU fan andduct (not shown).
Step 14
Use a plastic opening tool to pry the top of the keyboard loose from its casing.
Toshiba Satellite L305-S5946 LCD Screen Replacement Draft: 2014-01-28Guide ID: 14193 -
This document was generated on 2019-09-22 10:01:40 PM (MST).
© iFixit — CC BY-NC-SA www.iFixit.com Page 9 of 20

Step 15
Gently grasp the top of thekeyboard. Pull it up and toward thescreen.
Avoid pulling hard and damaging theblack ribbon cable under thekeyboard.
Step 16
Gently push the two tabs locking the black ribbon cable.
Slide the keyboard toward the screen to remove the black ribbon cable from the motherboard.
You may now safely separate the keyboard from the laptop.
Toshiba Satellite L305-S5946 LCD Screen Replacement Draft: 2014-01-28Guide ID: 14193 -
This document was generated on 2019-09-22 10:01:40 PM (MST).
© iFixit — CC BY-NC-SA www.iFixit.com Page 10 of 20

Step 17 — Base Housing
Turn the laptop upside-down with itshinges facing away from you.
Toshiba Satellite L305-S5946 LCD Screen Replacement Draft: 2014-01-28Guide ID: 14193 -
This document was generated on 2019-09-22 10:01:40 PM (MST).
© iFixit — CC BY-NC-SA www.iFixit.com Page 11 of 20

Step 18
Use a Phillips #1 screwdriver toremove the twelve 6-mm screwsthat borders the bottom of thelaptop.
Start with the three screws on thetop right corner and workclockwise. This will minimize thechances missing some of thescrews.
Use a Phillips #1 screwdriver toremove a 6-mm screw that islocated in the lower middle, asshown.
Use a Phillips #1 screwdriver toremove the three 3-mm screwslocated in the battery bay.
Use a Phillips #1 screwdriver toremove the one 4-mm screw locatednear the RAM.
Toshiba Satellite L305-S5946 LCD Screen Replacement Draft: 2014-01-28Guide ID: 14193 -
This document was generated on 2019-09-22 10:01:40 PM (MST).
© iFixit — CC BY-NC-SA www.iFixit.com Page 12 of 20

Step 19
Turn the laptop right-side up.
Flip open the laptop so that thescreen faces you.
Step 20
Use a Phillips #1 screwdriver toremove the five 6-mm screws in thekeyboard slot.
These are not captive panelscrews and, once loosened, willbe free to move about theassembly.
Be careful not to allow loosenedfasteners into the CPU fan andduct (located in the upper left).
Toshiba Satellite L305-S5946 LCD Screen Replacement Draft: 2014-01-28Guide ID: 14193 -
This document was generated on 2019-09-22 10:01:40 PM (MST).
© iFixit — CC BY-NC-SA www.iFixit.com Page 13 of 20

Step 21
Gently pull on the two black tabs locking the white ribbon cable in place.
Pull the white ribbon cable towards you to remove it.
Use tweezers to remove the connector that has the blue, red, black, and white wires.
Step 22
Use a plastic opening tool to pry the laptop's upper casing off of its lower casing. Move the openingtool around the sides of the case to help separate them.
Toshiba Satellite L305-S5946 LCD Screen Replacement Draft: 2014-01-28Guide ID: 14193 -
This document was generated on 2019-09-22 10:01:40 PM (MST).
© iFixit — CC BY-NC-SA www.iFixit.com Page 14 of 20

Step 23 — LCD Screen
Using a Philips #1 screwdriver,remove the four 6-mm screws fromthe two metal tabs that connect thescreen to the body.
Step 24
Using tweezers, remove two connectors: one with black and white wires and one with green,yellow, red, black, and white wires.
Using your fingers, remove the large connector from the top right corner of the motherboard.
Toshiba Satellite L305-S5946 LCD Screen Replacement Draft: 2014-01-28Guide ID: 14193 -
This document was generated on 2019-09-22 10:01:40 PM (MST).
© iFixit — CC BY-NC-SA www.iFixit.com Page 15 of 20

Step 25
Using the Phillips #1 or Phillips #00 screwdriver, remove the two 3-mm screws from the card withblack and white wires coming off of it.
Our card has one screw that required a Philips #1 and one that required a Philips #00. Start withthe Philips #1 and, if it doesn't fit, use the Philips #00.
The card should pop up. Gently remove the card with your fingers.
Toshiba Satellite L305-S5946 LCD Screen Replacement Draft: 2014-01-28Guide ID: 14193 -
This document was generated on 2019-09-22 10:01:40 PM (MST).
© iFixit — CC BY-NC-SA www.iFixit.com Page 16 of 20

Step 26
Remove the screen using yourhands and put it aside.
Step 27
Using tweezers, pry the rubber feetout of the corners of the laptop.
Toshiba Satellite L305-S5946 LCD Screen Replacement Draft: 2014-01-28Guide ID: 14193 -
This document was generated on 2019-09-22 10:01:40 PM (MST).
© iFixit — CC BY-NC-SA www.iFixit.com Page 17 of 20

Step 28
Using a Phillips #1 screwdriver,remove the four 4-mm screws at thecorners of the screen.
Step 29
Using a plastic opening tool, pry off the top of the screen casing.
Toshiba Satellite L305-S5946 LCD Screen Replacement Draft: 2014-01-28Guide ID: 14193 -
This document was generated on 2019-09-22 10:01:40 PM (MST).
© iFixit — CC BY-NC-SA www.iFixit.com Page 18 of 20
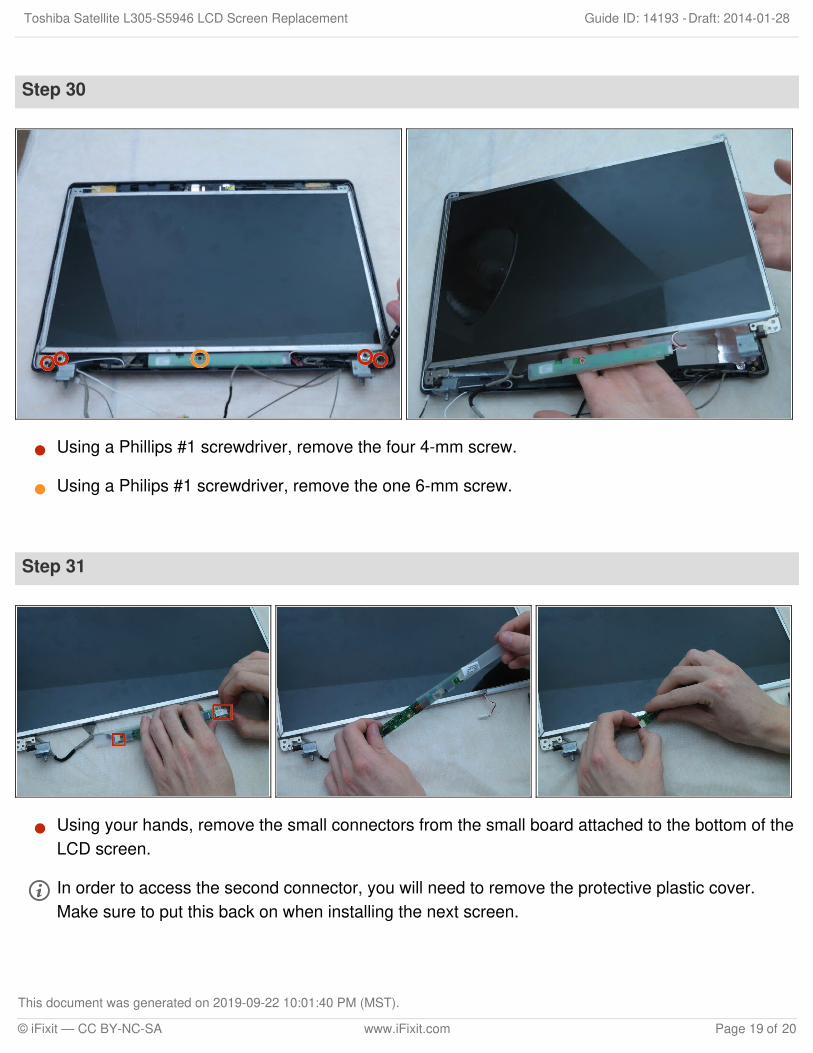
Step 30
Using a Phillips #1 screwdriver, remove the four 4-mm screw.
Using a Philips #1 screwdriver, remove the one 6-mm screw.
Step 31
Using your hands, remove the small connectors from the small board attached to the bottom of theLCD screen.
In order to access the second connector, you will need to remove the protective plastic cover.Make sure to put this back on when installing the next screen.
Toshiba Satellite L305-S5946 LCD Screen Replacement Draft: 2014-01-28Guide ID: 14193 -
This document was generated on 2019-09-22 10:01:40 PM (MST).
© iFixit — CC BY-NC-SA www.iFixit.com Page 19 of 20

To reassemble your device, follow these instructions in reverse order.
Step 32
Using a Phillips #1 screwdriver, remove the six 3-mm screws from the sides of the screen. Thereshould be three on each side.
Using your hands, remove the two metal strips the screws were holding.
Toshiba Satellite L305-S5946 LCD Screen Replacement Draft: 2014-01-28Guide ID: 14193 -
This document was generated on 2019-09-22 10:01:40 PM (MST).
© iFixit — CC BY-NC-SA www.iFixit.com Page 20 of 20