toolkit - iowa department of education · toolkit contents page 2 skills observation kit contents 3...
TRANSCRIPT
1 Updated 10/11
Toolkit
Contents Page
2 Skills observation kit contents
3 Labels
4 Skills checklist
Special medication administration skills checklists
7 Rectal diazepam
8 Glucagon injection 9 Nebulizer treatment
10 Gastrostomy Tube 11 Insulin Injection
12 Insulin Pump
13 Example assistive personnel documentation
14 Training-supervision-monitoring record
15 Course evaluation
16 Example emergency form
2 Updated 10/11
Skills Observation Kit Contents
When the designated school staff successfully completes the medication
administration course, they receive a certificate. Then the nurse observes their medication administration skills and signs the course completion certificate.
Nurses can put together a kit to use in the skills observation using the following list of kit contents, labels for the demonstration medication
containers, and skills observation checklist corresponding to the skills covered in the course:
❏ A labeled pill bottle filled with a candy, such as Red Hots
❏ A labeled liquid medication bottle, filled with water or colored water. Labels
will last longer if covered with clear packing tape
❏ Over-the-counter ointment or cream, such as Vitamin E
❏ Over-the-counter eye drop, such as Clear Eyes
❏ Swim ear drops
❏ Gauze pads for practicing topical skin medication application
❏ Tape for skin medication application
❏ Protective gloves
❏ Cotton balls
❏ Tongue depressor
❏ Medicine cup, spoon or dropper
❏ Skills checklist to copy for each person observed
❏ Epipen trainer

3 Updated 10/11
Rx: 5162001 Dr. Carlson
ALEX TURNER RPh: GAE Take 2 tablets 3 times a day CANDIES Qty: 90
Refills: None Date: yesterday
Rx: 5162001 Dr. Carlson ALEX TURNER RPh: GAE Take 2 tablets 3 times a day
CANDIES Qty: 90
Refills: None Date: yesterday
Rx: 51620000 RPh: GAE
Kayla Shephard Dr. Lewis
Give 7.5 ml by mouth
3 times a day for 7 days
WATER
250mg/5mL Date: this month/year
D
Rx: 51620000 RPh: GAE
Kayla Shephard Dr. Lewis
Give 7.5 ml by mouth
3 times a day for 7 days
WATER
250mg/5mL Date: this month/year
Rx: 5162006 Dr. Pantini
Rachel Demmer RPh: JJE
Apply to affected area twice daily for
4 weeks Over the counter ointment
Refills: 1 Date:today
Rx: 5162006 Dr. Pantini
Rachel Demmer RPh: JJE
Apply to affected area twice daily
for 4 weeks Over the counter ointment
Refills: 1 Date:today
Rx: 5162004 Dr. Ackker
Jason Cole Ph: FBF
Instill 1 drop in right eye every 4
hours
Over the counter eye drops
Refills: 0 Date: this year/month
Rx: 5162004 Dr. Ackker
Jason Cole RPh: FBF
Instill 1 drop in right eye every 4
hours
Over the counter eye drops
Refills: 0 Date: this year/month
Rx: 5162836 Dr. Morris
Emily Van Der Leest RPh: WMS
Instill 1 drop in left ear 4 times a
day for 10 days
Over the counter ear drops
Refills: None Date: current
Rx: 5162836 Dr. Morris
Emily Van Der Leest RPh: WMS
Instill 1 drop in left ear 4 times a
day for 10 days
Over the counter ear drops
Refills: None Date: current

4 Updated 10/11

5 Updated 10/11
1. Check five rights 2. Pour medication into cup
3. Hold cup at eye level to check amount
4. Wipe any drips from bottle
5. If using dropper, measure correct amount
6. Put cap on
7. Check five rights
8. Give student the medication in cup or
dropper
9. Watch student take all medication
10. Complete documentation
11. Put medicine away
TOPICAL SKIN MEDICATION
1. Gather supplies 2. Check five rights
3. Position student/observe affected area
4. Clean skin
5. Check five rights
6. Uncap ointment or lotion
7. Squeeze correct amount on tongue blade 8. Apply medication according to directions
9. Put cap back on
10. Cover skin as directed
11. Complete documentation
12. Put medicine away
EYE DROPS AND OINTMENTS OINTMENTSNJOJTUFSJOH FZF ESPQT BOE PJOUNFOUT
1. Gather supplies 2. Put on gloves
3. Check five rights
4. Position student with head tilted back
5. Check student’s eyes for changes
6. Check five rights
7. Open eye medicine
8. Pull lower lid down to expose conjunctival sac
ORAL LIQUID MEDICATION NFEJDBUJPO

6 Updated 10/11
EAR DROPS
1. Gather necessary supplies
2. Check five rights
3. Position student so head is to the side
4. Observe ear, clean with cotton ball if needed
5. Check five rights
6. Pull earlobe down and back for students
under three
7. Pull earlobe up and back for older students
8. Administer correct number of drops
9. Rub skin in front of ear
10. Wipe excess liquid from ear with cotton ball
11. Have student hold position for a minute
12. Treat other ear if directed
13. Document medication administration
14. Put medicine away
INHALERS (Note: A number of inhaler types exist, several demonstrations may be needed)
1. Check five rights
2. Place canister into inhaler
3. Shake inhaler for two seconds
4. Check the five rights
5. Remove cap and hold canister above
mouthpiece
6. Have student breathe out slowly
7. Follow directions for location of mouthpiece
8. Have student inhale slowly and deeply, hold breath
for up to 10 seconds
9. If spacer is used, have student take several breaths
10. Give second dose if prescribed
11. Put cap back on medication
12. Document medication administration
13. Put medication away
EPIPEN
DOCUMENTATION AND REPORTING
1. Remove cap from Epipen 2. Press tip against student’s thigh
3. Hold for several seconds
1. Document medication administration 2. Document errors or other incidents
3. Understand contact procedures for questions or
emergencies

7 Updated 10/11
Medications Management in Iowa Schools
Skills Observation
Checklist
Administering Rectal Diazepam This checklist is used by the nurse to observe skills before signing the certificate of completion for the rectal diazepam unit. The nurse should individualize this checklist to meet specific student needs. Check the box for each step done correctly. The qualified designated personnel must complete all steps successfully to complete the unit.
Name of Qualified Designated Personnel
District School Nurse observer Date Completed Date for rechecking
Stay calm when seizure occurs
Review student’s emergency health plan
Wash hands
Place student on his or her side where fall can’t occur
One person gets rectal diazepam kit; one person stays with student
Check five rights
NOTE: The following steps may vary with specific type of medication
Take syringe out of kit
Check to make sure right dose is dialed and green ready band is visible
Push up cap with thumb and pull off
Lubricate syringe tip by inserting in lubricating jelly
Turn student to face you
Expose buttocks and move student’s upper leg forward so rectum is exposed
Insert syringe in rectum until rim is against opening
Push the plunger in counting to three until plunger stops
Count to three before removing syringe from the rectum
Hold the buttocks together while counting to three again
Stay with the student
Implement contacts and follow up procedures in the emergency health plan
Discard syringe safely
Wash hands
Document medication administration
8 Updated 10/11
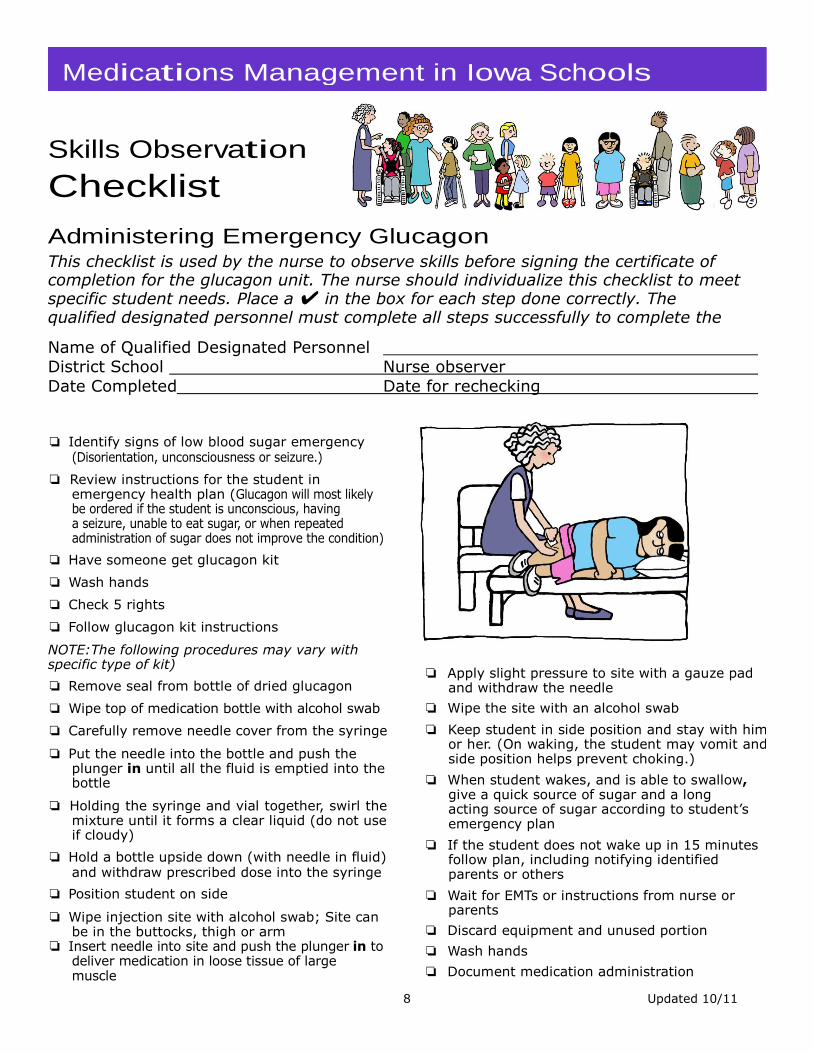
Medications Management in Iowa Schools
Skills Observation
Checklist
Administering Emergency Glucagon This checklist is used by the nurse to observe skills before signing the certificate of completion for the glucagon unit. The nurse should individualize this checklist to meet specific student needs. Place a ✔ in the box for each step done correctly. The qualified designated personnel must complete all steps successfully to complete the unit. Name of Qualified Designated Personnel District School Nurse observer
Date Completed Date for rechecking
❏ Identify signs of low blood sugar emergency (Disorientation, unconsciousness or seizure.)
❏ Review instructions for the student in
emergency health plan (Glucagon will most likely be ordered if the student is unconscious, having a seizure, unable to eat sugar, or when repeated administration of sugar does not improve the condition)
❏ Have someone get glucagon kit
❏ Wash hands
❏ Check 5 rights
❏ Follow glucagon kit instructions NOTE:The following procedures may vary with specific type of kit)
❏ Remove seal from bottle of dried glucagon
❏ Wipe top of medication bottle with alcohol swab
❏ Carefully remove needle cover from the syringe ❏ Put the needle into the bottle and push the
plunger in until all the fluid is emptied into the bottle
❏ Holding the syringe and vial together, swirl the
mixture until it forms a clear liquid (do not use if cloudy)
❏ Hold a bottle upside down (with needle in fluid) and withdraw prescribed dose into the syringe
❏ Position student on side ❏ Wipe injection site with alcohol swab; Site can
be in the buttocks, thigh or arm ❏ Insert needle into site and push the plunger in to
deliver medication in loose tissue of large muscle
❏ Apply slight pressure to site with a gauze pad and withdraw the needle
❏ Wipe the site with an alcohol swab
❏ Keep student in side position and stay with him or her. (On waking, the student may vomit and side position helps prevent choking.)
❏ When student wakes, and is able to swallow, give a quick source of sugar and a long acting source of sugar according to student’s emergency plan
❏ If the student does not wake up in 15 minutes follow plan, including notifying identified parents or others
❏ Wait for EMTs or instructions from nurse or parents
❏ Discard equipment and unused portion
❏ Wash hands
❏ Document medication administration

9 Updated 10/11
Medications Management in Iowa Schools
Skills Observation
Checklist
Administering Medication by Nebulizer This checklist is used by the nurse to observe skills before signing the certificate of completion for the nebulizer unit. The nurse should individualize this checklist to meet specific student needs. Check the box for each step done correctly. The qualified designated personnel must complete all steps successfully to complete the unit.
Name of Qualified Designated Personnel
District School Nurse observer Date Completed Date for recheck
Wash hands
Check for signed medication administration authorization
Assemble equipment and medication
Review directions for nebulizer assembly Place compressor on level surface
Plug in power cord
Wash hands
Unscrew top of nebulizer cup
Read the medication label and check for five rights
Prepare medication according to the directions. Pour specified amount of medication into medicine cup
Screw lid back on the cup
Attach tubing to the nebulizer cup outlet
Assess student as indicated in plan (pulse, respiratory rate and effort
Turn power switch on and check for mist
Attach face mask or T-piece and mouthpiece to the medicine cup
Have the student sit comfortably near the machine; Explain the treatment; Offer a toy, music or a book to help pass the time
Place mask on student or give student the mouthpiece to place in mouth
Have student inhale through the mouthpiece or the mask
Note the time
Stay with the student during the treatment; continually assess respirations and effort
Watch and listen to assess when medication is running out. Allow all medication to mist before ending treatment
When all medication is gone, help the student remove the mouthpiece or mask
When treatment is complete, turn off the compressor
Observe for any unusual symptoms; Follow student’s emergency plan if symptoms develop
Document medication administration
Disconnect the mouthpiece or mask from the tubing
Unscrew top on the medication cup and disconnect the tubing from the compressor
Follow the manufacturers directions for cleaning the equipment
Return medication and equipment to appropriate storage
Wash hands
10 Updated 10/11
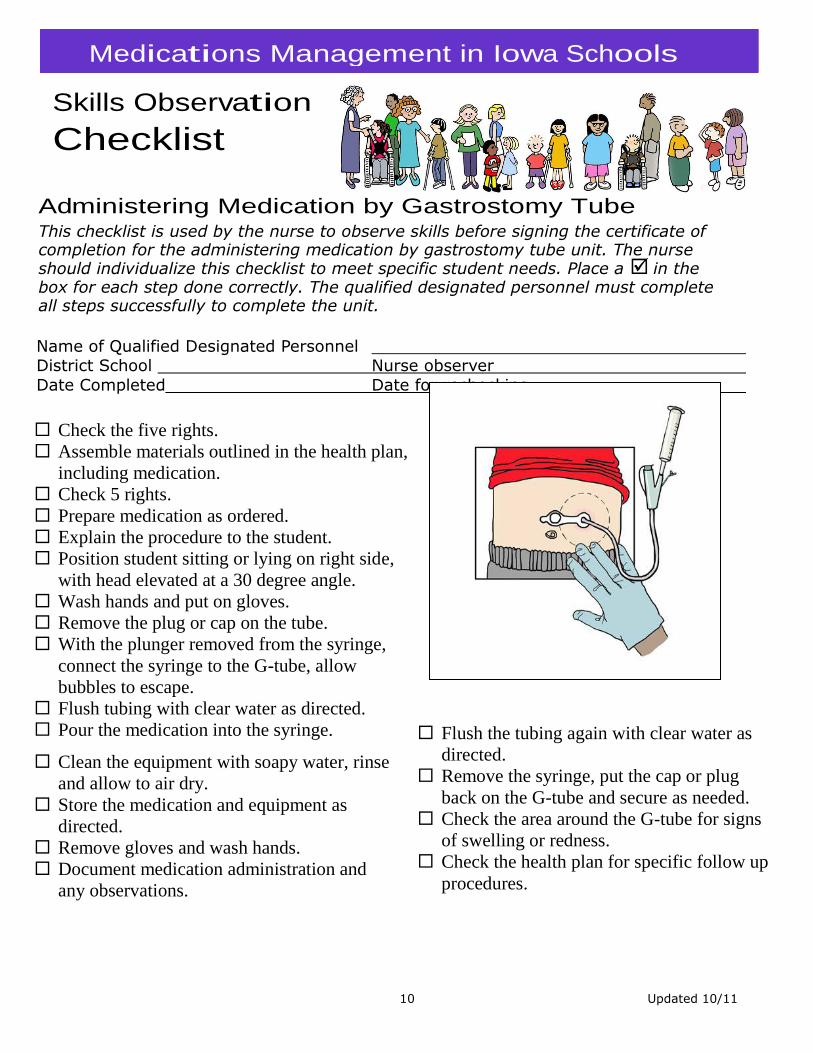
Skills Observation
Checklist
Administering Medication by Gastrostomy Tube This checklist is used by the nurse to observe skills before signing the certificate of completion for the administering medication by gastrostomy tube unit. The nurse should individualize this checklist to meet specific student needs. Place a in the box for each step done correctly. The qualified designated personnel must complete all steps successfully to complete the unit.
Check the five rights.
Assemble materials outlined in the health plan,
including medication.
Check 5 rights.
Prepare medication as ordered.
Explain the procedure to the student.
Position student sitting or lying on right side,
with head elevated at a 30 degree angle.
Wash hands and put on gloves.
Remove the plug or cap on the tube.
With the plunger removed from the syringe,
connect the syringe to the G-tube, allow
bubbles to escape.
Flush tubing with clear water as directed.
Pour the medication into the syringe.
Clean the equipment with soapy water, rinse
and allow to air dry.
Store the medication and equipment as
directed.
Remove gloves and wash hands.
Document medication administration and
any observations.
Name of Qualified Designated Personnel District School Nurse observer
Date Completed Date for rechecking
Flush the tubing again with clear water as
directed.
Remove the syringe, put the cap or plug
back on the G-tube and secure as needed.
Check the area around the G-tube for signs
of swelling or redness.
Check the health plan for specific follow up
procedures.
Medications Management in Iowa Schools

11 Updated 10/11
Skills Observation
Checklist
Name of Qualified Designated Personnel
District School Nurse observer
Date Completed Date for rechecking
Insulin Injection by vial and syringe Review student’s health plan. Consult with school nurse
to clarify procedures. Gather supplies: insulin, syringe, alcohol wipes,
disposable gloves, sharps container. Wash hands and put on gloves. Check the five rights. Check the insulin fluid for discoloration. Follow
directions in plan for preparation or when to discard. Wipe top of vial with alcohol wipe. Remove cap from the syringe. Pull plunger out to the number of units to be
administered. Push needle into air space in vial with syringe down and push in plunger.
Turn bottle upside down. Draw prescribed units into the syringe,
Tap syringe to remove any bubbles. Chose injection site with student. Clean injection site with alcohol wipe, wait for it to dry. Pinch up skin and insert needle at 90 degree angle. Release pinch. Push plunger in slowly, counting to five
seconds. Pull needle out straight. Wipe any bleeding away with alcohol wipe. Dispose of needle in sharps container. Implement any follow up procedures such as give the
student food. Remove gloves and wash hands. Document medication administration. Store insulin as directed.
Pen Injection (Use individual student step by step procedure) Review student’s health care plan. Consult the school nurse
to clarify procedures. Gather supplies: pen, needle, alcohol wipes, disposable
gloves, sharps container. Check the five rights and pen label. Wash hands and put on gloves. Pull pen cap to remove. For cloudy insulin roll pen back and forth and then up and
down until evenly mixed. Wipe pen end rubber seal with alcohol wipe. Screw new capped needle straight onto pen tip until tight. Hold pen pointing up and remove outer shield (keep to use
for needle removal). Remove inner shield. Prime the pen. Set the desired dose of insulin. Choose injection site with student, wipe with alcohol wipe
and allow to dry. Pinch up skin and insert needle at 90 degree angle. Release pinch, press injection button to inject insulin, wait
five to ten seconds per instructions. Remove needle straight out. Wipe any blood away with
alcohol wipe. Check pen to make sure the full dose was administered. Carefully replace the outer needle shield. Remove capped needle turning counterclockwise. Discard used needle and pen if disposable in sharps
container. Replace pen cap. Implement any follow up procedures such as giving student
food. Remove gloves and wash hands. Document medication administration. Store as instructed. Reusable pen usually kept at room
temperature away from heat and light.
Medications Management in Iowa Schools
Administering Insulin Injection by syringe and pen This checklist is used by the nurse to observe skills before signing the certificate of completion for the administering insulin by syringe and pen. The nurse should individualize this checklist to meet
specific student needs. Place a in the box for each step done correctly. The qualified designated
personnel must complete all steps successfully to complete the unit.

12 Updated 10/11
Skills Observation
Checklist
Insulin Pump A checklist is used by the nurse to observe skills before signing the certificate of completion for the insulin pump unit. The nurse should individualize a checklist to meet specific student needs. The qualified designated personnel must complete all steps successfully to complete the unit.
Name of Qualified Designated Personnel
District School Nurse observer Date Completed Date for rechecking
The insulin pump manages insulin administration Pump computer delivers the programmed amount of
insulin into the body Basal Rate-insulin programmed to deliver Blood Glucose-sugar in blood stream Glucose Target-programmed/ordered glucose level Bolus-additional insulin dose to keep in glucose target Reservoir-cylinder that holds insulin Carb Units-amount of carbohydrates that will be eaten Infusion Set-tubing, needle, cannula that delivers
insulin from pump Glucose Monitor-continuous or separate Pump-programming, monitoring connection and
blood glucose tasks are determined by specific pump, prescriber, nurse, student and student individual health plan
Review skills checklist based on the specific
manufacturer’s instructions for the specific pump.
NOTE: Some pump abilities and skills
Count carbohydrates
Bolus correct amount for carbohydrates consumed
Calculate and set basal profiles
Calculate and set temporary basal rate
Disconnect pump
Reconnect pump at infusion set
Prepare reservoir and tubing
Insert infusion set
Troubleshoot messages, alarms, malfunctions, injection
site, tubing, and pump reconnection instructions
Supplies: infusion set, reservoir, insulin, skin prep items, syringe, batteries, manufacturers manual, alarm card
Medications Management in Iowa Schools

13 Updated 10/11

14 Updated 10/11

15 Updated 10/11

16 Updated 10/11