toolbox & manual - adaptation community
TRANSCRIPT

Toolbox & ManualMapping the vulnerability of communitiesExample from Búzi, Mozambique

Ded i ca ted to the ones who con t r i bu ted wi th the i r knowledge and ded i ca t i on and whose l i v e l i hoods need to be s t r eng thened
Compiled by: Stefan Kienberger, Centre for Geoinformatics (Z_GIS, http://www.zgis.at), Salzburg University – Austria [email protected] | http://projects.stefankienberger.at/vulmoz/ Funded by: Munich Re Foundation, Munich – Germany (http://www.munichre‐foundation.org) Supported by: INGC, Maputo – Mozambique and CIG‐UCM, Beira – Mozambique Current Version 1.0, September 2008
This work is licensed under the Creative Commons Attribution‐Non‐Commercial‐Share Alike 3.0 Unported License. To view a copy of this licence, visit http://creativecommons.org/licenses/by‐nc‐sa/3.0/ or send a letter to Creative Commons, 171 Second Street, Suite 300, San Francisco, California 94105, USA.
1

I. Introduction
Project context and background This documentation is the result of research work conducted in the project context of the establishment of a ‚Community Based Early Warning System‘ at the Búzi River in Central Mozambique (SIDPABB). As the Early Warning System links directly to the preparedness phase within the disaster risk management cycle, the identification of vulnerabilities and its spatial occurrence should support the community and the disaster committees within activities linked to the mitigation and prevention phase at the community scale.
The research and the development of this toolbox has been funded through the Munich Re Foundation and supported/jointly implemented through PRO-GRC and INGC.
The intention of this manual is to document the developed workflow and to allow the possibility to implement and transfer the developed approach in other areas of interest. The approach developed comprises different methods which are combined to facilitate the reduction of vulnerabilities at the local level. Therefore, where appropriate, reference is made to additional documents which elaborate specifically on certain issues and methods.
Objectives and purpose The major aim of the developed approach is to provide the community members with appropriate decision support and awareness tools to identify and reduce their own vulnerabilities. A central element is the provision of community maps, which should significantly assist the community within their decision making. Answering the central questions of ‘where’ and ‘what’, is essential to deal with challenges in a general community planning context, but especially in the case of disaster risk reduction. However, a ‘map’ is not a solution at its own, as it also requires certain structures, commitments and technical expertise. Therefore, this manual can contribute significantly in the support of community-based disaster risk reduction measures, but has to be embedded in the context of an integral disaster risk reduction program (see chapter IV).
Specific objectives are:
● the compilation and design of a community vulnerability map which should assist the community members within their disaster risk reduction measures
● to map the community accordingly to the needs of the communities in a participatory manner
2

● to define, analyse and prioritise the driving forces of vulnerability according to the perception of the communities
● to enhance the ‘maps’ through spatial analyses results of different community characteristics related to disaster risk reduction
The overall workflow is documented in the figure below and will be outlined and described in detail within the following chapters.
Selected literature and web links which, provide in-depth description of specific issues, are marked with the symbol!
3

II. Step 1: Setting the project agenda and project design
Definition of programme objectives and setting – Case study definition As already mentioned in the introduction the supply and production of community maps and participatory mapping exercises has to be embedded in a wider disaster risk reduction strategy. Ideally, this involves different stakeholders, levels of decision making and targets different spheres within the disaster risk management process.
● The risk and vulnerability related mapping of communities needs to be integrated in a overall disaster risk reduction strategy with a long-term perspective targeting different levels of decision making (community – district – ... – national – international)
● The integration of maps has to be accepted as an appropriate decision support tool. The design and implem-entation has to be integrated horizontally within the project
● Map production and analyse of spatial data requires specialised training and support. This challenge has to accounted for and local/regional/national centres of expertise should be integrated in the project design
● The level of community participation has to be very critically reflected (is participation only needed to achieve donor/agency objectives?)
● The definition of the case study area has to be chosen comprehensibly (prioritisation of certain areas...)
_Munich Re Foundation (2006): Flood‐warning system in Mozambique ‐ Completion of the Búzi project. IntoAction2. Available at http://www.munichrefoundation.org/ _ProVention Consortium: Risk Analysis (Resources): http://www.proventionconsortium.org/?pageid=17 _Hyogo Framework for Action 2005‐2015 (HFA): http://www.unisdr.org/eng/hfa/hfa.htm _Macamo, E., (2005): How Development Aid Changes Societies: Disciplining Mozambique through Structural Adjustment http://www.codesria.org/Links/conferences/general_assembly11/papers/macamo.pdf _Cutter, S. L. (2003): GI Science, Disasters, and Emergency Management. Transactions in GIS. 7(4). pp. 439‐446. _Zeil, P., Kienberger, S. (Eds.) (2007): Geoinformation for Development – Bridging the divide through partnerships. Wichmann ‐ Heidelberg. 232 S.
4

Identification of previous work ‐ Familiarisation within general setting In certain cases different efforts in regard to community-based disaster risk reduction measures might have taken place. Additionally other community-based programmes might have been implemented in the area of interest. Being aware of the situation, experiences and capacities it is necessary to identify previous work and adopt the intended method accordingly.
● Identify previous work in regard to the wider context of disaster risk management and community based approaches
● Adapt the project design accordingly as community members might already have different experiences with PRA methodologies
● Familiarise yourself with the general setting. This should be based on a survey of already existing projects/initiatives in the country of interest ranging from the local to the national level. The identification of institutions involved in disaster risk reduction is critical and the interconnection among those. This can be facilitated through literature research but might only be successful through individual on-site investigations and contacts to key-experts
In the present case participatory sketch mapping exercises have been conducted through different organisations (even in the same community). This leads to the result that people might be already aware of the process and have established skills in mapping their environment. Considering conducted work is essential for successful implementation of constitutive activities.
5

III. Step 2a: Community Mapping
The community mapping exercise described here strongly links to participatory mapping (as a tool of PRA) and PGIS (especially photo mapping). It is assumed that the map is an essential planning instrument in general and suitable to facilitate disaster risk reduction measures.
The method outlined consists of two major steps: Firstly, data and satellite imagery is acquired and presented to community members as a ‘blank’ map to facilitate discussion and the mapping of specific features. In a second step the data is being integrated in a GIS and enhanced through additional spatial analysis.
In general the work described here builds on GIS capacities. Therefore it is important to consider the integration of adequate expertise within the project design and implementation.
Data acquisition ● In a first glance available data should be acquired through
national mapping agencies, statistical offices different organisations having a GIS unit established (FEWSW-NET, FAO,...), universities and private companies etc. In certain cases data at the community level might be available (also depending on previous work being conducted), whereas in many cases already available data might be limited
● The central element in the first part is the high resolution satellite image, which has to be acquired through data providers (list see below)
● Available data has to be integrated in a database and gaps identified. In certain cases additional mapping work has to be conducted to build a baseline (geo-)database
● Data has to be validated in regard to its actuality, accuracy and completeness
● Virtual globes and online maps (such as Google Earth, Google Maps, Microsoft Virtual Globe etc...) can provide, if high resolution data is available, a first overview/orientation of the area of interest. However, as the data is available only in lower resolution and it is not possible to use it for classification purposes the data is of limited use. However, the application might have a huge potential in areas where electricity (and internet access) is available
6
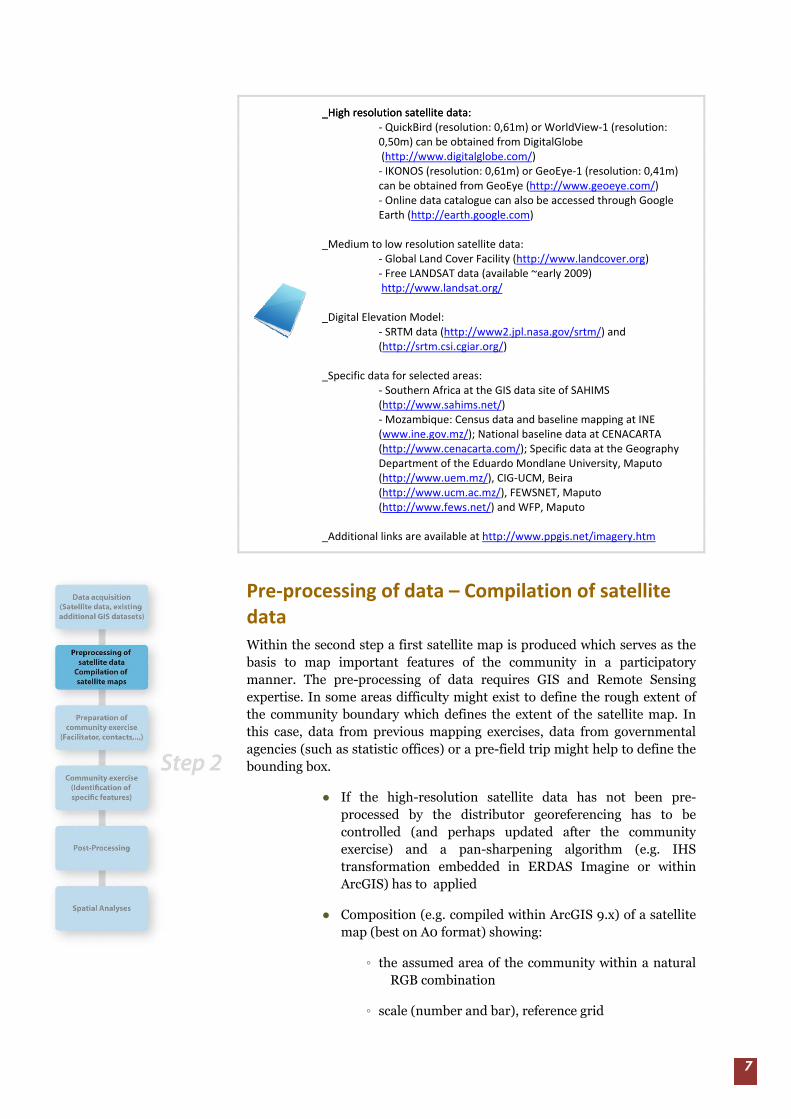
_High resolution satellite data: _High resolution satellite data: ‐ QuickBird (resolution: 0,61m) or WorldView‐1 (resolution: 0,50m) can be obtained from DigitalGlobe (http://www.digitalglobe.com/) ‐ IKONOS (resolution: 0,61m) or GeoEye‐1 (resolution: 0,41m) can be obtained from GeoEye (http://www.geoeye.com/) ‐ Online data catalogue can also be accessed through Google Earth (http://earth.google.com) _Medium to low resolution satellite data: ‐ Global Land Cover Facility (http://www.landcover.org) ‐ Free LANDSAT data (available ~early 2009) http://www.landsat.org/ _Digital Elevation Model: ‐ SRTM data (http://www2.jpl.nasa.gov/srtm/) and (http://srtm.csi.cgiar.org/) _Specific data for selected areas: ‐ Southern Africa at the GIS data site of SAHIMS (http://www.sahims.net/) ‐ Mozambique: Census data and baseline mapping at INE (www.ine.gov.mz/); National baseline data at CENACARTA (http://www.cenacarta.com/); Specific data at the Geography Department of the Eduardo Mondlane University, Maputo (http://www.uem.mz/), CIG‐UCM, Beira (http://www.ucm.ac.mz/), FEWSNET, Maputo (http://www.fews.net/) and WFP, Maputo _Additional links are available at http://www.ppgis.net/imagery.htm
Pre‐processing of data – Compilation of satellite data Within the second step a first satellite map is produced which serves as the basis to map important features of the community in a participatory manner. The pre-processing of data requires GIS and Remote Sensing expertise. In some areas difficulty might exist to define the rough extent of the community boundary which defines the extent of the satellite map. In this case, data from previous mapping exercises, data from governmental agencies (such as statistic offices) or a pre-field trip might help to define the bounding box.
● If the high-resolution satellite data has not been pre-processed by the distributor georeferencing has to be controlled (and perhaps updated after the community exercise) and a pan-sharpening algorithm (e.g. IHS transformation embedded in ERDAS Imagine or within ArcGIS) has to applied
● Composition (e.g. compiled within ArcGIS 9.x) of a satellite map (best on A0 format) showing:
◦ the assumed area of the community within a natural RGB combination
◦ scale (number and bar), reference grid
7

◦ information on the acquisition date of the image, the reference system and the cartographer
◦ additional space (for notes and the legend) at the margins of the paper
● Plotting of two A0 maps (paper should be strong enough)
● If required, additional plots of special interest areas can be produced in a larger scale to discuss specific issues and/or to identify additional features
Map on A0 paper format prepared for the community mapping exercise in Muchenessa
_GIS software: ArcGIS 9.x (http://www.esri.com/software/arcgis/) _Literature: e.g. Krygier, J., Wood, D. (2005): Making Maps: A Visual Guide to Map Design for GIS. Guilford Press (http://books.google.com/books?id=81aX0AIviv8C)
Preparation of community exercise Before conducting the community exercise, preparatory work in the field is required. As mentioned above the choice of communities to be mapped has to be embedded in the wider project context and depends on different issues. It might be helpful to have established contacts in the area. Important to consider is the environment and setting/perception of the people, which is best managed through the support of a local facilitator.
8

● Identification of local facilitator and translator. It is important that the facilitator/translator is experienced and has established contacts to the communities.
● Establish contact to the community and identify a date and time for the community exercise. It is important to consider the daily schedule of the community members (e.g. best time could be in the afternoon work has been finished). The amount of participants should not be more than ~15 people. The contact person, together with the facilitator, are responsible to identify the participants. In certain cases it is helpful to build already on established structures such as disaster risk committees or similar. However, the independence of the facilitator should be assured. It might also be important to critically reflect on his/her role within the community (e.g. social network analysis)
● An important issue is the contact to and permission of officials (e.g. district administrator) and traditional leaders. The work should be presented and explained. The agreement of officials will also help to acquire additional data in different administration offices if required.
● Within a preparatory meeting the facilitator should be introduced to the process and background information has to be provided to him/her. This is the most essential and important step as the ‘success’ of the exercise strongly depends on the engagement and commitment of the facilitator.
● A final check of the required material should be done before heading to the communities.
Community exercise The community exercise is the heart of the whole methodology and should be well prepared and conducted. As mentioned above, the facilitator plays a critical role as he/she is the one who communicates and engages with the community. During the exercise it is required to take a protocol of the different steps and responses of the community members. The following method and procedure should help to conduct the exercise:
● Welcome and introduction to the head of the community and additional representatives
● Decide on a place to conduct the exercise. Most suitable are schools or similar buildings as they provide enough space and protect the people and map from wind, sun, rain and dust
● Prepare and affix the two maps (e.g. on the blackboard) and prepare additional material (pens,...)
● Wait until all the community members have arrived (might also delay a bit the exercise)
9

● Introduction and welcome should be done through the facilitator
● Additional welcome from the researcher and give a short introduction on the satellite map and the technique behind (what is possible to see, how does it roughly work,...). It might be necessary to explain the difference to previous exercises, such as sketch mapping and what they can benefit from it
● Instructions should be given by the facilitator and what is intended with the exercise. It should also be mentioned that one map will remain directly with the community and the other map is needed to finalise the community map
● In a first step, community members should have the possibility to orientate themselves on the map. It might also be necessary to rearrange the map according to the ‘real’ position
Different steps during the community mapping exercise
● Ask the community to identify and mark the required features on the map. It is important to mention that different colours are available and should be used to identify and mark them. One of the two maps should be chosen on which the initial mapping should be conducted. The features to be identified depend on the background of the exercise, but a possible list in the context of disaster risk management could be:
◦ Community boundary (requires the most time, as this is an often heavily discussed issue, as it has never been documented before)
◦ Neighbouring communities
10

◦ Risk Zones (high risk/low risk/safe areas...)
◦ Agricultural Zones
◦ Special infrastructure of the community (such as wells, markets, schools, assembly points, accommodation centres etc.; sacred places should only be mapped if community members agree)
◦ Settlement area
◦ Naming of areas and natural features
◦ ...
The identified features should be summarised in a legend (at the margin of the plot). Additionally, the name of the map and the date has to be indicated
● In a next step, the community members should be asked if the map is complete and if they would like to add something. A short summary should be provided by the facilitator
● Finally, some of the community members should be asked to transfer the results to the second map. After this is finished, the members should be asked which of the two maps they want to keep with themselves. The map should be handed over officially to the head of the community. It is advisable to ask who will keep the map and where and how it will be accessible to other community members
● The facilitator and the implementer should conclude the exercise with a short summary on what has been achieved, the next steps and should express the thanks to the participants for dedicating their time and contributing with their knowledge. It is also sometimes expected to bring some drinks and/or biscuits as a final concluder. However, this decision has to be made properly as it might also lead to further expectations and could ‘spoil’ consecutive exercises
The map should finally be handed over officially to the head/representative of the community
11

● OPTIONAL/ADDITIONAL STEP: In many cases it might also be useful to additionally map the community with a GPS/PDA device. This is best done during a transect walk together with a community member. During the walk it is possible to get a clearer understanding of the community which could be documented with (georeferenced) photographs, which can later be added to the final map. The PDA/GPS (equipped with ArcPad or similar software) helps to collect the features (also different infrastructure) in a GIS readable format and allows a later association of the photographs with coordinates
_Resources required: ‐ Two A0 print outs (plots) of the satellite map (and additional Maps from older exercises or especially prepared zoom maps) ‐ Markers/pens in different colours (two/three of each colour) ‐ Tape to affix the map ‐ Photo camera ‐ PDA/GPS device (e.g. ArcPad software: http://www.esri.com/arcpad) ‐ Additional pens and paper (also for the protocol) _Literature: Photomapping http://www.iapad.org/participatory_photo‐mapping.htm
Post‐Processing After the field work the data has to be compiled, post-processed and, if required, additional data has to be gathered. This task is best managed in a GIS programme (such as ArcGIS or similar). This step includes also the integration of the results of the community mapping into a GIS:
● The identified features of the community have to be integrated (digitised) in a GIS environment. Technical aspects of database design etc. are not discussed here. Photographs and the map itself, which could be utilised on a digitizing board, help to integrate the data
● In a first assessment step boundaries and the correctness of already existing data sets should be evaluated
● If missing datasets can be identified or are required, data should be acquired (if possible)
● Through specialised software (see below) or the application of a GPS equipped camera, the photographs can be georeferenced
_Resources required: ‐ GIS software: ArcGIS (http://www.esri.com/arcgis) or similar e.g. FreeGIS software (http://www.freegis.org/) ‐ PhotoGPS software: RoboGEO http://www.robogeo.com/
12

Spatial Analysis After the different datasets have been compiled and integrated into a database, it is intended to enhance the final map product with spatial analysis related to the topic the mapping was conducted for. In this case, a special reference is made to the issue of disaster risk management. The analysis is also performed within an appropriate GIS software package.
● Distance analysis: To estimate the amount of people living within a certain distance to e.g. safe areas or accommodation centres appropriate analysis distance analysis tools can be performed. This provides a characteristic of the exposure of people. However, it is important to indicate the data sources and in which context the data has been gathered (e.g. especially when the risk zones have been mapped accordingly to the perception of the people)
Different spatial analysis results which should support community decision making (especially within disaster risk measures)
● Spatial queries: To estimate the amount of people living within a certain area (e.g. how many houses/people are within the high risk zone) spatial queries (e.g. “are located within”) should be applied
● Buffer zones: can be added to the map (e.g. distance to disaster risk kit/safe areas etc...) to provide additional information about distances to specific areas
● Density analysis: To estimate the density of settlement area ‘Kernel’ functions can be applied to calculate density estimates. This might help to define a modelled settlement area
13

● Land Use/Land Cover classification: Not directly related to spatial analysis a Land Use/Land Cover map can be produced using the high resolution satellite imagery. This result can be used to enhance the final cartographic product
● Results should be summarised within different tables and graphs which allow easy and visual communication
_Literature & Resources: ‐ The literature of Edward Tufte is recommend for sound, visual representation of statistical data (http://www.edwardtufte.com/) ‐ Remote Sensing software (especially capable to be used with High resolution satellite images) Definiens Professional (http://www.definiens.com/) ENVI (http://www.ittvis.com/ENVI/)
14

IV. Step 2b: Community based vulnerability prioritisation
In the second parallel step the issue of vulnerability to natural hazards is addressed together with the community members. The mapping exercise and the vulnerability prioritisation are best treated on different days as it is assumed that the exercises take place in the afternoon and therefore require its own dedication. In general, the order of the exercises is negligible, however it is recommended to time the ‘vulnerability exercise’ after the mapping, as a common understanding of the spatial structure of the community has been achieved and specific details can be discussed and explained. Therefore it is further recommended to affix the map close to the venue to allow a discussion on case studies.
The main objective of this exercise is to understand the vulnerability perception of the communities and the importance of the different factors. Additionally the exercise aims to stimulate a process among the community members about their susceptibility to different triggers of vulnerability. The exercise should allow prioritising issues within their own decision making process, communicate issues and raise awareness against officials.
From a research and project implementation perspective it is interesting to see how different vulnerability factors are perceived among the different communities. This might help to understand the perception of risk on a very local scale and the adjustment of development programs targeting risk reduction.
Specific literature research on setting and definition of vulnerability As a first step a specific literature research should be undertaken in regard to already existing findings of the specific area. The difficulty might be that the existing documents are grey literature. Therefore contacts should be established to organisations and projects working in the specific region.
● Get an understanding of the specific case study investigated and worked on
● Build on existing results and consider already conducted work
● Get an understanding of the concept of vulnerability and find a specific definition which suits the project context. However, the concept should be built on state-of-the-art definitions of vulnerability
● Identify the most important hazards related to the specific area. However, this issue might be influenced through
15

already consolidated perceptions. This is an important issue being discussed and reviewed/evaluated with the communities
_Link: ‐ Official Development Assistance Information Management System http://www.odadata.eu/ (database of ODA projects in specific areas) _Selected literature: ‐ Birkmann, J. (eds) (2006): Measuring Vulnerability to Natural Hazards. Towards Disaster Resilient Societies. United Nations University Press ‐ Villagrán, J.C. (2006): Vulnerability. A Conceptual and Methodological Review. Studies of the University: Research, Counsel, Education. Publication Series of UNU‐EHS, 4/2006 (http://www.ehs.unu.edu/article:240?menu=36)
Finalisation of methodology Based on the findings from the previous step, the methodology should be finalised. The methodology strongly depends on the specific objectives of the programme/initiative. Is the main objective to get an understanding of the perception of the community members and their prioritisation of vulnerability factors? Is it a way to stimulate a process, awareness and discussion among the community members? Who uses the results and to whom is the information being communicated? Are the results used to apply a further vulnerability modelling which builds on weights and scores? Is it used to identify specific indicators to allow a conceptual framework to be built for vulnerability modelling to specific hazards?
The present case study, where this manual has been built on focused on the issue of getting an understanding of the community perceptions, stimulate a process, allow the communication of issues to governmental representatives, a comparison among the communities in spatial contiguousness and the selection of indicators to model vulnerability on a higher decision making scale.
In this case the methods of brainstorming and scoring have been chosen to get an understanding of the factors and its importance/prioritisation by the community members. The method is described in more detail under the section ‘community exercise’.
● Apply a methodology which is suitable and fits the objectives of the aim of the project
● In this case the method of brainstorming and scoring has been applied. The method links to the approach of a Delphi exercise
● Acquire neccasary material and documents which are required to conduct the exercise
16

_Resources: In this case reference is made also to the wider PRA literature, which provides a deeper overview of available methods. http://en.wikipedia.org/wiki/Participatory_rural_appraisal
Preparation of community exercise Similar to the parallel step of community mapping the vulnerability prioritisation needs a specific preparation together with the facilitator. The facilitator plays a critical role! It is important to note that the facilitator should be experienced and should be as independent as possible. It should be considered that the translation from local languages is a critical point as the sharpness of expressions and specific meanings could get lost. The following steps have to be considered (and can also be linked to the parallel step of community mapping):
● Identification of local facilitator and translator. It is important that the facilitator/translator is experienced and has established contacts to the communities. In this case, it is very important that the facilitator is experienced and does not influence the feedback of the participants. Attention should also be paid to the difficulty of translating terms between different languages
● Establish contact to the community and identify a date and time for the community exercise. It is important to consider the daily schedule of the community members (e.g. best time could be in the afternoon after work has finished). The amount of participants should not be more than ~15 people. The contact person, together with the facilitator, are responsible to identify the participants. In certain cases it is helpful to build already on established structures such as disaster risk committees or similar
● An important issue is the contact to and permission of officials (e.g. district administrator) and traditional leaders. The work should be presented and explained. The agreement of officials will help to acquire additional data in different administration offices if required
● Within a preparatory meeting, the facilitator should be introduced into the process and background information provided to him. This is the most essential and important step as the ‘success’ of the exercise strongly depends on the engagement and commitment of the facilitator
● A final check of the required material should be done before heading to the communities
17

Community exercise As already mentioned above, this community exercise is best being accomplished (the day) after the community mapping exercise. The reason for that is that the implementers are already aware about the situation. The map can be used to identify specific features and discuss certain topics. During this exercise it is recommended to take notes and keep track about the discussion. Interventions should be avoided, however are necessary if the facilitator tries to direct the persons in a certain direction or the discussion looses momentum.
● Welcome and introduction to the head of the community and additional representatives
● Decide on a place to conduct the exercise. Most suitable are traditional gathering places (e.g. under a tree). However, in the case of unsuitable weather conditions an alternative site (e.g. school) might be more suitable
Steps taken during the vulnerability prioritisation exercise
● Optional: It is advisable to affix the map close to the venue or to keep it ready if issues which require further clarification need to be discussed
● Wait until all the community members have arrived (might delay the exercise)
● Introduction and welcome is done through the facilitator
● Additional welcome from the researcher and give a short introduction on the background of the exercise and the intention to collect the perceptions of the community
● The facilitator specifically explains the exercise and starts it, asking the community members the specific question to be
18

investigated (in this case: What are the factors which make the people of the community vulnerable to droughts and floods). The people can decide on the topic they want to start with. It might also be necessary to start first with the identification of the hazards and in a second step the associated factors/issues
● The feedback of the community members (brainstorming) should be noted on moderation cards and placed on the ground (or if appropriate also on moderation boards). The colour of the card naming the topic should be different from the factors being collected
● The facilitator has to take care that he/she does not influence or judge the feedback of the participants. On the other hand, the facilitator needs to stimulate the exercise, as in the beginning people might be cautious
● To get a better understanding of specific problems it is recommended to discuss shortly the background and reason of specific factors
● After the collection of the factors the facilitator should summarise the results and ask the community members if something has not been mentioned. This leaves an open space to add additional, missing issues
● In the last step the different factors should be quantified. Before the exercise it is necessary to buy some seeds/beans/nuts or similar. A predefined amount of beans should be used to weight/score the collected issues accordingly to their importance. In this case 40 beans have been used to weight the factors. Additionally, droughts and floods have been evaluated against each other (using 10 beans) showing the relevance of the hazard. The facilitator also guides this exercise but should not influence the distribution of the beans. This step should remain with the community members. However, it is important to assure that everybody contributes within this discussion
● After the beans have been distributed, the facilitator should ask the community members if they agree on the result and the exercise can be finalised
● A summary should be given by the facilitator
● The amount of beans should be noted on the moderation cards
● A final statement should be given by the researcher and should express his/her gratitude for committing their time and input
19

_Resources required: ‐ Moderation cards in different colours (http://www.neulandafrica.com/9) ‐ Beans/Seeds, best bought in a local market ‐ Black marker to collect the feedback on the cards ‐ Paper and pen to make notes of the exercise ‐ The satellite map can be used to discuss specific issues
Post‐Processing After the exercise the results should be documented accordingly.
● Translate and collect the issues within a spreadsheet
● The spreadsheet should show the factors ranked accordingly to its score for each community
● An additional spreadsheet should list all the factors derived from all the investigated communities. Specific statistics such as the average score, the standard deviation and the number of mentions should be indicated
● It might be necessary to group different factors. However, this is a critical process and attention should be taken. In some cases ‘same issues’ might be expressed/noted on the cards in a different way and require a precise understanding on the issue collected (notes taken during the exercise will help to clarify such issues)
● The results can be used to identify the different perceptions among the communities and identify gaps in the selection of priorities. Additionally it should be investigated why a prioritisation might differ, especially within the weighting of different hazard types
Visualisation of results It is proposed to visualise the results of the brainstorming and scoring as a treemap:
● A treemap is a visualisation of hierarchical data with nested rectangles. The size of the rectangles displays the weight of the representing factor
● This type of visualisation allows the easy capturing of the structure and the weight of the different factors
● Colours should be used to separate the different hazard types
● In the current case a separate tree map has been supplied which shows the perceived weighting between the investigated hazard types (flood vs drought)
20

Treemap of the results of the identification and weighting of vulnerability factors to floods (blue) and droughts (amber) in a community
_Links: ‐ Treemap add‐on for Excel http://research.microsoft.com/community/treemapper/ ‐ Background on Treemaps (Wikipedia) http://en.wikipedia.org/wiki/Treemapping
21

V. Step 3: Map composition
Step 3 compiles the results being achieved in the field work exercises. The map is perceived as a central element to enhance and support decision making in the communities and to avoid and mitigate the negative impacts of hazards.
Two maps are being compiled which should be available at the community. The composition of the maps requires GIS skills and is again best implemented within a GIS software (such as ArcGIS or similar).
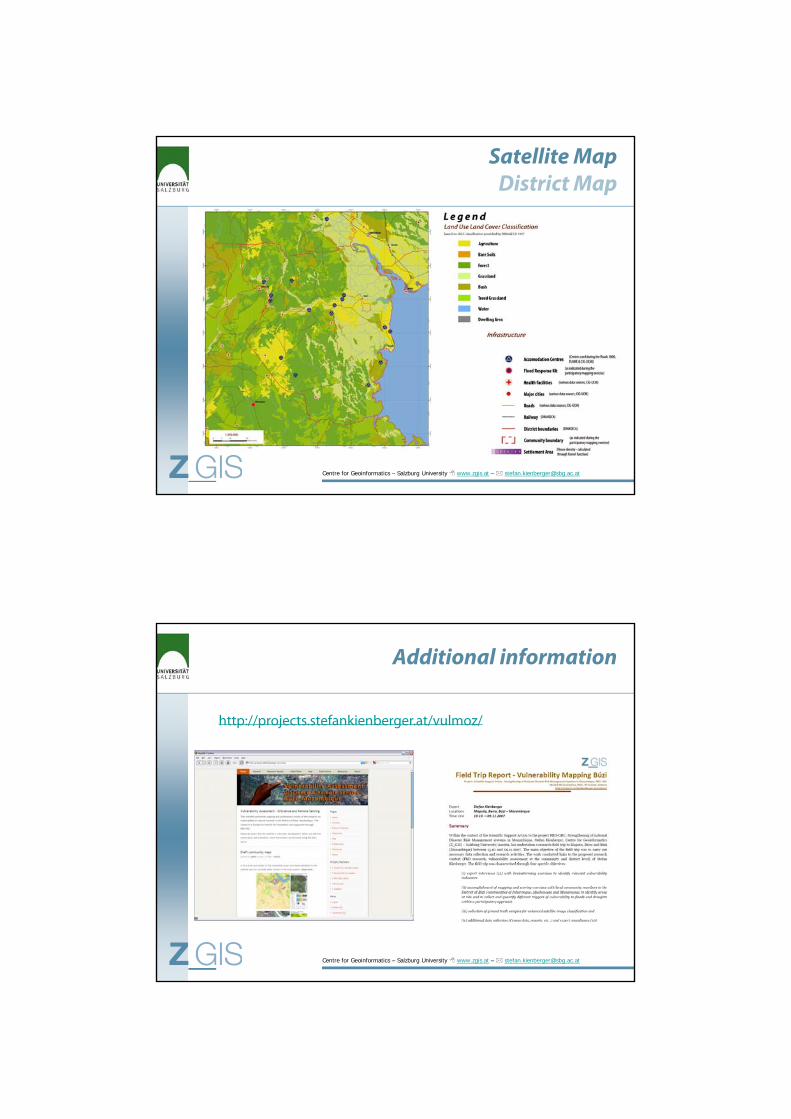
Community vulnerability map (above) and Satellite & District map (below)
22

The community vulnerability map integrates results of the mapping exercise, information on different community infrastructure features, results of the vulnerability prioritisation and a map of the wider surrounding area of the community. The map should serve as the central element addressing disaster risk reduction measures.
The satellite and district map should support the understanding of the community vulnerability map. As the first one integrates a Land Use/Land Cover map, which might already be abstract because of its classification and colour coding, the satellite map, which displays the environment in a RGB composition, should help to understand the Land Use/Land Cover classification approach. Additionally a district map is supplied and georeferenced photographs of characteristic community features have been added to enhance the educational value of the maps.
Screenshots of the different maps are provided in much more detail in Annex I.
Community Vulnerability Map The Community Vulnerability map integrates the following elements:
● The community vulnerability map itself, a map providing information of the wider surrounding, the legend & scale and the results of the vulnerability prioritisation
● The community vulnerability map consists of a Land Use/Land Cover map which has been classified in a previous step. Classes should be as simple as possible and summarise the major natural characteristic of the community. Additionally community infrastructures such as, houses, streets, the boundary, water wells, disaster response kit, school etc are mapped. Symbols should be as simple and understandable as possible and might perhaps need a redesign if the community members have difficulties to understand them. Additionally the results of the spatial analysis such as the interpolated settlement area and buffer zones indicating the distance to safe areas are indicated. The risk zones (high, low) are a central element of this map
23

● The map showing the surrounding area of the community integrates a Landsat image, inundated area of the flood 2000 (which is quite well in the memories of the people), infrastructure such as local markets, accommodation centres, health facilities, major villages, roads and boundaries. This map should provide information of the surroundings, whereas the community is centrally located
● The legend and scale (indicated as bar and number) are essential elements of each map and should be provided in a clear and understandable way. In this regard it is referred to cartographic conventions (and standard literature)
● The results of the community prioritisation (see step above) are documented in a special dedicated box. Next to the treemaps, a short description of the results is given and additionally a list of the results is provided. This box integrates results from the spatial analysis (like the number of houses within a certain risk zone, histogram of number of houses with a specific distance range to safe areas,...)
● In general, the data sources, the date of compilation, the date of the exercises, the cartographer and the involved institutions should be mentioned on the map
Satellite and District Map The Satellite and District map contains the following elements:
● The satellite map itself consists of a RGB visualisation of the satellite images. Additional features such as the settlement area, risk zones and selected infrastructures can be added to the map. Care should be taken within the appropriate visualisation of the satellite image (histogram stretch etc.)
● The district map integrates a Land Use/Land Cover map of the District (as mentioned above the classes should be chosen as simple and as understandable as possible), boundaries, important villages/communities, roads,
24

25
different infrastructure features (accommodation centres, health facilities,...).
● A special feature of this map is the integration of the location of photographs displaying characteristics of the communities
● A legend, scale bar/number and information on the data sources and information on the date of the acquisition of the satellite data have to be integrated.
For a complete documentation of the different elements a presentation is provided in Annex 1.

VI. Step 4: Provision of maps – Education and future planning
After the compilation of the maps, the results have to be provided to the community members. This is best achieved through the support of a local facilitator who has been briefed on the elements and objectives of the maps.
The maps should be handed over officially to the head of the community, who should decide together with the community members where the map should be kept and how access can be guaranteed. It should also be especially pointed out that the map involved the capacities, knowledge and dedicated input of the community members.
As it never can be assured that a map is 100% correct the possibility of updates has to be ensured. The decision on the integration of maps as a central decision making tool has to involve the possibility for feedback loops, continuous updates and the strengthening of capacities at all levels. Therefore a process is started which involves different actors on different levels. The process does actually not end with the handing over of the map, however it needs further continuous support, update and evaluation of the ‘success’ and usability if the maps. It is required that different institutions work together and have a common objective in mind
Key is a specific technical expertise which should support the compilation and production of the maps. In this case ‘independent centres of expertise & knowledge’ (e.g. university institutions, private companies, ...) can support the long-term integration and success of the integration of spatial decision support tools.
The coordination among different institutions and the integration of expertise is required for a successful provision of information products.
26

VII. Abbreviations
GIS Geographic Information System INGC Instituto Nacional de Gestão de Calamidades PGIS Participatory GIS PRA Participatory Rural Appraisal PRO-GRC Projecto ‘Institucionalicação de Gestão de Risco de
Calamidades em Moçambique’ RGB Red – Green – Blue SIDPABB Sistema Inter-Distrital de Pré-Aviso pela Bacia do Rio Búzi
27

VIII. ANNEX I: Documentation of map elements
28

Community Maps:Inharongue, Muchenessa, Munamicua
Mapping communitiesR d i l biliti
Centre for Geoinformatics | Salzburg University| www.zgis.atStefan Kienberger | Researcher | [email protected]
Stefan Kienberger
Reducing vulnerabilities
Community Maps 2 maps per community
Vulnerability Map
Centre for Geoinformatics – Salzburg University www.zgis.at – [email protected]
Satellite Map & District Map

Field WorkOctober/November 2007
- Participatory Mapping Exercises
- Vunerability identification and weighting (scoring)
Centre for Geoinformatics – Salzburg University www.zgis.at – [email protected]
Vulnerability Map
Map elements:
- Main map: Community mapa ap: Co u ty ap- Land Use/Land Cover- Community Infrastructure- Settlement area- Risk Zones (community identified)
- Small map: Surrounding area- Satellite Map- Infrastructure - Flood extend year 2000
Centre for Geoinformatics – Salzburg University www.zgis.at – [email protected]
Flood extend year 2000
- Additional information- Legend- Results of vulnerability identification- Analysis on exposure

Vulnerability Map Community map: elements
Centre for Geoinformatics – Salzburg University www.zgis.at – [email protected]
Vulnerability Map Community map: elements
Centre for Geoinformatics – Salzburg University www.zgis.at – [email protected]

Vulnerability Map Community map: elements
Centre for Geoinformatics – Salzburg University www.zgis.at – [email protected]
Vulnerability Map –Community map: elements
Centre for Geoinformatics – Salzburg University www.zgis.at – [email protected]

Vulnerability Map –Surrounding area: map elements
Small map: Surrounding area
- Community location- Accomodation centres (yr 2000)
- Flood extend yr 2000- Health facilities
Markets
Centre for Geoinformatics – Salzburg University www.zgis.at – [email protected]
- Markets- Streets- Major villages
Vulnerability Map Vulnerability identification
Centre for Geoinformatics – Salzburg University www.zgis.at – [email protected]

Vulnerability MapExposure Analysis
Centre for Geoinformatics – Salzburg University www.zgis.at – [email protected]
Satellite Map
Centre for Geoinformatics – Salzburg University www.zgis.at – [email protected]

Satellite MapCommunity map: elements
Centre for Geoinformatics – Salzburg University www.zgis.at – [email protected]
Satellite MapCommunity map: elements
Georeferenced photos of characteristic community spots
Centre for Geoinformatics – Salzburg University www.zgis.at – [email protected]
Satellite MapDistrict Map
Centre for Geoinformatics – Salzburg University www.zgis.at – [email protected]
Additional information
http://projects.stefankienberger.at/vulmoz/
Centre for Geoinformatics – Salzburg University www.zgis.at – [email protected]