toolbox 4.0 standalone installation toolbox 2.2 … · user manual toolbox 4.0 standalone...
TRANSCRIPT
User manual
Toolbox 4.0 Standalone Installation
Toolbox 2.2 Standalone Installation
For the latest
news and the
most up-to-date
information,
please consult the
ECHA website.

QSAR Toolbox User Manual
Toolbox 4.2 Installation Manual
Document Version 1.2 Page 2 of 14
January 2018
Document history
Version Comment
Version 1.0 March 2017: Installation notes for Toolbox version 4.0
Version 1.1 August 2017: Updated to reflect changes in version 4.1
Version 1.2 January 2018: Updated to reflect changes in version 4.2
Issue date: January 2018
Language: English
If you have questions or comments that relate to this document, please send them to
[email protected] or visit the QSAR Toolbox discussion forum at
https://community.oecd.org/community/toolbox_forum

QSAR Toolbox User Manual
Toolbox 4.2 Installation Manual
Document Version 1.2 Page 3 of 14
January 2018
Table of Contents
Document history ............................................................................................... 1
Issue date: ......................................................................................................... 2
Language:........................................................................................................... 2
1 Introduction ................................................................................................. 4
2 Requirements ............................................................................................... 4
3 Background .................................................................................................. 4
4 Installed components ................................................................................... 4
5 Installation package ..................................................................................... 4
6 Installation sequence ................................................................................... 6
6.1 PostgreSQL installation ............................................................................ 6
6.2 QSAR Toolbox database(s) installation ..................................................... 9
6.3 QSAR Toolbox applications installation ................................................... 10
6.4 OASIS Metapath ..................................................................................... 13
7 Known issues ............................................................................................. 13
7.1 Running the QSAR Toolbox on limited user accounts .............................. 13
QSAR Toolbox User Manual
Toolbox 4.2 Installation Manual
Document Version 1.2 Page 4 of 14
January 2018
1 Introduction
This document provides a summary description of the installation procedure of the QSAR
Toolbox (version 4.2) set-up kit on a local PC operating Microsoft® Windows®.
2 Requirements
It is recommended to use an up-to-date PC with 64 bit operating system (required) and a
processor running at 2.4GHz or faster, 15 Gigabyte of hard disc space for storage and 6
Gigabyte of RAM to operate.
In order to run this installation you will need administrator rights on your local PC.
However, once installed, normal user rights will be sufficient for running the application.
3 Background
The new QSAR Toolbox 4.2 is not a continuation of the Toolbox 3.4 codebase. It is a new
system, designed from the bottom up and rewritten using new underlying technologies
and database management sub-system. This in turn means a completely different
deployment experience.
QSAR Toolbox 4.2 is a major update to Toolbox and can be installed alongside previous
versions of 4.x.
4 Installed components
The following components will be installed on your PC if they are not already available:
• The database manager PostgreSQL 9.6
• Microsoft .NET Framework 4.5.2
5 Installation package
Navigate to the CD on which you have received the application or to the folder into which
you have downloaded the package. If you received the package as a ZIP archive, extract
the content to a new directory.
QSAR Toolbox User Manual
Toolbox 4.2 Installation Manual
Document Version 1.2 Page 5 of 14
January 2018
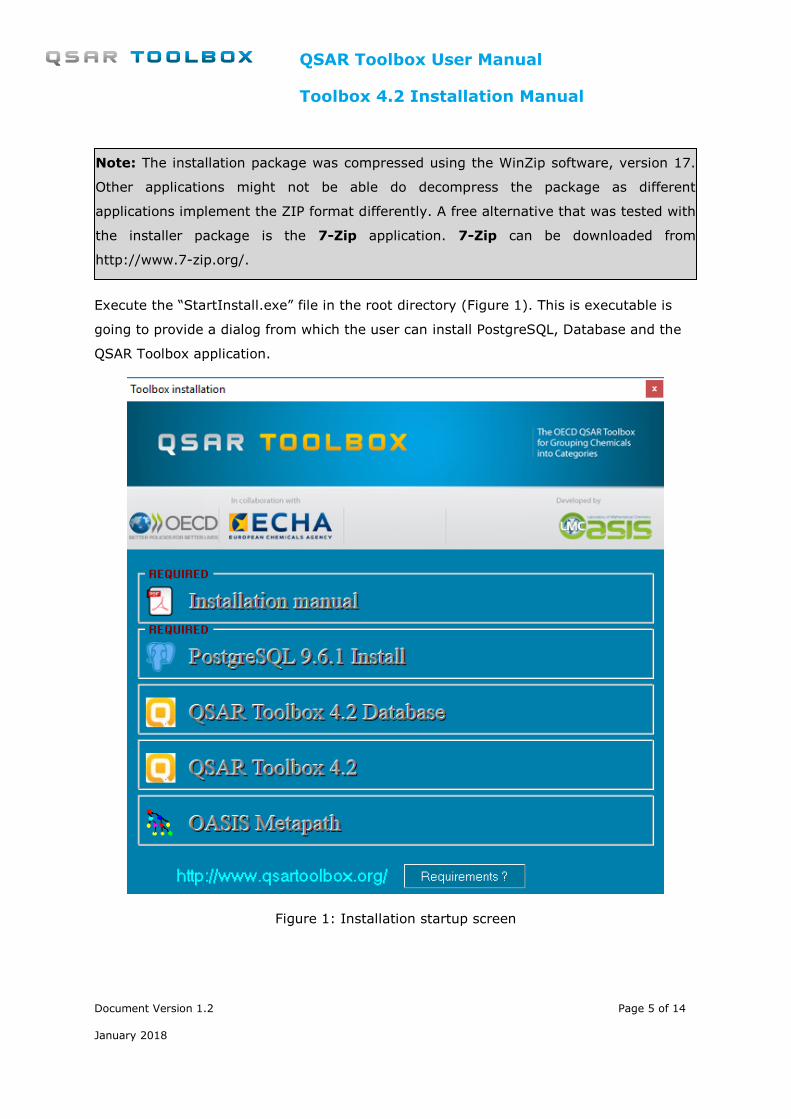
Execute the “StartInstall.exe” file in the root directory (Figure 1). This is executable is
going to provide a dialog from which the user can install PostgreSQL, Database and the
QSAR Toolbox application.
Figure 1: Installation startup screen
Note: The installation package was compressed using the WinZip software, version 17.
Other applications might not be able do decompress the package as different
applications implement the ZIP format differently. A free alternative that was tested with
the installer package is the 7-Zip application. 7-Zip can be downloaded from
http://www.7-zip.org/.

QSAR Toolbox User Manual
Toolbox 4.2 Installation Manual
Document Version 1.2 Page 6 of 14
January 2018
6 Installation sequence
6.1 PostgreSQL installation
If you have an existing PostgreSQL installation, versions 9.4, 9.5 or 9.6, you could use it
- you would need to provide the port and postgres superuser password - otherwise
continue reading this section.
Click on PostgreSQL 9.6.1 Install button and follow the on the screen.
You will be asked to select an installation folder (Figure 2), leave the default setting.
Figure 2: PostgreSQL install folder.
Next you will be asked to set the Data folder (Figure 3). Make sure the Data folder is on
a drive that has at least 5GB of free space.

QSAR Toolbox User Manual
Toolbox 4.2 Installation Manual
Document Version 1.2 Page 7 of 14
January 2018
Figure 3: PostgreSQL Data folder
Next you will be asked to enter the password for the superuser password (Figure 4).
Whatever you decide to put here make sure you write it down or memorise it as it
will be needed later in the installation procedure and generally throughout the
PostgreSQL installation’s lifetime.
Figure 4: Superuser password.
Next you need to specify the port the PostgreSQL server would listen to (Figure 5). The
default provided is 5432. If you have an already installed version of PostgreSQL (e.g 9.0)

QSAR Toolbox User Manual
Toolbox 4.2 Installation Manual
Document Version 1.2 Page 8 of 14
January 2018
this port may be taken. Whatever port you decide on make sure you write it down or
memorise it as it will be needed later in the installation procedure and generally in
throughout the PostgreSQL installation’s lifetime.
Figure 5: PostgreSQL listen port.
Next you will be asked to select locale. Just leave it as default.
On the final stage uncheck the “Launch Stack Builder at exit?” at the end of the
installation. Even if you leave it checked you can always close the stack builder
afterwards.
Figure 6: Launch stack builder prompt

QSAR Toolbox User Manual
Toolbox 4.2 Installation Manual
Document Version 1.2 Page 9 of 14
January 2018
6.2 QSAR Toolbox database(s) installation
The QSAR Toolbox Database layer consists of three separate PostgreSQL databases. One
is the data repository, one is the EPI reports cache and one is the bio-library data
(downloaded from http://itis.gov and slightly modified for performance reasons).
To install the databases click on the QSAR Toolbox 4 Database button. You will be
asked (Figure 7) to provide the PostgreSQL superuser password and listen port (see
PostgreSQL installation section of this manual).
Figure 7: Database deployment tool.
After you enter the path to PostgreSQL bin folder, the password and the port the
database deployment will commence. Note that the deployment tool will try to detect the
PostgreSQL bin folder and will populate the field if it succeeds. The port and password
will need to be entered. After filling the fields click on the “Start database deployment
button”. It is a lenghty operation (up to 15 min depending on computer configuration)
and it should not be interrupted.
Note: A prerequisite for the database deployment step is that there is a
functional PostgreSQL server listening. Whether you are using an existing
PostgreSQL deployment or one that was just deployed you need to check that
the PostgreSQL service is up and running before continuing with database
deployment. You could do that by going to Services tab of your Task manager
(you can bring it up by holding Ctrl+Shift+Esc buttons). Look for a service with
postgresql in its name (e.g. “postgresql-x64-9.4”), it should have “Running” in
the Status column.

QSAR Toolbox User Manual
Toolbox 4.2 Installation Manual
Document Version 1.2 Page 10 of 14
January 2018
After the databases have been deployed a “Databases succesfully deployed”
message will be displayed and the tool will close.
6.3 QSAR Toolbox applications installation
The QSAR Toolbox application consists of the two layers of the QSAR Toolbox – the client
and server. To install them click on the QSAR Toolbox 4 of the bootstrap installer. You
will be asked for a destination folder (Figure 8)
Figure 8: Destination folder for the QSAR Toolbox 4 client and server
Note: The QSAR Toolbox database is designed to be used by a single Toolbox
Server. Please make sure than there is no concurrent access to the same
Postgres database from different instances of Toolbox server.

QSAR Toolbox User Manual
Toolbox 4.2 Installation Manual
Document Version 1.2 Page 11 of 14
January 2018
Figure 9: Deployment mode
After you’ve specified the destination folder you will be prompted to select the
deployment mode for the installation suite. There are three deployment modes for
available for QSAR Toolbox 4.
Standalone – This deployment mode should be used on a single computer. Dhis
deployment mode allows for creation of new profiling schemes, importing of
databases and creation of new QSARs. This is the recomended deployment mode
for users who will be developing profiling schemes, QSARs, databases.
QSAR Toolbox Desktop Client Only - This mode will install only the Toolbox
client. It will have to be connected to a separate deployment of a QSAR Toolbox
multi-user Server.
QSAR Toolbox multi-user Server - This deployment mode is similar to the
standalone deployment, in that it installs both Server and Client layers of the
QSAR Toolbox, however it configures the Server in multi-user mode. When
connected to a multi-user server the user will have restrictions on certain
features, such as creation of new profiles and importing of databases.
Note: In order to open a port for incoming connections the multi-user server
needs to be started with administrative permissions (or equivalent).

QSAR Toolbox User Manual
Toolbox 4.2 Installation Manual
Document Version 1.2 Page 12 of 14
January 2018
After you’ve specified the deployment mode you will be prompted to enter the connection
parameters (Figure 10) for the Client and Server applications. These include both the
host and port that the Client connects to the Server and the host and the port that the
Server uses to connecto to the PostgreSQL database. Some of the controls will be
disables based on the selected deployment mode.
The parameters are:
Client connect host: This specifies the computer that the client will
connect to.
Client connect port: This is the port the client will use to connect to the
Server. It should match the listening port that the Server was configured
to listen to(see bellow)
Database host: This specifies the host computer where the PostgreSQL
database is located.
Database port: This specifies the port the PostgreSQL database server
listens to (see PostgreSQL installation section)
Server listening port: This is the port the QSAR Toolbox Server will listen
on (and Toolbox Client will try to contact on).
Figure 10: Connection parameters for QSAR Toolbox client and server

QSAR Toolbox User Manual
Toolbox 4.2 Installation Manual
Document Version 1.2 Page 13 of 14
January 2018
6.4 OASIS Metapath
Click on the OASIS Metapath item of the bootstrap application and follow the onscreen
instructions.
7 Known issues
7.1 Running the QSAR Toolbox on limited user
accounts
The QSAR Toolbox server requires administrative permissions to run when running in
Remote connect mode. They are necessary in order for the application to open a port and
listen for client connection.

OECD
2, rue André Pascal
75775 Paris Cedex 16
France
Tel.: +33 1 45 24 82 00
Fax: +33 1 45 24 85 00