tool information description: auto diagnostic tool gd860s-manual.pdf · this user manual is for...
TRANSCRIPT

Autosnap GD860 User’s Manual
Tool Information
Description: Auto Diagnostic Tool Model: GD860
If you have any technical questions, please contact
Service Center • Email: [email protected] • Phone: +86-755-2815 4008 • Website: www.auto-snap.com www.gd860.com
Copyright Information
Copyright © 2011 Autosnap Tech Co,. Ltd.
All rights reserved.
The information, specifications and illustrations in this guide are based on the latest information available at the time of printing.
Autosnap Tech reserves the right to make changes at any time without notice.
Autosnap GD860 User’s Manual
Statement
This User Manual is for diagnostic tool GD860. Without the prior written
permission of Autosnap (Short for “Autosnap Tech Co., Ltd.”), any enterprise
or person is NOT allowed to copy or store any data (electronic, mechanic,
photo copying, recording etc). The information contained herein is only used
for Autosnap GD860. Autosnap is not responsible for any damage by wrong
use and as stated below.
Autosnap shall not be liable for any part that has been abused, altered, used for
a purpose other than for which it was intended, or used in a manner
inconsistent with instructions regarding use. Other product names mentioned
herein are for explaining how to use this device; the copyrights belong to the
corresponding original enterprise.
TradeMark
Autosnap Tech Co., Ltd. registered the trademark of “Autosnap” in China and
other countries. In any countries where Autosnap trademarks, service marks,
logos and company name is not registered, Autosnap claims other right
associated with unregistered trademarks, service marks, logos and company
name. Without prior written permission, anyone is NOT allowed to use
trademark, service mark, logo or company name of Autosnap.
Autosnap GD860 User’s Manual
Contents 1. General introduction ·········································································· 1
1.1Product features ······························································································· 1
1.1.1 Generality ······························································································ 1
1.1.2 Advancement ·························································································· 1
1.1.3 Durability ······························································································ 1
1.2 Using the GD860 ······························································································ 1
1.2.1 Main unit and accessories ············································································ 1
1.2.2 Interface introduction ················································································ 3
1.3 Technical parameters ······················································································ 3
1.4 Power switch ··································································································· 3
1.5 Touch screen calibration ··················································································· 4
1.6 Button instruction ···························································································· 4
1.7 System setting ································································································ 7
1.7.1 Parameters setting ···················································································· 7
1.7.2 Software version information ········································································ 8
2. Operation ······························································································ 9
2.1 Preparation and cable connection ······································································· 9
2.1.1 Preparation ···························································································· 9
2.1.2 GD860 cable connection ············································································· 9
2.2 Diagnostics program ······················································································ 10
2.2.1 Available vehicle makes selection ································································ 10
2.2.2 Entering into diagnostic program ······························································· 11
2.3 Diagnostic options ·························································································· 12
2.3.1 Reading trouble code ·············································································· 12
2.3.2 Clearing trouble code ·············································································· 12
2.3.3 Reading data stream ················································································· 12
2.3.4 Data stream text ······················································································ 13
2.3.5 Data stream graphics ·············································································· 13
2.3.6 Data stream graphics comparison ································································ 13
2.3.7 Data stream dashboard ············································································ 14
2.3.8 Selection interface for data stream recording mode ·········································· 14
2.3.9 Normal mode ························································································ 15
2.3.10 Self-learning mode ················································································ 15
2.3.11 Comparison mode ·················································································· 17
2.3.12 Data stream recording ············································································· 17
2.3.13 Data stream playback ············································································ 17
2.3.14 Other diagnostic function ······································································· 17
2.4 Data management ························································································· 18
2.5 Playback ···································································································· 18
2.6 Last diagnostic ······························································································ 18

Autosnap GD860 User’s Manual
3. Updating the GD860 ······································································· 19
4. Powering the GD860 with external power supply··············· 21
5. Warranty and Service ···································································· 22
Autosnap GD860 User’s Manual
1
1. General instructions
1.1 Product feature
1.1.1 General Information
Covers more than 50 vehicle makes, including Asian, European
and American vehicles, and hundreds of vehicle electronic
systems.
American Vehicles: GM, Ford, Chrysler
European Vehicles: Mercedes-Benz, BMW, VW, Volvo, Citroen,
Peugeot, Opel, Porsche, Land rover, Renault, FIAT, etc.
Asian Vehicles: Toyota, Honda, Nissan, Mazda, Mitsubishi,
Subaru, Nissan, Suzuki, Isuzu, Hyundai, Kia, Ssanyong, Chery,
Brilliance, etc.
1.1.2 Advantages
Multilanguage Support which allows it to be used in different
countries and areas.
Fashionable and robust design, high-resolution colorful touch screen
combined with Electronic information technology that makes auto
diagnosis more convenient, practical, accurate and economical.
The PCB contains 6 layers circuit board which make the quality stable
and strengthen the anti-interference.
1.1.3 Durability
The integrative structural design is anti-falls, anti-seismic and durable.
The industrialization design ensures that the product works stably even
under adverse environments such as high-temperature, low-
temperature, etc.
High-voltage class protection design which supports vehicles with
12V and 24V.

Autosnap GD860 User’s Manual
2
1.2 Using the GD860
1.2.1 Tool Description
No. Name Description
1 Touch screen Indicating operation buttons, testing
information and help information.
2 Power light Storing diagnostic program and data.
3 Communication
light
Internal communication indicator of main unit
(HOST)
4 Communication
light
Communication indicator between main unit
and ECU.
5 Hot key Touch screen Calibration or shortcut key for
screen rotation.
6 Nylon strap To prevent the main unit from falling by
providing a secure grip of the unit
7 Power switch Turn on or turn off the main unit.
8 Bracket To support the main unit while standing it on
dashboard, car fender or counter.
9 Sticker Indicate the main unit information

Autosnap GD860 User’s Manual
3
1.2.2 Interface Introduction (as below figure)
NO. Name Description
10 Diagnostic port To connect the testing (OBD) cable
11 Host USB port To connect the USB data cable
12 SD card port To insert the Micro SD card
13 Slave USB port To connect the data cable
1.3 Technical Parameters
Main Unit Size: 209mm (L)*173mm (W)*52mm (H)
Operation System: WIN CE 6.0
CPU: 400MHZ ARM9
Memory: 64M
Interface: USB 2.0
Power: DC12V, 2A
Voltage: DC12V/DC24V
Display Screen: 7 inch LCD touch screen (800 x 480) TFT
1.4 Power Switch
Swith On:
Press the power switch button for 2-3 seconds to switch on the scan tool,
then the screen displays the following image.

Autosnap GD860 User’s Manual
4
Switch off:
Selection 1: Press the Power button on device, then click Yes to
switch off the device when the message “Do you want to shutdown this
device?” pops-up.
Selection 2: Click the Close on touch screen, then click Yes to switch
off the device when the message “Do you want to shutdown this
device?” pops-up.
1.5 Touch Screen Calibration
a) After turning on the device, press the GREEN button on the device,
follow the display’s information to start calibration.
b) Click the center cross on touch screen, the cross moves to another location
after this spot is calibrated successfully.
c) Repeat the operation as the cross moves, until the setting is finished. Press
the screen again to return back to the home page.
1.6 Buttons Definitions
Back to home page
To rotate the display from horizontal screen to vertical
screen, or from vertical screen to horizontal screen.

Autosnap GD860 User’s Manual
5
To capture a picture of information displayed in the screen.
Help information
To load the diagnostic software and enter the diagnostics
interface.
To print the current contents of the display.
(optional printer required)
Exit from current interface or screen and back to previous.
Store the present/new settings information.
Recover the settings information to the default data.
Cancel the current settings information.
Enter into the selected menu option.
Cancel the current operation.
To accept/proceed with the current operation.
Not to perform the current operation and go back to
previous screen.

Autosnap GD860 User’s Manual
6
Records the current live data, save it for later playback and
analysis. The minimal recording time is 5 seconds.
After clicking the [Record] button for 5 seconds, the [Stop
Record] button will be available and showed. Click [Stop
Record] button, recording stops and the data will be saved.
Continue live data’s real-time display and playback.
Data stream pauses and stops at the current data, and data
values will not be updated. It’s used to observe and analyze
the displayed data.
Move up to the previous page.
Move down to the next page.
Delet the selected document.
Enter the diagnostics inteface to select the desired
vehicles brand and start to diagnose.
Set the system, such as language, date, display
orientation, and etc.
Playback the recorded data.
Manage system data, such as recorded data,
diagnostic software, and etc.

Autosnap GD860 User’s Manual
7
Diagnose the same vehicle brand as previous time.
It’s convenient to diagnose the same brand vehicle
without selecting the relevant vehicle information.
Turn off the power to the unit.
1.7 System Setting
1.7.1 Parameter setting
Click on the button [System Setting] of home page to set various
parameters and information. (The figure as shown at below)
Parameter setting
a) Laguage setting: Click the sign “▼”to select desired language and
press the button Store to finish language setting. After you change the
setting, please restart the system to set it for future uses.
b) System date: Click the sign “▼” to select the correct date and press
the button Store to finish date setting.
c) System time: Click the sign “▼” to
select the correct time and press the
button Store to finish date setting.
d) Display mode: Click the sign “▼” to
select the desired default display
mode. The display interface will be
vertical when you select Portrait
display, its horizontal when you
select Landscape display. You can
temporarily change it by clicking the
Screen Rotation icon at the top of
the screen.
e) Store location of picture: Click the
sign “▼” to select the location where
you want to store the pictures you
snap-shot. Either, store the pictures in
internal memory or SD card, use Data management to review and
manage them.
f) Vehicle order:

Autosnap GD860 User’s Manual
8
[Sort in usage freq]: The vehicles logo will be arranged in order
according to using frequence. The more frequent you use the vehicle
logo, the most forward it displays in [Diagnostic software].
[Sort in alphabetic order]: The vehicles logo will be arranged in
alphabetical order in [Diagnostic software]
g) Diag COM: To select the communication serial port. The default serial
port is COM3, normally no need to modify it.
h) Baud rate: To select the serial port baud rate, the default baud rate is
19200, normally no need to modify it.
i) Printer COM: To select the printer serial port, the default serial port is
COM7, normally no need to modify it.
j) Printer Baud Rate: To select the printer baud rate, the default printer
baud rate is 115200, normally no need to modify it.
k) Adjust Brightness: Controlled by scrolling along the bar to increase
or decrease the contrast.
Note: After you have changed settings, please click the [Save] button to
accept and save the changes, if you want to discard the present settings
please click the [Cancel] button, if you want to recover the default settings
please click the [Restore] button.
1.7.2 Version information
Click on the [Version] tab to get the
current information on Software version,
Hardware version, Software Serial number,
Production date.

Autosnap GD860 User’s Manual
9
2. Operation
2.1 Preparation and OBD cable connection
2.1.1 Preparation
The connector selection
There are various connectors packed with the main unit. Every connector
has an application, please check the connector application carefully and
select the correct connector for the vehicle being diagnosed.
Location of the Data Link Connector
The location of the data link connector is usually in the left side under the
dash, behind covers on center of dash or center console, but there are 8
common locations as show below.
2.1.2 Cable connection
1) Find out the location of the DLC and check the type of DLC to see if
external power supply is required
2) Select corresponding connectors for car make and DLC.
3) Connect one end of main OBD cable to the main unit and the other end to
the appropriate connector selected.
4) Plug the cable assembly with connector into the DLC on car.

Autosnap GD860 User’s Manual
10
5) Turn on the unit using the power button to start testing.
Please refer to below figure to learn how to connect to get power
supply
There are 3 ways to get power:
a. AC Power supply
b. Vehicle DLC
c. Cigarette lighter
2.2 Diagnose procedure
2.2.1 Select available vehicle makes
GD860 can diagnose various makes of vehicles,
Autosnap keeps updating to enhance the
software. Please visit the Autosnap website to
download the latest updated software.
All of the GD860 diagnostic programs are
identified with the brand’s vehicle logo as
buttons, click on the corresponding vehicle logo
to load that diagnostics software. It’s very
useful and fast to enter into a diagnostic system
if you are familiar with the vehicle logos.
There are different software packages for
different user needs according to country and

Autosnap GD860 User’s Manual
11
vehicle makes. For the software in your unit, please refer to the packing list or
contact the local distributor.
2.2.2 Enter diagnostics program
After connecting to the DLC and power supply
(if required), press the [Power] button for 2-3
seconds to start the GD860.
After clicking on the [Diagnosis] button, you
will enter the diagnostic screen where you can
select the origin of the vehicle manufacturer.
Screen shows: Asia, Europe, America and OBD
II. [America] is selected as default, click on the
[Asia] button when you want to diagnose Asian
vehicles, please click on the [Europe] button
when you want to diagnose European vehicles
Please refer to the figure as shown at right:
Click on the [OBDII] button and select the
desired software version from the drop-down
menu. By default, the software version will
update to the latest version automatically. All of
high versions software is compatible with low
version software.
Note: Clicking the [OBD II] button, this
diagnostic program can test all vehicles with
OBDⅡ/ EOBD and CAN-OBD.
Click the [Start Diagnosis] button, the figure as
shown to the right will appear after the software
loads:
Click on [Generic OBDII _EOBD] to start
automatic detection of the vehicle’s protocol or
click the appropriate protocol if you know it.
Autosnap GD860 User’s Manual
12
2.3 Diagnostic options
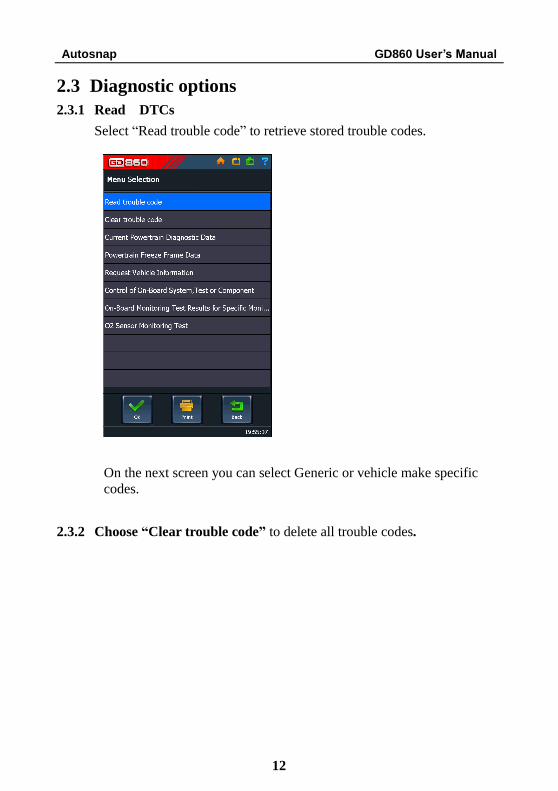
2.3.1 Read DTCs
Select “Read trouble code” to retrieve stored trouble codes.
On the next screen you can select Generic or vehicle make specific
codes.
2.3.2 Choose “Clear trouble code” to delete all trouble codes.

Autosnap GD860 User’s Manual
13
2.3.3 Review Data Stream
Click “Current powertrain diagnostic data” in menu, then on the next screen
click “Current Powertrain Diagnostic Data”, next click the “Normal” tab
followed by the “OK” button.
Now select the item(s) preferred to review data. As showed in right picture:
Select the desired datastream items and
click the [OK] button to read:
There will be four ways available to
display datastreams:
-Text,
-Graph,
-Graph Comparison (if more than one
item was selected) and,
-Dashboard.

Autosnap GD860 User’s Manual
14
2.3.4 Text Display:
The default display is in text.
2.3.5 Graphic Display
Click [Graph], the data stream would be
displayed in a grid, as the picture at right.
2.3.6 Merging Graphic Displays
Click [Graph Comparison], different
datastreams would be simutaniously displayed
in the same graph chart and make comparisons.
2.3.7 Dashboard Display
Click [Dashboard], the datastreams display in
the way of analog gages, and select different
datastreams for each gage to make
comparisons on the same page.
Autosnap GD860 User’s Manual
15
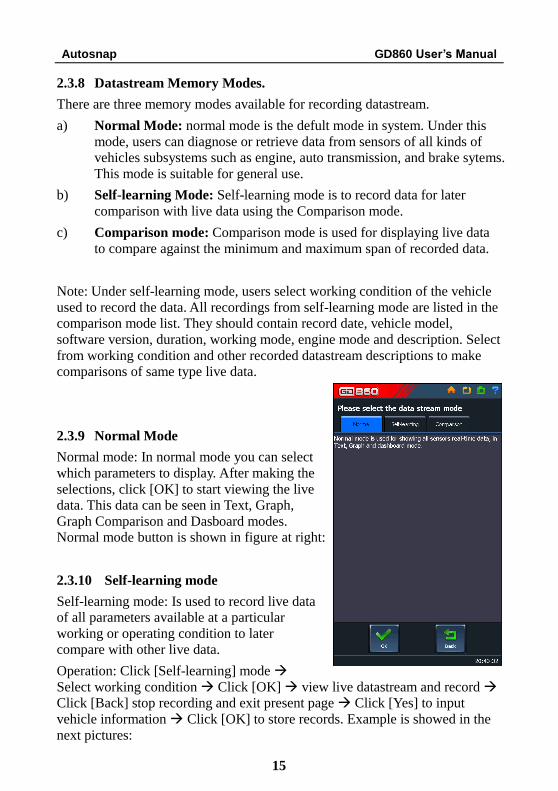
2.3.8 Datastream Memory Modes.
There are three memory modes available for recording datastream.
a) Normal Mode: normal mode is the defult mode in system. Under this
mode, users can diagnose or retrieve data from sensors of all kinds of
vehicles subsystems such as engine, auto transmission, and brake sytems.
This mode is suitable for general use.
b) Self-learning Mode: Self-learning mode is to record data for later
comparison with live data using the Comparison mode.
c) Comparison mode: Comparison mode is used for displaying live data
to compare against the minimum and maximum span of recorded data.
Note: Under self-learning mode, users select working condition of the vehicle
used to record the data. All recordings from self-learning mode are listed in the
comparison mode list. They should contain record date, vehicle model,
software version, duration, working mode, engine mode and description. Select
from working condition and other recorded datastream descriptions to make
comparisons of same type live data.
2.3.9 Normal Mode
Normal mode: In normal mode you can select
which parameters to display. After making the
selections, click [OK] to start viewing the live
data. This data can be seen in Text, Graph,
Graph Comparison and Dasboard modes.
Normal mode button is shown in figure at right:
2.3.10 Self-learning mode
Self-learning mode: Is used to record live data
of all parameters available at a particular
working or operating condition to later
compare with other live data.
Operation: Click [Self-learning] mode
Select working condition Click [OK] view live datastream and record
Click [Back] stop recording and exit present page Click [Yes] to input
vehicle information Click [OK] to store records. Example is showed in the
next pictures:

Autosnap GD860 User’s Manual
16
Autosnap GD860 User’s Manual
17
2.3.11 Comparison mode
Comparison mode is used to view recorded data from diagnosed vehicles; data
can be based on good working parameters recorded under self-learning mode
to compare to live parameters of vehicles having problems. Keep in mind to
make comparisons of same make, model, engine and operating/working
conditions to get accurate comparisons.
Operation: Click [Comparison mode] Select recorded data matching the
working condition mode and other information similar to the vehicle being
diagnosed click [OK] and select the parameters to compare click [OK] to
view the live data in Text mode click the [Graph] tab to view comparison of
recorde and live data at the same time in graph mode.
Note that the recorded data only shows as minimum and maximum graph
readings in the form of RED lines in the grids. Live data should be within the
red lines to be considered good. Again, make sure that you are comparing the
same type of data from vehicle, engine, operating condition, etc.
2.3.12 Live Data Records.
Live Data Recording is used to record currently displayed live data. The data is
saved as file records which can be played back and be analyzed.
Note: The live data recording should last at least 5 seconds. After 5 seconds
users can stop recording by clicking the “Stop Record” button.
Operation: click [Record] click [Stop Record] input the recorded
vehicle’s information with the various descriptions of the datastream click
[OK] to save.
2.3.13 Playback
The playback interface is used to playback the stored recorded files, which
display the files by vehicle working condition and other kinds of parameters.
Operation: Click [Data Playback] in main interface Select the desired record
for playback click [Playback]
You can view the recorded data in Text, Graph, Graph Comparison and
Dashboard modes.
Click [Play Again] to replay the same file.
Autosnap GD860 User’s Manual
18
2.3.14 Other Functions
This manual describes the device’s basic operations and functions. Diagnostic
software for different vehicle brands may differ in some functions, especially
in operation of some special settings and adaptation functions. This manual
will not offer detailed description. When using the device and no reference is
found in this manual, please refer to operation tips and help notes in the system.
2.4 Data Management Select [Data Management] in main interface to conduct various data functions,
including deletion of recorded files, vehicle diagnostic software information
and deletion, screenshot image viewing and deletion.
2.5 Data Playback Select [Data Playback] in main interface to review the recorded files, playback
files to analyze the data.
2.6 Last Diagnosis Select [Last Diagnosis] in main interface, the system will automatically load
the diagnostic program of the last vehicle scanned without the need of selecting
the brand, which is convenient for repeat diagnosis on the same vehicle make.

Autosnap GD860 User’s Manual
19
3. Updating the GD860
How to register and update software on www.gd860.com?
1. Click “Registration” button on right corner of website to enter the
registration interface.
2. Input the information as requested. The registration will be activated after
confirmed by Autosnap.
Note: The Serial Number, Product password and Dealer code will be provided
by Autosnap via an email.
The fields below with * need to be filled as required.

Autosnap GD860 User’s Manual
20
3. Login with user name and password
3. Download the software
Step 1: Enter into the “Software Download” interface
Step 2: Download and install the software “Update tool” on your computer
Step 3: Download the vehicles software and save on your computer
Step 4: Update the software
Click here to
download
the software

Autosnap GD860 User’s Manual
21
Open the update tool and browse the vehicles software, and then Click
“Update” button to update the software
Note: Before updating, please connect the power supply to device, and
connect device to computer with USB cable. Please see next page.
4. Using the AC external power supply The external power supply is used for updating and turning on the GD860 to
view stored data in it.
Step 1: Plug the wall power cable to the transformer
Step 2: Plug the transformer cable to the external feed wire on the main OBD II
cable
Step 3: Press the “Power” button on the GD860
Step 4: Connect the USB cable to GD860 and other end to the PC
Step 5: Proceed to “Step 4” on previous page to start the update OR work with
stored data files by pressing the “Data Management” or “Data Playback”
buttons.

Autosnap GD860 User’s Manual
22
5. Warranty and Service
5.1 Warranty This warranty is expressly limited to persons who purchase Autosnap
products for purposes of resale or use in the ordinary course of the
buyer’s business. It’s subject to the following terms and conditions:
1) Autosnap product is warranted against defects in materials and
workmanship for one year (12 months) from date of delivery to the
user.
2) The sole responsibility of Autosnap under the Warranty is limited to
either the repair or, at the option of Autosnap, replacement of the tool at
no charge with Proof of Purchase. The sales receipt may be used for this
purpose.
3) This warranty does not apply to damages caused by improper use,
accident, flood, lightning, or if the product was altered or repaired by
anyone other than the Manufacturer’s Service Center.
4) Autosnap shall not be liable for any incidental or consequential
damages arising from the use, misuse, or mounting of the tool. Some
states do not allow limitations on how long an implied warranty lasts, so
the above limitations may not apply to you.
5) No agent, employee, or representative of Autosnap has any authority to
bind Autosnap to any affirmation, representation, or warranty
concerning Autosnap automotive meters, except as stated herein
6) Autosnap reserves the right to make changes at any time without notice.
5.2 Service 1) Order Parts Replaceable and optional parts can be ordered directly from the
authorized Autosnap distributors.
2) Service Procedures
If you have any questions, please contact your local distributor first. If it
becomes necessary to contact Autosnap, please find our contacts below:
Autosnap Service Center: Company: Autosnap Tech Co., Ltd.
Add: 3rd Floor, Jianda Building, Hi-Tech Industrial Park, Nanshan
District, Shenzhen, China
Tel: +86-755-2815 4008
Fax: +86-755-8299 5063
E-mail: [email protected]