tone shaper instructions strat 1
TRANSCRIPT

DATE TITLE
PAGE
REV
DRAWN
© Tone Shapers, Inc. - All Rights Reserved
Tone Shapers, Inc.4005 43rd Ave, Unit 1Vero Beach, FL 32960
ASSY PN
George Ellison
A-TS-S1
ToneShaperfor Stratocaster®
12/27/08
1 of 8N/A
CR L
CR L
ALIGN CONNECTORS TO PINS
WELCOME!Your decision to purchase a ToneShaper was a good one! Your new toy should give you lots of tone tweaking enjoyment, and will prove to be a valuable tool in getting the tone you’re looking for from your guitar. Please read over these instructions to become acquainted with your new unit, and keep them handy for future reference.
Can’t wait to get started? Then go right to pages 5-8 for sample settings, and refer back to pages 1-4 as needed.
INSTALLATIONWe’ve included everything you’ll need. The first step is to remove the strings and pickguard from your guitar. Note that if you have a floating tremolo, removing all of the strings at once will ensure that several rounds of tuning will be needed when you restring the guitar, before the tremolo reaches equilibrium (before the string tension on the top of the guitar equals the spring tension in the rear of the guitar). You may already realize this, but if not then be advised that this will be the case, so you don’t tear your hair out when you get to that step.
Once the pickguard is removed, then you’ll attach the ToneShaper unit to your pickguard. Please note that this unit fits the control spacing of Fender pickguards, so if you’re using a pickguard from another manufacturer then you may need to modify it.
Put the included internal-tooth lockwashers (star washers) over the three pot shafts, then insert the three pot shafts into the pickguard holes. If you find that the pickguard holes are too small, then they’re probably sized for metric pots and need to be enlarged to 3/8”. If they don’t line up with the ToneShaper’s pots, then you’ll need to drill new ones in the correct locations. You’ll find that if you need to drill new holes that overlap, or are beside, existing holes, then there’s a good chance they’ll be covered by the knobs.If you need to re-drill, then you can cut out and use the full-scale drawing below as a drill template.
This drawing will also give you some visual confirmation as to whether or not any extra holes you might end up with will be covered by the knobs.
Once you have the ToneShaper mounted on the pickguard, then put the flat washers and nuts on the outside (the face) of the pickguard, and tighten the nuts.
Next, install the switch. Make sure that the two black connectors are facing over the side of the switch as shown in the illustration below, then slide the switch straight down. The idea is to have the switch’s actuator (lever) enter the slot in the pickguard at the same time that the 2 connectors are engaging the 8 pins on the circuit board. These 8 pins are pretty durable, but don’t use a hammer here. Just gently push the connectors down onto the pins as shown below.
The next step is to attach the pickup and jack leads, along with any grounds. This is easily done without soldering by using the ToneShaper’s quick-connect terminal blocks. Simply depress the appropriate button, insert the stripped wire, then release the button.
DEPRESS RELEASE
1/4”
STRIP INSERT
10
9 87
555555
222222222222222
1
4
666666666666666666666TONE
10
9 87
5
2
1
34
6TONE
10
9 87
5
2
1
34
6
EEEEVO
LUM
VVVVVV
10
98
7
5
2
1
34
6
TONE
10
98
7
5
2
1
34
6
VOLUME
10
98
7
5
2
1
34
6
TONE
10
98
7
5
2
1
34
6
TONE
10
98
7
5
2
1
34
6
VOLUME
10
98
7
5
2
1
34
6
TONE
10
98
7
5
2
1
34
6
TONE
10
98
7
5
2
1
34
6
VOLUME
10
98
7
5
2
1
34
6
TONE
10
98
7
5
2
1
34
6
TONE
10
98
7
5
2
1
34
6
VOLUME
10
98
7
5
2
1
34
6
TONE

DATE TITLE
PAGE
REV
DRAWN
© Tone Shapers, Inc. - All Rights Reserved
Tone Shapers, Inc.4005 43rd Ave, Unit 1Vero Beach, FL 32960
ASSY PN
George Ellison
A-TS-S1
ToneShaperfor Stratocaster®
12/27/08
2 of 8N/A
PICKUP CONNECTIONSYou’ll notice that there are six connection points for the pickup leads; two for the jack leads; two for grounding; and one for a series link. We’ve assumed that your pickups will each have a hot and a ground, so you’ll attach these six pickup wires to the six pickup connection points, making sure to follow the labeling on the board.
HOT = the hot wire (typically white)RTN (RETURN) = the ground wire (typically black)
If you have three wires on each pickup (Lace Sensor, Fender SCN, etc.) then you’ll follow the manufacturer’s wiring instruc-tions, which will typically involve two of the wires being connected to ground. Assuming this is the case, then these two wires will share the ground connection.
If you have four wires coming from each pickup, then you’ll most likely connect together the two that form the series link (consult the manufacturer’s wiring diagram to identify which wires are which) and tape or heat shrink this connection to keep it out of the way. This will leave a hot and a ground, and (typically) a bare wire. Any bare wires will be twisted together and attached to one of the two GND points (for convenience, there’s one GND point on each of the two terminal blocks). MAKE SURE that any bare wires won’t inadvertently contact anything else - wrap them in tape or put heat-shrink tubing over them. This will leave only the hot and ground for each pickup, which will be connected to the appropriate HOT and RTN points.
If you’re using a humbucker in the bridge and want it to be split in the 2-position, then its series link will be connected to the Series Link (or Serial Link) connection point.
JACK CONNECTIONSThe two jack leads are attached to the small terminal block:
JACK OUT = the hot wire (typically white)JACK GND = the ground wire (typically black)
GROUND CONNECTIONSYour guitar will most likely have a bridge ground, which is a wire coming from the tremolo claw in the rear of the guitar (or directly from the bridge if your guitar has a hardtail bridge), and attached to a ground point, such as to the back of a pot. Assuming your guitar has such a wire, then you’ll attach it to one of the two GND points on the ToneShaper.
Additionally, your guitar may have a ground wire similar to the one shown below that connects shielding paint in the cavity to ground. Note that most guitar bodies don’t have shielding paint in the cavities, and most that do have shielding paint don’t use a wire to connect the paint to ground. But many American and Mexican Fenders do, though it might not be immediately apparent. If there is a wire like the one below that is screwed into the cavity somewhere...
...then you’ll want to leave this wire screwed into the body, and attach its other end to one of the two GND points on the ToneShaper. Then you will be a happy camper.
AND NOW, THE FUN STARTSOkay, are we all ready to go? Let’s put this baby through its paces.
The ToneShaper has been designed to be really simple to use. Once installed, you can make changes to its configuration by simply removing the pickguard and flipping it over, then manipu-lating some mini switches. The mini switches that are used are large enough for many people to move with their fingernails, but we’ve also included a dandy pointed stick that you fingernail-challenged folks can use instead.
As you might expect, the mini switches have an OFF side and an ON side, and understanding which is which will make life just a little more rewarding for you:
This is pretty straightforward, but in the interest of making things really clear and easy-to-discern in the rest of this manual, we’re going to use color coding to illustrate when switches are on, off, or optional, as follows:
CYAN (BLUE) = ONMAGENTA (PINK) = OPTIONALYELLOW = SELECT ANYBLACK = OFF
1 2 3 4 5 6
ON CTS
1 2 3 4 5 6
ON CTS
ON
OFF
THESE SWITCHES ARE OFF THESE ARE ON
1 2 3 4 5 6
ON CTS
THESE SWITCHES ARE ON
1 2 3 4 5 6
ON CTS
TURN THESE ONIF YOU WANT TO
1 2 3 4 5 6
ON CTS
TURN ON AS MANY OFTHESE AS YOU WANT(BUT AT LEAST ONE)
1 2 3 4 5 6
ON CTS
MAKE SURE THESEARE OFF
10
98
7
5
2
1
34
6
TONE
10
98
7
5
2
1
34
6
VOLUME
10
98
7
5
2
1
34
6
TONE
10
98
7
5
2
1
34
6
TONE
10
98
7
5
2
1
34
6
VOLUME
10
98
7
5
2
1
34
6
TONE
10
98
7
5
2
1
34
6
TONE
10
98
7
5
2
1
34
6
VOLUME
10
98
7
5
2
1
34
6
TONE
10
98
7
5
2
1
34
6
TONE
10
98
7
5
2
1
34
6
VOLUME
10
98
7
5
2
1
34
6
TONE

DATE TITLE
PAGE
REV
DRAWN
© Tone Shapers, Inc. - All Rights Reserved
Tone Shapers, Inc.4005 43rd Ave, Unit 1Vero Beach, FL 32960
ASSY PN
George Ellison
A-TS-S1
ToneShaperfor Stratocaster®
12/27/08
3 of 8N/A
12
34
56
78
910
ON
CTS
12
34
56
ON
CTS
1 2 3 4 5 6 7 8 9 10
ON CTS
1 2 3 4 5 6
ON CTS
B HOTB RTNM HOTM RTNN HOT N RTN
GNDSERIALLINK
GND
JACK GND
JACK OUT
BC A
SW1SW2SW3SW4
12
34
56
78
910
ON
CTS
12
34
56
ON
CTS
1 2 3 4 5 6 7 8 9 10
ON CTS
1 2 3 4 5 6
ON CTS.1μF
.047μF
.033μF
.022μF
.015μF
.1μF
.047μF
.033μF
.022μF
.015μF
VOLUMEKIT
10
98
7
5
2
1
34
6
TONE
10
98
7
5
2
1
34
6
VOLUME
10
98
7
5
2
1
34
6
TONE
10
98
7
5
2
1
34
6
TONE
10
98
7
5
2
1
34
6
VOLUME
10
98
7
5
2
1
34
6
TONE
10
98
7
5
2
1
34
6
TONE
10
98
7
5
2
1
34
6
VOLUME
10
98
7
5
2
1
34
6
TONE
10
98
7
5
2
1
34
6
TONE
10
98
7
5
2
1
34
6
VOLUME
10
98
7
5
2
1
34
6
TONE
THE CONTROLSHere’s a picture of the ToneShaper:
There are four switches (SW1 - SW4), a volume kit (A), and two banks of tone capacitors (B & C), each of which has a .015μF, .022μF, .033μF, .047μF, and .1μF capacitor.
SW1 and SW3 are used to select the various wiring styles, as you shall see in the following pages.
SW2 turns the caps in bank B on and off (see how they’re beside each other?), and assigns them to the middle potentiom-eter. You can turn on any one, but you can also turn on more than one. When you add capacitors together in parallel (as we are doing here), their values add. So if you turn on, say, the .022μF cap and the .033μF cap, you’ll have the equivalent of a .055μF cap. And turning on the .015μF, .022μF, and .033μF caps will give you the equivalent of a .07μF cap. There are in fact 31 possible values that can be achieved by turning on one or more of the five caps, though only the bottom half or so fall within the “conventional” range used in guitar tone circuits (.015μF to .1μF). Still, we’ve provided a table on page 4 that will show you which caps to turn on in order to achieve any of the 31 combinations.
SW4 is similar to SW2, except that it turns the caps in bank C on and off, and assigns them to the third potentiometer (the one closest to your feet when you’re playing the guitar). We should clarify: this is what happens when you’re using the third potenti-ometer as a tone control, which will not be the case when you set up the ToneShaper for either blender or series/parallel operation.
It’s easy to remember which switch/bank is assigned to which pot, because SW2/bank B is located directly over the middle pot, and SW4/bank C is located directly over the bottom pot. Here’s a drawing that shows the cap/switch mapping:
THE VOLUME KITThe volume kit is a resistor/capacitor that can be engaged to address the problem of treble roll-off that accompanies rolling back your guitar’s volume control. Perhaps you’re aware of this. When you roll the volume control down, there is a discernible tonal change that comes along for the ride. This is the case with all vintage Strats, and it’s something that many people have never noticed, while it drives other people crazy. The volume kit may be switched on or off at almost any time, it’s use is optional. If you check it out then you’ll find that the treble roll-off that exists without it really is there, even though you may never have noticed.
THE BILLY MODSome people don’t like the idea of a volume kit, saying that it brings it’s own baggage to the party. There’s another way to address the treble roll-off issue that involves having the tone pot receive its signal from the volume pot’s output, rather than from the switch. Of course, this only works with a single tone control. Plus, it makes the tone/volume controls interactive, so this method has its own trade-off. Still, there are many people who swear by this method, so we’ve incorporated it into the ToneShaper in those schemes where a single tone control is employed. There are two of these schemes, and they’re the only two where the volume kit is not an option. You can’t use both; it’s one or the other, or neither.
By the way, we call this last mod the “billy mod”, after Billy Wagner, the killin’ (and illin‘) Tele player who first brought it to our attention.
OUR OPINIONWe’re not saying. The truth is that with any debate you can find friends and neighbors on both sides, and where the debate is heated there’s often no benefit in taking a stance.
In the end, it’s all just opinion. Tone is always about opinion, there is no wrong or right. The thinking with the ToneShaper is that we’ll provide all of the options (the “old way”, the volume kit, and the billy mod) so you can try them all and make up your own mind. People often agonize over these things, reading opinions on forum sites in an attempt to sniff out the prevailing wisdom. Our approach is to make it easy for you to try different things to see what works for you.
Tone is like art: your opinion is valid. Listen, learn, have fun, draw your own conclusions.

DATE TITLE
PAGE
REV
DRAWN
© Tone Shapers, Inc. - All Rights Reserved
Tone Shapers, Inc.4005 43rd Ave, Unit 1Vero Beach, FL 32960
ASSY PN
George Ellison
A-TS-S1
ToneShaperfor Stratocaster®
12/27/08
4 of 8N/A
12
34
56
78
910
ON
CTS
12
34
56
ON
CTS
1 2 3 4 5 6 7 8 9 10
ON CTS
1 2 3 4 5 6
ON CTS
B HOTB RTNM HOTM RTNN HOT N RTN
GNDSERIALLINK
GND
JACK GND
JACK OUT
12
34
56
78
910
ON
CTS
12
34
56
ON
CTS
1 2 3 4 5 6 7 8 9 10
ON CTS
1 2 3 4 5 6
ON CTS
B HOTB RTNM HOTM RTNN HOT N RTN
GNDSERIALLINK
GND
JACK GND
JACK OUT
12
34
56
78
910
ON
CTS
12
34
56
ON
CTS
1 2 3 4 5 6 7 8 9 10
ON CTS
1 2 3 4 5 6
ON CTS
B HOTB RTNM HOTM RTNN HOT N RTN
GNDSERIALLINK
GND
JACK GND
JACK OUT
.015μF.015μF.022μF.033μF.037μF.047μF.048μF.055μF.062μF.069μF.070μF.080μF.084μF.095μF.100μF.102μF.115μF.117μF.122μF.133μF.137μF.147μF.148μF.155μF.162μF.169μF.170μF.180μF.184μF.195μF.202μF.217μF
.022μF.033μF
.033μF
.033μF
.033μF
.033μF
.015μF
.015μF
.022μF
.022μF
.022μF
.022μF
.047μF
.047μF
.047μF
.047μF
.047μF
.015μF
.015μF
.022μF.015μF.033μF .047μF
.033μF .047μF
.015μF
.015μF
.015μF
.015μF
.015μF
.015μF
.015μF
.1μF
.1μF
.1μF
.1μF
.1μF
.1μF
.1μF
.1μF
.022μF
.022μF
.022μF
.022μF
.022μF
.022μF
.033μF
.033μF
.033μF
.033μF
.033μF
.047μF
.047μF
.1μF.047μF
.1μF
.1μF
.015μF .022μF
.022μF
.022μF
.1μF.033μF
.033μF
.1μF
.047μF
.047μF
.047μF.015μF
.015μF
.1μF.047μF.033μF .1μF.047μF.033μF .1μF.047μF
.022μF
LET’S GO!Okay, enough, let’s get on with the party. We’ll start with straight-up vintage wiring, the way Leo did it.
See those blue switches? They’re on, and everything else is off. You’ll notice that each tone control has its .1μF cap turned on; the ToneShaper’s tone controls don’t share a capacitor, as they sometimes do in a hardwired guitar. Even where you want both tone controls to have the same value, you have to turn the appropriate cap on for each one.
So let’s say that you try this configuration, but then you want to turn on the volume kit and give it a try. Then you would simply turn on SW1 9&10. They’re the magenta ones below (remember that magenta means optional).
Now, if you wanted to change the value of the capacitors, then you would simply turn on the appropriate switch for each tone control. You might decide that you like the .1μF cap for the middle pickup, but not for the neck. Perhaps you’d like to try a .047μF cap for the neck tone. No problem, on SW2, simply turn off the .1μF cap and turn on the .047μF cap:
Simple!
Now you have the idea. The ToneShaper is very simple to use, and once you get used to the color codes you’ll be able to quickly and easily make any changes you need. On the follow-ing pages, we’ll focus on the main wiring options available.
CAPACITOR MATRIXAs promised, the following table shows all of the combinations that can be achieved with the five cap values provided. Simply turn on the appropriate caps to get the value you’re looking for. The table applies to either set of caps, so if you’re using one of the wiring schemes with two tone controls, then you can select any of the values in the table for each control.
10
98
7
5
2
1
34
6
TONE
10
98
7
5
2
1
34
6
VOLUME
10
98
7
5
2
1
34
6
TONE
10
98
7
5
2
1
34
6
TONE
10
98
7
5
2
1
34
6
VOLUME
10
98
7
5
2
1
34
6
TONE
10
98
7
5
2
1
34
6
TONE
10
98
7
5
2
1
34
6
VOLUME
10
98
7
5
2
1
34
6
TONE
10
98
7
5
2
1
34
6
TONE
10
98
7
5
2
1
34
6
VOLUME
10
98
7
5
2
1
34
6
TONE

DATE TITLE
PAGE
REV
DRAWN
© Tone Shapers, Inc. - All Rights Reserved
Tone Shapers, Inc.4005 43rd Ave, Unit 1Vero Beach, FL 32960
ASSY PN
George Ellison
A-TS-S1
ToneShaperfor Stratocaster®
12/27/08
5 of 8N/A
1 2 3 4 5 6
ON CTS
12
34
56
78
910
ON
CTS
12
34
56
ON
CTS
1 2 3 4 5 6 7 8 9 10
ON CTS
B HOTB RTNM HOTM RTNN HOTN RTNGND
SERIALLINK
GND
JACK GND
JACK OUT
1 2 3 4 5 6
ON CTS
12
34
56
78
910
ON
CTS
12
34
56
ON
CTS
1 2 3 4 5 6 7 8 9 10
ON CTS
B HOTB RTNM HOTM RTNN HOTN RTNGND
SERIALLINK
GND
JACK GND
JACK OUT
1 2 3 4 5 6
ON CTS1
23
45
67
89
10
ON
CTS
12
34
56
ON
CTS
1 2 3 4 5 6 7 8 9 10
ON CTS
B HOTB RTNM HOTM RTNN HOTN RTNGND
SERIALLINK
GND
JACK GND
JACK OUT
1 2 3 4 5 6
ON CTS
12
34
56
78
910
ON
CTS
12
34
56
ON
CTS
1 2 3 4 5 6 7 8 9 10
ON CTS
B HOTB RTNM HOTM RTNN HOTN RTNGND
SERIALLINK
GND
JACK GND
JACK OUT
12
34
56
78
910
ON
CTS
12
34
56
ON
CTS
1 2 3 4 5 6 7 8 9 10
ON CTS
1 2 3 4 5 6
ON CTS
B HOTB RTNM HOTM RTNN HOTN RTNGND
SERIALLINK
GND
JACK GND
JACK OUT
VOLUME
VOLUME
VOLUME
VOLUME
VOLUME
NECK TONE
NECK TONE
MIDDLE TONE
MIDDLE TONE
BRIDGE TONE
BRIDGE TONE
BRIDGE TONE
NECK TONE
NECK + MIDDLE TONE
MIDDLE + BRIDGE TONE
10
98
7
5
2
1
34
6
TONE TONE
10
98
7
5
2
1
34
6
VOLUME VOLUME
10
98
7
5
2
1
34
6
TONE TONE
10
98
7
5
2
1
34
6
TONE
10
98
7
5
2
1
34
6
VOLUME
10
98
7
5
2
1
34
6
TONE
10
98
7
5
2
1
34
6
TONE
10
98
7
5
2
1
34
6
VOLUME
10
98
7
5
2
1
34
6
TONE
VOLUME
TONE 1
TONE 2
10
98
7
5
2
1
34
6
TONE
10
98
7
5
2
1
34
6
VOLUME
10
98
7
5
2
1
34
6
TONE
TWO TONE CONTROLS
The conventional way to wire a Strat, but now with the ability to select the capacitor values for each tone control, and then to decide which pickups the tone controls are assigned to. A lot more flexibility than the old way!
Each of the five diagrams yields a different tone control mapping, so you can dial ‘er in. Assign cap values to the tone controls by simply turning on the appropriate caps on SW2 and SW4. Refer to the table on page 4 for the possible values.
The volume kit is optional for all five of these schemes, so you can turn it on and off to see which you prefer. No billy mod with this one, since there are two tone controls.
DATE TITLE
PAGE
REV
DRAWN
© Tone Shapers, Inc. - All Rights Reserved
Tone Shapers, Inc.4005 43rd Ave, Unit 1Vero Beach, FL 32960
ASSY PN
George Ellison
A-TS-S1
ToneShaperfor Stratocaster®
12/27/08
6 of 8N/A
10
98
7
5
2
1
34
6
TONE
10
98
7
5
2
1
34
6
VOLUME
10
98
7
5
2
1
34
6
TONE
10
98
7
5
2
1
34
6
TONE TONE
10
98
7
5
2
1
34
6
VOLUME VOLUME
10
98
7
5
2
1
34
6
TONE TONE
10
98
7
5
2
1
34
6
TONE
10
98
7
5
2
1
34
6
VOLUME
10
98
7
5
2
1
34
6
TONE
VOLUME
MASTER TONE
BLENDER
10
98
7
5
2
1
34
6
TONE
10
98
7
5
2
1
34
6
VOLUME
10
98
7
5
2
1
34
6
TONE
VOLUMEMASTER TONEBLENDER
VOLUMEMASTER TONEBLENDER BILLY MOD
1 2 3 4 5 6
ON CTS1
23
45
67
89
10
ON
CTS
12
34
56
ON
CTS
1 2 3 4 5 6 7 8 9 10
ON CTS
THE
SE
MU
ST B
E O
FFH
ES
E M
US
T BE
OFF
B HOTB RTNM HOTM RTNN HOTN RTNGND
SERIALLINK
GND
JACK GND
JACK OUT
1 2 3 4 5 6
ON CTS
12
34
56
78
910
ON
CTS
12
34
56
ON
CTS
1 2 3 4 5 6 7 8 9 10
ON CTS
THE
SE
MU
ST B
E O
FFH
ES
E M
US
T BE
OFF
B HOTB RTNM HOTM RTNN HOTN RTNGND
SERIALLINK
GND
JACK GND
JACK OUT
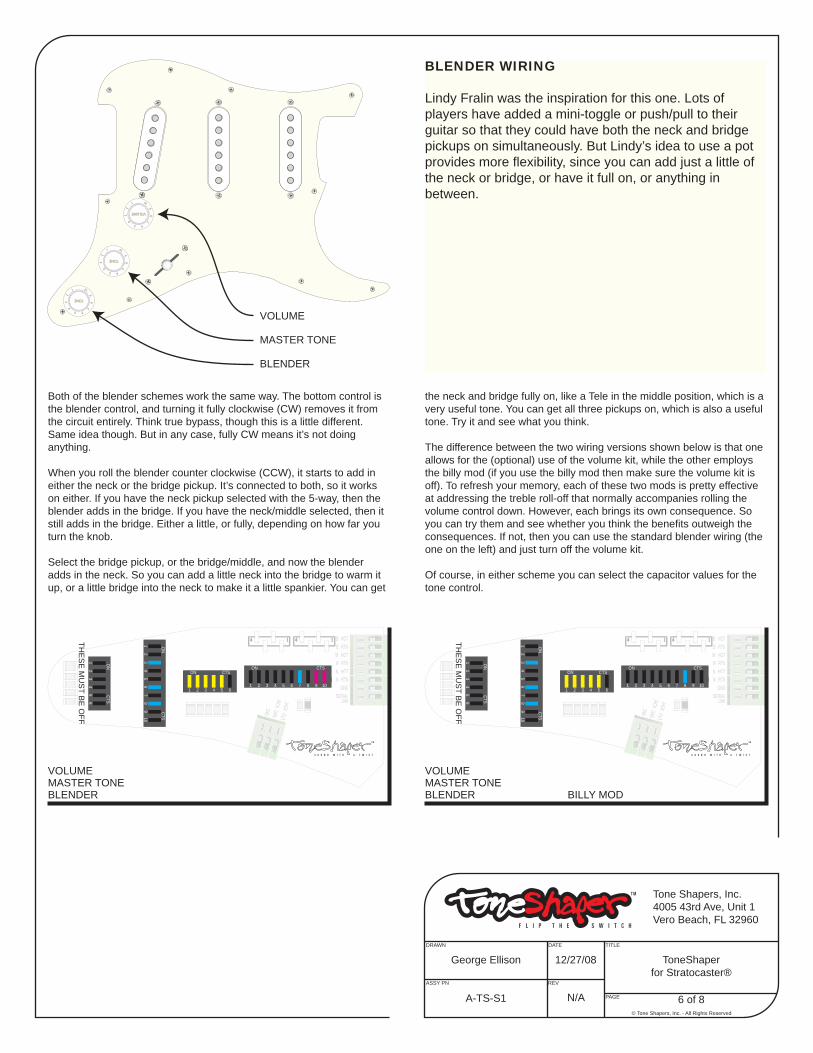
Both of the blender schemes work the same way. The bottom control is the blender control, and turning it fully clockwise (CW) removes it from the circuit entirely. Think true bypass, though this is a little different. Same idea though. But in any case, fully CW means it’s not doing anything.
When you roll the blender counter clockwise (CCW), it starts to add in either the neck or the bridge pickup. It’s connected to both, so it works on either. If you have the neck pickup selected with the 5-way, then the blender adds in the bridge. If you have the neck/middle selected, then it still adds in the bridge. Either a little, or fully, depending on how far you turn the knob.
Select the bridge pickup, or the bridge/middle, and now the blender adds in the neck. So you can add a little neck into the bridge to warm it up, or a little bridge into the neck to make it a little spankier. You can get
the neck and bridge fully on, like a Tele in the middle position, which is a very useful tone. You can get all three pickups on, which is also a useful tone. Try it and see what you think.
The difference between the two wiring versions shown below is that one allows for the (optional) use of the volume kit, while the other employs the billy mod (if you use the billy mod then make sure the volume kit is off). To refresh your memory, each of these two mods is pretty effective at addressing the treble roll-off that normally accompanies rolling the volume control down. However, each brings its own consequence. So you can try them and see whether you think the benefits outweigh the consequences. If not, then you can use the standard blender wiring (the one on the left) and just turn off the volume kit.
Of course, in either scheme you can select the capacitor values for the tone control.
BLENDER WIRING
Lindy Fralin was the inspiration for this one. Lots of players have added a mini-toggle or push/pull to their guitar so that they could have both the neck and bridge pickups on simultaneously. But Lindy’s idea to use a pot provides more flexibility, since you can add just a little of the neck or bridge, or have it full on, or anything in between.

DATE TITLE
PAGE
REV
DRAWN
© Tone Shapers, Inc. - All Rights Reserved
Tone Shapers, Inc.4005 43rd Ave, Unit 1Vero Beach, FL 32960
ASSY PN
George Ellison
A-TS-S1
ToneShaperfor Stratocaster®
12/27/08
7 of 8N/A
10
98
7
5
2
1
34
6
TONE
10
98
7
5
2
1
34
6
VOLUME
10
98
7
5
2
1
34
6
TONE
10
98
7
5
2
1
34
6
TONE
10
98
7
5
2
1
34
6
VOLUME
10
98
7
5
2
1
34
6
TONE
10
98
7
5
2
1
34
6
TONE TONE
10
98
7
5
2
1
34
6
VOLUME VOLUME
10
98
7
5
2
1
34
6
TONE TONE
VOLUME
MASTER TONE
SERIES / PARALLEL
10
98
7
5
2
1
34
6
TONE
10
98
7
5
2
1
34
6
VOLUME
10
98
7
5
2
1
34
6
TONE
1 2 3 4 5 6
ON CTS
12
34
56
78
910
ON
CTS
12
34
56
ON
CTS
1 2 3 4 5 6 7 8 9 10
ON CTS
THE
SE
MU
ST B
E O
FFH
ES
E M
US
T BE
OFF
B HOTB RTNM HOTM RTNN HOTN RTNGND
SERIALLINK
GND
JACK GND
JACK OUT
1 2 3 4 5 6
ON CTS1
23
45
67
89
10
ON
CTS
12
34
56
ON
CTS
1 2 3 4 5 6 7 8 9 10
ON CTS
THE
SE
MU
ST B
E O
FFH
ES
E M
US
T BE
OFF
B HOTB RTNM HOTM RTNN HOTN RTNGND
SERIALLINK
GND
JACK GND
JACK OUT
SERIES / PARALLEL
Time to get fat. Do you know the difference between series and parallel? Strat and Tele pickups are usually combined in parallel, yielding that hollow, open sound that we all love.
That is, we hope you love it. You do love it, right?
Gibson’s PAF, on the other hand, combines coils in series. That’s what gives it that full, punchy midrange. Now you can have the best of both worlds at the turn of a knob!
Like the blender options shown on the previous page, both of the series/parallel schemes work the same way. The difference is that the one on the left allows for the optional use of the volume kit, while the one on the right uses the billy mod to manage treble roll-off.
The middle control in these schemes is a master tone, and you can assign the capacitors to it by turning on the capacitors you want, using SW2.
The bottom control is the series/parallel control, and turning it fully clockwise (CW) removes it from the circuit entirely. Think true bypass, though this is a little different. Same idea though. But in any case, fully CW means it’s not doing anything. So with the control fully CW, you can forget it’s there and just use the Strat like you normally would, the pickup combinations will be just what you’d expect.
When you’re ready for a little mayhem, then turn that bottom knob fully counter clockwise (CCW). Unlike the blender, which can be turned on a little or a lot, with the series/parallel wiring you need to turn the bottom knob fully in either direction, no leaving it in the middle. Fully CW - nothing; fully CCW - mayhem. Got it?
Now, with the knob fully CCW, the switch positions don’t work like normal. In position 1 (all the way back) you get the bridge/middle in series. In position 5 (all the way forward) you get the neck/middle in series. In positions 2-4, you get only the middle pickup. Okay? Again, this is only when the bottom knob is fully CCW. Otherwise the 5-way works normally.
VOLUMEMASTER TONESERIES / PARALLEL SERIES / PARALLEL
VOLUMEMASTER TONE
BILLY MOD

DATE TITLE
PAGE
REV
DRAWN
© Tone Shapers, Inc. - All Rights Reserved
Tone Shapers, Inc.4005 43rd Ave, Unit 1Vero Beach, FL 32960
ASSY PN
George Ellison
A-TS-S1
ToneShaperfor Stratocaster®
12/27/08
8 of 8N/A
VOLUME VOLUME
VOLUME
NECK TONE
MASTER TONE
BRIDGE TONE
BLENDER
POT 3 NOT USEDMASTER TONE
10
98
7
5
2
1
34
6
TONE
10
98
7
5
2
1
34
6
VOLUME
10
98
7
5
2
1
34
6
TONE
10
98
7
5
2
1
34
6
TONE
10
98
7
5
2
1
34
6
VOLUME
10
98
7
5
2
1
34
6
TONE
10
98
7
5
2
1
34
6
TONE
10
98
7
5
2
1
34
6
VOLUME
10
98
7
5
2
1
34
6
TONE
10
98
7
5
2
1
34
6
TONE TONE
10
98
7
5
2
1
34
6
VOLUME VOLUME
10
98
7
5
2
1
34
6
TONE TONE
VOLUME
TONE 1
TONE 2 or BLENDER
1 2 3 4 5 6
ON CTS1
23
45
67
89
10
ON
CTS
12
34
56
ON
CTS
1 2 3 4 5 6 7 8 9 10
ON CTS
B HOTB RTNM HOTM RTNN HOTN RTNGND
SERIALLINK
GND
JACK GND
JACK OUT
1 2 3 4 5 6
ON CTS
12
34
56
78
910
ON
CTS
12
34
56
ON
CTS
1 2 3 4 5 6 7 8 9 10
ON CTS
THE
SE
MU
ST B
E O
FFH
ES
E M
US
T BE
OFF
B HOTB RTNM HOTM RTNN HOTN RTNGND
SERIALLINK
GND
JACK GND
JACK OUT
1 2 3 4 5 6
ON CTS
12
34
56
78
910
ON
CTS
12
34
56
ON
CTS
1 2 3 4 5 6 7 8 9 10
ON CTS
THE
SE
MU
ST B
E O
FFH
ES
E M
US
T BE
OFF
B HOTB RTNM HOTM RTNN HOTN RTNGND
SERIALLINK
GND
JACK GND
JACK OUT
SSH
Say, who’s up for a little humbucker in their bridge? Well, your ToneShaper will accommodate you in three ways. All three schemes auto-tap the humbucker in the 2 position, so you’ll be combining two single coils in that position, like with the legendary Lone Star Strat.
Scheme one gives you a neck tone and a bridge tone, with selectable cap values. Scheme 2 gives you a master tone control, with the bottom pot unused. And scheme 3 also gives you the master tone, but pot 3 becomes a blender control that will allow you to combine the neck/bridge, or have all three pickups on. Read the blender page for more details.