to: datatel users - accounting office - illinois state university
TRANSCRIPT

CHAPTER 12 Query Instructions for Datatel UI 1.5
The queries are ad hoc reports that have been written at Illinois State University to satisfy various user data reporting needs that could not be satisfied by the standard reports provided within the Datatel Colleague Financials system. The process used to execute the queries has changed very little with the transition to Datatel’s User Interface (UI) 1.5. You can still preview reports prior to deciding whether or not to print them.
FY2005 Queries Important Note: These same instructions apply to the FY1999, FY2000, FY2001, FY2002, FY2003, FY2004 & FY2005 queries. The only thing that varies is the query label: XQ01 = FY99, XQ51 = FY00, X151 = FY01, X251 = FY02, X351 = FY03, X451 = FY04 and X551 = FY05.. Simply said, the "Q" has been replaced by a "2" for FY2002 reports and by a “3” for FY2003 reports, and so on. From this point forward, we will refer only to FY2005, but you may assume that the previous years’ reports work in the same way. Thus, you can use these instructions if you want an FY2005 query report, just remember that when you see “X4" it can be replaced with a “Q”, “1”, “2” or “3” in the mnemonic, depending on the fiscal year you want. The new X576, X577, X578 and X579 queries for FY2005 have also been added to this document. X551 FY05 GR All Reports (excl personnel) X565 FY05 Non-GR Budget Balances X552 FY05 Agency All Reports X566 FY05 Cash Balance Listing X553 FY05 GR All Reports w/Multi Dept X567 FY05 Non-GR Budget Tfr Listing X554 FY05 GR College CAST (All) X568 FY05 Non-GR PO Listing X555 FY05 GR College A & S (All) X569 FY05 Non-GR Req Listing X556 FY05 GR College Business (All) X570 FY05 Non-GR Expense Listing X557 FY05GR College Education (All) X571 FY05 Grant Full Report (5) X558 FY05 GR College Fine Arts (All) X572 FY05Non-GR Expense Multi-Dept X559 FY05 GR Expense Listing X573 FY05 GR Expense Multi-Dept by Unit X560 FY05 GR Budget Tfr Listing X574 FY05 Non-GR Expense by Object X561 FY05 GR Budget Balances X575 FY05 Grant-to-Date Budget Balance X562 FY05 GR Purchase Order List X576 FY05 Grant Expenses by Umbrella X563 FY05 GR Requisition List X577 FY05 Expense List for Object X564 FY05 Receipt Listing X578 FY05 Expenses for an Umbrella X579 FY05 Comparative YTD Rev/Exp
Please note: GR denotes General Revenue (combined funds 10100, 10200 and 10400) Location of ad hoc reports within UI 1.5 The queries can be accessed in several ways: One method is type XQTP in the Mnemonic field on the Menu Bar, then click Go. When the Report Mnemonic dialog box appears, enter the XQ report name or enter X5…for FY05; X3… for FY03, etc., then select the desired query from the displayed list. You may also use the Menu tree, selecting CF > XISU – ISU Defined Processes > XQTP; then enter X5… in the Report Mnemonic dialog box. You may also click on File > Run , then type in XQTP when prompted for the mnemonic and hit <Enter>. Enter the four-digit X mnemonic when prompted and hit <Enter>.
- 56 -

Printing XQ Reports in UI 1.5
The following printing instructions apply to all of the Datatel X reports. After entering the appropriate criteria on the input screen you should send the report to the screen and view the output with the Report Browser. Click on the Save icon; the following dialog box will appear. Click on Update to save the input data and proceed with the report.
• After saving the input data, the following screen will appear. Enter H in the Output Device field and
save again. This will generate the report on your screen prior to deciding what to do with the output. It also prevents printing a report you did not desire.
• Upon saving, a gray screen will appear while the report is processing, followed by the Report Browser;
a sample page of the report follows. You may then decide what to do with the output.
- 57 -

• To expand a report, click on the “Maximize” button in the upper right corner of the Report Browser or use the vertical and horizontal scroll bars to view the full report.
• Use the Report Browser Toolbar buttons, shown below, to navigate through a report, print a report, or
save a copy of a report.
• Click the Exit Browser button to close the Report Browser and return to the application workspace.
• Click the Import button to save a copy of the report to your local hard drive. You are prompted to specify a name and path for the saved report. Saving a report's output to a local file allows you to then import that file into another application such as Microsoft Word or Excel. Once the data is imported into Word or Excel, you can further format the data, embed the report within a memo, create graphs, print, etc.
• Click the Page Up button to move to the previous page of the report.
• Click the Page Down button to move to the next page of the report.
• Click the First Page button or Last Page button to jump to the first or last page of the report. You may also use your keyboard’s Page Up and Page Down buttons.
• Click the Print Local button to print the report to a local printer (i.e., a printer that is accessible from Windows). This option downloads the report to your PC and uses Windows to print the report. When you select Print Local, a Printer Setup dialog box is displayed.
Note: For best results with the Print Local option, you must choose an appropriate font size and page orientation. If the font is too large, the report may not page properly or may be truncated short of the right margin. By default the setting is Courier New 7, which allows all reports and documents to print without word-wrapping or page overflows. Font size 8 will also work with nearly all reports.
- 58 -

• Some reports can accommodate a larger font. If you wish to increase the font size for a particular
report, click on the Font selection button to display the Font Selection screen.
• Select the font, style, and size you want and click OK.
(Any changes that you make to the font selection will remain in effect only for the current session. In all cases, make sure that the Use character mapping check box is checked.)
• Click the Print Remote button to print to an RPM printer. We do not currently recommend using RPM because the reports generally overflow the page and either word-wrap or truncate data. Most departments no longer support the RPM software.
• The Current Page/Total Pages box shows the number of the currently displayed page and the total number of pages in the report.
• Setting Report Browser Preferences: you can resize the browser window to fit any selected report.
If the entire report does not fit on the screen, use the vertical and horizontal scroll bars to view the other parts of it. To customize the font, background color, and text color of your browser, click the Options menu and choose Font or Change Colors.
Choosing the Print Local option sends the output of your report to a printer defined on your Windows desktop.
- 59 -

X451 FY2004 General Revenue Report (use X551 for FY2005)
This mnemonic will generate a series of reports for an account that begins with Fund numbers: 10100, 10200, 10300, or 10400. This series includes: • Account Balance Listing (same as X461 - excluding personnel) that includes requisitions and the
effects of current day expenditure transactions (the standard GLSA report does not include requisitions and only reflects balances through the previous day).
• Opening budget for each budget category and all Budget Transfers to arrive at current budget balances (same as X460)
• Purchase Order Listing by budget category (commodities, contractual, etc.) (same as X462) • Requisition Listing by budget category (commodities, contractual, etc.) (same as X463) • Expense Listing by budget category (commodities, contractual, etc.) (same as X459). There is a date
prompt for this section, so you can choose the period of time for which you want the expenses listed. For example, year-to-date, for a month, or for a specific period of time.
Instructions: (You must hit <Enter> after typing in the information at the prompts/in the fields when working with XQs.) • Enter XQTP then X451:
The following screen (without the data) will then appear:
- 60 -

• At the “ENTER 9 DIGIT UNIT FOR ACCOUNT BALANCE LISTING” prompt, enter the nine-digit Unit number for the report and depress <Enter>. This nine-digit number should be the Unit of the Umbrella account.
• At the “ENTER 9 DIGIT UNIT NUMBER FOR BUDGET ENTRIES” prompt, enter the same nine-digit Unit number for Budget Transfers and depress <Enter>.
For the Purchase Order, Requisition, and Expense Listings you will be asked to enter at least the first three digits of your Unit number followed by three periods (…) if fewer than nine digits are entered. By entering only the first three digits, data from all sub-units that begin with the same three digits will be included in the report. • At the Purchase Order prompt, enter at least the first three digits of the Unit followed by “…” • At the Requisition prompt, enter at least the first three digits of the Unit followed by “…” • At the Expense Listing prompt, enter at least the first three digits of the Unit followed by “…” • Note: Only the first five fields appear on the first page. Depress <Enter> to get to fields “6” and “7” to
enter the desired report dates (shown on the next page).
- 61 -

• Enter the beginning date for the Expense Listing, such as 070103 for July 1, 2003 • Enter the ending date for the Expense Listing, such as 073103 for July 31, 2003. • Click on the “Save” button. • Select “H” for the Peripheral Device to print the reports to the screen. After selecting “H,” click the
“Save” icon. • The reports will appear one the Report Browser one report at a time; you must close each report before
the subsequent reports can be viewed. • Click on the “Maximize” button (middle button in the upper right hand corner) to see a full-screen
report. You may then print the report using the Print Local instructions, save it as a file, etc. • Close each report to move to the next report in the sequence. • When you have viewed and closed the final report in the sequence, you will return to the workspace.
X452 FY2004 Agency Reports
(use X552 for FY2005) This mnemonic will generate a series of reports that includes: • Account Balance Listing (same as X465) (budget-expenditures-requisitions/purchase orders =
available budget) • Calculation of the “Cash Balance.” (same as X466) Cash is different than Budget. Cash is the actual
amount of money in the account. You must have Cash to cover the established budget (established spending authority).
• Budget Transfers (same as X467) • Purchase Order Listing (same as X468) • Requisition Listing (same as X469) • Expenditures by object code (subscriptions, rentals, etc) (same as X470) with date prompt to select
desired time period • Receipt Listing by object code (fees, sales, etc.) (same as X464) with date prompt to select desired
time period Instructions: • Enter XQTP then X452. • At the “ENTER 5 DIGIT FUND NUMBER FOR ACCOUNT BALANCE LISTING” prompt, enter
the five-digit Fund number (first five digits of account number) of the Umbrella account for which you are inquiring.
• At the “ENTER 9 DIGIT UNIT FOR ACCOUNT BALANCE LISTING” prompt, enter the nine-digit Umbrella Unit number.
- 62 -

• At the “ENTER 5 DIGIT FUND NUMBER FOR CASH BALANCE” prompt, enter the same five-digit Fund number that was entered at the Account Balance Listing prompt.
• At the “ENTER AT LEAST 3 DIGITS OF UNIT FOLLOWED BY … FOR CASH BALANCE” prompt, enter three or more digits of Unit for which you are running the report. This should coincide with the Umbrella account. If you have more than one Umbrella account within your Unit number, then you must enter the number of digits needed to capture data for that Umbrella number. For example, assume 502 is the Unit number for the Agriculture department. Assuming the Farm's Umbrella Unit is 502200000, then 5022… should be entered to capture Farm related data.
• Enter the same Fund and Unit numbers for the remaining prompts. • Enter the desired beginning and ending dates when prompted for expenses and receipts. • Click on the “Save” button. • Follow the standard printing procedures.
- 63 -

X453 FY2004 General Revenue with Multiple Department Prompt (use X553 for FY2005)
This mnemonic will generate a report for Fund numbers 10100, 10200, 10300, and 10400 for departments that have sub-units within their own Umbrella accounts. For example, department 490 has several Umbrella accounts. The report will include a (an):
- 64 -

• Account Balance Listing • Opening budget and all Budget Transfers by Object to arrive at the current budget • Purchase Order Listing by budget category (contractual, commodities, etc.) • Requisition Listing by budget category (contractual, commodities, etc.) • Expense Listing by budget category (contractual, commodities, etc.). There is a date select, which
allows you to choose the desired beginning and ending dates of expenditures to be listed. For example, year-to-date, a specific month, or any other selected time period within the fiscal year.
Instructions:
• Enter XQTP then X453. • At the “ENTER 9 DIGIT UNIT FOR ACCOUNT BALANCE LISTING” prompt, enter the nine-
digit Unit number for the report. This should be the Unit of the Umbrella account. • At the “ENTER 9 DIGIT UNIT NUMBER FOR BUDGET ENTRIES” prompt, enter the same
nine-digit Unit number for Budget Transfers as for the Account Balance Listing. • This query is designed to permit you to enter more than one Unit number for the Purchase Order,
Requisition, and Expense Listings. Note that the prompts for these listings state that you must
- 65 -

enter a ' before the first Unit number and a ' after the last Unit number entered. When you are finished entering the last Unit number, just depress the <Enter> key.
• You will be prompted to enter a beginning and ending date for the Expenditure Listing. This permits you to select the desired time period of the Expense Listing. The dates should be entered in the format mmddyy. For example, July 1, 2005 should be entered as 070105.
• Click on the “Save” button. • Follow the standard printing procedures.
- 66 -

X454 FY2004 GR College CAST (All) X455 FY2004 GR College A & S (All) X456 FY2004 GR College Business (All) X457 FY2004 GR College Education (All) X458 FY2004 GR College Fine Arts (All)
(use X55X for FY2005) Queries X454 through X458 were specially designed for each of the Colleges. This was necessary due to University Research Grants (URGs) being assigned numbers that begin with the College designation. Since the queries were specially written, minimal entry is needed. You only need to enter the desired beginning and ending dates in the mmddyy format to obtain the Expenditure Listing. Queries X459 through X463 are General Revenue (Funds 10100, 10200, 10300, and 10400) Operating Account reports. The data listed in these reports is exactly the same as the data listed in the X451 report. These reports enable you to generate a single portion of the X451 report, such as: • X459 Expense Listing • X460 Budget Transfers • X461 Budget Balances • X462 Purchase Order Listing • X463 Requisition Listing
X459 FY2004 General Revenue Expense Listing
(use X559 for FY2005)
- 67 -

Instructions: • Enter XQTP then X459. • Enter at least the first three digits of the Umbrella Unit number followed by “…” if fewer than nine
digits are entered. By entering only the first three digits, data from all sub-units that begin with the same three digits will be included in the report.
• Enter beginning and ending dates for the Expense Listing in mmddyy format. For example, July 1, 2003 should be entered as 070103.
• Click on the “Save” button. • Follow the standard printing procedures.
X460 FY2004 General Revenue Budget Transfer Listing (use X560 for FY2005)
This report will generate a list of Budget Transfers for an account that starts with 10100. The report begins with an opening budget for each budget category (contractual, commodities, etc.) and lists all subsequent transfers to arrive at the current budget balance.
Instructions: • Enter XQTP then X460. • Enter the Umbrella Unit number. • Click on the “Save” button. • Follow the standard printing procedures.
- 68 -

X461 FY2004 General Revenue Budget Balance Listing
(use X561 for FY2005)
This mnemonic will generate an Account Balance Listing report with the appearance of the standard GLSA report. The X461 report includes requisitions and current day expenditure activity, whereas the GLSA report does not include requisitions or current day expenditures.
Instructions: • Enter XQTP then X461. • Enter the nine-digit Umbrella Unit number. • Click on the “Save” button. • Follow the standard printing procedures.
X462 FY2004 General Revenue Purchase Order Listing (use X562 for FY2005)
This mnemonic will generate a listing of outstanding Purchase Orders for an account. The listing includes Blanket Purchase Orders.
Instructions: • Enter XQTP then X462. • Enter at least three digits of the Umbrella Unit number followed by “…” if fewer than nine digits are
entered. By entering only the first three digits, data from all sub-units that begin with the same three digits will be included in the report.
• Click on the “Save” button. • Follow the standard printing procedures.
- 69 -

X463 FY2004 General Revenue Requisition Listing
(use X563 for FY2005) This mnemonic will generate a listing of outstanding Requisitions for an account.
Instructions:
• Enter XQTP then X463. • Enter at least three digits of the Umbrella Unit number followed by “…” if fewer than nine digits
are entered. By entering only the first three digits, data from all sub-units that begin with the same three digits will be included in the report.
• Click on the “Save” button. • Follow the standard printing procedures.
X464 FY2004 Receipt Listing
(use X551 for FY2005) This report provides the same information as the receipt portion of X452 Agency Accounts mnemonic. It provides an opportunity to generate only a Receipt Listing for an account.
- 70 -

Instructions: • Enter XQTP then X464. • Enter the five-digit Fund number of the account (the first five digits of the account number). • At the Unit number prompt, enter three or more digits of Unit for which you wish to obtain the report.
This should coincide with the Umbrella account. If you have more than one Umbrella account within your Unit number, then you must enter the number of digits needed to capture data for that Umbrella number. If fewer than nine digits of the Unit number are entered, you should enter three periods “…” after the number. For example, assume 502 is the Unit number for the Agriculture department. Also, assume the Farm's Umbrella Unit is 502200000. Then 5022… should be entered to capture Farm related receipts.
• Enter the desired beginning and ending dates of the report in the mmddyy format. For example, July 1, 2003 should be entered as 070103.
• Click on the “Save” button. • Follow the standard printing procedures.
X465 – X470 (use X565 – X570 for FY2005)
These queries give the same data as the corresponding portion of the X452 Agency Report query. You can run these mnemonics to get just the desired section of the Agency report from the following. X465 FY2004 Non-GR Budget Balances X466 FY2004 Cash Balance Listing, calculates the FY2004 Cash Balance in an account X467 FY2004 Non-GR Budget Transfer Listing X468 FY2004 Non-GR PO Listing (includes Blanket POs) X469 FY2004 Non-GR Req Listings X470 FY2004 Non-GR Expense Listing, with user specifying report dates
X471 FY2004 Grant/Contract Report (115xx) (use X571 for FY2005)
This report will give you the following information for a grant or contract. These are accounts that begin with the Fund number 115xx. • Grant-to-date account balances (budget – expenses -- requisitions/purchase orders = available budget) • FY2004 Budget Transfers • Outstanding Purchase Orders • Outstanding Requisitions • FY2004 Expenditures in budget Umbrella order (contractual, commodities, etc.). There is a date
prompt that allows you to choose beginning and ending dates within the current fiscal year for which you wish to run the report.
- 71 -

- 72 -

Instructions: • Enter XQTP then X471. • Enter the five-digit Fund number (first five digits of the account number) of the grant. • Enter the nine-digit Unit number of the grant. • Follow the prompts to enter the five-digit Fund and nine-digit Unit for Budget Transfers, POs & Reqs. • Enter the five-digit Fund and nine-digit Unit number for expenses. Enter the beginning date of the
expense report in mmddyy format, such as 070103 for July 1, 2003. Enter the ending date of the report in mmddyy format.
• Click on the “Save” button. • Follow the standard printing procedures.
X472 FY2004 Multi-Department Expense Listing
(Use X572 for FY2005) This mnemonic is intended to be run for any account that does not begin with 10100, 10200, 10300, or 10400, but does have more than one Unit in a budget pool or more than one Unit number for a given Fund number. The report will page break and give totals per nine-digit Unit. The report is in Object (last six digits of the account number) order. For example, suppose a department had Units 120000000, 120100000, 120200000, and 120000100 for Fund 10529. You would enter 120… at the Unit prompt and the report would give you a separate report and totals per nine-digit Unit.
Instructions: • Enter XQTP then X472. • Enter the five-digit Fund number. • Enter at least the first three digits of the Unit followed by “…” For example, 120… or 5022… • Enter the beginning date of the report in mmddyy format. For example, 070103 for July 1, 2003. • Enter the ending date of the report in mmddyy format. • Click on the “Save” button. • Follow the standard printing procedures.
- 73 -

X473 FY2004 Operating Account Multi-Department Expenses (Use X573 for FY2005)
This report is for Operating Account (Funds 10100, 10200, 10300, and 10400) departments that have more than one nine-digit Unit in their budget pool. For example, suppose a department has Units 120000000. 120100000, 120200000, and 120000100 in its budget pool. This report will list expenditures for each nine-digit Unit by budget category (contractual, commodities, etc.). In this example, the report would page break and total on the four different Unit numbers.
Instructions: • Enter XQTP then X473. • Enter at least the first three digits of the Unit followed by … For example, 120… • Enter the beginning date of the report in mmddyy format. For example, 070103 for July 1, 2003. • Enter the ending date of the report in mmddyy format. For example, 073103 for July 31, 2003. • Click on the “Save” button. • Follow the standard printing procedures.
- 74 -

X474 FY2004 Non-GR Multiple Department Expense List (This mnemonic can be used for all Funds except 10100, 10200, 10300, and 10400)
(Use X574 for FY2005)
This report gives the same data as XQ72, except totals are given for each Object (subscriptions, dues, catering, etc.). Instructions: • Enter XQTP then X474. • Enter the five-digit Fund number. • Enter at least the first three digits of the Unit followed by “…” For example, 120… or 5022… • Enter the beginning date of the report in mmddyy format. For example, 070103 for July 1, 2003. • Enter the ending date of the report in mmddyy format. For example, 063003 for June 30, 2003. • Click on the “Save” button. • Follow the standard printing procedures.
- 75 -

X475 Grant-to-Date Account Balance Listing (Use X575 for FY2005)
This report will give you grant-to-date balances for a grant or contract. Grants are funds that begin with 115xx. The budget, expenses, requisitions/PO’s, and available balances are grant-to-date.
Instructions: • Enter XQTP then X475. • Enter the five-digit Fund number and the nine-digit Unit number. • Click on the “Save” button. • Follow the standard printing procedures.
X476 – Grant Expenditures by Umbrella (Use X576 for FY2005)
X476 will generate a list of grant expenditures by Umbrella (personnel, contractual, commodities, etc.). The expenditure listing can be generated only for the current fiscal year. Consequently, more than one report must be run for grants crossing fiscal years. • Enter XQTP then X476. • Complete the prompts. • Note you can choose the beginning and ending dates for the listing within the fiscal year. • Click on the save button after you enter data into the screen prompt. It is recommended that you print
the report to the screen for viewing prior to sending the output to the printer. • Click on the save button again and the report will generate. A sample of the report follows:
- 76 -

X477 – Expenditures for an Object Code(s) (Use X577 for FY2005)
X477 can be used to generate an expenditure report for an Object code(s). This is useful if you desire a very limited expenditure report. For example, you can enter 691… and get an expenditure listing for internal service department charges. • Enter XQTP then X477. • Complete the prompts. • Note you can choose the beginning and ending dates for the listing within the fiscal year. • Click on the save button after you enter data into the screen prompt. It is recommended that you print
the report to the screen for viewing prior to sending the output to the printer. • Click on the save button again and the report will generate. A sample of the report follows:
- 77 -

X478 – Expenditures for an Umbrella (Use X578 for FY2005)
X478 will generate an expenditure listing for one Umbrella account, such as Contractual, Commodities, Equipment, etc. This will alleviate the necessity of generating an expenditure listing for all Umbrellas when data from only one Umbrella is desired. • Enter XQTP then X478. • Note you can choose the beginning and ending dates for the listing within the fiscal year. • Click on the save button after you enter data into the screen prompt. It is recommended that you print
the report to the screen for viewing prior to sending the output to the printer. • Click on the save button again and the report will generate.
A sample report output follows:
- 78 -

X479 – Comparative Revenue/Expenditures at End of a Given Month
(Use X579 for FY2005) X479 will generate a fiscal year 2004 report of revenue (for those accounts having revenue) and expenditures showing the current year Budget, Current Month activity, and Year-to-Date (YTD) data for the current and three previous fiscal years. The user chooses the desired month of report. This comparative report shows the trend and/or timing of revenue and expenditures for an account. A total is given for revenue and for expenditures along with the net amount to indicate whether the account is or has operated at a profit or loss. The following data will appear on the report:
• User entered ‘Month of Report’ • Unit name and number for which the report is generated • Time and date the report is generated • Object code and description • Current year Budget • Current month activity • YTD data for current and three previous fiscal years as of the end of the selected month • Total revenue, total expenditures, and net of revenue and expenditures
Instructions: Enter XQTP and hit <Enter>. Type in X479 at the Report Mnemonic prompt and depress <Enter>. The following screen illustrates this:
- 79 -

After you depress <Enter> or click OK, the following prompt will appear:
Enter the desired data. The following example requests data for an Agency account. The Fund is the 5-digit fund number. The Unit is the 9-digit Unit number. For a multi-department report, just enter at least the first three digits
of the Unit followed by three dots (…). For example, entering 120... will generate a report for all Units that begin with 120 and with the Fund(s) entered. IMPORTANT!: The ‘VALUE MARK’ is the FISCAL YEAR month with July being 1, December being 6, and June being 12, etc. In this example, the number 6 will be entered for a December report. Enter the same VALUE MARK at all requested prompts. The Date is completed by the user. Enter the ‘as of’ date and/or other text you want to appear in the heading of the report. The following illustrates the completed screens.
- 80 -

Enter the same VALUE MARK in each requested prompt.
- 81 -

Click on the Save icon; the following dialog box will appear. Click on Update to save the input data and proceed with the report.
The following Output Device screen will appear. Enter H for Hold. This will generate the report to your screen for viewing prior to deciding what to do with the output.
Click the Save icon and the report will generate.
- 82 -

Following is a sample of the output.
Heading with unit, time & date
Total Revenues
Current year and three previous fiscal year data as of the end of July which was the requested month.
Budget Current Month Activity
There will also be a total for expenditures and a net of revenue and expenditures at the end of the report.
- 83 -

XD Query Instructions for Datatel R17 – UI 1.5
The XD queries are ad hoc reports that have been written at Illinois State University to supplement data reporting needs that could not be satisfied by the standard reports provided within the Datatel Colleague Financial system. The XD Queries differ from the XQ Queries in that they may be department specific and/or pertain to non-financial data, such as Fixed Assets (Equipment Inventories).
Location of ad hoc reports within UI 1.5
The queries can be accessed in several ways: The first method is type XQTP in the Mnemonic field on the Menu Bar, then click Go. When the Report Mnemonic dialog box appears, enter the XD report name or enter XD… and select the desired query from the displayed list. You may also use the Menu tree, selecting CF > XISU – ISU Defined Processes > XQTP; then enter XD… in the Report Mnemonic dialog box. You may also click on File > Run , then type in XQTP when prompted for the mnemonic and hit <Enter>. Enter the four-digit XD mnemonic when prompted and hit <Enter>.
Financial Data Reports XD03 Unit Expenditures with Expanded Item Description XD04 Unit Receipt Listing All Funds XD05 Prior Date Expenditures – W/Payroll XD06 Prior Date Expenditures – WO/Payroll XD07 General Revenue GLSA Detail Listing XD08 GLSA Detail Listing for Non-General Revenue Accounts XD09 Expenditures by Voucher Number – Double Spaced XD10 Detail of Cashier Deposits XD32 Five-year Revenue/Expenditure Ledger History XD33 Exp/Rev Data FY00-04 by Umbrella
Inventory Listings
XD20 Departmental Inventory Listing By Building/Room XD21 Departmental Inventory Listing By Tag XD22 Multiple Department Listing By Building/Room XD23 Multiple Department Listing By Tag XD24 Multiple Department Listing with Multiple Equipment Categories By Building/Room XD25 Multiple Unit Listing with Multiple Equipment Categories By Tag
- 84 -

XD03 – Unit Expenditures with Expanded Item Description
XD03 will generate an expenditure report with an expanded item description. You will enter three or more digits of the nine-digit unit and a report matching that portion of the account will be generated, regardless of the source of funds. For example, entering “120…” will generate an expenditure report for any unit that begins with “120.” Entering “5022…” will generate a report for all unit’s that begin with “5022.” Entering “502200001” would generate a report for just that one unit. The following data will appear on the report: • Heading with unit name and number along with the time and date the report was generated • Date of transaction • Voucher or Journal Entry number • Payee • Expanded Item Description • Check number • Transaction amount • Appropriation code (1200 for contractual, 1300 for commodities, etc.) • Fund number • Object code • Partial object code description Instructions: (You must hit <Enter> after typing in the information at the prompts/in the fields when working with XDs.) • Enter XQTP and hit <Enter>. Type XD03 at the Report Mnemonic prompt and hit <Enter>. The
following screen illustrates this:
• After you depress <Enter> or click OK, the following screen prompt will appear:
- 85 -

• Enter the desired data. The following example desires data for FY2003 for a unit like 120000000 and
with a beginning date of July 1, 2002 and an ending date of July 25, 2002.
Click on the Save icon; the following dialog box will appear. Click on Update to save the input data and proceed with the report.
• After saving the input data, the following screen will appear. Enter H in the Output Device field and
save again. This will generate the report on your screen prior to deciding what to do with the output. It also prevents printing a report you did not desire.
- 86 -

• Upon saving, a gray screen will appear while the report is processing, followed by the Report Browser; a sample page of the report follows. You may then decide what to do with the output.
• To expand a report, click on the “Maximize” button in the upper right corner of the Report Browser or
use the vertical and horizontal scroll bars to view the full report. • Use the Report Browser Toolbar buttons, shown below, to navigate through a report, print a report, or
save a copy of a report.
• Click the Exit Browser button to close the Report Browser and return to the application workspace.
• Click the Import button to save a copy of the report to your local hard drive. You are prompted to specify a name and path for the saved report. Saving a report's output to a local file
• allows you to then import that file into another application such as Microsoft Word or Excel. Once
the data is imported into Word or Excel, you can further format the data, embed the report within a memo, create graphs, print, etc.
• Click the Page Up button to move to the previous page of the report.
• Click the Page Down button to move to the next page of the report.
• Click the First Page button or Last Page button to jump to the first or last page of the report. You may also use your keyboard’s Page Up and Page Down buttons.
- 87 -

• Click the Print Local button to print the report to a local printer (i.e., a printer that is accessible from Windows). This option downloads the report to your PC and uses Windows to print the report. When you select Print Local, a Printer Setup dialog box is displayed.
Note: For best results with the Print Local option, you must choose an appropriate font size and page orientation. If the font is too large, the report may not page properly or may be truncated short of the right margin. By default the setting is Courier New 7, which allows all reports and documents to print without word-wrapping or page overflows.
• Some reports can accommodate a larger font. If you wish to increase the font size for a particular
report, click on the Font selection button to display the Font Selection screen.
• Select the font, style, and size you want and click OK.
Any changes that you make to the font selection will remain in effect for future sessions. In all cases, make sure that the Use character mapping check box is checked.
• Click the Print Remote button to print to an RPM printer. We do not currently recommend using RPM because the reports generally overflow the page and either word-wrap or truncate data.
• The Current Page/Total Pages box shows the number of the currently displayed page and the total number of pages in the report.
- 88 -

• Setting Report Browser Preferences: you can resize the browser window to fit any selected report. If the entire report does not fit on the screen, use the vertical and horizontal scroll bars to view the other parts of it. To customize the font, background color, and text color of your browser, click the Options menu and choose Font or Change Colors.
XD04 – Receipt Listing for a Unit
XD04 will generate a Receipt report for a given unit or a portion of a unit. You will enter three or more digits of the nine-digit unit and a report matching that portion of the account will be generated, regardless of the source of funds. For example, entering “120…” will generate a receipt report for any unit that begins with “120.” Entering “5022…” will generate a report for all unit’s that begin with “5022.” Entering “502200001” would generate a report for just that one unit. The following data will appear on the report: • Heading with the unit name and number along with the time and date the report was generated • Transaction date • Cashier batch number • Source code CR for Cash Receipt and JE for Journal Entry • Receipt description • Transaction amount • Object code • Object code description • Unit number Instructions: See instructions for XD03 (pages 3-5). Sample XD04 report follows:
- 89 -
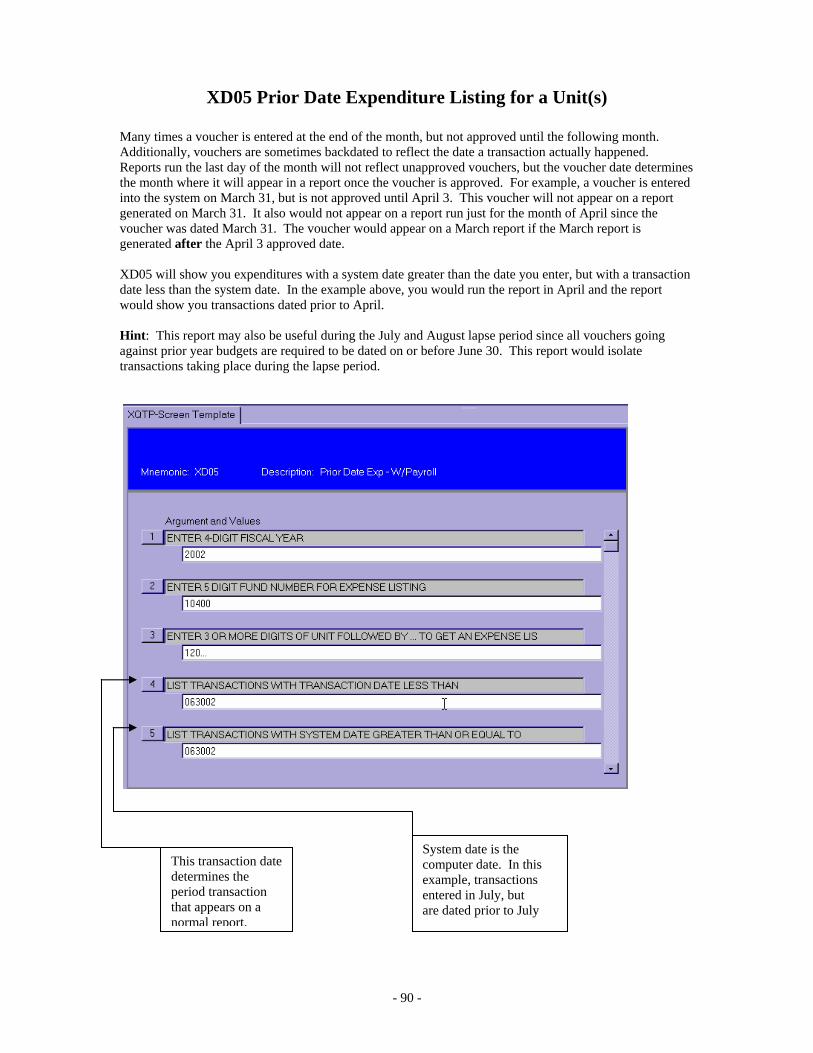
XD05 Prior Date Expenditure Listing for a Unit(s) Many times a voucher is entered at the end of the month, but not approved until the following month. Additionally, vouchers are sometimes backdated to reflect the date a transaction actually happened. Reports run the last day of the month will not reflect unapproved vouchers, but the voucher date determines the month where it will appear in a report once the voucher is approved. For example, a voucher is entered into the system on March 31, but is not approved until April 3. This voucher will not appear on a report generated on March 31. It also would not appear on a report run just for the month of April since the voucher was dated March 31. The voucher would appear on a March report if the March report is generated after the April 3 approved date. XD05 will show you expenditures with a system date greater than the date you enter, but with a transaction date less than the system date. In the example above, you would run the report in April and the report would show you transactions dated prior to April. Hint: This report may also be useful during the July and August lapse period since all vouchers going against prior year budgets are required to be dated on or before June 30. This report would isolate transactions taking place during the lapse period.
This transaction date determines the period transaction that appears on a normal report.
System date is the computer date. In this example, transactions entered in July, but are dated prior to July
- 90 -

This is the date that will appear in the heading of the report.
The transaction date is the date of the voucher. The system date is the
actual date entered into the system. Entered in July, dated June.
- 91 -

XD06 Prior Date Expenditure (without Payroll) Listing for a Unit(s)
To run this report, see instructions for XD05. XD06 excludes Payroll expenditures. In most cases XD05 and XD06 will yield the same results as Payroll is generally posted prior to the end of the month.
XD07 – General Revenue GLSA Detail Listing XD07 will generate a list of expenditure ledgers for an account by Umbrella. Only accounts that have a balance will be printed. The report will also detail the Budget and Available Balance for each Umbrella. XD07 can be used for any fiscal year. You will be prompted to enter the fiscal year for which you want the report. Note: The fiscal year will have to be entered three times. The same fiscal year must be entered in all three places. Instructions: XD07 must be accessed through the XQTP mnemonic just as the other Xxxx queries. After you enter XD07, the input prompt screen will appear. Complete the four input prompts. Note the fiscal year must be entered three times and the year must be the same in all three places.
Click on the save button after you enter data into the screen prompt. It is recommended that you print the report to the screen for viewing prior to sending the output to the printer.
- 92 -

Following is a sample of the report output (XD07):
XD08 – GLSA Detail Listing for Non-General Revenue Accounts XD08 will generate a list of expenditure ledgers for an account by Umbrella. Since most non-General Revenue accounts only have one Umbrella, most of the reports will be listed by Object code (the last six digits of the account number). XD08 can be run for any fiscal year. You will be prompted to enter the fiscal year for which you want the report. Note: The fiscal year will have to be enterer three times. The same fiscal year must be entered in all three places. Instructions: XD08 must be accessed through the XQTP mnemonic just as are all the other Xxxx queries. After entering XD08, the prompt screen will appear. Complete the five input prompts.
- 93 -

Click on the save button after you enter data into the screen prompt. It is recommended that you print the report to the screen for viewing prior to sending the output to the printer.
- 94 -

Following is a sample of the report output (XD08):
- 95 -

XD09 -- Expenditures By Voucher Number – Double Spaced
XD09 will generate an expenditure report in voucher number order. The report is also double-spaced to enhance readability. You will be prompted to enter the five-digit FUND number and at least three digits of the UNIT number (the unit you wish to generate the report for). The following data will appear on the report: • Heading with UNIT name and number, time and date of report generation • Date of transaction • Computer System Date (the date the voucher was actually entered into Datatel) • Voucher or Journal Entry number • Payee • Check number • Transaction amount • Object code • Partial object code description Instructions: (You must hit <Enter> after typing in the information at the prompts/in the fields when working with XDs.) • Enter XQTP, then XD09 at the Report Mnemonic prompt. • After you depress <Enter>, the following will appear:
Enter at least three digits of UNIT followed by three dots if fewer than nine digits are entered.
- 96 -

• Enter the desired data. The above example generates an expenditure report for FY2002 for FUND 10702 and any UNIT that begins with 5705 for the period beginning November 1, 2001 and ending November 30, 2001.
• After saving the input data, follow Print Local instructions (pages 3-5) to view report with the Report Browser.
• Upon saving, the report will generate. A sample page of the report follows. You will then decide what
to do with the output.
The system date is the calendar date entered into the system. If it is blank, then it is the same as the voucher/JE date.
- 97 -

XD10 – Detail of Cashier Deposits
XD10 generates a report that details deposits at the Cashier’s Office. You will be prompted to enter the five-digit FUND number and at least three digits of the UNIT number (the unit you wish to generate the report for). The following data will appear on the report: • Heading with UNIT number along with the time and date of report generation • Receipt date • Cashier Batch Number - A00000xxxx • Separates the deposit into Cash and Non-cash (checks, etc.) • Receipt number • Non-AR code • Non-AR code description Instructions: (You must hit <Enter> after typing in the information at the prompts/in the fields when working with XDs.) • Enter XQTP then XD10 in the Report Mnemonic dialog box. • Enter the desired data. The above example generates a detail deposit report for FUND 10702 and any
UNIT that begins with 5705 for the period beginning November 1, 2001 and ending November 30, 2001.
• After saving the input data, the following screen will appear. Enter ‘H’ and save again. This will generate the report to your screen first and prevents printing a report you did not desire.
Enter at least three digits of UNIT followed by three dots if fewer than nine digits are entered.
• Upon saving, the report will generate. A sample page of the report follows. You will then decide what
to do with the output.
- 98 -

Cash Deposit Total
Receipt Number
Non-AR Code Description
Date Deposited
Cashier Batch #
Non-cash Portion AR Code
Split Non-AR
Code
- 99 -

XD32 – Five Year Revenue/Expense Ledger History XD32 will generate a listing containing a five-year history of revenues (for those accounts having revenue) and expenditures by ledger. This may be beneficial for looking at trends. The user will enter the heading to appear on the report and has the option to double space the report. The following data will appear on the report:
• The person generating the report will enter the heading that will appear on the report. The time and date of the report will automatically appear.
• The 25-digit account number along with the object code (last six digits of the account number) description will appear for each five-year revenue or expense.
• A sub-total for revenues and for expenses is given along with the total net revenue minus expense. Instructions: (You must hit <Enter> after typing in the information at the prompts/in the fields when working with the XD’s)
• Enter XQTP and hit <Enter>. Type XD32 at the Report Mnemonic prompt and hit <Enter>. The following screen illustrates this:
After you depress <Enter> or click OK, the following screen prompt will appear:
- 100 -

• Enter the desired data. The following example requests a report for the General Revenue unit beginning with 120.
IMPORTANT!: For a General Revenue fund, you must enter three fund numbers separated by two single quote marks. This is necessary because your general revenue budget may be comprised of all three funding sources. 120… has been entered in the second line. If fewer than nine digits is entered in this field, the number must be followed by three periods indicating the selection should include all accounts for the fund that begin with 120 in this example. The user should insert the title of the report on the third line. This can be anything the user desires. In this example, the heading will be ‘5-year Expenditure History for Unit 120’ The user can determine if the report should appear single or double-spaced. Enter DBL.SPC for a double-spaced report or leave this line blank for a single-spaced report.
Click on the Save icon; the following dialog box will appear. Click on Uddate to save the input data and proceed with the report.
- 101 -

• After saving the input data, the following screen will appear. Enter H in the Output Device field and save again. This will generate the report on your screen prior to deciding what to do with the output. It also prevents printing a report you did not desire.
• Upon saving, a gray screen will appear while the report is processing, followed by the Report Browser; a sample page of the report follows. You may then decide what to do with the output.
- 102 -

XD20 – XD25 Inventory Queries The XD20 – XD25 inventory queries are accessed in the same manner as the other XD and XQ queries. You first enter mnemonic XQTP and then enter the XDxx mnemonic. As with other Datatel reports, you may view the report on the screen, print it locally, print it remotely (only with the RPM software), or save it to a file. See instructions at the beginning of the XD documentation for more details. XD20 – Departmental Inventory Listing by Building/Room XD20 will generate an inventory listing for a department by Building and Room. Data appearing on the report includes: • Heading with report date and department name • Building number • Room number • Tag number • Item description • Manufacturer • Model number • Serial number • Purchase order number • Purchase date • Purchase amount
- 103 -

Note: This is the inventory department number, not your Datatel Unit number.
The following is a sample report:
Rm.
Bldg
- 104 -

XD21 Departmental Inventory Listing by Tag Number XD21 generates an inventory listing for a department by Tag Number. Note the department number is the Inventory Control Department Number, not the Datatel Unit number. On this report, the Tag Number is in the first column and Building in the second column (the Building is in the first column in XD20).
Building number and Name
Tag Number
- 105 -

XD22 – Multiple Department Inventory Listing by Building/Room
This report is similar to XD20 except you may enter multiple department numbers for an inventory listing by Building/Room. This may be useful for units that have more than one funding source, for example, General Revenue, Agency, and Bond Revenue. When entering the Property Control Department number, leave a space between the department numbers. See following example:
First department number
space
Second department number
Note: You may enter more than two department numbers. See sample output for XD20. The report format will appear the same.
- 106 -
XD23 – Multiple Department Inventory Listing by Tag Number The input data will be the same as shown for XD22 above. The output format will be the same as the output shown for XD21. The only difference is there are multiple departments on this report.
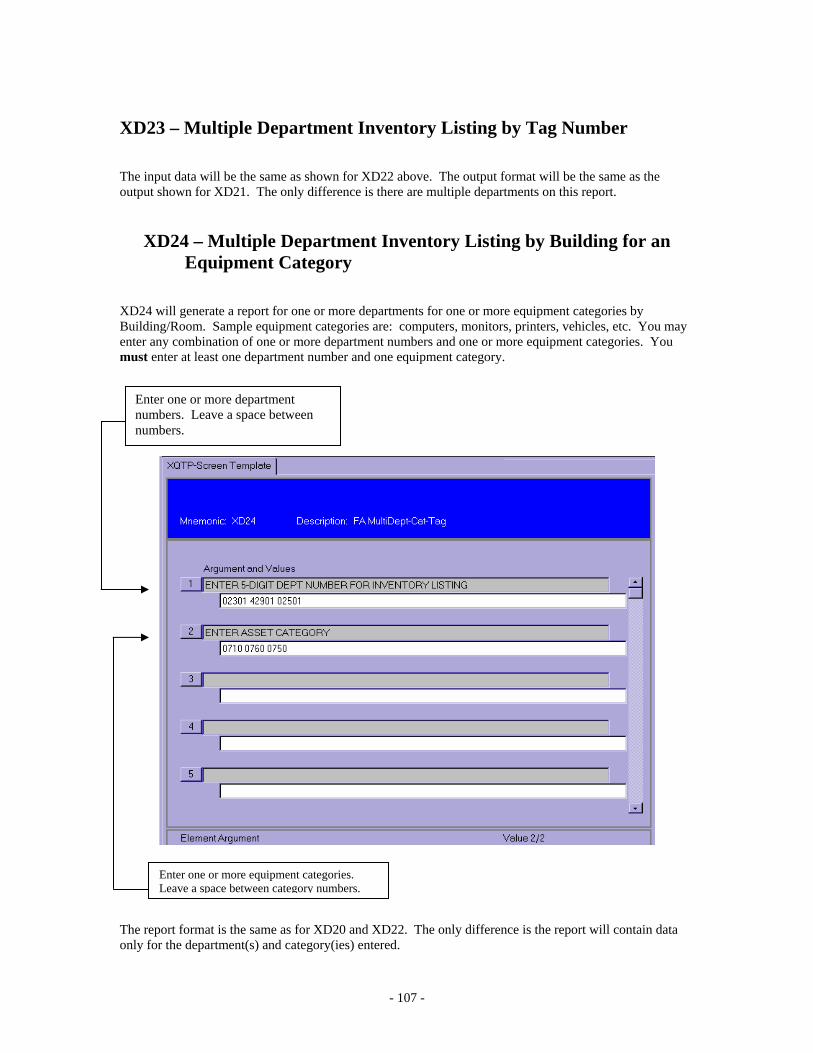
XD24 – Multiple Department Inventory Listing by Building for an Equipment Category XD24 will generate a report for one or more departments for one or more equipment categories by Building/Room. Sample equipment categories are: computers, monitors, printers, vehicles, etc. You may enter any combination of one or more department numbers and one or more equipment categories. You must enter at least one department number and one equipment category.
Enter one or more department numbers. Leave a space between numbers.
Enter one or more equipment categories. Leave a space between category numbers.
The report format is the same as for XD20 and XD22. The only difference is the report will contain data only for the department(s) and category(ies) entered.
- 107 -

XD25 – Multiple Department Inventory Listing by Tag Number for One
or More Equipment Categories XD25 is similar to XD24 except the output will be in Tag Number order rather than by Building/Room. The input screen will be the same as illustrated for XD24 above. Note: You must enter at least one department number and one equipment category. The report format is the same as for XD21 and XD23. The only difference is the report will contain data only for the department(s) and category(ies) entered. To determine the BUILDING numbers, go into ASST, enter the TAG number of an existing asset. The Building Number and Name will be shown in the Building field.
Building number/name
Enter ellipsis (…) to display list of Building names and numbers
- 108 -

To see additional Building numbers, type an ellipsis (…) in the Building field, and a list of all Building numbers will appear:
To change a Building number, select the Building by clicking in the box to the left of the desired Building number and name.
- 109 -

XD33 – Four Year Revenue/Expense History by Umbrella XD33 will generate a listing containing a four-year history of revenues (for those accounts having revenue) and expenditures by Umbrella (contractual, commodities, etc.). This may be beneficial for looking at trends. The user will enter the heading to appear on the report and has the option to double space the report. The following data will appear on the report:
• The person generating the report will enter the heading that will appear on the report. The time and date of the report will automatically appear.
• The 25-digit account number along with the object code (last six digits of the account number) description will appear for each five-year revenue or expense.
• A sub-total for revenues and for each umbrella is given along with the total net revenue minus expense.
Instructions: (You must hit <Enter> after typing in the information at the prompts/in the fields when working with the XD’s)
• Enter XQTP and hit <Enter>. Type XD33 at the Report Mnemonic prompt and hit <Enter>. The following screen illustrates this:
After you depress <Enter> or click OK, the following screen prompt will appear:
- 110 -

• Enter the desired data. The following example requests a report for the General Revenue unit beginning with 120.
IMPORTANT!: For a General Revenue fund, you must enter three fund numbers separated by two single quote marks. This is necessary because your general revenue budget may be comprised of all three funding sources. 120… has been entered in the second line. If fewer than nine digits is entered in this field, the number must be followed by three periods indicating the selection should include all accounts for the fund that begin with 120 in this example. The user should insert the title of the report on the third line. This can be anything the user desires. In this example, the heading will be ‘Sample 4-year Expense History by Umbrella for Unit 120’ The user can determine if the report should appear single or double-spaced. Enter DBL.SPC for a double-spaced report or leave this line blank for a single-spaced report.
- 111 -

Click on the Save icon; the following dialog box will appear. Click on Update to save the input data and proceed with the report.
• After saving the input data, the following screen will appear. Enter H in the Output Device field
and save again. This will generate the report on your screen prior to deciding what to do with the output. It also prevents printing a report you did not desire.
• Upon saving, a gray screen will appear while the report is processing, followed by the Report Browser; a sample page of the report follows. You may then decide what to do with the output.
- 112 -

The heading you enter
s
Contractual total
s
Travel total- 113 -