tms flexcel studio for .net - api developers guide - tms software
TRANSCRIPT

TMS SOFTWARE FLEXCEL STUDIO FOR .NET
1 | P a g e
Flexcel API Developers Guide
Documentation: May, 2010
Copyright © 2010 by tmssoftware.com bvba Web: http://www.tmssoftware.com
Email : [email protected]
TMS SOFTWARE FLEXCEL STUDIO FOR .NET
2 | P a g e
Table of contents Introduction ............................................................................................................. 3 Basic Concepts ......................................................................................................... 4
Arrays ................................................................................................................. 4 Cell Formats ......................................................................................................... 4 Cell and Style Formats............................................................................................. 5 Font Indexes ......................................................................................................... 5 Colors ................................................................................................................. 5 Date Cells ............................................................................................................ 6 Copying and pasting native Excel data ......................................................................... 7
Reading and Writing Files ............................................................................................ 8 Opening and saving files .......................................................................................... 8 Modifying files ...................................................................................................... 8 Using the ApiMate tool: ........................................................................................... 8
Considerations about Excel 2007 support ....................................................................... 10 Autofitting Rows and Columns ..................................................................................... 12
Autofitting Merged Cells ........................................................................................ 13 Preparing for Printing ............................................................................................... 15
Making the sheet fit in one page of width ................................................................... 15 Repeating Rows and Columns at the top ..................................................................... 15 Using Page Headers/Footers.................................................................................... 15 Intelligent Page Breaks .......................................................................................... 16
Using Excel's User Defined Functions (UDF) ..................................................................... 19 Introduction ....................................................................................................... 19
Miscellanea ........................................................................................................... 22 Using .NET languages different from C# ..................................................................... 22 Streaming Excel and Pdf files to the browser: .............................................................. 24 Finding out what format string to use in TFLXFORMAT .................................................... 24 .FORMAT ........................................................................................................... 24 Recalculating Linked Files ...................................................................................... 26
Closing Words ......................................................................................................... 29

TMS SOFTWARE FLEXCEL STUDIO FOR .NET
3 | P a g e
Introduction The FlexCel API (Application Programmer Interface) is what you use to read or write Excel files on a low level way. To create Excel file with a template, use FlexCelReport.

TMS SOFTWARE FLEXCEL STUDIO FOR .NET
4 | P a g e
Basic Concepts Before starting writing code, there are some basic concepts you should be familiar with. Mastering them will make things much easier in the future.
Arrays To maintain our syntax compatible with Excel OLE automation, most FlexCel indexes/arrays are 1-based. That is, cell A1 is (1,1) and not (0,0). To set the first sheet as ActiveSheet, you would write ActiveSheet=1 and not ActiveSheet=0. So, in C++ loops should read: “for (int i=1;i<=Count;i++)”, In VB.NET they should read “for i = 1 to Count” and in Delphi they should be like “for i:=1 to Count” The two exceptions to this rule are XF and Font indexes, that are 0 based because they are so on Excel.
Cell Formats All formats (colors, fonts, borders, etc) on an Excel workbook are stored into a list, and referred by number. This number is known as the XF (eXtended Format) index. A simple example follows:
Here Cell B3 has XF=0 and the XF definition for the background color is green. Row 6 has XF=2, so all the empty cells on row 6 are yellow. Column C has XF=1, so all the empty cells on column C that do not have a Row format are Blue. Most methods at FlexCel return an XF index, and then you have to look at the XF list (using the GetFormat method) to get a class encapsulating the real format. There are two helper methods, GetCellFormatDef and GetCellVisibleFormatDef that obtain the XF index and return the format class in one step. To create new formats, you have to use the AddFormat method. Once you get the Id of the new XF, you can use it as you wish.

TMS SOFTWARE FLEXCEL STUDIO FOR .NET
5 | P a g e
Also, you don't have to worry also on inserting a format 2 times, if it already exists, AddFormat will return the existing id and not add a new XF entry.
Cell and Style Formats XF formats can be of two types, “Cell” or “Style”. Cell formats are applied directly to a cell and can have a “ParentStyle” which must be a style format. Style formats cannot have ParentStyle and cannot be applied to cells, but they can be used as base for defining different Cell formats. You can know if a TFlxFormat contains a “Style” or “Cell” format by looking at its “IsStyle” property. Also, a cell style can link only parts of its format to its parent style, for example have the font linked so when you change the font in the style it changes the font in the cell, but not the cell borders. In order to set which properties are linked to the main style, you need to change the “LinkedStyle” property in TFlxFormat. You can create new Style formats with ExcelFile.SetStyle, and new Cell formats with ExcelFile.AddFormat. Once you create a new style and give it a name, you can get its definition as a TFlxFormat, change its “IsStyle” property to true, define which propertyies you want to link with the “LinkedStyle” property, and add that format using AddFormat to get the cell format. Once you have the cell style, you can just apply it to a cell.
The LinkedStyle class has a member, “AutomaticChoose”, that if left to true (the default) will compare your new format with the style and only link those properties that are the same.
For example, let’s imagine you create a style “MyHyperlink”, with font blue and underlined. Then you create a Cell format that uses “MyHyperLink” as parent style, but also has red background, and apply it to cell A1. If you leave AutomaticChoose true, FlexCel will detect that the cell format is equal in everything to its parent style except in the background, so it will not link the background of the cell to the style. If you later change the background of MyHyperlink, cell A1 will continue to be red. This allows for having “partial styles”, as in the example above, a “hyperlink” style defines that text should be blue and underlined, but it doesn’t care about the cell background. If you want to manually set which properties you want to have linked instead of FlexCel calculating that for you, you need to set AutomaticChoose to false and set the “Linked….” Properties in LinkedStyle to the values you want.
Font Indexes The same way we have an XF list were we store the formats for global use, there is a Font list were fonts are stored to be used by XFs. You normally don't need to worry about the FONT list because inserting on this list is automatically handled for you when you define an XF format. But, if you want to, you can for example change Font number 7 to be 15 points, and all XFs referencing Font 7 will automatically change to 15 points.
Colors While colors in Excel up to 2003 were indexes to a palette of 56 colors, Excel 2007 introduces true

TMS SOFTWARE FLEXCEL STUDIO FOR .NET
6 | P a g e
color, and FlexCel 5.0 implements it too. What is nice about them is that they can be retrofitted in the xls file format, so while you won’t be able to see true color in Excel 2003, an xls file saved with FlexCel 5 and opened in FlexCel 5 or Excel 2007 will have true color, even if it is not xlsx. There are four kinds of colors that you can use in Excel:
RGB: This is just a standard color specified by its Red, Green and Blue values.
Theme: There are 12 theme colors, and each of them can have a different tint (brightness) applied. The palette Excel 2007 shows by default is a Theme palette:
In this case, you can see the 12 theme colors horizontally, and vertically variations of those colors with different brightness. Themes are a nice way to specify colors, since you can change the theme later, and all colors will change to match.
Indexed Colors. This is kept for background compatibility with Excel 2003, but we strongly recommend you forget about them.
Automatic Color. This changes depending if the color is a background or a foreground. You can access any of these variants with the struct “TExcelColor”. TExcelColor also automatically converts from a System.Drawing.Color, so you can just specify something like: MyObject.Color = Color.Blue; If you want to use a theme color, you will have to use: MyObject.Color = TExcelColor.FromTheme(…); The “NearestColorIndex” used in older version of FlexCel has been deprecated and you shouldn’t use it.
Date Cells As you might already know, there is no DATE datatype in Excel. Dates are saved as a double floating number where the integer part is the number of days that have

TMS SOFTWARE FLEXCEL STUDIO FOR .NET
7 | P a g e
passed from 1/1/1900, and the fractional part is corresponding fraction of the day. For example, the number 2.75 stands for "02/01/1900 06:00:00 p.m." You can see this easily at Excel by entering a number on a cell and then changing the cell format to a date, or changing the cell format of a date back to a number. The good news is that you can set a cell value to a DateTimeValue, and FlexCel will automatically convert the value to a double, keeping in count “1904” date settings (see below). That is, if you enter XlsFile.SetCellValue(1,1, now), and the cell (1,1) has date format, you will write the actual value of "now" to the sheet. The bad news is that you have no way to know if a cell has a number or a date just by looking at its value. If you enter a date value into a cell and then read it back, you will get a double. So you have to look at the format of the cell. There is a helper function, TFlxNumberFormat.FormatValue that can help you on this issue.
Excel also has a “1904” date mode, where dates begin at 1904 and not 1900. This is used on Excel for mac, but you can change this option in Excel for Windows too. FlexCel completely supports 1900 and 1904 dates, but you need to be careful when converting dates to numbers and back.
Copying and pasting native Excel data XlsFile has a group of methods that allow you to copy/paste from/to FlexCel to/from Excel in native Excel format. All methods copy and paste the data on BIFF8 and Tabbed-Text format, to allow for copying/pasting from other sources besides Excel. Copying and pasting in native BIFF8 format is a great advance over copying/pasting on plain text only. It allows you to keep cell formats/colors/rounding decimals/merged cells/etc. But it has its limitations too:
It can't copy/paste images
It can't copy/paste strings longer than 255 characters
It can't copy the data on multiple sheets. We would like to say that these limitations are not FlexCel's fault. The BIFF8 specification is correctly implemented; those are limitations on Excel's part. Of course, Excel can copy and paste everything without problems, but this is because Excel doesn't use the clipboard to do the operation. If you close all instances of Excel, open a Worksheet, copy some cells to the clipboard, close Excel and open it again you will run into the same limitations. Copy/paste limitations on Excel don't show when it is kept in memory.

TMS SOFTWARE FLEXCEL STUDIO FOR .NET
8 | P a g e
Reading and Writing Files The native FlexCel engine is encapsulated on the class XlsFile. This class stores an Excel file in memory, and has methods allowing loading a new file into it, modifying it, or saving its contents to a file or a stream.
Important: Even when a FlexCel object is fully managed and you don't need to dispose it, keep in mind that it stores a full spreadsheet in memory. Do not leave global XlsFile objects hanging around when you don't need them because they can use a lot of memory. Just set them to null when you are done using them, or use local objects.
Opening and saving files A simple code to process an Excel file would be:
private void ProcessFile(string sourceFileName,
string destFileName)
{
XlsFile xls= new XlsFile(true);
xls.Open(sourceFileName);
//... process the file
xls.Save(destFileName);
}
Here we can note:
1. On this example xls variable is a local object, so there is no need to free it. If xls was a global variable, it would be a good idea to set xls=null at the end of the method (with a try/finally block).
2. By default FlexCel never overwrites an existing file. So, before saving you always have to call File.Delete, or set XlsAdapter.AllowOverWriteFiles property = true. On this example, we set AllowOverWriteFiles = true on the line: “... = new XlsFile(true)”.
Modifying files Once you have loaded a document with XlsFile.Open or created a new empty file with XlsFile.NewFile you can proceed to modify it. Add cells, formats, images, insert sheets, delete ranges, merge cells or copy ranges from one place to another. It is not on the scope of this document to show how to do this, you should look first at the available demos for the different things you can do, and then on the reference (F1 from Visual Studio or Delphi) to learn about specific methods.
Using the ApiMate tool: Many times an easy way to find out the exact command you need to call to do something is using the ApiMate tool (in the “Tools” folder). In short, this tool will “convert” a spreadsheet into code. If for example, you want to know how to insert a formatted comment in cell A3, just create a new
!

TMS SOFTWARE FLEXCEL STUDIO FOR .NET
9 | P a g e
Excel file, write the comment, save the file and open it with ApiMate. It will show you the code you need, in C#, VB.NET or Delphi.NET/Prism. ApiMate is not a panacea, and there are many methods you will never find with it (for example the methods for searching of for inserting and copying rows), but if can be very useful. You can find a tutorial on how to use it at http://www.tmssoftware.com/flexcel/tutorial.htm

TMS SOFTWARE FLEXCEL STUDIO FOR .NET
10 | P a g e
Considerations about Excel 2007 support FlexCel 5.0 introduces basic support for Excel 2007 file format (xlsx), and also for the new features in it, like 1 million rows or true color. Only basic features are supported in xlsx, no charts, objects, images or conditional format yet. We will be adding this functionality over the 5.x series. While most changes are under the hood, and we made our best effort to keep the API unchanged, some little things did change and could bring issues when updating: • The number of rows by default in FlexCel is now 1048576, and the number of columns is 16384. This can have some subtle effects:
1. Named ranges that were valid before might become invalid. For example, the name “LAB1” would be a valid cell reference in 2007 mode, (Just like “A1”). In Excel 2003 you can have up to column “IV”, but in Excel 2007 you can have up to column “XFD”, so almost any combination of 3 characters and a number is going to be a valid cell reference, and thus can’t be a name. If you have issues with this and can’t change the names, you will have to use the “Compatibility mode” by setting the static variable: ExcelFile.ExcelVersion
2. “Full Ranges” might become partial. Full ranges have the property that they don’t shrink
when you delete rows. That is, if for example you set the print area to be A1:C65536 in Excel 2003, if you delete or insert rows the range will stay the same. If you open this file with FlexCel 5 or Excel 2007, and delete the row 1, the range will shrink to A1:C65535, as it is not full anymore. To prevent this, FlexCel automatically converts ranges that go to the last row or column in an xls file to go to the last row or column in an xlsx file. If you don’t want FlexCel to autoexpand the ranges, you can change this setting with the static variable: XlsFile. KeepMaxRowsAndColumsWhenUpdating Also, when using XlsFile, use references like “=sum(a:b)” to sum in a column instead of “=sum(a1:b65536)”
3. Conditional Formats might become invalid
This is a limitation on how Conditional Formats are stored in an xls file. They are stored as a complement-2 of 2 bytes for the rows and one bye for the column. For example, if you have a formula in a conditional format that references the cell in the row above, this will be stored as “0xFFFF”, which is the same s “-1” if you are using signed math. And as you have exactly 2 bytes of rows and 1 byte of columns they are also the same. It is the same to add 65535 rows (wrapping) or to subtract one, you will always arrive to the cell above. Now, with more columns and rows this is not true anymore. And you can’t know by reading a file if the value was supposed to mean “-1” or “+65535”. So both Excel and FlexCel might interpret a CF formula wrong when the cells are separated by too many rows or columns. Again the solution if you have this issue is to turn “ExcelFile.ExcelVersion” back to 2003.
•Colors are now true color, not indexed.
1. In order to support it, we needed to change all “Object.ColorIndex” properties to “Object.Color”, so code won’t compile right away. You need to do a search and replace for “ColorIndex” properties. See the section about colors in this document for more information about colors and themes.
2. If you relied in changing the palette to change cell colors, this code might break. Before,
you had only indexed colors, so if you changed the palette color 3 from red to blue, all red cells would turn blue. Now, color will only change if the cell has indexed color. You might have a cell with the exact same read but with color specified as RGB, and this won’t change

TMS SOFTWARE FLEXCEL STUDIO FOR .NET
11 | P a g e
when you change the palette. It is recommended that you use themes in situations like this now.
• Default File Format for Saving: In version 4 finding the default file format for saving was simple, it saved in xls. Now, it isn’t so simple. By default, if you do a simple xls.Save(filename) without specifying a file format we will use the file extension to determine it. When it is not possible (for example if you are saving to a stream) we will use the format the file was originally in when you loaded it. If you prefer to change the default, you can change the static property ExcelFile. DefaultFileFormat •Headers and footer changes: Now headers and footers can be set differently for odd/even pages, or for the first page. While the properties PageHeader/PageFooter still exist in XlsFile, you are advised to use GetPageHeaderAndFoooter and SetPageHeaderAndFooter instead for better control. Also the method to change the images in the headers and footers changed to accept these different possibilities. Look at APIMate to see how to use these new methods. •.NET 3.5 Required for xlsx: .NET 3.5 adds functionality to manipulate zipped files, and this is basic to implement xlsx support, as xlsx are zip files. It makes no sense to duplicate all that functionality ourselves.

TMS SOFTWARE FLEXCEL STUDIO FOR .NET
12 | P a g e
Autofitting Rows and Columns FlexCel offers support for “autofitting” a row or a column, so it expands or shrinks depending on the data on the cells. But autofitting is not done automatically, and we have good reasons for it to be this way. So, to explain this better, let's try a simple example: 1) Imagine that we create a new Excel File, write “Hello world” on cell A1, and go to “Format->Column->AutoFit Selection”. We will get something like this:
2) As you see, column “A” was resized so “Hello World” fits inside. Easy, isn't it? Well, not as much as we would like it to be. Let's now change the zoom to 50%:
3) Now the text “Hello world” is using part of column “B”. We didn't changed anything except the zoom an now text does not fit anymore, in fact, you can autofit it again and column “A” will get bigger. What happened here? The easy answer is that Excel is resolution dependent. Fonts scale in “steps”, and they look different at different resolutions. What is worse, printing also changes depending on the printer, and as a thumb rule, it is not similar at what you see on the screen. So, what should a FlexCel autofit do? Make column A the width needed to show “Hello world” at 100% zoom, 96 dpi screen resolution? Resize column A so “Hello world” shows fine when printing? On a dot matrix printer? On a laser printer? Any answer we choose will lead us to a different column width, and there is no really “correct” answer. And it gets better. FlexCel uses GDI+, not GDI for rendering and calculating metrics, and GDI+ is resolution independent. But GDI and GDI+ font metrics are different, for example the space between letters on GDI+ for a font might be less than the space GDI gives to them. You will need less column width to fit “Hello world” on GDI+ than in GDI for that font, so the width calculated by FlexCel(GDI+) will be less than the width calculated by Excel(GDI). As you can imagine, if we used all this space to describe the problem, is because there is not a real solution. Autofit on FlexCel will try to adapt row heights and column widths so the text prints fine from Excel on a 600 dpi laser printer, but text might not fit exactly on the screen. Autofit methods on FlexCel also provide a “Adjustment” parameter that you can use to make a bigger fit. For

TMS SOFTWARE FLEXCEL STUDIO FOR .NET
13 | P a g e
example, using 1.1 as adjustment, most text will display inside the cells in Excel at normal screen resolution, but when printing you might find whitespace at the border, since columns or rows are bigger than what they need to be. Of course, autofit on FlexCel will work fine when printing from FlexCel, since FlexCel is resolution independent and it should be always the same. The problem arises when opening the files in Excel. And this was the reason we do not automatically autofit rows (as Excel does). Because of the mentioned differences between GDI+ and GDI (and also between GDI at different resolutions), we cannot calculate exactly what Excel would calculate. If we calculated the row height must be “149” and Excel calculated “155”, as all rows are by default autoheight, just opening an Excel file on FlexCel would change all row heights, and probably move page breaks. Due to the error accumulation, maybe on FlexCel you can enter one more row per page, and the header of the new page could land in the bottom of the previous. The lesson, do the autofit yourself when you need to and on the rows that really need autofit(most don't). If you are using XlsFile, you have XlsFile.Autofit... methods that you can use for that. If you are using FlexCelReport, use the <#RowHeight(Autofit)> and <#ColWidth(Autofit)> tags to autofit the rows or columns you want. By default, Excel autofits all rows. So, when opening the file in Excel, it will re calculate row heights and show them fine. But when printing from FlexCel, make sure you autofit the rows you need, since FlexCel will not automatically do that.
Autofitting Merged Cells Merged cells can be difficult to autofit, for two basic reasons: 1.If you are autofitting a row, and a merged cell spans over more than one row, which row should be expanded to autofit the cell? Imagine we have the following:
We could make the text fit by enlarging for example row 1, or row 5: We could also enlarge all rows by the same amount instead of changing only one row. FlexCel by default will use the last row of the merged cell to autofit, since in our experience this is what you will normally need. But you can change this behavior by changing the parameter “autofitMerged” when you call the “Autofit” methods, or, if you are using reports, you can use the <#Autofit settings> tag to do so. Note: All the above was done in rows for simplicity, but it applies the same to columns and merged cells over more than one column. 2.The second issue is that probably because of issue 1, Excel will never autofit merged cells. Even in cases where there would be no problem doing so, for example you are autofitting a row and the merged cell has only one row (but 2 columns). In all of those cases, Excel will just make the row the standard height. So, if you apply FlexCel autofitting but leave the autofit on, when you open the file in Excel, Excel will try to re-autofit the merged cell, and you will end up with a single row

TMS SOFTWARE FLEXCEL STUDIO FOR .NET
14 | P a g e
always. So, when autofitting rows with merged cells in FlexCel make sure you set autofitting off for Excel. You don’t need to do this for columns, since they don’t autofit in Excel.

TMS SOFTWARE FLEXCEL STUDIO FOR .NET
15 | P a g e
Preparing for Printing After creating a spreadsheet, one thing that can be problematic is to make it look good when printing or exporting to PDF.
Making the sheet fit in one page of width This is probably the first thing you should do when preparing most documents for printing. Go to the File Menu, select “Page Setup”, and then in the “Scaling” section make it fit in one page wide:
Make the “tall” combobox empty by deleting the number on it, to allow your document have as many pages as it needs. You can do this directly in Excel when using Templates to create your documents, or you can do this in FlexCel API by setting XlsFile.PrintToFit = true, XlsFile.PrintNumberOfHorizontalPages = 1, and XlsFile.PrintNumberOfVerticalPages = 0.
Repeating Rows and Columns at the top Other useful thing you can do in the “Page Setup” dialog is to setup some rows and columns to be repeated in every page. Select the “Sheet” tab and set the “Print Titles”:
This way your tables can keep their headers in every page. By the way, while you are in the “Sheet” tab, You might want to look at the option to print the gridlines or the column and row headings (The “A”, “B”, etc. at the top and “1”, “2”, etc. numbers at the left of the sheet) You can do this directly in Excel when using Templates to create your documents, or you can do this in FlexCel API by doing:
XlsFile.SetNamedRange(new
TXlsNamedRange(TXlsNamedRange.GetInternalName(
InternalNameRange.Print_Titles),1, 0, "=1:2,A:B"));
to set up the rows and columns to repeat, or set XlsFile.PrintGridLines = true and XlsFile.PrintHeadings = true to set up printing of gridlines and headings.
Using Page Headers/Footers Besides repeating rows and columns, you can also add headers and footers from the page setup dialog. One interesting feature in Excel XP or newer is the ability to include images in the page

TMS SOFTWARE FLEXCEL STUDIO FOR .NET
16 | P a g e
headers or footers. As those images can be transparent, you can have a lot of creative ways to repeat information in every sheet. From FlexCel API, use the XlsFile.PageHeader and PageFooter properties to set the header and footer text. If using a template, you can just set those things in the template.
Intelligent Page Breaks Excel offers the ability to include page breaks, but it has no support for any kind of “smart” page breaks that will only break if there is a need for it. Let's look at an example:
Here, the image in page 3 is being cut in the middle by a page break, so part of it appears at page 3 and part at page 4. While this is no problem when looking at the spreadsheet in Excel, it is clearly not what we want when printing or exporting to PDF. We want to place a page break before that image, so it prints completely in page 4. But we don't want to put a break before the next image, since it can print also in page 4. We need page breaks that only apply when the image does not fit in the current page. FlexCel offers a way to deal with this. In short, you need to say which rows or columns you would like to keep together by calling XlsFile.KeepRowsTogether or XlsFile.KeepColsTogether, and once you have finished creating your file, call XlsFile.AutoPageBreaks to paginate your whole document and create page breaks in a way your rows and columns are kept together as much as possible.
Note: The call to AutoPageBreaks must be the last before saving your file, so the document is in its final state. If you insert rows or autofit things after calling AutoPageBreaks then the page breaks will be moved out of place. Remember that this is not an Excel feature, so it is simulated by dumb page breaks in Excel, and once set, those page breaks will remain at where they were.
The Widow / Orphan problem: When paginating a document there are actually two similar but different things: Widow and orphan lines. In the example above we saw orphan rows, that is, rows that have their “parents” in the previous sheet. But there are also widow lines, and those are rows that are alone in a sheet because the lines below are in a different group, as shown in the following image:
!

TMS SOFTWARE FLEXCEL STUDIO FOR .NET
17 | P a g e
In this example, sheet 6 is almost empty, because there is only one line from the current group on it, and the next group starts at the next page. When there is so little written in one page, you will normally want to start the next group in the same page instead of having an empty sheet. And you can control this in FlexCel with the “PercentOfUsedSheet” parameter when you call AutoPageBreaks. PercentOfUsedSheet defaults at 20, which means that in order to add a page break, the page must be filled in at least 20%. In the example at the left, no page break would be made in page 6, since the 20% of the sheet has not been used yet, and so the next group would start at page 6 too. If you set the PercentOfUsedSheet parameter to 0% there will be no widow control, and the next group will start at page 7. Setting it at 100% means no widow or orphan control at all, since in order to set a page break the 100% of the page must have been used, so FlexCel has no margin to add the page breaks. It will not be able to set the page break somewhere before the 100% of the page, so all page breaks will be set at the last row, and it will not be able to keep any rows together. You are advised to keep this parameter around 20%
The different printers problem: As explained in the “Autofitting Rows and Columns” section, Excel prints different things to different printers, and even with the same paper size, some printer have different printing sizes. This can be problematic, since a document calculated to have breaks every 30 cm, will have a lot of widow lines if printed in a page with an effective 29 cm printing area:
Image 1: Page with 30 cm print area Image 2: Page with 29 cm print area As you can see in the images above, reducing a little the page height might cause the last row not to enter on that page and be printed in the next. As FlexCel added an automatic page break after that row (so it would break correctly with the 30 cm it used for the calculation), you end up with an empty page with only one row. To solve this issue, the second parameter to AutoPageBreaks is the percentage of the page that will be used by FlexCel to calculate the page breaks. It defaults at 95%, which means that it will consider a page 30 cm tall to be 30*0.95 = 28.5 cm, and calculate the page breaks for that sheet. So it will print correctly in a 29 cm sheet.

TMS SOFTWARE FLEXCEL STUDIO FOR .NET
18 | P a g e
When calculating the page breaks to directly export to PDF you can keep this parameter at 100%, since FlexCel is resolution independent, and it will not have this issues. But when calculating the page breaks to print from Excel, you need to have a smaller value here so it can fit in all the printers you might print this sheet from. Normally if targeting only laser printers you can have a larger value like 99%, but when there other kind of printers can be used it might be wise to lower this value. Using different levels of “Keep together” Normally just marking the rows you want to keep together and then calling AutoPageBreaks should be enough for most cases. But sometimes you might have more than one “keep together” level to keep, and you can set this as one of the parameters in KeepRows/ColsTogether. Imagine you have a master detail report with a list of stores, then the customers of each store and the orders for each customer. You might want to keep all customers of a store together in one page, but if that is not possible, at least keep the orders together. You can do this by assigning a level of “2” to the orders, and a level of “1” to the customers. The actual numbers don't matter, you could use a level of “10” for orders and “5” for customers. The only important thing is that one level is bigger than the other. When you assign different levels to different rows, FlexCel will try to keep lower levels first, but if not possible, it will try to fit at least the higher ones. Inserting and copying Rows with a “keep together” level Inserting and copying rows works as expected, when you copy a group of rows with a level of 2 and insert them in other place, the “2” level will be copied. It also works when copying across different files, but you need to copy full rows in any case. When copying ranges that are not the complete rows, those values will not be copied, as expected.

TMS SOFTWARE FLEXCEL STUDIO FOR .NET
19 | P a g e
Using Excel's User Defined Functions (UDF) Introduction User defined functions in Excel are macros that return a value, and can be used along with internal functions in cell formulas. Those macros must be defined inside VBA Modules, and can be in the same file or in an external file or addin. While we are not going to describe UDFs in detail here, we will cover the basic information you need to handle them with FlexCel. If you need a more in depth documentation in UDFs, there is a lot of information on them everywhere. So let's start by defining a simple UDF that will return true if a number is bigger than 100, false otherwise. We need to open the VBA editor from Excel (Alt-F11), create a new module, and define a macro inside that module:
Function NumIsBiggerThan100(Num As Single) As Boolean
NumIsBiggerThan100 = Num > 100
End Function
And then write “=NumIsBiggerThan100(120)” inside a cell. If everything went according to the plan, the cell should read “True” Now, when recalculating this sheet FlexCel is not going to understand the “NumIsBiggerThan100” function, and so it will write “#Name?” in the cell instead. Also, if you want to enter “=NumIsBiggerThan100(5)” in cell A2, FlexCel will complain that this is not a valid function name and raise an Exception. In order to have full access to UDFs in FlexCel, you need to define them as a class in .NET and then add them to the recalculation engine. Step 1: Defining the Function in .NET To create a function you need to derive a class from “TUserDefinedFunction”, and override the “Evaluate” method. For the example above, we would create:
public class NumIsBiggerThan100: TUserDefinedFunction
{
public TNumIsBiggerThan100(): base("NumIsBiggerThan100")
{ }
//Do not define any global variable here.
public override object Evaluate(TUdfEventArgs arguments,
object[] parameters)
{
//Check we have only one parameter
TFlxFormulaErrorValue Err;
if (!Checkparameters(parameters, 1, out Err))
return Err;
//The parameter should be a double.
double Number;

TMS SOFTWARE FLEXCEL STUDIO FOR .NET
20 | P a g e
if (!TryGetDouble(arguments.Xls, parameters[0],
out Number, out Err)) return Err;
return Number > 100
}
}
As you can see, it is relatively simple. Some things worth noting: 1.Don't use global variables inside Evaluate: Remember, the Evaluate() method might be called more than once if the function is written in more than one cell, and you cannot know the order in which they will be called. Also if this function is registered to be used globally, more than a thread at the same time might be calling the same Evaluate method for different sheets. The function must be stateless, and must return always the same value for the same arguments. 2.As you can see in the reference for the Evaluate method (FlexCel.chm), the evaluate method has two arguments. The first one provides you with utility objects you might need in your function (like the XlsFile where the formula is), and the second one is a list of parameters, as an array of objects. Each object in the parameters array might be a null, a Boolean, a String, a Double, a TXls3DRange, a TFlxFormulaErrorValue, or a 2 dimensional array of objects, where each object is itself of one of the types mentioned above. While you could manually check for each one of the possible types with code like:
if parameters[0] is double then ... else if parameter is String then
... etc
this will get tiring fast. So the TUserDefined class provides helper methods in the form of “TryGetXXX” like the “TryGetDouble” used in the example. There is also the convention in Excel that when you receive a parameter that is an error, you should return that parameter to the calling function. Again, this can be tiring to do each time, so the TUserDefined class provides a CheckParameters method that will do it for you. The only time you will not call CheckParameters as the first line of your UDF is when you are creating a function that deals with errors, like “IsError(param)”, that will return true when the parameter is an error. 3.Do not throw Exceptions. Exceptions you throw in your function might not be trapped by FlexCel, and will end in the recalculation aborting. Catch all expected exceptions inside your method, and return the corresponding TFlxFormulaErrorValue.XXX when there is an error. Step 2: Registering the UDF in FlexCel. Once you have defined the UDF, you need to tell FlexCel to use it. You do this by calling AddUserDefinedFnction in an XlsFile object. Once again, some points worth noting: 1.You need to define the scope of your function. If you want it to be globally accessible to all the XlsFile instances in your application, call AddUserDefinedFunction with a “Global” TUserDefinedFunctionScope. If you want the function to be available only to the XlsFile instance you are adding it to, specify “Local”. Global scope is easier if you have the same functions for all the files, but can cause problems if you have different functions in different files. Local scope is safer, but you need to add the functions each time you create an XlsFile object that needs them. If you are unsure, probably local scope is better.

TMS SOFTWARE FLEXCEL STUDIO FOR .NET
21 | P a g e
2.You also need to tell FlexCel if the function will be defined inside the same file or if it will be in an external file. This is not really needed for recalculating, but FlexCel needs to know it to enter formulas with custom functions into cells. There are four things you can do with formulas that contain UDFs, and there are different things you need to do for each one of them: 1. Retrieve the formula in the cell: You do not need to do anything for this. FlexCel will always return the correct formula text even if you do not define any udf. 2. Copy a cell from one place to another. Again, there is no need to do anything or define any UDF object. FlexCel will always copy the right formula, even if copying to another file. 3. Calculate a formula containing UDFs. For this one you need to define an UDF class describing the function and register it. You do not need to specify if the formula is contained in the sheet or stored in an external addin. 4. Enter a formula containing an UDF into a sheet. In order to do this, you need to define and register the UDF, and you must specify if the function is stored internally or externally. For more examples on how to define your own UDFs, please take a look at the “Excel User Defined Functions” API demo.
Note: Even when they look similar, UDFs are a completely different thing from Excel Built-in functions. Everything said in this section applies only to UDFs, you cannot use this functionality to redefine an Standard Excel function like “Sum”. If recalculating some built in function is not supported by FlexCel just let us know and we will try to add the support, but you cannot define them with this.

TMS SOFTWARE FLEXCEL STUDIO FOR .NET
22 | P a g e
Miscellanea Using .NET languages different from C# While FlexCel.NET runs in any .NET language, and we try to provide most demos and documentation for most languages, you will sooner or later find code snippets, newsgroups posts, etc. available only in C#, since FlexCel itself is written in C#. This will probably be no big problem since all languages under .NET behave in similar ways, but we will try in this section to help a little with it. Even if you do not have exposure to any C-based language, C# examples are not so difficult to read. But there are some basic concepts that you might help you understanding them, based on the feedback we get from our users, and we will explain them there. If you already are fluent at C#, just skip this section. Operators: C-based languages are a little less verbose than others when specifying operators, and this might result a little cryptic when you are not used to them. For example, to specify an “if” statement in C# that evaluates to true if either a and b are true or c is true you would write:
if ((a && b) || c)
while in VB.NET or Delphi.NET it would be:
if (a and b) or c then
A small list of operators you might find while reading the source code is here: LOGICAL OPERATORS:
Operator Meaning Example
! Not if (!a) means “If not a”
|| Or if (a || b) means “if a or b”
&& And if (a && b) means “if a and b” BITWISE OPERATORS:
Operator Meaning Example
~ Not ~ 1 means “not 1”
| Or 2 | 1 means “2 or 1” ( this is 3)
& And 2 & 1 means “2 and 1” ( this is 0)
^ Xor 1 ^ 1 means 1 xor 1 (this is 0) We will not make a detailed explanation of the operators here, as the only idea here is to help you read the examples, but you can read the full documentation at: http://msdn2.microsoft.com/en-us/library/6a71f45d(VS.71).aspx As an example, the code to print a page in portrait mode in C# is:
TMS SOFTWARE FLEXCEL STUDIO FOR .NET
23 | P a g e
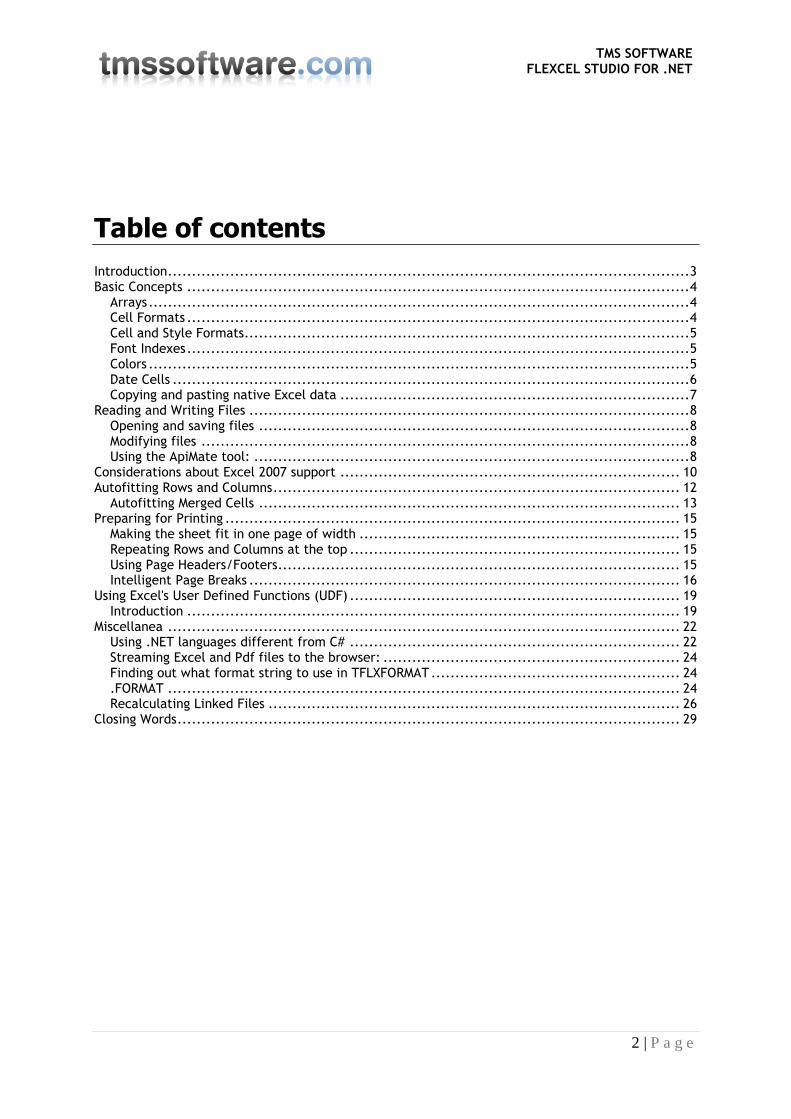
if (Landscape)
Xls.PrintOptions &= ~(TPrintOptions.Orientation |
TPrintOptions.NoPls);
else
{
//ALWAYS SET NOPLS TO 0 BEFORE CHANGING OTHER OPTIONS.
Xls.PrintOptions &= ~ TPrintOptions.NoPls;
Xls.PrintOptions |= TPrintOptions.Orientation;
}
The equivalent VB.NET code would be:
If Landscape Then
Xls.PrintOptions = Xls.PrintOptions And
(Not(TPrintOptions.Orientation Or TPrintOptions.NoPls))
Else
'ALWAYS SET NOPLS TO 0 BEFORE CHANGING OTHER OPTIONS.
Xls.PrintOptions = Xls.PrintOptions And
(Not TPrintOptions.NoPls)
Xls.PrintOptions = Xls.PrintOptions Or
(TPrintOptions.Orientation)
End If
The Delphi.NET code is similar to the one in VB.NET, but you need to cast the enums to integers in order to “and” & “or” them, and then back to the enum. For example, the first line would read:
Xls.PrintOptions := TPrintOptions(integer(Xls.PrintOptions)
and (not
(integer(TPrintOptions.Orientation) or
integer(TPrintOptions.NoPls))));
In Delphi Prism you can just use the “in” operator to see if the value is inside the range or not. In this example:
Xls.PrintOptions := TPrintOptions(integer(Xls.PrintOptions)
and (not
(integer(TPrintOptions.Orientation) or
integer(TPrintOptions.NoPls))));
Automatic conversion: Many times, the easiest way to understand a code snippet in C# is just to use an automatic translator to translate it to your language. You can find many online translators just by searching, but we will mention two of them here: For VB.NET: http://www.developerfusion.co.uk/utilities/convertcsharptovb.aspx For Delphi.NET: http://lingua.codegear.com/babelcode/

TMS SOFTWARE FLEXCEL STUDIO FOR .NET
24 | P a g e
Streaming Excel and Pdf files to the browser: A simple code snippet that you are likely to use, is the one to send the generated files to the browser, without creating any temporary file. You can find it in the ASP.NET demos, but just in case you need a fast reference, here it is:
using (MemoryStream ms= new MemoryStream())
{
Xls.Save(ms);
ms.Position=0;
Response.Clear();
Response.AddHeader("Content-Disposition", "attachment;"
+ "filename=Test.xls");
Response.AddHeader("Content-Length",
ms.Length.ToString());
Response.ContentType = "application/excel";
Response.BinaryWrite(ms.ToArray());
Response.End();
}
Make sure to use ms.ToArray() and not ms.GetBuffer(), since GetBuffer is not guaranteed to return everything. To stream a pdf file, change application/excel by application/pdf.
Finding out what format string to use in TFLXFORMAT .FORMAT When you want to format a cell with a specific numeric format, you need to specify it in the TFlxFormat.Format property. For example, to format a cell as Currency with two decimal places, you could use:
TFlxFormat f = Xls.GetDefaultFormat;
f.Format="#,##0.00";
Now, how do you find out which format string to use? Format strings in FlexCel are the same used in Excel, and you can find documentation about them in Excel help, if you have doubts about them. But there are two easy ways to find out which format to use for most normal cases, and this is what we will explain now: A.Simply use APIMate tool (In the tools folder) to find out. Create a new file in Excel, format the cells as you want, open the file with ApiMate and look at the formats. It will show you exactly the format you need, in C#, VB.NET or Delphi.NET.
!
TMS SOFTWARE FLEXCEL STUDIO FOR .NET
25 | P a g e
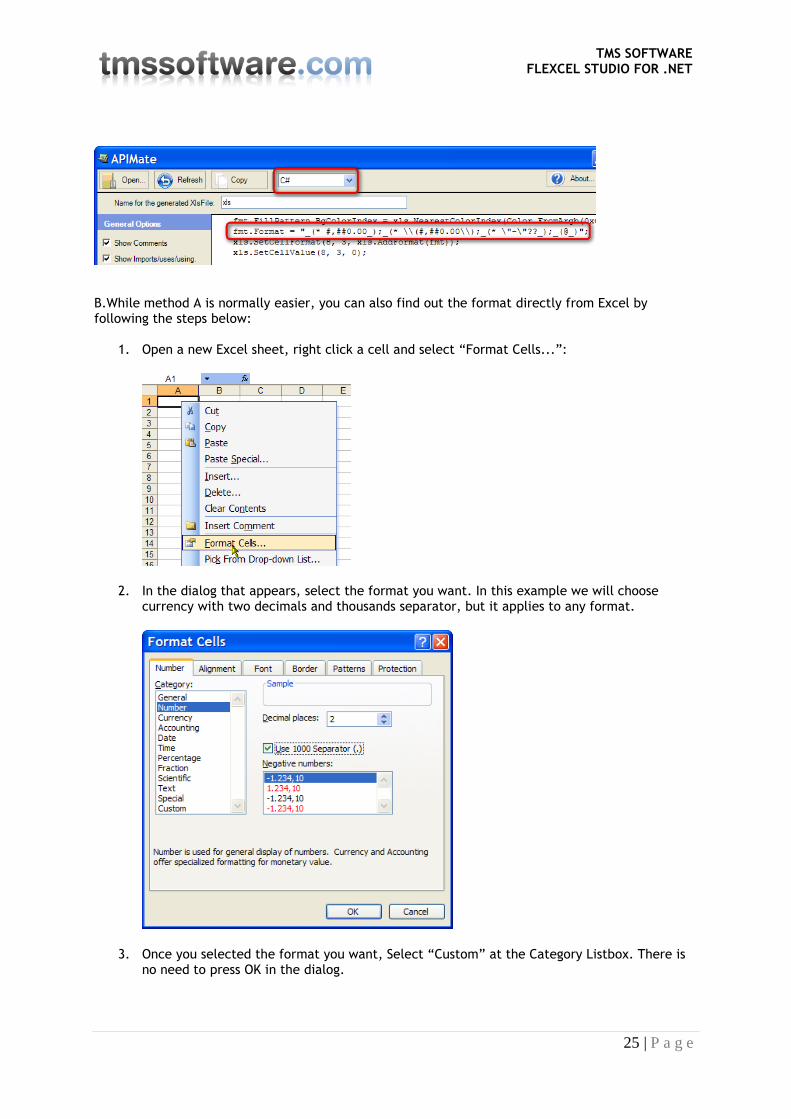
B.While method A is normally easier, you can also find out the format directly from Excel by following the steps below:
1. Open a new Excel sheet, right click a cell and select “Format Cells...”:
2. In the dialog that appears, select the format you want. In this example we will choose currency with two decimals and thousands separator, but it applies to any format.
3. Once you selected the format you want, Select “Custom” at the Category Listbox. There is no need to press OK in the dialog.

TMS SOFTWARE FLEXCEL STUDIO FOR .NET
26 | P a g e
4. The string that appears in the “Type” box is the one you need to use, converted to English locale.
Important: You always need to enter the strings in ENGLISH format even if your machine is not in English. In this example we used on purpose an Spanish locale, where the thousands separator is "." and decimal "," so Excel shows "#.##0,00" But as we need to enter the string as it would read in English, in FlexCel code we use "#,##0.00".
Other than the localization problem if your machine is not on an English locale, the string in the Type box is the one you need. And by the way, when using ApiMate you do not need to worry about localization, it will always show the correct string.
Recalculating Linked Files FlexCel offers full support for recalculating linked files, but you need to add some extra code to make it work. Everything we will discuss here is about XlsFile objects, but you can also use this on reports. Just run the reports with FlexCelReport.Run(XlsFile). The main issue with linked files is telling FlexCel where to find them. Normally, if your files are on a disk, there should be not much problem to find a linked file. After all, that information is inside the formula itself, for example if FlexCel finds the formula:
='..\Data\[linked.xls]Sheet1'!$A$3*2
inside a cell, it could automatically find “..\Data\linked.xls”, open it, and continue with the recalculation. In fact, there are two problems with that approach:
!

TMS SOFTWARE FLEXCEL STUDIO FOR .NET
27 | P a g e
1. Files might not be in a filesystem. FlexCel allows you to transparently work with streams instead of physical files, and so you might have for example the files stored in a database. In this case, trying to find “..\Data\linked.xls” makes no sense, and FlexCel would fail to recalculate.
2. Much more important than 1), this approach could imply an important security risk. Blindly following links in an unknown xls file is not a smart idea. Let's imagine that you have a web service where your user submits an xls file, you use FlexCel to convert it to PDF, and send back the converted PDF to him. If that user knows the location of an xls file in your server, he could just submit a hand-crafted xls file filled with formulas like:
='c:\Confidential\[BusinessPlan.xls]Sheet1'!A1,
='c:\Confidential\[BusinessPlan.xls]Sheet1'!A2, etc.
On return you would supply him with a PDF with the full contents of your business plan. What is even worse, since FlexCel can read plain text files, he might be also able to access any text file in your server. (Imagine you are running on mono and formulas pointing to /etc/passwd) You might argue that in a well secured server your application should not have rights on those files anyway, but on security, the more barriers and checks you add the better. So you should have a way to verify the links inside an arbitrary file instead of having FlexCel opening them automagically.
Because of reasons 1) and 2), FlexCel by default will not recalculate any linked formula, and just return “#NA” for them. Note that in most cases you will want to leave this that way, since most spreadsheets don't have linked formulas anyway, and there is no need to add extra security risks just because. But if you do need to support linked files, adding that support is easy. First thing you need to do is to create a TWorkspace object. Workspaces are collections of XlsFile objects, and when you recalculate any of the files in a Workspace, all the others will be used in the recalculation (and be recalculated) too. So the simplest and more secure way to recalculate linked files is to create a Workspace, add the needed XlsFile objects inside, and just recalculate any of the files as usual. For example:
XlsFile xls1 = new XlsFile();
xls1.Open("c:\\file1.xls");
XlsFile xls2 = new XlsFile();
xls2.Open("c:\\file2.xls");
TWorkspace work = new TWorkspace();
work.Add("file1.xls", xls1);
work.Add("file2.xls", xls2);
xls1.Recalc(); //Will recalculate xls1 and xls2
In the example above, we opened two files and added them to a workspace, giving each one a name to be used in the recalculation process. Note that here we don't have issues 1) or 2) at all. We could have opened those files from a stream and it would be the same, since the name “file1.xls” needed

TMS SOFTWARE FLEXCEL STUDIO FOR .NET
28 | P a g e
to calculate is actually given in the “work.Add()” method. The actual name and location (if any) of the file “file1.xls” is irrelevant. And also we don't have the security concern of FlexCel opening files by itself, since we opened the files we wanted, and FlexCel will not open any more files. Now, in some cases you don't know a priori which files you are going to need in order to recalculate the file, and so you cannot use the approach above. In those cases, you still use the Workspace object, but you assign an event where you load those files when FlexCel asks for them. The code would be something like:
XlsFile xls1 = new XlsFile();
xls1.Open("c:\\file1.xls");
//Create a workspace
TWorkspace Work = new TWorkspace();
//Add the original file to it
Work.Add(Path.GetFileName(openFileDialog1.FileName), Xls);
//Set up an event to load the linked files.
Work.LoadLinkedFile +=new
LoadLinkedFileEventHandler(Work_LoadLinkedFile);
//Recalc will recalculate xls1 and all the other files used in the
recalculation. At the end of the recalculation, all the linked files
will be loaded in the workspace, and you can use the methods in it to
access them.
xls1.Recalc();
In the Work_LoadLinkedFile event you can load the needed files, checking that they are not trying to access folders they shouldn't be looking to. For example, remove all path information and only load files from the same folder the original file is. Or only allow paths that are children of the path of the main file, or maybe paths from an allowed list of paths. The choice is yours. You can take a look at the “Validate Recalc” demo to see a real implementation of this. In that example there is no validation of the loaded filenames, but just because it is an application designed to run locally with full trust.
NOTE: If XlsFile objects can consume lots of memory, Workspace objects can consume much more, since they are a collection of XlsFiles themselves. So as with XlsFile objects, don't leave global Workspace objects hanging around. Set them to null as soon as possible, or use local objects.
!

TMS SOFTWARE FLEXCEL STUDIO FOR .NET
29 | P a g e
Closing Words We hope that after reading this document you got a better idea on the basic concepts of using the FlexCel API. It was kept short on purpose, so you can read it easily and remember it better. Concepts mentioned here (like XF format indexes) are basic to use FlexCel, so it is important that you get them right. And one last thing. Remember that FlexCel API's main strength is that it modifies existing files; it doesn't use the traditional approach of one API for reading the file and another for writing. In fact, FlexCel doesn't even know how to create an empty file. When you call XlsFile.NewFile, you are really reading an empty xls file embedded as a resource on flexcel.dll. You are always modifying things. Take advantage of this. For example, let's say you want to save a macro on your final file. There is no support on FlexCel for writing macros. But you can create the macro on Excel and save it to a template file, and then open the template with FlexCel instead of creating a new file with XlsFile.NewFile(). Use Excel and not FlexCel to create the basic skeleton for your file. Once you have all of this on place, modify it with FlexCel to add and delete the things you need. This is what FlexCel does best. And of course, whenever you can, use a FlexCelReport for creating files.