titus digital t3sq digital bms integration... · titus digital t 3 sq. ... mcu 2 gateway overview ....
TRANSCRIPT

MLM Integration with BMS
DOCUMENT NUMBER: BW0070-3
Issue 3
June 2015
Titus Digital T3SQ

MLM Integration with BMSJune 2015
Doc:BW0070 Page 2
Issue 3
Table of Contents
MLM Integration with BMS ................................................................................................................................ 1
MCU 2 Gateway Overview ............................................................................................................................. 3
Output from BMS ......................................................................................................................................... 3
Input to BMS ................................................................................................................................................ 4
Zone/Master/Slave Diffuser concept ........................................................................................................... 5
Channel and Zone designations ................................................................................................................... 5
Identifying, mapping and binding of network variables to other network protocols ....................................... 7
MCU to Lon Mapping ................................................................................................................................... 7
Discovering the MCU 2 with Lon ................................................................................................................. 8
MCU 2 BACnet to BMS setup ..................................................................................................................... 10
Bacnet/IP setup .......................................................................................................................................... 10
BACnet ms/tp setup ................................................................................................................................... 11
MCU BACnet point mapping ...................................................................................................................... 12
Diffuser Mode (status) - multi-state input 0-59 ........................................................................................ 15
Occupancy Mode (status) - multi-state input 60-119 ............................................................................... 16
BMS control override - multi-state output 0-59 ........................................................................................ 16
Occupancy override - multi-state output 60-119 ...................................................................................... 17
MLM Control Override Handling Procedure ................................................................................................ 19
Manual control override activation ........................................................................................................... 19
RTC control override activation ................................................................................................................. 20
RTC control override operation ................................................................................................................. 21
RTC control override Command Table: ...................................................................................................... 21
Occupancy sensor description ................................................................................................................... 22
Occupancy control override operation ...................................................................................................... 22
System set-up for Occupancy Sense .......................................................................................................... 23
MLM Tool occupancy wizard ..................................................................................................................... 24
MLM24 Tool Occupancy display ................................................................................................................ 25
Occupancy override ................................................................................................................................... 25
Light Switch operation ............................................................................................................................... 26
Airflow sense setup and operation ............................................................................................................ 27

MLM Integration with BMSJune 2015
Doc:BW0070 Page 3
Issue 3
MCU 2 Gateway Overview
The Master Comms Unit 2 (MCU) serves as a gateway to other BMS protocols such as Lontalk or BacNet.
The MCU features four diffuser data channels with a capacity of 15 diffusers each, i.e. a total of 60 diffusers
can be connected to a single MCU. It also interfaces with the MLM Tool application for setup, diagnostic and
monitoring functions.
The following physical protocol interfaces are supported:
MLM Tool application (UDP/IP) – Magnetic Ethernet
MLM Tool application(ms/tp) – USB
BacNet/IP – Magnetic Ethernet
BacNet ms/tp – RS485 bus
Lontalk - TP/FT-10 bus
The following MCU 2 hardware models are available:
MCU 2 model Part No Mlm Tool User Hardware Interface BMS Protocol
Standard BW2011-2T Magnetic Ethernet or USB B standard None
BACnet/IP BW2011-2B Magnetic Ethernet or USB B standard BACnet/IP
BACnet ms/tp BW2011-2M USB B standard device BACnet ms/tp
LON BW2011-2L USB B standard device LonTalk
Please note: The Standard and BACnet/IP MCU contains a two port magnetic Ethernet switch.
BACnet ms/tp and the Lon MCU only contains USB user interfaces.
The following network variables of the MLM Proprietary network are visible to other BMS network
protocols:
Output from BMS
Temperature Setpoint
BACnet - 0.1 °C, .5 °F resolution
Lon - 1°C resolution (°F not supported)
Control Override command available in BACnet:
Drive Diffuser Open to pre-set limit position
Drive Diffuser Close to pre-set limit position
Emergency Activation (Disable re-heat output)
Emergency Open to physical limit position

MLM Integration with BMSJune 2015
Doc:BW0070 Page 4
Issue 3
Emergency Close to physical limit position
Activate Backoff Band control
Set heater to maximum output
Occupancy override occupied/unoccupied
Occupancy external input occupied/unoccupied
The following MCU global outputs are available on BACnet:
Setpoint global
Control override
Occupancy override
Input to BMS
Space temperature, °C or °F
Re-heater output, 0 to 100%
Diffuser plate position, 0 to 100%
Supply air temperature, °C or °F
BacNet Mode
System Idle (in control temperature band)
Initializing
Heating mode
Cooling mode
Motor in manual drive mode
Occupancy state occupied/unoccupied
Zone air pressure
Zone air flow
Averaged MCU inputs available on BACnet:
Average disk position
Average space temperature
Lon Mode specific:
Data from the MCU active
Busy initializing
Heating mode
Cooling mode

MLM Integration with BMSJune 2015
Doc:BW0070 Page 5
Issue 3
Zone/Master/Slave Diffuser concept
The MLM Proprietary network can consist of up to 60 diffusers installed on 4 separate channels per MCU.
Each channel is connected to a maximum of 15 diffusers. They can be arranged into temperature control
areas, with each such area being populated with the number of diffusers required to satisfy the comfort
control in that area.
Areas of control are designated ‘zones’
and comprise a demarked space such as
a room, hallway or office area. Each
such ‘zone’ will contain a single or
multiple diffusers.
One diffuser in such a zone will be
designated a ‘master’ diffuser and will
‘host’ the space temperature
measurement and setpoint facility.
Other diffusers in the same control zone
will be designated ‘slave’ or ‘drone’
diffusers and will follow the ‘master’
control outputs.
Channel and Zone designations
The Channel number corresponds to the physical (hardware) connection of the field diffusers to the MCU.
From each Power Supply Unit (PSU) a RJ9 data cable connects to a numbered channel on the MCU. During
commissioning, diffusers for each control area are linked (zoned) together utilising the MLM Tool application
(see MLM Tool/Help/Getting Started). The number of zones could be from 1 to a maximum of 15 per
channel, sequentially allocated to each master diffuser, with a maximum then of 60 zones per MCU. In
practice there will be less than 60 zones as not all diffusers will be designated as master diffusers.
Information between channels can be routed across channels, with a master diffuser on one channel linked
to a slave diffuser(s) on a different channel(s).
For example, the above layout is designated Zone 16:
Diffuser with serial number 14010022 is connected to channel 2, designated as zone 16 and is set as a
master (temperature reading and setpoint enabled). This diffuser controls the slave diffusers with serial
numbers 12120347, 14010028 and 14010024, physically connected to channels 1 and 2.

MLM Integration with BMSJune 2015
Doc:BW0070 Page 6
Issue 3
Note:
It is important to mark the cables from a specific PSU to a specific channel. Swopping cables after
commissioning will rearrange the data points on the BMS.
The edit and save feature on the application MLM Tool is used to bind the diffusers to their respective
control zones.
Please consult the ‘Making changes to a diffuser network’ section in the MLM Tool rev 8.xx Help file.
During commissioning in edit mode, the user is prompted to allocate zone numbers to diffuser control
groups. These numbers can be arbitrarily allocated to each control zone by the user. Once the save button is
pressed, the application will automatically allocate sequential zone numbers to the project. Zone numbers
will be allocated 15 per channel, with channel 1 starting with Zone 1 up to a maximum of Zone 15. Channel 2
will start with Zone 16, irrespective of channel 1 taking up 15 control zones or not. By the same token the
channel 3 zone numbers will start at 31 and channel 4 starts at zone number 46.
The 3 zone numbers marked in bold in the table below corresponds to the physical connection to channel 1
(Zone 1) and channel 2 (Zones 16, 17 & 18) as depicted in the logical diffuser layout (below) in the MLM
Tool.
Channel 1 Z1 Z2 Z3 Z4 Z5 Z6 Z7 Z8 Z9 Z10 Z11 Z12 Z13 Z14 Z15
Channel 2 Z16 Z17 Z18 Z19 Z20 Z21 Z22 Z23 Z24 Z25 Z26 Z27 Z28 Z29 Z30
Channel 3 Z31 Z32 Z33 Z34 Z35 Z36 Z37 Z38 Z39 Z40 Z41 Z42 Z43 Z44 Z45
Channel 4 Z46 Z47 Z48 Z49 Z50 Z51 Z52 Z53 Z54 Z55 Z56 Z57 Z58 Z59 Z60
MLM Integration with BMSJune 2015
Doc:BW0070 Page 7
Issue 3
Identifying, mapping and binding of network variables to other network protocols
MCU to Lon Mapping
To connect with the MLM Tool to a Lon configured MCU, the USB type B hardware port on the MCU 2 is
used. Either ‘Basic View’ or ‘Project View’ can be selected in the MLM Tool application.
For Basic View access press the connect button and select the MSTP tab. The diffuser network will be
displayed. The MLM Tool can now be used to set up and commission the diffuser network.
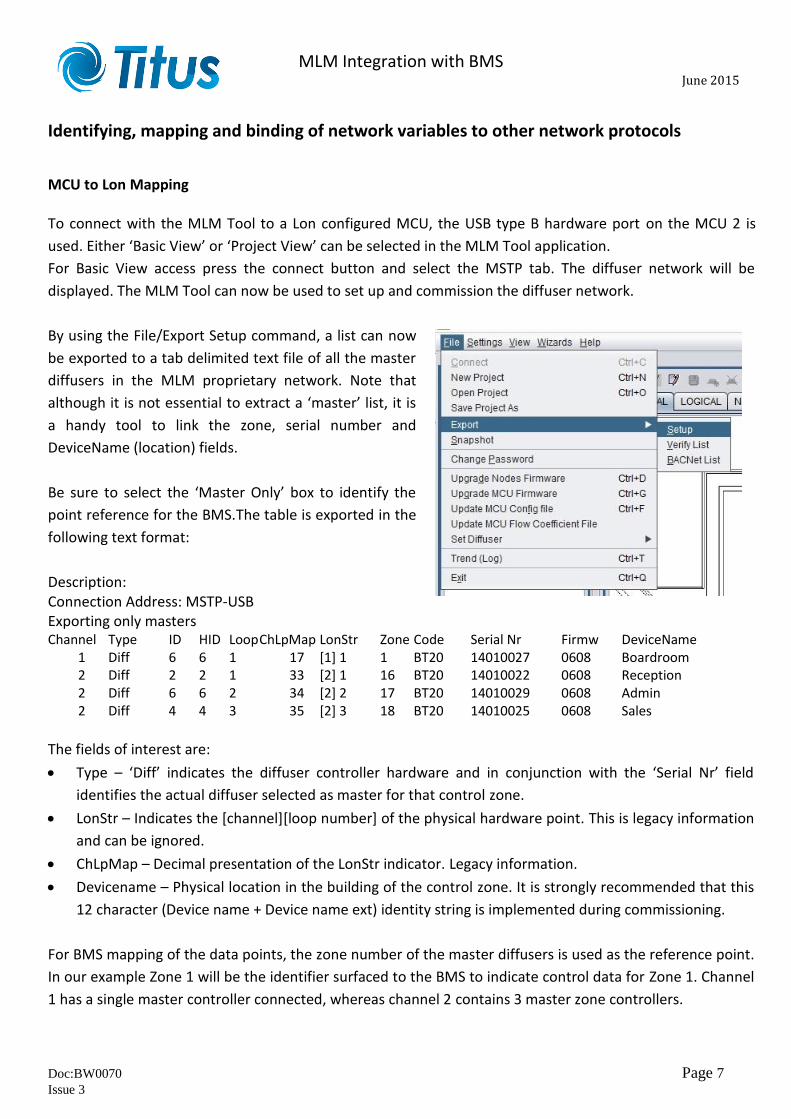
By using the File/Export Setup command, a list can now
be exported to a tab delimited text file of all the master
diffusers in the MLM proprietary network. Note that
although it is not essential to extract a ‘master’ list, it is
a handy tool to link the zone, serial number and
DeviceName (location) fields.
Be sure to select the ‘Master Only’ box to identify the
point reference for the BMS.The table is exported in the
following text format:
Description: Connection Address: MSTP-USB Exporting only masters Channel Type ID HID Loop ChLpMap LonStr Zone Code Serial Nr Firmw DeviceName
1 Diff 6 6 1 17 [1] 1 1 BT20 14010027 0608 Boardroom 2 Diff 2 2 1 33 [2] 1 16 BT20 14010022 0608 Reception 2 Diff 6 6 2 34 [2] 2 17 BT20 14010029 0608 Admin 2 Diff 4 4 3 35 [2] 3 18 BT20 14010025 0608 Sales
The fields of interest are:
Type – ‘Diff’ indicates the diffuser controller hardware and in conjunction with the ‘Serial Nr’ field
identifies the actual diffuser selected as master for that control zone.
LonStr – Indicates the [channel][loop number] of the physical hardware point. This is legacy information
and can be ignored.
ChLpMap – Decimal presentation of the LonStr indicator. Legacy information.
Devicename – Physical location in the building of the control zone. It is strongly recommended that this
12 character (Device name + Device name ext) identity string is implemented during commissioning.
For BMS mapping of the data points, the zone number of the master diffusers is used as the reference point.
In our example Zone 1 will be the identifier surfaced to the BMS to indicate control data for Zone 1. Channel
1 has a single master controller connected, whereas channel 2 contains 3 master zone controllers.

MLM Integration with BMS
June 2015
Doc:BW0070 Page 8
Issue 3
Discovering the MCU 2 with Lon Some concepts about the MCU Lon gateway implementation:
The Lon configuration file (.xif) should preferably be downloaded from the MCU device during
commissioning utilizing the service button. If not, the .xif program revision files 3 (standard command
set) and 4 (extended command set) is available on the Rickard Trac download site http://trac.lhar.co.za/
Pressing the service button will broadcast the Neuron ID and the program ID to the BMS system.
Each MCU is labelled with the unique Neuron ID number for that device.
Should the user wish to utilize the heartbeat (nciSndHrtBt) functionality, the MCU will propagate all the
remaining network variables that were not propagated during the previous heartbeat period.
It is assumed the user is familiar with the standard LNS (Lon Network Service) tools and their
implementation. Reference will only be made to these software tools.
The Lon MCU device is easily discovered by the Lonmaker tool by entering a Neuron ID or using the service
button.
Note the SCC functional blocks starting at SCC VAV(0) through SCC VAV(59) corresponds with Zone 1 through
Zone 60 on the MCU.

MLM Integration with BMS
June 2015
Doc:BW0070 Page 9
Issue 3
There are 62 functional blocks supported in the functional profile of the MCU Lon module. The node and
virtual blocks are standard Lon implementations. The balance all utilizes the Lon 8502 Space Comfort
Controller template. This in effect means each MCU serves as a gateway for a maximum of 60 master
diffuser zones. Zones not populated on the MCU will reflect as null data in the corresponding functional
block.
The table below shows the basic functional profile supported for each control zone:
Space Comfort Controller Object:
LHA_SFPTsccVav (8502)
Network Variables
Configuration Properties
nvoUnitStatus
mode:
HVAC_NUL no data from mcu
HVAC_AUTO motor initializing or in control band
HVAC_HEAT heating mode
HVAC_COOL cooling mode
heat_output_secondary: re-heater output %
cool_output: diffuser plate position
Note: More manufacturer defined network variables are available on request. The same functional block as depicted in
Lonmaker. Note the nvoHeatPrimary
variable is not activated in the basic
functional profile.
nviSpaceTemp[60]
SNVT_temp_p
nciSndHrtBt SCPTMaxSendTime
nciSetPnts SCPTsetPnts
nviSetpoint [60] SNVT_temp_p
nvoSpaceTemp[60]
SNVT_temp_p
nvoSetpoint[60]
SNVT_temp_p
nvoUnitStatus[60]
SNVT_hvac_status

MLM Integration with BMS
June 2015
Doc:BW0070 Page 10
Issue 3
MCU 2 BACnet to BMS setup
The MCU 2 supports both BACnet/IP or BACnet ms/tp. Note MLM Tool V8.xx is required to bind the MCU 2
to other devices in a BACnet installation.
The BACnet ms/tp MCU connects via a RS485 transceiver port to the ms/tp network, whereas BACnet /IP
interface to the Ethernet IP port on the MCU.
Please note the MCU ms/tp conforms electrically to the RS485 network specification as recommended by
ASHRAE. The RS485 port on MCU 2 is optically isolated. For the interconnection and shielding instructions,
refer to Addendum y of ANSI/ASHRAE Standard 135-2008.
A major advantage of BACnet/IP implementation is that the MLM Tool application can run simultaneously
with the BMS BACnet client on the same (PC) hardware platform. This greatly simplifies system
commissioning and diagnostics.
Bacnet/IP setup
To configure a MCU 2 into a BACnet/IP network, connect to the MCU web page by entering the MCU 2 IP
address into an Internet browser. The default IP address is 192.168.0.251. The following information will be
displayed on the web page:
The Serial number and Software Version number - cannot be changed.
The Device Name can be changed by the user and
usually identify the physical location of the MCU.
BACnet State indicates if the BACnet key has been
activated, i.e. the BACnet/IP protocol is active on
the MCU.
The default unique BACnet device ID (instance) is
derived from the Ethernet mac address. This
parameter can be changed by the user (edit and
press save) to comply with the BMS requirements.
BACnet key entered to activate the BACnet protocol. This is a once-of setting normally activated during
manufacture. To convert a MCU 2 Standard device to BACnet a key value can be procured from the
manufacturer and entered into this field.
Note:
The BACnet ID and Device Name fields indicated are contained in the Object Identifier and Object Name
properties of the BACnet Device Object.
To change MCU IP addresses consult the Hardware/Master Comms Unit section in the MLM Tool Help
menu.
To revert to the default IP address (192.168.0.251) press and hold the BOOT button on the MCU until
the ST1 LED flashes. Release BOOT, press and release the DEF button. After a few seconds the CH1…4
LED’s will flash to indicate a reset condition. The IP address is now set to default.
MLM Integration with BMS
June 2015
Doc:BW0070 Page 11
Issue 3
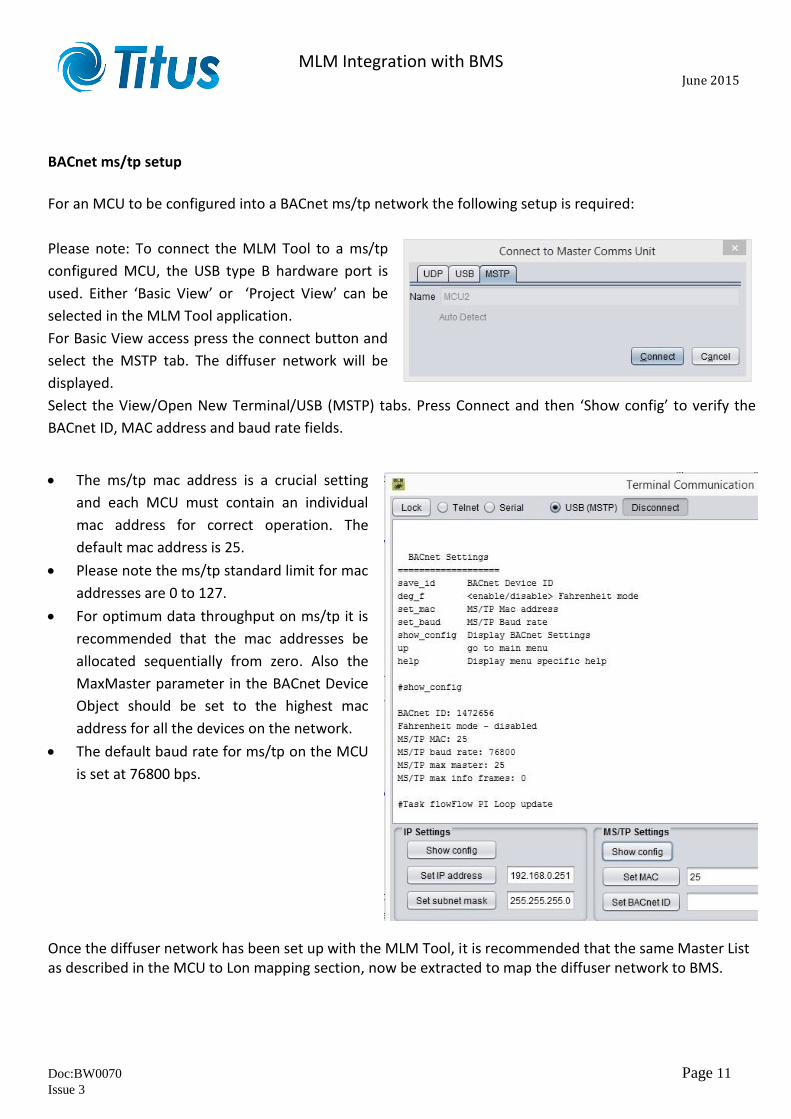
BACnet ms/tp setup
For an MCU to be configured into a BACnet ms/tp network the following setup is required:
Please note: To connect the MLM Tool to a ms/tp
configured MCU, the USB type B hardware port is
used. Either ‘Basic View’ or ‘Project View’ can be
selected in the MLM Tool application.
For Basic View access press the connect button and
select the MSTP tab. The diffuser network will be
displayed.
Select the View/Open New Terminal/USB (MSTP) tabs. Press Connect and then ‘Show config’ to verify the
BACnet ID, MAC address and baud rate fields.
The ms/tp mac address is a crucial setting
and each MCU must contain an individual
mac address for correct operation. The
default mac address is 25.
Please note the ms/tp standard limit for mac
addresses are 0 to 127.
For optimum data throughput on ms/tp it is
recommended that the mac addresses be
allocated sequentially from zero. Also the
MaxMaster parameter in the BACnet Device
Object should be set to the highest mac
address for all the devices on the network.
The default baud rate for ms/tp on the MCU
is set at 76800 bps.
Once the diffuser network has been set up with the MLM Tool, it is recommended that the same Master List as described in the MCU to Lon mapping section, now be extracted to map the diffuser network to BMS.
MLM Integration with BMS
June 2015
Doc:BW0070 Page 12
Issue 3
MCU BACnet point mapping
The MCU serves as a BACnet gateway to a maximum of 60 diffuser control zones. The point data is limited to
diffuser master information and although slave diffusers generally mimic the master data, some detail
information is not available through the BACnet point data. This includes specific diffuser setup as well as
diagnostics information.
The BACnet stack supports a priority array of 16 elements.
Read/Write_property_multiple is supported.
Segmentation is not supported.
The maximum APDU size is 480 bytes.
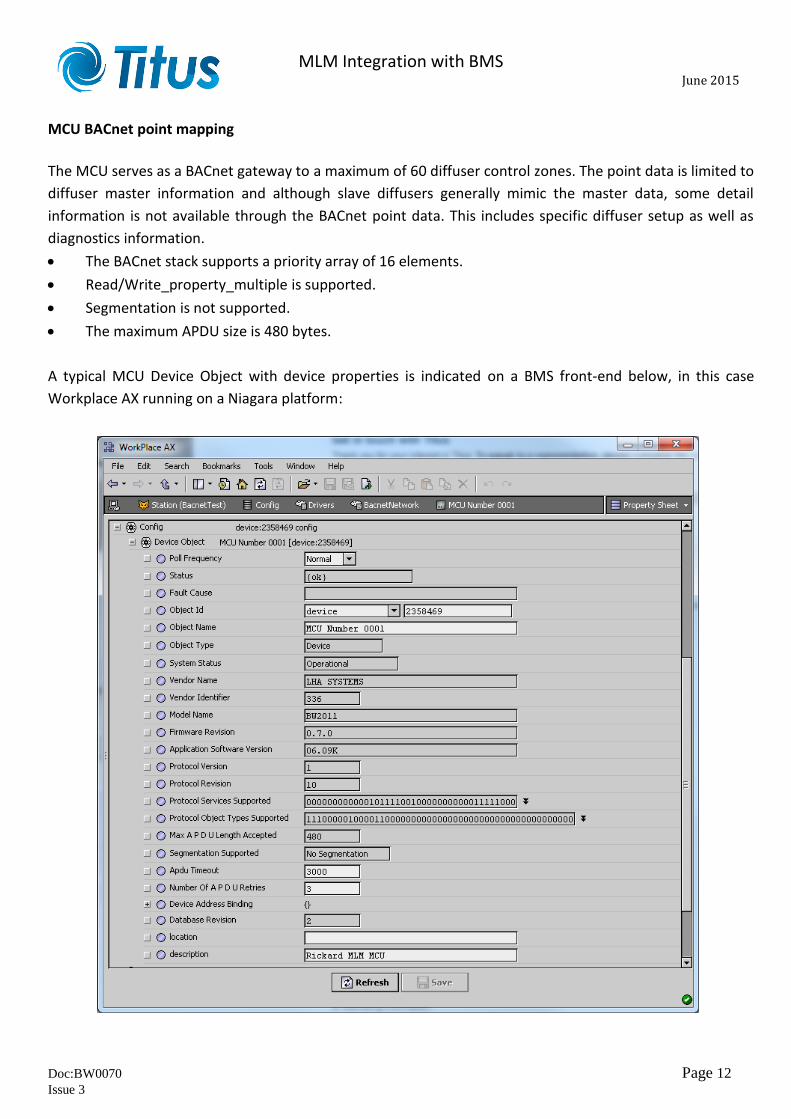
A typical MCU Device Object with device properties is indicated on a BMS front-end below, in this case
Workplace AX running on a Niagara platform:

MLM Integration with BMS
June 2015
Doc:BW0070 Page 13
Issue 3
The BACnet point list table can be browsed from the main web page as indicated below (BACnet/IP only):
The zone numbers of the diffuser network as set-up with the MLM Tool corresponds to the zone table on the Point List web page.
MLM Integration with BMS
June 2015
Doc:BW0070 Page 14
Issue 3
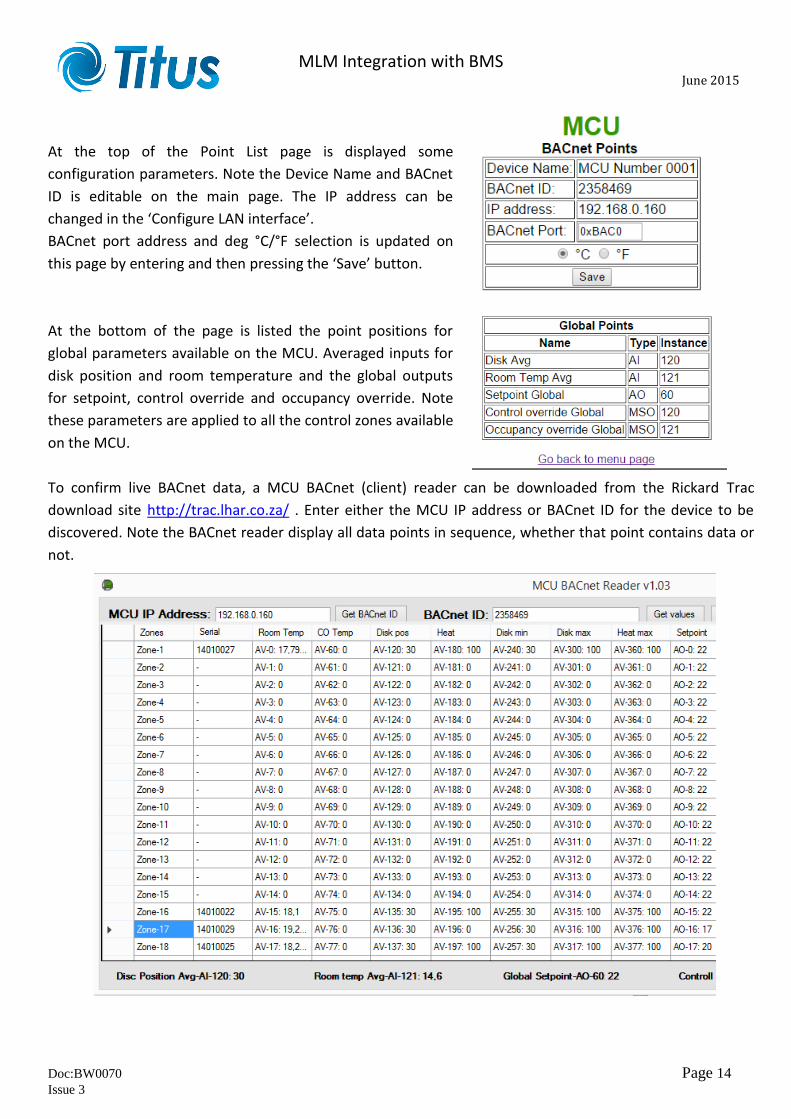
At the top of the Point List page is displayed some
configuration parameters. Note the Device Name and BACnet
ID is editable on the main page. The IP address can be
changed in the ‘Configure LAN interface’.
BACnet port address and deg °C/°F selection is updated on
this page by entering and then pressing the ‘Save’ button.
At the bottom of the page is listed the point positions for
global parameters available on the MCU. Averaged inputs for
disk position and room temperature and the global outputs
for setpoint, control override and occupancy override. Note
these parameters are applied to all the control zones available
on the MCU.
To confirm live BACnet data, a MCU BACnet (client) reader can be downloaded from the Rickard Trac
download site http://trac.lhar.co.za/ . Enter either the MCU IP address or BACnet ID for the device to be
discovered. Note the BACnet reader display all data points in sequence, whether that point contains data or
not.
MLM Integration with BMS
June 2015
Doc:BW0070 Page 15
Issue 3
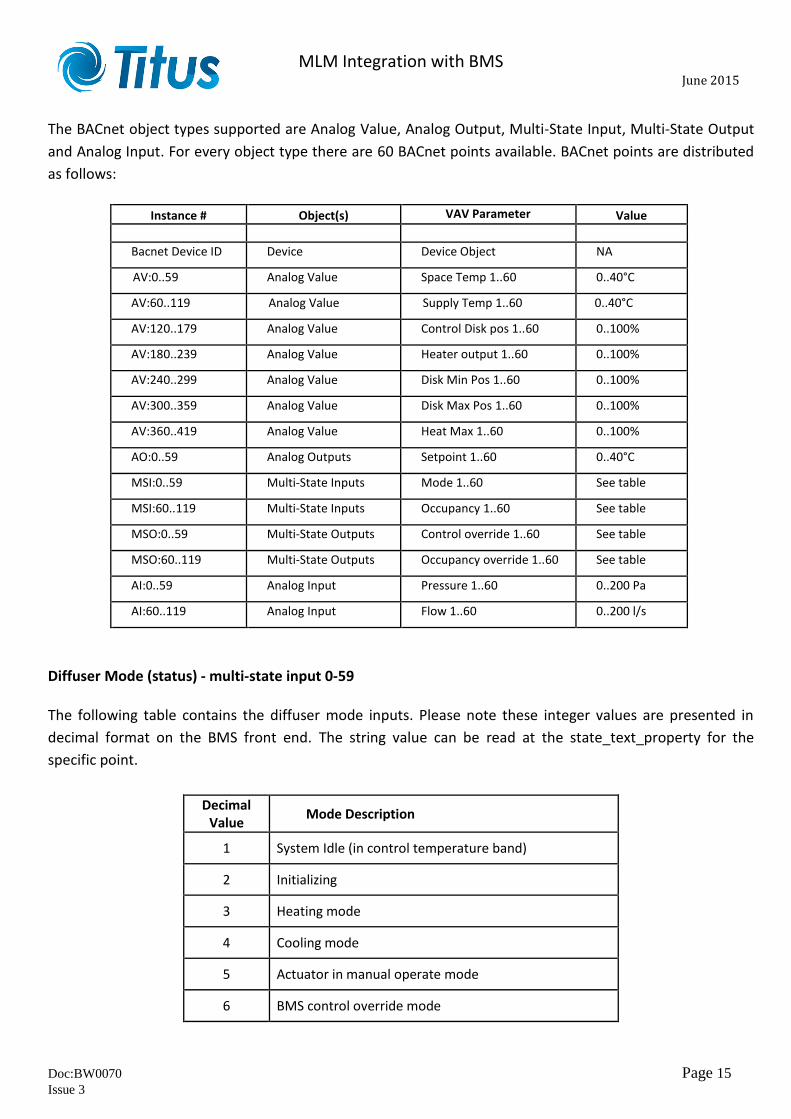
The BACnet object types supported are Analog Value, Analog Output, Multi-State Input, Multi-State Output
and Analog Input. For every object type there are 60 BACnet points available. BACnet points are distributed
as follows:
Instance # Object(s) VAV Parameter Value
Bacnet Device ID Device Device Object NA
AV:0..59 Analog Value Space Temp 1..60 0..40°C
AV:60..119 Analog Value Supply Temp 1..60 0..40°C
AV:120..179 Analog Value Control Disk pos 1..60 0..100%
AV:180..239 Analog Value Heater output 1..60 0..100%
AV:240..299 Analog Value Disk Min Pos 1..60 0..100%
AV:300..359 Analog Value Disk Max Pos 1..60 0..100%
AV:360..419 Analog Value Heat Max 1..60 0..100%
AO:0..59 Analog Outputs Setpoint 1..60 0..40°C
MSI:0..59 Multi-State Inputs Mode 1..60 See table
MSI:60..119 Multi-State Inputs Occupancy 1..60 See table
MSO:0..59 Multi-State Outputs Control override 1..60 See table
MSO:60..119 Multi-State Outputs Occupancy override 1..60 See table
AI:0..59 Analog Input Pressure 1..60 0..200 Pa
AI:60..119 Analog Input Flow 1..60 0..200 l/s
Diffuser Mode (status) - multi-state input 0-59 The following table contains the diffuser mode inputs. Please note these integer values are presented in
decimal format on the BMS front end. The string value can be read at the state_text_property for the
specific point.
Decimal Value
Mode Description
1 System Idle (in control temperature band)
2 Initializing
3 Heating mode
4 Cooling mode
5 Actuator in manual operate mode
6 BMS control override mode

MLM Integration with BMS
June 2015
Doc:BW0070 Page 16
Issue 3
Occupancy Mode (status) - multi-state input 60-119 The following table contains the occupancy mode inputs. These integer values are presented in decimal
format on the BMS front end. The string value can be read at the state_text_property for the specific point.
Decimal Value
Mode Description
1 Occupied
2 Unoccupied
BMS control override - multi-state output 0-59 The MLM 24 system contains some BMS commands to force certain diffuser behaviour. These commands
are typically used for zone flush or emergency operations. The following table indicates the command
(decimal) values:
Function Command Description
Normal 1 No BMS command active
Open 2 Drive Diffuser Open to pre-set limit position, heater off
Close 3 Drive Diffuser Close to pre-set limit position, heater off
Emergency 4 Emergency, this command will disable the heater output
Emergency Open
5 Disable heater output and drive diffuser completely open
Emergency Close
6 Disable heater output and drive diffuser completely closed
Backoff Active 7 Activate backoff dead-band control
Max Heat 8 Drive diffuser to supply air max heat position and switch heater max on
MLM Integration with BMS
June 2015
Doc:BW0070 Page 17
Issue 3
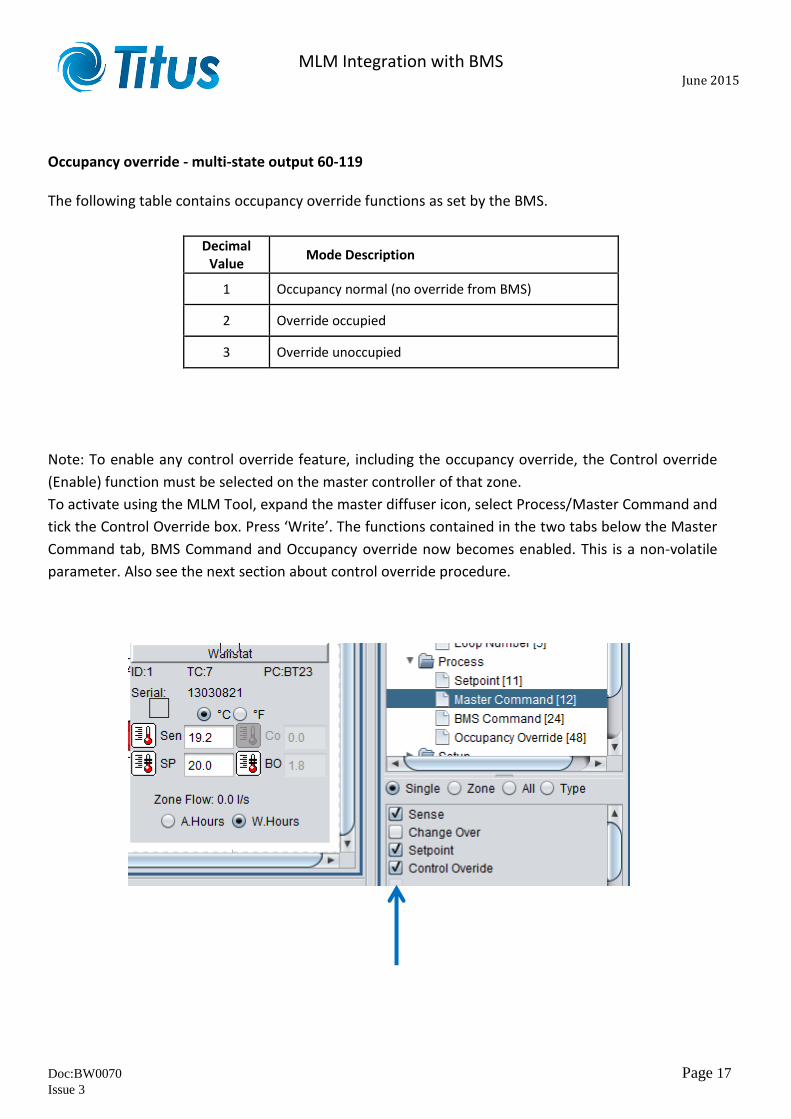
Occupancy override - multi-state output 60-119 The following table contains occupancy override functions as set by the BMS.
Decimal Value
Mode Description
1 Occupancy normal (no override from BMS)
2 Override occupied
3 Override unoccupied
Note: To enable any control override feature, including the occupancy override, the Control override
(Enable) function must be selected on the master controller of that zone.
To activate using the MLM Tool, expand the master diffuser icon, select Process/Master Command and
tick the Control Override box. Press ‘Write’. The functions contained in the two tabs below the Master
Command tab, BMS Command and Occupancy override now becomes enabled. This is a non-volatile
parameter. Also see the next section about control override procedure.

MLM Integration with BMS
June 2015
Doc:BW0070 Page 18
Issue 3
Mapped MCU on a BMS Front-end The following picture shows a typical MCU mapped on a BMS front-end, herewith Workplace AX running on
a Niagara platform showing data for Zone 1.
Please note the Read Only fields indicated in the Write (right hand) column.
MLM Integration with BMS
June 2015
Doc:BW0070 Page 19
Issue 3
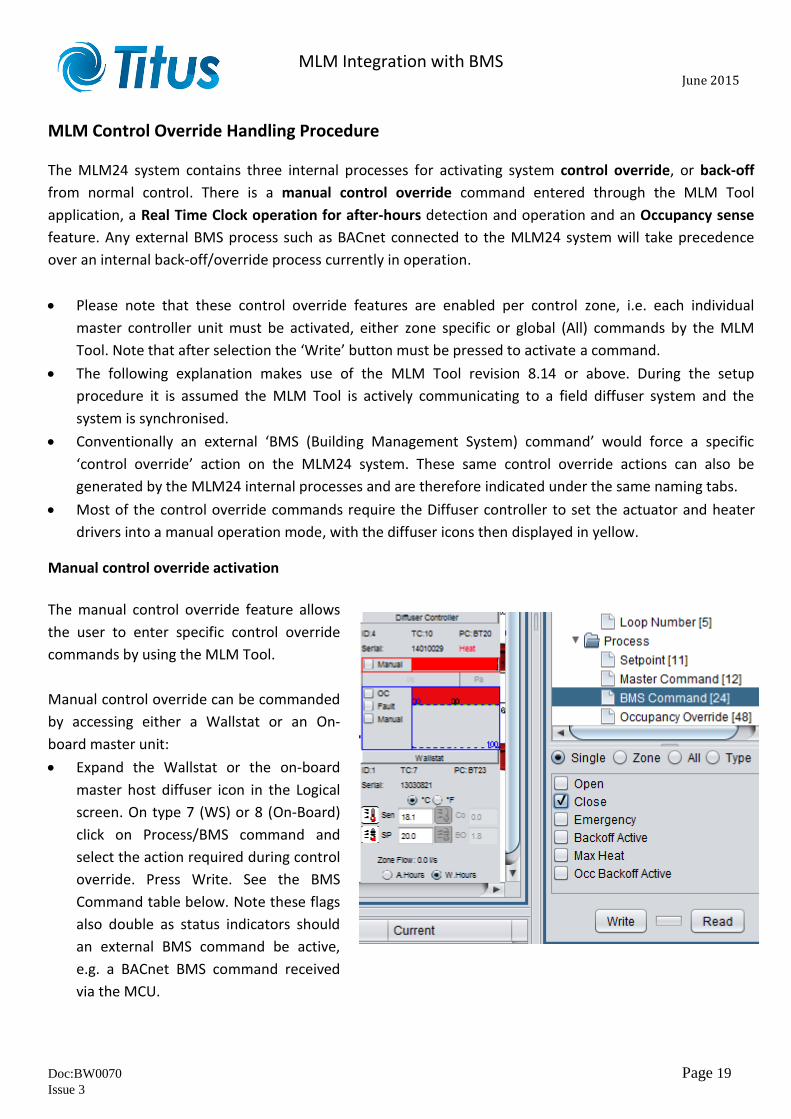
MLM Control Override Handling Procedure
The MLM24 system contains three internal processes for activating system control override, or back-off
from normal control. There is a manual control override command entered through the MLM Tool
application, a Real Time Clock operation for after-hours detection and operation and an Occupancy sense
feature. Any external BMS process such as BACnet connected to the MLM24 system will take precedence
over an internal back-off/override process currently in operation.
Please note that these control override features are enabled per control zone, i.e. each individual
master controller unit must be activated, either zone specific or global (All) commands by the MLM
Tool. Note that after selection the ‘Write’ button must be pressed to activate a command.
The following explanation makes use of the MLM Tool revision 8.14 or above. During the setup
procedure it is assumed the MLM Tool is actively communicating to a field diffuser system and the
system is synchronised.
Conventionally an external ‘BMS (Building Management System) command’ would force a specific
‘control override’ action on the MLM24 system. These same control override actions can also be
generated by the MLM24 internal processes and are therefore indicated under the same naming tabs.
Most of the control override commands require the Diffuser controller to set the actuator and heater
drivers into a manual operation mode, with the diffuser icons then displayed in yellow.
Manual control override activation
The manual control override feature allows
the user to enter specific control override
commands by using the MLM Tool.
Manual control override can be commanded
by accessing either a Wallstat or an On-
board master unit:
Expand the Wallstat or the on-board
master host diffuser icon in the Logical
screen. On type 7 (WS) or 8 (On-Board)
click on Process/BMS command and
select the action required during control
override. Press Write. See the BMS
Command table below. Note these flags
also double as status indicators should
an external BMS command be active,
e.g. a BACnet BMS command received
via the MCU.

MLM Integration with BMS
June 2015
Doc:BW0070 Page 20
Issue 3
To immediately activate a BMS command, select the Process/Master Command tab and select control
override. Press Write. The control override function selected in the BMS command tab will now be
activated.
Note that selecting the Backoff Active box will force the diffuser to control to the dead-band value
contained in the Backoff-band field.
For normal control operation again, uncheck the control override box under the Process/Master
Command tab and press Write.
RTC control override activation The MLM24 Wall thermostat (part no BT2311-5) contains a Real-Time-Clock used to activate a control
override timer. This feature is not currently available on the On-board master unit. To use the control
override time feature:
Ensure the RTC time is correctly set.
Expand the Wallstat host diffuser in the
Logical screen. On type 7 (WS) click on
Setup/RTC and press the read button. If
the time displayed is incorrect edit the
value and press write.
Expand the Backoff/Days tab and check
the boxes where a day/night control
override is required.
Where a 24 hour control override is
required, typically over weekends, it can
be checked under the 24H column.
Expand the Start time tab and enter the
time required for the control override
action to start.
Expand the End time tab and enter the
time required for the control override to
end.
Expand the Pre/Post timer tab and enter the pre-and/or post timer period (in minutes) if required. A
value of zero will disable the pre/post BMS command.
Expand the Pre/Post BMS Command tab and select the Pre/Post control override action required. This
command will typically be used to heat/cool a building after an extended control override period.
Expand the Backoff BMS Cmd tab. The BMS command selects the control override action required for
afterhours back-off.
The final step is to expand the Process/Master Command tab and check (and Write) the control override
box. Activating this box will enable either an external BMS command or internal control override.
MLM Integration with BMS
June 2015
Doc:BW0070 Page 21
Issue 3
Note:
It is important to distinguish between the three ‘BMS command’ tabs indicated. The ‘Process/BMS’ tab
is for selecting manual or external BMS commands. The ‘RTC/Backoff BMS’ tab is exclusively for RTC
driven operations. ‘RTC/ Pre_Post BMS Cmd’ tab is for RTC functions where a pre/post timer period is
required.
For any control override command to execute, the Master Command/Control override flag must be
enabled.
If a system is required to execute a control override command after hours only, the ‘Process/BMS
command’ check boxes should all be cleared.
RTC control override operation
Once the control override start time is reached, typically after working hours, the MLM24 system will check
if a pre-timer period was set. If so, the pre-BMS selection will be executed. In conjunction the indicator
button at the bottom of the Wallstat screen will switch from WH (working hours) to AH (after hours).
Once the pre-timer period has lapsed or if it is set to zero, the system will execute the control override BMS
selection.
On conclusion the post-BMS action will be activated if the post timer was set. The pre- and post-timer
periods are implemented if there is a requirement to condition an area prior to back-off or back-on.
Following this optional period the system will revert to normal control and the indicator will switch back
from AH to WH.
RTC control override Command Table:
Function Description
Open Drive Diffuser Open to pre-set limit position, heater off
Close Drive Diffuser Close to pre-set limit position, heater off
Emergency Emergency, this command will disable the heater output
Emergency & Open Disable heater output and drive diffuser completely open
Emergency & Close Disable heater output and drive diffuser completely closed
Backoff Active Activate WH or AH dead band back-off control, whichever is applicable
Max Heat Drive diffuser to supply air maximum heat position and switch heater 100% on
Occ Backoff Active Status flag to indicate the system is in unoccupied control mode

MLM Integration with BMS
June 2015
Doc:BW0070 Page 22
Issue 3
Occupancy sensor description
The MLM24 system makes use of PIR (Passive Infra-Red) technology to detect an occupied/unoccupied
state. The PIR sensors are mounted unobtrusively on the diffuser trim disk to cover the normal diffuser
‘throw’ area. These sensors are also fitted to Wall thermostats as an additional option for occupancy
detection.
The number of sensors mounted per control zone is determined by the detection area, and ranges from
one per control zone to one per diffuser and Wallstat units. The sensor signals are combined in an ‘or’
function, which means that detection picked up by any sensor in a control zone will flag that zone as
occupied.
Occupancy control override operation
Working Hours
When the room is vacant for a specific period, the diffuser(s) in that particular zone will drive to the
minimum closed position. This period is user adjustable as ‘delay 1’ in the MLM Tool application. Should a
second vacant period, as set in ‘delay 2’ elapse, the diffuser(s) will drive to the fully closed position. The
factory default on both these timers is set to 15 minutes.
If the room temperature drifts outside the temperature band during this state (set in
Process/Setpoint/Backoff Band), the diffuser(s) will revert to the minimum closed position.
If occupancy is detected during this control override operation, the diffuser(s) will revert to normal
operation.
After hours
After hours operation is basically the same as for working hours. Delays 1 & 2 are the same for both. The
only difference is the ‘After hours backoff band’ is used for phase two of the unoccupied control. The RTC
operation for after hour detection is described in the RTC control override section.
Note: If an On-board master unit is used to control a zone, no distinction is made between working hours
and after hours and only the ‘Backoff-band’ parameter is applicable, as the On-board master does not
contain a Real Time Clock.

MLM Integration with BMS
June 2015
Doc:BW0070 Page 23
Issue 3
System set-up for Occupancy Sense
The user can adjust the unoccupied period before the system reverts to a control override state. The
following procedure needs to be followed to set the system up:
Diffuser controller
Ensure an Occupancy sensor is fitted to the Diffuser controller hardware or to the Wallstat hardware.
Select the Diffuser controller (type code 10), go to Setup menu, Occupancy present and check the
Occupancy present box. By setting this parameter that particular diffuser is enabled for occupancy
sense.
A Wallstat unit containing an occupancy
sensor does not require an occupancy
present setup and is always enabled for
that zone.
The sensor sensitivity can be changed for a
value between 1 and 10 to offset false or
no triggers. The default setting ranges
between 6 and 8.
Note: Occupancy present will be selected on all Diffuser controllers that are factory fitted with occupancy
sensors.
On-board master
Expand the diffuser icon in the
Logical screen and select the
On-board master (type code 8).
Under Setup/Unoccupied
delays, verify and edit the delay
1 & delay 2 periods. Note the
default of 900 seconds for a 15
minute delay.
Check and edit the BackoffBand
setting under Setpoint. The
default is 1.8 °C.
Under Master Command, check
and write the control override
parameter.

MLM Integration with BMS
June 2015
Doc:BW0070 Page 24
Issue 3
Wallstat
Expand the diffuser icon in the Logical screen and select the Wallstat (type code 7).
Under Setup/Unoccupied delays, verify and edit the delay 1 & delay 2 periods. Note the default of
900 seconds for a 15 minute delay.
Check and edit the Process/Setpoint/BackoffBand setting. The default is 1.8 °C.
Check and edit the RTC/Afterhours Backoff Band setting. The default is 1.8 °C.
Under Master Command, check and write the control override parameter.
Note: The three parameters of interest in setting up occupancy sense are:
Occupancy present as set on the Diffuser controller – this enables/arms that particular sensor to be
active.
Unoccupied delays – setting these timers to zero will stop the timers and the controller unit (Wallstat or
On-board) will always indicate the zone as occupied.
Control override – by unchecking this box, the controller unit will still show the occupied status, but will
not command the Diffuser controllers into a back-off state.
MLM Tool occupancy wizard
The MLM Tool rev 8.xx contains a setup wizard (Wizards/Occupancy) that assists the installer to easily set-up or de-activate occupancy sensing on a zone by zone basis.
MLM Integration with BMS
June 2015
Doc:BW0070 Page 25
Issue 3
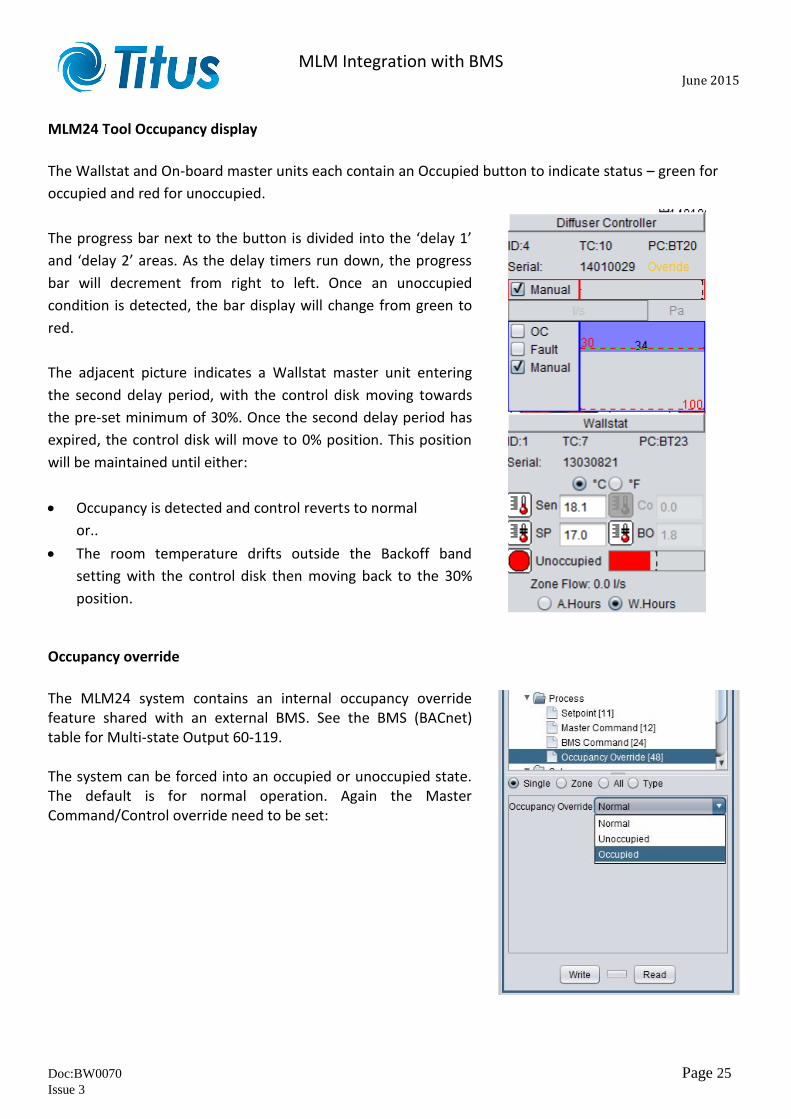
MLM24 Tool Occupancy display
The Wallstat and On-board master units each contain an Occupied button to indicate status – green for
occupied and red for unoccupied.
The progress bar next to the button is divided into the ‘delay 1’
and ‘delay 2’ areas. As the delay timers run down, the progress
bar will decrement from right to left. Once an unoccupied
condition is detected, the bar display will change from green to
red.
The adjacent picture indicates a Wallstat master unit entering
the second delay period, with the control disk moving towards
the pre-set minimum of 30%. Once the second delay period has
expired, the control disk will move to 0% position. This position
will be maintained until either:
Occupancy is detected and control reverts to normal
or..
The room temperature drifts outside the Backoff band
setting with the control disk then moving back to the 30%
position.
Occupancy override
The MLM24 system contains an internal occupancy override feature shared with an external BMS. See the BMS (BACnet) table for Multi-state Output 60-119. The system can be forced into an occupied or unoccupied state. The default is for normal operation. Again the Master Command/Control override need to be set:
MLM Integration with BMS
June 2015
Doc:BW0070 Page 26
Issue 3
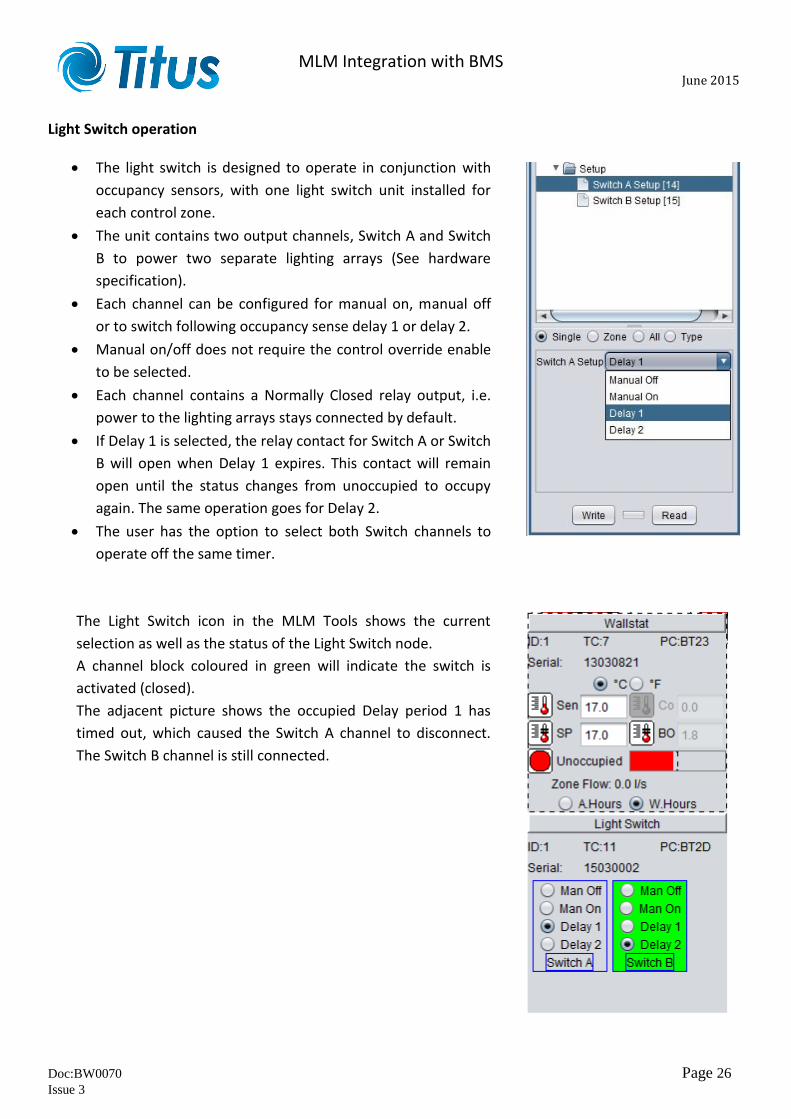
Light Switch operation
The light switch is designed to operate in conjunction with
occupancy sensors, with one light switch unit installed for
each control zone.
The unit contains two output channels, Switch A and Switch
B to power two separate lighting arrays (See hardware
specification).
Each channel can be configured for manual on, manual off
or to switch following occupancy sense delay 1 or delay 2.
Manual on/off does not require the control override enable
to be selected.
Each channel contains a Normally Closed relay output, i.e.
power to the lighting arrays stays connected by default.
If Delay 1 is selected, the relay contact for Switch A or Switch
B will open when Delay 1 expires. This contact will remain
open until the status changes from unoccupied to occupy
again. The same operation goes for Delay 2.
The user has the option to select both Switch channels to
operate off the same timer.
The Light Switch icon in the MLM Tools shows the current
selection as well as the status of the Light Switch node.
A channel block coloured in green will indicate the switch is
activated (closed).
The adjacent picture shows the occupied Delay period 1 has
timed out, which caused the Switch A channel to disconnect.
The Switch B channel is still connected.
MLM Integration with BMS
June 2015
Doc:BW0070 Page 27
Issue 3
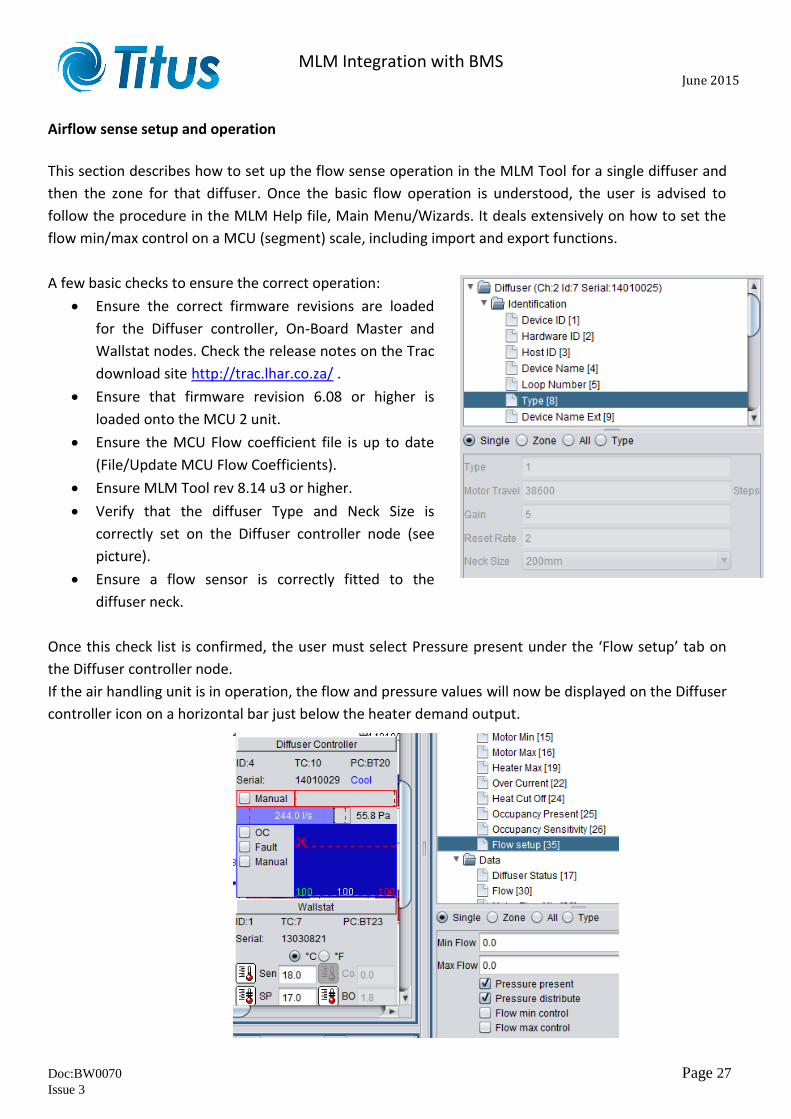
Airflow sense setup and operation
This section describes how to set up the flow sense operation in the MLM Tool for a single diffuser and
then the zone for that diffuser. Once the basic flow operation is understood, the user is advised to
follow the procedure in the MLM Help file, Main Menu/Wizards. It deals extensively on how to set the
flow min/max control on a MCU (segment) scale, including import and export functions.
A few basic checks to ensure the correct operation:
Ensure the correct firmware revisions are loaded
for the Diffuser controller, On-Board Master and
Wallstat nodes. Check the release notes on the Trac
download site http://trac.lhar.co.za/ .
Ensure that firmware revision 6.08 or higher is
loaded onto the MCU 2 unit.
Ensure the MCU Flow coefficient file is up to date
(File/Update MCU Flow Coefficients).
Ensure MLM Tool rev 8.14 u3 or higher.
Verify that the diffuser Type and Neck Size is
correctly set on the Diffuser controller node (see
picture).
Ensure a flow sensor is correctly fitted to the
diffuser neck.
Once this check list is confirmed, the user must select Pressure present under the ‘Flow setup’ tab on
the Diffuser controller node.
If the air handling unit is in operation, the flow and pressure values will now be displayed on the Diffuser
controller icon on a horizontal bar just below the heater demand output.
MLM Integration with BMS
June 2015
Doc:BW0070 Page 28
Issue 3
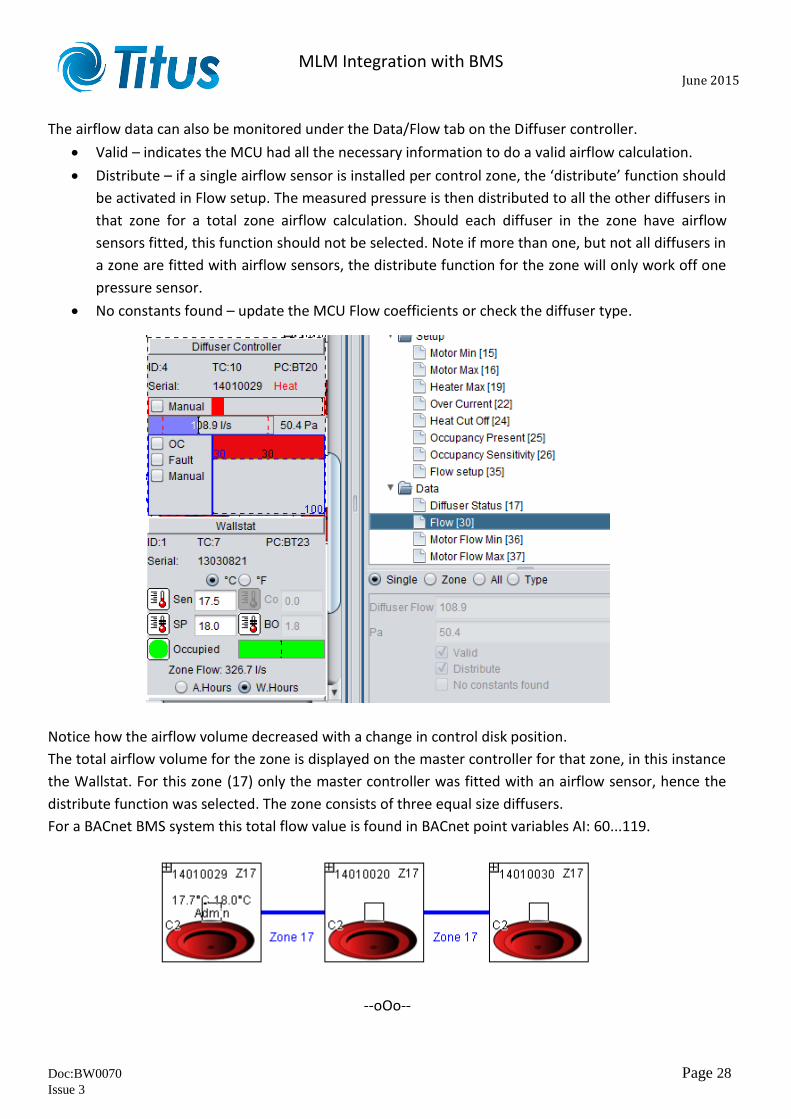
The airflow data can also be monitored under the Data/Flow tab on the Diffuser controller.
Valid – indicates the MCU had all the necessary information to do a valid airflow calculation.
Distribute – if a single airflow sensor is installed per control zone, the ‘distribute’ function should
be activated in Flow setup. The measured pressure is then distributed to all the other diffusers in
that zone for a total zone airflow calculation. Should each diffuser in the zone have airflow
sensors fitted, this function should not be selected. Note if more than one, but not all diffusers in
a zone are fitted with airflow sensors, the distribute function for the zone will only work off one
pressure sensor.
No constants found – update the MCU Flow coefficients or check the diffuser type.
Notice how the airflow volume decreased with a change in control disk position.
The total airflow volume for the zone is displayed on the master controller for that zone, in this instance
the Wallstat. For this zone (17) only the master controller was fitted with an airflow sensor, hence the
distribute function was selected. The zone consists of three equal size diffusers.
For a BACnet BMS system this total flow value is found in BACnet point variables AI: 60...119.
--oOo--