titanium locking screw · cocrmo alloy ultra-high molecular weight polyethylene (uhmwpe)...
TRANSCRIPT

Knees • Hips • Extremit ies • Cement and Accessories • PMI® • TechnologyKnees • Hips • Extremit ies • Cement and Accessories • PMI® • Technology
Surgical Technique
Titanium Locking Screw For Triflange Acetabular Component

This surgical technique is utilized by Daniel Wurtz, M.D. Biomet as the manufacturer of this device, does not practice medicine. Each surgeon is responsible for determining the appropriate device and technique to utilize on each individual patient.
Over 1 million times per year, Biomet helps one surgeon
provide personalized care to one patient.
The science and art of medical care is to provide the right
solution for each individual patient. This requires clinical
mastery, a human connection between the surgeon and the
patient, and the right tools for each situation.
At Biomet, we strive to view our work through the eyes of
one surgeon and one patient. We treat every solution we
provide as if it’s meant for a family member.
Our approach to innovation creates real solutions that assist
each surgeon in the delivery of durable personalized care
to each patient, whether that solution requires a minimally-
invasive surgical technique, advanced biomaterials, or a
custom, patient-matched implant.
When one surgeon connects with one patient to provide
personalized care, the promise of medicine is fulfilled.
One Surgeon. One Patient.®

1
Preoperative PlanningGive careful consideration as to what type of screw is most appropriate for any given location in the preoperative planning stages, as well as intraoperatively. Factors to consider when selecting a screw for a given location include:
• Bone quality
• Bone depth
• Screw length
• Soft tissue and other anatomic structures in the screw vicinity
• Ability to gain adequate exposure to drill for the screw along the axis of the hole
• Relationship between the direction of physiological loading and the axis of the screw
• Desired screw compression
• Promotion of load sharing between the screw and backside of the implant
Non-locking screw holes accept standard low-profile 6.5 mm titanium screws (Figure 1).
Locking screw holes will also accept standard low-profile 6.5 mm titanium screws (Figure 2).
Only locking screw holes will accept locking 6.5 mm titanium screws (Figure 3).
Note: While non-locking low-profile screws can be drilled for and inserted at variable angles (Figures 1 and 2), locking screws can only be drilled for and inserted along the fixed axis of the threads in the locking hole (Figure 3).
Titanium Locking Screw
Figure 2Figure 1 Figure 3
2
Titanium Locking Screw
To prepare a hole along the fixed axis for a locking screw, start by threading a 3.2 mm fixed angle drill guide into a locking hole (Figure 4). Both short (40 mm) and long (115 mm) drill guides are available for access around the soft tissue and retractors. To thread in a drill guide it must be aligned with the axis of the threads in the threaded hole. Apply light pressure to the drill guide and turn clockwise. The threads will lock with approximately one-quarter to one-half turn after initial engagement.
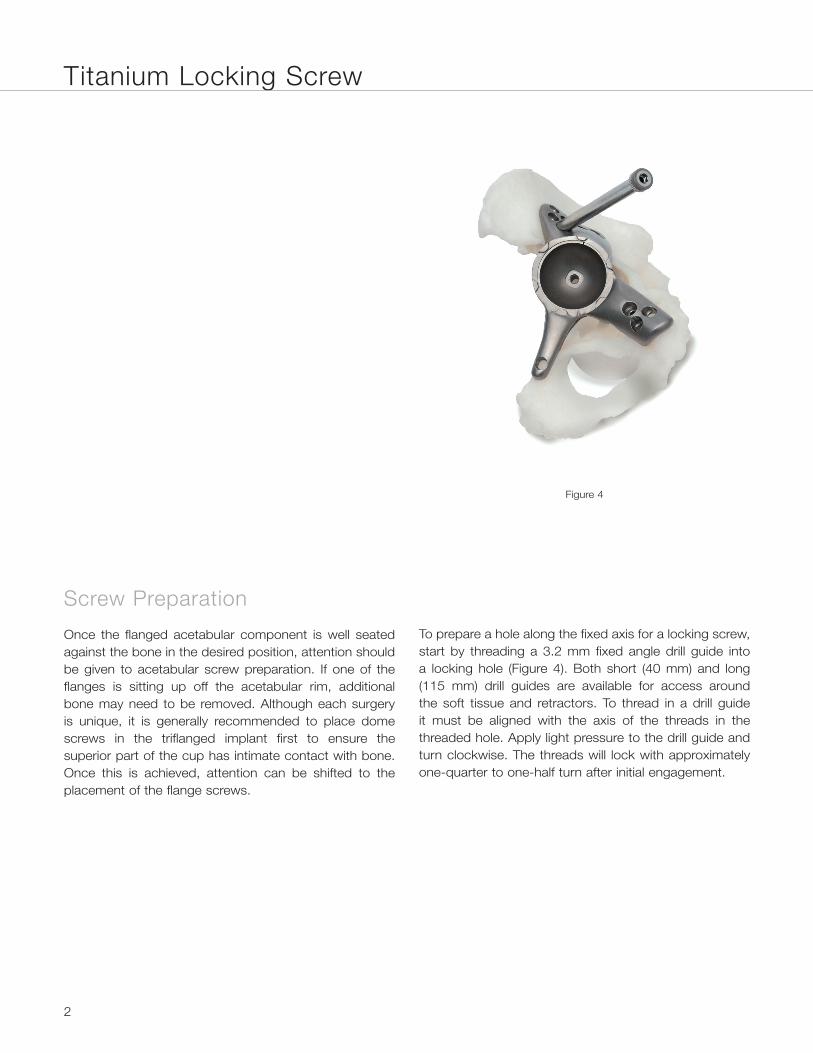
Screw Preparation
Once the flanged acetabular component is well seated against the bone in the desired position, attention should be given to acetabular screw preparation. If one of the flanges is sitting up off the acetabular rim, additional bone may need to be removed. Although each surgery is unique, it is generally recommended to place dome screws in the triflanged implant first to ensure the superior part of the cup has intimate contact with bone. Once this is achieved, attention can be shifted to the placement of the flange screws.
Figure 4
3
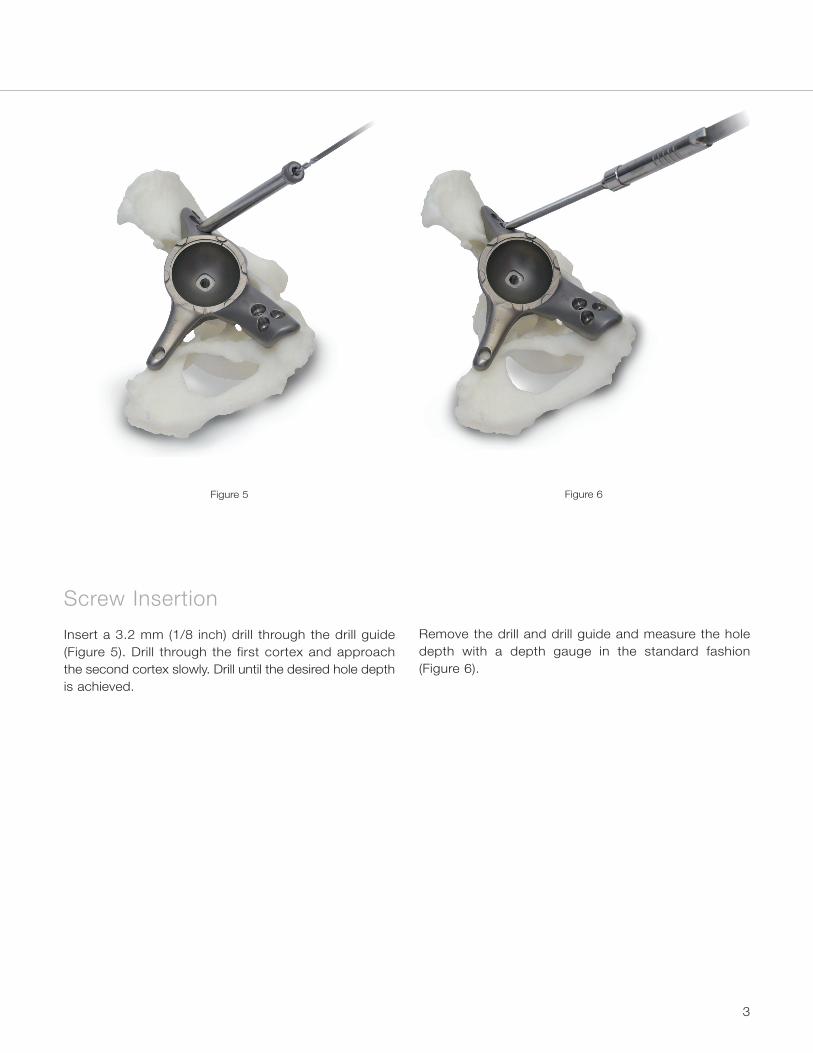
Screw Insertion
Insert a 3.2 mm (1/8 inch) drill through the drill guide (Figure 5). Drill through the first cortex and approach the second cortex slowly. Drill until the desired hole depth is achieved.
Figure 5 Figure 6
Remove the drill and drill guide and measure the hole depth with a depth gauge in the standard fashion (Figure 6).

4
Titanium Locking Screw
Figure 7
Remove the depth gauge. Insert the locking screw with a 3.5 mm straight or universal screwdriver as required (Figure 7). Approximately one-quarter to one-half turn should engage the locking screw threaded head with the hole threads. An abrupt increase in insertion torque will be noticed once the threads are locked.
Where desired, insert non-locking low-profile screws in the standard fashion.

5
Implants
Instruments
Product Part Number Description Size
CP161940 Titanium Locking-Screw Cancellous-Thread 6.5 x 15 mm
CP161941 Titanium Locking-Screw Cancellous-Thread 6.5 x 20 mm
CP161942 Titanium Locking-Screw Cancellous-Thread 6.5 x 25 mm
CP161943 Titanium Locking-Screw Cancellous-Thread 6.0 x 30 mm
CP161944 Titanium Locking-Screw Cancellous-Thread 6.0 x 35 mm
CP161945 Titanium Locking-Screw Cancellous-Thread 6.0 x 40 mm
CP161947 Titanium Locking-Screw Cancellous-Thread 6.0 x 50 mm
CP161949 Titanium Locking-Screw Cancellous-Thread 6.0 x 60 mm
CP161951 Titanium Locking-Screw Cancellous-Thread 6.0 x 70 mm
Product Part Number Description Size
CP461531 Drill Guide, Long 115 mm
CP461530 Drill Guide, Short 40 mm
31-111114 Depth Gauge —
472370 Drill 3.2 mm

6
Biomet OrthopedicsP.O. Box 587
56 East Bell DriveWarsaw, Indiana 46581 USA
01-50-1011
Date: 09/05
Biomet® Internal Fixation Devices
ATTENTION OPERATING SURGEON
DESCRIPTIONBiomet manufactures a variety of internal fixation devices intended to aid in the alignment and stabilization of fractures to the skeletal system until healing has occurred. Implants used for this application include: intramedullary nails, intramedullary pins, bone plates, bone screws, and smooth and threaded pins and wires. Specialty implants are available for specialized treatments.
MATERIALS316 LVM Stainless Steel316 L Stainless SteelTitanium AlloyCommercially Pure TitaniumCoCrMo AlloyUltra-High Molecular Weight Polyethylene (UHMWPE)
INDICATIONS1. Fresh Fractures 2. Osteotomy3. Revision procedures where other treatments or devices have failed.4. Arthrodesis
Patient selection factors to be considered include: 1) need for alignment and stabilization of bone fractures, 2) ability and willingness of the patient to follow postoperative care instructions until healing is complete, and 3) a good nutritional state of the patient.
CONTRAINDICATIONS1. Infection.2. Patient conditions including blood supply limitations, obesity and
insufficient quantity or quality of bone.3. Patients with metal or neurologic conditions who are unwilling or
incapable of following postoperative care instructions.4. Foreign body sensitivity. Where material sensitivity is suspected, testing
is to be completed prior to implantation of the device.
WARNINGSInternal fixation devices aid the surgeon in the alignment and stabilization of skeletal fractures and provide a means of fracture management in reconstructive surgical applications. While these devices are generally successful in attaining these goals, they cannot be expected to replace normal healthy bone or withstand the stress placed upon the device by full or partial weight bearing or load bearing, particularly in the presence of nonunion, delayed union, or incomplete healing. Internal fixation devices are internal splints that align the fracture until normal healing occurs. The size and shape of bones and soft tissue place limitation on the size and strength of implants. If there is delayed union on nonunion of bone in the presence of weight bearing, or load bearing, the implant could eventually break. Therefore, it is important that immobilization (use of external support, walking aids, braces, etc.) of the fracture site be maintained until firm bony union (confirmed by clinical and radiographic examination) is established. Surgical implants are subject to repeated stresses in use, which can result in fatigue fracture. Factors such as the patient’s weight, activity level, and adherence to weight bearing or load bearing instructions have an effect on the service life of the implant. The surgeon must be thoroughly knowledgeable not only in the medical and surgical aspects of the implant, but also must be aware of the mechanical and metallurgical aspects of the surgical implants.
Bone screws, 3mm – 10mm diameter and 10mm – 75mm overall length are not approved for screw attachment or fixation to the posterior elements (pedicles) of the cervical, thoracic or lumbar spine.
1. Correct selection of the implant is extremely important. The potential for success in fracture fixation is increased by the selection of the proper type of implant. While proper selection can help minimize risks, the size and shape of human bones present limitations on the size and strength of implants. Internal fixation devices cannot withstand the activity levels and/or loads equal to those placed on normal healthy bone. These devices are not designed to withstand the unsupported stress of full weigh bearing, or load bearing.
2. The devices can break when subjected to increased loading associated with nonunion or delayed union. Internal fixation devices are load sharing devices that hold a fracture in alignment until healing occurs. If healing is delayed, or does not occur, the implant can be expected to break, bend or fail. Loads produced by weight bearing, and activity levels may dictate the longevity of the implant.
3. Implant materials are subject to corrosion. Implanting metals and alloys subjects them to constant changing environments of salts, acids, and alkalis that can cause corrosion. Putting dissimilar metals and alloys in contact with each other can accelerate the corrosion process that may enhance fracture of implants. Every effort should be made to use compatible metals and alloys when marrying them to a common goal, i.e., screws and plates.
4. Correct handling of implants is extremely important, Do not modify implants. Do not notch or bend implants. Intraoperative fracture of screws can occur if excessive force (torque) is applied while seating bone screws. Notches or scratches put in the implant during the course of surgery may contribute to breakage.
5. Remove after fracture has healed. Implants can loosen, fracture, corrode, migrate, or cause pain. If an implant remains implanted after complete healing, the implant may cause stress shielding which may increase the risk of refracture in an active patient. The surgeon should weigh the risks versus benefits when deciding whether to remove the implant. Adequate postoperative management to avoid refracture should follow implant removal.
6. Adequately instruct the patient. Postoperative care is important. The patient’s ability and willingness to follow instruction is one of the most important aspects of successful fracture management. Patients with senility, mental illness, alcoholism, or drug abuse may be at higher risk of device failure. These patients may ignore instructions and activity restrictions. The patient is to be instructed in the use of external supports, walking aids, and braces that are intended to immobilize the fracture site and limit weight bearing or load bearing. The patient is to be made fully aware and warned that the device does not replace normal healthy bone, and that the device can break, bend or be damaged as a result of stress, activity, load bearing, or weigh bearing. The patient is to be made aware and warned of general surgical risks, possible adverse effects, and to follow the instructions of the treating physician. The patient is to be advised of the need for regular postoperative follow-up examination as long as the device remains implanted.
7. Do not use 9mm or less diameter nails in teenage or adult patients. The smaller sizes of femoral nails are intended for pediatric patients.
8. To reduce the driving force required on intramedullary nails and subsequent damage, the physician should consider reaming ½ mm to 1 ½ mm larger than the nail to be implanted.
9. Do not attempt screw fixation within a fracture line. Adequate fixation will be compromised if screws are placed within the fracture line.
PRECAUTIONSDo not reuse implants. While an implant may appear undamaged, previous stress may have created imperfections that would reduce the service life of the implant. Do not treat patients with implants that have been even momentarily placed in a different patient.
Instruments are available to aid in the accurate implantation of internal fixation devices. Intraoperative fracture or breaking of instruments has been reported. Surgical instruments are subject to wear with normal usage. Instruments, which are experienced extensive use or excessive force, are susceptible to fracture. Surgical instruments should only be used for their intended purpose. Biomet recommends that all instruments be regularly inspected for wear and disfigurement.
POSSIBLE ADVERSE EFFECTS1. Nonunion or delayed union which may lead to breakage of the implant. 2. Bending or fracture of the implant.3. Loosening or migration of the implant. 4. Metal sensitivity, or allergic reaction to a foreign body.5. Limb shortening due to compression of the fracture or bone resorption. 6. Decrease in bone density due to stress shielding.
7
7. Pain, discomfort, or abnormal sensation due to the presence of the device.
8. Nerve damage due to surgical trauma.9. Necrosis of bone.
10. Intraoperative or postoperative bone fracture and/or postoperative pain.11. Inadequate healing.
STERILITYUnless supplied sterile, metallic internal fixation devices must be sterilized prior to surgical use. Do not sterilize UHMWPE implants using steam autoclaving methods. Where specified, do not use implant after expiration date.
Pre-Vacuum Steam Sterilization (HI-VAC)Temperature 270°- 275°F (132°-135° C) – Wrapped or
Exposure Time 5 MinutesDrying Time 8 Minutes
Since Biomet is not familiar with individual hospital handling methods, cleaning methods and bioburden. Biomet cannot assume responsibility for sterility even though the guideline is followed.
Caution: Federal law (USA) restricts this device to sale by or on the order of a physician.
Authorized Representative: Biomet U.K., Ltd. Waterton Industrial Estates Bridgend, South Wales CF31 3XA UK
unwrapped.

8
PREPARATION AND ASSEMBLYAfter cleaning/disinfecting, the disassembled instruments should be reassembled and placed in their proper locations in the instrument cases.
CARE AND HANDLING OF INSTRUMENTS1. General. Surgical instruments and instrument cases are susceptible to damage for
a variety of reasons including prolonged use, misuse, rough or improper handling. Care must be taken to avoid compromising their exacting performance. To minimize damage and risk of injury, the following should be done:· Inspect the instrument case and instruments for damage upon receipt and
after each use and cleaning. Incompletely cleaned instruments should be cleaned until visibly clean, repeating as necessary. Instruments in need of repair should be set aside for repair service or returned to Biomet. Instruments returned to Biomet or its distributors should be cleaned and sterilized prior to shipment. ANSI/AAMI ST35 Safe Handling and Biological Decontamination of Reusable Medical Devices in Health Care Facilities and in Nonclinical Settings provides guidelines for return, or contact Biomet or your distributor for further instruction.
· Only use an instrument for its intended purpose.· When handling sharp instruments use extreme caution to avoid injury. Consult
with an infection control practitioner to develop and verify safety procedures appropriate for all levels of direct instrument contact.
2. General Cleaning. Thoroughly clean instruments until visibly clean, repeating as necessary, prior to initial sterilization and as soon as possible after use. Do not allow soil to dry on the instruments. If cleaning must be delayed, place groups of instruments in a covered container with appropriate detergent or enzymatic solution to delay drying. Wash all instruments whether or not they were used or inadvertently came into contact with blood or saline solution.
3. Ultrasonic Cleaners can be used with hot tap water per manufacturer’s recommended temperature (usually 90º-140ºF or 32º-60ºC) and specially formulated detergents. Follow manufacturer’s recommendations for proper cleaning solution formulated specifically for ultrasonic cleaners. Be aware that loading patterns, instrument cassettes, water temperature, and other external factors may change the effectiveness of the equipment.
4. Washer-Decontamination Equipment will wash and decontaminate instruments. Complete removal of soil from crevices and serrations depends on instrument construction, exposure time, pressure of delivered solution, and pH of the detergent solution, and thus may require prior brushing. Be familiar with equipment manufacturers’ use and operation instructions. Be aware that loading, detergent, water temperature, and other external factors may change the effectiveness of the equipment.
RESPONSIBILITIES OF THE USERGeneral. Health care personnel bear the ultimate responsibility for ensuring that any packaging method or material, including a reusable rigid container system, is suitable for use in sterilization processing and sterility maintenance in a particular health care facility.
Cleaning/Decontamination. The health care facility is responsible to ensure that conditions essential to safe handling and decontamination can be achieved. ANSI/AAMI ST79 Comprehensive Guide to Steam Sterilization and Sterility Assurance in Health Care provides guidelines for design and personnel considerations, immediate handling of contaminated items and transportation, decontamination processes, servicing, repair, and process performance.
Sterility. ANSI/AAMI ST79 Comprehensive Guide to Steam Sterilization and Sterility Assurance in Health Care Guidelines are provided by this standard for cleaning and decontamination, preparation and assembly, sterilizer loading and unloading, matching the container system to the appropriate sterilization cycle, quality assurance, sterile storage, transport, and aseptic use.
WARNINGS AND PRECAUTIONSUnless otherwise indicated, instrument sets are NOT STERILE and must be thoroughly cleaned and sterilized prior to use.
Instruments should NOT be flash-autoclaved inside the instrument case. Flash-autoclaving of individual instruments should be avoided.
STORAGE AND SHELF LIFEInstrument cases that have been processed and wrapped to maintain sterility should be stored in a manner to avoid extremes in temperature and moisture. Care must be exercised in handling of wrapped cases to prevent damage to the sterile barrier. The health care facility should establish a shelf life for wrapped instrument cases based upon the type of sterile wrap used and the recommendations of the sterile wrap manufacturer. The user must be aware that maintenance of sterility is event-related and that the probability of occurrence of a contaminating event increases over time, with handling, and whether woven or non-woven materials, pouches, or container systems are used as the packaging method.
STERILITYUnless otherwise indicated, instruments are NOT STERILE and must be thoroughly cleaned and sterilized prior to use.
Biomet Orthopedics and Biomet Sports Medicine instruments can be steam autoclaved and repeated autoclaving will not adversely affect them, unless otherwise indicated in the labeling. If you have any problems when using Biomet Orthopedics and Biomet Sports Medicine, please bring this to Biomet’s or its distributor’s attention when you return them. Instruments returned to Biomet or its distributors should be cleaned and sterilized prior to shipment. ANSI/AAMI ST79 Comprehensive Guide to Steam Sterilization and Sterility Assurance in Health care Facilities provides guidelines for return or contact Biomet or your distributor for further information.
Unless otherwise indicated, instruments must be thoroughly cleaned and sterilized prior to surgical use. Set forth below is a recommended minimum cycle for steam sterilization that has been validated by Biomet under laboratory conditions.
Instruments that have been used in a surgical environment should be thoroughly cleaned, repeating as necessary, until visibly clean prior to autoclaving. Use of ANSI/AAMI ST79 Comprehensive Guide to Steam Sterilization and Sterility Assurance in Health Care is recommended. Wraps used during the steam sterilization process are to be FDA cleared wraps (e.g. Kimguard® Sterilization Wrap, K082554)
Biomet Orthopedics Biomet Sports Medicine
56 East Bell Drive 56 East Bell DriveP.O. Box 587 P.O. Box 587
Warsaw, Indiana 46581 USA Warsaw, Indiana 46581 USA
01-50-1500Date: 2011-01
Recommendations for the Care and HandlingBiomet Orthopedics and Biomet Sports Medicine
Surgical Instruments and Instrument Cases
DESCRIPTIONBiomet Orthopedics and Biomet Sports Medicine instruments and instrument cases are generally composed of aluminum, stainless steel, and/or polymeric materials. The cases may be multi-layered with various inserts to hold surgical instrumentation in place during handling and storage. The inserts may consist of trays, holders, and silicone mats. The instrument cases are perforated to allow steam to penetrate these various materials and components. The instrument cases will allow sterilization of the contents to occur in a steam autoclave utilizing a sterilization and drying cycle that has been validated by the user for the equipment and procedures employed at the user facility. Instrument cases do not provide a sterile barrier and must be used in conjunction with a sterilization wrap to maintain sterility.
MaterialsAluminumStainless SteelPolymeric Materials
DISCLAIMERBiomet Orthopedics and Biomet Sports Medicine instrument cases are intended to protect instrumentation and facilitate the sterilization process by allowing steam penetration and drying. Biomet has verified through laboratory testing that its instrument cases are suitable for the specific sterilization methods and cycles for which they have been tested. Health care personnel bear the ultimate responsibility for ensuring that any packaging method or material, including a reusable rigid container system, is suitable for use in sterilization processing and sterility maintenance in a particular health care facility.
CLEANING AND DECONTAMINATION1. Removal of Visible Contamination-The effectiveness of subsequent
decontamination processes depends on prior removal of visible soil. Visible soil should be removed under running water using a mechanical aid, such as a brush with rigid nylon bristles. Care should be taken to avoid splashing and generating aerosols by holding instruments below the surface of the water in a sink into which water is running and continuously draining. Instruments should not be held under a running tap, as this is likely to result in splashing. Operatives should wear protective equipment including gloves and goggles. Care should be taken to avoid penetrating or cutting injuries. Particular attention should be taken to remove all debris from all cannulations and obscure holes in the instruments.
2. Disassembly-The majority of surgical instruments and trial prostheses are constructed in such a way that they will not require disassembly. However, some of the more complex instruments are made of several components and these should be disassembled into their individual parts prior to decontamination. In most cases the method of disassembly is self-evident. Loosen and/or disassemble instruments with removable parts. Screws or bolts on some instruments can be loosened for cleaning but are self-retaining to prevent loss.
3. Washing/Disinfecting- It is recommended that the instruments, disassembled as required, be decontaminated using an automatic washer-disinfection unit utilizing thermal disinfection. This should preferably be of the ultrasonic or continuous tunnel process type. The cabinet type is an acceptable alternative if a continuous process machine is not available. Compatible detergents and rinse aids may be used as recommended by the manufacturer of the washer-disinfection unit. These detergents and/or rinse aids, however, should be of neutral or near neutral pH. Excessively acidic or alkaline solutions may corrode aluminum instruments or instrument cases. The following table provides a validated method for cleaning instruments.
PhaseTime
(Minutes)Temperature &Water Quality
Detergent & Concentration
Pre-wash 2:0095°F (35°C)Tap water
None
Detergent Wash
6:00158°F (70°C)
Tap waterEnzol®1oz/gal.
Wash 4:00158°F (70°C)
Tap waterRenu-KlenzTM
¼ oz/gallon
Rinse 2:00158°F (70°C)
Tap waterNone
Drying 7:00 239°F (115°C) None
•
••

9
Kimguard® is a registered trademark of Kimberly-Clark.Enzol® is a registered trademark of Johnson & Johnson Co.Renu-Klenz™ is a trademark of Steris Corporation.Aesculap® is a registered trademark of B. Braun Co.
Authorized Representative: Biomet U.K., Ltd. Waterton Industrial Estate, Bridgend, South Wales CF31 3XA, U.K.
Symbol Legend
Manufacturer
Date of Manufacture
Do Not Reuse
Caution
Sterilized using Ethylene Oxide
Sterilized using Irradiation
Sterile
Sterilized using Aseptic Processing Techniques
Sterilized using Steam or Dry Heat
Use By
WEEE Device
Catalogue Number
Batch Code
Flammable
Authorized Representative in the European Community
The following cycle parameters are for instrument cases up to 25 lbs (11 kgs).
U.S. PARAMETERS
DYNAMIC-AIR-REMOVAL STEAM STERILIZER270ºF (132ºC) – Single Wrapped5 minutes exposure time - 20 minutes drying time
GRAVITY-DISPLACEMENT STEAM STERILIZER270ºF (132ºC) – Single Wrapped15 minutes exposure time - 15 minutes drying time
INTERNATIONAL PARAMETERS
DYNAMIC-AIR-REMOVAL STEAM STERILIZER132º - 137ºC (270º - 278ºF) – Double or Single Wrapped5 minutes exposure time - 20 minutes drying time
GRAVITY-DISPLACEMENT STEAM STERILIZER132º - 137ºC (270º - 278ºF) – Double or Single Wrapped15 minutes exposure time - 15 minutes drying time
Multi-Level Instrument CasesIn some instrument case designs, two or three individual instrument cases may be supplied with an outer transportation container. These instrument cases may be sterilized individually following the instructions above, or may be sterilized by placing the individual cases within the supplied transportation container. To sterilize two or three instrument cases within the supplied outer transportation container, the following sterilization cycle parameters are recommended. Wraps used during the steam sterilization process are to be FDA cleared wraps (e.g. Kimguard ® Sterilization Wrap, K082554).
The following cycle parameters are for instrument cases up to 35 lbs. (16 kgs.).
U.S. PARAMETERS
DYNAMIC-AIR-REMOVAL STEAM STERILIZER270ºF (132ºC) – Single Wrapped10 minutes exposure time - 20 minutes drying time
INTERNATIONAL PARAMETERS
DYNAMIC-AIR-REMOVAL STEAM STERILIZER132º - 137ºC (270º - 278ºF) – Double or Single Wrapped10 minutes exposure time - 20 minutes drying time
Reusable Rigid Sterilization ContainersSome instrument trays are designed to fit within a supplied reusable rigid sterilization container for sterilization. Ensure that the supplied reusable rigid sterilization container is in proper working order prior to sterilization. Biomet utilizes the Aesculap® SterilContainer™ System and the care and handling of these systems can be found at www.aesculapusa.com under instructions-for-use. NOTE: THE STERILIZATION PARAMETERS WITHIN THE AESCULAP INSTRUCTIONS-FOR-USE DO NOT SUPERSEDE THE STERILIZATION PARAMETERS OUTLINED BELOW.
The following cycle parameters are for instrument trays in rigid container systems up to 36 lbs (17 kgs).
U.S. PARAMETERS
DYNAMIC-AIR-REMOVAL STEAM STERILIZER270ºF (132ºC)5 minutes exposure time - 20 minutes drying time
INTERNATIONAL PARAMETERS
DYNAMIC-AIR-REMOVAL STEAM STERILIZER132º - 137ºC (270º - 278ºF)5 minutes exposure time - 20 minutes drying time
Since Biomet is not familiar with individual hospital handling procedures, cleaning methods, bioburden levels, and other conditions, Biomet assumes no responsibility for sterilization of product by a hospital even if the general above guidelines are followed.
CAUTION: Federal Law (USA) restricts this device to sale by or on the order of a physician.
Comments regarding Biomet Orthopedics and Biomet Sports Medicine devices or instruments can be directed to Attn: Regulatory Dept., Biomet, Inc., P.O. Box 587, Warsaw, IN 46581 USA, FAX: 574-372-3968.
All trademarks herein are the property of Biomet, Inc. or its subsidiaries unless otherwise indicated.

P.O. Box 587, Warsaw, IN 46581-0587 • 800.348.9500 x 1501 ©2011 Biomet Orthopedics • biomet.com
Form No. BIV0048.0 • REV051511
All trademarks herein are the property of Biomet, Inc. or its subsidiaries unless otherwise indicated.
This material is intended for the sole use and benefit of the Biomet sales force and physicians. It is not to be redistributed, duplicated or disclosed without the express written consent of Biomet.
For product information, including indications, contraindications, warnings, precautions and potential adverse effects, see the package insert and Biomet’s website.