tips and tricks how to use powerpoint - pumps, … access toolbar slide pane separators view icons...
TRANSCRIPT
Tips and Tricks How to Use PowerPointHelpful Tips and Tricks for Using PowerPoint

22
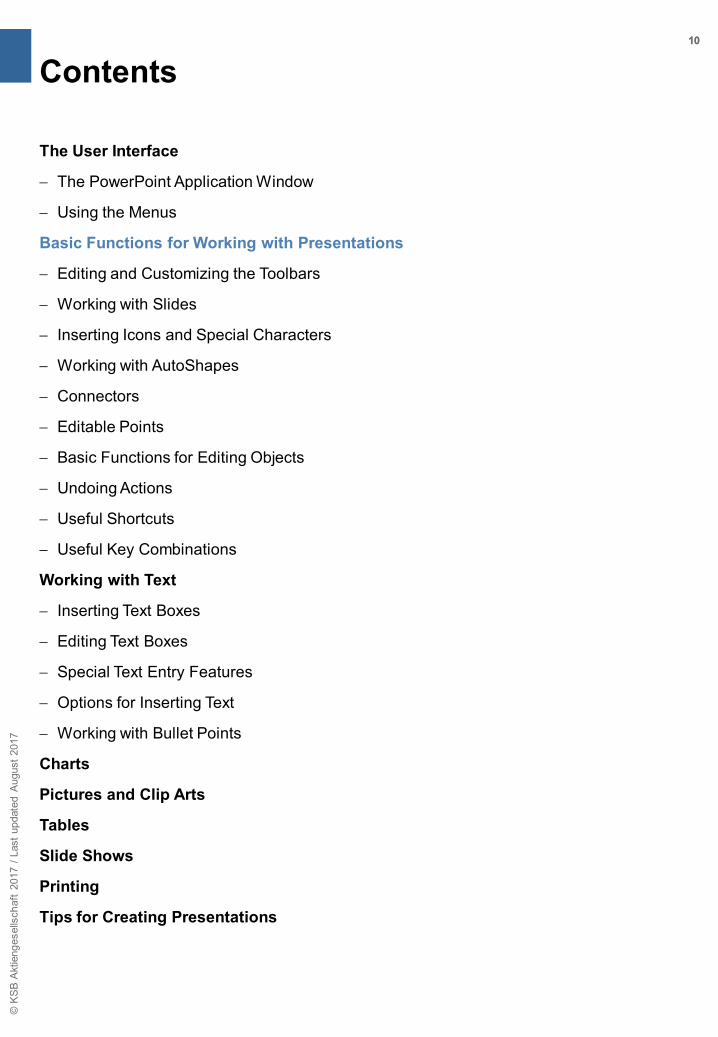
Contents
© K
SB A
ktie
nges
ells
chaf
t 20
17 /
Last
upd
ated
Aug
ust 2
017
The User Interface
− The PowerPoint Application Window
− Using the Menus
Basic Functions for Working with Presentations
− Editing and Customizing the Toolbars
− Working with Slides
− Inserting Icons and Special Characters
− Working with AutoShapes
− Connectors
− Editable Points
− Basic Functions for Editing Objects
− Undoing Actions
− Useful Shortcuts
− Useful Key Combinations
Working with Text
− Inserting Text Boxes
− Editing Text Boxes
− Special Text Entry Features
− Options for Inserting Text
− Working with Bullet Points
Charts
Pictures and Clip Arts
Tables
Slide Shows
Printing
Tips for Creating Presentations

33The User InterfaceThe PowerPoint Application Window
© K
SB A
ktie
nges
ells
chaf
t 20
17 /
Last
upd
ated
Aug
ust 2
017
1
Note
To the table of contents
The Application Window When you launch the program, you are taken to the PowerPoint application window. This contains both PowerPoint-specific elements and standard Windows elements.
Depending on the selected installation of PowerPoint and any settings that have already been changed in PowerPoint, the application window can differ from the figure shown here.
Only the basic functions and icons are displayed by default in your PowerPoint application window.
If icons or toolbars you need are not displayed, you can add them to your PowerPoint application window yourself.
For more information, see Section 2 - Editing and Customizing the Toolbars (slide 11).
File button
Ribbon
Outline,Miniature View,
Slide Sorter
Quick access toolbar
Slide pane
SeparatorsView icons
Notes pane
Ribbon tabs
Group
Minimize, Restore Down/Maximize, and
Close buttons
Zoom slider control
44The User InterfaceThe PowerPoint Application Window
© K
SB A
ktie
nges
ells
chaf
t 20
17 /
Last
upd
ated
Aug
ust 2
017
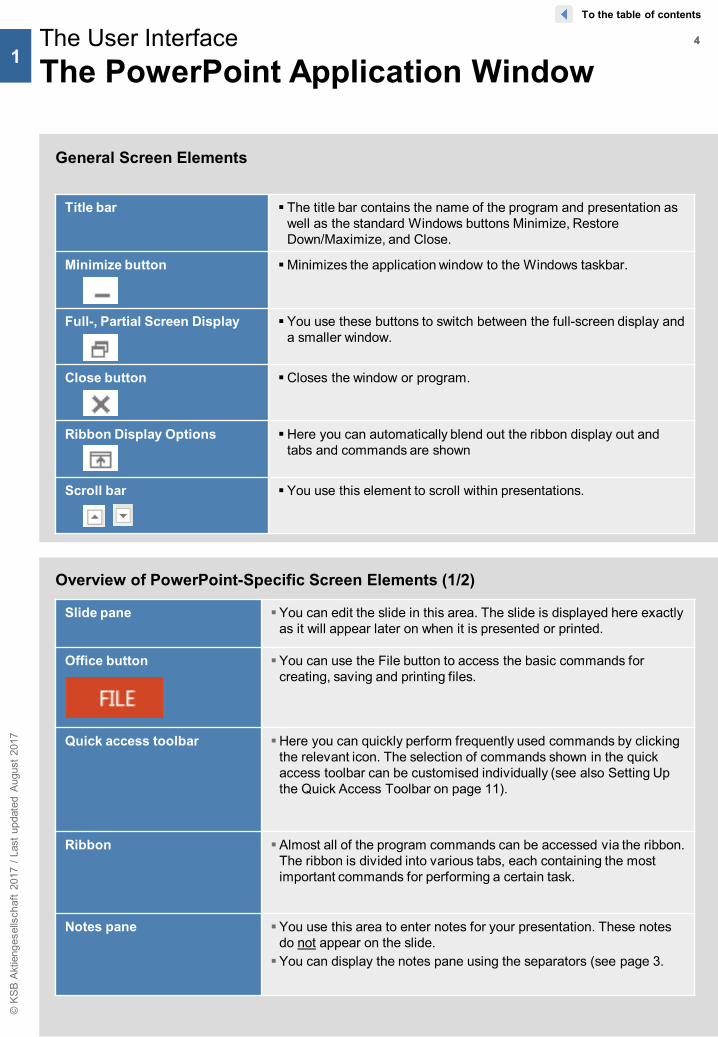
Title bar The title bar contains the name of the program and presentation as well as the standard Windows buttons Minimize, Restore Down/Maximize, and Close.
Minimize button Minimizes the application window to the Windows taskbar.
Full-, Partial Screen Display You use these buttons to switch between the full-screen display and a smaller window.
Close button Closes the window or program.
Ribbon Display Options Here you can automatically blend out the ribbon display out and tabs and commands are shown
Scroll bar You use this element to scroll within presentations.
Slide pane You can edit the slide in this area. The slide is displayed here exactly as it will appear later on when it is presented or printed.
Office button You can use the File button to access the basic commands for creating, saving and printing files.
Quick access toolbar Here you can quickly perform frequently used commands by clicking the relevant icon. The selection of commands shown in the quick access toolbar can be customised individually (see also Setting Up the Quick Access Toolbar on page 11).
Ribbon Almost all of the program commands can be accessed via the ribbon.The ribbon is divided into various tabs, each containing the most important commands for performing a certain task.
Notes pane You use this area to enter notes for your presentation. These notes do not appear on the slide.You can display the notes pane using the separators (see page 3.
1
To the table of contents
General Screen Elements
Overview of PowerPoint-Specific Screen Elements (1/2)

55The User InterfaceThe PowerPoint Application Window
© K
SB A
ktie
nges
ells
chaf
t 20
17 /
Last
upd
ated
Aug
ust 2
017
Tabs In this clipping either the miniature slide view or the slide sorter view is shownYou can change from one view to the other with the
window control „Normal“With the tab Slide Sorter you get an overview
of the number of slides of a presentation as well as an overview of designs and layouts The Miniature View is the folded Slide View The Outline tab displays all text information of
a presentation at a glance. This tab is therefore particularly useful for text and outline editing. You activate the relevant tab y clicking it
Status bar Here you receive the following detailsSlide 5 of 85: Current slide with indication of total number English (United Kingdom): As dictionary language English is selected If spelling errors were detected
View icons These icons allow you to switch quickly between the different views.You can switch to the most suitable view for the area of the presentation you
want to edit. The Normal View is activated by default.
Separators You can drag the vertical and horizontal separators to resize the notes pane and tab pages pane or display them if they are hidden.
Zoom slider control
By pulling the zoom slide control to the left or right, you can increase or decrease the size of the slide view.By clicking the icon, you adjust the slide to the current window.
Normal View Slide Sorter View
Slide Show (from current slide) or Shift+F5
2
1
To the table of contents
Overview of PowerPoint-Specific Screen Elements (2/2)
Note You can define general program settings of PowerPoint in the PowerPoint Options
dialog box. The settings you specify here will apply to all of your future sessions in PowerPoint. You open the dialog box by clicking the Office button and then selecting the PowerPoint Options button that appears.
ReadingView
Slide Sorter
2
1
1
Outline
66The User InterfaceUsing the Menus
© K
SB A
ktie
nges
ells
chaf
t 20
17 /
Last
upd
ated
Aug
ust 2
017
1
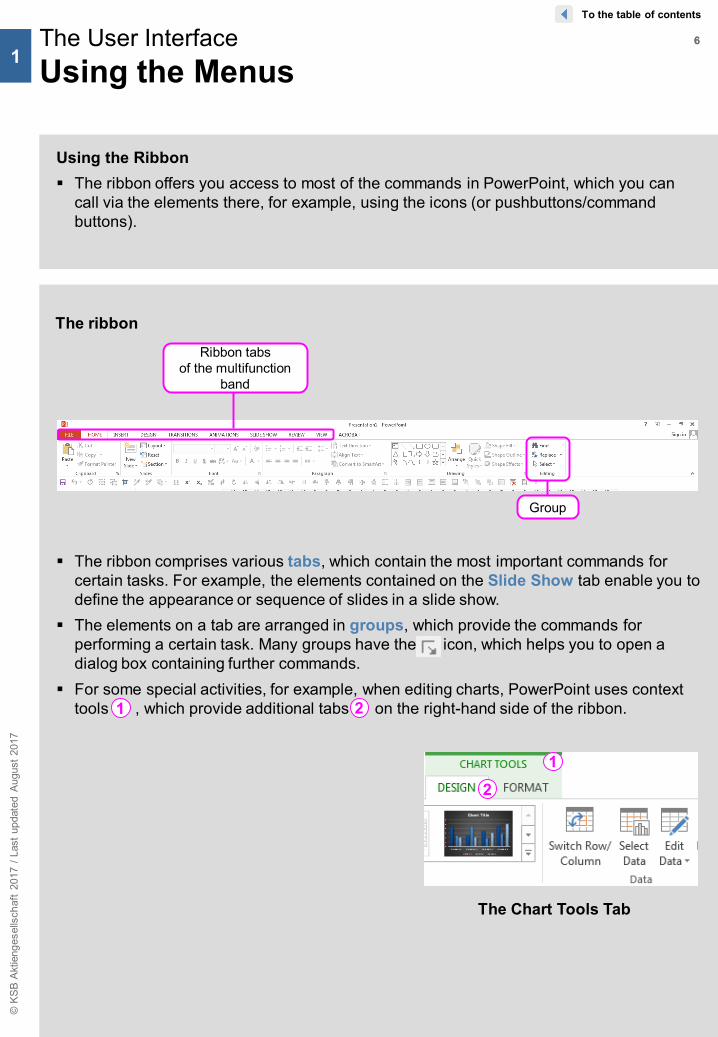
The Chart Tools Tab
1 2
To the table of contents
Using the Ribbon The ribbon offers you access to most of the commands in PowerPoint, which you can
call via the elements there, for example, using the icons (or pushbuttons/command buttons).
The ribbon
The ribbon comprises various tabs, which contain the most important commands for certain tasks. For example, the elements contained on the Slide Show tab enable you to define the appearance or sequence of slides in a slide show.
The elements on a tab are arranged in groups, which provide the commands for performing a certain task. Many groups have the icon, which helps you to open a dialog box containing further commands.
For some special activities, for example, when editing charts, PowerPoint uses context tools , which provide additional tabs on the right-hand side of the ribbon.
Ribbon tabsof the multifunction
band
Group
12

77The User InterfaceUsing the Menus
© K
SB A
ktie
nges
ells
chaf
t 20
17 /
Last
upd
ated
Aug
ust 2
017
1
Note
Context menu: A menu that displays a list of commands related to a specific element. To display a context menu, click the element using the right-hand mouse button or press ⇑Shift+F10.
On the right picture area a menu with all options available will open automatically
To the table of contents
Context Menu You open the context
menu by clicking the right-hand mouse button.
Depending on the area of the application window or slide in which you click the right-hand mouse button, the context menu contains different commands that are relevant for the current selection.
Examples of context menus For example, if you use the right-hand mouse button
to click an icon in the ribbon, you can add this icon to the quick access toolbar via the context menu that is displayed.
If you click an empty part of a slide using the right-hand mouse button, the context menu provides you with the most important commands that you can apply to this area.
If you call the context menu in a placeholder, PowerPoint assembles the most important commands that you can apply to the content of this place-holder. The Mini toolbar is also displayed, via which various formatting commands can quickly be selected.
For example, if you use the right-hand mouse button to click an object or image, a context menu also appears with further commands from which to select.
In addition on the right a menu with Text/Object/Picture will open, there you will find all other options

88The User InterfaceUsing the Menus
© K
SB A
ktie
nges
ells
chaf
t 20
17 /
Last
upd
ated
Aug
ust 2
017
Icon Name Function
AutoCorrect Options If PowerPoint has made automatic corrections to the text, you can use this smart tag to accept or reject the corrections.When you place the cursor on the word that has
been changed, a blue rectangle is displayed under the word that has been corrected automatically.When you place the cursor on the rectangle, the
smart tag appears.
Paste Options This smart tag appears as soon as you insert a copied or moved graphic or text on a slide.You can use the smart tag to define the settings, e.g. formatting,
to be applied to the object to be inserted.
AutoFit Options If you enter more text than can be displayed in a text box on a slide, PowerPoint adjusts the font size automatically to fit the box.You can use the smart tag that appears after the text has been
adjusted automatically to specify whether you want to accept the change. This function is deactivated in the KSB-Template
1
2
1
2
1
To the table of contents
SmartTags Smart tags enable you to execute context-related commands quickly and control actions
carried out automatically by PowerPoint. Smart tags appear automatically on the slide in the form of arrows that you can click to
open a pull-down menu with context-related selection options.
Note Smart tags are visible on the screen only and do not appear on the printout.

99The User InterfaceUsing the Menus
© K
SB A
ktie
nges
ells
chaf
t 20
17 /
Last
upd
ated
Aug
ust 2
017
1
TabControl field
Input field
Radio button
To the table of contents
Using Dialog Boxes You can confirm settings that you have made in a dialog box by choosing Apply or
Apply to All. The dialog box then closes. To close the dialog box without changing the settings, choose Cancel or press the Esc
key.
Settings are applied to all slides
Settings are applied to the current slide
only
1010
Contents
© K
SB A
ktie
nges
ells
chaf
t 20
17 /
Last
upd
ated
Aug
ust 2
017
The User Interface
− The PowerPoint Application Window
− Using the Menus
Basic Functions for Working with Presentations
− Editing and Customizing the Toolbars
− Working with Slides
− Inserting Icons and Special Characters
− Working with AutoShapes
− Connectors
− Editable Points
− Basic Functions for Editing Objects
− Undoing Actions
− Useful Shortcuts
− Useful Key Combinations
Working with Text
− Inserting Text Boxes
− Editing Text Boxes
− Special Text Entry Features
− Options for Inserting Text
− Working with Bullet Points
Charts
Pictures and Clip Arts
Tables
Slide Shows
Printing
Tips for Creating Presentations

1111Basic Functions for Working with PresentationsEditing and Customizing the Toolbars
© K
SB A
ktie
nges
ells
chaf
t 20
17 /
Last
upd
ated
Aug
ust 2
017
2
To the table of contents
Customizing the Quick Access Toolbar You can customize the quick access toolbar to meet your individual requirements by
adding new elements (e.g. icons or buttons) or removing existing elements from the toolbar.
Adding Elements from Tabs to the Quick Access Toolbar On the relevant tab, use the right-hand mouse button to click the element that you wish
to include on the quick access toolbar. Select the Add to Quick Access Toolbar context menu item. The element is added on the right-hand side of the quick access toolbar.
Adding Elements to the Quick Access Toolbar Click the quick access toolbar with the right-hand mouse button and select the
Customize Quick Access Toolbar context menu item. The PowerPoint Options dialog box opens if the Customize category is activated.
Note
When additional tabs are displayed in the ribbon, the quick access toolbar is shortened. You can avoid this by relocating the quick access toolbar below the ribbon. This enables you to use the full width of the ribbon. To do this, click the quick access toolbar with the right-hand mouse button and select Show Quick Access Toolbar Below the Ribbon in the context menu.
Some elements, such as the Quick Print icon, can also be added to the quick access toolbar by clicking the arrow next to the toolbar and selecting the required element in the dropdown list.
Quick access toolbar
The ruler is activated under View.

1212Basic Functions for Working with PresentationsEditing and Customizing the Toolbars
© K
SB A
ktie
nges
ells
chaf
t 20
17 /
Last
upd
ated
Aug
ust 2
017
1
2
1
2
To the table of contents
2
On the left of the screen select the commands that you wish to have for quick access (or wish to remove).
Click Add or Remove. The selected commands appear on the right of the screen . You can use the arrows to change the order of the commands. Click Ok.
Removing Existing Elements from the Quick Access Toolbar Click the relevant element with the right-hand mouse button and select the Remove
from Quick Access Toolbar context menu item.
Customizing the Quick Access Toolbar
1313
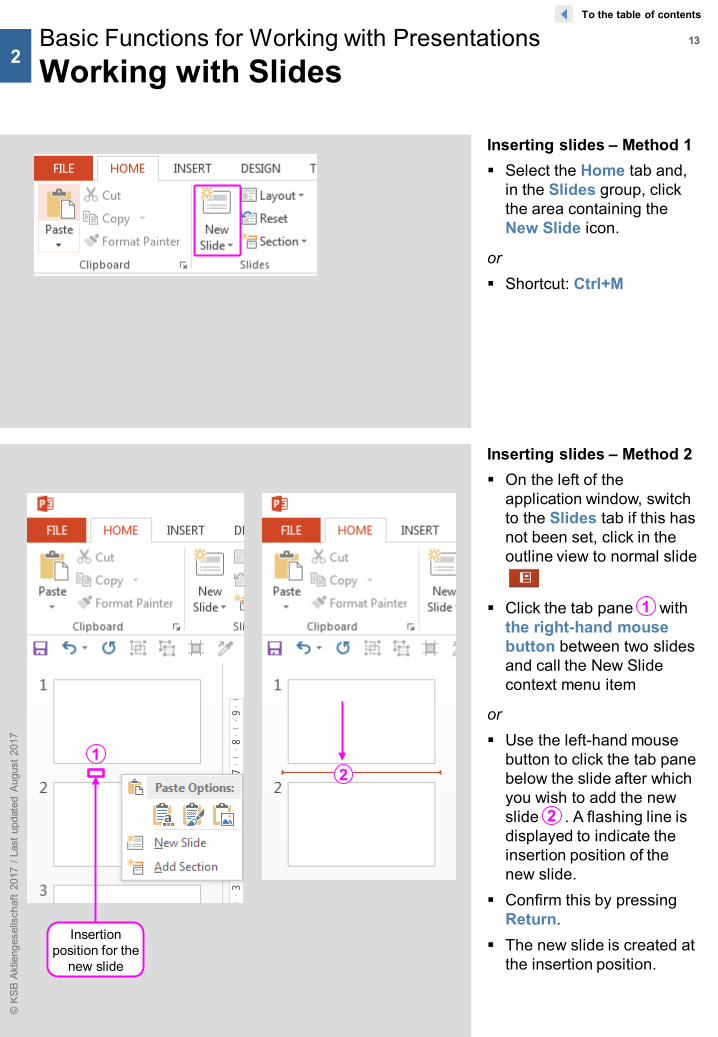
Inserting slides – Method 2 On the left of the
application window, switch to the Slides tab if this has not been set, click in the outline view to normal slide
Click the tab pane with the right-hand mouse button between two slides and call the New Slide context menu item
or Use the left-hand mouse
button to click the tab pane below the slide after which you wish to add the new slide . A flashing line is displayed to indicate the insertion position of the new slide.
Confirm this by pressing Return.
The new slide is created at the insertion position.
Basic Functions for Working with PresentationsWorking with Slides
© K
SB A
ktie
nges
ells
chaf
t 20
17 /
Last
upd
ated
Aug
ust 2
017
2
1
Insertion position for the
new slide
To the table of contents
2
Inserting slides – Method 1 Select the Home tab and,
in the Slides group, click the area containing the New Slide icon.
or Shortcut: Ctrl+M
2
1
1414
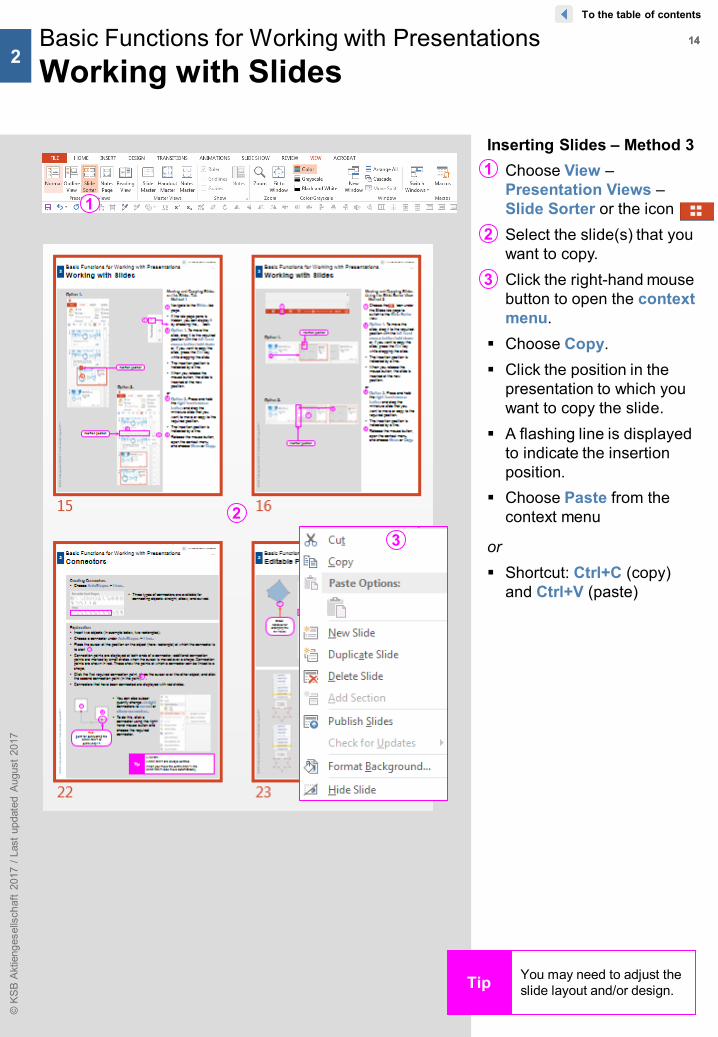
Inserting Slides – Method 3 Choose View –
Presentation Views –Slide Sorter or the icon
Select the slide(s) that you want to copy.
Click the right-hand mouse button to open the context menu.
Choose Copy. Click the position in the
presentation to which you want to copy the slide.
A flashing line is displayed to indicate the insertion position.
Choose Paste from the context menu
or Shortcut: Ctrl+C (copy)
and Ctrl+V (paste)
Basic Functions for Working with PresentationsWorking with Slides
© K
SB A
ktie
nges
ells
chaf
t 20
17 /
Last
upd
ated
Aug
ust 2
017
Tip You may need to adjust the slide layout and/or design.
2
1
3
To the table of contents
23
2
1
1515Basic Functions for Working with PresentationsWorking with Slides
© K
SB A
ktie
nges
ells
chaf
t 20
17 /
Last
upd
ated
Aug
ust 2
017
2
To the table of contents
Option 2:
Insertion position
1
2
Option 1:
4Insertion position3
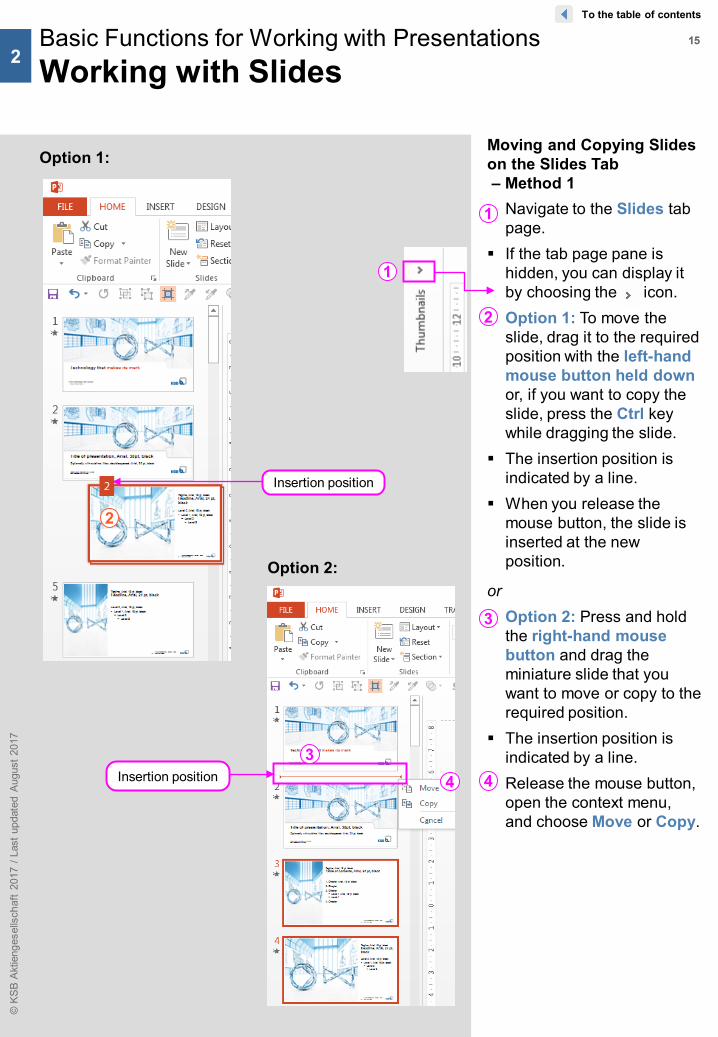
Moving and Copying Slides on the Slides Tab – Method 1 Navigate to the Slides tab
page. If the tab page pane is
hidden, you can display it by choosing the icon.
Option 1: To move the slide, drag it to the required position with the left-hand mouse button held down or, if you want to copy the slide, press the Ctrl key while dragging the slide.
The insertion position is indicated by a line.
When you release the mouse button, the slide is inserted at the new position.
or Option 2: Press and hold
the right-hand mouse button and drag the miniature slide that you want to move or copy to the required position.
The insertion position is indicated by a line.
Release the mouse button, open the context menu, and choose Move or Copy.
1
2
4
3
1616
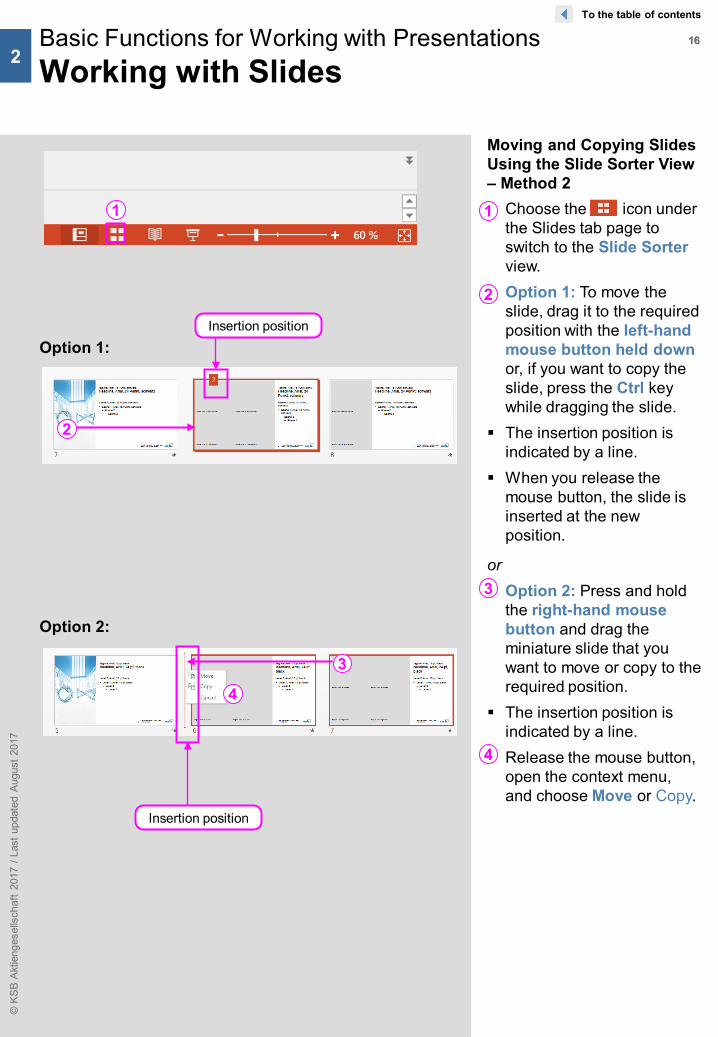
Moving and Copying Slides Using the Slide Sorter View – Method 2 Choose the icon under
the Slides tab page to switch to the Slide Sorter view.
Option 1: To move the slide, drag it to the required position with the left-hand mouse button held downor, if you want to copy the slide, press the Ctrl key while dragging the slide.
The insertion position is indicated by a line.
When you release the mouse button, the slide is inserted at the new position.
or Option 2: Press and hold
the right-hand mouse button and drag the miniature slide that you want to move or copy to the required position.
The insertion position is indicated by a line.
Release the mouse button, open the context menu, and choose Move or Copy.
Basic Functions for Working with PresentationsWorking with Slides
© K
SB A
ktie
nges
ells
chaf
t 20
17 /
Last
upd
ated
Aug
ust 2
017
Option 1:
1
4
3
4
Option 2:
Insertion position
Insertion position
2
3
To the table of contents
2
1
2
1717Basic Functions for Working with PresentationsWorking with Slides
© K
SB A
ktie
nges
ells
chaf
t 20
17 /
Last
upd
ated
Aug
ust 2
017 Tip
Shortcuts:
Ctrl + C (Copy)
Ctrl + X (Cut)
Ctrl + V (Paste)
Tip
These functions can also be carried out by clicking the icons on the Home tab, in the Clipboard group.
To the table of contents
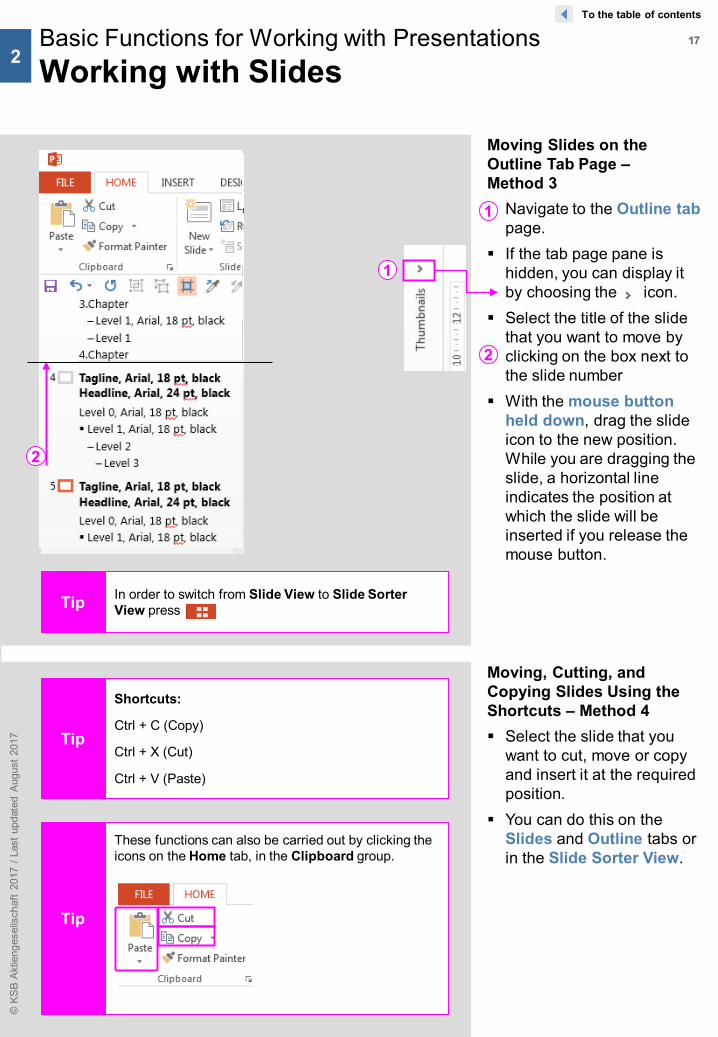
2
Moving, Cutting, and Copying Slides Using the Shortcuts – Method 4 Select the slide that you
want to cut, move or copy and insert it at the required position.
You can do this on the Slides and Outline tabs or in the Slide Sorter View.
Tip In order to switch from Slide View to Slide Sorter View press
1
2
Moving Slides on the Outline Tab Page –Method 3 Navigate to the Outline tab
page. If the tab page pane is
hidden, you can display it by choosing the icon.
Select the title of the slide that you want to move by clicking on the box next to the slide number
With the mouse button held down, drag the slide icon to the new position. While you are dragging the slide, a horizontal line indicates the position at which the slide will be inserted if you release the mouse button.
1
2
1818
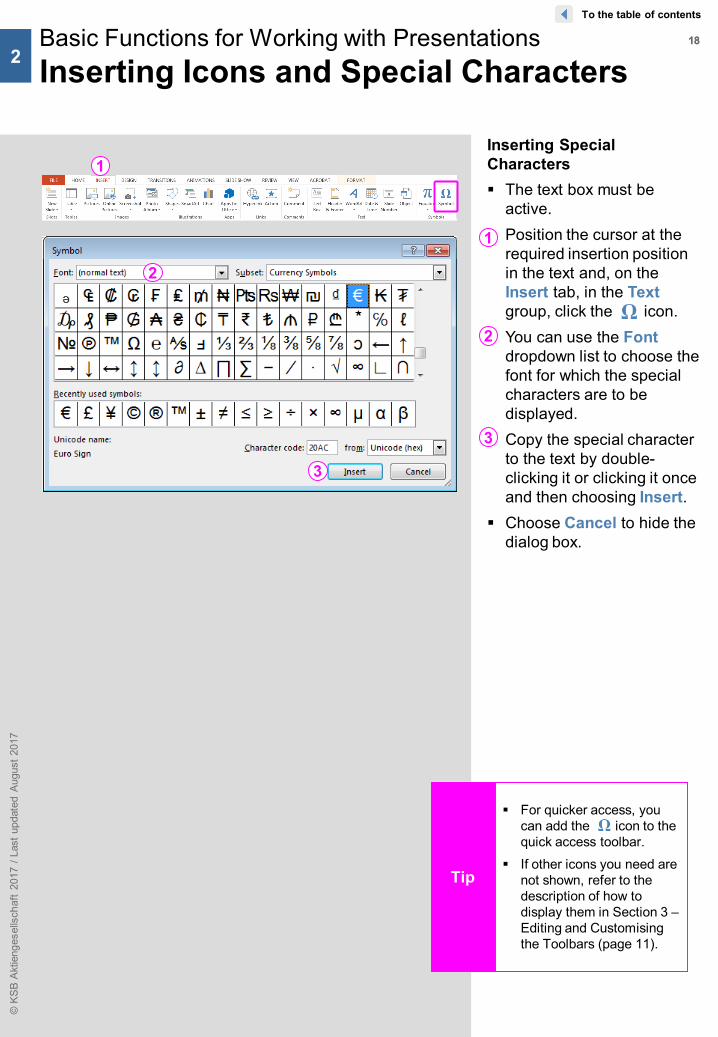
Inserting Special Characters The text box must be
active. Position the cursor at the
required insertion position in the text and, on the Insert tab, in the Textgroup, click the icon.
You can use the Fontdropdown list to choose the font for which the special characters are to be displayed.
Copy the special character to the text by double-clicking it or clicking it once and then choosing Insert.
Choose Cancel to hide the dialog box.
Basic Functions for Working with PresentationsInserting Icons and Special Characters
© K
SB A
ktie
nges
ells
chaf
t 20
17 /
Last
upd
ated
Aug
ust 2
017
1
2
3
Tip
1
2
3
To the table of contents
2
For quicker access, you can add the icon to the quick access toolbar.
If other icons you need are not shown, refer to the description of how to display them in Section 3 –Editing and Customisingthe Toolbars (page 11).

1919Basic Functions for Working with PresentationsWorking with AutoShapes
© K
SB A
ktie
nges
ells
chaf
t 20
17 /
Last
upd
ated
Aug
ust 2
017
Handle
Pivot
1
To the table of contents
2
Basic Drawing Method On the Insert tab, in the Illustrations group, click the Shapes icon and select the
icon for the drawing object you require. The cursor changes to a crosshair symbol . Click the slide to insert the object you selected and resize it as required by dragging it. When you release the mouse button, the object appears as selected, i.e. its corners are
marked with white circles (handles). The Format tab, which provides you with various functions for editing drawing objects, is
also displayed .
You will also find the Shapes icon on the Home tab, in the Drawing group.
1
2020Basic Functions for Working with PresentationsWorking with AutoShapes
© K
SB A
ktie
nges
ells
chaf
t 20
17 /
Last
upd
ated
Aug
ust 2
017
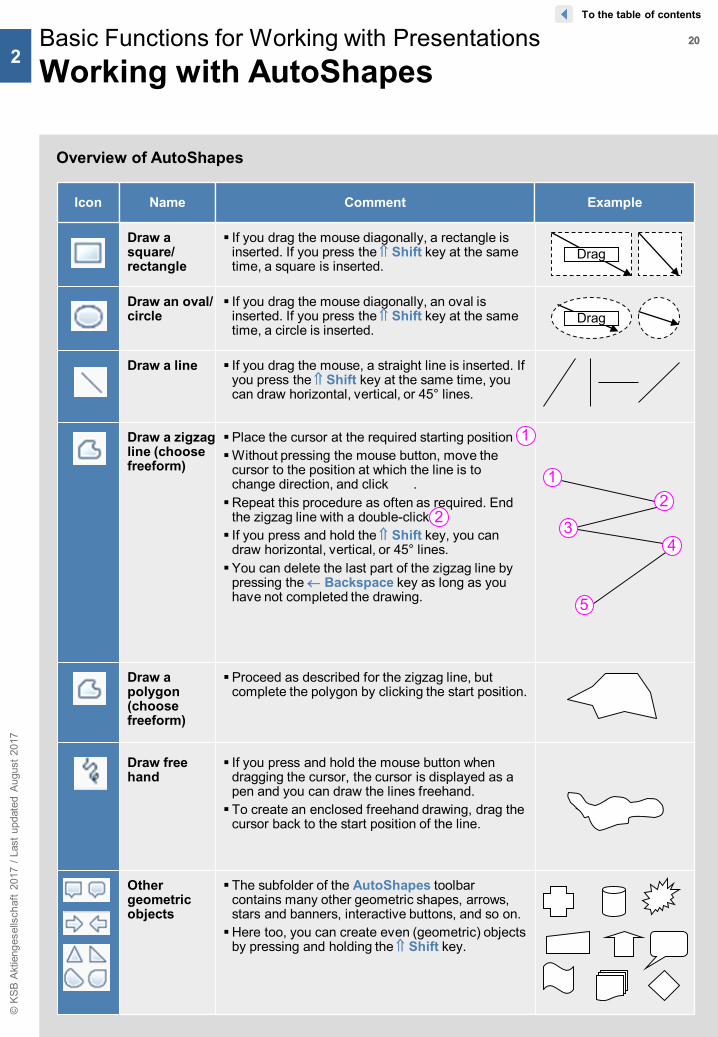
Draw a square/ rectangle
If you drag the mouse diagonally, a rectangle is inserted. If you press the ⇑ Shift key at the same time, a square is inserted.
Drag
Draw an oval/ circle
If you drag the mouse diagonally, an oval is inserted. If you press the ⇑ Shift key at the same time, a circle is inserted.
Drag
Draw a line If you drag the mouse, a straight line is inserted. If you press the ⇑ Shift key at the same time, you can draw horizontal, vertical, or 45° lines.
Draw a zigzag line (choose freeform)
Place the cursor at the required starting position Without pressing the mouse button, move the
cursor to the position at which the line is to change direction, and click . Repeat this procedure as often as required. End
the zigzag line with a double-click. If you press and hold the ⇑ Shift key, you can
draw horizontal, vertical, or 45° lines.You can delete the last part of the zigzag line by
pressing the ← Backspace key as long as you have not completed the drawing.
12
34
5
1
2
Icon Name Comment Example
Draw a polygon (choose freeform)
Proceed as described for the zigzag line, but complete the polygon by clicking the start position.
Draw free hand
If you press and hold the mouse button when dragging the cursor, the cursor is displayed as a pen and you can draw the lines freehand. To create an enclosed freehand drawing, drag the
cursor back to the start position of the line.
Other geometric objects
The subfolder of the AutoShapes toolbar contains many other geometric shapes, arrows, stars and banners, interactive buttons, and so on.Here too, you can create even (geometric) objects
by pressing and holding the ⇑ Shift key.
To the table of contents
2
Overview of AutoShapes

2121Basic Functions for Working with PresentationsWorking with AutoShapes
© K
SB A
ktie
nges
ells
chaf
t 20
17 /
Last
upd
ated
Aug
ust 2
017
To the table of contents
2
The shape of drawing objects (AutoShapes) can be changed retroactively. Select the required AutoShape. Format tab (or additional Drawing Tools tab that appears), Insert Shapes group, Edit
Shape icon, Change Shape icon. Select new AutoShape and click to replace the old one.

2222Basic Functions for Working with PresentationsConnectors
© K
SB A
ktie
nges
ells
chaf
t 20
17 /
Last
upd
ated
Aug
ust 2
017
TipBenefits:Connectors are always centered.When you move the AutoShapes, the connectors also move automatically.
Red:point for connecting the
connectors to AutoShapes
12
To the table of contents
2
Creating Connectors Choose AutoShapes – Lines.
Three types of connectors are available for connecting objects: straight, elbow, and curved.
Explanation Insert two objects (in example below, two rectangles). Choose a connector under AutoShapes – Lines. Place the cursor at the position on the object (here: rectangle) at which the connector is
to start . Connection points are displayed at both ends of a connector; additional connection
points are marked by small circles when the cursor is moved over a shape. Connection points are shown in red. These show the points at which a connector can be linked to a shape.
Click the first required connection point, place the cursor over the other object, and click the second connection point (in the point) .
Connectors that have been connected are displayed with red circles.
You can also subse-quently change straight connectors to curved or elbow connectors.
To do this, click a connector using the right-hand mouse button and choose the required connector.
1
2

2323Basic Functions for Working with PresentationsEditable Points
© K
SB A
ktie
nges
ells
chaf
t 20
17 /
Last
upd
ated
Aug
ust 2
017
Black: handles for
changing the freeform
To the table of contents
2
Working with Editable Points On the Home tab, in the
Drawing, Lines group, you can create a freeform.
Click the freeform. Choose Edit Points or the
icon. Click one of the small black
points using the right-hand mouse button.
You can edit the points using the context menu.
Extended context menu when editing freeforms If the editable points of
the freeform are activated, click the right-hand mouse button again on the edges and points of the freeform. Different context menus appear depending on where you click.
2424Basic Functions for Working with PresentationsBasic Functions for Editing Objects
© K
SB A
ktie
nges
ells
chaf
t 20
17 /
Last
upd
ated
Aug
ust 2
017
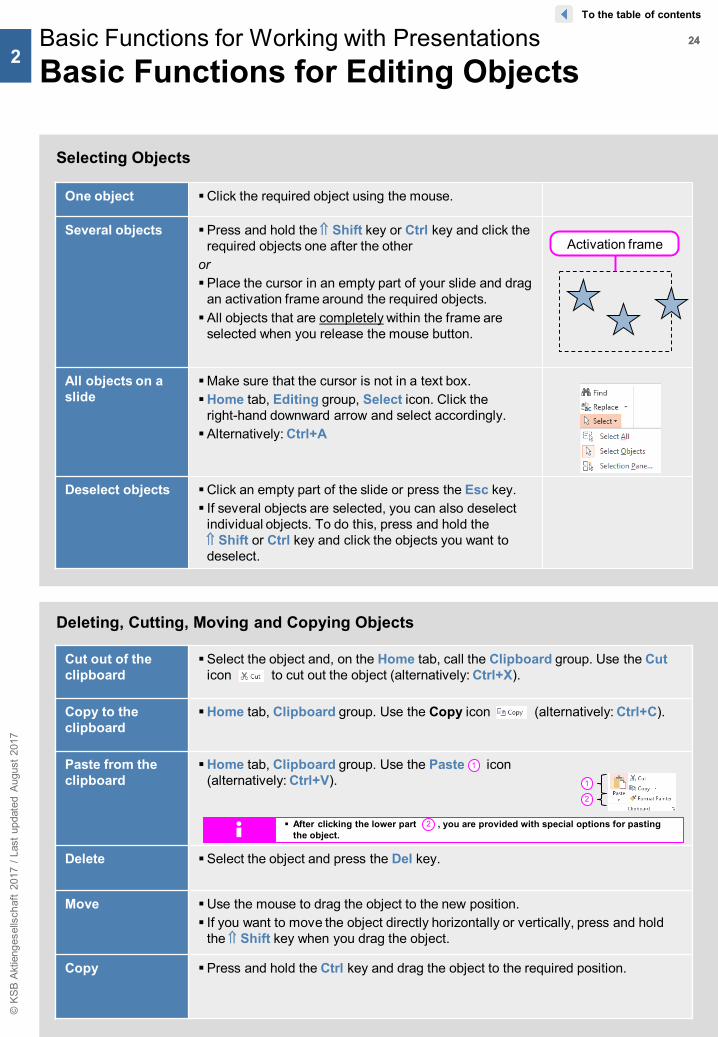
One object Click the required object using the mouse.
Several objects Press and hold the ⇑ Shift key or Ctrl key and click the required objects one after the other
orPlace the cursor in an empty part of your slide and drag
an activation frame around the required objects.All objects that are completely within the frame are
selected when you release the mouse button.
All objects on a slide
Make sure that the cursor is not in a text box.Home tab, Editing group, Select icon. Click the
right-hand downward arrow and select accordingly.Alternatively: Ctrl+A
Deselect objects Click an empty part of the slide or press the Esc key. If several objects are selected, you can also deselect
individual objects. To do this, press and hold the⇑ Shift or Ctrl key and click the objects you want to deselect.
Activation frame
Cut out of the clipboard
Select the object and, on the Home tab, call the Clipboard group. Use the Cuticon to cut out the object (alternatively: Ctrl+X).
Copy to the clipboard
Home tab, Clipboard group. Use the Copy icon (alternatively: Ctrl+C).
Paste from the clipboard
Home tab, Clipboard group. Use the Paste icon (alternatively: Ctrl+V).
Delete Select the object and press the Del key.
Move Use the mouse to drag the object to the new position. If you want to move the object directly horizontally or vertically, press and hold
the ⇑ Shift key when you drag the object.
Copy Press and hold the Ctrl key and drag the object to the required position.
Deleting, Cutting, Moving and Copying Objects
1
2
1
After clicking the lower part , you are provided with special options for pasting the object.
2
To the table of contents
2
Selecting Objects

2525Basic Functions for Working with PresentationsBasic Functions for Editing Objects
© K
SB A
ktie
nges
ells
chaf
t 20
17 /
Last
upd
ated
Aug
ust 2
017
Position the copy Five more times Ctrl + D Ctrl + D
To the table of contents
2
Duplicating Objects By choosing the Ctrl+D key combination, you can create copies (duplicates) of a
selected object and at the same time insert them at a specific angle to, and distance from, each other.
You define the angle and distance between the duplicates using the first duplicate, which you can move to any position you require.
Maintain the selection of the first duplicate and repeat the key combination as often as you like until the required number of duplicates has been achieved.
Alternatively, you can also duplicate selected objects via the Home tab, Clipboardgroup, Paste – Duplicate icon.
Overview of the Key Combinations When Moving and Copying Objects
Copy to the clipboard
Cut to the clipboard
Paste from the clipboard
Duplicate
Move in one direction only
Copy in one direction only
Move outside the grid
Copy outside the grid
Copy (same effect as the right-hand mouse button)
Ctrl + C
Ctrl + X
Ctrl + V
Ctrl + D
Shift + Left-click
Shift + Right-click
Alt + Left-click
Alt + Right-click
Ctrl + Left-click
2626
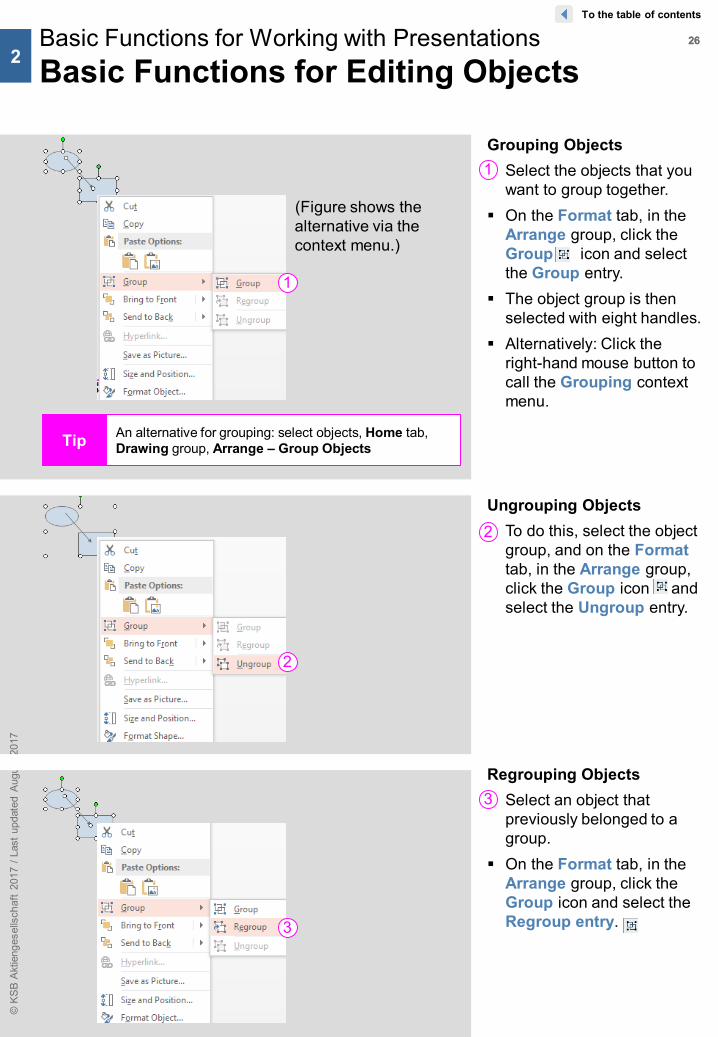
Grouping Objects Select the objects that you
want to group together. On the Format tab, in the
Arrange group, click the Group icon and select the Group entry.
The object group is then selected with eight handles.
Alternatively: Click the right-hand mouse button to call the Grouping context menu.
Basic Functions for Working with PresentationsBasic Functions for Editing Objects
© K
SB A
ktie
nges
ells
chaf
t 20
17 /
Last
upd
ated
Aug
ust 2
017
1
Tip An alternative for grouping: select objects, Home tab, Drawing group, Arrange – Group Objects
To the table of contents
2
Ungrouping Objects To do this, select the object
group, and on the Formattab, in the Arrange group, click the Group icon and select the Ungroup entry.
Regrouping Objects Select an object that
previously belonged to a group.
On the Format tab, in the Arrange group, click the Group icon and select the Regroup entry.
3
2
1
(Figure shows the alternative via the context menu.)
2
3

2727Basic Functions for Working with PresentationsBasic Functions for Editing Objects
© K
SB A
ktie
nges
ells
chaf
t 20
17 /
Last
upd
ated
Aug
ust 2
017
Resizing objects Place the cursor on a handle until it is displayed as a double arrow. If you want to change the height and width at the same
time, choose a corner handle. Drag the handle while holding down the left-hand
mouse button until the object is the required size. While you are dragging the handle, the cursor is displayed as a cross.
Changing the height and width uniformly
Press and hold the ⇑ Shift key while dragging a corner handle.
Changing the object uniformly from the centre point
Press and hold the Ctrl key while dragging a corner or midpoint handle to resize the object in all directions or vertically or horizontally only. If you want to resize the object uniformly from the centre point, press
Ctrl + ⇑ Shift when dragging the corner handle.
Changing the length of a line
Drag a handle of the line to the required position. If you want to retain the position of the line, press and hold the ⇑ Shift key while
dragging the handle.
Defining the precise object size
Double-click the object and, on the Format tab, in theSize group, enter the required values in the Heightor Width input fields.
Changing the shape of an object with the correction handle
You can vary or correct the basic shape of some drawing objects as well as the angle of a curve after it has been created. For example, you can define the degree of curvature on a rounded rectangle or change the size of the tip of an arrow. Such corrections can be made using the correction handles that appear when you select an object that can be changed in this way.Select the object whose shape you wish to correct.Use the cursor to pull the correction handle until the object has achieved the
required shape.
21
12
Correction handle
To the table of contents
2
Changing the Size and Shape of Objects

2828
Adding Fills to Objects Select the object and click
the arrow of the icon.
Choose the color you require.
When using the new Pipette Tool you can navigate over the slide and pick up the color anywhere on the slide
Basic Functions for Working with PresentationsBasic Functions for Editing Objects
© K
SB A
ktie
nges
ells
chaf
t 20
17 /
Last
upd
ated
Aug
ust 2
017
1
KSB user-defined colors!
3 4
5
To the table of contents
2
Editing Object Borders Select the object and click
the icon to change the color of the line.
Click the arrow of the icon to select the line weight.
Click the arrow of the icon to select the dash style.
3
4
2
Creating Arrows You can add one or two
arrows to curves, zigzag lines, freeform lines, and straight lines.
In the menu of the icon that opens, select the type of arrow you require.
5
New:Eyedropper
2
1
2929Basic Functions for Working with PresentationsBasic Functions for Editing Objects
© K
SB A
ktie
nges
ells
chaf
t 20
17 /
Last
upd
ated
Aug
ust 2
017
Tip You will also find the Quick Styles on the Home tab, in the Drawing group (Quick Styles button).
1
Shadow
Reflection
Glow
Soft Edges
Bevel
3-D Rotation
1
2
3
4
5
6
3
1
2
6
4
5
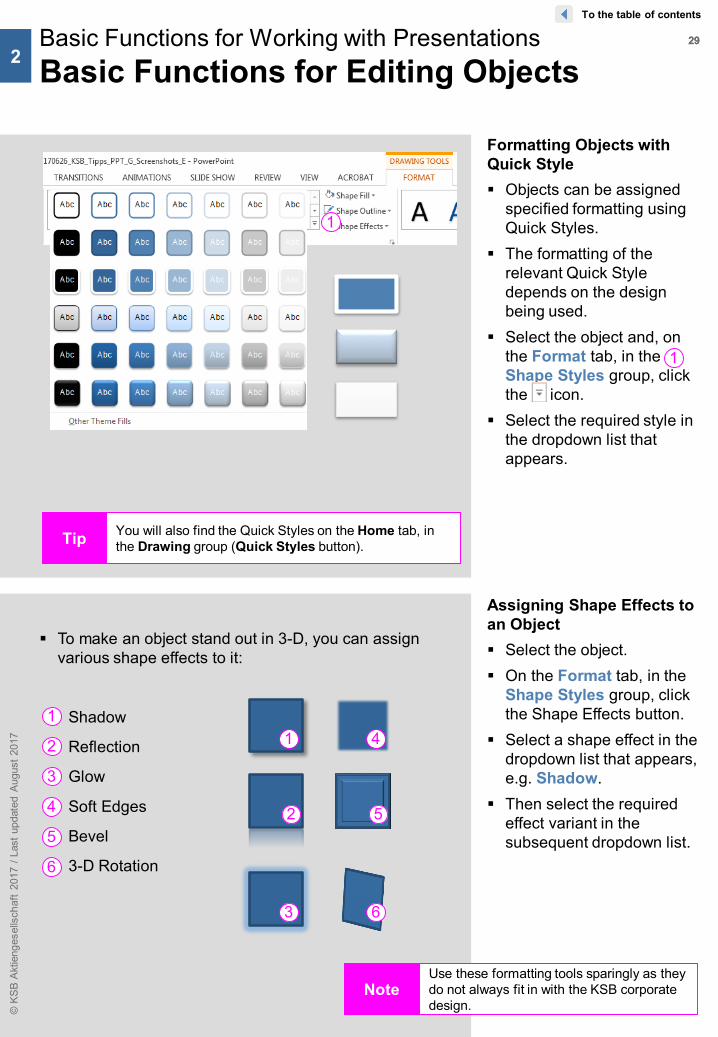
NoteUse these formatting tools sparingly as they do not always fit in with the KSB corporate design.
To the table of contents
2
Formatting Objects with Quick Style Objects can be assigned
specified formatting using Quick Styles.
The formatting of the relevant Quick Style depends on the design being used.
Select the object and, on the Format tab, in the Shape Styles group, click the icon.
Select the required style in the dropdown list that appears.
Assigning Shape Effects to an Object Select the object. On the Format tab, in the
Shape Styles group, click the Shape Effects button.
Select a shape effect in the dropdown list that appears, e.g. Shadow.
Then select the required effect variant in the subsequent dropdown list.
To make an object stand out in 3-D, you can assign various shape effects to it:
1
3030
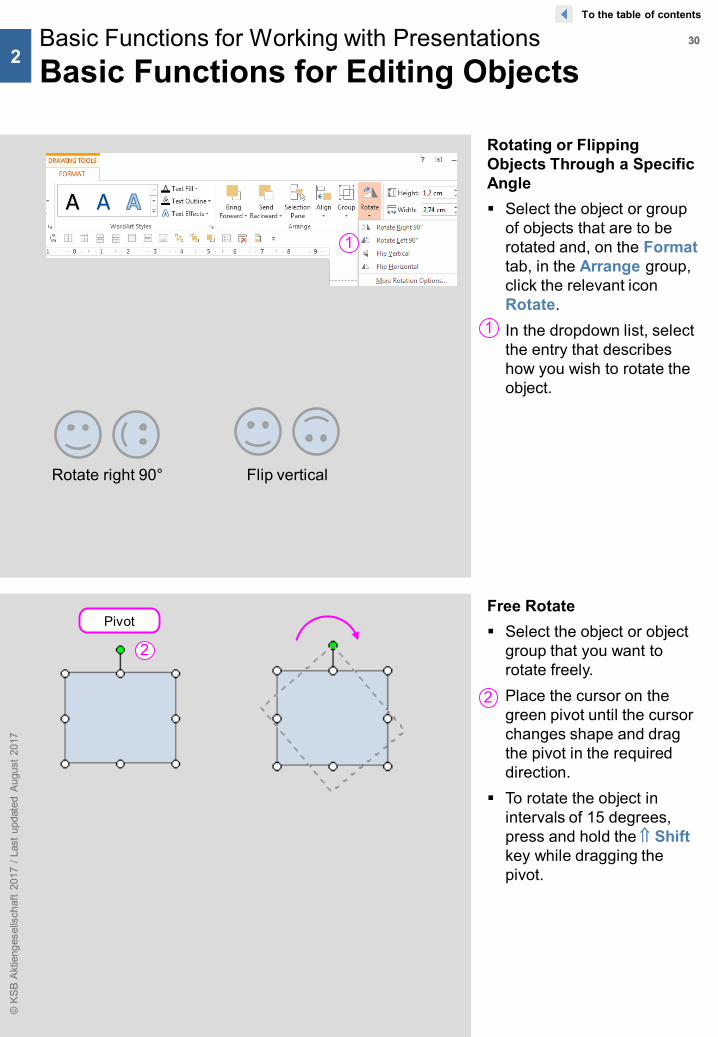
Rotating or Flipping Objects Through a Specific Angle Select the object or group
of objects that are to be rotated and, on the Formattab, in the Arrange group, click the relevant icon Rotate.
In the dropdown list, select the entry that describes how you wish to rotate the object.
Free Rotate Select the object or object
group that you want to rotate freely.
Place the cursor on the green pivot until the cursor changes shape and drag the pivot in the required direction.
To rotate the object in intervals of 15 degrees, press and hold the ⇑ Shift key while dragging the pivot.
Basic Functions for Working with PresentationsBasic Functions for Editing Objects
© K
SB A
ktie
nges
ells
chaf
t 20
17 /
Last
upd
ated
Aug
ust 2
017
1
2
Pivot
2
Rotate right 90° Flip vertical
To the table of contents
2
11
3131Basic Functions for Working with PresentationsBasic Functions for Editing Objects
© K
SB A
ktie
nges
ells
chaf
t 20
17 /
Last
upd
ated
Aug
ust 2
017
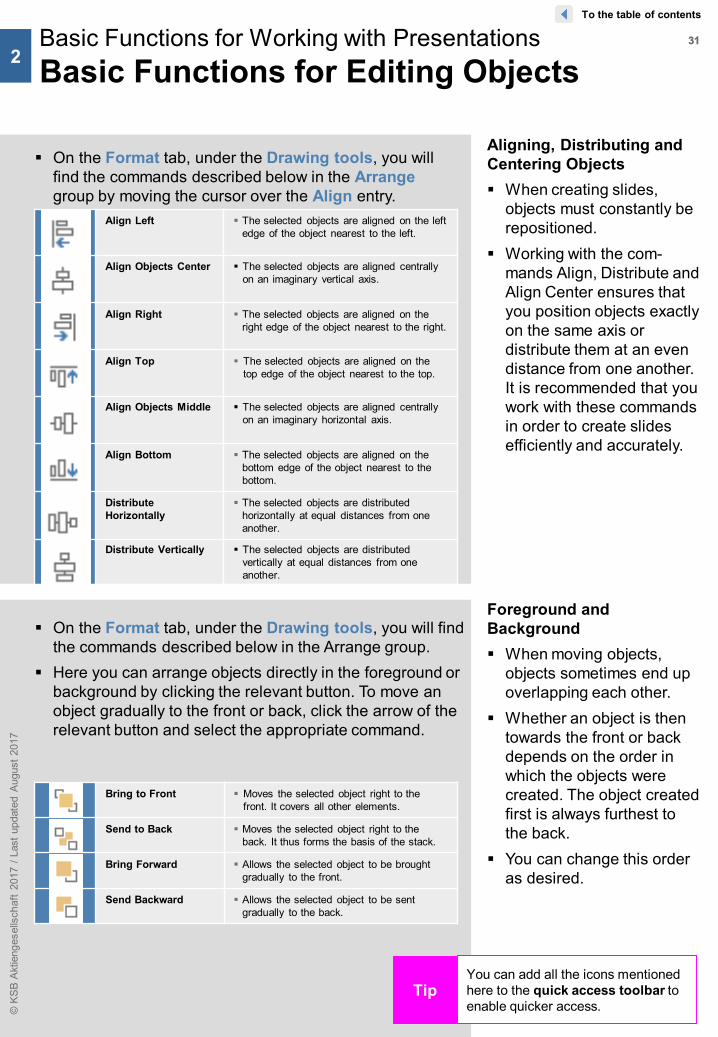
Align Left The selected objects are aligned on the left edge of the object nearest to the left.
Align Objects Center The selected objects are aligned centrally on an imaginary vertical axis.
Align Right The selected objects are aligned on the right edge of the object nearest to the right.
Align Top The selected objects are aligned on the top edge of the object nearest to the top.
Align Objects Middle The selected objects are aligned centrally on an imaginary horizontal axis.
Align Bottom The selected objects are aligned on the bottom edge of the object nearest to the bottom.
Distribute Horizontally
The selected objects are distributed horizontally at equal distances from one another.
Distribute Vertically The selected objects are distributed vertically at equal distances from one another.
Bring to Front Moves the selected object right to the front. It covers all other elements.
Send to Back Moves the selected object right to the back. It thus forms the basis of the stack.
Bring Forward Allows the selected object to be brought gradually to the front.
Send Backward Allows the selected object to be sent gradually to the back.
TipYou can add all the icons mentioned here to the quick access toolbar to enable quicker access.
To the table of contents
2
Aligning, Distributing and Centering Objects When creating slides,
objects must constantly be repositioned.
Working with the com-mands Align, Distribute and Align Center ensures that you position objects exactly on the same axis or distribute them at an even distance from one another. It is recommended that you work with these commands in order to create slides efficiently and accurately.
Foreground and Background When moving objects,
objects sometimes end up overlapping each other.
Whether an object is then towards the front or back depends on the order in which the objects were created. The object created first is always furthest to the back.
You can change this order as desired.
On the Format tab, under the Drawing tools, you will find the commands described below in the Arrange group.
Here you can arrange objects directly in the foreground or background by clicking the relevant button. To move an object gradually to the front or back, click the arrow of the relevant button and select the appropriate command.
On the Format tab, under the Drawing tools, you will find the commands described below in the Arrangegroup by moving the cursor over the Align entry.

3232
Transferring Formats To give individual texts or
letters the same style, use the format painter .
Like the eyedroppers, however, the format painter can transfer formats to objects and shapes.
You will find the format painter on the Home tab, in the Clipboard group.
Select the object (object frame border) that has the required properties.
Click the Pick Up Object Style icon .
Use the cursor to click the objects that should receive the required properties.
Click the Apply Object Style icon .
The object has now adopted the required format.
Adopted formats can transferred to several selected objects on a slide simultaneously.
Basic Functions for Working with PresentationsBasic Functions for Editing Objects
© K
SB A
ktie
nges
ells
chaf
t 20
17 /
Last
upd
ated
Aug
ust 2
017
Tip
The eyedropper function enables properties to be transferred quickly to other objects.
The eyedropper function enables properties to be
transferred quickly to other objects.
The eyedropper function enables properties to be transferred quickly to other objects.
11
22
33
To the table of contents
2
The eyedropper icons are not included on the tab by default. You can add them to the quick access toolbar.
Copying and Transferring Formats with the Eyedropper Function The eyedropper function
enables properties to be transferred quickly to other object attributes.
Object or text properties picked up by the eye-dropper function remain in the cache until new format properties are picked up.
This enables object or text properties to be quickly transferred to other objects on other slides.
Select the formatted shape. Then click the Format Painter button . A paintbrush then appears next to the cursor. Use this to click the shape to which the formatting should be
assigned. The shape is then displayed with the new formatting and the cursor
"loses" the function for transferring the format. To transfer the formatting to other objects, you must first pick up the
style each time. However, this can be done more quickly by double-clicking the Format Painter button. This permanently activates the Format Painter function and you can transfer the style picked up by the format painter to any number of objects by clicking them in succession.
You cancel the permanent activation by pressing the Esc key.
3333
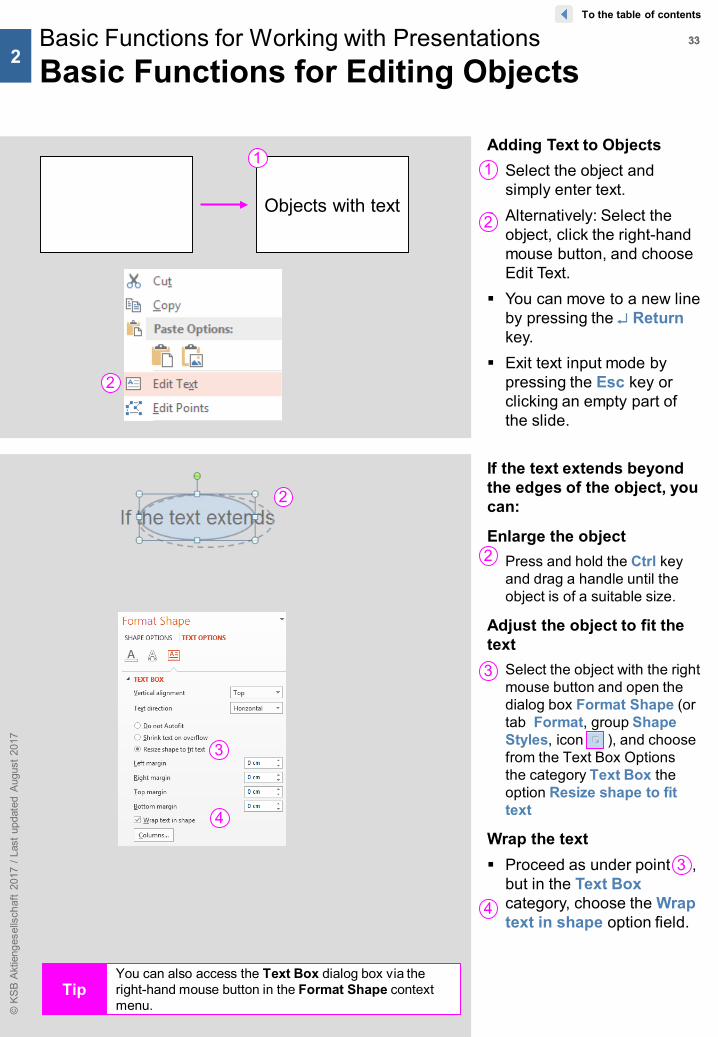
If the text extends beyond the edges of the object, you can:
Enlarge the object Press and hold the Ctrl key
and drag a handle until the object is of a suitable size.
Adjust the object to fit the text Select the object with the right
mouse button and open the dialog box Format Shape (or tab Format, group Shape Styles, icon ), and choose from the Text Box Options the category Text Box the option Resize shape to fit text
Wrap the text Proceed as under point ,
but in the Text Box category, choose the Wrap text in shape option field.
Adding Text to Objects Select the object and
simply enter text. Alternatively: Select the
object, click the right-hand mouse button, and choose Edit Text.
You can move to a new line by pressing the ↵ Return key.
Exit text input mode by pressing the Esc key or clicking an empty part of the slide.
Basic Functions for Working with PresentationsBasic Functions for Editing Objects
© K
SB A
ktie
nges
ells
chaf
t 20
17 /
Last
upd
ated
Aug
ust 2
017
1
Objects with text
1
2
3
4
2
2
TipYou can also access the Text Box dialog box via the right-hand mouse button in the Format Shape context menu.
3
To the table of contents
2
3
4
2
3434Basic Functions for Working with PresentationsUndoing Actions
© K
SB A
ktie
nges
ells
chaf
t 20
17 /
Last
upd
ated
Aug
ust 2
017
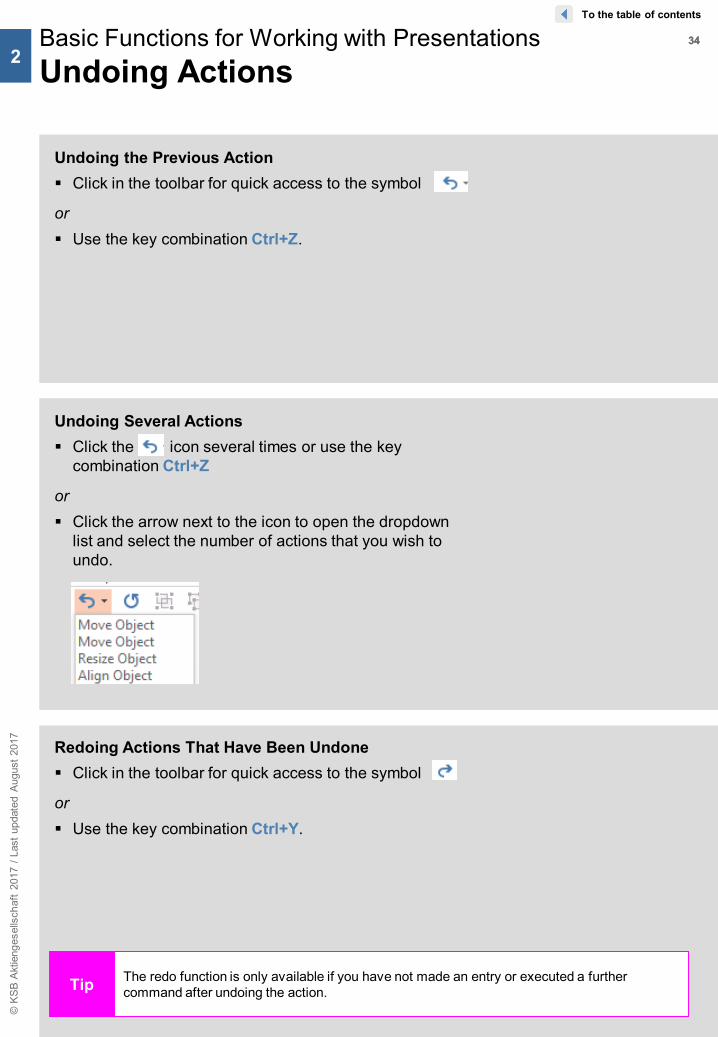
Tip The redo function is only available if you have not made an entry or executed a further command after undoing the action.
To the table of contents
2
Undoing the Previous Action Click in the toolbar for quick access to the symbol
or Use the key combination Ctrl+Z.
Undoing Several Actions Click the icon several times or use the key
combination Ctrl+Z
or Click the arrow next to the icon to open the dropdown
list and select the number of actions that you wish to undo.
Redoing Actions That Have Been Undone Click in the toolbar for quick access to the symbol
or Use the key combination Ctrl+Y.

3535Basic Functions for Working with PresentationsUseful Shortcuts
© K
SB A
ktie
nges
ells
chaf
t 20
17 /
Last
upd
ated
Aug
ust 2
017
Basic PowerPoint Keyboard Shortcuts – Basic Editing Functions
To the table of contents
2
Preface Shortcuts are listed here to enable you to execute frequently used functions more
quickly. PowerPoint's "hidden" shortcuts can be very useful as they save you from having to make long series of mouse clicks.
It is nearly impossible, of course, to remember all shortcuts as and when you need them. Not all shortcuts will be of use to you. Some of the shortcuts will, nevertheless, make your work with PowerPoint easier.
Classic examples are the functions of the Enter and Esc keys, which you can use to confirm or cancel a window function and close the window.
Cut (add to clipboard)
Copy
Paste copied content (from clipboard)
Duplicate
Undo
Redo
Cancel/close window without confirmation
Repeat previous function
Select all
Find
Find and replace text
Show or hide grids and guides
Copy formatting (colors, font size)
Paste formatting (colors, font size)
Ctrl + C
Ctrl + D
Ctrl + Z
Ctrl X+
Ctrl V+
Esc
F4
Ctrl + Y
Ctrl + F
Ctrl A+
Ctrl H+
Alt F9+
Ctrl + Shift + C
Ctrl + Shift + V

3636Basic Functions for Working with PresentationsUseful Shortcuts
© K
SB A
ktie
nges
ells
chaf
t 20
17 /
Last
upd
ated
Aug
ust 2
017
Ctrl + O
Ctrl + S
Ctrl + P
Ctrl N+
Ctrl W+
Ctrl + Q
Ctrl + F4
Shift + F12
F12
Ctrl + Shift + F12
Alt + F4
Strg M+
Ctrl + M
+Alt Shift + D
+Alt Shift + P
+Alt Shift + T
Open new presentation
Open existing presentation
Close current presentation
or
Save current presentation
or
Save under new name
Print (open print dialog box)
or
Quit
or
Insert new blank slide
Insert new slide without dialog box
Insert date
Insert page number
Insert time
Moving Within Text
Moving Texts1)
Delete word to the left
Delete letter to the right
Delete word to the right
BkSp
Ctrl +
Ctrl
Entf
Entf
+
1) The cursor must be in the text box (write mode)2) BkSp = Backspace key
2)
To the table of contents
2
PowerPoint Keyboard Shortcuts for Text

3737Basic Functions for Working with PresentationsUseful Shortcuts
© K
SB A
ktie
nges
ells
chaf
t 20
17 /
Last
upd
ated
Aug
ust 2
017
Selecting Texts1)
1) The cursor must be in the text box (write mode)2) Applies to selected text only
One character to the right
One character to the left
Go to start of (next) word
Go to start of (previous) word
Go to end of line
Go to start of line
Up one line from cursor position
Down one line from cursor position
Go to end of text
Go to start of text
Select all words in text box1)
Select all words in text box1)
Select word Double-click
Select paragraph Triple-click
Select from word to word Press and hold left-hand mouse button, drag, release
Shift
Shift
Ctrl Shift
Ctrl Shift
Shift
Shift
Ctrl A
+
+
+
+
+
+
+
+
+
Home
EndShift
Shift
+
+
Home
EndCtrl Shift
Ctrl Shift
+
+
+
+
F2
Text Orientation
L
Ctrl
Ctrl +
+
Ctrl
Ctrl +
+
R
E
J
Aligned left
Aligned right
Centered
Justify (not used)
Shift F3+
Shift F3+
WRITE TEXT IN CAPITAL LETTERS
write text in lower case
Capitalization in Texts2)
2x
(Twice for lower case word), once for word with upper case initial letter
Tip
Some keyboards do not have the Homecommand – in this case, use the Pos1 key.
To the table of contents
2
PowerPoint Keyboard Shortcuts for Text

3838Basic Functions for Working with PresentationsUseful Shortcuts
© K
SB A
ktie
nges
ells
chaf
t 20
17 /
Last
upd
ated
Aug
ust 2
017
Text Design1)
1) Applies to selected text only2) These commands apply to the outline view only
Apply or remove italics
Apply or remove bold typeface
Increase font size by one size
Decrease font size by one size
Apply or remove superscript
Apply or remove subscript
Change font type (enter font name)
Display the dialog box for text formatting
Create e-mail hyperlink
Ctrl
Ctrl +
+
Ctrl +
T
.
KShift
Ctrl + ,
+
Ctrl +
Ctrl + +
+ +Shift
Ctrl + + FShift
Ctrl +
Shift
Shift
+
+
KCtrl +
Shift
Alt Shift
Alt
Alt Shift
Alt Shift
+
+
+
+
+
+
+
+
Alt Shift+ +
Alt Shift+ +
1
Alt Shift+ + -
Alt Shift+ + A
÷ (key on numerical block on keyboard)
+
Promote a paragraph
Demote a paragraph
Move selected paragraphs up
Move selected paragraphs down
Display headings only2)
Expand text below a heading2)
Collapse text below a heading2)
Display all text and headings2)
Activate/deactivate text formatting2)
Text Design2)
FShift +
or
Ctrl + + PShift
To the table of contents
2
PowerPoint Keyboard Shortcuts for Text
3939Basic Functions for Working with PresentationsUseful Shortcuts
© K
SB A
ktie
nges
ells
chaf
t 20
17 /
Last
upd
ated
Aug
ust 2
017
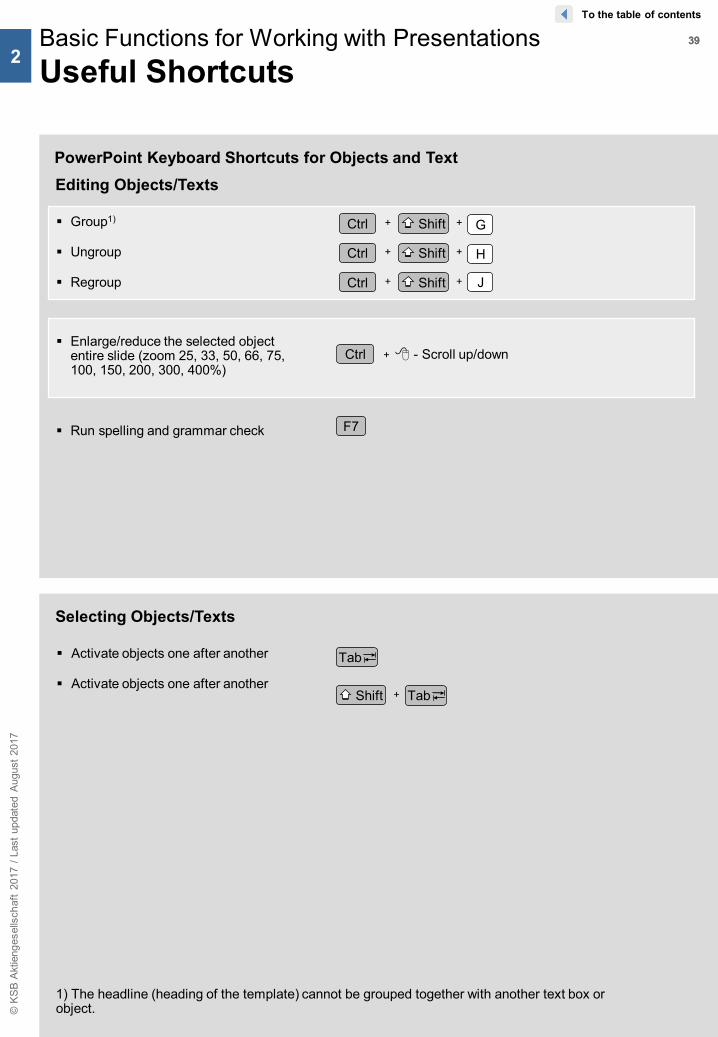
Editing Objects/Texts
Group1)
Ungroup
Regroup
Enlarge/reduce the selected object entire slide (zoom 25, 33, 50, 66, 75, 100, 150, 200, 300, 400%)
Run spelling and grammar check
Ctrl Shift+ + G
Ctrl Shift+ + H
Ctrl Shift+ + J
- Scroll up/downCtrl +
F7
Selecting Objects/Texts
Activate objects one after another
Activate objects one after another
Tab
TabShift +
To the table of contents
2
PowerPoint Keyboard Shortcuts for Objects and Text
1) The headline (heading of the template) cannot be grouped together with another text box or object.
4040Basic Functions for Working with PresentationsUseful Shortcuts
© K
SB A
ktie
nges
ells
chaf
t 20
17 /
Last
upd
ated
Aug
ust 2
017
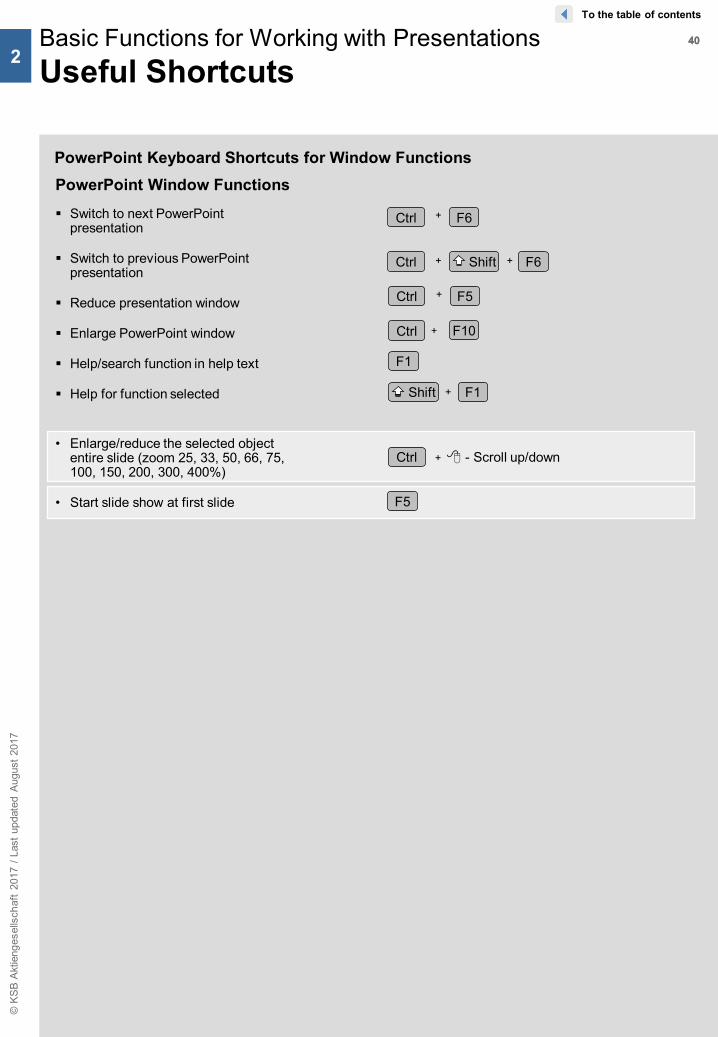
PowerPoint Window Functions
Ctrl
F10
Ctrl Shift F6+ +
+
Ctrl F5+
F6+
Shift + F1
F1
Switch to next PowerPoint presentation
Switch to previous PowerPointpresentation
Reduce presentation window
Enlarge PowerPoint window
Help/search function in help text
Help for function selected
- Scroll up/downCtrl +
F5
• Enlarge/reduce the selected object entire slide (zoom 25, 33, 50, 66, 75, 100, 150, 200, 300, 400%)
• Start slide show at first slide
Ctrl
To the table of contents
2
PowerPoint Keyboard Shortcuts for Window Functions

4141Basic Functions for Working with PresentationsUseful Shortcuts
© K
SB A
ktie
nges
ells
chaf
t 20
17 /
Last
upd
ated
Aug
ust 2
017
Slide Show Commands (Effects)
Black screen (on/off)
White screen (on/off)
Hide/show cursor and buttons
Pause/restart slide show
End slide show
Show next slide if it is hidden
Show with new timing
Show with original timing
Show by mouse click
Back to first slide Press and hold both mouse buttons for 2 seconds
Change cursor to pen1)
Change pen to cursor
Hide cursor and button on current slide
Always hide cursor and button
Delete screen notes
Call command menu
List of commands for slide show2)
To the table of contents
2
PowerPoint Keyboard Shortcuts for Slide Shows (Automatic Slide Shows)
1) The markings you "draw" with the pen during the presentation cannot be printed, have no effect on the file that is stored, and are deleted when you switch to a different slide.2) Available for every slide show
B
W
S
Esc
A
Ctrl
Ctrl +
P
A
Ctrl
Ctrl +
H
L
+
+
F1
(click right-hand button)
or .
or ,
Ctrl + E
O
M
H
E
4242Basic Functions for Working with PresentationsUseful Shortcuts
© K
SB A
ktie
nges
ells
chaf
t 20
17 /
Last
upd
ated
Aug
ust 2
017
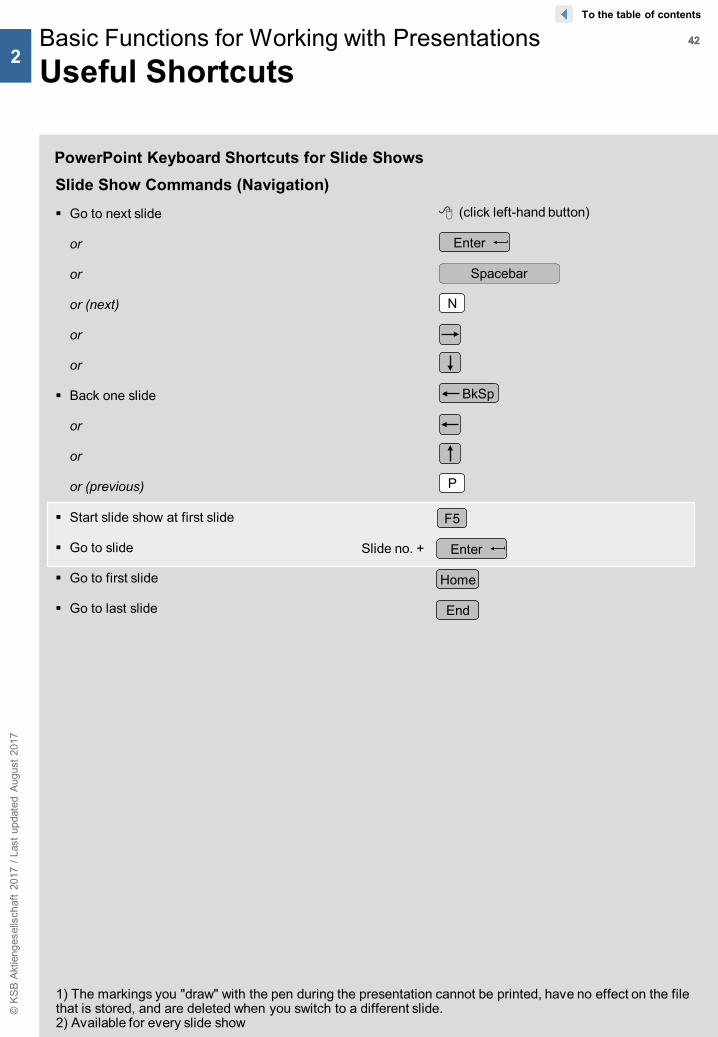
Slide Show Commands (Navigation) Go to next slide
or
or
or (next)
or
or
Back one slide
or
or
or (previous)
(click left-hand button)
Spacebar
N
BkSp
Enter
P
Home
End
F5
EnterSlide no. +
Start slide show at first slide
Go to slide
Go to first slide
Go to last slide
To the table of contents
2
1) The markings you "draw" with the pen during the presentation cannot be printed, have no effect on the file that is stored, and are deleted when you switch to a different slide.2) Available for every slide show
PowerPoint Keyboard Shortcuts for Slide Shows
4343Basic Functions for Working with PresentationsUseful Key Combinations
© K
SB A
ktie
nges
ells
chaf
t 20
17 /
Last
upd
ated
Aug
ust 2
017
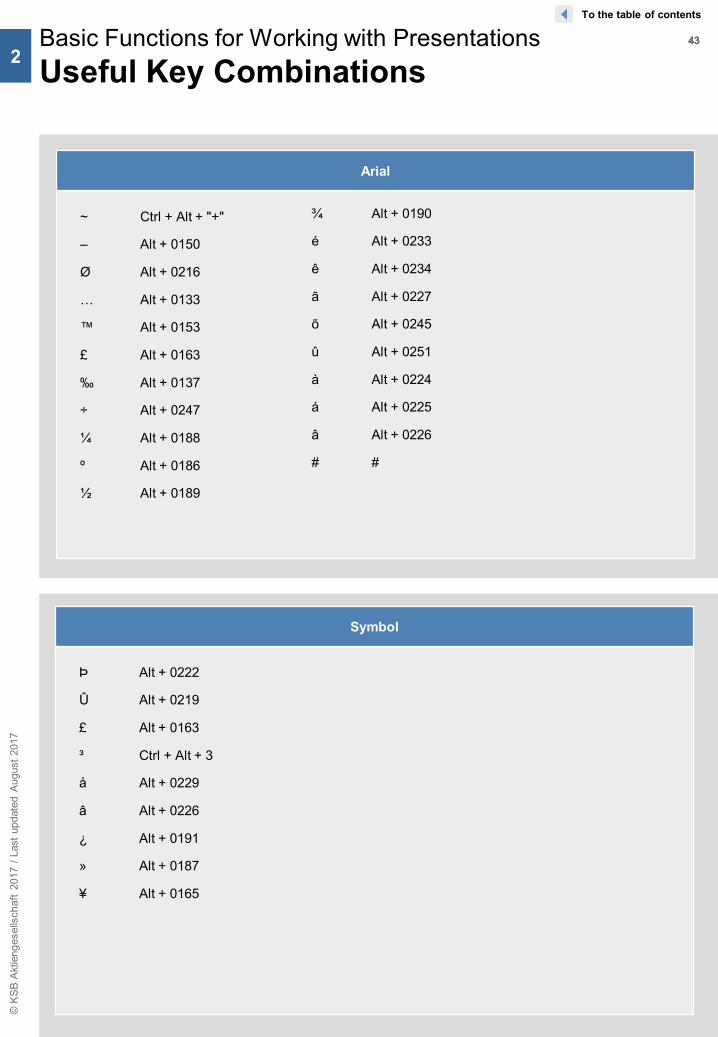
Arial
~ Ctrl + Alt + "+"
– Alt + 0150
Ø Alt + 0216
… Alt + 0133
™ Alt + 0153
£ Alt + 0163
‰ Alt + 0137
÷ Alt + 0247
¼ Alt + 0188
º Alt + 0186
½ Alt + 0189
¾ Alt + 0190
é Alt + 0233
ê Alt + 0234
ã Alt + 0227
õ Alt + 0245
û Alt + 0251
à Alt + 0224
á Alt + 0225
â Alt + 0226
# #
Symbol
Þ Alt + 0222
Û Alt + 0219
£ Alt + 0163
³ Ctrl + Alt + 3
å Alt + 0229
â Alt + 0226
¿ Alt + 0191
» Alt + 0187
¥ Alt + 0165
To the table of contents
2
4444
Contents
© K
SB A
ktie
nges
ells
chaf
t 20
17 /
Last
upd
ated
Aug
ust 2
017
The User Interface
− The PowerPoint Application Window
− Using the Menus
Basic Functions for Working with Presentations
− Editing and Customizing the Toolbars
− Working with Slides
− Inserting Icons and Special Characters
− Working with AutoShapes
− Connectors
− Editable Points
− Basic Functions for Editing Objects
− Undoing Actions
− Useful Shortcuts
− Useful Key Combinations
Working with Text
− Inserting Text Boxes
− Editing Text Boxes
− Special Text Entry Features
− Options for Inserting Text
− Working with Bullet Points
Charts
Pictures and Clip Arts
Tables
Slide Shows
Printing
Tips for Creating Presentations

4545
Resizing Text Click the text. The text box
frame and the cursor are displayed. Handles also appear along the text box frame.
Place the cursor on the required handle. The cursor is displayed as a double arrow.
Drag the frame to the required size while holding down the mouse button. A dotted line indicates the new size of the frame.
Inserting Text On the Insert tab, in the
Text group, select the Text Box icon.
or On the Home tab, in the
Drawing group, select the text box from the default shapes.
Working with TextInserting Text Boxes
© K
SB A
ktie
nges
ells
chaf
t 20
17 /
Last
upd
ated
Aug
ust 2
017
3
1
2
2
1
3
1
2
To the table of contents
1
2
3
Placeholder with text
Placeholder with text
Placeholder with text
Handles
4646
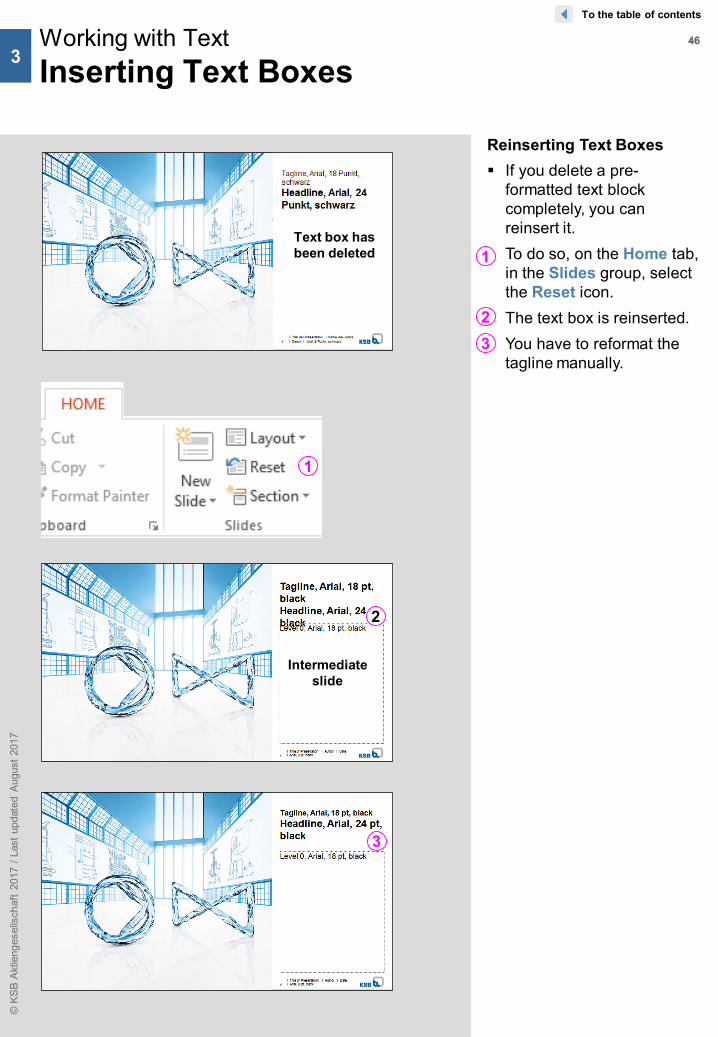
Reinserting Text Boxes If you delete a pre-
formatted text block completely, you can reinsert it.
To do so, on the Home tab, in the Slides group, select the Reset icon.
The text box is reinserted. You have to reformat the
tagline manually.
Working with TextInserting Text Boxes
© K
SB A
ktie
nges
ells
chaf
t 20
17 /
Last
upd
ated
Aug
ust 2
017
23
To the table of contents
1Text box has been deleted
3
1
2
Intermediate slide
3

4747Working with TextEditing Text Boxes
© K
SB A
ktie
nges
ells
chaf
t 20
17 /
Last
upd
ated
Aug
ust 2
017
One word Double-click the word.You can select the entire sentence by triple-clicking it.
Any text Move the cursor to the beginning (or end) of the text section.Press and hold the left-hand mouse button and drag the cursor to the end (or start)
of the text.
All text boxes / elements
Navigate to the required slide in the slide window and click an empty part of the slide.Switch to the Home tab if necessary. In the Editing group, click the Select button and choose the Select All entry.Alternatively: Ctrl+A
One text element In the slide window or on the Outline tab page, select the word or text that you want to delete.Press the Del key.
One slide On the Outline tab page, click on the slide icon of the slide you want to delete. The slide text is selected.Choose Edit – Delete Slide from the menu orAlternatively: Press the Del key and confirm
the security prompt that appears by choosing Ok to delete the slide.
One character to the right/left ⇑ Shift + → or ⇑ Shift + ←
One word to the right/left Ctrl + ⇑ Shift + → or Ctrl + ⇑ Shift + ←
To the table of contents
3
Selecting Text Elements Using the Mouse You must select the relevant text before you can edit it, e.g. delete or overwrite it.
Selecting Text Elements Using the Keyboard Place the cursor at the position as of which you want to select the text and press the
required key combination. You can select neighboring characters, words, or paragraphs by pressing the key
combination several times.
Deleting Text Elements or Slides

4848
Editing Text In the slide window, click
the text you want to edit. The cursor (flashing line) appears in the text and the entire text is surrounded by the text box frame
or Enter the required charac-
ters or text using the keyboard.
You can use the arrow keys to move the cursor within the text so that you can make further changes.
Alternatively: Click a different position in the text.
Working with TextEditing Text Boxes
© K
SB A
ktie
nges
ells
chaf
t 20
17 /
Last
upd
ated
Aug
ust 2
017
1
Delete character to the left of the cursor Press the ← Backspace key.
Delete character to the right of the cursor Press the Del key.
To the table of contents
3
How do I correct typos or delete text?
Text box frame
1
Cursor

4949Working with Text Special Text Entry Features
© K
SB A
ktie
nges
ells
chaf
t 20
17 /
Last
upd
ated
Aug
ust 2
017
Only 2 1/2 weeks - the “Marathon” series for
(e) 75.00.
Only 2½ weeks – the “Marathon” series for
€ 75.00.
[email protected] [email protected]
www.herdt.com www.herdt.com
GRreat deal! we can offer you this excellant range for
onyl (e) 25 each.
Great deal! We can offer you this excellent range for
only € 25 each.
To the table of contents
3
Automatic Formatting and Correction as You Type
Examples of the AutoFormat function If you enter fractions, e.g. 1/2, PowerPoint changes them automatically to ½. If you enter a space before a hyphen, PowerPoint changes the hyphen to a dash. If you enter (e), this is automatically replaced with the euro sign €.
Special features of the AutoFormat function The AutoFormat function changes all e-mail and Internet addresses to hyperlinks
automatically. The hyperlinks are displayed as blue underlined text that you can click to open the
relevant Internet page or e-mail program.
Examples of the AutoCorrect function If you enter two capital letters at the start of a word, these are corrected automatically. PowerPoint recognizes the end of a sentence when you enter a full stop and starts the
next word with a capital letter. Frequently-made typos are also corrected.

5050Working with Text Special Text Entry Features
© K
SB A
ktie
nges
ells
chaf
t 20
17 /
Last
upd
ated
Aug
ust 2
017
TipYou can display the AutoCorrect Options smart tag repeatedly by clicking the marking so that you can make subsequent changes until you close the presentation. When you open the presentation again, the smart tag is no longer available.
To the table of contents
3
Undoing Automatic Corrections If PowerPoint has made an automatic correction or changed the formatting and you do
not want to accept this change, you can undo it easily using the AutoCorrect Options smart tag.
Place the cursor on the word that was changed automatically. A small blue marking is displayed under the first letter of the word to indicate a smart tag.
Place the cursor on this marking and click the smart tag that is displayed . Use the menu to specify whether you want to undo the correction once only or
deactivate it permanently .1
2
GRreat deal! we can offer you this excellant range for
onyl (e) 25 each.
Great deal! We can offer you this excellent range for
only € 25 each.
12

5151Working with Text Options for Inserting Text
© K
SB A
ktie
nges
ells
chaf
t 20
17 /
Last
upd
ated
Aug
ust 2
017
1
2
3
To the table of contents
3
Defining Paste Options Using a Smart Tag If, for example, you have copied or moved text using the Windows clipboard, PowerPoint
displays the Paste Options smart tag under the text you have inserted. Click the smart tag after you have inserted the text. In the pull-down menu displayed, choose option if you want the text you have inserted
to retain its original formatting. Choose option if you want the text you have inserted to be adjusted to the formatting
of the text box. Choose option if you want the text you have inserted to be adjusted to the formatting
of the text.
In the advanced PowerPoint Options window, the settings for inserting the text can be specified.
Cursor position for text to be inserted Inserted text Text adjusted to the
formatting 3
Computer Training for Kids
2 1 3
5252Working with Text Working with Bullet Points
© K
SB A
ktie
nges
ells
chaf
t 20
17 /
Last
upd
ated
Aug
ust 2
017
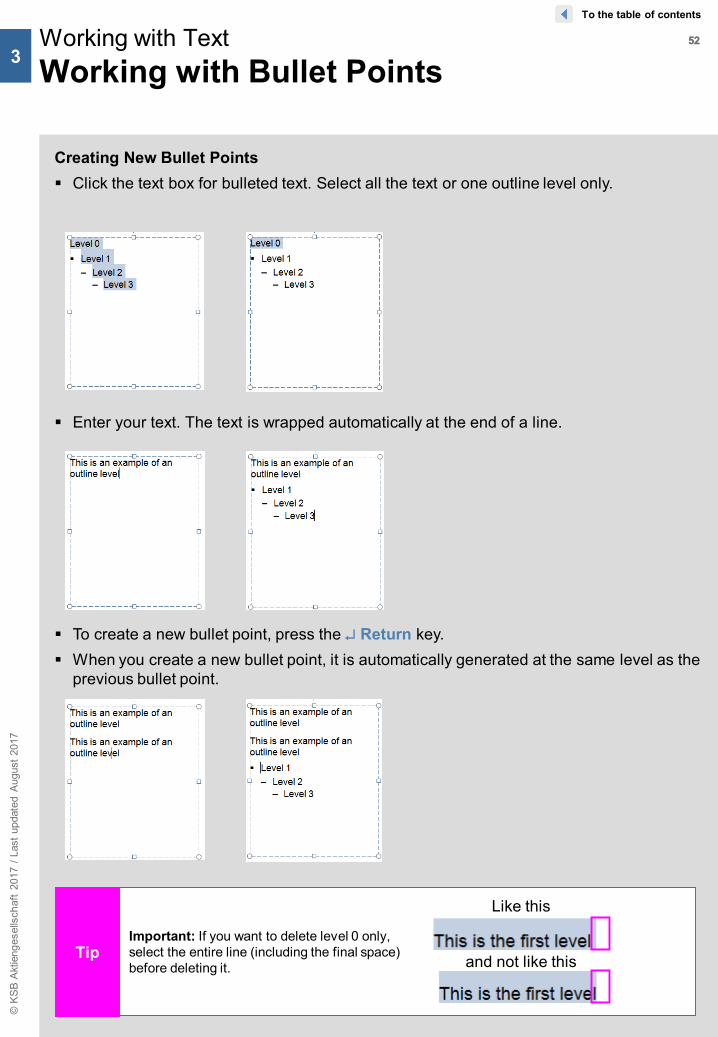
TipImportant: If you want to delete level 0 only, select the entire line (including the final space) before deleting it.
To the table of contents
3
Creating New Bullet Points Click the text box for bulleted text. Select all the text or one outline level only.
Enter your text. The text is wrapped automatically at the end of a line.
To create a new bullet point, press the ↵ Return key. When you create a new bullet point, it is automatically generated at the same level as the
previous bullet point.
Like this
and not like this

5353Working with Text Working with Bullet Points
© K
SB A
ktie
nges
ells
chaf
t 20
17 /
Last
upd
ated
Aug
ust 2
017
Tip
Only the bullet points in the preformatted text boxes on the slides can be adjusted automatically to a higher or lower outline level.
For texts that you insert yourself using the icon, you have to reformat the bullet points manually. To do this, click the relevant line using the right-hand mouse button and choose Bullets or Numbering from the context menu or, on the Home tab, in the Paragraph group, choose .
To the table of contents
3
Changing Outline Levels Place the cursor on the relevant bullet point. With the icons on the Home tab, in the Paragraph group, you can increase or
decrease the indent level.
Adding a New Line Within a Paragraph (= Bullet Point) The text is normally wrapped automatically at the end of the line. If you want to create a
new line yourself within a paragraph, press ⇑ Shift + ↵ Return. There is then less space between the lines than between the paragraphs.

5454Working with Text Working with Bullet Points
© K
SB A
ktie
nges
ells
chaf
t 20
17 /
Last
upd
ated
Aug
ust 2
017
1 3
To the table of contents
3
Changing Bulleted Lists to Numbered Lists You can select the bullet points by clicking the right-hand mouse button to open the
context menu and selecting Bullets or Numbering or, on the Home tab, in the Paragraph group, select one of the icons.
Select the paragraph for which you want to change the numbering. Open the Bullets and Numbering dialog box and navigate to the Numbered tab. Click the required format. You can use fields to to define the size, color, and start of the numbering. Select Ok to confirm.
312

5555
Contents
© K
SB A
ktie
nges
ells
chaf
t 20
17 /
Last
upd
ated
Aug
ust 2
017
The User Interface
− The PowerPoint Application Window
− Using the Menus
Basic Functions for Working with Presentations
− Editing and Customizing the Toolbars
− Working with Slides
− Inserting Icons and Special Characters
− Working with AutoShapes
− Connectors
− Editable Points
− Basic Functions for Editing Objects
− Undoing Actions
− Useful Shortcuts
− Useful Key Combinations
Working with Text
− Inserting Text Boxes
− Editing Text Boxes
− Special Text Entry Features
− Options for Inserting Text
− Working with Bullet Points
Charts
Pictures and Clip Arts
Tables
Slide Shows
Printing
Tips for Creating Presentations

5656
Opening Charts via the KSB Template Choose a chart template
from the KSB template. Click Chart Tools and
select tab Design and open the group Edit Data
Here you have two options to Edit Data
Edit Data (in PowerPoint). A small Edit Box opens on top above the graph
Edit Data in Excel 2013. The datasheet is opened in Excel in a separate Window
Basic Functions for Working with PresentationsCharts
© K
SB A
ktie
nges
ells
chaf
t 20
17 /
Last
upd
ated
Aug
ust 2
017
4
TipUse the preformatted charts in the KSB template. The correct colors, font sizes, etc. are predefined here.
1
1
2
As of the 2007 version, PowerPoint works directly together with Excel. You now enter the data directly in Excel (see ).2
To the table of contents
2
12
5757Basic Functions for Working with PresentationsCharts
© K
SB A
ktie
nges
ells
chaf
t 20
17 /
Last
upd
ated
Aug
ust 2
017
4
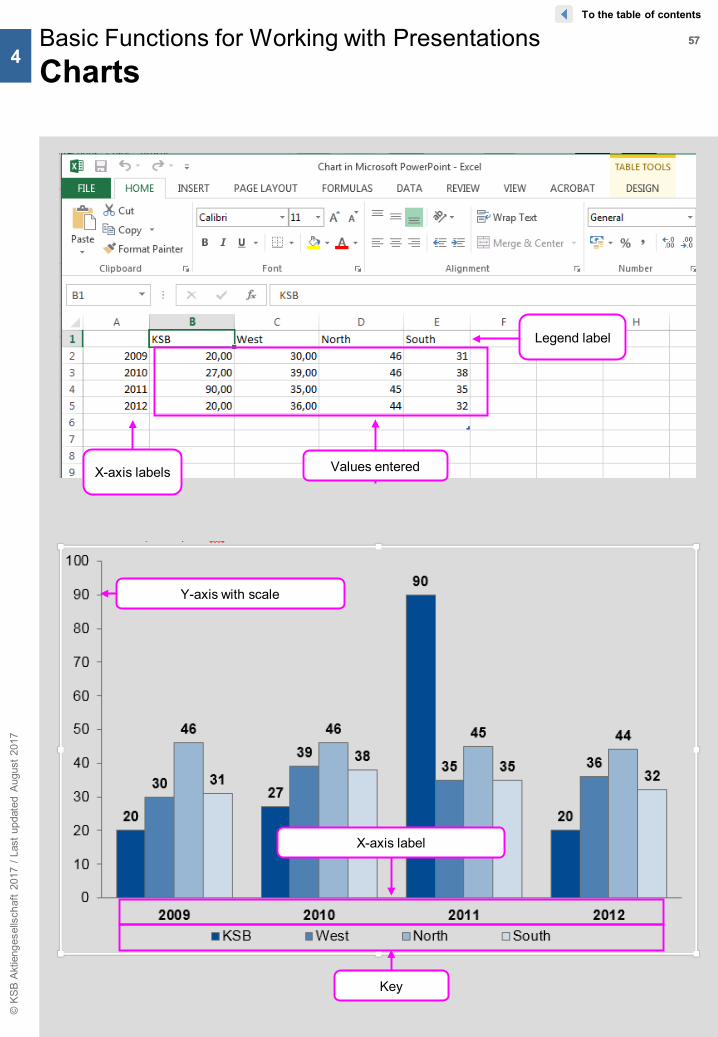
Key
X-axis label
Y-axis with scale
To the table of contents
Legend label
X-axis labels Values entered
5858Basic Functions for Working with PresentationsCharts
© K
SB A
ktie
nges
ells
chaf
t 20
17 /
Last
upd
ated
Aug
ust 2
017
To the table of contents
4
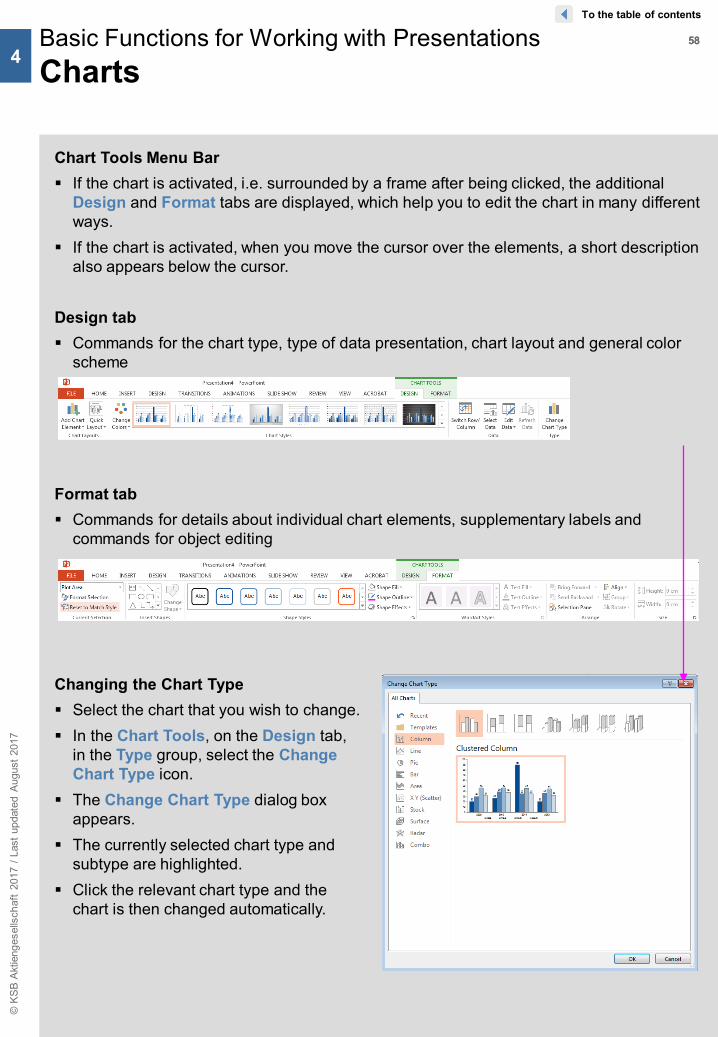
Chart Tools Menu Bar If the chart is activated, i.e. surrounded by a frame after being clicked, the additional
Design and Format tabs are displayed, which help you to edit the chart in many different ways.
If the chart is activated, when you move the cursor over the elements, a short description also appears below the cursor.
Design tab Commands for the chart type, type of data presentation, chart layout and general color
scheme
Format tab Commands for details about individual chart elements, supplementary labels and
commands for object editing
Changing the Chart Type Select the chart that you wish to change. In the Chart Tools, on the Design tab,
in the Type group, select the Change Chart Type icon.
The Change Chart Type dialog box appears.
The currently selected chart type and subtype are highlighted.
Click the relevant chart type and the chart is then changed automatically.

5959Basic Functions for Working with PresentationsCharts
© K
SB A
ktie
nges
ells
chaf
t 20
17 /
Last
upd
ated
Aug
ust 2
017
Showing/hiding the datasheet
Design (Chart Tools) tab, Data group, Edit Data button– Edit Data in Excel 2013
Moving datasheet As with all windows, you can move, reduce or enlarge the datasheet by dragging the title bar.
Selecting datasheet areas
A cell: Click the required cellSeveral cells: Click the first cell of the area to be selected
and, keeping the left-hand mouse button pressed down,drag the cursor over the cell area.
A row: Click the row header.A column: Click the column header. Full datasheet: Click the "Select All" field
of the datasheet.
Inserting rows or columns
Select the column or row headers by dragging the cursor over them.Using the right-hand mouse button, click in the selected column or row header
area and call the Insert Cells context menu item.
Deleting an entire row/column
Click the row or column header to select the entire row or column.Press the Del key to delete the selected data.Alternatively: Using the cursor,
select the column or row and, with the right-hand mouse button,click Delete Cells
Changing the width of a column
Place the cursor between the column headers and drag the column separator to the right or left with the mouse button held down.
Setting the optimal column width and row height
Double-click the right-hand boundary in the column header or the lower boundary in the row header.Alternatively: On the Home tab, in the Cells group, click the Format button and
select the entry Autofit Column Width or Autofit Row Height.
Cursor changes shape
To the table of contents
4
Editing a Datasheet – Working with Data In contrast to the previous Microsoft Graph application, you can now use the full
convenience and functions of Excel when entering data. To be able to work with the data, the datasheet must be displayed (see below for this
procedure).
Column headerRow header

6060Basic Functions for Working with PresentationsCharts
© K
SB A
ktie
nges
ells
chaf
t 20
17 /
Last
upd
ated
Aug
ust 2
017
Arranging data series in columns
Sometimes it is necessary to switch data series in a datasheet (columns become rows and vice versa). In the Chart Tools, on the Design tab, in the Data group, the Switch Row/Column icon is available for this purpose.
Excluding data Select the relevant row(s) or column(s) and call the Hide context menu item.
Including data again
To include data in the chart again that has been excluded, select the two columns or rows that are next to the hidden column(s) or row(s) and call the Show context menu item.
orYou can also change the datasheet area by pressing and holding the mouse
button and dragging the green frame . The advantage of this is that the hidden data on the datasheet remains visible.
Formatting numbers
Select the cell area, which you want to assign the number format and open the box General and choose More Number Formats… Then select from the Menu Number in the category the type of Number format
you needSpecify any other settings you may require in the remaining fields.
1
2
To the table of contents
4
Editing a Datasheet – Working with Data
General
2
3
1
3

6161Basic Functions for Working with PresentationsCharts
© K
SB A
ktie
nges
ells
chaf
t 20
17 /
Last
upd
ated
Aug
ust 2
017
Selected group of elements
Selected individual element
Note: If you change the size of an element, the size of the other elements can be adapted automatically. Formatting that has previously been carried out may then no longer be available.
1
2
To the table of contents
4
Formatting and Editing Chart Elements
Selecting chart elements Irrespective of the chart type you choose, you can customize the chart to your own
requirements (formatting, labelling, moving, and so on). To do this, you must select the relevant elements:
Click the group of elements with the cursor
or To select an individual element, first click the group of elements and then the required
element
Moving or resizing a chart or chart elements Axis labels, titles, data labels and
legends can be moved using the cursor in the usual way.
The actual chart or individual chart elements are resized by using the cursor to drag a handle on the selected element. When the cursor changes to a double arrow, drag the element to the required size.
To change the size of an inserted chart object, special handles appear once you select the chart object.
Axle labels, legends, titles and data labels can be changed by altering the font size. Chart object
handles
Plot area handles

6262Basic Functions for Working with PresentationsCharts
© K
SB A
ktie
nges
ells
chaf
t 20
17 /
Last
upd
ated
Aug
ust 2
017
To the table of contents
4
Formatting and Editing Chart Elements
Deleting chart elements Select the element. Press the Del key. The selected element is deleted from the chart. If it was based on data on the datasheet
(e.g. data series), the relevant information is retained on the datasheet.
Formatting chart elements Select the graph element and edit it by using the standard PowerPoint commands in
the group Font and Design
Quick variant: Select element with the right mouse button, a menu with various editing options opens up
Selecting a chart layout Switch to the Design tab. In the Chart Layouts group, click the icon to display the list of all available layouts. Click the required layout icon.

6363Basic Functions for Working with PresentationsCharts
© K
SB A
ktie
nges
ells
chaf
t 20
17 /
Last
upd
ated
Aug
ust 2
017
To the table of contents
4
Adding labelling elements individually After opening tab Draft select the group Add Chart
Element and select the needed entry To apply Axis Titles, click in the dropdown list and select
which primary axis you want to label In the dropdown list that appears, select the position and
options for labelling the axis.
To apply data labels to the chart, click in the dropdown list and select the Data Labels button.
Positioning and hiding the legend By using the dropdown menu Legend you can quickly
change the position of the Legend or hide the Legend
Creating additional elements You can also assign text boxes and arrows or other drawing
objects to your chart. To do this, open the Insert tab and create the required object as usual.
Formatting and changing text content You can change and format titles and labels as usual.
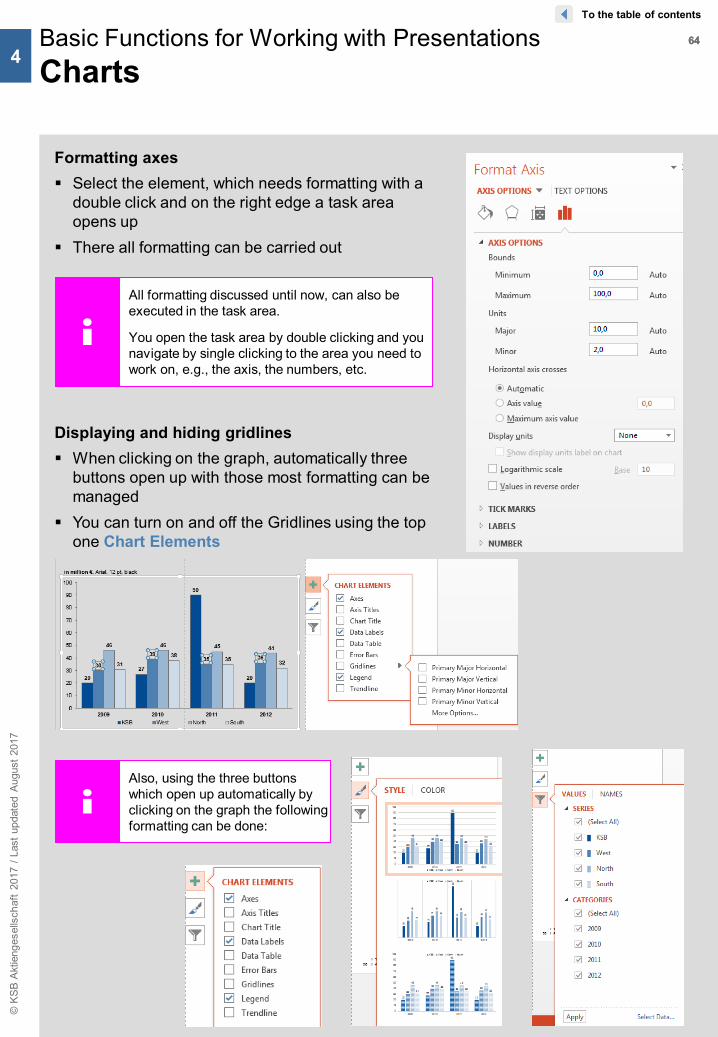
6464Basic Functions for Working with PresentationsCharts
© K
SB A
ktie
nges
ells
chaf
t 20
17 /
Last
upd
ated
Aug
ust 2
017
To the table of contents
4
Formatting axes Select the element, which needs formatting with a
double click and on the right edge a task area opens up
There all formatting can be carried out
Displaying and hiding gridlines When clicking on the graph, automatically three
buttons open up with those most formatting can be managed
You can turn on and off the Gridlines using the top one Chart Elements
Also, using the three buttons which open up automatically by clicking on the graph the following formatting can be done:
All formatting discussed until now, can also be executed in the task area.
You open the task area by double clicking and you navigate by single clicking to the area you need to work on, e.g., the axis, the numbers, etc.

6565Basic Functions for Working with PresentationsCharts
© K
SB A
ktie
nges
ells
chaf
t 20
17 /
Last
upd
ated
Aug
ust 2
017
To the table of contents
4
Compatibility with Earlier Versions If you open a presentation file created in an earlier version of PowerPoint in
PowerPoint 2013 without converting it, charts initially remain in the old format as an object as presentations from earlier versions are always opened in compatibility mode. Only when you double-click a chart, i.e. when you want to edit it, is a dialog box displayed that offers the two following selection options:1. Convert the current chart (Convert button)2. Convert all charts in the current presentation (Convert All button)

6666
Contents
© K
SB A
ktie
nges
ells
chaf
t 20
17 /
Last
upd
ated
Aug
ust 2
017
The User Interface
− The PowerPoint Application Window
− Using the Menus
Basic Functions for Working with Presentations
− Editing and Customizing the Toolbars
− Working with Slides
− Inserting Icons and Special Characters
− Working with AutoShapes
− Connectors
− Editable Points
− Basic Functions for Editing Objects
− Undoing Actions
− Useful Shortcuts
− Useful Key Combinations
Working with Text
− Inserting Text Boxes
− Editing Text Boxes
− Special Text Entry Features
− Options for Inserting Text
− Working with Bullet Points
Charts
Pictures and Clip Arts
Tables
Slide Shows
Printing
Tips for Creating Presentations
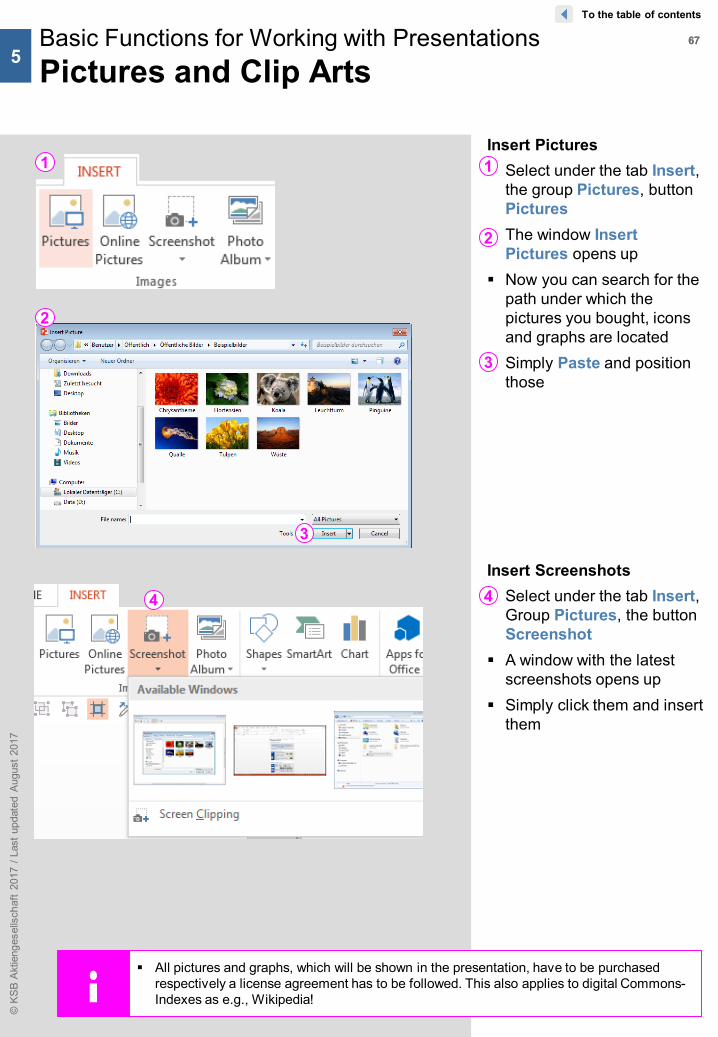
6767
Insert Pictures Select under the tab Insert,
the group Pictures, button Pictures
The window Insert Pictures opens up
Now you can search for the path under which the pictures you bought, icons and graphs are located
Simply Paste and position those
Basic Functions for Working with PresentationsPictures and Clip Arts
© K
SB A
ktie
nges
ells
chaf
t 20
17 /
Last
upd
ated
Aug
ust 2
017
5
1
To the table of contents
All pictures and graphs, which will be shown in the presentation, have to be purchased respectively a license agreement has to be followed. This also applies to digital Commons-Indexes as e.g., Wikipedia!
Insert Screenshots Select under the tab Insert,
Group Pictures, the button Screenshot
A window with the latest screenshots opens up
Simply click them and insert them
4
2
3
3
2
4
1
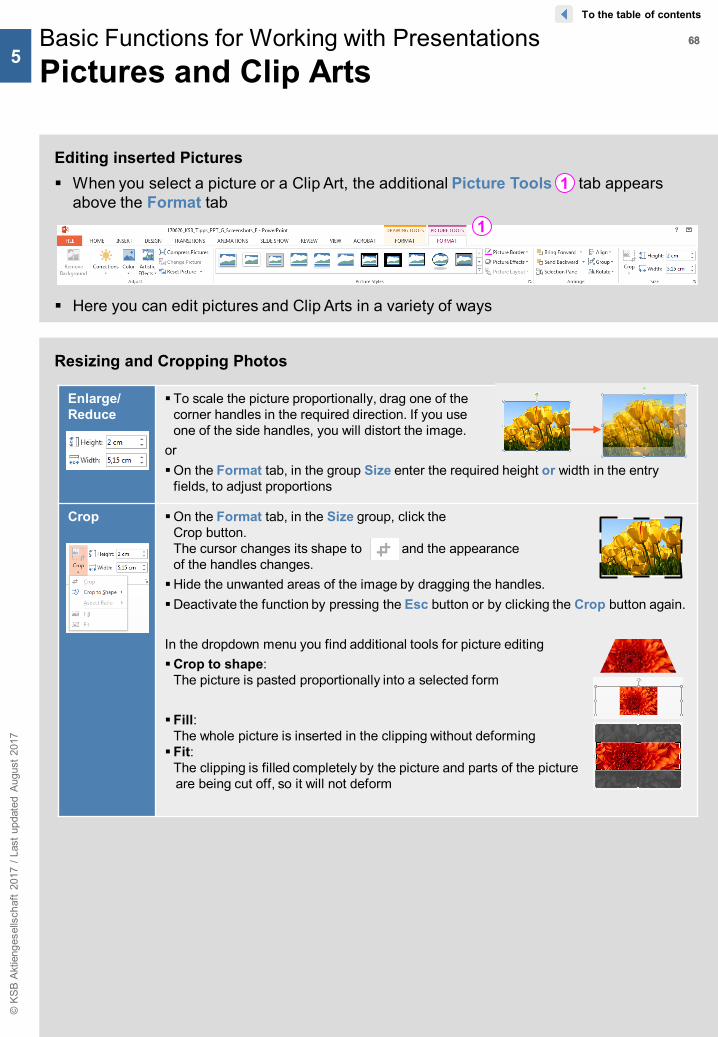
6868Basic Functions for Working with PresentationsPictures and Clip Arts
© K
SB A
ktie
nges
ells
chaf
t 20
17 /
Last
upd
ated
Aug
ust 2
017
1
Enlarge/Reduce
To scale the picture proportionally, drag one of the corner handles in the required direction. If you useone of the side handles, you will distort the image.
orOn the Format tab, in the group Size enter the required height or width in the entry
fields, to adjust proportions
Crop On the Format tab, in the Size group, click the Crop button. The cursor changes its shape to and the appearance of the handles changes. Hide the unwanted areas of the image by dragging the handles.Deactivate the function by pressing the Esc button or by clicking the Crop button again.
In the dropdown menu you find additional tools for picture editingCrop to shape:
The picture is pasted proportionally into a selected form
Fill:The whole picture is inserted in the clipping without deforming Fit:
The clipping is filled completely by the picture and parts of the picture are being cut off, so it will not deform
To the table of contents
5
Editing inserted Pictures When you select a picture or a Clip Art, the additional Picture Tools tab appears
above the Format tab
Here you can edit pictures and Clip Arts in a variety of ways
Resizing and Cropping Photos
1
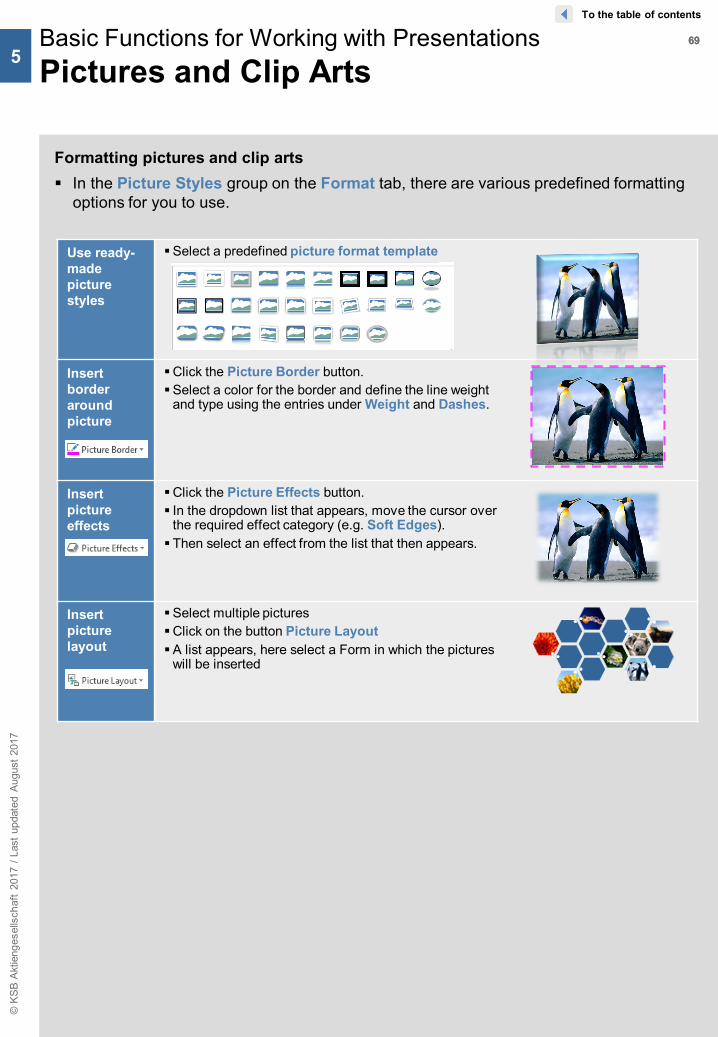
6969Basic Functions for Working with PresentationsPictures and Clip Arts
© K
SB A
ktie
nges
ells
chaf
t 20
17 /
Last
upd
ated
Aug
ust 2
017
Use ready-made picture styles
Select a predefined picture format template
Insert border around picture
Click the Picture Border button.Select a color for the border and define the line weight
and type using the entries under Weight and Dashes.
Insert picture effects
Click the Picture Effects button. In the dropdown list that appears, move the cursor over
the required effect category (e.g. Soft Edges). Then select an effect from the list that then appears.
Insert picture layout
Select multiple picturesClick on the button Picture LayoutA list appears, here select a Form in which the pictures
will be inserted
To the table of contents
5
Formatting pictures and clip arts In the Picture Styles group on the Format tab, there are various predefined formatting
options for you to use.

7070Basic Functions for Working with PresentationsPictures and Clip Arts
© K
SB A
ktie
nges
ells
chaf
t 20
17 /
Last
upd
ated
Aug
ust 2
017
Tipp The icon is not included on the tab by default. You can add it to the quick access
toolbar. If other icons you need are not shown, refer to the description of how to display them in
Section 3 – Editing and Customizing the Toolbars (page 11).
To the table of contents
5
Formatting pictures and clip arts In the Adjust group on the Format tab, there are
various predefined formatting options for you to use.
Sharpen/Soften andBrightness/Contrast adjustment
Confirm in the group Adjust the button Corrections and select the best Picture
2 3
5
1 4
color adjustment
Confirm in the group Adjust the button color. Here you are able to select color Saturation, color Tone.
Using Recolor the picture is automatically adjusted to the color scheme of the template
Set transparent color
You can use this icon to make a photo with a colored background transparent.
Example logo:
2
3
1
Reset picture
Using Reset Picture, the original format of the picture is restored, but the size is maintained. All other changes will be reset
Using Reset Picture & Size, the original format of the pictures is restored and all other changes will be reset.
4
3
1
2
4

7171Basic Functions for Working with PresentationsPictures and Clip Arts
© K
SB A
ktie
nges
ells
chaf
t 20
17 /
Last
upd
ated
Aug
ust 2
017
To the table of contents
5
Compressing Pictures PowerPoint presentations often become very large due to pictures, photos and images
being inserted. You can compress pictures in a presentation to save memory space or to use them for sending by e-mail.
To compress only certain pictures, select one or more of them and, on the Format tab, in the Adjust group, click the Compress Pictures button.
Activate in the now shown window Compression Options the control button When the control button is deactivated all existing pictures in the presentation will be
compressed Activate the control button , if cropped areas of pictures should be deleted when
saving Under Target Output the compression adjustments are being set Select in area , for which medium the presentation is being used, in order to set the
size of the compression Confirm with the button Ok.
2
3
1
1
2
3

7272
Contents
© K
SB A
ktie
nges
ells
chaf
t 20
17 /
Last
upd
ated
Aug
ust 2
017
The User Interface
− The PowerPoint Application Window
− Using the Menus
Basic Functions for Working with Presentations
− Editing and Customizing the Toolbars
− Working with Slides
− Inserting Icons and Special Characters
− Working with AutoShapes
− Connectors
− Editable Points
− Basic Functions for Editing Objects
− Undoing Actions
− Useful Shortcuts
− Useful Key Combinations
Working with Text
− Inserting Text Boxes
− Editing Text Boxes
− Special Text Entry Features
− Options for Inserting Text
− Working with Bullet Points
Charts
Pictures and Clip Arts
Tables
Slide Shows
Printing
Tips for Creating Presentations

7373
Creating and Editing Tables On the Insert tab, in the
Tables group, click the Table icon to generate an
Specify the number of columns and rows.
An automated table is generated
When a table is clicked and activated, an additional Table Tools tab appears on the Format tab.
In turn, this contains two additional tabs for table formatting and editing: Design and Layout
Basic Functions for Working with PresentationsTables
© K
SB A
ktie
nges
ells
chaf
t 20
17 /
Last
upd
ated
Aug
ust 2
017
6
2
Table Tools – Design tab
Table Tools – Layout tab
To the table of contents
2
3
4
1
5
1
3
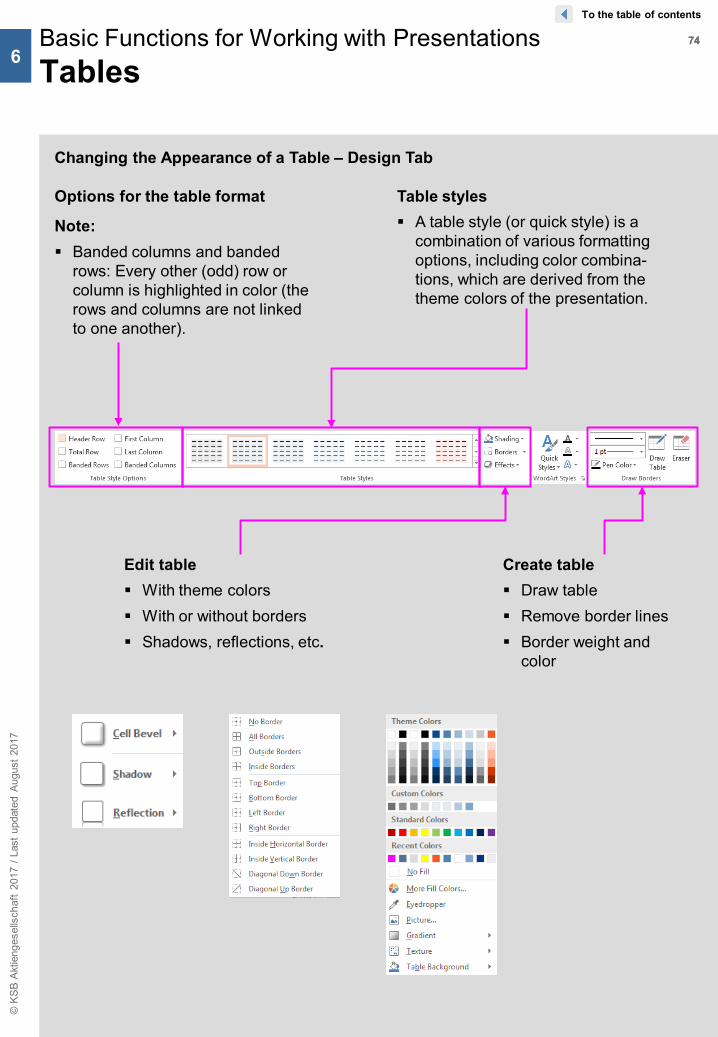
7474Basic Functions for Working with PresentationsTables
© K
SB A
ktie
nges
ells
chaf
t 20
17 /
Last
upd
ated
Aug
ust 2
017
6
To the table of contents
Changing the Appearance of a Table – Design Tab
Options for the table format
Note: Banded columns and banded
rows: Every other (odd) row or column is highlighted in color (the rows and columns are not linked to one another).
Table styles A table style (or quick style) is a
combination of various formatting options, including color combina-tions, which are derived from the theme colors of the presentation.
Create table Draw table Remove border lines Border weight and
color
Edit table With theme colors With or without borders Shadows, reflections, etc.
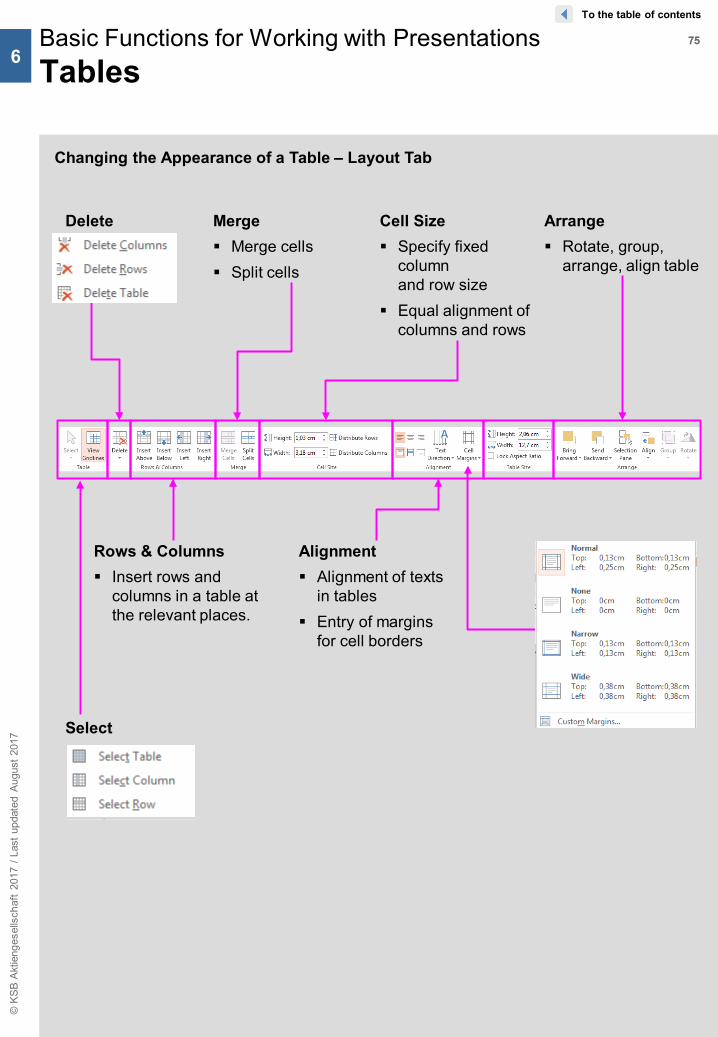
7575Basic Functions for Working with PresentationsTables
© K
SB A
ktie
nges
ells
chaf
t 20
17 /
Last
upd
ated
Aug
ust 2
017
6
Select
Delete
To the table of contents
Changing the Appearance of a Table – Layout Tab
Rows & Columns Insert rows and
columns in a table at the relevant places.
Alignment Alignment of texts
in tables Entry of margins
for cell borders
Arrange Rotate, group,
arrange, align table
Cell Size Specify fixed
column and row size
Equal alignment of columns and rows
Merge Merge cells Split cells

7676Basic Functions for Working with PresentationsTables
© K
SB A
ktie
nges
ells
chaf
t 20
17 /
Last
upd
ated
Aug
ust 2
017
6
To the table of contents
KSB Tables No outer border. Only use lines as
horizontal/vertical separators.
Fill the table header using KSB blue.
When, Arial, 14 pt, white What
10.30 – 11.30 … Arial, 14 pt, black
10.30 – 11.30 …
Outer edge (no border)
Line (grey RGB 112, 112, 112 and width 3/4 pt)
Colored fill in table header only (KSB
blue, white text, bold)
7777
Contents
© K
SB A
ktie
nges
ells
chaf
t 20
17 /
Last
upd
ated
Aug
ust 2
017
The User Interface
− The PowerPoint Application Window
− Using the Menus
Basic Functions for Working with Presentations
− Editing and Customizing the Toolbars
− Working with Slides
− Inserting Icons and Special Characters
− Working with AutoShapes
− Connectors
− Editable Points
− Basic Functions for Editing Objects
− Undoing Actions
− Useful Shortcuts
− Useful Key Combinations
Working with Text
− Inserting Text Boxes
− Editing Text Boxes
− Special Text Entry Features
− Options for Inserting Text
− Working with Bullet Points
Charts
Pictures and Clip Arts
Tables
Slide Shows
Printing
Tips for Creating Presentations
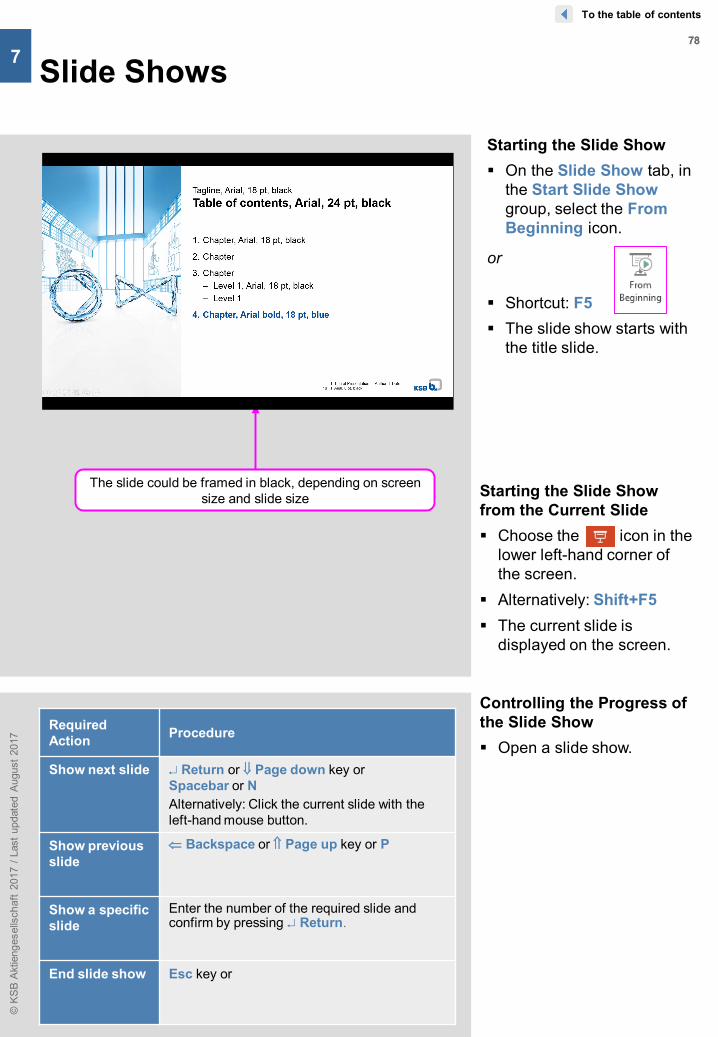
7878
Slide Shows
© K
SB A
ktie
nges
ells
chaf
t 20
17 /
Last
upd
ated
Aug
ust 2
017
7
Required Action Procedure
Show next slide ↵ Return or ⇓ Page down key or Spacebar or NAlternatively: Click the current slide with the left-hand mouse button.
Show previous slide
⇐ Backspace or ⇑ Page up key or P
Show a specific slide
Enter the number of the required slide and confirm by pressing ↵ Return.
End slide show Esc key or
To the table of contents
The slide could be framed in black, depending on screen size and slide size
Starting the Slide Show On the Slide Show tab, in
the Start Slide Show group, select the From Beginning icon.
or
Shortcut: F5 The slide show starts with
the title slide.
Starting the Slide Show from the Current Slide Choose the icon in the
lower left-hand corner of the screen.
Alternatively: Shift+F5 The current slide is
displayed on the screen.
Controlling the Progress of the Slide Show Open a slide show.

7979
Slide Show Icons If you move the cursor to
the lower, left-hand side of the screen during the slide show, the slide show icons are displayed.
When you click one of the 6 icons , a corresponding context menu opens.
You can also use this menu to switch from slide to slide.
Clicking the Help menu item enables you to display an overview that shows which keyboard commands are available for controlling slide shows.
In the context menu, with the pen, you can write on the slides and cross out or mark elements during the slide show.
When you close the slide show, PowerPoint asks you whether you want to keep or discard the entries you made with the pen.
Slide Shows
© K
SB A
ktie
nges
ells
chaf
t 20
17 /
Last
upd
ated
Aug
ust 2
017
7
1
2
3
To the table of contents
1 2
3
…
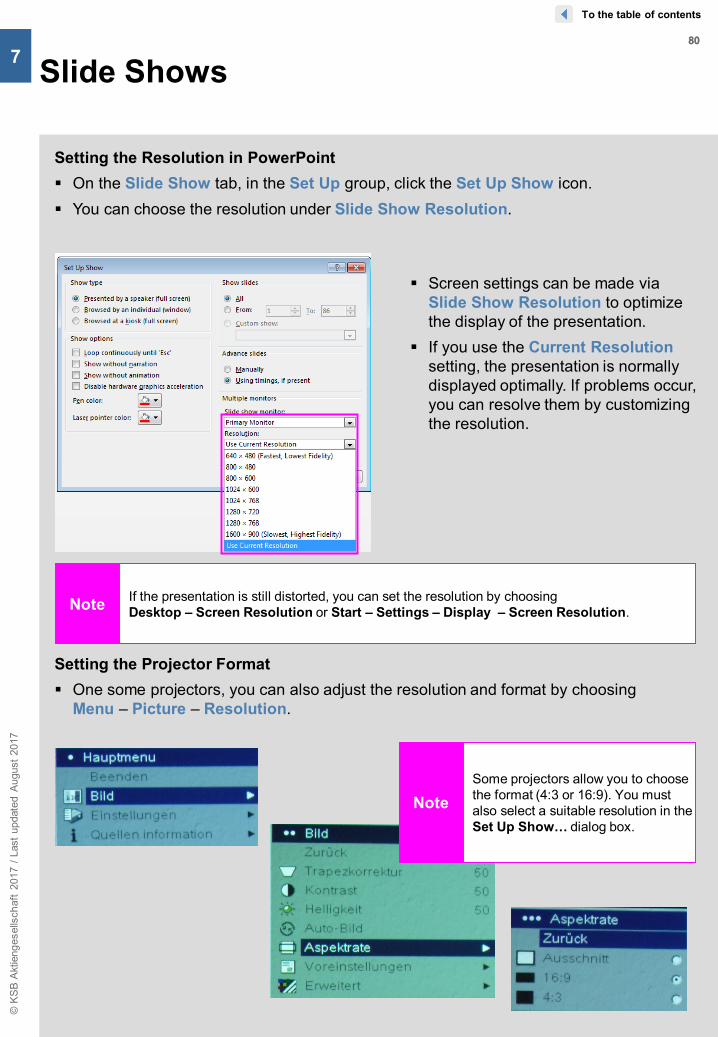
8080
Slide Shows
© K
SB A
ktie
nges
ells
chaf
t 20
17 /
Last
upd
ated
Aug
ust 2
017
7
NoteSome projectors allow you to choose the format (4:3 or 16:9). You must also select a suitable resolution in the Set Up Show… dialog box.
Note If the presentation is still distorted, you can set the resolution by choosing Desktop – Screen Resolution or Start – Settings – Display – Screen Resolution.
To the table of contents
Setting the Resolution in PowerPoint On the Slide Show tab, in the Set Up group, click the Set Up Show icon. You can choose the resolution under Slide Show Resolution.
Screen settings can be made via Slide Show Resolution to optimize the display of the presentation.
If you use the Current Resolution setting, the presentation is normally displayed optimally. If problems occur, you can resolve them by customizing the resolution.
Setting the Projector Format One some projectors, you can also adjust the resolution and format by choosing
Menu – Picture – Resolution.
8181
Contents
© K
SB A
ktie
nges
ells
chaf
t 20
17 /
Last
upd
ated
Aug
ust 2
017
The User Interface
− The PowerPoint Application Window
− Using the Menus
Basic Functions for Working with Presentations
− Editing and Customizing the Toolbars
− Working with Slides
− Inserting Icons and Special Characters
− Working with AutoShapes
− Connectors
− Editable Points
− Basic Functions for Editing Objects
− Undoing Actions
− Useful Shortcuts
− Useful Key Combinations
Working with Text
− Inserting Text Boxes
− Editing Text Boxes
− Special Text Entry Features
− Options for Inserting Text
− Working with Bullet Points
Charts
Pictures and Clip Arts
Tables
Slide Shows
Printing
Tips for Creating Presentations

8282
Printing the Presentation with Specific Settings Click the File button and
select the Print menu Shortcut: Ctrl+P Select your settings in the
dialog box that opens In the right window you find
a printing preview, which you can start by confirming with OK
Using Print All Slides, you select the range to be printed
Using color, you select if you would like to print in color or black and white
You can make additional settings using Properties
Select Scale to fit papercheckbox if you want to print the slides
Printing
© K
SB A
ktie
nges
ells
chaf
t 20
17 /
Last
upd
ated
Aug
ust 2
017
8
1
2
3
4
5
To the table of contents
3
1
2
4
5
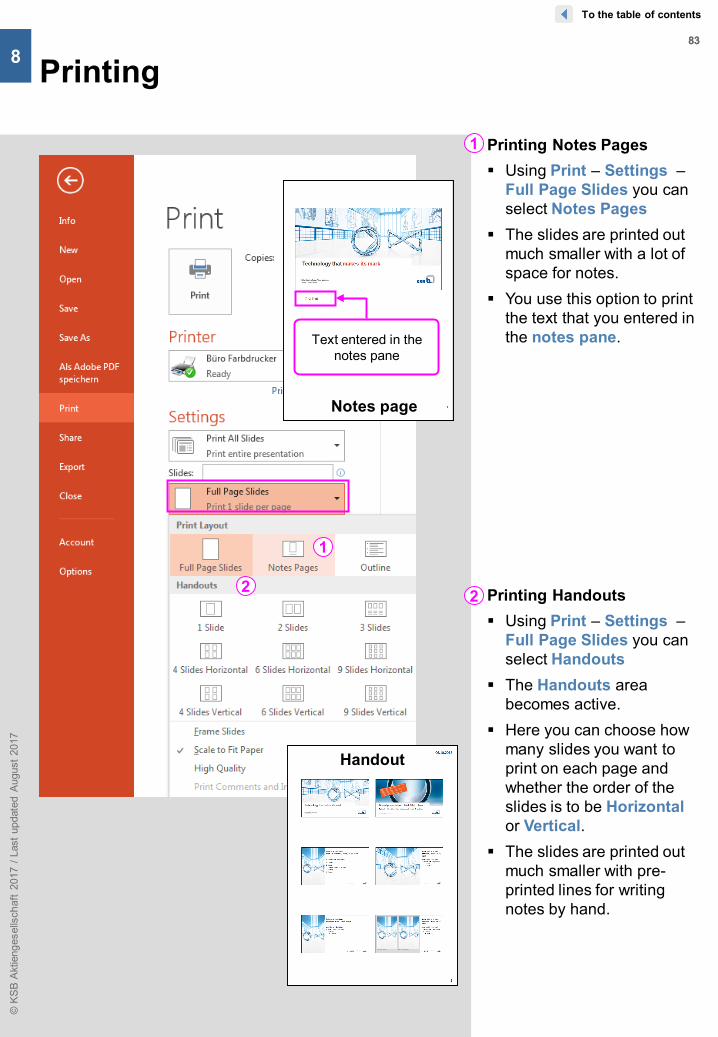
8383
Printing Notes Pages Using Print – Settings –
Full Page Slides you can select Notes Pages
The slides are printed out much smaller with a lot of space for notes.
You use this option to print the text that you entered in the notes pane.
Printing Handouts Using Print – Settings –
Full Page Slides you can select Handouts
The Handouts area becomes active.
Here you can choose how many slides you want to print on each page and whether the order of the slides is to be Horizontal or Vertical.
The slides are printed out much smaller with pre-printed lines for writing notes by hand.
Printing
© K
SB A
ktie
nges
ells
chaf
t 20
17 /
Last
upd
ated
Aug
ust 2
017
8
2
To the table of contents
2
1
1
Text entered in the notes pane
Notes page
Handout
8484
Contents
© K
SB A
ktie
nges
ells
chaf
t 20
17 /
Last
upd
ated
Aug
ust 2
017
The User Interface
− The PowerPoint Application Window
− Using the Menus
Basic Functions for Working with Presentations
− Editing and Customizing the Toolbars
− Working with Slides
− Inserting Icons and Special Characters
− Working with AutoShapes
− Connectors
− Editable Points
− Basic Functions for Editing Objects
− Undoing Actions
− Useful Shortcuts
− Useful Key Combinations
Working with Text
− Inserting Text Boxes
− Editing Text Boxes
− Special Text Entry Features
− Options for Inserting Text
− Working with Bullet Points
Charts
Pictures and Clip Arts
Tables
Slide Shows
Printing
Tips for Creating Presentations
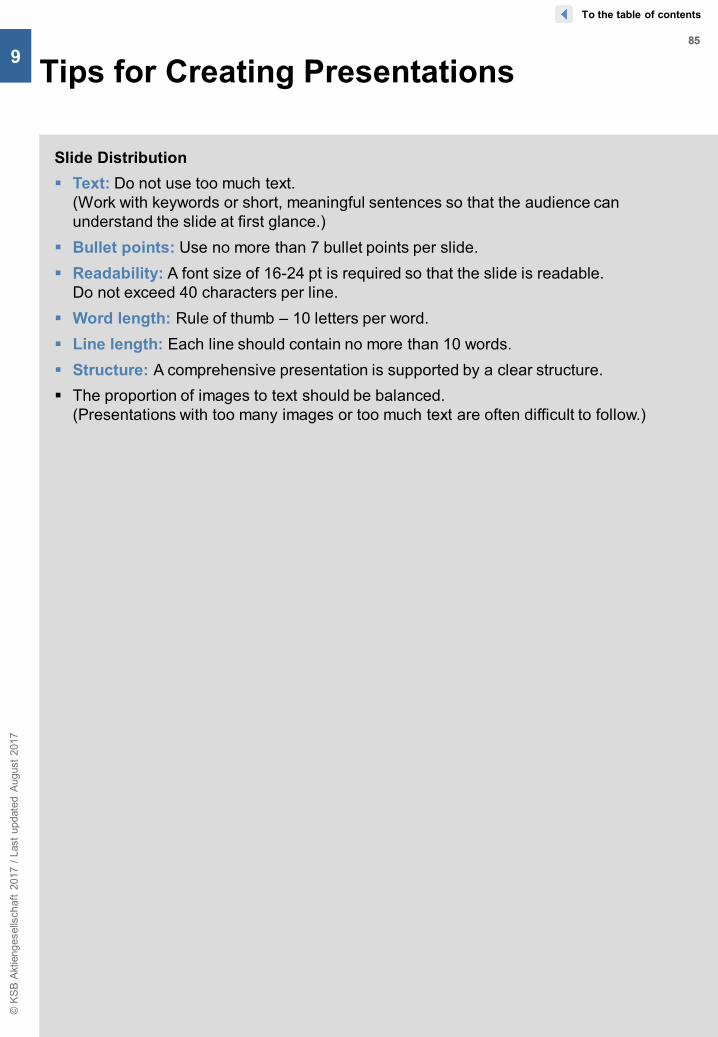
8585
Tips for Creating Presentations
© K
SB A
ktie
nges
ells
chaf
t 20
17 /
Last
upd
ated
Aug
ust 2
017
9
To the table of contents
Slide Distribution Text: Do not use too much text.
(Work with keywords or short, meaningful sentences so that the audience can understand the slide at first glance.)
Bullet points: Use no more than 7 bullet points per slide. Readability: A font size of 16-24 pt is required so that the slide is readable.
Do not exceed 40 characters per line. Word length: Rule of thumb – 10 letters per word. Line length: Each line should contain no more than 10 words. Structure: A comprehensive presentation is supported by a clear structure. The proportion of images to text should be balanced.
(Presentations with too many images or too much text are often difficult to follow.)