timeclock plus user’s guide · timeclock plus user’s guide ... from the customers login...
TRANSCRIPT

TimeClock Plus User’s Guide
Publication No. EL1016-02 Publication Date: November 2007
This manual contains reference information about software products from Activant Solutions Inc.™ The software described in this manual and the manual itself are furnished under the terms and conditions of a license agreement. The software consists of software options that are separately licensed. It is against the law to copy the software on any medium, or to enable any software options, except as specifically permitted under the license agreement. In addition, no part of this manual may be copied or transmitted in any form or by any means without the prior written permission of Activant Solutions Inc.
From time to time, Activant makes changes to its software products. Therefore, information in this manual is subject to change, and the illustrations and screens that appear in the manual may differ somewhat from the version of the software provided to you.
Created by Learning Products and Education
Copyright: © 2007 Activant Solutions Inc. All rights reserved.
Activant Solutions Inc., the Activant logo, Activant Eagle, and Activant Eagle for Windows are trademarks of Activant Solutions Inc. All other trademarks are property of their respective owners.
Activant Solutions Inc. 7683 Southfront Road Livermore, CA 94551
Publication No. EL1016-02 Publication Date: November 2007

Contents
1) Using This Guide .............................................................................................1
TimeClock Overview ..............................................................................................................1 Who Should Use This Guide...................................................................................................3 How This Guide Is Organized.................................................................................................3 Conventions Used In This Guide ............................................................................................3 Where To Get Help .................................................................................................................4 Viewing QuickTip Videos ......................................................................................................5 Training Courses and Seminars...............................................................................................5 If You Have Comments About This Guide.............................................................................6
2) Setting Up TimeClock.....................................................................................7
Set Up Security........................................................................................................................7 Set the Payroll Default Upload Directory ...............................................................................7 Add Employee Information.....................................................................................................8
Add Information to the Eagle System............................................................................8 Add to TimeClock Plus................................................................................................10
Receive TimeClock Notification By E-Mail.........................................................................12
3) Clocking In and Clocking Out .....................................................................13
About Clock In and Clock Out..............................................................................................13 Clock In Using the Eagle Browser ........................................................................................14 Clock Out Using the Eagle Browser .....................................................................................14 Clock In Using Function CIN ...............................................................................................16 Clock Out Using Function COUT.........................................................................................17 Review the Who’s Here List .................................................................................................18 Close the Current Week in TimeClock Plus .........................................................................18 Review the TimeClock Activity Log ....................................................................................19
4)
i

Transferring Time Transactions to Eagle Payroll ....................................20
Transfer Time Transactions...................................................................................................20 Create the Time Transaction File .................................................................................20 Merge the Time Transaction File .................................................................................21
Review the Log Information .................................................................................................22
5) Using TimeClock with Other Payroll Packages .........................................24
6) Troubleshooting.............................................................................................25
Eagle Error Messages............................................................................................................25 Function TCLOCK, Sign In, and Sign Out Error Messages ........................................25
TimeClock Activity Log .......................................................................................................26 TimeClock Activity Log Messages..............................................................................27
TimeClock Plus Error Messages ...........................................................................................28 File Transfer Error Messages .......................................................................................28 Merge Error Messages .................................................................................................29
Retry a Failed Transfer..........................................................................................................30 Commonly Asked Questions.................................................................................................30
ii

1 Using This Guide
The purpose of this guide is to help you set up your system to transfer time and attendance information between your Activant Eagle™ system and the TimeClock Plus™ application.
This chapter describes how to use this guide. It includes: • a TimeClock overview • guidelines on who should use this guide • organization of the guide • conventions used throughout the guide • other resources for information, help, and training
TimeClock Overview
TimeClock is a software application you use to clock in and clock out, similar to punching a timecard. In addition, you can transfer time transaction information between your Eagle system and the PC running TimeClock Plus. TimeClock Plus is a third-party software program from Data Management, Inc. (DMI).
On your Eagle system, employees clock in and clock out. This information is transferred to a PC on your network running TimeClock Plus. Once the information has been transferred, there are a variety of tools within TimeClock Plus to help you manage employee time transactions.
If you use the Activant Eagle™ Payroll application, you can transfer work hours to Payroll at the end of the pay period.
Note: If you want to use TimeClock Plus with a payroll processor (for example, ADP), contact your Activant Direct representative at 1(800) 538-8597. You will need to purchase a communication module and then install and set up the module. For more information about the installation and set up process, refer to Chapter 5 “Using TimeClock with Other Payroll Packages.”
1

The following is an overview of the TimeClock process.
Time transaction information is merged into
TimeClock Plus.
Time transaction information is
automatically sent to a temporary file on the TimeClock Plus PC.
Employees clock in and clock out on the Eagle system when their shift
begins or ends, or they go on break.
At the end of a pay period, time transactions are transferred from the
TimeClock Plus PC to the Eagle payroll system
(optional).
2

Who Should Use This Guide
This guide is for anyone responsible for setting up or monitoring time and attendance using TimeClock Plus.
How This Guide Is Organized
The following table presents a brief description of each chapter in this guide.
In this chapter You will find 1—Using This Guide The structure and conventions used in this
guide that will help you find the information you need.
2—Setting Up TimeClock Instructions for getting your system ready to enter time transactions and transfer information using the TimeClock software.
3—Clocking In and Clocking Out Instructions for clocking in/clocking out and reviewing the error log.
4—Transferring Time Transactions to Eagle Payroll
Instructions for transferring information from the TimeClock Plus program to your Eagle system.
5—Using TimeClock with Other Payroll Packages
Instructions for purchasing and downloading the interface module so you can use TimeClock with other payroll packages.
6—Troubleshooting Information that you can use to help you solve problems and interpret error messages.
Conventions Used In This Guide
The following style conventions should help you use the guide more efficiently.
Convention Description Entries Actual entries you type at the terminal
keyboard appear in boldface type. For example, type TCLOCK.
Important Important information describes the consequences of completing or not completing a procedure. For example, if you delete an item you also delete the sales history. Important information begins with
this symbol
3

Keys The keys you press to perform a function appear in boldface type inside angle brackets. For example, press <Enter>.
Messages The messages and prompts you receive from the system are presented in special type. For example, THIS RECORD HAS BEEN ADDED.
Multistore Multistore user notes contain special information. For example, a multistore user note may tell you to repeat a procedure for each store on your system.
Notes Notes contain special information. For example, a note may tell you to skip a procedure if you do not have a certain software package.
Tips Tips provide an alternate method for completing a task.
Where To Get Help
Use the following table to help you turn to the right source when you have questions.
For questions about Do the following Setting up the Eagle system for TimeClock Check this guide and QuickTip videos. If
you cannot find the answer, call the Eagle Advice Line at 1(800) 322-3077.
An error message or solving a problem Check this guide and QuickTip videos. If you cannot find the answer, call the Eagle Advice Line at 1(800) 322-3077.
Training courses and seminars Visit www.activant.com/eaglecustomers to view available online training or call your IS (Implementation Specialist) at 1(800) 322-3077. See detailed instructions below in “Training Courses and Seminars.”
Clocking in or clocking out Check this guide and QuickTip videos. If you cannot find the answer, call the Eagle Advice Line at 1(800) 322-3077.
Transferring information from the TimeClock Plus PC to your Eagle system
Check this guide and QuickTip videos. If you cannot find the answer, call the Eagle Advice Line at 1(800) 322-3077.
Using the TimeClock Plus software Refer to your TimeClock Plus for Windows manual or online help. If you cannot find the answer, call the Eagle Advice Line at 1(800) 322-3077.
4

Viewing QuickTip Videos
In addition to this guide and online help, video tutorials are also available. These tutorials are called QuickTip videos and they display as a short video clip. You can access the videos in two ways: from your local version of the Training Browser or from the web version of the Training Browser.
To access the QuickTip videos for TimeClock Plus from your local version of the Training Browser, follow this procedure:
1. From the Eagle Browser window, click Training. The Eagle Training Browser window displays.
2. Click “App Map” and in the Application Map window, click the TimeClock Plus icon.
3. A window displays with the various TimeClock Plus training materials. From the list of videos, select the one you want to view.
To access the QuickTip videos from the web version of the Training Browser, follow this procedure:
1. At a client PC that has Internet access, from the Eagle Browser window, in the Launch box, type www.activant.com/eaglecustomers.
2. The Eagle Customer Site screen displays. In the Quick Links box, click Eagle Training Browser. The web version of the Training Browser displays.
3. Click “App Map” and in the Application Map window, click the TimeClock Plus icon.
4. A window displays with the various TimeClock Plus training materials. From the list of videos, select the one you want to view.
Training Courses and Seminars
In addition to this guide and online help, Activant Learning Solutions offers courses and seminars to help you learn about TimeClock Plus. Refer to their web page for more information:
http://www.activant.com/eaglecustomers/education/training_index.html
You can also access this page from the Activant home page (www.activant.com):
1. From the Customers Login drop-down, select Eagle.
2. From the Eagle Customer site, select Learning Solutions.
3. From the Learning Solutions page, you have various options for looking up courses and seminars that are offered for all areas of the Eagle system, including TimeClock Plus.
5
If You Have Comments About This Guide
Comments?
As you use this guide to work with and learn more about the TimeClock Plus application, we hope you find it helpful. If you have suggestions for what should be included in this guide, or if you find content that is incorrect or incomplete, please let us know.
Send an email with your comments to this address:
[email protected] We will review your suggestions and consider them for future updates of this guide. Thank you!
6

2 Setting Up TimeClock
This chapter describes the steps to set up the TimeClock application on your system. It includes how to: • set up security • set up the default upload directory for Payroll • add employee information on the Eagle system and TimeClock Plus • set up to receive TimeClock notification by email (SCO systems only)
Complete the setup procedures in this chapter only after you have installed the TimeClock programs. Refer to the TimeClock Plus Install and Conversion Guide (EL 2155/2156) for the installation procedures.
Set Up Security
To access Functions TCLOCK, CIN, or COUT, you need to add the following security bit(s) to your user ID in Function MSE (Modify Security File) or in the Security Maintenance window (Eagle for Windows): • Bit 384 - allows access to Function TCLOCK • Bit 385 - allows access to Function CIN and Clock In from Eagle Browser • Bit 386 - allows access to Function COUT and Clock In from Eagle Browser • Bit 91 - restricts access to Function CDT (Change Date and Time). If an employee does
not have bit 91, they cannot change the time before clocking in or out.
Set the Payroll Default Upload Directory
If you use Eagle Payroll to upload time transactions, you must set the default upload directory.
1. Start the TimeClock Manager.
2. From the menu bar, select Reports.
3. From the Reports Menu, select Pay Period. The TimeClock Reports window displays.
4. Select the Export button at the bottom of the screen. The Export Payroll Data screen displays.
5. In the Export Format field, select Triad Payroll Export.
7

6. In the Export Filename field, type C:\3APPS\HOURFILE.
7. Click the Process button at the bottom of the screen.
8. Close the window.
Add Employee Information
This section describes how to set up employee numbers and department/job codes on your Eagle system and TimeClock Plus program.
You must have the same employee numbers and department/job codes on each system. If you do not, information cannot be transferred.
Tip: For additional information on adding employee information, view the Quick Tip videos. For additional information on Quick Tip videos, see Chapter 1 “Viewing QuickTip Videos.”
Add Information to the Eagle System
This section describes how to add TimeClock employee numbers and department/job codes to each employee User ID (in Function MUR or the Security Maintenance window). The User ID is required when clocking in and clocking out.
Before you begin, print a list of your employee numbers and department codes from Function PEMU (if you use the Eagle Payroll application). You can view employee information in Function PEMU, Option 2, or print the information in Function PEMU, Option 4.
You can add information using Function MUR or in the Security Maintenance window. Both methods are described in this section.
Security Maintenance Window
To add employee numbers and department/job codes using the Security Maintenance window, do the following:
1. From the Eagle Browser, click System Management Menu, then click Security Maintenance.
2. From the Security Maintenance window, click Misc. Click Add/Change/Delete User, then click Change a User.
3. In the Select a Store field, leave the default of 1 if you only have one store, or select the appropriate store if you are multistore. Then click OK.
4. In the User field, select the user name for an employee from the drop-down list, and click OK.
8

5. At Employee Number, type the number you use to identify this employee in Function PEMU. If you do not use the Eagle Payroll application, you still must enter an employee number. You create your own employee numbering scheme.
6. At Department/Job Code, type the department number from Eagle Payroll or assign a job code to this employee. This field is optional. If you do not enter a department/job code for an employee, they will need to enter their department/job code each time they clock in. This field is numeric only. Enter a maximum of ten numbers.
If you do not know the Eagle Payroll department code, display the employee in Function PEMU, Option 2. The department code is in field 18 on Screen 1.
For example: A department/job code can be: • The existing department codes already used in Eagle Payroll. Use these
department codes as job codes in TimeClock Plus. • A set of codes you create, based on how you would like to categorize the
employees. Examples of employee categories are the following: • The different jobs employees do in your organization, such as bookkeeping,
POS clerk, department manager etc. • The different store locations • Hourly vs. salaried employees • Or some combination of the above
Keep in mind that you will be able to use the codes to run reports to specify data for a specific job code category. You define these job codes in TimeClock Plus. See the sections “Create a Master Job Code List” and “Link Job Codes to Employee Records” later in this chapter.
7. Click <Change>.
8. Repeat steps 2 through 7 for each employee.
Multistore: Link employee numbers and department/job codes for all stores the employee will be clocking in and clocking out.
9. Continue with the section “Add to TimeClock Plus” to enter employee information that will be used by the TimeClock Plus program.
Function MUR
To add employee numbers and department/job codes using Function MUR, do the following:
1. At the Main Menu, or from Network Access at the Function prompt, type MUR and press <Enter>.
2. At User, type the User ID for an employee and press <Display>.
3. At Employee Number, type the number you use to identify this employee in Function PEMU. If you do not use the Eagle Payroll application, you still must enter an employee number. You create your own employee numbering scheme.
9

4. At Department/Job Code, type the department number from Eagle Payroll or assign a job code to this employee. This field is optional. If you do not enter a department/job code for an employee, they will need to enter their department/job code each time they clock in. This field is numeric only. Enter a maximum of ten numbers.
If you do not know the Eagle Payroll department code, display the employee in Function PEMU, Option 2. The department code is in field 18 on Screen 1.
For example: A department/job code can be: • The existing department codes already used in Eagle Payroll. Use these
department codes as job codes in TimeClock Plus. • A set of codes you create, based on how you would like to categorize the
employees. Examples of employee categories are the following: • The different jobs employees do in your organization, such as bookkeeping,
POS clerk, department manager etc. • The different store locations • Hourly vs. salaried employees • Or some combination of the above
Keep in mind that you will be able to use the codes to run reports to specify data for a specific job code category. You define these job codes in TimeClock Plus. See the sections “Create a Master Job Code List” and “Link Job Codes to Employee Records” later in this chapter.
5. Press <Change>.
6. Repeat steps 2 through 5 for each employee.
Multistore: Link employee numbers and department/job codes for all stores the employee will be clocking in and out.
7. Press <End> to exit.
Continue with the next section to enter employee information that will be used by the TimeClock Plus program.
Add to TimeClock Plus
You must set up the following before using TimeClock to clock in:
• Create a master job code list
• Add employee records
• Link job codes to employee records
Note: You must have the same employee numbers and department/job codes set up on both your Eagle system and in the TimeClock Plus program.
10

Create a Master Job Code List
1. Open the TimeClock Manager program. Click the Start button and then point to Programs. Point to the TimeClock Plus 4.0 folder and then click TimeClock Manager.
2. On the Configuration menu, click Master Job Code List.
If this is a new installation of TimeClock, job codes may not display. We recommend adding job codes for sick time and vacation time. However, you cannot use these codes to clock in. You must create at least one additional code.
If this is not a new installation, the codes mentioned above (if already set up in your system) should display.
3. Click Add. Add job codes to: • define your Eagle Payroll departments or • represent the various jobs that employees do at your company
Tip: If you want to process payroll by location, use the job code or the employee number to indicate the location. For example, use the first number of the employee number to indicate the store location. Store 1 employees would then be numbers 101, 102, 103 and so on. Store 2 employees would be 201, 202, 203, and so on.
Refer to the TimeClock Plus for Windows manual (or TimeClock Plus online help) for more information about adding these codes.
4. Click Exit when you have completed adding job codes.
Add Employee Records
Add employee records to TimeClock Plus to match the Eagle system.
1. On the Employee menu, click Add.
2. At Employee Number To Add, enter the Employee Number from your Eagle system (created in either Function MUR or the Security Maintenance window). This field must match the code from your Eagle system.
3. Click OK. The Personal Information screen displays.
4. Click anywhere in the Employee Code field (on the right side of the screen).
5. Enter the Employee Number from your Eagle system (created in either Function MUR or the Security Maintenance window). This field must match the code from your Eagle system.
6. Fill in the rest of the Personal Information fields. Do not click OK.
Refer to your TimeClock Plus for Windows manual (or TimeClock Plus online help) for more information about adding employees.
11
7. Continue with the next section. Do not click OK.
Link Job Codes to Employee Records
You must link job codes to the employee record so the TimeClock Plus program can compare them to the Department/Job Code field in your Eagle system (either Function MUR or the Security Maintenance window) when employees clock in.
1. With the Personal Information screen displayed, click on the Jobs tab to display the Job Code screen.
If this is a new installation of TimeClock, job codes may not display. We recommend adding job codes for sick time and vacation time. However, you cannot use these codes to clock in. You must create at least one additional code.
If this is not a new installation, the codes mentioned above (if already set up in your system) should display.
2. Click Add.
3. Enter a job code from the Master Job Code List.
4. Click OK.
You have now completed the setup procedures and are ready to use TimeClock on your Eagle system. Chapter 3 explains how to clock in and clock out.
If you are using Eagle email software, continue with the next section before reading Chapter 3.
Receive TimeClock Notification By E-Mail
Eagle SCO systems only:
If you are using Eagle E-mail software on an Eagle SCO system, you can receive an e-mail message if clock in or clock out errors occur. If you are not using e-mail on an Eagle SCO system, skip to Chapter 3 “Review the TimeClock Activity Log” for information about reviewing error messages.
To receive information by e-mail, do the following:
1. At the Main Menu, or from Network Access at the Function prompt, type MAILOPT and press <Enter>.
2. Press <Next Screen> to display the second screen.
3. At Time Clock Notification, enter the E-Mail Login Name or distribution list to whom you want TimeClock errors reported.
4. Press <Change>. Press <End> to exit the screen.
12

3 Clocking In and Clocking Out
This chapter describes how to clock in and out on your Eagle system. It describes the procedures on how to: • clock in and out using various methods • review who has clocked in • close the week • review the activity log
About Clock In and Clock Out
There are two methods available for clocking in and clocking out. The first method is to use any terminal connected to your Eagle system to access the CIN and COUT functions or the Clock In and Clock Out windows from the Eagle Browser window. The second method is to use a PC and the TimeClock Plus program. It is important that you review these two methods and determine which method each of your employees will use.
Important
An employee must use only one method of clocking in and out. You should not, for example, clock in using the Eagle TimeClock software (Function CIN or the Eagle Browser) and clock out using the TimeClock Plus software. If you do, your Eagle system will not know that you have clocked out and will not allow you to clock in again until you have correctly clocked out.
The following sections in this guide describe the clocking in and clocking out procedure using Function CIN and Function COUT, and the Clock In and Clock Out buttons in the Eagle Browser window. For more information about clocking in and clocking out using the TimeClock Plus software on a PC, refer to the TimeClock Plus for Windows manual.
Tip: For additional information on clocking in and clocking out, view the Quick Tip videos. For more information, see Chapter 1 “Viewing QuickTip Videos.”
13

Clock In Using the Eagle Browser
You clock in at the start of your shift or at the end of a break at any PC with an Eagle Browser window. To clock in, do the following:
1. From the Eagle Browser window, click the Clock In button on the toolbar (or select Clock In from the Action menu). The Eagle Clock In window displays.
2. Type your name and password.
3. At Department/Job Code, do one of the following: • If your default department/job code has already been entered in Function MUR
or the Security Maintenance window, you can skip this step. • If your default department/job code has not been entered in Function MUR or the
Security Maintenance, type it in this field now. • If you have multiple job codes assigned and want to clock in using a code other
than the default code, enter it now.
4. At Signon to Terminal, select N or Y. Select N if you want to clock in only. Select Y if you want to clock in and also sign on to this terminal.
5. Click Clock In on the toolbar (or select Clock In from the Action menu). A message displays indicating that the user is clocked in.
Clock Out Using the Eagle Browser
You clock out at the end of your shift or at the start of a break at any terminal connected to your Eagle system.
Note: Clock Out (F10) does not sign you off the terminal. Use Sign Off (F8) if you want to also log off from the terminal.
14
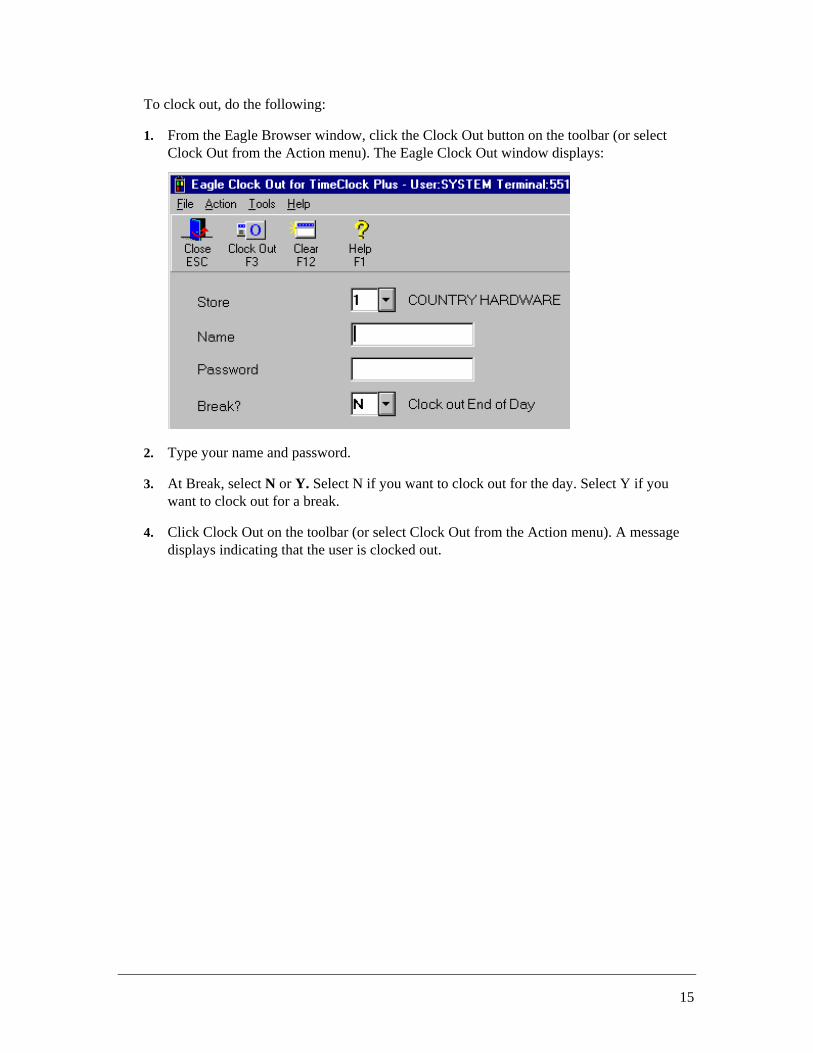
To clock out, do the following:
1. From the Eagle Browser window, click the Clock Out button on the toolbar (or select Clock Out from the Action menu). The Eagle Clock Out window displays:
2. Type your name and password.
3. At Break, select N or Y. Select N if you want to clock out for the day. Select Y if you want to clock out for a break.
4. Click Clock Out on the toolbar (or select Clock Out from the Action menu). A message displays indicating that the user is clocked out.
15
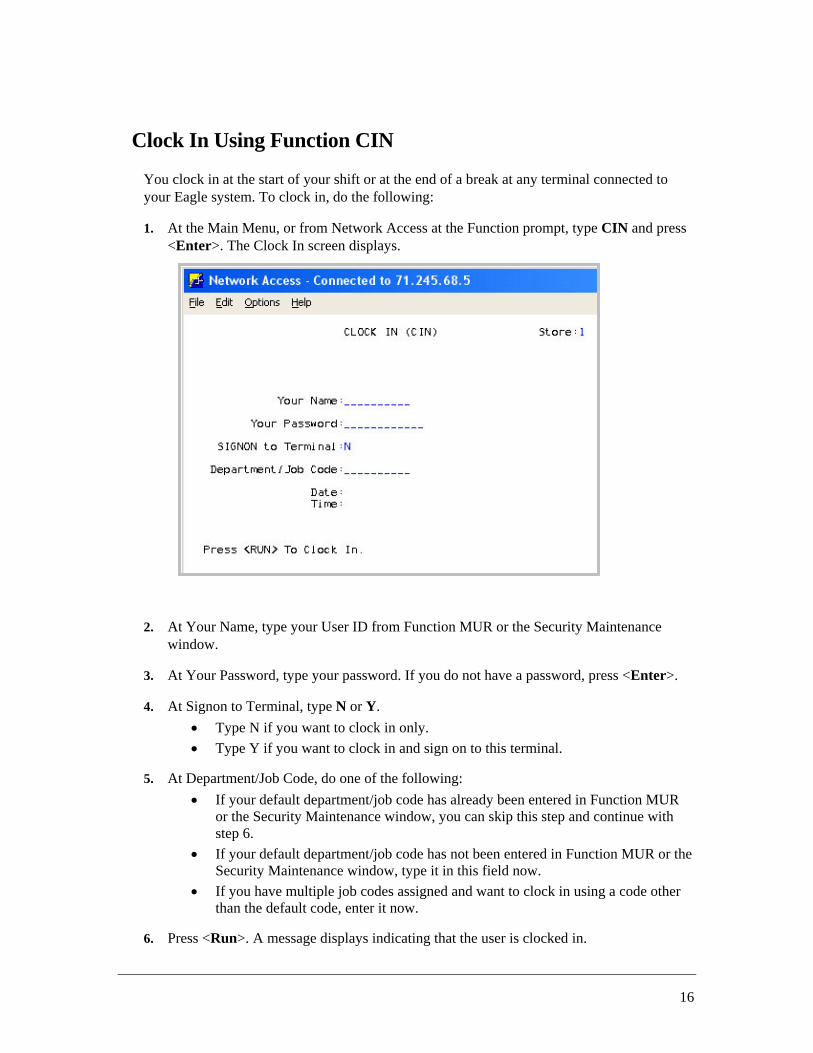
Clock In Using Function CIN
You clock in at the start of your shift or at the end of a break at any terminal connected to your Eagle system. To clock in, do the following:
1. At the Main Menu, or from Network Access at the Function prompt, type CIN and press <Enter>. The Clock In screen displays.
2. At Your Name, type your User ID from Function MUR or the Security Maintenance window.
3. At Your Password, type your password. If you do not have a password, press <Enter>.
4. At Signon to Terminal, type N or Y. • Type N if you want to clock in only. • Type Y if you want to clock in and sign on to this terminal.
5. At Department/Job Code, do one of the following: • If your default department/job code has already been entered in Function MUR
or the Security Maintenance window, you can skip this step and continue with step 6.
• If your default department/job code has not been entered in Function MUR or the Security Maintenance window, type it in this field now.
• If you have multiple job codes assigned and want to clock in using a code other than the default code, enter it now.
6. Press <Run>. A message displays indicating that the user is clocked in.
16

Clock Out Using Function COUT
You clock out at the end of your shift or at the start of a break at any terminal connected to your Eagle system.
Note: Function COUT does not sign you off the terminal. Use Function SIGNOFF if you want to also log off from the terminal.
To clock out, do the following:
1. At the Main Menu, or from Network Access at the Function prompt, type COUT and press <Enter>. The Clock Out screen displays.
2. At Your Name, type your User ID from Function MUR or the Security Maintenance window.
3. At Your Password, type your password. If you do not have a password, press <Enter>.
4. At Break?, type N or Y. • Type N if you are clocking out at the end of your shift. • Type Y if your are clocking out for a break.
5. Press <Run>. A message displays indicating that the user is clocked out.
17

Review the Who’s Here List
Once an employee has clocked in on the Eagle system, the information automatically transfers to the TimeClock Plus PC. This section describes how to access the Who’s Here list in TimeClock Plus to verify who has clocked in. For more information about using the Who’s Here list, refer to your TimeClock Plus for Windows manual.
To view the TimeClock Plus Who’s Here list, do the following:
1. Open the TimeClock Manager.
2. From the Tools menu, click Who’s Here. A list of clocked in employees displays.
3. Review the list of employees. If an employee has clocked in but you do not see the information displayed, refer to the troubleshooting information in Chapter 6 for help.
4. Click Exit to close the Who’s Here list.
Close the Current Week in TimeClock Plus
The TimeClock system requires you to close your week once every week, regardless of when your pay period ends. The information is not lost, only moved to a history file and is always available for transferring to the Eagle system.
You can close the week anytime up to seven days after the end of that week. If you do not close the week, however, employees will be unable to clock in or clock out.
To close a week in TimeClock Plus, do the following at the TimeClock Plus PC:
1. Open the TimeClock Plus Manager.
2. From the File menu, click Close current week. An alert message appears and indicates which week you are about to close.
3. Click Yes to continue. The week closes.
4. Click Complete to close the window.
Refer to your TimeClock Plus for Windows manual for more information on closing the current week.
18

Review the TimeClock Activity Log
When an employee clocks in or out, the information displays in the TimeClock Activity Log. If an employee has trouble clocking in, you can review this log for information about the problem.
Note: The TimeClock Activity Log is limited to 2000 lines and old information is cleared by nightly maintenance. This information is not printed on the bootlog.
To review the TimeClock Activity Log, do the following:
1. At the Main Menu, or from Network Access at the Function prompt, type SHOWLOG and press <Enter>.
2. Down arrow to highlight the TimeClock Activity Log and press <Enter>. The log displays.
3. Review the log for any error messages. For information about the error messages, refer to the troubleshooting information in Chapter 6.
Note: You can print information from the log. In the Network Access window, click the Print button.
4. Close the log. To do this from the Network Access window, click the End button twice.
19

4 Transferring Time Transactions to Eagle Payroll
This chapter describes how to transfer time transactions from the TimeClock Plus program to your Eagle Payroll system. If you are not using Eagle Payroll, skip to Chapter 5.
This chapter includes information on how to: • create the time transactions file you will export from the TimeClock Plus program to your
Eagle system • merge the time transactions into your Eagle Payroll system • check for error messages in the TimeClock Activity Log
Transfer Time Transactions
At the end of each pay period, transfer your time transactions to the Eagle System. To transfer time transactions, you must complete steps to: • create the time transactions file • merge the time transactions file into your Eagle Payroll system
Tip: For additional information on transferring time transactions, view the Quick Tip videos. For more information, see Chapter 1 “Viewing QuickTip Videos.”
Create the Time Transaction File
To create the time transaction file, do the following on the TimeClock Plus PC.
Note: If you are using the Eagle Payroll application, Function PTTU must be cleared of any transactions before creating the time transaction file.
1. Open the TimeClock Manager.
2. From the toolbar, select Export, then select Pay Period from the Exports menu. The TimeClock Period Export window displays.
20

3. From Export format list, click Triad Payroll Export.
4. Using the drop-down box in the upper right corner, select the pay period you want to close. Dates are entered in the Print Reports From fields based on the pay period you selected.
5. In the Export filename field, type C:\3APPS\HOURFILE.
Note: Do not select the Split export by job code box.
6. Optional: If you are processing payroll by location, click Criteria. Enter the employee number or job code range for the location you want to process. Click OK.
7. Click Process. A status window displays and closes when processing is complete.
8. Click Exit to close the window.
9. Click Exit again to close the window.
Merge the Time Transaction File
To merge the time transactions file into your Eagle Payroll system, complete the following procedure from your Eagle system.
1. From Network Access, from the File menu, click Payroll Upload.
2. On the File menu, click Payroll Upload. The Upload File dialog displays. A message displays when the transfer is complete. Click OK.
21

Note: If the file already exists, a prompt displays asking you if you want to upload the new file over the existing file.
3. From Network Access at the Function prompt, type PTTU and press <Enter>.
4. Type 6 (for Generate Standard Payroll) and press <Enter>.
5. At the prompt, Generate From TimeClock?, type Y and press <Enter>.
6. At the prompt, Pay Salaried Employees Salary?, type Y or N. • If you type Y, Function PTTU does not use the regular hours from TimeClock
and it creates a transaction with zero regular hours. Continue with step 7. • If you type N, the employee is like an hourly employee and the regular hours
from TimeClock are transferred to the regular hours for the payroll transaction. Skip step 7 and go to step 8.
7. At the prompt, Adjust for Vacation, Sick, and Holiday Hours?, type Y or N.
This question only applies to salaried employees and not to hourly employees. • If you type Y, then salaried employees will have these hours subtracted from
the SAL (salaried) hours on their check. They will not get extra pay for these hours. However, they do get overtime, if that applies.
• If you type N, then salaried employees will have these hours added to the SAL (salaried) hours on their check. They will then get paid more than their normal salary.
8. The following prompts display:
1. Pay Period Ending Date
2. Paying Employees With Pay Frequencies
3. Holiday Hours This Period
These are the same questions you would normally see in Function PTTU, #1 (Add Transactions). Enter your answers for these questions and continue with your normal procedure for calculating payroll. For more information, refer to your Payroll Workbook.
Review the Log Information
Information about the time transaction file transfer is recorded in the TimeClock Activity Log. You can access this log by entering SHOWLOG at the Main Menu or from Network Access at the Function prompt. See Chapter 3 “Review the TimeClock Activity Log” for procedures on how to review the log.
The TimeClock Activity Log will record messages about errors that occurred during the file transfer of time transactions from the TimeClock Plus program on the PC to the Eagle system Payroll application.
22

Transfer errors will occur if: • The data is not for a standard payroll transaction. A standard transaction cannot include
an employee record that requires manual distribution to General Ledger. You can determine this by checking Function PCON, field #17. If this field is set to A (for always distribute), then a time transaction record will not be created in Function PTTU. If this field is set to S (for selectively distribute), then a time transaction record will not be created in Function PTTU if Function PEMU, field #39 is set to Y.
• The data is for a terminated employee. • The employee does not fall within the pay frequency selected in Function PTTU. • An employee number or job code in TimeClock does not match the Employee Number or
Department/Job Code fields in Function MUR or the Security Maintenance window.
23

5 Using TimeClock with Other Payroll Packages
This chapter describes how to download the interface module so you can use TimeClock with other payroll packages. Once you complete the download and installation process of the interface module, you will be prompted to print separate instructions on how to set up the module, export data, and view error messages. You should read these separate instructions after installing the module in order to fully understand how to use it.
To download and install the interface module, do the following:
1. Make sure the PC you are using has Internet access.
2. Launch the TimeClock Manager.
3. Log in as a Supervisor.
4. Go to Launch and then open Auto Update. The Auto Update window displays.
5. On the Auto Update window, click Modules. The system exits from TCP Manager and the Module Download window displays.
6. Enter your activation code then click OK. The system will install the module and add it to the list of available modules in your Module Manager. To use the module, you must set it up through the Module Manager. You will be prompted to print the instructions on how to set up the module.
7. Print and read the instructions to set up the module.
24

6 Troubleshooting
This chapter provides information about solving TimeClock error messages, including how to: • solve problems on your Eagle system • solve problems on your TimeClock Plus PC • retry a transfer after you have corrected an error • find answers to commonly asked questions
You can receive email notices of clock in and clock out errors. See Chapter 2 “Receive TimeClock Notification by Email” for more information.
Eagle Error Messages
This section describes error messages that may display in Function TCLOCK, when clocking in or clocking out, or in the Application Error Log.
Function TCLOCK, Sign In, and Sign Out Error Messages
The following table includes a list of error messages. In the Problem/Solution column is a description of the problem that caused the error along with a solution.
Error Message Problem/Solution Program access not available, please press <enter>
The TimeClock package is not installed.
Program access not allowed, please press <enter>
You may not have the security required to access these screens. See Chapter 2 “Set Up Security.”
Individual is already clocked in This employee has already clocked in. They must clock out before they can clock in again.
Password invalid The password you typed is invalid. Try retyping the password again. If you still receive this error message, contact your manager to correct your password in Function MUR or the Security Maintenance window.
25

Transaction saved. Connection attempt to TimeClock server failed.
The TimeClock PC is not working, its Network (IP) address is incorrect, or WarFTP is not running. To verify the Network Address, refer to the TimeClock Plus Install and Conversion Guide (EL 2155/2156) section “Eagle Function TCLOCK Set Up.”
Transaction Saved. TimeClock Plus server is offline or mis-configured.
AutoImport is not running or is not set up correctly. Transaction will automatically be retried.
Department/job code required You did not enter a department/job code when signing in and there is no default code set up (in Function MUR or the Security Maintenance window). You need to enter a department/job code when clocking in, or set up a default.
Invalid job code The job code entered is not set up in TimeClock Plus, was entered incorrectly, or is not set up as “clockable” in TimeClock Plus.
Invalid name The User ID you entered is not set up in Function MUR or the Security Maintenance window.
User not clocked in The employee has not clocked in. You cannot clock out without first clocking in.
Individual is already clocked out The employee has already been clocked out. No TCLOCK record for Store: You need to set up Function TCLOCK for
the store indicated in the error message.
TimeClock Activity Log
Information about clocking in, clocking out, and the time transaction file transfer is recorded in the TimeClock Activity Log. You can access this log by entering SHOWLOG at the Main Menu or from Network Access at the Function prompt. See Chapter 3 “Review the TimeClock Activity Log” for procedures.
The TimeClock Activity Log will record messages about successful clock in and clock out records created and transferred to TimeClock Plus. In addition, messages are generated for errors that occurred during the file transfer of time transactions from TimeClock Plus to the Eagle Payroll application.
Transfer errors will occur if: • The data is not for a standard payroll transaction. A standard transaction cannot include
an employee record that requires manual distribution to G/L. You can determine this by checking Function PCON, field #17. If this field is set to A (for always distribute), then a time transaction record will not be created in Function PTTU. If this field is set to S (for
26

selectively distribute), then a time transaction record will not be created in Function PTTU if Function PEMU, field #39 is set to Y.
• The data is for a terminated employee. • The employee does not fall within the pay frequency selected in Function PTTU.
For example: The employee is set up as a weekly pay frequency in Function PEMU, field #15, but bi-weekly was specified to be paid in Function PTTU.
• Function PTTU is not cleared of any time transactions before creating the time transaction file. The message, TIME TRANSACTIONS ALREADY EXIST, will display in the log.
• An employee number or job code in the TimeClock Manager does not match the Employee Number or Department/Job Code fields in Function MUR or the Security Maintenance window.
TimeClock Activity Log Messages
The following table includes a list of error messages. In the Problem/Solution column is a description of the problem that caused the error along with a solution.
Error Message Problem/Solution Clock in already exists for “user name” This employee has already clocked in. He
must clock out before he can clock in again. Could not transfer clock in The TimeClock PC is not working or the
Network Address in Function TCLOCK is incorrect. To verify the Network Address, refer to the TimeClock Plus Install and Conversion Guide (EL 2155/2156) section “Eagle Function TCLOCK Set Up.”
Invalid job code The Department/Job code in Function MUR or the Security Maintenance window does not match a job code assigned to the employee record on the TimeClock Plus system.
Invalid employee name or number The Employee Number from Function MUR or the Security Maintenance window does not match the TimeClock Employee Number.
Invalid employee code The Employee Number from Function MUR or the Security Maintenance window does not match the Employee Code field on the employee record in TimeClock Manager.
Clock out already exists – see supervisor The employee has already been clocked out.
27

Connection timed out The Network Address in Function TCLOCK
is incorrect. To verify the Network Address, refer to the TimeClock Plus Install and Conversion Guide (EL 2155/2156) section “Eagle Function TCLOCK Set Up.”
EMPLOYEE ID, ACTIVITY, DATE, TIME, STORE
This information is listed before an error message. It tells you the employee who attempted to clock in or out and when it was attempted. For example, the entry for employee 1234 who attempted to clock in on June 12, 1998 at 10:15 in Store 1 is: 1234, I, 19980612, 1015, 1 The Activity code for clock in is I. For clock out, the code is O. For clocked out for a break, the code is B.
TimeClock Plus Error Messages
This section describes error messages you may receive when time transactions are transferred and merged on the TimeClock Plus PC.
File Transfer Error Messages
To display error messages that may have occurred when the time transactions were transferred between the TimeClock Plus PC and the Eagle system, do the following:
1. Open the WAR-FTPD Server. Double click the icon to open the WAR-FTPD Server.
The WAR-FTPD Server icon is found on the status area of your Windows taskbar and looks similar to the icon below:
2. Review the messages in the lower portion of the window. If you do not understand the error messages, or do not know how to correct them, contact the Eagle Advice Line at 1(800) 322-3077.
28

If you receive an error message in the WAR-FTPD Server error log, you may have to post the time transaction manually in the TimeClock Plus Manager program. Refer to your TimeClock Plus for Windows manual for help posting manual time transactions.
Merge Error Messages
To display error messages that may have occurred when time transactions were merged into TimeClock Plus, do the following:
1. Open the TimeClock Plus Auto Import window. Double click the icon to open the TimeClock Plus Auto Import window.
The TimeClock Plus Auto Import icon is found on the status area of your Windows taskbar and looks similar to the icon below:
2. The window is divided into two sections. The top section displays each time transaction that the system imported from your Eagle system. The bottom section displays any error messages that occurred when the time transaction was imported.
Review the Reason for Failure column in the bottom section. If you do not understand the error messages, or do not know how to correct them, contact the Eagle Advice Line at 1(800) 322-3077.
29

Retry a Failed Transfer
If you receive an error message while clocking in or out on your Eagle system, you may need to retry the transfer after the error is corrected. Your Eagle system will automatically retry the transfer based on the information you have set up in Function TCLCOK. You can also manually stop or start a transfer by pressing the <Query> and <Run> keys in Function TCLOCK.
Commonly Asked Questions
This section presents the answers to some commonly asked questions about TimeClock.
How do I round clock in and clock out times?
To round clock in and clock out times, do the following on the TimeClock PC:
1. Open the TimeClock Manager.
2. On the Employee menu, click Edit, and then click the Restrictions tab. Under Auto Rounding, choose one of the following: • round clock in time • round clock out time • round both clock in and clock out times.
3. Enter the minute(s) to round and at what point the rounding will take affect. Breaks are not affected by rounding time.
For example: By setting the clock in time to round to the nearest 15 minutes, and you round up at the eighth minute, you could:
30

• clock in at 8:07 but have the TimeClock program round it to 8:00 • clock in at 8:09 but have the TimeClock program round it to 8:15
I am on a bi-weekly, semi-monthly, or monthly pay frequency, must I close the current period each week?
Yes, you must close your week every week. Current Week actually means the TimeClock Week, not the calendar week (based on the starting day specified during TimeClock Plus installation). However, when the actual date passes the start day by seven days, you must close the Current Week. The information is not deleted, just moved to a history file. When it is time to calculate payroll, all the information is available.
Our Current Week ends on Saturday, but no one can close the week until Monday or Tuesday, is that okay?
Yes, you have up to seven days after the end of the Current Week to close. After seven days, employees will not be able to clock in or out until the week is closed.
31