timber - historic england · most of the timber-frame buildings that have survived are of...
TRANSCRIPT

TIMBER_22322_12 JULY.indd ATIMBER_22322_12 JULY.indd A 15/07/2011 15:0015/07/2011 15:00
ENGLISH HERITAGENGLISH HERITAGEE PRACTICAL BUILDING CONSERVATION
TIMBER

TIMBER_22322_12 JULY.indd 14TIMBER_22322_12 JULY.indd 14 13/07/2011 03:5013/07/2011 03:50
PRACTICAL BUILDING
CONSERVATION
14
Heartwood development
These sections of pine from the west midlands of England have been stained to show heartwood development. The small section (about 15 cm under bark) is from a 20-year-old tree and a small area of heartwood (the central red spot) is just developing.The larger section (about 19 cm under bark) is from a 35-year-old tree, but the heartwood zone is still small compared to the surrounding sapwood.
Juvenile wood differs from mature wood in a number of ways. It has reduced density, so it is less strong. It also has a different orientation of the bundles of microscopic cellulose fibres (microfibrils) that form the wood cell wall. In mature wood, these fibres are orientated more or less parallel to the longitudinal axis of the tree, so that when a plank is cut from the tree its shrinkage in that direction will be minimal. In juvenile wood, the microfibrils are shorter and at a much shallower angle, which can lead to significant longitudinal shrinkage. Weakness and distortion (particularly twisting) in modern fast-grown and young timber is often caused by its high juvenile wood content, and therefore small-section timber that includes the core of the tree is probably best avoided.
If a tree is growing in conditions that cause it to lean or bend (perhaps adverse weather or light from one direction), then it will respond by producing abnormal timber, which is known as reaction wood. Reaction wood will also form where there are heavy branches. This is abnormal timber only as far as wood utilisation is concerned; for the tree it is a normal mechanism for resuming vertical growth, controlling the angle of a branch and maintaining the shape of the canopy structure.

TIMBER_22322_12 JULY.indd 15TIMBER_22322_12 JULY.indd 15 13/07/2011 03:5013/07/2011 03:50
Reaction wood
Top: A distorted pine tree producing compression wood on the underside of the bend.
Bottom: Compression wood from a leaning pine tree trunk. The wide growth rings that develop in the compression zone are weaker than normal wood and may fail unexpectedly.
In softwoods, the response is 15 on the underside of the trunk or branch and produces compression wood. The cross-section at that point is ellipsoidal, with the pith appearing close to the top and unusually wide growth rings towards the bottom. The wood has a higher lignin content than normal and this frequently makes it darker.
Compression wood can be a major defect in converted timber. The wood is denser and harder (producing an uneven uptake of stain and splitting when it is nailed), but weaker. It may fail unexpectedly, producing a brash fracture where it snaps without splintering. Compression wood is also much more prone to longitudinal shrinkage and distortion. Longitudinal shrinkage is commonly about 0.1–0.2 % in normal wood, but in compression wood it tends to be about 2 %, and shrinkage by as much as 20 % has been recorded. At the same time, tangential shrinkage may be less than normal, causing high internal stresses. Compression wood may be recognised on a planed surface by faint, irregular lines that cross and displace the grain.
TIMBER MATERIALS & HISTORY OF USE

METHODS OF CONVERTING A LOG INTO BUILDING TIMBERS
heartwood sapwood
BOXED-HEART HALVED QUARTERED
used for posts, beams, purlins, used for girdings, bressumers, used for plates, joists, ridges, rafters plates, ridges, rafters roof truss components, studs,
braces, joists, rafters
shake As a boxed-heart timber dries, shakes that follow the planes of the medullary rays tend to develop towards the centre of each face of the timber
heartwood SAWN DEALS AND PLANKS sapwood
CONVERSION OF CURVED TIMBERS: effect of conversion method on strength
Halved log before conversion
Cleaving and hewing parallel to the grain produces curved timbers, with minimal waste, which could be used as rafters
waste Sawing a curved log produces timbers which are straight, but weaker than hewed timbers of similar section, because of the slope of grain timber weakened in this area by sloping grain
TIMBER_22322_12 JULY.indd 24TIMBER_22322_12 JULY.indd 24 01/11/2011 15:5301/11/2011 15:53
24
PRACTICAL BUILDING
CONSERVATION

SAPWOOD CONTENT OF SAWN TIMBERS
A small proportion of sapwood (and sometimes even bark) might be left on the baulk and retained through subsequent conversion. This sapwood will have been susceptible to wood-boring beetle infestation and it is often the sight of this damaged sapwood that causes alarm, even though the heartwood remains sound. It is not unusual, for example, for an oak window lintel to be condemned because deathwatch beetle damage is visible, but then a chainsaw is required to remove it because the heartwood is as hard as iron. It is important to remember that the beetles cannot normally attack the heartwood of our traditional construction timbers (this subject is discussed in greater detail in Deterioration & Damage). There may be the appearance of widespread degradation, but if it is confined to the sapwood it is unlikely to be of structural significance.
SAPWOOD CONTENT OF CONVERTED TIMBERS
sapwood radially
tangentially sawn board
sawn board heartwood
boxed-heart timber
quartered timber
halved timber
heartwood sapwood
TIMBER_22322_12 JULY.indd 25TIMBER_22322_12 JULY.indd 25 13/07/2011 03:5013/07/2011 03:50
25
TIMBER MATERIALS & HISTORY OF USE

TYPICAL CRUCK FRAME
common rafters purlin
ridge beam
cruck blade
collar
wall plate
arch brace
spur
TIMBER_22322_12 JULY.indd 46TIMBER_22322_12 JULY.indd 46 13/07/2011 03:5213/07/2011 03:52
46
PRACTICAL BUILDING
CONSERVATION
Styles of framing tended to be strongly influenced by local traditions. Cruck-framed buildings are found mostly in the Midlands and the north and west of England, and this basic system of construction (with many variants including the base-cruck and raised-cruck) remained in use for over 400 years.
In cruck-framed buildings the roof was carried by paired timbers or blades, which were normally cut from a single tree. These were usually curved, and rose from the ground or a sill beam (a horizontal beam running along the base of the wall) to the ridge, where they were joined. A collar or tie beam was incorporated to form an ‘A’ frame. Sometimes the collar or tie beam would be extended to carry the purlins and wall plates that supported the rafters. Alternatively, the wall plates might be carried on short, cantilevered components called cruck spurs. The structure was divided into bays and the prefabricated crucks were reared into position. As the crucks transmitted the roof loads directly to the ground, the walls did not always have a load-bearing function, other than to help resist racking in the structure as a whole. Cruck-framed buildings would sometimes be built with walls of stone, earth or even turf.
TIMBER_22322_12 JULY.indd 47TIMBER_22322_12 JULY.indd 47 13/07/2011 03:5213/07/2011 03:52
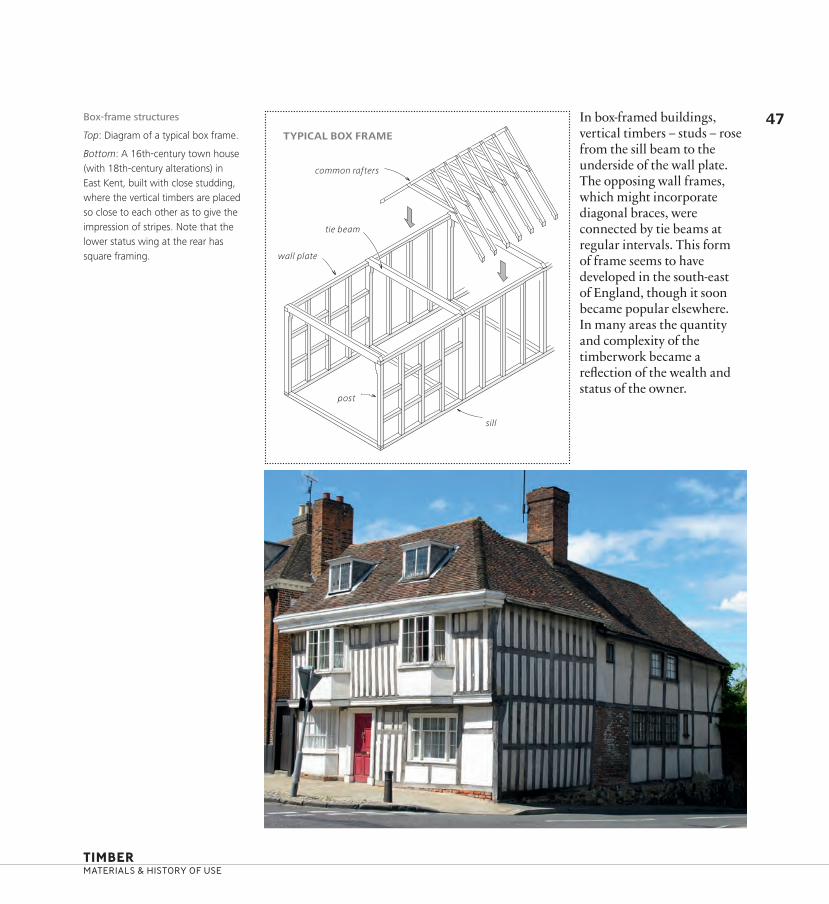
47 In box-framed buildings, vertical timbers – studs – rose from the sill beam to the underside of the wall plate. The opposing wall frames, which might incorporate diagonal braces, were connected by tie beams at regular intervals. This form of frame seems to have developed in the south-east of England, though it soon became popular elsewhere. In many areas the quantity and complexity of the timberwork became a reflection of the wealth and status of the owner.
Box-frame structures
Top: Diagram of a typical box frame.
Bottom: A 16th-century town house (with 18th-century alterations) in East Kent, built with close studding, where the vertical timbers are placed so close to each other as to give the impression of stripes. Note that the lower status wing at the rear has square framing.
TYPICAL BOX FRAME
common rafters
tie beam
wall plate
post
sill
TIMBER MATERIALS & HISTORY OF USE

Most of the timber-frame buildings that have survived are of post-and-truss construction. In this form of construction, wall-frames, cross-frames and purlin roof were combined in an integrated structure. Wall- and cross-frames were stiffened with horizontal rails and diagonal braces. Roof trusses, consisting of principal rafters joined by a tie beam, might also incorporate a collar and struts. Post-and-truss frames are inherently robust and resilient: in theory, you could pick up the building and lay it down on its roof, and, provided the joints held, it would remain intact.
Post-and-truss frame structures
Top: Diagram of a typical post-and-truss frame.
Bottom: Close studding and ornamental braces reflect the prosperity of the owner of this large farmhouse, built between 1576 and 1625 in the West Midlands.
TYPICAL POST-AND-TRUSS FRAME
CROSS FRAME WALLFRAME
bay
truss
post
floor frame
close studding
square panel framing
TIMBER_22322_12 JULY.indd 48TIMBER_22322_12 JULY.indd 48 01/11/2011 15:5301/11/2011 15:53
48
PRACTICAL BUILDING
CONSERVATION
TIMBER_22322_12 JULY.indd 49TIMBER_22322_12 JULY.indd 49 01/11/2011 15:5301/11/2011 15:53
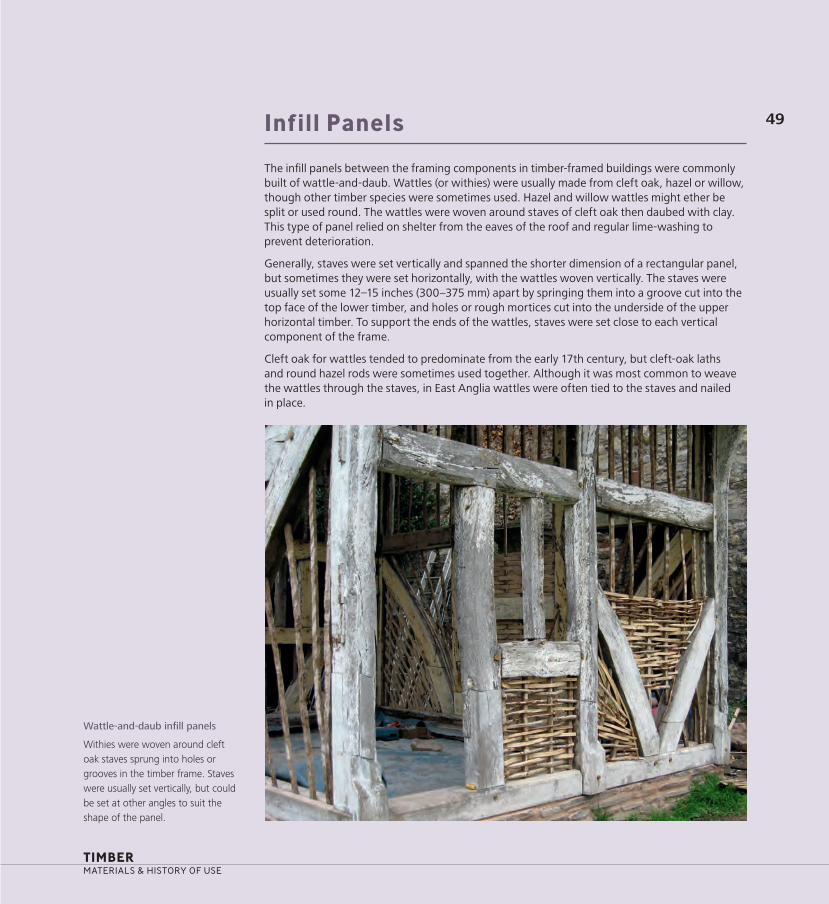
49 Infill Panels
The infill panels between the framing components in timber-framed buildings were commonly built of wattle-and-daub. Wattles (or withies) were usually made from cleft oak, hazel or willow, though other timber species were sometimes used. Hazel and willow wattles might ether be split or used round. The wattles were woven around staves of cleft oak then daubed with clay. This type of panel relied on shelter from the eaves of the roof and regular lime-washing to prevent deterioration.
Generally, staves were set vertically and spanned the shorter dimension of a rectangular panel, but sometimes they were set horizontally, with the wattles woven vertically. The staves were usually set some 12–15 inches (300–375 mm) apart by springing them into a groove cut into the top face of the lower timber, and holes or rough mortices cut into the underside of the upper horizontal timber. To support the ends of the wattles, staves were set close to each vertical component of the frame.
Cleft oak for wattles tended to predominate from the early 17th century, but cleft-oak laths and round hazel rods were sometimes used together. Although it was most common to weave the wattles through the staves, in East Anglia wattles were often tied to the staves and nailed in place.
Wattle-and-daub infill panels
Withies were woven around cleft oak staves sprung into holes or grooves in the timber frame. Staves were usually set vertically, but could be set at other angles to suit the shape of the panel.
TIMBER MATERIALS & HISTORY OF USE

TIMBER_22322_12 JULY.indd 104TIMBER_22322_12 JULY.indd 104 13/07/2011 04:0213/07/2011 04:02
104
PRACTICAL BUILDING
CONSERVATION
Moulding planes
Top: A 19th-century moulding plane.
Bottom left: A moulding plane being used to run a matching moulding on a pieced-in repair.
Bottom right: A late 18th- or early 19th-century saddle template, a brass-faced jig used for scribing the moulding at the end of a glazing bar.

TIMBER_22322_12 JULY.indd 105TIMBER_22322_12 JULY.indd 105 13/07/2011 04:0213/07/2011 04:02
105
Pinned mortice-and-tenon joint in a late 17th-century door leaf. This method for securing joints in architectural joinery remained in use up to the early 19th century.
The system of frame and panel construction, consisting of relatively thin timber panels mounted in grooves in a rectangular framework of vertical stiles and muntins and horizontal rails, formed the basis of much joinery work, and was used in the construction of doors, shutters and panelling.
This ‘case-work’ (as in window-case, doorcase, staircase, casement and so forth) was the province of the joiner. Frame and panel construction was devised to allow the panels and framework to expand and contract freely and independently in response to fluctuations in moisture content of the timber. If the panels were restrained by glue, nails or paint, they would be likely to split. The structural integrity of frame and panel construction relied upon the system of mortice-and-tenon joints between the stiles, rails and muntins. These joints were usually secured by draw-bored timber pins, until the early 19th century. Glue would be used only in the fabrication of wider panels, made up of two or more butt-jointed boards.
As time went on, there was an increasing trend towards specialisation in the joinery trade. By the 18th century, there were already joiners specialising in the manufacture of doors, while others made windows and shutters. Staircase building was yet another branch of the joinery trade. Further developments in the design of tools, especially powered tools, in the late 19th century enabled the mass production of planed timber and mouldings, which eventually led to the decline in the manufacture and use of moulding planes.
TIMBER MATERIALS & HISTORY OF USE

TIMBER_22322_12 JULY.indd 324TIMBER_22322_12 JULY.indd 324 13/07/2011 04:2013/07/2011 04:20
324
PRACTICAL BUILDING
CONSERVATION
panels rise inexorably until fungi and other decay mechanisms can take hold, or the panels lose cohesion and become susceptible to frost damage. Moreover, heat loss is very much greater through persistently wet materials.
It has also become fashionable to expose the timber frame both internally and externally, often by removing plaster or claddings. This adversely affects the thermal performance of the building and may hasten the deterioration of previously protected elements. Draughts and water penetration are inevitable whether the infill panel is traditional or modern.
In practical terms, new wattle-and-daub panels will be perfectly serviceable where the timber frame is reasonably well protected. As an alternative, the use of natural hydraulic lime-and-hemp infill is well established on the Continent. Temporary shuttering is applied to the internal and external faces of the timber frame, and the lime/hemp mix is cast in situ in lifts of approximately 300 mm. Brick infill (whether original or added more recently) does not necessarily cause major problems where the timber frame is reasonably substantial and well protected. However, if the frame is relatively light and poorly constructed, a brick infill can significantly increase the rate of deterioration of the frame. Often the brick projects beyond the face of the frame, creating ledges that trap water.
A mixture of hemp and natural hydraulic lime being used to make a replacement infill panel. The mixture, which can be prepared in a concrete mixer, is placed between shuttering boards. The timber staves provide reinforcement.
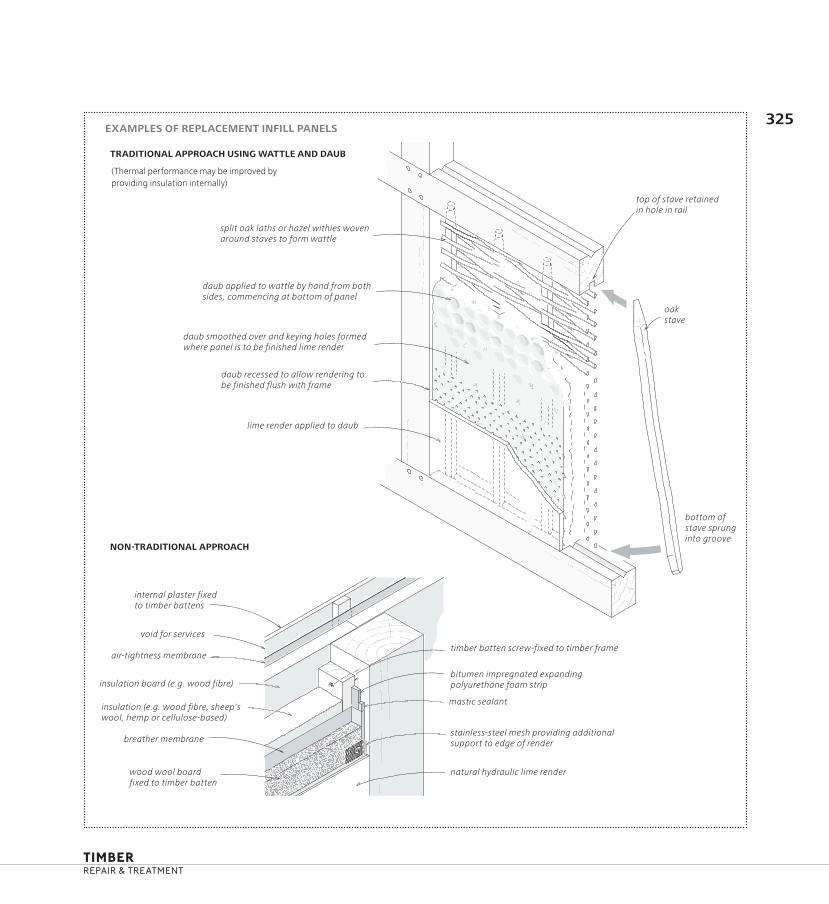
EXAMPLES OF REPLACEMENT INFILL PANELS
TRADITIONAL APPROACH USING WATTLE AND DAUB
(Thermal performance may be improved by providing insulation internally)
325
top of stave retained in hole in rail
split oak laths or hazel withies woven around staves to form wattle
daub applied to wattle by hand from both sides, commencing at bottom of panel
oak stave
daub smoothed over and keying holes formed where panel is to be finished lime render
daub recessed to allow rendering to be finished flush with frame
lime render applied to daub
bottom of stave sprung
NON-TRADITIONAL APPROACH into groove
internal plaster fixed to timber battens
void for services
timber batten screw-fixed to timber frame air-tightness membrane
bitumen impregnated expanding insulation board (e.g. wood fibre) polyurethane foam strip
insulation (e.g. wood fibre, sheep's mastic sealant
wool, hemp or cellulose-based)
breather membrane stainless-steel mesh providing additional support to edge of render
wood wool board natural hydraulic lime render fixed to timber batten
TIMBER_22322_12 JULY.indd 325TIMBER_22322_12 JULY.indd 325 13/07/2011 04:2013/07/2011 04:20
TIMBER REPAIR & TREATMENT

TIMBER_22322_12 JULY.indd 354TIMBER_22322_12 JULY.indd 354 13/07/2011 04:2513/07/2011 04:25
354
PRACTICAL BUILDING
CONSERVATION
Where original H or HL hinges have been replaced with butt hinges, the timber linings are sometimes too thin to support the fixings and the hinges may become loose. In such cases, particularly where the door is heavily used, consideration should be given to reinforcing the lining or reinstating an original hinge type. Badly worn hinges may be saved by replacing the pins and inserting steel washers between the knuckles. In some cases it may be sufficient to swap the top and bottom hinges so that the wear on the pins is reversed.
As with wall panelling, replacement timber components and inserts should be made from heartwood, and be as similar as possible to the host timber in terms of species, moisture content, grain orientation and growth rate.
Care should be taken to match existing mouldings. Before a door leaf is dismantled, the mortice-and-tenon joints should be closely examined to find out how they were made. Before the mid- to late-19th century, mortice-and-tenon joints were usually secured with timber pins which were draw-bored to ensure a tight joint. These have to be drilled out before the joint can be taken apart. Before a pinned joint is reassembled, a timber insert should be glued into the hole drilled in the tenon. This will allow the joint to be draw-bored before driving in the new pin. Later joints tend not to be pinned, but are secured by wedges driven into the tenon.
This type of joint may also have been glued. Dismantling involves carefully cutting or drilling out the wedges, and softening the glue with gentle heat. Animal glue will also fracture when cold if a sharp blow is applied. When the joints are reassembled they should be glued and drawn tightly together with sash cramps. Then replacement wedges should be driven into the tenons.
Doors which have become warped or twisted are very difficult to make flat again. Where warping has been caused by saturation of the timber following rapid or uneven drying, the damage may be irreversible. Sometimes it may be possible to reduce the magnitude of warping by re-soaking the door (assuming that the paint has been removed), and using weights and blocks to twist the door in the opposite direction for a period while it dries. However, the correction may be short-lived: in time, the door tends to resume its previous set. In some cases a simpler and more effective solution is to accommodate the warping by modifying the door stops.
Redundant holes and mortices left by locks and latches should be repaired with ‘joiners patches’, following the same principles of timber selection, grain orientation and profile as any other timber insert.

TIMBER_22322_12 JULY.indd 355TIMBER_22322_12 JULY.indd 355 01/11/2011 16:0501/11/2011 16:05
EXAMPLE OF REPAIRS TO AN EXTERNAL PANELLED DOOR 355
A
BC
1
2
3
4
1. Split panels may be repaired in situ, as described for wall panelling, or removed for repair by dismantling the door leaf
2. Redundant holes from ironmongery or fixings made good by letting in timber inserts – grain direction to match host timber
3. Decayed panels renewed
4. Decayed bottom rail renewed
DETAIL AT A
spliced repair to defective or redundant hinge housing
Repair to hinge housing
DETAIL AT B
Repair of decayed muntin base
bottom rail
oak pin (where this formed part of the original joint)
face patch incorporating tenon spliced to sound existing timber
muntin
Joints are designed to provide optimum strength while minimising risk of moisture penetration. Adhesives, except epoxy resins, do not bond strongly in end grain-to-end grain situations. A splay or lap is required to introduce side grain to improve adhesion.
DETAIL AT C
Alternative repair joints for decayed stile base
sound existing timber
replacement timber
Splayed bridle joint
Splayed joint reinforced with timber dowels or biscuits
oak pins (where these formed part of the original joint)
panel
bottom rail
Square bridle joint
TIMBER REPAIR & TREATMENT

TIMBER_22322_12 JULY.indd 422TIMBER_22322_12 JULY.indd 422 13/07/2011 04:3413/07/2011 04:34
422
PRACTICAL BUILDING
CONSERVATION
Freezing and Heating
Deep-freezing furniture and timber artefacts can destroy infestations. Initially, infested items are kept at room temperature so that the larvae remain active. They are then placed in polythene bags, and positioned in a freezer so that air can circulate around them. The freezer must maintain a minimum temperature of −18˚C for two weeks or −30˚C for three days. Surface-temperature probes ensure that the correct temperature is reached.
The articles remain in the polythene bags, while they are slowly returned to room temperature over about eight hours. Some authorities recommend that this freeze-thaw cycle be repeated immediately.
Insect pests are killed at a temperature of 55˚C, and a commercial heating process using portable chambers is available. Relative humidities are controlled to avoid damage to the objects treated, and the temperature is raised, maintained and lowered over an 18-hour cycle. Objects do not need to be bagged. Heat treatment is available for whole buildings, but the method is expensive and there is little evidence that it has been particularly successful in England. Further details are provided within the discussion of deathwatch-beetle treatment.
Injection
Brush-and-spray treatments will not penetrate surface finishes such as paint, and these can be a considerable impediment to effective treatment. If other methods are not available, then furniture and small removable items can be treated by injecting a spirit-based or microemulsion-based insecticide into flight holes at close-spaced centres, using either a hypodermic syringe or a can fitted with a suitable nozzle. This treatment should only be undertaken in a well-ventilated space and the item should then be removed to a dry environment.
Injection with an insecticide may perhaps be applicable for localised infestations in timbers which cannot be removed, but the spread of the chemical from the flight holes will be patchy and erratic. The treatment is unlikely to be entirely successful unless the environment can be modified, so that the wood is dry (moisture content less than 15 %) and becomes a hostile environment for the beetles. In some cases, environmental control and the removal of unnecessary infested timbers and debris may be the only methods of furniture beetle control that is possible.

TIMBER_22322_12 JULY.indd 423TIMBER_22322_12 JULY.indd 423 13/07/2011 04:3413/07/2011 04:34
-423
NO SIGNS OF CURRENT OR RECENT INFESTATION
• holes blunt-edged with interiors the same colour as the unfinished exterior surface
SIGNS OF CURRENT OR RECENT INFESTATION
• Beetles (alive or dead)
• Larvae in wood
• Trickles of bore dust
• Holes with a fresh-cut appearance
No treatment required
Consider treatment by freezing, heating, fumigation or an oxygen-free
atmosphere, or move item to a dry location. Remove all debris or other sources of infestation
A GUIDE TO THE TREATMENT OF FURNITURE BEETLE INFESTATION
Beetles or beetle larvae found
No beetles or beetle larvae, but trickles of bore dust and holes with a fresh-cut appearance
Post-1900 softwood, or non-durable hardwood, or timber with a high sapwood content
Surface finishes absent or can be removed (insecticde can penetrate the
timber)
Surface finishes present and cannot be removed (these will prevent effective surface treatment)
Infested item cannot be removed
Infested item can be removed or is portable
Inject flight holes at close-spaced centres with a contact
insecticide if feasible. Remove all possible sources of damp. Remove all debris or other sources of infestation
Oak or pre-1900 softwood with low sapwood content
Ensure that any water penetration is halted and that the building dries or is dry. Any residual infestation will die out. Treatment optional and probably
unnecessary
Brush treat infested area with a contact insecticide
Spray treat the infested timbers with a contact insecticide
Signs of infestation localised
Signs of infestation widespread
TIMBER REPAIR & TREATMENT

TIMBER_22322_12 JULY.indd 424TIMBER_22322_12 JULY.indd 424 13/07/2011 04:3413/07/2011 04:34
424 DEATHWATCH BEETLE
PRACTICAL BUILDING
CONSERVATION
It is important to realise, when considering deathwatch-beetle eradication with insecticides, that effective treatment is generally impossible even with considerably expensive and destructive exposure work. This is because the eggs and larvae are deep within the wood and many beetles do not bite their own emergence holes. Contact between all stages of the beetle’s life cycle and the chemical is at best unlikely, particularly with surface-spray treatments. Paste formulations that penetrate deeper into the timber can be more effective, but only if access is good. A requirement that an infestation must be eradicated immediately, and that this must be guaranteed, is likely to result in disappointment unless the beetle population is already declining, or was no longer present prior to treatment.
Offsetting this is the slow progress of a beetle infestation (most will have been present for decades or even centuries) and its reliance on damp conditions. A year or two taken to fully understand a problem will not endanger the building, and the removal of all sources of water penetratio, together with effective maintenance, will contain the beetle population and eventually eradicate it. If there is significant damage, then much of the infestation will be removed during repairs.

TIMBER_22322_12 JULY.indd 425TIMBER_22322_12 JULY.indd 425 13/07/2011 04:3413/07/2011 04:34
-
425
No beetles found despite a careful search on surfaces not
regularly cleaned
Beetles (dead or alive) found on floors, cupboard tops, window
sills or other surfaces
No treatment. Ensure that the building is dry and well maintained
Ensure that the building is well maintained and dry. There may be a residual population if the building has been recently restored or repaired, but the infestation should die out as the building dries
A GUIDE TO THE TREATMENT OF DEATHWATCH BEETLE INFESTATION
A few beetles found scattered around the building. No focus of infestation (check identification of beetles)
Dozens of beetles found either widespread or concentrated in specific areas. If the areas are not regularly swept or cleaned, then remove all dead beetles and check again at the end of the next emergence season
Many beetles found in rooms and areas throughout the building
Numerous beetles, but localised and probably associated with some specific
timber
The building may have a substantial damp problem which must be identified and
addressed. Possibilities would be defective rainwater goods/ drains or a cracked cementitious render over a timber frame
Find and repair any source of
moisture that might be sustaining the infestation. Localised treatment with an insecticide formulated as a paste, to give a greater depth of penetration, may be useful if access allows
Search for groups of beetle holes. A moisture meter may indicate elevated moisture contents. Monitor for current infestation if necessary by attaching paper tightly across a group of emergence holes, and checking to see if the paper has been punctured at the end of the summer
TIMBER REPAIR & TREATMENT

If you require an alternative accessible version of this document (for instance in audio, Braille or large print) please contact our Customer Services Department: Telephone: 0870 333 1181 Fax: 01793 414926 Textphone: 0800 015 0516 E-mail: [email protected]