tibco mdm® studio
TRANSCRIPT
TIBCO MDM® StudioUI Builder TutorialVersion 5.3.0December 2020
Copyright © 2007-2020. TIBCO Software Inc. All Rights Reserved.
TIBCO MDM® Studio UI Builder Tutorial
2 | Contents
Contents
Contents 2
TIBCO Documentation and Support Services 3
Tutorial Overview 5Creating a Project 6Defining Repository Data 9Creating a New Custom Page - Adding Client Details 10Creating a New Custom Page - Modifying Client Details 19Generating WSDL 29Exporting the Custom Page 33Deploy the Custom Page 36Accessing the Custom Page from the TIBCO MDM Server 37
Legal and Third-Party Notices 44
TIBCO MDM® Studio UI Builder Tutorial
3 | TIBCO Documentation and Support Services
TIBCO Documentation and Support Services
How to Access TIBCO Documentation
Documentation for TIBCO products is available on the TIBCO Product Documentation website, mainly in HTML and PDF formats.
The TIBCO Product Documentation website is updated frequently and is more current than any other documentation included with the product. To access the latest documentation, visit https://docs.tibco.com.
Product-Specific Documentation
Documentation for TIBCO MDM® Studio is available on the TIBCO MDM® Studio Product Documentation page.
To directly access documentation for this product, double-click the following file:
TIBCO_HOME/release_notes/TIB_bstudio-mdm_5.3.0_docinfo.html
where TIBCO_HOME is the top-level directory in which TIBCO products are installed. On Windows, the default TIBCO_HOME is C:\tibco. On UNIX systems, the default TIBCO_HOME is /opt/tibco.
The following documents for this product can be found in the TIBCO Documentation site:
l TIBCO MDM® Studio Release Notes
l TIBCO MDM® Studio Installation
l TIBCO MDM® Studio Process Designer Tutorial
l TIBCO MDM® Studio Process Designer User's Guide
l TIBCO MDM® Studio Repository Designer Tutorial
l TIBCO MDM® Studio Repository Designer User's Guide
l TIBCO MDM® Studio Rulebase Designer User's Guide
l TIBCO MDM® Studio Rulebase Designer Tutorial
l TIBCO MDM® Studio UI Builder Tutorial
l TIBCO MDM® Studio UI Builder User's Guide
TIBCO MDM® Studio UI Builder Tutorial
4 | TIBCO Documentation and Support Services
How to Contact TIBCO Support
You can contact TIBCO Support in the following ways:
l For an overview of TIBCO Support, visit http://www.tibco.com/services/support.
l For accessing the Support Knowledge Base and getting personalized content about products you are interested in, visit the TIBCO Support portal at https://support.tibco.com.
l For creating a Support case, you must have a valid maintenance or support contract with TIBCO. You also need a user name and password to log in to https://support.tibco.com. If you do not have a user name, you can request one by clicking Register on the website.
How to Join TIBCO Community
TIBCO Community is the official channel for TIBCO customers, partners, and employee subject matter experts to share and access their collective experience. TIBCO Community offers access to Q&A forums, product wikis, and best practices. It also offers access to extensions, adapters, solution accelerators, and tools that extend and enable customers to gain full value from TIBCO products. In addition, users can submit and vote on feature requests from within the TIBCO Ideas Portal. For a free registration, go to https://community.tibco.com.
TIBCO MDM® Studio UI Builder Tutorial
5 | Tutorial Overview
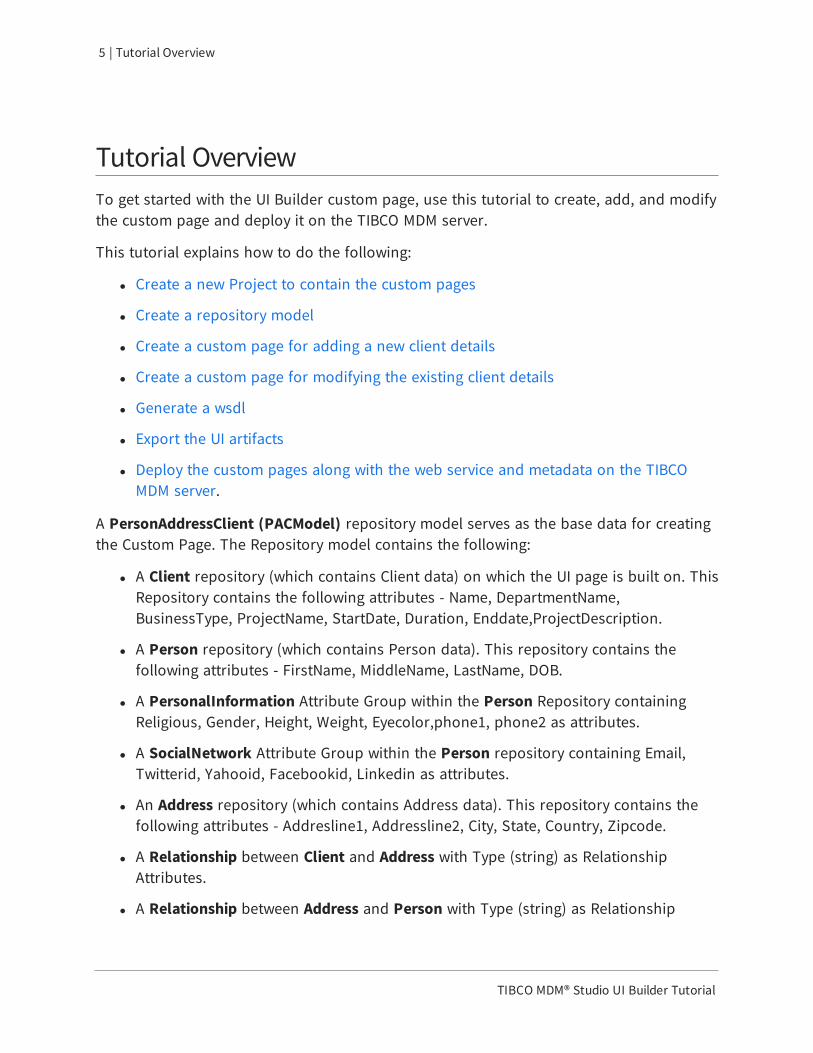
Tutorial OverviewTo get started with the UI Builder custom page, use this tutorial to create, add, and modify the custom page and deploy it on the TIBCO MDM server.
This tutorial explains how to do the following:
l Create a new Project to contain the custom pages
l Create a repository model
l Create a custom page for adding a new client details
l Create a custom page for modifying the existing client details
l Generate a wsdl
l Export the UI artifacts
l Deploy the custom pages along with the web service and metadata on the TIBCO MDM server.
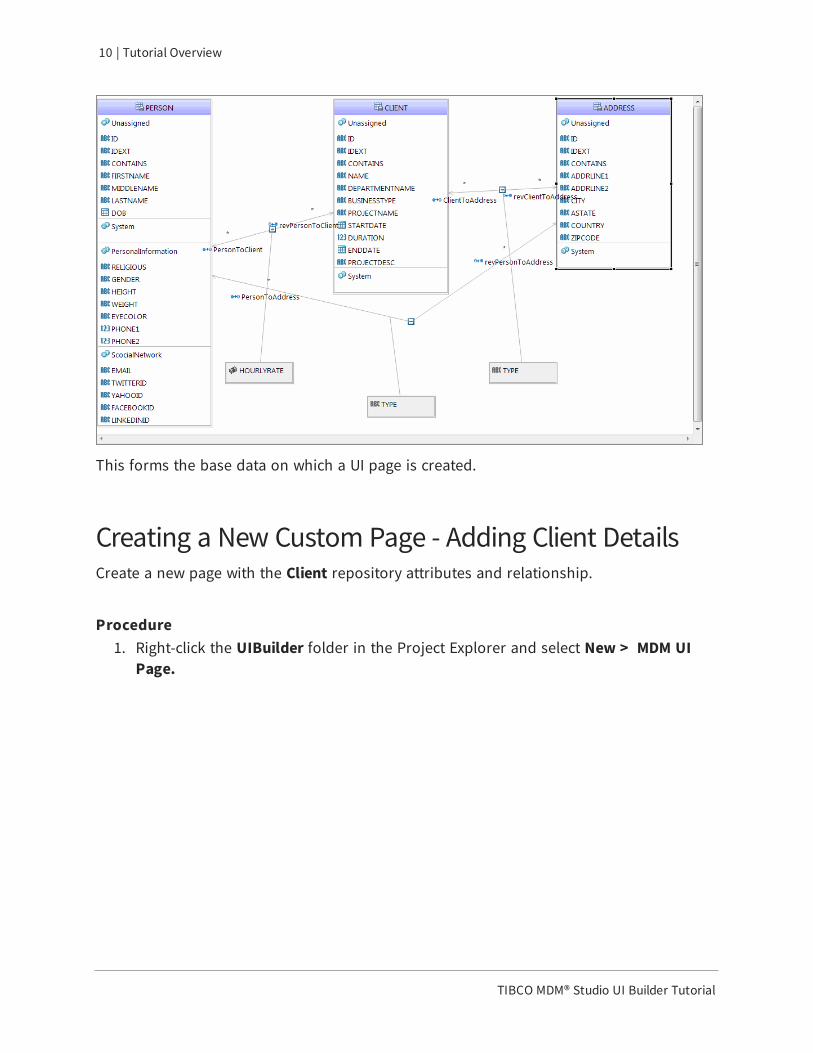
A PersonAddressClient (PACModel) repository model serves as the base data for creating the Custom Page. The Repository model contains the following:
l A Client repository (which contains Client data) on which the UI page is built on. This Repository contains the following attributes - Name, DepartmentName, BusinessType, ProjectName, StartDate, Duration, Enddate,ProjectDescription.
l A Person repository (which contains Person data). This repository contains the following attributes - FirstName, MiddleName, LastName, DOB.
l A PersonalInformation Attribute Group within the Person Repository containing Religious, Gender, Height, Weight, Eyecolor,phone1, phone2 as attributes.
l A SocialNetwork Attribute Group within the Person repository containing Email, Twitterid, Yahooid, Facebookid, Linkedin as attributes.
l An Address repository (which contains Address data). This repository contains the following attributes - Addresline1, Addressline2, City, State, Country, Zipcode.
l A Relationship between Client and Address with Type (string) as Relationship Attributes.
l A Relationship between Address and Person with Type (string) as Relationship

TIBCO MDM® Studio UI Builder Tutorial
6 | Tutorial Overview
Attributes.
l A Relationship between Person and Client with HourlyRate (Amount) as Relationship Attributes.
Creating a ProjectFirst, create a new Project to hold the Custom Page.
Procedure 1. Go to File > New > MDM Developer Project.
2. The Create a new project resource wizard is displayed.

TIBCO MDM® Studio UI Builder Tutorial
7 | Tutorial Overview
3. Provide a name for the project: UIBuilderTutorial. Clear the Use default location check box if you want to provide a different location for the project (by default, the current workspace). Select Destination Environment as MDM. Click Next.
4. The Asset Type Selection dialog is displayed.

TIBCO MDM® Studio UI Builder Tutorial
8 | Tutorial Overview
5. By default, all the asset types are selected. Click Next.
6. The Business Object Model, the Business Processes, the Package Information, the Template Selection wizards are displayed, select the relevant options and click Next.
7. The Set Special Folders wizard is displayed.

TIBCO MDM® Studio UI Builder Tutorial
9 | Tutorial Overview
8. Click Finish.
Defining Repository DataIn the Project Explorer, create a new repository model under the Repository Models folder (right click the Repository Models folder, select New > Repository Model, and then complete the wizard). Call the file PACModel.rep.
Double-click the newly created .rep file and create the following repository and relationship structure.
TIBCO MDM® Studio UI Builder Tutorial
10 | Tutorial Overview
This forms the base data on which a UI page is created.
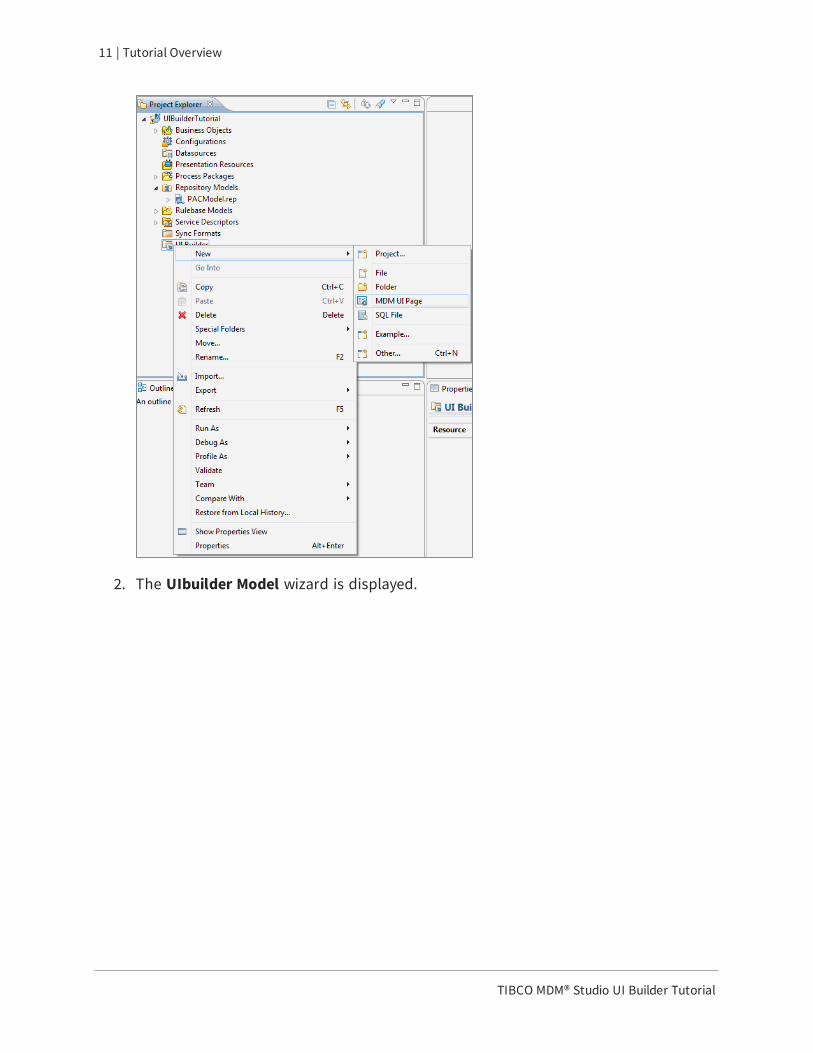
Creating a New Custom Page - Adding Client DetailsCreate a new page with the Client repository attributes and relationship.
Procedure 1. Right-click the UIBuilder folder in the Project Explorer and select New > MDM UI
Page.
TIBCO MDM® Studio UI Builder Tutorial
11 | Tutorial Overview
2. The UIbuilder Model wizard is displayed.

TIBCO MDM® Studio UI Builder Tutorial
12 | Tutorial Overview
3. Enter the file name as AddClient.mub and click Finish.
4. The Add Client page is displayed on the Canvas.
After creating the canvas add the Client Repository to the canvas. Drag the Client

TIBCO MDM® Studio UI Builder Tutorial
13 | Tutorial Overview
Repository attributes and drop it on the panel. 5. Expand the PAC repository model and select the Client repository. Drag and drop it
on the panel_0(panel).
6. The Select Attribute Groups and Attributes wizard is displayed.
7. Select the Tabbed pane check box. Select the Unassigned check box, all the attributes in the Unassigned Group are displayed.
8. Select the check box corresponding to the repository attributes and click Finish.
9. A form is created with selected attributes and displayed on the canvas.
TIBCO MDM® Studio UI Builder Tutorial
14 | Tutorial Overview
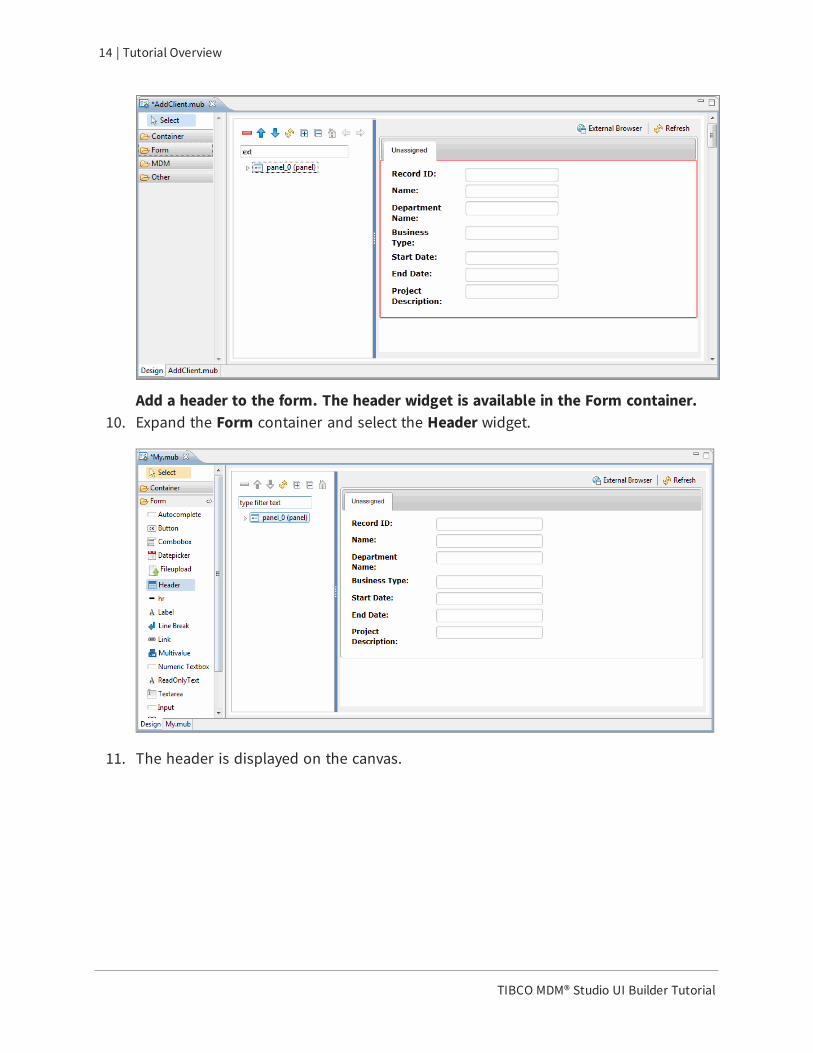
Add a header to the form. The header widget is available in the Form container. 10. Expand the Form container and select the Header widget.
11. The header is displayed on the canvas.
TIBCO MDM® Studio UI Builder Tutorial
15 | Tutorial Overview
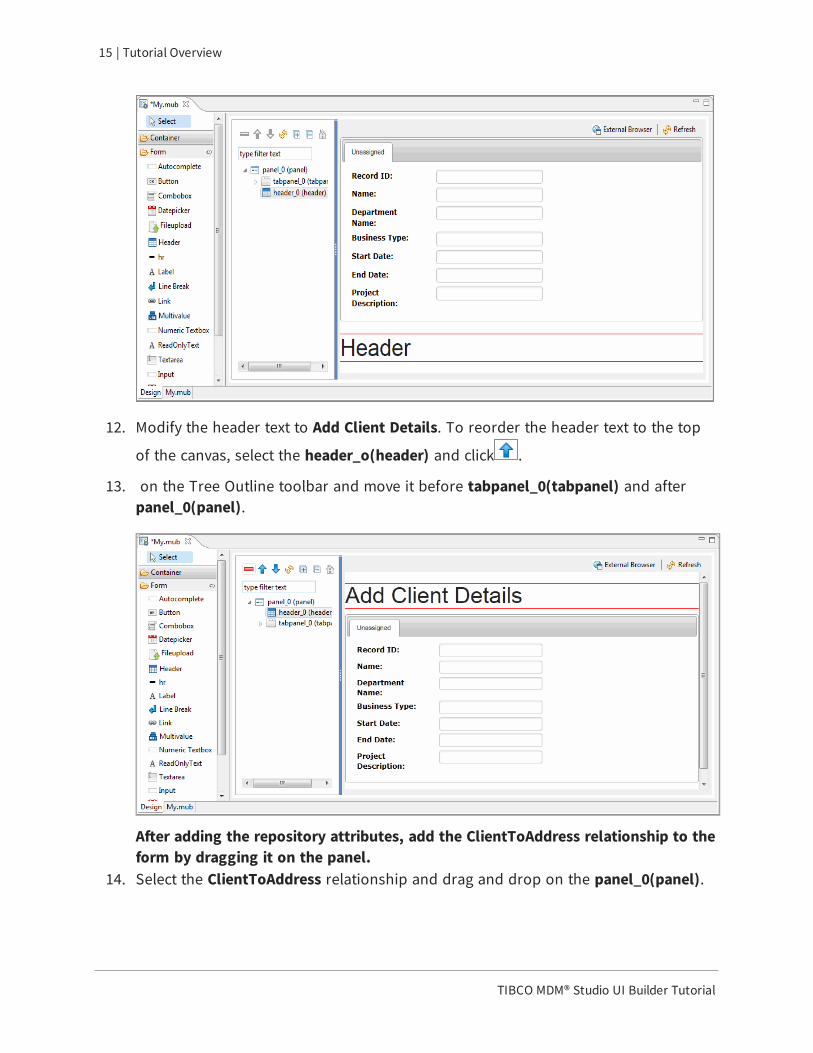
12. Modify the header text to Add Client Details. To reorder the header text to the top
of the canvas, select the header_o(header) and click .
13. on the Tree Outline toolbar and move it before tabpanel_0(tabpanel) and after panel_0(panel).
After adding the repository attributes, add the ClientToAddress relationship to the form by dragging it on the panel.
14. Select the ClientToAddress relationship and drag and drop on the panel_0(panel).
TIBCO MDM® Studio UI Builder Tutorial
16 | Tutorial Overview
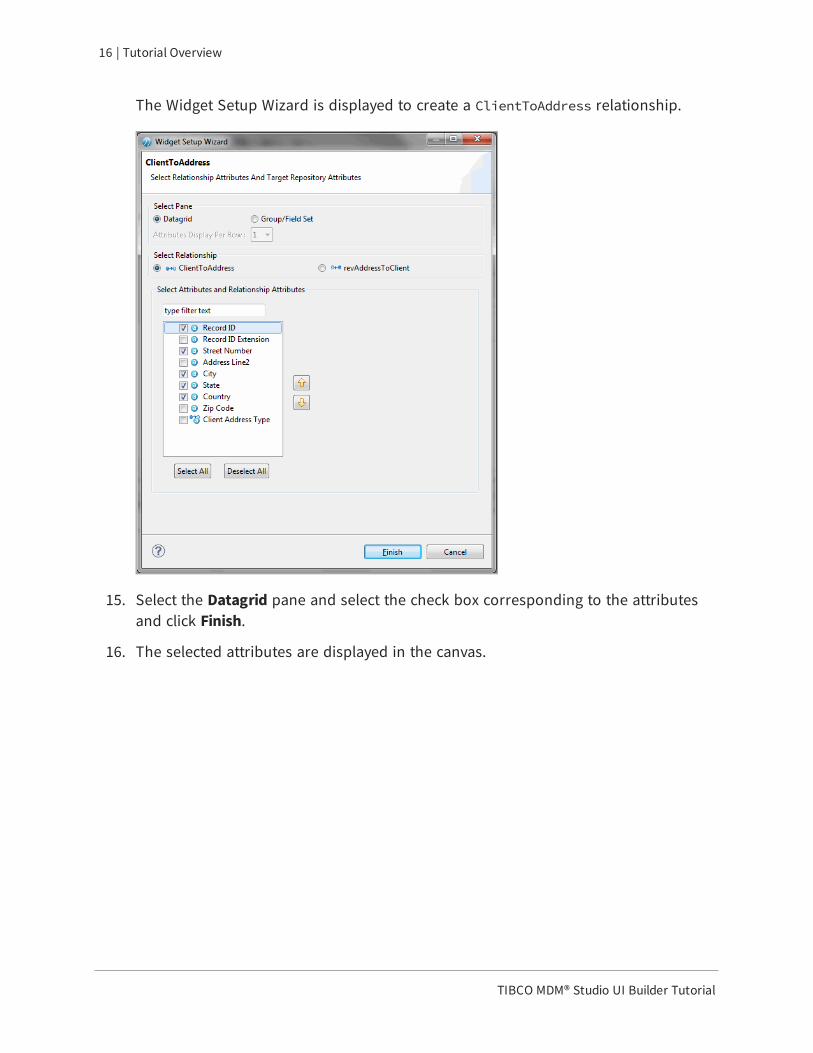
The Widget Setup Wizard is displayed to create a ClientToAddress relationship.
15. Select the Datagrid pane and select the check box corresponding to the attributes and click Finish.
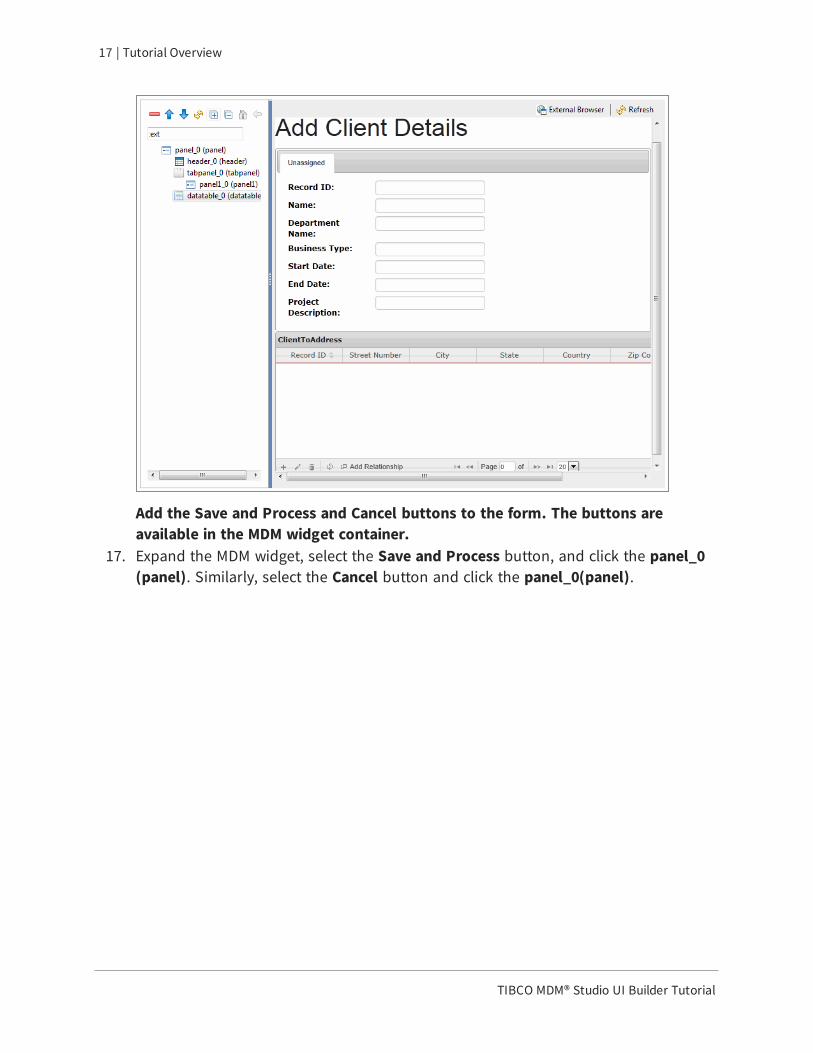
16. The selected attributes are displayed in the canvas.
TIBCO MDM® Studio UI Builder Tutorial
17 | Tutorial Overview
Add the Save and Process and Cancel buttons to the form. The buttons are available in the MDM widget container.
17. Expand the MDM widget, select the Save and Process button, and click the panel_0(panel). Similarly, select the Cancel button and click the panel_0(panel).

TIBCO MDM® Studio UI Builder Tutorial
18 | Tutorial Overview
The Add Client page is ready. Save the page and view it in the system default browser.
18. Click the External Browser on the top of the canvas. The Add Client page is displayed in the browser.

TIBCO MDM® Studio UI Builder Tutorial
19 | Tutorial Overview
Creating a New Custom Page - Modifying Client DetailsCreate a new page with the Client repository attributes and relationship.
Procedure 1. Right click the UIBuilder folder in the Project Explorer and select New > MDM UI
Page.

TIBCO MDM® Studio UI Builder Tutorial
20 | Tutorial Overview
2. The UIbuilder Model wizard is displayed.

TIBCO MDM® Studio UI Builder Tutorial
21 | Tutorial Overview
3. Enter the file name as ModifyClient.mub and click Finish.
4. The Modify Client page is displayed in the canvas.

TIBCO MDM® Studio UI Builder Tutorial
22 | Tutorial Overview
After creating the canvas, add the Client Repository to the canvas. Drag the Client Repository attributes and drop it on the panel.
5. Expand the PAC repository model, select the Client repository and drag and drop it on the panel_0(panel).
6. The Select Attribute Groups and Attributes wizard is displayed.

TIBCO MDM® Studio UI Builder Tutorial
23 | Tutorial Overview
7. Select the Tabbed pane check box. Select the Unassigned check box, all the attributes in the Unassigned Group are displayed.
8. Select the check box corresponding to the repository attributes and click Finish.
9. A form is created with selected attributes and displayed on the canvas.

TIBCO MDM® Studio UI Builder Tutorial
24 | Tutorial Overview
Add a header to the form, the header widget is available in the Form container. 10. Expand the Form container and select the Header widget.
11. The header is displayed on the canvas.

TIBCO MDM® Studio UI Builder Tutorial
25 | Tutorial Overview
12. Modify the header text to Modify Client Details. To reorder the header text to the
top of the canvas, select the header_o(header) and click .
13. on the Tree Outline toolbar and move it before tabpanel_0(tabpanel) and after panel_0(panel).
After adding the repository attributes, add the ClientToAddress relationship to the form by dragging it on the panel.
14. Select the ClientToAddress relationship and drag and drop on the panel_0(panel). The ClientToAddress wizard is displayed.

TIBCO MDM® Studio UI Builder Tutorial
26 | Tutorial Overview
15. Select the Datagrid pane and select the check box corresponding to the attributes and click Finish.
16. The selected attributes are displayed in the canvas.

TIBCO MDM® Studio UI Builder Tutorial
27 | Tutorial Overview
Add the Save and Process and Cancel buttons to the form. The buttons are available in the MDM widget container.
17. Expand the MDM widget, select the Save and Process button, and click the panel_0(panel). Similarly, select the Cancel button and click the panel_0(panel).
TIBCO MDM® Studio UI Builder Tutorial
28 | Tutorial Overview
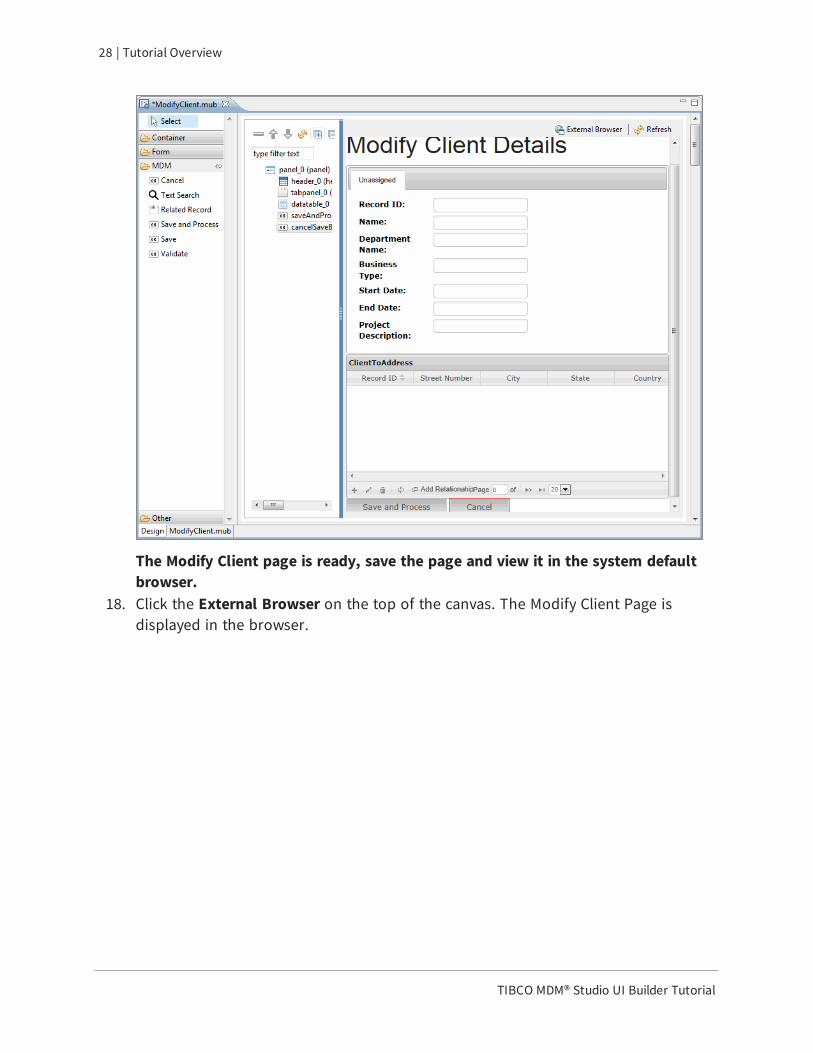
The Modify Client page is ready, save the page and view it in the system default browser.
18. Click the External Browser on the top of the canvas. The Modify Client Page is displayed in the browser.

TIBCO MDM® Studio UI Builder Tutorial
29 | Tutorial Overview
Result
Generating WSDLYou can now Generate WSDL for the Client repository.
Procedure 1. Using the WSDL Generator wizard, generate WSDL for the Client repository. Follow
the wizard to complete the web service project creation.
2. Navigate to File > New > Other.

TIBCO MDM® Studio UI Builder Tutorial
30 | Tutorial Overview
3. Navigate to File > New > Other.
4. Select WSDL Generator from the WSDL Generator tree node and click Next.
5. The wizard to select the repository is displayed.

TIBCO MDM® Studio UI Builder Tutorial
31 | Tutorial Overview
6. Browse to the repository folder in the project. From the Select File field, select the PACModel.rep. Similarly, from the Select Repository field, select the Client repository.
7. Select the Relationship option from the Select Artifacts section and click Next.
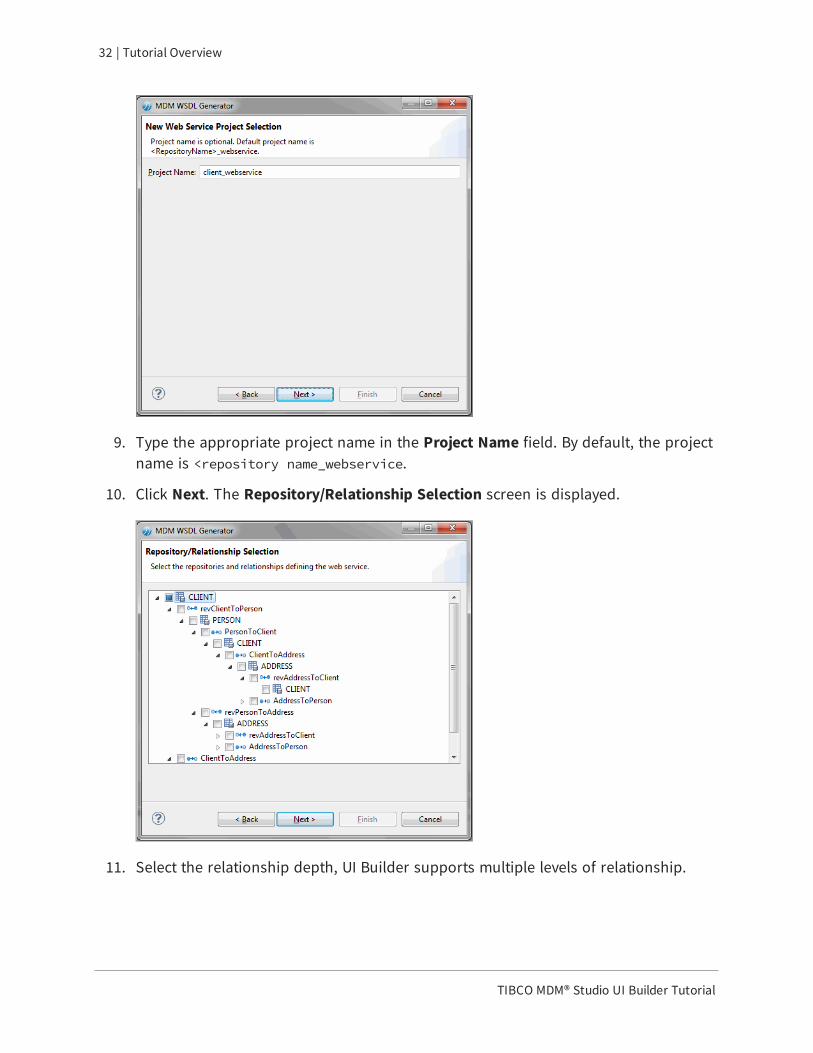
8. The New Web Service Project Selection screen is displayed.
TIBCO MDM® Studio UI Builder Tutorial
32 | Tutorial Overview
9. Type the appropriate project name in the Project Name field. By default, the project name is <repository name_webservice.
10. Click Next. The Repository/Relationship Selection screen is displayed.
11. Select the relationship depth, UI Builder supports multiple levels of relationship.

TIBCO MDM® Studio UI Builder Tutorial
33 | Tutorial Overview
12. Click Next. The Generation Options screen is displayed.
13. Type the appropriate package name in the Package Name field. By default, a package name is provided. The package name convention is com.tibco.mdm.dynservices.webservice.<repository name>_webservice.You can modify the package name.
14. Click Finish.
Exporting the Custom PageNext, export the UI artifacts. The Export Wizard is used to export the custom page to TIBCO MDM presentation forms.
Procedure 1. Select the UIBuilder folder in the Project Explorer and click File > Export or right
click the project and select Export.
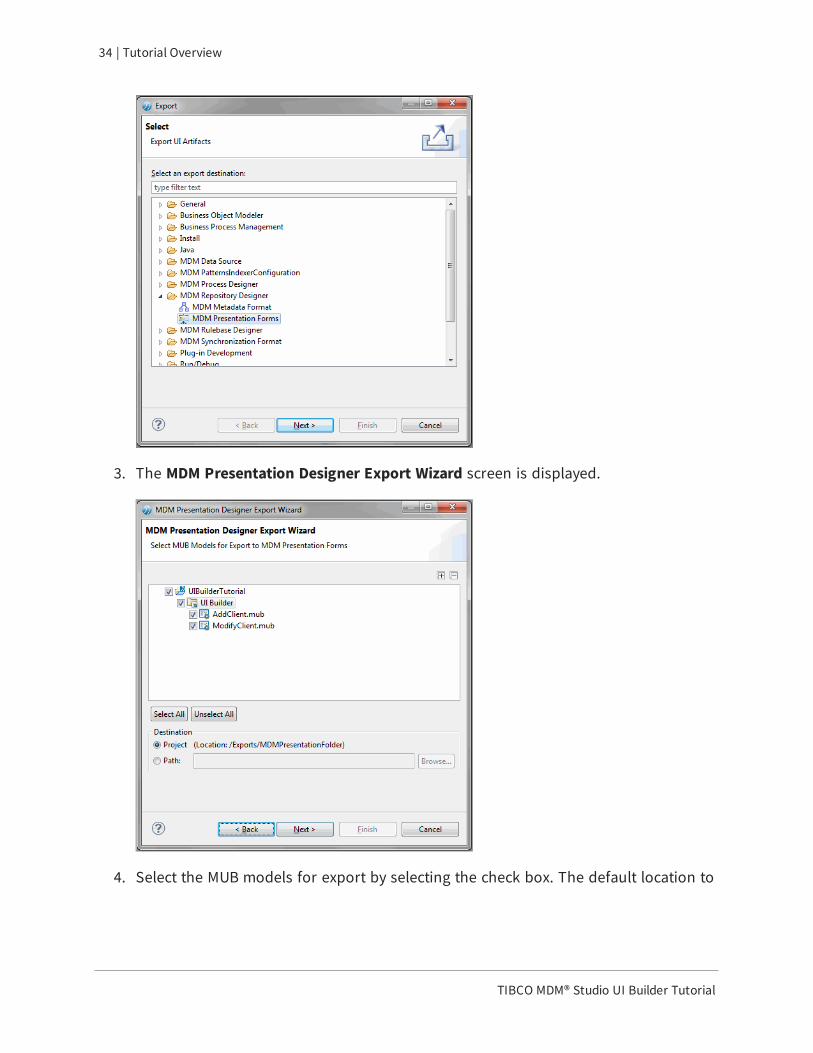
2. Select MDM Presentation Forms under MDM Repository Designer. Click Next.
TIBCO MDM® Studio UI Builder Tutorial
34 | Tutorial Overview
3. The MDM Presentation Designer Export Wizard screen is displayed.
4. Select the MUB models for export by selecting the check box. The default location to
TIBCO MDM® Studio UI Builder Tutorial
35 | Tutorial Overview
which the file is exported is displayed in the Destination section under Project (/Exports/MDMPresentationFolder). You can change the path if required.
5. Click Next.
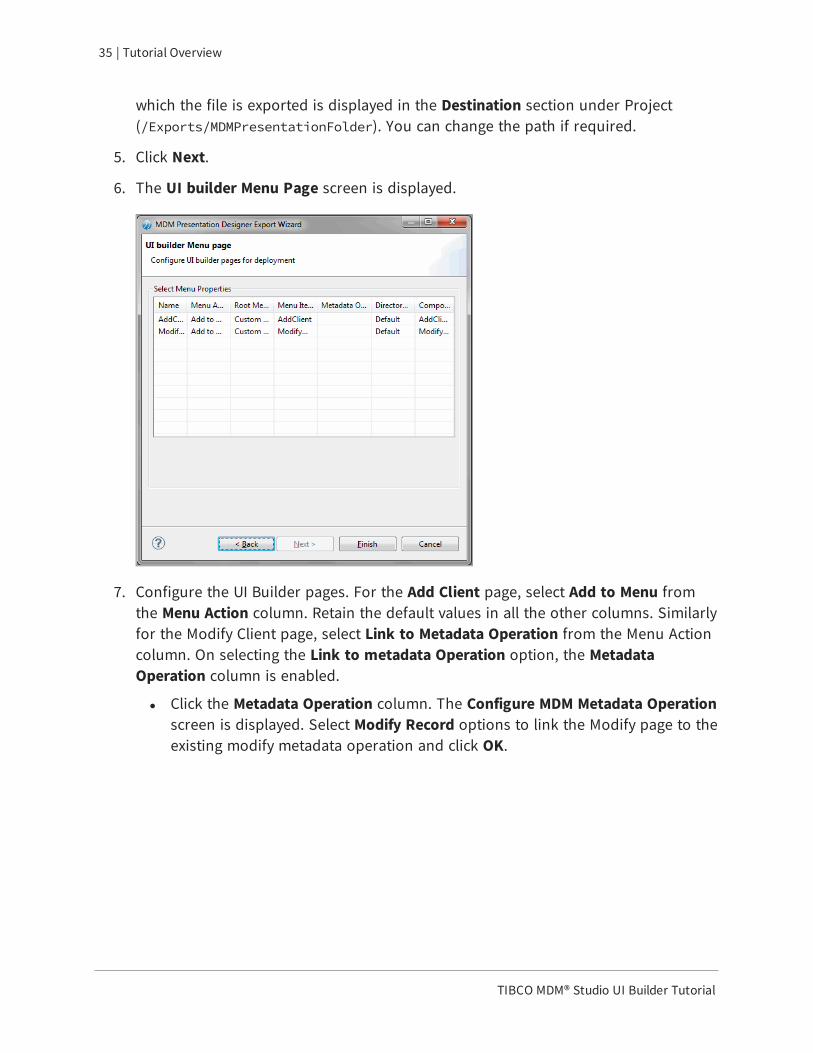
6. The UI builder Menu Page screen is displayed.
7. Configure the UI Builder pages. For the Add Client page, select Add to Menu from the Menu Action column. Retain the default values in all the other columns. Similarly for the Modify Client page, select Link to Metadata Operation from the Menu Action column. On selecting the Link to metadata Operation option, the Metadata Operation column is enabled.
l Click the Metadata Operation column. The Configure MDM Metadata Operation screen is displayed. Select Modify Record options to link the Modify page to the existing modify metadata operation and click OK.
TIBCO MDM® Studio UI Builder Tutorial
36 | Tutorial Overview
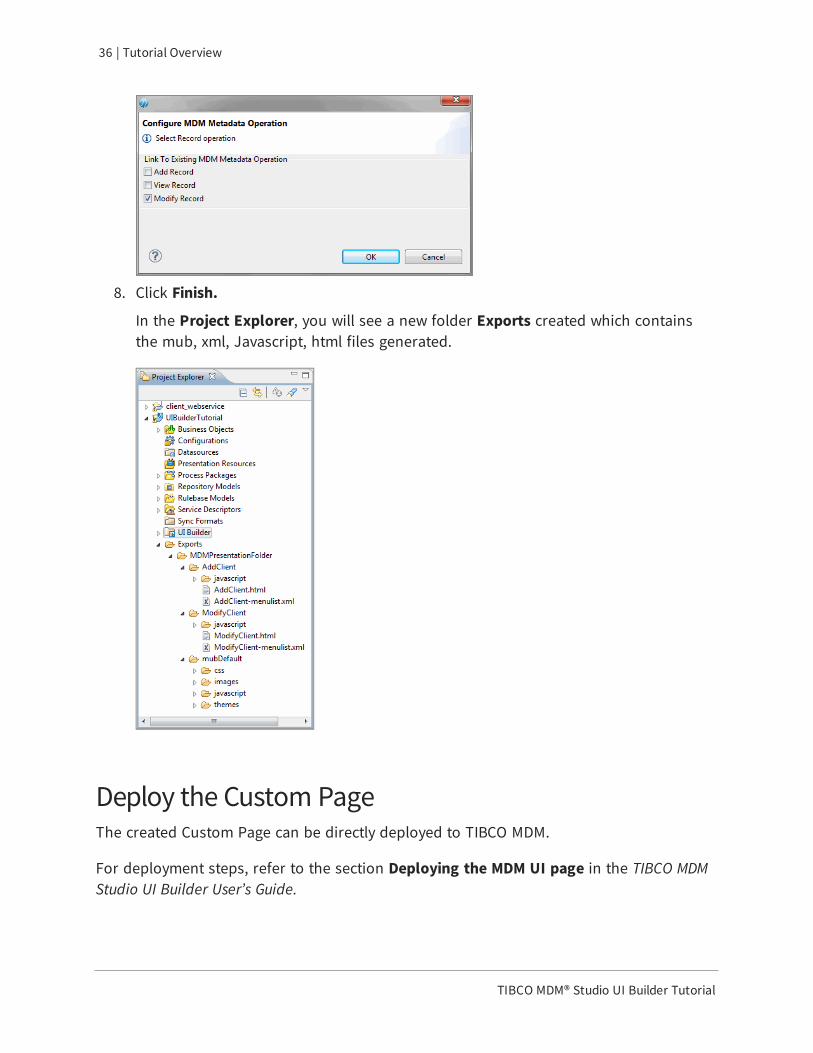
8. Click Finish.
In the Project Explorer, you will see a new folder Exports created which contains the mub, xml, Javascript, html files generated.
Deploy the Custom PageThe created Custom Page can be directly deployed to TIBCO MDM.
For deployment steps, refer to the section Deploying the MDM UI page in the TIBCO MDM Studio UI Builder User’s Guide.

TIBCO MDM® Studio UI Builder Tutorial
37 | Tutorial Overview
Accessing the Custom Page from the TIBCO MDM ServerNext, login to the TIBCO MDM server and access the custom pages.
Procedure 1. On the web browser, type URL http://<localhost:Port no/eml/Login and login
using the TIBCO MDM server credentials.
2. The TIBCO MDM server login page is displayed.
3. Click Customs Pages > AddClient. The Add Client Details page is displayed.
TIBCO MDM® Studio UI Builder Tutorial
38 | Tutorial Overview
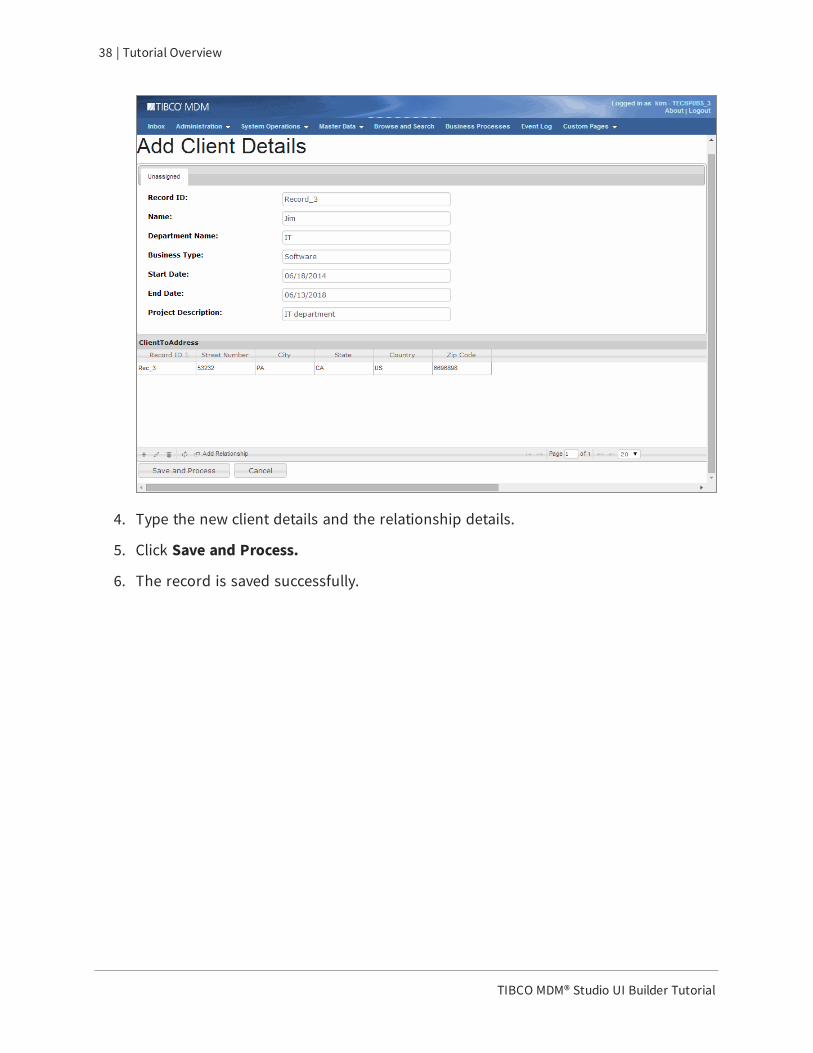
4. Type the new client details and the relationship details.
5. Click Save and Process.
6. The record is saved successfully.
TIBCO MDM® Studio UI Builder Tutorial
39 | Tutorial Overview
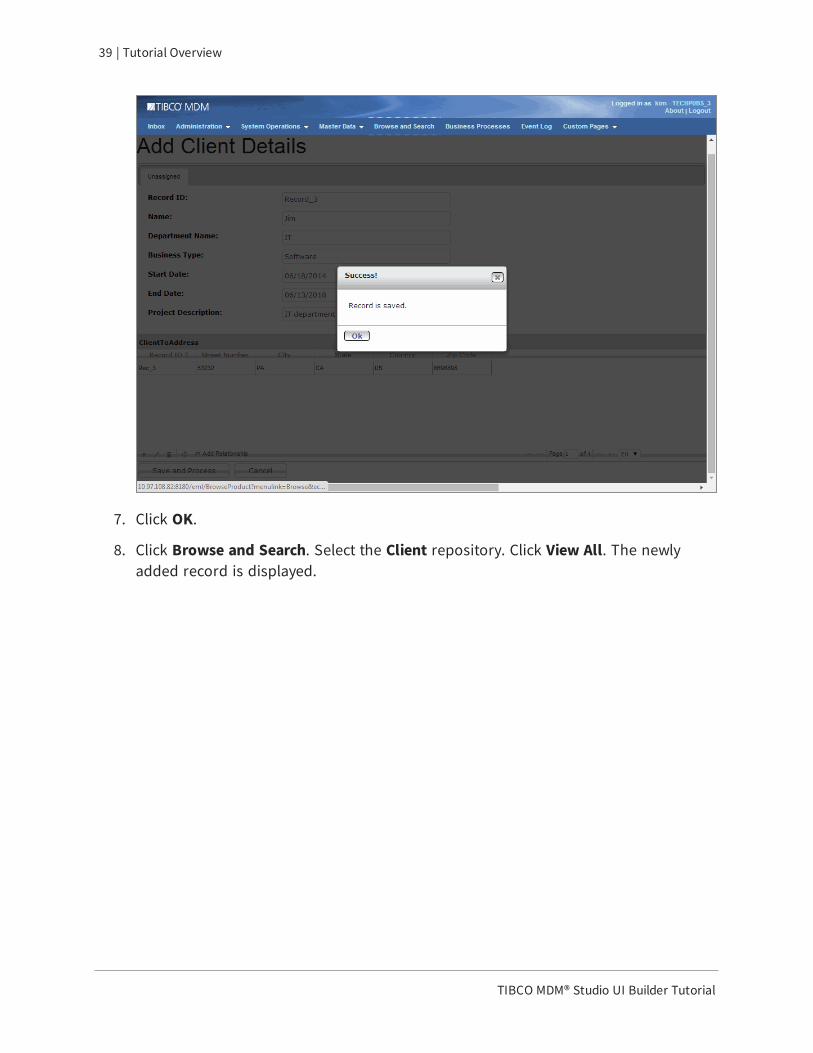
7. Click OK.
8. Click Browse and Search. Select the Client repository. Click View All. The newly added record is displayed.

TIBCO MDM® Studio UI Builder Tutorial
40 | Tutorial Overview
Next, modify an existing record. 9. Select the check box corresponding to Record_3 and click Modify. The Modify Client
Details page is displayed.
TIBCO MDM® Studio UI Builder Tutorial
41 | Tutorial Overview
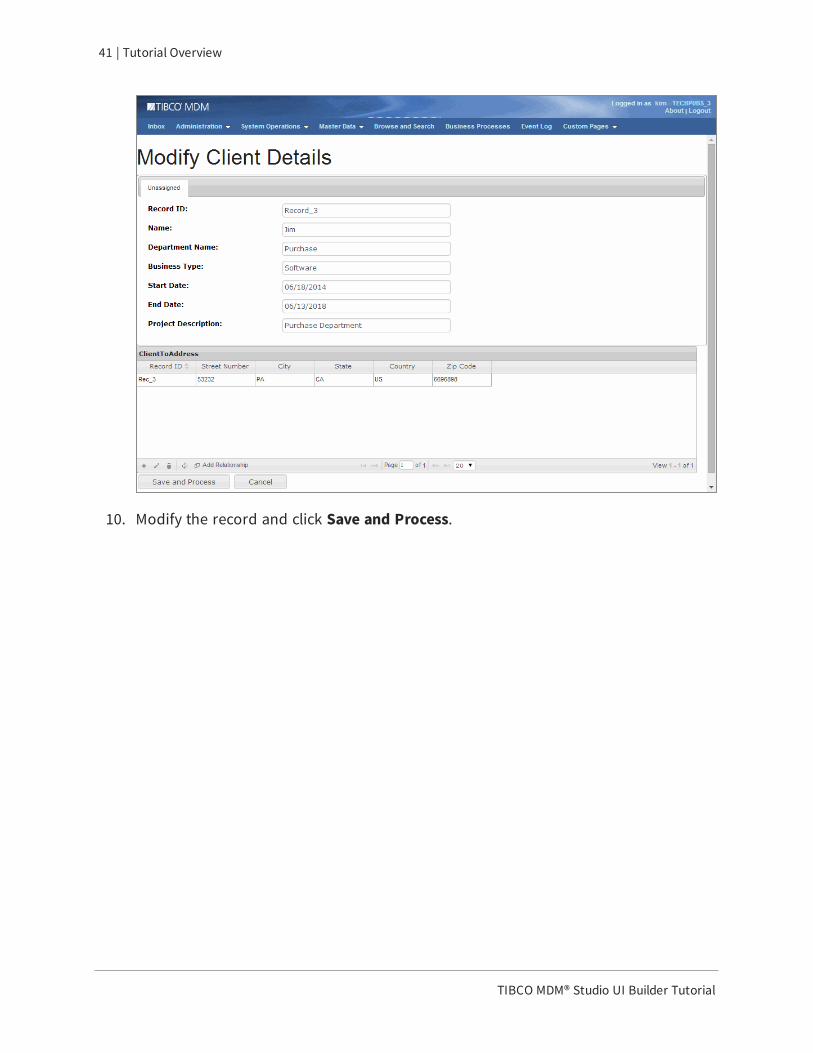
10. Modify the record and click Save and Process.

TIBCO MDM® Studio UI Builder Tutorial
42 | Tutorial Overview
11. Click Ok.
12. The modified record is displayed.

TIBCO MDM® Studio UI Builder Tutorial
43 | Tutorial Overview
TIBCO MDM® Studio UI Builder Tutorial
44 | Legal and Third-Party Notices
Legal and Third-Party NoticesSOME TIBCO SOFTWARE EMBEDS OR BUNDLES OTHER TIBCO SOFTWARE. USE OF SUCH EMBEDDED OR BUNDLED TIBCO SOFTWARE IS SOLELY TO ENABLE THE FUNCTIONALITY (OR PROVIDE LIMITED ADD-ON FUNCTIONALITY) OF THE LICENSED TIBCO SOFTWARE. THE EMBEDDED OR BUNDLED SOFTWARE IS NOT LICENSED TO BE USED OR ACCESSED BY ANY OTHER TIBCO SOFTWARE OR FOR ANY OTHER PURPOSE.
USE OF TIBCO SOFTWARE AND THIS DOCUMENT IS SUBJECT TO THE TERMS AND CONDITIONS OF A LICENSE AGREEMENT FOUND IN EITHER A SEPARATELY EXECUTED SOFTWARE LICENSE AGREEMENT, OR, IF THERE IS NO SUCH SEPARATE AGREEMENT, THE CLICKWRAP END USER LICENSE AGREEMENT WHICH IS DISPLAYED DURING DOWNLOAD OR INSTALLATION OF THE SOFTWARE (AND WHICH IS DUPLICATED IN THE LICENSE FILE) OR IF THERE IS NO SUCH SOFTWARE LICENSE AGREEMENT OR CLICKWRAP END USER LICENSE AGREEMENT, THE LICENSE(S) LOCATED IN THE “LICENSE” FILE(S) OF THE SOFTWARE. USE OF THIS DOCUMENT IS SUBJECT TO THOSE TERMS AND CONDITIONS, AND YOUR USE HEREOF SHALL CONSTITUTE ACCEPTANCE OF AND AN AGREEMENT TO BE BOUND BY THE SAME.
This document is subject to U.S. and international copyright laws and treaties. No part of this document may be reproduced in any form without the written authorization of TIBCO Software Inc.
TIBCO, the TIBCO logo, the TIBCO O logo, BusinessConnect, ActiveMatrix BusinessWorks, and Enterprise Message Service are either registered trademarks or trademarks of TIBCO Software Inc. in the United States and/or other countries.
Java and all Java based trademarks and logos are trademarks or registered trademarks of Oracle and/or its affiliates.
This document includes fonts that are licensed under the SIL Open Font License, Version 1.1, which is available at: https://scripts.sil.org/OFL
Copyright (c) Paul D. Hunt, with Reserved Font Name Source Sans Pro and Source Code Pro.
All other product and company names and marks mentioned in this document are the property of their respective owners and are mentioned for identification purposes only.
This software may be available on multiple operating systems. However, not all operating system platforms for a specific software version are released at the same time. See the readme file for the availability of this software version on a specific operating system platform.
THIS DOCUMENT IS PROVIDED “AS IS” WITHOUT WARRANTY OF ANY KIND, EITHER EXPRESS OR IMPLIED, INCLUDING, BUT NOT LIMITED TO, THE IMPLIED WARRANTIES OF MERCHANTABILITY, FITNESS FOR A PARTICULAR PURPOSE, OR NON-INFRINGEMENT.

TIBCO MDM® Studio UI Builder Tutorial
45 | Legal and Third-Party Notices
THIS DOCUMENT COULD INCLUDE TECHNICAL INACCURACIES OR TYPOGRAPHICAL ERRORS. CHANGES ARE PERIODICALLY ADDED TO THE INFORMATION HEREIN; THESE CHANGES WILL BE INCORPORATED IN NEW EDITIONS OF THIS DOCUMENT. TIBCO SOFTWARE INC. MAY MAKE IMPROVEMENTS AND/OR CHANGES IN THE PRODUCT(S) AND/OR THE PROGRAM(S) DESCRIBED IN THIS DOCUMENT AT ANY TIME.
THE CONTENTS OF THIS DOCUMENT MAY BE MODIFIED AND/OR QUALIFIED, DIRECTLY OR INDIRECTLY, BY OTHER DOCUMENTATION WHICH ACCOMPANIES THIS SOFTWARE, INCLUDING BUT NOT LIMITED TO ANY RELEASE NOTES AND "READ ME" FILES.
This and other products of TIBCO Software Inc. may be covered by registered patents. Please refer to TIBCO's Virtual Patent Marking document (https://www.tibco.com/patents) for details.
Copyright © 2007-2020 TIBCO Software Inc. All Rights Reserved.
TIBCO Software Inc. Confidential Information