tiara for girls tutorial · · 2017-11-10special stitch 4 double crochet popcorn . if the popcorn...
TRANSCRIPT

The ornaments and accessories for the hair are one of the things that fascinate young girls and the not so young. This simple tiara can be done by anyone with a basic knowledge of crochet.
TIARA FOR GIRLS TUTORIAL

DIFFICULTY Advance
MATERIALS 1 ball of 50 gr of cotton, polyester and acrylic silver color to work with hook number 2,5 Hooks used numbers 2 and 3 Wool needle Grey or silver color thread Needle 9 silver beads of 6 mm of diameter 1 m of silver satin ribbon of 12 mm Scissors
CROCHET STITCHES
• Chain (ch) • Slip stitch (sl st) • Single crochet (sc) • Back loop single crochet • Front loop single crochet • Half double crochet (hdc) • Front loop half double crochet • Double crochet (dc) • Treble crochet (tr) • Popcorn stitch of 4 double crochet • Picot of 3 chains with double slip stitch • 3 picots clover with slip stitch •
SPECIAL STITCH 4 DOUBLE CROCHET POPCORN

If the popcorn stitch is done at the beginning of the row the first stitch is made with 3 ch to start the row.
If the popcorn stitch is somewhere else in the row, make 4 dc together, pull out the hook and introduce it into the end of the first dc, from front to back, recover the thread of the fourth dc, yarn over and close it by pulling slightly.
This stitch is bulky but only on one side which is on the opposite side from where it is closed. That is, if we close it on wrong side as in our tiara, it will be bulky in the visible side.
SPECIAL STITCH CLOVER OF 3 CHAINS WITH SLIP STITCH Make 3 ch and introduce the hook in the first ch. 1 sl st. The first picot is done. Make another two the same. To finish the clover make a sl st next to the initial ch of the first picot.
Before you start working insert the beads into the thread with a needle.

With hook number 3.
FOUNDATION ROW: 76 ch
Change to hook number 2.
ROW 1 Front : 1 ch that counts as 1 sc, 75 sc. ROW 2 Back: 27 sl st , 22 sc and 27 sl st, all taken in the back loop of the previous row.

ROW 3 Back: In the first sc of the previous row make 3 ch to start the row and 3 dc to form the first popcorn stitch, 1 ch to close the popcorn and 1 ch. Skip 1 sc of the previous row, 1 popcorn of 4 dc. 12 popcorn stitches in total.

ROW 4 Front: 1 ch that counts as 1 hdc, 2 ch, 1 hdc over each closing ch of the popcorn stitches of the previous row. Insert the first bead. Repeat 2 ch, 1 hdc, 2 ch, 1 hdc and insert the second bead. 12 hdc and 5 beads in total.
The beads are on the back side, so push them a bit to pass them to the front (visible) side.
ROW 5 Back: 3 sl st until reaching the second hdc of the previous row. Wave of 9 ch and 1 sc in the back loop of the fifth hdc. Repeat. 3 waves in total. ROW 6 Front: 11 sc in each wave and 1 sc in the sc of the previous wave. Finish with 1 sc. ROW 7 Back: 6 sl st in the back loop of the sc of the previous row, 10 ch and 1 sc in the centre of the wave of the previous row. Repeat. 2 waves in total. Finish with 1 sc.

ROW 8 Front: 7 sc in the wave of the previous row, 3 tr, insert a bead, 2 ch, 3 tb in the sc of the previous row and 7 sc. Finish with 1 sc in a sl st of the previous row. ROW 9 Back: Place de hook next to the left popcorn stitch of the tiara. Leave a separation of 3 sl st and start in the fourth one of ROW 2 with 4 ch, 1 sc over the popcorn stitch of ROW 3, 1 ch, 1sc in the hdc of ROW 4, 1 ch and 17 sl st in the back loop of the previous row, in the central ch of the previous row make 2 sc, 1 ch, insert a bead and y 2 sc, 17 sl st, 1 ch, 1 sc in the hdc of ROW 4, 1 ch,1 sc over the popcorn stitch of ROW 3 and 4 ch. Finish off in ROW 2 with 1 sl st. ROW 10 Front: Work in the front loop 5 sc, 1 picot of 3 ch and double sl st , 4 sl st, 1 picot, 4 sc, insert 1 bead, 1 picot, 5 sc, 1 picot, 5 sc. 1 picot, 4 hdc and 1 picot in the centre of the tiara, 2 dc, 1 clover form by 3 picots of 3 ch and simple sl st and 2 dc. Repeat on the left hand side of the tiara. Finish with 1 sl st to the headband.
Sew with a wool needle and cut the remaining thread.
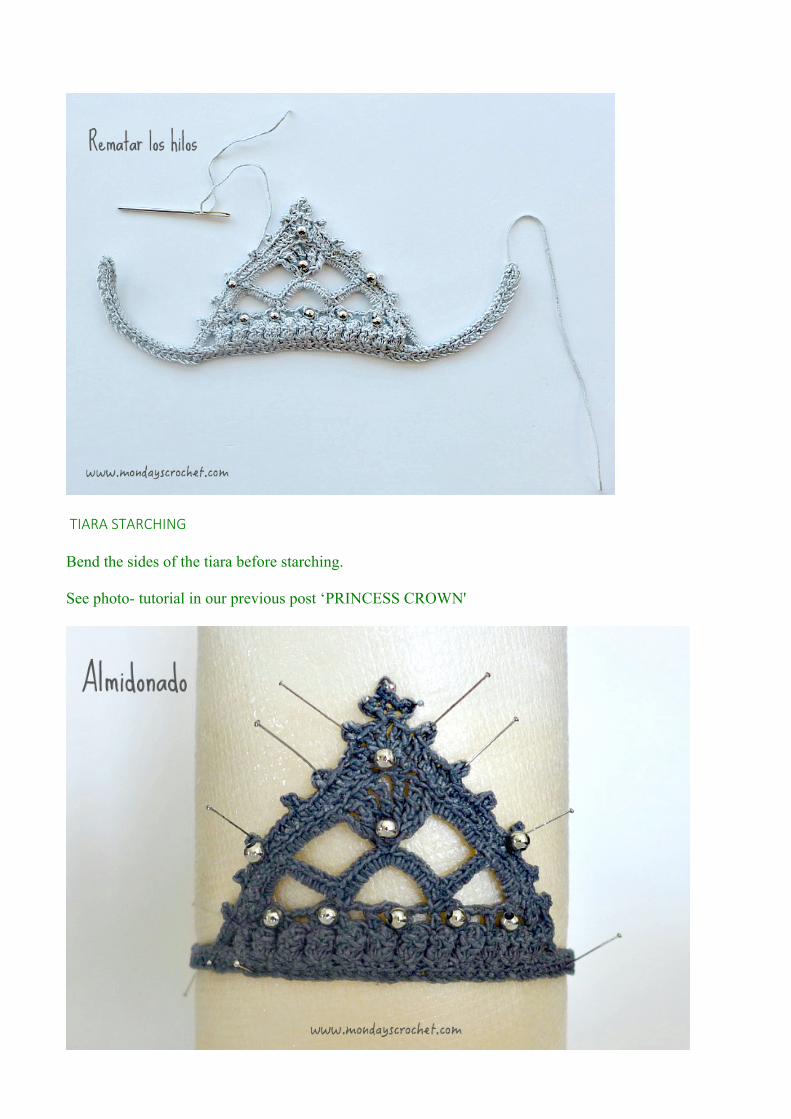
TIARASTARCHING
Bend the sides of the tiara before starching.
See photo- tutorial in our previous post ‘PRINCESS CROWN'

RIBBONFASTENER
Sew a satin ribbon 50 cm length and 12 mm width at the ends.
This tiara can be adapted to all sizes.
We hope you like it!