three.js essentials - packt publishing · in this package, you will find: a biography of the author...
TRANSCRIPT
Three.js Essentials
Jos Dirksen
Chapter No. 3 "Navigate around a Randomly
Generated Maze"
In this package, you will find: A Biography of the author of the book
A preview chapter from the book, Chapter NO.3 "Navigate around a Randomly Generated Maze"
A synopsis of the book’s content
Information on where to buy this book
About the Author Jos Dirksen has worked as a software developer and architect for more than a decade. He has quite a lot of experience in a large range of technologies that range from backend technologies, such as Java and Scala, to frontend development using HTML5, CSS, and JavaScript. Besides working with these technologies, he also regularly speaks at conferences and likes to write about new and interesting technologies on his blog. He also likes to experiment with new technologies and see how they can be best used to create beautiful data visualizations, the results of which you can see on his blog at http://www.smartjava.org/.
Jos currently works as an enterprise architect for Malmberg, a large Dutch publisher of educational material. He helps to create a new digital platform for the creation and publication of educational content for primary, secondary, and vocational education. Previously, he worked in many different roles in the private and public sectors, ranging from private companies such as Philips and ASML to organizations in the public sector, such as the Department of Defense.
Jos has already written a book on Three.js named Learning Three.js: The JavaScript 3D Library for WebGL, Packt Publishing, which is an in-depth description of all the features Three.js provides. Besides his interest in frontend JavaScript and HTML5 technologies, he is also interested in backend service development using REST and traditional web service technologies. He has already written two books on this subject. He is the co-author along with Tijs Rademakers of Open-Source ESBs in Action, Manning Publications, an action book that was published in 2008. In 2012, he published a book on how to apply SOA Governance in a practical manner, titled SOA Governance in Action, Manning Publications.
For More Information: www.packtpub.com/three-js-essentials/book
Acknowledgment Writing a book isn't something you do by yourself. A lot of people have helped and supported me when I was doing this, and my special thanks go out to the following people:
• All the guys from Packt Publishing who have helped me during the writing, reviewing, and laying out part of the process. Great work guys!
• I, of course, have to thank Ricardo Cabello, also known as Mr. dò_ób, for creating the great Three.js library.
• Many thanks go to the reviewers. They have provided me with great feedback and comments that really helped me improve the book; their positive remarks have really helped me shape the book!
And, of course, I'd like to thank my family. I'd like to thank my wife, Brigitte, for supporting me and my two girls, Sophie and Amber, who can always find reasons to pull me away from the keyboard and computer.
For More Information: www.packtpub.com/three-js-essentials/book
Three.js Essentials Web development has been changing a lot in the last couple of years. JavaScript libraries have matured, browsers have become more powerful, and the HTML5 spec is well supported on most systems. Currently, though, the Web mostly focuses on 2D to represent information, create games, and build websites. There is also, however, a great and standardized way to create 3D graphics. This is called WebGL; it provides an API to create hardware-accelerated 3D graphics.
However, the WebGL API isn't very easy to use. It requires you to program in C, and you really need to have an in-depth knowledge of how WebGL works internally to work with this API. Luckily though, there are a number of JavaScript libraries available that hide the complexity of WebGL and provide you with an easy-to-use API to create 3D applications and visualizations. Currently, the best of these JavaScript libraries, the one that is explained in this book, is called Three.js.
With Three.js, you're provided with an easy-to-use API and a whole range of advanced materials and shapes that you can use to access WebGL. In this book, we'll walk you through the most essential features of Three.js. We do this by creating some advanced visualizations that cover various parts of the Three.js API.
What This Book Covers Chapter 1, Get Up and Running with Three.js, explains how to get the source code and set up a local environment to get started with the development of Three.js. At the end of this chapter, you'll have a simple Three.js scene that we will further expand on in the following chapters.
Chapter 2, Creating a 3D World Globe and Visualizing Open Data, shows how you can create a rotating 3D globe. While going through this example, you'll learn how to use materials, how to set up camera controls, and how to enhance your object using the various available textures. As a bonus, we'll also explain how you can use the HTML5 canvas as a texture.
Chapter 3, Navigate around a Randomly Generated Maze, explains how you can create a random 3D maze through which you can navigate a cube. In this chapter, we'll show you how to use animations, lights, and the rotation and position properties.
Chapter 4, Visualizing Audio Data with a Particle System, uses the HTML5 Web Audio API in combination with Three.js to visualize audio. This chapter shows what you can do with the particle system from Three.js. It shows this through visualizations of the waveform, the amplitude, and a 3D histogram.
For More Information: www.packtpub.com/three-js-essentials/book

Chapter 5, Programmatic Geometries, shows an alternative way through which you can create 3D geometries. Three.js, out of the box, offers a number of standard geometries, but creating geometries from scratch is also very easy. In this chapter, we'll show you the various properties you need to configure to correctly set up your own geometries. We do this by creating a programmatic terrain and a programmatic tree.
Chapter 6, Combining HTML and Three.js with CSS3DRenderer, explains how to use CSS3DRenderer to apply a 3D transformation to HTML elements. We'll show a couple of examples that explain what is possible with CSS3DRenderer and how to use it to animate any HTML element.
Chapter 7, Loading and Animating External Models Using Blender, shows how you can load and display models created by external 3D modeling programs. This chapter will also show you a Blender-based workflow that explains how you can model your geometries in Blender and then show and animate these models through Three.js.
For More Information: www.packtpub.com/three-js-essentials/book
Navigate around a Randomly Generated Maze
In the previous chapter, we showed you how to set up a scene where we showed a 3D rotating globe. You learned about the basics of materials, geometries, and lights. In this chapter, we're going to create a simple game that we'll use to explain some other features provided by Three.js. To be more specifi c, we're going to create a random 3D maze through which you have to navigate a rolling cube using the arrow keys on your keyboard. Through this example, we'll explore the following Three.js features:
• With Three.js, it is easy to rotate and move objects around a scene. For this, there are two different approaches, which we'll explore in this chapter. First, rotating and translating objects through standard Three.js properties and second, using matrix transformations.
• We've already seen a couple of light sources. In this chapter, we'll introduce the THREE.SpotLight light source. This light source sends out a beam of light.
• We've already set up an animation loop in Chapter 1, Get Up and Running with Three.js. In this chapter, we'll explain an easy way to create more advanced animations by combining the Tween.js JavaScript library with Three.js.
• In this chapter, we'll also expand on how you can use textures in Three.js by explaining how to set up a repeating texture.
• When you create games or more advanced 3D scenes, it is important to know when objects touch each other. We'll show you an approach to set up collision detection using THREE.Raycaster.
For More Information: www.packtpub.com/three-js-essentials/book
Navigate around a Randomly Generated Maze
[ 52 ]
• Three.js comes with a number of different camera controls. In the previous chapter, we looked at the THREE.OrbitControls object. In this chapter, we'll show you how you can use the THREE.TrackballControls object to easily move and pan around the created scene.
• Finally, we'll also explain the use of the keyboard to control Three.js elements in our scene.
Before we dive into the individual steps needed to create the 3D maze, you can already look and play around with the fi nal result.
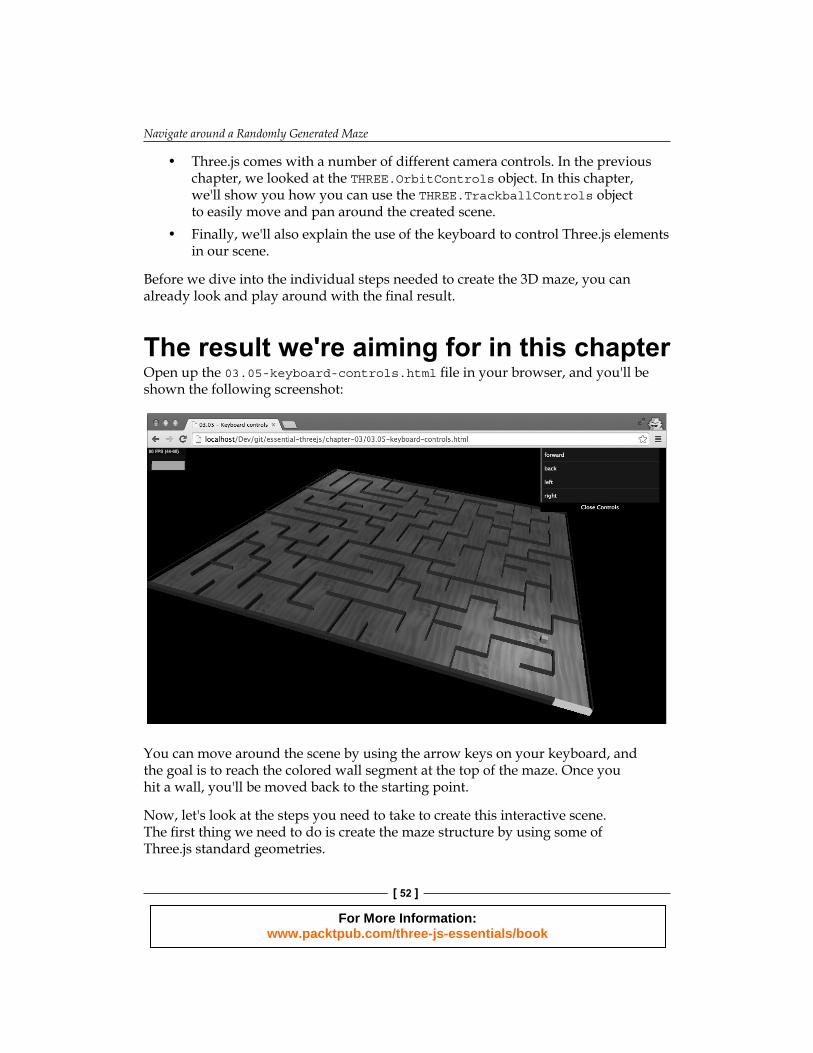
The result we're aiming for in this chapterOpen up the 03.05-keyboard-controls.html fi le in your browser, and you'll be shown the following screenshot:
You can move around the scene by using the arrow keys on your keyboard, and the goal is to reach the colored wall segment at the top of the maze. Once you hit a wall, you'll be moved back to the starting point.
Now, let's look at the steps you need to take to create this interactive scene. The fi rst thing we need to do is create the maze structure by using some of Three.js standard geometries.
For More Information: www.packtpub.com/three-js-essentials/book
Chapter 3
[ 53 ]
Creating the mazeA maze is a rather simple shape that consists of a number of walls and a fl oor. So, what we need is a way to create these shapes. Three.js, not very surprisingly, doesn't have a standard geometry that will allow you to create a maze, so we need to create this maze by hand. To do this, we need to take two different steps:
1. Find a way to generate the layout of the maze so that not all the mazes look the same.
2. Convert that to a set of cubes (THREE.BoxGeometry) that we can use to render the maze in 3D.
There are many different algorithms that we can use to generate a maze, and luckily there are also a number of open source JavaScript libraries that implement such an algorithm. So, we don't have to start from scratch. For the example in this book, I've used the following random-maze-generator project that you can fi nd on GitHub at the following link:
https://github.com/felipecsl/random-maze-generator
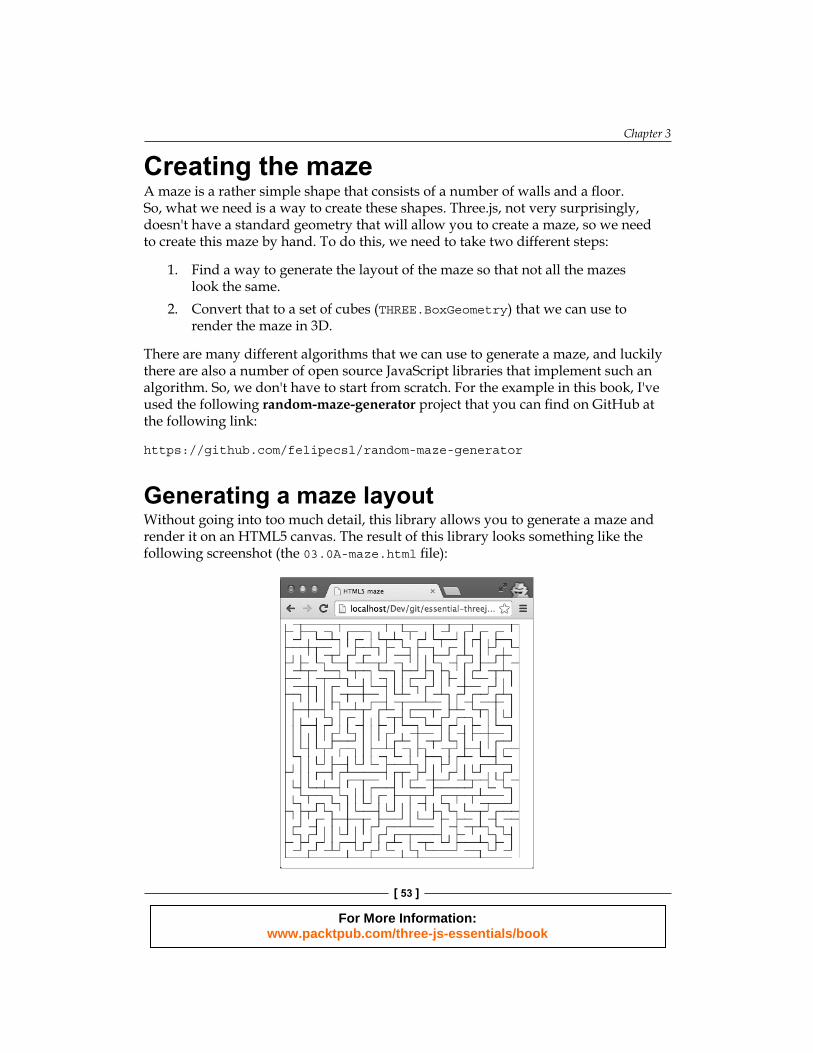
Generating a maze layoutWithout going into too much detail, this library allows you to generate a maze and render it on an HTML5 canvas. The result of this library looks something like the following screenshot (the 03.0A-maze.html fi le):
For More Information: www.packtpub.com/three-js-essentials/book
Navigate around a Randomly Generated Maze
[ 54 ]
You can generate this by just using the following JavaScript:
var maze = new Maze(document, 'maze'); maze.generate(); maze.draw();
Even though this is a nice looking maze, we can't use this directly to create a 3D maze. What we need to do is change the code the library uses to write on the canvas, and change it to create Three.js objects. This library draws the lines on the canvas in a function called drawLine:
drawLine: function(x1, y1, x2, y2) { self.ctx.beginPath(); self.ctx.moveTo(x1, y1); self.ctx.lineTo(x2, y2); self.ctx.stroke();}
If you're familiar with the HTML5 canvas, you can see that this function draws lines based on the input arguments. Now that we've got this maze, we need to convert it to a number of 3D shapes so that we can render them in Three.js.
Converting the layout to a 3D set of objectsTo change this library to create Three.js objects, all we have to do is change the drawLine function to the following code snippet:
drawLine: function(x1, y1, x2, y2) { var lengthX = Math.abs(x1 - x2); var lengthY = Math.abs(y1 - y2);
// since only 90 degrees angles, so one of these is always 0 // to add a certain thickness to the wall, set to 0.5 if (lengthX === 0) lengthX = 0.5; if (lengthY === 0) lengthY = 0.5;
// create a cube to represent the wall segment var wallGeom = new THREE.BoxGeometry(lengthX, 3, lengthY); var wallMaterial = new THREE.MeshPhongMaterial({ color: 0xff0000, opacity: 0.8, transparent: true });
// and create the complete wall segment var wallMesh = new THREE.Mesh(wallGeom, wallMaterial);
// finally position it correctly wallMesh.position = new THREE.Vector3( x1 - ((x1 - x2) / 2) - (self.height / 2),
For More Information: www.packtpub.com/three-js-essentials/book
Chapter 3
[ 55 ]
wallGeom.height / 2, y1 - ((y1 - y2)) / 2 - (self.width / 2));
self.elements.push(wallMesh); scene.add(wallMesh);}
In this new drawLine function, instead of drawing on the canvas, we create a THREE.BoxGeometry object whose length and depth are based on the supplied arguments. Using this geometry, we create a THREE.Mesh object and use the position attribute to position the mesh on a specifi c points with the x, y, and z coordinates. Before we add the mesh to the scene, we add it to the self.elements array. We don't need this at this moment, but we'll use this later on in this chapter for collision detection.
Now we can just use the following code snippet to create a 3D maze:
var maze = new Maze(scene,17, 100, 100);maze.generate();maze.draw();
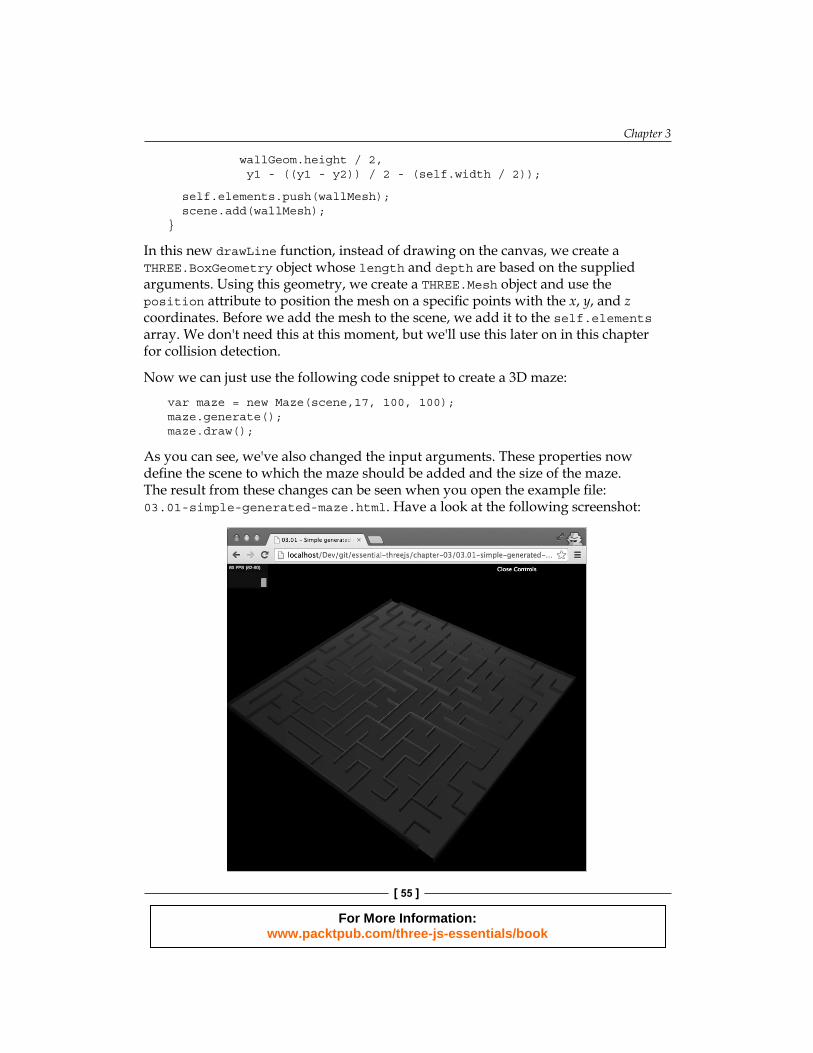
As you can see, we've also changed the input arguments. These properties now defi ne the scene to which the maze should be added and the size of the maze. The result from these changes can be seen when you open the example fi le: 03.01-simple-generated-maze.html. Have a look at the following screenshot:
For More Information: www.packtpub.com/three-js-essentials/book

Navigate around a Randomly Generated Maze
[ 56 ]
Every time you refresh, you'll see a newly generated random maze. Now that we've got our generated maze, the next step is to add the object that we'll move through the maze.
Animating the cubeBefore we dive into the code, let's fi rst look at the result we're aiming for. Open the example fi le, 03.02-animate-cube.html, and you'll see something like the following screenshot:
Using the controls at the top-right corner, you can move the cube around. What you'll see is that the cube rotates around its edges, not around its center. In this section, we'll show you how to create that effect. Let's fi rst look at the default rotation, which is along an object's central axis, and the translation behavior of Three.js.
For More Information: www.packtpub.com/three-js-essentials/book
Chapter 3
[ 57 ]
The standard Three.js rotation behaviorLet's fi rst look at all the properties you can set on THREE.Mesh. They are shown as follows:
Function/property Descriptionposition This property refers to the position of an object, which is
relative to the position of its parent. In all our examples, so far the parent is THREE.Scene.
rotation This property defines the rotation of THREE.Mesh around its own x, y, or z axis.
scale With this property, you can scale the object along its own x, y, and z axes.
translateX(amount) This property moves the object by a specified amount over the x axis.
translateY(amount) This property moves the object by a specified amount over the y axis.
translateZ(amount) This property moves the object by a specified amount over the z axis.
If we want to rotate a mesh around one of its own axes, we can just call the following line of code:
plane.rotation.x = -0.5 * Math.PI;
We've used this to rotate the ground area from a horizontal position to a vertical one. It is important to know that this rotation is done around its own internal axis, not the x, y, or z axis of the scene. So, if you fi rst do a number of rotations one after another, you have to keep track at the orientation of your mesh to make sure you get the required effect. Another point to note is that rotation is done around the center of the object—in this case the center of the cube. If we look at the effect we want to accomplish, we run into the following two problems:
• First, we don't want to rotate around the center of the object; we want to rotate around one of its edges to create a walking-like animation
• Second, if we use the default rotation behavior, we have to continuously keep track of our orientation since we're rotating around our own internal axis
In the next section, we'll explain how you can solve these problems by using matrix-based transformations.
For More Information: www.packtpub.com/three-js-essentials/book
Navigate around a Randomly Generated Maze
[ 58 ]
Creating an edge rotation using matrix-based transformationIf we want to perform edge rotations, we have to take the following few steps:
• If we want to rotate around the edge, we have to change the center point of the object to the edge we want to rotate around.
• Since we don't want to keep track of all the rotations we've done, we'll need to make sure that after each rotation, the vertices of the cube represent the correct position.
• Finally, after we've rotated around the edge, we have to do the inverse of the fi rst step. This is to make sure the center point of the object is back in the center of the cube so that it is ready for the next step.
So, the fi rst thing we need to do is change the center point of the cube. The approach we use is to offset the position of all individual vertices and then change the position of the cube in the opposite way. The following example will allow us to make a step to the right-hand side:
cubeGeometry.applyMatrix(new THREE.Matrix4().makeTranslation (0, width / 2, width / 2));cube.position.y += -width / 2;cube.position.z += -width / 2;
With the cubeGeometry.applyMatrix function, we can change the position of the individual vertices of our geometry. In this example, we will create a translation (using makeTranslation), which offsets all the y and z coordinates by half the width of the cube. The result is that it will look like the cube moved a bit to the right-hand side and then up, but the actual center of the cube now is positioned at one of its lower edges. Next, we use the cube.position property to position the cube back at the ground plane since the individual vertices were offset by the makeTranslation function.
Now that the edge of the object is positioned correctly, we can rotate the object. For rotation, we could use the standard rotation property, but then, we will have to constantly keep track of the orientation of our cube. So, for rotations, we once again use a matrix transformation on the vertices of our cube:
cube.geometry.applyMatrix(new THREE.Matrix4().makeRotationX(amount);
For More Information: www.packtpub.com/three-js-essentials/book
Chapter 3
[ 59 ]
As you can see, we use the makeRotationX function, which changes the position of our vertices. Now we can easily rotate our cube, without having to worry about its orientation. The fi nal step we need to take is reset the cube to its original position; taking into account that we've moved a step to the right, we can take the next step:
cube.position.y += width/2; // is the inverse + widthcube.position.z += -width/2;cubeGeometry.applyMatrix(new THREE.Matrix4().makeTranslation(0, - width / 2, width / 2));
As you can see, this is the inverse of the fi rst step; we've added the width of the cube to position.y and subtracted the width from the second argument of the translation to compensate for the step to the right-hand side we've taken.
If we use the preceding code snippet, we will only see the result of the step to the right. In the next section, we'll use the Tween.js JavaScript library to animate the step.
Using Tween.js to add an animationWe've created a function that takes care of a single step. This function makes the appropriate matrix transformations and sets up the animation. The following code fragment shows this function, where we've left out the transformations for clarity:
function takeStepRight(cube, start, end, time) { var cubeGeometry = cube.geometry; var width = 4; if (!isTweening) { var tween = new TWEEN.Tween({ x: start, cube: cube, previous: 0 }) .to({ x: end }, time) .easing(TWEEN.Easing.Linear.None) .onStart(function() { // change center point to edge }) .onUpdate(function() { var amount = -(this.x – this.previous); // do rotation based on amount }) .onComplete(function() { // reset center point to center of cube isTweening = false; })
For More Information: www.packtpub.com/three-js-essentials/book
Navigate around a Randomly Generated Maze
[ 60 ]
.start(); }}
So, whenever we take a step to the right-hand side, we create a new tween. A tween can be used to change the value of a variable from one value to another over a period of time. In this example, we created a tween that changes the x variable from the provided start to end value within a duration of time. With a tween, we can also defi ne how the variable changes. Whether it changes quickly in the beginning and slowly at the end, or, for instance, if it changes exponentially. This is called easing, and we can defi ne this on our tween using the easing function. In this case, we use TWEEN.Easing.Linear.None, which means that the value changes in a linear fashion. We can also use exponential, sinusoidal, and many more easing methods.
Using the onStart function, we defi ne what we want to do when this tween is started. In this case, we changed the center point as we explained in the previous section. Next in the onUpdate function, which is called a number of times during the animation, we changed the rotation based on the current value of the x property, just as we explained in the previous section. Finally, using the onEnd function, we reset the center of the cube. With Tween.start(), we started the animation directly.
The last thing we need to do is add one line to the render() function to update this animation, which in turn will call the function supplied to onUpdate:
TWEEN.update();
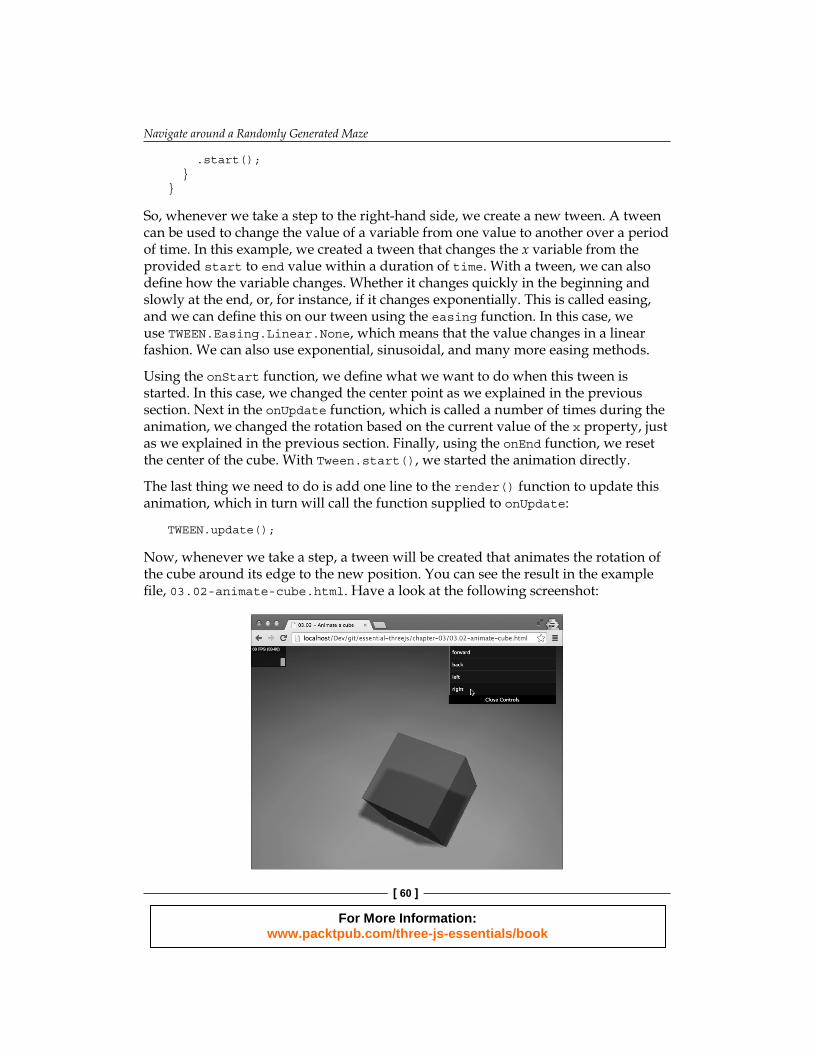
Now, whenever we take a step, a tween will be created that animates the rotation of the cube around its edge to the new position. You can see the result in the example fi le, 03.02-animate-cube.html. Have a look at the following screenshot:
For More Information: www.packtpub.com/three-js-essentials/book
Chapter 3
[ 61 ]
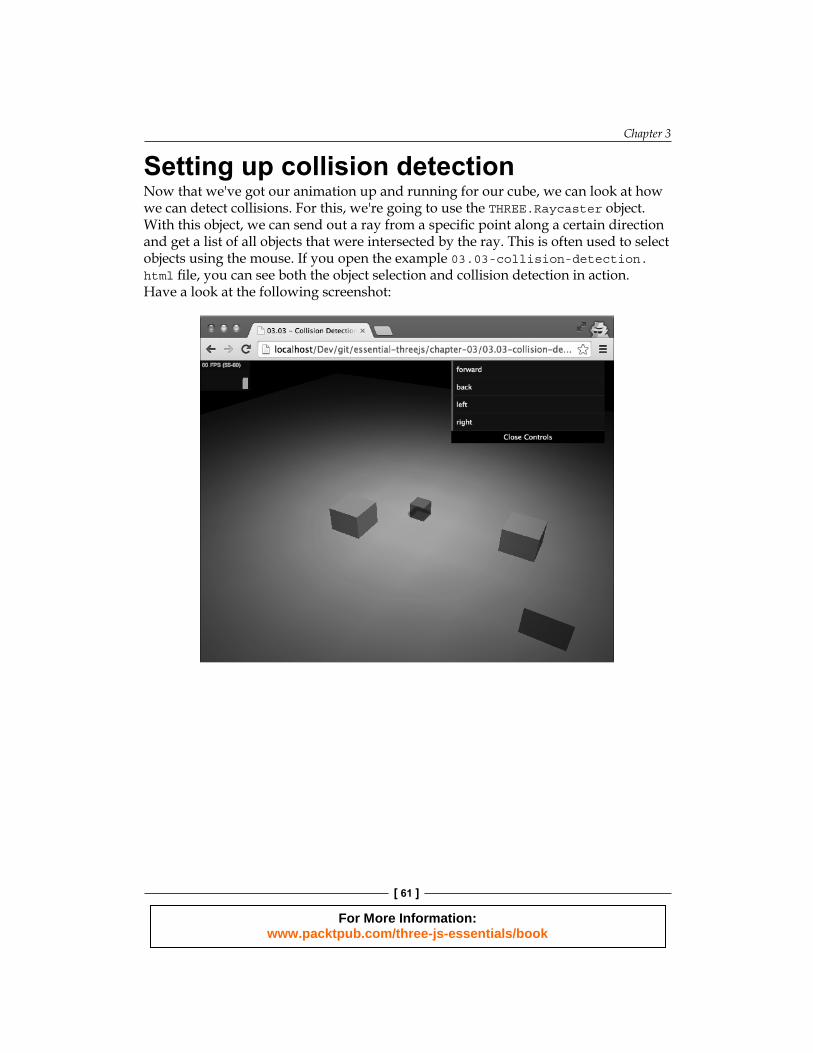
Setting up collision detectionNow that we've got our animation up and running for our cube, we can look at how we can detect collisions. For this, we're going to use the THREE.Raycaster object. With this object, we can send out a ray from a specifi c point along a certain direction and get a list of all objects that were intersected by the ray. This is often used to select objects using the mouse. If you open the example 03.03-collision-detection.html fi le, you can see both the object selection and collision detection in action. Have a look at the following screenshot:
For More Information: www.packtpub.com/three-js-essentials/book
Navigate around a Randomly Generated Maze
[ 62 ]
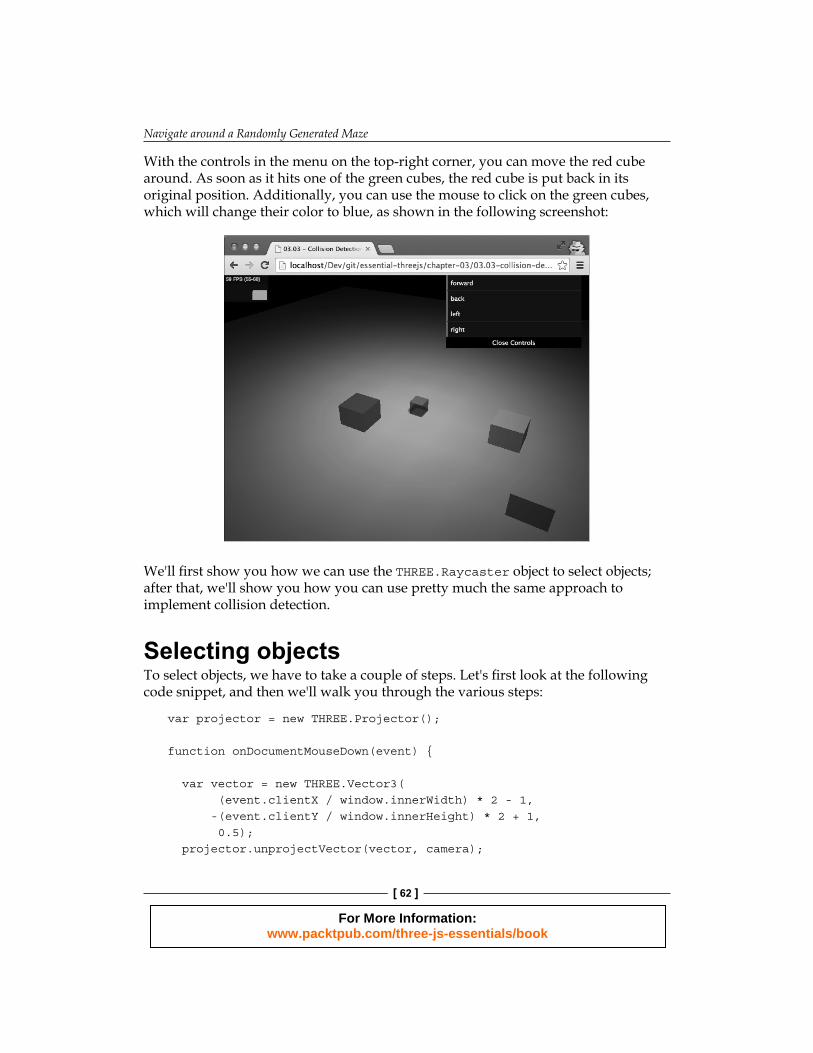
With the controls in the menu on the top-right corner, you can move the red cube around. As soon as it hits one of the green cubes, the red cube is put back in its original position. Additionally, you can use the mouse to click on the green cubes, which will change their color to blue, as shown in the following screenshot:
We'll fi rst show you how we can use the THREE.Raycaster object to select objects; after that, we'll show you how you can use pretty much the same approach to implement collision detection.
Selecting objectsTo select objects, we have to take a couple of steps. Let's fi rst look at the following code snippet, and then we'll walk you through the various steps:
var projector = new THREE.Projector();
function onDocumentMouseDown(event) {
var vector = new THREE.Vector3( (event.clientX / window.innerWidth) * 2 - 1, -(event.clientY / window.innerHeight) * 2 + 1, 0.5); projector.unprojectVector(vector, camera);
For More Information: www.packtpub.com/three-js-essentials/book
Chapter 3
[ 63 ]
var raycaster = new THREE.Raycaster( camera.position, vector.sub(camera.position).normalize()); var intersects = raycaster.intersectObjects(collidableMeshList);
if (intersects.length > 0) { intersects[0].object.material.transparent = true; intersects[0].object.material.color = new THREE.Color(0x0000ff); }}window.onmousedown = onDocumentMouseDown;
So, what is done in this code fragment? This is explained as follows:
• First, we created a THREE.Projecter object, which we can use to convert the coordinates where you've clicked into the coordinates in your 3D scene.
• Using this projector, we convert the position where we clicked (vector) into a position in the scene by using the unprojectVector function.
• Now, we can create a THREE.Raycaster object to cast rays in the direction we clicked from the point of view of the camera.
• Using the raycaster.intersectObjects function, we can check whether the ray we cast intersects any of the objects that are in the collidableMeshList array. Any objects that are intersected by the ray are returned in the form of an array of objects from this function.
• If there are objects that are intersected (intersects.length > 0) by our ray, we change the color of the fi rst one, which is the nearest one, to blue.
As you can see, this is a fairly straightforward approach to select objects in our scene and do something with the selected object. We use pretty much the same approach for detecting collisions.
Detecting collisionsIf we want to detect a collision in our scene between the cube and the walls, we can use an approach that is pretty much the same as the one we've used in the previous section. Let's walk you step by step through the detectCollision function, which handles collision detection in our examples:
var cube = scene.getObjectByName('cube');var originPoint = cube.position.clone();
For More Information: www.packtpub.com/three-js-essentials/book
Navigate around a Randomly Generated Maze
[ 64 ]
The fi rst thing we need to do is get the current position of our cube. Now, we're going to send rays from the center of our cube to each vertex and check whether they intersect with one of our walls:
for (var vertexIndex = 0; vertexIndex < cube.geometry.vertices.length; vertexIndex++) {
For each vertex, we create a THREE.Raycaster object, just as we did in the previous code fragment, send a ray to one of the vertices, and check whether we intersect with one of our wall segments, which we stored in the collidableMeshList array:
var localVertex = cube.geometry.vertices[vertexIndex].clone(); var globalVertex = localVertex.applyMatrix4(cube.matrix); var directionVector = globalVertex.sub(cube.position);
var ray = new THREE.Raycaster( originPoint, directionVector.clone().normalize()); var collisionResults = ray.intersectObjects(collidableMeshList);
The ray sent by the THREE.Raycaster object doesn't stop when it reaches the vertex it is aimed at. So the collisionResults object will also contain objects that are hit by the ray but haven't collided with the cube yet. So, additionally, we check the distance of the object we intersected with. If that is smaller than the distance between the center of the cube and the vertex, it means we have a collision. Have a look at the following code snippet:
if (collisionResults.length > 0 && collisionResults[0].distance < directionVector.length()) {
At this point, we have a collision; for our maze, it means we stop all the current running animations, remove the cube from its current position, and position it back at the beginning:
var tweens = TWEEN.getAll();
if (tweens.length > 0) {
tweens[0].stop(); TWEEN.removeAll(); isTweening = false;
scene.remove(cube); cube = createCube(); } }}
For More Information: www.packtpub.com/three-js-essentials/book
Chapter 3
[ 65 ]
With this approach, using collision detection is very easy. There is also, however, a downside to detecting collisions like this. It is a fairly resource-intensive process. The more complex shapes become, or when the number of shapes increases, the more time it'll cost to determine whether there are collisions. There are different ways in which you can make collision detection less resource intensive. For complex shapes, you could, for instance, use an invisible bounding box, instead of the actual complex shapes. Going into details here is a bit out of the scope of this book. The main thing to remember is that collision detection comes at a price, and you should really look at the performance implications when using this in complex scenes and scenarios.All parts of the maze and the functionality are pretty much done. We can generate a maze, move the cube around, and detect collisions. Now let's improve what the maze would look like.
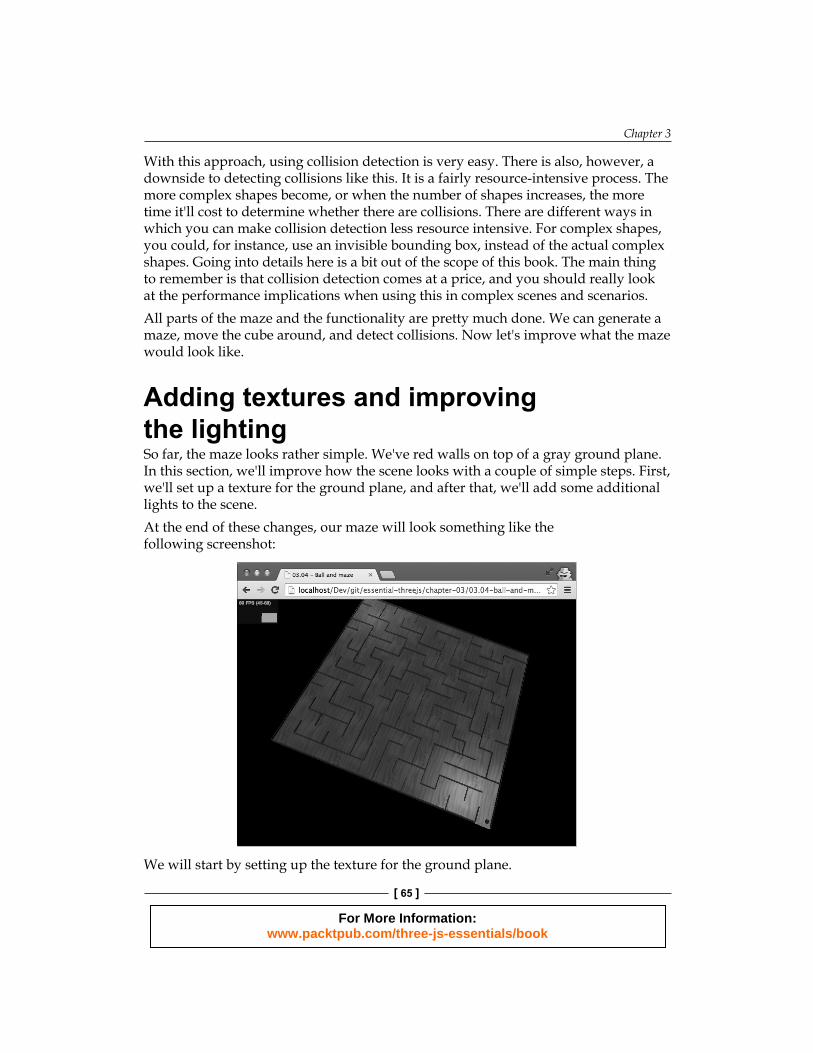
Adding textures and improving the lightingSo far, the maze looks rather simple. We've red walls on top of a gray ground plane. In this section, we'll improve how the scene looks with a couple of simple steps. First, we'll set up a texture for the ground plane, and after that, we'll add some additional lights to the scene.At the end of these changes, our maze will look something like the following screenshot:
We will start by setting up the texture for the ground plane.
For More Information: www.packtpub.com/three-js-essentials/book
Navigate around a Randomly Generated Maze
[ 66 ]
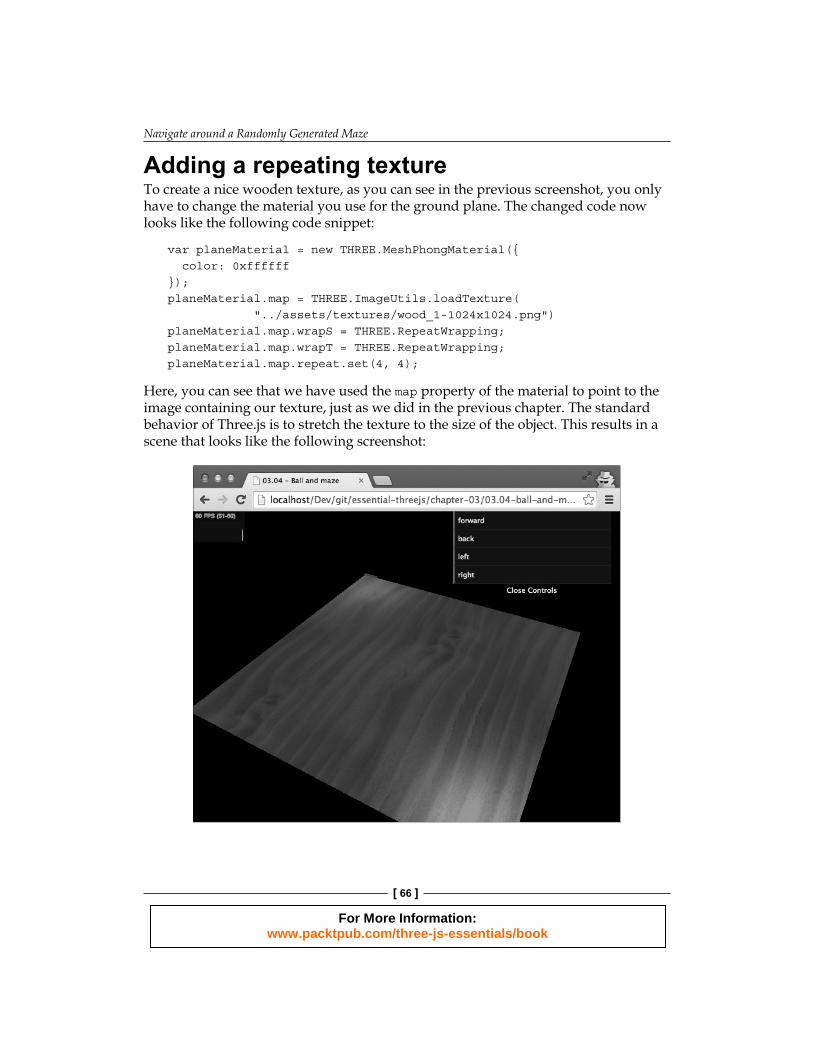
Adding a repeating textureTo create a nice wooden texture, as you can see in the previous screenshot, you only have to change the material you use for the ground plane. The changed code now looks like the following code snippet:
var planeMaterial = new THREE.MeshPhongMaterial({ color: 0xffffff});planeMaterial.map = THREE.ImageUtils.loadTexture( "../assets/textures/wood_1-1024x1024.png")planeMaterial.map.wrapS = THREE.RepeatWrapping;planeMaterial.map.wrapT = THREE.RepeatWrapping;planeMaterial.map.repeat.set(4, 4);
Here, you can see that we have used the map property of the material to point to the image containing our texture, just as we did in the previous chapter. The standard behavior of Three.js is to stretch the texture to the size of the object. This results in a scene that looks like the following screenshot:
For More Information: www.packtpub.com/three-js-essentials/book

Chapter 3
[ 67 ]
Even though the result looks nice, it looks very zoomed in. By setting the planeMaterial.map.wrapS and planeMaterial.map.wrapT properties to THREE.RepeatWrapping, we tell Three.js that we want to repeat the texture along its x and y axes. We can specify the number of times the texture is repeated by using the map.repeat property. In this example, we repeat the texture four times along the x and y axes. As you can see in the following screenshot, the texture is repeated:
Now that we've set up the texture for the fl oor, the next step is to add the red and green light sources at the start and end positions.
Setting up the light sourcesIf you look back at the earlier screenshots, you will see that we've added green and red lights to the bottom-left corner and top-right corner, respectively. To accomplish this, we've used a THREE.SpotLight object. This light source behaves like a fl ashlight that emits a beam of light. Using a THREE.SpotLight object is pretty much the same as the other lights we've seen so far:
// add spotlight for the finish linevar finishLight = new THREE.SpotLight(0xff0000);
For More Information: www.packtpub.com/three-js-essentials/book
Navigate around a Randomly Generated Maze
[ 68 ]
finishLight.position.set(-50, 70, -50);finishLight.castShadow = true;finishLight.intensity = 0.5;
var finishTarget = new THREE.Object3D();finishTarget.position.set(-60, 0, -60);finishLight.target = finishTarget;
scene.add(finishLight);
In this code fragment, we've created a THREE.SpotLight object that emits red light. With the position property, we set the light above the top-left area of our maze, and we set the intensity of the light to 0.5 to make the light a bit softer. By default, all lights point to the center of the scene; using the target property, we can tell the light where it needs to look. A light source expects THREE.Object3D, or any of its subclasses, such as THREE.Mesh, as its target. In our case, we create a new THREE.Object3D object and set it as the target property. The interesting part is that if we now move the finishTarget object, our light will automatically follow it around.
The previous code snippet was used to add the red light; we've used the same approach to add the green light at the bottom-left corner. For a complete overview of the properties you can set on a THREE.SpotLight object, look at the following table:
Property DescriptioncastShadow Set this property to true to have this light cast shadows.shadowCameraNear This property signifies the distance from the light that
shadows should be created.shadowCameraFar This property refers to the distance from the light that
shadows should be created.shadowCameraFov This property tells us how wide the area is for which
shadows need to be created.target This property determines where the light is looking.shadowBias This property can be used to slightly offset the position
of the rendered shadow.angle This property tells us how wide the beam of light is.
It is measured in radians. Its default value is Math.PI/3.exponent A light is aimed at a specific target. The farther away
the light is from this direction, the more its intensity will decrease. This value determines how fast the light's intensity will decrease.
onlyShadow If this property is set to true, the light will only cast a shadow.
For More Information: www.packtpub.com/three-js-essentials/book
Chapter 3
[ 69 ]
Property DescriptionshadowCameraVisible If this property is set to true, you will see how and
where this light source casts a shadow. This is very easy for debugging purposes.
shadowDarkness Its default value is 0.5. This property defines how dark the shadow rendered is.
shadowMapWidth This property determines how many pixels are used to create the shadow. Increase this when the shadow has jagged edges or doesn't look smooth.
shadowMapHeight This property determines how many pixels are used to create the shadow. Increase this when the shadow has jagged edges or doesn't look smooth.
In the next section, we'll add trackball controls that you can use to move and pan around the scene, and we'll add some keyboard controls that you can use to move the cube around.
Adding trackball and keyboard controlsAll that is left to do now is make it a bit friendlier to use. To do this, we'll add THREE.TrackballControls, which you can use to pan and move the camera around, and we'll confi gure some keyboard controls that you can use to move the cube around.
Adding trackball controls to the cameraWith the trackball controls, you can very easily use your mouse to move the camera around the scene. The following table shows how you can move the camera around when this control is used:
Control ActionLeft mouse button and move Rotate and roll the camera around the sceneScroll wheel Zoom in and zoom outMiddle mouse button and move Zoom in and zoom outRight mouse button and move Pan around the scene
For More Information: www.packtpub.com/three-js-essentials/book
Navigate around a Randomly Generated Maze
[ 70 ]
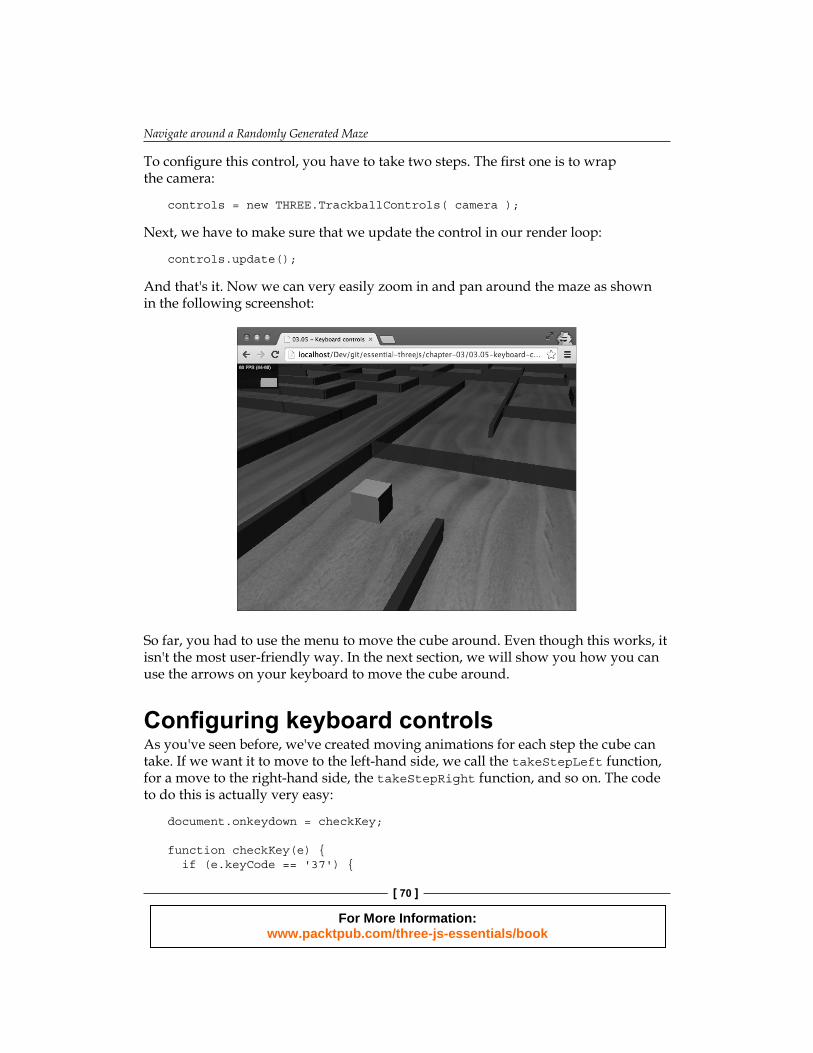
To confi gure this control, you have to take two steps. The fi rst one is to wrap the camera:
controls = new THREE.TrackballControls( camera );
Next, we have to make sure that we update the control in our render loop:
controls.update();
And that's it. Now we can very easily zoom in and pan around the maze as shown in the following screenshot:
So far, you had to use the menu to move the cube around. Even though this works, it isn't the most user-friendly way. In the next section, we will show you how you can use the arrows on your keyboard to move the cube around.
Confi guring keyboard controlsAs you've seen before, we've created moving animations for each step the cube can take. If we want it to move to the left-hand side, we call the takeStepLeft function, for a move to the right-hand side, the takeStepRight function, and so on. The code to do this is actually very easy:
document.onkeydown = checkKey;
function checkKey(e) { if (e.keyCode == '37') {
For More Information: www.packtpub.com/three-js-essentials/book
Chapter 3
[ 71 ]
// left takeStepLeft(scene.getObjectByName('cube'), 0, 0.5 * Math.PI, 100); } else if (e.keyCode == '38') { // up takeStepForward(scene.getObjectByName('cube'), 0, 0.5 * Math.PI, 100); } else if (e.keyCode == '39') { // right takeStepRight(scene.getObjectByName('cube'), 0, 0.5 * Math.PI, 100); } else if (e.keyCode == '40') { // down takeStepBackward(scene.getObjectByName('cube'), 0, 0.5 * Math.PI, 100); }}
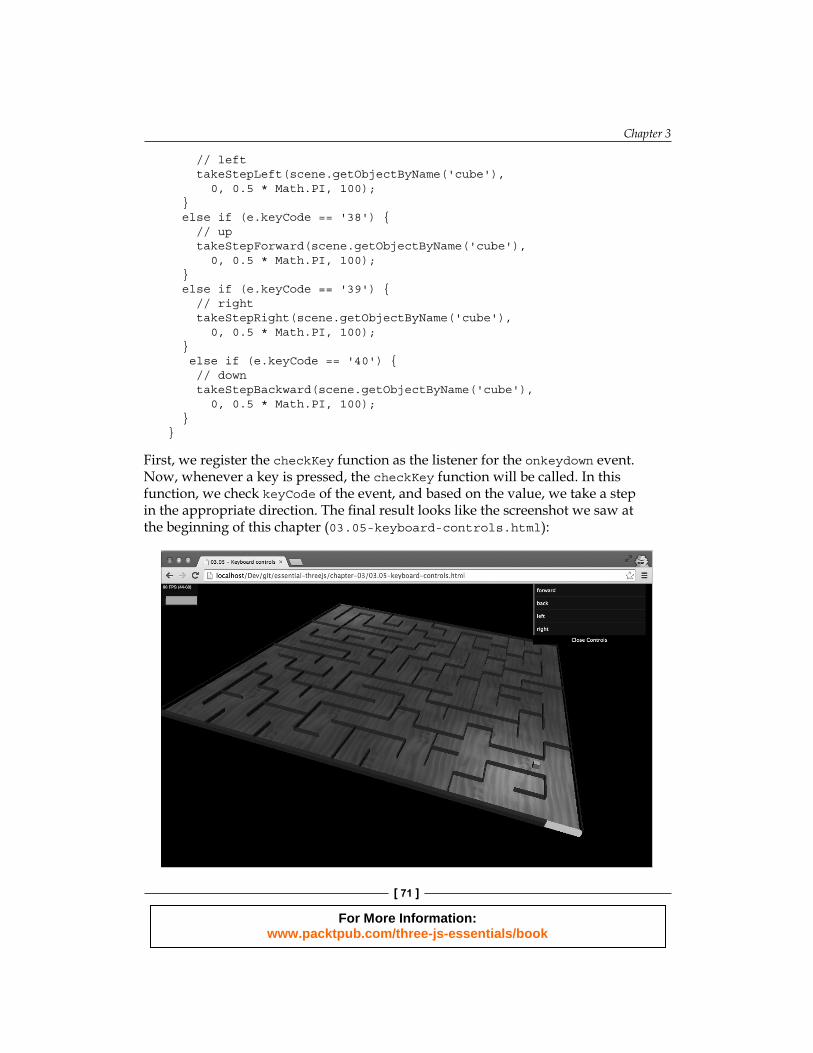
First, we register the checkKey function as the listener for the onkeydown event. Now, whenever a key is pressed, the checkKey function will be called. In this function, we check keyCode of the event, and based on the value, we take a step in the appropriate direction. The fi nal result looks like the screenshot we saw at the beginning of this chapter (03.05-keyboard-controls.html):
For More Information: www.packtpub.com/three-js-essentials/book
Navigate around a Randomly Generated Maze
[ 72 ]
SummaryIn this chapter, we covered many different parts of Three.js to create the maze with a walking cube. We started by adapting a standard JavaScript library since Three.js didn't provide us with a geometry we could use out of the box. As you've seen, it is pretty easy to adapt these kinds of libraries and use them as input for creating Three.js geometries.
In this chapter, we've also spent a lot of time on rotation. By default, Three.js rotates objects around their center point. For many use cases, this is enough, but for more advanced animations or rotations, you need to approach this differently by moving its rotation point (also called pivot point). If you want to change its rotation point, you fi rst need to translate a geometry and change this pivot point before applying the rotation.
Another aspect of rotation that you need to understand is the difference between the rotation property of a mesh, and applying rotations through a matrix transformation. When you set the rotation property of a mesh, you're not really changing the position of its vertices. You're just telling Three.js that it needs to apply this rotation before rendering the object. In this case, the position of the vertices of the geometry doesn't change. If you apply a matrix transformation directly to the geometry, you change the position of the individual vertices.
Another object of Three.js that we used in this chapter is the THREE.Raycaster object. We can use this object to select objects with our mouse or use it for some simple collision detection between objects.
The last big part of this chapter dealt with animations. There are many different ways to do animations in Three.js. You could update the variables yourself in the render loop, but it is often easier to use Tween.js, or another tween library such as TweenLite, for this purpose. With these kinds of libraries, you can easily change the value of a variable from start to end over a period of time using a specifi c easing method.
In the earlier chapters, we looked at geometries that consist of vertices and faces. In the next chapter, we'll look at particles. With particles we don't create 3D objects; instead, we work with particles created from the vertices of geometry. Each particle can be animated, and styled separately to create beautiful effects.
For More Information: www.packtpub.com/three-js-essentials/book

Where to buy this book You can buy Three.js Essentials from the Packt Publishing website: http://www.packtpub.com/three-js-essentials/book. Free shipping to the US, UK, Europe and selected Asian countries. For more information, please read our shipping policy.
Alternatively, you can buy the book from Amazon, BN.com, Computer Manuals and most internet book retailers.
www.PacktPub.com
For More Information: www.packtpub.com/three-js-essentials/book