this procedure is for asustek routers wl520gu, wl500w, wl500g
TRANSCRIPT

Chillifire Hotspot Router Installation Guide Version 09.10
This procedure is for Asustek routers WL520gU, WL500w, WL500g, WL500gD (Deluxe), and Wl500gP (Premium) v1 and v2
Contents Firmware Installation .............................................................................................................................................................. 2
Windows XP/Vista TFTP Client Instructions .................................................................................................................... 2
Router Registration ................................................................................................................................................................. 5
Setting your timezone ..................................................................................................................................................... 5
Link your router to your Chillifire account ...................................................................................................................... 5
Router Configuration .............................................................................................................................................................. 7
Define a “Walled Garden” ............................................................................................................................................... 7
Define your custom splash page / homepage ................................................................................................................ 7
Change your router’s password ...................................................................................................................................... 8
Change your router’s SSID (name of the hotspot the end‐user will see) ....................................................................... 8
Add devices to the Whitelist to bypass hotspot authentication .................................................................................... 9
Change the wireless channel the Hotspot is sending on ................................................................................................ 9
Assign the Ethernet LAN connections to either Hotspot or Free Access ...................................................................... 10
Change wireless transmission settings ......................................................................................................................... 10
Establish Quality of Service (QoS) and establish maximum throughput rates ............................................................. 11
Chillifire Status, Add‐Ons and Upgrades ...................................................................................................................... 11
Connecting a USB Printer, USB Memory Stick or External Drive .................................................................................. 11
Switch Configuartion ..................................................................................................................................................... 12
Additional Configuration ............................................................................................................................................... 12
Show Active Hotspot Connections ................................................................................................................................ 12
Backup and Reload Settings, Reset to Default Settings ........................................................................................................ 13
Upgrading older Chillifire Versions ....................................................................................................................................... 13
How to connect to a shared USB printer connected to the router ...................................................................................... 14
Windows clients (XP/Vista) ........................................................................................................................................... 14
MAC OS X Version 10.4.6 .............................................................................................................................................. 14
Linux clients ................................................................................................................................................................... 15
Appendix: .............................................................................................................................................................................. 16
LINUX TFTP Client Instructions for TFTP ....................................................................................................................... 16
MAC OS X Client Instructions for TFTP .......................................................................................................................... 17
Chillifire Hotspot Router Installation Guide Version 09.10
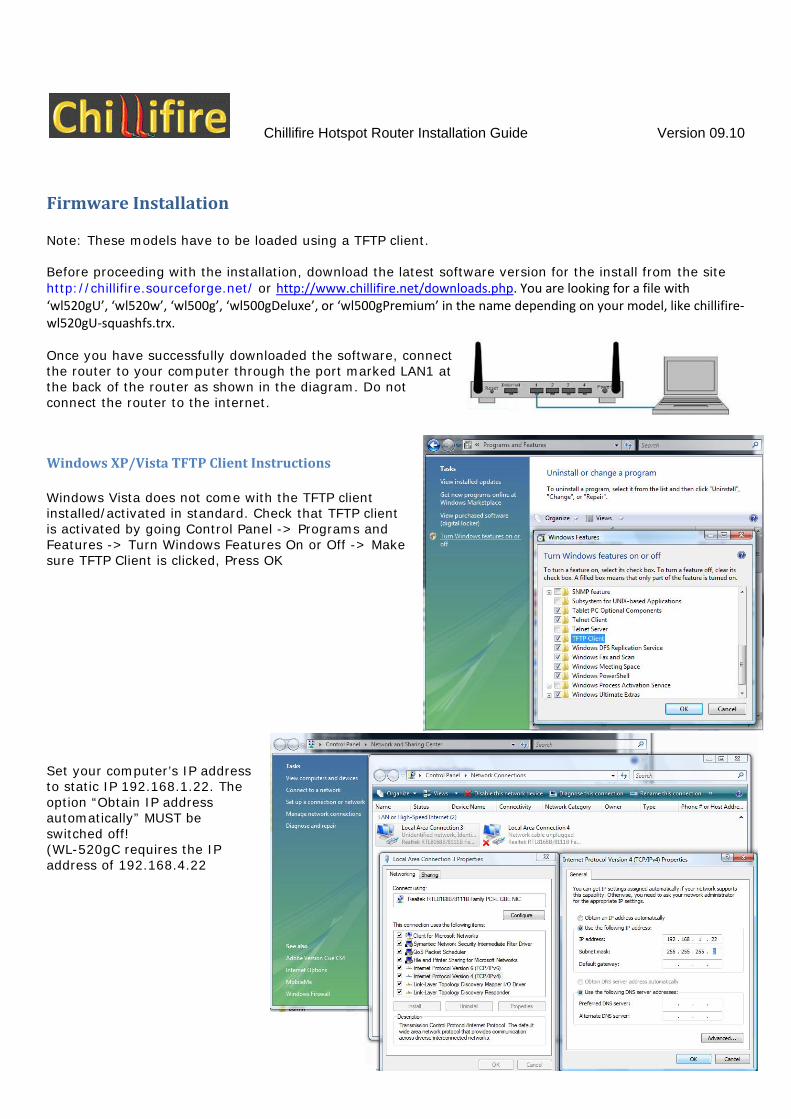
Firmware Installation Note: These models have to be loaded using a TFTP client. Before proceeding with the installation, download the latest software version for the install from the site http://chillifire.sourceforge.net/ or http://www.chillifire.net/downloads.php. You are looking for a file with ‘wl520gU’, ‘wl520w’, ‘wl500g’, ‘wl500gDeluxe’, or ‘wl500gPremium’ in the name depending on your model, like chillifire‐wl520gU‐squashfs.trx. Once you have successfully downloaded the software, connect the router to your computer through the port marked LAN1 at the back of the router as shown in the diagram. Do not connect the router to the internet.
Windows XP/Vista TFTP Client Instructions
Windows Vista does not come with the TFTP client installed/activated in standard. Check that TFTP client is activated by going Control Panel -> Programs and Features -> Turn Windows Features On or Off -> Make sure TFTP Client is clicked, Press OK Set your computer’s IP address to static IP 192.168.1.22. The option “Obtain IP address automatically” MUST be switched off! (WL-520gC requires the IP address of 192.168.4.22

Chillifire Hotspot Router Installation Guide Version 09.10 Make sure the router is powered off. Hold down the reset button on the back (use a pen or pencil to do so). Plug in the power, keeping the rest button pressed. Don't release the reset button until the power light flashes on and off about I time per second. Now release the rest button. Open a command window (XP: Start-Run-Enter "cmd", Vista: Start-All Programs-Accessories-Command Prompt). In this window, prepare the tftp command *: tftp -i 192.168.1.1 PUT chillifire-wl520gU-squashfs.trx
Press enter. (* replace chillifire-09.07-wl520gU-squashfs.trx with the correct file for your Asustek router model, WL-520gC requires the IP address of 192.168.4.1) The system will tell you whether the transfer was successful. Allow the router to do its thing. It will process the new image, reboot and configure itself. This will easily take 5-10 minutes. Some routers, namely WL520gU, do NOT automatically reboot. Wait 5 minutes after the successful transfer of the firmware, then power down the router and power it up again. Wait until the reboot is complete. Now set your computer back to receiving an IP address through DHCP again (setting “Obtain IP address automatically”)

Chillifire Hotspot Router Installation Guide Version 09.10 Open a new browser window. Type in the address http://192.168.12.1 into the address bar of your browser and press ‘Enter’. You will be presented with the firmware’s logon screen. Enter ‘root’ as user and ‘shae-4’ as password. (You can change the password later to anything you like.) You will see the initial System Info screen, giving you details about version and status of the firmware. You were Successful! Next Step is to register the router.

Chillifire Hotspot Router Installation Guide Version 09.10
Router Registration Please note: For the registration process to work your router MUST be connected to the internet and have a valid connection. If you cannot access the internet from the computer connected to the router, you are most likely not connected to the internet and this registration process will fail.
Setting your timezone
Log in to your router with your username and password. Please select the timezone that is relevant for you or the one closest to you. Selecting the timezone will automatically reschedule the daily reboot to between 3-4am of your local time. It will also determine the most appropriate Chillifire server to connect to so that your users have the fastest possible online connection facility. Press the ‘Save and Apply’ button.
Link your router to your Chillifire account
On the menu move your mouse over ‘Chillifire’, then press ‘Router Registration’. You now need to press the ‘Register Router’ button. 2. Next you will see the Chillifire login screen. If you already have an account created on our website or you are adding another router to your existing account, please type in your account name and password and press the ‘Login’ button. If you do not have an account yet, please press the ‘Signup Now’ button and create a new account (see step 3).

Chillifire Hotspot Router Installation Guide Version 09.10 3. (Only if you had not yet created a Chillifire account) If you pressed the ‘Sign up now’ button, you will the Chillifire Control Panel Login screen. Choose an account name (up to 10 characters), enter the billing address details of your account (can be different to the physical address of the router(s), choose the default currency for your router(s) and finally, enter an affiliate code, if you have been given one (otherwise, leave empty). Press the ‘Register’ button on the screen and you will see a success message.
4. The system will direct you automatically to a screen that allows you to register the router against your account (regardless whether you pressed the ‘Login’ or the ‘Sign up now’ button in step 3. IMPORTANT: If you just Signed Up Now as described in step 8 be sure you activate your account first via the activation email you will receive. You cannot logon before you activated the account!
Enter the router location and press ‘Insert’. The system will return a message to confirm the successful registration of the router.
DONE!

Chillifire Hotspot Router Installation Guide Version 09.10
Router Configuration This section describes how to change some configuration settings of the Chillifire Hotspot. While this list of configuration options is by no means exhaustive, it gives guidance to the most popular configuration options. All the configuration options described in this guide occur on the router. Please open your favorite browser, type http://192.168.12.1 into the browser’s address bar and press enter. You will need to log in with your user name admin and the password. The standard password is ‘shae-4’.
Define a “Walled Garden”
A ‘walled garden’ is a facility that allows hotspot users access to selected sites without having to be logged on. This makes sense if you want to give access to your own website, i.e. your hotel’s or café’s information pages. The sites the users are allowed to have access to can be defined by entering them into the allowed sites filed and pressing the green button next to the entry field. You can remove allowed sites by pressing the red removal button next to the allowed site. On the Pages tab you can allow complete websites like, say, www.google.com. On the domains tab you can allow entire domains like .google.com (including www.google.com, maps.google.com, mail .google.com etc.) Press the ‘Save and Apply’ button.
Define your custom splash page / homepage
In standard mode the Chillifire system will bring up a login page for users who have connected to the hotspot, open a browser, but are not yet logged in. However, this behavior can be changed with the Custom ‘Splash Page’ setting. Go to Chillifire->Custom Splash Page Enter your home page with the leading protocol http:// or https:// for example http://www.yourdomain.com/yourstartpage.html or https://www.yourdomain.com/yourstartpage.html You MUST include a link https://192.168.182.1:3990/prelogin into your home page. This link leads to the Login Page (if the user is connected to the hotspot network) so the hotspot user can buy tickets and can login. Press the ‘Save & Apply’ button
Chillifire Hotspot Router Installation Guide Version 09.10
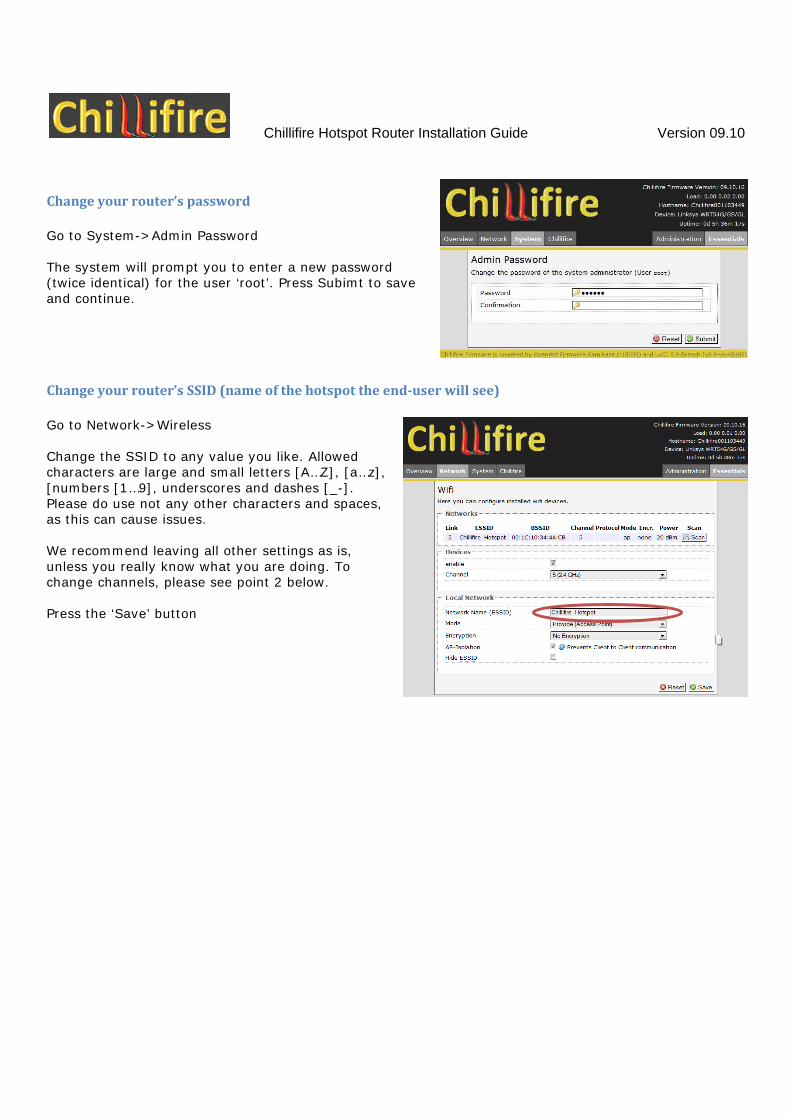
Change your router’s password
Go to System->Admin Password The system will prompt you to enter a new password (twice identical) for the user ‘root’. Press Subimt to save and continue.
Change your router’s SSID (name of the hotspot the end‐user will see)
Go to Network->Wireless Change the SSID to any value you like. Allowed characters are large and small letters [A…Z], [a…z], [numbers [1…9], underscores and dashes [_-]. Please do use not any other characters and spaces, as this can cause issues. We recommend leaving all other settings as is, unless you really know what you are doing. To change channels, please see point 2 below. Press the ‘Save’ button

Chillifire Hotspot Router Installation Guide Version 09.10
Add devices to the Whitelist to bypass hotspot authentication
Devices that have been put on the whitelist will bypass the login procedure completely and have straight and unlimited access to the internet. The devices that are on the whitelist are defined by their MAC Address, which can be entered on the Chillifire Configuration Screen. Note: The MAC address of a device (laptop etc.) can be found on the bottom of the Chillifire login screen. Just enter the MAC address in the field and press the green ‘add’ button. Confirm your settings by pressing ‘Save &Apply’. To remove a device press the red ‘remove’ button next to it and press ‘Save & Apply’.
Change the wireless channel the Hotspot is sending on
In an area with a number of wireless networks present it can be beneficial not to allow the router to select a channel by itself, but to look for other networks present in the area, and to select a channel that is not yet used. This will avoid interference and improve signal range and clarity for the receiving clients. In a wireless extender scenario, sending and receiving on the same channels between routers is essential. Go to Network->Wifi Press the ‘Scan’ button After scanning the environment for other networks the system will give you all the other networks it found and their channels. You can now select a channel that is not yet used in your specific environment. Press the ‘Save’ button To set more sophisticated Wifi settings refer to ‘Change wireless transmission settings’ below.

Chillifire Hotspot Router Installation Guide Version 09.10
Assign the Ethernet LAN connections to either Hotspot or Free Access
Go to the Administration section. Go to Network->Switch You can now assign the 4 LAN ports at the back of the router either to free internet access (VLAN0) or to Hotspot controlled paid internet access (VLAN2). The standard configuration has the inner two ports 2 and 3 assigned to the Hotspot, while ports 1 and 4 are guaranteed free internet access. We strongly recommend granting always free internet access to at least one port, preferably port 1, in case more significant repairs are required. Please observer the following rules, or you may break either specific ports or even the entire Hotspot configuration.
The Internet port must always be assigned to VLAN1 Do not assign ports 1 through to 4 to VLAN1 All VLANs must have port 5 assigned VLAN eth0.0 must have a star against it.
Violating any of these rules may cause the router to stop functioning. Press the ‘Save Settings’ button and confirm your settings by pressing ‘Save & Apply’ We recommend you reboot your router and also unplug the connected devices for at least 10 seconds before plugging them in again. This will enforce that the lease for a new IP address is enforced and that the tunnel for the chillispot connection is built up. We recommend you reboot your router.
Change wireless transmission settings
Go to the Administration portal to Network->Wifi->Wl0. There you can set transmission power and other transmission and antenna settings. The settings will depend on the router’s capabilities and drivers. Recommended standard transmission power is 20dB equating to 100mW. Please take local health and transmission regulations into account when setting this value. Press the ‘Save & Apply’ button

Chillifire Hotspot Router Installation Guide Version 09.10 Establish Quality of Service (QoS) and establish maximum throughput rates
Go to Network->QoS You can set Q0S to 'Enabled' at the top of the Options section. Once that is done you have the option to set a maximum WAN upload and download speed. This will limit the speed for any connection regardless of settings you may choose as part of the Hotspot package setup. We do not recommend you manipulate the QoS firewall settings unless you have a thorough understanding of IP networking. The standard is configured to favor basic services like DNS traffic and SSH, treat web traffic as ‘Normal’ use, and treat P2P and other data intensive services as least priority. Press the ‘Save Settings’ button and confirm your settings by pressing ‘Apply Settings’
Chillifire Status, Add‐Ons and Upgrades
Click on ‘Chillifire’ Here you can see the status of the Chillifire Hotspot, Restart your remote connection, force the upgrade of your router, and install additional modules. The list of add-on modules will be extended over time as requested by our client base.
Connecting a USB Printer, USB Memory Stick or
External Drive
Click on ‘Chillifire’ To do these things you have to install an extension – the Chillifire Firmware does not come in standard with USB drivers installed. USB kernel support is loaded, but specific drivers for printers and memory stick must be added. This keeps the firmware image light and reduces it to the absolute necessary size. If you would like to add a function that is not yet represented in the add-on section, pelase contact us via the support form on www.chillifire.net/support.php

Chillifire Hotspot Router Installation Guide Version 09.10 Switch Configuartion
The Asus routers have a switch tha can be configured via OpenWrt a switch allows you to split the four different LAN ports into different virtual LANs (VLANs). This is useful if you want to have some LAN ports to be controlled by the Chillifire Hotspot, while others have free access to the internet.
Go to the Administration section.
Got to Network>Switch
Ethx.0 are the free ports (ports 1 and 4 in this example). Ethx.1 is the internet connection (the WAN). Ethx.2 are the Hotspot controlled ports (ports 2 and 3 in this example)
Important: Never delete the 5, the * sign from the entries – it will kill your router’s switch and may stop your router from operating as expected.
Note: We also recommend you always leave at least one LAN port uncontrolled – in case you need to access your router through a LAN cable.
Additional Configuration
Go to the Administration section.
Got to Chillifire->Additional Configuration
Here you can set the default Idle Time-out period (the period of time an inactive user session on the hotspot is ended by the router) defined in seconds. The default is set to 2600 seconds which is one hour.
Clicking the anonymous button will disable the Chillifire logon during logon.
The Time of daily reboot define when during the day (in local time) the daily reboot is performed. Default is 4am in the morning.
Show Active Hotspot Connections
Got to Chillifire->Connections
The system shows active usr connections and connected WDS routers. If users are logged in, there will be a ‘Disconnect’ link at the right hand side of the screen next to the logged in user. This button can be used to force a disconnection.

Chillifire Hotspot Router Installation Guide Version 09.10
Backup and Reload Settings, Reset to Default Settings Go to System -> Backup / Restore Here you can save your current settings, reload old ones or reset to default settings of the Chillifire Firmware by clicking the appropriate link and following instructions.
Upgrading older Chillifire Versions First reboot your router. Wait for the router to be up and log in Go to System -> Flash Firmware Make sure you untick – ‘Keep configuration files’, Choose the firmware file that needs to be stored on your computer and press ‘Upload image’. It must be a firmware file ending with file extension .trx Note: In older version the path might be System -> Upgrade. There may also be a filed ‘Erase JFFS partition’ which needs to be clicked. The system will present you with an information screen and ask you to confirm that you wish t proceed. Press the ‘Proceed’ button. You then get update on the progress like so: Once the router rebooted you can close the browser, open a fresh browser window and reconnect to your router to login.

Chillifire Hotspot Router Installation Guide Version 09.10
How to connect to a shared USB printer connected to the router The Chillifire firmware comes with USB kernel modules preloaded that allow you to connect a USB printer and share it on those LAN ports, which are NOT controlled by the Chillifire Hotspot (free access ports). Connected printers are not ‘advertised’ through the network and can therefore not be discovered by operating systems like Vista, which try to automate the process. The connection needs to be created manually. How that is done on the clients (PC, desktop, laptop) is described in the following steps for different operating systems. If you do not plan to use USB printers, these steps are not required. In some Asustek routers with 8MB flash memory (i.e. WL-500gPremium, WL-500gW etc.) there is enough space to also install storage modules to be able to connect USB memory sticks or external drives. This is not preinstalled as there is an large number of possible configuration options and combinations. If that is something you wish to give a try please turn to for advice and a ‘HowTo’.
Windows clients (XP/Vista)
The following instructions should work on all versions of windows from Windows 2000 onwards, and have been tested in both Windows 2000 and Windows Vista.
Install your printer software as you would if it were a local printer. Go to your printer properties in the control panel/printer settings. Select the tab "Ports". Select "Add Port". Select "Standard TCP/IP Port" and click on "New Port...". Follow the wizard. In the field "Printer Name or IP Address", enter the IP address of your router:
192.168.12.1. Windows will send a couple of UDP packets to port 161 of the Router. You can safely discard them. You will need to select a Device Type. Select “Generic Network Card” or "Custom" and click
"Settings...". Be sure the protocol is "Raw" and the port number is correct (i.e. 9100). Finish the Settings wizard and close the Add Port window. The newly created Port should now be
selected. Click ‘OK’ You printer should be configured now. Be sure that your firewall allows communication to the
chosen port. The firewall on the router is configured to allow incoming LAN traffic on all ports. You may print a test page to see if all went well.
MAC OS X Version 10.4.6
select system preferences Print & Fax Click on + button Click on IP Printer set Protocol: HP Jet Direct - Socket, Address: 192.168.12.1:9100 and then select brand and
printer. Type a name if you don't want the IP address for a name. close the Printer Browser.

Chillifire Hotspot Router Installation Guide Version 09.10
Linux clients
CUPS
Assuming the printer driver is installed locally, it's a simple matter of entering http://localhost:631 in your favorite web-browser, and pressing add printer under the "Printers" pane. Then:
Enter something into the information fields and press continue. Select "Internet Printing Protocol (IPP)" and press continue. Write "socket://192.168.12.1:9100”. Press continue. Select the appropriate manufacturer and press continue. Select the appropriate printer and press continue. Voila...Then you use your new printer like you would a local one.
kprinter (KDE)
Start kprinter Select 'Add printer' Select Network printer (TCP) Use 192.168.12.1 (the router's IP address) as the printer's IP Fill in the port you want to use (normally defaults to 9100) Pick manufacturer and model Pick the recommended driver Then you can new print a test page or change the settings of the printer further
Gnome
Select System -> Administration -> Printing Select New Printer Select Network Printer and "HP JetDirect" Enter your IP address 192.168.12.1 (the router's IP address) as and port 9100. Select your printer's make and model. Continue forward and apply settings. Check the properties to ensure you are using A4 or US Letter size as appropriate.

Chillifire Hotspot Router Installation Guide Version 09.10 Appendix:
LINUX TFTP Client Instructions for TFTP
First you need to make sure that you can reach the router on your network, and that it can reach you. If you are using an existing machine which is not on 192.168.1.x, you can temporarily add an interface alias (on most modern Linux distributions). Presuming that the correct network interface is eth0 (if you don't know, assume that it's eth0), run this as root: ifconfig eth0:1 192.168.1.5 netmask 255.255.255.0
When you're done configuring the router, run this (as root again) to take the alias down ifconfig eth0:1 down
netkit's tftp commands: tftp 192.168.1.1 binary rexmt 1 timeout 60 trace Packet tracing on. tftp> put chillifire-09.07-wl520gU-squashfs.trx
Or, for a single command, so you don't have to retype each time: echo -e "binary\nrexmt 1\ntimeout 60\ntrace\nput chillifire-09.07-wl520gU-squashfs.trx \n" | tftp 192.168.1.1
Setting "rexmt 1" will cause the tftp client to constantly retry to send the file to the given address. As advised above, plug in your box after typing the commands, and as soon as the bootloader starts to listen, your client will successfully connect and send the firmware. You can try to run "ping -f 192.168.1.1" (as root) in a separate window and enter the line "put chillifire-09.07-wl520gU-squashfs.trx "1 as the colons stop running over your terminal when you power-recycle your router. If you get an ACK from your router but don't send any data, try a different tftp client. atftp works well. This occurs with some netkit tftp packages. ATFTP (Advanced TFTP) commands: atftp connect 192.168.1.1 mode octet trace timeout 1 put chillifire-09.07-wl520gU-squashfs.trx
Or use the command-line:
atftp --trace --option "timeout 1" --option "mode octet" --put --local-file chillifire-09.07-wl520gU-squashfs.trx 192.168.1.1
(atftp source code: http://downloads.openwrt.org/sources/atftp-0.7.tar.gz)
1 Replace chillifire-09.06-wl520gU-squashfs.trx with the correct file for your Asustek router model

Chillifire Hotspot Router Installation Guide Version 09.10
MAC OS X Client Instructions for TFTP
On Mac OS X, you should be able to flash the router with the command line tftp client, which behaves identically to netkit's tftp above.
Some people have had problems with the command line tftp client, however, and recommend using MacTFTP instead:
Download, install, and open MacTFTP Choose Send Address: 192.168.1.1 Choose the chillifire-09.07-wl520gU-squashfs.trx file Click on start while applying power to the WL520gU
Many Macs will disable the Ethernet card when the router is powered off and will take too long to re-enable the card, causing the TFTP transfer to fail with an "Invalid Password" error. Many people have had success if they manually configure their network card (in the "Ethernet" tab of "Built-in Ethernet" in System Preferences' Network panel) to:
Configure: Manual (Advanced) Speed: 10 BaseT/UTP Duplex: full-duplex