thinpacs viewing software 3.6 guide - radlink inc. – gps ...€¦ · page 4 of 124 introduction...
TRANSCRIPT

ThinPACS Viewer Software Guide
Software Version 3.6
October 15, 2012 Revision 1.1
Reference Only
Radlink, Inc.
1415 W 178th St Gardena, CA 90248 310-643-6900 (phone)
310-643-6906 (fax)

Page 2 of 124
© Copyright 2008 by Radlink, Inc All rights reserved Printed in USA Product and/or service offerings such as this document are subject to change without notice. The information in this documentation is provided for general informational proposes only. Radlink, Inc. assumes no liability for any errors or inaccuracies that may appear in this document, including any loss or damage whatsoever arising from loss of data or profits arising out of, or in connection with, the use of this document. No part of this publication may be reproduced, stored in a retrieval system, or transmitted, in any form or by any means, electronic, mechanical, photocopying, recording or otherwise, without the prior written permission of Radlink, Inc. The following product names are trademarks of Radlink, Inc.
• ThinPACS
• CR Pro
• LaserPro16 Film Digitizer
• Pro Imaging™
• Pro Imaging Acquisition™
• ProMerge™
Page 3 of 124
TABLE OF CONTENTS Introduction Chapter 1: Installation Requirements Chapter 2: Software Setup and Configuration Chapter 3: Operating Instructions Chapter 4: Software Upgrades Chapter 5: Troubleshooting Chapter 6: Appendix
Page 4 of 124
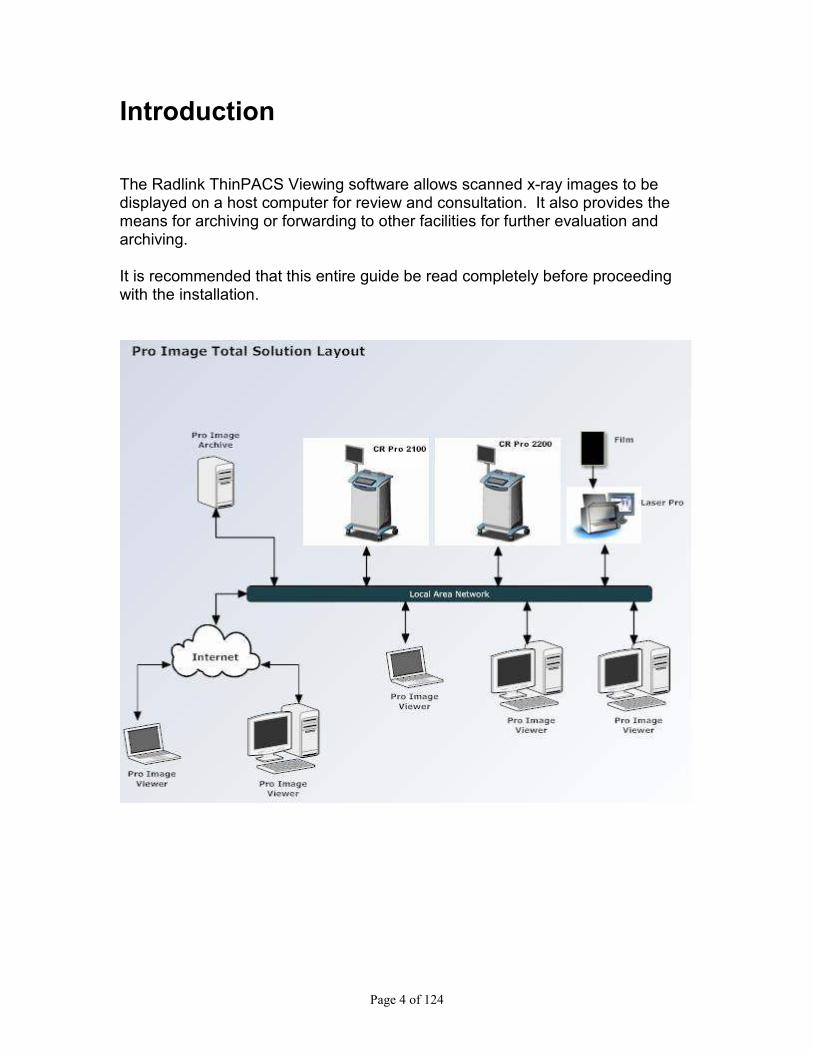
Introduction
The Radlink ThinPACS Viewing software allows scanned x-ray images to be displayed on a host computer for review and consultation. It also provides the means for archiving or forwarding to other facilities for further evaluation and archiving. It is recommended that this entire guide be read completely before proceeding with the installation.
Page 5 of 124
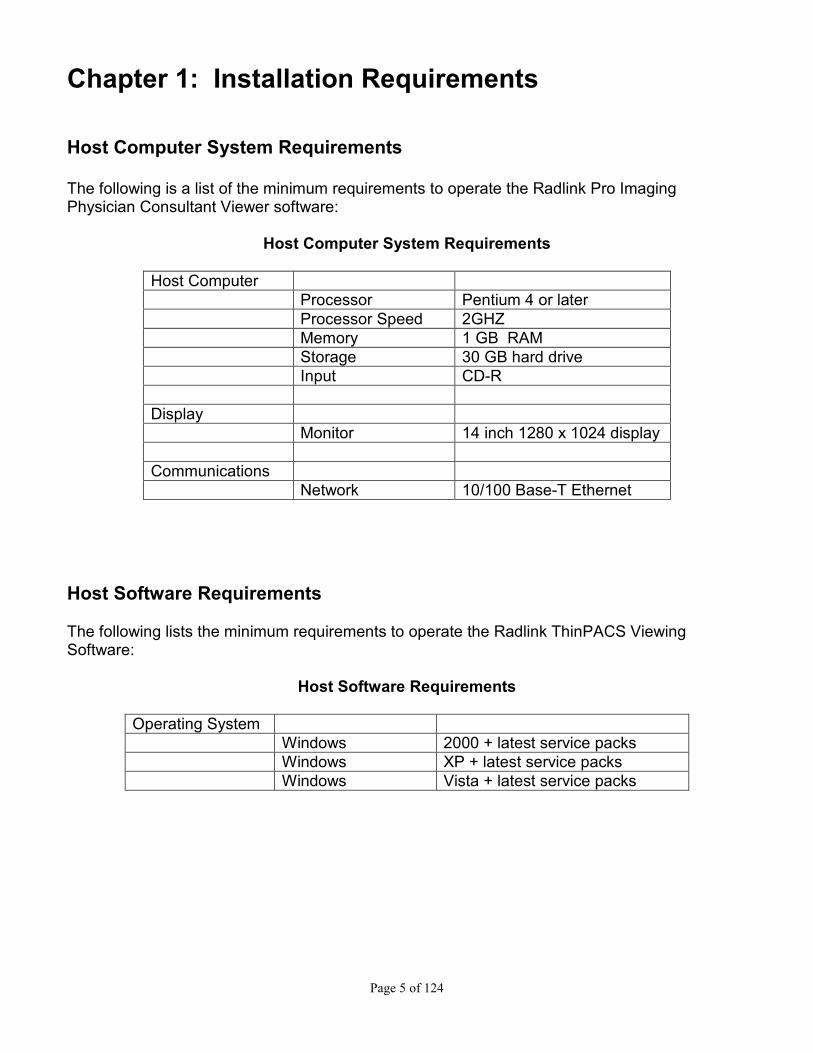
Chapter 1: Installation Requirements Host Computer System Requirements The following is a list of the minimum requirements to operate the Radlink Pro Imaging Physician Consultant Viewer software:
Host Computer System Requirements
Host Computer
Processor Pentium 4 or later
Processor Speed 2GHZ
Memory 1 GB RAM
Storage 30 GB hard drive
Input CD-R
Display
Monitor 14 inch 1280 x 1024 display
Communications
Network 10/100 Base-T Ethernet
Host Software Requirements The following lists the minimum requirements to operate the Radlink ThinPACS Viewing Software:
Host Software Requirements
Operating System
Windows 2000 + latest service packs
Windows XP + latest service packs
Windows Vista + latest service packs

Page 6 of 124
Installing the Software The installation procedures are similar for all supported Microsoft Operating Systems such as Windows 2000, XP, and Vista.
1. Insert the ThinPACS Viewing Software CD or go to Radlink’s web site, copying to desktop, and opening.
2. Double-click setup.exe

Page 7 of 124
Installing the Software (con’t)
3. If the above window appears, click Accept.
4. If the above window appears, click Install.

Page 8 of 124
Installing the Software (con’t)
5. Click Next
6. Click Next 7. Click Next, then select Close

Page 9 of 124
Starting the Viewing Software To start the ThinPACS Viewing Software, double-click the desktop shortcut icon Radlink Pro Imaging shown below or click Start ���� All Programs ���� Radlink Pro Imaging

Page 10 of 124
Chapter 2: Software Setup and Configuration
Radlink Login 1 Log into this computer:::: Local users can log into this computer, with limited access and rights to PACS. Local users can login with the following user name and password: User name: radlink Password: radlink 2 Log into PACS:::: PACS system creates user accounts under different access groups; each access group has a set of security codes which differentiates the access rights for this group and user accounts under it. Login screen is as below: 1: Enter user name and password 2: Select Setting From( )This computer or PACS 3: Click on Submit to login.

Page 11 of 124
Software initiated
Page 12 of 124
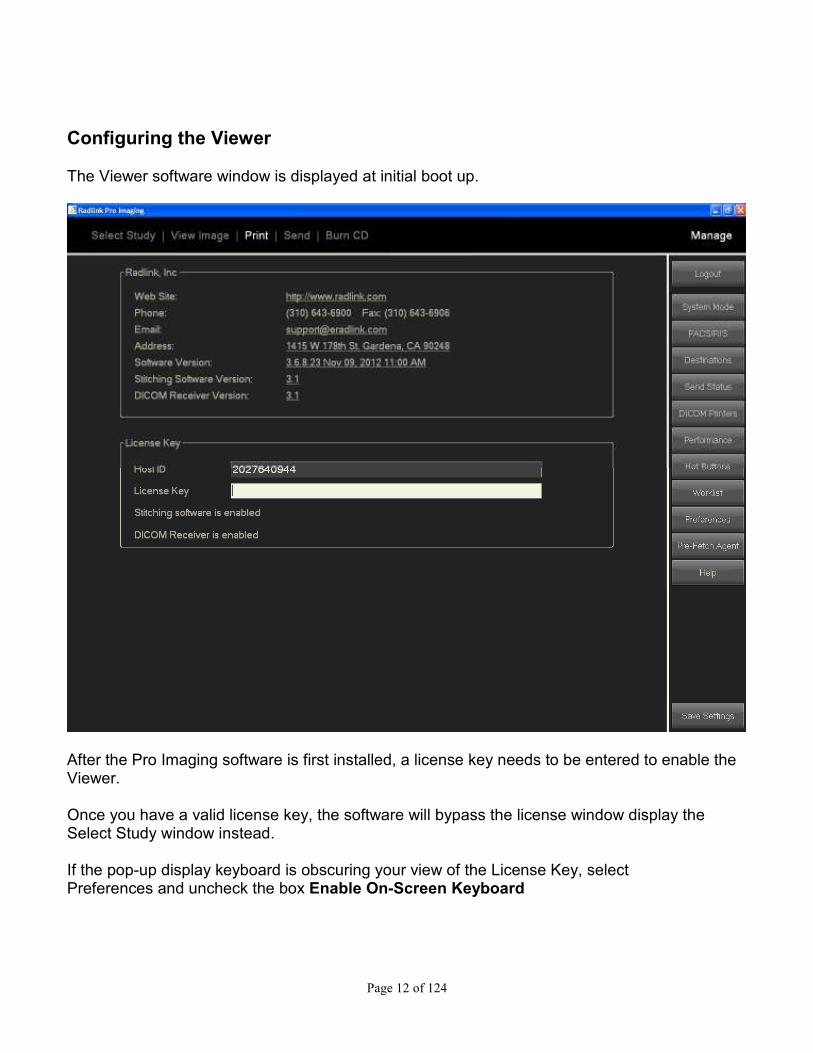
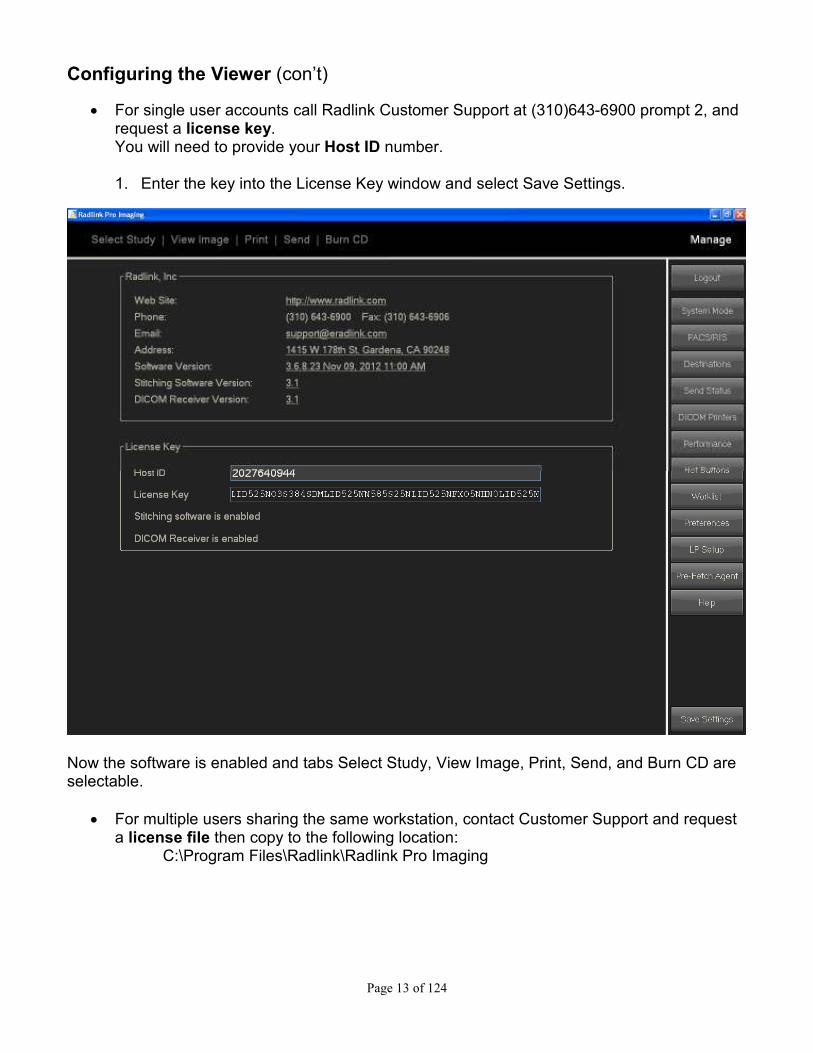
Configuring the Viewer The Viewer software window is displayed at initial boot up.
After the Pro Imaging software is first installed, a license key needs to be entered to enable the Viewer. Once you have a valid license key, the software will bypass the license window display the Select Study window instead. If the pop-up display keyboard is obscuring your view of the License Key, select Preferences and uncheck the box Enable On-Screen Keyboard
Page 13 of 124
Configuring the Viewer (con’t)
• For single user accounts call Radlink Customer Support at (310)643-6900 prompt 2, and request a license key. You will need to provide your Host ID number.
1. Enter the key into the License Key window and select Save Settings.
Now the software is enabled and tabs Select Study, View Image, Print, Send, and Burn CD are selectable.
• For multiple users sharing the same workstation, contact Customer Support and request a license file then copy to the following location:
C:\Program Files\Radlink\Radlink Pro Imaging

Page 14 of 124
Setting the PACS Server Settings Setting the PACS Server Settings allows your PC to view images from a Radlink PACS system. NOTE: If the intended PACS server is not a Radlink PACS server then the IP field of the PACS Server Setting section should be left blank. 1. Select the PACS/RIS button.
The PACS Server Setting window is displayed.

Page 15 of 124
Setting the PACS Server Settings (con’t) 1. Enter the IP address of the PACS into the IP field and select Save Settings. If you don’t know the IP address, contact your local IT person for assistance.
The viewing software is now enabled to communicate with the PACS server. Below is an explanation of the fields: IP: The physical network node address of the PACS server. DICOM Port: The logical port of the PACS server. Source AET: Application Entity Title is the user chosen name of the PACS host Destination AET: Must be proimagepacs WEB Port: Default Web server port of a Radlink PACS. Compression: Provides the ability to save viewed images to: C:\Documents and
Settings\CR Pro User\ViewPro\images..The following compression formats are available: None, Lossless, Lossy High Quality, Lossy Medium Quality, and Lossy Low Quality. Note: the PACS may need to be upgraded with the latest software version to support this feature.

Page 16 of 124
Setting up Destinations The destination settings allow you to specify the destination(s) to store DICOM images. The Viewer provides a means for you to add reports, markers, lines, angles, and free hand drawings to existing images using the Save command located in the Send menu. Note that if you had previously setup the PACS settings, you could have clicked the button Copy to Destinations and any PACS settings would have been copied to the destination fields. 1) To specify a destination, click the Destinations button.
The Destination Settings window is displayed.

Page 17 of 124
Setting up Destinations (con’t) To add a new destination: 1) Click the New button, and then enter the Host name (in this example ‘PACS 1’), IP, DICOM
Port, Source AET, and Dest AET fields. 2) Select the Active checkbox.
The following are typical settings to store images on the internal PACS: Name A default name that can be renamed if desired. (This is typically the same
name as entered in the PACS settings) IP: (This is typically the same IP address entered in the PACS settings) DICOM Port: 11112 Source AET: If you are using a Radlink PACS, this is an optional field, but it must contain
one letter Dest AET: For a Radlink PACS system, this needs to be proimagepacs
Page 18 of 124
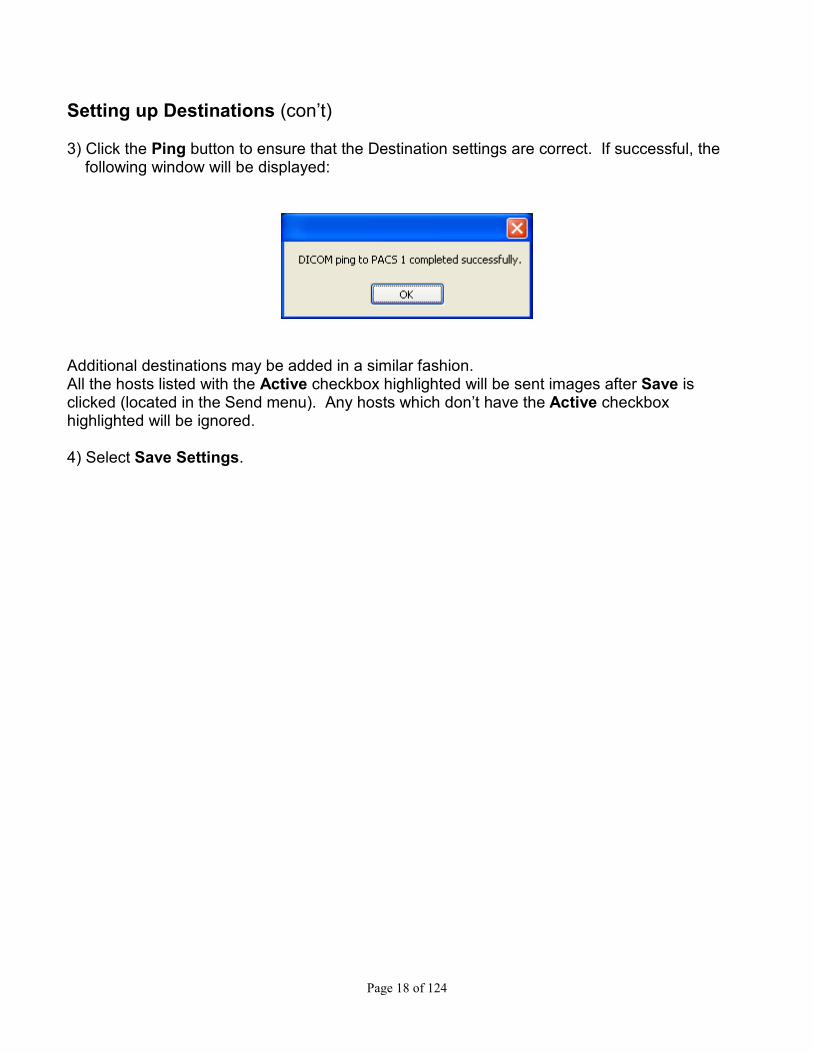
Setting up Destinations (con’t) 3) Click the Ping button to ensure that the Destination settings are correct. If successful, the
following window will be displayed:
Additional destinations may be added in a similar fashion. All the hosts listed with the Active checkbox highlighted will be sent images after Save is clicked (located in the Send menu). Any hosts which don’t have the Active checkbox highlighted will be ignored. 4) Select Save Settings.

Page 19 of 124
Setting up a DICOM Receiver (optional – purchased separately) A DICOM receiver allows the reception of DICOM images from any networked DICOM storage device such as another Viewing workstation or CR. To purchase the optional Receiver feature call your Radlink sales office for pricing. Once purchased, you will need to call Radlink Customer Support (310)643-6900 prompt 2, for a password to enable its usage To setup a DICOM Receiver:
1. Start the Pro Imaging software on the PC or CR that you wish to send images 2. Click Manage 3. Click Preferences
The DICOM Receiver Settings are displayed in the center. Note that DICOM Receiver may be run in either a Run as a Thread (default) or Run as a Service mode. When run in Thread mode, the software must be running in order for DICOM Receiver to function. When run in Run as a Service mode, the software does not need to be running in order for DICOM Receiver to function. If Run as a Service is selected, the user will be prompted to enter their Windows username and password so that the service can be installed.
Page 20 of 124
Setting up a DICOM Receiver (con’t)
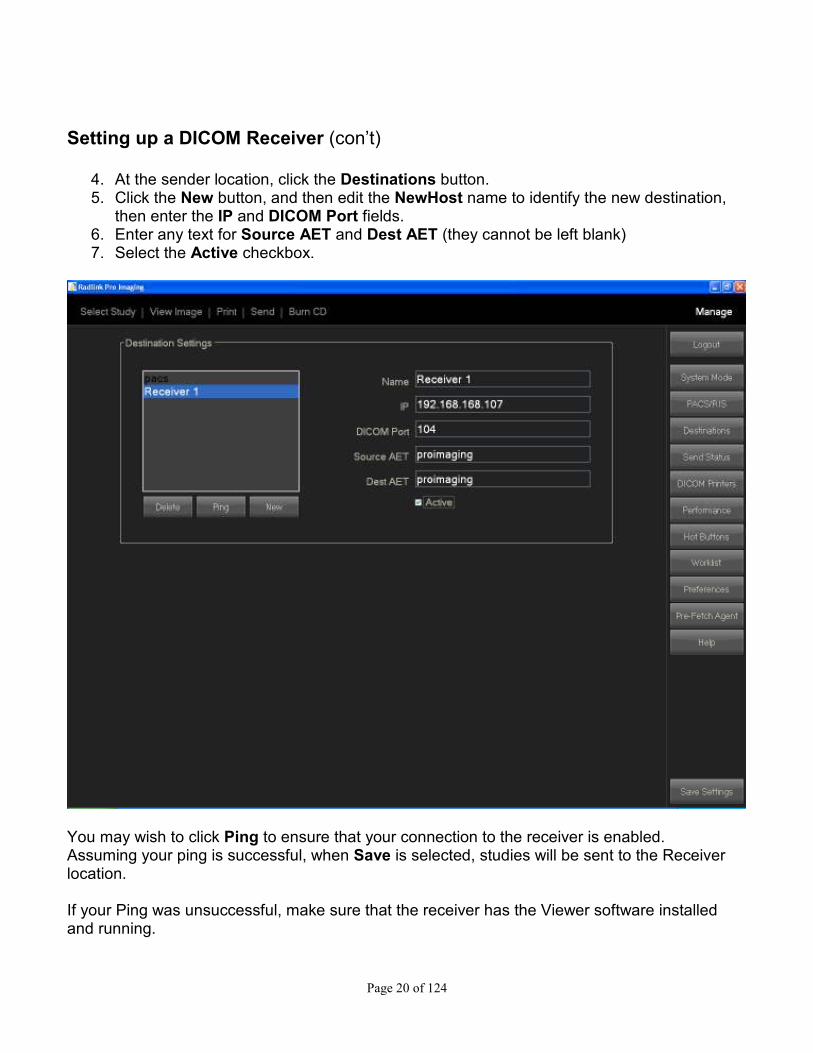
4. At the sender location, click the Destinations button. 5. Click the New button, and then edit the NewHost name to identify the new destination,
then enter the IP and DICOM Port fields. 6. Enter any text for Source AET and Dest AET (they cannot be left blank) 7. Select the Active checkbox.
You may wish to click Ping to ensure that your connection to the receiver is enabled. Assuming your ping is successful, when Save is selected, studies will be sent to the Receiver location. If your Ping was unsuccessful, make sure that the receiver has the Viewer software installed and running.

Page 21 of 124
Setting up DICOM Printing
1. Select the DICOM Printers button.
The DICOM Printers screen is displayed.
Page 22 of 124
Setting up DICOM Printing (con’t)
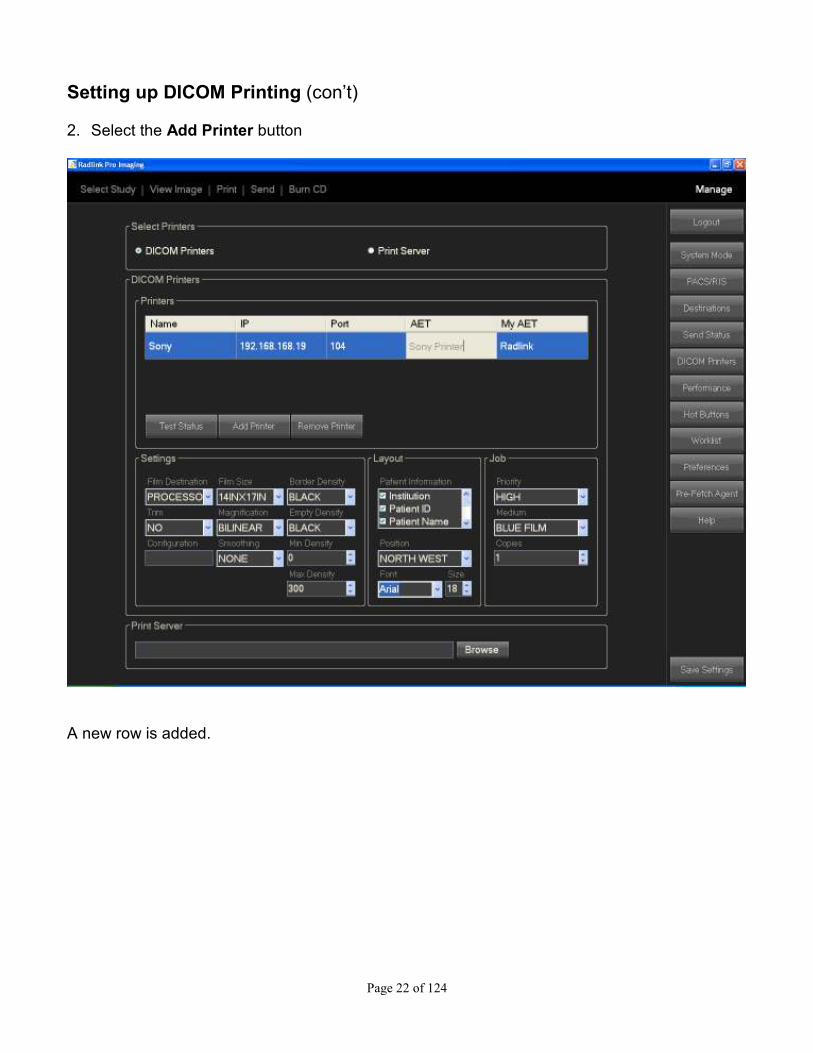
2. Select the Add Printer button
A new row is added.

Page 23 of 124
Setting up DICOM Printing (con’t)
3. To add a DICOM printer: a. Select the Add Printer button. b. Select the blue row under Name and enter the manufacturers name (e.g., Sony) c. Select the blue row under IP and enter the IP address for the printer. d. Select the blue row under Port and enter the port number for the printer (e.g., 104) e. Select the blue row under AET and enter the AET name (e.g., DICOM_PRINTER). f. Select Save Settings.
The printer listed above may now be used to print images on media supported by the printer, such as film.

Page 24 of 124
Setting up DICOM Printing (con’t)
g. Click the Test Status button to ensure that the printer settings are correct. If successful, the following window will be displayed:
h. Configure printer as desired in Settings, Layout, and Job fields.
Page 25 of 124
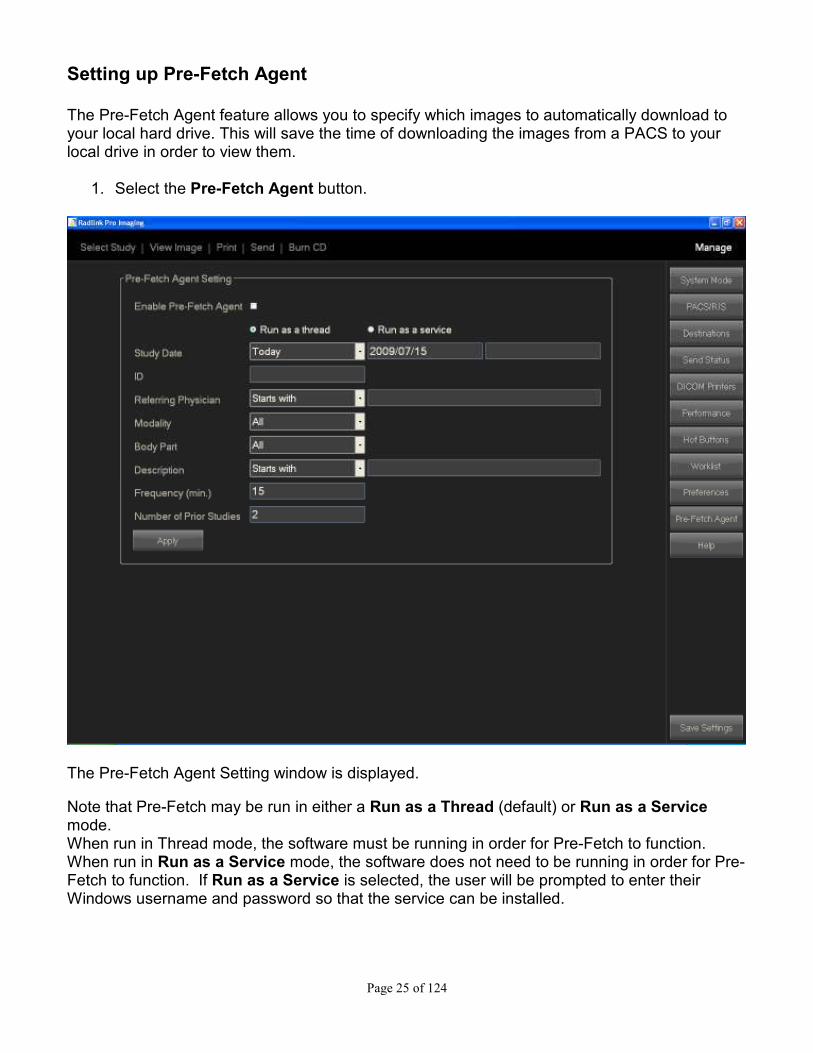
Setting up Pre-Fetch Agent The Pre-Fetch Agent feature allows you to specify which images to automatically download to your local hard drive. This will save the time of downloading the images from a PACS to your local drive in order to view them.
1. Select the Pre-Fetch Agent button.
The Pre-Fetch Agent Setting window is displayed.
Note that Pre-Fetch may be run in either a Run as a Thread (default) or Run as a Service mode. When run in Thread mode, the software must be running in order for Pre-Fetch to function. When run in Run as a Service mode, the software does not need to be running in order for Pre-Fetch to function. If Run as a Service is selected, the user will be prompted to enter their Windows username and password so that the service can be installed.

Page 26 of 124
Setting up Pre-Fetch Agent (con’t)
2. Set the Study Date field to All Studies. 3. Enter a physician’s name into the Referring Physician field. 4. Set the Referring Physician pull-down menu to Contains. 5. Select the Enable Pre-Fetch Agent checkbox.
In this example, all the studies that contain Gordon as the referring physician will be automatically downloaded to the local image folder. As the day progresses, a query will be automatically performed every 15 minutes so that any new studies containing Gordon will also be downloaded. Note that if you change any selections after you’ve enabled the pre-fetch agent, you can either select Apply or uncheck and recheck the Enable Pre-Fetch Agent checkbox to perform a new fetch.

Page 27 of 124
Chapter 3: Operating Instructions
Starting the Viewing Software. To start the ThinPACS Viewing Software, double-click the desktop shortcut icon Radlink Pro Imaging shown below or click Start ���� All Programs ���� Radlink Pro Imaging

Page 28 of 124
Radlink Login 1 Log into this computer:::: Local users can log into this computer, with limited access and rights to PACS. Local users can login with the following user name and password: User name: radlink Password: Radlink 2 Log into PACS:::: PACS system creates user accounts under different access groups; each access group has a set of security codes which differentiates the access rights for this group and user accounts under it. Login screen is as below: 1: Enter user name and password 2: Select Setting From( )This computer or PACS 3: Click on Submit to login.

Page 29 of 124
Software initiated The Select Study screen is displayed with Worklist set to Today and STUDY DATE set to the current date. Note that the system will automatically perform a query at startup for the Worklist setting (in this case Today), and will display all studies that match today’s date (in this case none).

Page 30 of 124
Using the Worklist to display studies 1. Select the Worklist field located in the upper right side of the display.
A pull-down menu of available pre-defined dates is displayed. Selecting a Worklist value will do the following:
Today - display all studies with today’s date Past 2 Days – display all studies with today’s date and yesterday’s date Past 7 Days – display all studies within the last week Past 30 Days - display all studies within the last 30 days All Studies – display all studies regardless of date

Page 31 of 124
Using the Worklist to display studies (con’t)
2. Select the Worklist field choice All Studies.
All available studies are displayed Note that the default sorting order is by Patient ID.
Today - display all studies with today’s date Past 2 Days – display all studies with today’s date and yesterday’s date Past 7 Days – display all studies within the last week Past 30 Days - display all studies within the last 30 days All Studies – display all studies regardless of date

Page 32 of 124
Using the Worklist to Display Studies (con’t)
3. Select the Next button to display more studies.
The next page of studies are displayed. Note that the Prev and Next buttons can continue to be used to parse the studies list as long as the button’s name is readable and not blacked-out, as is the case here.

Page 33 of 124
Using the Patients Last Name to Display Studies
1. Select the PATIENT NAME field and type first initial(s) for a patient’s last name and press Search.
All the studies for patients whose last name begins with the letters “ac” are displayed. Note that the same operation in searching for a patient’s name applies to the PATIENT ID, ACCESSION, MODALITY, REFERRING physician, and STUDY DATE fields as well.

Page 34 of 124
Displaying Images from a Study
1. Once the study is displayed in the Select Study menu, simply select the desired study’s image(s).
One of the two images from the selected study(s) is displayed in the View Image window.
The other thumbnail image at the bottom may be selected for display. If your mouse is equipped with a scroll wheel, you may also use it to display the next or previous image. This is especially useful when viewing CT or US images. Note that for the above patient, there are two studies taken about 6 months apart. This information is available in the left side pane.

Page 35 of 124
Hang Two Images Side by Side 1. Once an image is displayed in the View Image window, select the X | Y hot button located below the large image
The window places the current image on the left side of a 2-pane window.
Note that the red bounding box indicates the active window.

Page 36 of 124
Hang Two Images Side by Side (cont’) 2. Select the empty right-side window.
Note that the red bounding box now encircles the empty right-side window.

Page 37 of 124
Hang Two Images Side by Side (cont’) 3. Select the earlier study from the left side under the heading Studies.
Note that the earlier studies’ image is automatically displayed next to the previously placed image.

Page 38 of 124
Magnifying Images 1. Select an image in the View Image window and press the ZOOM button on the right side.
a. Mouse usage: Place cursor anywhere on the target image and hold down left mouse button while moving mouse downward.
b. Touch display: Touch anywhere on the target image and while touching screen move downward.
The selected image has been enlarged.
Notes: If you zoom too close, you can reverse the process by moving your pointing device upward. To restore the image back to the original zoomed size, you may select the RESET button located at the bottom of the display. Also note that the current operation button is always highlighted in green.

Page 39 of 124
Magnifying Images (con’t) 2. Now select the other image in the View Image window and press the ZOOM button. And repeat the process for zooming until the magnification matches the other image.
Now both images are approximately zoomed to the same level.
The next step will be to display the same area for both images. Note that you can magnify images at a later time if necessary.

Page 40 of 124
Magnifying Glass This feature is available when the W/L PRESET hot button is checked.
1. Click the MAG GLASS hot button 2. Click and drap the magnifying glass viewing area to the desired location
Click the MAG GLASS button again to remove the magnified viewing area.

Page 41 of 124
Moving Images
1. Select an Image and press the PAN button located on the right side.
Place your pointing device near the middle of the image you intend to move and move in a direction that will better display the desired area.
Note that the left image has been moved upward to display more of the rib cage.

Page 42 of 124
Moving Images (con’t) 2. Now select the other image, select the PAN button and repeat the process on the right
image.
Both images are now approximately displayed at the same area and magnification factor.

Page 43 of 124
Window Leveling Normally selecting the available image processing algorithms will produce an image that is optimal, but depending on your preference, you may manually change the brightness and contrast by adjusting the window leveling using the method described below.
1. Select the image window you intend to change and select the W/L button located on the right side of the display.
2. Adjust by dragging the pointing device on the image. Moving horizontally will change the window setting (brightness). Moving vertically will change the level (contrast).
The left image after adjusting the window leveling.

Page 44 of 124
Region of Interest Window Leveling (ROI W/L) This feature allows the selection of a specific region of the anatomy to alter the brightness and darkness of the image. The pixels inside the chosen area are used to determine the W/L.
1. Select the image window you intend to change and select the W/L button
The ROI/WL button is now visible.

Page 45 of 124
Region of Interest Window Leveling (ROI W/L - con’t)
2. Choose the region of interest by clicking and dragging over the selected area, moving from top left to lower right.
Note rectangle in center of right image created by ROI W/L

Page 46 of 124
Region of Interest Window Leveling (ROI W/L - con’t)
3. Release dragging over the selected area.
Note the window leveling change for the area selected with ROI/WL

Page 47 of 124
Window Level Preset This feature is available when the W/L PRESET hot button is checked.
1. Change the W/L to a desired appearance 2. Click the W/L PRESET hot button 3. Label the appropriate body part in the Name field 4. Click Save
These window/level values can now be recalled for each instance of this body part. NOTE: This feature is dependent on the body part selected during the initial acquisition of the image. Saving these values for a chest that is scanned with CHEST settings and then applying these values to a chest that has been scanned with ABDOMINAL settings will provide less than optimal results.

Page 48 of 124
Negative Image Displaying a negative image may make it easier to view objects such as blood vessels. To display a negative image: 1. Select the NEG button while viewing an image.
A negative image is displayed for the left image. To toggle a negative image back to its original state, select NEG again.

Page 49 of 124
Adding Annotations Freehand drawings may be added to highlight an area within the image. 1. Select the image window you intend to annotate and press the Free Style button located on
the right side. 2. Place your pointing device on the image on which you intend to draw and annotate the
desired area.
Note the highlighted area on the right side image.
Page 50 of 124
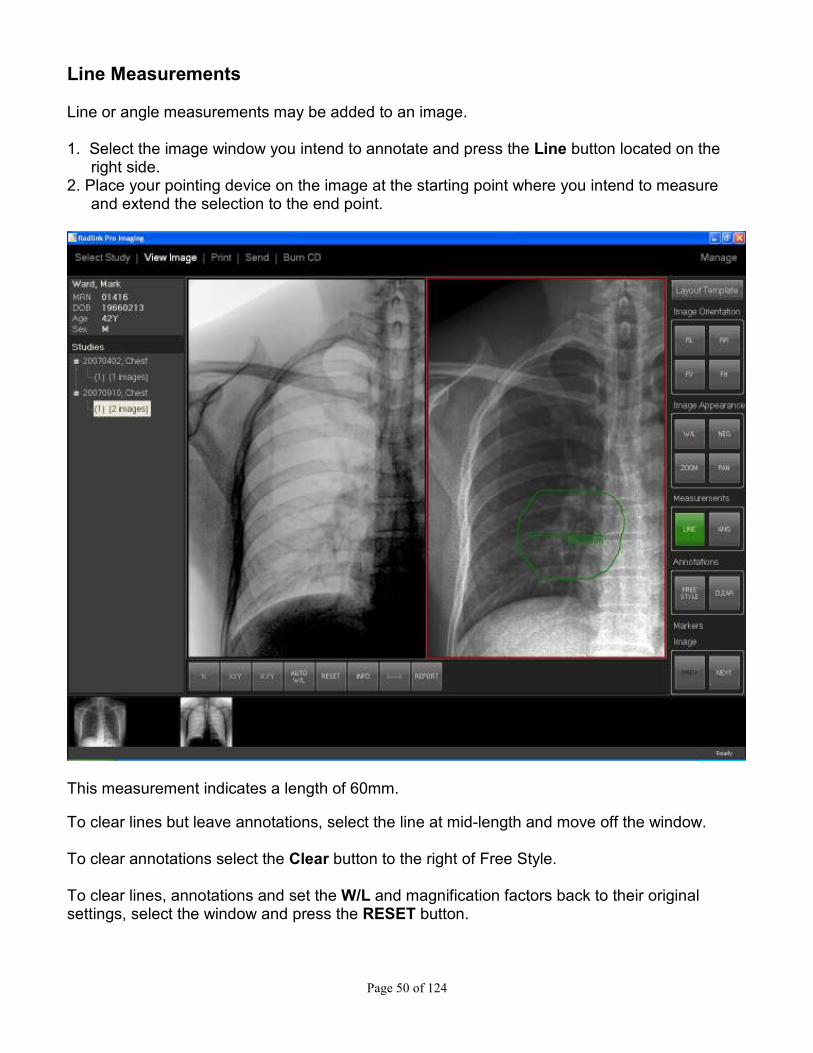
Line Measurements
Line or angle measurements may be added to an image. 1. Select the image window you intend to annotate and press the Line button located on the
right side. 2. Place your pointing device on the image at the starting point where you intend to measure
and extend the selection to the end point.
This measurement indicates a length of 60mm.
To clear lines but leave annotations, select the line at mid-length and move off the window. To clear annotations select the Clear button to the right of Free Style. To clear lines, annotations and set the W/L and magnification factors back to their original settings, select the window and press the RESET button.

Page 51 of 124
Converting viewed images to JPEG files To convert and save an image as a compressed JPEG file:
1. Select Manage > Hot Buttons and check the SAVE JPEG box. 2. View the desired image
Note the SAVE JPEG hot button above. 3. Select the hot button SAVE JPEG 4. In the Save As window, specify the desired location and select Save. Note: If more than one window is displayed when SAVE JPEG is selected, only the active window will be saved. The active window is the one with the red bounding box.

Page 52 of 124
Printing Images may be printed to any of the printers that were previously setup in Chapter 1: Setting Up DICOM Printing and/or to the printer defined as the Windows default.
1. Press the Print tab located at the top of the display. 2. View the image window you intend to print 3. Click the checkbox of the printer(s) you wish to print in the Printers section. 4. Press the Print button
Note that the image was re-centered when the Print tab was selected. If you wanted to move the annotation to the middle again, return to View Image, select Pan then go to Print menu and reposition the image. For a non-DICOM printer such as the Windows default printer, only one image may be printed at a time even though multiple images can be displayed. The following options apply to DICOM Printing Only: True Size when checked will print the actual size of the image to film. True Size when unchecked will print the image as it is currently viewed on the display.
• Select the image(s) you wish to print using the X, X | Y, X/Y, or Layout buttons, Click the checkbox of the printer(s) you wish to print, and press the Print button.
Page 53 of 124
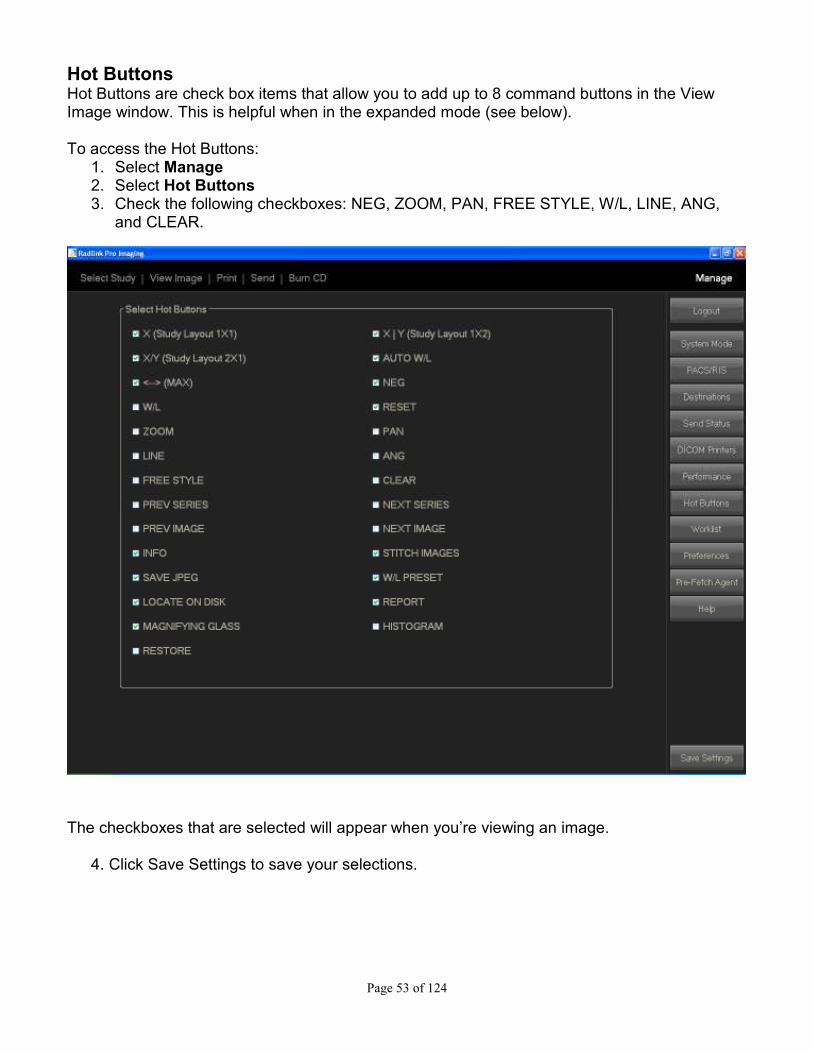
Hot Buttons Hot Buttons are check box items that allow you to add up to 8 command buttons in the View Image window. This is helpful when in the expanded mode (see below). To access the Hot Buttons:
1. Select Manage 2. Select Hot Buttons 3. Check the following checkboxes: NEG, ZOOM, PAN, FREE STYLE, W/L, LINE, ANG,
and CLEAR.
The checkboxes that are selected will appear when you’re viewing an image.
4. Click Save Settings to save your selections.

Page 54 of 124
Hot Buttons (con’t)
5. Select View Image
The hot buttons are now displayed below the right image.
Page 55 of 124
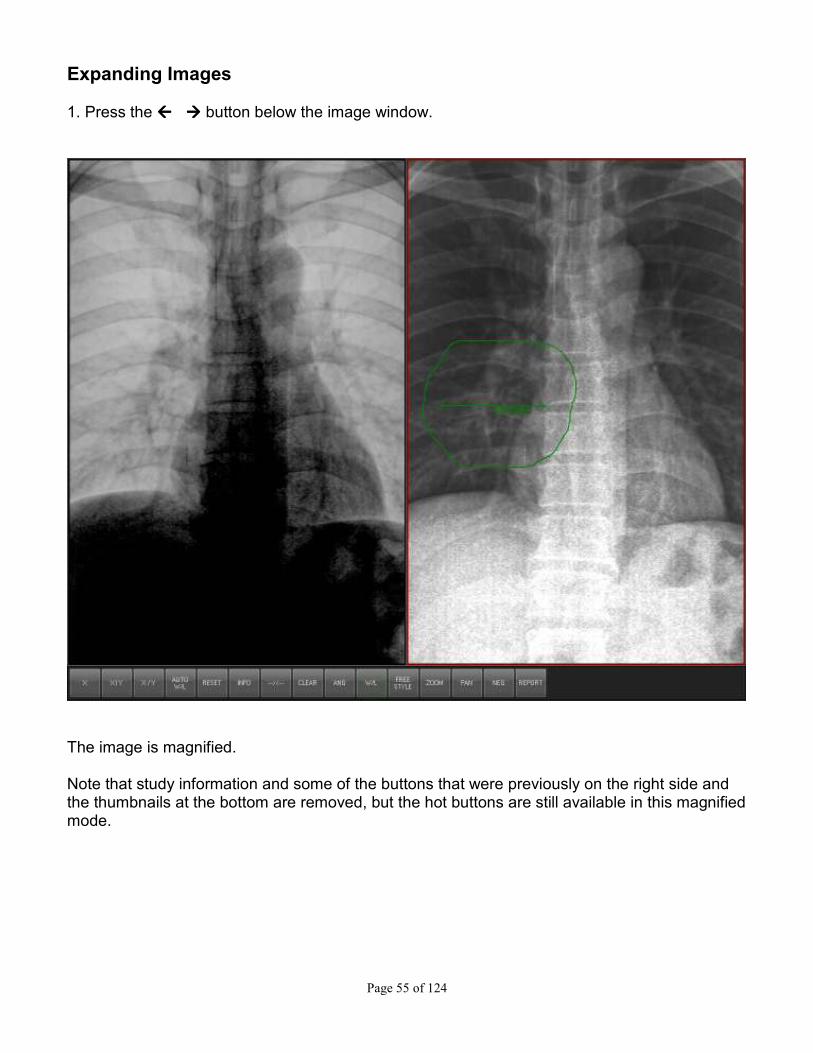
Expanding Images 1. Press the ���� button below the image window.
The image is magnified. Note that study information and some of the buttons that were previously on the right side and the thumbnails at the bottom are removed, but the hot buttons are still available in this magnified mode.

Page 56 of 124
Enlarging Images (con’t) 2. To return to the previous view press the ���� button.
The window is restored to its original size.

Page 57 of 124
Storing Annotations When you are satisfied with your changes such as rotations, lines, angles, and drawing, you should store them.
1. Select Send
The Send window is displayed. Note the checkboxes of sending images, series, and studies. If you made changes to more than just one image, you should select the Selected Study checkbox.
Page 58 of 124
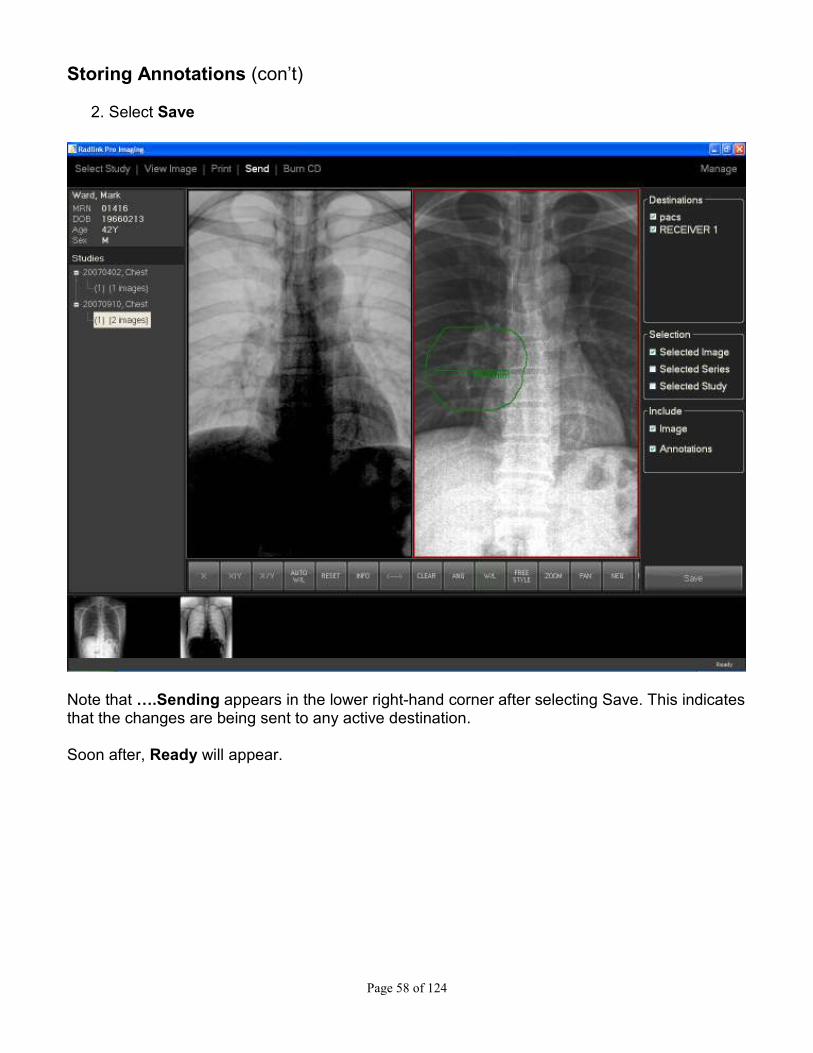
Storing Annotations (con’t)
2. Select Save
Note that D.Sending appears in the lower right-hand corner after selecting Save. This indicates that the changes are being sent to any active destination. Soon after, Ready will appear.

Page 59 of 124
Storing Annotations (con’t) To verify that the study has been successfully stored: 1. Select Manage 2. Select Send Status
The Send Status window is displayed showing the progress of the send operation for 3 studies. Under the Status column, the current state is automatically updated to indicate the progress. A typical progression is Pending > Executing > Success Once Success appears, the study has reached its destination(s). If the study contains few images, you may only see Success by the time you look at the Send Status window. If there are problems, Send Status will attempt to send the study 10 times before giving up and indicate a Status of Error. The number of attempts will be displayed in the Retries column. See the Troubleshooting chapter for more information.

Page 60 of 124
Optional scrollbar on worklist page
You may use scrollbar on worklist page instead of viewing the worklist in pages.
1. Go to Manage/Worklist, select Scrollbar under worklist display setting.

Page 61 of 124
Optional scrollbar on worklist page (con’t)
2. Use the scrollbar in Select Study window to scroll up and down the studies.

Page 62 of 124
Using DICOM Reports You may attach notes to studies and save them with the images to the PACS. To set the default doctor name so that you don’t have to re-enter it for each report: 1. Click Manage/Preferences
The Default Author on Report is displayed in the Preferences section.
Page 63 of 124
Using DICOM Reports (con’t)
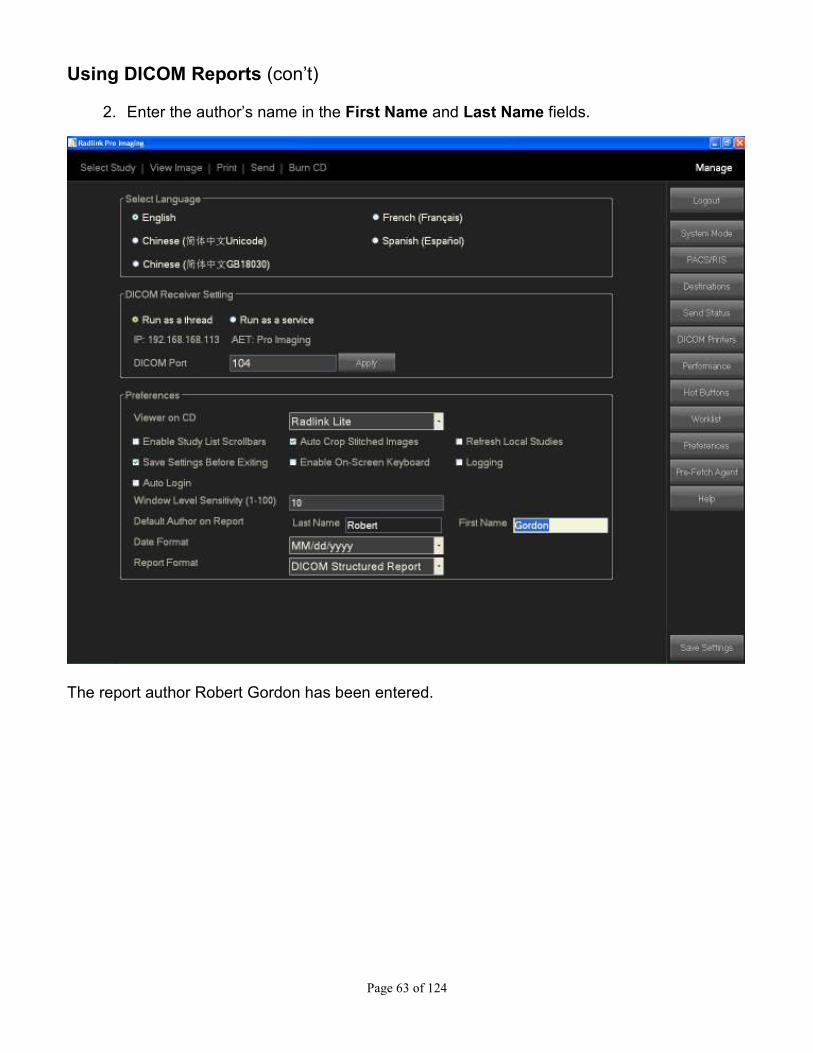
2. Enter the author’s name in the First Name and Last Name fields.
The report author Robert Gordon has been entered.

Page 64 of 124
Using DICOM Reports (con’t) To enter notes on a specific patient: 1. Select the desired study and view it in the QC Image window 2. Click Report
The Structured Report window is displayed. Note that the destinations are shown in the upper right hand corner. After entering a report, when Save or Sign is selected the report will be stored to all active destinations.
Page 65 of 124
Using DICOM Reports (con’t)
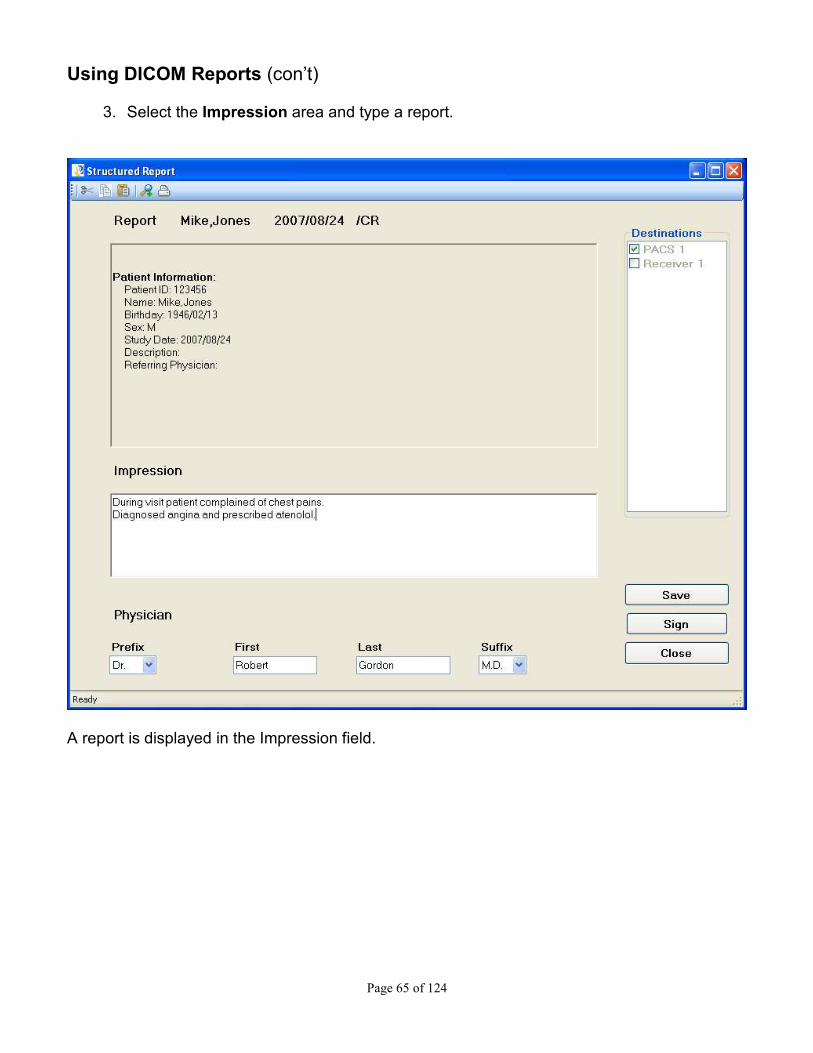
3. Select the Impression area and type a report.
A report is displayed in the Impression field.

Page 66 of 124
Using DICOM Reports (con’t)
4. When you are finished with a report, select Sign
After clicking Sign, the report is displayed in a read only window, and also stored to the active destination(s). A signed report can no longer be modified. Note: To view the Impression field AND the currently displayed image simultaneously, press the Minimize icon at the top of the Report window.

Page 67 of 124
Using DICOM Reports (con’t) To enter a second report:
1. Select the Impression area and type a report.

Page 68 of 124
Using DICOM Reports (con’t)
2. When you are finished with the second report, select Save
Note that while Save sends the report to the specified destination, you may still modify it.

Page 69 of 124
Using DICOM Reports (con’t) When you have finished with the report and don’t wish to make any more changes, select Sign to finalize it.
Note that the second report was pushed into the read only area of the window, and stored to the active destination(s).

Page 70 of 124
Using DICOM Reports (con’t) To determine whether a study has a report: 1. Select View Study and set the worklist to All Studies
Any study that has a report will contain an icon displayed in the Report column. In the above example, the bottom study contains a report. To read a report, select any study that has this icon, and then select the Report button.

Page 71 of 124
Report editing using IE browser You may edit and save reports using IE browser To set the Report Format to HTML: 1. Click Manage/Preferences 2. Select HTML for Report Format 3. Save settings

Page 72 of 124
Report editing using IE browser (Con’t) To enter notes on a specific patient: 1. Select the desired study and view it in the QC Image window 2. Click Report
The HTML Report window is displayed. After entering a report, when Save is selected the report will be stored to all active destinations.

Page 73 of 124
Report editing using Microsoft Word 2003 format You may edit and save reports using Microsoft Word 2003 format
To set the Report Format to Word 2003: 1. Click Manage/Preferences 2. Select Microsoft Word 2003 for Report Format 3. Save settings

Page 74 of 124
Report editing using Microsoft Word 2003 format (Con’t) To enter notes on a specific patient: 1. Select the desired study and view it in the QC Image window 2. Click Report
Note :::: If PACS is configured with workflow states (refer to "Workflow States" section), this report select window will pop up. If PACS is configured without workflow states, report for current study will be brought up without this report select window will poped up.

Page 75 of 124
Report editing using Microsoft Word 2003 format (Con’t) To enter notes on a specific patient: The Word 2003 Report window is displayed.
After entering a report, when Save is selected the report will be stored to all active destinations.
Page 76 of 124
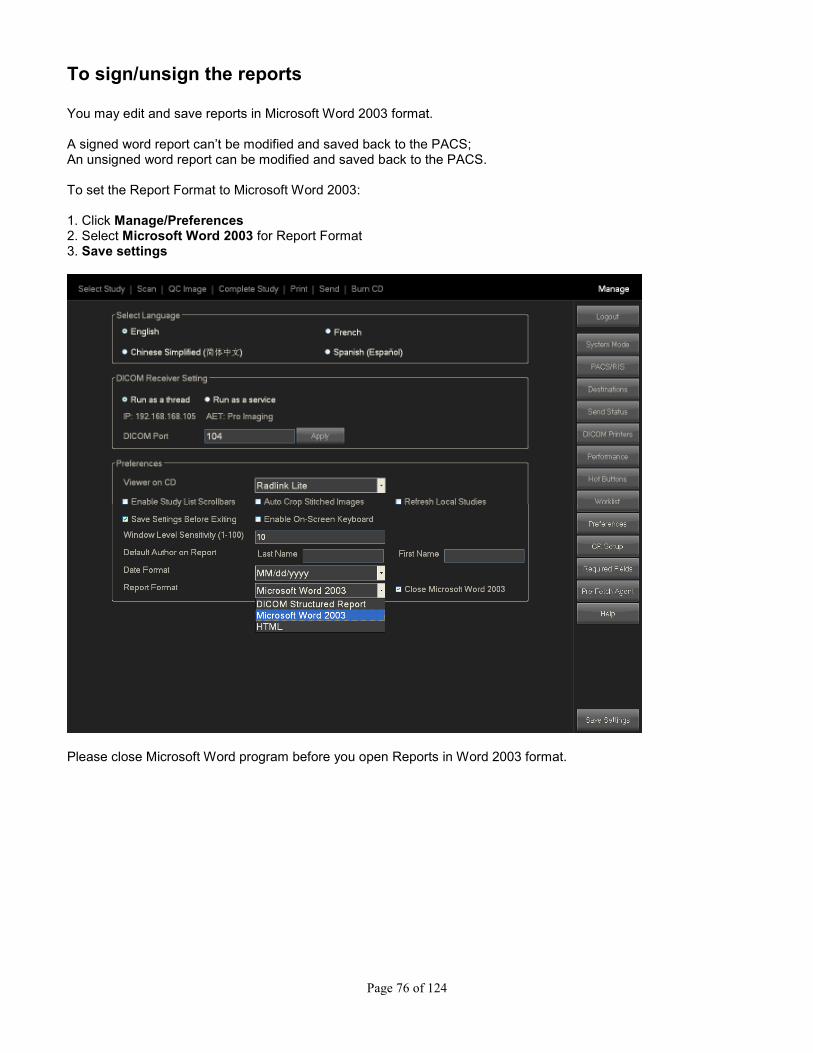
To sign/unsign the reports You may edit and save reports in Microsoft Word 2003 format. A signed word report can’t be modified and saved back to the PACS; An unsigned word report can be modified and saved back to the PACS. To set the Report Format to Microsoft Word 2003: 1. Click Manage/Preferences 2. Select Microsoft Word 2003 for Report Format 3. Save settings
Please close Microsoft Word program before you open Reports in Word 2003 format.

Page 77 of 124
To sign/unsign the reports (con’t) To sign a report: 1. Log in as CRUser

Page 78 of 124
To sign/unsign the reports (con’t) 2. Select a new study and view it in the QC Image window 3. Click Report 4. Modify the report, select SIGN and SAVE the report.
The report is loaded in word with read-only permission when you login with a different user account.

Page 79 of 124
To sign/unsign the reports (con’t) To unsign the report: 1. Log in as CRUser 2. Open the report signed above 3. Select UNSIGN and SAVE the report.
The report is loaded in word with normal permission even when you login with a different user account.

Page 80 of 124
Report template ViewPro allows users to edit and save reports by using any defined layouts of a report (report templates) stored in PACS. To use a report template:
1. Set the report format to be Microsoft Word 2003:

Page 81 of 124
Report template (Con't) 2. Select the desired study and view it in the QC Image window 3. Click Report to bring up the report window in Microsoft Word 2003 format 4. Choose one template and double-click on it to load it.
Patient information will be prefilled into the report template。 You may click “NEW” to open a blank report without the template or click “Open” to load new templates in word format from your PC.
Page 82 of 124
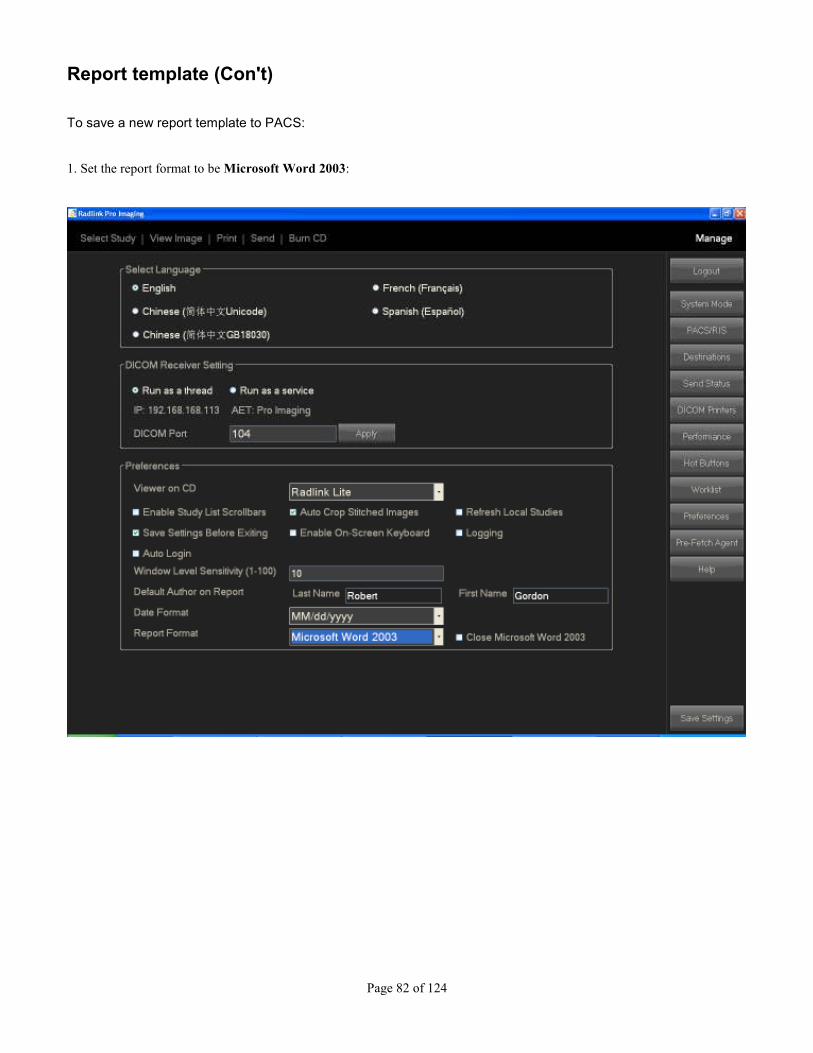
Report template (Con't) To save a new report template to PACS:
1. Set the report format to be Microsoft Word 2003:

Page 83 of 124
Report template (Con't) 2. Go to "Select Study" window
3. Click on "Report" button on the right bottom, report window will pop up
4. Select "Template" and click on "Next"

Page 84 of 124
Report template (Con't) 5. Click on Open
You may select any report template in the local drive.
Page 85 of 124
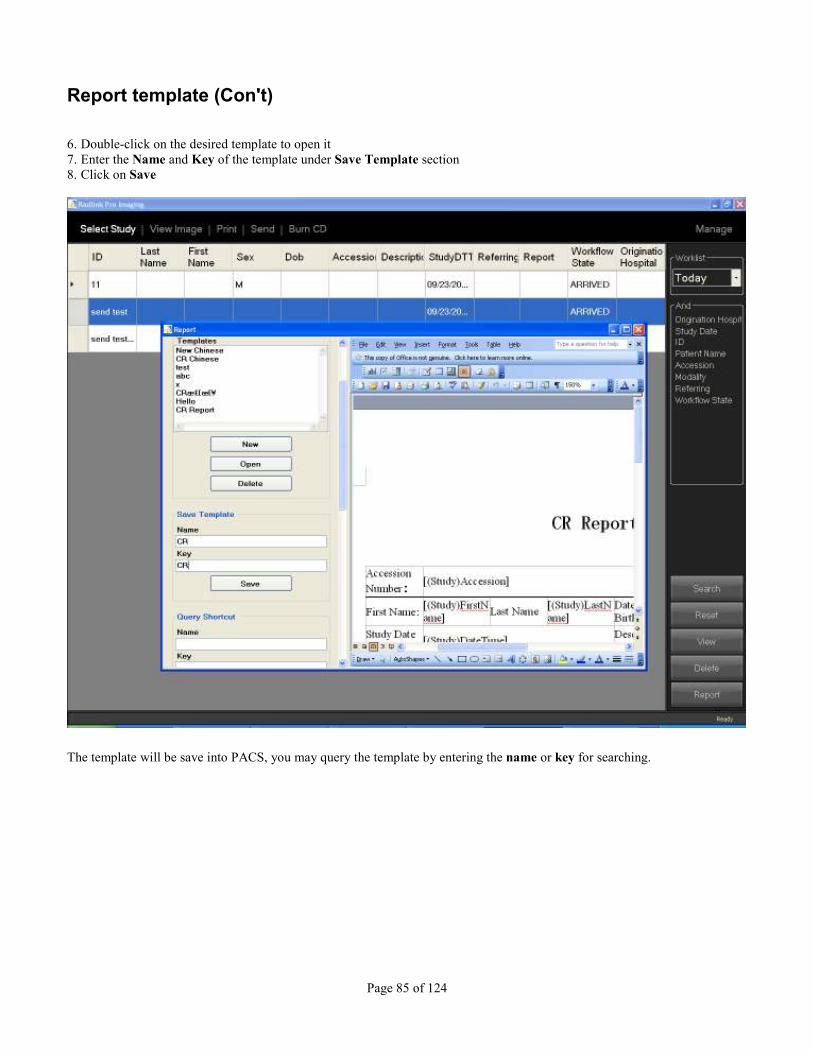
Report template (Con't)
6. Double-click on the desired template to open it
7. Enter the Name and Key of the template under Save Template section
8. Click on Save
The template will be save into PACS, you may query the template by entering the name or key for searching.

Page 86 of 124
Lexicon/shortcut ViewPro allows users to define/retrieve Lexicon/shortcuts. To create a new shortcut: 1. Enter the Name and Key under Save Shortcut column 2. Select desired text in word window 3. Click Save

Page 87 of 124
Lexicon/shortcut (con’t) To query the shortcut: 1. Place the mouse in the word window at the point that you want to add the text of the shortcut. 2. Double-click the desired shortcut name under Query Shortcut column.
The text of the shortcut added to your report.

Page 88 of 124
Workflow states
The ThinPACS is configured with a list of workflow states that best suits the needs of the site. The
complete list of workflow states is:
Workflow State Description
ARRIVED When a study first arrives at the PACS, its state is ARRIVED.
VERIFIED The completeness and accuracy of the study has been verified.
DICTATED A report has been dictated for the study.
TRANSCRIBED The report has been transcribed into the PACS system.
FINALIZED The report has been approved and finalized.
A site can be configured with a subset of the states “ARRIVED, VERIFIED, DICTATED, FINALIZED”.

Page 89 of 124
Workflow states (Con’t)
If a site is configured with the full set of the workflow states, the behavior of the action button should be as following:
1. Open a new study in the View Image screen.
The action button shows “Verify”

Page 90 of 124
Workflow states (Con’t)
2. Click Select Study.
The Workflow States in Worklist Fields shows “ARRIVED”

Page 91 of 124
Workflow states (Con’t)
3. Go to View Image screen and Click Verify.
The action button shows “DICTATE” and the state of the study changed to “VERIFIED”.

Page 92 of 124
Workflow states (Con’t)
4. Click Dictate
Report window for the current study brought up with a “SAVE” button.

Page 93 of 124
Workflow states (Con’t)
5. Click SAVE
The action button shows “Transcribe” and the state of the study changed to “Dictated”.

Page 94 of 124
Workflow states (Con’t)
6. Click Transcribe
Report window for the current study brought up again with a “”SAVE” button.
Page 95 of 124
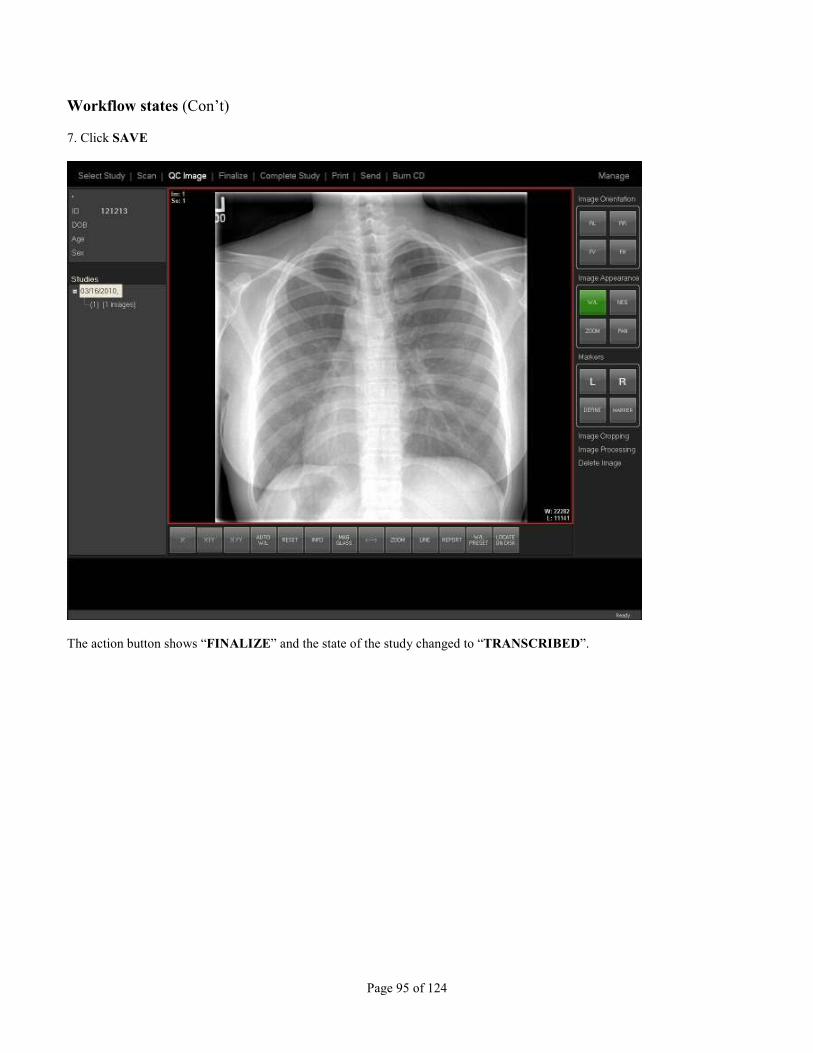
Workflow states (Con’t)
7. Click SAVE
The action button shows “FINALIZE” and the state of the study changed to “TRANSCRIBED”.

Page 96 of 124
Workflow states (Con’t)
8. Click Finalize.
The action button shows “FINALIZE” but disabled and the state of the study changed to “FINALIZED”.

Page 97 of 124
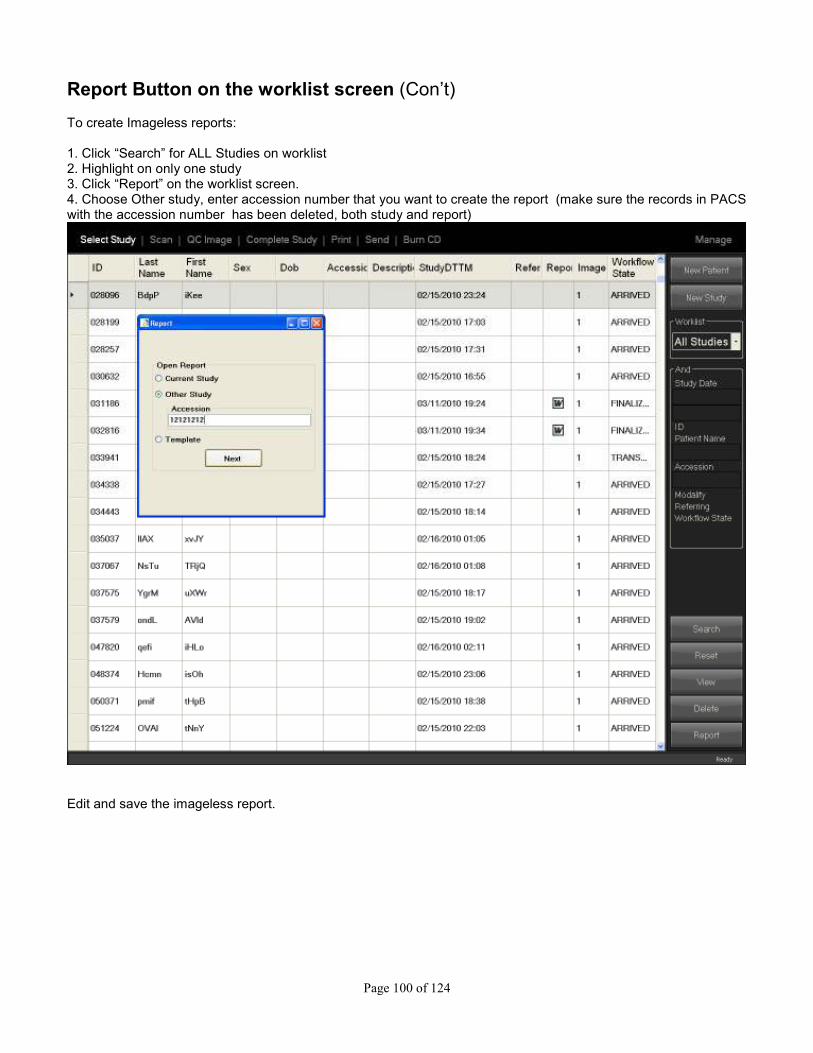
Report Button on the worklist screen
The Report Button shall also appear on the worklist screen.
To open the Report Window for the current study
1. Click “Search” for ALL Studies on worklist
2. Highlight on only one study
3. Click “Report” on the worklist screen.
ViewPro shall bring up a popup window, with the following options:
• Report for Current Study (if there is only one study is selected in the worklist screen)
• Report for New Study (imageless reports)
• Report Template

Page 98 of 124
Report Button on the worklist screen (Con’t)
4. Choose Current study and Click “Next”
5. Pick a template
The correct template will be loaded in word, patient info pre-filled

Page 99 of 124
Report Button on the worklist screen (Con’t) To open the Report Window for More than one study:
1. Click “Search” for ALL Studies on worklist 2. Highlight on 3 studies. 3. Click “Report” on the worklist screen
A popup window will be brought up with following options: a. Report for other study b. Report Template Current Study option will be disabled
Page 100 of 124
Report Button on the worklist screen (Con’t) To create Imageless reports: 1. Click “Search” for ALL Studies on worklist 2. Highlight on only one study 3. Click “Report” on the worklist screen. 4. Choose Other study, enter accession number that you want to create the report (make sure the records in PACS with the accession number has been deleted, both study and report)
Edit and save the imageless report.

Page 101 of 124
Printing Images may be printed to any of the printers that were previously setup in Chapter 1: Setting Up DICOM Printing and/or to the printer defined as the Windows default.
1. Press the Print tab located at the top of the display. 2. View the image window you intend to print 3. Click the checkbox of the printer(s) you wish to print in the Printers section. 4. Press the Print button.
For a non-DICOM printer such as the Windows default printer, only one image may be printed at a time even though multiple images can be displayed.
The following options apply to DICOM Printing Only: True Size when checked will print the actual size of the image to film. True Size when unchecked will print the image as it is currently viewed on the display. - Select the image(s) you wish to print using the X, X | Y, X/Y, or Layout buttons, Click the checkbox of the printer(s) you wish to print, and press the Print button.

Page 102 of 124
Printing images from different patients Images from different patients are allowed to be printed in the same print session.
1. Press the Print tab located at the top of the display. 2. View the image window you intend to print
3. Click GRID button
Grid window pops up and allows you to set up the layout of the film.

Page 103 of 124
Printing images from different patients (Con’t)
4. Select the desired layout and click OK button. 5. Left click in the grid where you want to place the next image 6. Click the Patient Folder button
The Search Patients window should pop up and allows you to add images from different patients in the same print session. You can search by patient name, patient ID, accession # or referring. You can also narrow down by modality.
7. Search the desired patient.

Page 104 of 124
Printing images from different patients (Con’t) 8. Select the patient, click Load button and close the Search Patients window
All the images of that patient will be loaded as thumbnails at the bottom. 9. Select the desired image to fill in the grid. 10. Repeat 5-8 to add images from other patients if needed.

Page 105 of 124
Printing images from different patients (Con’t)
11. Double click the printer you wish to print in the Printers section
The Print setting window will pop up and allows you to modify the setting of the printer.
12. Click Save button. 13. Press the Print button.

Page 106 of 124
Printing images for multiple sheets
1. Press the Print tab located at the top of the display. 2. View the image window you intend to print 3. Select the layout of the film and add images 4. Click NEXT button under Film box
New sheet will be loaded and allows you to set up the layout and add images for the next film.
You may Click ADD or DEL buttons to add or delete the sheets.

Page 107 of 124
Burning a CD
Exams may be burned to a CD and inserted into a PC for later viewing. To burn a CD:
1. Select Burn CD 2. Set Worklist to All Studies to view all studies that can be burned to CD.
The Burn CD window appears. Note that only the studies that have been previously viewed are shown. If the study you are attempting to burn to CD is not displayed, you must first go Select Study, find the study, and then view it.
Page 108 of 124
Burning a CD (con’t)
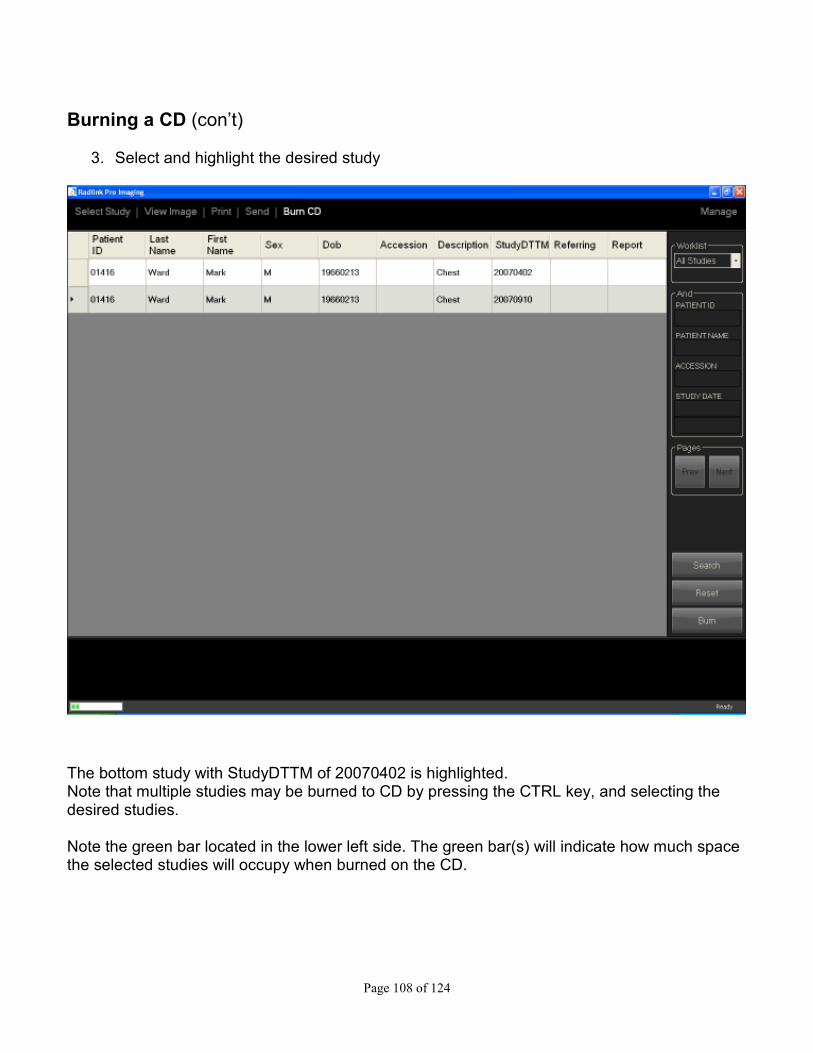
3. Select and highlight the desired study
The bottom study with StudyDTTM of 20070402 is highlighted. Note that multiple studies may be burned to CD by pressing the CTRL key, and selecting the desired studies. Note the green bar located in the lower left side. The green bar(s) will indicate how much space the selected studies will occupy when burned on the CD.
Page 109 of 124
Burning a CD (con’t)
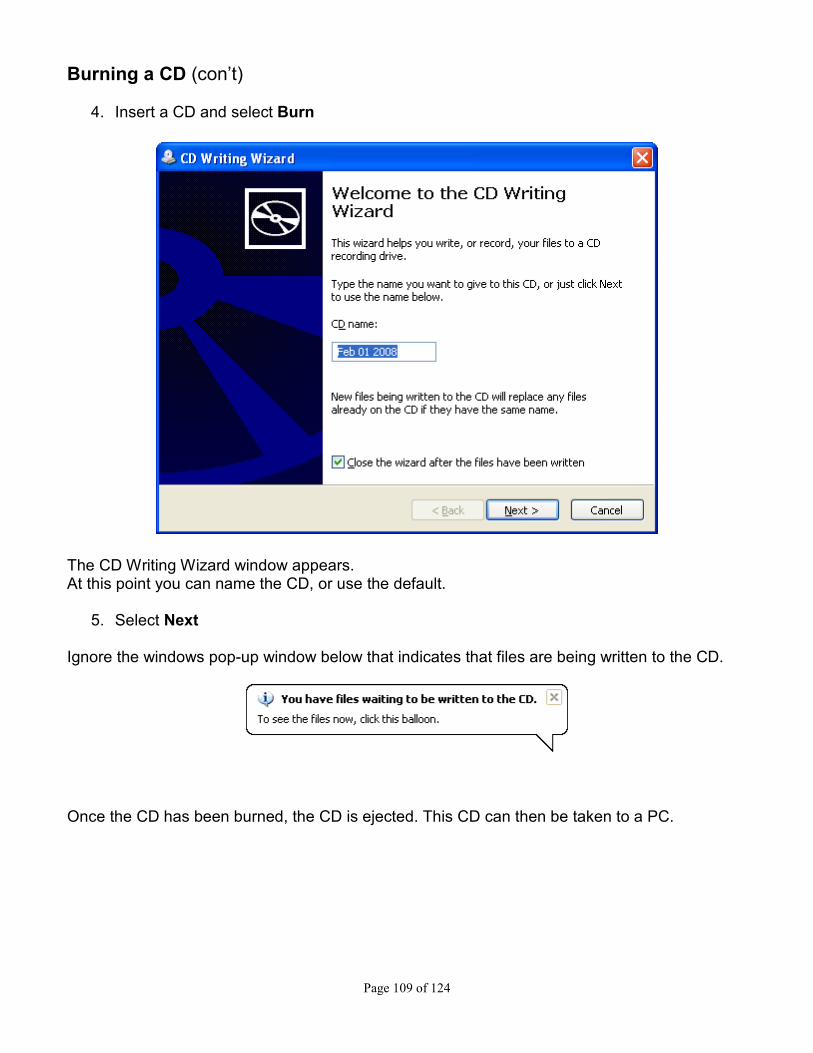
4. Insert a CD and select Burn
The CD Writing Wizard window appears. At this point you can name the CD, or use the default.
5. Select Next Ignore the windows pop-up window below that indicates that files are being written to the CD.
Once the CD has been burned, the CD is ejected. This CD can then be taken to a PC.

Page 110 of 124
Viewing a Burned CD
1. To view the study that was burned, insert the CD into a PC.
Note that the default viewer is Radlink Lite. To use the e-Film Lite viewer, go to Manage/Preference and set the Viewer on CD field to eFilm Lite.
2. If the above window appears, double click Run setup.exe

Page 111 of 124
3. If the above window appears, click Accept.
4. If the above window appears, click Install.
Page 112 of 124
Viewing a Burned CD (con’t)
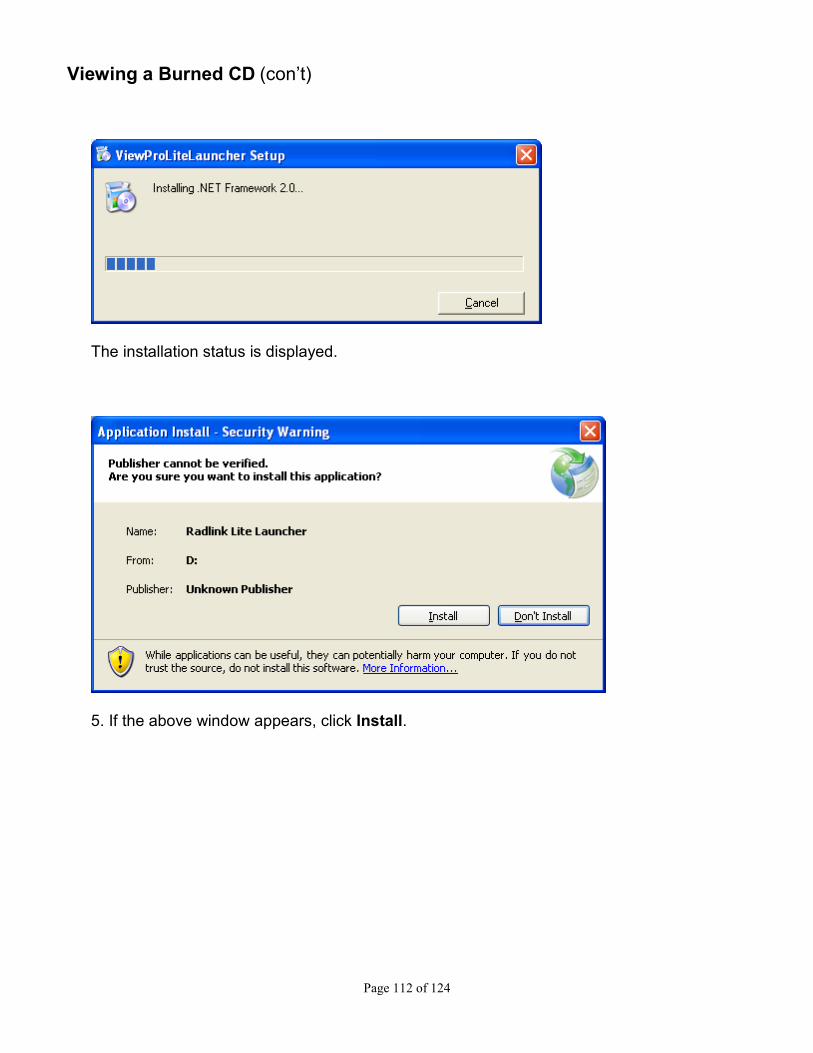
The installation status is displayed.
5. If the above window appears, click Install.

Page 113 of 124
Viewing a Burned CD (con’t)
A de-featured version of the viewer appears after several minutes.

Page 114 of 124
Chapter 4: Software Upgrades For instructions on how to reinstall the ThinPACS Viewing Software or upgrade to a later version browse to: http://www.radlink.com/software/ProImaging/CR Pro SW Upgrade Instructions/Read Me First.pdf. To download the latest version of software browse to: http://www.radlink.com/software/ProImaging/Release

Page 115 of 124
Chapter 5: Troubleshooting
This section addresses how to resolve some of the common problems using the Viewer software.
Can’t display studies in Select Study window 1) If the following message Search Failed: DicomService module unable to establish DICOM connection. Please check the DICOM connection setting. appears in the status window at the bottom of the Viewer display, the connection to the PACS server is not established. Please refer to: Chapter 1: Configuring the PACS Server Settings or contact your IT person for assistance.
Search Failed: DicomService module unable to establish DICOM connection. Please check the DICOM connection setting.
2) If the And fields PATIENT ID, PATIENT NAME, ACCESSION, or STUDYDATE have been edited, they can determine which studies are displayed. To erase these fields, select Reset, then change the Worklist field to the desired setting.
Can’t display studies in Burn CD window
For studies to appear in the Burn CD window they must have been previously viewed. To do this, select the Select Study tab and select the study that you want to burn to CD. Then return to Burn CD window, highlight the desired study and select Burn. If you still don’t see the study, change the Worklist setting to a different date.
Viewer won’t start Ask your IT person if Microsoft’s Active Directory is installed at your site. If it is, the Pro Imaging Viewer software may not start. Here is a workaround if Active Directory is installed.
1) Create a new local user account with Administrator rights a) Control panel b) User Accounts c) Advanced tab d) Advanced button e) Click User f) Right-click and select New User g) Enter User Name h) Enter Password i) Confirm Password j) Unclick ‘Users must change password at next login’ k) Click Create
2) Logout of current account and login to new account 3) Double-click icon ‘Radlink Pro Imaging’ and verify software runs 4) Logout and login to main user account 5) Go to C:\Program Files\Radlink\Radlink Pro Imaging 2.0.3’ 6) Right-click ViewPro.exe and select ‘Create Shortcut’ 7) Drag shortcut to desktop 8) To start ViewPro:
a) Right-Click desktop shortcut and select ‘Run As…’ b) Click the button ‘The following user’ c) Replace the word ‘Administrator’ with the new user account name d) Enter password e) Click Ok

Page 116 of 124
Send Study indicates Error One of the things that could lead to an error is if the network went down that connects the CR Pro to a remote PACS. In this case, the software will wait 15 minutes to re-establish connection before indicating an Error state.
To resend a study that is displayed with a status of Error, highlight it and select Send. The system will again try 10 times to send the study to the destination.
Page 117 of 124
Send Study indicates Error (con’t)
If the error still exists: 1. Select Manage 2. Select Destinations 3. If there is more than one host, highlight the host listed in the Send Status’ Destination
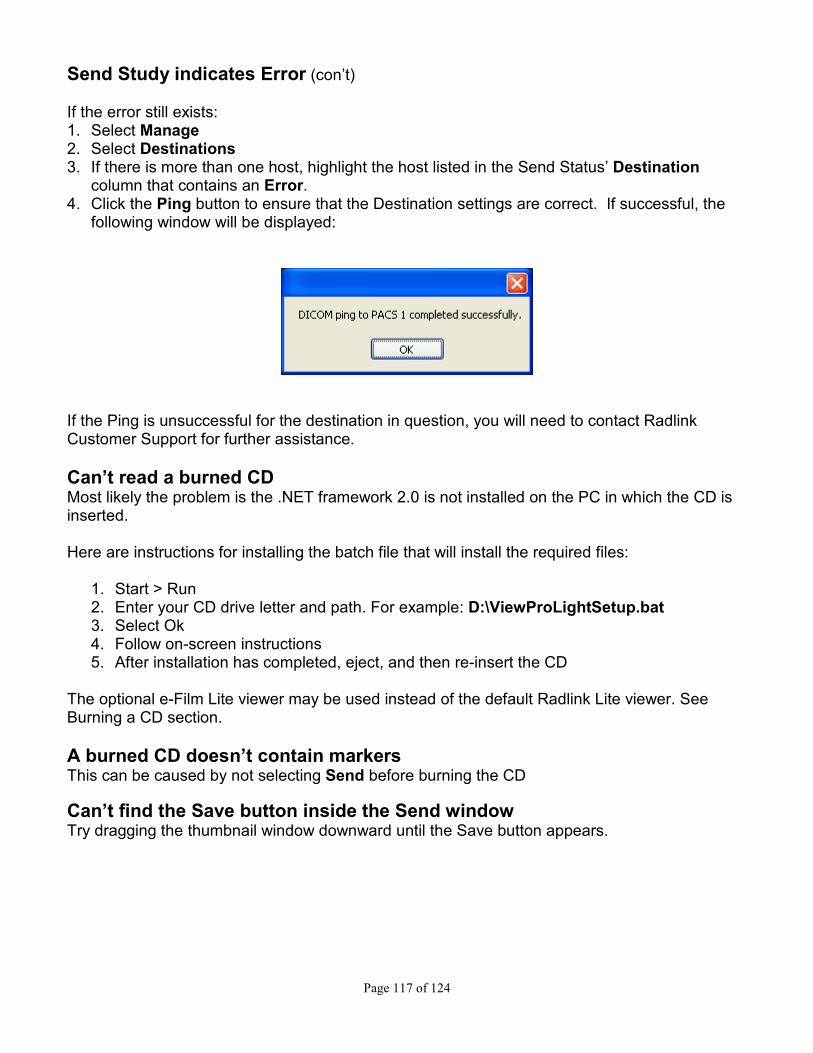
column that contains an Error. 4. Click the Ping button to ensure that the Destination settings are correct. If successful, the
following window will be displayed:
If the Ping is unsuccessful for the destination in question, you will need to contact Radlink Customer Support for further assistance.
Can’t read a burned CD
Most likely the problem is the .NET framework 2.0 is not installed on the PC in which the CD is inserted. Here are instructions for installing the batch file that will install the required files:
1. Start > Run 2. Enter your CD drive letter and path. For example: D:\ViewProLightSetup.bat 3. Select Ok 4. Follow on-screen instructions 5. After installation has completed, eject, and then re-insert the CD
The optional e-Film Lite viewer may be used instead of the default Radlink Lite viewer. See Burning a CD section.
A burned CD doesn’t contain markers
This can be caused by not selecting Send before burning the CD
Can’t find the Save button inside the Send window
Try dragging the thumbnail window downward until the Save button appears.

Page 118 of 124
Chapter 6: Appendix
This section describes the set of features according to menu.
Select Study Menu Worklist A pull-down menu of available pre-defined dates is displayed Selecting a Worklist value will do the following:
Today - display all studies with the current day’s date Past 2 Days – display all studies with the current day’s date and yesterday’s date Past 7 Days – display all studies within the last week Past 30 Days - display all studies within the last 30 days All Studies – display all studies regardless of date
And Used in conjunction with Worklist and Search. Consists of 4 fields:
PATIENT ID (aka Medical Record Number or MRN) PATIENT NAME (must be last name) ACCESSION MODALITY (examples: CR, SC, MR, etc.) REFERRING (the referring physician as specified in Study Information window) DATE RANGE
After specifying one or more And field(s), the Search button or Enter key must be selected. Pages
Next - displays the next group of studies Prev - displays the previous group of studies
Search When Search is selected, the studies that match the Worklist and the fields in the And section are displayed. Reset Resets the Worklist to Today and inserts the current day’s date into the DATE RANGE field. View Downloads selected studies to your local hard drive so that they may be displayed faster the next time they’re selected. To use, highlight one or more studies by placing the cursor in the leftmost column next to the study and click. The row will appear highlighted. Then press the View button. To highlight multiple studies hold down the CTRL key while making selections and then press the View button.
Page 119 of 124
Delete Deletes the PC’s local images for each highlighted study. Note that any studies that were previously stored to a PACS are not deleted. Column Headings Studies may be sorted in forward or reverse order by selecting the desired heading. A second selection will toggle the sort order.
View Image Menu Image Orientation RL – Rotate Left. Rotates selected image 90 degrees to the left side. RR – Rotate Right. Rotates selected image 90 degrees to the right side. FV – Flip Vertically. Flips the selected image 180 degrees up/down. FH – Flip Horizontally. Flips the selected image 180 degrees left/right. Image Appearance W/L – Window Leveling. Allows the adjustment of the contrast of the selected image. Select the image and move left or down to lighten and right or up to darken ROI W/L – Region of Interest Window Leveling. Allows the adjustment of the brightness and contrast within a selected area of the image. NEG – displays a negative of the selected image. ZOOM – enlarges selected image. PAN – moves selected image. Studies (left margin) All studies for the patient are displayed Below Studies are Series, and Image information. The number for each is indicated. You may select these to display the desired images. For example: Studies 20060920, L/S <- Study 1 (StudyDTTM/Modality) (1) (1 images) <- Series 1, 1 image (2) (3 images) <- Series 2, 3 images (3) (5 images) <- Series 3, 5 images
Hot Buttons Settable in Manage/Hot Buttons Default buttons: X – displays a 1x1 grid X | Y – displays a 2x1 grid X / Y – displays a 1x2 grid AUTO W/L – restores window leveling to original setting. RESET – restores all Image Orientation, Image Appearance, Measurements, and Annotations customizations to their original values. INFO – overlays patient information on image.

Page 120 of 124
���� expands the window to full screen size
���� restores the window to default screen size REPORT – Brings up the Structured Report window which allows the entry of clinical notes. Measurements LINE – allows the placement of a line between two points on an image and determines the resulting length in millimeters. ANG – allows the placement of two lines on an image and determines the resulting angle in degrees. Once placed, lines or angles may be individually removed by selecting their midpoints and dragging them off the image. Annotations FREE STYLE – allows the placement of freehand drawing to an image. CLEAR – removes all freehand drawing from selected image. Add Markers Allows the placement of Left, Right designators, and customizable text strings using Define. Once placed, they may be removed by selecting and dragging off the image. Series NEXT - displays the next series of images in selected study PREV - displays the previous series of images in selected study Image NEXT - displays the next group of images in selected series PREV - displays the previous group of images in selected series Thumbnail Images Small .jpg images called thumbnails are located at the bottom and may be selected for display in the main window(s). Note that for the MR modality images, only one thumbnail will be displayed.
Send Menu Stores the images, lines, angles and freestyle annotations, to destination(s). Destinations Displays the destinations that are specified in Manage/Destinations. Each destination that is checked will receive any images lines, angles and free hand drawings when Save is clicked. Selection Determines whether to send the displayed image, the series for the selected image, or the entire study when Save is clicked.

Page 121 of 124
Include Determines whether you want to store the image(s), annotation(s), or both when Save is clicked.
Print Menu In the Printers section, a checkbox will appear for each printer that was previously added including the Windows default printer. For information on adding or removing DICOM printers, see Manage/DICOM Printers. Print – prints the displayed image to the printer(s) checked under Printers heading. Preview – applies only to the Windows default printer. Displays how the image will appear when printed. True Size - when checked will print the actual size of the image (DICOM printing only) True Size when unchecked will fit the image to the film size (DICOM printing only) Layout – Allows multiple images to be printed on one film (DICOM printing only) Print Series – Prints every image in the selected Series. Print Study – Prints every image in all Series.
Burn CD Menu Studies may be burned to a CD and inserted into a different CR Pro or a PC for viewing. A de-featured version of either the Radlink (default) or e-Film viewer is stored on the CD along with the study information. To select the viewer, go to Manage/Preference and set the Viewer on CD field.

Page 122 of 124
Manage Menu System Mode – allows the selection of Image Acquisition or Viewing Workstation. Image Acquisition - contains most of the features of Viewing Workstation plus the ability to create studies, receive images from the CR Pro systems, and perform additional image enhancements not available in the Viewing Workstation mode. Save Settings – saves the System Mode setting. PACS/RIS (Picture Archiving Communication Systems/Radiology Information Systems) The server repository for images (PACS) or patient tracking and scheduling (RIS) is selectable in Worklist. The following fields are displayed under the PACS Server Setting window: IP - the physical network node address of the PACS server. DICOM Port - the logical port of the PACS server. AET - Application Entity Title is the user chosen name of the PACS host WEB Port -default outbound Web request port Compression - save viewed images from a Radlink PACS to: C:\Documents and Settings\CR Pro User\ViewPro\images in compressed formats: None, Lossless, Lossy High Quality, Lossy Medium Quality, and Lossy Low Quality. The same settings except for Compression are available under the Modality Worklist Setting window. Save Settings – saves the PACS information Destinations The destination settings allow you to specify the PACS that will receive the images you’ve scanned when you select Complete Study. Save Settings – saves the Destinations settings. Send Status Used to verify that a study has been successfully stored to the active PACS’ listed in Destinations. Cancel – after sending a study to the PACS, if it is listed in the ‘Executing’ state, the transmission can be cancelled by highlighting the study and selecting Cancel. If a study is in any other state such as Pending, it cannot be cancelled. Send – if a study is displayed in either Cancelled, Error or Unknown states, highlighting the study and selecting Send will attempt to re-send the study to the destinations. DICOM Printers Specifies the printer parameters and allows printers to be added and removed. Test Status – provides feedback on the availability of the specified printer. Add printer – allows addition of a DICOM printer Remove printer – removes the highlighted printer. FilmSize – allows the selection of the following film sizes: 14INX17IN, 14INX14IN, 11INX14IN, 10INX14IN, 10INX12IN, 8INX10IN. Save Settings – saves the DICOM printer information. Performance The defaults under the heading System Performance Setting are: Memory Buffer HWM (MB) = 500
Page 123 of 124
Memory Buffer LWM (MB) = 250 Disk HWM (%) = 90 Disk LWM (%) = 50 Delete Studies Older Than (Days) = user defined Application Disk Drive = C HWM stands for high watermark LWM stands for low watermark When studies are viewed for the first time they are copied to the local disk drive along with their thumbnails so that subsequent views will be more efficient in terms of the display time. The above parameters apply to these local files. For example, if the memory allocation exceeds 500MB, the system will automatically try release local memory to reach the lower watermark setting of 250MB. The same applies to the Disk watermarks. Files are removed if they occupy 90% of the disk, which is defaulted to the C drive, until they occupy 50% of the disk capacity. Studies can also be automatically cleared from the local hard drive after a specified number of days by populating the Delete Studies Older Than field. Local Database Rebuild – the studies.xml file (local database) can be rebuilt automatically by clicking this button. This file may need to be rebuilt in the case of if being deleted or corrupted. Hot Buttons Specifies which imaging buttons will appear under the main image window in the QC Image and Print windows.
X (Study Layout 1x1) – the default 1x1 grid display
X/Y (Study Layout 2x1) – used to display 2 images at the same time. Divides the display into 2 rows, 1 column
RESET – restores an image to its state after a scan
W/L – window leveling
ZOOM – enlarges an image
PAN – moves an image
FREESTYLE – freehand drawing
PREV SERIES – displays previous series
PREV IMAGE – displays previous image
INFO – displays Patient info, study date, Gain, KVP, Mas, distance, and window leveling.
SAVE JPEG – save’s a jpeg image of the currently active window
LOCATE ON DISK – locates current image on local drive (acquisition folder)
MAGNIFYING GLASS – tool for magnifying specified area of image
X | Y (Study Layout 1x2) – used to display 2 images at the same time. Divides the display into 1 row, 2 columns
AUTO W/L – resets any manual window leveling to the default.
<--> (MAX) – expand the image
NEG – display a negative image
LINE – adds a measured line

Page 124 of 124
ANG – adds a measured angle
CLEAR - removes all freehand drawing
NEXT SERIES – displays the next series
NEXT IMAGE – displays the next image
STITCH IMAGES – stitches two images together W/L PRESET – opens menu for saving and calling saved window/level values REPORT – opens window for reporting impressions HISTOGRAM – graph showing data distribution of current image Save Settings – saves the Hot Button selections Worklist Fields When checked, specifies the column headings that will appear when in Select Study window. Preferences Select Language – select English, French, Chinese (simplified), or Spanish user interface. DICOM Receiver Setting (optional- purchased separately) – The IP and DICOM Port values can be used to allows the reception of DICOM images from any networked DICOM storage device such as another Viewing workstation or CR. Viewer on CD - Specifies the default viewer that will be used when Burn CD is performed. Enable Study List Scrollbars – useful when there many studies for a patient that overflow the window list. Enable On-Screen Keyboard – used for touch screen displays. Whenever a text field is selected, a keyboard is displayed. Uncheck for non-touch screen displays. Auto Crop Stitched Images - removes a portion of the image surrounding the stitched area and makes the resulting image appear more seamless. Refresh Local Studies – displays images from the PACS (if present) rather than from local drive. Save settings before exiting – automatically performs Save Settings when the software is exited. Default Author on Report – used to set the default doctor name in a report so that you don’t have to manually re-enter it each time. Date Format – allows the selection of date formats MM/dd/yyyy (month, day, year), yyyy/MM/dd (year, month, day), and dd/MM/yyyy (day, month, year). The date format selection will appear on the display for Select Study, QC Image, and Print menus.
Help Contains selectable hypertext links to Radlink’s website, email, address, and software updates. Save Settings After making any changes to the Manage menus, be sure to click the Save Settings button. This will record and implement your settings if the system is restarted.