thetransplant - brown bird designs quilts
TRANSCRIPT
theA PAPER PIECED PATTERN
CREATED BY : BROWN BIRD DESIGNS
Transplantfeaturing Sage fabric designed by Bari J

Fabric Requirements & Cutting:
Paper Piecing Basics:
Supplies You Will Need:
• Printed pattern • Printed pages 6, 7 & 8 on paper piecing paper • Cotton thread • Sewing machine • 90/14 Sewing machine needle • Cutting mat and rotary cutter • .25” Edged ruler • Scissors for paper and Scissors for fabric • Pins• Glue stick • Hand needle • Seed beads
6.5” of one fabric5” of twelve fabrics. If you use charms, the most you will use the same fabric is three times.
1 Fat quarter of a contrast fabric(see last page for fabric key)
www.brownbirddesigns.com | Page 2
5) Trim off excess fabric- Use a .25” ruler to trim off excess fabric. Fold the paper down on the line you are going to work on, exposing the back side of your fabrics. The .25” ruler has a lip where when you place the folded edge. The ruler extends .25” beyond the paper fold creating a perfect .25” seam allowance. Using your rotary cutter to cut the excess fabric off.
4) The pattern consists of five sections. Each section has a sequence of numbers that will help guide you through that section. Sew directly on these line. Start at #1 and continue adding fabric and seams until all of the numbers are covered, trimming seams as you go. The grey area on your paper indicates where colored fabric is used.
6) The fabric is placed on the back of the paper causing a mirrored effect. If you use a light color on Section A it will appear on the left side of your mini quilt top.
Both images are Section A.
One is the top view and the
other is the bottom view.
1
2
3
4
5
6
2) The dotted line is the seam allowance. All seams need to extend beyond the border and dotted line. 3) If your line starts or ends intersecting any line, (other then the border) start one or two stitches before the line as well as after the line.
1) Before you start sewing, adjust your stitch length to a shorter setting. Some where between 1.5 and 2. This will perforate the paper more making it easier to remove the paper.
Take #2 fabric and place it more than .25” away from the line between number one and number two. Holding it up to a light will help see where the fabrics are. Pin RST.
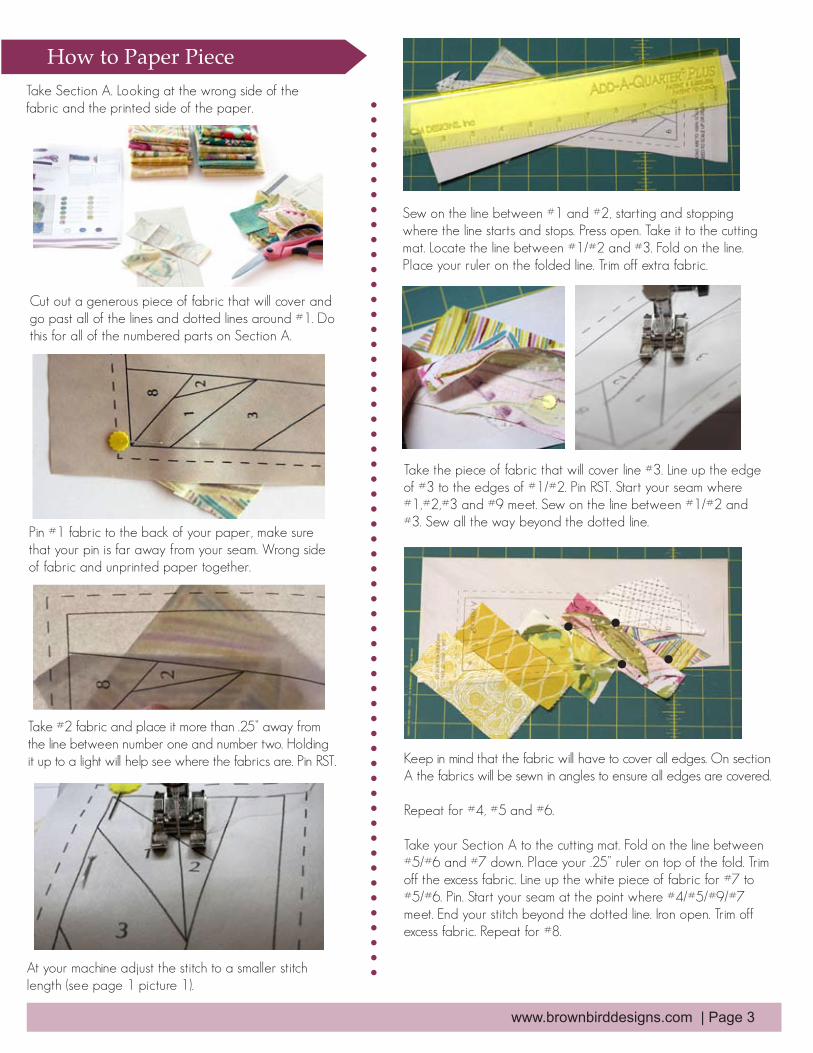
Take Section A. Looking at the wrong side of the fabric and the printed side of the paper.
Cut out a generous piece of fabric that will cover and go past all of the lines and dotted lines around #1. Do this for all of the numbered parts on Section A.
Pin #1 fabric to the back of your paper, make sure that your pin is far away from your seam. Wrong side of fabric and unprinted paper together.
At your machine adjust the stitch to a smaller stitch length (see page 1 picture 1).
Sew on the line between #1 and #2, starting and stopping where the line starts and stops. Press open. Take it to the cutting mat. Locate the line between #1/#2 and #3. Fold on the line. Place your ruler on the folded line. Trim off extra fabric.
Take the piece of fabric that will cover line #3. Line up the edge of #3 to the edges of #1/#2. Pin RST. Start your seam where #1,#2,#3 and #9 meet. Sew on the line between #1/#2 and #3. Sew all the way beyond the dotted line.
Keep in mind that the fabric will have to cover all edges. On section A the fabrics will be sewn in angles to ensure all edges are covered.
Repeat for #4, #5 and #6.
Take your Section A to the cutting mat. Fold on the line between #5/#6 and #7 down. Place your .25” ruler on top of the fold. Trim off the excess fabric. Line up the white piece of fabric for #7 to #5/#6. Pin. Start your seam at the point where #4/#5/#9/#7 meet. End your stitch beyond the dotted line. Iron open. Trim off excess fabric. Repeat for #8.
How to Paper Piece
www.brownbirddesigns.com | Page 3

Take your Section A to the cutting mat. Fold on the line between #8/#2/#3/#4/#7 and #9 down. Place your .25” ruler on top of the fold. Trim off the excess fabric. Line up the white piece of fabric for #9 to #8/#2/#3/#4/#7. Pin. Start sewing before the dotted line and end beyond the dotted line. Press open.
Trim the section down by placing the .25” ruler lip on the border line. The edge of the ruler will be where the dotted line is. Trim each edge of the section. Set aside.
Repeat process for Section B, C, D and E.
1) Line up & pin Section C to Section A. 2) Double check that the seam points will line up by folding the pinned edge .25” back to reveal the fabric beneath. If the seam lines meet at .25” in, your points will match. Sew together. Press seams open. 3) Line up & pin Section C/A to Section D. Sew together. Press seams open. 4) Line up and pin Section C/A/D to Section B. Sew together. Press seams open. 5) Line up edges and pin Section C/A/D/B to E. Sew together. Press seams open.
Putting the Block Together
Finishing your mini
Pull your paper off of each section.
Quilt and bind mini as desired.
www.brownbirddesigns.com | Page 4
1 3
4
2
5

www.brownbirddesigns.com
Fabric key
Adding Flowers
Cut .75“ deep slits in the folded top half of fabric every .25”.
On the right side of the seam pull one thread making a slight ruffle, tie the two threads into a knot. Repeat on the left side.
Cut a rectangle measuring 2.5” x 10”. Fold in half. Spread glue with your glue stick on one of the halves. Using a longer stitch, (4.1) sew a seam .25“ away from the raw edge.
Use a needle and thread to tack one side of the fabric onto the quilt front. Wrap the fabric so it forms circles, tacking as you go. When the flower has taken shape, secure it in place. Then with the thread in the front, pull the needle off. Add twelve (or more) beads. Thread the needle and pull it through, to the back on the other side of the inside circle stitch. Repeat until you have covered any seam stitches still showing. Secure the thread by making a few anchor stitches. Trim thread.
Bougainvillea Evergreen (be) used three times
Prickly Pear Indigo Prickly Pear RubyCrisp Crisscross
Cactus Flora Lily sm (cfl) used three times
Primrose Field Dark (pfd) used three times
Cactus Flora Berry sm (cfb) used two times
Painted Desert Morning (pdm) used two times
Saguaro Crest Olive (sco) used two times
Saguaro Crest Sun (scs) used one time
Sunswept Canyon Sage (scs) used two times
Hay (h) used two times
Primrose Field Light (pfl) used one time
Yuma Lemons Mist (ylm) used two times
www.brownbirddesigns.com | Page 5
www.brownbirddesigns.com | Page 6
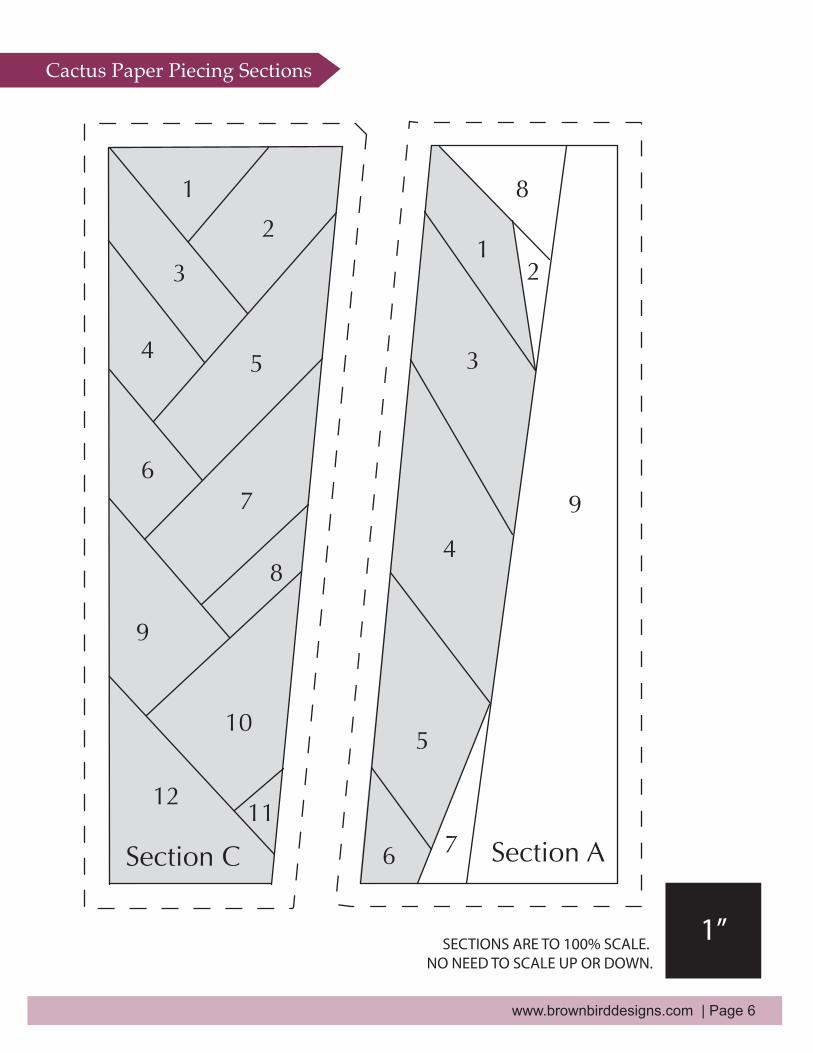
1
2
3
4 5
67
8
9
10
1112
Section C
21
3
4
7
8
9
5
6 Section A
SECTIONS ARE TO 100% SCALE. NO NEED TO SCALE UP OR DOWN.
Cactus Paper Piecing Sections
1”
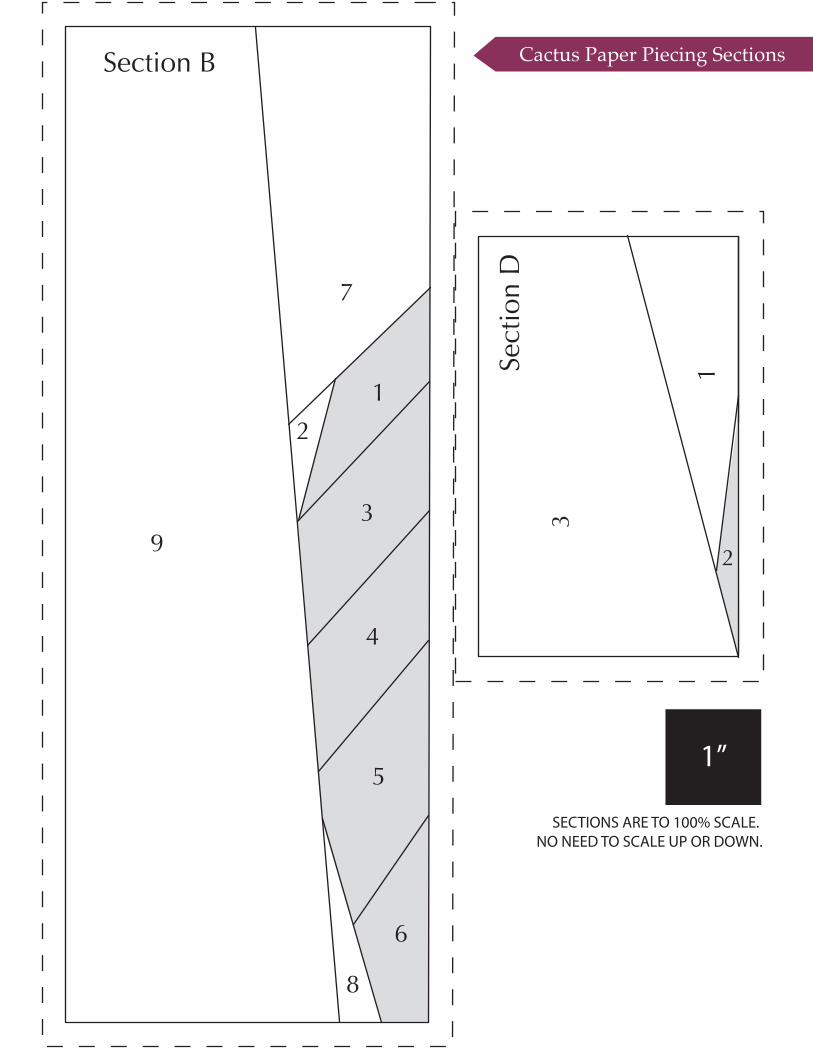
1
2
3
4
5
6
8
7
9
Section B Cactus Paper Piecing Sections
.5”
23
1Sect
ion
D
SECTIONS ARE TO 100% SCALE. NO NEED TO SCALE UP OR DOWN.
1”

Cactus Paper Piecing Sections
www.brownbirddesigns.com | Page 8
2
45
1
6
3
Sect
ion
E
SECTIONS ARE TO 100% SCALE. NO NEED TO SCALE UP OR DOWN.
1”