thermo hybaid pcr express thermal cycler - · pdf filethermo hybaid pcr express thermal...
TRANSCRIPT

© Thermo Hybaid 1999. Issue 5.0, March 1999
THERMO HYBAID
PCR Express Thermal Cycler
USER INSTRUCTION MANUAL
Head Office
Thermo HybaidAction CourtAshford RoadAshfordMiddlesex TW15 1XB
Telephone: +44 (0) 1784 425000Free Phone UK: 0500 95 55 72Facsimile: +44 (0) 1784 248085
STOCK CODE:HB-PX-MAN
FS31999

© Thermo Hybaid 1999 Issue 5.0, March1999ii

© Thermo Hybaid 1999. Issue 5.0, March 1999 iii
PCR EXPRESS TEMPERATURE CYCLING SYSTEMPCR License Registration
This instrument, Serial No. ................................................ is an Authorized Thermal Cycler.Its purchase price includes the up-front fee component of a license under the patents on thePolymerase Chain Reaction (PCR) process, which are owned by Hoffmann-La Roche Inc. andF. Hoffmann-La Roche Ltd, to practise the PCR process for internal research and developmentusing this instrument. The running royalty component of that license may be purchased fromPerkin-Elmer or obtained by purchasing Authorized Reagents. This instrument is also anAuthorized Thermal Cycler for use with applications’ licenses available from Perkin-Elmer.Its use with Authorized Reagents also provides a limited PCR license in accordance with thelabel rights accompanying such reagents. Purchase of this product does not itself convey tothe purchaser a complete license or right to perform the PCR process. Further information onpurchasing licenses to practice the PCR process may be obtained by contacting the Director ofLicensing at The Perkin-Elmer Corporation, 850 Lincoln Centre Drive, Foster City, California94404, USA. Tel No: + 415 638 5551. Fax No: +415 638 6071.Perkin-Elmer does not guarantee the performance of this instrument.

© Thermo Hybaid 1999 Issue 5.0, March1999iv
PCR EXPRESS TEMPERATURE CYCLING SYSTEMWarranty
Thermo Hybaid guarantees that the PCR Express Temperature Cycling system you havereceived has been thoroughly tested and meets its published specification.
This guarantee is valid for 36 months only if the product and functions have been usedaccording to the instruction manual. No liability is accepted for loss or damage arising fromthe incorrect use of the PCR Express Temperature Cycling system. Thermo Hybaid's liabilityis limited to the repair or replacement of the unit or refund of the purchase price at ThermoHybaid's option. Thermo Hybaid is not liable for any consequential damages.
The tube thermistor assembly supplied with your PCR Express unit is guaranteed for 90 days.
Thermo Hybaid reserves the right to alter the specification of the PCR Express without priornotice. This will enable us to implement developments as soon as they arise.
The Thermo Hybaid PCR Express is for research use only.
Read the Instruction Manual carefully before using the PCR Express to ensure that youobtain the best possible results from the machine.
NB: The PCR Express should only be used by suitably qualified and trained people. Ifthe PCR Express is not used as specified in this Manual, the protection provided bythe equipment may be impaired.

© Thermo Hybaid 1999. Issue 5.0, March 1999 v
PCR EXPRESS TEMPERATURE CYCLING SYSTEMContents
PCR LICENSE REGISTRATION ..................................................................................... iii
WARRANTY ........................................................................................................................ iv
CHAPTER 1: INTRODUCTION ......................................................................................1
1.1 Overview ............................................................................................1
1.2 PCR Express System.........................................................................1The 0.2ml Block Module & 0.2ml Gradient Block Module...............1The 0.5ml Block Module & 0.5ml Gradient Block Module...............2The Flat Block Module .......................................................................2The 384 Well Block Module ..............................................................2Temperature Control Methods............................................................2Heating and Cooling ...........................................................................3Programming and Operation...............................................................3Pre-set Programs .................................................................................3Advanced Edit.....................................................................................4Temperature Control ...........................................................................4
1.3 The Heated Lid..................................................................................4
1.4 Support Services................................................................................6
CHAPTER 2: SAFETY PRECAUTIONS ........................................................................7
Symbols and Conventions ............................................................................8
CHAPTER 3: UNPACKING & INSTALLATION .........................................................9
3.1 Unpacking..........................................................................................9
3.2 Packing List .......................................................................................9
3.3 Installation .......................................................................................10
Block Installation and Removal........................................................10
Thermistor Positioning......................................................................10
Choosing a Location .........................................................................11
© Thermo Hybaid 1999 Issue 5.0, March1999vi
Use in Cold Rooms ...........................................................................11
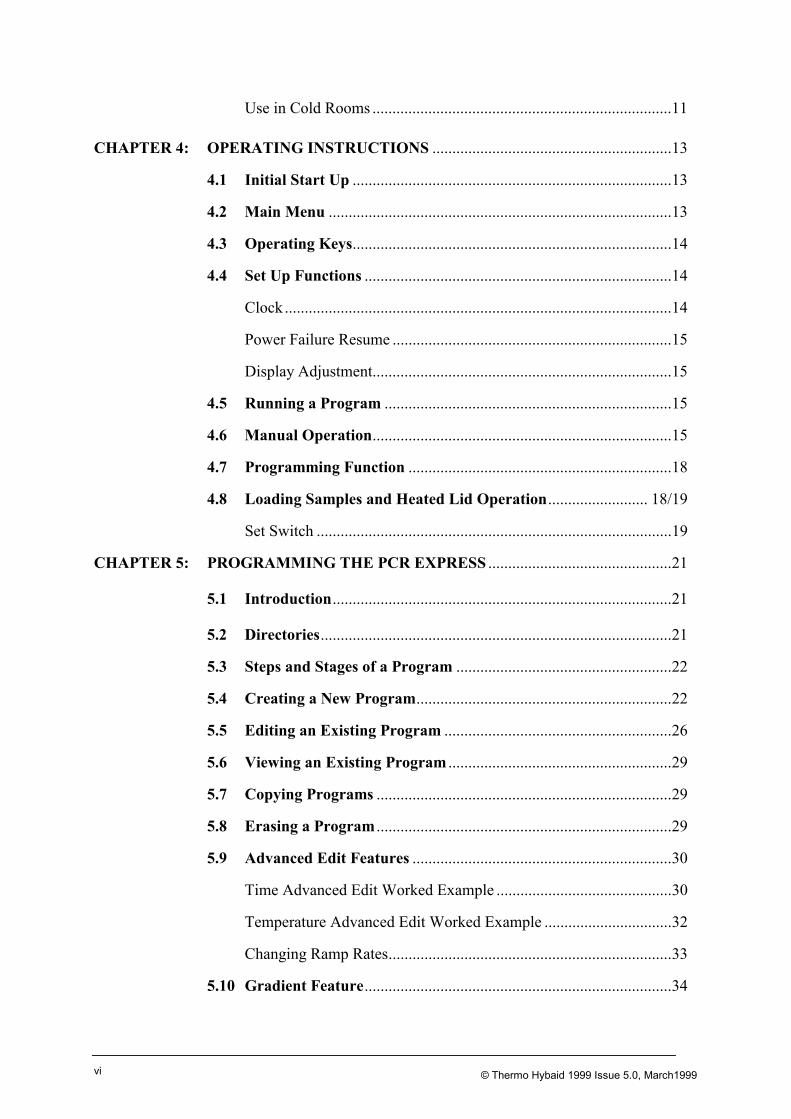
CHAPTER 4: OPERATING INSTRUCTIONS ............................................................13
4.1 Initial Start Up ................................................................................13
4.2 Main Menu ......................................................................................13
4.3 Operating Keys................................................................................14
4.4 Set Up Functions .............................................................................14
Clock .................................................................................................14
Power Failure Resume ......................................................................15
Display Adjustment...........................................................................15
4.5 Running a Program ........................................................................15
4.6 Manual Operation...........................................................................15
4.7 Programming Function ..................................................................18
4.8 Loading Samples and Heated Lid Operation......................... 18/19
Set Switch .........................................................................................19
CHAPTER 5: PROGRAMMING THE PCR EXPRESS ..............................................21
5.1 Introduction.....................................................................................21
5.2 Directories........................................................................................21
5.3 Steps and Stages of a Program ......................................................22
5.4 Creating a New Program................................................................22
5.5 Editing an Existing Program .........................................................26
5.6 Viewing an Existing Program ........................................................29
5.7 Copying Programs ..........................................................................29
5.8 Erasing a Program ..........................................................................29
5.9 Advanced Edit Features .................................................................30
Time Advanced Edit Worked Example ............................................30
Temperature Advanced Edit Worked Example ................................32
Changing Ramp Rates.......................................................................33
5.10 Gradient Feature.............................................................................34

© Thermo Hybaid 1999. Issue 5.0, March 1999 vii
Gradient Programming Worked Example.........................................35
Gradient Calculator Function............................................................36
CHAPTER 6: RUNNING A PROGRAM ON THE PCR EXPRESS ..........................39
6.1 The RUN Option .............................................................................39
6.2 Running A Program on the PCR Express ....................................39
6.3 Example Run Screens .....................................................................41
6.4 Temperature Control Options .......................................................43
Active Tube Control .........................................................................43
Simulated Tube Control....................................................................44
Simulated Plate Control ....................................................................45
Simulated Slide Control....................................................................47
Block Control....................................................................................47
6.5 Heated Lid Preheat .........................................................................47
Heated Lid - Automatic Start ............................................................47
Heated Lid - Manual Start.................................................................48
No Heated Lid...................................................................................48
6.6 Hold and Pause Function ...............................................................48
6.7 Aborting Programs .........................................................................49
6.8 Program Completion ......................................................................49
CHAPTER 7: TROUBLESHOOTING...........................................................................51
7.1 Protocol transfer .............................................................................53
CHAPTER 8: MAINTENANCE .....................................................................................57
8.1 General Cleaning ............................................................................57
8.2 Decontamination .............................................................................57
8.3 Protection to the User .....................................................................58
8.4 Protection of the Instrument ..........................................................58
Fuses .................................................................................................58
8.5 Tube Thermistor Care....................................................................58
© Thermo Hybaid 1999 Issue 5.0, March1999viii
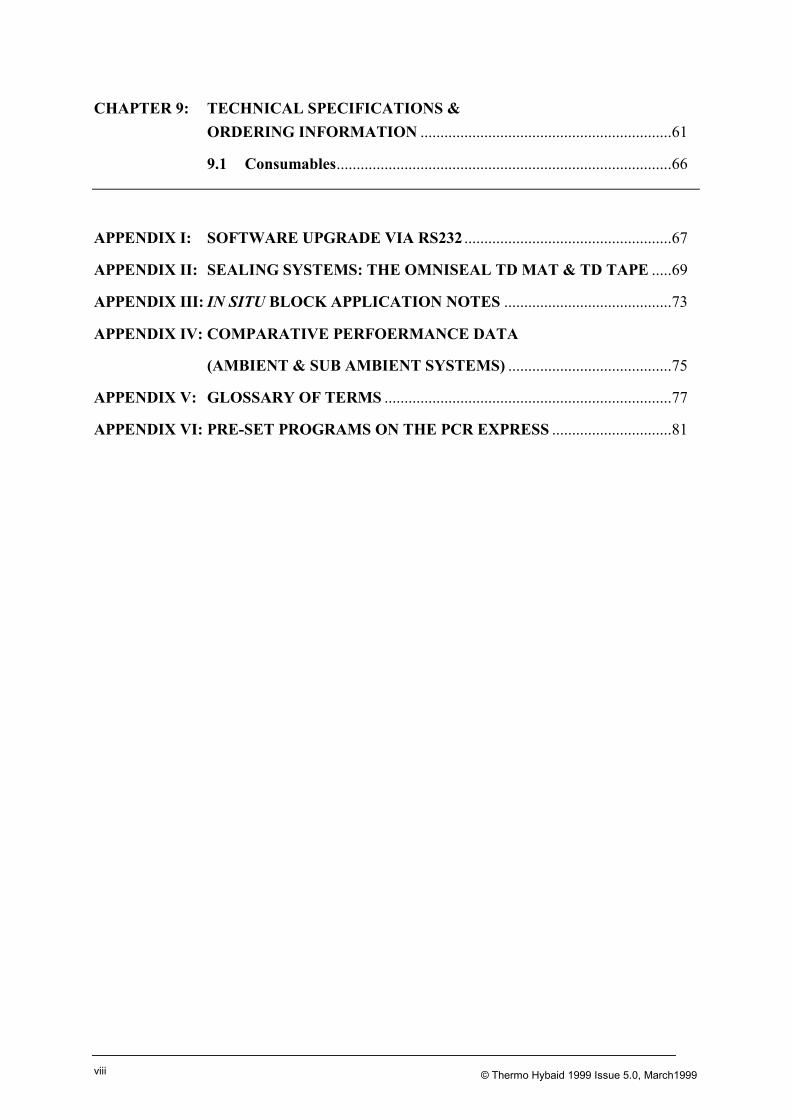
CHAPTER 9: TECHNICAL SPECIFICATIONS &ORDERING INFORMATION ...............................................................61
9.1 Consumables....................................................................................66
APPENDIX I: SOFTWARE UPGRADE VIA RS232 ....................................................67
APPENDIX II: SEALING SYSTEMS: THE OMNISEAL TD MAT & TD TAPE .....69
APPENDIX III: IN SITU BLOCK APPLICATION NOTES ..........................................73
APPENDIX IV: COMPARATIVE PERFOERMANCE DATA
(AMBIENT & SUB AMBIENT SYSTEMS) .........................................75
APPENDIX V: GLOSSARY OF TERMS ........................................................................77
APPENDIX VI: PRE-SET PROGRAMS ON THE PCR EXPRESS ..............................81

© Thermo Hybaid 1999. Issue 5.0, March 1999 1
CHAPTER 1PCR EXPRESS THERMAL CYCLER
Introduction
1.1 Overview
PCR Express is the essence of fast accurate, licensed thermal cycling. PCR Express featureshigh capacity, high speed and sub-ambient blocks to perform oil-free thermal cycling withexcellent dynamic uniformity and precision control of sample temperature.
1.2 PCR Express System
The PCR Express System comprises a Control Chassis and an Interchangeable Block Module.Each control chassis can operate one block module, which can be changed according to theneeds of the sample format. There are six types of block module:
The 0.2ml Block Module & 0.2ml Gradient Block Module
This block can hold any of the following:
• 1 x OmniPlate 96 well plate
• 1 x OmniTube 96 single piece polypropylene plate

© Thermo Hybaid 1999 Issue 5.0, March19992
• 96 x 0.2ml OmniStrip tubes
• 96 x 0.2ml individual OmniTubes
The 0.5ml Block Module & 0.5ml Gradient Block Module
This block can hold any of the following:
• 1 x 96 well plate (e.g. Costar Thermowell H)
• 96 x 0.3ml OmniStrip tubes
• 96 racked 0.3ml OmniTubes
• 48 standard 0.5ml individual OmniTubes.
The Flat Block Module
This block accommodates up to four standard microscope slides.
The 384 Well Block Module
This block accommodates 1 x OmniPlate 384 polypropylene plate.
Temperature Control Methods
The temperature cycling blocks for the system are of a specially coated precision-machinedaluminium, ensuring the best possible fit of reaction tubes in the block. This ensures excellentcontact between the tubes and the block, enabling rapid and accurate heat transfer from theblock to the samples.
1. Active Tube Control
Accurate sample temperature control in 0.2ml and 0.5ml block types is achieved by ThermoHybaid's Active Tube Control software. The tube thermistor probe monitors the temperaturewithin a dummy sample tube and this information is fed back to precisely control the blocktemperature to achieve the optimum cycling profile.
2. Simulated Tube/Plate Control
Alternatively, Simulated Tube Control or Simulated Plate Control may be used forreactions when it is not appropriate to use the tube thermistor probe, for example in very small(<20µl) reactions or reactions in 96 Well or 384 Well OmniPlates or racked OmniTubes. The

© Thermo Hybaid 1999. Issue 5.0, March 1999 3
temperature control algorithm is similar to active tube control, but is based on calculatedvalues for the sample temperature rather than values fed back by the tube thermistor.
3. Simulated Slide Control
For the In Situ module Simulated Slide Control should be selected. This operates on asimilar principle to Simulated Tube Control, but in this case the algorithm is based onachieving the set temperatures at the top surface of a standard glass microscope slide (1mmthick).
Heating and Cooling
The PCR Express sub-ambient blocks are built to proven designs, providing an accurate andreliable thermal cycling system.
The sub-ambient aluminium block is heated and cooled by the latest in Peltier technology.With proven durability, the block modules excel in performing applications such as RAPDand Differential Display, which require cycling temperatures close to ambient. The blockmodules will control the temperature of the samples from 20°C to 99°C for cycling reactionsin all reaction formats. In addition, static incubation steps may be performed as low as 4°C.
Programming and Operation
Cycling programs are simple to perform, using the combination of user-friendly screens andoperating keys. During programmed operation, the display screens provide comprehensiveinformation for the block including sample temperature, number of cycles completed,estimated time for completion, etc.
The PCR Express can thus be programmed to perform all types of temperature controlledreactions, from simple one step incubations, to complex multi-step temperature cyclingprotocols and temperature gradient experiments*. Three additional temperature controlsoftware options are available to the user in the Advanced Edit Menu: Temperature Ramping,Time Increment and Temperature Increment.
The unit has program space for up to 99 full cycling protocols including the pre-set protocols.
* With the gradient interchangeable block options.

© Thermo Hybaid 1999 Issue 5.0, March19994
Pre-set Programs
The PCR Express is supplied with ten non-editable pre-set protocols stored as programs 90-99in the F:HYBAID directory. These cover the most common thermal cycling techniques, andcan be used to create customised protocols by editing (see Appendix VI).
Advanced Edit - Temperature Ramping
The temperature ramping (Ramp Rate) enables the rate of change of sample temperature(°C/second) to be artificially slowed down.
Under normal circumstances the temperature cycling times are very rapid, which minimisesnon-specific reactions. The rate of sample temperature change during temperature cycling iscontrolled so that it is as fast as possible without affecting the block uniformity and accuracy.In some instances, it may be advantageous to limit the rate of change of temperature, e.g. toallow limited extension of short or degenerate primers between primer annealing and DNAsynthesis steps to stabilise the primer/template duplex.
Advanced Edit - Time/Temperature Increment
These features enable the time interval and/or the temperature of a specified programmed stepto be increased or decreased with successive temperature cycles. It may be advantageous toincrement the extension time interval to compensate for deterioration of enzyme activity inlater cycles. Alternatively, temperature decrements can be used, e.g. in PCR Express cyclingreactions where the annealing temperature is decreased with successive cycles.
Temperature Control
Every machine is calibrated using miniature thermistor probes located in tubes or attached tomicroscope slides. These are placed at several block positions simultaneously, ensuring therequired temperatures and incubation times achieved are identical in all samples.
1.3 The Heated Lid
The unique auto-adjust Heated Lid enables the running of temperature cycling protocolswithout the need for paraffin or mineral oil overlays. Such vapour barriers are normallyrequired to prevent evaporation before thermal cycling is complete. This system is designed tobe compatible with most reaction sample formats, i.e. 0.5ml, 0.3ml, 0.2ml tubes and 96/384well plates. In most cases, the experimental protocol is largely unchanged when switching toan oil free format.

© Thermo Hybaid 1999. Issue 5.0, March 1999 5
The Heated Lid operates by positioning a heated plate in contact with the top of the reactiontubes or wells. This heated plate then heats the air temperature at the top of each reactionmixture to a temperature that is permanently higher than the sample temperature. Thiselevated air temperature, relative to the sample temperature, minimises evaporation so thatthere is no condensation of the reaction mixture as it is repeatedly heated and cooled.
Opening the Lid
The lid is opened by lifting the light blue catch, and pushing it back.
The mechanism operates in 2 stages but through one continuous action; the first part of theaction raises the heating plate within the machine, the second releases the catches at the frontof the unit to raise the lid and expose the block recess.
Closing the Lid
To close, gently lower the dark blue lid and depress the light blue catch. At this point a ‘click’should be heard as the catches are engaged. This action lowers the heated lid on to thesamples and closes the unit, ensuring tight contact.
The height of the heating plate inside the Heated Lid is automatically adjusted as the lid isclosed. The downward pressure can be adjusted using the set switch according to whetherlight pressure (300g for tubes) or greater force (3.5kg to maintain the seal on plates) isrequired.
The temperature of the heating plate is set at 115°C (max. surface temperature) with powercontrol effected by the control chassis.
The heated plate inside the lid is switched on and off from within the program. The lidoperates once a program is activated, with a heating time of typically 2 minutes before cyclingcommences. The unit can be operated with or without the lid being switched on (the lid isautomatically deactivated in units fitted with flat block modules).

© Thermo Hybaid 1999 Issue 5.0, March19996
1.4 Support Services
The PCR Express has been designed for reliability and for ease of maintenance. ThermoHybaid continues to offer full service and technical support for all its products.
Telephone Contacts:
International Sales, Service and Technical Support (UK) +44 (0)1784 425000
UK Sales and Technical Support 01784 425000/(Freephone) 0500 95 55
72
UK Service Support 01784 425000/(Freephone) 0500 49 22
43
Fax Contacts:
UK & International Sales, Service & Technical Support (UK) +44 (0) 1784 248085
Alternatively, contact your local Thermo Hybaid subsidiary or authorised distributor.

© Thermo Hybaid 1999. Issue 5.0, March 1999 7
CHAPTER 2PCR EXPRESS THERMAL CYCLER
Safety Precautions
General Safety Precautions
1. The PCR Express should only be used by suitably qualified and trained personnel. Theunit should only be used for its intended purpose in accordance with the instructions andsafety warnings contained within this manual.
2. Before use, ensure that the unit has been set to the appropriate mains voltage.
3. The PCR Express is a class 1 appliance. To minimize the risk of electric shock, the unitmust be connected to a protective earth via the supplied mains cord.
4. Replacement fuses must be of the correct rated current, voltage and type.
5. Do not operate the unit in an explosive environment.
6. Do not operate the unit if it appears to be damaged or if a liquid or foreign object hasentered the enclosure. Disconnect from the mains supply and contact an authorizedservice centre.
7. Do not attempt to dismantle the unit. To avoid the risk of personal injury and to ensurethat the safety features of this unit are maintained, servicing should only be carried out byauthorized service personnel.
8. The tops of the reaction vessels and the surfaces of the Heated Lid assembly (in particularthe inner surfaces) can become very hot during normal operation. Touching the surfacescan cause burns. Do not touch the heated plate without safety gloves.
9. When positioning the unit ensure that there is no restriction to the power inlet. Specialcare should be taken not to obstruct the vent underneath the unit, for example looseBenchcote or sheets of paper.
10. When installing/removing the interchangeable block
• Ensure that the power to the instrument is turned off.
• The Block Heat Sink may be hot after use. Use gloves when interchangingblocks if the unit has been used recently.
11. This product is fitted with RFI suppression circuitry. Testing of the electrical insulationshould only be carried out using a DC voltage. For more information please contactThermo Hybaid.

© Thermo Hybaid 1999 Issue 5.0, March19998
Symbols & Conventions
The PCR Express has been designed for safe operation. The following symbols appearing onthe unit and their meanings should be noted.
I Indicates the ON position of the main power switch.
O Indicates the OFF position of the main power switch.
Consult the manual for further information.Consulter les documents d’accompagnement.
WARNING: Indicates a heating hazard. Proceed with caution to avoid burninjury.
ATTENTION: Surface chaude.
SAFETY NOTE: This symbol indicates high voltage. Risk of electric shock.
AVERTISSEMENT: Risqué de choc éléctrique.
In addition, the following conventions are adopted in the manual in respect of indicating safetyhazard:
SAFETY NOTE: indicates a potentially hazardous situation, which could resultin death or serious injury.
WARNING: indicates a potentially hazardous situation, which could result inminor or moderate injury to the user or damage to the instrument.

© Thermo Hybaid 1999. Issue 5.0, March 1999 9
CHAPTER 3PCR EXPRESS THERMAL CYCLER
Unpacking & Installation
3.1 Unpacking
Before unpacking the PCR Express, please make sure that the outer packaging is undamaged.
After unpacking, ensure all packaging and fixtures are retained, as the unit should always betransported in the original packing to avoid damage. Thermo Hybaid cannot acceptresponsibility for any damage incurred if the unit is incorrectly packed and transported.
3.2 Packing List
1. PCR Express Control Chassis2. PCR Express Block Module3. User Instruction Manual4. Mains Lead5. Control Thermistor Probe (0.2ml and 0.5ml gradient and standard block modules)6. Control Thermistor Probe Extension Lead (0.2ml and 0.5ml gradient and standard block
modules)7. Specific Consumable Pack8. RS232 Lead9. Self Adhesive Unit Identity Label
NB: The In Situ Flat Block Module includes a humidity chamber.
If any item is missing or damaged, contact the UK Service Department, or your local ThermoHybaid office/authorised distributor.
Ensure any padding between the plate inside the Heated Lid and the block is removed beforeusing the instrument.

© Thermo Hybaid 1999 Issue 5.0, March199910
3.3 Installation
Block Installation and Removal
1. Remove the PCR Express Control Chassis and Block Module from the packaging andplace on the bench; do not connect to the mains supply immediately.
2. Open the lid (by lifting the light blue latch) to expose the block recess.
3. Supporting the block from the blue plastic moulding and the ring pull, position the backof the block on the two lugs on the chassis.
4. Lower the block, via the pull ring into the recess (see fig 3.1). Placing your thumb onthe ring pull (just beneath the hole) firmly push downwards until you hear the blockclick into place.
5. Do not force the block if this does not happen: remove the block and check forobstructions in the block recess. The following error screens will appear if the block hasnot been installed properly or you attempt to run a program without a block in place:
SELF CHECK FAILED or SELF CHECK FAILED
BLOCK NOT PRESENT BLOCK ID ERROR
Removal is the reverse procedure.
Figure 3.1 Installing the Block Module
Thermistor Positioning
The control thermistor probe (when required) should be inserted into socket A2 to the left ofthe block towards the rear of the instrument (see fig 3.2).
Ensure that the tube contains the same volume of mineral oil as the sample reaction volume,and that the probe is immersed in the oil.

© Thermo Hybaid 1999. Issue 5.0, March 1999 11
Figure 3.2 Well Numbering Showing Tube Thermistor Positioning in A2
Choosing a Location
1. Where possible, avoid connecting the Control Chassis to a mains supply subject to mainsvoltage fluctuations, e.g. a socket shared by an ultracentrifuge or refrigerator.
2. In PCR Express systems, excess heat is removed from the system by a fan. Therefore,allow at least 8cm clearance between the sides of each module and any restriction to theflow of air. Allow 15cm of clearance at the back of the unit. The air intake is locatedunderneath and air is expelled out of the back of the unit. Care should be taken not toobstruct the vent underneath the unit with, for example, loose Benchcote or sheets ofpaper. The unit must not be covered during operation.
3. All PCR Express instruments should be placed on a stable and level surface, out of directsunlight and away from strong currents of hot or cold air. The heated lid should always beclosed during temperature cycling, even if the lid is not switched on.
4. The PCR Express is intended for indoor use at an ambient temperature of 4-34°C inconditions of up to 80% humidity. These specifications have been calculated foroperations at between 0 and 2000m altitudes.
Use in Cold Rooms
The PCR Express may be used in a cold room (down to 4°C). However, when removed toroom temperature the instrument should be allowed to equilibrate for at least two hours beforebeing switched on. If equilibration is not done, condensation may form within the unit andcause a short circuit.
A
H
1 12

© Thermo Hybaid 1999 Issue 5.0, March199912
© Thermo Hybaid 1999. Issue 5.0, March 1999 13
CHAPTER 4PCR EXPRESS THERMAL CYCLER
Operating Instructions
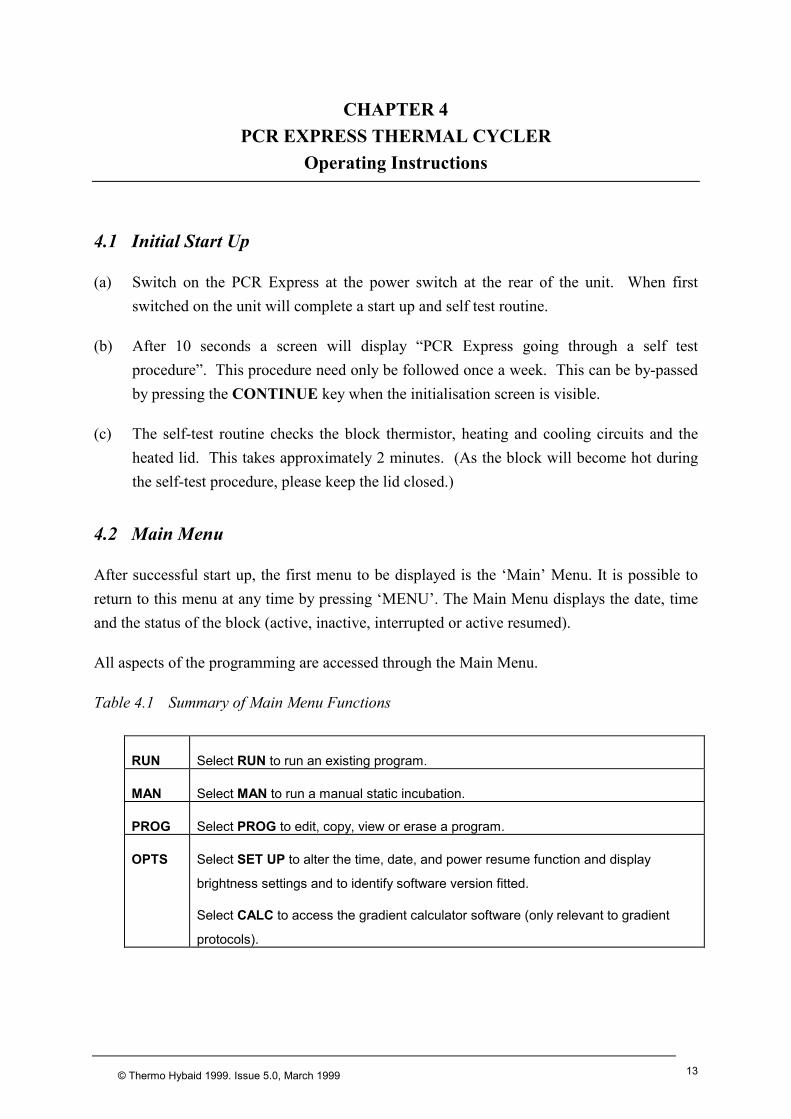
4.1 Initial Start Up
(a) Switch on the PCR Express at the power switch at the rear of the unit. When firstswitched on the unit will complete a start up and self test routine.
(b) After 10 seconds a screen will display “PCR Express going through a self testprocedure”. This procedure need only be followed once a week. This can be by-passedby pressing the CONTINUE key when the initialisation screen is visible.
(c) The self-test routine checks the block thermistor, heating and cooling circuits and theheated lid. This takes approximately 2 minutes. (As the block will become hot duringthe self-test procedure, please keep the lid closed.)
4.2 Main Menu
After successful start up, the first menu to be displayed is the ‘Main’ Menu. It is possible toreturn to this menu at any time by pressing ‘MENU’. The Main Menu displays the date, timeand the status of the block (active, inactive, interrupted or active resumed).
All aspects of the programming are accessed through the Main Menu.
Table 4.1 Summary of Main Menu Functions
RUN Select RUN to run an existing program.
MAN Select MAN to run a manual static incubation.
PROG Select PROG to edit, copy, view or erase a program.
OPTS Select SET UP to alter the time, date, and power resume function and display
brightness settings and to identify software version fitted.
Select CALC to access the gradient calculator software (only relevant to gradient
protocols).

© Thermo Hybaid 1999 Issue 5.0, March199914
4.3 Operating Keys
The PCR Express software is designed to be intuitive, the following table gives a summary ofthe primary functions of each of the operating keys.
KEY FUNCTION
ENTER KEY - Selecting Menu and program choices.
MENU KEY - Always moves to the Main Menu – (can be utilised as an “escape” key).
NUMBER KEYS - Used for entering parameters and selecting programs.
ARROW KEYS - Moving cursor between program positions.
- Alphanumeric naming of programs/directories.
- Used to toggle between options.
- Used for rapid scrolling through programs and for moving between run
screens.
STOP KEY - Cancels instructions/operations/programs.
- Used to delete programs & directories.
CONTINUE KEY - Used to progress from “hold”, “pause” or “self test” instructions.
- Also used to access advanced edit functions.
PAUSE KEY - Pauses a cycling program at current step.
BLOCK KEY - Provides access to current/historical information on block status
screens.
These functions are discussed fully in the following chapters.
4.4 Set Up Functions
Selecting SETUP at the Main Menu and pressing ENTER gives access to the SETUP menu.The SETUP menu also displays the current software version.
Clock
The time and date format of the clock display can be modified. To set the clock or alter theformat, select CLOCK from the SETUP menu and press ENTER.
The American (MM/DD/YY) or European (DD/MM/YY) format can be selected using the key.
Press ENTER to move to the time/date setting fields. Use the number keys to enter time (hrs& mins) and day/month/year information. Press ENTER to return to the Main Menu.

© Thermo Hybaid 1999. Issue 5.0, March 1999 15
Power Failure Resume
If there is a power interruption during a run, the PCR Express will switch back onautomatically. The unit can be set to resume a program (at the cycle and setpoint where theinterruption occurred) or to abandon the program. Select POWER from the SETUP menu andpress ENTER. The ABANDON or RESUME options can be selected using the key.Press ENTER to return to the Main Menu.
The instrument will record the duration of the interruption and the step, stage and cyclenumber at which it occurred.
(Note that if there have been several breaks in the power supply, only the most recentinterruption is recorded.)
Display Adjustment
The display brightness can be adjusted under varying light conditions.
• Select DISPLAY from the SETUP menu, and press ENTER.
• Hold down or to increase or decrease the brightness observed on the screen.
• Press ENTER to save the current screen brightness and return to the Main Menu.
4.5 Running a Program
Running a pre-stored program is easy on the PCR Express.
• At the Main Menu, with the cursor on RUN, press ENTER.
• Select the source directory (e.g. F:HYBAID) and press ENTER then select programnumber to be run and follow the screen prompts.
Prior to starting the program, pressing the MENU key at any stage, will return to the MainMenu. More details can be found in Chapter 6.
4.6 Manual Operation
This option is used for static incubations when thermal cycling is not required, e.g. hot startprotocols, probe denaturations, enzyme reactions. In this mode the unit will operate underblock control (see Chapter 5 for details). The count-up timer will start when the block reachestemperature.

© Thermo Hybaid 1999 Issue 5.0, March199916
1. Select MAN from the Main Menu and press ENTER.
2. Enter the name of the user or protocol if desired using the and arrows to scrollthrough the characters. Move to the next/previous character using the and arrowkeys.
3. Enter the temperature using the numeric keys. Press ENTER to continue.
4. Select the heated lid on (auto) or off using the key.
5. Press ENTER to start the incubation. The screen displays the set temperature and actualtemperature of the block together with the elapsed time.
NB: If the machine is started from ‘cold’, approximately two minutes will be requiredbefore the Heated Lid is at operating temperature (based on 20°C ambient and230V supply. This may vary under different power conditions). Condensation maybe experienced if samples are loaded before the lid is at operating temperature.
6. Press STOP twice to cancel the manual program.
7. Press CONTINUE to change the set temperature.
(See Figure 4.1 on the following page)

© Thermo Hybaid 1999. Issue 5.0, March 1999 17
Figure 4.1:Using the PCR Express for static temperature incubations (Manual control)
2 0 / 0 7 / 9 9 1 2 : 0 1 : 0 0I N A C T I V E
M A I N M E N UR U N M A N P R O G O P T S
(1) Press ENTER to select the MANUAL mode.
↓↓↓↓M A N U A L U S E R H Y B A I DT E M P 3 7 . 0H O T L I D O F F< E N T E R > T O C O N T I N U E
(2) Use , , , and to enter name then press ENTER.
↓↓↓↓M A N U A L U S E R H Y B A I DT E M P 4 5 . 0H O T L I D O F F< E N T E R > T O C O N T I N U E
(3) Use number keys to enter the required temperature, then press ENTER.
↓↓↓↓M A N U A L U S E R H Y B A I DT E M P 4 5 . 0H O T L I D O F F< E N T E R > T O C O N T I N U E
(4) Use to toggle heated lid on (auto) or off, then press ENTER.
↓↓↓↓M A N U A L U S E R H Y B A I DT E M P 4 5 . 0 T I M E 0 5 : 0 0B L O C K 4 5 . 0< C O N T I N U E > N E W T E M P
(5) Press CONTINUE to change the setpoint temperature, or STOP to stop theincubation

© Thermo Hybaid 1999 Issue 5.0, March199918
4.7 Programming Function
Programming PCR protocols of varying degrees of complexity can easily be created usingPCR Express. As with all operations of the PCR Express, programming is accessed from theMain Menu. Press MENU to access the Main Menu screen.
Use the arrow keys to move the cursor to PROG, and then press ENTER to access theProgram Menu. If at any time you wish to stop programming, press MENU to return to theMain Menu. Four options are available for programming:
1. EDIT: To alter the details of an EXISTING program or to create a completely NEWprogram.
Note that if NEW is used, it will automatically move to the next available programnumber.
2. COPY: Use the screen prompts to copy between programs stored on the PCR Express.
3. VIEW: To check the details of a previously stored program.
4. ERASE: To erase the details of a program, setting the parameters to zero.
These are discussed in detail in Chapter 5.
4.8 Loading Samples and Heated Lid Operation
The PCR Express will produce identical cycling profiles whether 1 or 96 samples are to beanalysed.
Loading Samples
The following guidelines maximise the uniformity and thermal transfer characteristics of theblock:
• Load samples uniformly across the block rather than in clusters. Spreading the thermalload in this way maintains uniformity.
• If small numbers of samples are to be run, use dummy tubes to ensure that there is at leastone tube in each quadrant of the block. This facilitates even heated lid pressure for goodthermal transfer to the tubes.
• Care should be taken when matching block, consumable, control mode and sample number(as shown below).

© Thermo Hybaid 1999. Issue 5.0, March 1999 19
• Ensure tube caps are properly closed before loading the block.
Table 4.2 Consumable Compatibility Table
Type* Control Method** Block0.5ml
Block0.2ml
Notes
0.5ml TUBESIM TUBE X
Max. 48 tubes/block arranged in adiagonal pattern e.g. A2, B1, A4, B3, C2,D1 etc. (see also figure 3.2). Space outtubes for even loading.
0.3ml TUBESIM TUBE
X Max. 96 tubes/block.Space out strips for even loading.
0.2ml TUBESIM TUBE (includingOmniTube 96, 96 wellarrays)
X Max. 96 tubes/blockSpace out strips for even loading.
OmniPlate96
SIM PLATE ? Seal using TD Tape/compression pad orOmniSeal mat for oil free operation (seealso App II). Use on 0.5ml blocks mayrequire optimisation**
U-Well0.5mlPlates
SIM PLATE X Sealing may be problematic for oil freeoperation TD Tape is the best option.
* Details of Thermo Hybaid’s own consumable range are given in Chapter 9** See Section 5.2
Heated Lid Operation
The Auto Adjust Heated Lid is simple to operate. In one action, the lid is closed and theheated plate lowered to its correct height and pressure setting.
No adjustment is necessary to compensate for different height consumables.
Set Switch
The Set Switch allows selection between a higher and a lower pressure setting. The switch islabelled “PLATE” and “TUBE”.
• “PLATE” setting should be used when sealing 96/384 well plates with TDTape/compression pad or OmniSeal TD Mats.
• “TUBE” setting should be used for all other consumables.

© Thermo Hybaid 1999 Issue 5.0, March199920
© Thermo Hybaid 1999. Issue 5.0, March 1999 21
CHAPTER 5PCR EXPRESS THERMAL CYCLER
Programming the PCR Express
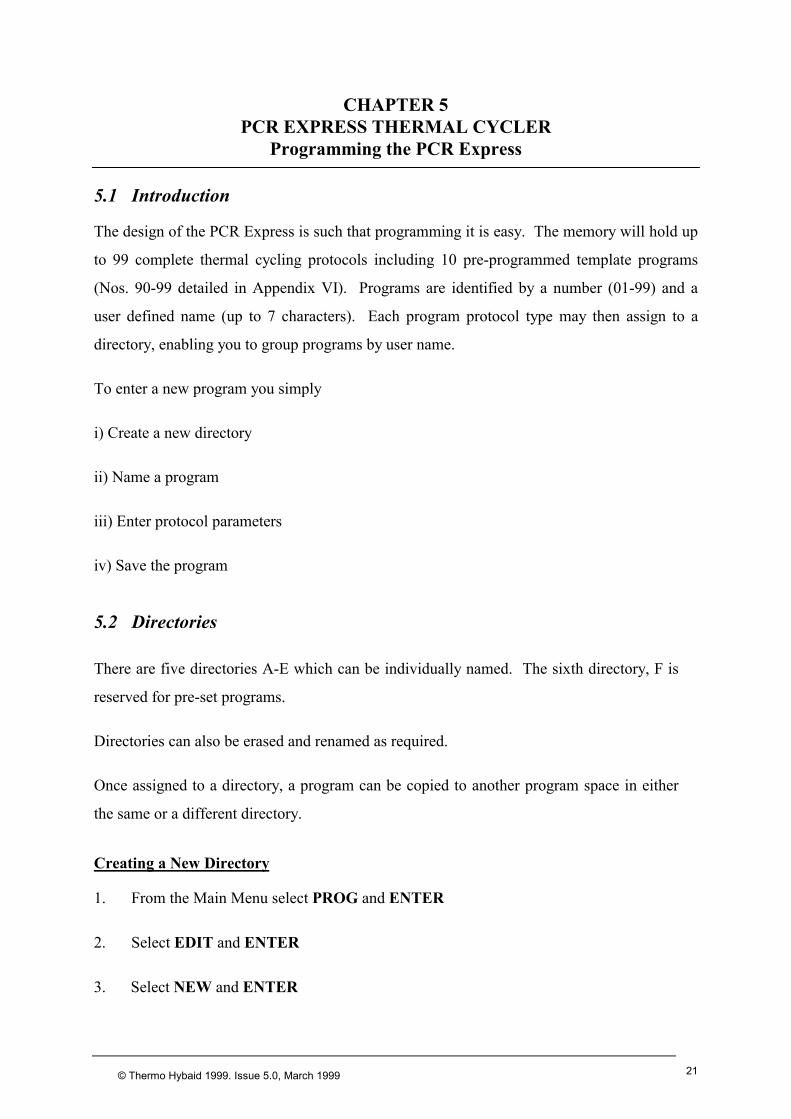
5.1 Introduction
The design of the PCR Express is such that programming it is easy. The memory will hold up
to 99 complete thermal cycling protocols including 10 pre-programmed template programs
(Nos. 90-99 detailed in Appendix VI). Programs are identified by a number (01-99) and a
user defined name (up to 7 characters). Each program protocol type may then assign to a
directory, enabling you to group programs by user name.
To enter a new program you simply
i) Create a new directory
ii) Name a program
iii) Enter protocol parameters
iv) Save the program
5.2 Directories
There are five directories A-E which can be individually named. The sixth directory, F is
reserved for pre-set programs.
Directories can also be erased and renamed as required.
Once assigned to a directory, a program can be copied to another program space in either
the same or a different directory.
Creating a New Directory
1. From the Main Menu select PROG and ENTER
2. Select EDIT and ENTER
3. Select NEW and ENTER

© Thermo Hybaid 1999 Issue 5.0, March199922
4. Select NEWDIR and ENTER
5. Select the desired target directory (A-E) using the cursor keys and then ENTER.
6. You are now able to name the directory, using the and arrows to scroll through the
characters or the alphanumeric keypad. Move to the next/previous character using the
and arrow keys. Press ENTER only when the name is complete. If no characters
are entered, the default NO NAME will be entered.
5.3 Steps & Stages of a Program
The programs in the PCR Express are divided into ‘stages’ and ‘steps’ when displayed on
the screen. In a simple PCR program, a stage typically includes three steps where each step
refers to the temperatures and times within the protocol. E.g. Step 1: 95°C for 30 seconds,
Step 2: 55°C for 30 seconds, Step 3: 72°C for 30 seconds. In addition each stage can be
repeated for up to 99 cycles, and a ‘hold’ added to the end of the stage.
The PCR Express allows you to program up to 10 separate stages each with up to 10
separate steps. This means that even the most complex thermal cycling protocol may be
saved in a single program space.
5.4 Creating a New ProgramUsing the NEW Program Option
Figure 5.1
2 0 / 0 7 / 9 9 1 4 : 1 5 : 0 7I N A C T I V E
M A I N M E N UR U N M A N P R O G O P T S
(1) Move cursor to PROG, then press ENTER to select.
↓↓↓↓2 0 / 0 7 / 9 9 1 4 : 1 5 : 0 7
I N A C T I V EP R O G R A M M E N U
E D I T C O P Y V I E W E R A S E
© Thermo Hybaid 1999. Issue 5.0, March 1999 23
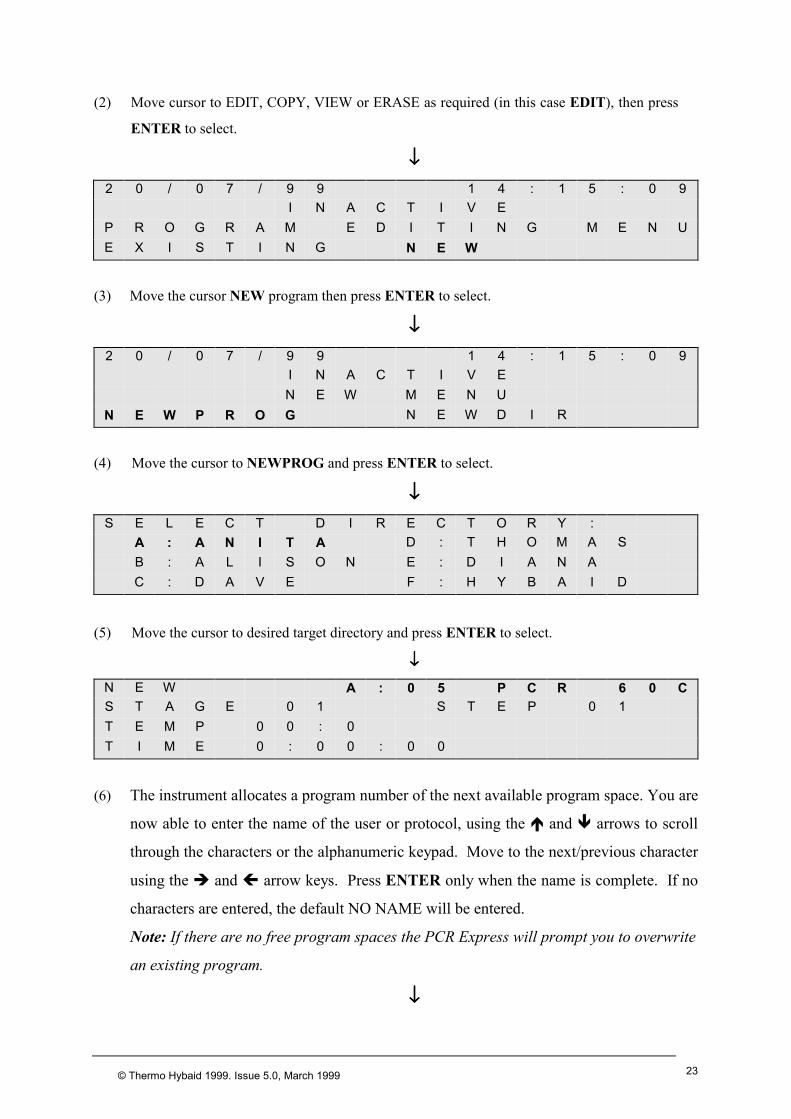
(2) Move cursor to EDIT, COPY, VIEW or ERASE as required (in this case EDIT), then press
ENTER to select.
↓↓↓↓2 0 / 0 7 / 9 9 1 4 : 1 5 : 0 9
I N A C T I V EP R O G R A M E D I T I N G M E N UE X I S T I N G N E W
(3) Move the cursor NEW program then press ENTER to select.
↓↓↓↓2 0 / 0 7 / 9 9 1 4 : 1 5 : 0 9
I N A C T I V EN E W M E N U
N E W P R O G N E W D I R
(4) Move the cursor to NEWPROG and press ENTER to select.
↓↓↓↓S E L E C T D I R E C T O R Y :
A : A N I T A D : T H O M A SB : A L I S O N E : D I A N AC : D A V E F : H Y B A I D
(5) Move the cursor to desired target directory and press ENTER to select.
↓↓↓↓
N E W A : 0 5 P C R 6 0 CS T A G E 0 1 S T E P 0 1T E M P 0 0 : 0T I M E 0 : 0 0 : 0 0
(6) The instrument allocates a program number of the next available program space. You are
now able to enter the name of the user or protocol, using the and arrows to scroll
through the characters or the alphanumeric keypad. Move to the next/previous character
using the and arrow keys. Press ENTER only when the name is complete. If no
characters are entered, the default NO NAME will be entered.
Note: If there are no free program spaces the PCR Express will prompt you to overwrite
an existing program.
↓↓↓↓

© Thermo Hybaid 1999 Issue 5.0, March199924
N E W A : 0 5 P C R 6 0 CS T A G E 0 1 S T E P 0 1T E M P 9 5 : 0T I M E 0 : 0 5 : 0 0
(7) Enter temperature (e.g. 95oC) and time (hr:min:sec), as required. Use to move across
menu, or to advance to the next step. The ENTER key can also be used to move to
the next step of the protocol.
Note: The arrow keys can be used to scroll backward or forward to correct a mistake.
The program will not allow you to advance to step 2 until a valid temperature and time
have been entered.
Continue to enter the remaining times and temperatures of this stage. If none are
required at the stage of the protocol, press ENTER (leaving each parameter at 0:0) until
you access the number of cycle’s screen.
N E W A : 0 5 P C R 6 0 CS T A G E N U M B E R 0 1N U M B E R O F C Y C L E S 0 1H O L D T E M P 0 0 . 0
(8) Enter the number cycles for this stage using the alphanumeric keys. A hold step can
also be programmed after each stage. This is particularly useful for ‘hot start’ protocols.
If a hold step is not required, press ENTER to reach the next stage.
↓↓↓↓N E W A : 0 5 P C R 6 0 CS T A G E 0 2 S T E P 0 2T E M P 9 5 : 0T I M E 0 : 0 0 : 3 0
(9) Continue adding steps as required for stage 1 (max. 10 steps per stage).
↓↓↓↓
N E W A : 0 5 P C R 6 0 CS T A G E 0 1 S T E P 0 2T E M P 6 0 : 0T I M E 0 : 0 0 : 3 0

© Thermo Hybaid 1999. Issue 5.0, March 1999 25
↓↓↓↓
N E W A : 0 5 P C R 6 0 CS T A G E 0 1 S T E P 0 2T E M P 7 2 : 0T I M E 0 : 0 0 : 3 0
(10) Press ENTER (or key) with each parameter at zero to finish the last stage of your
protocol.
↓↓↓↓N E W A : 0 5 P C R 6 0 CS T A G E N U M B E R 0 1N U M B E R O F C Y C L E S 3 0H O L D T E M P 0 0 . 0
(11) Enter the number of cycles. Enter a hold temperature if required. Press ENTER to go
to the next stage.
↓↓↓↓N E W A : 0 5 P C R 6 0 CS T A G E 0 3 S T E P 0 1T E M P 7 2 : 0T I M E 0 : 0 5 : 0 0
(12) Enter any additional stages and steps you require up to a maximum of 10. Press
ENTER.
↓↓↓↓N E W A : 0 5 P C R 6 0 CS T A G E N U M B E R 0 2N U M B E R O F C Y C L E S 0 1H O L D T E M P 0 0 . 0
(13) Enter the number of cycles. Enter a hold temperature if required. If a hold temperature
is not entered the instrument will cool to room temperature once the protocol is finished.
Press ENTER to access the SAVE screen.

© Thermo Hybaid 1999 Issue 5.0, March199926
↓↓↓↓S A V E A : 0 5 P C R 6 0 C< E N T E R > T O S A V E< M E N U > T O A B A N D O N
(14) Press ENTER to save the program.
5.5 Editing an Existing Program
When editing a program and saving as a different program, the COPY function should first be
used to save the program to a different program space (see Section 5.7) and then the copy
should be edited.
The program name can be edited or deleted at this stage although it will be saved unchanged if
the enter key is pressed without changing the data.
Advanced editing features (adjusting ramp speeds, changing time/temperature with successive
cycles) can be accessed by pressing the CONTINUE key at the relevant step. (See section
5.9.)
It is possible to edit programs whilst the PCR Express is running a different protocol.
Figure 5.2 Editing an existing program
2 0 / 0 7 / 9 9 1 4 : 1 5 : 0 7I N A C T I V E
M A I N M E N UR U N M A N P R O G O P T S
(1) To edit and overwrite existing programs select PROG from the Main Menu.
↓↓↓↓2 0 / 0 7 / 9 9 1 4 : 1 5 : 0 7
I N A C T I V EP R O G R A M M E N U
E D I T C O P Y V I E W E R A S E

© Thermo Hybaid 1999. Issue 5.0, March 1999 27
(2) Select EDIT from the Program Menu.
↓↓↓↓
2 0 / 0 7 / 9 9 1 4 : 1 5 : 0 9I N A C T I V E
P R O G R A M E D I T I N G M E N UE X I S T I N G N E W
(3) Select EXISTING from the Program Editing Menu.
↓↓↓↓
S E L E C T D I R E C T O R Y :A : A N I T A D : T H O M A SB : A L I S O N E : D I A N AC : D A V E F : H Y B A I D
(4) Move the cursor to the source directory and press ENTER to select.
↓↓↓↓
E D I T A : 0 5 N O N A M E
< E N T E R > T O C O N T I N U E
(5) The keypad numbers or keys can be used to select the number of the program to be
edited.
↓↓↓↓
E D I T A : 0 5 P C R 6 0 CS T A G E 0 1 S T E P 0 1T E M P 9 5 : 0T I M E 0 : 0 5 : 0 0
(6) Use the cursor keys to edit the program name. Press ENTER to proceed.
↓↓↓↓E D I T I N G A : 0 5 P C R 5 5 CS T A G E 0 1 S T E P 0 1T E M P 9 4 : 0T I M E 0 : 0 2 : 0 0
(7) Use →→→→ to move across the menu, and ↓↓↓↓ or ENTER to advance through the fields. Time
and temperature parameters can be altered using the numerical keys as required.

© Thermo Hybaid 1999 Issue 5.0, March199928
Note: To increase the number of steps in a stage, simply input values into the zero
time/temperature fields. To decrease the number of steps in a stage just input the new
data over existing time/temperature values.
↓↓↓↓E D I T I N G A : 0 5 P C R 5 5 CS T A G E 0 1 S T E P 0 2T E M P 0 0 : 0T I M E 0 : 0 0 : 0 0
(8) To complete editing stage 1, press ENTER with each parameter set at zero.
↓↓↓↓
E D I T I N G A : 0 5 P C R 5 5 CS T A G E N U M B E R 0 1N U M B E R O F C Y C L E S 0 1H O L D T E M P 0 0 . 0
(9) Enter any changed cycle number or hold temperature values. Press ENTER to proceed
to the next stage.
↓↓↓↓
N E W A : 0 5 P C R 5 5 CS T A G E 0 2 S T E P 0 1T E M P 9 4 : 0T I M E 0 : 0 0 : 2 0
(10) Edit steps in further stages as required. Press ENTER with each parameter at zero to
access the save screen.
↓↓↓↓
S A V E A : 0 5 P C R 5 5 C< E N T E R > T O S A V E< M E N U > T O R E T A I N
O L D P R O G R A M
(11) Press ENTER to save changes.
5.6 Viewing an Existing Program

© Thermo Hybaid 1999. Issue 5.0, March 1999 29
It is possible to view existing programs without altering the information contained within
them.
1. Select PROG from the Main Menu, VIEW from the program menu and (using the
and keys) enter the source directory.
2. Use the ENTER key and and arrows to move through the program, and
CONTINUE to enter and leave the Advanced Edit information.
3. The MENU key closes the view screen, and returns to the Main Menu.
5.7 Copying Programs
Copying programs is necessary in, for example, modifying the pre-set programs described in
Appendix VI. To do this select COPY from the Program Menu and press ENTER.
Enter the directory (using and to select) and number of the source program (or use
and to locate the source program) and press ENTER. Enter the directory and number of
the target program (or scroll using and ) to locate a target program space. Press ENTER
to copy the program. Note that any existing program data in the target program space will be
overwritten.
5.8 Erasing a Program
Programs can be erased to vacate program space for future use.
From the Program Menu, select ERASE and press ENTER.
Enter the directory (using and to select) and number of the program to be erased (or
scroll using and ) and press ENTER to erase the program. Confirm erasure of the
program by pressing STOP as prompted or MENU to keep the program.
5.9 Advanced Edit Features

© Thermo Hybaid 1999 Issue 5.0, March199930
The Advanced Edit features allow the creation of more complex cycling protocols in order to
enhance experimental data. It is possible to program:
• An incrementation or decrementation of both time and temperature on a cycle-by-cycle
basis.
• The rate at which the temperature changes between two given temperatures.
Advanced Edit features are accessed by pressing the CONTINUE key at the temperature step
at which the function is to take effect. If Advanced Edit data already exists for any step -
<ADV> is indicated on the screen.
Enter and change Advanced Edit parameters using the number, arrow and ENTER keys. The
Advanced Edit feature can also be accessed from the normal EDIT program menu options if
Advanced Edit parameters are to be added to an Existing program.
If desired, the Advanced Edit feature can be deleted for the current step. To do this, set all the
parameters back to zero. The <ADV> message will then not be shown in the
temperature/time set up screen, denoting that no Advanced Edit functions are operating.
Time Advanced Edit Worked Example
The user can specify the increment/decrement per cycle for each program stage.
Time increments can be used for example in high cycle number reactions to allow longer for
enzyme action with successive cycles.
Below is an example of a protocol where the extension step is fixed for the first 15 cycles of a
25-cycle program and increased by 5 seconds/cycle for the next 10 cycles, to compensate for
loss of enzyme activity:
Stage 1: Enter parameters to create:
95oC - 30s
55oC - 30s x 14 Cycles
72oC - 30s

© Thermo Hybaid 1999. Issue 5.0, March 1999 31
Stage 2: Enter parameters to create:
95oC - 30s
55oC - 30s x 11 Cycles
72oC - 30s + 5s/cycle
Figure 5.3 Programming Time IncrementsE D I T I N G A : 0 5 P C R 5 5 CS T A G E 0 2 S T E P 0 3T E M P 7 2 : 0T I M E 0 : 0 0 : 2 0
(1) In the EDIT mode (NEW or EXISTING) move to the temperature step of interest.
↓↓↓↓
G R A D 0 0 S T A G E 0 2R A M P 0 . 0 0 S T E P 0 3T E M P I N C 0 : 0 0T I M E I N C 0 : 0 0
(2) Press CONTINUE to access the Advanced Edit screen.
↓↓↓↓
G R A D 0 0 S T A G E 0 2R A M P 0 . 0 0 S T E P 0 3T E M P I N C 0 : 0 0T I M E I N C 0 : 0 5
(3) Using the cursor, move through the fields until you reach the desired parameter. Use the
→→→→ to toggle between Increase and Decrease in set point time/cycle. Enter the amount by
which the set point time per cycle should change (min:sec) using the number keys. (E.g.
an increase of 5 sec per cycle).
Note: It is possible to alter both the RAMP speed and TEMP increment/decrement
parameters in this screen using the same keys. These altered parameters would also be
executed, simultaneously during your experiment.

© Thermo Hybaid 1999 Issue 5.0, March199932
↓↓↓↓
E D I T I N G A : 0 5 P C R 5 5 CS T A G E 0 2 S T E P 0 3T E M P 7 2 : 0T I M E 0 : 0 0 : 2 0 < A D V >
(4) Using ↓↓↓↓ or ENTER to get back to the Editing screen. <ADV> now appears on the
screen indicating an Advanced Edit function has been programmed.
Temperature Advanced Edit Worked Example
Temperature decrements can be used (for example in touchdown cycling reactions) where
the annealing temperature is decreased with successive cycles.
This example shows a protocol where the annealing step is fixed for the first 5 cycles of a 25
cycle program and decreases by 1.0°C/cycle for the next 15 cycles, to reduce specificity and
increase yield as product accumulates (a “touchdown” protocol).
Stage 1: Enter parameters to create:
95oC - 30s
65oC - 30s x 4 Cycles
72oC - 30s
Stage 2: Enter parameters to create:
95oC - 30s
65oC - 30s – 1.0°C/cycle x 16 Cycles
72oC - 30s
Stage 3: Enter parameters to create:
95oC - 30s
50oC - 30s x 5 Cycles
72oC - 30s
Figure 5.4 Programming Temperature Decrements

© Thermo Hybaid 1999. Issue 5.0, March 1999 33
E D I T I N G A : 0 5 P C R T DS T A G E 0 2 S T E P 0 3T E M P 6 5 : 0T I M E 0 : 0 0 : 3 0
(1) In the EDIT mode (NEW or EXISTING) move to the temperature step of interest.
↓↓↓↓
G R A D 0 0 S T A G E 0 2R A M P 0 . 0 0 S T E P 0 3T E M P D E C 1 . 0 0T I M E I N C 0 : 0 0
(2) Press CONTINUE to access the Advanced Edit screen. Move through the screen until
you reach the TEMP field using the ↓↓↓↓ key. Use →→→→ to toggle between Increase and
Decrease in set point temp/cycle. Enter the desired value by which the set point temp
per cycle should change (°C) using the number keys (E.g. 1.0°C decrease per cycle).
↓↓↓↓
E D I T I N G A : 0 5 P C R T DS T A G E 0 2 S T E P 0 3T E M P 6 5 : 0T I M E 0 : 0 0 : 3 0 < A D V >
(3) Move back to the main step screen using the ↓↓↓↓ key. <ADV> will now appear on screen.
Changing Ramp Rates
Ramp rates can be altered in the Advanced Edit screen (refer to Figs.5.4 and 5.5). The default
ramp rate (0.00oC/sec) is “as fast as possible”. The settable range is 0.01oC/sec to 9.99oC/sec,
with the maximum practical setting being 3.00oC/sec with current technologies. The data
entered refers to the ramp rate to the CURRENT step from the PREVIOUS temperature set
point.
For example, cycle sequencing of some targets requires the use of degenerate primers and a
ramp rate set at 1oC/second between the annealing temperature and extension temperature.
5.10 Gradient Feature

© Thermo Hybaid 1999 Issue 5.0, March199934
This feature is only available to those who have purchased a 0.2ml or 0.5ml gradient block for
temperature gradient cycling. If an attempt to run a gradient program on a non-gradient block
the following screen will appear:
T H I S P R O G R A MR E Q U I R E S A G R A D I E N TB L O C K T O B E F I T T E D< M E N U > T O R E S T A R T
Customers who have purchased a PCR Express prior to 1 December 1998, ensure that:
• Software version 2.0 or later (for use with the PCR Express gradient block) has been
loaded on to your PCR Express chassis.
• Your PCR Express chassis has received a small wiring modification from a Thermo
Hybaid Service Engineer.
If these modifications have not been performed on your PCR Express chassis then your
gradient block will not function. If you are unsure whether these adjustments have been made
to your PCR Express chassis, please contact your local Thermo Hybaid office.
For customers who have purchased a PCR Express after 1 December 1998, all PCR
Express chassis have been modified and are gradient compatible.
The Gradient feature is also accessed through the Advanced Edit function. Simply press the
CONTINUE key from the annealing step in the main programming menu to access the
Advanced Edit screen. After a gradient spread value has been entered in the GRAD section
the number will be displayed on the main programming screen. E.g. <G:10>
The following screen will be displayed when attempting to run a program created under a
previous version of the software, which is incompatible with the new program format in v 2.0
software. The following screen will only appear if an existing program contains time
increments/decrements. This existing program should be edited by returning to the MAIN
MENU and using PROG-EDIT-EXISTING to check that all steps (including other advanced
edit functions) are re-entered as required.

© Thermo Hybaid 1999. Issue 5.0, March 1999 35
P R O G R A M F O R M A T E R R O RP L E A S E C O R R E C TB E F O R E R U N N I N G< M E N U > T O A B A N D O N
For information on the Gradient Calculator function, refer to section 5.13.
Gradient Programming Worked ExampleE D I T I N G A : 0 5 G R A DS T A G E 0 2 S T E P 0 2T E M P 4 5 : 0T I M E 0 : 0 0 : 2 0
(1) In the EDIT mode (NEW or EXISTING) move to the annealing temperature step. The
annealing temperature entered in this step will be the lowest temperature within the
gradient. You must enter a time value as well in order to access the Gradient function in
the Advanced Edit screen. Press CONTINUE to access the Advanced Edit screen.
↓↓↓↓
G R A D 1 5 S T A G E 0 2R A M P 0 . 0 0 S T E P 0 3T E M P I N C 0 : 0 0T I M E I N C 0 : 0 0
(2) Enter your required gradient range from 1-15oC.
↓↓↓↓
E D I T I N G A : 0 5 G R A DS T A G E 0 2 S T E P 0 2T E M P 4 5 : 0 < G : 1 5 >T I M E 0 : 0 0 : 3 0
(3) The program editing screen will now display the gradient spread depicted as <G:15>. If
a time increment/decrement has been activated then <ADV> will also be displayed on
this screen. Proceed though the programming as discussed in Figure 5.2.
Invalid Gradient Parameters

© Thermo Hybaid 1999 Issue 5.0, March199936
If the combination of the Set Annealing Temperature and Gradient results in the block
operating outside the temperature limits of 30 to 70oC a ‘TEMP/GRAD INVALID’ message
will briefly be displayed in place of the entered value. E.g. SET TEMP = 70oC and GRAD =
10oC. The SET TEMP will need to be re-entered.
If a temperature is entered that exceeds the 15oC gradient range then a ‘??’ error message will
appear beside the GRAD parameter. A gradient range from 1 – 15oC will need to be re-
entered.
Gradient Calculator FunctionOnce you have run your samples on an agarose gel, the annealing temperature that
corresponds to your optimum gel result can be determined using the Gradient Calculator
function. Refer to the following figure for an illustration on how to utilise this function.
Figure 5.5 Gradient Calculator Worked Example
2 0 / 0 7 / 9 9 1 4 : 1 5 : 0 7I N A C T I V E
M A I N M E N UR U N M A N P R O G O P T S
1. To access the Gradient Calculator move the cursor to OPTS in the MAIN MENU and
press ENTER.
↓↓↓↓
2 0 / 0 7 / 9 9 1 4 : 1 5 : 0 7I N A C T I V E
O P T I O N S M E N US E T U P C A L C
2. Move the cursor to CALC and press ENTER.
↓↓↓↓
G R A D I E N T C A L C U L A T O RB L O C K T Y P E 0 . 2 m l
© Thermo Hybaid 1999. Issue 5.0, March 1999 37
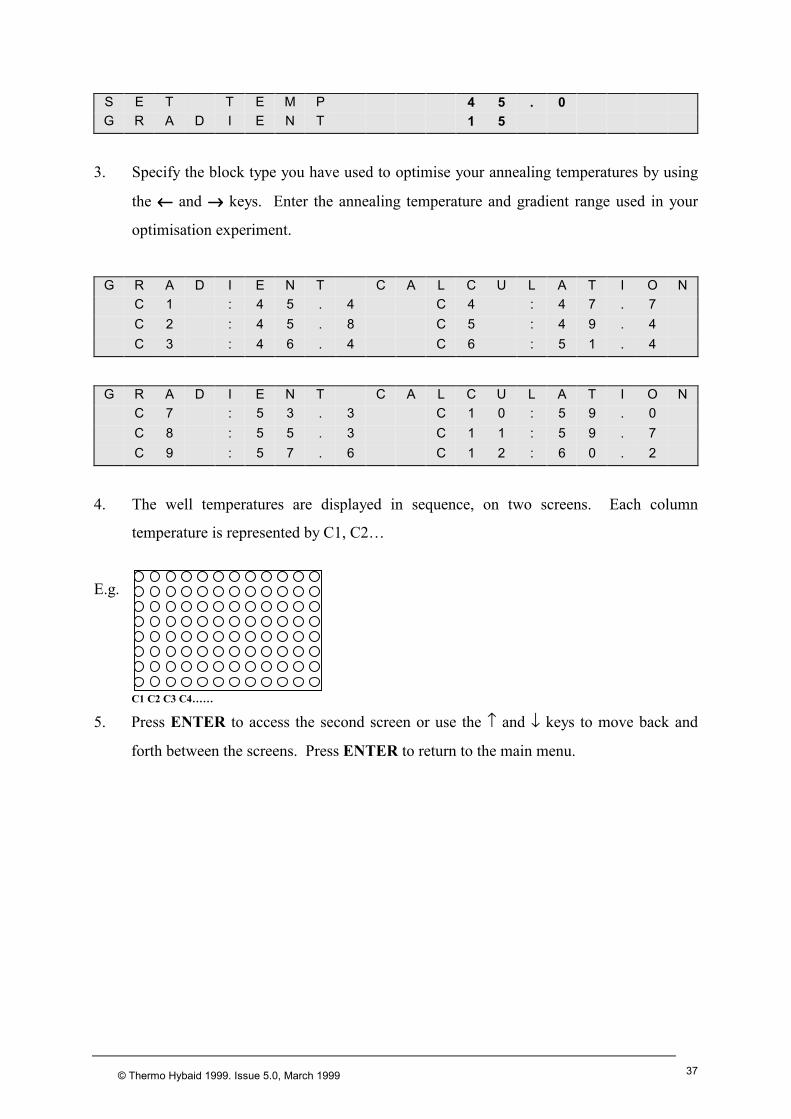
S E T T E M P 4 5 . 0G R A D I E N T 1 5
3. Specify the block type you have used to optimise your annealing temperatures by using
the ←←←← and →→→→ keys. Enter the annealing temperature and gradient range used in your
optimisation experiment.
G R A D I E N T C A L C U L A T I O NC 1 : 4 5 . 4 C 4 : 4 7 . 7C 2 : 4 5 . 8 C 5 : 4 9 . 4C 3 : 4 6 . 4 C 6 : 5 1 . 4
G R A D I E N T C A L C U L A T I O NC 7 : 5 3 . 3 C 1 0 : 5 9 . 0C 8 : 5 5 . 3 C 1 1 : 5 9 . 7C 9 : 5 7 . 6 C 1 2 : 6 0 . 2
4. The well temperatures are displayed in sequence, on two screens. Each column
temperature is represented by C1, C2…
E.g.
C1 C2 C3 C4……
5. Press ENTER to access the second screen or use the ↑ and ↓ keys to move back and
forth between the screens. Press ENTER to return to the main menu.

© Thermo Hybaid 1999 Issue 5.0, March199938

© Thermo Hybaid 1999. Issue 5.0, March 1999 39
CHAPTER 6
PCR EXPRESS THERMAL CYCLER
Running a Program on the PCR Express
6.1 The RUN Option
The RUN option in the Main Menu enables you to:
• Run a previously stored program.
• Choose the method of temperature control used whilst the program is running.
• Choose whether to run your samples oil free i.e. Heated Lid option.
• Once a program is selected, the program name will be displayed and lid preheating (if
selected) will commence.
If a program is selected and an inappropriate temperature control method is used (e.g.
tube control or simulated tube control for an In Situ interchangeable block module;
simulated slide for an 02/05 module) then a warning message will appear and the
program will be run under the correct mode of control.
6.2 Running a Program on the PCR Express – Short Instructions
Figure 6.1 shows how to run a previously stored protocol. For further information on
temperature control and heated lid functions refer to the sections towards the end of this
chapter. It is possible to edit programs whilst the PCR Express is running a different protocol
(see Section 5.5).
Figure 6.1: Running a Program on the PCR Express2 0 / 0 7 / 9 9 1 4 : 1 5 : 0 7
I N A C T I V EM A I N M E N U
R U N M A N P R O G O P T S
1. Press ENTER to select the RUN mode from the MAIN MENU.

© Thermo Hybaid 1999 Issue 5.0, March199940
↓↓↓↓
S E L E C T D I R E C T O R Y :A : A N I T A D : T H O M A SB : A L I S O N E : D I A N AC : D A V E F : H Y B A I D
2. Use the ↑ and ↓ keys to select the source directory.
↓↓↓↓
R U N A : 0 1 N O N A M EH O T L I D A U T OL O A D I N G A L A R M O F FE N D R U N A L A R M O F F
3. Enter the program number using the ↑ and ↓ keys, and then press ENTER.
↓↓↓↓ R U N A : 0 2 H Y B A I D H O T L I D O N L O A D I N G A L A R M O F F E N D R U N A L A R M O F F
4. Select the heated lid operating method, loading and end run settings, using the → and
pressing ENTER.
↓↓↓↓ R U N A : 0 2 H Y B A I D T U B E
P R E S S > T O C H A N G E < E N T E R > T O C O N T I N U E
5. Select the control mode using the → and pressing ENTER.
↓↓↓↓ P R O G R A M A : 0 2 H Y B A I D L I D P R E H E A T B E F O R E A U T O S T A R T < S T O P > T O A B O R T
6. Cycling commences if the heated lid is selected OFF. If it is ON then the lid will preheat.
If MANUAL start is selected press ENTER to commence cycling.
If AUTO start is selected then it will start automatically.

© Thermo Hybaid 1999. Issue 5.0, March 1999 41
6.3 Example Run Screens
When a program is running three different run screens can be displayed. These containinformation about the progress of the run together with the temperatures achieved during therun. This allows the user to monitor the performance of the PCR Express and to determine thetime of the end of the program. These can be accessed by pressing the and arrows, toscroll through each screen in turn.
These screens can be accessed from the Main Menu by pressing the BLOCK key.
Screen 1
R U N N I N G A : 0 2 H Y B A I D T E M P 9 5 . 0 B L K 9 6 . 2 T I M E T U B E 9 5 . 2 0 0 : 0 7
The current block performance screen displays the following:
• Program number and name.
• Current block and tube temperatures.
• Set point (programmed) temperature.
• Time remaining at current setpoint.
Screen 2
R U N N I N G A : 0 2 H Y B A I D S T A G E 0 1 S T E P 0 2 C Y C L E 1 1 . O F 3 0 M A X 9 7 . 4 M I N 4 4 . 6
The program progress and performance screen displays the following:
• The current stage and step of the running program.
• The total number of cycles completed and remaining.
• The maximum and minimum temperatures achieved during the run in the respective controlmode.

© Thermo Hybaid 1999 Issue 5.0, March199942
Screen 3
R U N N I N G A : 0 2 H Y B A I D C O N T R O L T U B E T I M E N O W 1 0 : 4 3 P R O G R A M E N D 1 2 : 0 3
The estimated run time screen displays the following:
• Temperature control method.
• Time now.
• The calculated run end time (an estimated value which is updated throughout the run).
Screen 4 (During a gradient step)
R U N N I N G A : 0 2 H Y B A I D T E M P 4 5 . 0 / 5 5 . 0 B L K 4 5 . 2 / 5 5 . 1 T I M E T U B E 4 5 . 1 0 0 : 0 7
The gradient run screen displays the following:
• TEMP 45.0 = Annealing temperature programmed.
• TEMP 55.0 = Highest annealing temperature programmed.
• BLK = Real time gradient range.
• TUBE 45.1 = Actual sample temperature in position A2 as monitored by the tubethermistor.
Power Failure Screen
This additional screen appears if the run has been interrupted by a power failure or powerfluctuation severe enough to affect the unit. It contains the following information: -
• The duration of the power failure.
• The stage in the run when the power failure occurred.

© Thermo Hybaid 1999. Issue 5.0, March 1999 43
End of Run Screen
The PCR Express displays a further screen at the end of the run, this provides the following:
• The program name and number.
• The total run time.
• The maximum and minimum temperatures recorded during the run.
Block Idle Screen
If BLOCK is pressed and there is no run in progress, the block idle screen is displayed.
Error Screens
A number of error screens may be displayed if a fault has been detected in the unit. Contact
the Thermo Hybaid Service Department or your local supplier for advice before attempting to
use the instrument further.
6.4 Temperature Control Options
Crucial to the accurate operation of a thermal cycler is an understanding of the temperature
control methodology.
Active Tube Control (TUBE)
Recommended for all reactions above 20µl volume in 0.5ml and 0.2ml tubes. This type of
control uses the remote thermistor probe mounted in an appropriate tube. A volume of
mineral oil equivalent to the total volume in the reaction tubes (including any oil overlay)
must be present in the control tube (do not use aqueous solutions with the control tube
thermistor).
The thermistor acts as a simple mimic, monitoring the sample temperatures as it changes
during cycling, feeding back this information to the PCR Express processor. This feedback
allows the unit to respond to the sample temperature ensuring that the samples achieve the
exact temperatures and times programmed. To bring the sample to temperature rapidly, the
block is heated/cooled beyond the set temperature for the sample (Figure 6.2). When
designing/transferring to a tube control program it is essential to understand the difference

© Thermo Hybaid 1999 Issue 5.0, March199944
between tube control and block control on a conventional temperature cycling machine. With
tube control, the actual samples are held at the programmed temperature for the programmed
time. With block control, either on the PCR Express or a thermal cycler without tube control,
there will be a lag between the block reaching target temperature and the sample reaching
target temperature. Thus when transferring protocols from a block control machine the
incubation times may be reduced by up to 50%, and in some cases the temperatures adjusted
slightly.
For Tube Control reactions, check that the tube thermistor is connected and located in the
block (the tube thermistor should be placed in position A2).
When you receive your unit, the thermistor is mounted in a HB-TC-3372 tube for 0.2ml
blocks or a HB-TC-3505 tube for 0.5ml blocks.
NB: Do not disconnect a tube thermistor when a program utilising tube control is in progress.
If this does occur, the program will be abandoned and an error message will be
displayed.
NB: Tube thermistors from TouchDown, OmniGene and Omn-E instruments are not
compatible and CANNOT be used with PCR Express thermal cyclers.
Extension Lead for the Tube Thermistor
The PCR Express is provided with an extension lead for the thermistor. This should only be
used for transferring protocols from instruments that cannot use Active Tube Control. See
Section 7.1 for further details.
Simulated Tube Control (SIM TUBE)
This temperature control method uses an algorithm similar to tube control. However, with
simulated tube control, the block temperature overheat characteristic which is used to
eliminate the sample temperature lag is based on calculated values, rather than the temperature
monitored by the tube thermistor.
Similar considerations apply when transferring protocols from a block control machine as
discussed above, and the extension lead can again be used.

© Thermo Hybaid 1999. Issue 5.0, March 1999 45
Reactions using Simulated Tube Control do not require the tube thermistor to be connected,
but sample loading and volume details must be entered when prompted by the run screen. For
all tube reactions in a 0.2ml or a 0.5ml thin walled tube, the volume factor is the total
reaction volume in µµµµl in one well, including any oil overlay. (See Table 6.1) For reactions in
thick walled 0.5ml tubes, use (volume + 50) µl as a good approximation to achieving the same
profile.
Table 6.1: Guidelines for Selecting Temperature Control Method and Entering Volume
Factors
Control Method Loading Factor Volume Factor
Consumable Type 0.5ml Block 0.2ml Block
OmniPlate 96 well
polycarbonate plate
SIM PLATE No. of samples 1-96 vol (µl) x 10 vol (µl)
0.5ml 96 well plate SIM PLATE No. of samples 1-96 vol (µl) - 0.5ml thin walled SIM TUBE No. of tubes 1-48 vol (µl) - 0.5ml thick walled SIM TUBE No. of tubes 1-48 vol (µl) + 50 - 0.3ml thin walled SIM TUBE No. of tubes 1-96 vol (µl) - 0.2ml thin walled SIM TUBE No. of tubes 1-96 - vol (µl)
OmniTube 96 array SIM TUBE No. of tubes (96) - vol (µl)
Simulated Plate Control (SIM PLATE)
This mode of control operates on a similar principle to simulated tube control (see Table 6.1).
However in this case, the control algorithm has been adjusted so that the programmed
temperature is achieved in the volume inside a plate well. The system is optimised for the
0.2ml block and OmniPlate 96.
The use of 96 well plates on the 0.5ml block should be treated with caution. The OmniPlate
96 can and has been used successfully on the 0.5ml block. However, the fit is not optimal,
and as a result there is a significant air gap between the plate and the block itself and the
volume factor should be used to compensate. We recommend initially using a volume factor
equal to 10 x reaction volume, but further optimisation may be necessary.

© Thermo Hybaid 1999 Issue 5.0, March199946
Figure 6.2 Modes of Control used with the PCR Express
Simulated Slide Control (SIM SLIDE)
a. Active Tube Control
b. Simulated Control (Tube, Plate, Slide)
c. Block Control

© Thermo Hybaid 1999. Issue 5.0, March 1999 47
This mode of control operates on a similar principle to simulated tube control. However, in
this case, the control algorithm has been adjusted so that the programmed temperature is
achieved on the top surface of a standard microscope slide. The performance of the In Situ
module has been measured using miniature thermistor probes attached to the surface of slides.
Optimum results in terms of overshoot and uniformity across four standard glass microscope
slides (0.8mm-1.0mm thickness) with the humidity chamber in place, have been obtained
using a calibration factor of 200 (the default value). Using a higher calibration accelerates the
approach to target temperature but results in some degree of overshoot. Conversely, a lower
calibration factor slows the approach to target temperature.
Block Control
Controls block temperature as on a conventional dry block machine. We do not recommend
this means of control for thermal cycling due to the variability in thermal profile obtained with
different sample volumes and consumable types.
6.5 Heated Lid Preheat
Once a program and block have been selected, (and calibration factors entered whereappropriate) the program will proceed according to the setup conditions as outlined below.The heated lid typically takes around 2 minutes to reach operating temperature. During thistime, the block is controlled at 4°C.
WARNING: Both the tops of reaction vessels and the surfaces of the Heated Lidassembly (in particular the inner surfaces), can become very hot during normaloperation. Touching the surfaces can cause burns. Do not touch the heated platewithout safety gloves.
Heated Lid - Automatic Start
This should be selected for robust cycling reactions, where the reactants can withstand beingincubated for the duration of the preheat (about 2 minutes) without the generation of spuriousproducts. After the program is selected, the Lid Heating indicator light will switch on,denoting preheating of the lid. When the lid reaches operating temperature, theReady/Working indicator light will change to green and the temperature cycling will startautomatically. In this mode, samples should be loaded and the lid closed before starting thepreheat.

© Thermo Hybaid 1999 Issue 5.0, March199948
Heated Lid - Manual Start
This should be used for sensitive cycling reactions, where the reactants will not tolerate beingincubated at low temperatures even for a short time, or where all risk of non-specific reactionsmust be eliminated. After the program is selected, the Lid Heating indicator light will switchon, denoting preheating of the lid. When the lid reaches operating temperature, theReady/Working indicator light will change to green. An alarm will sound (if activated) andthe ENTER key will need to be pressed to start temperature cycling. In this mode, samplesshould be mixed, loaded and the lid closed after the preheat is completed.
If, after 90 minutes, the ENTER key has not been pressed to start a program, the lid willswitch off and the block will return to the idle condition.
No Heated Lid
If the heated lid is switched off (for example to perform experiments with oil overlay present),the temperature cycling will commence as soon as the program/control/calibration factorshave been entered.
NB: The Lid Heating indicator light will remain off in this mode, and the Ready/Workinglight will come on immediately.
6.6. Hold & Pause Function
When entering a program the PCR Express will give you the opportunity to enter a ‘Hold’temperature at the end of each stage. The samples will be held at this set temperatureindefinitely. The screen will display HOLD during a run. If a “Hold” is inserted betweenstages, the program can be advanced to the next stage by pressing CONTINUE. If a “Hold”is inserted at the last stage, pressing CONTINUE will switch to the run summary screen.
Common uses of the Hold step include the following: -
• Inserting an initial 95oC incubation at the start of the protocol to perform the ‘Hot Start’procedure. After the enzyme has been added, pressing CONTINUE will advance theprogram into the cycling part of the protocol.
• A final low temperature (4-10oC) hold for the end of overnight runs. Although unnecessaryfor the vast majority of protocols, some scientists prefer to have this step included.
• A final 72oC incubation to ensure completion of the final extension step of a reaction.
© Thermo Hybaid 1999. Issue 5.0, March 1999 49
Pressing PAUSE during a cycling program will pause the program at the current or next targettemperature within the step. Pressing CONTINUE will continue the countdown for the step.
6.7 Aborting Programs
The program will run to completion unless interrupted by the pressing of either the PAUSE orSTOP keys whilst the appropriate run screen is displayed.
Pressing the STOP key once will display a verification screen (the program continues whilethis is displayed). Pressing STOP again aborts the program. Pressing MENU displays theMain Menu and continues the program.
6.8 Program Completion
At the end of the program the END OF RUN screen will be displayed. In this case, the heatedlid will be switched off automatically.
The alarm (if selected) will sound and the block will remain at 20°C for 30 minutes to drivethe heated lid plate temperature to ambient.
If a final HOLD temperature has been specified, the heated lid (if selected) will remain on.
For most thermal cycling applications a final HOLD at elevated temperature is notnecessary. Extended high temperature hold steps can lead to evaporation andcondensation problems, particularly with polycarbonate plates.

© Thermo Hybaid 1999 Issue 5.0, March199950

© Thermo Hybaid 1999. Issue 5.0, March 1999 51
CHAPTER 7PCR EXPRESS THERMAL CYCLER
Troubleshooting
Check the volume in the tube thermistor
Check the volume of mineral oil in the control tube (a vial of suitable mineral oil is provided(alternatively Sigma molecular biology-grade mineral oil, M5904 or equivalent can be used).Do not use aqueous solutions in the control tube. Too much oil in the control tube willresult in overshoots in the sample tube temperatures, whilst too little oil there will result in atime lag in the samples achieving temperature. The volume of oil in the control tube shouldmatch that in the reaction tubes, (including any oil overlay). Repeated overshoots at thedenaturation temperature during temperature cycling, will reduce the activity of thethermostable enzyme resulting in poor yields of product. The correct position for the controltube is position A2.
Check location of thermistor within the control tube
Always ensure the thermistor probe is located centrally in the control tube and immersed inthe liquid. If pushed against the side it will be measuring the temperature of themicrocentrifuge tube and not the sample temperature.
Check the fit of the tube in the block
The PCR Express block accommodates most types of reaction tubes. The tube thermistorsupplied with the PCR Express is mounted on an OmniTube, which should be changedperiodically, as the fit of the tube will deteriorate with time. Reaction tubes should bedistributed evenly in the block. If you are using a reaction tube that has not beenrecommended, check its fit in the PCR Express block before use. You should also remountthe thermistor probe in this tube to ensure that your samples and the control tube are matched.
Check through the program
Before running a program, use the VIEW function to check that the correct combination oftemperature and program number have been entered.

© Thermo Hybaid 1999 Issue 5.0, March199952
Runs using Simulated Control Methods
1. Simulated Tube
Enter the number of samples, including the thermistor and the total reaction volume per tubeincluding any oil overlay. 50µl should be added to the volume factor if thick walled tubes areused.
Use a setting of 96 samples and the correct reaction volume including oil overlay if apolypropylene OmniTube 96 is used.
2. Simulated Plate
0.2ml blocks
For 96 well microplates, (including OmniPlate 96), on a 0.2ml block, the volume factorentered is the individual sample volume. (NB: Polypropylene OmniTube 96 should be rununder Sim Tube Control).
0.5ml blocks
For OmniPlates on a 0.5ml block, the volume factor entered is the total sample volumemultiplied by 10 (to a maximum of 500). This accommodates the non-optimal fit of theOmniPlate 96 in the 0.5ml block. Other 96 well plates, for example the Costar ThermowellH,may be used with lower multiples of volume, but these need to be individually determined.
384 well blocks
For 384 well blocks the individual well volume should be used for the volume factor
3. Simulated Slide
For 0.8mm - 1mm thick glass slides using simulated slide control, the calibration factor is 200(default value), other thicknesses will need optimization.
Check maximum and minimum values achieved during the run. This will give an indicationof unusual temperature performance.
Power failure during a run
A message will appear on the main menu screen. The machine will either restart automaticallywhen power is restored, or the program will be abandoned, as specified by the user on the SET

© Thermo Hybaid 1999. Issue 5.0, March 1999 53
UP menu screen. Viewing the run screens for the block will indicate the time of the powerfailure, and where applicable the time the run resumed.
7.1 Transfer of protocols from a block control machine to tube control usingthe thermistor lead extension
The different modes of control should be considered before transferring protocols directly.E.g., consider a temperature cycling protocol consisting of 1 minute at 95°C followed by 1minute at 65°C, repeated 30 times. Using block control, the actual sample temperature is at95°C for just 30 seconds at each step, a total of 15 minutes overall. In contrast tube controlwill result in precise one minute incubations at each step, a total of 30 minutes at the targetdenaturation temperature. Even though tube control gives a more accurate representation ofthe program, transferring such a protocol directly could result in lower yields because theenzyme is exposed to the high temperature for significantly longer, thus reducing its activity inlater cycles.
The most accurate way to transfer protocols is to use the control tube of the PCR Express as atemperature probe in the block control machine as follows:
1. Set the PCR Express to run a single program at a set temperature for an extended time.(e.g. 37°C for 4 hrs), ensuring that the heated lid is switched off and the instrument isset to block control. This enables the tube thermistor to be used remotely.
2. Connect the thermistor lead extension to the thermistor control tube and plug it intothe PCR Express.
3. Place the thermistor tube probe into the corresponding thermistor probe socket of thePCR Express, and locate the tube in a well of the block control machine running therequired protocol.
4. After a short equilibration interval, the display on the PCR Express will indicate thesample tube temperature, which should be noted at regular time intervals (e.g. 10seconds, for a number of cycles.) The actual length of time spent at each of thedenaturation, annealing and elongation stages should be recorded, as well as anytemperature overshoot values where the maximum/minimum temperature exceeds thetarget temperature or undershoots where the target temperature is not actually reached.
5. The temperature profile that the samples in the block control machine actually achieve,rather than simply the block temperature, can be used to program your PCR Express.

© Thermo Hybaid 1999 Issue 5.0, March199954
Optimisation of protocols
The capability of the PCR Express programming enables protocol optimizations to beperformed very rapidly. Typically, temperature cycling protocols may consist of three distinctstages:
1. Denaturation at an elevated temperature (usually 90-95°C).
2. Annealing at a temperature dictated by the melting temperature (Tm) of theoligonucleotides.
3. Enzymatic activity at a temperature dictated by the optimum temperature of thethermostable enzyme being used.
These three steps are typically repeated for twenty to thirty cycles depending on the amount ofstarting template.
Denaturation
The denaturation step at each cycle must be sufficient to denature the target DNA completely,including G-C rich regions. However, the effect on the enzyme activity of repeated hightemperature incubations should also be considered. An extended initial denaturation step, (3minutes, 95°C, before enzyme addition) will denature complex high molecular weight DNAtemplate, but for later cycles this should be reduced to a maximum of 30 seconds at 92-95°C.Optimisation of the denaturation step is the most critical factor when transferring a protocolfrom a block control machine to tube control.
Annealing
The annealing temperature depends on the size and nucleotide composition of theoligonucleotides used. In general it varies between 50°C and 70°C and as a rough guideshould be 5°C below the Tm. This may be calculated approximately using the followingformula:
Tm = 2 x (A + T) + 4 x (G + C)
A difference in the annealing temperature of as little as 1°C can affect the specificity of areaction, it is therefore recommended that a range of temperatures is tested to optimise theannealing temperature for each primer and template combination.
© Thermo Hybaid 1999. Issue 5.0, March 1999 55
Extension
The extension temperature is largely dependent upon the optimum temperature of the enzymechosen and is usually in the range 70-75°C (see data sheet from manufacturer). The timerequired depends on the length of product being synthesised.

© Thermo Hybaid 1999 Issue 5.0, March199956
© Thermo Hybaid 1999. Issue 5.0, March 1999 57
CHAPTER 8PCR EXPRESS THERMAL CYCLER
Maintenance
8.1 General Cleaning
1. All surfaces of the PCR Express system and Heated Lid should be cleaned regularlywith a soft cloth, hot water and a mild detergent.
2. It is important to thoroughly dry all surfaces after cleaning.
3. The PCR Express is not intended for use with aggressive chemicals and on no accountshould organic solvents be used to clean this equipment.
4. Dampened cotton buds can be used to remove dirt and debris from individual wells.The wells should be kept clean to maintain optimum heat transfer performance.
8.2 Decontamination
When 35S labelled nucleotides are thermally cycled they break down into lower molecularweight forms which are highly volatile and can leach through the walls of tubes and microtitreplates thus contaminating the block and possibly the heater plate of the heated lid.
We therefore do not recommend the use of 35S labels, as replacing a dangerouslycontaminated block is expensive.
If 35S labels are used, we recommend the following to minimize contamination.
1. Use a mineral oil overlay in all reactions, even when the Heated Lid is used.
2. If using tubes, use only the thick walled variety.
3. Use the thermal cycler in a fume hood, to minimize air contamination.
4. If using microtitre plates, coat the under surface with a thin layer of mineral oil.
5. If radioactivity must be used, the thermal cycling block and Heated Lid surfaces can bedecontaminated using a 10 % v/v solution of Neutracon (Decon Lab Ltd, Conway StreetHove, East Sussex BN3 3LY Tel: +44(0) 1273-739241, Fax: +44(0) 1273-722088) orPCC-54 (Pierce Eurochemie B.V Holland). Complete decontamination is unlikely, butlow level counts can be achieved by repeated application of a fresh solution of 10% v/vNeutracon to the "Hot" area.
© Thermo Hybaid 1999 Issue 5.0, March199958
All Control Chassis, Block Module, and Heated Lid components coming into contact withradioactivity should be decontaminated before re-use or transportation. In the event ofreturning a contaminated item please contact Thermo Hybaid’s Service Department so that theappropriate handling arrangements can be made.
Thermo Hybaid recommends that if radioisotopes are to be used, equipmentmust be located in a designated Radiation Area. Local Radiation Safetyprocedures must be followed at all times.
The use of 35S labelled nucleotides is not covered under our warranty agreementand requires special service arrangements.
8.3 Protection to the User
The PCR Express has been designed with operation safety in mind. In the rare event of aninstrument failure, three levels of protection are built in to ensure the unit “fails safe”. First,the software sets normal operating ranges for the block and lid. Should this fail; electricalcircuitry is in place to ensure that safe temperatures are not exceeded. In the unlikely event ofthis failing, thermal fuses are fitted to shut off the power supply to damaged components.
The unit is fitted with an internal lithium battery containing a hazardous substance. Thisshould be replaced with the original type and disposed of with care.
8.4 Protection of the Instrument
Fuses
The PCR Express mains power inlet is fitted with two T6.3A fuses (20mm x 5mm). Ifnecessary these may be replaced by a qualified person.
8.5 Tube Thermistor Care
The tube thermistor assembly ensures that the programmed temperature profile is accuratelyand reproducibly achieved within all sample tubes. As a ‘sample mimic’, it is important thatthe thermistor is as close a representation as possible to the biological samples. To maintainaccuracy and longevity of the tube thermistor Thermo Hybaid recommends the following:

© Thermo Hybaid 1999. Issue 5.0, March 1999 59
1) Do change the tube thermistor annually. It may be necessary to change the thermistormore often under heavy use (e.g. frequent removal of the thermistor from the tube).
2) Do check that the mineral oil volume is the same as the reaction volume including anyoil overlay.
3) Do check and replace the control tube if it is showing signs of thermal degradation.
4) Do use the same type of tube for the thermistor tube as for the biological samples.
5) Do make sure the sensor part of the thermistor probe is centrally located at the base ofthe tube and is fully covered by mineral oil.
6) Don’t use aqueous solutions in the thermistor tube.
7) Don’t remove the control tube from the cap assembly by pulling the wire; gently leverthe tube from the cap.
8) Don’t kink the thermistor wire or crush the sensor part of the thermistor probe end.
9) Don’t remove the thermistor assembly from the instrument by pulling on the wire, pullfrom the plug.

© Thermo Hybaid 1999 Issue 5.0, March199960

© Thermo Hybaid 1999. Issue 5.0, March 1999 61
CHAPTER 9PCR EXPRESS THERMAL CYCLER
Technical Specifications & Ordering Information
Description PCR Express with 0.5ml Block PCR Express with 0.2ml Block
Catalogue Number HB-PX-05-220/110 HB-PX-02-220/110
Block Capacity 48 x 0.5ml tubes
96 x 0.3ml tubes
1 x 96 well plate
96 x 0.2ml tubes
1 OmniPlate 96
Temperature ControlAvailable
Tube control
Simulated tube control
Simulated plate control
Block control
Tube control
Simulated tube control
Simulated plate control
Block control
Performance
Block TemperatureRange
4°C - 99°C 4°C - 99°C
Block Heating Rate Up to 3°C/Sec Up to 3°C/Sec
Block Cooling Rate Up to 2°C/Sec Up to 2°C/Sec
Precision Control 1°C 1°C
Block Uniformity + 0.4°C within 15 secs + 0.4°C within 15 secs
Heated LidTemperature Range
95°C - 120°C 95°C - 120°C
Display Resolution 0.1°C 0.1°C
Standard Accessories Tube Thermistor 0.5ml
(HB-PX-TTM05)
Tube Thermistor 0.2ml
(HB-PX-TTM02)
InterchangeableBlock Modules
HB-PX-B05 HB-PX-B02
PCR Express Chassis HB-PX-220/110
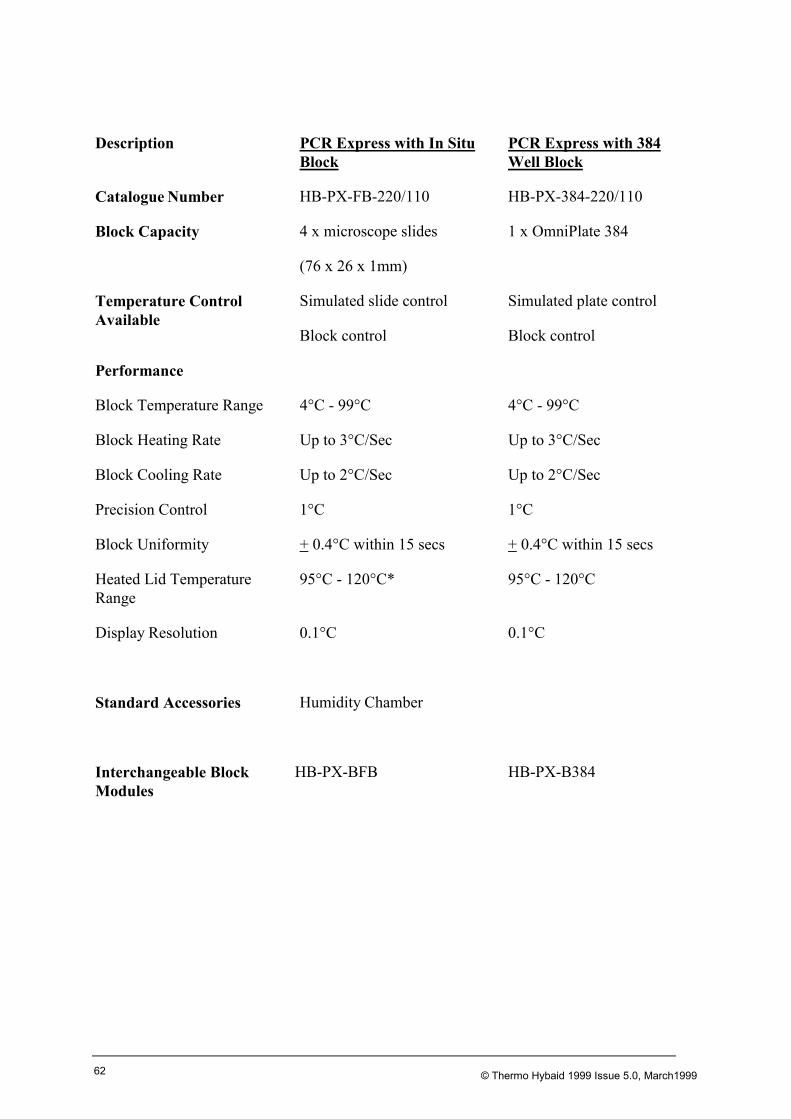
© Thermo Hybaid 1999 Issue 5.0, March199962
Description PCR Express with In SituBlock
PCR Express with 384Well Block
Catalogue Number HB-PX-FB-220/110 HB-PX-384-220/110
Block Capacity 4 x microscope slides
(76 x 26 x 1mm)
1 x OmniPlate 384
Temperature ControlAvailable
Simulated slide control
Block control
Simulated plate control
Block control
Performance
Block Temperature Range 4°C - 99°C 4°C - 99°C
Block Heating Rate Up to 3°C/Sec Up to 3°C/Sec
Block Cooling Rate Up to 2°C/Sec Up to 2°C/Sec
Precision Control 1°C 1°C
Block Uniformity + 0.4°C within 15 secs + 0.4°C within 15 secs
Heated Lid TemperatureRange
95°C - 120°C* 95°C - 120°C
Display Resolution 0.1°C 0.1°C
Standard Accessories Humidity Chamber
Interchangeable BlockModules
HB-PX-BFB HB-PX-B384

© Thermo Hybaid 1999. Issue 5.0, March 1999 63
PCR Express Gradient Cyclers
Description PCR Express with 0.5mlGradient Block
PCR Express with 0.2mlGradient Block
Catalogue Number HB-PX-G05-220/110 HB-PX-G02-220/110
Block Capacity 48 x 0.5ml tubes
96 x 0.3ml tubes
1 x 96 well plate
96 x 0.2ml tubes
1 OmniPlate 96
Temperature ControlAvailable
Tube control
Simulated tube control
Simulated plate control
Block control
Tube control
Simulated tube control
Simulated plate control
Block control
Performance
Block Temperature Range 4°C - 99°C 4°C - 99°C
Block Heating Rate Up to 3°C/Sec Up to 3°C/Sec
Block Cooling Rate Up to 2°C/Sec Up to 2°C/Sec
Precision Control 1°C 1°C
Block Uniformity + 0.4°C within 15 secs + 0.4°C within 15 secs
Heated Lid TemperatureRange
95°C - 120°C 95°C - 120°C
Display Resolution 0.1°C 0.1°C
Standard Accessories Tube Thermistor 0.5ml
(HB-PX-TTM05)
Tube Thermistor 0.2ml
(HB-PX-TTM02)
Interchangeable BlockModules
HB-PX-BG05 HB-PX-BG02
PCR Express Chassis HB-PX-220/110
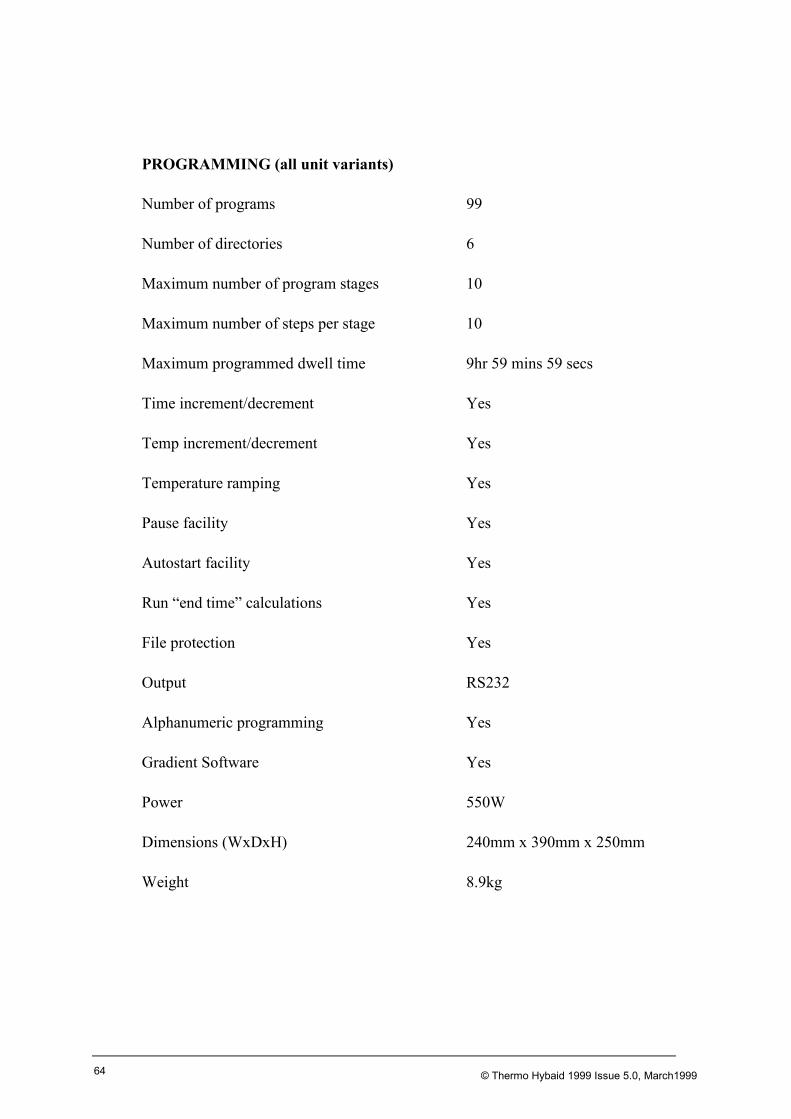
© Thermo Hybaid 1999 Issue 5.0, March199964
PROGRAMMING (all unit variants)
Number of programs 99
Number of directories 6
Maximum number of program stages 10
Maximum number of steps per stage 10
Maximum programmed dwell time 9hr 59 mins 59 secs
Time increment/decrement Yes
Temp increment/decrement Yes
Temperature ramping Yes
Pause facility Yes
Autostart facility Yes
Run “end time” calculations Yes
File protection Yes
Output RS232
Alphanumeric programming Yes
Gradient Software Yes
Power 550W
Dimensions (WxDxH) 240mm x 390mm x 250mm
Weight 8.9kg

© Thermo Hybaid 1999. Issue 5.0, March 1999 65
Working Conditions
Ambient temperatures of 4°C to 35°C
Power requirements: 550W at 115/230V a.c. + 10% and 50/60Hz.
Satisfies the requirements of BS EN 61010-1:1993.
NB: When the PCR Express temperature cycler is removed from a cold room, it should beleft to equilibrate for 2-3 hours to avoid condensation.

© Thermo Hybaid 1999 Issue 5.0, March199966
9.1 Consumables
Consumables PackSize
Description Catalogue Number
Sealing Systems
TD Tape 50 Sealing tape for polycarbonate plates HB-TD-TAPE50
TDX Tape 100 Sealing tape for polypropylene plates HB-TD-TAPE100
Compression Pad 1 Foam pressure pad for use with tape sealing
system
HB-TD-SFOAM
OmniSeal TD Mat 5 Reusable 96 well sealing mat HB-TD-MTSRS5
Plastic Ware
Consumables PackSize
Description CatalogueNumber
Plates
OmniPlate 96 25 Polycarbonate 96 well plate HB-TR3-MT
OmniPlate 96 Lid 25 Polycarbonate lids HB-TR3-MTL
OmniFast 96 25 Polypropylene 96 well plate HB-TC-8002N
OmniFast 384 50 Polypropylene 384 well plate HB-TC-3840N
OmniTube 96 25 Single piece polypropylene plate HB-TC-6002N
Tubes
OmniTube 0.2ml 1000 0.2ml individual tubes with integral domed caps HB-TC-3372N
OmniTube 0.2ml 1000 0.2ml individual tubes with integral flat caps HB-TC-6202N
OmniTube 0.5ml 1000 0.5ml individual tubes with integral domed caps HB-TC-4895N
OmniTube 0.5ml 1000 0.5ml individual tubes with integral flat caps HB-TC-3505N
OmniStrip 0.2ml 2000 0.2ml strips of 8 tubes & caps HB-TC-2662N
OmniStrip 0.3ml 2000 0.3ml strips of 8 tubes & caps HB-TC-4043N
Racked OmniTubes 25 For 0.3ml 96 well plates (caps not included) HB-TC-4073N
OmniTube Caps 2400 For all 0.2ml and 0.3ml OmniTube products HB-TC-6022N
We recommend that domed cap tubes are used when the temperature control is set toActive Tube and flat cap tubes are used under Simulated Tube Control.
Polycarbonate can be affected by contact with formamide, DMSO and other organicsolvents; these should therefore be avoided when using the polycarbonate OmniPlate 96.

© Thermo Hybaid 1999. Issue 5.0, March 1999 67
APPENDIX IPCR EXPRESS THERMAL CYCLER
Software Upgrade via RS232
Thermo Hybaid issues software upgrades on a regular basis as new programming featuresbecome available. So that you can benefit from future innovations, the PCR Express softwarecan be upgraded via an RS232 connection to the serial point of the PC using the cableprovided.
Software is distributed free via Thermo Hybaid’s Internet site (http://www.hybaid.com), orcan be obtained on disk (PC) from your local Thermo Hybaid representative.
To upgrade the software you will need:
• A PC with a free COM1 port (9 way connector).
• Communications cable (supplied with your PCR Express).
• The PCR Express to be upgraded.
Upgrade Instructions (Dos)
• Ensure that the PCR Express is switched off.
• Connect the PC to the PCR Express using the cable supplied. One end should beconnected to the COM1 port of the PC; the other should be connected to the 9-wayconnector on the underside of the PCR Express (next to the fan).
• Whilst simultaneously depressing the PAUSE and CONTINUE keys, switch on the PCRExpress which will respond with three short bleeps and display a “READY TO LOADSOFTWARE" message. The PAUSE and CONTINUE keys may then be released.
• On the PC, at the DOS prompt, type:
• A:UPLOADSA A:PCRE0200.BIN
• The PC will display the status of the upload as it progresses.
• When the upload is complete, the PC will display the message. Your PCR Express is nowready to use. Switch off the PCR Express and then switch back on in the normal manner(do not depress the PAUSE and CONTINUE keys).
© Thermo Hybaid 1999 Issue 5.0, March199968
Upgrade Instructions (Windows 3.1)
• Insert Setup Disk 1 in drive A or Drive B.
• In Program Manager, click on File on the menu bar, click on Run…
• Type in the command line: a:\setup.exe if you inserted Setup Disk 1 in drive A, or typeb:\setup.exe if you inserted Setup Disk 1 in drive B. Click the OK button.
• Follow the on-screen instructions given by the installation program.
• To upgrade your PCR-Express, double click the Pcrexp icon in the Windows ProgramManager. Follow the on-screen instructions.
Upgrade Instructions (Windows 95)
• Insert Setup Disk 1 in drive A or Drive B.
• Click on Start and then Run…
• Type in the command line: a:\setup.exe if you inserted Setup Disk 1 in drive A, or typeb:\setup.exe if you inserted Setup Disk 1 in drive B. Click the OK button.
• Follow the on-screen instructions given by the installation program.
• To upgrade your PCR-Express, click Start, select Programs, point to the Pcrexp folderand then click Pcrexp. Follow the on-screen instructions.
Upgrade Instructions (Internet)
Instructions will be given on Thermo Hybaid’s Internet site.
It is important that the self test is not bypassed when first powering up a machinecontaining new software.
Verify that the self test completes correctly and that the correct software version is displayedon the SETUP MENU screen. The software upgrade process is now complete.
© Thermo Hybaid 1999. Issue 5.0, March 1999 69
APPENDIX IIPCR EXPRESS THERMAL CYCLER
Sealing Systems: The OmniSeal TD Mat & TD Tape
Overview
Thermo Hybaid offers two sealing systems to suit individual preferences. The TD Tape is asingle use adhesive tape suitable for use with 96 well and 384 well systems, whereas theOmniSeal TD Mat is a re-usable silicone rubber mat designed for 96 well systems only.
How to use the TD/TDX Tape
TD Tape and TDX Tape are unique single use sealing systems for oil free thermal cycling in96 well and 384 well plates which prevents cross contamination between wells. After athermal cycling reaction TD or TDX tape can be removed from the plate with ease.
TD Tape
Green in colour and designed for use with polycarbonate plates such as OmniPlate 96.
TDX Tape
Clear in colour and designed for use with polypropylene plates such as OmniTube 96,OmniFast 96 or OmniFast 384.
TD and TDX tape cannot be interchanged, as the TDX tape will bind irreversibly topolycarbonate.
To secure contact with the heated lid of the thermal cycler the TD and TDX tapes must beused in combination with the reusable TD Compression Pad.
Sealing a 96/384 Well Plate
1. The tape can be applied to 96/384 well plates by positioning over one of the short edgesand peeling back the lining material, allowing the adhesive layer to fall on to the plate.This should be possible without introducing creases. However, before heating, theadhesive is soft enough to be repositioned without adverse effects.
2. The tape should be firmly anchored by pressing over each well. This can be done using asoft roller or by finger pressure.
3. Once in the machine, the Compression Pad (HB-TD-SFOAM) must be placed on top ofthe sealed plate. The Compression Pad performs a dual function. It ensures that the tops

© Thermo Hybaid 1999 Issue 5.0, March199970
of the sealed well reach the correct temperature and under compression it ensures thesealing between wells is intact.
Adding the TD Tape
Place a sealed 96 well/384 well plate on the machine. Select the “Plates” setting and close thelid.
Removing The TD Tape
Prior to removing the TD Tape/TDX Tape from a plate, ensure there is no condensation of thesolution inside the wells or on the plugs of the tape by either:
1. Removing the 96 well plate from the block and cooling to 4°C.
2. Cooling down the PCR block to 4°C (if possible).
3. Heating the sample to 35°C for 30 minutes.
This will minimise the risk of well-to-well contamination when removing the TD Tape fromthe 96 well plate.
The TD Tape is most easily removed while the 96 well plate is in a rack or still on themachine. The sheet should be peeled back from one corner diagonally across the plate usinga single smooth action. The TD Tape is easily removed and therefore is especially suitablefor applications which require additions of reagents part way through the reaction, forexample when performing reverse transcription and amplification in two stages.
Resealing Using TD Tape
TD Tape is designed for single use. Once heated and compressed, the backing conforms tothe plate and cannot be easily repositioned. Re-use is therefore not advised.
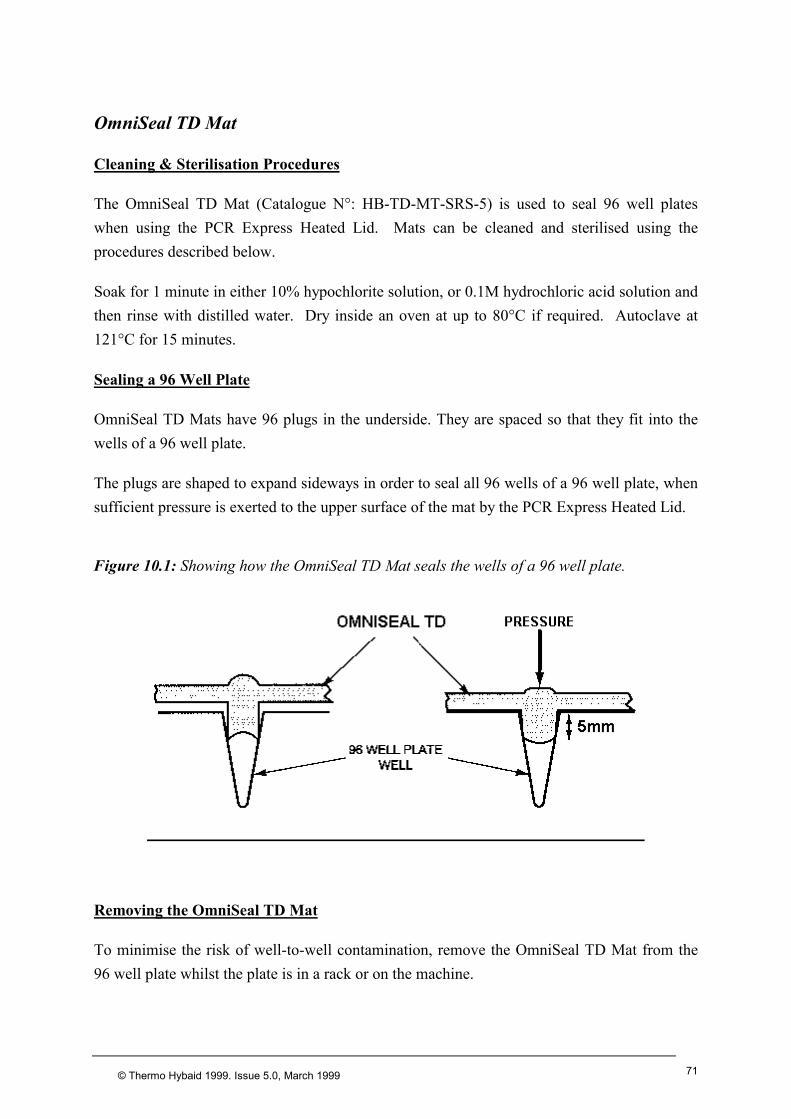
© Thermo Hybaid 1999. Issue 5.0, March 1999 71
OmniSeal TD Mat
Cleaning & Sterilisation Procedures
The OmniSeal TD Mat (Catalogue N°: HB-TD-MT-SRS-5) is used to seal 96 well plateswhen using the PCR Express Heated Lid. Mats can be cleaned and sterilised using theprocedures described below.
Soak for 1 minute in either 10% hypochlorite solution, or 0.1M hydrochloric acid solution andthen rinse with distilled water. Dry inside an oven at up to 80°C if required. Autoclave at121°C for 15 minutes.
Sealing a 96 Well Plate
OmniSeal TD Mats have 96 plugs in the underside. They are spaced so that they fit into thewells of a 96 well plate.
The plugs are shaped to expand sideways in order to seal all 96 wells of a 96 well plate, whensufficient pressure is exerted to the upper surface of the mat by the PCR Express Heated Lid.
Figure 10.1: Showing how the OmniSeal TD Mat seals the wells of a 96 well plate.
Removing the OmniSeal TD Mat
To minimise the risk of well-to-well contamination, remove the OmniSeal TD Mat from the96 well plate whilst the plate is in a rack or on the machine.
© Thermo Hybaid 1999 Issue 5.0, March199972
Re-usability of the OmniSeal TD Mats
The OmniSeal TD Mat can be re-used at least 5 times. Repeated washing and autoclaving ofthe Mats causes them to crack around the edges. When this starts to happen, they should bediscarded.
NB: The number of times an OmniSeal TD Mat can be re-used is reduced considerably if itis cleaned with alcohols or detergents, or if exposed to UV irradiation.
Limitation of Microtitre Plate Operations
Some users have reported loss of volume when using microtitre plates for thermal cycling.Recent experiments performed at Thermo Hybaid have demonstrated that volume loss isindependent of sample volume and occurs through the sides of the polycarbonate microtitreplate (all manufacturer plates tested) and is not due to poor sealing. Typically volume loss of3µl per well in a 30-cycle reaction can be expected.
If you are working with small sample volumes it may be advisable to switch to polypropyleneconsumables instead.

© Thermo Hybaid 1999. Issue 5.0, March 1999 73
APPENDIX III
PCR EXPRESS THERMAL CYCLER
In Situ Block Application Notes
Overview
The PCR Express In Situ module with flat block has been designed for the precise control oftemperature on up to four standard microscope slides (dimensions 76mm x 26mm x 1mm).Flat blocks are supplied with a Humidity Chamber, which can be used to reduce sampledrying.
Temperature Control
The In Situ block can perform all the control functions of the standard PCR Express reactiontube block with the exceptions of Active Tube Control and Simulated Tube Control. Instead,the Simulated Slide Control option is used which minimises the time lag between the blockreaching target temperature and the sample on the surface of the slide achieving targettemperature. At the start of running a program on an In Situ module the SIM SLIDE optionshould be selected as the control mode (see Figure 5.1). The Heated Lid is not operationalunder this control mode.
The performance of the In Situ module has been measured using miniature thermistor probesattached to the surface of slides. Optimum results across four standard slides (1mm thickness)with the humidity chamber in place have been obtained using a calibration factor of 200.Using a higher calibration factor accelerates the approach to target temperature, but results in adegree of overshoot. Conversely, a lower calibration factor slows the approach to targettemperature, but minimises any overshoot. A calibration factor of zero would be equivalent toblock control when using SIM SLIDE.
Protocol Transfer
When transferring protocols from a conventional 'block control' machine, it is important toconsider the effect of using PCR Express's 'Simulated Slide' control. On conventional thermalcyclers, the programmed temperatures commonly refer to the temperature achieved by theblock and not the microscope slide. Consequently, a sample on the top surface of a glass slidewill be significantly cooler than the block temperature. The PCR Express’s 'Simulated Slide'control overcomes this problem by using an algorithm to ensure the temperature achieved bysamples on the surface of the slides is as close as possible to the programmed temperature.

© Thermo Hybaid 1999 Issue 5.0, March199974
In practice this difference in achieved temperature between different control systems is mostpronounced at the denaturation step. As a guide, we recommend that when transferringprotocols from a conventional thermal cycler to the PCR Express In Situ, the denaturationtemperature is reduced by 3°C.
Programming
Programming and operation of the In Situ module are identical to the standard PCR Expresstube modules (see Chapter 5) with the exceptions previously noted and also no heated lidoperation is supported. For simple fixed temperature incubations of the slides, manual controlcan be used (Chapter 4). For more complex multi-step incubations or for temperature cyclingreactions use Programmed Operation (Chapter 6).
Humidity Chamber
The polycarbonate Humidity Chamber has been designed to reduce drying out of the sampleon the slides. For accurate temperature performance, the In Situ module should be used withthe Humidity Chamber in place and the lid closed.
• Fill the reservoirs with water.
• Pre-heat the block with the Humidity Chamber in place. This allows the reservoir to warmup so that evaporation of the solution can begin. Alternatively, preheat the reservoirsolution to the incubation temperature required.
• For thermal cycling with extended/high temperature incubations, it is important to seal thereagents under the cover slip. Thermo Hybaid recommends the use of EasiSeal sealingframes. These are available in three sizes (25µl - HB-OS-SSEZ1E, 65µl - HB-OS-SSEZ2E, and 125µl - HB-OS-SSEZ3E). They will completely seal the specimen area toprevent drying.
NB: If a petroleum based rubber compound is used for sealing cover slips in place, thecompound should be allowed to dry out completely before use with this system. If completedrying is not allowed, the solvent vapour will damage the surface of the Humidity Chamber.
More information on the use of In Situ applications using Thermo Hybaid equipment can be
obtained from the Thermo Hybaid In Situ Hybridization Guide, which is available free upon
request.
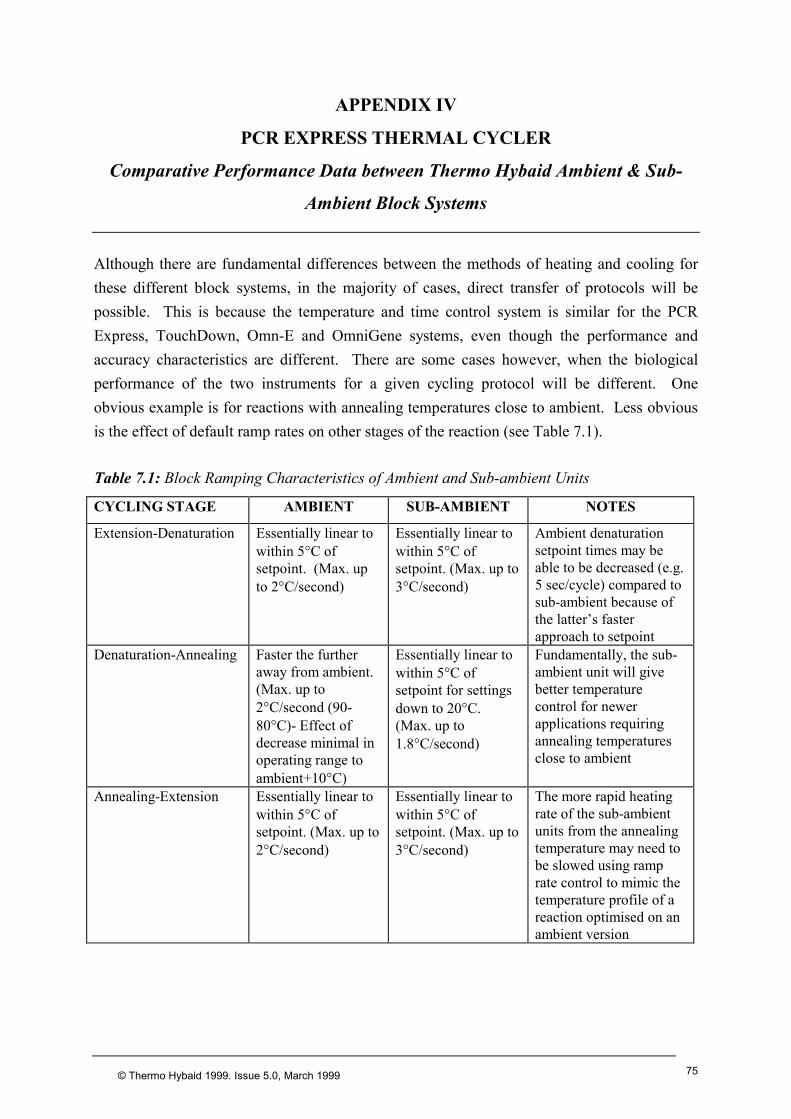
© Thermo Hybaid 1999. Issue 5.0, March 1999 75
APPENDIX IV
PCR EXPRESS THERMAL CYCLER
Comparative Performance Data between Thermo Hybaid Ambient & Sub-
Ambient Block Systems
Although there are fundamental differences between the methods of heating and cooling forthese different block systems, in the majority of cases, direct transfer of protocols will bepossible. This is because the temperature and time control system is similar for the PCRExpress, TouchDown, Omn-E and OmniGene systems, even though the performance andaccuracy characteristics are different. There are some cases however, when the biologicalperformance of the two instruments for a given cycling protocol will be different. Oneobvious example is for reactions with annealing temperatures close to ambient. Less obviousis the effect of default ramp rates on other stages of the reaction (see Table 7.1).
Table 7.1: Block Ramping Characteristics of Ambient and Sub-ambient Units
CYCLING STAGE AMBIENT SUB-AMBIENT NOTES
Extension-Denaturation Essentially linear towithin 5°C ofsetpoint. (Max. upto 2°C/second)
Essentially linear towithin 5°C ofsetpoint. (Max. up to3°C/second)
Ambient denaturationsetpoint times may beable to be decreased (e.g.5 sec/cycle) compared tosub-ambient because ofthe latter’s fasterapproach to setpoint
Denaturation-Annealing Faster the furtheraway from ambient.(Max. up to2°C/second (90-80°C)- Effect ofdecrease minimal inoperating range toambient+10°C)
Essentially linear towithin 5°C ofsetpoint for settingsdown to 20°C.(Max. up to1.8°C/second)
Fundamentally, the sub-ambient unit will givebetter temperaturecontrol for newerapplications requiringannealing temperaturesclose to ambient
Annealing-Extension Essentially linear towithin 5°C ofsetpoint. (Max. up to2°C/second)
Essentially linear towithin 5°C ofsetpoint. (Max. up to3°C/second)
The more rapid heatingrate of the sub-ambientunits from the annealingtemperature may need tobe slowed using ramprate control to mimic thetemperature profile of areaction optimised on anambient version

© Thermo Hybaid 1999 Issue 5.0, March199976

© Thermo Hybaid 1999. Issue 5.0, March 1999 77
APPENDIX V
PCR EXPRESS THERMAL CYCLER
Glossary of Terms
Advanced Edit Allows the adjustment of the following:1) Incrementation/decrementation of time and/ortemperature on a cycle-by-cycle basis.2) Control of temperature ramping between setpoints.
Block Control The temperature of the cycling block is monitoredand controlled by the thermistor mounted on theblock. Because of the time lag between the blockand sample reaching temperature we recommendthat tube control is used.
Block Module The interchangeable assembly comprising sampleblock, Peltier array, heatsink and control thermistor.
Control Chassis The main body of the machine, incorporatingkeypad, control and power functions, fan anddisplay. The Heated Lid is fitted to the controlchassis.
Copy Copy is used to make identical copies of storedprograms, prior to editing.
Edit Edit is used to create new programs or to changeexisting programs.
Erase Erase is used to delete programs or create extra spacefor new protocols.
GRADIENT CALCULATORSoftware
Software for use in calculating optimized annealingtemperatures after gradient cycling.
HOLD A HOLD step may be specified at the end of a stage.Samples are held at this temperature untilCONTINUE is pressed to resume the program. Thisfunction can be used to hold samples at a fixedtemperature while a reagent is added beforetemperature cycling starts.
In Situ Module The PCR Express Flat Block, for performing In Situreactions on up to four microscope slides.
Loading Factor To compensate for differing numbers of samples,enter the number of tubes for each cycling run.
MANManual Operation
Manual operation is used for single temperatureincubations under block control. The incubation willproceed at the set temperature until the STOP buttonis pressed; or until a new temperature is specified.
Menu The menu key allows the user to return to the mainmenu at any time without making changes in theprogramming/operation of the unit.
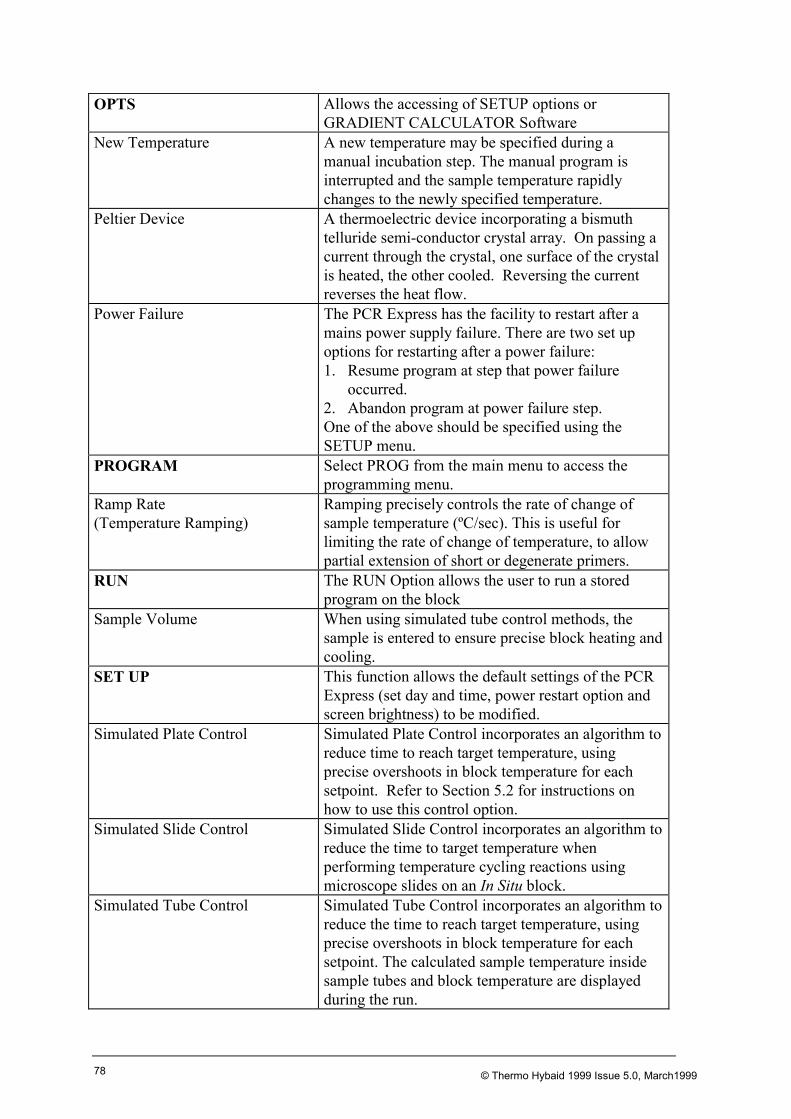
© Thermo Hybaid 1999 Issue 5.0, March199978
OPTS Allows the accessing of SETUP options orGRADIENT CALCULATOR Software
New Temperature A new temperature may be specified during amanual incubation step. The manual program isinterrupted and the sample temperature rapidlychanges to the newly specified temperature.
Peltier Device A thermoelectric device incorporating a bismuthtelluride semi-conductor crystal array. On passing acurrent through the crystal, one surface of the crystalis heated, the other cooled. Reversing the currentreverses the heat flow.
Power Failure The PCR Express has the facility to restart after amains power supply failure. There are two set upoptions for restarting after a power failure:1. Resume program at step that power failure occurred.2. Abandon program at power failure step.One of the above should be specified using theSETUP menu.
PROGRAM Select PROG from the main menu to access theprogramming menu.
Ramp Rate(Temperature Ramping)
Ramping precisely controls the rate of change ofsample temperature (ºC/sec). This is useful forlimiting the rate of change of temperature, to allowpartial extension of short or degenerate primers.
RUN The RUN Option allows the user to run a storedprogram on the block
Sample Volume When using simulated tube control methods, thesample is entered to ensure precise block heating andcooling.
SET UP This function allows the default settings of the PCRExpress (set day and time, power restart option andscreen brightness) to be modified.
Simulated Plate Control Simulated Plate Control incorporates an algorithm toreduce time to reach target temperature, usingprecise overshoots in block temperature for eachsetpoint. Refer to Section 5.2 for instructions onhow to use this control option.
Simulated Slide Control Simulated Slide Control incorporates an algorithm toreduce the time to target temperature whenperforming temperature cycling reactions usingmicroscope slides on an In Situ block.
Simulated Tube Control Simulated Tube Control incorporates an algorithm toreduce the time to reach target temperature, usingprecise overshoots in block temperature for eachsetpoint. The calculated sample temperature insidesample tubes and block temperature are displayedduring the run.

© Thermo Hybaid 1999. Issue 5.0, March 1999 79
Stage One stage of a program consists of one or more stepsup to a maximum of 10. A stage may be repeated fortemperature cycling. Up to ten stages may be used inone program, and stage-to-stage linking is automatic.
Step A step consists of a programmed temperature andtime interval. Time increment and ramp rate mayalso be specified if required. Enter zero for eachheading to specify the last step of a particular stage,and enter zero for each heading at the first step of thefinal stage.
Sub-ambient Block The aluminium block used on sub-ambient PCRExpress systems. This uses Peltier devices forheating and cooling. Operating range: 4°C to 99°C.
TEMP INC/DECTemperatureIncrement/Decrement
May be used to increase/decrease a temperature setpoint at successive cycles. E.g. a decrement of 0.1°Cwill give 60, 59.9, 59.8, 59.7.... °C.This is useful for touchdown PCR reactions wherestringency at the annealing step is decreased as thereaction proceeds.
Thermistor A thermistor is a resistor whose resistance changeswith temperature. It can therefore be used as a veryaccurate temperature probe with small liquidvolumes.
TIME INC/DECTime Increment/Decrement
May be used to change a time interval to each repeatcycle of a specific step. E.g. an increment of 10seconds on a 60 second step will give time intervalsof 60, 70, 80, 90, 100....seconds. This is useful whenincreasing an incubation step to allow for thedepletion of an enzyme.
Touchdown PCR A gene amplification procedure where the annealingtemperature is high (e.g. 65°C) to achieve highspecificity at the start of the reaction. It can then bereduced with successive cycles (by e.g. 0.5°C/Cycle)to increase yield once high stringency is no longerrequired.
TUBE(Active) Tube Control
This type of software control is dependent upon theexternal thermistor probe located in the microfugetube. This allows very accurate monitoring andcontrol of sample tube temperature. This feedbackcontrol loop allows the transition to targettemperature to be accelerated by creating atemperature gradient between the block temperatureand the tube temperature.
HEATED LID A standard fitting which allows oil free cycling in0.2, 0.3, 0.5ml tubes and 96/384 well plates. Theauto-height adjusting heated plate in contact with thetop of the reaction vessels maintains the temperatureabove 100ºC, preventing evaporation of the sample.

© Thermo Hybaid 1999 Issue 5.0, March199980
View The View function allows the contents of programsto be accessed.

© Thermo Hybaid 1999. Issue 5.0, March 1999 81
APPENDIX VI
PCR EXPRESS THERMAL CYCLER
Pre-Set Programs on the PCR Express
Programs coded into the F:HYBAID Directory of the PCR Express memory can be useddirectly or as building blocks for other protocols using the COPY function.
PROGRAM F:90 3T_PCR
Stage 1 Step 1 94°C 0:01:00 x 1
Stage 2 Step 1 94°C 0:00:30
Step 2 55°C 0:00:30
Step 3 72°C 0:00:30 x 30
Stage 3 Step 1 72°C 0:05:00 x 1
Hold 4°C
PROGRAM F:91 2T_PCR
Stage 1 Step 1 94°C 0:01:00 x 1
Stage 2 Step 1 94°C 0:00:10
Step 2 68°C 0:00:10 x 30
Stage 3 Step 1 72°C 0:05:00 x 1
Hold 4°C
PROGRAM F:92 LONGPCR
Stage 1 Step 1 94°C 0:02:00 x 1
Stage 2 Step 1 94°C 0:00:10
Step 2 65°C 0:00:30
Step 3 68°C 0:10:00 x 10
Stage 3 Step 1 94°C 0:00:10
Step 2 65°C 0:00:30
Step 3 68°C 0:10:00 + Time Inc. 0:20/cycle x 20
Stage 4 Step 1 68°C 0:07:00 x 1
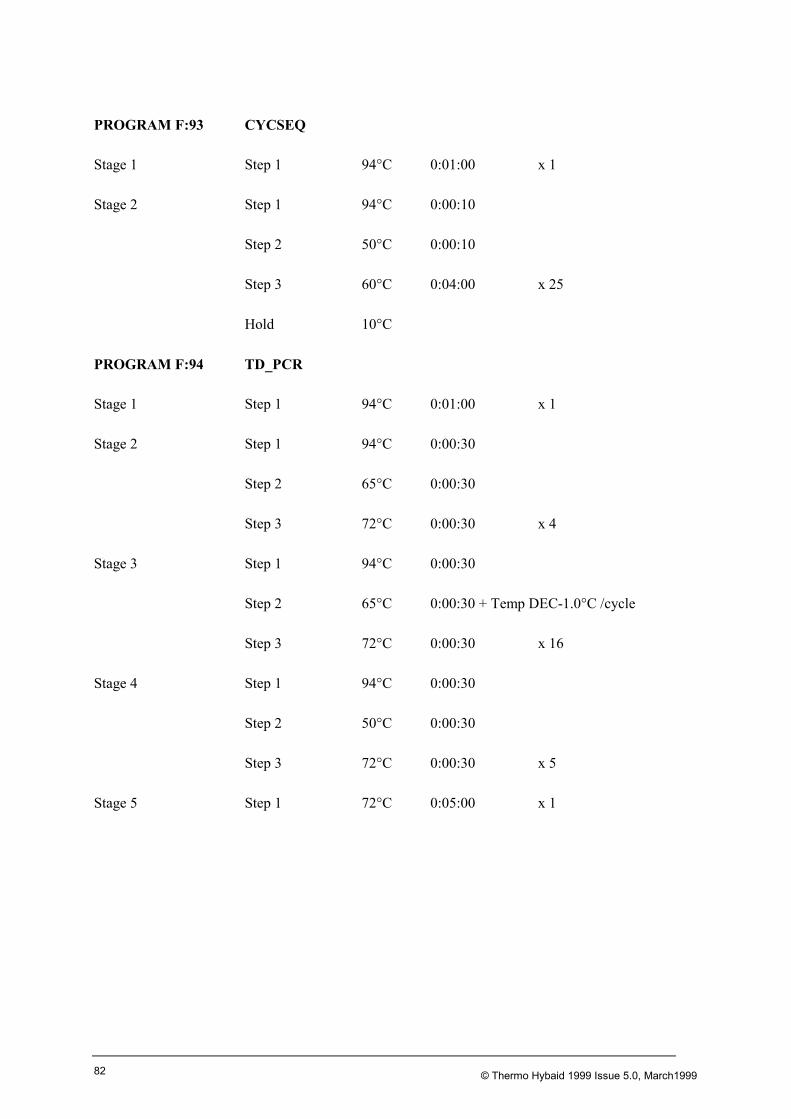
© Thermo Hybaid 1999 Issue 5.0, March199982
PROGRAM F:93 CYCSEQ
Stage 1 Step 1 94°C 0:01:00 x 1
Stage 2 Step 1 94°C 0:00:10
Step 2 50°C 0:00:10
Step 3 60°C 0:04:00 x 25
Hold 10°C
PROGRAM F:94 TD_PCR
Stage 1 Step 1 94°C 0:01:00 x 1
Stage 2 Step 1 94°C 0:00:30
Step 2 65°C 0:00:30
Step 3 72°C 0:00:30 x 4
Stage 3 Step 1 94°C 0:00:30
Step 2 65°C 0:00:30 + Temp DEC-1.0°C /cycle
Step 3 72°C 0:00:30 x 16
Stage 4 Step 1 94°C 0:00:30
Step 2 50°C 0:00:30
Step 3 72°C 0:00:30 x 5
Stage 5 Step 1 72°C 0:05:00 x 1

© Thermo Hybaid 1999. Issue 5.0, March 1999 83
PROGRAM F:95 RTPCR37
Stage 1 Step 1 37°C 1:00:00
Step 2 95°C 0:10:00 x 1
Hold 4°C
Stage 2 Step 1 95°C 0:00:30
Step 2 55°C 0:00:30
Step 3 72°C 0:00:30 x 40
Stage 3 Step 1 72°C 0:05:00 x 1
PROGRAM F:96 RTPCR65
Stage 1 Step 1 65°C 1:00:00
Step 2 94°C 0:01:00
Stage 2 Step 1 94°C 0:00:15
Step 2 65°C 0:00:30 x 40
Stage 3 Step 1 65°C 0:07:00 x 1
PROGRAM F:97 RAMP
Stage 1 Step 1 94°C 0:01:00 x 1
Stage 2 Step 1 94°C 0:00:30 Ramp 1.0°C/Sec
Step2 55°C 0:00:30 Ramp 1.0°C/Sec
Step 3 72°C 0:00:30 Ramp 1.0°C/Sec
Stage 3 Step 1 72°C 0:05:00 x 1

© Thermo Hybaid 1999 Issue 5.0, March199984
PROGRAM F:98 DIGEST
Stage 1 Step 1 37°C 4:00:00 x 1
PROGRAM F:99 CUT/KIL
Stage 1 Step 1 37°C 4:00:00
Step 2 95°C 0:15:00 x 1
Hold 4°C