therapeutic wearable system tens + ems wireless muscle
TRANSCRIPT

Therapeutic Wearable SystemTENS + EMS Wireless Muscle Stimulator
Instruction ManualModel # ET-5050

INDICATIONS Read this instruction manual before operation. Be sure to comply with all “CAUTIONS” and “WARNINGS” in this manual. Failure to follow and implement according to the use and operating instructions can cause harm to the user or device.
The device is intended for over-the-counter use however if you have medical questions we strongly encourage you to consult with your physician regarding indications for use of this device.
What is TENS? TENS stands for transcutaneous electrical nerve stimulation. This TENS unit is intended to deliver electrical current to electrode pads applied to your skin to relieve pain associated with sore or aching muscles.
What is EMS?EMS stands for electrical muscle stimulation. This electric muscle stimulator is used to stimulate healthy muscles to improve muscle strength and performance.
Indications for Use The iReliev® Therapeutic Wearable System is a muscle stimulator system for active treatment as per the intended use:• For temporary relief of pain associated with sore and aching muscles in the lower back due to strain from exercise or
normal household and work activities. (Choose TENS programs P1 through P7)
• For temporary relief of pain associated with sore and aching muscles in the upper and lower extremities (arm and/or leg) due to strain from exercise or normal household and work activities. (Choose TENS programs P1 through P7)
• For symptomatic relief and management of chronic, intractable pain, and relief of pain associated with arthritis. (Choose TENS program P8)
• For use by healthy adults for the stimulation of healthy muscles to improve or facilitate muscle performance.• (Choose EMS programs P1 through P6)
2 www.iReliev.com

TABLE OF CONTENTS INDICATIONS......................................................................................................................................................................................................................................................................................................................... 2CONTRAINDICATIONS, WARNINGS, AND PRECAUTIONS………………………………………………..................................................................................................................................... 4-7WHAT'S INCLUDED……………………....……………………………................................................................................................................................................................................................................................................. 8DEVICE FEATURES……………………....…………………………….................................................................................................................................................................................................................................................. 9ABOUT RECHARGEABLE BATTERIES……………….……..…………………....................................................................................................................................................................................................... 10USING THE AC ADAPTER TO CHARGE REMOTE AND RECEIVER PODS........................................................................................................................................... 11-13STEP BY STEP OPERATION GUIDE FOR TREATMENT…..…………………......................................................................................................................................................................... 14• Preparing the Skin……………………………………………………......................................................................................................................................................................................................................................... 14• Attach Electrode Pad to Receiver Pod…………………………………………………………………................................................................................................................................................................. 14• Attach Pod and Electrode Pad to Your Body…………………………………………………………………............................................................................................................................................... 14• Turning On & Off Receiver Pod(s)………………………….………………………………...................................................................................................................................................................................... 15• Turning On & Off Remote…………………………………………………………............................................................................................................................................................................................................... 15• Selecting TENS or EMS Mode……………………………………………………………………...................................................................................................................................................................................... 16• Selecting Therapy Program……………………………………………………………………............................................................................................................................................................................................. 16• Selecting Treatment Minutes….……………………………………………….......................................................................................................................................................................................................... 17• Selecting Intensity Level…………………….................……………………………......................................................................................................................................................................................................... 17CARE AND MAINTENANCE…………………………………………………............................................................................................................................................................................................................................. 18ELECTRODE PAD PLACEMENT……………………………………............................................................................................................................................................................................................................... 19TENS PROGRAMS……………………………………..................................................................................................................................................................................................................................................................... 20EMS PROGRAMS……………………………………........................................................................................................................................................................................................................................................................ 21POD CHANNEL PAIRING....................................................................................................................................................................................................................................................................................... 22-23TECHNICAL SPECIFICATIONS……………………………………………………................................................................................................................................................................................................................. 24-26TROUBLESHOOTING.………..……………………………………………….….................................................................................................................................................................................................................................... 27RADIO FREQUENCY WIRELESS INFORMATION…………………………………………………................................................................................................................................................................ 28-29INFORMATION ABOUT ELECTROMAGNETIC COMPATIBILITY………............................................................................................................................................................... 30-33FCC INFORMATION………………………………………………………………...................................................................................................................................................................................................................................... 34WARRANTY…………………………………………................................................................................................................................................................................................................................................................................... 35REGISTER YOUR DEVICE…………………................................................................................................................................................................................................................................................................... 37
3www.iReliev.com

4 www.iReliev.com
EMS CONTRAINDICATIONSPowered muscle stimulators should not be used on people with cardiac demand pacemakers. WARNINGS• The long-term effects of chronic electrical stimulation are unknown.• Stimulation should not be applied over the carotid sinus nerves, particularly in people with a known sensitivity to the
carotid sinus reflex.• Stimulation should not be applied over the neck or mouth. Severe spasm of the laryngeal and pharyngeal muscles may
occur and the contractions may be strong enough to close the airway or cause difficulty in breathing.• Stimulation should not be applied transthoracically in that the introduction of electrical current into the heart may cause
cardiac arrhythmias.• Stimulation should not be applied transcerebrally.• Stimulation should not be applied over swollen, infected, or inflamed areas or skin eruptions, e.g., phlebitis,
thrombophlebitis, varicose veins, etc.• Stimulation should not be applied over, or in proximity to, cancerous lesions.
PRECAUTIONS• Safety of powered muscle stimulators for use during pregnancy has not been established.• Caution should be used for people with suspected or diagnosed heart problems.• Caution should be used for people with suspected or diagnosed epilepsy.• Caution should be used in the presence of the following:
• When there is a tendency to hemorrhage following acute trauma or fracture.• Following recent surgical procedures when muscle contraction may disrupt the healing process.• Over the menstruating or pregnant uterus.• Over areas of the skin which lack normal sensation.
• Some people may experience skin irritation or hypersensitivity due to electrical stimulation or electrical conductive medium. The irritation can usually be reduced by using an alternate conductive medium, or alternate electrode placement.
• Electrode placement and stimulation settings should be based on the guidance of the prescribing practitioner. • Powered muscle stimulators should be kept out of the reach of children.

5www.iReliev.com
• Powered muscle stimulators should only be used with electrodes provided for use by the manufacturer.• Do not apply stimulation while driving, operating machinery, or during any activity in which electrical stimulation can put
you at risk of injury. • Muscle contractions may put the user at undue risk of injury which may include use while driving, operating
machinery, or during any activity in which involuntary muscle contractions may put the user at undue risk of injury.
ADVERSE REACTIONSSkin irritation and burns beneath the electrodes have been reported with the use of powered muscle stimulators.
TENS CONTRAINDICATIONS• TENS should not be used if you have a cardiac pacemaker, implanted defibrillator, or other implanted metallic electronic
device. Such use could cause electric shock, burns, electrical interference, or death.
WARNINGS• If you are in the care of a physician consult with your physician before using this device.• If you have had medical or physical treatment for your pain, consult with your physician before using this device.• If your pain does not improve, becomes more than mild, or continues for more than five days, stop using the device and
consult with your physician.• Do not apply stimulation over your neck because this could cause severe muscle spasms resulting in closure of your
airway, difficulty in breathing, or adverse effects on heart rhythm or blood pressure.• Do not apply stimulation across your chest because the introduction of electrical current into the chest may cause
rhythm disturbances to your heart, which could be lethal.• Do not apply stimulation over open wounds or rashes, or over swollen, red, infected, or inflamed areas or skin eruptions
(e.g. phlebitis, thrombophlebitis, varicose veins). • Do not apply stimulation over, or in proximity to, cancerous lesions.• Do not apply stimulation in the presence of electronic monitoring equipment (e.g., cardiac monitors, ECG alarms), which
may not operate properly when the electrical stimulation device is in use. • Do not apply stimulation when in the bath or shower.

6 www.iReliev.com
• Do not apply stimulation while sleeping.• Do not apply stimulation while driving, operating machinery, or during any activity in which electrical stimulation can put
you at risk of injury.• Do not use the device on children, if it has not been evaluated for pediatric use.
We also recommend the following: • Consult with your physician before using this device, because the device may cause lethal rhythm disturbances to the
heart in susceptible individuals.• Apply stimulation only to normal, intact, clean, healthy skin.
PRECAUTIONSWe recommend the user manual advise users of the following: • TENS is not effective for pain of central origin, including headache. • TENS is not a substitute for pain medications and other pain management therapies.• TENS devices have no curative value.• TENS is a symptomatic treatment and, as such, suppresses the sensation of pain that would otherwise serve as a
protective mechanism.• Effectiveness is highly dependent upon the individual using. Results may vary.• The long-term effects of electrical stimulation are unknown. • Since the effects of stimulation of the brain are unknown, stimulation should not be applied across your head, and
electrodes should not be placed on opposite sides of your head. • The safety of electrical stimulation during pregnancy has not been established.• You may experience skin irritation or hypersensitivity due to the electrical stimulation or electrical conductive medium
(gel).• If you have suspected or diagnosed heart disease, you should follow precautions recommended by your physician. • If you have suspected or diagnosed epilepsy, you should follow precautions recommended by your physician.

7www.iReliev.com
We also recommend the following: • Use caution if you have a tendency to bleed internally, such as following an injury or fracture. Consult with your
physician prior to using the device after a recent surgical procedure, because stimulation may disrupt the healing process.
• Use caution if stimulation is applied over the menstruating or pregnant uterus.• Use caution if stimulation is applied over areas of skin that lack normal sensation. • Keep this device out of the reach of children. • Use this device only with the electrodes and accessories recommended by the manufacturer to avoid adverse
reactions.
Please be aware of adverse reactions and precautions below: • You may experience skin irritation and burns beneath the stimulation electrodes applied to your skin. • You may experience headaches and other painful sensations during or following the application of electric stimulation
near your eyes and to your head and face.• You should stop using the device and should consult with your physician if you experience adverse reactions from the
device.

WHAT'S INCLUDED
Package Content 1. Wireless Remote (1)2. Wireless Receiver Pods (2)3. Electrode Pads 3" x 5" Pads (2) 4. Dual USB Charging Cable (1) Length: 23.5"5. AC Adapter (1)6. Portable Carrying Case
8 www.iReliev.com

9www.iReliev.com
DEVICE FEATURES DESCRIPTION
Indicators and Buttons:
1. LED backlight will display for 10 seconds upon turning on.2. CH1 and wireless symbol will display. CH2, CH3 and CH4 will be accessible if advanced pairing has been set. 3. When charging, the remote will shut off automatically.4. If symbol is displayed, battery power is low.
Receiver Pod Features: 1. When power is on, blue LED light is on.2. LED in blue blinks on with the channel in use when it receives signal from the remote. Wireless symbol will appear next to channel on remote when successfully paired.3. If LED in orange is flashing, battery power is low.Receiver pod will turn on when charging the battery. Orange light will remain until fully charged, then turns off.
1 Power OFF/Adjust/Decrease Key
2 Navigation Key/Program Set
3 Power ON/Adjust/Increase Key
4 Therapy Program
5 Therapy Mode (TENS or EMS)
6 Battery Status/Wireless Connection Indicator
7 Channel Indicator
8 Treatment Minutes Remaining
9 Intensity Level
10 Channel Key (Access CH1, CH2, CH3, and CH4)
10
ABOUT RECHARGEABLE BATTERIES Please fully charge the batteries in both the remote and the receiver pods before using. To prevent the risk of electric shock, make sure power cord is unplugged from wall socket. To fully disengage the power to the unit, please disconnect the power cord from the AC outlet. Do not remove cover (or back). The AC outlet shall be readily available and accessible.
Note: Use important precautions regarding the batteries:
• It is recommended to use a manufacturer supplied battery charger to maximize battery life.• Do not connect the battery to metal objects placed in your pocket or backpack or other containers.• Do not short the metal (+)(-) terminals.• Do not dismantle or modify the battery.• Please do not apply heavy force onto batteries. Do not throw batteries.• Do not use sharp utensils or metal objects to scratch or puncture the battery.• Do not place the battery in a microwave, oven, or dryer. Do not place the battery into high pressure or high temperature
environments.• Do not mix this product with other brands or other types of batteries.• Before charging or discharging the battery, read the manual.• Stay away from conductive objects during battery charging and discharging.• Keep batteries away from children.• When the device(s) system is not in use, store in a low humidity, low temperature environment. • In the event the battery fluid comes into contact with your eyes, do not rub your eyes. Rinse with water and immediately
seek treatment.• If you detect abnormal heat, odors, or flames coming from the battery, discontinue using the battery. • If the battery fluid leaks and comes into contact with the skin, wash with clean water.• Do not throw batteries into a fire. The battery could explode causing injury or death.• When discarding or recycling batteries, make sure not to short circuit (+)(-) the terminals.• Please recycle. Do not dispose of old batteries with your household waste; dispose of them safely at your recycling
center or business where the batteries were purchased.
www.iReliev.com

11www.iReliev.com
USING THE AC ADAPTER TO CHARGE REMOTE AND RECEIVER PODS
Charging the Receiver Pod and Remote Using the AC Adapter1. Connect the small end of the USB cable to the remote or pod and the large end to the AC adapter. 2. Plug the adapter into any standard wall outlet.
When charging the remote, the battery symbol will flash until fully charged; When fully charged, the battery symbol will be displayed and will not be flashing.
An orange light indicates the receiver pod is now in charge mode; once fully charged the orange light will turn off.
Note: You may not use the remote while it's charging. When charging, the remote will turn off automatically.
Note: Do not charge receiver pods with electrode pads snapped on to the receiver pods as it will reduce longevity of the electrode pads due to excessive heat from charging.

Remote Charging1. When battery is charging, the symbol will show on LCD screen.2. The battery symbol will not change as the voltage increases; it only serves as an indication.3. Battery symbol will be flashing, 1 flash/sec. like the sequence shown below:
Remote Done Charging1. When the device is done charging, the full battery symbol will show on the LCD screen and will not be flashing.
(disappear)
Remote Low Battery1. When voltage is lower or equal to 3.3v, the symbol will show on the LCD screen.2. The battery symbol will not change as the voltage decreases; it only serves as a warning.3. Battery symbol will be flashing, 4 flashes/sec.
12
REMOTE BATTERY STATUS
www.iReliev.com

13www.iReliev.com
Receiver Pod On Receiver Pod Low Battery Receiver Pod Battery Depleted Light Blinking
Receiver Pod Charging Receiver Pod Done Charging Orange Light On Light Off
RECEIVER POD BATTERY STATUS

STEP BY STEP OPERATION GUIDE FOR TREATMENT (AFTER CHARGING YOUR REMOTE AND PODS)
STEP 1 - Preparing Your Skin Before UsingFollowing the steps below can help prepare the skin for optimal electrical dispersion and increased stimulation sensitivity. Such care may also help extend electrode pad life and may reduce the risk of skin irritation.
1. Determine the electrode pad placement sites for the electrode pad(s).2. Wash the area with mild soap and water (do not use alcohol). Rinse and dry thoroughly.3. Trim excess body hair from the area with scissors (do not shave).4. If desired, apply iReliev® Conductive Gel or Conductive Spray to help increase conductivity. This may also reduce the chance of skin irritation and may extend the life of the electrode pads.5. When removing electrode pads, always remove by pulling in the direction of hair growth.6. It may be helpful to apply iReliev® After Use Electrotherapy Lotion on electrode pad placement area when system is not in use to help increase moisture of skin.
STEP 2 - Attach Electrode Pad to Receiver Pod1. Place the electrode pad with the contact plugs up onto a flat surface. Place the receiver pod with the contact jacks down onto the electrode pad so that plugs and jacks are aligned. Then press down until they are completely snapped in.2. Do not remove the clear plastic shield from electrode pad until the unit is ready to be placed on the body.
STEP 3 - Attach Pod and Electrode Pad to Your Body 1. Place the pod and electrode pad on your body as per the illustration on page 19.
14 www.iReliev.com

15www.iReliev.com
STEP 5 - Turning On and Off Remote• To turn on the remote, press and hold the ON/+ button for 3 seconds. Settings will be shown
on the display with backlight for 10 seconds. The most recently selected program will display.• To turn off the remote manually, press and hold the OFF/- button for 3 seconds. Or it will
automatically turn off when no button is pressed for 3 minutes.
Note: Do not turn the remote on until the receiver pod(s) are properly attached to electrode pad(s).
Note: When stimulating the muscles of the arms or legs, muscle contraction may cause involuntary limb movement which may cause injury to yourself or others. Ensure limbs are secured to prevent movement.
STEP 4 - Turning On and Off Receiver Pod(s)1. To turn on the receiver pod(s), press and hold the power button for 3 seconds. 2. Blue backlight of the receiver pods will blink two times when it receives the signal from the remote.3. Wireless symbol will appear next to "CH" on remote when successfully paired.4. To turn off the receiver pod(s):
• When treatment minutes are remaining, reduce intensity to "0" then press and hold the OFF/- button for 3 seconds.
• When treatment minutes have not been set, press and hold the OFF/- button or 3 seconds.
Note: Pods will only turn off automatically under the following conditions:• Treatment minutes have expired.• No activity or if treatment intensity has not been set for 3 minutes.
Note: To prevent unpleasant electric shocks, never remove the pod and electrode pad while it is still turned on. However, in an emergency, you may unsnap the receiver pod from the electrode pad.

16
STEP 6 - Select TENS or EMS Mode1. Press SET button on remote; the preset therapy mode TENS or EMS will flash on the display. 2. While flashing, use the ON/+ button to toggle between TENS or EMS. Once desired mode is selected, then press SET.
STEP 7 - Select Therapy Program (TENS P1-P8 or EMS P1-P6)1. While flashing, press the ON/+ button (to increase) or the OFF/– button (to decrease) repeatedly until the desired therapy program (TENS P1-P8 or EMS P1-P6) flashes on the display. Once the desired therapy program is selected, then press SET.
Note: The device offers 8 preset TENS programs and 6 EMS programs; the programs differ with respect to varying pulse widths and frequencies. The program you choose determines the impulse output type. Choose the program that is appropriate to your needs as shown on pages 20-21 or is most comfortable to you.
www.iReliev.com

17www.iReliev.com
STEP 8 - Select Treatment Minutes1. While flashing, press the ON/+ button (to increase) or the OFF/– button (to decrease) repeatedly until the desired treatment time flashes on the display. Once desired treatment minutes is selected, then press SET.
Note: The device offers 12 preset times: 5, 10, 15, 20, 25, 30, 35, 40, 45, 50, 55, 60 minutes. Time will countdown on the display in 1-minute increments for the duration of your treatment.
Note: The last treatment program used is stored and appears on the display when turned on.
Note: If you change therapy mode/program during a therapy session, the intensity level will reset to “0” to avoid unpleasant and unexpected impulses; it's a safety and precautionary feature.
STEP 9 - Select Intensity Level1. While flashing, press the ON/+ button (to increase) or the OFF/– button (to decrease) repeatedly until the desired intensity level flashes on the display. Once desired intensity level is selected, then press SET.
Note: The device offers 25 intensity levels. Intensity levels are adjustable per receiver pod channel selected. Make sure the respective receiver pod is turned on and set if you are using advanced pairing option to create isolated channels.
Note: While you are using, you will feel the intensity level increase or decrease as you select the intensity level. Always start with the lowest intensity gradually increasing until you feel a "tingling" sensation. Never increase the intensity to a level that causes pain. Stay under point of discomfort. You can use this as a guide to select an intensity level that is comfortable for you.

18
CARE & MAINTENANCE
Remote and Receiver Pods • To clean exterior of system, please lightly wipe with a clean, wet cloth. Do not submerge the stimulator in liquid or
expose it to large amounts of water.• The system should be cleaned each time after use, and kept safe away in a drawer.• Never use aggressive cleaning products or stiff brushes to clean the device.• Do not clean devices when charging. Always unplug the charger first before cleaning the device(s). • Do not use the device until it is completely dry.• Do not expose the device to direct sunlight and protect it from dirt and moisture.• Store the system in a clean, dry place. • Do not dispose of the device(s) in a fire. The battery could explode, causing injury or death.
Electrode PadsThe electrode pads are disposable and use an adhesive that will dry after prolonged usage or storage. Electrode pads should be replaced when they lose their adhesive quality or when you sense a change in stimulation sensation. Electrode pads are for single person use only.
If you have questions about the integrity of the electrode pads or if you want to order new electrode pads, please order online at www.iReliev.com or call us at 855-723-2582.
Rechargeable Battery CareThe rechargeable batteries are built-in the device(s). Please do not attempt to disassemble or force open the built-in battery. Batteries have a finite lifetime, with approximately 300-450 cycle times. To maximize battery life, please charge the system every 3 months when not in use.
Note: Fully charged devices will provide therapy for:• Pods: 3-5 hours• Remote: 8-10 Hours
www.iReliev.com

19www.iReliev.com
Go to iReliev.com/electrode-placements for more information
ELECTRODE PAD PLACEMENT

20 www.iReliev.com
TENS PROGRAMS: When using any of the 8 programs for pain relief, always start with the lowest intensity level and gradually increase the level of intensity until you feel a “tingling” sensation. All programs are different and therefore have a different sensation. You may try all 8 programs in the beginning and choose the one that feels pleasant. Never increase the intensity to a level that it hurts; always stay under the point of discomfort. Start with short sessions of 5 to 10 minutes until your body gets used to the stimulation.
Program/Mode Benefits What You Should Feel
P1
For temporary relief of pain associated with sore and/or aching muscles in the lower back due to strain from exercise or normal household and/or work activities.
For temporary relief of pain associated with sore and/or aching muscles in the upper and lower extremities (arm and/or leg) due to strain from exercise or normal household and work activities.
Continuous comfortable tingling. The underlying pain should help decrease gradually after treatment.
P2 Comfortable pulsing sensation. The underlying pain should decrease.
P3 Comfortable pulsing sensation. The underlying pain should decrease.
P4 Variable comfortable tingling and pulsing sensation (sensation should appear to come in waves). Pain should ease and there should be relief after treatment.
P5 Variable comfortable mild tingling sensation (sensation will appear to come in waves).
P6 Variable comfortable pulsing and pumping action (action will appear to come in waves).
P7 Variable comfortable tingling and pumping action (action should appear to come in waves).
P8 For symptomatic relief and management of chronic, intractable pain, and relief of pain associated with arthritis.
Variable comfortable tingling and pulsing sensation (sensation should appear to come in waves). Pain should ease and there should be relief after treatment.

21www.iReliev.com
EMS PROGRAMS:For electrical muscle stimulation (EMS) any of the 6 programs may be used. The intent is to cause a muscle contraction, and then release. All 6 programs will achieve contraction and vary by rate and duration of the contractions. Start out slowly with low intensity levels for a warm-up (5-10 min). Increase intensity level and treatment minutes as you progress. Use the device regularly or for longer sessions to achieve benefits similar to passive "exercise."
Program/Mode What You Should Feel & Benefits Suggestion
P1Exercise Prep
P1 gently warms up the muscles prior to exercise; it feels like a rhythmic massage.
Increase intensity level until you get a strong but comfortable muscle movement; 10 min/duration.
P2Muscle
Recovery
P2 produces muscle twitches at a very low frequency, feels like a tapping massage; for muscle recovery from fatigue for relaxation and reduced stiffness.
Use it after intense exercise to promote recovery and relaxation; 30 min/duration.
P3Active
Recovery
P3 is similar to P2, except that the muscle twitch rate slows down during the session. It feels like a tapping massage, but softer than P2.
Use it after intense exercise to promote recovery and relaxation; 20 min/duration.
P4Active
Recovery
P4 activates the muscle in a short contraction/relax-ation cycle. It feels like a kneading massage, smoother than P2/P3.
Use it after intense exercise to promote recovery and relaxation; 20 min/duration.
P5Build
Endurance
P5 uses a low frequency pulse which may favor slow twitch fibers, for potential development of aerobic capacity and capillary supply. It improves fatigue resistance during long duration and moderate intensity exercise.
The exercise comprises of an alternating sequence of work and rest phases lasting several seconds. Increase the intensity level until you get a strong and deep muscle contraction. Do not exceed your comfort level; 20min/duration.
P6Muscle
Strengthening
P6 uses a pulse frequency appropriate to help fast twitch muscle fibers. It may help improve anaerobic capacity and may help improve muscle strength.
The exercise comprises of a sequence of work phases separated by longer relaxation phases. Increase the stimulation intensity level until you get a strong and deep contraction. Do not exceed your comfort level; 20 min/duration.

22 www.iReliev.com
POD CHANNEL PAIRINGUsing the remote you can set the modes, programs, treatment times, and intensity levels independently on one to four channels. (CH1, CH2, CH3, and CH4)
As an added convenience, you may use as many pods as you would like on a single channel. The settings and intensity levels will be shared to all pods paired as that respective channel.
The two pods that come with this system are paired as CH1 but may be paired as an alternate channel (CH2, CH3, or CH4) in the event you would like to control the pods independently of each other.
PAIR PODS AS FOLLOWS:
STEP 1 - Turn on wireless remote and receiver pod(s) you wish to pair.
Note: All pods powered on at this time will be paired. Turn off all pod(s) you wish not to pair or you may unintentionally pair any pod(s) within 9-10 feet.
STEP 2 - Hold the ON/+ and OFF/- buttons for 8 seconds to access the channel pairing screen.
STEP 3 - While in pairing screen, press the CH button to navigate to desired channel (CH1, CH2, CH3, CH4). Once you have selected the channel, then press SET button.
Note: When the receiver pod(s) are paired, the button on the pod(s) will blink twice, whichmeans that the channel pairing was successful. The LCD on the remote will display SS.
Number is unique to the remote.

23www.iReliev.com
Pod Channel Pairing Continued
Note: If the receiver pod(s) did not pair successfully, the button on the receiver pod(s) will not blink. The LCD on the remote will display FF.
STEP 4 - To exit pairing screen, press the OFF/- button to return to the standby screen.
Note: Your receiver pod(s) will now be programmed to the channel you selected. Repeat the process with additional pod(s) if desired.
ADJUST YOUR THERAPY SETTINGS ON REMOTE AS FOLLOWS:
STEP 1 - Turn ON respective pod(s).
STEP 2 - Press CH on remote to navigate to the new channel select CH1, CH2, CH3, or CH4. Respective channel will be displayed in the upper right corner of the LCD screen.
STEP 3 - Press SET on remote to adjust mode, program, and intensity level by channel pod(s). See steps 6-9 on pages 16-17 to complete the set-up.
Note: If you have programmed your pod(s) to a different channel other than CH1, use the adhesive labels provided to mark the pod's channel on the pod(s).

24 www.iReliev.com
TECHNICAL SPECIFICATIONS
• Pulse Rate: As pre-programmed, in operation mode.• Pulse Width: As pre-programmed, in operation mode.• Minutes: 5-60 min. adjustable.• Wave Form: Symmetrical bi-phasic square pulse.• Max Charge per Pulse: 20.8 microcoulombs maximum.• Essential Performance: The stimulation output as defined in the following specification table for TENS & EMS.
TENS Programs
Program Pulse width(uS) Frequency(Hz) Function Mode
P1 260 15 Constant
P2 260 60 Burst
P3 260 60 Constant
P4 260~156 2~60 Modulation
P5 260~156 60 Modulation
P6 260 7~60 Modulation
P7 260~156 60 Modulation
P8 210 2.45~245 Cycle

25www.iReliev.com
EMS Programs:
Programs Pulse Width(uS)
Pulse Rate(Hz)
Ramp up(sec)
On Time(sec)
Ramp down(sec)
Off Time(sec)
P1 300 40~99 - 2 - 1
P2 200 4 - - - -
P3 300 5 - - - -
P4 200 99 - 2 - 1
P5 200 4~20 2 6 2 1
P6 300 50 2 5 3 10
**All electrical specifications are ±10% at 500Ω load.
• Input rating: 5Vdc, 1A• Power Source: Remote Battery 3.7V /260 mAh Lithium polymer (LiPo) battery • Receiver Pod Battery: 3.7V /180 mAh Lithium polymer (LiPo) battery• AC Adapter I/P: 100-240Vac, 50-60Hz, 0.3-0.15A ; O/P: 5Vdc, 1.2A• Weight & Dimensions:
• Remote: 2.11 ounces (battery included), 6.18'"x 1.85" x 0.61" • Receiver Pod: 1.05 ounces (battery included) , 2.36" x 2.36" x 0.61"
• Operating Conditions: +50°F (10°C) to +104°F (40°C), 40-90% max. Relative humidity• Transport and Storage Conditions: +14°F (-10°C) to +140° (60°C), 30-95% max. Relative humidity• Operation Altitude: 3000m• Operating Atmospheric Pressure Range: 700~1013 hPa• Transport and Storage Atmospheric
Pressure Range: 500 ~ 1060 hPa
26 www.iReliev.com
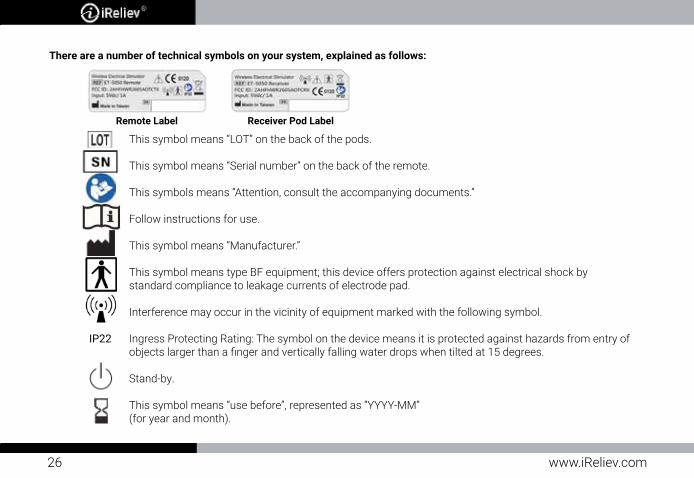
This symbol means “LOT” on the back of the pods. This symbol means “Serial number” on the back of the remote.
This symbols means “Attention, consult the accompanying documents.”
Follow instructions for use.
This symbol means “Manufacturer.”
This symbol means type BF equipment; this device offers protection against electrical shock by standard compliance to leakage currents of electrode pad.
Interference may occur in the vicinity of equipment marked with the following symbol. IP22 Ingress Protecting Rating: The symbol on the device means it is protected against hazards from entry of objects larger than a finger and vertically falling water drops when tilted at 15 degrees.
Stand-by.
This symbol means “use before”, represented as “YYYY-MM” (for year and month).
Remote Label Receiver Pod Label
There are a number of technical symbols on your system, explained as follows:
27www.iReliev.com
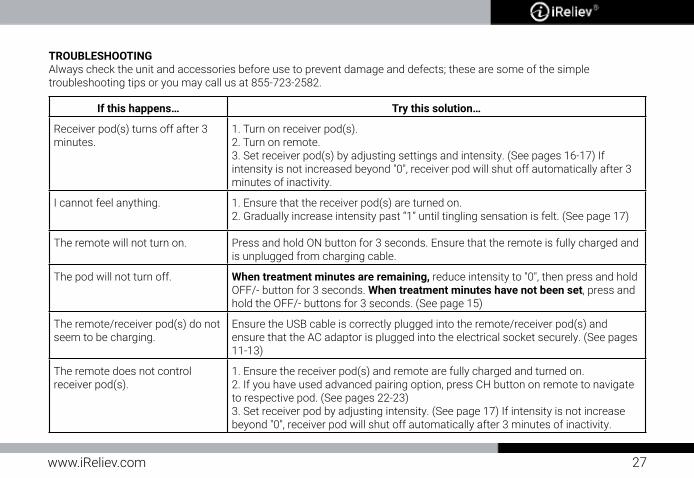
If this happens… Try this solution…
Receiver pod(s) turns off after 3minutes.
1. Turn on receiver pod(s). 2. Turn on remote. 3. Set receiver pod(s) by adjusting settings and intensity. (See pages 16-17) If intensity is not increased beyond "0", receiver pod will shut off automatically after 3 minutes of inactivity.
I cannot feel anything. 1. Ensure that the receiver pod(s) are turned on. 2. Gradually increase intensity past “1” until tingling sensation is felt. (See page 17)
The remote will not turn on. Press and hold ON button for 3 seconds. Ensure that the remote is fully charged and is unplugged from charging cable.
The pod will not turn off. When treatment minutes are remaining, reduce intensity to "0", then press and hold OFF/- button for 3 seconds. When treatment minutes have not been set, press and hold the OFF/- buttons for 3 seconds. (See page 15)
The remote/receiver pod(s) do not seem to be charging.
Ensure the USB cable is correctly plugged into the remote/receiver pod(s) and ensure that the AC adaptor is plugged into the electrical socket securely. (See pages 11-13)
The remote does not control receiver pod(s).
1. Ensure the receiver pod(s) and remote are fully charged and turned on.2. If you have used advanced pairing option, press CH button on remote to navigate to respective pod. (See pages 22-23)3. Set receiver pod by adjusting intensity. (See page 17) If intensity is not increase beyond "0", receiver pod will shut off automatically after 3 minutes of inactivity.
TROUBLESHOOTINGAlways check the unit and accessories before use to prevent damage and defects; these are some of the simple troubleshooting tips or you may call us at 855-723-2582.

28 www.iReliev.com
RADIO FREQUENCY WIRELESS INFORMATIONRadio Frequency Wireless technology is used in the iReliev® Therapeutic Wearable System.For communication between the remote and the wireless receiver pods the wireless protocol characteristics are as follows:
Wireless Protocol Characteristics
Frequency band 2.4GHz ISM
Protocol type Proprietary frequency
Channel 1
Channel width 1MHz
Frequency modulation GFSK
Frequency deviation ±50KHz
EIRP Measured max. -4.9 dBM (0dBM configured as maximum output power)
Effective emission power 0dBm
Data rate 1Mbps
Quality of service requirement 9.8 feet range between remote and receiver pod.

29www.iReliev.com
Wireless Security Measures
Device Identification 8 bits, shared only with other iReliev® devices.
Data Integrity Checks Each data frame is protected by a 16 (b) length CRC.
Acknowledgment Each point-to-point communication is acknowledged.
Out of range behavior • Remote can’t operate on the receiver pods. • Receiver pods won’t work.
Wireless Coexistence Testing
The iReliev® Therapeutic Wearable System protocol is designed to allow coexistence with at least 2 other iReliev® devices.
Each iReliev® Therapeutic Wearable System remote and receiver pod is assigned a unique ID. Before initial use, the remote is paired as CH1 with 2 receiver pods in its network.
Designed for coexistence with wireless products in the same RF band
• Bluetooth (IEEE 802.15.1)• Wi-Fi (IEEE 802.11)
Utilizes established coexistence principles to minimize cross-talk with other wireless devices
• FDMA (Frequency Division Multiple Access)• TDMA (Time Division Multiple Access)
Interference from other devices
• If the iReliev® Therapeutic Wearable System RF channel is interfered by emission from other devices, fail-safe outcome is that the remote will not operate, and/or reset the intensity level to “0”; the receiver pods will stop stimulation.
• Interference from other RF wireless and mobile communication devices is possible. Refer to Table 1 for recommended distance between the devices with other RF devices.

30 www.iReliev.com
• The iReliev® Therapeutic Wearable System complies with current medical standards.• The iReliev® Therapeutic Wearable System also complies with IEC 60601-1 on general safety requirements for
electromedical devices, the IEC 60601-1-2 standard on electromagnetic compatibility, the IEC 60601-2-10 standard on particular safety requirements for nerve and muscle stimulators, and the IEC 60601-1-11 standard for use in the home environment.
INFORMATION ABOUT ELECTROMAGNETIC COMPATIBILITY (EMC)• The iReliev® Therapeutic Wearable System is designed to be used in typical approved environments in accordance with
the safety standard EMC EN60601-1-2. • The iReliev® Therapeutic Wearable System is designed to support anticipated disturbances originating from
electrostatic discharge, magnetic fields for the power supply, or radio frequency emitters. • However, it is not possible to guarantee that the stimulator will not be affected by powerful RF field (radio frequency)
originating from other sources. ELECTROMAGNETIC COMPATIBILITY • The device complies with current specifications with regards to electromagnetic compatibility and is suitable for use in
all premises, including those designated for private residential purposes. The radio frequency emissions of the device are extremely low and, in all probability, do not cause any interference with other devices in the proximity.
• It is recommended that you do not place the device on top of or close to other electronic devices. Should you notice any interference with other electrical devices, move the device or connect it to a different socket.
• Radio equipment may affect the operation of this device. ELECTROMAGNETIC COMPATIBILITY INFORMATION
Table 1 Recommended separation distances betweenportable and mobile RF communications equipment and the ME equipment
The iReliev® Therapeutic Wearable System is intended for use in an electromagnetic environment in which radiated RF disturbances are controlled. The customer or the user of the system can help prevent electromagnetic interference by maintaining a minimum distance between portable and mobile RF communications equipment (transmitters) and the iReliev® Therapeutic Wearable System as recommended on next page, according to the maximum output power of the communications equipment.

31www.iReliev.com
Rated maximum output power of transmitter W
Separation distance according to frequency of transmitter m
150 kHz to 80 MHzd= 0.6 P
80 MHz to 800 MHzd= 0.35 P
800 MHz to 2.5 GHzd= 0.7 P
0.01 0.06 0.04 0.07
0.1 0.19 0.11 0.22
1 0.6 0.35 0.7
10 1.9 1.1 2.2
100 6 3.5 7 Declaration – electromagnetic emissions and immunity for EQUIPMENT and SYSTEMS that are not
LIFESUPPORTING and are specified for use only in a shielded location
Table 2 The iReliev® Therapeutic Wearable System declaration – electromagnetic immunity
The iReliev® Therapeutic Wearable System is intended for use in the electromagnetic environment specified below. The customer or the user of the iReliev® Therapeutic Wearable System should assure that it is used in such an environment.
Immunity test IEC 60601 test level Compliance level Electromagnetic environment - guidance
Conducted RF IEC 61000-4-6
3 Vrms150 kHz to 80 MHz
6V Portable and mobile RF communications equipment should be used no closer to any part of the EQUIPMENT or SYSTEM including cables, than the recommended separation distance calculated from the equation applicable to the frequency of the transmitter. Interference may occur in the vicinity of equipment marked with the following symbol:
Radiated RF IEC 61000-4-3
3 V/m80 MHz to 2.5 GHz
10V/m

32 www.iReliev.com
Table 3 Declaration – electromagnetic immunity
The iReliev® Therapeutic Wearable System is intended for use in the electromagnetic environment specified below. The customer or the user should assure that it is used in such an environment.
Immunity test IEC 60601 test level Compliance level Electromagnetic environment guidance
Electrostatic discharge (ESD) IEC 61000-4-2
±6 kV contact±8 kV air
±8 kV contact±15 kV air
Floors should be wood, concrete or ceramic tile. If floors are covered with synthetic materi-al, the relative humidity should be at least 5%.
Electrical fasttransient/burst IEC 61000-4-4
±2 kV for power supply lines ±1 kV for input/output lines
±2 kV for power supply lines
Mains power quality should be that of a typical commercial or hospital environment.
SurgeIEC 61000-4-5
±1 kV differential mode±2 kV common mode
±1 kV differential mode Mains power quality should be that of a typical commercial or hospital environment.
Voltage dips, short interrup-tions and voltage variations on power supply input lines IEC 61000-4-11
0 % UT ; 0 , 5 cycleAt 0o , 45o , 90o , 135o , 180o , 225o , 270o and 315o 0 % UT ; 1 cycle and 70 % UT ; 25/30 cycle sin-gle phase: at 0o
0 % UT ; 0 , 5 cycleAt 0o , 45o , 90o , 135o , 180o , 225o , 270o and 315o 0 % UT ; 1 cycleand 70 % UT ; 25/30 cycle single phase: at 0o
Mains power quality should be that of a typical commercial or hospital environment. If the user of the EQUIPMENT or SYSTEM requires con-tinued operation during power mains interrup-tions, it is recommended that the EQUIPMENT or SYSTEM be powered from an uninterrupt-ible power supply or a battery.

33www.iReliev.com
Power frequency (50/60 Hz)magnetic fieldIEC 61000-4-8
3 A/m 30 A/mPower frequency magnetic fields should be at levels characteristic of a typical lo-cation in a typical commercial or hospi-tal environment. The magnetic field from common appliances are not expected to affect the device.
NOTE: UT is the a.c. main voltage prior to application of the test level.
Table 4 Declaration – electromagnetic emissions
The iReliev® Therapeutic Wearable System is intended for use in the electromagnetic environment specified below. The customer or the user of the system should assure that it is used in such an environment.
Emissions test Compliance Electromagnetic environment guidance
CE emissions CISPR11 Group 1 The iReliev® Therapeutic Wearable System uses RF energy only for its internal function. Therefore, its RF emissions are very low and are not likely to cause any interference in nearby electronic equipment.
RE emissions CISPR11 Class B The iReliev® Therapeutic Wearable System is suitable for use in all establishments, including domestic establishments and those directly connected to the public low-voltage power supply network that supplies buildings used for domestic purposes.
Harmonic emissionsIEC 61000-3-2 Class A
Voltage fluctuations/Flicker emissions IEC 61000-3-3
Complies

34 www.iReliev.com
FCC INFORMATION The Federal Communication Commission Radio Frequency Interference statement includes the following paragraph:
The equipment has been tested and found to comply with the limits for a Class B Digital Device, pursuant to Part 15 of the FCC Rules. These limits are designed to provide reasonable protection against harmful interference in a residential installation. This equipment generates, uses and can radiate radio frequency energy and, if not installed and used in accordance with the instructions, may cause harmful interference to radio communication. However, there is no guarantee that interference will not occur in a particular installation. If this equipment does cause harmful interference to radio or television reception, which can be determined by turning the equipment off and on, the user is encouraged to try to correct the interference by one or more of the following measures:
• Reorient or relocate the receiving antenna.• Increase the separation between the equipment and receiver pod.• Connect the equipment into an outlet on a circuit different from that to which the receiver pod is connected.• Consult the dealer or an experienced radio/TV technician for help.
The user should not modify or change this equipment without written approval from ExcelHealth Inc. Modification could void authority to use this device. Note: The changes or modifications not expressly approved by the party responsible for compliance could void the user’s authority to operate the equipment.
IMPORTANT NOTE:To comply with the FCC RF exposure compliance requirements, no change to the antenna or the device is permitted. Any change to the antenna or the device could result in the device exceeding the RF exposure requirements and void user’s authority to operate the device.
35www.iReliev.com
WARRANTYThe iReliev® Therapeutic Wearable System carries a one-year warranty from the date of purchase.
The warranty applies to the remote, receiver pods, necessary parts, and labor relating thereto.
Consumable items, like electrode pads and other accessories, are guaranteed to be free from defects in workmanship and materials at the time of delivery.
The warranty does not apply to damage resulting from failure to follow the operating instructions, accidents, abuse, alterations, or disassembly by unauthorized individuals.
ExcelHealth Inc. dba iReliev reserves the right to replace or repair the unit at our discretion.
ExcelHealth Inc.iReliev ProductsAttn: Warranty1603 Hart StreetSouthlake, TX 76092
www.iReliev.comPhone: 855-723-2582Email: [email protected]

36 www.iReliev.com
THANK YOU FOR PURCHASING Your new iReliev® device is one of the best in the industry, and in many ways, leads the industry, particularly in the warranty coverage and customer satisfaction. Customer satisfaction is a key factor in every iReliev® transaction.
We are a company with a passion for affordable and effective sport and fitness products. At iReliev®, word-of-mouth recommendations result in a large percentage of our business. This is a testament to our excellent product value and customer satisfaction.
REGISTER YOUR DEVICEPlease go to https://www.iReliev.com/register to register your iReliev® Therapeutic Wearable System # ET-5050, within 14 days of purchase to receive free gifts and discounts.
When registering your device, flip device to the back to reveal the serial number. Enter the serial number on the warranty registration form or complete warranty on page 37. Please send registration card within 14 days of purchase in a stamped envelope. All iReliev® devices have separate serial numbers.
OTHER iReliev® ACCESSORIES
Wireless Pads Refill Kit
The iReliev® Wireless Pads Refill Kit offers the highest quality of reusable gel so that they last longer. With proper care, this premium grade electrode pad will last up to 20-30 uses each. These electrode pads are highly conductive and provide excellent dispersion.
Expandable Wireless Receiver Pods
iReliev® Expandable Wireless Receiver pods gives you the ability to expand the power of your ET-5050 System with 2 additional wireless receiver pods. Perfect for maximum coverage of large body parts or muscle groups.

37www.iReliev.com

38 www.iReliev.com
39www.iReliev.com

ExcelHealth Inc.www.iReliev.com
1603 Hart StreetSouthlake, TX 76092
If you have any questions whatsoever regarding your iReliev® Therapeutic Wearable System
Model # ET-5050, contact your reseller or ExcelHealth Inc. at: 855-723-2582 or visit www.iReliev.com