the umass audience response system · the functionality of the i>clicker and i>grader...
TRANSCRIPT
oitUMass Office of Information Technologies
OIT Academic Computing
Lederle Graduate Research Center
University of Massachusetts Amherst
Phone: (413) 577-0072
Email: [email protected]
http://www.oit.umass.edu/academic
Getting Started with i>clickerThe UMass Audience Response System
(Based on i>clicker software v6.4 & the i>clicker remote v2)
Before You Begin... ............................................................................ 2
The i>clicker Hardware ...................................................................... 3
Download & Run i>clicker ..................................................................4
Run a Polling Session... .................................................................... 5
View Student Responses... ............................................................... 6
Customize Your Settings... ................................................................ 7
Integrate Moodle & i>clicker... ........................................................... 9
Import a Moodle Roster to i>grader... .............................................. 10
Edit i>grader Data... .........................................................................11
View i>grader Reports......................................................................12
Export Grades..................................................................................14
Student Clicker Registration.............................................................15
Create & Utilize Question Lists.........................................................16
Create & Utilize Demographics ....................................................... 19
i>clicker Support for Faculty... ......................................................... 22
August 2013 JC Gray Sawyer

Getting Started with i>clicker - The UMass Audience Response System 2
OIT Academic Computing, University of Massachusetts http://www.oit.umass.edu/academic 130812jc
IntroductionThe i>clicker audience response system (ARS) uses a handheld remote (clicker) to collect student responses to questions posed by the instructor. Student data is recorded and then displayed on a results graph by software on the instructor’s computer.
i>clicker may be used as a simple tool to provide instant, anonymous feedback or as a tool to promote active learning in the classroom and give students credit for class paricipation and/or performance.
Before You BeginPrior to using i>clicker in a course, please consider the following tips:
• List the i>clicker2 remote as a requirement through your SPIRE course listing in the “Class Overview/Textbook” page. You should select “other materials” to list an audience response system device (aka clicker). The “special instructions” text entry box allow you to provide brand name, purchasing, or any other information..
• Contact the Textbook Annex and provide information for your course so that they can pre-order enough clickers for your students.
• Contact the Instructional Media Lab ([email protected]/545-2823) to reserve an i>clicker Instructor Kit and to schedule a consultation for an i>clicker introduction.
• Download the specific UMass Amherst i>clicker software here: https://www.oit.umass.edu/software/iclicker. Unzip and place the software folder in an easy to find location on your laptop. The i>clicker software will run from your computer or a flash drive without any installation procedure.
• To avoid frustration or in-class delays, we recommend that you go to the classroom you will be teaching in, well in advance, to practice using the i>clicker audience response system with that room’s unique configuration.
• Consider setting-up an appointment with the Center for Teaching and Faculty Development to develop a series of appropriate strategies for your classroom and course content.
• Have a backup plan in case of technical difficulties.
Getting Started with i>clicker - The UMass Audience Response System 3
OIT Academic Computing, University of Massachusetts http://www.oit.umass.edu/academic 130812jc
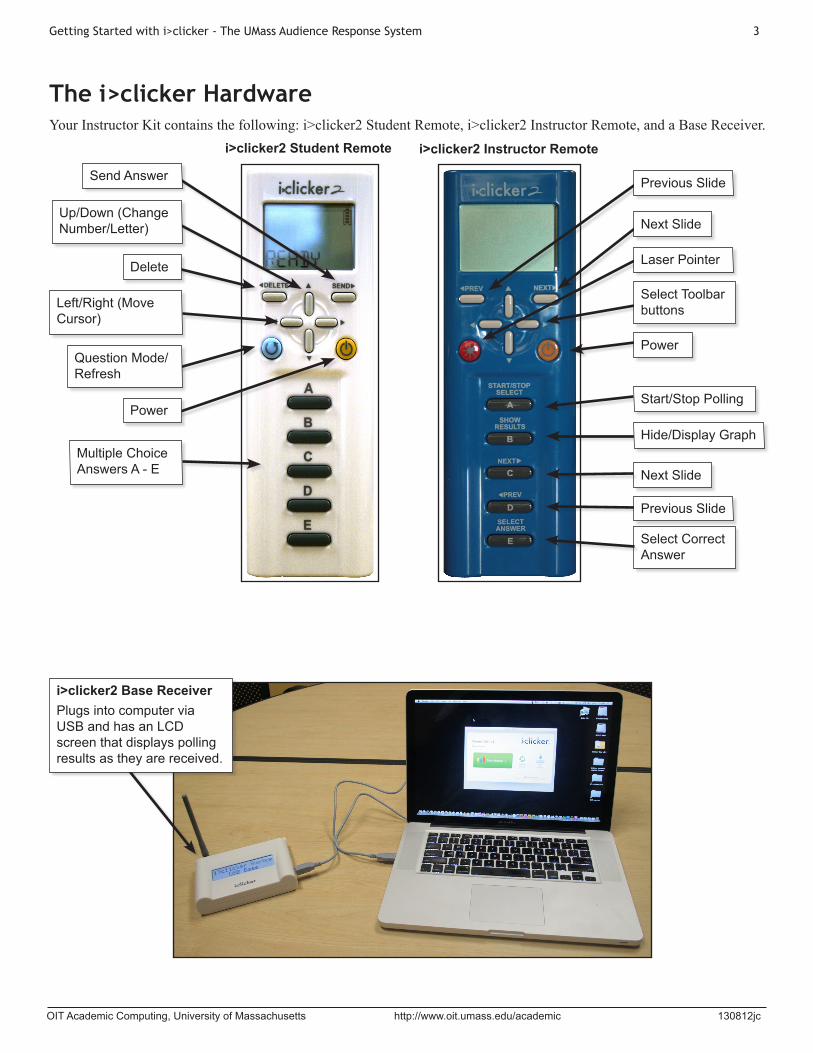
The i>clicker HardwareYour Instructor Kit contains the following: i>clicker2 Student Remote, i>clicker2 Instructor Remote, and a Base Receiver.
i>clicker2 Student Remote
Left/Right (Move Cursor)
i>clicker2 Instructor Remote
Multiple Choice Answers A - E
Select Correct Answer
Next Slide
Send Answer
Up/Down (Change Number/Letter)
Delete
Question Mode/Refresh
Power
i>clicker2 Base ReceiverPlugs into computer via USB and has an LCD screen that displays polling results as they are received.
Previous Slide
Hide/Display Graph
Start/Stop Polling
Power
Select Toolbar buttons
Laser Pointer
Next Slide
Previous Slide

Getting Started with i>clicker - The UMass Audience Response System 4
OIT Academic Computing, University of Massachusetts http://www.oit.umass.edu/academic 130812jc
Download & Run i>clicker1. Go to https://www.oit.umass.edu/software/iclicker and
download and unzip either the Windows or Mac version of the software.
2. Unzip and place the i>clicker software folder in an easy to find location on your computer (or on a USB drive).
3. Connect the i>clicker base receiver to your computer through a USB port.
4. Open the i>clicker folder that you unzipped and double-click the i>clicker application. (Consider placing an alias or shortcut on your desktop for easy access.) The Welcome to i>clicker window will open.
5. Click New (at bottom, left) to add a course to i>clicker. The New Course window will open.
6. On the New Course window enter your Course Name, Course Number, and Section Number, then click Create.
7. Repeat steps 5-6 to create as many courses or sections as you need. Once you have created your course(s) you are ready to start a session and begin polling.
i>clicker.app
Welcome to i>clicker window
New Course window
Tips:
• To be sure the base receiver has sufficient power, plug it directly into a computer. Do not connect it through a keyboard USB port or a non-powered USB hub.
• If you are running i>clicker from a flash drive, connect the i>clicker flash drive to the USB port on the back of the i>clicker base receiver.
Getting Started with i>clicker - The UMass Audience Response System 5
OIT Academic Computing, University of Massachusetts http://www.oit.umass.edu/academic 130812jc
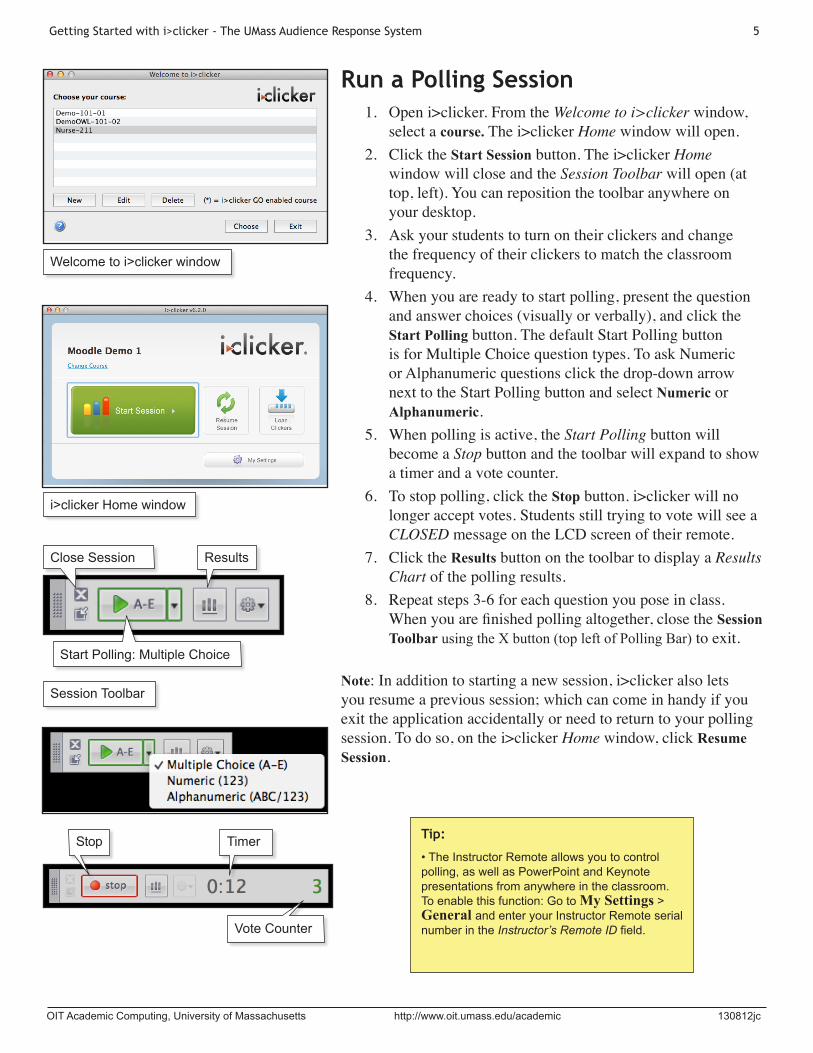
Run a Polling Session1. Open i>clicker. From the Welcome to i>clicker window,
select a course. The i>clicker Home window will open.2. Click the Start Session button. The i>clicker Home
window will close and the Session Toolbar will open (at top, left). You can reposition the toolbar anywhere on your desktop.
3. Ask your students to turn on their clickers and change the frequency of their clickers to match the classroom frequency.
4. When you are ready to start polling, present the question and answer choices (visually or verbally), and click the Start Polling button. The default Start Polling button is for Multiple Choice question types. To ask Numeric or Alphanumeric questions click the drop-down arrow next to the Start Polling button and select Numeric or Alphanumeric.
5. When polling is active, the Start Polling button will become a Stop button and the toolbar will expand to show a timer and a vote counter.
6. To stop polling, click the Stop button. i>clicker will no longer accept votes. Students still trying to vote will see a CLOSED message on the LCD screen of their remote.
7. Click the Results button on the toolbar to display a Results Chart of the polling results.
8. Repeat steps 3-6 for each question you pose in class. When you are finished polling altogether, close the Session Toolbar using the X button (top left of Polling Bar) to exit.
Note: In addition to starting a new session, i>clicker also lets you resume a previous session; which can come in handy if you exit the application accidentally or need to return to your polling session. To do so, on the i>clicker Home window, click Resume Session.
Tip:
• The Instructor Remote allows you to control polling, as well as PowerPoint and Keynote presentations from anywhere in the classroom. To enable this function: Go to My Settings > General and enter your Instructor Remote serial number in the Instructor’s Remote ID field.
Welcome to i>clicker window
i>clicker Home window
Session Toolbar
Close Session
Start Polling: Multiple Choice
Timer
Results
Stop
Vote Counter
Getting Started with i>clicker - The UMass Audience Response System 6
OIT Academic Computing, University of Massachusetts http://www.oit.umass.edu/academic 130812jc
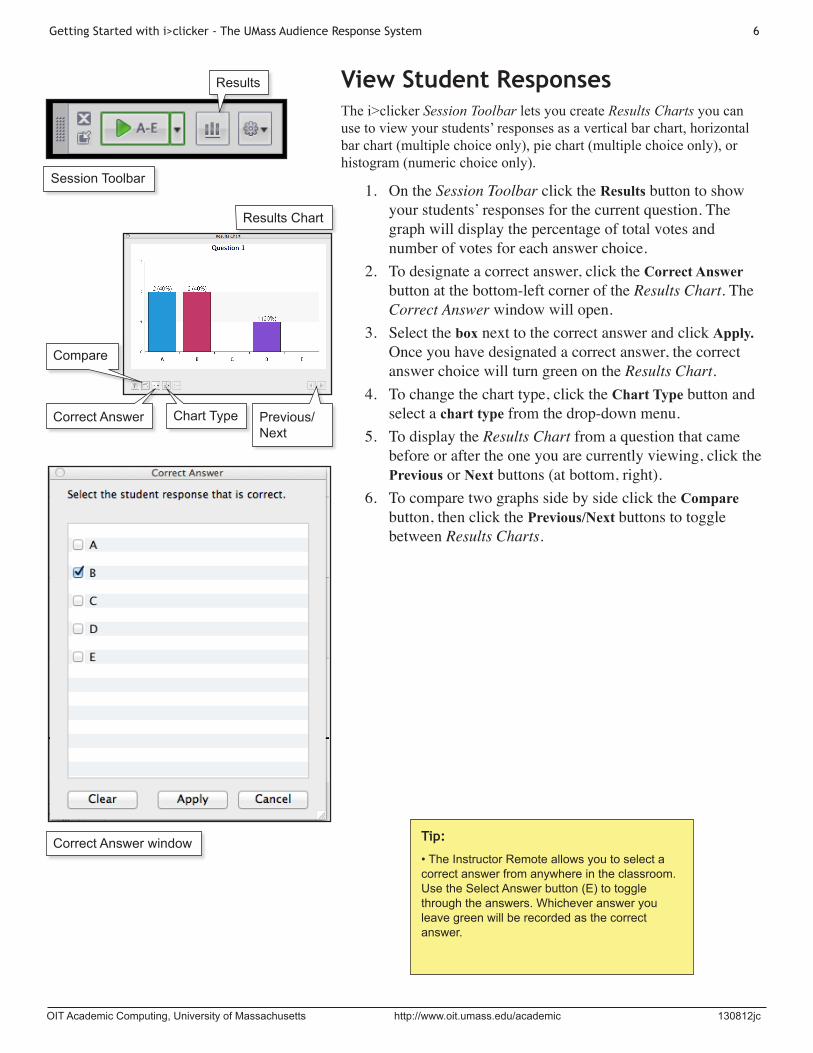
View Student ResponsesThe i>clicker Session Toolbar lets you create Results Charts you can use to view your students’ responses as a vertical bar chart, horizontal bar chart (multiple choice only), pie chart (multiple choice only), or histogram (numeric choice only).
1. On the Session Toolbar click the Results button to show your students’ responses for the current question. The graph will display the percentage of total votes and number of votes for each answer choice.
2. To designate a correct answer, click the Correct Answer button at the bottom-left corner of the Results Chart. The Correct Answer window will open.
3. Select the box next to the correct answer and click Apply. Once you have designated a correct answer, the correct answer choice will turn green on the Results Chart.
4. To change the chart type, click the Chart Type button and select a chart type from the drop-down menu.
5. To display the Results Chart from a question that came before or after the one you are currently viewing, click the Previous or Next buttons (at bottom, right).
6. To compare two graphs side by side click the Compare button, then click the Previous/Next buttons to toggle between Results Charts.
Session Toolbar
Results Chart
Results
Chart Type Previous/Next
Correct Answer
Compare
Correct Answer window Tip:
• The Instructor Remote allows you to select a correct answer from anywhere in the classroom. Use the Select Answer button (E) to toggle through the answers. Whichever answer you leave green will be recorded as the correct answer.
Getting Started with i>clicker - The UMass Audience Response System 7
OIT Academic Computing, University of Massachusetts http://www.oit.umass.edu/academic 130812jc
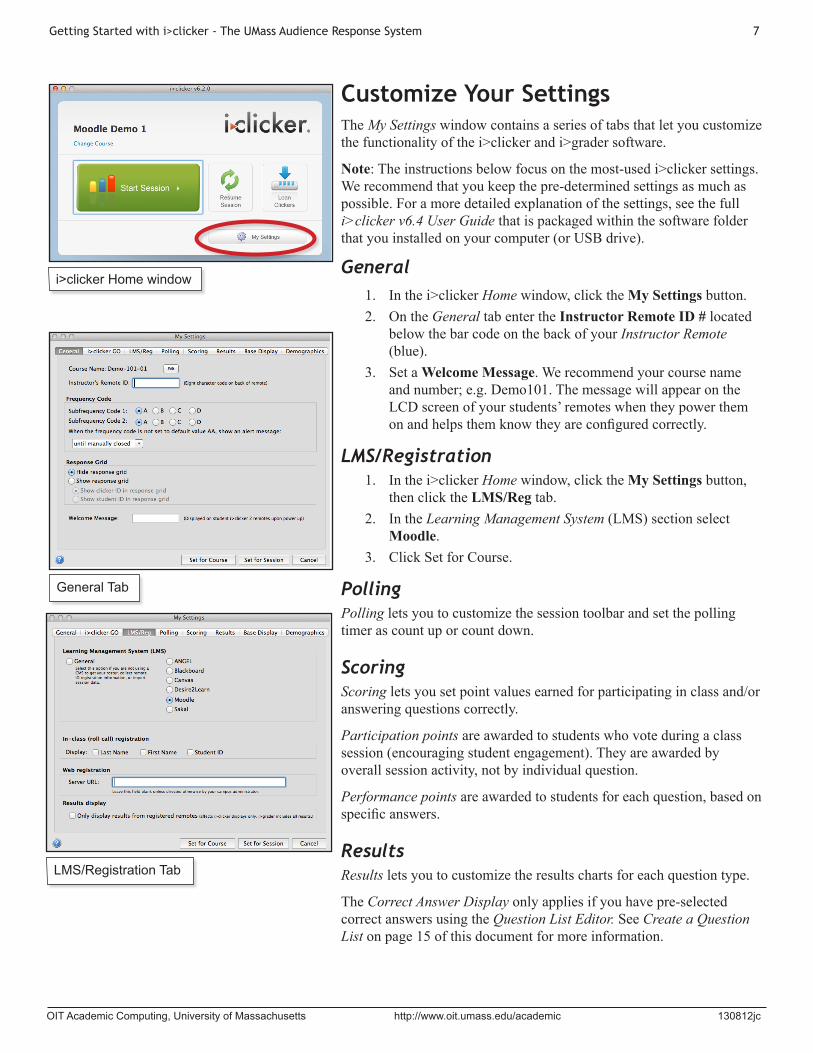
Customize Your SettingsThe My Settings window contains a series of tabs that let you customize the functionality of the i>clicker and i>grader software.
Note: The instructions below focus on the most-used i>clicker settings. We recommend that you keep the pre-determined settings as much as possible. For a more detailed explanation of the settings, see the full i>clicker v6.4 User Guide that is packaged within the software folder that you installed on your computer (or USB drive).
General1. In the i>clicker Home window, click the My Settings button.2. On the General tab enter the Instructor Remote ID # located
below the bar code on the back of your Instructor Remote (blue).
3. Set a Welcome Message. We recommend your course name and number; e.g. Demo101. The message will appear on the LCD screen of your students’ remotes when they power them on and helps them know they are configured correctly.
LMS/Registration1. In the i>clicker Home window, click the My Settings button,
then click the LMS/Reg tab.2. In the Learning Management System (LMS) section select
Moodle.3. Click Set for Course.
PollingPolling lets you to customize the session toolbar and set the polling timer as count up or count down.
ScoringScoring lets you set point values earned for participating in class and/or answering questions correctly.
Participation points are awarded to students who vote during a class session (encouraging student engagement). They are awarded by overall session activity, not by individual question.
Performance points are awarded to students for each question, based on specific answers.
ResultsResults lets you to customize the results charts for each question type.
The Correct Answer Display only applies if you have pre-selected correct answers using the Question List Editor. See Create a Question List on page 15 of this document for more information.
General Tab
LMS/Registration Tab
i>clicker Home window
Getting Started with i>clicker - The UMass Audience Response System 8
OIT Academic Computing, University of Massachusetts http://www.oit.umass.edu/academic 130812jc
Base DisplayBase Display lets you to customize the base receiver LCD display. During polling, i>clicker responses are shown on the base receiver LCD screen in real-time. The LCD display is useful in situations when you want to see how your audience is responding but don’t want to make the results viewable to everyone.
Demographicsi>clicker includes the option to collect student demographic data. This data can be used in class to filter (slice) student polling results. The Demographics settings allow you to select, edit, create, and import demographic questions.
For a detailed explanation on how to set-up and ask Demographics questions in class see Create and Utilize Demographics on page 18 of this handout.
Getting Started with i>clicker - The UMass Audience Response System 9
OIT Academic Computing, University of Massachusetts http://www.oit.umass.edu/academic 130812jc
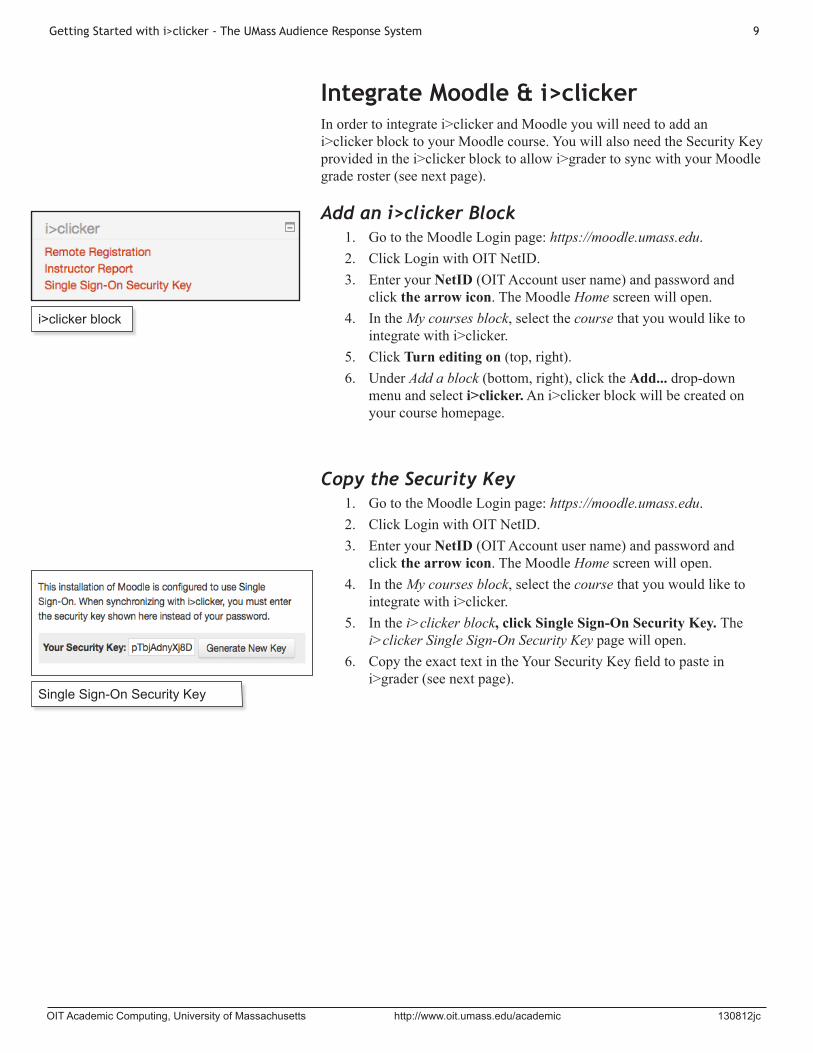
Integrate Moodle & i>clickerIn order to integrate i>clicker and Moodle you will need to add an i>clicker block to your Moodle course. You will also need the Security Key provided in the i>clicker block to allow i>grader to sync with your Moodle grade roster (see next page).
Add an i>clicker Block1. Go to the Moodle Login page: https://moodle.umass.edu.2. Click Login with OIT NetID.3. Enter your NetID (OIT Account user name) and password and
click the arrow icon. The Moodle Home screen will open.4. In the My courses block, select the course that you would like to
integrate with i>clicker.5. Click Turn editing on (top, right).6. Under Add a block (bottom, right), click the Add... drop-down
menu and select i>clicker. An i>clicker block will be created on your course homepage.
Copy the Security Key1. Go to the Moodle Login page: https://moodle.umass.edu.2. Click Login with OIT NetID.3. Enter your NetID (OIT Account user name) and password and
click the arrow icon. The Moodle Home screen will open.4. In the My courses block, select the course that you would like to
integrate with i>clicker.5. In the i>clicker block, click Single Sign-On Security Key. The
i>clicker Single Sign-On Security Key page will open.6. Copy the exact text in the Your Security Key field to paste in
i>grader (see next page).
Single Sign-On Security Key
i>clicker block

Getting Started with i>clicker - The UMass Audience Response System 10
OIT Academic Computing, University of Massachusetts http://www.oit.umass.edu/academic 130812jc
Import a Moodle Roster to i>graderi>grader is i>clicker’s built-in gradebook. It lets you review, edit, and export your polling sessions, questions, and student data. You will need to sync your Moodle roster with i>grader to associate polling data with specific students.
1. Open your i>clicker software folder and double-click the i>grader application. (Consider creating an alias or shortcut for it on your desktop for easy access.) The Welcome to i>grader window will open.
2. Select your course and click Choose. The i>grader Home screen will open.
3. If this is the first time you have opened i>grader, you will be prompted to download your roster. Click Download Roster to download it. If this is not the first time you have opened i>grader, you will need to click the Sync button and confirm the roster download by clicking Yes. The Log in to your Course Management System window will open.
4. On the Log in to your Course Management System window, in the CMS Username field, enter your OIT NetID. (You do not need to enter your OIT password.) In the Security Key field, paste the security key you copied from the i>clicker block in Moodle (see previous page). Then click Log In.
5. In the Select your course window, choose your course from the drop-down menu and click Import Roster. When the download has finished, the Download Complete window will open. Click Restart i>grader.
6. Once you have imported your course roster, you will see a list of students in the left-most column and a list of your polling sessions will appear across the top row of the results table. Select the drop-down menu directly above the column name to view the students by Student ID or by last name.
Each Session Column on the i>grader Home window will be labeled by polling session date. If you conduct two sessions on the same day, they will appear separately on the main i>grader screen. If you choose Resume Session from the i>clicker Home window, the resumed polling data will be added to the previous session.
The example at left indicates three sessions that were held on August 6th and one session on August 7th. Of the student names that appear in column at left, five did not register their clickers (Tessler, Tremblay, Turre, Wrigley, and Zussman—noted in red), one did register his clicker (Zinn—noted in black). The four remote IDs at the bottom of the list belong to students who have participated in polling sessions but not yet registered their clickers.
Moodle Roster not found prompt
Download roster with Sync button
Log in to your Course Management System
i>grader Home window (Roster)
Getting Started with i>clicker - The UMass Audience Response System 11
OIT Academic Computing, University of Massachusetts http://www.oit.umass.edu/academic 130812jc
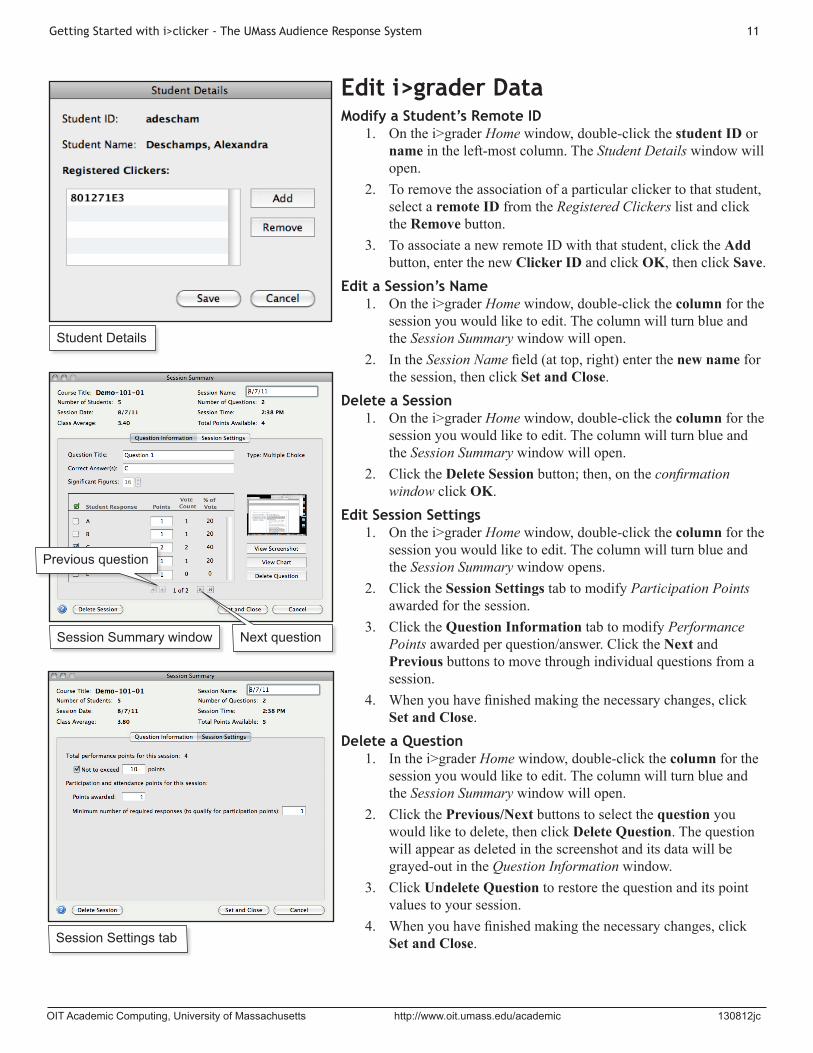
Edit i>grader DataModify a Student’s Remote ID
1. On the i>grader Home window, double-click the student ID or name in the left-most column. The Student Details window will open.
2. To remove the association of a particular clicker to that student, select a remote ID from the Registered Clickers list and click the Remove button.
3. To associate a new remote ID with that student, click the Add button, enter the new Clicker ID and click OK, then click Save.
Edit a Session’s Name1. On the i>grader Home window, double-click the column for the
session you would like to edit. The column will turn blue and the Session Summary window will open.
2. In the Session Name field (at top, right) enter the new name for the session, then click Set and Close.
Delete a Session1. On the i>grader Home window, double-click the column for the
session you would like to edit. The column will turn blue and the Session Summary window will open.
2. Click the Delete Session button; then, on the confirmation window click OK.
Edit Session Settings1. On the i>grader Home window, double-click the column for the
session you would like to edit. The column will turn blue and the Session Summary window opens.
2. Click the Session Settings tab to modify Participation Points awarded for the session.
3. Click the Question Information tab to modify Performance Points awarded per question/answer. Click the Next and Previous buttons to move through individual questions from a session.
4. When you have finished making the necessary changes, click Set and Close.
Delete a Question1. In the i>grader Home window, double-click the column for the
session you would like to edit. The column will turn blue and the Session Summary window will open.
2. Click the Previous/Next buttons to select the question you would like to delete, then click Delete Question. The question will appear as deleted in the screenshot and its data will be grayed-out in the Question Information window.
3. Click Undelete Question to restore the question and its point values to your session.
4. When you have finished making the necessary changes, click Set and Close.
Student Details
Session Summary window
Session Settings tab
Next question
Previous question
Getting Started with i>clicker - The UMass Audience Response System 12
OIT Academic Computing, University of Massachusetts http://www.oit.umass.edu/academic 130812jc
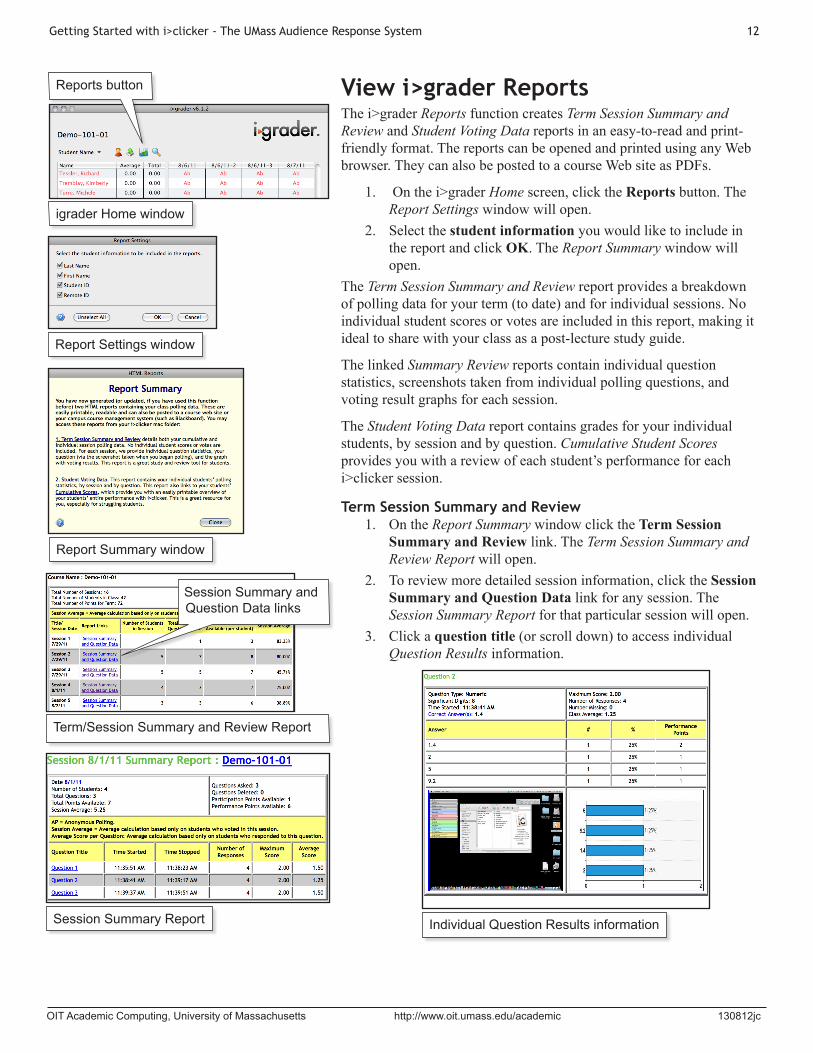
View i>grader ReportsThe i>grader Reports function creates Term Session Summary and Review and Student Voting Data reports in an easy-to-read and print-friendly format. The reports can be opened and printed using any Web browser. They can also be posted to a course Web site as PDFs.
1. On the i>grader Home screen, click the Reports button. The Report Settings window will open.
2. Select the student information you would like to include in the report and click OK. The Report Summary window will open.
The Term Session Summary and Review report provides a breakdown of polling data for your term (to date) and for individual sessions. No individual student scores or votes are included in this report, making it ideal to share with your class as a post-lecture study guide.
The linked Summary Review reports contain individual question statistics, screenshots taken from individual polling questions, and voting result graphs for each session.
The Student Voting Data report contains grades for your individual students, by session and by question. Cumulative Student Scores provides you with a review of each student’s performance for each i>clicker session.
Term Session Summary and Review1. On the Report Summary window click the Term Session
Summary and Review link. The Term Session Summary and Review Report will open.
2. To review more detailed session information, click the Session Summary and Question Data link for any session. The Session Summary Report for that particular session will open.
3. Click a question title (or scroll down) to access individual Question Results information.
Reports button
igrader Home window
Report Settings window
Report Summary window
Individual Question Results informationSession Summary Report
Term/Session Summary and Review Report
Session Summary and Question Data links
Getting Started with i>clicker - The UMass Audience Response System 13
OIT Academic Computing, University of Massachusetts http://www.oit.umass.edu/academic 130812jc
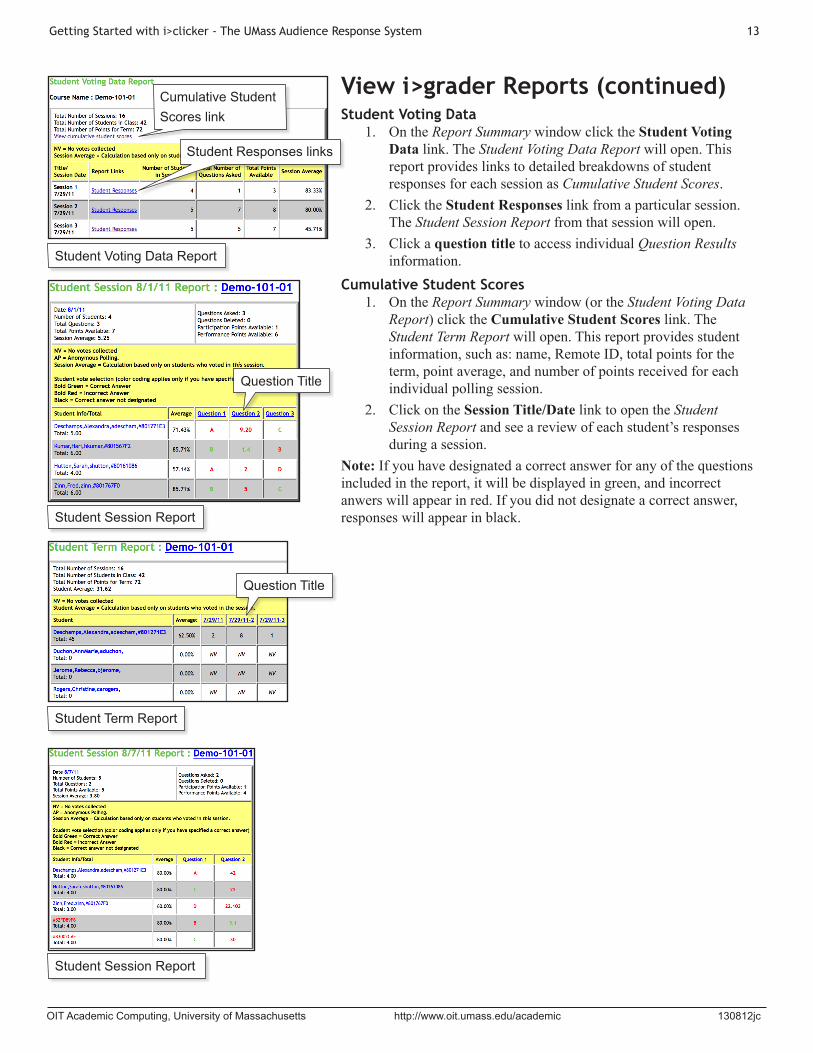
View i>grader Reports (continued)Student Voting Data
1. On the Report Summary window click the Student Voting Data link. The Student Voting Data Report will open. This report provides links to detailed breakdowns of student responses for each session as Cumulative Student Scores.
2. Click the Student Responses link from a particular session. The Student Session Report from that session will open.
3. Click a question title to access individual Question Results information.
Cumulative Student Scores1. On the Report Summary window (or the Student Voting Data
Report) click the Cumulative Student Scores link. The Student Term Report will open. This report provides student information, such as: name, Remote ID, total points for the term, point average, and number of points received for each individual polling session.
2. Click on the Session Title/Date link to open the Student Session Report and see a review of each student’s responses during a session.
Note: If you have designated a correct answer for any of the questions included in the report, it will be displayed in green, and incorrect anwers will appear in red. If you did not designate a correct answer, responses will appear in black.
Student Voting Data Report
Student Session Report
Student Term Report
Student Session Report
Student Responses links
Cumulative StudentScores link
Question Title
Question Title
Getting Started with i>clicker - The UMass Audience Response System 14
OIT Academic Computing, University of Massachusetts http://www.oit.umass.edu/academic 130812jc
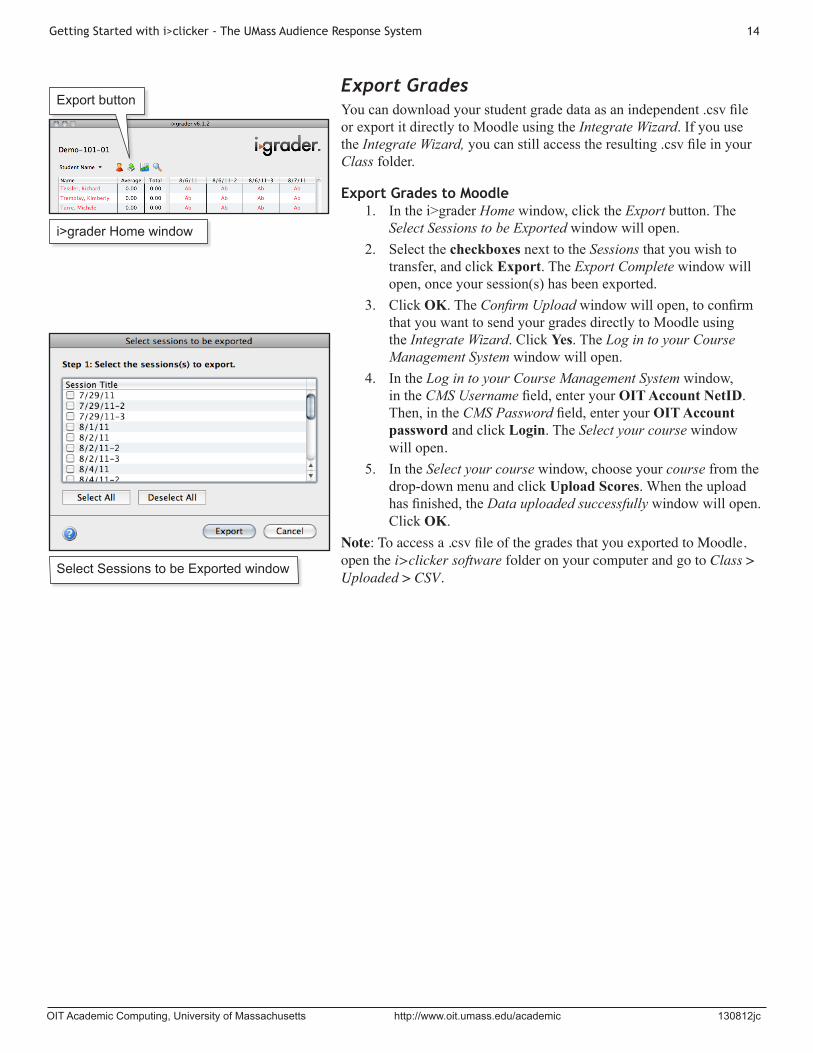
Export GradesYou can download your student grade data as an independent .csv file or export it directly to Moodle using the Integrate Wizard. If you use the Integrate Wizard, you can still access the resulting .csv file in your Class folder.
Export Grades to Moodle1. In the i>grader Home window, click the Export button. The
Select Sessions to be Exported window will open. 2. Select the checkboxes next to the Sessions that you wish to
transfer, and click Export. The Export Complete window will open, once your session(s) has been exported.
3. Click OK. The Confirm Upload window will open, to confirm that you want to send your grades directly to Moodle using the Integrate Wizard. Click Yes. The Log in to your Course Management System window will open.
4. In the Log in to your Course Management System window, in the CMS Username field, enter your OIT Account NetID. Then, in the CMS Password field, enter your OIT Account password and click Login. The Select your course window will open.
5. In the Select your course window, choose your course from the drop-down menu and click Upload Scores. When the upload has finished, the Data uploaded successfully window will open. Click OK.
Note: To access a .csv file of the grades that you exported to Moodle, open the i>clicker software folder on your computer and go to Class > Uploaded > CSV.
Export button
i>grader Home window
Select Sessions to be Exported window
Getting Started with i>clicker - The UMass Audience Response System 15
OIT Academic Computing, University of Massachusetts http://www.oit.umass.edu/academic 130812jc
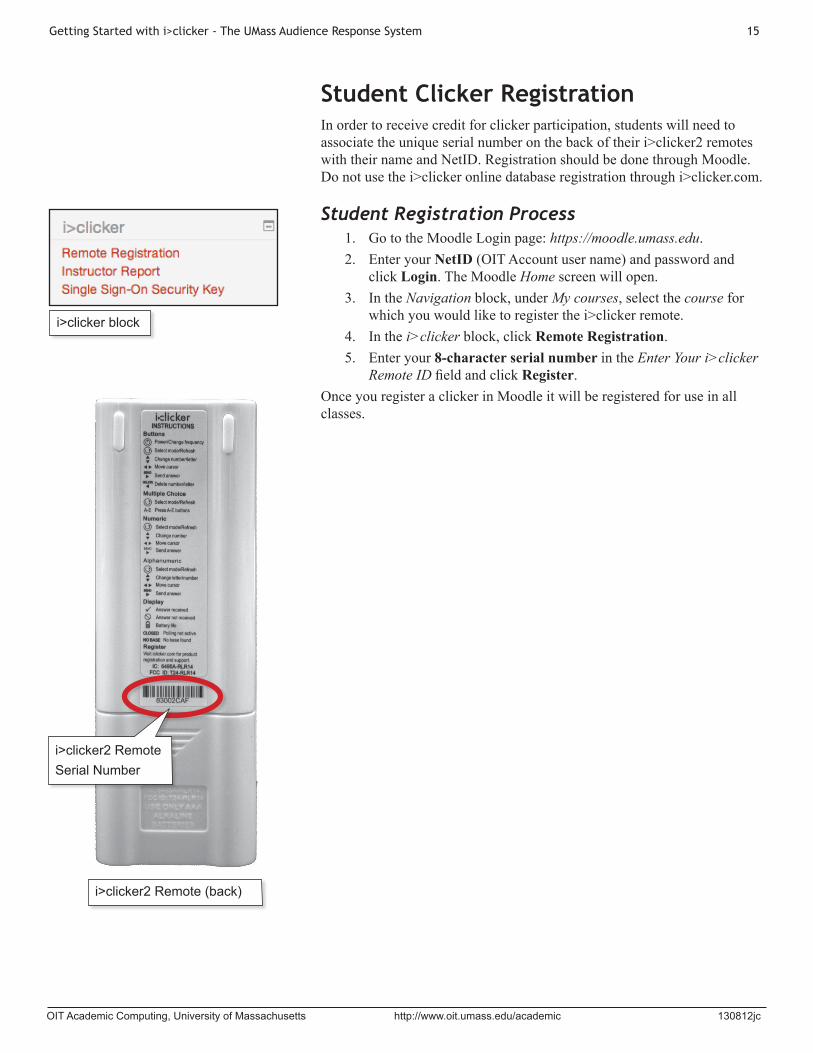
Student Clicker RegistrationIn order to receive credit for clicker participation, students will need to associate the unique serial number on the back of their i>clicker2 remotes with their name and NetID. Registration should be done through Moodle. Do not use the i>clicker online database registration through i>clicker.com.
Student Registration Process1. Go to the Moodle Login page: https://moodle.umass.edu.2. Enter your NetID (OIT Account user name) and password and
click Login. The Moodle Home screen will open.3. In the Navigation block, under My courses, select the course for
which you would like to register the i>clicker remote.4. In the i>clicker block, click Remote Registration.5. Enter your 8-character serial number in the Enter Your i>clicker
Remote ID field and click Register.Once you register a clicker in Moodle it will be registered for use in all classes.
i>clicker2 Remote (back)
i>clicker2 RemoteSerial Number
i>clicker block
Getting Started with i>clicker - The UMass Audience Response System 16
OIT Academic Computing, University of Massachusetts http://www.oit.umass.edu/academic 130812jc
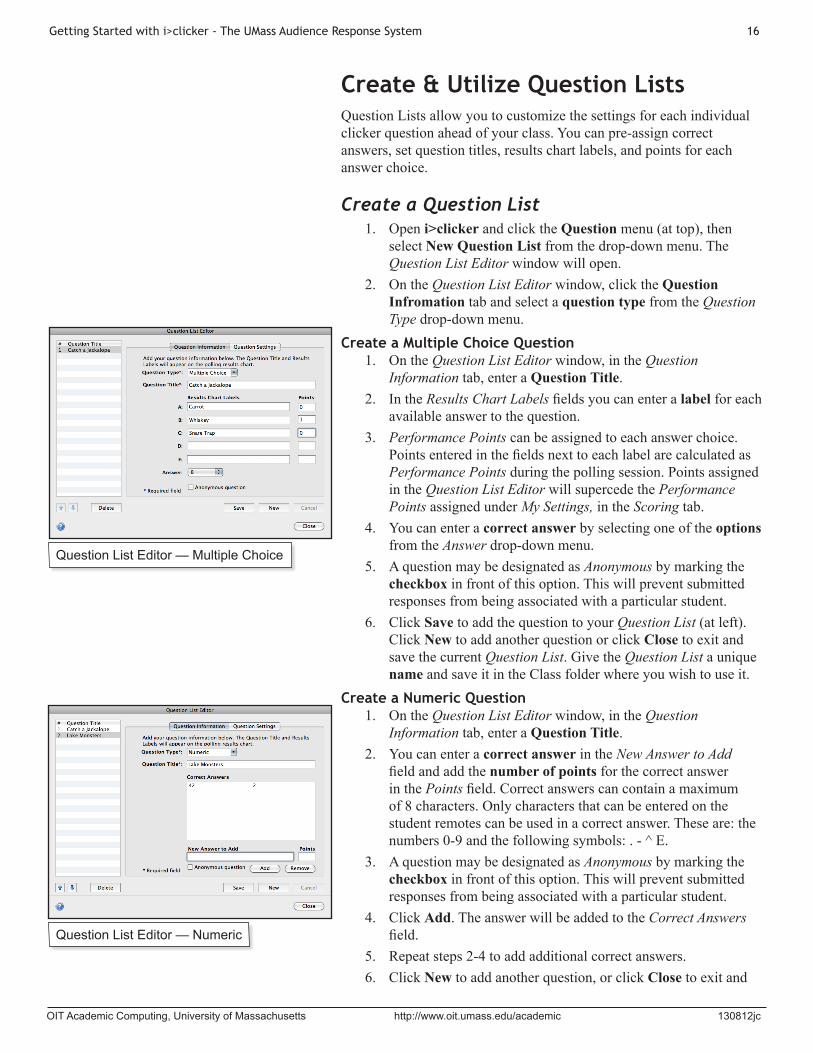
Create & Utilize Question ListsQuestion Lists allow you to customize the settings for each individual clicker question ahead of your class. You can pre-assign correct answers, set question titles, results chart labels, and points for each answer choice.
Create a Question List1. Open i>clicker and click the Question menu (at top), then
select New Question List from the drop-down menu. The Question List Editor window will open.
2. On the Question List Editor window, click the Question Infromation tab and select a question type from the Question Type drop-down menu.
Create a Multiple Choice Question1. On the Question List Editor window, in the Question
Information tab, enter a Question Title.2. In the Results Chart Labels fields you can enter a label for each
available answer to the question.3. Performance Points can be assigned to each answer choice.
Points entered in the fields next to each label are calculated as Performance Points during the polling session. Points assigned in the Question List Editor will supercede the Performance Points assigned under My Settings, in the Scoring tab.
4. You can enter a correct answer by selecting one of the options from the Answer drop-down menu.
5. A question may be designated as Anonymous by marking the checkbox in front of this option. This will prevent submitted responses from being associated with a particular student.
6. Click Save to add the question to your Question List (at left). Click New to add another question or click Close to exit and save the current Question List. Give the Question List a unique name and save it in the Class folder where you wish to use it.
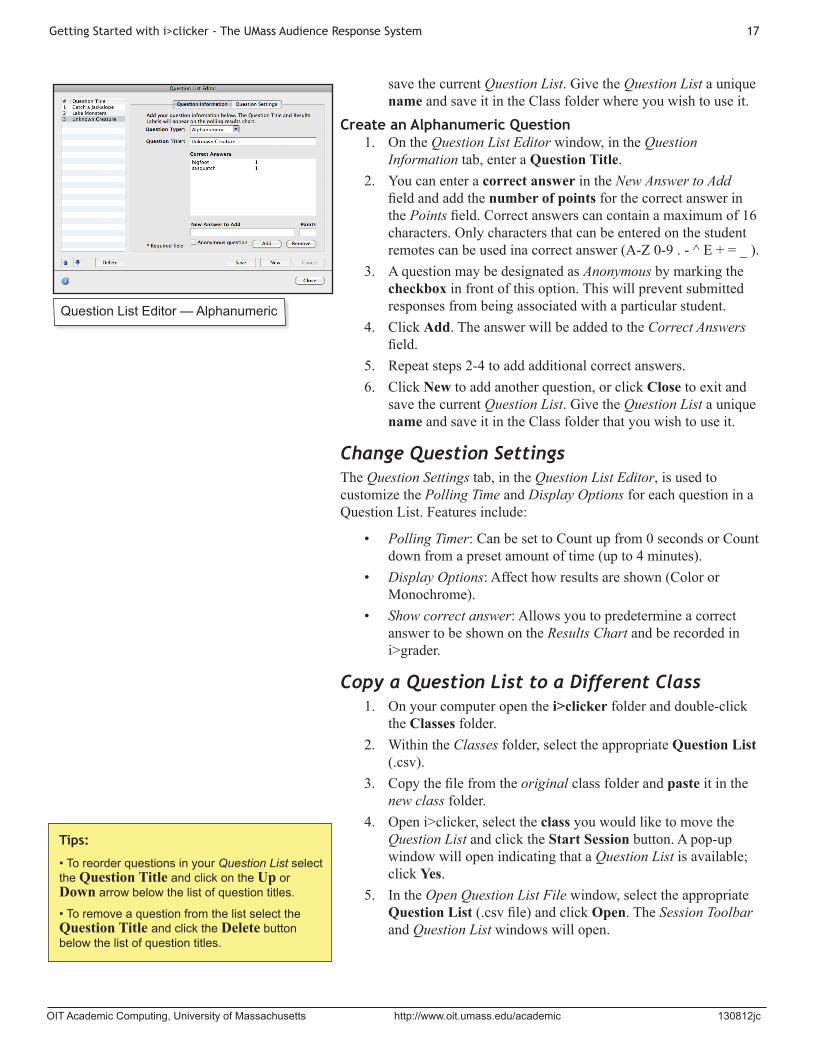
Create a Numeric Question1. On the Question List Editor window, in the Question
Information tab, enter a Question Title.2. You can enter a correct answer in the New Answer to Add
field and add the number of points for the correct answer in the Points field. Correct answers can contain a maximum of 8 characters. Only characters that can be entered on the student remotes can be used in a correct answer. These are: the numbers 0-9 and the following symbols: . - ^ E.
3. A question may be designated as Anonymous by marking the checkbox in front of this option. This will prevent submitted responses from being associated with a particular student.
4. Click Add. The answer will be added to the Correct Answers field.
5. Repeat steps 2-4 to add additional correct answers.6. Click New to add another question, or click Close to exit and
Question List Editor — Multiple Choice
Question List Editor — Numeric
Getting Started with i>clicker - The UMass Audience Response System 17
OIT Academic Computing, University of Massachusetts http://www.oit.umass.edu/academic 130812jc
save the current Question List. Give the Question List a unique name and save it in the Class folder where you wish to use it.
Create an Alphanumeric Question1. On the Question List Editor window, in the Question
Information tab, enter a Question Title.2. You can enter a correct answer in the New Answer to Add
field and add the number of points for the correct answer in the Points field. Correct answers can contain a maximum of 16 characters. Only characters that can be entered on the student remotes can be used ina correct answer (A-Z 0-9 . - ^ E + = _ ).
3. A question may be designated as Anonymous by marking the checkbox in front of this option. This will prevent submitted responses from being associated with a particular student.
4. Click Add. The answer will be added to the Correct Answers field.
5. Repeat steps 2-4 to add additional correct answers.6. Click New to add another question, or click Close to exit and
save the current Question List. Give the Question List a unique name and save it in the Class folder that you wish to use it.
Change Question SettingsThe Question Settings tab, in the Question List Editor, is used to customize the Polling Time and Display Options for each question in a Question List. Features include:
• Polling Timer: Can be set to Count up from 0 seconds or Count down from a preset amount of time (up to 4 minutes).
• Display Options: Affect how results are shown (Color or Monochrome).
• Show correct answer: Allows you to predetermine a correct answer to be shown on the Results Chart and be recorded in i>grader.
Copy a Question List to a Different Class1. On your computer open the i>clicker folder and double-click
the Classes folder.2. Within the Classes folder, select the appropriate Question List
(.csv).3. Copy the file from the original class folder and paste it in the
new class folder.4. Open i>clicker, select the class you would like to move the
Question List and click the Start Session button. A pop-up window will open indicating that a Question List is available; click Yes.
5. In the Open Question List File window, select the appropriate Question List (.csv file) and click Open. The Session Toolbar and Question List windows will open.
Question List Editor — Alphanumeric
Tips:
• To reorder questions in your Question List select the Question Title and click on the Up or Down arrow below the list of question titles.
• To remove a question from the list select the Question Title and click the Delete button below the list of question titles.
Getting Started with i>clicker - The UMass Audience Response System 18
OIT Academic Computing, University of Massachusetts http://www.oit.umass.edu/academic 130812jc
Edit a Question List1. Open i>clicker and click the Question menu (at top), then
select Open Question List from the drop-down menu. The Open Question List File window will open.
2. Select the Question List (.csv file) that you would like to edit and click Open. The Question List Editor will open with the Question Title information shown in the left display window.
3. Select a Question Title to edit.4. Make any changes to the question in the Question Information
and Question Settings tabs. You can edit questions, reorder questions, delete questions, and add new questions.
5. Click the Close button to return to the i>clicker Home window.
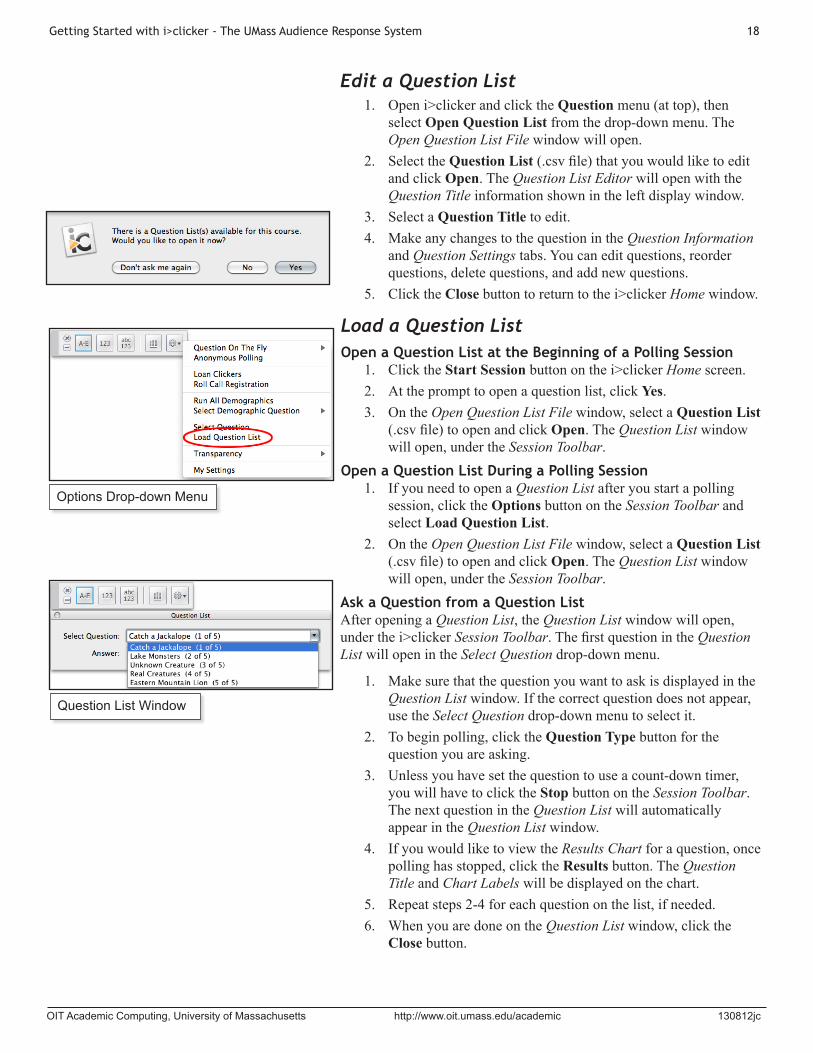
Load a Question ListOpen a Question List at the Beginning of a Polling Session
1. Click the Start Session button on the i>clicker Home screen.2. At the prompt to open a question list, click Yes.3. On the Open Question List File window, select a Question List
(.csv file) to open and click Open. The Question List window will open, under the Session Toolbar.
Open a Question List During a Polling Session1. If you need to open a Question List after you start a polling
session, click the Options button on the Session Toolbar and select Load Question List.
2. On the Open Question List File window, select a Question List (.csv file) to open and click Open. The Question List window will open, under the Session Toolbar.
Ask a Question from a Question ListAfter opening a Question List, the Question List window will open, under the i>clicker Session Toolbar. The first question in the Question List will open in the Select Question drop-down menu.
1. Make sure that the question you want to ask is displayed in the Question List window. If the correct question does not appear, use the Select Question drop-down menu to select it.
2. To begin polling, click the Question Type button for the question you are asking.
3. Unless you have set the question to use a count-down timer, you will have to click the Stop button on the Session Toolbar. The next question in the Question List will automatically appear in the Question List window.
4. If you would like to view the Results Chart for a question, once polling has stopped, click the Results button. The Question Title and Chart Labels will be displayed on the chart.
5. Repeat steps 2-4 for each question on the list, if needed.6. When you are done on the Question List window, click the
Close button.
Options Drop-down Menu
Question List Window

Getting Started with i>clicker - The UMass Audience Response System 19
OIT Academic Computing, University of Massachusetts http://www.oit.umass.edu/academic 130812jc
Create & Utilize Demographics
Select Demographic QuestionsThe first step in collecting student demographic data is to select the demographic questions that you would like to use in a particular class. i>clicker includes a list of common demographic questions from which to choose. You may also add your own questions to the list or edit any of the provided questions.
To select demographics questions from the list:
1. Open i>clicker and click the My Settings button.2. On the My Settings window, click the Demographics tab.3. Click a question title in the Available question list, then
click the Right Arrow button to move the question into the Selected questions list.
4. Repeat steps 1-3 until you have selected all of the demographics questions that you would like to ask in class.
5. To change the order that your selected questions will be asked in class, click the Move Up and Move Down buttons.
6. If you need to remove a question from the Selected questions list, select the question title and click the Left Arrow button.
7. If you wish to automatically advance the questions when you start a demographic polling session, select the Auto Advance checkbox and select the amount of time that each question should appear on screen.
8. Click Set for Course to save your edits and exit.
Add a New Demographic Question1. In the My Settings > Demographics window, under the
Available questions list, click New. The Demographics Editor window will open.
2. On the Demographics Editor window enter a Question Title, Question, and up to five answer choices.
3. Click Save to add only one question or Save and New to add more than one question.
4. Click Close to exit.
Edit a Demographic Question1. In the My Settings > Demographics window, click the Edit
button under the Available questions list. The Demographics Editor window will open.
2. On the Demographics Editor window, edit the Question Title, Question, or any of the answer choices.
3. Click Save. Your edits will be saved and the Demographics Editor window will close.
Demographics Tab
Demographics Editor window
Tips:
• To view or edit a question, select the question title in the Available questions list and click Edit.• Any question can be created as a demographics question. Demographic questions are labeled as such simply because this is their most likely use.

Getting Started with i>clicker - The UMass Audience Response System 20
OIT Academic Computing, University of Massachusetts http://www.oit.umass.edu/academic 130812jc
Collect Demographic DataOnce you have created a demographic questions list, you can compile student demographic data by collecting student responses in class. You can ask demographic questions all at once or individually.
Run All Demographic Questions1. In the i>clicker Home window, click the green Start Session
button to start an i>clicker session.2. On the i>clicker Session Toolbar, click the Options button.3. From the menu options, click Run All Demographics.4. The first demographic question will open in the Question
Viewer window and polling will begin. Students can answer each demographic question by pressing A-E on their remotes.
5. When all students have answered the question, click the Stop button on the Session Toolbar. Polling is stopped for the question and the next question will be displayed. Repeat this process until all questions have been answered.
Please note:
• If you selected Auto Advance when customizing your demographic questions, you do not need to click the start and stop buttons. After time runs out for each question, i>clicker will automatically advance to the next, then continue until all of them have been answered.
• We recommend that you use Auto Advance when running demographics questions.
• You may ask demographic questions at any time; each time you ask, older demographic data will be overwritten by the new answers.
Ask a Single Demographic Question1. On the i>clicker Home window, click the green Start
Session button to start an i>clicker session.2. On the i>clicker Session Toolbar, click the Options button,
choose Select Demographic Question, and select the question title of the demographic question you would like to ask. The selected question will appear in the Question Viewer window and polling will begin.
3. Click the Stop button to end polling for that question. The Question Viewer window will close.
Session Toolbar
Run All Demographics
Select a Demographic Question
Options

Getting Started with i>clicker - The UMass Audience Response System 21
OIT Academic Computing, University of Massachusetts http://www.oit.umass.edu/academic 130812jc
Filter Student Polling Results by Demographics1. In the i>clicker Home window, click the green Start Session
button to start an i>clicker session.2. Conduct a poll as described in the Run a Polling Session
instructions on page 5 of this document.3. Once you have completed your poll, on the Session Toolbar,
click the Results button to display the Results Chart.4. On the Results Chart, click the Filter button (at bottom,
left) and select a demographic question from your list.5. The Results Chart will reload according to responses
to the demographic question you selected. The filtered data will appear as a stacked bar chart.
Note: You can click the Compare button on the Results Chart to view more than one filtered chart at a time.
Filter Compare
Results Chart — Question 1 Filtered by GenderResults Chart — Select aDemographic Question
Getting Started with i>clicker - The UMass Audience Response System 22
OIT Academic Computing, University of Massachusetts http://www.oit.umass.edu/academic 130812jc
i>clicker Support for Faculty
i>clicker Technical SupportProvided by i>clicker for higher education instructors.
• FAQs on the web — http://www.iclicker.com/support• Technical Support Center — toll free at 866-209-5698 or email to [email protected]• Online Training Tutorials — http://www.iclicker.com
Instructional Media LabA 205 LGRC (Lederle Lowrise) Open Mondays through Fridays 10am to 4pm 413-545-2823 Google Talk and Email: [email protected] AIM / Skype / Yahoo: instructoit
Center for Teaching and Faculty DevelopmentThe Center for Teaching and Faculty Development provides assistance in developing appropriate strategies for your classroom and course content.
http://www.umass.edu/ctfd/
Audience Response System BlogFor news and events related to clickers on the UMass Amherst campus:
http://blogs.umass.edu/ars/
i>clicker Support for Students
i>clicker Technical SupportProvided by i>clicker for higher education students.
• FAQs on the web — http://www.iclicker.com/support• Technical Support Center — toll free at 866-209-5698 or email to [email protected]• Online Training Tutorials — http://www.iclicker.com
UMass OIT Help Desk• OIT Help Desk staff are available for telephone and walk-in help.
413-545-9400 A109 LGRC 8:30 a.m. - 5:00 p.m., Monday - Friday
• You can also visit the Help Desk staff at the Learning Commons Lower Level, W.E.B. Du Bois Library See the Learning Commons Web Site (www.library.umass.edu/learningcommons/) for hours.