the typewriter repairmen - selectric typewriter museum · the typewriter repairmen 2009 national...
TRANSCRIPT

The Typewriter Repairmen ___ROV: Bob
Team Members:Jim Forbes, David Forbes, Steven Forbes, Janet Forbes
Team Website:http://www.selectric.org
Level:Adult team
Location:Sierra Vista, AZ
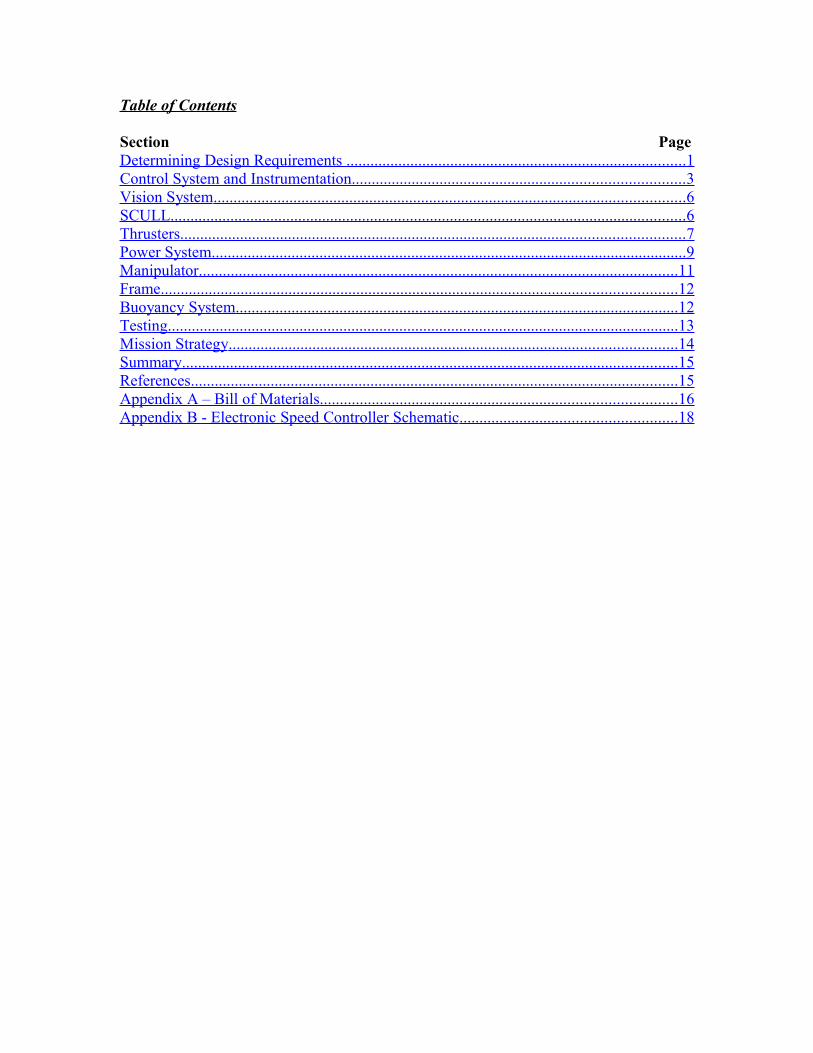
Table of Contents
Section PageDetermining Design Requirements ..................................................................................... 1 Control System and Instrumentation ................................................................................... 3 Vision System ...................................................................................................................... 6 SCULL ................................................................................................................................. 6 Thrusters .............................................................................................................................. 7 Power System ....................................................................................................................... 9 Manipulator ........................................................................................................................ 11 Frame ................................................................................................................................. 12 Buoyancy System ............................................................................................................... 12 Testing ................................................................................................................................ 13 Mission Strategy ................................................................................................................ 14 Summary ............................................................................................................................ 15 References .......................................................................................................................... 15 Appendix A – Bill of Materials ......................................................................................... 16 Appendix B - Electronic Speed Controller Schematic ...................................................... 18
Abstract
The Typewriter Repairmen robotics team designed and built an underwater Remotely Operated Vehicle for use in the 2009 National Underwater Robotics Challenge. The team analyzed the mission requirements, and designed a relatively small, robust, robot with all the necessary degrees of movement, a versatile vision system, a simple manipulator, and limited instrumentation. Cost, construction methods, and materials availability factors drove many of the design features. Reliability and maintainability were incorporated into the design. Team members used commercial software tools to model the mechanical and electronics designs, and learned new building techniques. The ROV operates on solar power, generated by a photovoltaic panel, and stored in sealed lead acid batteries. The ROV was tested extensively before the competition.

The Typewriter Repairmen 2009 National Underwater Robotics Challenge
Determining Design Requirements
We used a systems engineering approach to decide how to build the ROV. The first step was to carefully read the competition rules to determine the requirements for each task. They can be categorized by the type of robot action required to perform the task. The points attainable by each type of action can be summed and compared, as seen in Table 1.
Table 1 – Mission Points AllocationMission Task Locate Retrieve Other Action Sensory Total PointsAnchor 5 -- 10 -- 15Damaged ROV 5 -- 10 -- 15Work Lights 10 -- 10 -- 20Mooring Chain 10 -- 10 -- 20Scientific Package 5 15 35 -- 55Glacial Melt Flow 25 50 100 25 200Volcanic Vent 5 -- -- 75 80Core and Bact. Samples 50 114 -- -- 164
Total Points: 115 179 175 100 569
What became immediately obvious from our points allocation table is how many points could be achieved with a simple ROV with a high degree of mobility and visibility. Because these features are also required to complete the other tasks, it became our primary goal to have a very maneuverable ROV with sufficient lighting and cameras to give the pilot a good sense of the vehicle’s surroundings.
Because a large portion of the mission points can only be obtained with a retrieval device, the next most important design priority for the ROV is a gripping device capable of completing most of the manual tasks required of the robot. To keep the gripping mechanism as simple as possible, we planned for a single degree of freedom claw (requiring just one motor).
Sensors capable of measuring depth, temperature, and providing an audio signal provide the least return on points. Due to their relative ease of implementation, we made plans to provide an audio signal from the robot, implement a pressure sensor to calculate depth, and make use of a thermometer for the temperature measurement of the volcanic vent.
Brainstorming
Following determination of design priorities, the team “brainstormed” various design concepts. Some of the ideas considered were:
A torpedo type ROV with a single forward thruster, and fins for attitude adjustment. It would have a pump/bladder buoyancy system for quick submersion and surfacing, jet thrusters at the front for easy camera positioning, and a loosely attached manipulator with it’s own small thrusters to allow fine control for grasping objects. The camera would be behind a large dome at the front, mounted on gimbals.
Another drive design considered is a holonomic type with angled thrusters mounted in sewer pipe. This would allow driving in any direction as well as turning.
Page 1

The Typewriter Repairmen 2009 National Underwater Robotics Challenge
To keep the tether weight low, and provide good lighting and an overview of the ROV in action, we considered making a tender boat that would hold the ROV batteries, provide flood lighting, a downward looking camera, and possibly a winch for a short tether to the ROV.
Various construction methods were considered, including using ABS sewer pipe, aluminum tube, and modular construction with light/thrust modules.
Final Design
After much consideration, we decided to make an ROV with a basic design concept that resembles some commercial ones. The main design requirements are high maneuverability and good vision, so the ROV must have powerful forward and vertical thrusters, but it also needs to be able to steer and move sideways. This means that the forward thrusters should be mounted on the sides and be controlled independently, to provide steering torque. Side movement without turning is called strafing, and requires a lower power thruster mounted in the center of the ROV, pointed to the side. This drive setup gives full control of the ROV.
Vision is a vital part of the ROV, and having great vision requires both a camera that can see all around, and plenty of light. Since the ROV can drive in all directions, but stays right side up and mostly level at all times, a forward looking camera cannot see what is below. One solution is to let the camera tilt downward, but this requires a dome of some type. Since the ROV can easily turn to see what is around the sides, the camera and dome don’t need to allow panning action or vision, only tilting. An easy way to make a “dome” that only works for tilting is to use a clear tube, placed horizontally.
The vision requirements for the mission include both searching for things, and working with things. Searching requires a bright light with a long range, but working with things requires a more gentle, distributed light that will not overpower the camera. The light only needs to be aimed at what the camera can see, so the light can be mounted to the camera tilt mechanism. This reduces the amount of light needed, compared to using stationary lights.
The parts of the ROV need to be held together in a way that puts weight down low for stability, provides as little drag as possible to reduce thrust requirements, is strong, and can be easily fabricated and modified. Structural steel satisfies all these requirements.
The final ROV concept is pictured in Figure 1. The electronic control system is housed in a clear cylindrical compartment at the front of the robot. It also holds a pivoting structure that holds two cameras to provide stereoscopic vision, and for redundancy if one fails. Mounted with the cameras are a high power halogen spotlight
Page 2
Figure 1 – ROV Concept
The Typewriter Repairmen 2009 National Underwater Robotics Challenge
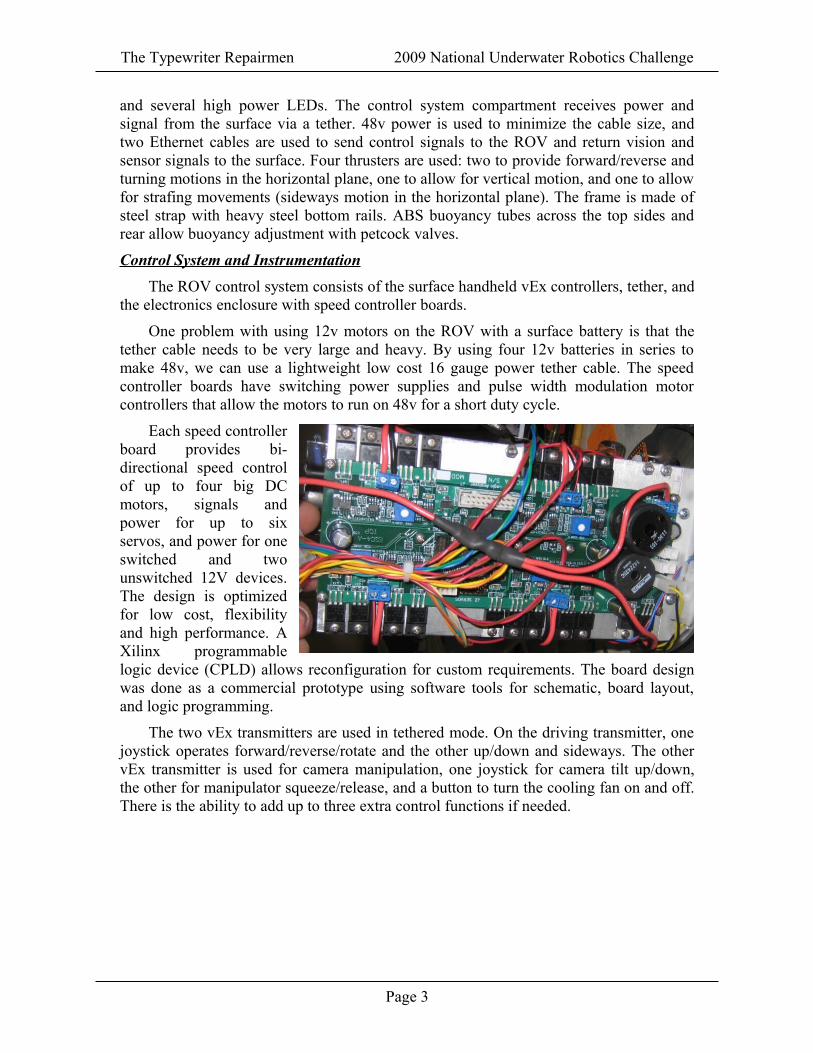
and several high power LEDs. The control system compartment receives power and signal from the surface via a tether. 48v power is used to minimize the cable size, and two Ethernet cables are used to send control signals to the ROV and return vision and sensor signals to the surface. Four thrusters are used: two to provide forward/reverse and turning motions in the horizontal plane, one to allow for vertical motion, and one to allow for strafing movements (sideways motion in the horizontal plane). The frame is made of steel strap with heavy steel bottom rails. ABS buoyancy tubes across the top sides and rear allow buoyancy adjustment with petcock valves.
Control System and Instrumentation
The ROV control system consists of the surface handheld vEx controllers, tether, and the electronics enclosure with speed controller boards.
One problem with using 12v motors on the ROV with a surface battery is that the tether cable needs to be very large and heavy. By using four 12v batteries in series to make 48v, we can use a lightweight low cost 16 gauge power tether cable. The speed controller boards have switching power supplies and pulse width modulation motor controllers that allow the motors to run on 48v for a short duty cycle.
Each speed controller board provides bi-directional speed control of up to four big DC motors, signals and power for up to six servos, and power for one switched and two unswitched 12V devices. The design is optimized for low cost, flexibility and high performance. A Xilinx programmable logic device (CPLD) allows reconfiguration for custom requirements. The board design was done as a commercial prototype using software tools for schematic, board layout, and logic programming.
The two vEx transmitters are used in tethered mode. On the driving transmitter, one joystick operates forward/reverse/rotate and the other up/down and sideways. The other vEx transmitter is used for camera manipulation, one joystick for camera tilt up/down, the other for manipulator squeeze/release, and a button to turn the cooling fan on and off. There is the ability to add up to three extra control functions if needed.
Page 3
The Typewriter Repairmen 2009 National Underwater Robotics Challenge
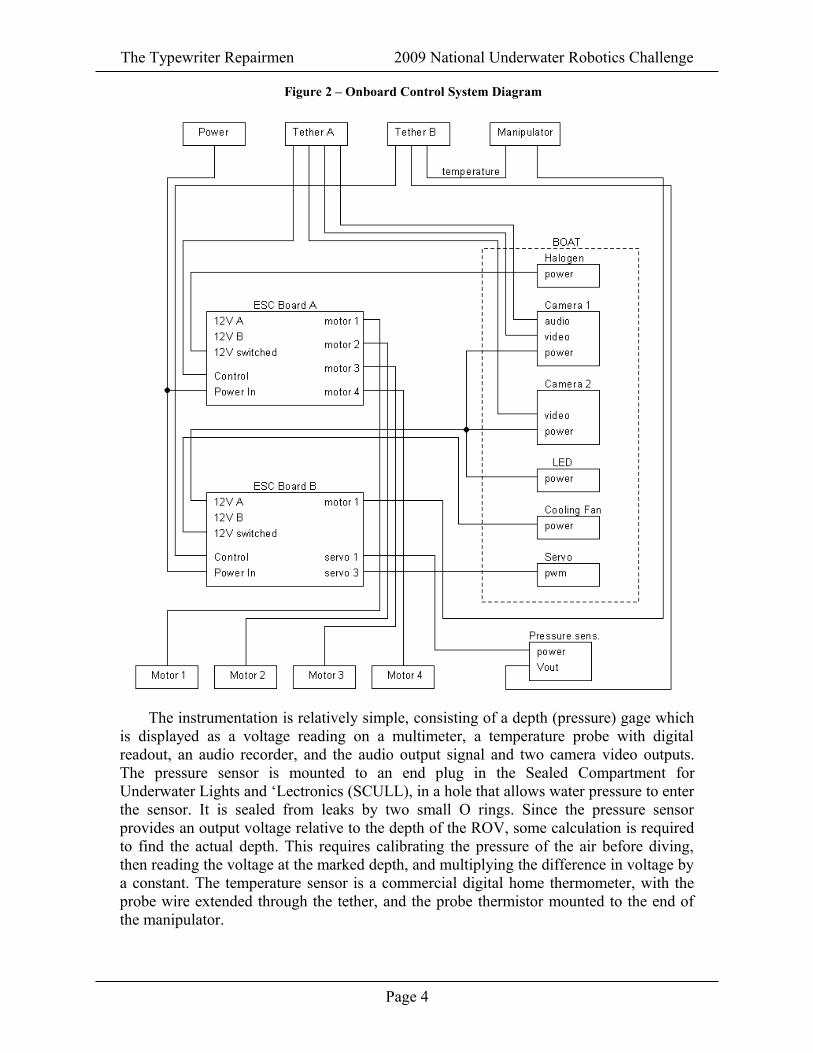
The instrumentation is relatively simple, consisting of a depth (pressure) gage which is displayed as a voltage reading on a multimeter, a temperature probe with digital readout, an audio recorder, and the audio output signal and two camera video outputs. The pressure sensor is mounted to an end plug in the Sealed Compartment for Underwater Lights and ‘Lectronics (SCULL), in a hole that allows water pressure to enter the sensor. It is sealed from leaks by two small O rings. Since the pressure sensor provides an output voltage relative to the depth of the ROV, some calculation is required to find the actual depth. This requires calibrating the pressure of the air before diving, then reading the voltage at the marked depth, and multiplying the difference in voltage by a constant. The temperature sensor is a commercial digital home thermometer, with the probe wire extended through the tether, and the probe thermistor mounted to the end of the manipulator.
Page 4
Figure 2 – Onboard Control System Diagram
The Typewriter Repairmen 2009 National Underwater Robotics Challenge
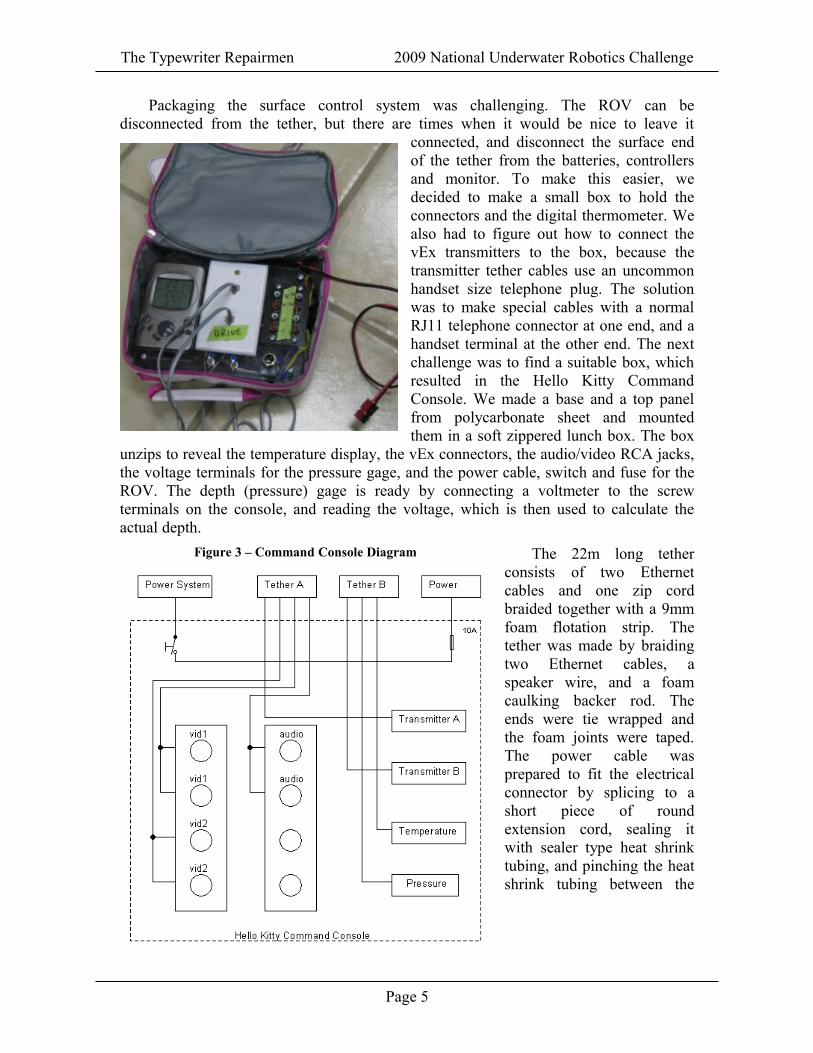
Packaging the surface control system was challenging. The ROV can be disconnected from the tether, but there are times when it would be nice to leave it
connected, and disconnect the surface end of the tether from the batteries, controllers and monitor. To make this easier, we decided to make a small box to hold the connectors and the digital thermometer. We also had to figure out how to connect the vEx transmitters to the box, because the transmitter tether cables use an uncommon handset size telephone plug. The solution was to make special cables with a normal RJ11 telephone connector at one end, and a handset terminal at the other end. The next challenge was to find a suitable box, which resulted in the Hello Kitty Command Console. We made a base and a top panel from polycarbonate sheet and mounted them in a soft zippered lunch box. The box
unzips to reveal the temperature display, the vEx connectors, the audio/video RCA jacks, the voltage terminals for the pressure gage, and the power cable, switch and fuse for the ROV. The depth (pressure) gage is ready by connecting a voltmeter to the screw terminals on the console, and reading the voltage, which is then used to calculate the actual depth.
The 22m long tether consists of two Ethernet cables and one zip cord braided together with a 9mm foam flotation strip. The tether was made by braiding two Ethernet cables, a speaker wire, and a foam caulking backer rod. The ends were tie wrapped and the foam joints were taped. The power cable was prepared to fit the electrical connector by splicing to a short piece of round extension cord, sealing it with sealer type heat shrink tubing, and pinching the heat shrink tubing between the
Page 5
Figure 3 – Command Console Diagram
The Typewriter Repairmen 2009 National Underwater Robotics Challenge
wires with pliers to seal the web. The ends of the wires were sealed to the wire jacket with epoxy.
Vision System
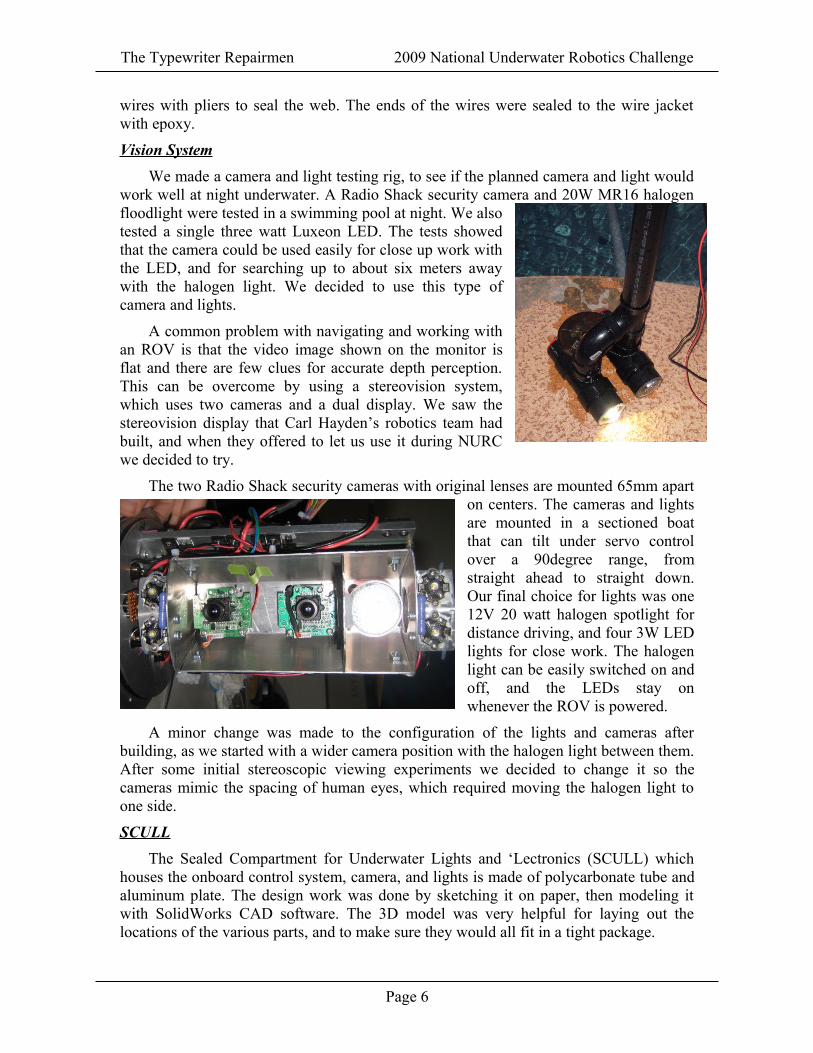
We made a camera and light testing rig, to see if the planned camera and light would work well at night underwater. A Radio Shack security camera and 20W MR16 halogen floodlight were tested in a swimming pool at night. We also tested a single three watt Luxeon LED. The tests showed that the camera could be used easily for close up work with the LED, and for searching up to about six meters away with the halogen light. We decided to use this type of camera and lights.
A common problem with navigating and working with an ROV is that the video image shown on the monitor is flat and there are few clues for accurate depth perception. This can be overcome by using a stereovision system, which uses two cameras and a dual display. We saw the stereovision display that Carl Hayden’s robotics team had built, and when they offered to let us use it during NURC we decided to try.
The two Radio Shack security cameras with original lenses are mounted 65mm apart on centers. The cameras and lights are mounted in a sectioned boat that can tilt under servo control over a 90degree range, from straight ahead to straight down. Our final choice for lights was one 12V 20 watt halogen spotlight for distance driving, and four 3W LED lights for close work. The halogen light can be easily switched on and off, and the LEDs stay on whenever the ROV is powered.
A minor change was made to the configuration of the lights and cameras after building, as we started with a wider camera position with the halogen light between them. After some initial stereoscopic viewing experiments we decided to change it so the cameras mimic the spacing of human eyes, which required moving the halogen light to one side.
SCULL
The Sealed Compartment for Underwater Lights and ‘Lectronics (SCULL) which houses the onboard control system, camera, and lights is made of polycarbonate tube and aluminum plate. The design work was done by sketching it on paper, then modeling it with SolidWorks CAD software. The 3D model was very helpful for laying out the locations of the various parts, and to make sure they would all fit in a tight package.
Page 6
The Typewriter Repairmen 2009 National Underwater Robotics Challenge
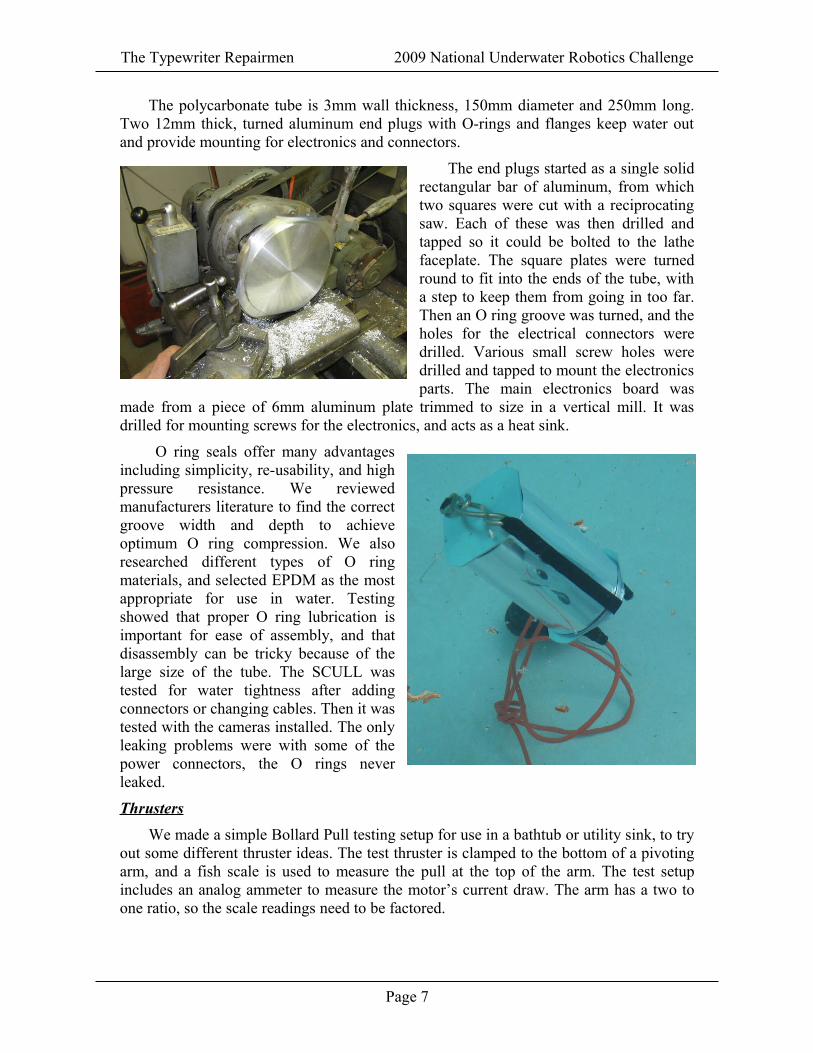
The polycarbonate tube is 3mm wall thickness, 150mm diameter and 250mm long. Two 12mm thick, turned aluminum end plugs with O-rings and flanges keep water out and provide mounting for electronics and connectors.
The end plugs started as a single solid rectangular bar of aluminum, from which two squares were cut with a reciprocating saw. Each of these was then drilled and tapped so it could be bolted to the lathe faceplate. The square plates were turned round to fit into the ends of the tube, with a step to keep them from going in too far. Then an O ring groove was turned, and the holes for the electrical connectors were drilled. Various small screw holes were drilled and tapped to mount the electronics parts. The main electronics board was
made from a piece of 6mm aluminum plate trimmed to size in a vertical mill. It was drilled for mounting screws for the electronics, and acts as a heat sink.
O ring seals offer many advantages including simplicity, re-usability, and high pressure resistance. We reviewed manufacturers literature to find the correct groove width and depth to achieve optimum O ring compression. We also researched different types of O ring materials, and selected EPDM as the most appropriate for use in water. Testing showed that proper O ring lubrication is important for ease of assembly, and that disassembly can be tricky because of the large size of the tube. The SCULL was tested for water tightness after adding connectors or changing cables. Then it was tested with the cameras installed. The only leaking problems were with some of the power connectors, the O rings never leaked.
Thrusters
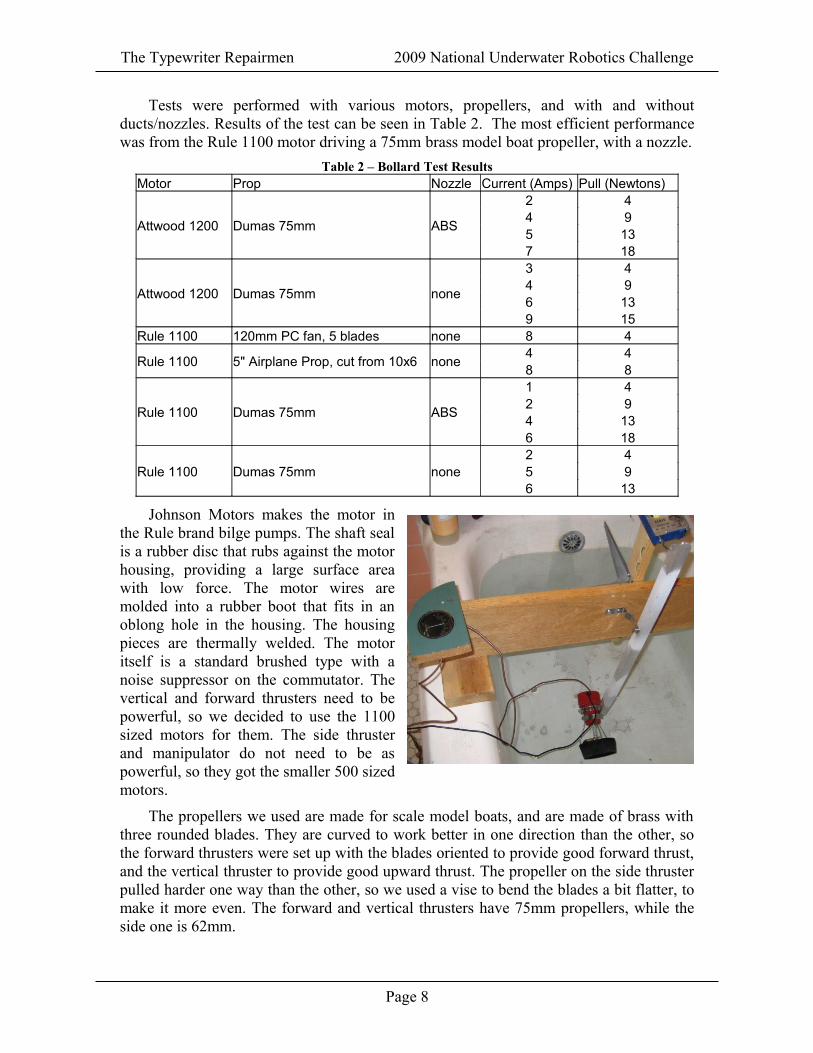
We made a simple Bollard Pull testing setup for use in a bathtub or utility sink, to try out some different thruster ideas. The test thruster is clamped to the bottom of a pivoting arm, and a fish scale is used to measure the pull at the top of the arm. The test setup includes an analog ammeter to measure the motor’s current draw. The arm has a two to one ratio, so the scale readings need to be factored.
Page 7
The Typewriter Repairmen 2009 National Underwater Robotics Challenge
Tests were performed with various motors, propellers, and with and without ducts/nozzles. Results of the test can be seen in Table 2. The most efficient performance was from the Rule 1100 motor driving a 75mm brass model boat propeller, with a nozzle.
Table 2 – Bollard Test ResultsMotor Prop Nozzle Current (Amps) Pull (Newtons)
Attwood 1200 Dumas 75mm ABS
2 44 95 137 18
Attwood 1200 Dumas 75mm none
3 44 96 139 15
Rule 1100 120mm PC fan, 5 blades none 8 4
Rule 1100 5" Airplane Prop, cut from 10x6 none4 48 8
Rule 1100 Dumas 75mm ABS
1 42 94 136 18
Rule 1100 Dumas 75mm none2 45 96 13
Johnson Motors makes the motor in the Rule brand bilge pumps. The shaft seal is a rubber disc that rubs against the motor housing, providing a large surface area with low force. The motor wires are molded into a rubber boot that fits in an oblong hole in the housing. The housing pieces are thermally welded. The motor itself is a standard brushed type with a noise suppressor on the commutator. The vertical and forward thrusters need to be powerful, so we decided to use the 1100 sized motors for them. The side thruster and manipulator do not need to be as powerful, so they got the smaller 500 sized motors.
The propellers we used are made for scale model boats, and are made of brass with three rounded blades. They are curved to work better in one direction than the other, so the forward thrusters were set up with the blades oriented to provide good forward thrust, and the vertical thruster to provide good upward thrust. The propeller on the side thruster pulled harder one way than the other, so we used a vise to bend the blades a bit flatter, to make it more even. The forward and vertical thrusters have 75mm propellers, while the side one is 62mm.
Page 8

The Typewriter Repairmen 2009 National Underwater Robotics Challenge
In low speed use, propellers provide more thrust if they are fitted with a nozzle. In the 1930s, Ludwig Kort did a lot of research on nozzles, and determined that an airfoil shaped nozzle can increase thrust by about 30% at low speeds. We discovered that a common size of ABS sewer pipe is just the right size to fit over the 75mm propellers, so we tried making some Kort type nozzles from pipe, using a lathe. Testing showed the nozzles worked well, so we decided to use them for the forward thrusters. Since the vertical thruster is used to go down as often as up, we decided that a directional nozzle would probably not be a good idea, so we made a flat
shroud for it instead. We also added a finger guard over the shroud, since the propeller is just below the handle that is used to retrieve the ROV from the water.
The motor wires were prepared by putting them into a piece of sealer type heat shrink tubing, with another short piece of wire to make the assembly more round. The tubing was then shrunk and the web pinched as with the power wire. Then the area between the wires and the heat shrink was filled with epoxy, using a needle and syringe, so the connector gland would have a solid surface to seal against.
Power System
Four 12V 7AH sealed lead-acid batteries are used. They are wired to DPDT switches, operated in series to make 48V to operate the ROV, and in parallel to be recharged by the 75W solar panel. A 10A fuse protects the wiring, and limits total power to 500W, well below the 1700W maximum allowed.
Page 9
The Typewriter Repairmen 2009 National Underwater Robotics Challenge
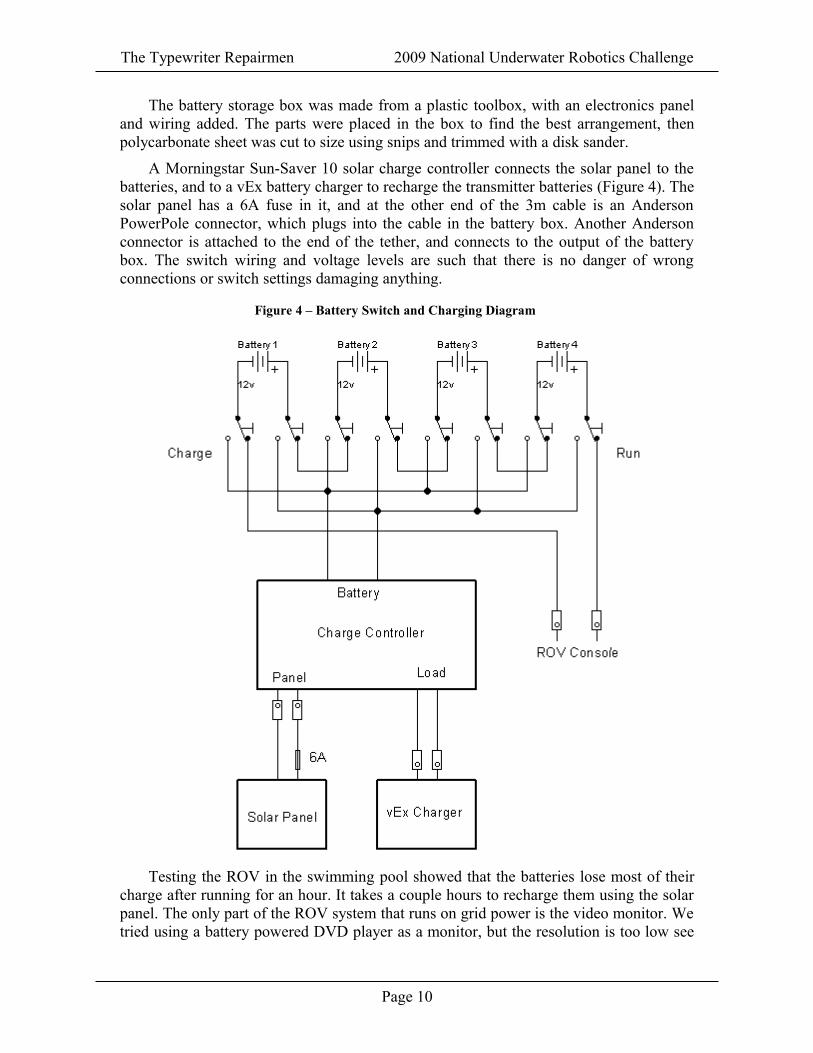
The battery storage box was made from a plastic toolbox, with an electronics panel and wiring added. The parts were placed in the box to find the best arrangement, then polycarbonate sheet was cut to size using snips and trimmed with a disk sander.
A Morningstar Sun-Saver 10 solar charge controller connects the solar panel to the batteries, and to a vEx battery charger to recharge the transmitter batteries (Figure 4). The solar panel has a 6A fuse in it, and at the other end of the 3m cable is an Anderson PowerPole connector, which plugs into the cable in the battery box. Another Anderson connector is attached to the end of the tether, and connects to the output of the battery box. The switch wiring and voltage levels are such that there is no danger of wrong connections or switch settings damaging anything.
Testing the ROV in the swimming pool showed that the batteries lose most of their charge after running for an hour. It takes a couple hours to recharge them using the solar panel. The only part of the ROV system that runs on grid power is the video monitor. We tried using a battery powered DVD player as a monitor, but the resolution is too low see
Page 10
Figure 4 – Battery Switch and Charging Diagram

The Typewriter Repairmen 2009 National Underwater Robotics Challenge
enough detail to perform the mission. Solar power was used to recharge the batteries for the last few weeks of robot testing.
Manipulator
The manipulator presented an interesting challenge. The design of the camera mounting and the game challenge dictated that it be located in front and at the bottom of the vehicle, and extend forward. The ROV motion lets the manipulator work with a single degree of freedom, that is it just opens and closes, and the ROV is moved around to position it properly to perform the tasks. Since it is located in the line of sight of the cameras, it would be nice if it could open far enough to get out of view, and it needs to
have a reasonably strong grip. These considerations led to an interesting linkage design, which has variable leverage—when it is open most of the way, it moves quickly and with little force. When it is closed most of the way, it has a lot of force and little travel. The actuator is a threaded rod, which screws into a threaded High Density Polyethylene (HDPE) plate. There are springs to cushion the grip, and the gripping pads are foam rubber cut from a mouse pad, taped on with self-vulcanizing rubber tape.
The manipulator was designed using SolidWorks. It was built from aluminum rod and channel, sheet HDPE, and steel threaded rod. Most of the work was done with hand tools such as a hacksaw and files, but the lathe and drill press were also used. The linkage required careful fitting, but it works smoothly and is very effective underwater.
Page 11
The Typewriter Repairmen 2009 National Underwater Robotics Challenge
Frame
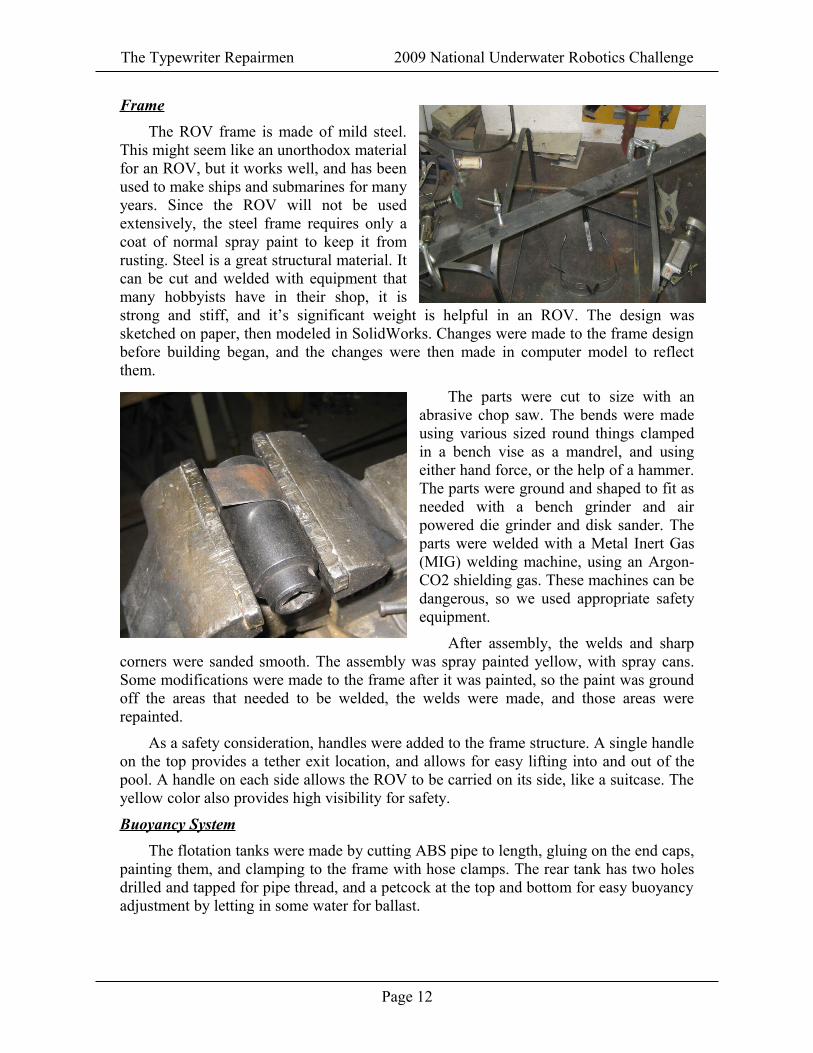
The ROV frame is made of mild steel. This might seem like an unorthodox material for an ROV, but it works well, and has been used to make ships and submarines for many years. Since the ROV will not be used extensively, the steel frame requires only a coat of normal spray paint to keep it from rusting. Steel is a great structural material. It can be cut and welded with equipment that many hobbyists have in their shop, it is strong and stiff, and it’s significant weight is helpful in an ROV. The design was sketched on paper, then modeled in SolidWorks. Changes were made to the frame design before building began, and the changes were then made in computer model to reflect them.
The parts were cut to size with an abrasive chop saw. The bends were made using various sized round things clamped in a bench vise as a mandrel, and using either hand force, or the help of a hammer. The parts were ground and shaped to fit as needed with a bench grinder and air powered die grinder and disk sander. The parts were welded with a Metal Inert Gas (MIG) welding machine, using an Argon-CO2 shielding gas. These machines can be dangerous, so we used appropriate safety equipment.
After assembly, the welds and sharp corners were sanded smooth. The assembly was spray painted yellow, with spray cans. Some modifications were made to the frame after it was painted, so the paint was ground off the areas that needed to be welded, the welds were made, and those areas were repainted.
As a safety consideration, handles were added to the frame structure. A single handle on the top provides a tether exit location, and allows for easy lifting into and out of the pool. A handle on each side allows the ROV to be carried on its side, like a suitcase. The yellow color also provides high visibility for safety.
Buoyancy System
The flotation tanks were made by cutting ABS pipe to length, gluing on the end caps, painting them, and clamping to the frame with hose clamps. The rear tank has two holes drilled and tapped for pipe thread, and a petcock at the top and bottom for easy buoyancy adjustment by letting in some water for ballast.
Page 12
The Typewriter Repairmen 2009 National Underwater Robotics Challenge
It did take some effort to get the buoyancy just right, so the flotation tanks were revised a few times during the build and testing process. One cause of this was the frequent testing of the partially constructed ROV during the build phase, as we wanted to make sure to catch any serious problems early on. Since not all the parts were on the ROV yet, we got some wrong impressions of how much flotation would be needed with the finished machine.
Testing
As the robot construction progressed, each new assembly was tested. For example, the thrusters were tested after being mounted to the frame. In this way problems could be found and corrected immediately, preventing having to deal with multiple problems at once.
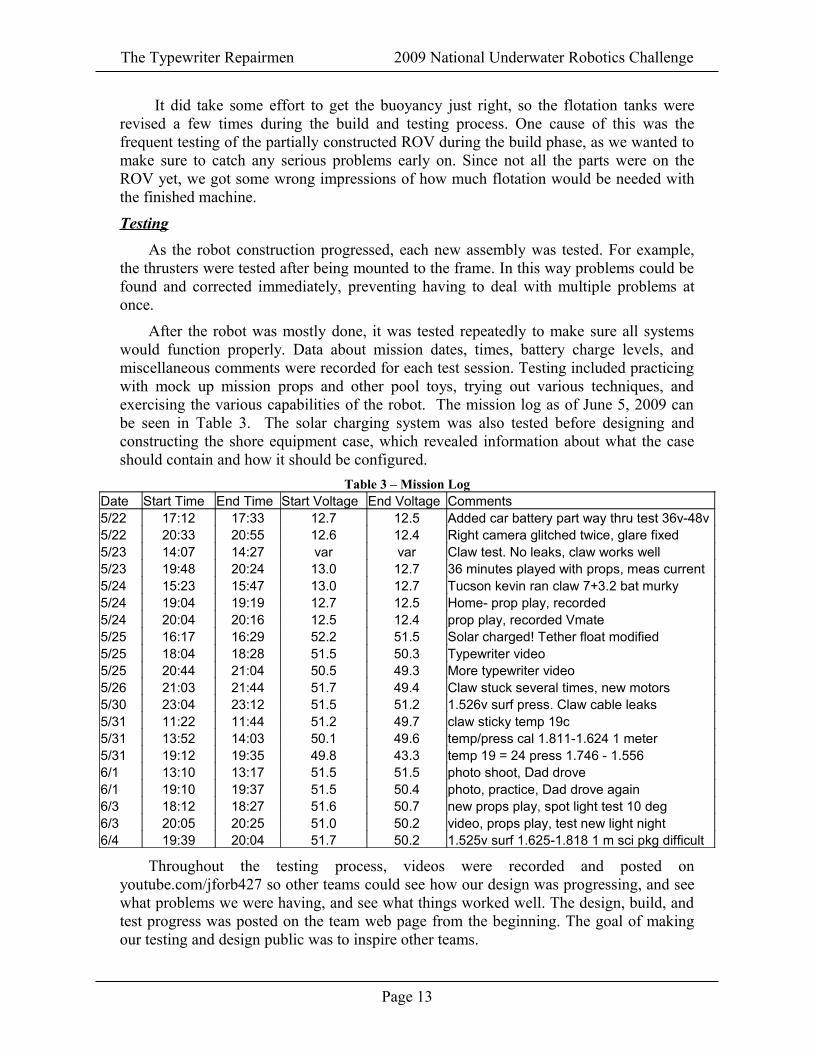
After the robot was mostly done, it was tested repeatedly to make sure all systems would function properly. Data about mission dates, times, battery charge levels, and miscellaneous comments were recorded for each test session. Testing included practicing with mock up mission props and other pool toys, trying out various techniques, and exercising the various capabilities of the robot. The mission log as of June 5, 2009 can be seen in Table 3. The solar charging system was also tested before designing and constructing the shore equipment case, which revealed information about what the case should contain and how it should be configured.
Table 3 – Mission LogDate Start Time End Time Start Voltage End Voltage Comments5/22 17:12 17:33 12.7 12.5 Added car battery part way thru test 36v-48v5/22 20:33 20:55 12.6 12.4 Right camera glitched twice, glare fixed5/23 14:07 14:27 var var Claw test. No leaks, claw works well5/23 19:48 20:24 13.0 12.7 36 minutes played with props, meas current5/24 15:23 15:47 13.0 12.7 Tucson kevin ran claw 7+3.2 bat murky 5/24 19:04 19:19 12.7 12.5 Home- prop play, recorded5/24 20:04 20:16 12.5 12.4 prop play, recorded Vmate5/25 16:17 16:29 52.2 51.5 Solar charged! Tether float modified5/25 18:04 18:28 51.5 50.3 Typewriter video5/25 20:44 21:04 50.5 49.3 More typewriter video5/26 21:03 21:44 51.7 49.4 Claw stuck several times, new motors5/30 23:04 23:12 51.5 51.2 1.526v surf press. Claw cable leaks5/31 11:22 11:44 51.2 49.7 claw sticky temp 19c5/31 13:52 14:03 50.1 49.6 temp/press cal 1.811-1.624 1 meter5/31 19:12 19:35 49.8 43.3 temp 19 = 24 press 1.746 - 1.556 6/1 13:10 13:17 51.5 51.5 photo shoot, Dad drove6/1 19:10 19:37 51.5 50.4 photo, practice, Dad drove again6/3 18:12 18:27 51.6 50.7 new props play, spot light test 10 deg6/3 20:05 20:25 51.0 50.2 video, props play, test new light night6/4 19:39 20:04 51.7 50.2 1.525v surf 1.625-1.818 1 m sci pkg difficult
Throughout the testing process, videos were recorded and posted on youtube.com/jforb427 so other teams could see how our design was progressing, and see what problems we were having, and see what things worked well. The design, build, and test progress was posted on the team web page from the beginning. The goal of making our testing and design public was to inspire other teams.
Page 13
The Typewriter Repairmen 2009 National Underwater Robotics Challenge
Mission Strategy
The mission involves a lot of driving around searching for things and either manipulating or retrieving them, or making some type of observation using specialized instrumentation. Because of the large number of things that need to be found, our strategy is to build a robot that can move and see well, and practice using it as much as possible before the competition. Because of the number of objects that need to be manipulated, we chose to make a simple but versatile manipulator. The manipulator and robot need not lift a lot of weight, and since the robot is highly maneuverable, the manipulator need not have many degrees of freedom. The manipulator does need to be able to deal with misalignment of the robot and target object, so it can open wide, and it can close quickly to grab objects as soon as the robot is in the right position.
Because of the large number of objects to retrieve, we decided to use a basket to collect them before returning to the surface, to save time. The basket can be picked up with the manipulator when the manipulator is closed, by simply driving the manipulator under the basket handle. The basket is slightly negatively buoyant, so it will stay where it is set on the pool floor.
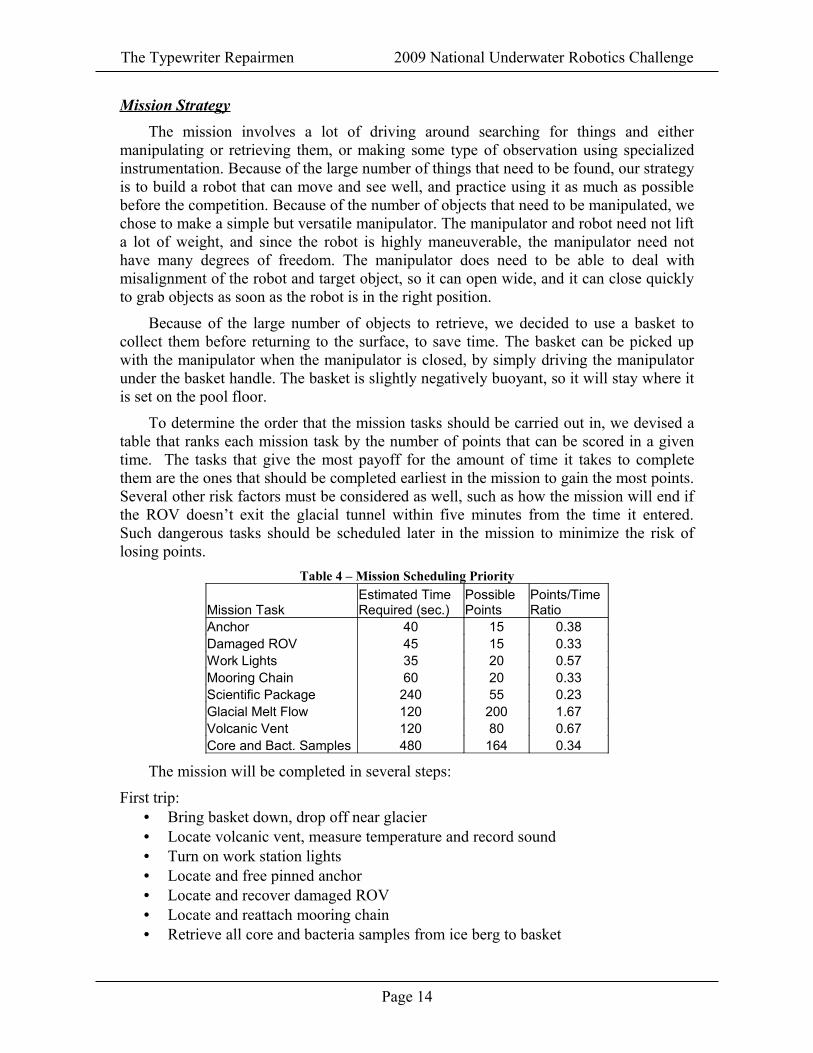
To determine the order that the mission tasks should be carried out in, we devised a table that ranks each mission task by the number of points that can be scored in a given time. The tasks that give the most payoff for the amount of time it takes to complete them are the ones that should be completed earliest in the mission to gain the most points. Several other risk factors must be considered as well, such as how the mission will end if the ROV doesn’t exit the glacial tunnel within five minutes from the time it entered. Such dangerous tasks should be scheduled later in the mission to minimize the risk of losing points.
Table 4 – Mission Scheduling Priority
Mission TaskEstimated Time Required (sec.)
Possible Points
Points/Time Ratio
Anchor 40 15 0.38Damaged ROV 45 15 0.33Work Lights 35 20 0.57Mooring Chain 60 20 0.33Scientific Package 240 55 0.23Glacial Melt Flow 120 200 1.67Volcanic Vent 120 80 0.67Core and Bact. Samples 480 164 0.34
The mission will be completed in several steps:
First trip:• Bring basket down, drop off near glacier• Locate volcanic vent, measure temperature and record sound• Turn on work station lights• Locate and free pinned anchor • Locate and recover damaged ROV • Locate and reattach mooring chain• Retrieve all core and bacteria samples from ice berg to basket
Page 14
The Typewriter Repairmen 2009 National Underwater Robotics Challenge
• Surface with basketSecond trip:
• Locate and enter glacial melt flow• Locate and measure depth mark• Collect ice core sample in glacial melt flow• Surface with ice core sample
Third trip:• Locate work station and open door• Recover science package and bring to surface
Fourth trip:• Bring new science package down to work station• Deliver new science package• Close work station door• Surface
Summary
This project has been a great learning experience for all team members. We have learned how to design and build a waterproof enclosure, a speed controller circuit, a mechanical claw, a renewable energy system, and package a control system. David has discovered how much fun it can be to work on a robotics project (Jim and Steve have done robots before). We have created a machine that can do it’s job, and put it on the internet for all to see. Hopefully all will go well at the National Underwater Robotics Challenge.
References
Power Sonic “Sealed Lead-Acid Batteries Technical Manual”, http://www.power-sonic.com/
Parker O Ring Handbook, ORD 5700, http://www.parker.com
Freescale Semiconductor MPX4250A Datasheet, Integrated Silicon Pressure Sensor, http://www.freescale.com/
MK AGM Battery Datasheet, http://mkbattery.com
Bulgin Standard Buccaneer IP68 Connector Datasheet, http://www.bulgin.co.uk
SIL-GLYDE Lubricating Compound data sheet, http://agscompany.com
http://en.wikipedia.org/wiki/Kort_nozzle
Team Website: http://selectric.org/nurc
Page 15
The Typewriter Repairmen 2009 National Underwater Robotics Challenge
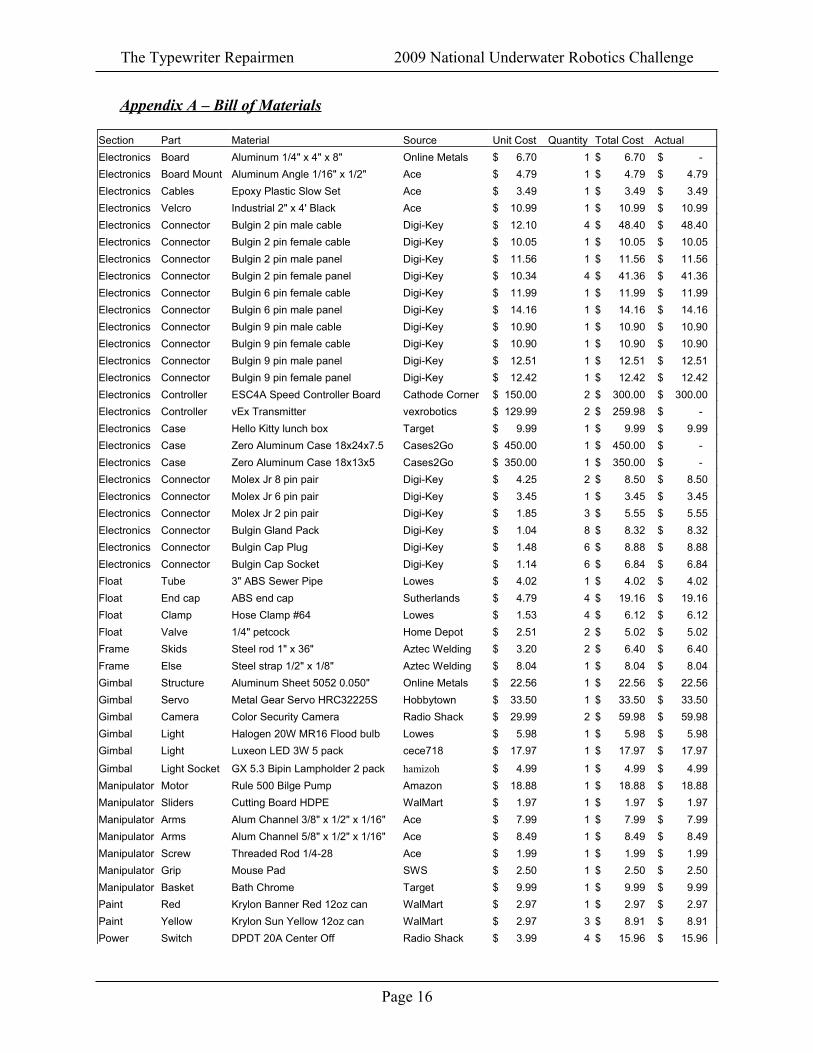
Appendix A – Bill of Materials
Section Part Material Source Unit Cost Quantity Total Cost Actual
Electronics Board Aluminum 1/4" x 4" x 8" Online Metals $ 6.70 1 $ 6.70 $ -
Electronics Board Mount Aluminum Angle 1/16" x 1/2" Ace $ 4.79 1 $ 4.79 $ 4.79
Electronics Cables Epoxy Plastic Slow Set Ace $ 3.49 1 $ 3.49 $ 3.49
Electronics Velcro Industrial 2" x 4' Black Ace $ 10.99 1 $ 10.99 $ 10.99
Electronics Connector Bulgin 2 pin male cable Digi-Key $ 12.10 4 $ 48.40 $ 48.40
Electronics Connector Bulgin 2 pin female cable Digi-Key $ 10.05 1 $ 10.05 $ 10.05
Electronics Connector Bulgin 2 pin male panel Digi-Key $ 11.56 1 $ 11.56 $ 11.56
Electronics Connector Bulgin 2 pin female panel Digi-Key $ 10.34 4 $ 41.36 $ 41.36
Electronics Connector Bulgin 6 pin female cable Digi-Key $ 11.99 1 $ 11.99 $ 11.99
Electronics Connector Bulgin 6 pin male panel Digi-Key $ 14.16 1 $ 14.16 $ 14.16
Electronics Connector Bulgin 9 pin male cable Digi-Key $ 10.90 1 $ 10.90 $ 10.90
Electronics Connector Bulgin 9 pin female cable Digi-Key $ 10.90 1 $ 10.90 $ 10.90
Electronics Connector Bulgin 9 pin male panel Digi-Key $ 12.51 1 $ 12.51 $ 12.51
Electronics Connector Bulgin 9 pin female panel Digi-Key $ 12.42 1 $ 12.42 $ 12.42
Electronics Controller ESC4A Speed Controller Board Cathode Corner $ 150.00 2 $ 300.00 $ 300.00
Electronics Controller vEx Transmitter vexrobotics $ 129.99 2 $ 259.98 $ -
Electronics Case Hello Kitty lunch box Target $ 9.99 1 $ 9.99 $ 9.99
Electronics Case Zero Aluminum Case 18x24x7.5 Cases2Go $ 450.00 1 $ 450.00 $ -
Electronics Case Zero Aluminum Case 18x13x5 Cases2Go $ 350.00 1 $ 350.00 $ -
Electronics Connector Molex Jr 8 pin pair Digi-Key $ 4.25 2 $ 8.50 $ 8.50
Electronics Connector Molex Jr 6 pin pair Digi-Key $ 3.45 1 $ 3.45 $ 3.45
Electronics Connector Molex Jr 2 pin pair Digi-Key $ 1.85 3 $ 5.55 $ 5.55
Electronics Connector Bulgin Gland Pack Digi-Key $ 1.04 8 $ 8.32 $ 8.32
Electronics Connector Bulgin Cap Plug Digi-Key $ 1.48 6 $ 8.88 $ 8.88
Electronics Connector Bulgin Cap Socket Digi-Key $ 1.14 6 $ 6.84 $ 6.84
Float Tube 3" ABS Sewer Pipe Lowes $ 4.02 1 $ 4.02 $ 4.02
Float End cap ABS end cap Sutherlands $ 4.79 4 $ 19.16 $ 19.16
Float Clamp Hose Clamp #64 Lowes $ 1.53 4 $ 6.12 $ 6.12
Float Valve 1/4" petcock Home Depot $ 2.51 2 $ 5.02 $ 5.02
Frame Skids Steel rod 1" x 36" Aztec Welding $ 3.20 2 $ 6.40 $ 6.40
Frame Else Steel strap 1/2" x 1/8" Aztec Welding $ 8.04 1 $ 8.04 $ 8.04
Gimbal Structure Aluminum Sheet 5052 0.050" Online Metals $ 22.56 1 $ 22.56 $ 22.56
Gimbal Servo Metal Gear Servo HRC32225S Hobbytown $ 33.50 1 $ 33.50 $ 33.50
Gimbal Camera Color Security Camera Radio Shack $ 29.99 2 $ 59.98 $ 59.98
Gimbal Light Halogen 20W MR16 Flood bulb Lowes $ 5.98 1 $ 5.98 $ 5.98
Gimbal Light Luxeon LED 3W 5 pack cece718 $ 17.97 1 $ 17.97 $ 17.97
Gimbal Light Socket GX 5.3 Bipin Lampholder 2 pack hamizoh $ 4.99 1 $ 4.99 $ 4.99
Manipulator Motor Rule 500 Bilge Pump Amazon $ 18.88 1 $ 18.88 $ 18.88
Manipulator Sliders Cutting Board HDPE WalMart $ 1.97 1 $ 1.97 $ 1.97
Manipulator Arms Alum Channel 3/8" x 1/2" x 1/16" Ace $ 7.99 1 $ 7.99 $ 7.99
Manipulator Arms Alum Channel 5/8" x 1/2" x 1/16" Ace $ 8.49 1 $ 8.49 $ 8.49
Manipulator Screw Threaded Rod 1/4-28 Ace $ 1.99 1 $ 1.99 $ 1.99
Manipulator Grip Mouse Pad SWS $ 2.50 1 $ 2.50 $ 2.50
Manipulator Basket Bath Chrome Target $ 9.99 1 $ 9.99 $ 9.99
Paint Red Krylon Banner Red 12oz can WalMart $ 2.97 1 $ 2.97 $ 2.97
Paint Yellow Krylon Sun Yellow 12oz can WalMart $ 2.97 3 $ 8.91 $ 8.91
Power Switch DPDT 20A Center Off Radio Shack $ 3.99 4 $ 15.96 $ 15.96
Page 16

The Typewriter Repairmen 2009 National Underwater Robotics Challenge
Power Connector Anderson Power 4pk Elliott $ 3.81 3 $ 11.43 $ 11.43
Power Fuse 10 A Blade 3 pk Radio Shack $ 1.99 1 $ 1.99 $ 1.99
Power Enclosure Tool Box, Plastic 17800 techni-tool $ 21.05 1 $ 21.05 $ -
Power Panel BP 75 W Solar Panel Affordable Solar $ 391.00 1 $ 391.00 $ -
Power Controller Morningstar SunSaver10 Charger Affordable Solar $ 48.00 1 $ 48.00 $ -
Power Wire 18 gage red/black zip 8m Radio Shack $ 5.99 1 $ 5.99 $ 5.99
Power Batteries SLA 12v 7ah rechargeable Radio Shack $ 34.99 4 $ 139.96 $ -
SCULL End Plugs Aluminum Plate 1/2" x 4" x 36" McMaster Carr $ 55.86 1 $ 55.86 $ 55.86
SCULL Tube Polycarbonate Tube 6"x1/8"x12" McMaster Carr $ 33.22 1 $ 33.22 $ 33.22
SCULL O ring 254 O ring EPDM 10 pack McMaster Carr $ 9.30 1 $ 9.30 $ 9.30
Sensor Thermometer Acu-Rite WalMart $ 12.00 1 $ 12.00 $ 12.00
Sensor Pressure MPXA4250AC6U Digi-Key $ 14.96 1 $ 14.96 $ 14.96
Tether Power Speaker Wire #16 x 2 SWS $ 25.00 1 $ 25.00 $ 25.00
Tether Signal Cat5 Network Cable SWS $ 40.00 1 $ 40.00 $ 40.00
Tether Float Foam Backer Rod 9mm x 6m Ace $ 4.49 1 $ 4.49 $ 4.49
Tether Connector Jack Phone Duplex Sutherlands $ 2.79 1 $ 2.79 $ 2.79
Tether Connector Phone Handset Plug 10 pk Elliott $ 1.69 1 $ 1.69 $ 1.69
Tether Connector RCA Jack 4 place Elliott $ 1.50 2 $ 3.00 $ 3.00
Thruster Propeller 3 blade 75mm d 50mm p Right Dumas $ 33.75 2 $ 67.50 $ 67.50
Thruster Propeller 3 blade 75mm d 50mm p Left Dumas $ 33.75 1 $ 33.75 $ 33.75
Thruster Propeller 3 blade 62mm d 50mm p Right Dumas $ 28.00 1 $ 28.00 $ 28.00
Thruster Motor Rule 1100 Bilge Pump Amazon $ 31.05 3 $ 93.15 $ 93.15
Thruster Motor Rule 500 Bilge Pump Amazon $ 18.88 1 $ 18.88 $ 18.88
Thruster Clamp Hose Clamp #20 2 pack Lowes $ 1.83 2 $ 3.66 $ 3.66
Thruster Shaft 3/8" aluminum rod 3' Online Metals $ 1.92 1 $ 1.92 $ -
Thruster Nozzle 3" ABS Sewer Pipe Lowes $ 4.02 1 $ 4.02 $ 4.02
LIST TOTAL: $ 2,967.73
ACTUAL TOTAL: $ 1,299.12
Page 17

The Typewriter Repairmen 2009 National Underwater Robotics Challenge
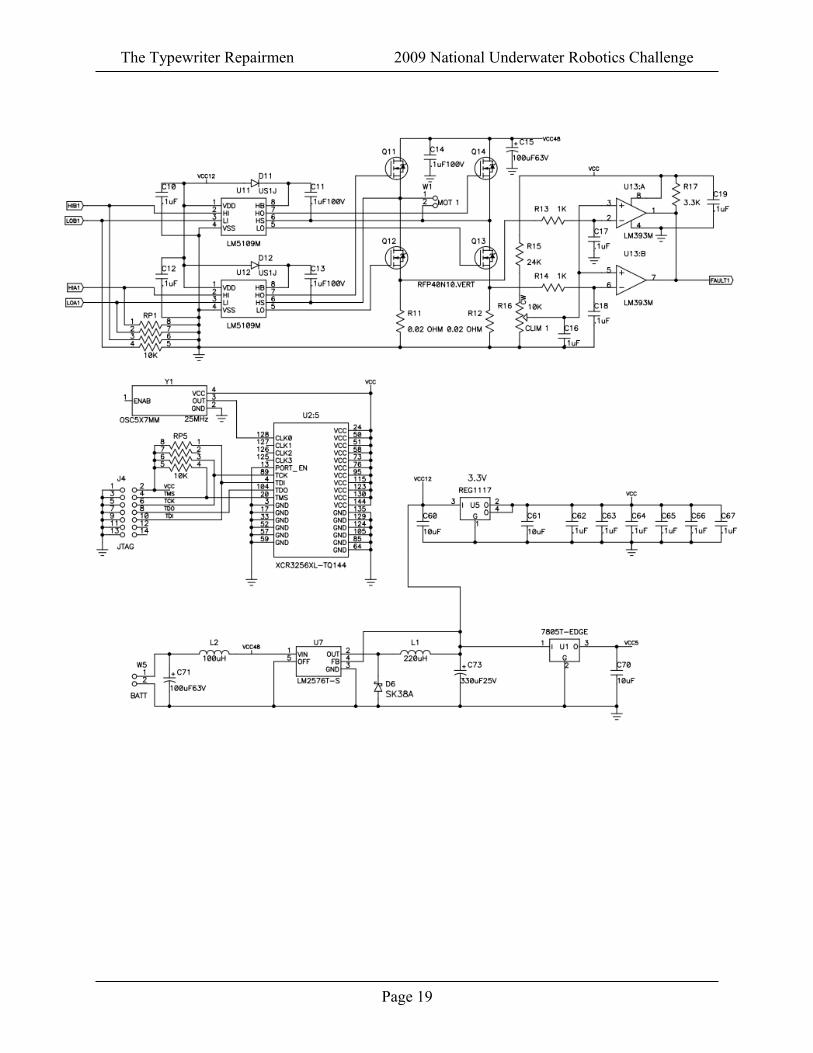
Appendix B - Electronic Speed Controller Schematic
Page 18
The Typewriter Repairmen 2009 National Underwater Robotics Challenge
Page 19