the trials & tribulations of the mga twin cam by allan … page files (new)/allans story/the...
TRANSCRIPT
1
The Trials & Tribulations of the MGA Twin Cam
By Allan Semmler
My troubles began December 2012 when I drove the car to our workshop at Elizabeth, in front of the Elizabeth Police Station it stopped with copious amounts of steam issuing from under the bonnet, on investigation the problem was traced to a blown hose on the bottom of the thermostat housing. The housing on a Twin Cam is situated directly above the distributor the result of this was a severe lack of electrical activity. After a suitable amount of time to allow things to dry out, I managed to start the car and although running on two or three cylinders drove the remaining 1Km to work. Over the next couple of days I removed the thermostat housing to find that the aluminium casting was rather severely corroded away. On to the Internet looking for a new housing and as with most parts for a Twin Cam found the usual answer NLA (No Longer Available). The next course of action was to consult the Twin Cam Owners Group on the net and place a request for a new or used housing. I received a reply from a member in the U.S.A. who had a used cast iron housing, he sent photo’s of the housing and informed me that it was in very good condition and advised me that the housing was changed from aluminium to cast iron in mid 1959 because of some problems experienced with corrosion on the original aluminium housing. Price negotiated ($300 US plus shipping $50 US). Received the part five days later and was surprised to find it was in better condition than he described it.
I decided it would probably be a good idea if I removed the radiator at this point and have it cleaned and tested. (Removing the radiator from a Twin Cam is not an easy job requiring removal of front wheels and various panels on the inner mudguards to allow access to the holding bolts and hoses) The use of a hoist at Supaloc Racing is a must for a person of my senior years.
City Radiators removed the top and bottom tank, and cleaned the gunk out of the core, they told me it was about 40% blocked. At this stage I believed that this was the cause of my overheating problems. I replaced the radiator and took the car for a test drive only to find the temperature gauge hovering around 200 + degrees F. Twin Cams do run hot and it was a hot day but I was not real happy with this result.
On to the Internet again to checkout overheating problems with MGA Twin Cams, there are pages of information from all the experts around the world. One article that caught my attention was from some boffin who stated that the aerodynamics of an MGA Twin Cam or any MGA are abysmal especially when it comes to removing the hot air from under the bonnet. He put a Twin Cam in a wind tunnel and found that the vents in the bonnet up near the windscreen do not let hot air out but at anything above 30 M.P.H air actually goes in to the vents. One suggestion from a number of Twin Cam owners to help overcome overheating problems and the one that I liked was the fitting of a shroud on the radiator.
Back to the internet again and a shroud specifically for a Twin Cam is not available, I enquire with a well known supplier of MG parts as to whether a normal MGA shroud will fit a Twin Cam. His answer was “I don’t know but will see what I can find out” I got an answer from him a couple of days later to the effect that the “experts” think it will fit. I purchase the MGA shroud ($95.00 + Postage) it arrives in a couple of days; I remove the radiator from the car again and guess what ! It doesn’t look like fitting. The shroud is made of vacuum formed plastic and being a reasonable sheet metal worker I decide I can make it fit. After cutting about 50mm from one side and adding the same amount in the form of an aluminium strip pop riveted to the other side the modified shroud fits well and looks pretty good. The one problem I encountered was that fitting the shroud made the replacement of the radiator about twice as difficult. I was convinced that the extra effort required would be worth it to overcome the overheating problems. With the radiator and shroud back in it is now time for the big test. It made next door to no difference, the exception being a minimal drop (less than 5 degrees F) when driving in heavy traffic conditions, no difference at all to cruising or driving under load. Back onto the Internet and over the next couple of months tried the following fixes recommended by the “experts”

2
1 – Different pressure radiator caps from 4 to 18 psi. Result no change.
2 – Various thermostats ranging from 140 to 180 degrees F. Result no change
3 – The experts sure fire fix, a blanking sleeve fitted to the thermostat housing. Result no change.
4 – Various types of coolant. Result no change. (By this time I had probably used 50 gallons of various coolant)
I am getting to the desperate stage now and came close to the ultimate fix “Water Wetter” the answer to all your overheating issues. Fortunately I was saved by ex President Wayne who had already been sucked into purchasing a $30 + bottle of this “magic fluid” that had no effect whatsoever on his overheating MGA.
About this time I started to get a little concerned (As I had booked and paid to do the Targa Adelaide Tour starting on the 21st of August and now had less than 3 weeks to the event) and was rapidly running out of ideas. I then had a serious talk to the Supaloc Racing Guru’s Brad Greenslade and Simon Wenzel. Along with the theory that a 1959 MG is a Pommy Heap of Crap and should probably be scrapped, they wanted to know where the fuel injection system was and what were those two funny things attached to the inlet manifold. On a more serious note, the end result of these deliberations was that the time had come to consider more serious issues like a knackered water pump, blown head gasket, or a cracked head. A pressure test on the coolant system finds a rather serious leak of coolant from the water pump seal. This seemed to be a good starting point. I remove the radiator for possibly the 5th time along with the shroud to enable access to the water pump. I remove the pump and take apart to find the seal well past its use by date. Try the Internet to locate a new seal, same answer as always NLA. Although I did locate a supplier of new water pumps machined from billet aluminium at a mere 1200 Euro’s.
Brad comes up with a water pump seal from a Lamborghini that looks a little similar; I make a new shaft and machine the housing to accommodate the new seal. Replace the pump and the dreaded radiator and shroud. (I am still at this stage persevering with the shroud) A pressure test reveals that problem fixed. A road test reveals no difference to the overheating issues.
The next step on the list is to do a compression test. (I should add that there is no evidence of oil in the coolant or vice versa). Test results are great and all four cylinders show 175 – 180 PSI. To check for a cracked head or blown gasket Brad suggests a Co2 test on the coolant system (they do not have a C02 tester you don’t need such things when you work on Lamborghini’s and GT40 Fords)
I arranged with Holden Hill Radiators to do a Co2 test. My car is parked outside of their workshop, the mechanic ask me to start the motor while he goes inside to get his tester. I open the bonnet and as the mechanic is about to fit the tester to the radiator cap, the hose between the thermostat housing and the radiator splits along its entire length and sprays coolant everywhere including all over the distributor. After allowing things to dry out I manage to get the car home again and over the next day or so replace the hose, not with an original, that has to come from the U.K. but with a hose from a 1998 Nissan Skyline (almost identical) I then take the car back to Supaloc Racing having decided that the time had come to fix this bloody thing properly. Brad will do most of the technical stuff and I will do all the lackey work.
It is necessary to remove the following to allow the motor to be removed from the car. Front wheels and the panels in the inner mudguards, radiator along with shroud, generator, starter motor, carburettors, exhaust, distributor, many hoses and a bit of electrical wiring, speedo and tacho cables, fuel lines, heater pipes, sump, header tank and the thermostat housing. All of the above must be removed to have any chance of getting the motor out without destroying the inner mudguards’ and firewall etc. Also the steering rack must be moved forward. With all that stuff removed it is still a very tight squeeze to remove the unit from the car. A couple of items for the backyard mechanic to be aware of are, the book says that it is necessary to remove the bonnet, the floor to allow access to the top bolts on the gearbox and that the bolts that hold the sump are accessible through holes strategically drilled through the chassis. If you have every spanner

3
known to man (like Supaloc Racing) it is not necessary to remove the floor. It would also be relatively easy to remove the sump if those holes through the chassis actually lined up with the bolts holding the sump. The bonnet does not need to be removed but can be opened to its full extent and tied with rope to the rear bumper bar.
With the right sort of lifting gear and two experts on the job, Brad and Simon remove the motor with relative ease

4
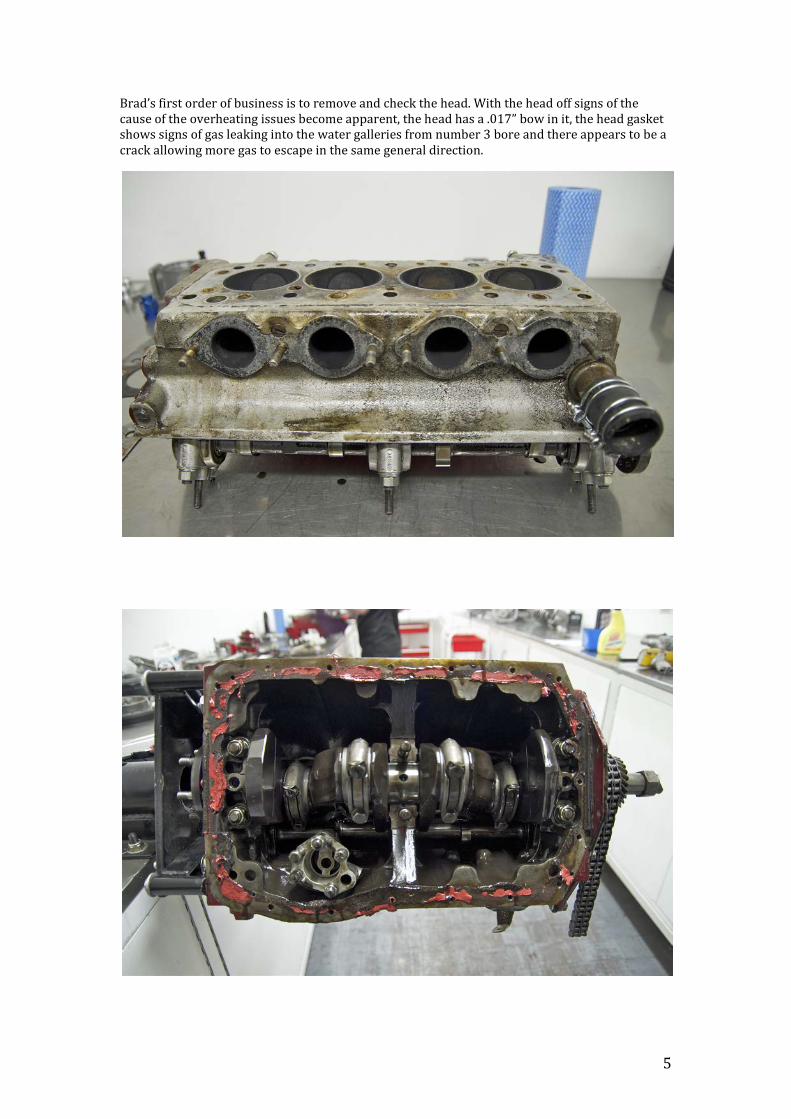
Once the motor is out it is easy to see where the oil that continually filled the drip tray in the garage came from. Major leaks around the sump, overhead cam covers, front and rear engine plates, side breather plates on the block and crankshaft rope seal, more on these issues later
5
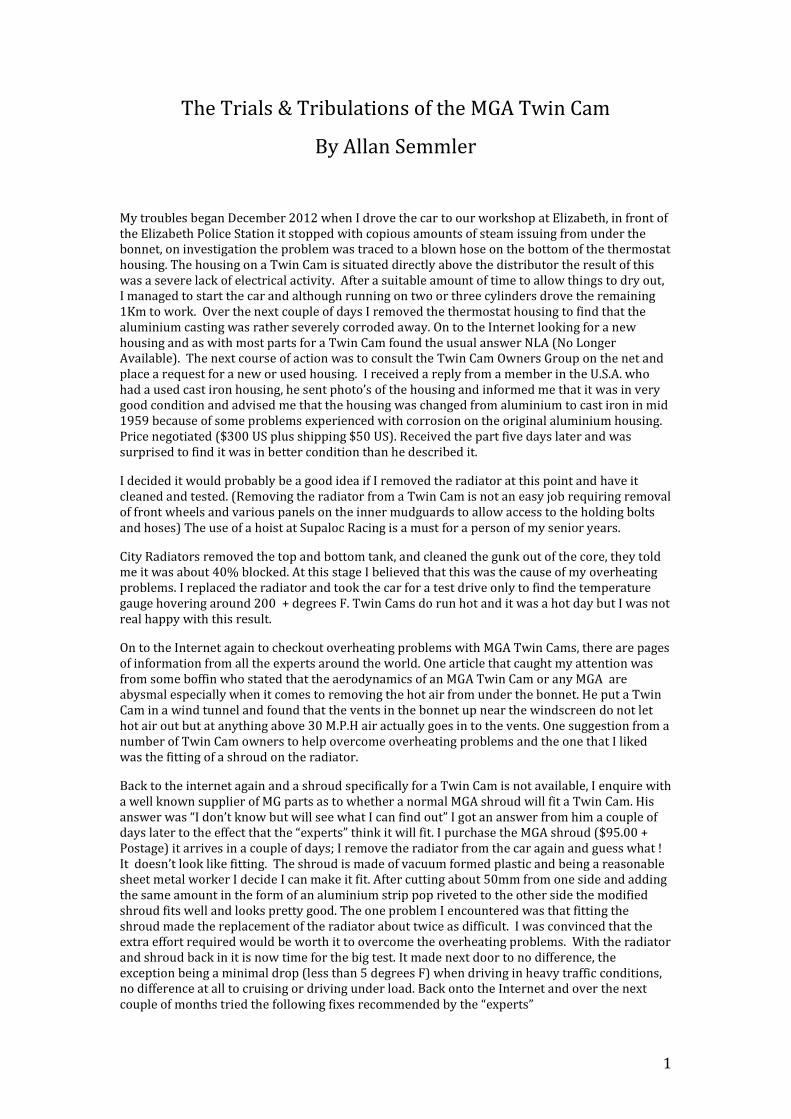
Brad’s first order of business is to remove and check the head. With the head off signs of the cause of the overheating issues become apparent, the head has a .017” bow in it, the head gasket shows signs of gas leaking into the water galleries from number 3 bore and there appears to be a crack allowing more gas to escape in the same general direction.

6
Valves and valve seats appear to be reasonable, but valves will be ground and new seats fitted. There is a rather serious issue with the split collets that hold the valves in, five sets show considerable wear to the point that they would have failed in the not to distant future allowing the valves to bounce up and down on the pistons. On further investigation I discover that these sets have been “home made” by some turkey out of mild steel probably because they are another NLA item and because the person that supposedly restored this car was a shonk who had little idea as to what he was doing. I made a full set of new collets from 4140 high carbon steel and had them heat treated to 58 Rockwell C, the collets that were in the motor measured between 18 & 48 Rockwell C (If anyone needs collets for a twin cam I have about 200 sets for sale and no they are not the same as standard MGA collets.)
The head was sent to Milton Engine Developments (he does all Supaloc Racing work, not cheap but his work is exceptionally good). The head is straightened, ultrasonically cleaned and pressure tested to reveal five small cracks. These are welded and the head face machined (It is vitally important to remove the bare minimum from the head as the valves when open are extremely close to the piston top about .020”) Valves are reground seats replaced and machined and valve clearance reset. Valve clearance on the twin cam should be .014” - .015, when the head was removed the clearances ranged from .012” - .019” more evidence of a shonky restoration job. Cost of head repairs $1800.00.
The block was in very good condition with minimal glazing in the bores only requiring a very light hone. Similarly the crankshaft, bearing, con rods and pistons did not require any work or replacement. The head and block were ultrasonically cleaned to loosen any deposits in the water galleries and then high-pressure water blasted to remove an amazing amount of crap. This consisted of either Devcon or Araldite that had been used to repair various aluminium components i.e. the thermostat housing, water pump outlet, and the head coolant inlet housing. This dodgy fix had over the seven years since the motor was supposedly rebuilt, all fallen off and lodged in the radiator and the bottom of the block. I machined out the corroded sections and made corresponding new aluminium parts that have been welded in and re machined, as new parts are again NLA. If you attempt any of these repairs, use Grade 6061 T6 Aluminium. Do not use any of the 2000 or 7000 series, as these cannot be welded successfully.

7
Whilst the major engine work was being done other parts were being prepared e.g. Exhaust Manifold was ceramic coated, aluminium parts (timing chain cover, carby bodies and various other parts) were wet blasted. (Produces a lovely finish and easy to clean compared with traditional blasting techniques) Various small nuts, bolts and fittings were zinc plated.
Brad now starts the job of rebuilding the engine and in the process of replacing the pistons breaks one piston ring, (Simon did a remarkable job of repairing the ring with a bit of sticky tape but I thought I would try to get a new one before I took a chance with his repair) I immediately think that this may be a serious issue as the block has been bored .100” oversize (engine is now approx. 1720 cc as against the original 1580 cc) and a new ring or set of rings will again have the dreaded NLA next to the part No. The Internet reveals rings are only available in .020”, .040” and .060” oversize. I rang JP Engineering on the off chance that they may have one or can make me one, to my amazement amongst the many thousands of rings they have in stock, they have from some obscure 1950”s American car, a ring exactly the right size.
I mentioned earlier the oil leaks discovered when the motor was removed. Anticipating replacing all the gaskets I purchased a complete set from Brown and Gammon (yes gaskets are one item that do not have the dreaded NLA notation) Price for the set including postage $210.00.
Brad informs me that with the exception of the head, inlet and exhaust manifold gaskets he has no intention of using any of them and instead I (me) will machine all the surfaces that seal to ensure that they are flat and will also machine “O” ring grooves into the sump, inlet manifold on the carby side and overhead cam covers and will make an 8mm thick aluminium cover with “O” ring groove to replace the breather covers on the side of the block. His reasoning for this approach is that primitive ¼” thick cork gaskets and thin sheet metal covers will never seal as long as his backside points to the ground and besides the only gasket on Lamborghini’s and GT40 Fords (the cars that he normally works on) is the head gasket. (This too incorporates a silicone “O” ring) The only problem area he has is the rope seal on the rear end of the crankshaft, he believes that this method of sealing a crankshaft was used on the very early steam traction engines and that is where it should have stayed. We investigate using a conventional oil seal in its

8
place but decide that it would be near impossible to incorporate a modern seal with out major re-machining of the block and rear engine plate so he reluctantly agrees to use a new rope seal. He is concerned that if I find any oil leaks after he has finished I will never let him forget it While Brad is re-assembling the engine I spend untold hours machining surfaces and “O” ring grooves into the above mentioned parts. (Fortunately I am The Worlds Greatest Engineer)
Brad encounters problems timing the engine; adjustment for the timing entails matching the holes in the face of the cam shaft with the correct hole in the timing chain sprockets to achieve the correct valve timing. The correct hole on the left hand sprocket was badly burred and it would appear that the afore mentioned “shonk” instead of fixing the hole decided that the next hole around would be near enough, thus the timing was out by about 4 degree’s, Fixed the correct hole and now have the engine timed correctly.

9
Some of the oil leaks that were present were probably caused by more “shonky” work as follows. Sump sealing surface had approx .075” buckle probably caused by one of the studs on the big end bearing cap for number 1 cylinder being .080” longer than the rest with the result that with every rotation of the crank it hit the sump-sealing surface. The aluminium cam drive cover on the front of the engine was .060” higher than the corresponding surface on the head so that tightening the cam cover resulted in bending the cover to fit resulting in more oil leaks.
10
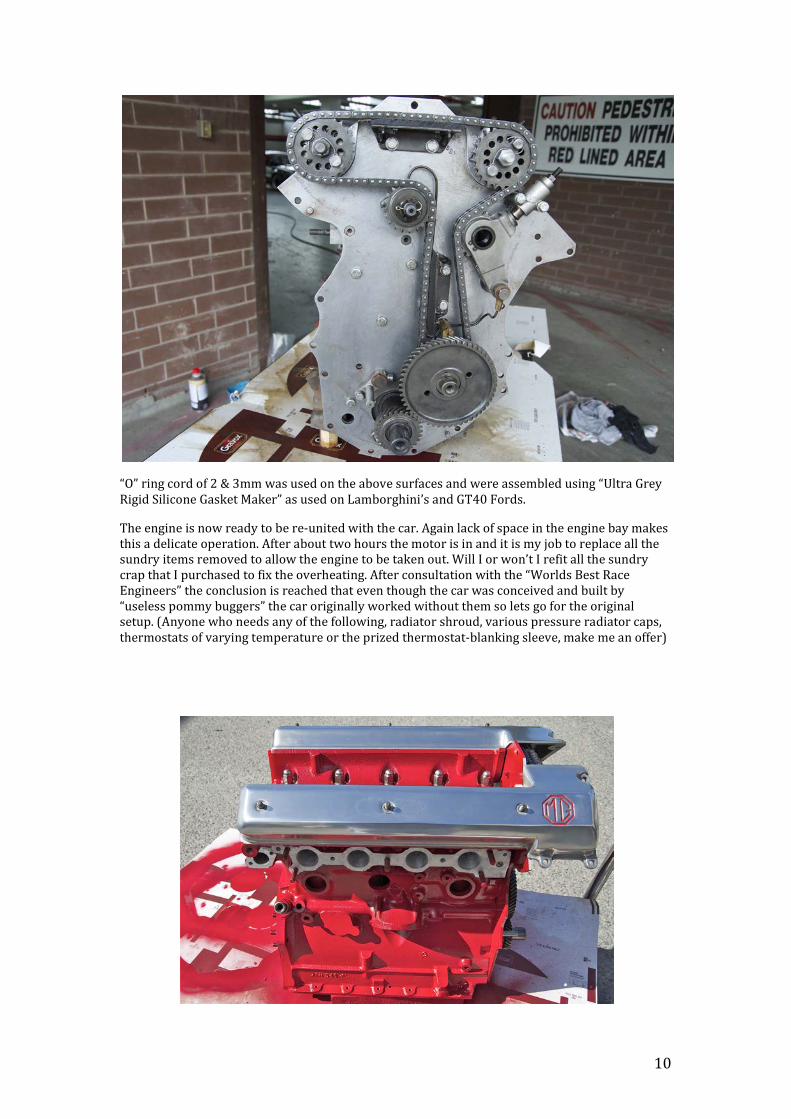
“O” ring cord of 2 & 3mm was used on the above surfaces and were assembled using “Ultra Grey Rigid Silicone Gasket Maker” as used on Lamborghini’s and GT40 Fords.
The engine is now ready to be re-united with the car. Again lack of space in the engine bay makes this a delicate operation. After about two hours the motor is in and it is my job to replace all the sundry items removed to allow the engine to be taken out. Will I or won’t I refit all the sundry crap that I purchased to fix the overheating. After consultation with the “Worlds Best Race Engineers” the conclusion is reached that even though the car was conceived and built by “useless pommy buggers” the car originally worked without them so lets go for the original setup. (Anyone who needs any of the following, radiator shroud, various pressure radiator caps, thermostats of varying temperature or the prized thermostat-blanking sleeve, make me an offer)

11

12
After about ten hours of hard labour lost skin and various cuts and bruises to yours truly, the engine is ready to fire up. Will it go? Brad has a bit of a fiddle with the carburettors and says that they should be somewhere near right. Turn the motor over for about 30 sec. (with ignition immobiliser on) to get a bit of oil pressure. Switch off immobiliser hit the starter and bugger me it starts, after a bit more fiddling with the carby settings it is running like a new one or maybe better than a new one. Check the ignition timing, slight adjustment and it is running better still. Up onto the hoist to check for leaks, not an oil leak to be seen but horror of all horrors we have slight coolant leaks from two of the new welsh plugs on the side of the motor. Immediately I think that the motor will need to be removed to fix this. It is now late on the Friday afternoon before the following Wednesday start of Targa Adelaide. I have never been much of a worrier but am now beginning to panic a little. Brad reckons a mate of his has a tool that will allow the removal and replacement of the two offending plugs without removing the motor, he will pick it up Friday night and we will fix it Saturday morning. Off to Autobarn at Elizabeth, they only have one welsh plug, onto Sprint Auto Parts at Mono Para, they also have only one. So now I have two, we can’t afford to stuff one up. Brad arrives with the TOOL OF THE MONTH Saturday morning and proceeds with some degree of difficulty to remove the offending plugs and fit the new ones.
Refill the coolant system start the motor and to our relief no leaks. I spend the rest of the day refitting the various removable panels under the front mudguards and various other parts that had been removed.
13
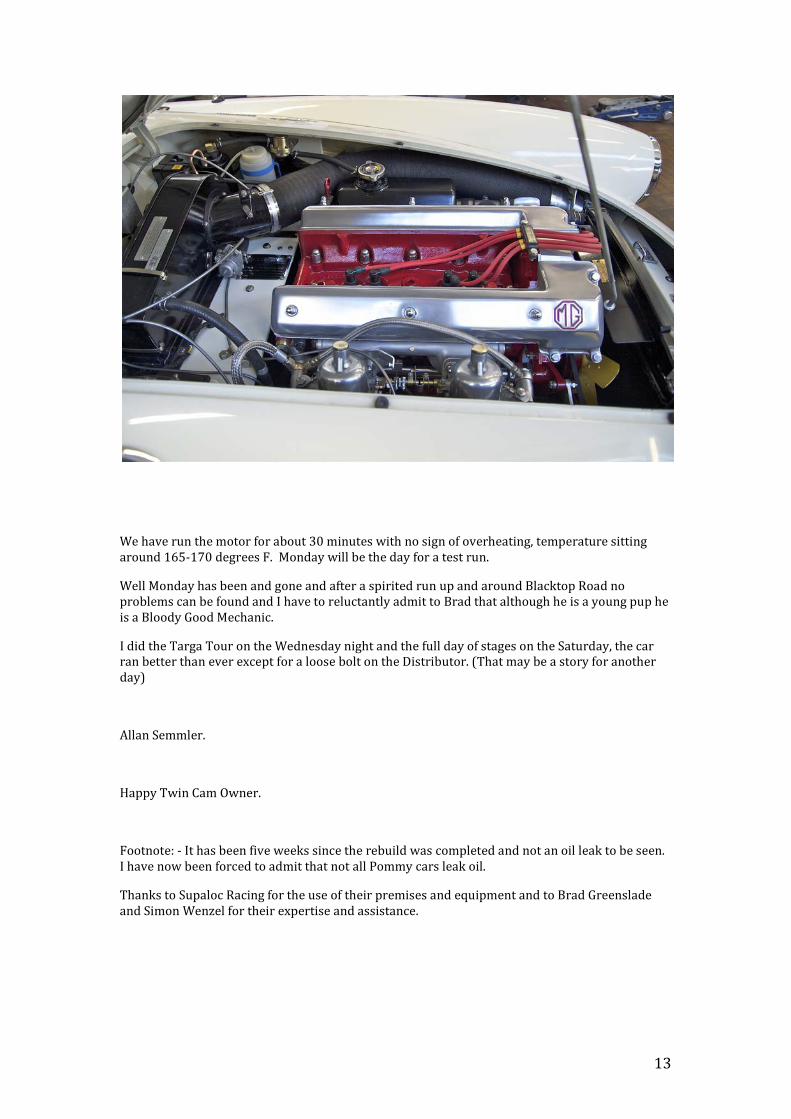
We have run the motor for about 30 minutes with no sign of overheating, temperature sitting around 165-170 degrees F. Monday will be the day for a test run.
Well Monday has been and gone and after a spirited run up and around Blacktop Road no problems can be found and I have to reluctantly admit to Brad that although he is a young pup he is a Bloody Good Mechanic.
I did the Targa Tour on the Wednesday night and the full day of stages on the Saturday, the car ran better than ever except for a loose bolt on the Distributor. (That may be a story for another day)
Allan Semmler.
Happy Twin Cam Owner.
Footnote: - It has been five weeks since the rebuild was completed and not an oil leak to be seen. I have now been forced to admit that not all Pommy cars leak oil.
Thanks to Supaloc Racing for the use of their premises and equipment and to Brad Greenslade and Simon Wenzel for their expertise and assistance.