the sun shines on the granite bay montessori shack20articles_stories/sun... · · 2011-01-28two...
TRANSCRIPT

February 2011 1
day to get the required battery Ah capacity. We wanted to run without solar energy
for 3 days. We took the average Ah per day (30 Ah), multiplied it by 3 days and determined we need 90 Ah of storage. The nearest battery capacity available is 98 Ah, which means we can run without solar energy for 31⁄3 days.
Calculating PV Panel CapacityTo determine PV panel capacity, you need
to know the power and energy budget from step 1. First, take the Wh value and divide it by the minimum hours of sunlight per day (in winter, usually). That will give you the minimum PV panel wattage.
We determined we needed about 365 Wh per day to run our station (see Table 1) and estimated that we get about 8 hours of sun-light each day in the winter. Dividing 8 into 365 means we need a 45 W panel. Since PV
panels only produce about half their rated power in real life, we multiply our mini-mum PV panel wattage by two. This gives us 90 W, which is the minimum PV panel wattage needed for our installation.
We got a really good deal on a 120 W panel on eBay.
D uring our last Field Day our school station used solar power for its opera- tion. After Field Day, when we were
back in school, our Science and Technology teacher, Brian Lloyd, WB6RQN, challenged us to design a solar power system for our club station.
You probably thought that you could go out, buy a solar (PV) panel, hook it up to your station and then your station would run off of solar energy. Well, we hate to break it to you, but it is a bit more complicated than that if you want good results. There are many things that you have to do before you convert your station to solar power. Our school applied for and received a grant from the ARRL to con-vert our station to solar power. This article explains how we did it.
Power and Energy BudgetThe first step is to create a power and
energy budget for the equipment. To do so, follow these steps to find out how much power your equipment uses throughout the day.
1. Find the average current drawn by each radio. To calculate this multiply current used in receive by the average amount of time spent receiving (in percent). Perform the same calcu-lation for transmit and add them together. That will give you your average current in amperes (AA). For example, if the radio uses 0.2 A on receive, 10 A on transmit and receives 90% of the time, the calculation would be:
0.2 A × 0.9 = 0.18 AA10 A × 0.1 = 1 AA
2. To get power, you mul-tiply the average current by the voltage (AA × V) for each radio. If the average cur-rent was 0.5 A at 12 V, the power is 6 W.
3. Now it’s time to calculate ampere-hours (Ah) so we can determine the battery capacity. Multiply the total AA by the hours per day the radio is used
The Sun Shines on the Granite Bay Montessori Shack
Sylvie Fournier, KI6WZB, Frankie Moirao, KI6QYS, and Brian Lloyd, WB6RQN
Two young hams design and build a solar power system for their school’s shack.
Table 1Power/Energy Budget (12 V)
Receive Receive Transmit Transmit Average Hours/Device A Percent A Percent A Day Ah Wh2 m transceiver 0.29 90 11 10 1.36 4 5.44 65.33HF transceiver 0.54 90 15 10 1.99 4 7.94 95.33Satellite receiver 0.1 100 — 0 0.1 8 0.8 9.6440 MHz repeater 0.46 95 4.8 5 0.68 24 16.25 194.98
Totals 30.44 365.23
Figure 1 — The solar panel attached to the side of the school building adjusted for an angle of 60° to get the most sunlight regardless of the time of year.
to find your Ah requirement. If AA is 0.5 A and the hours per day is 5, then your radio requires 2.5 Ah per day.
4. Next find the total watt-hours (Wh) by multiplying your power by the hours per day that you use your radios. So, if the power is 6 W and you use that radio 5 hours per day, then the radio requires 30 Wh per day. Do this for each radio then add the individual Ah and Wh values together to determine the total for the whole station. At our school we built a spreadsheet to do the calculations (see Table 1).
Calculating Battery CapacityThe next step is to determine the battery
capacity required to run the station without being charged by the PV panel. Take the number of days you want to run without the solar panel (sunless days) and multiply that by how many Ah your station consumes each
2 February 2011
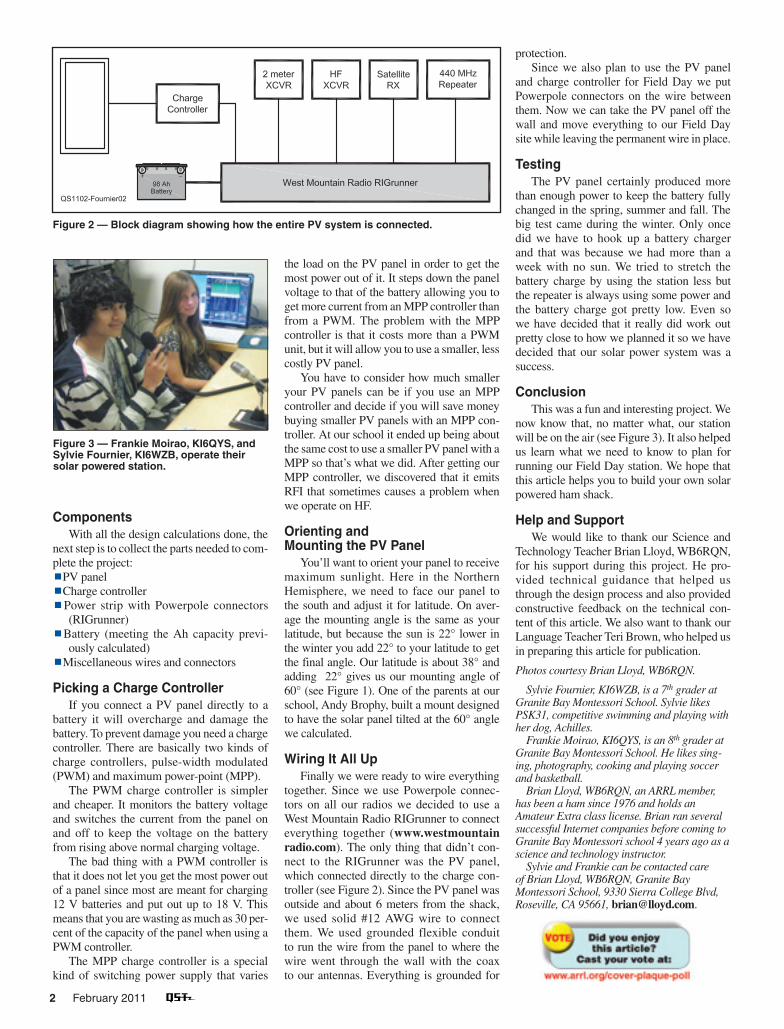
Figure 2 — Block diagram showing how the entire PV system is connected.
Figure 3 — Frankie Moirao, KI6QYS, and Sylvie Fournier, KI6WZB, operate their solar powered station.
ComponentsWith all the design calculations done, the
next step is to collect the parts needed to com-plete the project: PV panelCharge controllerPower strip with Powerpole connectors
(RIGrunner)Battery (meeting the Ah capacity previ-
ously calculated)Miscellaneous wires and connectors
Picking a Charge ControllerIf you connect a PV panel directly to a
battery it will overcharge and damage the battery. To prevent damage you need a charge controller. There are basically two kinds of charge controllers, pulse-width modulated (PWM) and maximum power-point (MPP).
The PWM charge controller is simpler and cheaper. It monitors the battery voltage and switches the current from the panel on and off to keep the voltage on the battery from rising above normal charging voltage.
The bad thing with a PWM controller is that it does not let you get the most power out of a panel since most are meant for charging 12 V batteries and put out up to 18 V. This means that you are wasting as much as 30 per-cent of the capacity of the panel when using a PWM controller.
The MPP charge controller is a special kind of switching power supply that varies
protection. Since we also plan to use the PV panel
and charge controller for Field Day we put Powerpole connectors on the wire between them. Now we can take the PV panel off the wall and move everything to our Field Day site while leaving the permanent wire in place.
TestingThe PV panel certainly produced more
than enough power to keep the battery fully changed in the spring, summer and fall. The big test came during the winter. Only once did we have to hook up a battery charger and that was because we had more than a week with no sun. We tried to stretch the battery charge by using the station less but the repeater is always using some power and the battery charge got pretty low. Even so we have decided that it really did work out pretty close to how we planned it so we have decided that our solar power system was a success.
ConclusionThis was a fun and interesting project. We
now know that, no matter what, our station will be on the air (see Figure 3). It also helped us learn what we need to know to plan for running our Field Day station. We hope that this article helps you to build your own solar powered ham shack.
Help and SupportWe would like to thank our Science and
Technology Teacher Brian Lloyd, WB6RQN, for his support during this project. He pro-vided technical guidance that helped us through the design process and also provided constructive feedback on the technical con-tent of this article. We also want to thank our Language Teacher Teri Brown, who helped us in preparing this article for publication.
Photos courtesy Brian Lloyd, WB6RQN.
Sylvie Fournier, KI6WZB, is a 7th grader at Granite Bay Montessori School. Sylvie likes PSK31, competitive swimming and playing with her dog, Achilles.
Frankie Moirao, KI6QYS, is an 8th grader at Granite Bay Montessori School. He likes sing-ing, photography, cooking and playing soccer and basketball.
Brian Lloyd, WB6RQN, an ARRL member, has been a ham since 1976 and holds an Amateur Extra class license. Brian ran several successful Internet companies before coming to Granite Bay Montessori school 4 years ago as a science and technology instructor.
Sylvie and Frankie can be contacted care of Brian Lloyd, WB6RQN, Granite Bay Montessori School, 9330 Sierra College Blvd, Roseville, CA 95661, [email protected].
the load on the PV panel in order to get the most power out of it. It steps down the panel voltage to that of the battery allowing you to get more current from an MPP controller than from a PWM. The problem with the MPP controller is that it costs more than a PWM unit, but it will allow you to use a smaller, less costly PV panel.
You have to consider how much smaller your PV panels can be if you use an MPP controller and decide if you will save money buying smaller PV panels with an MPP con-troller. At our school it ended up being about the same cost to use a smaller PV panel with a MPP so that’s what we did. After getting our MPP controller, we discovered that it emits RFI that sometimes causes a problem when we operate on HF.
Orienting and Mounting the PV Panel
You’ll want to orient your panel to receive maximum sunlight. Here in the Northern Hemisphere, we need to face our panel to the south and adjust it for latitude. On aver-age the mounting angle is the same as your latitude, but because the sun is 22° lower in the winter you add 22° to your latitude to get the final angle. Our latitude is about 38° and adding 22° gives us our mounting angle of 60° (see Figure 1). One of the parents at our school, Andy Brophy, built a mount designed to have the solar panel tilted at the 60° angle we calculated.
Wiring It All UpFinally we were ready to wire everything
together. Since we use Powerpole connec-tors on all our radios we decided to use a West Mountain Radio RIGrunner to connect everything together (www.westmountainradio.com). The only thing that didn’t con-nect to the RIGrunner was the PV panel, which connected directly to the charge con-troller (see Figure 2). Since the PV panel was outside and about 6 meters from the shack, we used solid #12 AWG wire to connect them. We used grounded flexible conduit to run the wire from the panel to where the wire went through the wall with the coax to our antennas. Everything is grounded for