the study on upper west integrated agricultural
TRANSCRIPT

Ministry of Food and Agriculture The Republic of Ghana
JAPAN INTERNATIONAL COOPERATION AGENCY
KAIHATSU MANAGEMENT CONSULTING, INC. CTI ENGINEERING INTERNATIONAL CO., LTD.
No.
GNO
JR
10-004
The Study on Upper West Integrated Agricultural Development
in the Republic of Ghana
Final Report
Part III Instruction Manuals for Agricultural Technologies and Tools
March 2010

Ministry of Food and Agriculture The Republic of Ghana
JAPAN INTERNATIONAL COOPERATION AGENCY
KAIHATSU MANAGEMENT CONSULTING, INC. CTI ENGINEERING INTERNATIONAL CO., LTD.
The Study on Upper West Integrated Agricultural Development
in the Republic of Ghana
Final Report
Part III Instruction Manuals for Agricultural Technologies and Tools
March 2010

i
Table of Contents
Guide for the Use of the Manual ..................................................................1 Chapter 1 Crop Production 1.1 Sorghum Production ..............................................................................3 1.2 Cowpea Production ...............................................................................7 1.3 Soybean Production ............................................................................. 11 1.4 Groundnut Production .........................................................................15 1.5 Upland Rice Production ......................................................................19 1.6 Lowland Rice Production ....................................................................25 1.7 Tomato Production ..............................................................................29 1.8 Eggplant Production ............................................................................39 1.9 Green Pepper Production ....................................................................49 1.10 Cabbage Production ............................................................................59 1.11 Okra Production ...................................................................................67 1.12 Melon Production ................................................................................71 1.13 Mango Transplanting ...........................................................................79 1.14 Drying and Storing the Harvests .........................................................83 1.15 Compost Making .................................................................................87 1.16 Erosion Check .....................................................................................93 Chapter 2 Animal Production 2.1 Pig Rearing ..........................................................................................97 2.2 Guinea Fowl Rearing ........................................................................103 2.3 Rabbit Rearing ...................................................................................109 Chapter 3 Processing 3.1 Shea Soap .......................................................................................... 115 3.2 Groundnut Oil .................................................................................... 121

1
Guide for the Use of the Manual
The Instruction Manuals for Agricultural Technologies and Tools have been developed for the purpose of introducing appropriate agricultural technologies to the MOFA staff and farmers in the Upper West Region (UWR). The intended readers of the Manuals are therefore mainly DAOs, AEAs of MOFAUWR, and farmers.
It is expected to enhance food security and increase income of the people in the area by improving agricultural technologies. To verify potential agricultural technologies for the UWR, the Pilot Development Activities (PDAs) have been implemented through the JICA’s Study on “Upper West Integrated Agricultural Development” in 2008 and 2009. Various agricultural technologies have been tested in comparison with the traditional methods at the trial plots. The findings have been reflected on the Manuals.
The Manuals are comprised of three chapters; crop production, animal production, and processing. These activities are the most important for farmers in the area to produce foods and generate incomes. All the technologies included in the Manuals are: i) require low cost and low input, ii) use locally available materials as much as possible, and iii) are applicable to the farms in the area. It is the hope of the Study Team that the Manuals are widely used and contribute to improve the livelihood of farmers.

Chapter 1 Crop Production

3
Instruction Manual for Agricultural Technologies
1.1 Sorghum Production
Improved variety Local variety

4
Sorghum seeds can be sown on the ridged
beds.
The field must be well leveled after weeding
and plowing by hoe.
If compost is available, spread it all over the
planting field in the dose of 20t/ha prior to
sowing seeds.
Compost must be uniformly spread all over
before sowing seeds, unlike chemical
fertilizer, since it takes time for
decomposition to be in usable form for
plants.
Sowing has to be done in the early stages of
rainy season. Sow 3 to 4 seeds per hill, under
rain fed condition, about 2cm deep keeping
interval of 20cm and 70cm between rows.
Cover the seeds with the soil around.
An improved early matured variety like
Kapaala/Dorado is recommended under the
unsteady rain pattern in UWR.
a) Weeding and leveling
1. Land Preparation and Sowing
c) Sowing
b) Compost application

5
Weeding must be done to eliminate
competition for the growth of sorghum.
Uproot “Striga” whenever you see it.
In case of use of chemical fertilizer, apply
130kg (about 2.5 bags)/ha of NPK:15,15,15
when the crop grows 30-40cm in hight.
Fertilizer should be applied along the
planting rows or dropped little by little at the
base of each planting hill, and cover it with
soil.
To prevent from insect pest, spray chemical
on the entire plants once or twice in the
planting period.
Any commercial insecticides available can
be used by diluting into 1000 to 2000 times
with water, that is equivalent to one and a
half (1.5) caps of “Voltic Water” for 16 liters
knapsack sprayer filled with water.
2. Crop Management
a) Weeding and fertilizer application
b) Pest control
20cm
10-15cm
70cm
d) Planting distance

6
Harvest matured heads/pinnacles one by one
by cutting.
Threshing is normally done by beating with a
wooden stick on the concrete floor or
tarpaulin after sufficiently drying up the
grains under sunlight.
Grains are dried up again after threshing.
a) Time of harvesting
3. Harvesting and Post Harvest
b) Threshing and drying

7
Instruction Manual for Agricultural Technologies
1.2 Cowpea Production

8
Cowpea seeds can be sown on the flat or
ridged beds.
The field must be well leveled after weeding
and plowing by hoe.
If compost is available, spread it all over the
planting field in the dose of 20t/ha prior to
sowing seeds.
Compost must be uniformly spread all over
before sowing seeds, unlike chemical
fertilizer, since it takes time for
decomposition to take place and release
nutrients in usable form for plants uptake.
Sow 2 to 3 seeds for each hill, under rain fed
condition, about 2-3cm deep keeping interval
of 20cm and 60cm between intra-row
spacing.
Cover the seeds with the soil around.
An improved early matured variety like
Songotra/Apagbaala is recommended under
the unsteady rain pattern in UWR.
a) Weeding and leveling
1. Land Preparation and Sowing
c) Sowing
b) Compost application

9
Weeding must be done to eliminate
competition for the growth of cowpea.
In case of the use of chemical fertilizer,
apply 130kg (about 2 and half bags) of
NPK:15,15,15 per hectares as soon as
possible before the initial growth of cowpea
is completed.
Fertilizer should be applied along the
planting rows or dropped little by little at the
base of each planting hill.
To prevent from insect pest, spray chemical
on the entire plants once or twice in the
planting period.
Any commercial insecticides available can
be used by diluting into 1000 to 2000 times
with water, that is equivalent to one and a
half (1.5) caps of “Voltic Water” for 16 liters
knapsack sprayer filled with water.
2. Crop Management
a) Weeding and fertilizer application
b) Pest control
10-15cm
20cm
60cm

10
Harvest matured pods one by one by picking
as they get brownish and dry.
Threshing is normally done by beating with a
wooden stick on the concrete floor or
tarpaulin after sufficiently drying up the peas
under sunlight.
Peas are dried up again after threshing.
a) Time of harvesting
3. Harvesting and Post Harvest
b) Threshing and drying

11
Instruction Manual for Agricultural Technologies
1.3 Soybean Production

12
Soybean seeds can be sown on the flat beds.
The field must be well leveled after weeding
and plowing by hoe.
If compost is available, spread it all over the
planting field in the dose of 20t/ha prior to
sowing seeds.
Compost must be uniformly spread all over
before sowing seeds, unlike chemical
fertilizer, since it takes time for
decomposition to be in usable form for
plants.
Sow 2 to 3 seeds for each hill, under rain fed
condition, about 2-3cm deep keeping interval
of 10cm and 75cm between intra-row
spacing.
Cover the seeds with the soil around.
An improved early matured variety like
Jengumatra is recommended under the
unsteady rain pattern in UWR.
a) Weeding and leveling
1. Land Preparation and Sowing
c) Sowing
b) Compost application

13
Weeding must be done to eliminate
competition for the growth of soybean.
In case of use of chemical fertilizer, apply
130kg (about 2 and half bags) of
NPK:15,15,15 per hector as soon as possible
before initial growth of soybean is
completed.
Fertilizer should be applied along the
planting rows or dropped little by little at the
base of each planting hill.
To prevent from insect pest, spray chemical
on the entire plants once or twice in the
planting period.
Any commercial insecticides available can
be used by diluting into 1000 to 2000 times
with water that is equivalent to one and a
half (1.5) caps of “Voltic Water” for 16 liters
knapsack sprayer filled with water.
2. Crop Management
a) Weeding and fertilizer application
b) Pest control
10cm
10cm
75cm 75cm

14
Harvest matured pods one by one by picking
as they get brownish and dry.
Threshing is normally done by beating with a
wooden bar on the concrete floor in Ghana
after sufficiently drying up the beans under
sunlight.
Beans are dried up again after threshing.
a) Time of harvesting
3. Harvesting and Post Harvest
b) Threshing and drying

15
Instruction Manual for Agricultural Technologies
1.4 Groundnut Production
With compost No compost
16
Groundnut seeds can be sown on the flat or
ridged beds.
The field must be well leveled after weeding
and plowing by hoe.
If compost is available, spread it all over the
planting field in the dose of 20t/ha prior to
sowing seeds.
Compost must be uniformly spread all over
before sowing seeds.
The effect of the compost is shown in the
cover page.
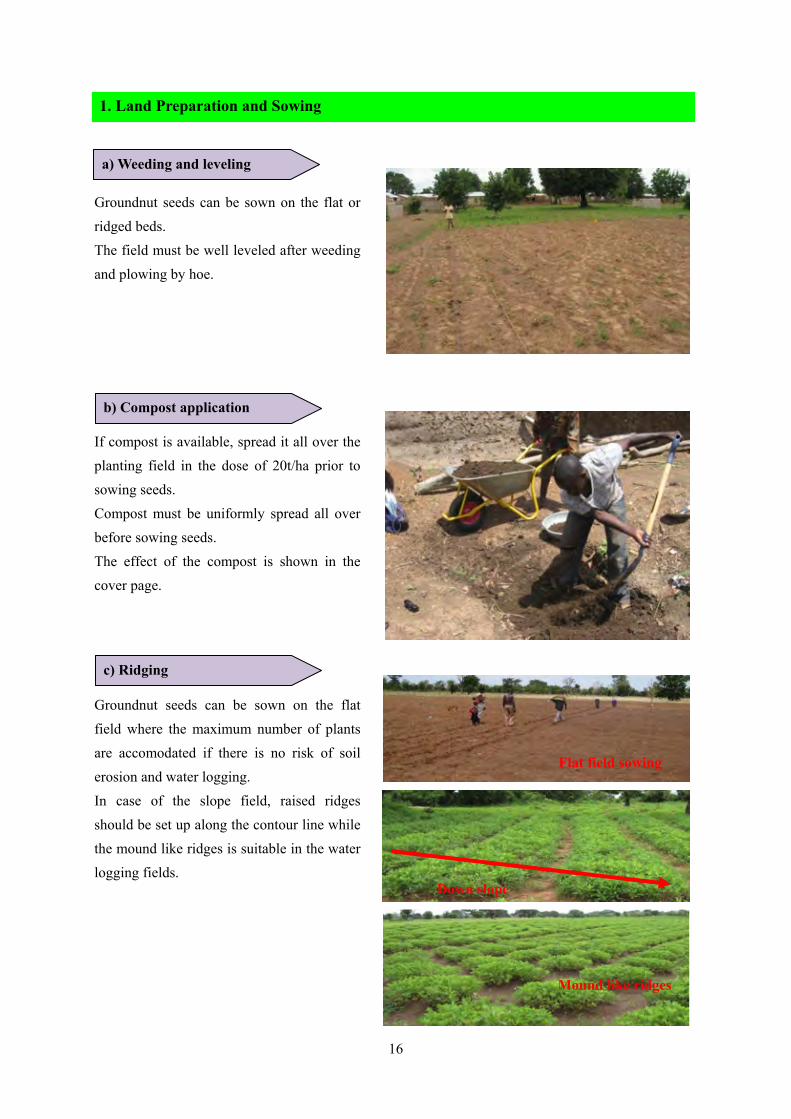
Groundnut seeds can be sown on the flat
field where the maximum number of plants
are accomodated if there is no risk of soil
erosion and water logging.
In case of the slope field, raised ridges
should be set up along the contour line while
the mound like ridges is suitable in the water
logging fields.
a) Weeding and leveling
1. Land Preparation and Sowing
c) Ridging
b) Compost application
Flat field sowing
Down slope
Mound like ridges

17
Sow 2 seeds per hill, under rain fed
condition, about 2-3cm deep keeping interval
of 20cm and 40cm between rows spacing.
Cover the seeds with the soil around.
An improved early matured variety like
“Chinese” is recommended under the
unsteady rain pattern in UWR
Weeding must be done to eliminate
competition for the growth of groundnut.
In case of the use of chemical fertilizer, apply
130kg (about 2 and a half bags) of
NPK:15,15,15 per hectares as soon as possible
before the initial growth of groundnut is
completed.
Fertilizer should be applied along the planting
rows or dropped little by little at the base of
each plant hill.
2. Crop Management
a) Weeding and fertilizer application
d) Sowing
A sample of planting
space on ridge 20
20 40 40 20
120cm

18
To prevent from insect pest, spray chemical on
the entire plants once or twice in the planting
period.
Any commercial insecticides available can be
used by diluting into 1000 to 2000 times with
water that is equivalent to one and a half (1.5)
caps of “Voltic Water” for 16 liters knapsack
sprayer to be filled with water.
Harvest when 70-80 % of nuts are matured by
uprooting with a hoe to ease the plant out of
soil.
The harvested groundnut has to be dried
immediately, and never heap or pack it in
sacks to avoid the incidence of fungal
diseases.
Removing shell from plant is normally done by
hand, and dry them up again under sunlight
before putting in sacks to store.
Shelling is done either by hand or a manual
shelling machine.
a) Time of harvesting
3. Harvesting and Post Harvest
b) Pest control
b) Shelling and drying

19
Instruction Manual for Agricultural Technologies
1.5 Upland Rice Production

20
Activities May. Jun. Jul. Aug. Sep. Oct.
1. Field preparation
2. Compost application
3. Sowing
4. Weeding & fertilizer application
5. Harvesting
Upland rice seeds can be sown on the flat
beds.
The field must be well leveled after weeding
and plowing by hoe.
If compost is available, spread it all over the
planting field in the dose of 20t/ha prior to
sowing seeds.
Compost must be uniformly spread all over
before sowing seeds, unlike chemical
fertilizer, since it takes time for decomposition
to be in usable form for plants.
a) Weeding and leveling
2. Land Preparation and Sowing
b) Compost application
1. Farming Calendar
a) Farming calendar

21
Make sowing ditches straight with a wooden
stick along the rope tightly stretched between
the ends of rows.
Ditches are to be made about 2cm deep
keeping interval of 50cm to 60cm between
intra-row spacing.
Sow in drill in the amount of 50kg/ha along
the ditches under rain fed condition.
An improved early matured variety like Wap
is recommended under the unsteady rain
pattern in UWR.
After sowing seeds, cover the seeds with the
soil around and step down to press the seeds
for better contact with the soil.
c) Sowing
50 – 60cm
d) Compaction by stepping

22
Weeding must be done to eliminate
competition for the growth of rice plants.
In case of use of chemical fertilizer, apply
130kg (about 2 and a half bags) of
NPK:15,15,15 per hector as soon as possible
before the initial growth of rice plants is
completed.
Fertilizer should be applied along the planting
rows.
To prevent from insect pest, spray chemical on
the entire plants once or twice in the planting
period.
Any commercial insecticides available can be
used by diluting into 1000 to 2000 times with
water that is equivalent to one and a half (1.5)
caps of “Voltic Water” for 16 liters knapsack
sprayer filled with water.
Harvest panicles using a sickle when the
majority of the grains turn brownish.
Harvesting should be done when the weather
is fine, considering the later processes such as
drying and threshing.
3. Crop Management
a) Weeding and fertilizer application
a) Harvesting time
b) Pest control
4. Harvesting

23
Threshing is normally done by beating with a
wooden bar on a tarpouline sheet or a concrete
floor in Ghana after sufficiently drying up the
grains under sunlight.
b) Threshing and drying

24

25
Instruction Manual for Agricultural Technologies
1.6 Lowland Rice Production

26
Lowland rice has to be sown in valley
bottom fields where submerged shallowly.
The field must be well leveled after
weeding and plowing by hoe.
If compost is available, spread it all over
the planting field in the dose of 20t/ha prior
to sowing seeds.
Compost must be uniformly spread all over
before sowing seeds, unlike chemical
fertilizer, since it takes time for
decomposition to be in usable form for
plants.
Sow 5- 6 seeds per hill about 1cm deep
keeping interval of 20cm and 25cm
between rows.
Cover the seeds with the soil around.
An improved early matured variety like
“Digan” is recommended.
a) Weeding and leveling
1. Land Preparation and Sowing
c) Sowing
b) Compost application
25 25 25 25
20

27
Weeding must be done to eliminate
competition for the growth of rice.
In case of use of chemical fertilizer, apply
130kg (about 2.5 bags)/ha of
NPK:15,15,15 when the crop grows
30-40cm in hight.
Fertilizer should be applied by
broadcasting evenly all over the field.
To prevent from insect pest, spray chemical
on the entire plants once or twice in the
planting period.
Any commercial insecticides available can
be used by diluting into 1000 to 2000 times
with water, that means 2-3 Voltic caps per
16 liters sprayer.
Harvest matured heads/pinnacles one by
one by cutting.
a) Time of harvesting
3. Harvesting and Post Harvest
b) Pest control
2. Crop Management
a) Weeding and fertilizer application

28
Threshing is normally done by beating with
a wooden stick on the concrete floor after
sufficiently drying the grains under sun.
The grains are dried up again after
threshing.
For the rice for domestic use within the
limited period, dry the grain remains on
panicles ,then heap up for store.
b) Threshing and drying
A heap of well dried rice panicles

29
Instruction Manual for Agricultural Technologies
1.7 Tomato Production

30
Find a sunny and flat place for nursery.
Apply NPK compound fertilizer in the amount of
200g/m2 to the nursery and mix it well with the soil
dug up 10cm in the depth.
Make flat bed for nursery at about 10–20cm high
and 100cm wide by hoe.
Rio Grande is the only improved variety available
in UWR.
The variety bears firmer fruits than the local
variety and is more suitable to handle and
transport.
Make 5 sowing ditches/m2 of about 1 to 1.5cm in the depth at 20cm interval on the bed. Sow seeds in
the drilled ditches uniformly.
Cover the sowing ditches with light soil sieved by fine mesh for quick germination.
1. Preparation of Nursery
a) Fertilizer application
b) Nursery bed
2. Sowing
a) Sowing
c) Improved variety

31
After watering gently, cover the soil thinly with
palm leaves or any dry grass for promoting
germination and preventing dryness.
Remove the cover from the soil when seeds
germinate and gradually refrain from watering.
Watering is preferred to be done every morning.
Check out the optimal time to transplant.
Optimal time is when there are 3-4 true leaves and
about 20-25 days after the sowing date.
b) Covering
3. Raising Seedling
a) Removal of the cover
b) Optimal time for transplanting

32
Manuring is preferred. Put it as much as
possible.
It should be applied one week before
transplanting.
Example:
Prepare 10m x 10m land for 200 plants.
Till to the depth of 20cm from surface soil and
mix.
Make ridges in height of 15cm and width of
1m by hoe.
Open a space between ridges wide enough to
walk.
Cut inter-row spaces by knife every two days
starting a week before transplanting to
stimulate the growth of new roots.
4. Land Preparation
a) Compost application
b) Ridging
5. Transplanting
a) Cutting inter-row space

33
After watering substantially, uproot them from
the bottom of the roots by hand.
Be careful not to injure the roots.
Dig planting holes and put seedlings in the
holes.
The planting depth is to coordinate soil surface
and root of the seed leaf.
Push the soil softly by hand. Root taking will
be done within 3 days.
b) Uprooting
d) Transplanting
c) Planting density
1m
0.5m
0.5m
1m
15-20cm

34
Apply 4kg/10a on K2O base of NPK
compound fertilizer around the plants.
The fertilizer has to be incorporated with the
soil.
Example:
Fertilizer type: NPK 15-15-15
Amount: 27Kg/10a
Apply a hand grip of fertilizer for each plant.
Cover the soil with rice straw or similar one to
retain water and to prevent from weeds.
Water sufficiently every day.
Top dress around or between plants every 2
weeks after the first fruits set.
Example:
Fertilizer type: NPK 15-15-15
Apply a pinch of fertilizer per plant and cover
with the soil.
� First top dressing.
� Second top dressing
� Third top dressing
e) Fertilizer application
6. Crop Management
a) Mulching
b) Top dressing

35
Pinch lateral shoots except the primary stems and 2 of the most vigorous secondary stems.
c) Pinching
Pruning of tomato
The shoot growing from under the 1st cluster is vigorous
The shoot growing from under the 2nd cluster or above that position is not so vigorous
The shoot growing from under the 1st cluster is vigorous
Leave any shoots growing from above the 1st cluster
Pinch off all the lateral shoots under the shoot growing from 2nd node under the 1st flower

36
Disease and insects should be controlled
thoroughly in the nursery to avoid them widely
spread to the field.
However, little damage occurs after transplanting.
For the insect control, the following measures
should be taken.
Applicable insecticide:
Organic phosphorus compound such as
Malathion, Endosulfan and Cyflane.
Application method:
Spray immediately after any insects appear on the
plants especially at the nursery, by diluting with
2000 to 3000 times of water.
Caution:
Spray several times for the complete control.
Keep 3 days for the 2nd spraying after the 1st
spraying.
As for disease, “Alternaria” (Early Blight) is one
of the most serious diseases on tomato occurring
especially in dry season.
Symptom occurs from the lower part of foliage
with brown spots on leaves, and gradually
expands to entire leaves to wilting.
For prevention and control, spraying Dithene or
some other major fungicide is effective.
Grasshopper
Aphid
Alternaria (Early Blight)
7. Pest Control
Disease and insect

37
Harvest by hand pick when the fruits matured to
red color.
The first fruit is recommended to be removed
when it is in small size to maintain the plant
vigor.
8. Harvesting
a) Harvesting

38

39
Instruction Manual for Agricultural Technologies
1.8 Eggplant Production

40
Find a sunny and flat place for nursery.
Apply NPK compound fertilizer in the amount
of 200g/m2 to the nursery and mix it well with
the soil dug up 10cm in the depth.
Make flat bed for nursery about 10–20cm high
and 100cm wide by hoe.
An improved variety like Black Beauty is
recommendable for market sales.
Make 5 sowing ditches/m2 about 1 to 1.5cm in the depth at 20cm interval on the bed. Sow seeds in
the drilled ditches uniformly.
Cover the sowing ditches with light soil sieved by fine mesh for quick germination.
1. Preparation of Nursery
a) Fertilizer application
b) Nursery bed
2. Sowing
a) Sowing
c) Improved variety

41
After watering gently, cover the soil thinly with
palm leaves or any dry grass for promoting
germination and preventing dryness.
Remove the cover from the soil when seeds
germinate, and gradually refrain from watering.
Watering is preferred to be done every morning.
Check out the optimal time to transplant.
Optimal time is when there are 3-4 true leaves
and about 20-25 days after the sowing date.
b) Covering
3. Raising Seedling
a) Removal of the cover
b) Optimal time for transplanting

42
Manuring is preferred.
Put it as much as possible.
It should be applied one week before
transplanting.
Example:
Prepare 10m x 10m land for 200 plants.
Till to the depth of 20cm from the surface soil
and mix.
Make ridges in height of 15cm and width of
1m by hoe.
Open a space between ridges wide enough to
walk.
Cut inter-row spaces by knife every two days
starting a week before transplanting to stimulate
the growth of new roots.
4. Land Preparation
a) Compost application
b) Ridging
5. Transplanting
a) Cutting inter-row space

43
After watering substantially, uproot them from
the bottom of the roots by hand.
Be careful not to injure the roots.
Dig planting holes and put seedlings in the
holes.
The planting depth is to coordinate soil surface
and root of the seed leaf.
Push the soil softly by hand.
Root taking will be done within 3 days.
b) Uprooting
d) Transplanting
c) Planting density
1m
0.6m
0.6m
1m
15-20cm

44
Apply 4kg/10a on K2O base of NPK compound
fertilizer around the plants.
The fertilizer has to be incorporated with the
soil.
Example:
Fertilizer type: NPK 15-15-15
Amount: 27Kg/10a
Apply a hand grip of fertilizer for each plant.
Cover the soil with rice straw or similar one to
retain water and to prevent weeds.
Water sufficiently every day.
Top dress around or between plants every 2
weeks after the first fruits set.
Example:
Fertilizer type: NPK 15-15-15
Apply a pinch of fertilizer per plant and cover
with the soil.
(1) First top dressing.
(2) Second top dressing
(3) Third top dressing
e) Fertilizer application
6. Crop Management
a) Mulching
b) Top dressing

45
Pinch lateral shoots except the primary stems and 2 of the most vigorous secondary stems.
c) Pinching
Main stem
Shoot growing from 2nd node under the 1st flower
1st flower
Pinch off all the lateral shoots under the shoot growing from 2nd node under the 1st flower
Leave any shoots growing from above the 1st flower
Shoot growing from under the 1st flower

46
Disease and insects should be controlled
thoroughly in the nursery to avoid them widely
spread to the field.
However, little damage occurs after transplanting.
For the insect control, the following measures
should be taken.
Applicable insecticide:
Organic phosphorus compound such as Malathion,
Endosulfan and Cyflane.
Application method:
Spray immediately after any insects appear on the
plants especially at the nursery, by diluting with
2000 to 3000 times of water.
Caution:
Spray several times for the complete control.
Keep 3 days for the 2nd spraying after the 1st
spraying.
Grasshopper
Beatle
Aphid
7. Pest Control
Disease and insect

47
Harvest by knife when the fruits matured.
The first fruit is recommended to be removed when
it is in small size to maintain the plant vigor.
8. Harvesting
a) Harvesting

48

49
Instruction Manual for Agricultural Technologies
1.9 Green Pepper Production

50
Find a sunny and flat place for nursery.
Apply NPK compound fertilizer in the amount of
200g/m2 to the nursery and mix it well with the
soil dug up 10cm in the depth.
Make flat bed for nursery about 10–20cm high
and 100cm wide by hoe.
An improved variety like California Wonder/Yolo
Wonder is recommendable for market sales.
Make 5 sowing ditches/m2 about 1 to 1.5cm in the depth at 20cm interval on the bed. Sow seeds in the
drilled ditches uniformly.
Cover the sowing ditches with light soil sieved by fine mesh for quick germination.
1. Preparation of Nursery
a) Fertilizer application
b) Nursery bed
2. Sowing
a) Sowing and covering
c) Improved variety

51
After watering gently, cover the nursery soil
thinly with palm leaves or any dry grass for
promoting germination and preventing dryness.
Remove the cover from the soil when seeds
germinate and gradually refrain from watering.
Watering is preferred to be done every morning.
Check out the optimal time to transplant.
Optimal time is when there are 3-4 true leaves
and about 20-25 days after the sowing date.
b) Covering
3. Raising Seedling
a) Removal of the cover
b) Optimal time for transplanting

52
Manuring is preferred. Put it as much as
possible.
It should be applied one week before
transplanting.
Example:
Prepare 10m x 10m land for 200 plants.
Till to the depth of 20cm from surface soil and
mix.
Make ridges in height of 15cm and width of
1m by hoe.
Open a space between ridges wide enough to
walk.
Cut inter-row spaces by knife every two
days starting a week before transplanting to
stimulate the growth of new roots.
4. Land Preparation
a) Compost application
b) Ridging
5. Transplanting
a) Cutting inter-row space

53
After watering substantially, uproot them
from the bottom of the roots by hand.
Be careful not to injure the roots.
Dig planting holes and put seedlings in the
holes.
The planting depth is to coordinate soil
surface and root of the seed leaf.
Push the soil softly by hand. Root taking
will be done within 3 days.
b) Uprooting
d) Transplanting
c) Planting density
1m
0.5m
0.5m
1m
15-20cm

54
Apply 4kg/10a on K2O base of NPK
compound fertilizer along the plants.
The fertilizer has to be covered with the soil.
Example:
Fertilizer type: NPK 15-15-15
Amount: 27Kg/10a
Apply a hand grip of fertilizer per plant.
Cover the soil with rice straw or similar one
to retain water and to prevent weeds.
Water sufficiently every day.
Top dress around or between plants every 2
weeks after the first fruits set.
Example:
Fertilizer type: NPK 15-15-15
Apply a pinch of fertilizer per plant and
cover soil.
e) Fertilizer application
6. Crop Management
a) Mulching
b) Top dressing

55
Pinch lateral shoots except the primary stems and 2 to 3 of the most vigorous secondary stems.
c) Pinching
No prun-ning abovefirst flower
First flower
Second flower
First flower ofsecondary stemPrune secondary
stems here atearly stage.Prune leaves afterharvesting thefirst fruit.
1. Primary stem2. Axillary bud fromfirst flower's joint ofprimary stem
4. Axillary bud fromfirst flower's joint ofsecondary stem
3. Axillary budfrom secondflower's joint ofprimary stem

56
Disease and insects should be controlled
thoroughly in the nursery to avoid them widely
spread to the field.
However, little damage occurs after
transplanting.
For the insect control, the following measures
should be taken.
Applicable insecticide:
Organic phosphorus compound such as
Malathion, Endosulfan and Cyflane.
Application method:
Spray immediately after any insects appear on
the plants especially at the nursery, by diluting
with 2000 to 3000 times of water.
Caution:
Spray several times for the complete control.
Keep 3 days for the 2nd spraying after the 1st
spraying.
Mosaic virus is a serious issue in pepper
cultivation.
Eradicating aphids by chemical is a practical
measure to control the virus infection.
Aphid on the back of the leaves
Leaves infected by Tobacco mosaic virus
Close-up of leaves infected by virus
7. Pest Control
Disease and insect

57
Harvest by knife when the fruits matured.
First fruit is recommended to be removed
when it is in small size to maintain the plant
vigor.
8. Harvesting
a) Harvesting

58

59
Instruction Manual for Agricultural Technologies
1.10 Cabbage Production

60
Find a sunny and flat place for nursery.
Apply NPK compound fertilizer in the amount of
200g/m2 to the nursery and mix it well with the
soil dig up 10cm in the depth.
Make flat bed for nursery about 10–20cm high
and 100cm wide by hoe.
An improved variety like Copenhagen Market/ F1
Oxylus is recommendable for market sales.
Make 5 sowing ditches/m2 about 1 to 1.5cm in the depth at 20cm interval on the bed. Sow seeds in
the drilled ditches uniformly.
Cover the sowing ditches with light soil sieved by fine mesh for quick germination.
1. Preparation of Nursery
a) Fertilizer application
b) Nursery bed
2. Sowing
a) Sowing and covering
c) Improved variety

61
After watering gently, cover the nursery soil
thinly with palm leaves or any dry grass for
promoting germination and preventing dryness.
Remove the cover from the soil when seeds
germinate, and gradually refrain from watering.
Watering is preferred to be done every morning.
Check out the optimal time to transplant.
Optimal time is when there are 5-6 true leaves
and about 25-30 days after the sowing date.
b) Covering
3. Raising Seedling
a) Removal of the cover
b) Optimal time for transplanting

62
Manuring is preferred. Put it as much as
possible.
It should be applied one week before
transplanting.
Example:
Prepare 10m x 10m land for 250 to 300 plants.
Till to the depth of 20cm from surface soil and
mix.
Make ridges in height of 15cm and width of
1m by hoe.
Open a space between ridges wide enough to
walk.
Cut inter-row spaces by knife every two
days starting a week before transplanting
to stimulate the growth of new roots.
4. Land Preparation
a) Compost application
b) Ridging
5. Transplanting
a) Cutting inter-row space

63
After watering substantially, uproot them
from the bottom of the roots by hand.
Be careful not to injure the roots.
Dig planting holes and put seedlings in the
holes.
The planting depth is to coordinate soil
surface and root of the seed leaf.
Push the soil softly by hand.
Root taking will be done within 3 days.
b) Uprooting
d) Transplanting
c) Planting density
15cm 1m
0.5m
0.4m
1m

64
Apply 4kg/10a on K2O base of NPK
compound fertilizer along the plants.
The fertilizer has to be covered with the
soil.
Example:
Fertilizer type: NPK 15-15-15
Amount: 27Kg/10a
Apply a hand grip of fertilizer for each
plant and cover it with soil.
Cover the soil with rice straw or similar one
to retain water and to prevent from weeds.
Water sufficiently every day.
Top dress around or between plants every 2
weeks after the head formation starts.
Example:
Fertilizer type: NPK 15-15-15
Apply a pinch of fertilizer per plant and
cover with the soil.
e) Fertilizer application
6. Crop Management
a) Mulching
b) Top dressing

65
Disease and insects should be controlled
thoroughly in the nursery to avoid them widely
spread to the field.
However, little damage occurs after transplanting.
Insects such as aphid, caterpillar, and worm
normally attack severely on cabbage.
For insect control, the following measures should
be taken.
Applicable insecticide:
Organic phosphorus compound such as
Malathion, Endosulfan and Cyflane.
Application method:
Spray immediately after any insects appear on the
plants especially at the nursery, by diluting with
2000 to 3000 times of water.
Caution:
Spray several times for the complete control.
Keep 3 days for the 2nd spraying after the 1st
spraying.
Aphid on the back of the leaves
Cabbage webworm is feeding the core of cabbage
Severely damaged by Caterpillar
7. Pest Control
Disease and insect

66
Harvest by knife when the heads are well
compacted. 2 to 3 outer leaves should be
attached for protection of the heads.
It is recommended to apply salt water on the
cut section to avoid discoloration.
8. Harvesting
a) Harvesting