the spec practitioner s toolbucket
TRANSCRIPT

Teaching and LearningThe Backcountry Classroom – 2nd Edition
117
The SPEC Practitioner’s Toolbucket
P repared by
3 Before Me
Count OFF
Pin Wheel
Home Teams
Journaling
Anecdotal ObservationRubrics
End of Day Sheets
w w w .realw orldlear nin g. in fo
Teaching and LearningThe Backcountry Classroom – 2nd Edition
118
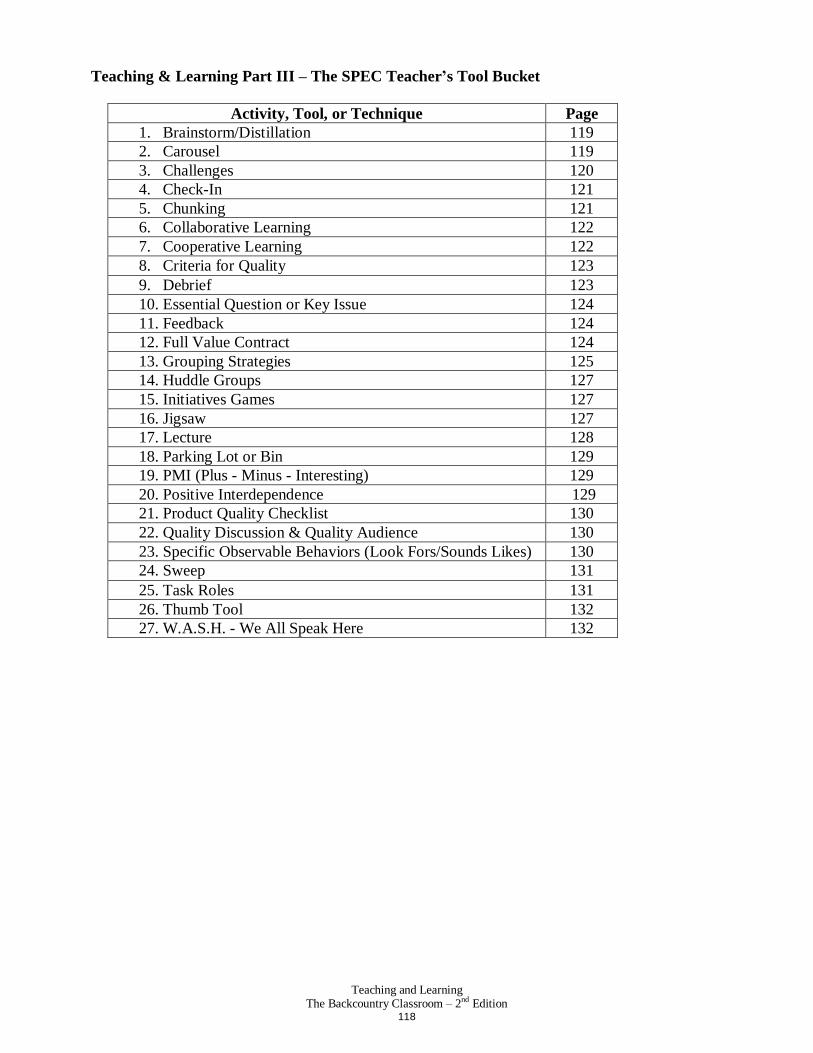
Teaching & Learning Part III – The SPEC Teacher’s Tool Bucket
Activity, Tool, or Technique Page1. Brainstorm/Distillation 1192. Carousel 1193. Challenges 1204. Check-In 1215. Chunking 1216. Collaborative Learning 1227. Cooperative Learning 1228. Criteria for Quality 1239. Debrief 12310. Essential Question or Key Issue 12411. Feedback 12412. Full Value Contract 12413. Grouping Strategies 12514. Huddle Groups 12715. Initiatives Games 12716. Jigsaw 12717. Lecture 12818. Parking Lot or Bin 12919. PMI (Plus - Minus - Interesting) 12920. Positive Interdependence 12921. Product Quality Checklist 13022. Quality Discussion & Quality Audience 13023. Specific Observable Behaviors (Look Fors/Sounds Likes) 13024. Sweep 13125. Task Roles 13126. Thumb Tool 13227. W.A.S.H. - We All Speak Here 132

Teaching and LearningThe Backcountry Classroom – 2nd Edition
119
The SPEC Teacher’s Tool Bucket
Activities, Tools, & Techniques–The following are what we call the AT&T or Activities, Tools, & Techniques, to help the SPEC teacher. We list these alphabetically, provide a brief description, and provide observations about their use in both the classroom and the backcountry setting.1. Brainstorm/Distillation
a. Description– A tool where an individual or group first attempts to spontaneously create (Brainstorm) ideas that might provide a possible solution to an issue or problem, and then narrows down (Distills) the ideas to the ones that seem to be “best.”(1) Brainstorming is used to maximize the chances of generating as many potential options
as possible and improve the probability that all options will be thoroughly considered.(2) Brainstorming encourages creativity and provides an opportunity to “think outside of
the box.”(3) There are certain important brainstorming “rules.”
(a) Have a facilitator who encourages the sharing of ideas and restrains the group’s impulse to criticize or discount ideas.
(b) Set a specific timeframe for brainstorming. It is important to recognize that at some point you must move from brainstorming to decision making.
(c) Have a recorder. Record ideas accurately without judging the quality of the ideas. Voicing opinions about ideas comes after brainstorming when you distill.
(d) Only share your ideas if you are willing to let go of them. Once an idea is shared, the group owns it and its ultimate acceptance or rejection should not be taken personally.
(e) Work for quantity, not quality. Judging the quality of the ideas also comes after brainstorming during the distillation phase.
(f) Do not criticize any of the ideas. All ideas must be afforded equal acceptance. To be effective, a brainstorming session must be governed by the attitude that “anything is possible.” Again, evaluating the ideas comes after the brainstorming session.
(g) Encourage the “piggybacking” of ideas. Let ideas trigger new ideas. What some may think are crazy ideas frequently help trigger good ideas.
b. Distillation only occurs after the brainstorming process. (1) It is a distinct step separate from brainstorming.(2) It is when you narrow down the ideas to the ones your want to examine more closely or
act on.(3) The distillation is done in relation to the established criteria of success.
c. Application– Anytime you want to explore ideas of any type, brainstorming/distillation is an excellent tool. We use brainstorm/distillation for:(1) Creating a Full Value Contract.(2) Creating Quality Discussion and Quality Audience criteria.(3) Determining what route the group might take to their next ration point.
d. Observations– The brainstorm and the distillation stages are two distinct stages. Don’t try to do both at the same time. Set a time for brainstorming, and then set a separate time for distillation.
2. Carousela. Description– A Carousel is where you arrange participants into groups and rotate them
around and have them respond to a series of questions or issues. Three to five people make an ideal group. You may want to decide how many groups to have based on the number of questions or issues you want to explore.

Teaching and LearningThe Backcountry Classroom – 2nd Edition
120
(1) On tables around the classroom, place large sheets of chart (easel) paper, one sheet per group. (In the outdoor environment you can have a notebook at each location and have people carousel around to the various notebooks or have the notebooks move around to the groups.)
(2) On each sheet, write one of the key questions or issues that you want to “Carousel.” (3) Try to provide a different colored marker for each group of students (so later, if anyone
has questions about comments, people will know which group made the comment). (4) Have each group appoint one person (perhaps one with good handwriting) to be the
group’s recorder. (5) Explain to participants that they are going to make their way around the “Carousel”,
i.e., they will work at each chart during the activity. (6) Introduce each chart and explain the issue/question they will discuss when they get to
that chart. As each group (or chart) moves, group members have one minute to silently review what previous groups have written on the chart. Then they will have 2 minutes (you can determine whatever time limit you want, although we recommend no more than five minutes). Whatever time you set, we recommend you be consistent and keep them moving to discuss and add new thoughts to the chart.
(7) As they work around to the different charts, they can annotate (make notes or comments) the previous groups’ comments and add their own. The only thing theycan’t do is cross out any other groups’ comments.
(8) When the groups come back to the chart they started with, they can try to distill/synthesize the comments and report out to the other groups or perhaps post the final posters for everyone to look at. This usually leads to a discussion regarding the issues. It is at this point that some lively discussions take place!
b. Application– A Carousel is an effective activity when people have prior knowledge about a topic they are discussing or learning about. It relies on small group brainstorming rather than on one large group process that often leaves people feeling disengaged.
c. Example– See the “Equipment Selection” Challenge in the appendix of this chapter. Here groups Carousel around posters writing down considerations in purchasing four major pieces of outdoor equipment. Since it is important that their comments represent “expert” thinking, they have to reference books or magazines that provide the observations they make.
3. Challenges– Challenges are SPEC learning experiences that progress with increasing authenticity, complexity, and uncertainty, requiring an increasing variety of resources and degrees of student self-direction to accomplish. We use the following types of Challenges both in the classroom and in the backcountry. The examples are brief descriptions of the types of Challenges.a. Academic Challenge– Learning experiences structured as a problem for learners to solve.
They usually arise from a common area of study and are used to promote greater understanding of the subject matter. They target specified learning standards. With Academic Challenges, there is virtually no difference between the classroom and backcountry examples.(1) Classroom Example: Working in small teams, create a poster that graphically
represents the “ideal” outdoor leader.(2) Backcountry Example: Working in small teams, create a catchy jingle that will
reinforce the Leave No Trace Principles.b. Scenario – Similar to the Academic Challenge, but its authenticity is enhanced by placing
the problem within the context of a current, historic, or futuristic role play where the roles

Teaching and LearningThe Backcountry Classroom – 2nd Edition
121
are either reality-based or fictional. At this level there is virtually no difference between the classroom and backcountry examples.(1) Classroom Example: You are a group of early wilderness advocates in the 1930’s. You
have been asked to testify to a confessional panel on why there should be designated wilderness in the United States. You are to play the roles of the “real” wilderness advocates.
(2) Backcountry Example: Create a skit that accurately represents the different inter-relationships of Expedition Behavior. It should be creative and represent real-life situations.
c. Real-Life – A real-life problem is driven by a real situation that requires a real “solution.” It usually comes from the larger community, is authentic, and has real-life consequences.(1) Classroom Example: You have been asked by the director of a nearby outdoor
education center to create a series of evening Wilderness Education “Fireside Chats” on wilderness travel.
(2) Backcountry Example: Your group is to plan and execute a day trip up a nearby mountain. In your planning be sure to include a time control plan, emergency plan, and who will serve in the task roles of leader, scout, logger, sweep, and any other appropriate task roles.
4. Check-Ina. Description– The Check-In is a ritualized activity where the group goes around to all
group members and invites them to share one of two things:(1) Anything that is going on in their life outside of the immediate learning environment
that might affect their role of learner on that day.(2) Any observations about what they have learned or experienced that has had an impact
on their learning.b. Application– We use this daily in the outdoors and on a regular basis in the classroom as a
special ritual, usually at the beginning of the day, to “take the pulse” of the group in order to gauge their readiness to participate in the day’s activities. The group will “circle up” and one member will start by sharing; that person then turns to the person on their right or left and says, “Good morning....” addressing by name the next person who will share. It works its way around the circle to the person it started with. If anyone passed, they are given another chance to share, which then ends the activity. Some mornings it is very quick and some mornings it may take over an hour.
c. Special Considerations:(1) Everyone is specifically invited to participate, but the choice to opt out or not
participate is respected. People can “pass” to the next person.(2) As the learning community becomes a safe environment, be prepared for emotional
things to come out. If issues come up that are beyond your comfort/ability, be sure to refer them to the appropriate person who can help.
5. Chunkinga. Description– Chunking is a technique for getting and keeping information in short-term
memory; it is also a type of elaboration that will help get information into long-term memory. For our purpose, Chunking is a technique we use for breaking down a task or challenge into understandable “chunks,” i.e., we chunk a challenge by breaking it down into smaller understandable units so that everyone has a clear understanding of what the task is. In one sense, it is just an oral regurgitation of the task.
b. Application– Whenever we give a group a challenge/task, we ask them to read (or listen) to the task, discuss it among themselves for a couple of minutes, then report out what they think the elements or “chunks” of the task are.

Teaching and LearningThe Backcountry Classroom – 2nd Edition
122
c. Observations– We find this is a very important technique that eliminates misunderstanding and prevents a group from going in the wrong direction (sometimes literally!) with a challenge or task.
6. Collaborative Learninga. Definition– While Collaborative Learning has many features of Cooperative Learning
(such as working in small groups, interaction with peers, active participation, groups grappling with understanding concepts, ideas, addressing issues and producing results that would be impossible individually), Collaborative Learning has some unique characteristics that define it as different from Cooperative Learning:(1) Collaboration requires more than just getting along and doing a share of the tasks.
Collaboration requires an investment in the group’s goals and sharing in the group vision. It means that members are willing to disagree and “bang heads” in a positive way in order to insure that the task gets done to the highest standards possible given the resources available.
(2) Successful Collaborative Learning requires learners to recognize that learners have different learning/collaboration styles and that successful teams require representation from all of these different approaches. Collaborative learners recognize that working with learners whose style is different from their own is frequently painful, but that without the diversity of styles the team is incomplete.
b. Application– The backcountry inherently has learners working in groups to accomplish the group’s real-life tasks, so we strive to create collaborative groups whenever we work in the outdoors. We have also learned to use collaborative teams in our classrooms by implementing SPEC strategies. When efforts are structured collaboratively, we have found that students achieve and learn more, use higher level thinking skills, and retain information more accurately. We also feel that Collaborative Learning promotes and builds self-esteem through more authentic experiences.
c. Observations– We frequently describe the difference between cooperation and collaboration in this way: A person who cooperates works with all team members in a professional manner and returns to his tent at night and tells his tent partner how working with his team members drives him crazy. A person who collaborates works with all team members in a professional manner, returns to his tent at night, and tells his tent partner how working with his team members drives him crazy, but he adds one important thing; he adds that even though they drive him crazy, he is extremely grateful that they are there because they all bring unique skills to the group that they would be missing otherwise.
7. Cooperative Learninga. Definition– “Instructional use of small groups so that students work together to maximize
their own and each other’s learning.”F1 Cooperative Learning is a team process where members work together to support and rely on each other to achieve an agreed-upon goal. Learners work in small groups, interact with peers, actively participate, and grapple with understanding concepts, ideas, addressing issues and producing results that would be impossible individually.
b. Application– Although we think highly of Cooperative Learning, we strive to work at the higher Collaborative Learning level. (see above)
Teaching and LearningThe Backcountry Classroom – 2nd Edition
123
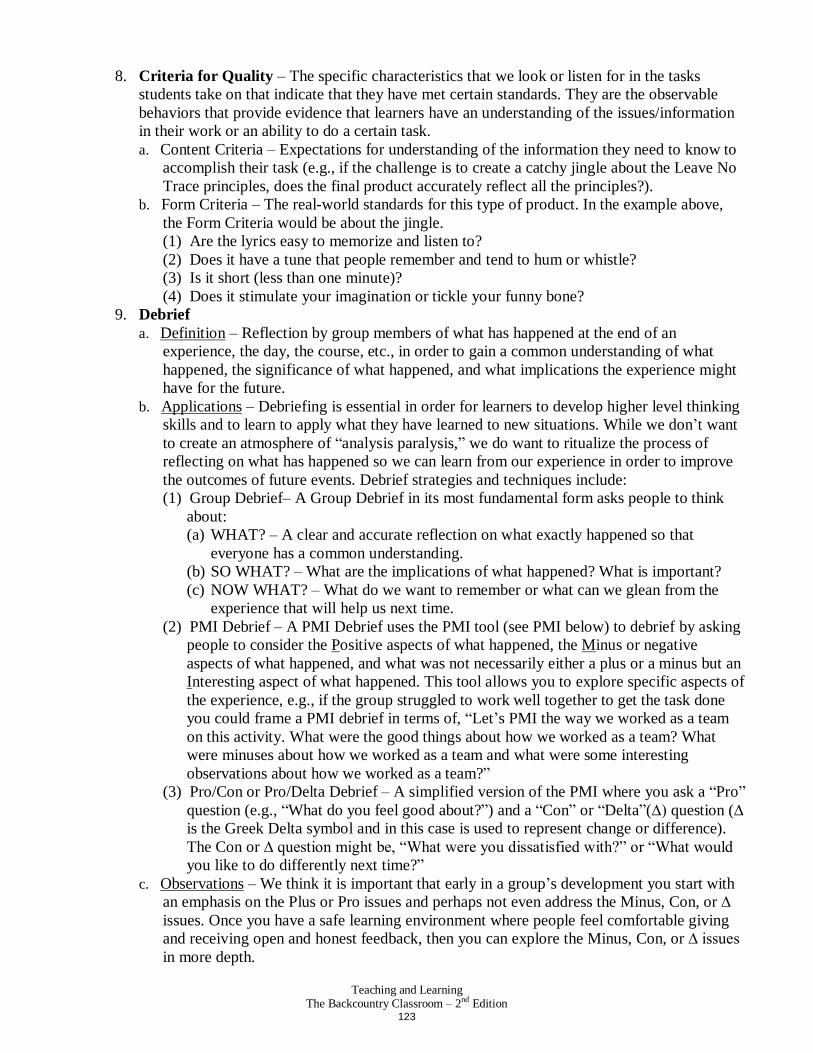
8. Criteria for Quality– The specific characteristics that we look or listen for in the tasks students take on that indicate that they have met certain standards. They are the observable behaviors that provide evidence that learners have an understanding of the issues/information in their work or an ability to do a certain task.a. Content Criteria – Expectations for understanding of the information they need to know to
accomplish their task (e.g., if the challenge is to create a catchy jingle about the Leave No Trace principles, does the final product accurately reflect all the principles?).
b. Form Criteria – The real-world standards for this type of product. In the example above, the Form Criteria would be about the jingle.(1) Are the lyrics easy to memorize and listen to?(2) Does it have a tune that people remember and tend to hum or whistle?(3) Is it short (less than one minute)?(4) Does it stimulate your imagination or tickle your funny bone?
9. Debriefa. Definition– Reflection by group members of what has happened at the end of an
experience, the day, the course, etc., in order to gain a common understanding of what happened, the significance of what happened, and what implications the experience might have for the future.
b. Applications– Debriefing is essential in order for learners to develop higher level thinking skills and to learn to apply what they have learned to new situations. While we don’t want to create an atmosphere of “analysis paralysis,” we do want to ritualize the process of reflecting on what has happened so we can learn from our experience in order to improve the outcomes of future events. Debrief strategies and techniques include:(1) Group Debrief– A Group Debrief in its most fundamental form asks people to think
about: (a) WHAT? – A clear and accurate reflection on what exactly happened so that
everyone has a common understanding.(b) SO WHAT? – What are the implications of what happened? What is important?(c) NOW WHAT? – What do we want to remember or what can we glean from the
experience that will help us next time.(2) PMI Debrief – A PMI Debrief uses the PMI tool (see PMI below) to debrief by asking
people to consider the Positive aspects of what happened, the Minus or negative aspects of what happened, and what was not necessarily either a plus or a minus but an Interesting aspect of what happened. This tool allows you to explore specific aspects of the experience, e.g., if the group struggled to work well together to get the task done you could frame a PMI debrief in terms of, “Let’s PMI the way we worked as a team on this activity. What were the good things about how we worked as a team? What were minuses about how we worked as a team and what were some interesting observations about how we worked as a team?”
(3) Pro/Con or Pro/Delta Debrief – A simplified version of the PMI where you ask a “Pro” question (e.g., “What do you feel good about?”) and a “Con” or “Delta”(∆) question (∆ is the Greek Delta symbol and in this case is used to represent change or difference). The Con or ∆ question might be, “What were you dissatisfied with?” or “What would you like to do differently next time?”
c. Observations– We think it is important that early in a group’s development you start with an emphasis on the Plus or Pro issues and perhaps not even address the Minus, Con, or ∆ issues. Once you have a safe learning environment where people feel comfortable giving and receiving open and honest feedback, then you can explore the Minus, Con, or ∆ issues in more depth.

Teaching and LearningThe Backcountry Classroom – 2nd Edition
124
10. Essential Question or Key Issuea. Description– This is a statement that responds to the questions: “Why should the learner
do this task? What is essential about this knowledge or skill? How is it connected/relevant to both the “big picture” of the course and to the life of the learner?”
b. Application– We use Essential Questions to drive our academic and scenario challenges and also to frame most of our classroom courses. We frequently design a semester-long course based on what Essential Questions or Key Issues we want addressed.
c. Observations– We find that many educators struggle with writing Essential Questions or Key Issues because it requires us to ask questions that we rarely ask ourselves: “Why do our students really need to know this information? Why are we teaching it? What is the really essential information (what Paul Petzoldt called the “must knows”) that our learners need to master?” We feel it is important to ask these questions and find ways to use our answers to create essential questions or key issues.
11. Feedback– Reflective dialogue between or among group members regarding their growth towards specific criteria. It might be between teacher and student, student and student, student and teacher. It models that everyone is a learner. Some sample forms of feedback include:a. Huddle Feedback – Where large groups are broken down into small “huddle” groups to
discuss and determine what feedback they would like to provide. We find Huddle Feedback much more effective than large group feedback because it encourages more participation (it is harder to sit back and say nothing in small groups) and people are more likely to feel comfortable giving feedback in a small group than they might be in a large group.
b. Peer Feedback – Where learners give each other feedback on a variety of work. It might be feedback on how they performed a task, how they contributed to a group task, or other relevant issues.
c. End of the Day Feedback – An opportunity for learners to let the teacher know how things are going. We use “End of the Day Sheets” both in the classroom and in the field to allow learners to give us feedback so that we can “take the pulse” of the group to help us determine if we need to modify our practice to maximize learning opportunities. The most basic, yet very effective, end of the day questions are:(1) What are you feeling good about?(2) What are you concerned about?(3) What can I (the instructor) do to help?
12. Full Value Contracta. Description– A social understanding that helps to create a safe place for individuals to be
productive members of the community. It provides a structure for expectations of behavior that allows community members to hold each other accountable. “Full Value” refers to the idea that, “In order for us to honor our contracts, we must support one another. If we don’t support one another, we are discounting each other.”F3
b. Application– We use the Full Value Contract in both the classroom and the backcountry. In both cases, it is created by the learners with input from instructors. We sometimes let the need for it arise and then introduce it as a way to address issues. On long backcountry trips, we spend a considerable amount of time exploring the concept and having students create their group’s contract.
c. Observations(1) Full Value Contracts, if they are to be effective, cannot be delivered top-down from the
instructor. Ownership by the learners requires that they create it; however, that does not mean, that the teacher doesn’t have input and may even require that certain elements be included.

Teaching and LearningThe Backcountry Classroom – 2nd Edition
125
(2) Full Value Contracts must be living documents that are referred to on a regular basis and modified as necessary if they are to be effective. When behavioral issues arise, you may want to debrief them in terms of how they did or did not model the Full Value Contract.
(3) The Thumb Tool (see below) is an effective way to ratify a Full Value Contract.13. Grouping Strategies
a. Do you really need to group? – By far the first consideration in addressing the issue of grouping is to determine whether you really need a group to do the task or challenge. Few things undermine the authenticity of SPEC strategies more than requiring students to work in small groups when there is no legitimate reason to do so. If you can imagine one capable student meeting the parameters of the task or challenge with reasonable quality, then you need to rethink the design of the challenge. In a SPEC environment, we place students in groups because the challenge requires the diverse capacities of more than one person to engage it successfully. There must be meaningful work for everyone in the group. If there isn’t, do not put students in a group!
b. How big should groups be?(1) Fit group size to the complexity of the task and the experience level of your learners
and you. When working with groups for the first time, we recommend you keep group size small - pairs or groups of three at most. This size group permits both you and your learners to begin your exploration of SPEC strategies at a lower level of risk. For you, a challenge designed for two or three should be fairly simple, directed toward reasonably straightforward outcomes, and involve a time frame that is acceptably brief.
(2) For students, a group of two or three gives them the opportunity to develop skill with SPEC group process techniques (Task Roles, Brainstorm and Distillation, Sweep, etc.) while learning to handle the personality and social issues engendered by a limited number of people. When you are prepared to design challenges of greater complexity, and your learners are ready to work productively with more people, then by all means increase the size of your groups.
c. How should you group them? – Choose a grouping mechanism that fits your desired outcomes. There are really only four or five different ways to arrive at group membership. We have used all of these strategies at various times. (1) Instructor arranges the groups. This approach gives the instructor some measure of
control in balancing student strengths among the groups and perhaps to be proactive regarding the teaming of “difficult” students together. We used this approach extensively when we were first exploring the SPEC approach and despite early resistance from some students, it worked well provided we kept the students in this configuration long enough (at least through three or four challenges) for them to adjust to each other and “bond.” The main disadvantage of this mechanism is that the students do not “own” the choice of group membership and therefore find it convenient to blame the instructor for any group dysfunction. Any instructor using this approach with challenging students must be prepared to “stay the course” with the group assignments and outlast student complaints.
(2) Students arrange the groups. As the instructor, this was the most challenging way of choosing groups -- for a time. Obviously, less responsible students exploited the opportunity to team with their mates and wasted all sorts of time. Frequently, they would leave some classmates out of the group formation process as well.(a) Anticipating these difficulties, we learned to design several simple and very brief
challenges with groups formed this way. As part of each one, we insisted that ALL students be included in a group. Additionally, we were adamant that all criteria for

Teaching and LearningThe Backcountry Classroom – 2nd Edition
126
quality be fulfilled. Finally, in the debriefing of each challenge we always asked the question, “Do you feel the grouping of your team has had any impact on the quality of your work?”
(b) Predictably, some students denied there was any connection. Eventually, however, one student would break the code of silence and admit that sometimes working just with one’s friends was not the best strategy for producing quality work. When other students in the class acknowledged the truth of the statement, we knew we had moved to a higher level of honesty and maturity within the class. We could then move on and honestly discuss the reasons for group work and how each challenge was an opportunity for each student to accept responsibility for their own behavior and learning and to demonstrate his/her increasing maturity, knowledge of content, and collaborative skill.
(c) As we became more comfortable with the SPEC approach over the years, we deliberately started each year with students choosing their own groups so that we could get at these issues early on. It wasn’t always an easy strategy, but over time has yielded great dividends.
(3) Groups are formed at random. Each year we would tell students on the first day of class, “One of my expectations for each of you this year is that before our time together is over, you will demonstrate your capacity to work productively with every otherstudent in this class.” In schools where SPEC strategies have been highly successful over a period of years, this expectation is system wide and random grouping is the norm in SPEC environments.
(4) Groups are formed heterogeneously by matching talents with tasks. Specific talents or capacities are identified and listed as necessary to complete the challenge successfully. Perhaps they will draw a chart (matrix) listing these abilities along a vertical axis as jobs or tasks to be led within each team. Then the students and teacher will recognize those in the class who have these special talents. The names of these students are entered along the horizontal axis of the chart. Finally, teacher and students match the entries on the horizontal and vertical axis to ensure that these talents are distributed fairly among the teams. In short, grouping is done with the requirements of the task and best interests of each team in mind, rather than the personal preferences of either the students or the teacher. Success with this approach, much like random grouping, is a clear indicator of a healthy community within the classroom. This grouping strategy also highlights the advantages of heterogeneity in a SPEC learning environment where people of various diverse talents are needed and valued.
(5) Groups are formed homogeneously. This has been done for years in the traditional classroom and is highly controversial. In theory it is supposed to allow the more capable students to excel while others get to master the basics. The research tells us that students of all ability levels benefit from homogeneous groups when compared with no grouping at all; however, students of low ability generally perform worse when placed in homogeneous groups as opposed to students of low ability placed in heterogeneous groups. The research indicates that homogeneous grouping can have a slightly positive effect on high-ability students. (a) Unfortunately, it often (intentionally or otherwise) promotes “labeling” among the
students. Learners begin to see each other as having greater or lesser value as a person. They don’t understand that group membership is often based on a very narrow range of criteria. They need to know that this is a criteria referencing of a specific capacity (reading complex sentences or reading speed, using fractions in

Teaching and LearningThe Backcountry Classroom – 2nd Edition
127
math) rather than a judgment about them as a person. (b) Keep in mind that homogeneous groups have very different effects on different
students. We don’t recommend it except in very special circumstances. One of us was once a student on a wilderness course where the final exam for testing navigational skills was to find our way nearly three miles up to the summit of a trailless peak. The instructor sorted them homogeneously by perceived map and compass ability. The instructor had to have confidence that each group would have success and would not get lost. In this case, the students all succeeded and the group with the “lowest” ability gained tremendous confidence in not needing help from the “higher” ability students.
14. Huddle Groupsa. Description– A small number of people who work together to accomplish a task. Usually
the group gets together for a short task (thus the term “huddle”) to brainstorm, debrief a specific question, or accomplish a similar task.
b. Application– We tend to use huddle groups whenever we have a simple task/question that could be addressed by the entire class. We would rather have them work on the task or discuss the question in small groups because it encourages more participation (it is harder to sit back and say nothing in smaller groups than it is in larger groups) and people are more likely to feel comfortable participating in a small group than they might be in a large group.
c. Observations– Huddle groups sometimes are effective for dealing with the occasional class “saboteur”. Instead of the disruptive group member sabotaging the entire class the person now is only sabotaging one group.
15. Initiatives Gamesa. Description– Challenging activities, usually fun and cooperatively oriented, in which a
group is confronted with a specific problem to solve. Initiatives games can be used for several reasons. The games can be used to demonstrate and teach leadership skills to people, which helps to promote the growth of trust and problem-solving skills in groups. Games demonstrate a process of thinking about experiences that helps people learn and practice a variety of skills and dispositions.
b. Application(1) Classroom – We use Initiatives Games in the classroom as a metaphor for what
happens in the backcountry. We have found that, between the wise use of Initiatives Games and well-designed Challenges, we can create most, if not all, of the same learning opportunities that are created naturally in the out of doors.
(2) Backcountry – We use Initiatives Games in the backcountry for one of two reasons (and sometimes both at the same time):(a) To reinforce an experience that the group has had in the backcountry so that
everyone gets a deeper understanding of the topic or issue (e.g., perhaps a group has struggled with group decision making during their day hikes; the instructor may have them play Warp Speed in order to examine how the group makes decisions and so they can improve their process).
(b) To lighten the moment (e.g., perhaps the group has been working hard trying to decide what route to take to their next ration point and tensions are a little high as they have been unable to reach consensus; the instructor may suggest that they play Elbow Tag just to have some fun and release the tension).
16. Jigsawa. Definition

Teaching and LearningThe Backcountry Classroom – 2nd Edition
128
(1) A Jigsaw is a cooperative learning activity that promotes the sharing and understanding of ideas or texts by creating “expert” groups and then mixing the groups into “task” teams so they get to share and use their expertise.
(2) A Jigsaw facilitates learning in two areas: (a) Learners acquire knowledge and understanding.(b) Learners develop skills and dispositions as they relate to positive interdependence
and equal participation.b. Application
(1) Let’s say you have a class of 24 students. You might create four groups of six each and assign each group a different chapter to read in a textbook. They would be told how important it would be to read the assignment because they will be expected to be the “experts” on their chapter and share their understanding with new groups when you reconvene.
(2) When you reconvene, you will give them fifteen minutes in their “expert” teams to discuss their reading assignment. Encourage each person to take any necessary notes so they can share the essence of their reading assignment with their new “task” teams.
(3) After the fifteen minutes is up each “expert” team counts off by the number of people in the group. (In this case they would count off from one to six.) All the ones would create a new “task” team; all the twos would create another team, and so on.
(4) Each new team would now have each person “report out” to their new “task” team for five minutes. At the end of the twenty minutes, everyone should have reported out.
(5) In some cases the class will be over so you may give them a written challenge to work on with the new information the next time you meet or, if you have more time, you give them the challenge and have them “chunk” it. (See Chunking above)
c. Observations(1) A Jigsaw is a great way to have learners teach each other a lot of information. Done
correctly, Jigsaws can be used to “cover” a lot of information.(2) It can be tricky to do your first Jigsaw. You really have to be organized and plan the
whole activity through. When you try this for the first time, don’t be too ambitious. Choose a fairly straightforward topic. Work on the logistics, i.e., what you want the students to do and when, how long each grouping will take, how students will apply the information they teach/learn, what happens next (an Academic Challenge?). Counting off or color coding sometimes helps.
(3) Task Roles are very valuable in a Jigsaw. We suggest the use of a Facilitator and Timekeeper in particular.
(4) Jigsaws are frequently seen by learners as fun.17. Lecture
a. Description– When one person delivers information verbally or visually to an audience that receives the information by listening and looking. It may also include questioning and a limited discussion.
b. Application– Lecture is most effective when:(1) Factual information is presented. (2) Information is not available in another form. (3) Students have no experience. (4) Material must be presented in a particular way (e.g., for safety purposes).(5) Time is the most important consideration.
c. Observations:(1) Lecture is limited by the fact that:
(a) It is a passive technique with very limited student interaction.

Teaching and LearningThe Backcountry Classroom – 2nd Edition
129
(b) It only reaches one or two learning styles.(c) Even the shortest lecture exceeds the attention span of most learners.(d) It only involves the senses of sight and sound.
(2) Lecture has been defined as, “The process by which the notes of the professor become the notes of the student without ever passing through the mind of either.”
(3) If you need to lecture, we recommend that you try to:(a) Keep it as short as possible.(b) Make it as interactive as possible, e.g., ask questions.(c) Use visual as well as audio techniques.
18. Parking Lot or Bina. Description– A graphic poster, perhaps with a Parking Lot or trash bin drawn on it, for in
the classroom, or perhaps a notebook for in the backcountry, where questions are “parked” as they arise until it is an appropriate time to respond to them.
b. Application– We find that the use of this tool saves a lot of time. In particular, when you know many of the questions will be answered later, it allows you to acknowledge the value of the questions but “park” them for later discussion.
c. Observations(1) In the classroom, Post it Notes are handy to put the questions on the poster.(2) So you don’t lose credibility, be sure to respond to the questions. If you fail to, it sends
a message that they weren’t important.(3) The use of the Parking Lot is a good way to deal with the learner that wants to show
off with their questioning ability. It allows you to acknowledge the question but not respond to it. If you have a learner that is continually asking questions, they can be asked to put them in the Parking Lot rather than ask them.
19. PMI (Plus - Minus - Interesting)a. Description–Using a chart with three columns, one each for P, M, & I, an individual or
group can look at the plusses, minuses, and interesting characteristics of an issue or option.b. Application– We use it extensively for two purposes:
(1) In debriefing.(2) To weigh options in decision making.
c. Observations:(1) A PMI can be very helpful in providing a relatively objective analysis of an option.(2) Author Edward De Bono tells the story of the use of the PMI as a decision-making
tool: “Thirty youngsters aged around twelve were asked if they liked the idea of being given a small wage just for going to school. All of them liked the idea. Then they were introduced to the PMI. In small groups they scanned the Plus points of the idea and then the Minus points and then the Interesting points. At the end of this exercise twenty-nine out of thirty had changed their minds and decided it was a bad idea.”F
20. Positive Interdependencea. Description– Where learners recognize that they can’t accomplish a given task or
challenge alone; they need each other in a way that benefits all group members and the need contributes to the successful completion of the task or challenge.
b. Application– We try to build conditions for Positive Interdependence whenever we give a classroom challenge. In the backcountry the conditions frequently exist naturally. There are a number of ways to create conditions for Positive Interdependence: (1) Limit the available materials.(2) Use a Jigsaw.(3) Pick one student from the group to make the group’s presentation just before the
presentation.

Teaching and LearningThe Backcountry Classroom – 2nd Edition
130
(4) Require that all group members participate in the final presentation or exhibition of their work.
(5) Assign and rotate roles.(6) Set criteria that necessitates inter-group decision making.(7) Require consensus decision making.(8) Give group assessments.
21. Product Quality Checklista. Description– A Product Quality Checklist is a tool for determining whether learners met
the standards on a specific task or Challenge.b. Application– We use Product Quality Checklists or something similar to them for virtually
every task we give to learners. (See the Equipment Challenge for a sample and the Challenge Template for a Product Quality Checklist template.)
c. Observations(1) We think Product Quality Checklists are very handy to use, but after using them for a
while you may find that they aren’t detailed enough. (2) We find Rubrics are valuable in this case as they can be designed to be more detailed
and allow a more refined assessment. Rubrics are descriptions of varying levels of quality for a particular complex performance task or product that guide the scoring of the task consistent with relevant performance standards.
22. Quality Discussion & Quality Audiencea. Description– A form of Full Value Contract for how groups talk to each other and how
they behave during a formal presentation.(1) Quality Discussion: A list brainstormed and distilled by the group of what a high
quality conversation among participants might look or sound like.(2) Quality Audience: A list brainstormed and distilled by the group of what a quality
group of spectators of a presentation might look or sound like. b. Application– We find both of these tools invaluable when working with groups. We have
the groups create them as they need them. Creating a Quality Discussion list is usually the first brainstorm/distill activity we have groups do before they start working together. We then have them create a Quality Audience list just before the group is about to have their first presentation so that the audience understands what being a good audience looks and sounds like.
c. Observations(1) No matter what the age of the group, we find these important and valuable tasks.(2) It is essential that the criteria be described in terms of what a person would see or hear
that would be an indicator of a Quality Discussion/Audience.(3) Like the Full Value Contract, if these tools are to be effective they cannot be delivered
top down from the instructor. Ownership by the students requires that they create them. However, that does not mean that the teacher doesn’t have input and may even require that certain elements be included.
(4) Like the Full Value Contract, these tools also must become living documents that are referred to on a regular basis and modified as necessary if they are to be effective. When issues arise you may want to debrief them in terms of what they did or did not do to model the criteria.
(5) We usually introduce the use of the Thumb Tool in order to ratify the Quality Discussion criteria.
23. Specific Observable Behaviors (Look Fors/Sounds Likes)a. Description– Some action that you can describe in terms of what you can hear or see.
Teaching and LearningThe Backcountry Classroom – 2nd Edition
131
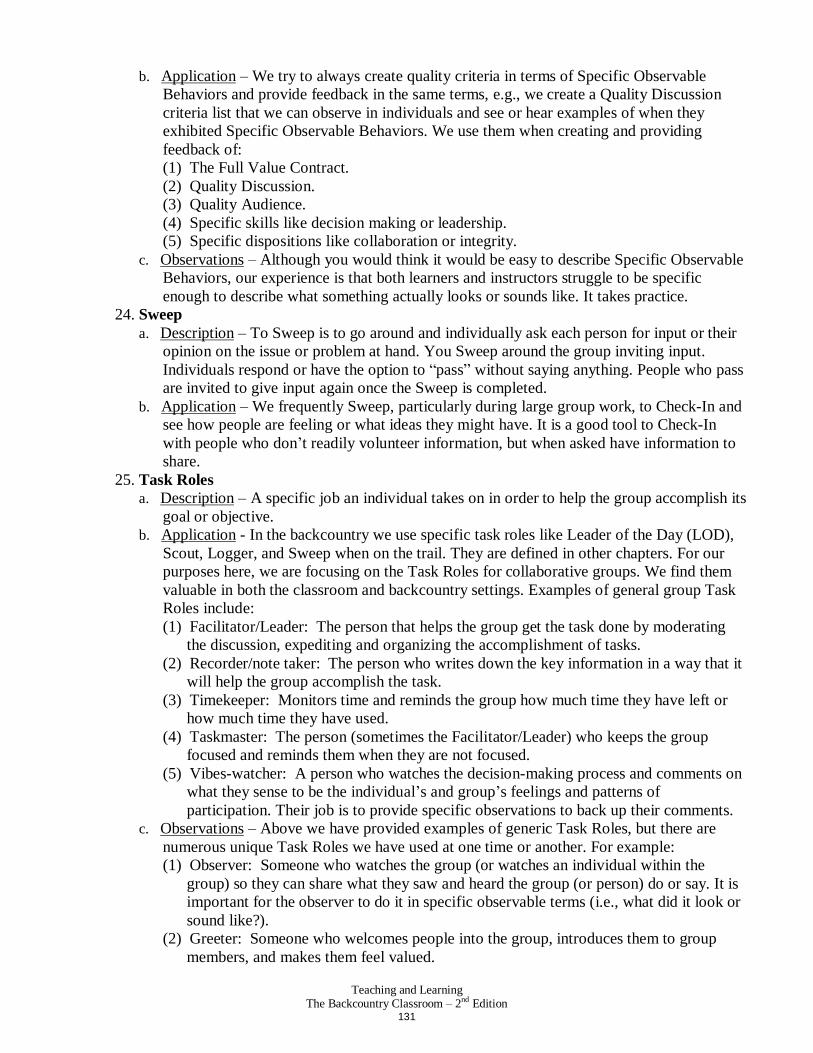
b. Application– We try to always create quality criteria in terms of Specific Observable Behaviors and provide feedback in the same terms, e.g., we create a Quality Discussion criteria list that we can observe in individuals and see or hear examples of when they exhibited Specific Observable Behaviors. We use them when creating and providing feedback of:(1) The Full Value Contract.(2) Quality Discussion.(3) Quality Audience.(4) Specific skills like decision making or leadership.(5) Specific dispositions like collaboration or integrity.
c. Observations– Although you would think it would be easy to describe Specific Observable Behaviors, our experience is that both learners and instructors struggle to be specific enough to describe what something actually looks or sounds like. It takes practice.
24. Sweepa. Description– To Sweep is to go around and individually ask each person for input or their
opinion on the issue or problem at hand. You Sweep around the group inviting input. Individuals respond or have the option to “pass” without saying anything. People who pass are invited to give input again once the Sweep is completed.
b. Application– We frequently Sweep, particularly during large group work, to Check-In and see how people are feeling or what ideas they might have. It is a good tool to Check-In with people who don’t readily volunteer information, but when asked have information to share.
25. Task Rolesa. Description– A specific job an individual takes on in order to help the group accomplish its
goal or objective.b. Application - In the backcountry we use specific task roles like Leader of the Day (LOD),
Scout, Logger, and Sweep when on the trail. They are defined in other chapters. For our purposes here, we are focusing on the Task Roles for collaborative groups. We find them valuable in both the classroom and backcountry settings. Examples of general group Task Roles include:(1) Facilitator/Leader: The person that helps the group get the task done by moderating
the discussion, expediting and organizing the accomplishment of tasks.(2) Recorder/note taker: The person who writes down the key information in a way that it
will help the group accomplish the task.(3) Timekeeper: Monitors time and reminds the group how much time they have left or
how much time they have used.(4) Taskmaster: The person (sometimes the Facilitator/Leader) who keeps the group
focused and reminds them when they are not focused.(5) Vibes-watcher: A person who watches the decision-making process and comments on
what they sense to be the individual’s and group’s feelings and patterns of participation. Their job is to provide specific observations to back up their comments.
c. Observations– Above we have provided examples of generic Task Roles, but there are numerous unique Task Roles we have used at one time or another. For example:(1) Observer: Someone who watches the group (or watches an individual within the
group) so they can share what they saw and heard the group (or person) do or say. It is important for the observer to do it in specific observable terms (i.e., what did it look or sound like?).
(2) Greeter: Someone who welcomes people into the group, introduces them to group members, and makes them feel valued.

Teaching and LearningThe Backcountry Classroom – 2nd Edition
132
(3) Sarcasm monitor: Someone who keeps an ear out for put-downs and caustic or cynical comments. The monitor will let people know when they are being sarcastic.
26. Thumb Toola. Description– the Thumb Tool is a consensus “voting” tool that allows each person to share
their position on an issue. There are three ways to “vote”:(1) A thumb up means that the person enthusiastically supports the decision(2) A horizontal thumb means that the person supports the decision but has reservations or
doesn’t have strong feelings one way or the other(3) A thumb down means the person cannot accept the decision. The person giving a
thumb down must provide a rationale for their position and provide an option that they would find acceptable
(4) For an issue to be approved, all thumbs must be either up or horizontal; there must be no thumbs down
b. Application– We use the Thumb Tool to approve a decision where we want consensus, i.e., total group ownership. For example, if you have a number of different options on how to get to your next ration point, you may want consensus on the route so no one person gets blamed for taking the “difficult” or “easy” route.
c. Observations– The Thumb Tool is not a voting tool to see how many people want to do something. It is designed strictly to try to build consensus.
27. W.A.S.H. - We All Speak Herea. Description
(1) A technique where four specific questions are asked to small groups. The questions are based on Dr. Bernice McCarthy’s Learning Styles and are a WHAT, WHY, HOW, and WHAT IF question.
(2) The four questions are designed around a common topic or concept.(3) It can be done within a Carousel or in Brainstorm/Distill “Huddle Groups” (see
above).(4) In either the Carousel or Huddle Groups, we recommend about two minutes of
brainstorming. In the Huddle Groups, we then recommend a one-minute distillation.(5) If you Carousel with this technique, then we recommend that you have the groups
return to the question they started with and have them distill the question down to what they want to share with the large group.
(6) The distillation question can be very important and shape the direction of the discussion. For example, you could ask to distill the top three responses that are:(a) Most/least interesting(b) Most/least significant(c) Most/least unusual(d) Most/least helpful
b. Application(1) A W.A.S.H. is a technique that allows individuals and groups to discover for
themselves ideas, issues, concerns, concepts, and misinterpretations about nearly anything.
(2) The W.A.S.H. can be very effective in reinforcing and examining important issues and concepts.
(3) Example: If the topic is “Learning Community,” perhaps the questions might be:(a) What is community?(b) Why are communities important to learning?(c) How can we create a learning community?(d) What If all learning experiences took place in healthy learning communities?