compressorassets.empresseffects.com/manuals/compressor.pdf · sidechain the sidechain connector on...
TRANSCRIPT
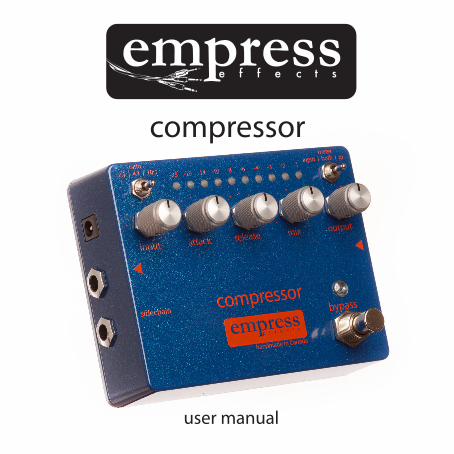
user manual
compressor
Introduction
Compression is a tool used on pretty much every recording you will ever hear, yet this extremely useful and versatile tool is often overlooked by guitar players as part of their rig.
Other compressor pedals are often limited by oversimplified controls and heavily colored sounds. We have created a truly transparent compressor, complete with all the controls found in the studio. The result is a tool that allows for a wide range of sounds from subtly adding sustain to getting the “quack” that country players love.
We’ve also included a mix knob to blend in the dry signal for an even more transparent sound and a gain reduction meter so you know what the compressor is doing at all times.
To help you get the most out of this product, we’ve put some brief instructional videos on our website: www.empresseffects.com
Enjoy,
Steve Bragg
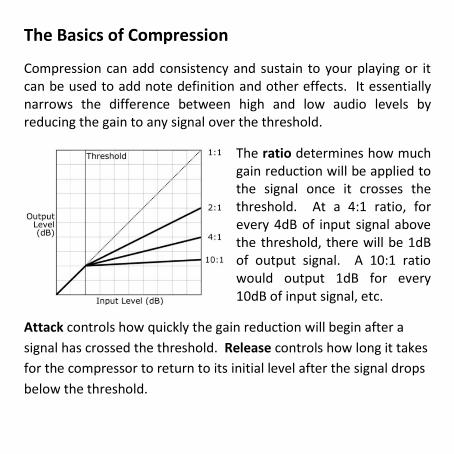
The Basics of Compression
Compression can add consistency and sustain to your playing or it can be used to add note definition and other effects. It essentially narrows the difference between high and low audio levels by reducing the gain to any signal over the threshold.
The ratio determines how much gain reduction will be applied to the signal once it crosses the threshold. At a 4:1 ratio, for every 4dB of input signal above the threshold, there will be 1dB of output signal. A 10:1 ratio would output 1dB for every 10dB of input signal, etc.
Attack controls how quickly the gain reduction will begin after a
signal has crossed the threshold. Release controls how long it takes
for the compressor to return to its initial level after the signal drops
below the threshold.

Controls at a Glance
Power: 9V - 18V DC negative tip 2.1mm jack. 100mA or greater
-+
sidechain: used to alter the signal going to the gain reduction control circuit. It accepts a ¼” TRS plug: Tip = send, Ring = return, Sleeve= ground.
input: sets the level entering the compressor circuit. Higher levels will result in more compression.
ratio: determines how aggressive the gain reduction is.
2:1 - good for gentle gain control and smoothing out uneven playing. Very transparent.
4:1 - a great general purpose setting. Still transparent but oers a large range of compression.
10:1 - close to limiting. Good for acheiving the classic coutry overcompressed sound and adding a lot of sustain for soloing.
attack: controls how quickly the compressor will react to an incoming signal. Attack time increases as you turn the knob clockwise. Range: 50us - 50ms
release: controls how quickly the compressor retuns to its initial level. Release time increases as your turn the knob clockwise. Range: 50ms - 1s

Controls at a Glance
Power: 9V - 18V DC negative tip 2.1mm jack. 100mA or greater
bypass stompswitch: when the LED is shining, the compressor eect is applied to the signal. When o, the compressor is being bypassed (true bypass).
output: sets the output level. This will not eect the amout of compression. Can be used to make up gain lost in compression or as a boost for soloing.
mix: controls the level between the dry signal and the wet (compressed) signal. All the way clockwise is 100% wet signal and all the way counterclockwise is 100% dry signal.Blending in the dry signal brings back the dynamics that can be lost during compression. This technique of parallel compression allows for added sustain without losing the life associated with an uncompresed signal.
meter: red LEDs indicate gain reduction (gr). Gain reduction values are marked over each LED.
when “both” is selected, overlapping gain reduction and input LEDs will appear yellow.
green LEDs indicate input volume.
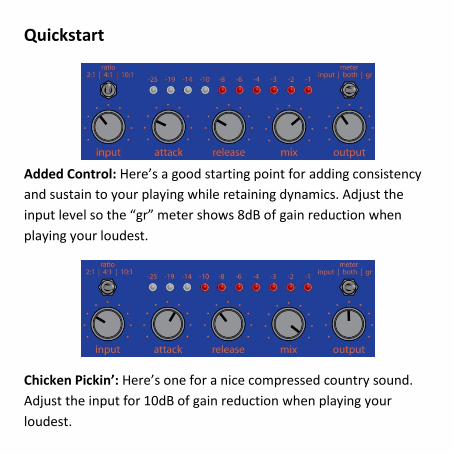
Quickstart
Added Control: Here’s a good starting point for adding consistency
and sustain to your playing while retaining dynamics. Adjust the
input level so the “gr” meter shows 8dB of gain reduction when
playing your loudest.
Chicken Pickin’: Here’s one for a nice compressed country sound.
Adjust the input for 10dB of gain reduction when playing your
loudest.
Sidechain
The sidechain connector on the compressor is a loop that lets you
alter the signal going to the gain reduction control circuit. It accepts
a ¼” TRS plug: Tip = send, Ring = return, Sleeve= ground.
When using the compressor on a bass guitar, it can be very useful to
add a high pass filter to the sidechain in order to avoid triggering
the compressor with high energy notes in the lowest octave.
Using the Meter
The compressor has a 10 segment LED meter that shows input gain,
gain reduction or both.
Red LEDs indicate gain reduction. Gain reduction values are marked
over each LED. Green LEDs indicate input volume. When “both” is
selected, overlapping gain reduction and input LEDs will appear
yellow.
Specifications
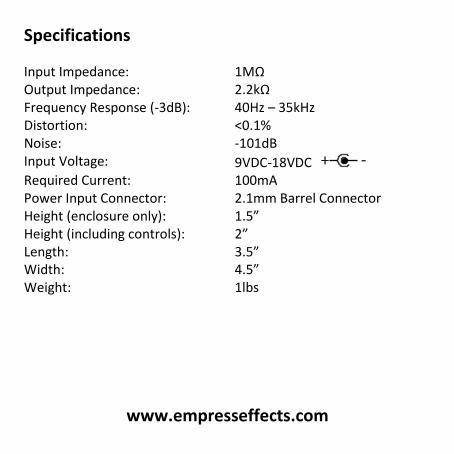
Input Impedance: 1MΩ Output Impedance: 2.2kΩ Frequency Response (-3dB): 40Hz – 35kHz Distortion: <0.1% Noise: -101dB Input Voltage: 9VDC-18VDC Required Current: Power Input Connector: Height (enclosure only): Height (including controls): Length: Width: Weight:
100mA 2.1mm Barrel Connector 1.5” 2” 3.5” 4.5” 1lbs
www.empresseffects.com