the registered master joiners’masterjoiners.nz/wp-content/uploads/2014/07/health-and-saftey... ·...
TRANSCRIPT

in
The Registered Master Joiners’
Health and Safety Guide
The Registered Master Joiners’ Health and Safety Guide
© Securo Ltd. 2
Contents
Foreword .......................................................................................................................................... 3 Preface, Scope and Guide Overview .............................................................................................. 4 Introduction ...................................................................................................................................... 5 A Typical Safety System .................................................................................................................. 6
Part One - The Registered Master Joiners Health and Safety System ........ 8 Contents ........................................................................................................................................... 8 SECTION 1 - POLICY and PLANNING .......................................................................................... 9 SECTION 2 - TRAINING and SUPERVISION .............................................................................. 10 SECTION 3 - HAZARD IDENTIFICATION and RISK MANAGEMENT ....................................... 11 SECTION 4 - INCIDENT RECORDING, REPORTING and INVESTIGATION ............................ 24 SECTION 5 - PURCHASING, PERSONAL PROTECTIVE EQUIPMENT AND CONTRACTOR
CONTROL ............................................................................................................................ 25 SECTION 6 - OCCUPATIONAL HEALTH .................................................................................... 26 SECTION 7 - EMERGENCY PREPAREDNESS .......................................................................... 27 SECTION 8 - COMMUNICATION ................................................................................................. 28
Part Two - Machine and Hand Tool Safety ................................................. 30 Introduction .................................................................................................................................... 30 Contents ......................................................................................................................................... 30 SECTION 1 - WOODWORKING MACHINERY – GENERAL INTRODUCTION ......................... 31 SECTION 2 - CABINET MAKING ................................................................................................. 33 SECTION 3 - BAND SAWS ........................................................................................................... 39 SECTION 4 - JOINTERS, STET AND PLANERS ........................................................................ 41 SECTION 5 - MITRE SAWS ......................................................................................................... 43 SECTION 6 - PUSH STICKS ........................................................................................................ 45 SECTION 7 - RADIAL ARM SAWS .............................................................................................. 46 SECTION 8 - SANDERS ............................................................................................................... 48 SECTION 9 - SHAPERS/ SPINDLE MOULDER .......................................................................... 50 SECTION 10 - TABLE SAWS ....................................................................................................... 52 SECTION 11 - WOOD TURNING LATHES .................................................................................. 54 SECTION 12 - THICKNESSERS .................................................................................................. 56 SECTION 13 - POWERED HAND TOOLS – GENERAL INTRODUCTION ................................ 57 SECTION 14 - ERGONOMIC HAZARDS OF POWERED HAND TOOLS .................................. 60 SECTION 15 - PORTABLE CIRCULAR SAWS............................................................................ 62 SECTION 16 - BELT SANDERS ................................................................................................... 64 SECTION 17 - PORTABLE ELECTRIC DRILLS .......................................................................... 65 SECTION 18 - POWERED HAND SAWS, SABRE AND JIG SAWS ........................................... 66 SECTION 19 - PLANERS .............................................................................................................. 68 SECTION 20 - ROUTERS ............................................................................................................. 69 SECTION 21 - PNEUMATIC TOOLS ............................................................................................ 71 APPENDIX 1 - MACHINERY GUARDING PRINCIPLES ............................................................. 74 APPENDIX 2 - PERSONAL PROTECTIVE EQUIPMENT ........................................................... 77

The Registered Master Joiners’ Health and Safety Guide
© Securo Ltd. 3
Foreword As President of Registered Master Joiners Association, I am delighted to provide the Foreword for this Guide and to have the opportunity to publicly congratulate Securo Ltd, who in conjunction with and on behalf of the Master Joiners, has developed this Health and Safety guide. The Registered Master Joiners have shown foresight and initiative in taking ownership for the preparation of this publication. Considerable effort has gone into the development and consultation process, which is now presented as a ‘best practice’ document. By using the information contained in this Guide, Industry members can be confident that they are taking all practicable steps to manage health and safety. The Guide will make an important contribution to our commitment to reduce workplace injuries. This publication is a significant step forward because it represents consensus by the Registered Master Joiners on practical ways to reduce injuries and illness for our industry. It sets out the minimum acceptable agreed standard for all parties. The collaborative approach taken to develop the Guide is also consistent with the government's health and safety legislation and framework that enables everyone to work together to reduce the economic and social costs of workplace illness and injury. There is no doubt hazard management is most effective when the issue is jointly owned and driven by the people who know and understand the nature of the work and workplaces involved. The Joinery trade has some significant hazards to deal with, such as:
• wood dust
• noise • machine hazards
• manual handling
• occupational overuse syndrome
• spray painting
• slips trips and falls from dust covered floors
• glass handling
• stacking wood and materials. Therefore, it is with great pleasure that I endorse this health and safety Guide on the management of health and safety hazards in the Joinery Industry. I look forward to hearing about the influence that it has on improving workplace health and safety.
Murray McIndoe President Registered Master Joiners Association

The Registered Master Joiners’ Health and Safety Guide
© Securo Ltd. 4
Preface, Scope and Guide Overview
Preface This Guide has been prepared by Securo Ltd in conjunction with the Registered Master Joiners after consultation with other interested groups. The purpose of this Guide is to provide:
• general information about the types of hazards found in the joinery industry
• suggestions for managing and controlling those hazards
• a framework for each Registered Master Joiners member to implement a health and safety system and more effectively manage their workplace hazards.
Scope
The Guide applies to all organisations involved in the joinery industry and similar operations. It provides both general guidance and also solutions to managing specific hazards found in the industry. The objective is to safeguard the health and safety of joinery industry employees, and others who may be affected by their activities, from risks and hazards such as:
• Inhalation of wood dust and harmful vapours
• Slips, trips and falls from dust covered floors
• Wood dust explosion • Collapse of stacked wood and materials
• Excessive noise
• Machine hazards
• Manual handling
• Exposure to chemicals
• Lacerations from Glass Handling Guide Overview This Guide is divided into two separate and distinct parts:
• Part One - The Registered Master Joiners Health and Safety System Part One describes the Registered Master Joiners Health and Safety System. It addresses the concepts of safety management and key areas of health and safety that need to be addressed to have a successful system that will protect employees and others. This part of the Guide contains both general and specific information regarding the management of hazards and risk. For example, whilst Section 1 talks about the general need for a Safety Policy and Planning, Section 3 deals with a number of specific joinery workshop hazards such as wood dust and the safe stacking of materials.
• Part Two – Machine and hand tool safety Part Two deals with the machinery and equipment utilised in the construction of Joinery Industry items. It begins with a section on the general hazards associated with all items of woodworking machinery and equipment. It should prove particularly useful for inexperienced employees. It may also serve as a useful training aid. This is followed by a general section on detailed section on the hazards encountered in cabinet making and the necessary controls to reduce risk. Finally, Part Two provides detailed instructions and guidance on the safe use of specific types of powered hand tools such as belt sanders, circular saws, routers etc.
*Securo Ltd. is a private Health and Safety Consultancy. PO Box 6981 Wellesley St. Auckland Tel: 09 303 3477, Fax: 09 307 3360 Email [email protected]
The Registered Master Joiners’ Health and Safety Guide
© Securo Ltd. 5
Introduction All organisations are legally required to implement a documented health and safety System and develop procedures to manage all significant hazards identified in the workplace. An effective system will ensure compliance with the Health and Safety in Employment Act 1992. An integrated health and safety system requires a number of elements, with related procedures, to succeed in achieving ‘Safe Systems of Work’. The elements of a Safety System interact and work together, as illustrated in Figure 1 overleaf and the following pages. A system only exists once all elements have been implemented. Once health and safety procedures have been documented a system has to be implemented and maintained by attending to issues such as regular training and workplace inspections. The system also needs to be regularly monitored and reviewed to ensure that it is fully effective. Implementing a health and safety System, as outlined in this Guide, will enable Registered Master Joiners members to: Implement and achieve:
• A legally compliant health and safety system
• An effective competency training program
• Reduced risk from effective management of Hazards
• Safer work practices for all tasks
• An effective Emergency Response plan
• Appropriate accident and investigation procedures
• Better communication with employees, contractors and visitors Control and minimise:
• Non-compliance with health and safety legislation
• Non-compliance with the Association’s own guideline procedures
• Occupational injury and illness costs
• ACC premiums and injury claims, rehabilitation and retraining costs
• Property damage:
ο• Buildings
ο• Plant, machinery and equipment
ο• Vehicles and mobile plant
• Fire and other Emergencies
• Management System inadequacies.
Formatted: Bullets and Numbering

The Registered Master Joiners’ Health and Safety Guide
© Securo Ltd. 6
A Typical Safety System A Safety System typically consists of the elements listed under item numbers 1 to 8 below. The way in which these different elements interact is illustrated in Figure 1. Each component is explained more fully in the following pages. For a system to be fully effective, all elements must be addressed. It is essential that such a system is regularly reviewed and monitored to ensure that it is meeting its aims and objectives. Once implemented, an effective Safety System will enable Registered Master Joiners members to achieve legal compliance with health and safety legislation and should lead to ACC premium discounts.
1. Policy and Planning
2. Training and Supervision
3. Hazard Identification and Risk Management
4. Accident Reporting and Investigation
5. Purchasing, Personal Protective Equipment, Contractor Control
6. Occupational Health
7. Emergency Preparedness
8. Communication
Figure 1.
1
Policy & Planning
ManagementCommitment
2
Training &Supervision
3
HazardIdentification &
Risk Management
4
AccidentReporting &
Analysis
8
Communication
7
Emergencypreparedness& Response
6
OccupationalHealth
5
Purchasing &Contractor
Control
The Registered Master Joiners’ Health and Safety Guide
© Securo Ltd. 7
Part One
The Registered Master Joiners’ Health and Safety System
The Registered Master Joiners’ Health and Safety Guide
© Securo Ltd. 8
Part One - The Registered Master Joiners Health and Safety System
This part of the Guide describes the various system elements and procedures of the Registered Master Joiners Safety System, as indicated below.
Contents
1 POLICY and PLANNING 2 TRAINING and SUPERVISION 3 HAZARD IDENTIFICATION and RISK MANAGEMENT 4 ACCIDENT REPORTING and INVESTIGATION 5 PURCHASING, PPE and CONTRACTOR CONTROL 6 OCCUPATIONAL HEALTH 7 EMERGENCY PREPAREDNESS 8 COMMUNICATION
The Registered Master Joiners’ Health and Safety Guide
© Securo Ltd. 9
SECTION 1 - POLICY and PLANNING Introduction Legislation requires employers to adopt a systematic approach to Health and Safety. To achieve this, it is necessary to document the Health and Safety Policy of the organisation and describe the actions and planning required for implementing and reviewing both the Policy and the company’s Safety System. Objectives:
1. To demonstrate an active commitment to consultation with employees on all matters of health and safety management.
2. To demonstrate a systematic approach and a culture of continuous improvement by setting and reviewing targets for all aspects of health and safety performance.
What should you do?
• Sign, issue and display the agreed health and safety Policy
• Review Policy periodically and at least annually
• Confirm appointment of a health and safety Coordinator with agreed responsibilities
• Confirm health and safety Responsibilities and required competencies for all staff. Review performance against responsibilities regularly
• Establish a health and safety Committee and involve employees in setting health and safety standards and the internal auditing of Workplace Safety Management Practices
• Establish a health and safety reference library
• Promote health and safety activities by signage, memos, and posters etc.

The Registered Master Joiners’ Health and Safety Guide
© Securo Ltd. 10
SECTION 2 - TRAINING and SUPERVISION
Introduction Training and supervision of employees are key areas to ensure health and safety in the workplace and are specifically required under the Health and Safety in Employment Act 1992. Therefore, there is a need to identify and implement all training needs for workplace activities and tasks. Objectives:
1. To ensure that all employees are sufficiently trained and supervised to enable them to avoid all hazards and conduct all their work activities and tasks safely, without causing harm to themselves or others
2. To ensure that all employees are informed of both their own and the management's responsibilities for Health and safety in the workplace.
What should you do?
• Develop and implement a health and safety training Policy. Within the Policy, senior management should commit to work only being carried out by appropriately trained personnel
• Develop and implement a Program and Plan to identify and address the health and safety training needs of all employees
• Do not allocate tasks to part-time and temporary employees, volunteers and work experience students unless full and suitable training for the task has been provided to them i.e. treat them in the same way as full-time employees
• Implement a health and safety induction process incorporating general and specific work risks as well as site-specific hazards. Training should be conducted prior to exposure to risk or commencement of any work activities and include regular contractors and volunteers, utilising a checklist and health and safety induction handbook
• Train all employees in the avoidance of hazards to which they are exposed through workplace procedures, environment, plant, machinery, equipment, vehicles, materials and substances
• Ensure training procedures take into account differing levels of responsibility, individual ability and competence, age and maturity, experience, and operational risk
• Where it is needed, train all employees in the use of personal protective equipment
• Ensure that training addresses both general risks and those specific to the individual
• Appoint competent and experienced trainers to deliver the training and retain a list of approved trainers. If internal trainers are used, they should have not only the technical skills, but the ability to train others in a structured and appropriate way
• Following training, trainees should be assessed to ensure that the training received was both appropriate and understood and that they have gained the requisite knowledge, skill, and understanding. Assessment should include subsequent on-the-job supervision and observation
• Ensure adequate supervision at all times, especially for recent trainees
• Maintain a detailed and dated record, signed by the employee, of all training provided
• Maintain detailed and dated Competency, Licence, and Training Records for each employee where appropriate (or contractor/volunteer) including issue and renewal or refresher dates. Ensure that all such records are signed by the employee, contractor or volunteer

The Registered Master Joiners’ Health and Safety Guide
© Securo Ltd. 11
SECTION 3 - HAZARD IDENTIFICATION and RISK MANAGEMENT Introduction Like training, Hazard Identification and Management are crucially important if safety in the workplace is to be achieved. Employers are legally required to identify all hazards, assess risks, and implement appropriate Hazard Control Plans to eliminate, isolate, or minimise risks to the lowest level possible. Objectives: To ensure that there is an active method that systematically identifies, assesses, and manages both the actual and potential hazards in the workplace.
What should you do?
• Identify all Significant Hazards relating to:
• Specific work processes, tasks, vehicles, plant and equipment
• Specific hazard categories e.g. electrical, chemical, mechanical etc.
• New or modified equipment, processes or tasks
• The general work environment
• Site-specific risks e.g. overhead cables
• Off-site external locations where work is carried out
• Take all practicable steps to Eliminate, Isolate or Minimise Hazards. A hazard is something with the potential to cause harm e.g. electricity, work at height, machinery etc. Ways in which this can be best achieved are not always immediately apparent and reducing the risk to its lowest level to protect employees and others, often needs careful thought. As an example, noisy environments are known to have an adverse effect not only on hearing, but also on safety generally. Utilising this hierarchy of controls, the following potential actions (which are by no means exhaustive) might be considered :
• Eliminate: replace a noisy work process with a quiet one if possible • Isolate: enclose the process so that most employees are not affected
• Minimise: after enclosing process, provide operatives with ear defenders
Additionally, hazards are not always as obvious as large items of equipment, untrained employees or recognised hazardous tasks, but are often ‘hidden’ e.g.
• Work Method – inherently unsafe methods of work are allowed
• Work Organisation – repetitive actions, shift work, long hours
• Workplace Culture – poor safety practices tolerated by management
• Workplace Environment – hot, noisy, poor lighting, poor surfaces etc.
• Enter all Significant Hazards on Hazard Control Plan and place in Register.
• Regularly Review Hazard Control Plans (at least annually) and following any incident or accident, whether minor or serious, to ascertain if improvements to the plans are necessary.

The Registered Master Joiners’ Health and Safety Guide
© Securo Ltd. 12
Typical Joinery workplace hazards In the following sections 3.2 to 3.11, some detailed information on typical hazards at Joinery Workplaces is provided. This is a guide only and is not exhaustive. To fully address and control identified hazards, it will frequently be necessary to supplement this information with more specific and detailed guides from sources such as the Dept. of Labour and ACC.
Section Page
3.2 Working Environment 13
3.3 Wood Working Machinery Safety 14
3.4 Wood Dust 15 - 16
3.5 Chemicals 17
3.6 Manual Handling 18
3.7 Safe Stacking 19
3.8 Noise 20 - 21
3.9 Hand-Arm Vibration 22
3.10 Glass Handling 23
The Registered Master Joiners’ Health and Safety Guide
© Securo Ltd. 13
3.2 WORKING ENVIRONMENT Introduction The working environment includes the atmosphere, temperature and comfort, lighting, air quality, noise and the general surroundings. It needs to be recognised that these are not simply issues of comfort or convenience that can be lightly dismissed. When any one of these working conditions is sub-standard they can adversely affect health and safety. Below is a brief overview of the hazards relating to lighting, temperature, and comfort Lighting There must be levels of lighting sufficient for the work areas and tasks being performed. Too much and too little light can lead to:
• Eye strain
• Headaches
• Blurred vision. The principal Standard AS/NZS 1680.2 Interior Lighting Part 1: General Principles and Recommendations, gives detailed aspects of good lighting and the level of illumination required for different types of work. For example, lighting for routine office work does not need to be as high as lighting for cabinet-making inspection. Temperature and Comfort Uncomfortably warm or cold work environments can affect the comfort, concentration, and safety of employees. Productivity can also be adversely affected. Temperature controls can range from fans and blowers to air conditioning and heating systems. Optimal temperature is between 21 to 24 degrees Celsius. Environments that have extreme temperatures can be detrimental to health and safety generally and should be assessed so that adequate controls can be determined. Factors which contribute to comfort and need to be considered include:
• Humidity (many parts of New Zealand suffer high humidity)
• Air movement
• Level of activity
• Clothing.

The Registered Master Joiners’ Health and Safety Guide
© Securo Ltd. 14
3.3 WOODWORKING MACHINERY SAFETY Introduction Even where machine guarding is in place, the risk of injury in using woodworking machinery is not eliminated. Guarding is very important, but there are many other aspects to machinery safety that must be considered and some are highlighted below. Common accidents include:
• Lacerations to hands while planing and moulding
• Wood kicking back or flinging upwards, striking the machinist
• Wood of a jig breaking and injuring the machinist
• Injuries from clearing wood or sawdust while the machine is running.
Guarding As a minimum, all machines should be guarded to the level specified in Schedule 1 of the Health and Safety in Employment Regulations 1995, the Department of Labour ‘Guidelines for the Safe Use of Woodworking Machinery’, and current Australia/New Zealand Standards for Woodworking Machines. General Safety Precautions The risks associated with operating woodworking machines can be reduced by the following safe work practices: Machines
• Use mechanical feeding wherever possible
• Maintain machines and guards on a regular basis, not just when there is a problem
• Ensure adequate lighting
• Ensure that emergency stop buttons are clearly identified and signed
• Ensure that machines are switched off and isolated when not in use
• Ensure that machines are switched off and isolated when being maintained or cleaned to prevent accidental or deliberate operation of the machine by the operator or another person
• Ensure that unauthorised persons cannot access machine areas.
Operators
• Only properly trained, authorised and competent staff may operate machinery
• Wear clothing that will not become caught in machinery
• Keep a list of Operator competency reviews for each machine. Review operators' competency to operate the machine annually and record date of review
• Ensure that eye protection is worn where necessary
• Ensure operators' conduct daily pre-use Inspections of their machines checking critical parts. For example, checking saw settings, condition of guards, blades, bolt heads, spindle nuts correctly tightened
• Practice good housekeeping
The Registered Master Joiners’ Health and Safety Guide
© Securo Ltd. 15
3.4 WOOD DUST Introduction Wood dust produced by machining or sanding may contain naturally occurring chemicals, irritating to the eyes, respiratory system, and skin. It can cause sensitisation by inhalation and skin contact in some people; for example, in the form of dermatitis and asthma. Prolonged exposure to wood dust may cause nasal and nasal cavity cancer by inhalation. Particular care should be taken when machining preservative-treated wood because of possible health effects from the added chemicals. In 1995 the International Agency for Research on Cancer (IARC), which is an agency of the World Health Organisation, evaluated the cancer risks associated with workplace exposures in a variety of wood industries. The IARC classified wood dust as a Group 1 carcinogen to humans. This classification is the result of a marked increase in the occurrence of cancer of the nasal cavities and paranasal sinuses among workers exposed to many types of wood dust. Extracting wood dust Airborne wood dust is a significant hazard in joinery operations. In addition, the dust accumulates in the workshop, making the work environment unpleasant and hazardous. The best way to control dust inhalation is by the use of properly designed and maintained dust extraction systems. In addition to dust extraction equipment, work areas should be well ventilated. In the absence of effective dust extraction, an approved dust mask in conformance with the requirements of Standards AS/NZS 1715 and AS/NZS 1716 should be used. At all times eye protection meeting the requirements of AS/NZS Standard 1337 should be worn. The wood dust produced when machining MDF and hardboard is finer and more readily dispersed into the surrounding air than the dust from most solid wood, plywood, or particleboard. In this respect, these dusts are similar to the wood dust produced when sanding finely textured hardwoods, with both requiring a higher level of extraction efficiency. For wood dust from pine timber particleboard, dust extraction systems require a minimum capture velocity of 10 to 20m/sec, compared with 20 to 30 m/sec for wood dust from MDF, hardboard and some hardwoods. The higher capture velocity required for these finer wood dusts can often be met by simple modifications to existing equipment. For example:
• By reducing the size of the collector hood openings and placing them as close as practicable to the point of dust collection will assist in raising capture velocities
• By closing off ducts connected to machines which are not in use, subject to maintaining the recommended minimum air velocity in the remaining ducting. For fine wood dusts, such as that from MDF, the air velocity in the ducting needs to be 15 to 20 m/sec to prevent an accumulation of dust (plugging), which could cause a fire risk.
High concentrations of wood dust, particularly from sanding, can form explosive mixtures with air. It is recommended that ducting should be fitted with explosion vents, which should be located externally wherever possible. Do not use PVC piping (without bonding) for ducting as there can be a high static build-up and the discharge may cause an explosion. For large extraction systems, the fitting of spark detectors and automatic extinguishing equipment is advisable. In addition, electric motors should be spark proof.
The Registered Master Joiners’ Health and Safety Guide
© Securo Ltd. 16
Wood dust which gathers on the floor, ledges, and in machinery pits, etc. should be removed by suction devices or wet sweeping. Use of compressed air should be avoided in order to prevent creating a potentially explosive atmosphere. If it is used, the person using the compressed air should wear a suitable dust mask or respirator in conformance with the requirements of Standards AS/NZS 1715 and AS/NZS 1716. Protective clothing In particular, long shirtsleeves and gloves, should be worn at all times to avoid skin contact. Soiled clothing should be washed without shaking off the dust. See Appendix 2 for more details on appropriate usage of Personal Protective Equipment.
The Registered Master Joiners’ Health and Safety Guide
© Securo Ltd. 17
3.5 CHEMICALS Introduction Many of the finishes applied to wood and wood products, such as paints, lacquers and varnishes, contain solvents, bacteriocides, and other chemicals, which potentially, may have adverse health effects. These effects include irritation to the:
• Eyes
• Nose
• Mouth and throat
• Nasal passages
• Lungs
It is important that all such substances are assessed prior to use to ensure that the risks associated with them are fully understood and safe usage procedures are implemented by:
• Firstly, obtaining a Material Safety Data Sheet from the supplier or manufacturer prior to purchase
• Secondly, reading the labels on the containers for information about possible health effects and how to avoid them.
The above precautions apply not only to paints, lacquers, or varnishes, but equally to adhesives and other chemicals used in the industrial environment. Documentation such as labels and Material Safety Data Sheets are designed to ensure that any potential hazards associated with the material are known and the handling procedures for safe use are detailed. For additional information regarding control measures, storage, use and environmental monitoring of hazardous substances, refer to www.hsno.govt.nz or HSNO Act 1996. The Act is administered by ERMA. Also refer to DoL “A Guide to the Spray Coating Regulations 1962”. Formaldehyde Formaldehyde is a colourless liquid or gas with a pungent odour. It has now been declared to be a proven human carcinogen by the International Agency for Research on Cancer. [IARC] As an atmospheric contaminant it can be an irritant to eyes, nose, mouth and throat and may cause burning to the nasal and/or bronchial passages at levels above the Workplace Exposure Standard (WES) of 1 part per million [ppm]. Asthmatics are particularly vulnerable. Wood panels such as particleboard, medium density fibreboard and plywood, laminated veneer lumber and laminated beams, which utilise formaldehyde-based adhesives, may emit small amounts of formaldehyde into the air. Research has indicated that, generally, the amounts of formaldehyde emitted are well below the New Zealand Workplace Exposure Standard (WES) for formaldehyde of 1 ppm or 1.2 mg/m/3 as a dust. However, unacceptable exposure levels could occur when large quantities of product are stored in a confined, poorly ventilated space or when plastic wrapping is removed from newly manufactured material. The solution is to improve air circulation and ventilation to the affected area or wear a respirator if levels of dust are high during peak workflows. Remove all dust from MDF cutting and sawing operations as soon as possible.

The Registered Master Joiners’ Health and Safety Guide
© Securo Ltd. 18
3.6 MANUAL HANDLING Introduction Manual Handling is not, as many people think, simply lifting an item but includes any activity that involves the following when handling items or materials:
• Lifting
• Throwing
• Carrying
• Holding
• Supporting
• Pushing
• Pulling
What injuries can occur? Strain injuries of the muscles and ligaments through overexertion or continuous overuse. Injuries can be sudden or occur over a long period of time. Why should you do something about it?
• Back, neck injuries and hernias are serious injuries. They are often debilitating and can seriously affect an individual’s general lifestyle as well as their working life, leading to permanent restricted movement and pain
• These injuries often take a long time to heal and frequently require time off work
• Unplanned time off work can cause disruption to your business' productivity
• Accident compensation for these types of injuries is usually high.
What are your legal obligations? Manual Handling activities should be treated like All other workplace hazards. The Dept. of Labour Manual Handling Code of Practice provides practical guidance on the identification, assessment, and control of risks arising from manual handling activities. The prevention of manual handling injuries requires:
• The identification, assessment and control of all Manual Handling activities
• Avoiding risks in the first place by eliminating the need to physically handle items e.g. utilising mechanical lifting aids, delivery of regularly used materials in lighter, smaller boxes or bags etc.
• Providing general and job-specific manual Handling training for employees
What should you do?
• Obtain the Dept. of Labour Manual Handling Code of Practice and conduct detailed Manual Handling Risk Assessments
• Identify all jobs and tasks where significant manual handling activities are carried out
• Identify all persons whose tasks include specific lifting activities and who are therefore at greater risk
• Identify any particularly vulnerable individuals e.g. pregnant women and people with medical conditions and restrict their lifting activities accordingly
• Provide training in conducting a Manual Handling Hazard Assessments
• Train all employees in manual handling activities to the level their job requires.

The Registered Master Joiners’ Health and Safety Guide
© Securo Ltd. 19
3.7 SAFE STACKING Introduction There have been numerous fatalities due to unsafe stacking practices, leading to stacks of timber sheets falling and crushing the victims. This type of accident is easily preventable by good management and the implementation of simple systems and procedures. In some cases there may be a need to re-design work areas which are inherently unsuitable. Prevention of stacking-related Injuries:
• All sheet timber products should be stored in a proper racking system
• All other items should be stored where they can be easily and safely retrieved without the risk of
o manual handling injuries due to awkward manoeuvring or heavy items being stored at inappropriate height
o removal of items leading to the potential collapse of other materials
• Train all employees on the hazards associated with stacked materials and safe procedures for removal of items from stacks
• Ensure that all stacking/storage areas are structurally sound.
• Ensure that appropriate means of access to racking is provided and employees are forbidden to climb upon racking/storage structures
• Ensure that racking is never overloaded
• Stack materials/equipment so that they cannot slip or fall, by interlocking or some other safe recognised method.
• Arrange stacks in clearly defined lines with working aisles/passages between them.
• Restrict the height of stacks to ensure the material below can withstand the weight
• Avoid stacking rounded objects such as drums and poles on their sides if possible
• Implement safe unloading and transport procedures for unloading stacked materials and items from delivery vehicles.

The Registered Master Joiners’ Health and Safety Guide
© Securo Ltd. 20
3.8 NOISE Introduction Noise is measured in decibels (dB). The maximum permitted workplace noise exposure level to which a person can be subjected is 85 dB(A) for eight hours and a peak noise of 140dB. As a general ‘rule of thumb’, if normal conversation is difficult at 1 metre distance, the noise level is probably too high and approaching or exceeding the maximum level allowed for an 8-hour working day. What should you do? Even if the level of noise is below that which might damage hearing, it can contribute to other dangers by masking warning signals and hindering communication. Excessive noise can:
• affect concentration
• cause mental confusion
• lead to operator fatigue
• cause frustration
• result in undue levels of stress
Unfortunately, the actual need to wear hearing protection can also create some of these problems. Consequently, noise reduction techniques are preferable to simply masking existing noise levels by the use of hearing protection. Additionally, by eliminating, isolating, or minimising noise levels, all employees are protected rather than just those closest to the source of the noise. Therefore, wherever possible, excessive noise levels should be reduced by engineering controls such as:
• Modifying existing noisy machinery through design changes.
• Replacing noisy machinery by installing newer equipment designed for operating at lower noise levels.
• Isolating the source of the excessive noise from all persons not involved with the operation of the equipment
• Planned maintenance of machinery (frequently, excessive noise levels emanate from poorly maintained tools, plant and equipment).
After such controls have been implemented, any person still subjected to excessive noise levels should wear personal hearing protection in the form of earmuffs or earplugs which conform to AS/NZS 1270:2002 Acoustics - Hearing Protectors. Reference should also be made to AS/NZS 1269:3.1998 - Hearing Protector Program. Nine reasons why machines of all types get noisier with use
1. Worn or chipped gear teeth: worn or chipped teeth will not properly engage. Shiny wear marks may not be visible on the teeth but they raise noise levels.
2. Worn bearings: bearing wear will show up as vibration and noise, as flat spots or cracks appear in the balls.
3. Slackness between worn or loose parts: this noise (squealing from slack drive belts, "pistons etc.) leaks.
4. Poor lubrication: this appears as squeaking noises due to friction or excess impact noise in dry and worn gears or bearings.
5. Imbalance in rotating parts: just like car wheels, any imbalance in a fan impeller or motor shaft will show up as excess vibration.

The Registered Master Joiners’ Health and Safety Guide
© Securo Ltd. 21
6. Obstructed airways: a build-up of dirt or a bent/damaged piece of metal in an airway or near a moving part, e.g. a bent fan guard, can cause whistling or other "air" type noise.
7. Blunt blades or cutting faces: blunt or chipped saw teeth, drill bits muter bits etc, usually make the job noisier as well as slower.
8. Damaged silencers: silencers for air-driven machines or mufflers for engines may become dogged with dirt, rusted out or damaged, losing their ability to absorb noise.
9. Removal of a noise-reducing attachment: mufflers, silencers, covers, guards, vibration isolators etc.
Reference Materials and Resources AS/NZS 1473 Series - Guarding of Woodworking Machinery (currently being drafted into three parts for relevant industry sectors)

The Registered Master Joiners’ Health and Safety Guide
© Securo Ltd. 22
3.9 HAND-ARM VIBRATION Introduction Any tool, plant, or machine which vibrates, especially where the operator is directly affected by vibration on a regular basis, can potentially cause severe and permanent nerve and tissue damage. This may have a life-altering effect for the victim. In severe cases, the inability to use several fingers or an entire hand can occur, resulting in simple tasks, such as holding a cup of coffee, becoming impossible. Any one (or a combination) of a group of conditions can result from exposure to vibrating equipment. For some people, symptoms may be experienced after only a few months exposure, but for others the period might be several years. Collectively, this group of conditions is known as Hand-Arm Vibration Syndrome (HAVS). HAVS is a cause for serious concern and some countries, such as the UK, have introduced specific legislation, imposing certain requirements on employers to address this hazard. Hand-Arm Vibration symptoms may include:
• Severe and temporary or permanent loss of grip
• Reduced grip strength, resulting in inability to do a job safely
• Numbness and/or tingling sensation
• Severe pain in wrist/hand/arm
• Sensory Nerve Damage
• Sleep disturbance
What should you do?
• Familiarise yourself with the hazards and risks associated with vibration
• Identify all tasks and items of equipment where vibration may be a risk
• Conduct hazard assessments on the tasks and equipment
• Inform your employees of the hazards and how to avoid them
• Inform employees on how to recognise and report signs of injury
• Implement a Planned Maintenance policy
• Replace high-risk equipment where possible
• Ask the manufacturer to add anti-vibration mounts to equipment where possible
• Look for alternative ways of working which eliminate the vibrating equipment
• Mechanise or automate the work or change the way of working
• Make sure your employees use the most appropriate equipment for each job
• Introduce a ‘low-vibration performance’ purchasing policy for new equipment
• Consider job rotation to minimise the time individuals use the equipment
• Design the job so that poor posture is avoided
• Introduce health monitoring for employees known to be at risk.

The Registered Master Joiners’ Health and Safety Guide
© Securo Ltd. 23
3.10 GLASS HANDLING Introduction Joinery involves the fitting of glass to cabinets, doors etc and requires the careful handling of sheets of glass on arrival, during construction of cabinets and at the customer’s work site. The risk of cuts and serious lacerations is ever present with any operation that involves glass handling. It is therefore important to ensure that appropriate safety measures are in place where work of this type is undertaken. What should you do?
• Train employees in safe Glass handling techniques
• Reduce unnecessary glass handling to a minimum
• Ensure that glass is safely stored in suitable racking
• Provide racking for stored glass that anyone passing by cannot fall onto it
• Provide a suitable table with cushion padding for cutting glass
• Provide and ensure that suitable gloves are worn when handling glass
• Implement procedures for carrying large sheet glass in windy or confined spaces
• Dispose of all off-cuts into a suitable storage bin for re-cycling
• Implement glass breakage procedures for speedy removal of broken glass
• Provide first aid facilities and ensure that first aiders are well versed in treatment for minor and serious cuts
• Inform all employees of the need to have even minor cuts cleaned and covered to protect both themselves and others from the risk of cross-infection
The Registered Master Joiners’ Health and Safety Guide
© Securo Ltd. 24
SECTION 4 - INCIDENT RECORDING, REPORTING and INVESTIGATION Introduction Recording and reporting incidents and accidents is a legal obligation. This section provides an overview of incident reporting and recording requirements for companies, and the procedure for incident/accident investigation. Company procedures should specify who does the recording, reporting, and investigating of all incidents, what forms must be completed and what records kept. Objectives:
• To ensure that there is an active reporting, recording and investigation system for all work-related illnesses, incidents, and accidents
• The investigation to ensure causation of all incidents and accidents followed by corrective and preventive action
• To implement and record changes in the health and safety System resulting from investigations and corrective and preventive action.
What should you do?
• Maintain use an Accident Register
• Implement Incident Reporting Procedures
• Train all relevant employees in incident/accident investigation techniques
• Record all ‘near miss’ incidents where someone could have been harmed
• Report all Serious Harm incidents to the Dept. of Labour immediately and within seven days provide details of how the accident occurred.
• Document the following:
o How investigations are carried out when incidents occur
o Who is responsible for investigations and taking Corrective Action
o Review of all incidents or accidents to ensure Hazard Assessments and Emergency Response Procedures accurately identify all hazards and controls
o Process for ensuring that accident causation is communicated
o to all employees, contractors and volunteers as relevant
o All meetings with staff to minute discussions and action(s) on Accident reporting, recording and investigation.

The Registered Master Joiners’ Health and Safety Guide
© Securo Ltd. 25
SECTION 5 - PURCHASING, PERSONAL PROTECTIVE EQUIPMENT AND CONTRACTOR CONTROL
Introduction This section describes company purchasing requirements as they relate to the health and safety of employees. Organisations need to decide how health and safety may be affected when services, materials, or equipment is purchased so that risks to health and safety are not, unknowingly, introduced. The latter category should also take into account design issues. Numerous serious accidents have arisen due to purchasers giving inadequate consideration to the safety aspects of the equipment design. Objectives: To ensure that there is an active Purchasing Process including:
• A review of workplace design, work processes, materials, plant and equipment
• A review of the fabrication, installation, commissioning, handling and disposal of materials, plant and equipment
• The purchasing of goods and services
• The selection, issue and control of Personal Protective Equipment*
• The contracting and sub-contracting of plant, equipment and services
• The inspection, maintenance, testing, repair, and replacement of plant and equipment.
What should you do? Implement Purchasing Policy and guidelines for all purchases which may have an impact upon health and safety. Purchasing Controls need to include:
Plant, Machinery and Equipment Reviews o Checking all purchases against both Legal and AS/NZ Standard requirements for items
such as machine guarding, ergonomics, electrical safety, suitable lighting
o The design of workplaces, work processes, materials, plant and equipment
Hazardous Substances o Obtaining the Material Safety Data Sheet for the substance prior to use
o Ascertaining whether a less hazardous substance can be used
Personal Protective Equipment [PPE] o Purchasing PPE that complies with relevant AS/NZ Standards
o Ensuring that PPE not only meets standards but is fit for the purpose
o Training provisions by the supplier, where appropriate
Contractor Controls o Checking of Contractors health and safety policies, practices and procedures
o Use of a written contract requiring details of qualifications and experience
o Competency of the Contractors for the specific work they will undertake
o Registering Contractors on and off site, and informing them of hazards that may affect them in the course of their work
o Monitoring of all work carried out by Contractors to ensure that they do not introduce any new avoidable hazards, either temporarily or permanently.
Note: For further information regarding PPE, see Appendix 2 or refer to the HSE Act 1992- Part 2, Section 18A- “Duties of persons selling or supplying plant for use in place of work”.

The Registered Master Joiners’ Health and Safety Guide
© Securo Ltd. 26
SECTION 6 - OCCUPATIONAL HEALTH Introduction This section outlines the Occupational Health procedures and monitoring requirements for joinery companies, based on legislative requirements. Occupational illness is any condition that may cause sickness, impaired health and well being, or significant discomfort and inefficiency. Objectives To ensure the organisation will undertake any recommended health surveillance for noise, chemical hazards, and dust exposure. What should you do?
• Pre-employment checks to determine that each individual is capable of carrying out their tasks they will be asked to perform, both physically and mentally. ‘Capability’ should take into account physical fitness, strength, pre-existing conditions, eyesight, hearing, asthma, epilepsy and any other condition that might is relevant. This may require a medical examination by a GP.
• Complete your Hazard Register, identifying specific health Hazards
• Implement a health surveillance program to monitor exposure to noise, vibration, hazardous substances etc. The program should be individual and environmental
• Include the Monitoring Program on the agenda of health and safety meetings
• Ensure that all employees are informed of health hazards and their individual health monitoring results
• Ensure that the First-Aid and Emergency Response Procedures reflect the specific health risks of the workplace
The Registered Master Joiners’ Health and Safety Guide
© Securo Ltd. 27
SECTION 7 - EMERGENCY PREPAREDNESS
Introduction To ensure that the company has an Emergency Response Plan (ERP) and directions, which will prevent injury to employees, visitors, and neighbouring people/premises in the event of any emergency. The ERP also aims to minimise damage to company Plant, Equipment, Materials, and the general Environment. Objectives: To ensure that there is an effective general Emergency Response Plan, complying with health and safety legislation, to enable the company to manage any type of emergency likely to occur within the business. What should you do?
• Carry out an assessment of all possible Emergency Scenarios
• Prepare an Emergency Response Plan, which should include:
o Appointment of an Emergency Co-ordinator and Fire Wardens
o Agreement on the duties of all Emergency Response personnel
o Training procedures for designated personnel
o Approved Emergency Equipment and Personal Protective Equipment
o Evacuation procedures with registers for employees, contractors and visitors
o Identified Energy Controls required, with shut-down procedures
o Damage control procedures for Plant/Buildings and Environmental Protection
o Vital records checklist completed
o Regular testing at least twice yearly
o Records kept of all activities, training, drills etc
o Involvement of the Fire Service in Training Drills
o Agreed post-emergency actions for clean-up, Investigation etc.
o Effective Signage for Emergency Procedures in all work areas
o Post-Emergency review after all incidents/drills to improve your response
o An annual review of your plan.

The Registered Master Joiners’ Health and Safety Guide
© Securo Ltd. 28
SECTION 8 - COMMUNICATION Introduction There must be documented procedures, agreed by employees, for employee participation involvement and consultation on how the company will communicate with employees regarding health and safety issues. Objectives: To ensure that there is an effective process for employees to have the opportunity to be fully involved in the development of workplace safety practices. This includes the 'right to know' about the risks of all workplace hazards. What should you do?
• Establish a forum to enable employees to communicate to management about issues of interest and concern related to health and safety
• Establish an agreed process with employees to support employee consultation and representation
• Involve employees in the development of hazard management and emergency procedures to be used in the workplace
• Provide all employees with information on the hazards to which they are exposed, or which they may create, to enable them to avoid and minimise the risk wherever possible
• Encourage employees to report potential hazards

The Registered Master Joiners’ Health and Safety Guide
© Securo Ltd. 29
Part Two
Machine
and Hand Tool Safety
The Registered Master Joiners’ Health and Safety Guide
© Securo Ltd. 30
Part Two - Machine and Hand Tool Safety
Introduction This part of the Guide is designed to be used by all employees, but particularly ‘new starters’ and those who do not have the background of more experienced staff. It should also serve as a useful refresher for more experienced employees, especially if they have had limited exposure to some of the many items of equipment listed. The information given may also be useful for basic training purposes. Section 1 commences with an overview and guidance on the general hazards associated with all woodworking machinery and necessary safety precautions. Section 2 addresses the work of cabinet making in a similar manner. Sections 3 to 11 deal with the many potential hazards associated with the use of specific types of fixed woodworking machinery. Section 12 begins with a general overview of the hazards associated with powered hand tools before moving onto specific types of such tools in Sections 13 to 20. This information is not exhaustive but does provide both general and specific guidance and solutions to typical hazards encountered by the joinery Industry.
Contents 1WOODWORKING MACHINERY – GENERAL INTRODUCTION 2CABINET MAKING 3BAND SAWS 4JOINTERS AND PLANERS 5MITRE SAWS PUSH STICKS RADIAL ARM SAWS SANDERS SHAPERS TABLE SAWS WOOD TURNING LATHES THICKNESSERS POWERED HAND TOOLS – GENERAL INTRODUCTION ERGONOMIC HAZARDS OF POWERED HAND TOOLS CIRCULAR SAWS BELT SANDERS PORTABLE ELECTRIC DRILLS POWERED HAND SAWS PLANERS ROUTERS PNEUMATIC TOOLS
Formatted: Bullets and Numbering
The Registered Master Joiners’ Health and Safety Guide
© Securo Ltd. 31
SECTION 1 - WOODWORKING MACHINERY – GENERAL INTRODUCTION Introduction This section provides a general introduction to the hazards and risks associated with all types of woodworking equipment. These hazards can be substantially reduced by ensuring:
• Only properly trained, authorised and competent staff operate machinery
• All Guards, Interlocks and other safety devices are operational at all times*
• Operators carry basic safety checks to ensure the machine is functioning correctly
• Defective machinery, equipment or tools are taken out of use immediately
• Machines, equipment and tools are only used for their intended function
• Machines and work areas are kept clean and free of obstacles
• Machines are maintained in accordance with the manufacturer's instructions
• Machines are serviced regularly
• All signs concerning safety are clearly posted and complied with
• Operators are supplied with and wear appropriate PPE and safety equipment.
Do’s and Don’ts
Machine operators can reduce the risk of injury to themselves and others by following this practical advice:
Do: • Wear safety glasses or face shield where appropriate
• Wear dust masks when required
• Wear hearing protection that is suitable for the level and frequency of the noise you are exposed to in the woodworking area. If you cannot properly hear someone speak at normal level from 1 metre away, the noise level from the machine is probably too high. Without protection, damage to your hearing may occur over time
• Use gloves to protect hands from splinters when handling wood but do not wear them near rotating blades and other machinery parts where the gloves can catch
• Make sure all guards are in position, in good working condition and offer you adequate protection before operating any equipment or machine. Check and adjust all other safety devices
• Make sure the equipment is properly earthed before being used for the first time
• Check that keys and adjusting wrenches are removed from the machine before turning on the power
• Inspect stock for nails or other materials before cutting, planing, routing or carrying out similar activities
• Make sure that all machines have start and stop buttons within easy and convenient reach of an operator. Start buttons should be protected so that accidental contact will not start the machine. A collar around the button 3 to 6 mm above the button is recommended
• Ensure that all cutting tools and blades are clean, sharp, and in good working order so that they will cut freely, not forced
• Turn the power off and unplug the power cord (or lock out the power source) before inspecting, changing, cleaning, adjusting or repairing a blade or a machine
• Turn the power off when discussing the work

The Registered Master Joiners’ Health and Safety Guide
© Securo Ltd. 32
• Use a "push stick" to move material into the cutting area. Jigs are also useful in keeping hands safe during cutting procedures. Keep hands out of the line of the cutting blade
• Clamp down and secure all work pieces being worked on
• Use good lighting so that the work piece, cutting blades, and machine controls can be seen clearly. Position or shade lighting sources so they do not shine in the operator's eyes or cause any glare and reflections
• Ensure that the floor space around you is sufficient for you to machine the work piece being processed safely without bumping into other workers or equipment
• Where fitted, ensure local exhaust ventilation systems are operating correctly to fully remove all sawdust or chips that are produced
• Keep electric power cords above head level or in the floor and ensure that they are not tripping hazards
• Keep the work area free of clutter, clean, well swept, and well lit
• Clean up any spillages immediately.
Do Not: • Do not wear loose clothing, work gloves, neckties, rings, bracelets or other jewellery that
can become entangled with moving parts
• Do not carry out awkward operations and hand positions where a sudden slip could cause your hand to move into the cutting tool or blade
• Do not remove sawdust or cuttings from the cutting head by hand while a machine is running. Use a stick or brush when the machine has stopped moving
• Do not use compressed air to remove sawdust, turnings, etc. from machines or clothing. This causes potentially serious health problems from dust inhalation and can create an explosive dust atmosphere
• Do not leave machines running unattended, unless they are designed and intended to be operated in this way
• Do not leave a machine until the power is turned off and the machine comes to a complete stop
• Do not try to free a stalled blade before isolating the power supply and ensuring that there is no residual power or mechanical action that could cause the machine to continue its cycle whilst you are in the danger zone
• Do not distract or startle an operator while they are using woodworking equipment
• Do not become involved in ‘horseplay’, games, or pranks. Serious injuries and fatalities have resulted from this type of behaviour.
* For further information about machinery guarding, see Appendix 1.

The Registered Master Joiners’ Health and Safety Guide
© Securo Ltd. 33
SECTION 2 - CABINET MAKING Introduction The manufacture of kitchen cabinets and other furniture is a complex process requiring the management of many hazards and using a variety of skills. Three common tasks are:
• Shaping: involving numerous operations of the machinery
• Sanding: involving repetitive tasks and excessive bodily motions
• Assembling: involving tasks using different tools in a variety of work positions.
Shaping Tasks The shaping operation consists of modelling pieces of wood with a shaper according to the style of kitchen cabinet being made (Figure 1).
To complete a task a worker has to:
• pick up pieces of wood
• place wood on the shaper
• press and push the wood sideways on the shaper
• pile pieces of wood for further processing
The task lasts approximately 3 seconds and is done while standing on a concrete floor.
Figure 1
Wood shaping
Shaping Risk factors
• Highly repetitious movements
• Excessive force while pressing work objects on the shaper
• Exposure to vibration These factors put the workers at risk for Occupational Overuse Syndrome (OOS). The wrists, neck, and shoulders are at the highest risk. In addition, prolonged standing in a stooped position and repetitious side motions can contribute to low back injuries. OOS refers to a series of musculo-skeletal disorders associated with:
• work postures and movements
• repetitiveness and pace of work,
• force of movements,
• vibration, and
• temperature.
Certain workplace conditions such as the layout of the workstation, the speed of work and the weight of the objects being handled influence these factors. Prolonged standing on a concrete floor can contribute to lower leg and back discomfort that, over time, can develop into injuries. All of these factors have a compounding effect. In other words, each of them increases the effects of the others.

The Registered Master Joiners’ Health and Safety Guide
© Securo Ltd. 34
Sanding Tasks
The sanding operation consists of smoothing the surface of wooden sheets by using a hand-operated power sander (Figure 2). The worker uses both hands to carry out this task. The dominant hand is used to operate the sander while the other hand is used to hold the sheet of wood (Figure 3). To complete a task a worker has to:
• pick up sheets
• place the sheets on work bench
• sand the sheets
• pile the sheets for further processing
Sanding requires excessive movements such as bending and reaching while keeping the elbow above the shoulder level. Forceful movements are used to hold both the sander and the sheet of wood. Sanding is done in a standing position.
Figure 2 Sanding
Figure 3 Sanding
Sanding Risk Factors Sanding exposes workers to:
• high risk from repetitive motion injuries affecting the hands, neck and shoulders
• high mechanical stress due to
o repetitive and forceful movements while operating the sander and
o the sustained muscular effort to hold work objects
• exposure to vibration particularly affecting the elbow and wrist of the operating hand
• prolonged stooped standing position and excessive and forceful bending which creates a risk for low back injury
• high risk of respiratory issues from prolonged exposure to dust from sanding without protective equipment.
Assembling Tasks
Assembling all the components that will form a kitchen cabinet involves the use of various tools such as staplers, screwdrivers, and hammers. Assembling kitchen cabinets is a manual operation requiring many steps and skills. While assembling, workers use a variety of body positions such as bending, twisting, and reaching (Figures 4 – 8). They also have to stoop and crouch while working (Figure 9).
Figure 4 Assembling kitchen cabinets

The Registered Master Joiners’ Health and Safety Guide
© Securo Ltd. 35
Figures 5 and 6 Bending while assembling kitchen cabinets
Figures 7 and 8 Reaching while assembling kitchen cabinets
Assembling Risk Factors
The assembly tasks at a kitchen cabinet manufacturing plant create the conditions that favour the development of OOS, as well as low back problems. Operating heavy tools in very awkward body positions (Figures 9 - 11) and exerting forces in an "off line" direction are extremely hazardous for the upper limbs. The neck and shoulders are also at risk for OOS. Whole body motions and lifting, while handling assembled cabinets, put workers at risk for back injuries.
Figure 9 Awkward body position used
while assembling kitchen cabinets

The Registered Master Joiners’ Health and Safety Guide
© Securo Ltd. 36
Continuous standing on a concrete floor can cause lower leg and back discomfort that, over time, can develop into injuries. All these factors have a compound effect. Each of them increases the effects of the others. Figures 10 and 11 - Using heavy tools in very awkward body position
Figure 10
Figure 11
Reducing the OOS risk factors for Shaping, Sanding and Assembly The three tasks that were selected for examination in the kitchen cabinet manufacturing plant pose similar risks for repetitive motion injuries. However, each one requires a different approach for controlling the risk for OOS. Shaping The working position is the major hazard for OOS while shaping. This can be improved by providing:
• More leg clearance - Allow the worker to get closer to the work area, thereby reducing bending (Figure 12)
• Sit/stand stools and foot rests - These increase the flexibility of the work position and reduce stress on the lower back and legs
• Anti-vibration gloves. However, thick or heavy gloves are not appropriate if operating the tool requires precise movements
• Anti-fatigue matting - This reduces lower leg and back discomfort from prolonged standing
• A full-scale rotation of tasks
Figure 12
Working in a standing position with adequate leg clearance and
sit/stand stool
Sanding Awkward body positions and forceful movements are the major risk factors for OOS. Prolonged standing creates lower leg and back discomfort. These conditions can be improved by :
The Registered Master Joiners’ Health and Safety Guide
© Securo Ltd. 37
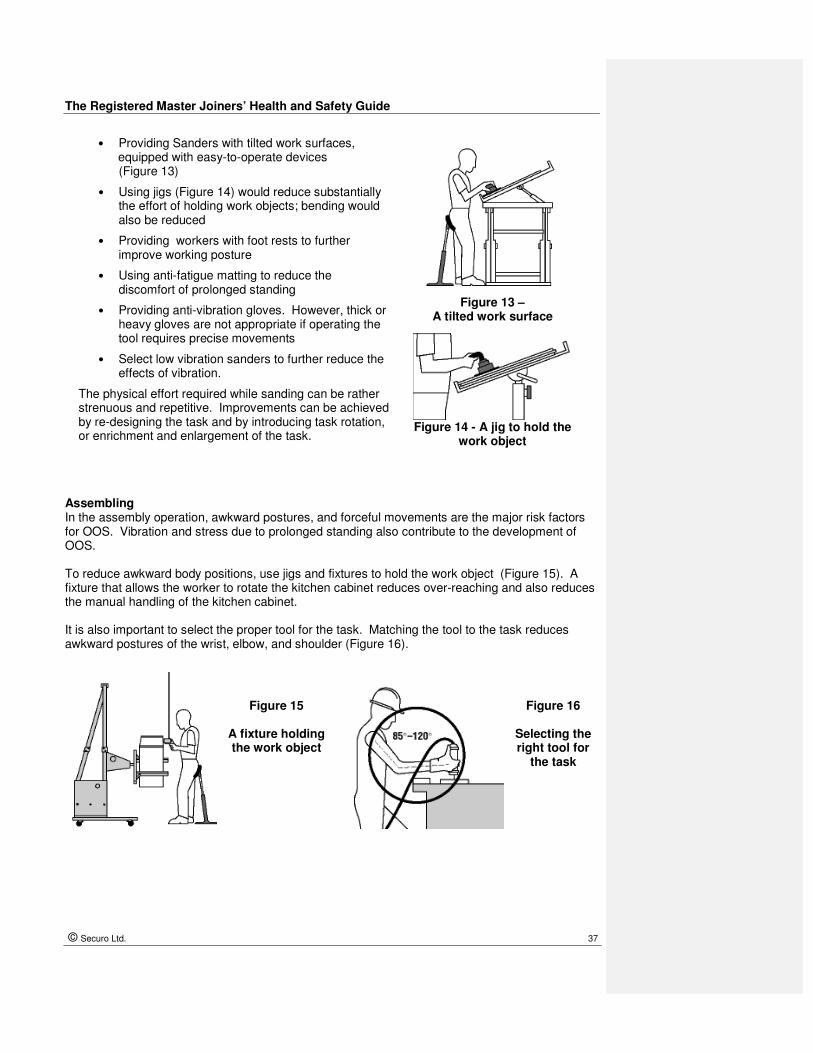
Assembling In the assembly operation, awkward postures, and forceful movements are the major risk factors for OOS. Vibration and stress due to prolonged standing also contribute to the development of OOS. To reduce awkward body positions, use jigs and fixtures to hold the work object (Figure 15). A fixture that allows the worker to rotate the kitchen cabinet reduces over-reaching and also reduces the manual handling of the kitchen cabinet. It is also important to select the proper tool for the task. Matching the tool to the task reduces awkward postures of the wrist, elbow, and shoulder (Figure 16).
Figure 15
A fixture holding the work object
Figure 16
Selecting the right tool for
the task
• Providing Sanders with tilted work surfaces, equipped with easy-to-operate devices
(Figure 13)
• Using jigs (Figure 14) would reduce substantially the effort of holding work objects; bending would also be reduced
• Providing workers with foot rests to further improve working posture
• Using anti-fatigue matting to reduce the discomfort of prolonged standing
• Providing anti-vibration gloves. However, thick or heavy gloves are not appropriate if operating the tool requires precise movements
• Select low vibration sanders to further reduce the effects of vibration.
The physical effort required while sanding can be rather strenuous and repetitive. Improvements can be achieved by re-designing the task and by introducing task rotation, or enrichment and enlargement of the task.
Figure 13 –
A tilted work surface
Figure 14 - A jig to hold the
work object

The Registered Master Joiners’ Health and Safety Guide
© Securo Ltd. 38
Using tool balancers reduces the amount of force necessary to hold and operate the tool (Figure 17). To reduce stress on the legs and back from prolonged standing, workers should use anti-fatigue matting.
Figure 17 - Using a tool
balancer for a heavy tool
The Registered Master Joiners’ Health and Safety Guide
© Securo Ltd. 39
SECTION 3 - BAND SAWS Introduction If not used correctly a band saw, like all equipment and machinery, can be unnecessarily hazardous. This section is specific and should be read in conjunction with the information and guidance provided in Section 1 – Woodworking Machinery – General Introduction. Do’s and Don’ts
Operators of Band Saws can reduce the risk of injury to themselves and others by following this practical advice:
Do: • Securely anchor the band saw to the floor (or workbench) to reduce vibration
• Wear safety glasses or a face shield where appropriate
• Wear hearing protection for the level and frequency of the noise you are exposed to
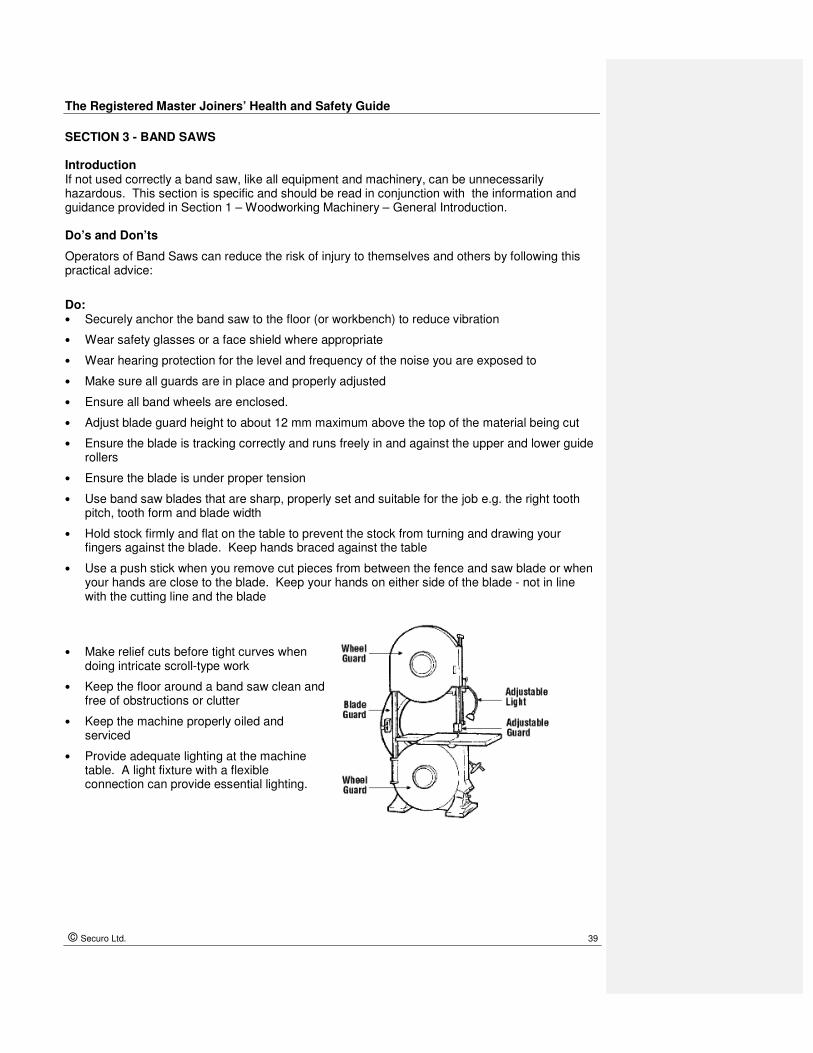
• Make sure all guards are in place and properly adjusted
• Ensure all band wheels are enclosed.
• Adjust blade guard height to about 12 mm maximum above the top of the material being cut
• Ensure the blade is tracking correctly and runs freely in and against the upper and lower guide rollers
• Ensure the blade is under proper tension
• Use band saw blades that are sharp, properly set and suitable for the job e.g. the right tooth pitch, tooth form and blade width
• Hold stock firmly and flat on the table to prevent the stock from turning and drawing your fingers against the blade. Keep hands braced against the table
• Use a push stick when you remove cut pieces from between the fence and saw blade or when your hands are close to the blade. Keep your hands on either side of the blade - not in line with the cutting line and the blade
• Make relief cuts before tight curves when doing intricate scroll-type work
• Keep the floor around a band saw clean and free of obstructions or clutter
• Keep the machine properly oiled and serviced
• Provide adequate lighting at the machine table. A light fixture with a flexible connection can provide essential lighting.

The Registered Master Joiners’ Health and Safety Guide
© Securo Ltd. 40
Do not: • Do not use excessive force when pushing the wood past the blade
• Do not back the stock away from the blade while the saw is in motion if the work piece binds or pinches on the blade
• Do not stop a band saw by thrusting stock against the cutting edge or the side of a blade immediately after the power has been shut off
• Do not remove sawdust or cuttings from the table by hand or with compressed air Instead, use a stick or brush
• Do not leave a saw running unattended. Turn off the power and make sure the machine has stopped running before leaving the area.

The Registered Master Joiners’ Health and Safety Guide
© Securo Ltd. 41
SECTION 4 - JOINTERS, AND PLANERS Introduction If not used correctly jointers and planers, like all equipment and machinery, can be unnecessarily hazardous. This section is specific and should be read in conjunction with the information and guidance provided in Section 1 – Woodworking Machinery – General Introduction and Department of Labour – Safety Rules for Operators of Overhand Planers. Do’s and Don’ts Operators of jointers and planers can reduce the risk of injury to themselves and others by following this practical advice: Do:
• Check that the knives set for the proper clearance and depth of cut
• Check that the knives are sharp, balanced, and fastened securely when installing new cutters
• Ensure the fence is anchored in the proper position
• Ensure the bridge guard is adjusted correctly
• Ensure that any exposed knives behind the fence are guarded
• Check that the equipment is properly lubricated
• Ensure that the parts or accessories are in proper working condition
• Wear safety glasses where appropriate
• Wear hearing protection when necessary that is suitable for the level and frequency of the noise you are exposed to in the woodworking area
• Allow only experienced and trained personnel to operate jointers and planers
• Replace old square cutting heads with roundheads, which are much safer – required by HSE Regulations 1995
• Ensure start and stop buttons are within easy and convenient reach of the operator
• Remove all wrenches and tools used in the set up from the table
• Provide a minimum clearance of at least 1 metre greater than the length of the longest stock being worked
• Construct hold-down push blocks to do bevelling and surface operations
• Use hold-down (double handed) push blocks. These keep hands well away from the cutting head
• Maintain an adequate amount of downward and forward force with push blocks as the knife blades on a revolving cutting head can take the stock from an operator’s hands.
The Registered Master Joiners’ Health and Safety Guide
© Securo Ltd. 42
Do Not: • Do not leave the machine running unattended. Shut off the power and make sure that the
cutting head has stopped revolving
• Do not make cuts deeper than 3 mm in one pass
• Do not join (edge) stock of pieces less than 300 mm long, 20 mm wide and less than 60 mm thick
• Do not use surface stock less than 300 mm long, 20 mm wide or more than 150 mm wide or less than 15 mm thick
• Do not pass hands over the cutters
• Do not remove dust or particles of wood from a table by hand or with compressed air. Instead, use a stick or brush.

The Registered Master Joiners’ Health and Safety Guide
© Securo Ltd. 43
SECTION 5 - MITRE SAWS
Introduction If not used correctly a mitre saw, like all equipment and machinery, can be unnecessarily hazardous. This section is specific and should be read in conjunction with the information and guidance provided in Section 1 – Woodworking Machinery – General Introduction. Do’s and Don’ts
Operators of mitre saws can reduce the risk of injury to themselves and others by following this practical advice:
Do:
• Wear safety glasses or a face shield where appropriate. If work is dusty, use a respirator or dust mask
• Wear appropriate hearing protection
• Attach the saw firmly on a workbench or other rigid frame and operate saw at waist height. The saw can also be taken to remote locations by mounting it on a piece of plywood 13 mm or thicker. This must be clamped to a waist high work surface on the job site with large "G" clamps, (avoid “F” clamps which can vibrate loose).
• Keep one hand on the trigger switch and handle and use the other hand to hold the stock against the fence
• Keep hands out of the path of the blade
• Keep guards in place and in working order
• Remove adjusting keys and wrenches
• Use a crosscut or combination blade
• Ensure that the blade rotates in the correct direction
• Ensure that the blade and arbor collars are secure and clean. Recessed sides of collars should be against blade
• Keep blade tight, clean, sharp and properly set so that it cuts freely and easily
• Allow motor to reach full speed before cutting
• Follow instructions for lubricating and changing accessories
• Keep the work area clean. Cluttered areas and benches invite accidents
• Keep the work area well lit

The Registered Master Joiners’ Health and Safety Guide
© Securo Ltd. 44
• Reduce the risk of unintentional start-up by ensuring the saw switch is in the ‘off’ position before plugging in
• Unplug tools before servicing and when not in use
• Check and take damaged items out of service immediately or repair at once
• Keep motor air slots clean and free of chips
• Use only the accessories designed for the specific saw and job.
Do Not:
• Do not operate the saw on the ground
• Do not cut pieces smaller than 200 mm in length
• Do not cut "free hand." The stock should lie solidly on the table against the fence
• Do not reach around or behind the saw blade
• Do not take your hand away from the trigger switch and handle until the blade is fully covered by the lower blade guard
• Do not over-reach. Keep proper footing and balance at all times
• Do not force the saw, which cuts better and more safely at its design speed
• Do not leave the saw until it has stopped completely. Turn the power off and unplug the saw
• Do not use electric tools in damp or wet locations
• Do not operate electric tools near flammable liquids or in gaseous or explosive atmospheres, as sparks may ignite fumes.
The Registered Master Joiners’ Health and Safety Guide
© Securo Ltd. 45
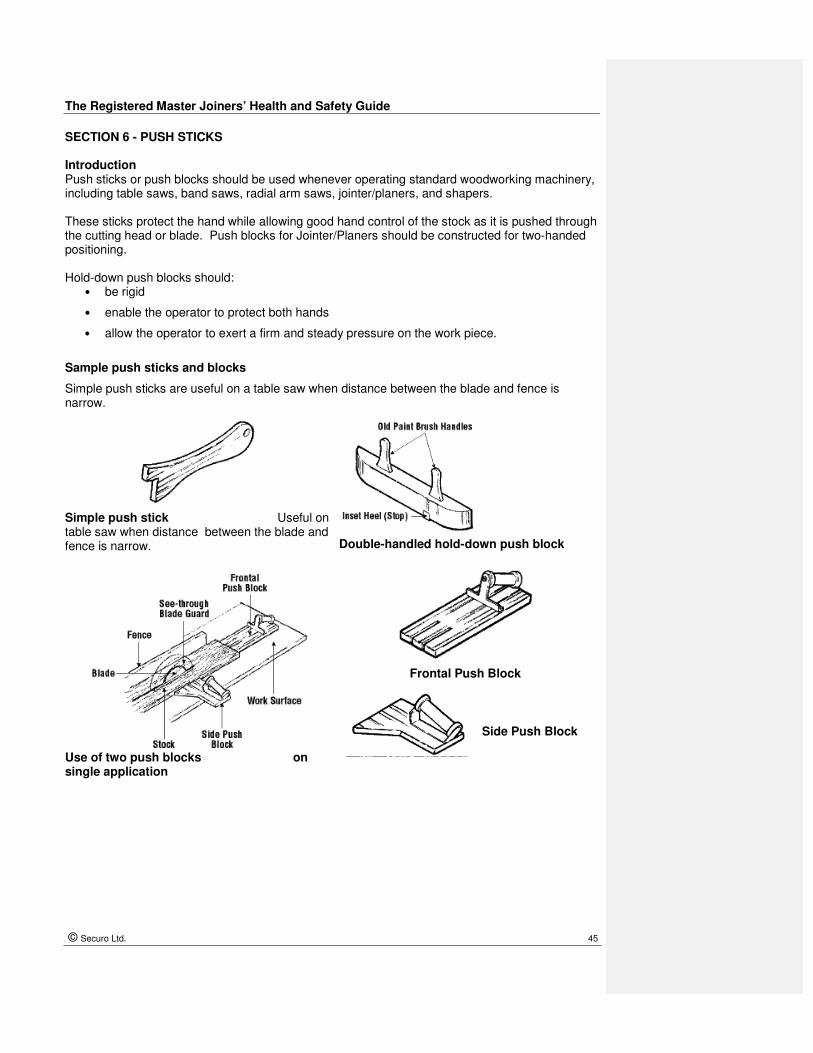
SECTION 6 - PUSH STICKS Introduction Push sticks or push blocks should be used whenever operating standard woodworking machinery, including table saws, band saws, radial arm saws, jointer/planers, and shapers. These sticks protect the hand while allowing good hand control of the stock as it is pushed through the cutting head or blade. Push blocks for Jointer/Planers should be constructed for two-handed positioning. Hold-down push blocks should:
• be rigid
• enable the operator to protect both hands
• allow the operator to exert a firm and steady pressure on the work piece.
Sample push sticks and blocks
Simple push sticks are useful on a table saw when distance between the blade and fence is narrow.
Simple push stick Useful on table saw when distance between the blade and fence is narrow.
Double-handled hold-down push block
Use of two push blocks on single application
Frontal Push Block
Side Push Block
The Registered Master Joiners’ Health and Safety Guide
© Securo Ltd. 46
SECTION 7 - RADIAL ARM SAWS Introduction If not used correctly a radial arm saw, like all equipment and machinery, can be unnecessarily hazardous. This section is specific and should be read in conjunction with the information and guidance provided in Section 1 – Woodworking Machinery – General Introduction. Do’s and Don’ts Operators of radial arm saws can reduce the risk of injury to themselves and others by following this practical advice: Do:
• Wear safety glasses or a face shield where appropriate
• Wear hearing protection that is suitable for the level and frequency of the noise you are exposed to in the woodworking area
• Set the Stroke Limiter to prevent the saw blade from extending beyond near side of the bench or work table or extend the bench
• Ensure that the Saw is in correct working order
• Ensure that all Guards, Interlocking brakes and other Safety Devices operational
• Feed stock against the direction of the blade - the blade should move downward when viewed by the operator
• Ensure that you only use accessories designed for that specific saw and application
• Ensure that you only use saw blades rated at or above the speed of the saw arbor (the attachment from the motor to the blade)
• Ensure the guard consists of two parts: o Upper hood type that covers arbor o These guards are not typical on radial arm saws. Most have an
adjustable front guard that must be adjusted to approximately 6mm of the timber being cut
• Stand on the handle side when cross cutting. Pull the cutting head with the hand nearest
the handle and manoeuvre the stock with the other hand
• Make sure that the hand holding the stock is never in line with the blade
• Return the cutting head completely to the back of the saw table after each cut. The saw should be designed so that the blade will not move forward under its own weight or if the machine is vibrating
• Clamp stock to the table on one side of the saw blade, when making mitre, bevel or compound mitre cuts. Clamping prevents the wood from sliding along the fence during the cut.

The Registered Master Joiners’ Health and Safety Guide
© Securo Ltd. 47
• Turn off the saw when making any adjustments or changes in the set up.
• Make measurements by placing the wood to be cut against the stop gauge. When measuring with a tape measure or ruler is necessary, turn off the saw until the measuring is complete.
Do Not:
• Do not use radial arm saws for ripping
• Do not take your hand away from the operating handle unless the cutting head is behind the fence
• Do not remove the stock from a saw table until the blade has been returned to its "resting" position at the back of the saw table. Use a stick or brush to remove scrap from the saw table
• Do not cut "free hand". Use the back guide or fence, or other device to keep the work piece from moving
• Do not use cracked or dull blades
• Do not leave a running saw unattended - leave only after the saw has been turned off and it has come to a complete stop.

The Registered Master Joiners’ Health and Safety Guide
© Securo Ltd. 48
SECTION 8 - SANDERS Introduction If not used correctly a sander, like all equipment and machinery, can be unnecessarily hazardous. This section is specific and should be read in conjunction with the information and guidance provided in Section 1 – Woodworking Machinery – General Introduction. Do’s and Don’ts Operators of sanders can reduce the risk of injury to themselves and others by following this practical advice: Do:
• Wear safety glasses where appropriate
• Wear hearing protection that is suitable for the level and frequency of the noise you are exposed to in the woodworking area
• Use sanders with the local exhaust ventilation (LEV) turned on. The LEV should be designed for the sander and well maintained to work effectively
• Wear respiratory protection (e.g., dust masks) where required, during sanding operations and clean up
• Keep hands away from the abrasive surface
• Hold small or thin pieces of stock in a jig or holding device to prevent injuries to the fingers or hands
• Inspect abrasive belts before using them. Replace belts that are worn, or excessively worn in spots, and frayed
• Sand on the downward side of a disc sander so that the wood is driven onto the table by the machine's rotation
• Enclose all drums, disc or belt sanding machines with an exhaust dust hood that covers all portions of the machine but the portion designed for the work feed
• Adjust work rests on all manually fed sanders to provide minimum clearance between the
belt and the rest. The work rest should be secured properly
• Install abrasive belts that are the same width as the pulley drum
• Adjust abrasive belt tension to keep the belt running the same speed as the pulley-drum when the wood is in contact with the belt.

The Registered Master Joiners’ Health and Safety Guide
© Securo Ltd. 49
• Guard feed rollers, to allow boards to pass, but keep operators' fingers and arms out
• Install guards to prevent contacts at:
o in-running nip points
o power transmission
o feed roll parts
o the unused portion of the abrasion belt on the operator's side of the machine.
Do Not:
• Do not wear
o loose clothing or jewellery while using revolving power tools
o long hair down unless it is tied back or appropriate hair protection is worn These measures will prevent hair, clothing, or jewellery (like dangling neck chains) from being caught and pulled by sander belts and pulleys that are in motion
• Do not sand small or thin hand-held work pieces
• Do not use sanders without the exhaust system operating
• Do not operate sanders unless they are adequately guarded
• Do not operate sanders unless the work rest is properly adjusted.
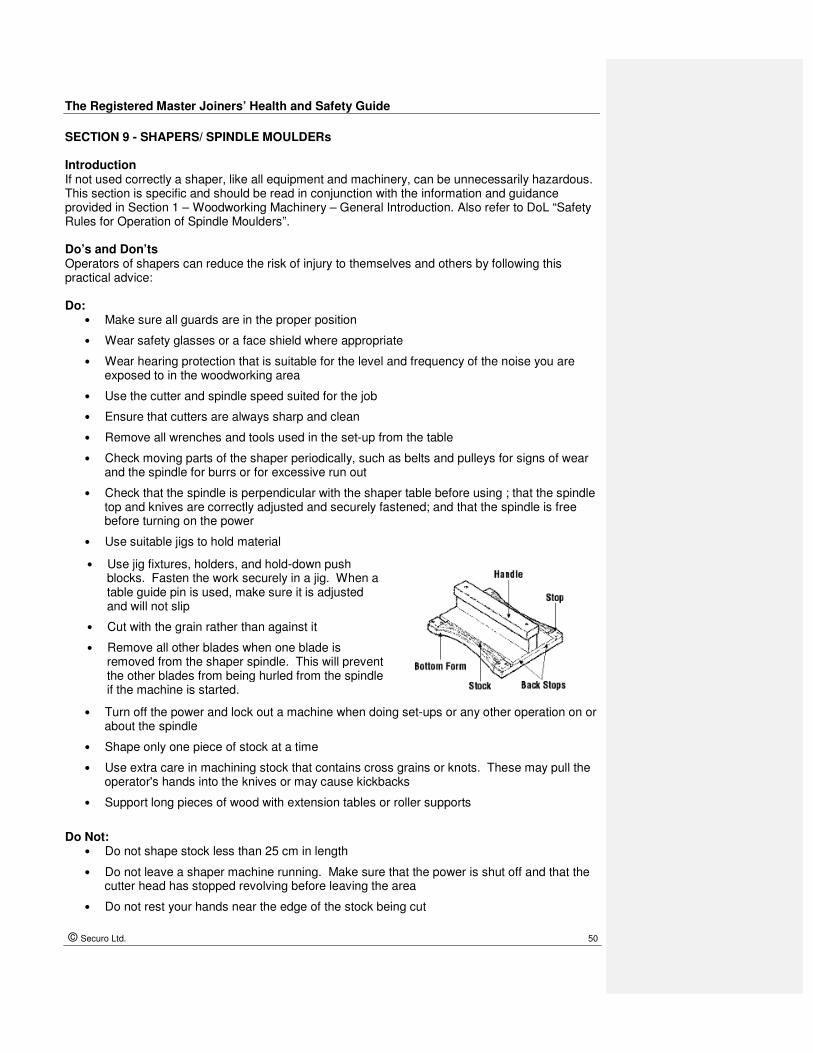
The Registered Master Joiners’ Health and Safety Guide
© Securo Ltd. 50
SECTION 9 - SHAPERS/ SPINDLE MOULDERs Introduction If not used correctly a shaper, like all equipment and machinery, can be unnecessarily hazardous. This section is specific and should be read in conjunction with the information and guidance provided in Section 1 – Woodworking Machinery – General Introduction. Also refer to DoL “Safety Rules for Operation of Spindle Moulders”. Do’s and Don’ts Operators of shapers can reduce the risk of injury to themselves and others by following this practical advice: Do:
• Make sure all guards are in the proper position
• Wear safety glasses or a face shield where appropriate
• Wear hearing protection that is suitable for the level and frequency of the noise you are exposed to in the woodworking area
• Use the cutter and spindle speed suited for the job
• Ensure that cutters are always sharp and clean
• Remove all wrenches and tools used in the set-up from the table
• Check moving parts of the shaper periodically, such as belts and pulleys for signs of wear and the spindle for burrs or for excessive run out
• Check that the spindle is perpendicular with the shaper table before using ; that the spindle top and knives are correctly adjusted and securely fastened; and that the spindle is free before turning on the power
• Use suitable jigs to hold material
• Use jig fixtures, holders, and hold-down push blocks. Fasten the work securely in a jig. When a table guide pin is used, make sure it is adjusted and will not slip
• Cut with the grain rather than against it
• Remove all other blades when one blade is removed from the shaper spindle. This will prevent the other blades from being hurled from the spindle if the machine is started.
• Turn off the power and lock out a machine when doing set-ups or any other operation on or about the spindle
• Shape only one piece of stock at a time
• Use extra care in machining stock that contains cross grains or knots. These may pull the operator's hands into the knives or may cause kickbacks
• Support long pieces of wood with extension tables or roller supports
Do Not:
• Do not shape stock less than 25 cm in length
• Do not leave a shaper machine running. Make sure that the power is shut off and that the cutter head has stopped revolving before leaving the area
• Do not rest your hands near the edge of the stock being cut

The Registered Master Joiners’ Health and Safety Guide
© Securo Ltd. 51
• Do not tamper with or disable the guards or make them inoperative in any way. Many serious injuries have been caused by such practices
• Do not back material away – lift it up and restart operation. (Check to see that the direction of rotation is as expected). Always feed against rotation of the cutter
• Do not make deep cuts or feed the stock too rapidly
• Do not distract or startle an operator during a shaping operation
• Do not remove sawdust or cuttings around knives by hand or with compressed air. Use a stick or brush
• Do not clear the table while the cutter is rotating
• Do not accumulate stock or finished work on the table
• Do not stand in line with the stock being fed.

The Registered Master Joiners’ Health and Safety Guide
© Securo Ltd. 52
SECTION 10 - TABLE SAWS Introduction If not used correctly a table saw, like all equipment and machinery, can be unnecessarily hazardous. This section is specific and should be read in conjunction with the information and guidance provided in Section 1 – Woodworking Machinery – General Introduction. Do’s and Don’ts Operators of table saws can reduce the risk of injury to themselves and others by following this practical advice: Do:
• Wear safety glasses or a face shield where appropriate
• Wear hearing protection that is suitable for the level and frequency of the noise you are exposed to in the woodworking area
• Pay particular attention to the manufacturer's instructions on reducing the risk of kickback, which allows the wood to be violently thrown toward the operator
• Choose proper blades for the type of work being done
• Keep blades clean, sharp, and properly set so that they will cut freely without having to force the work piece against the blade
• Use the guards provided with the saw or ones designed for use with the saw that you are using. Keep them in place and in good working condition.
• Use a guard high enough to cover the part of the blade rising above the stock and wide enough to cover the blade when it is tilted. The blade height should be set so it does not extend more than about 13 mm above the height of the piece being cut.
• Ensure that the fence is locked in position after the desired width has been set
• Hold the work piece firmly down on the table and against the fence when pushing the wood through
• Ensure that there is adequate support to hold a work piece; use extension tables or roller supports at the side or back for larger pieces. If an assistant is at the back (outfeed) end of the saw, an extension table should be in place so the back edge is about 1.2 m from the saw blade. The assistant should wait for the work piece to reach the edge of the extension table and should not reach toward the saw blade
• Feed stock into the blade against the direction of its rotation
Note: The riving knife is not shown in this diagram for simplicity, but a riving knife must be installed.
• Move the rip-fence out of the way when cross cutting. Never use it as a cut-off gauge
without a spacer unless the fence does not extend forward past the front of the blade

The Registered Master Joiners’ Health and Safety Guide
© Securo Ltd. 53
• Use a push stick when ripping narrow or short stock (e.g., when the fence is set less than about 15 cm from the blade; when the piece is less than 30 cm long or when the last 30 cm of a longer piece is being cut). Refer to ripping applications in the manufacturer's instruction manual. See Section 6 - Push Sticks, for more information on push stick design
• Keep hands out of the line of a saw blade
• Use guard with a spreader (riving knife) and anti-kickback fingers for all ripping or cross cutting operations
• Use the proper sawdust exhaust systems as required by operation
Do Not:
• Do not saw freehand. Always hold the stock firmly against the mitre gauge or a rip fence to position and guide the cut
• Do not reach around and over moving blades
• Do not feed the work piece faster than the saw can accept it
• Do not leave a saw running unattended. Turn off the power and make sure the machine has stopped running before leaving the area.
Note:
Refer to the OSH/DoL Woodworking Machinery Guidelines for hood guard/ riving knife requirements. Hood guards may not be often used but they should be.
There is no specific reference to anti-kickback guards but must have a riving knife for ripping. We have not required riving knives when cutting composite material e.g. MDF etc.
• Keep the body and face to one side of the saw blade out of the line of a possible kickback
• Provide adequate support to the rear and sides of a saw table for wide or long stock
• Be careful when waxing, cleaning, or servicing the table. Shut off and unplug (or lock out) a saw before doing any work on it
• Keep area clean and clutter-free, and operate the saw in a non-congested, well-lit area
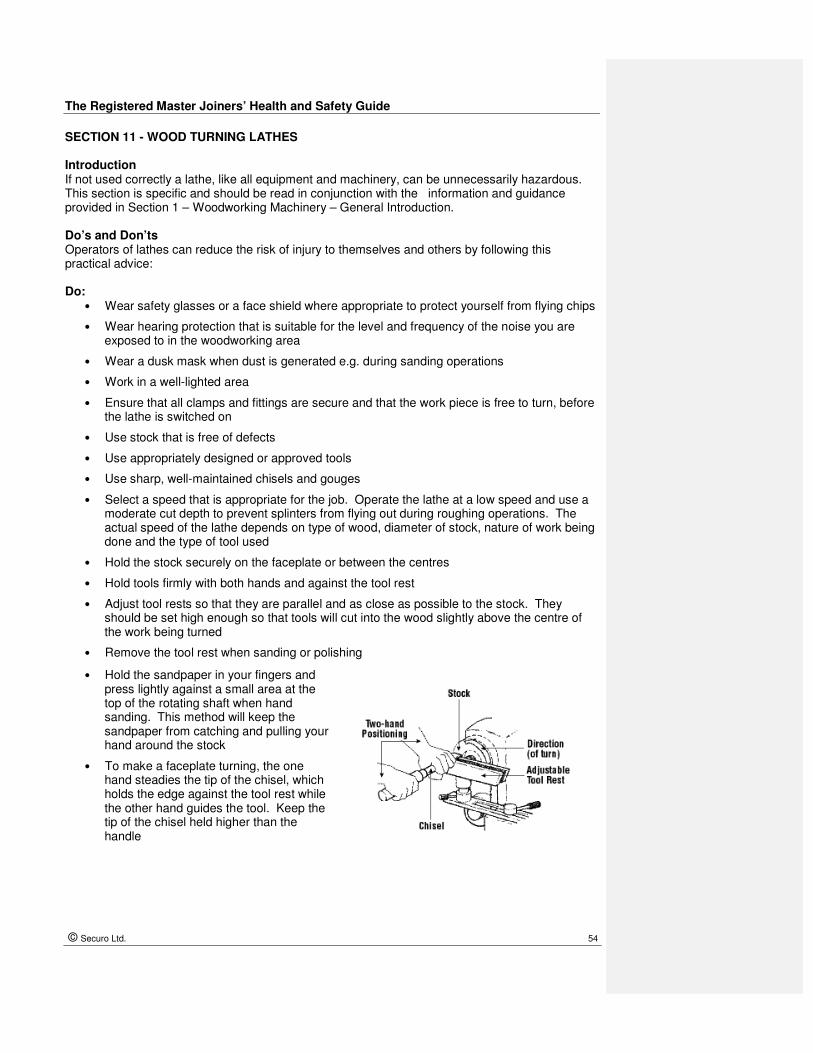
The Registered Master Joiners’ Health and Safety Guide
© Securo Ltd. 54
SECTION 11 - WOOD TURNING LATHES Introduction If not used correctly a lathe, like all equipment and machinery, can be unnecessarily hazardous. This section is specific and should be read in conjunction with the information and guidance provided in Section 1 – Woodworking Machinery – General Introduction. Do’s and Don’ts Operators of lathes can reduce the risk of injury to themselves and others by following this practical advice: Do:
• Wear safety glasses or a face shield where appropriate to protect yourself from flying chips
• Wear hearing protection that is suitable for the level and frequency of the noise you are exposed to in the woodworking area
• Wear a dusk mask when dust is generated e.g. during sanding operations
• Work in a well-lighted area
• Ensure that all clamps and fittings are secure and that the work piece is free to turn, before the lathe is switched on
• Use stock that is free of defects
• Use appropriately designed or approved tools
• Use sharp, well-maintained chisels and gouges
• Select a speed that is appropriate for the job. Operate the lathe at a low speed and use a moderate cut depth to prevent splinters from flying out during roughing operations. The actual speed of the lathe depends on type of wood, diameter of stock, nature of work being done and the type of tool used
• Hold the stock securely on the faceplate or between the centres
• Hold tools firmly with both hands and against the tool rest
• Adjust tool rests so that they are parallel and as close as possible to the stock. They should be set high enough so that tools will cut into the wood slightly above the centre of the work being turned
• Remove the tool rest when sanding or polishing
• Hold the sandpaper in your fingers and press lightly against a small area at the top of the rotating shaft when hand sanding. This method will keep the sandpaper from catching and pulling your hand around the stock
• To make a faceplate turning, the one hand steadies the tip of the chisel, which holds the edge against the tool rest while the other hand guides the tool. Keep the tip of the chisel held higher than the handle

The Registered Master Joiners’ Health and Safety Guide
© Securo Ltd. 55
Do Not: • Do not wear
o loose clothing or jewellery
o long hair down unless it is tied back or appropriate hair protection is worn These measures will prevent hair, clothing, or jewellery (like dangling neck chains) from being caught and pulled by belts and pulleys that are in motion
• Do not leave a running lathe unattended. Leave only after the lathe has been turned off and it has come to a complete stop
• Do not use makeshift tools
• Do not use stock containing splits, cracks, or knots
The Registered Master Joiners’ Health and Safety Guide
© Securo Ltd. 56
SECTION 12 - THICKNESSERS Introduction If not used correctly, a thicknesser, like all equipment and machinery, can be unnecessarily hazardous. This section is specific and should be read in conjunction with the information and guidance provided in section 1 – Woodworking Machinery – General Introduction. Do’s and Don’ts Operators of thicknessers can reduce the risk of injury to themselves and others by following this practical advice: Do:
• Ensure that the anti-kickback devices are fitted and operating
• Ensure that the blades are regularly sharpened and well maintained and mounted
• Use the guards and safety devices provided and keep them in proper adjustment. Wherever possible use the power feed units.
• Keep the machines clean
• Ensure the extraction system is operating before any work piece is placed in the machine
• Wear suitable ear defenders
• Ensure that no other person is passing behind the work piece whilst it is being passed through the thicknesser
• Follow the safe work methods as laid down in the safety manual.
Do Not:
• Do not operate the machine unless you are trained to do so or are supervised by a trained operator
• Do not use the machine without the extraction system being activated
• Do not turn the extraction system off for at least 60 seconds after the last work piece has been passed through the device
• Do not try to take excessive cuts in any one single pass. Set the machine so the cutter blades are not being overworked
• Never stand behind the work piece when feeding wood into the machine.

The Registered Master Joiners’ Health and Safety Guide
© Securo Ltd. 57
SECTION 13 - POWERED HAND TOOLS – GENERAL INTRODUCTION Introduction If not used correctly powered hand tools, like all equipment and machinery, can be unnecessarily hazardous. This section provides general information and guidance on the hazards associated with all types of powered hand tools. Inspecting powered hand tools
• Inspect tools for any damage prior to each use
• Check the handle and body casing of the tool for cracks or other damage
• If the tool has auxiliary or double handles, check to see that they installed securely
• Inspect cords for defects: check the power cord for cracking, fraying, and other signs of wear or faults in the cord insulation
• Check for damaged switches and ones with faulty trigger locks
• Inspect the plug for cracks and for missing, loose, or faulty prongs.
Defective or damaged tools
• Remove from service immediately and tag clearly "Out of service for repair"
• Replace damaged equipment immediately - do not use defective tools "temporarily"
• Have tools repaired by a qualified person - do not attempt “field” repairs.
Do’s and Don’ts Operators of powered hand tools can reduce the risk of injury to themselves and others by following this practical advice: Do:
• Comply with Regulation 69 (1) of the Integrated Electricity Regulations 1997, which requires that all electrical equipment, installations, fittings, and appliances are electrically safe. Compliance with this requirement will be met if such items have been tested, inspected and tagged in accordance with AS/NZS 3760:2003 (In-service safety inspection and testing of electrical equipment). Other methods of ensuring electrical safety are acceptable only if they are valid and effective
• Ensure that you have been properly trained to use the tool safely. Read the operator's manual before using the tool and operate the tool according to the manufacturer's instructions
• Ensure that the power tool has the correct guard, shield or other attachment that the manufacturer recommends
• Prevent electric shocks. Ensure that the tools are properly earthed using a three-prong plug, are double-insulated (and are labelled as such), or are powered by a low-voltage isolation transformer, which will protect users from an electrical shock
• Check electric tools to ensure that a tool with a 3-prong plug has an approved 3-wire cord and is earthed. The three-prong plug should be plugged in a properly earthed 3-pole outlet
• If an adapter must be used to accommodate a two-hole receptacle, the adapter wire must be attached to a known, functioning ground. Never remove the third, grounding prong from a plug
• Replace open front plugs where possible, with sealed front plugs, which present less danger of electric shock or short circuit
� Formatted: Bullets and Numbering
The Registered Master Joiners’ Health and Safety Guide
© Securo Ltd. 58
• Use only the battery that the tool manufacturer specifies for battery-powered tools
• Recharge a battery-powered tool only with the specific battery charger for that tool
• Remove the battery from the tool or ensure that the tool is switched off or locked off before changing accessories, making adjustments, or storing the tool
• Store a battery pack safely so that no metal parts, nails, screws, wrenches etc. can come in contact with the battery terminals, which could result in shorting the battery and possibly cause sparks, fires or burns
• Wear or use personal protective equipment (PPE) or clothing that is appropriate for the work you are doing; this may include items such as safety glasses, hearing protection, dust mask, gloves, safety boots or shoes, or rubber boots
• Switch off tools before connecting them to a power supply
• If a power cord feels more than comfortably warm or if a tool is sparking excessively, have it checked by an electrician or other qualified person
• Disconnect the power supply before making adjustments or changing accessories
• Remove any wrenches and adjusting tools before turning on a tool
• During use, keep power cords clear of tools and the path that the tool will take
• Use clamps, a vice, or other devices to hold and support the piece being worked on, when practical to do so. This will allow you to use both hands for better control of the tool and will help prevent injuries if a tool jams or binds in a work piece
• Use only approved extension cords that have the proper wire size for the length of cord and power requirements of the electric tool that you are using. This will prevent the cord from overheating
• For outdoor work, use high quality outdoor extension leads with sealed plugs and shock protection
• Suspend power cords over aisles or work areas to eliminate tripping hazards
• Eliminate ‘octopus’ connections. If more than one receptacle plug is needed, use a power bar or power distribution strip that has an integral power cord and a built-in over-current protection
• Pull the plug, not the cord when unplugging a tool. Pulling the cord causes wear and may affect the wiring to the plug potentially resulting in an electric shock
• Follow good housekeeping procedures. Keep the work area free of clutter and debris that could be tripping or slipping hazards
• Keep power cords away from heat, water, oil, sharp edges and moving parts as they can damage the insulation and potentially cause an electric shock
• Ensure that cutting tools, drill bits, etc. are kept sharp, clean and well maintained
• Store tools in a dry, secure location when they are not being used
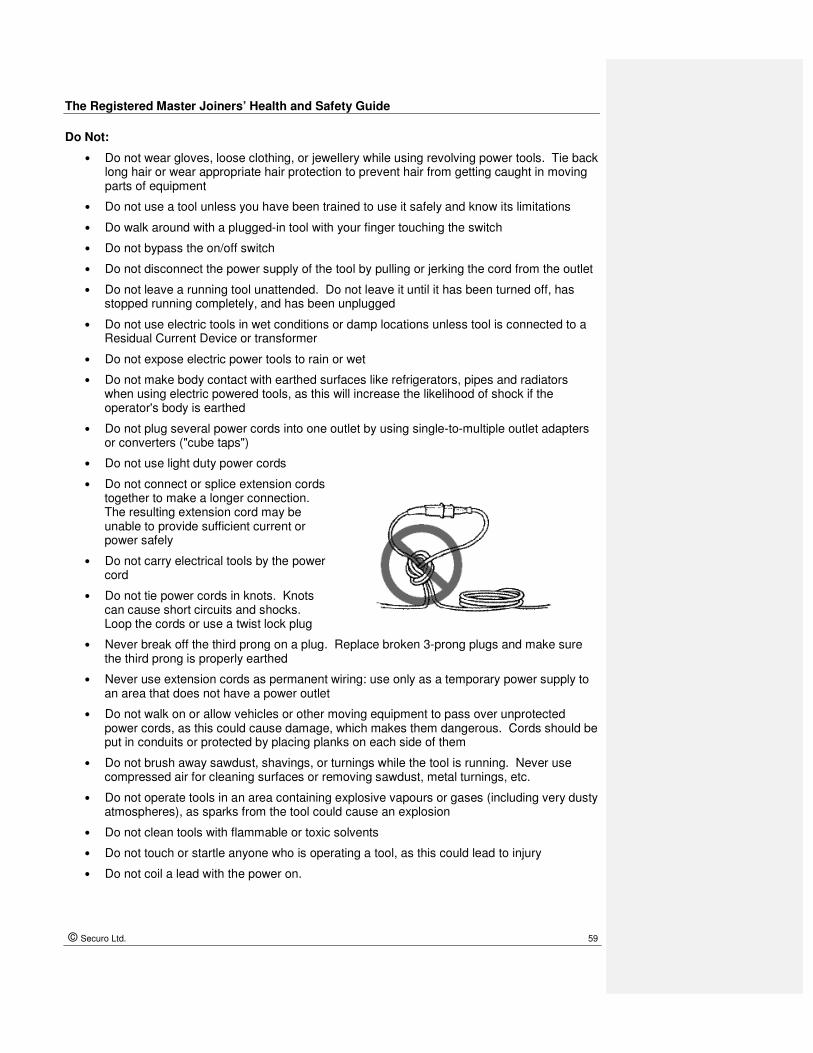
The Registered Master Joiners’ Health and Safety Guide
© Securo Ltd. 59
Do Not:
• Do not wear gloves, loose clothing, or jewellery while using revolving power tools. Tie back long hair or wear appropriate hair protection to prevent hair from getting caught in moving parts of equipment
• Do not use a tool unless you have been trained to use it safely and know its limitations
• Do walk around with a plugged-in tool with your finger touching the switch
• Do not bypass the on/off switch
• Do not disconnect the power supply of the tool by pulling or jerking the cord from the outlet
• Do not leave a running tool unattended. Do not leave it until it has been turned off, has stopped running completely, and has been unplugged
• Do not use electric tools in wet conditions or damp locations unless tool is connected to a Residual Current Device or transformer
• Do not expose electric power tools to rain or wet
• Do not make body contact with earthed surfaces like refrigerators, pipes and radiators when using electric powered tools, as this will increase the likelihood of shock if the operator's body is earthed
• Do not plug several power cords into one outlet by using single-to-multiple outlet adapters or converters ("cube taps")
• Do not use light duty power cords
• Do not connect or splice extension cords together to make a longer connection. The resulting extension cord may be unable to provide sufficient current or power safely
• Do not carry electrical tools by the power cord
• Do not tie power cords in knots. Knots can cause short circuits and shocks. Loop the cords or use a twist lock plug
• Never break off the third prong on a plug. Replace broken 3-prong plugs and make sure the third prong is properly earthed
• Never use extension cords as permanent wiring: use only as a temporary power supply to an area that does not have a power outlet
• Do not walk on or allow vehicles or other moving equipment to pass over unprotected power cords, as this could cause damage, which makes them dangerous. Cords should be put in conduits or protected by placing planks on each side of them
• Do not brush away sawdust, shavings, or turnings while the tool is running. Never use compressed air for cleaning surfaces or removing sawdust, metal turnings, etc.
• Do not operate tools in an area containing explosive vapours or gases (including very dusty atmospheres), as sparks from the tool could cause an explosion
• Do not clean tools with flammable or toxic solvents
• Do not touch or startle anyone who is operating a tool, as this could lead to injury
• Do not coil a lead with the power on.
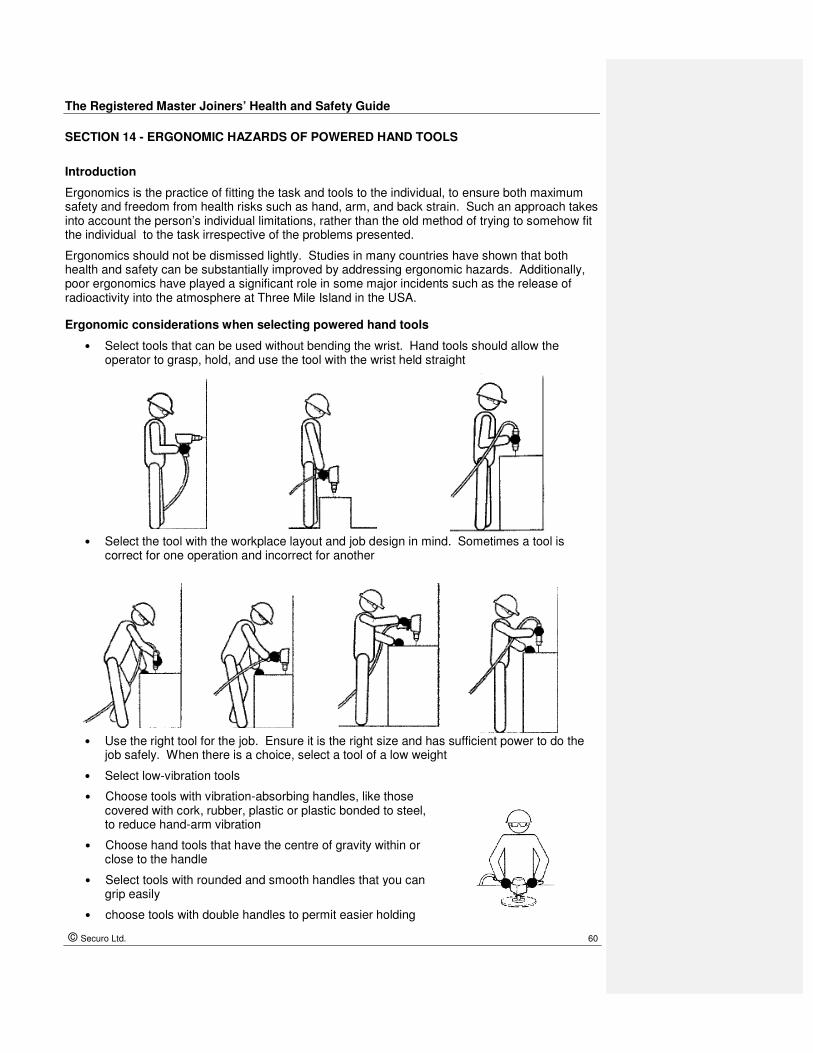
The Registered Master Joiners’ Health and Safety Guide
© Securo Ltd. 60
SECTION 14 - ERGONOMIC HAZARDS OF POWERED HAND TOOLS
Introduction
Ergonomics is the practice of fitting the task and tools to the individual, to ensure both maximum safety and freedom from health risks such as hand, arm, and back strain. Such an approach takes into account the person’s individual limitations, rather than the old method of trying to somehow fit the individual to the task irrespective of the problems presented.
Ergonomics should not be dismissed lightly. Studies in many countries have shown that both health and safety can be substantially improved by addressing ergonomic hazards. Additionally, poor ergonomics have played a significant role in some major incidents such as the release of radioactivity into the atmosphere at Three Mile Island in the USA.
Ergonomic considerations when selecting powered hand tools
• Select tools that can be used without bending the wrist. Hand tools should allow the operator to grasp, hold, and use the tool with the wrist held straight
• Select the tool with the workplace layout and job design in mind. Sometimes a tool is
correct for one operation and incorrect for another
• Use the right tool for the job. Ensure it is the right size and has sufficient power to do the job safely. When there is a choice, select a tool of a low weight
• Select low-vibration tools
• Choose tools with vibration-absorbing handles, like those covered with cork, rubber, plastic or plastic bonded to steel, to reduce hand-arm vibration
• Choose hand tools that have the centre of gravity within or close to the handle
• Select tools with rounded and smooth handles that you can grip easily
• choose tools with double handles to permit easier holding

The Registered Master Joiners’ Health and Safety Guide
© Securo Ltd. 61
Reducing the ergonomic hazards
• Ensure that all tools are well maintained and in good repair
• Frequently-used tools that weigh more than 0.5 kg should be counter-balanced
• Hold the tool close to the body. Do not over-reach
• Keep good balance and proper footing at all times. This will help operators to control the tool better, especially in response to unexpected situations
• Rest your hands by putting the tool down when you are not using it
• Reduce power to the lowest setting that can complete the job safely. This action reduces tool vibration at the source
�
• Select tools with a trigger strip, rather than a trigger button. This strip will allow you to exert more force over a greater area of the hand that, in turn, will reduce muscle fatigue
• Ensure that the trigger works easily to reduce the effort needed to operate it
Formatted: Bullets and Numbering
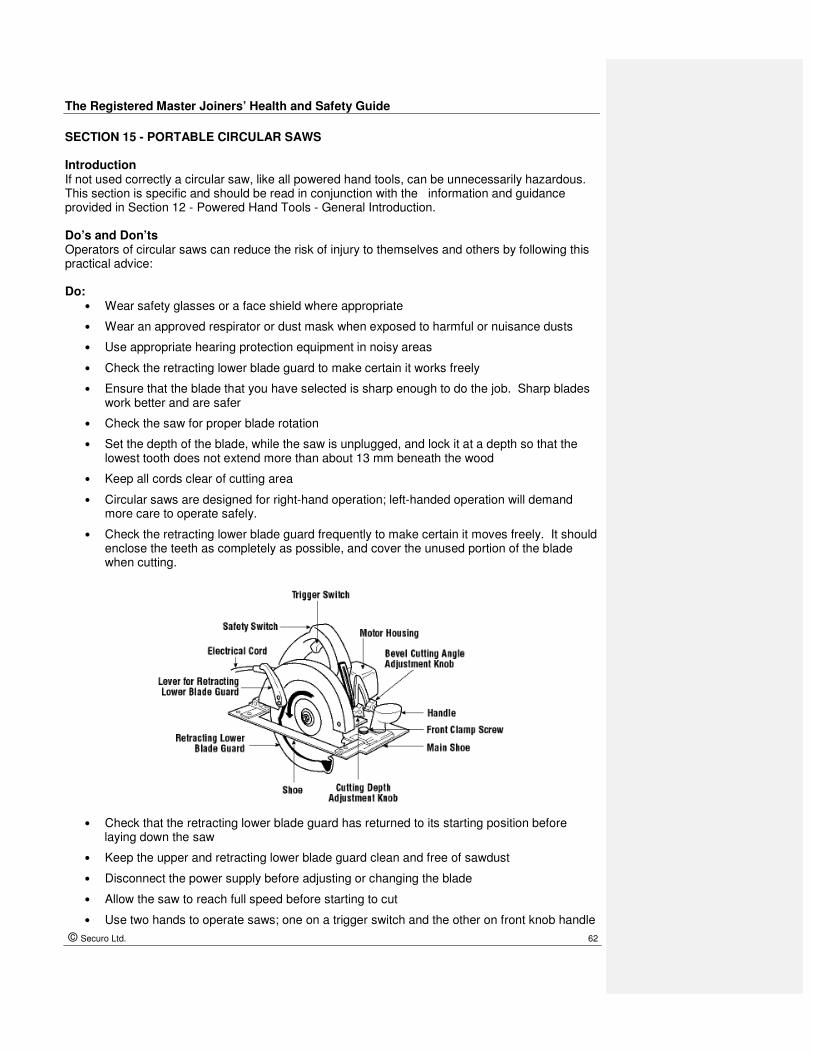
The Registered Master Joiners’ Health and Safety Guide
© Securo Ltd. 62
SECTION 15 - PORTABLE CIRCULAR SAWS Introduction If not used correctly a circular saw, like all powered hand tools, can be unnecessarily hazardous. This section is specific and should be read in conjunction with the information and guidance provided in Section 12 - Powered Hand Tools - General Introduction. Do’s and Don’ts Operators of circular saws can reduce the risk of injury to themselves and others by following this practical advice: Do:
• Wear safety glasses or a face shield where appropriate
• Wear an approved respirator or dust mask when exposed to harmful or nuisance dusts
• Use appropriate hearing protection equipment in noisy areas
• Check the retracting lower blade guard to make certain it works freely
• Ensure that the blade that you have selected is sharp enough to do the job. Sharp blades work better and are safer
• Check the saw for proper blade rotation
• Set the depth of the blade, while the saw is unplugged, and lock it at a depth so that the lowest tooth does not extend more than about 13 mm beneath the wood
• Keep all cords clear of cutting area
• Circular saws are designed for right-hand operation; left-handed operation will demand more care to operate safely.
• Check the retracting lower blade guard frequently to make certain it moves freely. It should enclose the teeth as completely as possible, and cover the unused portion of the blade when cutting.
• Check that the retracting lower blade guard has returned to its starting position before
laying down the saw
• Keep the upper and retracting lower blade guard clean and free of sawdust
• Disconnect the power supply before adjusting or changing the blade
• Allow the saw to reach full speed before starting to cut
• Use two hands to operate saws; one on a trigger switch and the other on front knob handle

The Registered Master Joiners’ Health and Safety Guide
© Securo Ltd. 63
• Keep a motor free from accumulation of dust and chips
• Select the correct blade for stock being cut and allow it to cut steadily. Do not force it
• Secure work being cut to avoid movement
• Ensure that any off-cuts can have a clear fall so that they do not jam on the blade
Do Not: • Do not hold or force the retracting lower guard in the open position
• Do not place a hand under the shoe or guard of the saw
• Do not over tighten the blade-locking nut
• Do not twist the saw to change, cut or check alignment
• Do not use a saw that vibrates or appears unsafe in any way
• Do not force the saw during cutting
• Do not cut materials without first checking for obstructions or other objects e.g. nails
• Do not carry the saw with a finger on the trigger switch
• Do not over-reach. Keep proper footing and balance at all times
• Do not rip stock without using a wedge or guide clamped or nailed to the stock.

The Registered Master Joiners’ Health and Safety Guide
© Securo Ltd. 64
SECTION 16 - BELT SANDERS Introduction If not used correctly a belt sander, like all powered hand tools, can be unnecessarily hazardous. This section is specific and should be read in conjunction with the information and guidance provided in Section 12 - Powered Hand Tools - General Introduction. Do’s and Don’ts Operators of belt sanders can reduce the risk of injury to themselves and others by following this practical advice: Do:
• Wear safety glasses or a face shield where appropriate
• Wear a dust respirator for dusty operations
• Make sure the sander is switched off before connecting the power supply
• Disconnect the power supply before changing a sanding belt, making adjustments, or emptying dust collector
• Inspect sanding belts before using them. Replace worn or frayed belts
• Install sanding belts that are the same widths as the pulley drum
• Adjust sanding belt tension to keep it running true and at the same speed as pulley drum
• Secure the sanding belt in the direction shown on the belt and the machine
• Keep hands away from a sanding belt
• Use two hands to operate sanders; one on trigger switch and the other on front handle
• Keep all cords clear of the sanding area during use
• Clean dust from the motor and vents at regular intervals.
Do Not: • Do not use a sander without an exhaust system or a dust collector present that is in good
working order. Empty the collector when 1/4 full. The dust created when sanding can be an inhalation, fire and explosion hazard. Proper ventilation is essential.
• Do not exert excessive pressure on a moving sander. The weight of the sander supplies adequate pressure for the job
• Do not work on unsecured stock unless it is heavy enough to stay in place. Clamp the stock into place or use a "stop block" to prevent movement
• Do not over-reach. Always keep a proper footing and balance
• Do not cover the air vents of the sander.
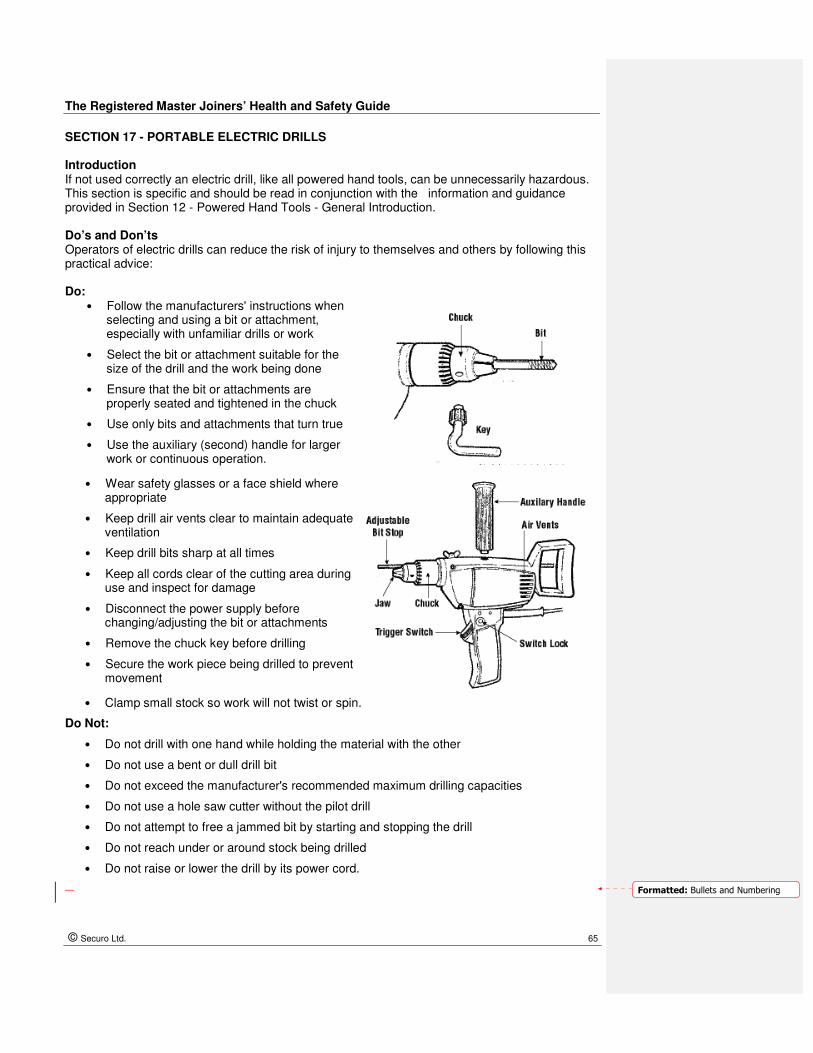
The Registered Master Joiners’ Health and Safety Guide
© Securo Ltd. 65
SECTION 17 - PORTABLE ELECTRIC DRILLS Introduction If not used correctly an electric drill, like all powered hand tools, can be unnecessarily hazardous. This section is specific and should be read in conjunction with the information and guidance provided in Section 12 - Powered Hand Tools - General Introduction. Do’s and Don’ts Operators of electric drills can reduce the risk of injury to themselves and others by following this practical advice: Do:
• Follow the manufacturers' instructions when selecting and using a bit or attachment, especially with unfamiliar drills or work
• Select the bit or attachment suitable for the size of the drill and the work being done
• Ensure that the bit or attachments are properly seated and tightened in the chuck
• Use only bits and attachments that turn true
• Use the auxiliary (second) handle for larger work or continuous operation.
• Wear safety glasses or a face shield where appropriate
• Keep drill air vents clear to maintain adequate ventilation
• Keep drill bits sharp at all times
• Keep all cords clear of the cutting area during use and inspect for damage
• Disconnect the power supply before changing/adjusting the bit or attachments
• Remove the chuck key before drilling
• Secure the work piece being drilled to prevent movement
• Clamp small stock so work will not twist or spin.
Do Not:
• Do not drill with one hand while holding the material with the other
• Do not use a bent or dull drill bit
• Do not exceed the manufacturer's recommended maximum drilling capacities
• Do not use a hole saw cutter without the pilot drill
• Do not attempt to free a jammed bit by starting and stopping the drill
• Do not reach under or around stock being drilled
• Do not raise or lower the drill by its power cord.
� Formatted: Bullets and Numbering

The Registered Master Joiners’ Health and Safety Guide
© Securo Ltd. 66
SECTION 18 - POWERED HAND SAWS, SABRE AND JIG SAWS Introduction If not used correctly a powered handsaw, like all powered hand tools, can be unnecessarily hazardous. This section is specific and should be read in conjunction with the information and guidance provided in Section 12 - Powered Hand Tools - General Introduction. Do’s and Don’ts Operators of powered handsaws can reduce the risk of injury to themselves and others by following this practical advice:
Do:
• Wear safety glasses or a face shield where appropriate
• Disconnect the power supply before changing or adjusting blades
• Keep blades sharp and clean. Clean and sharp blades operate best
• Use lubricants when cutting metals
• Keep all cords clear of cutting area
• Position the saw beside the material before cutting and avoid entering the cut with a moving blade
• Make sure any guards are installed and are working properly
• Remember that sabre saws cut on the up stroke
• Secure and support stock as close as possible to the cutting line to avoid vibration
• Keep the base or shoe of the saw in firm contact with the stock being cut
• Select the correct blade for the material being cut and allow it to cut steadily without forcing
• Maintain proper control of the saw at all times.
Do Not:
• Do not start cutting until the saw reaches its full power
• Do not force a saw along or around a curve. Allow the machine to turn with ease
• Do not insert a blade into or withdraw a blade from a cut or lead hole while the blade is moving
• Do not put down a saw until the motor has stopped
• Do not reach under or around the stock being cut
• Do not cut shoulder height or above unless absolutely unavoidable and then only after a full hazard assessment of the task has been done and extra safety precautions put in place

The Registered Master Joiners’ Health and Safety Guide
© Securo Ltd. 67
How should you start an external cut?
• Place the front of the shoe on the stock
• Make sure that the blade is not in contact with the material or the saw will stall when the motor starts
• Hold the saw firmly down against the material and switch the saw on
• Feed the blade slowly into the stock maintaining an even forward pressure
How should you start an inside cut?
• Drill a lead hole slightly larger than the saw blade. With the saw switched off, insert the blade in the hole until the shoe rests firmly on the stock
• Do not let the blade touch the stock until the saw has been switched on.

The Registered Master Joiners’ Health and Safety Guide
© Securo Ltd. 68
SECTION 19 - PLANERS Introduction If not used correctly a planer, like all powered hand tools, can be unnecessarily hazardous. This section is specific and should be read in conjunction with the information and guidance provided in Section 12 - Powered Hand Tools - General Introduction. Do’s and Don’ts Operators of planers can reduce the risk of injury to themselves and others by following this practical advice:
Do: • Wear safety glasses or a face shield where appropriate and use the appropriate hearing
protection
• Use blades of the same weight and set at the same height
• Ensure that the blade-locking screws are tight after new blade is fitted
• Remove adjusting keys and wrenches before turning on power
• Check depth of cut before starting the machine
• Support the material (stock) in a comfortable position that will allow the job to be done safely and accurately. Check stock thoroughly for staples, nails, screws, or other foreign objects before using a planer.
• Disconnect the planer from the power supply before making any adjustments to the cutter head or blades
• Start a cut with the infeed table (front shoe) resting firmly on the stock and with the cutter head slightly behind the edge of the stock
• Use two hands to operate a planer - one hand on the trigger switch and the other on a front handle
• Keep all cords clear of cutting area.
Do Not:
• Do not put your finger or any object in a deflector to clean out chips while a planer is running
• Do not set a planer down until blades have stopped turning
• Do not over-reach. Keep a proper footing and balance at all times.

The Registered Master Joiners’ Health and Safety Guide
© Securo Ltd. 69
SECTION 20 - ROUTERS Introduction If not used correctly routers, like all powered hand tools, can be unnecessarily hazardous. This section is specific and should be read in conjunction with the information and guidance provided in Section 12 - Powered Hand Tools - General Introduction. Do’s and Don’ts Operators of routers can reduce the risk of injury to themselves and others by following this practical advice:
Do: • Wear eye protection or a face shield where appropriate and appropriate hearing protection
when required
• Disconnect the power supply before making any adjustments or changing bits
• Ensure that the bit is securely mounted in the chuck and the base is tight
• Put the base of the router on the work, template, or guide. Make sure that the bit can rotate freely before switching on the motor
• Secure stock. Never rely on yourself or a second person to support or hold the material. Sudden torque or kickback from the router can cause injury
• Before using a router, check stock thoroughly for staples, nails and other foreign objects
• Keep all cords clear of the cutting area.
• Hold both hands on router handles until the motor has stopped. Do not set the router down until the exposed router bit has stopped turning
• Keep a proper footing and balance at all times
• Start the motor with the bit above the stock when inside routing
• Guide the router counter clockwise around the work when routing outside edges
• Ensure, when routing bevels, mouldings and other edge work, that the router bit is in contact with the stock to the left of a starting point and is pointed in the correct cutting direction

The Registered Master Joiners’ Health and Safety Guide
© Securo Ltd. 70
• Feed the router bit into the material at a firm, controlled speed
• The sound of the motor can indicate safe cutting speeds. When the router is fed into the material too slowly, the motor makes a high-pitched whine. When the router is pushed too hard, the motor makes a low growling noise
• When the type of wood or size of the bit requires going slow, make two or more passes to prevent the router from burning out or kicking back
• To decide the depth of cut and how many passes to make, test the router on scrap lumber similar to the work.
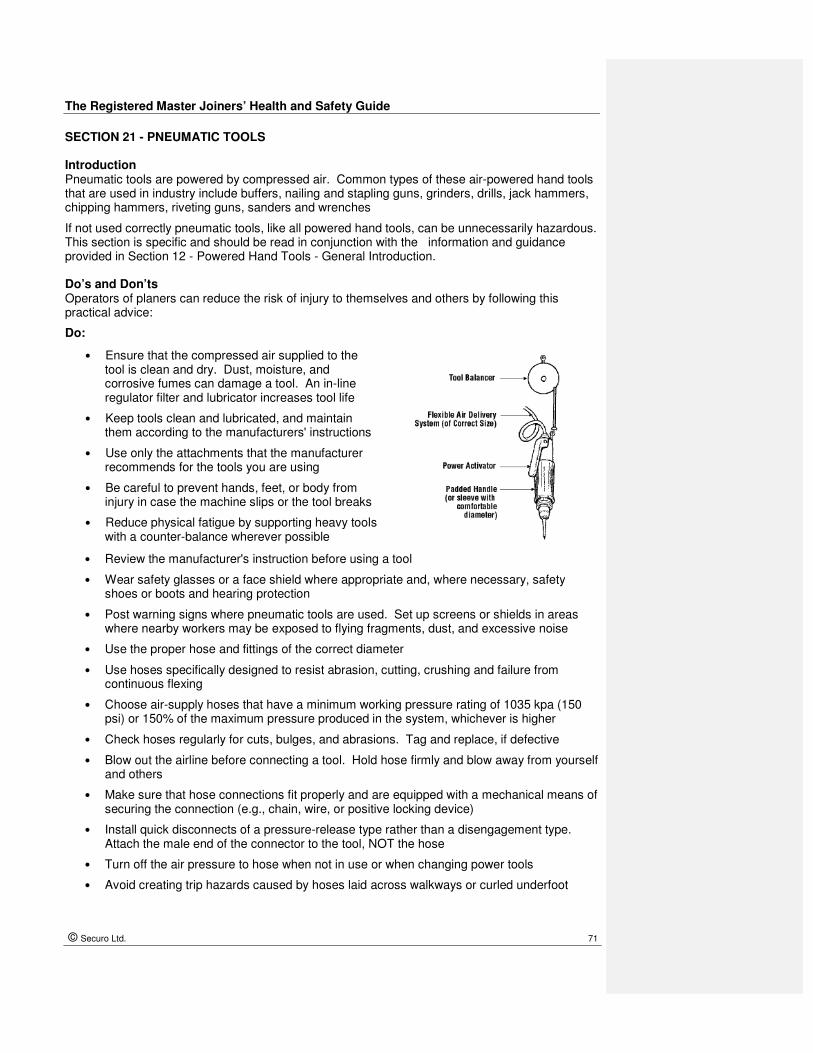
The Registered Master Joiners’ Health and Safety Guide
© Securo Ltd. 71
SECTION 21 - PNEUMATIC TOOLS Introduction Pneumatic tools are powered by compressed air. Common types of these air-powered hand tools that are used in industry include buffers, nailing and stapling guns, grinders, drills, jack hammers, chipping hammers, riveting guns, sanders and wrenches
If not used correctly pneumatic tools, like all powered hand tools, can be unnecessarily hazardous. This section is specific and should be read in conjunction with the information and guidance provided in Section 12 - Powered Hand Tools - General Introduction. Do’s and Don’ts Operators of planers can reduce the risk of injury to themselves and others by following this practical advice:
Do:
• Ensure that the compressed air supplied to the tool is clean and dry. Dust, moisture, and corrosive fumes can damage a tool. An in-line regulator filter and lubricator increases tool life
• Keep tools clean and lubricated, and maintain them according to the manufacturers' instructions
• Use only the attachments that the manufacturer recommends for the tools you are using
• Be careful to prevent hands, feet, or body from injury in case the machine slips or the tool breaks
• Reduce physical fatigue by supporting heavy tools with a counter-balance wherever possible
• Review the manufacturer's instruction before using a tool
• Wear safety glasses or a face shield where appropriate and, where necessary, safety shoes or boots and hearing protection
• Post warning signs where pneumatic tools are used. Set up screens or shields in areas where nearby workers may be exposed to flying fragments, dust, and excessive noise
• Use the proper hose and fittings of the correct diameter
• Use hoses specifically designed to resist abrasion, cutting, crushing and failure from continuous flexing
• Choose air-supply hoses that have a minimum working pressure rating of 1035 kpa (150 psi) or 150% of the maximum pressure produced in the system, whichever is higher
• Check hoses regularly for cuts, bulges, and abrasions. Tag and replace, if defective
• Blow out the airline before connecting a tool. Hold hose firmly and blow away from yourself and others
• Make sure that hose connections fit properly and are equipped with a mechanical means of securing the connection (e.g., chain, wire, or positive locking device)
• Install quick disconnects of a pressure-release type rather than a disengagement type. Attach the male end of the connector to the tool, NOT the hose
• Turn off the air pressure to hose when not in use or when changing power tools
• Avoid creating trip hazards caused by hoses laid across walkways or curled underfoot
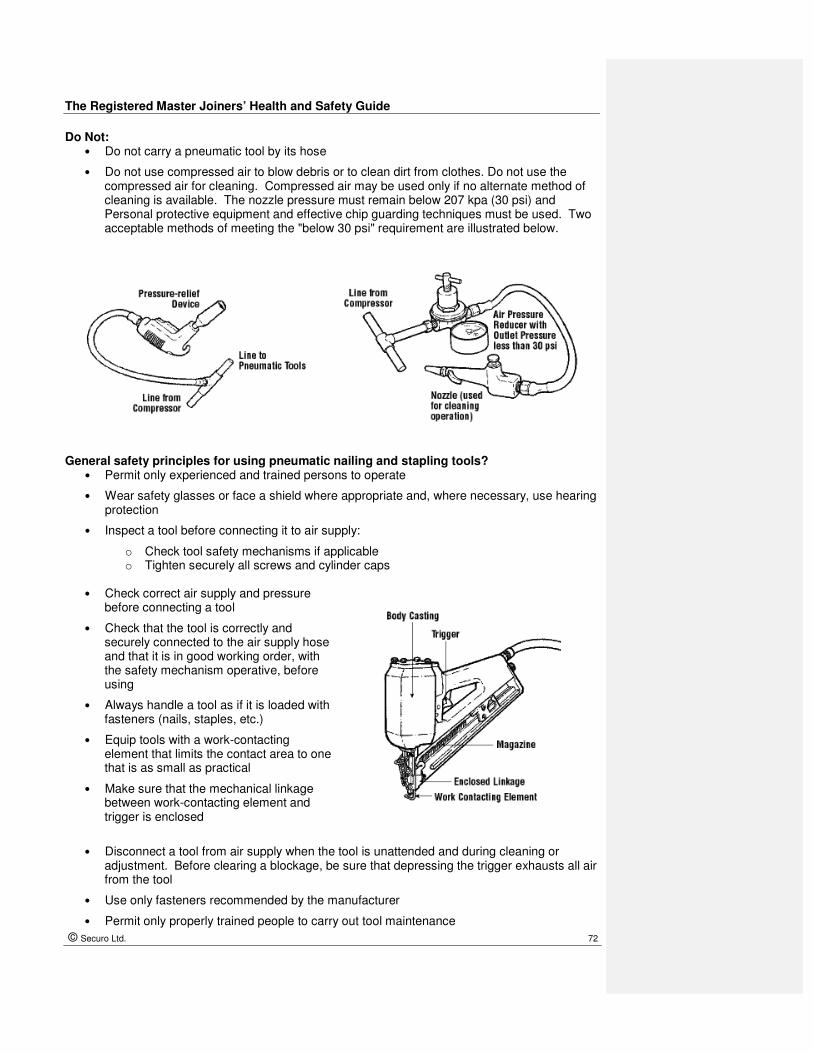
The Registered Master Joiners’ Health and Safety Guide
© Securo Ltd. 72
Do Not: • Do not carry a pneumatic tool by its hose
• Do not use compressed air to blow debris or to clean dirt from clothes. Do not use the compressed air for cleaning. Compressed air may be used only if no alternate method of cleaning is available. The nozzle pressure must remain below 207 kpa (30 psi) and Personal protective equipment and effective chip guarding techniques must be used. Two acceptable methods of meeting the "below 30 psi" requirement are illustrated below.
General safety principles for using pneumatic nailing and stapling tools?
• Permit only experienced and trained persons to operate
• Wear safety glasses or face a shield where appropriate and, where necessary, use hearing protection
• Inspect a tool before connecting it to air supply:
o Check tool safety mechanisms if applicable o Tighten securely all screws and cylinder caps
• Check correct air supply and pressure
before connecting a tool
• Check that the tool is correctly and securely connected to the air supply hose and that it is in good working order, with the safety mechanism operative, before using
• Always handle a tool as if it is loaded with fasteners (nails, staples, etc.)
• Equip tools with a work-contacting element that limits the contact area to one that is as small as practical
• Make sure that the mechanical linkage between work-contacting element and trigger is enclosed
• Disconnect a tool from air supply when the tool is unattended and during cleaning or
adjustment. Before clearing a blockage, be sure that depressing the trigger exhausts all air from the tool
• Use only fasteners recommended by the manufacturer
• Permit only properly trained people to carry out tool maintenance

The Registered Master Joiners’ Health and Safety Guide
© Securo Ltd. 73
• Do not point the tool toward yourself or anyone else
whether it contains fasteners or not
• Do not operate at a pressure above the manufacturers' rating
• Do not depress the trigger unless the nosepiece of tool is directed onto a safe work surface
• Do not carry a tool with the trigger depressed
• Do not load a tool with fasteners while the trigger is depressed
• Do not overreach. Keep proper footing and balance
• Do not use compressed air to blow debris or to clean dirt from clothes unless at low pressure.

The Registered Master Joiners’ Health and Safety Guide
© Securo Ltd. 74
APPENDIX 1 - MACHINERY GUARDING PRINCIPLES Introduction Machinery accidents cause serious and permanently disabling injuries.
• Machinery is involved in 80% of fatal workplace accidents
• Machinery is involved in 25% of non-fatal workplace accidents
• There are approximately 10,000 injury compensation claims in New Zealand each year from accidents involving Machinery.
Many of these accidents happen when:
• Machinery is unguarded or inadequately guarded
• Operators try to remove an item which has become caught in a machine
• Operators try to clean hazardous areas whilst machine is in motion
• Maintenance staff try to repair or service a machine which is still energised
It is the Policy of the Registered Master Joiners to reduce the risks of injury that may occur when operating machinery. The Hazard Management procedure is as follows:
1. Identify the Hazard
2. Eliminate, Isolate or minimise the hazard by a design improvement
3. The use of various safeguards e.g. fixed guards, interlocks, and light beams etc.
4. Following the Safe Working Practices outlined in this Guide.
Machinery accident types
Movement of machinery parts consists mainly of rotary, sliding or reciprocating motion or combination of these. There are five typical ways that people can be injured when working with machines:
1. Being struck by an object
2. Striking against an object
3. Coming into contact with a harmful energy source e.g. electricity or heat
4. Becoming entangled on a stationary or moving object
5. Becoming caught between (e.g. pinched or crushed), either between a moving object and a stationary object or between two moving objects.
Most injuries from working with machines are caused by Mechanical Hazards. Always make sure you understand your work instructions before attempting to use any tool or machine and learn the applications and limitations before use.

The Registered Master Joiners’ Health and Safety Guide
© Securo Ltd. 75
Machine high-risk hazards include:
• Shearing and Cutting actions
• Entanglement actions
• In-running Nip actions [see diagram above]
• Impact actions
• Flying particles
• Crushing actions
• Pressing and Forming actions
• Stabbing actions
• Drilling actions
Machine high hazard areas must be guarded, to prevent any part of the body gaining access to those risk areas whilst the machine is switched on or in motion. Machine high hazard areas, that must be accessed for machine setting or maintenance must be shut-off from all sources of energy and locked-off and/or tagged out before guards are removed to gain access. MACHINE GUARD TYPES There are a number of different types of Machine Guards in use, some of which are described below. Except for planned maintenance and repairs, guards of any type should never (under any circumstances and for whatever reason) be tampered with. Failure to adhere to this ‘golden rule’ has led to many serious injuries and a number of fatalities. Fixed Guard. A fixed guard has no moving parts and stops contact between moving machinery parts and any part of the body. It protects people only if they are correctly fixed in position. Fixed guards must only be able to be opened or removed by a special tool. Removal of any guard is a serious matter and must only be carried out by authorised and competent staff. Interlocking Guard. This type of guard does not allow a person to access the high-risk areas of the machine during the working stroke. It is typically electrically or mechanically operated by the drive mechanism of the machine. When a gate, guard, or door is opened, the interlocking switch isolates the power supply. Automatic Guard. This type of guard automatically moves into position as the machine, or cycle, starts. It is also known as a ‘push-away’ or ‘sweep-away’ guard. It is only suitable on slow Machines. Distance Guard. A distance guard is a barrier, such as a fence, to prevent any person from getting access to the high-risk areas of the machine. Trip Guard. A trip guard senses the presence of an object usually via some type of beam or ray and stops the machine when an operator gets into a position where they could be injured. A photoelectric light curtain, which uses infra red light is an example of this type of guard. Isolation Guarding. This is not a physical guard. People are protected from injury by the separation between them and the hazardous parts of the machine i.e. they are ‘isolated’ from the hazard, unless they deliberately enter the hazardous area.
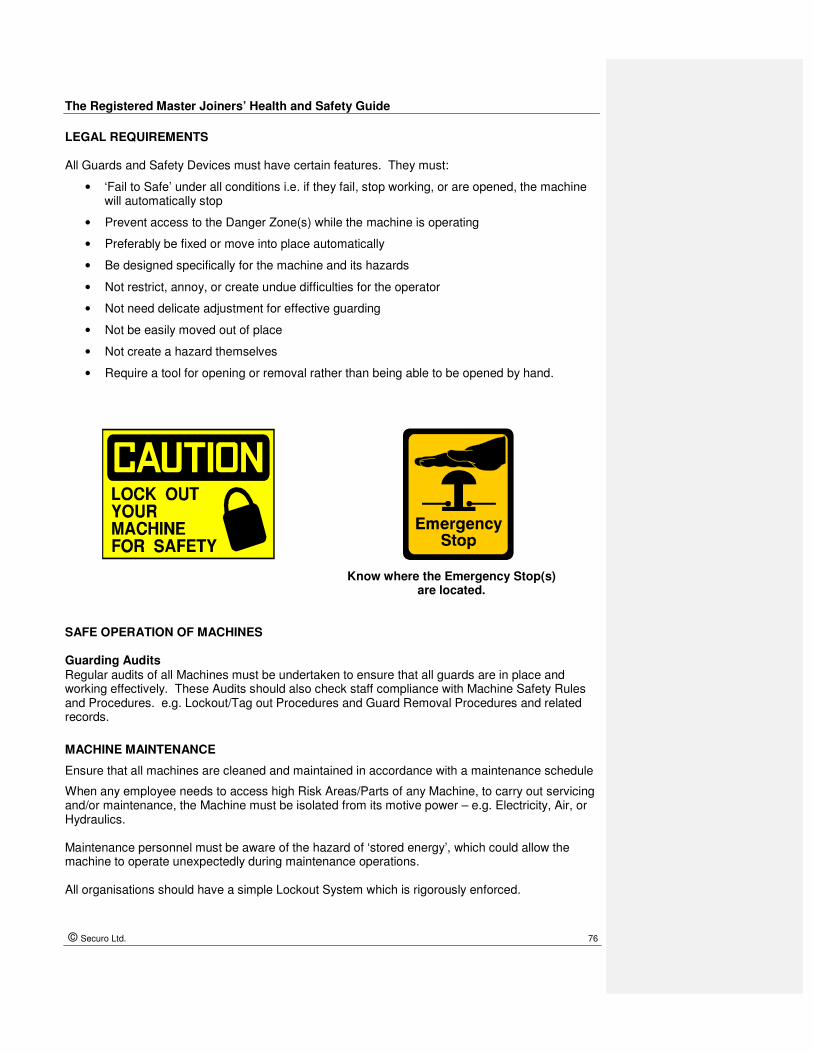
The Registered Master Joiners’ Health and Safety Guide
© Securo Ltd. 76
LEGAL REQUIREMENTS All Guards and Safety Devices must have certain features. They must:
• ‘Fail to Safe’ under all conditions i.e. if they fail, stop working, or are opened, the machine will automatically stop
• Prevent access to the Danger Zone(s) while the machine is operating
• Preferably be fixed or move into place automatically
• Be designed specifically for the machine and its hazards
• Not restrict, annoy, or create undue difficulties for the operator
• Not need delicate adjustment for effective guarding
• Not be easily moved out of place
• Not create a hazard themselves
• Require a tool for opening or removal rather than being able to be opened by hand.
Know where the Emergency Stop(s)
are located.
SAFE OPERATION OF MACHINES
Guarding Audits Regular audits of all Machines must be undertaken to ensure that all guards are in place and working effectively. These Audits should also check staff compliance with Machine Safety Rules and Procedures. e.g. Lockout/Tag out Procedures and Guard Removal Procedures and related records.
MACHINE MAINTENANCE
Ensure that all machines are cleaned and maintained in accordance with a maintenance schedule
When any employee needs to access high Risk Areas/Parts of any Machine, to carry out servicing and/or maintenance, the Machine must be isolated from its motive power – e.g. Electricity, Air, or Hydraulics. Maintenance personnel must be aware of the hazard of ‘stored energy’, which could allow the machine to operate unexpectedly during maintenance operations. All organisations should have a simple Lockout System which is rigorously enforced.
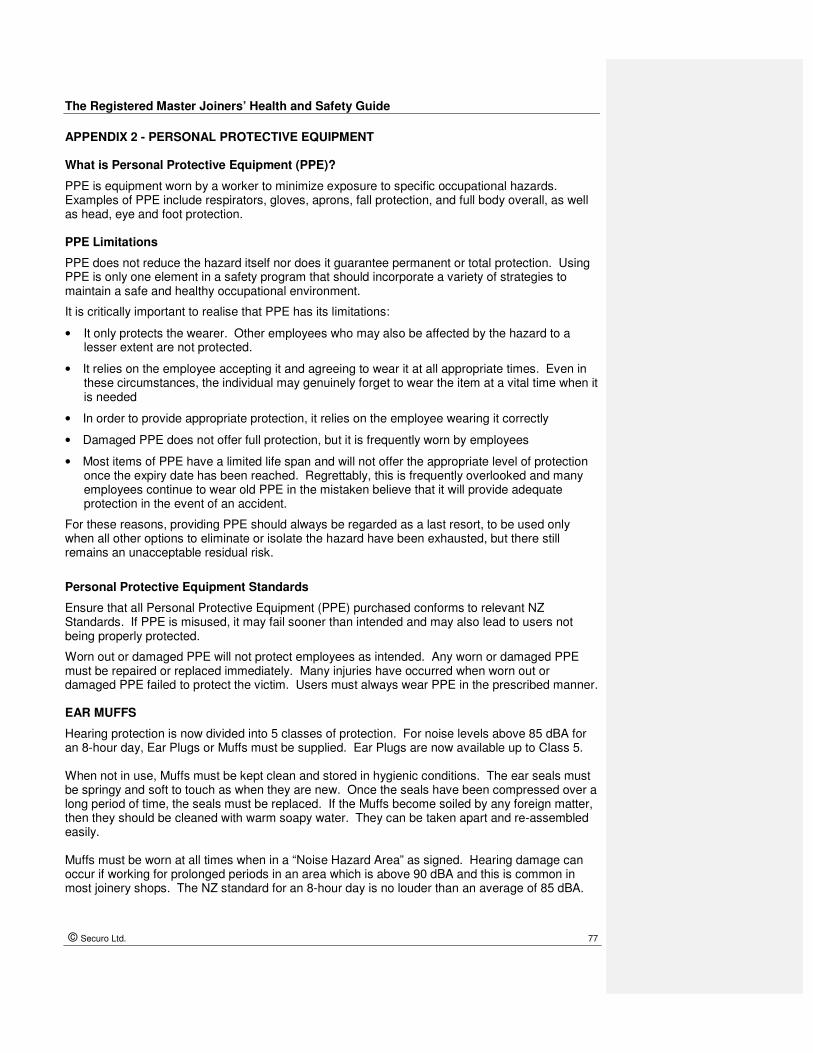
The Registered Master Joiners’ Health and Safety Guide
© Securo Ltd. 77
APPENDIX 2 - PERSONAL PROTECTIVE EQUIPMENT What is Personal Protective Equipment (PPE)?
PPE is equipment worn by a worker to minimize exposure to specific occupational hazards. Examples of PPE include respirators, gloves, aprons, fall protection, and full body overall, as well as head, eye and foot protection. PPE Limitations
PPE does not reduce the hazard itself nor does it guarantee permanent or total protection. Using PPE is only one element in a safety program that should incorporate a variety of strategies to maintain a safe and healthy occupational environment.
It is critically important to realise that PPE has its limitations:
• It only protects the wearer. Other employees who may also be affected by the hazard to a lesser extent are not protected.
• It relies on the employee accepting it and agreeing to wear it at all appropriate times. Even in these circumstances, the individual may genuinely forget to wear the item at a vital time when it is needed
• In order to provide appropriate protection, it relies on the employee wearing it correctly
• Damaged PPE does not offer full protection, but it is frequently worn by employees
• Most items of PPE have a limited life span and will not offer the appropriate level of protection once the expiry date has been reached. Regrettably, this is frequently overlooked and many employees continue to wear old PPE in the mistaken believe that it will provide adequate protection in the event of an accident.
For these reasons, providing PPE should always be regarded as a last resort, to be used only when all other options to eliminate or isolate the hazard have been exhausted, but there still remains an unacceptable residual risk.
Personal Protective Equipment Standards
Ensure that all Personal Protective Equipment (PPE) purchased conforms to relevant NZ Standards. If PPE is misused, it may fail sooner than intended and may also lead to users not being properly protected.
Worn out or damaged PPE will not protect employees as intended. Any worn or damaged PPE must be repaired or replaced immediately. Many injuries have occurred when worn out or damaged PPE failed to protect the victim. Users must always wear PPE in the prescribed manner. EAR MUFFS
Hearing protection is now divided into 5 classes of protection. For noise levels above 85 dBA for an 8-hour day, Ear Plugs or Muffs must be supplied. Ear Plugs are now available up to Class 5. When not in use, Muffs must be kept clean and stored in hygienic conditions. The ear seals must be springy and soft to touch as when they are new. Once the seals have been compressed over a long period of time, the seals must be replaced. If the Muffs become soiled by any foreign matter, then they should be cleaned with warm soapy water. They can be taken apart and re-assembled easily. Muffs must be worn at all times when in a “Noise Hazard Area” as signed. Hearing damage can occur if working for prolonged periods in an area which is above 90 dBA and this is common in most joinery shops. The NZ standard for an 8-hour day is no louder than an average of 85 dBA.

The Registered Master Joiners’ Health and Safety Guide
© Securo Ltd. 78
RESPIRATORS
For all contact with nuisance and hazardous particulates, (e.g. occasional airborne wood dust, paint, solvent vapours and aerosols) an approved respirator or appropriate dust mask should be worn as required.
In order to be effective, respirators must be properly sealed to the face. They must form a close fit over the mouth and nose and achieve an airtight seal with the skin. Any hair from a moustache or beard will almost certainly mean that a seal test will fail so special consideration is required for the individual in these circumstances.
Any leak will let in the very small particulates that protection against is required. Most problems with harmful dust are caused by particulates of less than 5 microns, which pass easily through the human respiratory defence system and lodge themselves in the lung. When spraying paint, lacquer, or varnish, employees are required to wear a respirator. All wearers must be instructed in how to fit and wear a respirator correctly. When not being worn, respirators must be stored in a sealed container or bag. If left in a polluted atmosphere, the filters will continue to absorb the noxious dust or any fumes and will need to be replaced more frequently. The respirator should be cleaned at the end of a shift or on completion of a task. All the components of the respirator can be renewed. A sure sign that a filter cartridge needs replacing is when the operator finds it more difficult to breath. Always use the correct replacement filter. To ensure adequate hygiene, each user should have their own respirator for hygiene purposes.
SAFETY GLASSES
Safety Glasses are designed to be worn when performing any task where there is a possibility of an impact from any flying objects. Joinery operations will require the issue of AS/NZS Standard 1337 Eye Protection (Usually with Polycarbonate lens) for all employees exposed to this risk. Most glasses have an adjustable side arm, to allow for individual differences. They need to be properly adjusted and the lenses kept clean and scratch-free to ensure appropriate safety.
SAFETY FOOTWEAR
Steel capped safety Footwear complying with AS/NZS standard 2210.3 should be issued to all employees engaged in manual handling and other tasks where a foot injury may occur. Footwear must always be laced up to avoid trailing laces which present a tripping hazard. Lacing should be in parallel style, which will facilitate easy cutting and removal in the event of an accident. GLOVES
A wide variety of gloves for different tasks are now available to minimise hand injuries. The correct selection of appropriate gloves for the task is important to provide a suitable level of protection. This is not as straightforward as it appears and careful selection is needed for many applications. If in doubt, you should contact a specialist provider.
As with all other PPE, gloves must be kept in good condition and discarded when damaged or worn. Gloves should be cleaned regularly and suitably stored when not in use to avoid damage and premature degradation.


The Registered Master Joiners’
Health and Safety Guide
If you need further guidance regarding the information provided in this document, please contact the Registered Master Joiners or Securo Ltd. Securo Ltd. is a private Health and Safety Consultancy. PO Box 6981 Wellesley St. Auckland Tel: 09 303 3477, Fax: 09 307 3360, Email [email protected]