the place in question summary
TRANSCRIPT
The Place in QuestionAlice Kell summary presentation

Location Studies!Unit 12 (Fine Art) a. recording of experiences or information to develop intentions !What approaches did you use to examine and record your location? Representing the space; details; light etc. How did you decide and which worked the best? Why? !I used a variety of different methods and medium when recording my area such as photographs, observational drawings, paintings and collage. I tried to adapt my materials based on the qualities I wanted to capture for example for heavily tonal objects I used charcoal, ink and pastel whereas when I wanted to focus more on line and form I used simple line drawings. I found it really useful varying my choice of medium as by the end of my initial research I had many studies reflecting all the different qualities of my are such as the contract between nature and man made. For objects I found more interesting than others, such as the chairs, I made sure to do several studies of in different materials in order to fully develop my understanding of the objects. I found free drawing with ink the most successful medium of capturing the chaotic unorganised qualities of the chairs. !I also took many measurements around my area such as the chairs, table and tree as to help with my observational drawings and general understanding of the composition of my area. I also recorded the distances between objects as to get an exact sense of distance and perspective. I found this a very helpful method when drawing the objects accurately. !
b use of materials, processes and technology or a combination of materials, processes and technology to develop ideas
What did you learn through your initial enquiries? Experiments and techniques, use of an experimental process to generate new ideas, suitability of some rather than others?
!After complete my initial studies of my area I found myself far more interested in the concept of this project and its artistic potential. By using a variety of mediums, materials and techniques I think I gave myself a lot of options to work with at the beginning of this project. i found that there were many different ways I could take my broad research. As well as helping me identify the positives and strengths of my area, they also allowed me to assess its weaknesses, such as the areas of which weren't so visually interesting such as the tree/totem pole.
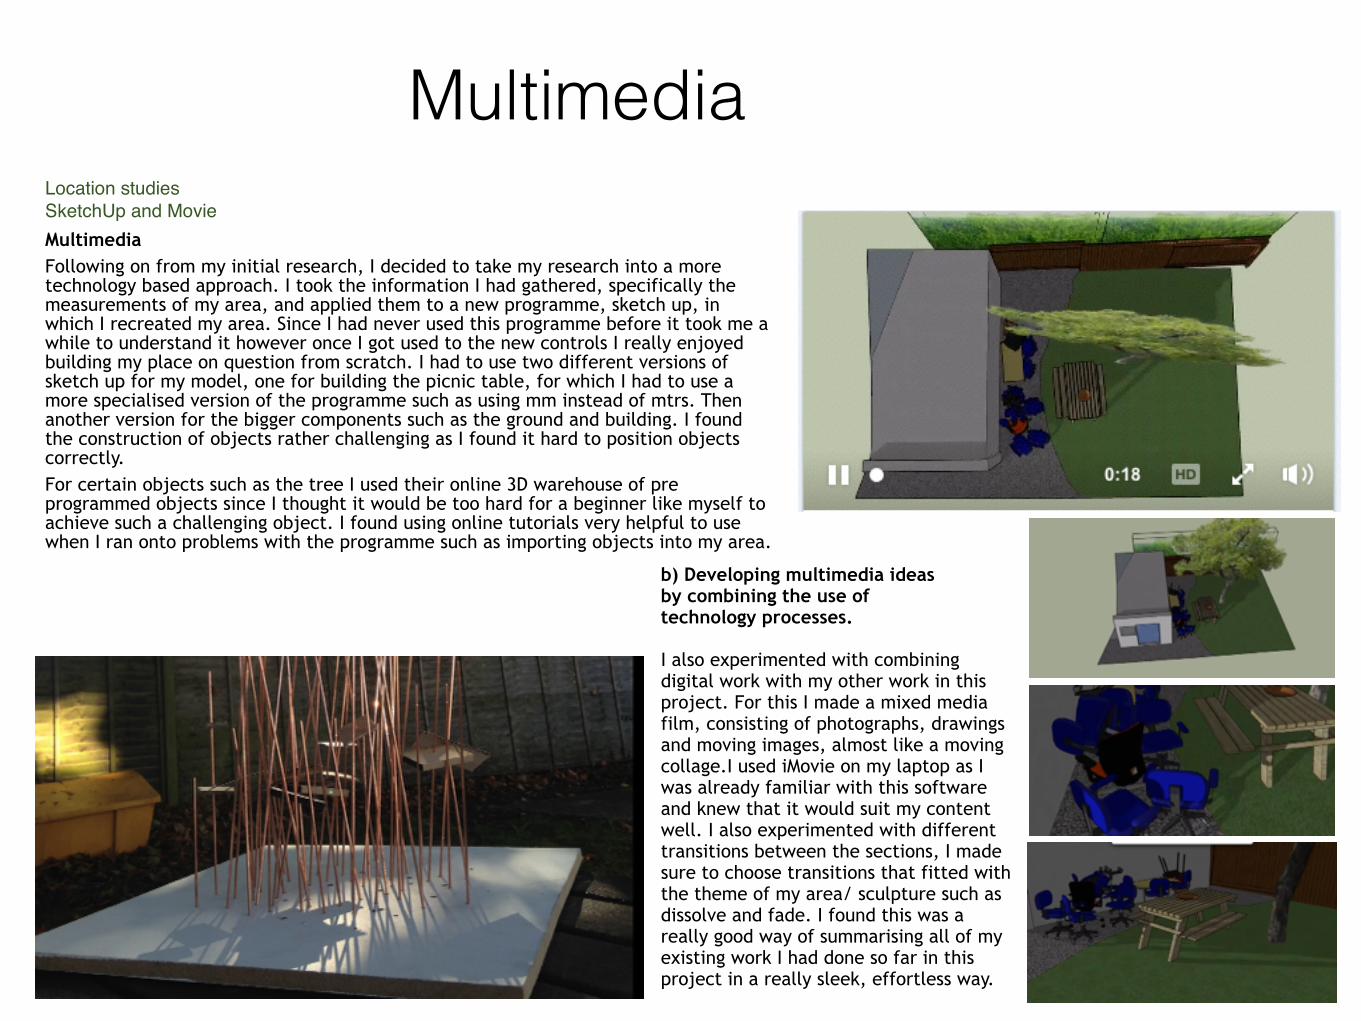
MultimediaLocation studies SketchUp and Movie!Multimedia Following on from my initial research, I decided to take my research into a more technology based approach. I took the information I had gathered, specifically the measurements of my area, and applied them to a new programme, sketch up, in which I recreated my area. Since I had never used this programme before it took me a while to understand it however once I got used to the new controls I really enjoyed building my place on question from scratch. I had to use two different versions of sketch up for my model, one for building the picnic table, for which I had to use a more specialised version of the programme such as using mm instead of mtrs. Then another version for the bigger components such as the ground and building. I found the construction of objects rather challenging as I found it hard to position objects correctly. For certain objects such as the tree I used their online 3D warehouse of pre programmed objects since I thought it would be too hard for a beginner like myself to achieve such a challenging object. I found using online tutorials very helpful to use when I ran onto problems with the programme such as importing objects into my area. ! b) Developing multimedia ideas
by combining the use of technology processes. !I also experimented with combining digital work with my other work in this project. For this I made a mixed media film, consisting of photographs, drawings and moving images, almost like a moving collage.I used iMovie on my laptop as I was already familiar with this software and knew that it would suit my content well. I also experimented with different transitions between the sections, I made sure to choose transitions that fitted with the theme of my area/ sculpture such as dissolve and fade. I found this was a really good way of summarising all of my existing work I had done so far in this project in a really sleek, effortless way.

Development Making and developmental work - (Large drawing, 3D, print) Unit 12 (Fine Art) a. recording of experiences or information to develop intentions What approaches did you use to examine and record your location? Representing the space; details; light etc. How did you decide and which worked the best? Why? I went onto develop my understanding of my area into a variety of developed pieces such as a large scale composition, 3D model and series of dry point prints. I found that I referred back to all my initial research pages then took my favourite components and used them as the starting point for my developed pieces. For example I really liked the bold ink studies I did of the chairs and the deep contrast of light and shadow in my photographs, therefore I based my initial designs around this concept. Unfortunately I wasn't happy with the way my first large scale piece turned out as I didn't think it reflected all that I had learnt from my initial research and artist studies. I then went onto develop the first concept into a more successful second A2piece ( see right) This interest in shadows an contrasts in my drawings lead me onto the concept for my 3D model, in which I had the intention of making shadow work the main focus of the piece. I then took one of my many photographs I took of my model in staged lighting, traced it and used it as the base of my dry point print, of which I went to further exaggerate the contrast of light and dark, Overall I am really surprised and happy with how much my work has developed into so many different mediums, yet all stemming from the same concept. I think it is clear to see the links between the piece yet they do not all look like clones of one another. I also enjoyed this aspect of the project the most as I found it allowed me to be very free and expressive with my work !! b use of materials, processes and technology
or a combination of materials, processes and technology to develop ideas What did you learn through your initial enquiries? Experiments and techniques, use of an experimental process to generate new ideas, suitability of some rather than others?
Throughout this development stage I experimented with many different materials, processes and technologies. For my large scale piece I was using collage and mixed media of ink, paint and charcoal. I then went onto work in 3D, firstly by making a range of makettes with cardboard, then going into the workshop and making my final sculpture with wood, copper rods and PVC. I really enjoyed using such a large variety of materials as I found each step of this process allowed me to express and develop a new quality of my area that I simply couldn't achieve with just drawing.
Contextual References Unit 9Contextual References
a research into historical and contemporary work, showing understanding of the contexts which influenced the work .
What have you learned about the influences on other’s work?
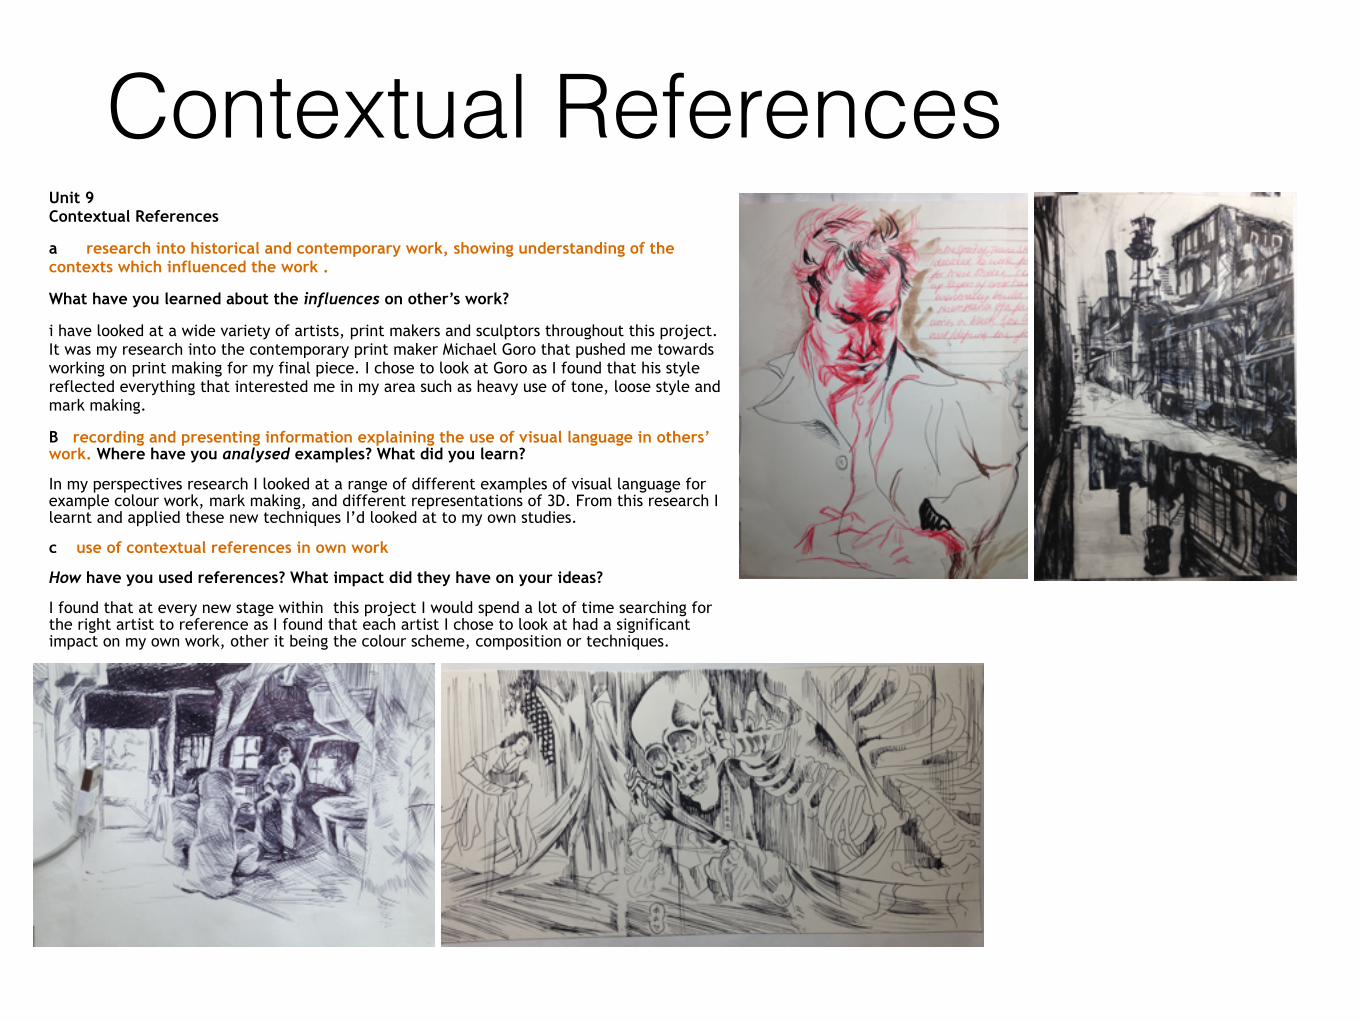
i have looked at a wide variety of artists, print makers and sculptors throughout this project. It was my research into the contemporary print maker Michael Goro that pushed me towards working on print making for my final piece. I chose to look at Goro as I found that his style reflected everything that interested me in my area such as heavy use of tone, loose style and mark making.
B recording and presenting information explaining the use of visual language in others’ work. Where have you analysed examples? What did you learn?
In my perspectives research I looked at a range of different examples of visual language for example colour work, mark making, and different representations of 3D. From this research I learnt and applied these new techniques I’d looked at to my own studies.
c use of contextual references in own work
How have you used references? What impact did they have on your ideas?
I found that at every new stage within this project I would spend a lot of time searching for the right artist to reference as I found that each artist I chose to look at had a significant impact on my own work, other it being the colour scheme, composition or techniques.

Personal BriefUnit 13 (Design) a) Resolve the needs of the brief to develop intentions How did you develop the final brief? What client / end user is it for? Why? What constraints and requirements did you consider? What research did you undertake into your chosen area of creative enquiry? !As part of my brief for this project I had to find myself a client for my work as to keep my work to a professional standard and focussed. I looked at a range of contemporary galleries across London before deciding on the Saatchi gallery. Having visited the gallery myself, and having seen its vast variety of work I thought it was by far the best suited client for me. In order for me to get a better understanding of what my client would generally be willing to sell I went onto their website and looked over their large selection of prints.I then used these as inspiration when designing the initial composition of my final product.
b) Develop a range of ideas in response to the brief. How did you develop your ideas for the final outcome? What techniques did you use to generate ideas? What influenced you in doing this? I did many pages in my sketchbook of initial design work and planning for my final print. I played around with a range of mark making techniques and tonal qualities, all based around the same image ( see above). I developed what I learnt from these experiments and took the best qualities of each and came up with a developed design idea. I then took my ideas into print form, firstly by experimenting with simple mark making panels, different thicknesses of ink and grounds.

Producing own ideasUnit 11 Develop & Produce Own Ideas !a) Create and develop ideas in response to the brief. How did you interpret your brief? What different approaches to the same theme did you explore? What decisions did you make to refine your ideas? I deliberately gave myself a lot of freedom with my brief since I knew that I wanted to focus more on the fine art aspect of this project, compared to focussing too much on the needs of a design brief/ professional client. Despite this, my brief did have its limitations such as I made sure that my final product would fit with the aesthetic of the galleries usual work. In addition I also set myself limitations such as colour scheme and images as I wanted to stay true to all of my earlier artistic development and explorational work. !b) Plan and produce final outcome using specialist working methods and processes. How did you decide on the final outcome? Why was this the best approach? How did you choose the techniques you’ve used? Did they work effectively? !Overall I am very happy with my final product.I think it really reflects all of my earlier development work yet also has a fresh new take on representing my area. I chose to develop on dry point printing for my final piece as I found that it was a really easy effective way of mass producing top quality images. I also think the heavy emphasis on tonal qualities in dry point relates really nicely back to all of my earlier development work on light and shadow.
Unit 10Professional Practicea investigate and analyse professional practice Where have you looked at the working methods and approaches of others in this project?
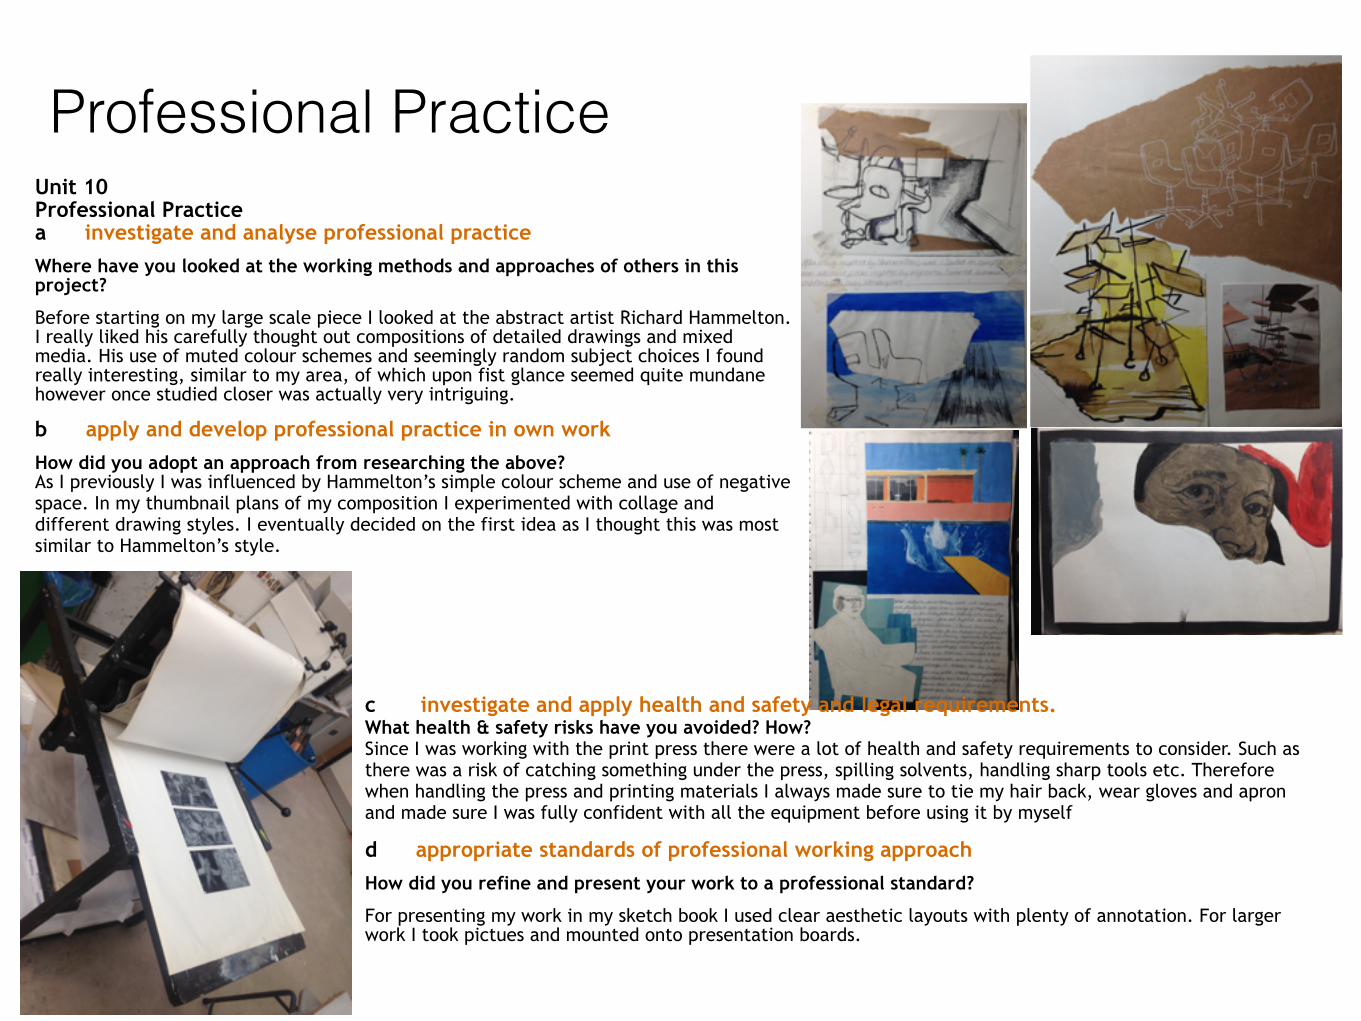
Before starting on my large scale piece I looked at the abstract artist Richard Hammelton. I really liked his carefully thought out compositions of detailed drawings and mixed media. His use of muted colour schemes and seemingly random subject choices I found really interesting, similar to my area, of which upon fist glance seemed quite mundane however once studied closer was actually very intriguing.
b apply and develop professional practice in own work How did you adopt an approach from researching the above? As I previously I was influenced by Hammelton’s simple colour scheme and use of negative space. In my thumbnail plans of my composition I experimented with collage and different drawing styles. I eventually decided on the first idea as I thought this was most similar to Hammelton’s style.
Professional Practice
c investigate and apply health and safety and legal requirements. What health & safety risks have you avoided? How? Since I was working with the print press there were a lot of health and safety requirements to consider. Such as there was a risk of catching something under the press, spilling solvents, handling sharp tools etc. Therefore when handling the press and printing materials I always made sure to tie my hair back, wear gloves and apron and made sure I was fully confident with all the equipment before using it by myself
d appropriate standards of professional working approach How did you refine and present your work to a professional standard?
For presenting my work in my sketch book I used clear aesthetic layouts with plenty of annotation. For larger work I took pictues and mounted onto presentation boards.

Personal, portfolio and presentationa personal presentation and communication skills
b portfolio presentation techniques How have you presented your work?
Did you make particular use of photography or presentation boards?
How have you considered clarity of information in your sketchbooks and boards?
After making my sculpture/ prints/ large scale pieces I made sure to photograph and present as professionally as possible. For example for my sculpture I photographed it in a specially set up plain white studio with special light fixtures. I found that this really captured the best qualities of my sculpture, as opposed to if I had just photograph it in an every day environment. I then went to mount these pictures onto a presentation board and briefly summary and evaluate them. Similarly I have ,mounted my dry point printing. I hope to also photoshop my final piece into situ.
c identifying and pursuing progression goals
What evidence do you have of research into progression? Photos of open days, website research? What have you learned so far?
Over the last month I have been to several open days, for both foundation and degree courses. I have documented my visits to both AUB ( arts university Bournemouth) and Manchester MET on my blog. I made sure to not just talk about the coerces I am applying to but the city/ campus environment of the university/ lectures/ accommodation as I think these aspects are just as important as the educational side of university. However, I also made sure to do as much research as possible about the progression of the courses such as work experience opportunities and future career plans.
evaluationI feel that at the beginning of this project I managed my time efficiently. I kept on top of all my deadlines and found myself working quickly through my sketchbook. For example, when making my sculpture as I knew that I wanted to make a reasonably large scale piece therefore I had to manage my time very effectively as I only had a limited amount of time in the work shop. This meant I worked very decisively when planning and making my makette and final piece. However as the project progressed I found myself struggling with the development stages of the project such as the deciding on a brief, which lead me to falling behind. I think this is mostly due to my self critical approach to work. I often found myself redoing assignments which unfortunately held me back from further stages of development. This was due to my indecisiveness of choosing my brief, initially I wanted to look at animation, however after some research into practitioners and the technology surrounding this medium, I found that it was going to be too much work to fit into such a small time constraint. This meant I had to rework my brief and make it more attainable. !
Initially I wanted to choose a brief that meant I didn't have to scrap all my previous research however the more research I did into illustrators and artists, lead me more down the print making route. Despite all the extra work load I gave myself, I am glad that I changed my brief when I did. I think that print making relates more to the atmosphere of my area and earlier work ( light and shadow/ tone). Furthermore, I think print making feeds more into my preferred interests of art and design, fine art. !
As I mentioned before, I did a lot of research into a range of contemporary and historical artists, illustrators, sculptors and print makers throughout this project. For example at the beginning of my research I looked at illustrators such as James Jean, Linda Rodgers and fine artists such as David Hockney and Richard Hammelton I found this helpfully lead me onto adapting similar styles of work to my own studies. I really liked his carefully thought out compositions of detailed drawings and mixed media. His use of muted colour schemes and seemingly random subject choices I found really interesting, similar to my area, of which upon fist glance seemed quite mundane however once studied closer was actually very intriguing.!
I found doing artist copies a very useful tool when trying to understand an individuals style of working. By making a copy of their work I found myself understanding their method and intention of line/ mark-making/ colour, which made it far easier to apply wheat I learnt to my own studies. For my research over the course of this project I used a range of sources such as the internet, college library, art gallery broachers and simply by talking to my teachers about specific artists/ techniques.!
Aside from my final piece,I feel that the development of my 3D work was the most successful throughout this project. The process in which I developed the concept for my sculpture is very clear and in depth, from the initial sketches to makettes to final refined sculpture. I found this time I invested into this side project very beneficial as it went onto inspire my other work ie print making. !
After struggling with my chosen brief I think I went onto to successfully develop my final idea, by doing sufficient design work in my sketchbook and with test prints. I made sure to evaluate my progression at each stage, constantly referring back to my brief and client. I had never done dry point printing before and I found that I really enjoyed the process freedom it allowed me creatively. I think that the visual qualities achieved with dry point complimented my area very well,!
Overall I am very happy with my final product.I think it really reflects all of my earlier development work yet also has a fresh new take on representing my area. I chose to develop on dry point printing for my final piece as I found that it was a really easy effective way of mass producing top quality images. I also think the heavy emphasis on tonal qualities in dry point relates really nicely back to all of my earlier development work on light and shadow.