the pioneer robots - umn - mars lab
TRANSCRIPT

The Pioneer Robots
CSci 5551: Intro. To Robotics
Organizational Matters
• Undergraduate Robotics Lab:– EE/CSci 2-140B
• Swipe U-Card to enter
• Robots are in cages, with color coded padlocks.– Re-charge the robots after use
• You will be assigned based on project proposals.
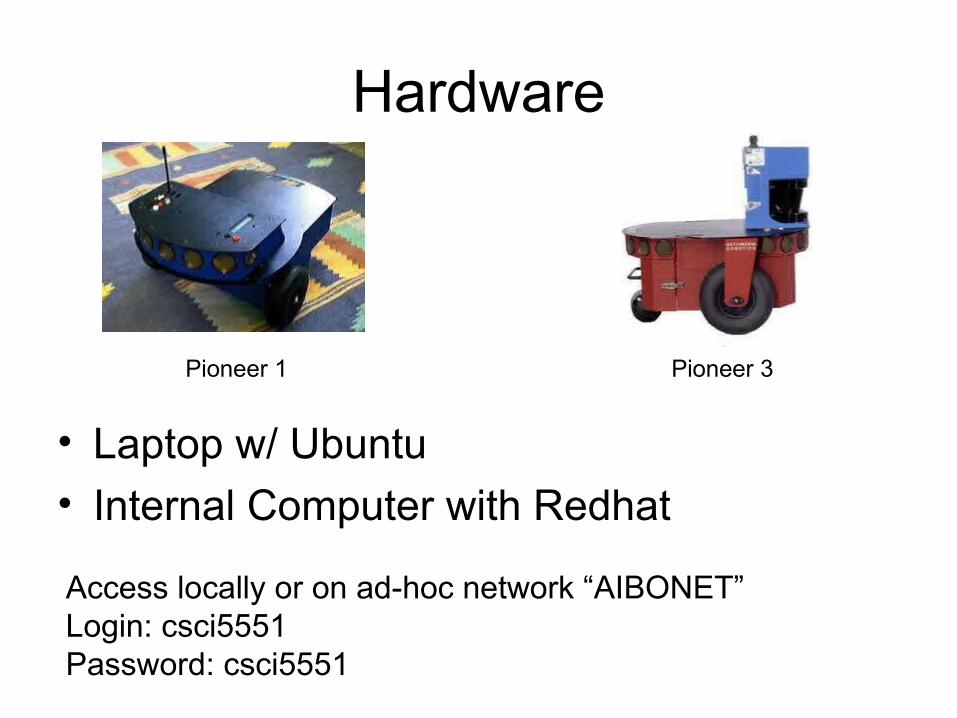
Hardware
• Laptop w/ Ubuntu
• Internal Computer with Redhat
Pioneer 1 Pioneer 3
Access locally or on ad-hoc network “AIBONET”Login: csci5551Password: csci5551

The Pioneer Robot• Serial Connection
– Send commands to microcontroller
• Differential Drive– Control wheel velocities independently
• Maximum Speeds– 0.6 m/s linear velocity
– 150 deg/s rotational velocity
• Wheel Encoders– Resolution: 100 ticks/rev
– Give velocity measurements
• SICK Laser Scanner– Details follow
• Additional Sensors:• Sonar: 5 in front, 1 on each side• Camera
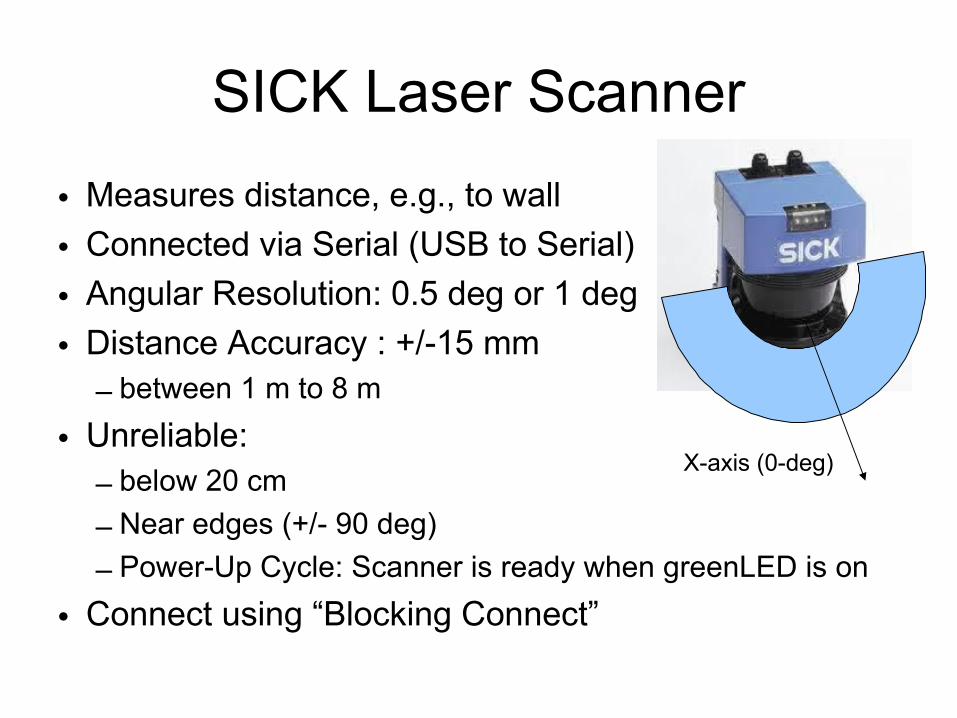
SICK Laser Scanner
• Measures distance, e.g., to wall
• Connected via Serial (USB to Serial)
• Angular Resolution: 0.5 deg or 1 deg
• Distance Accuracy : +/-15 mm– between 1 m to 8 m
• Unreliable:– below 20 cm
– Near edges (+/- 90 deg)
– Power-Up Cycle: Scanner is ready when greenLED is on
• Connect using “Blocking Connect”
X-axis (0-deg)
Battery Power
• Power-on Cycle
– Main power switch controls sensors and robot
– Red/White Buttons for Motor Control
– Powering off the hardware at any point is ok
– Pioneer 3 w/ internal computer: sudo /sbin/shutdown –h now
• Battery Usage
– Monitor battery charge from Green/Yellow LED or LCD panel
– Do not let charge drop below 11 V (can monitor w/ software)
– Do not forget to turn off robot when finished
• Charging the Battery
– Full charge requires 24 hours
– Leave robots connected to charges while in cage
How to Break Your Hardware
• Pioneers with SICKs are Very Top-heavy– Unstable, they can turn upside down :D
– Do not stop robot suddenly
– Do not operate the robot on an incline
– Monitor robot at all times during operation
• Wireless Antenna is Fragile– Do not disconnect antenna from PCMCIA card
– Be extremely careful when removing the laptop from the robot
Robot Programming
• Aria – Provided by the manufacturer of Pioneers
– Based on Player/Stage
• Player/Stage– General purpose robot programming
• ROS (Robot Operating System)– Developed by Willow Garage
Robot Programming w/ Aria
• Installing Aria and MobileSim
• Running programs in MobileSim
• Aria API
• Setup laser scanner & robot
• Some example code
• Demo video

Installing Aria & MobileSim
• Download ARIA and MobileSim from – http://robots.mobilerobots.com
• To install on Debian use:– dpkg –i libaria_2.7.2_i386.deb– dpkg –i mobilesim_0.5.0_i386.deb
• Default directory– /usr/local/Aria– /usr/local/MobileSim
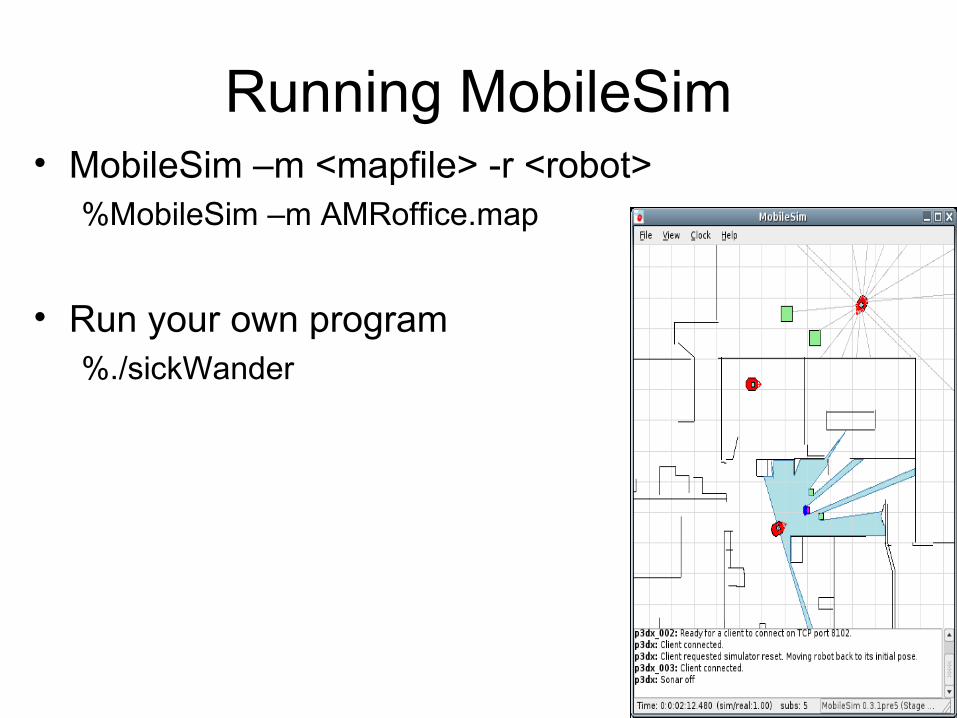
Running MobileSim• MobileSim –m <mapfile> -r <robot>
%MobileSim –m AMRoffice.map
• Run your own program%./sickWander

ARIA:Software Interface to the Pioneers
• ARIA– ActiveMedia Robotics Interface for Application– Multi-threaded client/server API written in C++
• ARIA Directories– Main: /usr/local/Aria– Example: /usr/local/Aria/examples– Documentation: /usr/local/Aria/docs/index.html
• Environment Variables– LD_LIBRARY_PATH should include /usr/local/Aria/lib
• Or “sudo ldconfig /usr/local/Aria/lib/”– ARIA should be set to /usr/local/Aria
%export ARIA=/usr/local/Aria
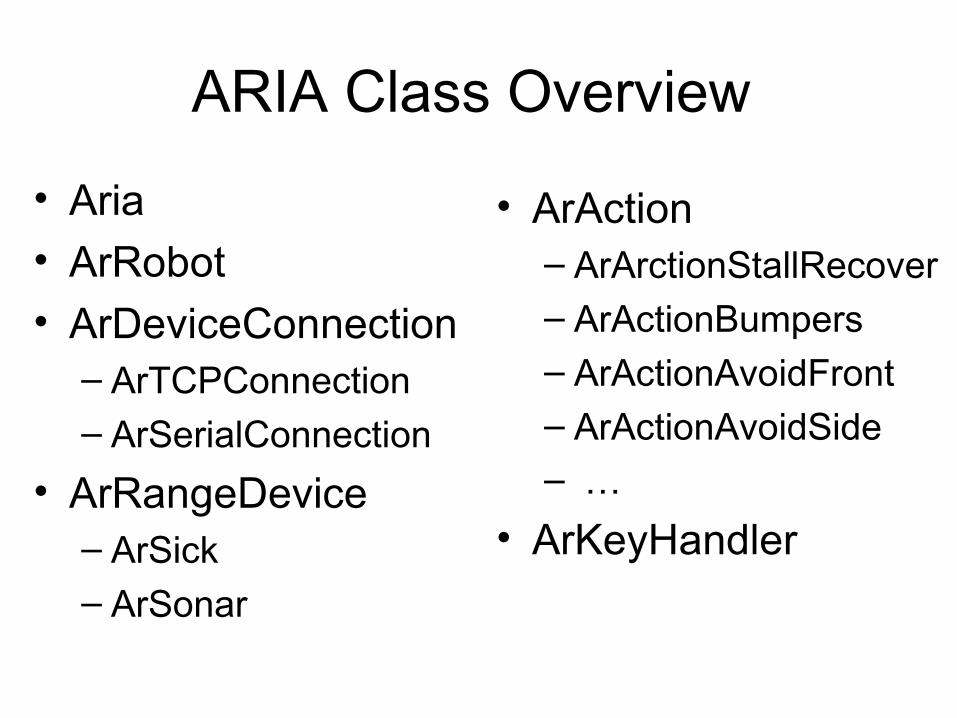
ARIA Class Overview
• Aria
• ArRobot
• ArDeviceConnection– ArTCPConnection– ArSerialConnection
• ArRangeDevice– ArSick– ArSonar
• ArAction– ArArctionStallRecover– ArActionBumpers– ArActionAvoidFront– ArActionAvoidSide
– …
• ArKeyHandler
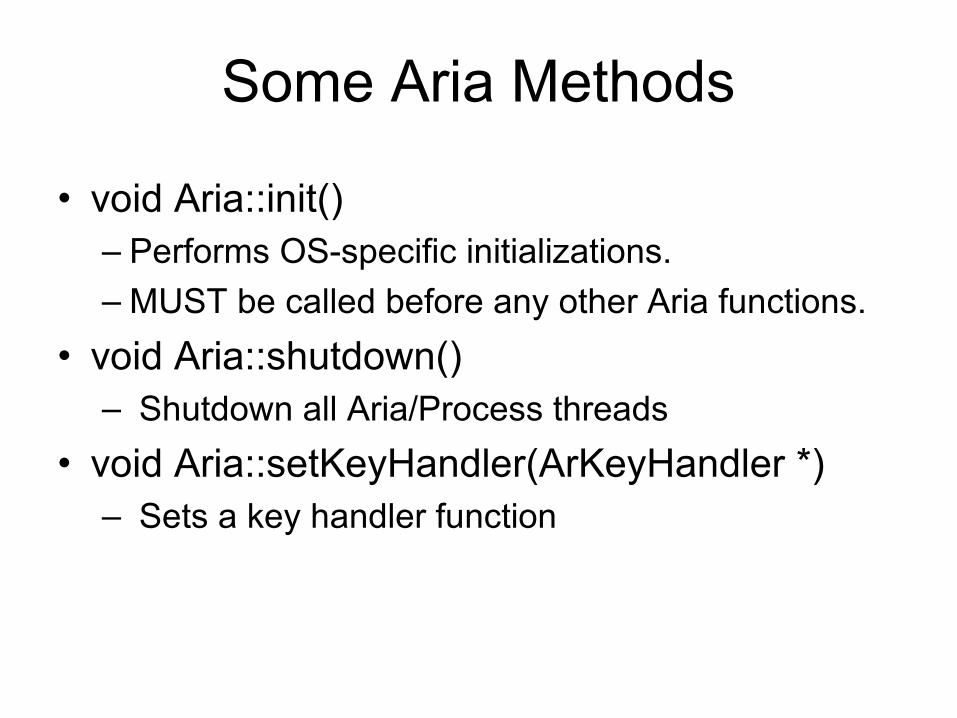
Some Aria Methods
• void Aria::init()– Performs OS-specific initializations.
– MUST be called before any other Aria functions.
• void Aria::shutdown()– Shutdown all Aria/Process threads
• void Aria::setKeyHandler(ArKeyHandler *)– Sets a key handler function
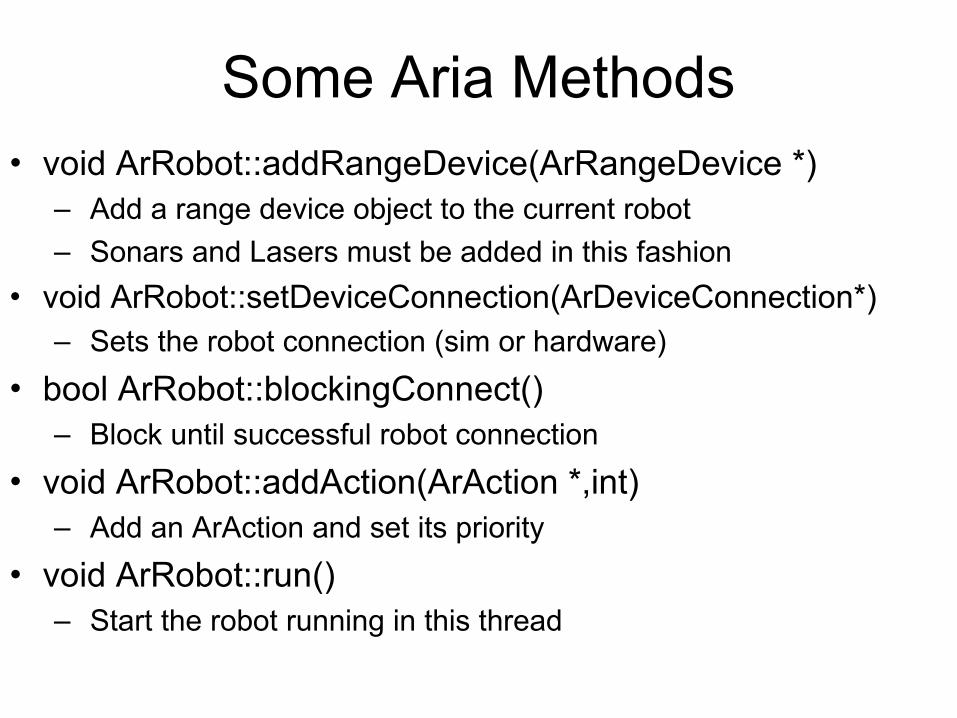
Some Aria Methods• void ArRobot::addRangeDevice(ArRangeDevice *)
– Add a range device object to the current robot
– Sonars and Lasers must be added in this fashion
• void ArRobot::setDeviceConnection(ArDeviceConnection*)– Sets the robot connection (sim or hardware)
• bool ArRobot::blockingConnect()– Block until successful robot connection
• void ArRobot::addAction(ArAction *,int)– Add an ArAction and set its priority
• void ArRobot::run()– Start the robot running in this thread
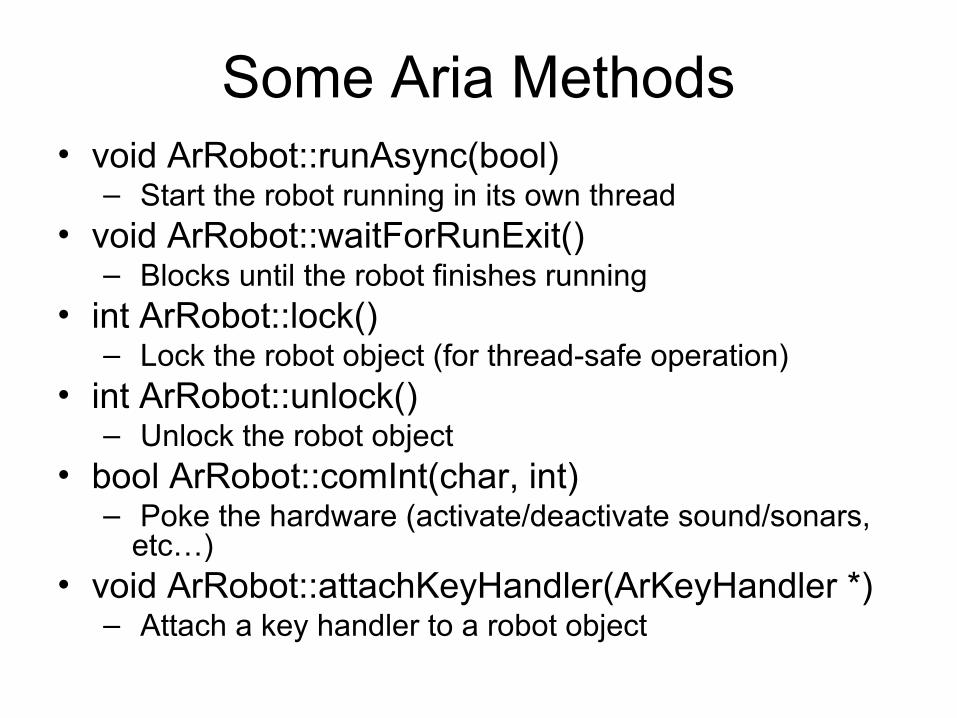
Some Aria Methods• void ArRobot::runAsync(bool)
– Start the robot running in its own thread• void ArRobot::waitForRunExit()
– Blocks until the robot finishes running• int ArRobot::lock()
– Lock the robot object (for thread-safe operation)• int ArRobot::unlock()
– Unlock the robot object• bool ArRobot::comInt(char, int)
– Poke the hardware (activate/deactivate sound/sonars, etc…)
• void ArRobot::attachKeyHandler(ArKeyHandler *)– Attach a key handler to a robot object

Control the Robot• void ArRobot::setVel(double)
– Sets the linear velocity of the robot
• void ArRobot::setRotVel(double)– Sets the rotational velocity of the robot
• void ArRobot::move(double)– Moves the robot straight
• void ArRobot::setHeading(double)– Sets “absolute” heading of the robot
• void ArRobot::setDeltaHeading(double)– Sets “relative” heading of the robot
• bool ArRobot::isMoveDone(double)– Is the last specified move done?
• void ArRobot::stop()– Stops the robot
• All of these must be wrapped in lock() and unlock()
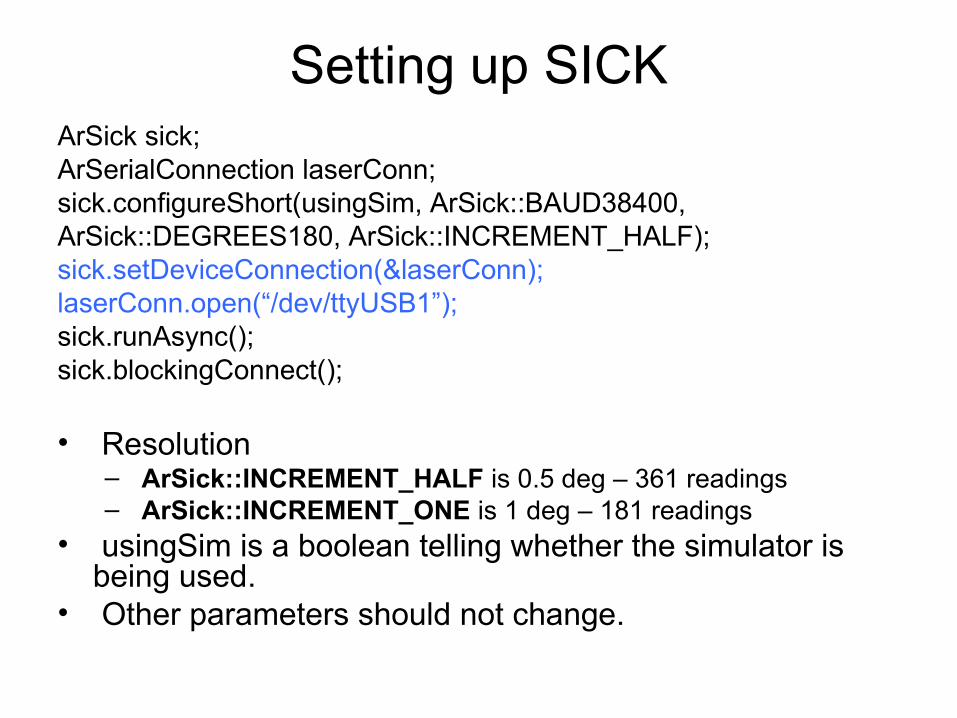
Setting up SICKArSick sick;ArSerialConnection laserConn;sick.configureShort(usingSim, ArSick::BAUD38400,ArSick::DEGREES180, ArSick::INCREMENT_HALF);sick.setDeviceConnection(&laserConn);laserConn.open(“/dev/ttyUSB1”);sick.runAsync();sick.blockingConnect();
• Resolution– ArSick::INCREMENT_HALF is 0.5 deg – 361 readings– ArSick::INCREMENT_ONE is 1 deg – 181 readings
• usingSim is a boolean telling whether the simulator is being used.
• Other parameters should not change.

Reading data from SICKstd::list<ArSensorReading *> *readings;std::list<ArSensorReading *>::iterator it;mySick->lockDevice();readings = mySick->getRawReadings();if (NULL!= readings) {
if ((readings->end() != readings->begin())) { for (it = readings->begin(); it != readings->end(); it++) { std::cout << (*it)->getRange() << " "; } std::cout << std::endl;} else { std::cout << "(readings->end() == readings->begin())" << std::endl;}
} else {std::cout << "NULL == readings" << std::endl;
}mySick->unlockDevice();
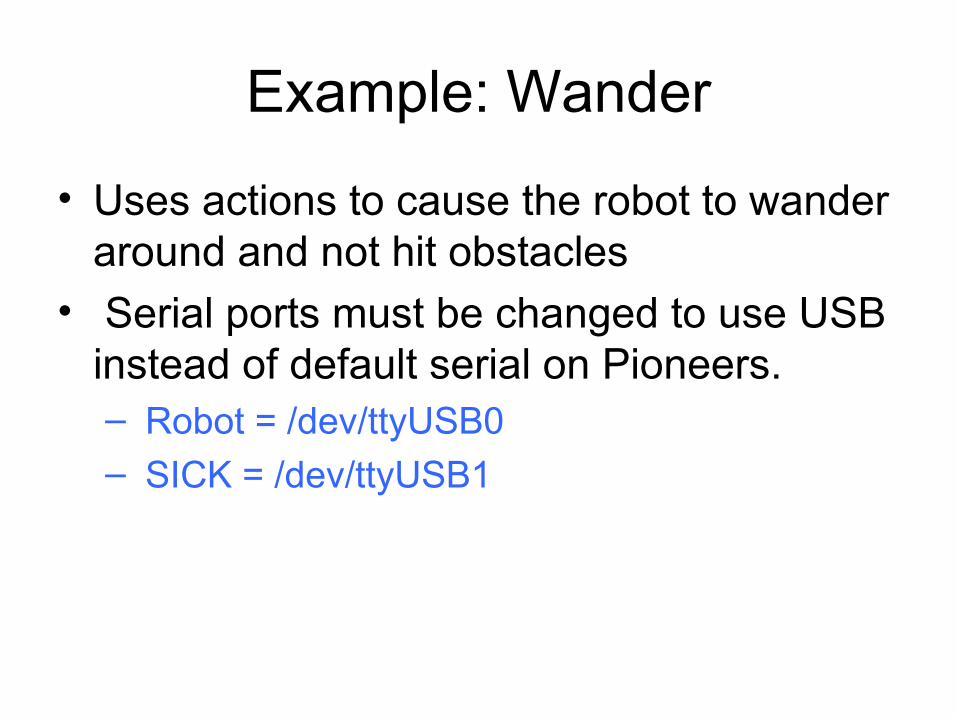
Example: Wander
• Uses actions to cause the robot to wander around and not hit obstacles
• Serial ports must be changed to use USB instead of default serial on Pioneers.– Robot = /dev/ttyUSB0– SICK = /dev/ttyUSB1

Example: Wander// the serial connection (robot) Do not use Arsimpleconnector ArSerialConnection serConn;// tcp connection (sim)ArTcpConnection tcpConn;// see if we can get to the simulator (true is success)if (tcpConn.openSimple()) {
// set the robots device connection to the simprintf("Connecting to simulator through tcp.\n");robot.setDeviceConnection(&tcpConn);
} else {// we couldn't get to the sim, so set the port on the serial// connection and then set the serial connection as the robots// deviceserConn.setPort(“/dev/ttyUSB0”);printf(“Connecting to robot through serial.\n");robot.setDeviceConnection(&serConn);
}robot.blockingConnect()
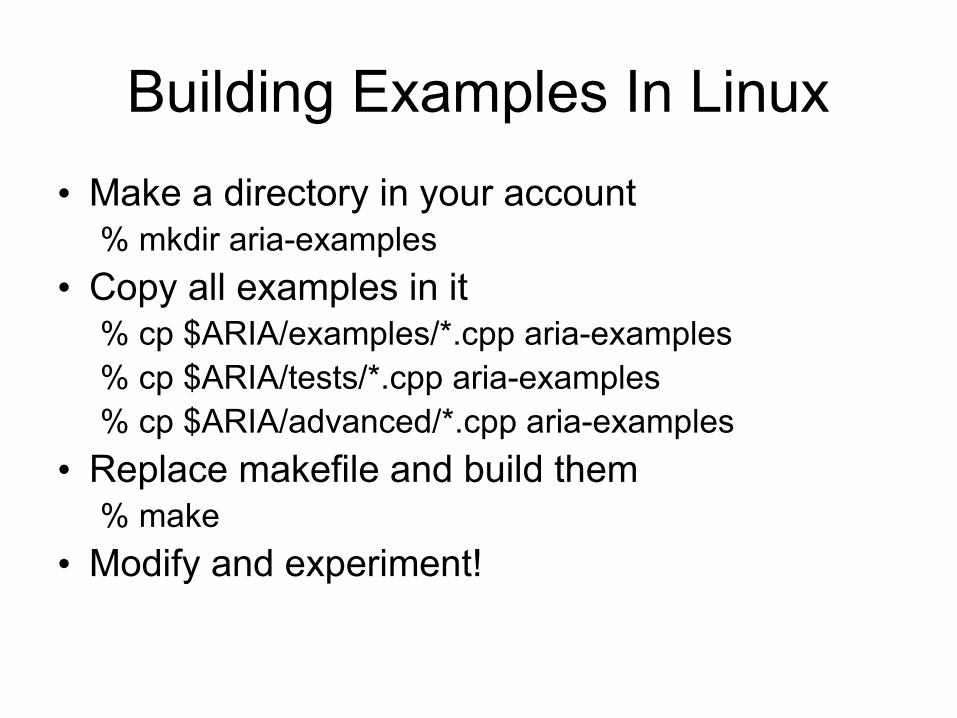
Building Examples In Linux
• Make a directory in your account% mkdir aria-examples
• Copy all examples in it% cp $ARIA/examples/*.cpp aria-examples% cp $ARIA/tests/*.cpp aria-examples% cp $ARIA/advanced/*.cpp aria-examples
• Replace makefile and build them% make
• Modify and experiment!

A Makefile for AriaShow the makefile
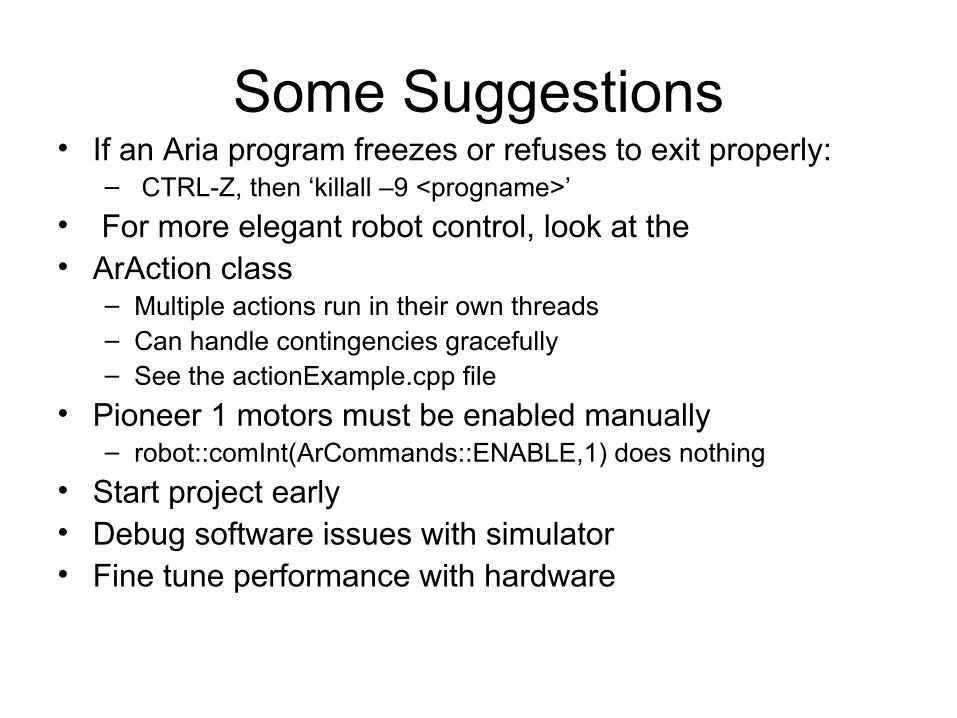
Some Suggestions• If an Aria program freezes or refuses to exit properly:
– CTRL-Z, then ‘killall –9 <progname>’
• For more elegant robot control, look at the• ArAction class
– Multiple actions run in their own threads– Can handle contingencies gracefully– See the actionExample.cpp file
• Pioneer 1 motors must be enabled manually– robot::comInt(ArCommands::ENABLE,1) does nothing
• Start project early• Debug software issues with simulator• Fine tune performance with hardware

Reference
• $firefox /usr/local/Aria/docs/index.html
• ActiveMedia– http://robots.mobilerobots.com
• Standard template library– http://www.sgi.com/tech/stl/