the new milano 2021
TRANSCRIPT

The New Milano 2021
We have been working hard to get a new design out during these strange times. Our
popular Milano 750 has been re-designed to make it easier to handle, easier to build and an
ability to increase our production to reduce our lead times.
Please read through these instructions before commencing with your build. This is the final
stage so it is assumed that you have already planned out where to locate, what you are
building your base out of and any coverings, arches and all other aspects have been pre-
planned.
Don’t forget that if you are building an arch or will be using a door, then you will need to
build a shelf in front of your oven mouth projecting at least 150mm and 750mm wide. This is
the size of five 150mm quarry tiles, but you could use slate, stone or anything else that will
withstand quite a bit of heat.
All the important measurements are
the same, so we can still maintain its
fantastic performance. We have
streamlined the chimney outlet to
enhance performance.

Write your lifting plan and assess any risks in this box.

Please read these instructions fully before starting your build.
When you come to assemble your oven over the next steps, remember that they are quite large pieces and will need
two people. While great care was taken during both the mould and oven manufacture, there are certain tolerances.
Refractory concrete cures and expands at different rates. The reaction is exothermic, so creates heat, that starts the
curing process.
The reaction happens like a domino effect, so can start anywhere in the mould, then pass the reaction on to the next
molecule. This can lead to an expansion of plus or minus 5mm. As a rule of thumb the pieces will have between a
piece of paper and a piece of cardboard gap. Don’t fill these gaps from the inside, just get the insides as close as
possible, put the fire cement on the vertical faces, then use normal sand and cement on the joints from the outside.
The kiln blanket works up to 1200 degrees C so will take care of any of any heat trying to escape.
Step 1: Check components and fitting before starting.
Step 2: Do a dry run and plan your route. Write a lift plan, method statement and risk assessment and check you
have the correct PPE (gloves, safety glasses, work footwear, dust mask as a minimum). Ensure you have enough
help with lifting. The dry materials in the rear dome pieces weigh 50 kilos. Use suitable lifting equipment if in doubt.
http://www.hse.gov.uk/pubns/indg143.pdf
Step 3: Place the two base pieces into position on a 10 to 20mm bed of mortar.
Step 4: Lift the 3 rear dome sections into place and support. The 3 back pieces are the same, so no particular order.
Step 5: Lay the refractory bricks on a 10mm to 20mm bed of mortar, just a normal sand and cement mix.
Step 6: Lay the two front sides. The flat tops of the fronts should sit slightly lower than the rounded rear section
tops.
Step 7: Put heat proof cement all the joints.
Step 8: Put in the chimney, fit the damper first if purchased. The recess with the two holes goes onto the oven. (The
two holes are for connecting any extensions and are nothing to do with the damper)
Step 9: Mortar over joints and base externally with normal sand and cement mix.
Step 11: Cut and lay kiln blanket, you can use duct tape or similar to hold it in place.
Step 12: Fit vapour barrier and if rendering attach the chicken wire.
Step 13: Finish surface as required.
Step 14: Cure your oven by lighting a few small fires for a couple of hours using kindling. The idea is to air any
remaining moisture like a radiator, rather than let it boil like a kettle.
It is not like a clay oven that has to be fired for days or even weeks, refractory cement gains 90% of its strength in
the first 24 hours after, then the rest over the next few days.
Don’t use any hardwood at this point, damp wood, large logs or man-made briquettes
should never be used.
Quick start guide

Let’s Build a Pizza Oven
How long should it take?
In theory, two people a few hours to complete these stages only, obviously building the base and covering the dome
take a lot longer. However, there are many different factors which include location, experience, understanding to
name but a few. Just remember, if you get it wrong first time you can always start again, I did in the early days.
Hopefully I have overcome most of the pitfalls years ago and now it is just fine tuning on your behalf.
I will give you a rough idea, but every situation is different. Just mixing a bucket of mortar can take longer than a full
mix in a cement mixer and only do a 10th as much.
Remember every situation is different and common sense prevails. It is up to you to assess every stage and step
for different hazards. It is recommended that at least 2 people should be used when lifting.
What will I need?
TOOLS: trowel: A standard brick trowel
bucket: for water
utility knife: (Stanley type) to cut the moisture barrier and kiln blanket
shovel: to mix and move your mortar
spirit level: to level the refractory bricks
rubber hammer: to tap refractory bricks
pliers: to cut chicken wire (if required)
spatula or putty knife: to apply Kos refractory cement
dustpan type brush: to brush in grog and fire cement mixture
water spray bottle: to dampen grog mixture, or you could just flick water with a
brush
something to mix mortar in or on
MATERIALS: About a bucket of mortar if laying the base on , more if laying the base on slabs as
the bed is spread over a larger area.

STAGE 1: Laying the base sections.
Position the two base pieces into position without any mortar. Make sure at this point that the base is
exactly where you want it, in the correct position. Lift the rear base onto the front base.
Put a bed of mortar onto the surface where the rear section has just been removed from. The bed of mortar
should be at least 10mm thick.
You should use this point to adjust the internal oven finished height, to the external height of the external
oven mouth. The base should be 60mm to 70mm below the outside tile or plinth. This allows for the 50mm
refractory brick and a 10mm to 20mm bed of mortar under the brick.
If you need to adjust the oven floor height to suit, then you can use a thicker joint or add some tile/slate
packers.
The front shelf should be
level with the refractory
bricks.
Work down from the shelf to
the lower arch, adjusting the
inside as required.
The distance
between the middle
of chimney and the
refractory bricks is
240mm

STAGE 2: Assembling the rear dome sections.
It doesn’t matter which order the dome is assembled and the three rear sections are the same. In the ideal
situation I would assemble it in the following order, however you can adjust the order to suit your situation.
A rule of thumb is “always do the hardest one first”. So if you have limited access to the left dome section,
then do that one first.
Get them as close as you can, keeping the bottoms in as close as possible. The pieces have a natural
tendency to want to push out at the bottom, leaving a gap at the bottom while touching at the top.
It is best to have the gap at the top at this point, put a 5mm to 10mm packer in the top and push the
bottoms in until they touch. The packers can simply be removed when all the oven pieces are in place,
allowing the sections to snuggle up.
If you find it easier to lay the refractory bricks with another rear section of the dome removed, then remove
it.
Remember, every situation is different. Take the time now to assess everything. Access, lifting, location,
materials, in fact right the way the way to imagining the oven lit. It’s not too late to change your mind on
positioning now.
If you are reading these instructions all the way through before starting your build, you are going to be well
prepared for most eventualities.
STAGE 3: Laying the refractory bricks.
Lay out the refractory bricks dry on the base like the pattern below, taking care not to mix them up.
Mix a 6 sand and 1 ordinary mortar mix, (there is no need for fire cement, this is not structural, it is just a
gap filler to take the tolerance out of the refractory bricks, keeping the oven floor surface flat).
Make the mortar wet and there may be a need to soak the refractory bricks in a bucket of water on warm
days as they will absorb all the moisture out of the mortar, making them difficult to lay.
Lay the first two full refractory bricks at the centre and flush with the front of the oven floor on a bed of
10mm to 20mm of normal mortar. The height of the brick is determined by the center of the arch, this

should be 240mm if using a door, lay all the full refractory bricks butted up to each other, then lay the cuts.
DON’T LEAVE ANY GAPS BETWEEN THE REFRACTORY BRICKS
There will be a gap for expansion of about 20mm between the refractory bricks and the oven walls. This will
be filled later.
STAGE 4: Assembling the front oven sections.
You will need two or even three people for this part. As before, you can change the sequence around to suit
your surroundings, for example, you could remove a side and put the two fronts in if it’s easier. Take care
not to pinch any fingers when moving the sections.
Place a front section into place and support it, then offer the other section up. Use the chimney joint as a
guide, it should be closed and perpendicular.
We have increased the thickness of
the oven walls slightly so they will
overhang the base by around 10mm.
Concentrate on getting the inside as
close as possible then fill any gaps
from the outside with Kos cement.
https://www.ibstockbrick.co.uk/wp-
content/uploads/2015/08/Ibstock-
TIS-B10-SIZE-TOLERANCES-and-
MEASUREMENT-brick.pdf

Keep the bottoms of the oven sections touching, packing the top of the sections out if needed. When you
are happy that the inside is as close as possible, put in the KOS fire cement with a spatula from the outside
into the recessed joints. The fire cement will set fully when your oven is first fired.
I don’t advise to put any fire cement in from the inside.
The rear dome sections are around 10mm
higher than the fronts (pic 1)
Below is an interesting link about brick
tolerances. The faces of your oven are the
same. +- 6mm
Fill the joints with the Kos fire cement from the
outside
Note the wider joint where the fronts meet
the rear (pic 2 & 3)
The distance
between the
middle of
chimney and the
refractory bricks
is 240mm

STAGE 5: Insulate your oven.
Cut the kiln blanket as per the pattern below and lay on the dome. You could just cut it and patchwork the
insulation, as long as you cover the dome with at least one layer.
WEAR GLOVES, GOGGLES AND DUST MASK. See safety data sheet.
http://www.morganthermalceramics.com/media/1814/sw_blanket_data_sheet_english_1.pdf
STAGE 6: Fitting the vapour/moisture barrier
If you are rendering your oven then you will need to add chicken wire at this point. A good tip is to insert a
few temporary nails between the base and the dome sections. No set rules just get it as tight as you can
twisting it with pliers.
If you are covering your dome with bricks,
happy days, you don’t need to use chicken wire.
The chicken wire is to reinforce the render, it
just gets in the way if using bricks.
The vapour/moisture barrier is simply stuck down
with aluminium tape or duct tape. Cover your oven
with it in one piece and pleat it over. You can cut
slits in and fold it over itself.
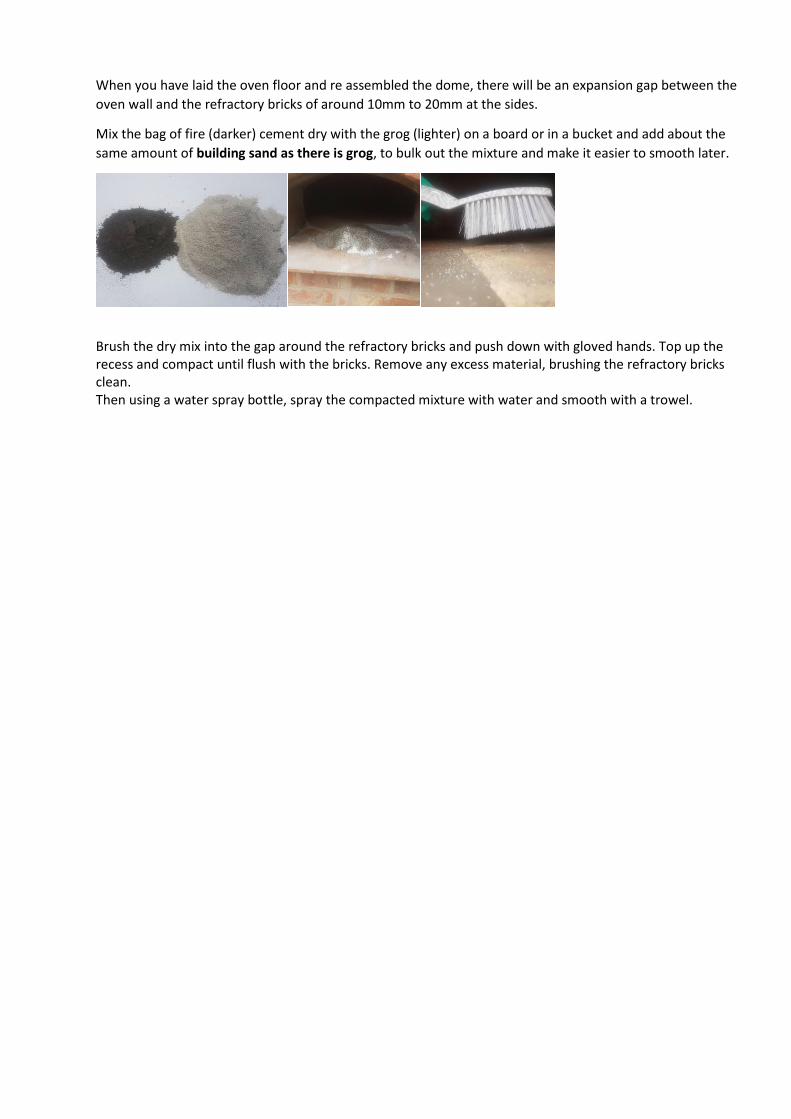
When you have laid the oven floor and re assembled the dome, there will be an expansion gap between the
oven wall and the refractory bricks of around 10mm to 20mm at the sides.
Mix the bag of fire (darker) cement dry with the grog (lighter) on a board or in a bucket and add about the
same amount of building sand as there is grog, to bulk out the mixture and make it easier to smooth later.
Brush the dry mix into the gap around the refractory bricks and push down with gloved hands. Top up the recess and compact until flush with the bricks. Remove any excess material, brushing the refractory bricks clean. Then using a water spray bottle, spray the compacted mixture with water and smooth with a trowel.