the materials in this book may be reproduced freely ...icaseonline.net/stl_materials.pdf · and...
TRANSCRIPT
The materials in this book may be reproduced freely without infringing copyright provided
the reproduction is not for commercial use and is suitably acknowledged.
Printed and published by
Centre for Science Education and Communication, University of Delhi
10 Cavalry Lane, Delhi 110 007
in association with UNESCO, New Delhi and UNICEF, India
July2001
PREFACE
Welcome to this first volume of Scientifıc and Technological Literacy (STL) materials developed by the Jammu
and Kashmir Board of School Education (JKBOSE), in collaboration with UNESCO New Delhi, the Centre for
Science Education and Communication (CSEC) of the University of Delhi, and the International Council of
Associations for Science Education (ICASE). These materials were produced within the overall framework of
Project 2000+, which aims at fostering science and technology education for ali, at ali levels, by promoting the:
"Understanding of the nature of, and needfor, Scientifıc and Technological literacy in relation to local culture
and values and national social and economic needs and aspirations; identification/development and
dissemination of suitable interdisciplinary teaching and learning strategies, methods and materials;
establishment of suitable teaching and learning environments and structures; development ofeffective
communication, assessment and evaluation strategies ".
With a view to improving the quality of science education in the State of Jammu and Kashmir, JKBOSE
approached UNESCO New Delhi for technical and fınancial support. Following UNESCO's sanction for a
Workshop for the development of STL materials, the Board conducted a 5-day Workshop in Jammu in
December 1999, in co-operation with CSEC, University of Delhi, and UNESCO, New Delhi.
A cross-section of practising teachers from various schools, teacher educators and non-formal education
instructors were brought together to discuss and understand the philosophy of STL, to look at STL materials
produced in the Delhi Workshop and workshops conducted earlier, and to write new materials relevant to the
children of J&K State.
Preiiminary versions of thirteen scripts vvere developed in the December 1999 Workshop, and reviewed in a
follow-up workshop in July 2000. in the meantime the editors suggested some modifıcations. The materials as
finally edited are presented here in this volume.
The scripts contained in this volume address key societal issues, especially those having a bearing on the quality
of life, like "How Safe is my Glass of Water?", "The Food we must Eat", "Why is my Tooth Aching?", ete.
Some of the scripts deal with the environment like "Why is my Pond Dying?", "Why should we Preserve the
Natural Forest in our Locality?".
We are extremely grateful to ali the authors who took time off their busy sehedules and participated in the
December 1999 and July 2000 Workshops and prepared the scripts. We are grateful to Professor O N Koul,
Head of the Department of Biosciences, University of Jammu, who acted as a resource person along with Dr
Amitabha Mukherjee from CSEC and Mr Bashir Ahmad Dar. We are also grateful to Professor M A Charoo,
Chairman JKBOSE, and Professor Aman Rathore, Secretary JKBOSE, for the support they gave in organising
the Workshop. We are thankful to the staff of the Curriculum Development and Research Wing of the Board
who worked tirelessly for the success of the Workshop.
We are particularly thankful to Jenab Mohammad Shafı, the Honourable Education Minister J&K State, for
inaugurating the Workshop and evincing keen interest in furthering the objectives of Project 2000+.
In the preparation of the scripts in their final form, Mr P Kasturi Rangan played an important role, providing
editorial assistance and often content-related inputs.
The Workshops were possible only because of the strong support from Ms Maria Malevri, Education Programme
Specialist, UNESCO. We thank her for the support and guidance she provided. We are also grateful to Professor
Moegiadi, Director UNESCO New Delhi, for supporting the programme.
Bashir Ahmad Dar
Jack Holbrook
Amitabha Mukherjee
Vijaya S. Varma
July 2001
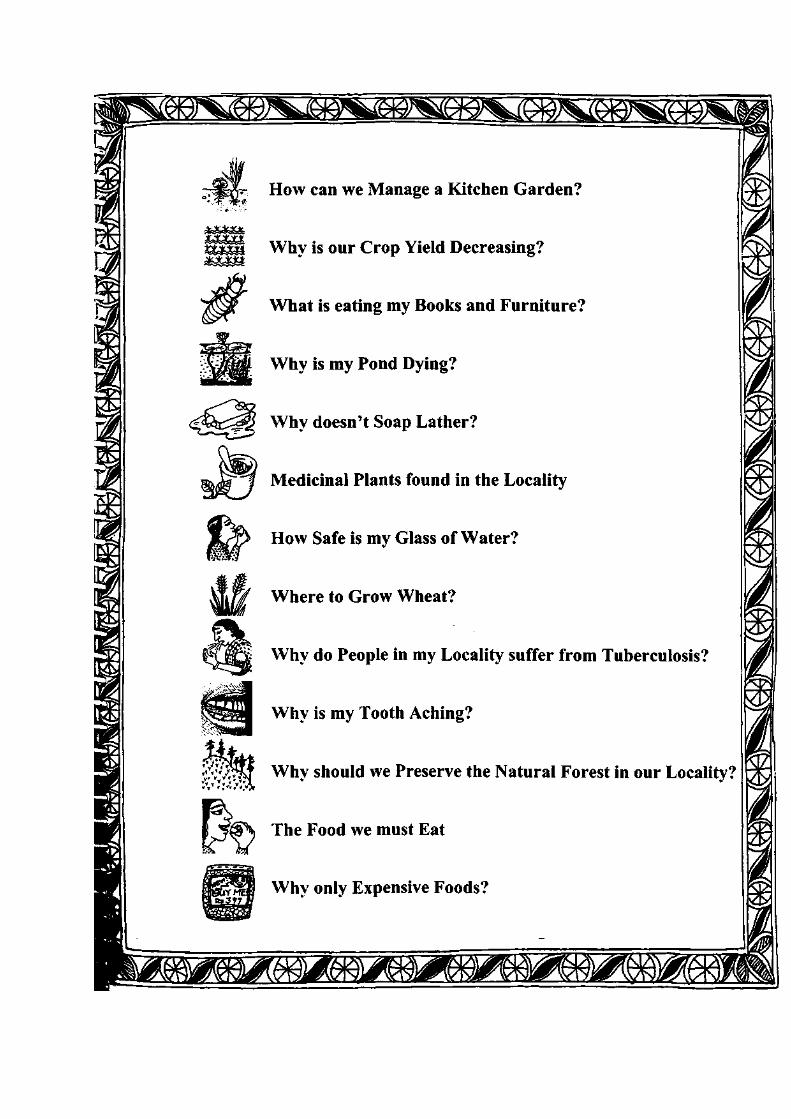
CONTENTS
Part I: INTRODUCTION
Project 2000+ and the Jammu VVorkshops
1. Background 1
2. The need for supplementary teaching materials 1
3. Objectives of the Jammu Workshops 2
4. Venue, dates and participation 2
Introduction to the Materials
1. Exemplar STL scripts and creation of materials 3
2. Educational objectives 3
3. Comments on the structure of the scripts 3
4. How to use these scripts 4
Part II: THE SCRİPTS
1. How can we Manage a Kitchen Garden? 5
2. Why is our Crop Yield Decreasing? 14
3. What is eating my Books and Furniture? 21
4. Why is my Pond Dying? 30
5. Why doesn't my Soap Lather? 38
6. , Medicinal Plants found in the Locality 48
7. How Safe is my Glass of Water? 52
8. Where to Grow Wheat? 60
9. Why do People in my Locality suffer from Tuberculosis? 68
10. Why is my Tooth Aching? 74
11. Why should we Preserve the Natural Forest in our Locality? 81
12. The Food we must Eat 88
13. Why only Expensive Foods? 97
Part III: ANNEXURES
The Jammu and Kashmir State Board of School Education: A Note 106
The International Council of Associations for Science Education: A Note 107
The Centre for Science Education and Communication: A Note 108
List of Participants 109
Project 2000+ and the Jammu Workshops
1. Background
The UNESCO-JKBOSE-CSEC-ICASE Regional Workshop for the development of STL materials was held at
the office of the Board, Rehari Colony, Jammu Tawi, from 27 to 31 December 1999, and was followed by a
second Workshop held in July 2000. These Workshops, henceforth referred to as the Jammu Workshops, were
organised within the overall framework of Project 2000+: Scientifıc and Technological Literacy for Ali. This is a
project launched by UNESCO in 1993, in co-operation with, among others, ICASE, following a
recommendation of the World Conference on Education for Ali (Jomtien 1990).
The Jomtien Conference recognised that "sound and basic education is fundamental to the strengthening of
higher levels of education and of scientifıc and technological literacy and capacity, and thus to the development
of self-reliance." Project 2000+ aims at fostering science and technology education for ali, at ali levels, and by
promoting ali över the world:
the understanding of the nature of. and need for, scientifıc and technological literacy in relation to local
culture. values, national, social and economic needs and aspirations
identification/development and dissemination of suitable inter-disciplinary teaching/learning
strategies, methods and materials
establishment of suitable teaching/learning environments and structures
development of effective communication, assessment and evaluation strategies
support for non-formal, informal and life-long learning strategies.
2. The need for supplementary teaching materials
One approach, vvhich guides science education towards greater relevance for the 2İst century, is the use of STL
supplementary teaching materials. These materials are not extensions of the textbook, but are additional
resources for the teacher. They are intended to be optional and to be used as and when the teacher feels they
would be appropriate. If the materials allow students to engage in activities relevant to STL, they enhance
learning and hence guide students to achieve the intended educational objectives. The Jammu Workshops were
held to develop exemplar materials within this type of framework.
After the launch of Project 2000+, workshops to develop teaching/learning materials in science and technology
education that would be relevant in the 2İst century were held in Estonia, Pakistan, Argentina. the Philippines
and Nepal. Project 2000+ activities were initiated in India with a National Workshop held in May 1999 in Delhi,
jointly organised by CSEC (Delhi University), UNESCO and ICASE. in each of these Workshops, participants
developed exemplar supplementary teaching/learning materials for STL suited to their own environment.
These materials as well as those produced in the Jammu Workshops have been developed as complementary
resources for teachers to guide students to achieve wider
STL-related educational goals. Ali such materials are expected to be fıeld-tested, and modifıed in the light of
feedback from such trials. These Workshops have ahvays been envisaged as only the beginning of a continuous
development process, which will pass through a phase in which a Supplementary Resource for Science Teachers
will be made available as exemplar for teachers, in print and possibly via the Internet. The idea is that eventually
this will help teachers in the School to develop STL materials on their own.
3. Objectives of the Jammu Workshops
The Jammu Workshops aimed at developing locale-specifıc STL materials suited to schools in the state of
Jammu and Kashmir (J&K). Specifically, they were organised to
■ Examine the exemplar STL materials developed in earlier workshops, particularly the draft materials from
the Delhi Workshop of May 1999, and consider the implementation of an STL project in Jammu and Kashmir.
■ Develop new STL materials in English and in Urdu, following the approaches and recommendations of the
Delhi Workshop.
■ Discuss possible piloting procedures for testing these materials in schools of J&K State and collecting
feedback.
■ Attempt to develop teacher-based formative and summative assessment as a measure of how well the
materials are designed and written to achieve the goals of STL for Ali.
■ Plan future action for promoting STL by holding follow-up workshops at the district level in collaboration
vvith UNESCO.
4. Venue, dates and participation
The fırst Jammu Workshop was organised by the Curriculum Development and Research Wing of JKBOSE at
the offıce of the Board, Rehari Colony, Jammu Tawi, from 27 to 31 December 1999. Jenab Mohammad Shafı,
the Honourable Education Minister J&K State, inaugurated the Workshop. Över 35 persons - science teachers
from different Schools/Colleges as well as teacher-educators from various Teacher Training institutions -
participated in the Workshop. Dr Amitabha Mukherjee, CSEC, Delhi University, Mr Bashir Ahmad Dar,
Director Academic, JKBOSE, and Professor O N Koul, Head of the Department of Biosciences, University of
Jammu, worked as resource persons. A follow-up workshop was held at Srinagar in July 2000. This provided the
participants an opportunity to have a second look at their scripts and consider modifıcations suggested by the
editors.
Introduction to the Materials
1. Exemplar STL scripts and creation of materials
The STL materials ("scripts") in this volume have been prepared by people who have considerable experience of
teaching science in schools. These scripts are meant to serve as exemplars. it is expected that STL materials
actually used in schools will be essentially created by the teachers of the schools themselves. it is important that
STL materials be locale-specifıc. The reader will no tice that several scripts in this collection, such as "Why
should we Preserve the Natural Forest in our Locality?" and "Why is my Pond Dying?", are strongly locale-
specifıc.
The process of creation and testing of STL materials is discussed in detail in Jack Holbrook's article "Creating
and implementing STL teaching materials", reprinted in "Scientifıc and Technological Literacy for Ali: Materials
from the UNESCO-ICASE-CSEC Delhi Workshops", the companion volume to the present collection.
2. Educational objectives
The key assumption of the STL philosophy is that science education is effective and meaningful when it stems
from societal concerns. it should address key societal issues, especially those having a bearing on people, the
quality of their lives, the environment, health and development. it should emphasise the science and technology
involved in an integrated/interdisciplinary manner and adopt a problem solving approach. in the present instance
it should address local culture and values, as well as the socio-economic needs and aspirations of J&K State.
3. Comments on the structure of the scripts
All the scripts here have a certain common structure. Each script has an Introduction, which lists the educational
objectives and the science concepts involved. The intended grade level of the material and the previous
knowledge assumed are also stated and finally, the teaching/learning materials required are listed. The
Introduction is followed by the Students' Guide, consisting of a Scenario and a summary of activities entitled
Your Tasks. The Scenario is, in most cases, a narrative - a story or a real-life happening.
The next section in each script is the Teacher's Guide with the suggested teaching strategy, which is not
necessarily in one-to-one correspondence with the Tasks. Note that Student Handouts form part of the Teacher's
Guide. The idea is that the teacher decides when a particular Handout needs to be used. Some scripts have
additional sections called Information for Teachers and/or Students.
4. How to use these scripts
Although these scripts are meant to be exemplars, they are so written that someone who wishes to use them can
do so with appropriate modifıcations and adaptations.
Here are some suggestions, addressed to the teacher who intends to use the materials in a formal school.
Preliminary: Before teaching any unit, read the entire script and get an overall perspective. Check that the setting
of the script is suffıciently similar to that of your school so that you can adapt it to your needs. Assess your
students' knovvledge and see that it matches the previous knowledge assumed by the authors of the script.
Planning and preparation: Please note that it is not possible to complete the vvhole of a script in one teaching
period. Use your discretion to divide the script suitably. You should feel free to make appropriate modifıcations
in any or ali of these activities in order to make them suitable to your situation.
Plan activities in advance, particularly those requiring materials not normally available in the classroom. in the
case of experiments, try them out before asking children to do them. This should give you a feel for how they are
done, the time required, and the arrangements that must be made beforehand. Arranging field trips and
interaction with people in the community also requires prior preparation.
Prepare a suffıcient number of copies of the Student Handouts - one for each group. You can modify them to
make them more relevant to your situation.
Teaching Strategies: When using these materials, the focus should be on societal issues and concerns and the
way in which science relates to them. Students will appreciate the importance of science berter when the science
emerges from a real problem of relevance to them.
Most of the activities should be student-driven, with children always being active participants. The Teacher's role
should be that of a catalyst, facilitator and organiser of various activities. One of the techniques recommended
for vvhole class sessions is brainstorming. The teacher seeds the discussion by raising a question or putting
forvvard a keyword to which students react. Ali student responses are written on the board, and naturally feed
into the discussion that follows.
Student activities should include discussion in groups and in the whole class, working co-operatively in small
groups, engaging in design and decision making, estimation, calculation, measurement, experimentation,
recording of results, summarising, etc. Students are expected to record their fındings, draw inferences and share
these with others. Arrangements should be made for the display/exhibition of students' work both inside the class
and in the community.
The teacher should point out different sources of information. Help in the form of making the facilities available
for the activities and guiding the students in dravving inferences and conelusion and in vvriting reports should be
forthcoming.
Assessment strategies: The importance of assessment has been pointed out in the background paper. Given the
educational objeetives, you can move in the direetion of creating your own assessment criteria. One of the seripts
in this colleetion has an assessment component as an appendix. it may be of use to you as a guideline.
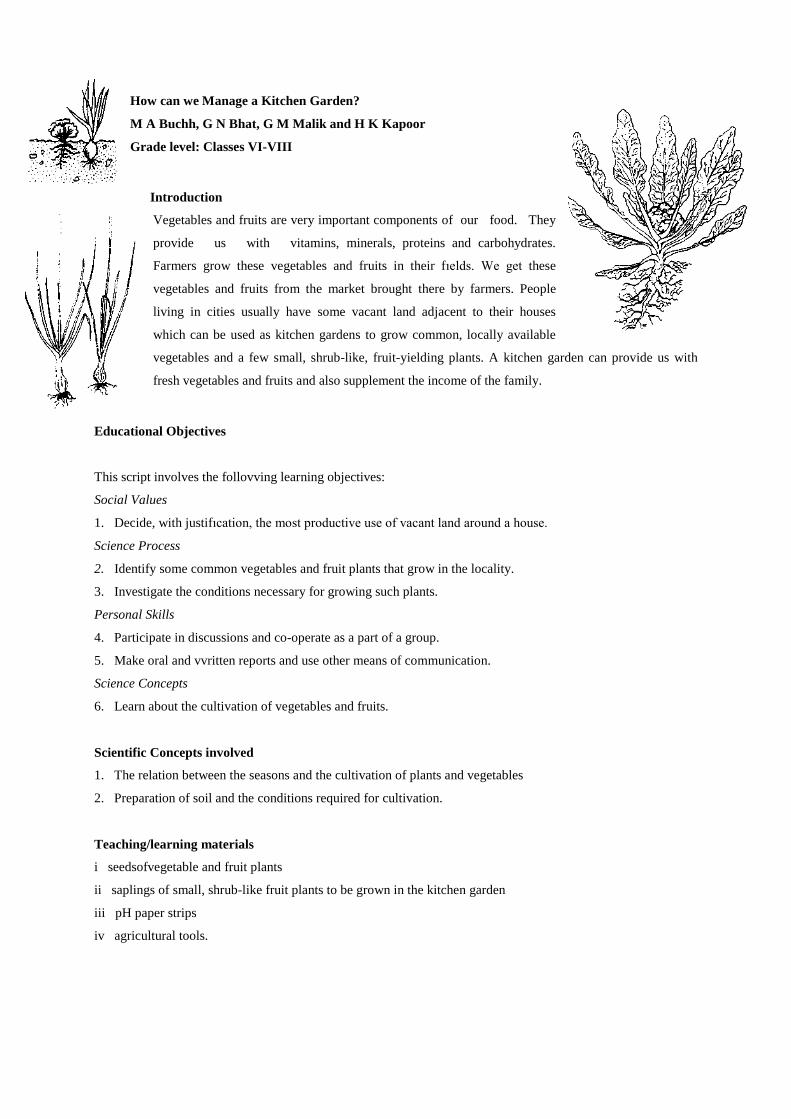
How can we Manage a Kitchen Garden?
M A Buchh, G N Bhat, G M Malik and H K Kapoor
Grade level: Classes VI-VIII
Introduction
Vegetables and fruits are very important components of our food. They
provide us with vitamins, minerals, proteins and carbohydrates.
Farmers grow these vegetables and fruits in their fıelds. We get these
vegetables and fruits from the market brought there by farmers. People
living in cities usually have some vacant land adjacent to their houses
which can be used as kitchen gardens to grow common, locally available
vegetables and a few small, shrub-like, fruit-yielding plants. A kitchen garden can provide us with
fresh vegetables and fruits and also supplement the income of the family.
Educational Objectives
This script involves the follovving learning objectives:
Social Values
1. Decide, with justifıcation, the most productive use of vacant land around a house.
Science Process
2. Identify some common vegetables and fruit plants that grow in the locality.
3. Investigate the conditions necessary for growing such plants.
Personal Skills
4. Participate in discussions and co-operate as a part of a group.
5. Make oral and vvritten reports and use other means of communication.
Science Concepts
6. Learn about the cultivation of vegetables and fruits.
Scientific Concepts involved
1. The relation between the seasons and the cultivation of plants and vegetables
2. Preparation of soil and the conditions required for cultivation.
Teaching/learning materials
i seedsofvegetable and fruit plants
ii saplings of small, shrub-like fruit plants to be grown in the kitchen garden
iii pH paper strips
iv agricultural tools.
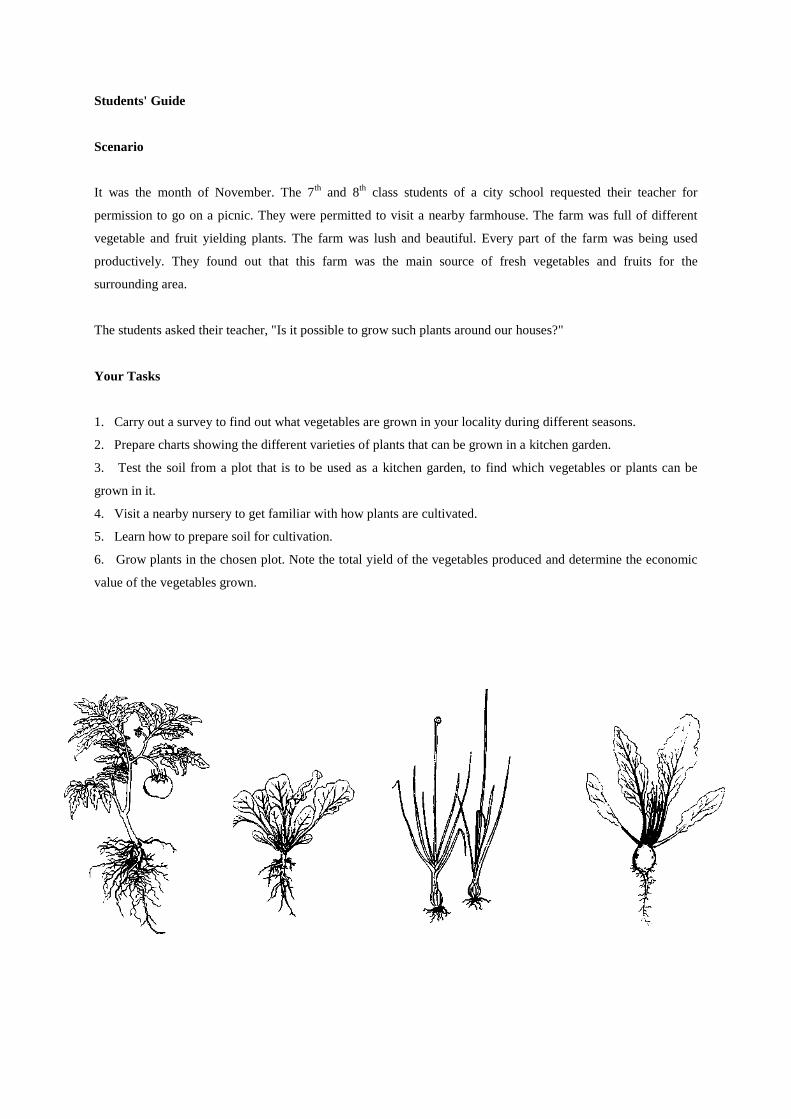
Students' Guide
Scenario
It was the month of November. The 7th and 8
th class students of a city school requested their teacher for
permission to go on a picnic. They were permitted to visit a nearby farmhouse. The farm was full of different
vegetable and fruit yielding plants. The farm was lush and beautiful. Every part of the farm was being used
productively. They found out that this farm was the main source of fresh vegetables and fruits for the
surrounding area.
The students asked their teacher, "Is it possible to grow such plants around our houses?"
Your Tasks
1. Carry out a survey to find out what vegetables are grown in your locality during different seasons.
2. Prepare charts showing the different varieties of plants that can be grown in a kitchen garden.
3. Test the soil from a plot that is to be used as a kitchen garden, to find which vegetables or plants can be
grown in it.
4. Visit a nearby nursery to get familiar with how plants are cultivated.
5. Learn how to prepare soil for cultivation.
6. Grow plants in the chosen plot. Note the total yield of the vegetables produced and determine the economic
value of the vegetables grown.

Teacher's Guide
Suggested Teaching Strategy
1. Hold a brainstorming session to create awareness about the desirability of using a vacant plot as a kitchen
garden and to make a list of the common vegetables and fruits, which can be grown in such a plot.
2. Get students to prepare a chart of the vegetables and fruits selected for growing in the kitchen garden
(Student Handout 1).
3. Ask students to perform experiments (in groups) to test the type of soil in the plots selected as kitchen
gardens (Student Handouts 2, 3 and 4). This should be followed by inter-group discussions to compare results.
4. Hold a brainstorming session to discuss the different conditions that are necessary for growing the vegetables
and plants selected (Student Handout 5).
5. Students should be asked to till the soil with the agricultural tools provided. Bunds and furrows may be
constructed for easier irrigation and çare of the plants. The seeds should be sown on the furrows in a line instead
of broadcasting them.
6. Organise a class excursion to the local 'mandi', or invite a fruit and vegetable merchant for a talk on the
economic parameters involved with the distribution and sale of different products (Student Handout 6).
Information for Teachers
Soil is a complex mixture of organic and inorganic materials. it is the medium for plant growth. Understanding
the characteristics of soil, how to maintain good quality soil and how to improve soil of poor quality - are
important for proper growth of plants. Soils have the following main constituents:
• mineral matter
• organic matter
• soil-air
• soil-water.
Soils are composed of fragments of gravel, stone and fine earth of varying size. Depending on the size of
particles, soil may be classifıed into three types: sandy, clayey and loamy. Sandy soil contains more than 50%
sand along with some clay. Its capacity to hold water is very poor. There is a lot of air present in this type of soil.
This type of soil is not suited for growth of plants because it does not retain water or humus in it. Clayey soil
consists mostly of clay particles. Though it is diffıcult to till, it has good water holding capacity, is rich in
minerals and is therefore good for growing plants. Loamy soil consists of a mixture of sand, clay and humus, it
has good vvater holding capacity and has suffıcient aeration. Depending on the geographical region, soils differ
in colour, texture and content. There are six varieties soils in
India - red, black, alluvial, desert, mountain and laterite soil. The relative proportions of the three components
determine the texture of a soil. The texture in turn influences drainage, retention of nutrients and the temperature
profile of the soil. Medium and fınely textured soils, such as clay, clay-loam and silt-loam, are generally more
suitable for growing plants because they have good nutrient and water retention capacities. Sandy soils drain
faster and lose nutrients through leaching but may be advantageous in obtaining early crops as their surface dries
more rapidly than that of clay in spring, resulting in a warmer soil.
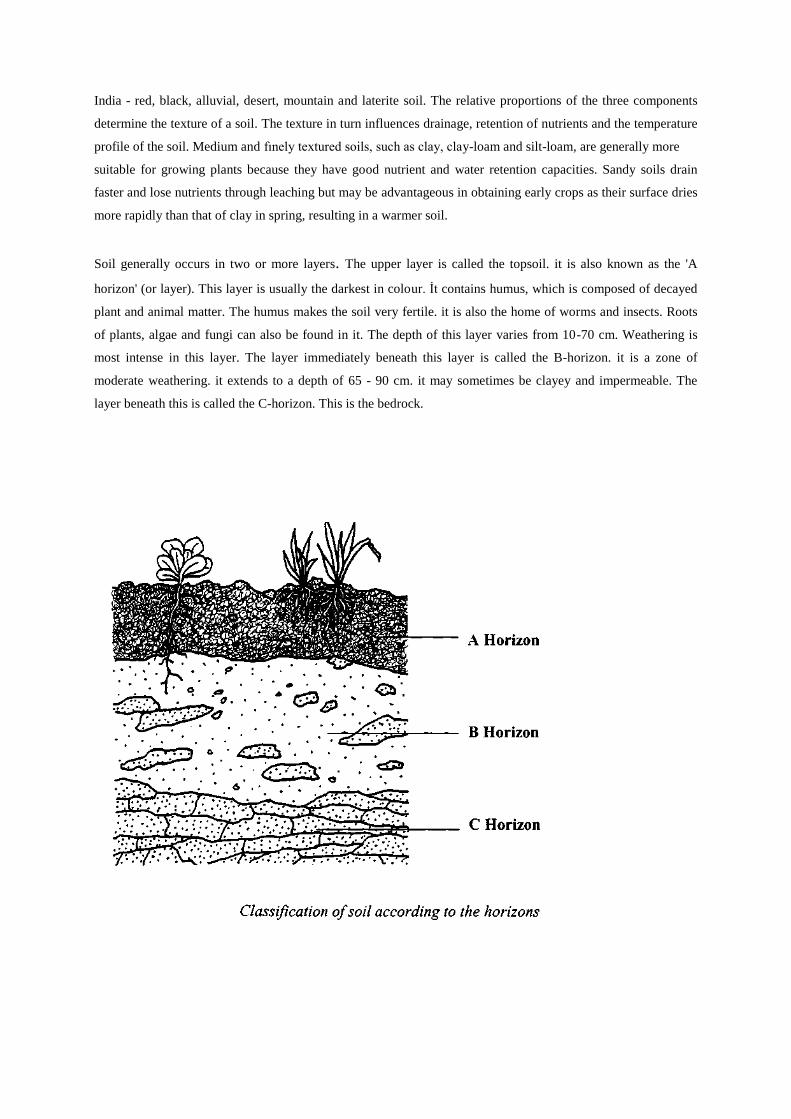
Soil generally occurs in two or more layers. The upper layer is called the topsoil. it is also known as the 'A
horizon' (or layer). This layer is usually the darkest in colour. İt contains humus, which is composed of decayed
plant and animal matter. The humus makes the soil very fertile. it is also the home of worms and insects. Roots
of plants, algae and fungi can also be found in it. The depth of this layer varies from 10-70 cm. Weathering is
most intense in this layer. The layer immediately beneath this layer is called the B-horizon. it is a zone of
moderate weathering. it extends to a depth of 65 - 90 cm. it may sometimes be clayey and impermeable. The
layer beneath this is called the C-horizon. This is the bedrock.

Relating Tasks to Objectives
Objectives Tasks
Identify some common vegetables and fruit plants that grow in the locality. 1,2,3
Investigate the conditions necessary for growing plants in the kitchen
garden.
2,4,5
Learn about the cultivation of vegetables and fruits. 2,6
Co-operate as a member of a group in planning and carrying out the various
cultivation activities.
4,5,6
Learn about the preparation of soil and the conditions required for cultivation 5
Student Handout 1
1. Make a list of the vegetables and fruits commonly used by people.
2. Of these, prepare a list of those that are grown locally.
3. Prepare a chart of the different vegetables and fruit plants that are grown during different seasons in your
locality.
A. List of vegetables and fruits commonly used
Vegetables Fruits
B. Vegetables and fruit plants grown locally during different seasons
Seasons Vegetables Fruits
Spring
Summer
Autumn
Winter
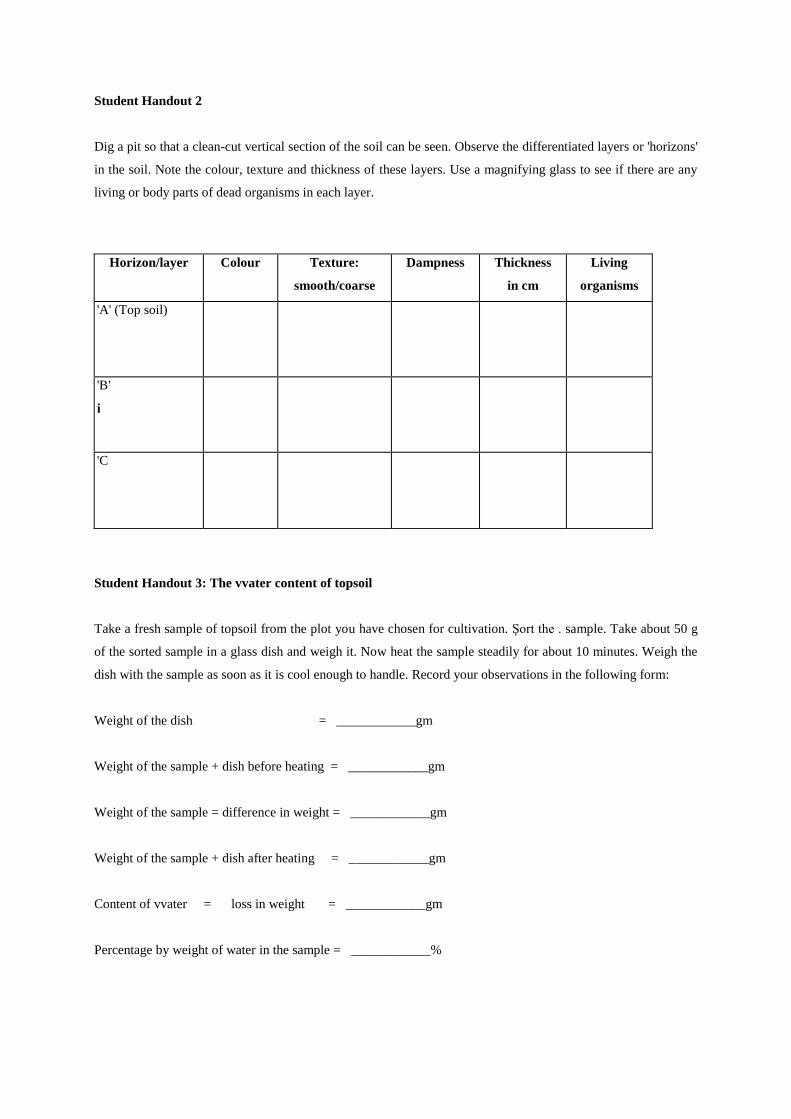
Student Handout 2
Dig a pit so that a clean-cut vertical section of the soil can be seen. Observe the differentiated layers or 'horizons'
in the soil. Note the colour, texture and thickness of these layers. Use a magnifying glass to see if there are any
living or body parts of dead organisms in each layer.
Horizon/layer Colour Texture:
smooth/coarse
Dampness Thickness
in cm
Living
organisms
'A' (Top soil)
'B'
i
'C
Student Handout 3: The vvater content of topsoil
Take a fresh sample of topsoil from the plot you have chosen for cultivation. Şort the . sample. Take about 50 g
of the sorted sample in a glass dish and weigh it. Now heat the sample steadily for about 10 minutes. Weigh the
dish with the sample as soon as it is cool enough to handle. Record your observations in the following form:
Weight of the dish = ____________gm
Weight of the sample + dish before heating = ____________gm
Weight of the sample = difference in weight = ____________gm
Weight of the sample + dish after heating = ____________gm
Content of vvater = loss in weight = ____________gm
Percentage by weight of water in the sample = ____________%

Student Handout 4: Testing for pH
The pH value of a soil is a measure of how acidic or alkaline it is. If the soil is neutral, its pH is 7. A lower value
indicates that it is acidic while a higher value indicates it is alkaline. The pH of a soil is a good indicator of its
nutrient status and of the types of plants that can be grown in it. Acidic soils tend to be less rich in nutrients.
Take a sample of topsoil from the plot selected for growing vegetables. Şort the sample. Then take about 10 g
and spread it uniformly över a plate. Divide this uniform layer into 4 parts. Take one part and divide it similarly
into 4 more parts. Take this sixteenth part for sampling, place it in a test tube and add 5 to 8 mi of water to it so
that the soil becomes a solution. Now dip some pH paper into the solution and compare the change in colour
with the chart provided with the pH strip.
After consulting your teacher and the elders in your community, make a üst of the fruits and vegetables that can
be grown in the soil from which you have taken the sample.
Type of soil Name of vegetable(s) for
which the soil is suitable
Name of fruit plants for
vvhich the soil is suitable
Alternate test for pH
If resources allow, the pH of soil samples can be tested in a more refined manner. For this you
will require:
i A flat dish
ii Barium sulphate
iii BDH universal indicator solution and colour chart.
1. Add about a quarter spoonful of soil and a little of barium sulphate in the flat dish.
2. Add a few drops of BDH universal indicator solution to this and knead well.
3. Tilt the dish to one side and note the colour of the supernatant liquid. Compare the colour
of the supernatant liquid with the colours on the BDH reference colour chart and read the
approximate pH.
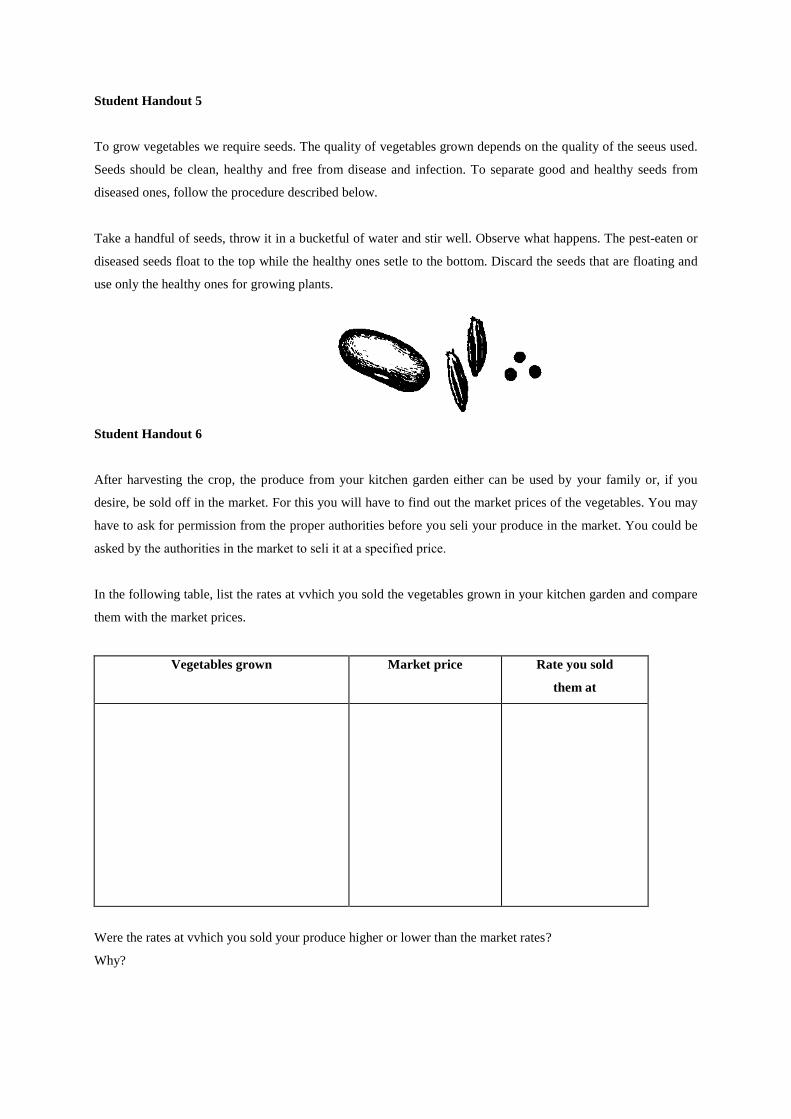
Student Handout 5
To grow vegetables we require seeds. The quality of vegetables grown depends on the quality of the seeus used.
Seeds should be clean, healthy and free from disease and infection. To separate good and healthy seeds from
diseased ones, follow the procedure described below.
Take a handful of seeds, throw it in a bucketful of water and stir well. Observe what happens. The pest-eaten or
diseased seeds float to the top while the healthy ones setle to the bottom. Discard the seeds that are floating and
use only the healthy ones for growing plants.
Student Handout 6
After harvesting the crop, the produce from your kitchen garden either can be used by your family or, if you
desire, be sold off in the market. For this you will have to find out the market prices of the vegetables. You may
have to ask for permission from the proper authorities before you seli your produce in the market. You could be
asked by the authorities in the market to seli it at a specifıed price.
In the following table, list the rates at vvhich you sold the vegetables grown in your kitchen garden and compare
them with the market prices.
Vegetables grown Market price Rate you sold
them at
Were the rates at vvhich you sold your produce higher or lower than the market rates?
Why?

Why is our Crop Yield Decreasing?
S Singh
Grade level: Classes VIII-X
Introduction
Crop productivity is dependent on many factors including availability of nutrients, water and climatic conditions.
it is also dependent on the right kind of soil, disease- free seeds, protection from weeds and pests as well as the
use of proper implements and practices. Some of the things that should be kept in mind, to get better crop
productivity, are:
1. the crop fıeld should be öpen so that sunlight and air are abundantly available
2. the fıeld should be protected from stray cattle
3. the soil should be loosened before cultivation starts
4. the soil should contain suffıcient nutrients
5. the right amount of water should be available.
Soil is one of the most important natural resources for increasing crop productivity. The fertility of soil
determines the crop wealth or food production in a country. Productivity as well as fertility of soil is reduced,
when the right type of seed is not used or when crops are continuously grown without using fertilisers. it also
decreases when the top layer of the soil gets washed away. Any decrease in soil fertility leads to a reduction in
crop production.
Educational Objectives
The script includes the follovving learning objectives:
Social Values
1.Decide, with justifıcation, which type of soil is suitable for which crop.
Science Process
1. Prepare a questionnaire to fınd vvhether the farmers know which soil is fit for which crop and what is the right
type of seed and which fertilisers and pesticides should be used.
Personal Skills
1. Co-operate within a group in developing and administering questionnaires and
analysing responses.
2. Commımicate verbally as well as in writing while using a questionnaire and
while presenting results.
Science Concepts
1. Find out about the formation of soil.
2. Investigate the characteristics of soil present in the locality.
3. Discuss the effect of manures and fertilisers on crop yield.
Scientific Concepts involved
1. Soil is an important natural resource.
2. The development of soil involves interaction of physical, biological, chemical and climatic processes.
3. One type of soil is not suitable for every crop.
4. Productivity is increased by using proper agricultural practices and implements.
5. Soil can be enriched by adding manures and fertilisers.
Teaching/learning materials
i pictures and charts of areas showing poor yield
ii polythene bags for collecting soil samples
iii magnifying glass lens
iv pH paper.
Students' Guide
Scenario
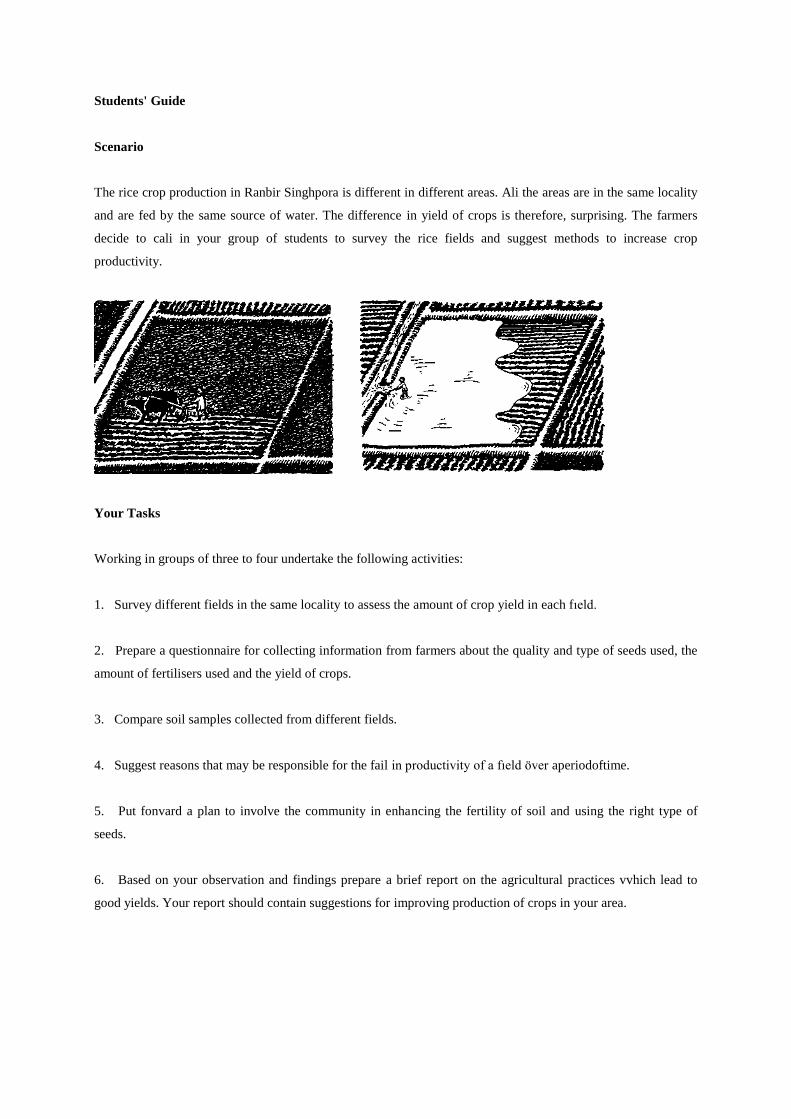
The rice crop production in Ranbir Singhpora is different in different areas. Ali the areas are in the same locality
and are fed by the same source of water. The difference in yield of crops is therefore, surprising. The farmers
decide to cali in your group of students to survey the rice fields and suggest methods to increase crop
productivity.
Your Tasks
Working in groups of three to four undertake the following activities:
1. Survey different fields in the same locality to assess the amount of crop yield in each fıeld.
2. Prepare a questionnaire for collecting information from farmers about the quality and type of seeds used, the
amount of fertilisers used and the yield of crops.
3. Compare soil samples collected from different fields.
4. Suggest reasons that may be responsible for the fail in productivity of a fıeld över aperiodoftime.
5. Put fonvard a plan to involve the community in enhancing the fertility of soil and using the right type of
seeds.
6. Based on your observation and findings prepare a brief report on the agricultural practices vvhich lead to
good yields. Your report should contain suggestions for improving production of crops in your area.
Teacher's Guide
Suggested Teaching Strategy
1. Begin with a brainstorming session on why different fıelds might have different crop yields.
2. Encourage class discussions on the following subjects:
i How soil is formed. The discussion should zero in on factors like: climate, type of parent soil, living
organisms, topography and time.
ii The characteristics of soil: texture, structure, acidity, nutrient content, gas content and moisture
content.
iii The composition of soil: organic matter, mineral nutrients, soil-air, moisture, ete.
iv Classification of soils.
v Agricultural practices: choice of erops, seleetion of seeds, tilling or ploughing the soil, broadcasting,
transplantation, manuring, use of fertilisers, irrigation, weeding and the use of pesticides and herbicides.
vi The importance of crop rotation and the cultivation of leguminous erops alternately with majör erops.
3. Ask students to collect information on the type of soil present in different fıelds, the kind of fertiliser and the
type of seeds that have been used. Students should then discuss their fındings and give suggestions for inereasing
crop yield.
Relating Tasks to Objectives
Objectives Tasks
Decide, with justification, which type of soil is most fertile in your
region.
1,2,3,4,5
Prepare a questionnaire to determine the knowledge of farmers
about soil erosion and the use of fertilisers.
2,5
Co-operate as a group in developing, administering and analysing a
questionnaire.
1,2,3,5
Communicate through a questionnaire and presentation oftheresult. 2
Explain the formation of soil. 3
Devise measures to maintain the fertility of a soil. 5
Student Handout 1
Visit 3 or 4 different rice fıelds. Do you think crop yield will be the same in ali the fields? If no, which fıeld do
you think will have the most yield and vvhich fîeld should, according to you, have the least? Record your
observations. Prepare a questionnaire for collecting information from the farmers about the steps taken by them
in respect of the following:
i preparation of the fıeld, i.e. things done before sowing
ii checking the quality of seeds used
iii method of sowing
iv use of manure, fertilisers and/or any other method for enriching the soil
v irrigation of the fıeld
vi use of insecticides or pesticides
vii use of herbicides or vveedicides.
Record the information provided by each farmer in your questionnaire. Analyse the information you have
gathered.
How do you rate the steps taken by the farmer whose fıeld is expected to have a higher yield than the others? in
what ways was his approach different from the others? Prepare a report to discuss the possible reasons for a poor
crop.
Student Handout 2
Take a bucket of water. Put a handful of seeds in it. Record what you see.
Have ali the seeds settled down to the bottom of the bucket?
Are some of the seeds floating? Why are they floating?
Which ones are healthy: those that have settled down or those that are floating?
Which seeds are berter? Why?
How does the selection of seed help improve crop production?
Student Handout 3
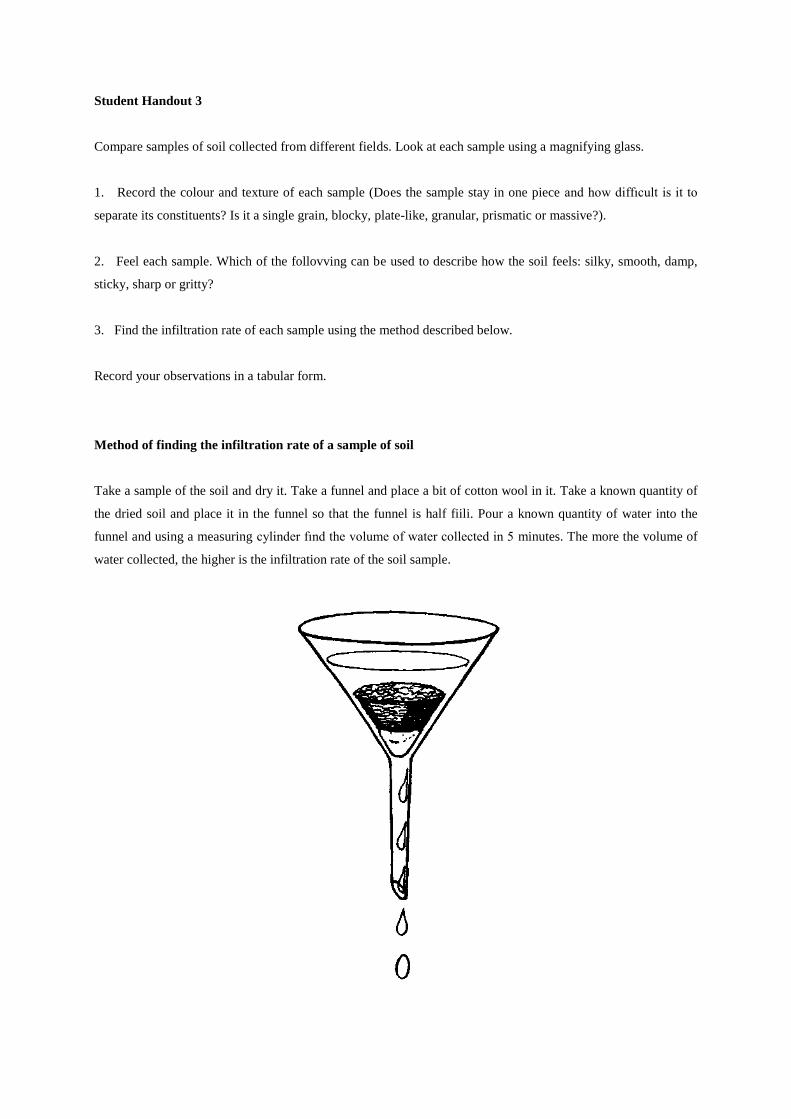
Compare samples of soil collected from different fields. Look at each sample using a magnifying glass.
1. Record the colour and texture of each sample (Does the sample stay in one piece and how diffıcult is it to
separate its constituents? Is it a single grain, blocky, plate-like, granular, prismatic or massive?).
2. Feel each sample. Which of the follovving can be used to describe how the soil feels: silky, smooth, damp,
sticky, sharp or gritty?
3. Find the infiltration rate of each sample using the method described below.
Record your observations in a tabular form.
Method of finding the infiltration rate of a sample of soil
Take a sample of the soil and dry it. Take a funnel and place a bit of cotton wool in it. Take a known quantity of
the dried soil and place it in the funnel so that the funnel is half fiili. Pour a known quantity of water into the
funnel and using a measuring cylinder fınd the volume of water collected in 5 minutes. The more the volume of
water collected, the higher is the infiltration rate of the soil sample.
Student Handout 4
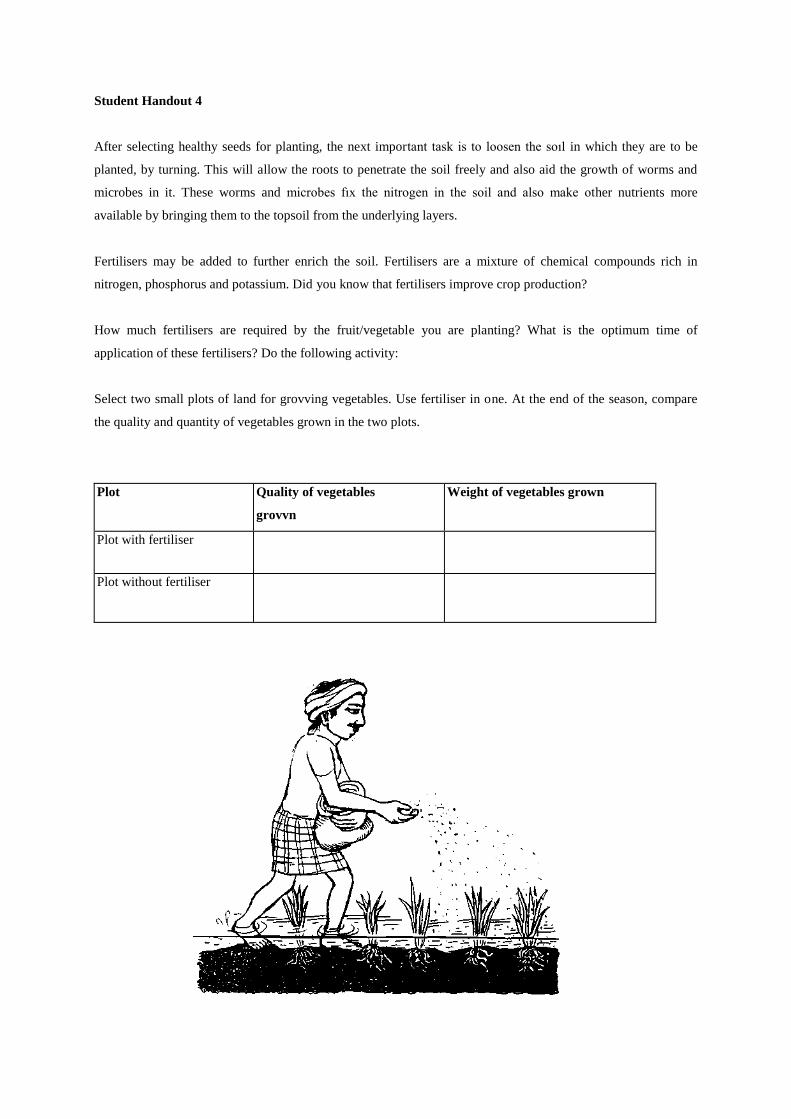
After selecting healthy seeds for planting, the next important task is to loosen the soıl in which they are to be
planted, by turning. This will allow the roots to penetrate the soil freely and also aid the growth of worms and
microbes in it. These worms and microbes fıx the nitrogen in the soil and also make other nutrients more
available by bringing them to the topsoil from the underlying layers.
Fertilisers may be added to further enrich the soil. Fertilisers are a mixture of chemical compounds rich in
nitrogen, phosphorus and potassium. Did you know that fertilisers improve crop production?
How much fertilisers are required by the fruit/vegetable you are planting? What is the optimum time of
application of these fertilisers? Do the following activity:
Select two small plots of land for grovving vegetables. Use fertiliser in one. At the end of the season, compare
the quality and quantity of vegetables grown in the two plots.
Plot Quality of vegetables
grovvn
Weight of vegetables grown
Plot with fertiliser
Plot without fertiliser
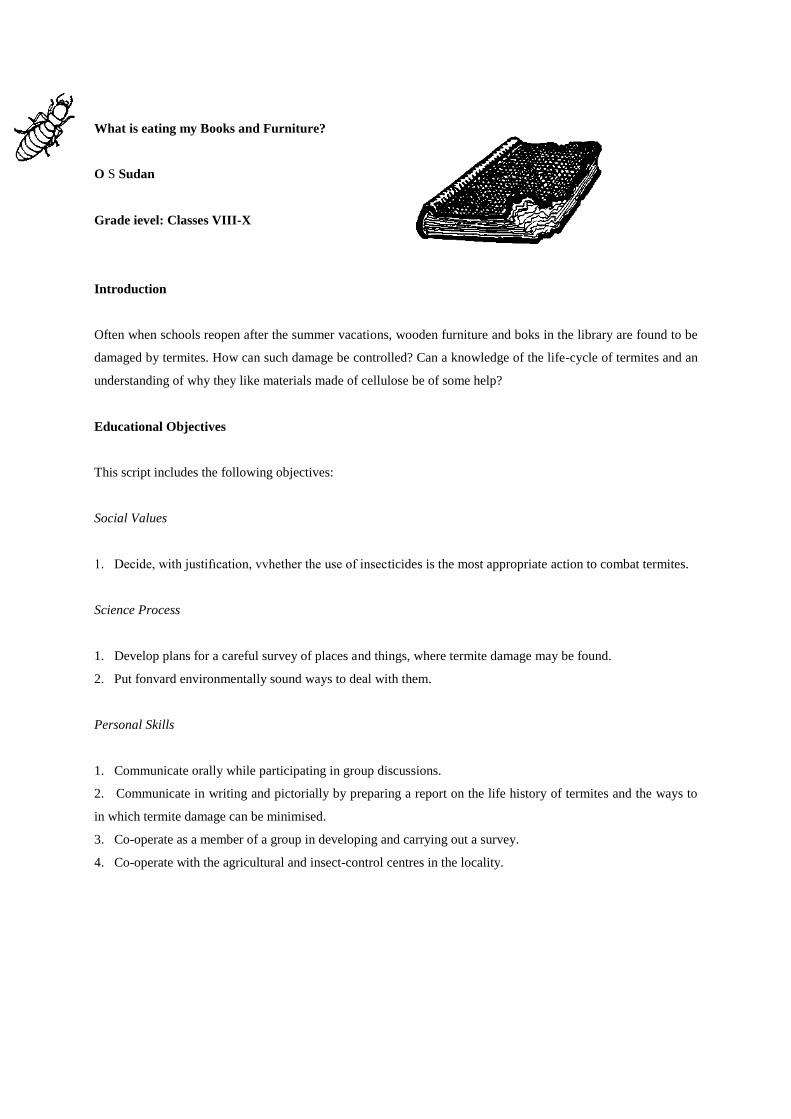
What is eating my Books and Furniture?
O S Sudan
Grade ievel: Classes VIII-X
Introduction
Often when schools reopen after the summer vacations, wooden furniture and boks in the library are found to be
damaged by termites. How can such damage be controlled? Can a knowledge of the life-cycle of termites and an
understanding of why they like materials made of cellulose be of some help?
Educational Objectives
This script includes the following objectives:
Social Values
1. Decide, with justifıcation, vvhether the use of insecticides is the most appropriate action to combat termites.
Science Process
1. Develop plans for a careful survey of places and things, where termite damage may be found.
2. Put fonvard environmentally sound ways to deal with them.
Personal Skills
1. Communicate orally while participating in group discussions.
2. Communicate in writing and pictorially by preparing a report on the life history of termites and the ways to
in which termite damage can be minimised.
3. Co-operate as a member of a group in developing and carrying out a survey.
4. Co-operate with the agricultural and insect-control centres in the locality.
Scientific Concepts involved
1. Identify the role of cellulose as a source of food for termites.
2. Srudy the life cycle of termites.
3. Investigate existing methods of controlling termite infestation.
Teaching/learning materials
i termite infested articles (pieces of furniture, books, ete.)
ii empty injection vials (bottles) with caps
iii a pair of forceps 10 to 15 cm long
iv a large magnifying glass
v a glass slide or a piece of broken window pane
vi charts and colour pens.
Students' Guide
Scenario
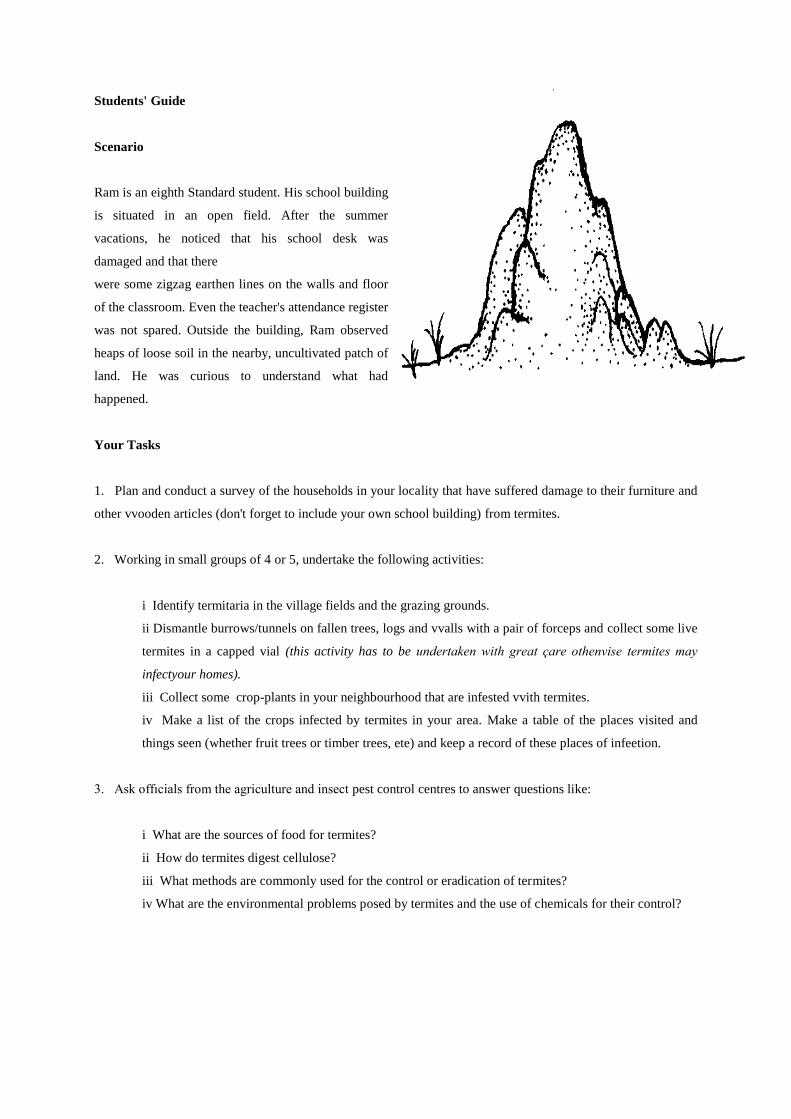
Ram is an eighth Standard student. His school building
is situated in an open field. After the summer
vacations, he noticed that his school desk was
damaged and that there
were some zigzag earthen lines on the walls and floor
of the classroom. Even the teacher's attendance register
was not spared. Outside the building, Ram observed
heaps of loose soil in the nearby, uncultivated patch of
land. He was curious to understand what had
happened.
Your Tasks
1. Plan and conduct a survey of the households in your locality that have suffered damage to their furniture and
other vvooden articles (don't forget to include your own school building) from termites.
2. Working in small groups of 4 or 5, undertake the following activities:
i Identify termitaria in the village fields and the grazing grounds.
ii Dismantle burrows/tunnels on fallen trees, logs and vvalls with a pair of forceps and collect some live
termites in a capped vial (this activity has to be undertaken with great çare othenvise termites may
infectyour homes).
iii Collect some crop-plants in your neighbourhood that are infested vvith termites.
iv Make a list of the crops infected by termites in your area. Make a table of the places visited and
things seen (whether fruit trees or timber trees, ete) and keep a record of these places of infeetion.
3. Ask offıcials from the agriculture and insect pest control centres to answer questions like:
i What are the sources of food for termites?
ii How do termites digest cellulose?
iii What methods are commonly used for the control or eradication of termites?
iv What are the environmental problems posed by termites and the use of chemicals for their control?
4. Based on the information provided by the agricultural offıcers and other available resources like elders in the
community, library, the Internet, ete. decide the best strategy for controlling termites keeping in mind the
scientifıc, environmental and social issues.
5. Use the information you have gathered for devising methods to protect your books and furniture from
termites.
6. Create a report on termites and the methods available to control them.
Teacher's Guide
Before taking up this material the teacher should be aware of:
(a) methods usually used to control the spread of termites
(b) the advantages and disadvantages of using insecticides, and
(c) the use of environment friendly methods for controlling termites.
Suggested Teaching Strategy
1. Conduct a brainstorming session on the damage to books and furniture by termites.
2. Ask students to conduct a survey of the community to identify the objects damaged by termites and the
extent of infestation.
3. Guide students on how to collect termites from the sites of infestation.
4. Ask students to draw pictures/diagrams of the different kinds of termites they find and to identify them.
5. Ask students to prepare a report containing information about termites and their habitats.
6. Organise a visit to the nearby agricultural pest-control centre.
7. Encourage students to develop concern and responsibility for curbing the menace of termite infestation.
8. Persuade students to plan a project for capturing the queen termite in her hideout. Motivate them to co-
operate in hunting termitaria and destroying the queens.
Information for Teachers
Termites are insects belonging to the order Isoptera, and are closely related to cockroaches (order Dictyoptera).
Although some species attack living trees, most termites are ecologically important as decomposers. Three
quarters of ali the known species of termites belong to a single family, the Termitidae. Most of them live in huge
colonies in furniture or the ground depending on the place of infestation. Permanent termite mounds are a
characteristic feature of the landscape in many countries. These afford protection to the colony, which may
number up to a million individuals in some species. Nests are constructed in a variety of shapes and sizes
depending on the species which live in them. Some are flat-topped like mushrooms so that the rain bounces off
the top and thus keeps the nest beneath dry; others have chimneys and deep tunnels down to the water table so
that the internal microclimate can be regulated. in the species of termites Macroterms natalensis, circulation of
the air within the nest keeps the nest cool and the level of carbon dioxide low.
In many species of termites the hindguts hold huge numbers of symbiotic bacteria and specialised flagellate
protozoa. These microorganisms enable the termites to utilise cellulose and lignin present in wood, as food. in
some species it has been found that they can digest över 90% of the cellulose and about 50% of the lignin they
eat. These microorganisms are lost when the lining of the hindgut is shed at moulting. To counter this, a newly
moulted individual is fed special anal secretions rich in these microorganisms.
Different termite species specialise in surviving on a range of materials as food. Most eat wood, but the most
primitive termite known, the Australian Mastotermes danviniesis, has the broadest diet of any termite species.
The workers of this specie may eat crop plants, rubber, ivory, sugar, dung, plastic lining of electric cables and
wooden buildings. Unattended houses have occasionally been reduced to dust within a couple of years of
infestation.
All of the 2,200 or so termite species are eusocial. A eusocial species contains large numbers of individuals
which never reproduce, but dedicate their lives to helping other individuals to reproduce. This means that each
such species satisfies three conditions:
i there is co-operation in looking after the young
ii some individuals are permanently sterile, and
iii there is an overlap of at least two generations contributing to colony labour.
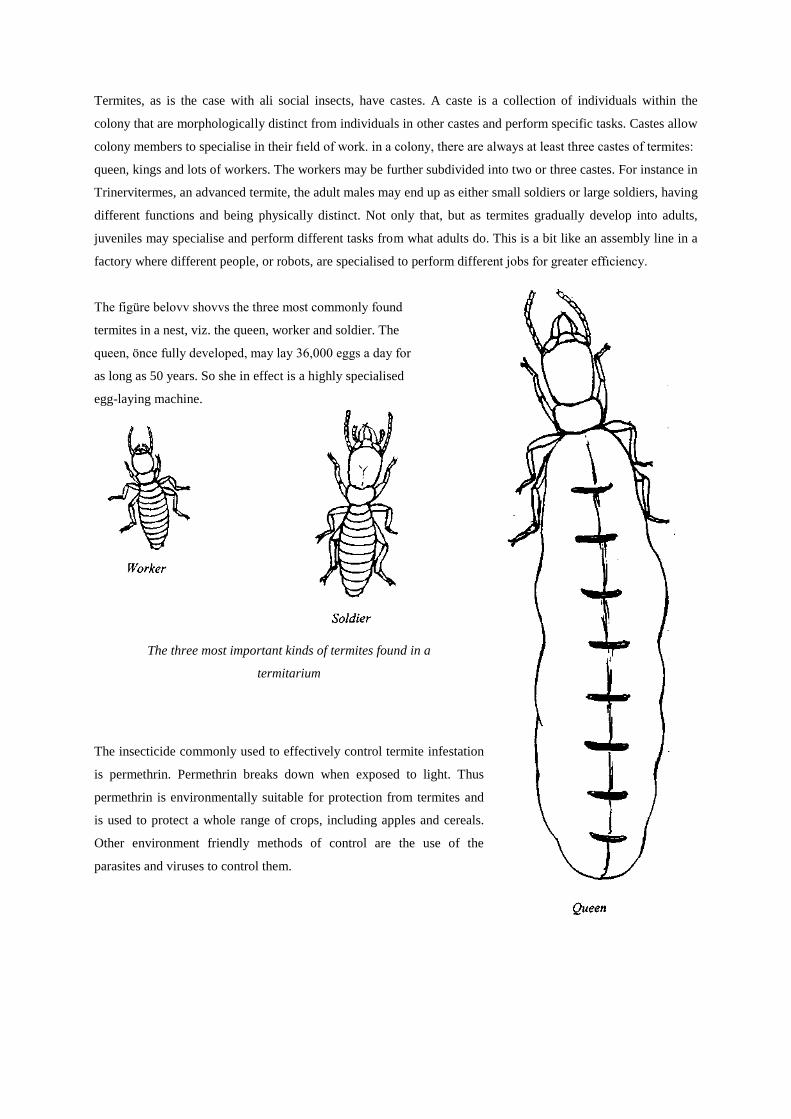
Termites, as is the case with ali social insects, have castes. A caste is a collection of individuals within the
colony that are morphologically distinct from individuals in other castes and perform specific tasks. Castes allow
colony members to specialise in their fıeld of work. in a colony, there are always at least three castes of termites:
queen, kings and lots of workers. The workers may be further subdivided into two or three castes. For instance in
Trinervitermes, an advanced termite, the adult males may end up as either small soldiers or large soldiers, having
different functions and being physically distinct. Not only that, but as termites gradually develop into adults,
juveniles may specialise and perform different tasks from what adults do. This is a bit like an assembly line in a
factory where different people, or robots, are specialised to perform different jobs for greater effıciency.
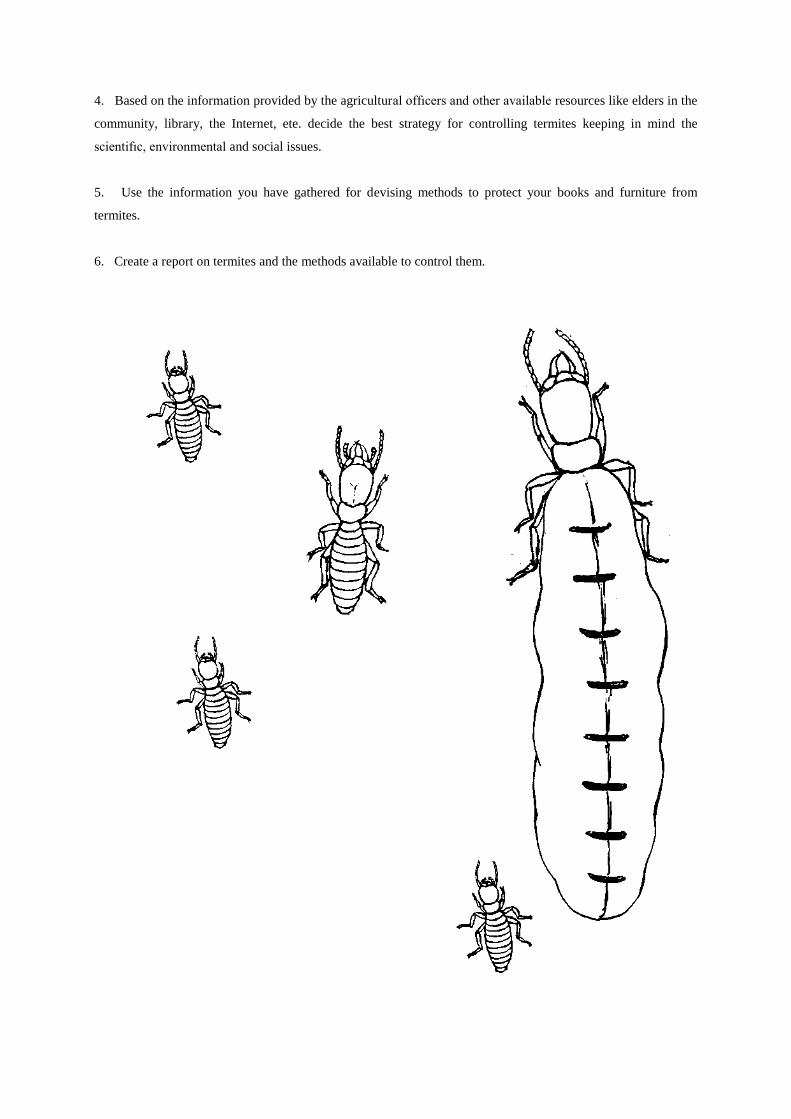
The figüre belovv shovvs the three most commonly found
termites in a nest, viz. the queen, worker and soldier. The
queen, önce fully developed, may lay 36,000 eggs a day for
as long as 50 years. So she in effect is a highly specialised
egg-laying machine.
The three most important kinds of termites found in a
termitarium
The insecticide commonly used to effectively control termite infestation
is permethrin. Permethrin breaks down when exposed to light. Thus
permethrin is environmentally suitable for protection from termites and
is used to protect a whole range of crops, including apples and cereals.
Other environment friendly methods of control are the use of the
parasites and viruses to control them.
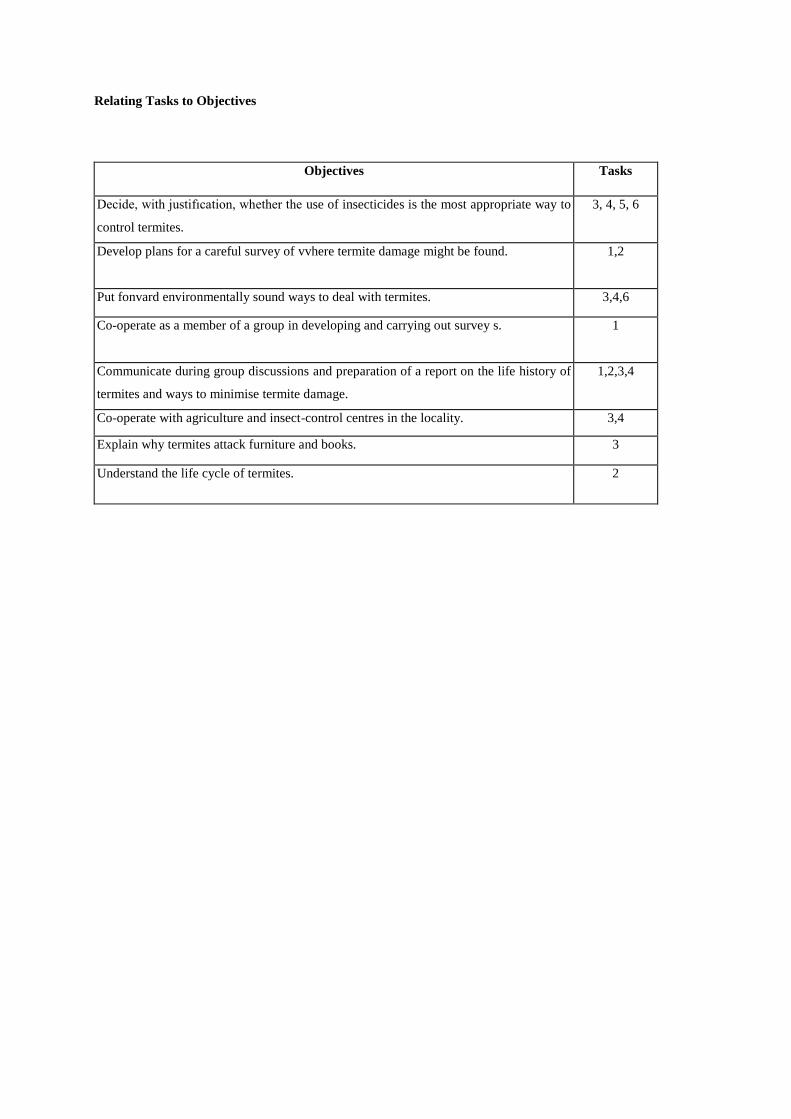
Relating Tasks to Objectives
Objectives Tasks
Decide, with justifıcation, whether the use of insecticides is the most appropriate way to
control termites.
3, 4, 5, 6
Develop plans for a careful survey of vvhere termite damage might be found. 1,2
Put fonvard environmentally sound ways to deal with termites. 3,4,6
Co-operate as a member of a group in developing and carrying out survey s. 1
Communicate during group discussions and preparation of a report on the life history of
termites and ways to minimise termite damage.
1,2,3,4
Co-operate with agriculture and insect-control centres in the locality. 3,4
Explain why termites attack furniture and books. 3
Understand the life cycle of termites. 2

Student Handout 1
Identify termite mounds. Observe the shape and size of the mounds. Record your observations in the following
table:
Shape Location of termite mound
Flat-topped (like mushrooms)
Tunnelshaped
Rounded
Funnelshaped
Student Handout 2
Conduct a survey of the various possible infestation sites like books, furniture, walls, playground ete. in your
sehool. Make a list of the items/area infested.
How will you prevent further infestation? Are these methods environmentally sound?
How?
Student Handout 3
Complete the table below on issues related to the control of termites.
Place of
infestation
Methods of
control
available
Scientific issues
Environmental
Social
In your opinion, should the 'method of control available' be used to eradicate termites
In spite of the issues that arise, or not?
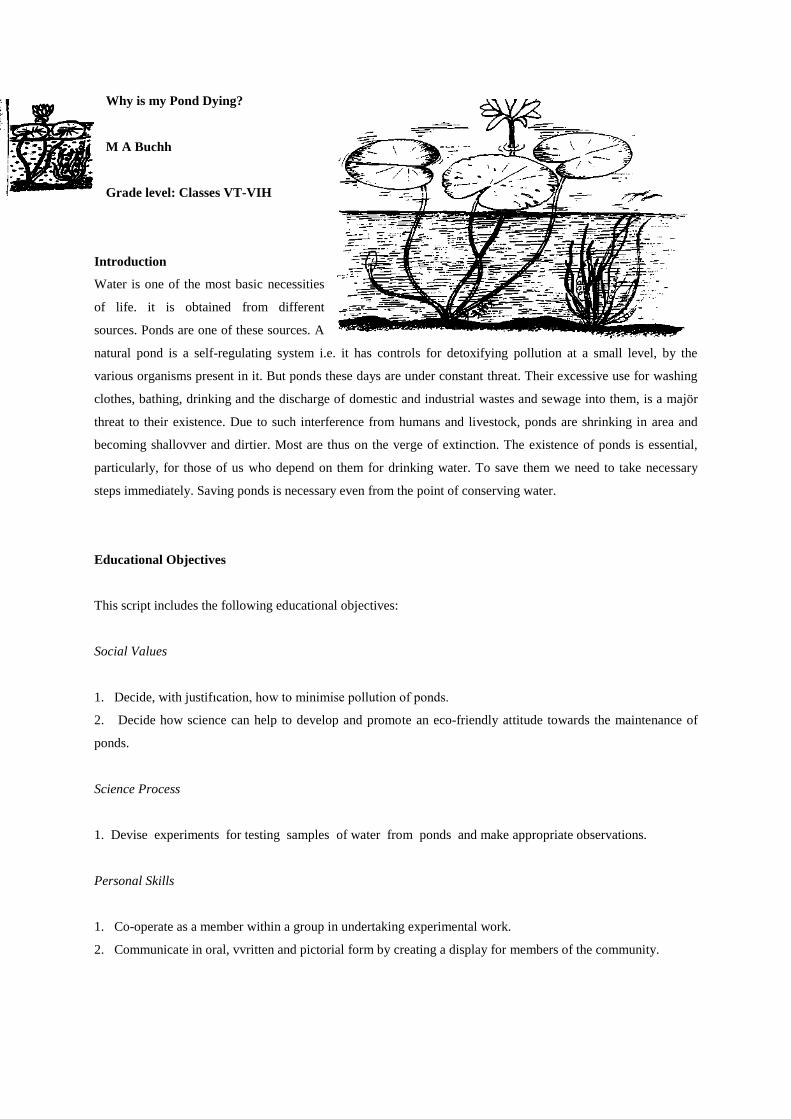
Why is my Pond Dying?
M A Buchh
Grade level: Classes VT-VIH
Introduction
Water is one of the most basic necessities
of life. it is obtained from different
sources. Ponds are one of these sources. A
natural pond is a self-regulating system i.e. it has controls for detoxifying pollution at a small level, by the
various organisms present in it. But ponds these days are under constant threat. Their excessive use for washing
clothes, bathing, drinking and the discharge of domestic and industrial wastes and sewage into them, is a majör
threat to their existence. Due to such interference from humans and livestock, ponds are shrinking in area and
becoming shallovver and dirtier. Most are thus on the verge of extinction. The existence of ponds is essential,
particularly, for those of us who depend on them for drinking water. To save them we need to take necessary
steps immediately. Saving ponds is necessary even from the point of conserving water.
Educational Objectives
This script includes the following educational objectives:
Social Values
1. Decide, with justifıcation, how to minimise pollution of ponds.
2. Decide how science can help to develop and promote an eco-friendly attitude towards the maintenance of
ponds.
Science Process
1. Devise experiments for testing samples of water from ponds and make appropriate observations.
Personal Skills
1. Co-operate as a member within a group in undertaking experimental work.
2. Communicate in oral, vvritten and pictorial form by creating a display for members of the community.

Science Concepts
1. Understand the causes of pollution of pond water.
2. Explain the hazards of polluted water to human health.
Scientific Concepts involved
1. Wastes, when thrown into a pond, pollute the water.
2. Polluted vvater is unsafe for drinking. If consumed it can lead to a number of gastro-intestinal disorders like
diarrhoea, hepatitis, ete.
3. Decrease in the oxygen content kills the useful organisms and promotes the growth of harmful organisms in a
pond (eutrophication).
4. Water bodies can be proteeted.
Previous Knowledge
Ponds are essential sources of vvater in a number of areas.
Teaching/learning materials
i containers for collectıng vvater samples, test-tubes or glass tumblers
ii fılter paper, funnel, muslin eloth and kettle
iii spirit lamp or any other source of heat
iv magnifying lens.
Students' Guide
Scenario
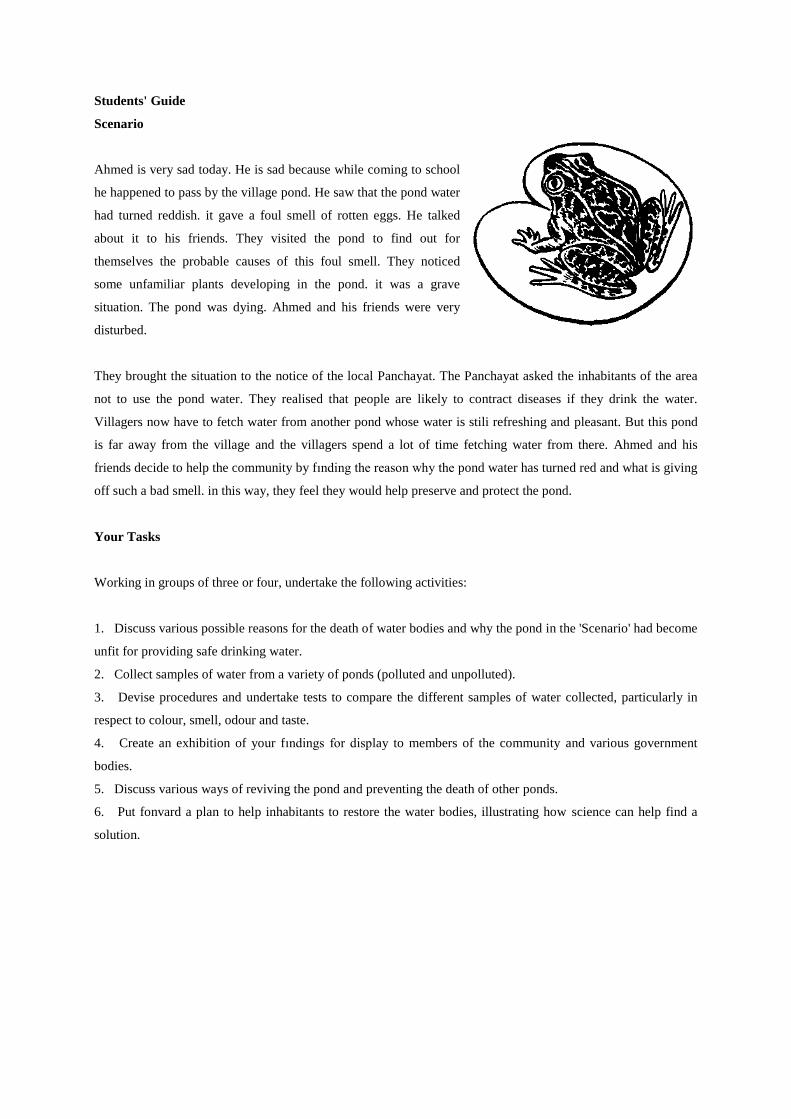
Ahmed is very sad today. He is sad because while coming to school
he happened to pass by the village pond. He saw that the pond water
had turned reddish. it gave a foul smell of rotten eggs. He talked
about it to his friends. They visited the pond to find out for
themselves the probable causes of this foul smell. They noticed
some unfamiliar plants developing in the pond. it was a grave
situation. The pond was dying. Ahmed and his friends were very
disturbed.
They brought the situation to the notice of the local Panchayat. The Panchayat asked the inhabitants of the area
not to use the pond water. They realised that people are likely to contract diseases if they drink the water.
Villagers now have to fetch water from another pond whose water is stili refreshing and pleasant. But this pond
is far away from the village and the villagers spend a lot of time fetching water from there. Ahmed and his
friends decide to help the community by fınding the reason why the pond water has turned red and what is giving
off such a bad smell. in this way, they feel they would help preserve and protect the pond.
Your Tasks
Working in groups of three or four, undertake the following activities:
1. Discuss various possible reasons for the death of water bodies and why the pond in the 'Scenario' had become
unfit for providing safe drinking water.
2. Collect samples of water from a variety of ponds (polluted and unpolluted).
3. Devise procedures and undertake tests to compare the different samples of water collected, particularly in
respect to colour, smell, odour and taste.
4. Create an exhibition of your fındings for display to members of the community and various government
bodies.
5. Discuss various ways of reviving the pond and preventing the death of other ponds.
6. Put fonvard a plan to help inhabitants to restore the water bodies, illustrating how science can help find a
solution.
Teacher's Guide
This activity relates to:
a) Identifying the causes of pollution of water in a pond and fınding ways to prevent it.
b) Helping to develop a sense of responsibility and an eco-friendly approach among the members of the
community.
Pollution may be defıned as a release of substances or energy into the environment in such quantities and for
such duration that they cause harm to the people or other organisms or the environment. Water pollution is a
complex problem. The sources of water pollution are numerous, e.g. industrial effluents discharged with little or
no treatment, effluents from sewage works. and chemicals washed into the waterway by rain. in spite of our
considering that metals are vvater-insoluble, the washings of metal particles into streams and rivers from
industrial. sewage and agricultural run-offs, are a hazard. Small amounts of these metals do dissolve in water
making it toxic to plants and animals.
Water may be contaminated by faulty or overflowing septic tanks and cesspits or by materials leaching out of
rubbish pits. There can be many other reasons for water pollution. For example, in case of certain water bodies
like ponds, it is found that people place logs of wood, ete. for seasoning on the banks. Some of these logs slip
into the pond, sink to the bottom and decay. The bacterium causing this decay requires vast amounts of oxygen
that leads to the death of the organisms in the water body, also known as eutrophication. The leaching of
nitrogen fertilisers from agricultural land and inereased diseharge of phosphates from sevvage works also causes
eutrophication. Similarly, excessive soil erosion on the land and subsequent deposition of the displaced soil in
water bodies inereases their şilt load, leading to murky water which is favourable to eutrophication.
All of the above-mentioned sources of pollution should be avoided to inerease the life of the pond.
Suggested Teaching Strategy
1. The lesson can begin with a brainstorming session in which students put fonvard reasons why they think the
village pond is dying.
2. Let a discussion follow the brainstorming session and zero in on:
i decrease in oxygen content
ii accumulation of organic wastes, and
iii deposition of elay at the bottom of the pond.
The discussion may follow into the adverse effect of the death of a pond on the availability of water. This
discussion should lead students to recognise the need to examine the pond and fınd out the causes for it
becoming polluted.
3. Students should be asked to collect samples of water from different ponds/sources and to study them for
colour, smell and presence of different microorganisms.
4. Students should be asked to discuss their fındings and suggest remedial measures.
The following measures may be suggested:
i Do not throw refuse in the pond.
ii Prevent accumulation of inorganic and organic wastes on the banks of the pond.
iii Prevent deposition of clay at the bottom of the pond.
iv Plant suitable herbs or shrubs in the vicinity to prevent soil erosion and hence the degradation of the
banks of the ponds.
v Keep the surroundings in proper hygienic conditions.
5. Students should be asked to carefully prepare their fındings and put fonvard an exhibition for members of the
community/Panchayat/Governrnent for preserving and protecting the water body.
Relating Tasks to Objectives
Objectives Tasks
Decide, with justifıcation, how to minimise the pollution of ponds. 5,6
Decide how science can help in developing and promoting an eco friendly attitude tovvards
the maintenance of ponds.
6
Devise experiments to test different samples of water and make appropriate
observations.
2,3
Suggest ways to minimise pollution and devise methods to preserve the ponds. 5,6
Co-operate as a member of a group in undertaking experimental work. 2, 3, 5,
6
Communicate verbally as well as in written and diagrammatic form by
creating a display for members of the community.
4
Explain why throvving waste into ponds pollutes the water. 1
Explain the hazards of water pollution to human health. 1,2

Student Handout 1
Pure water is transparent, colourless, odourless and tasteless. Collect equal amounts of water as samples from
two ponds - one unpolluted and the other polluted. Label each test tube or glass tumbler accordingly. Observe
the colour, smell, transparency and the presence of microorganisms in each sample and record your findings in
the table below.
Water
source
Colour Smell Odour Transparent
(yes/no)
Presence of micro-
organisms (yes/no)
Polluted
pond
Unpolluted
pond
Using separate filter papers filter the two samples. See if there are any residues left on the filter papers. Also look
at the vvater which is collected after fıltering the samples. Heat the two samples obtained after fıltration in
different test tubes or glass tumblerstill the entire water evaporates. Observe the residues left in the test tubes.
Note: While heating the test tube or the glass tumbler, hold the container carefully with the help of a clamp.
Record your observations.
1. What is the colour of the residue left on the filter paper on fıltering samples from
the polluted and the unpolluted ponds?
Polluted .....................................................................................................
Unpolluted .....................................................................................................
2. What is the colour of residue left at the bottom of the test tube or glass tumbler on heating the fıltered
samples from the polluted and unpolluted ponds?
Polluted .....................................................................................................
Unpolluted .....................................................................................................
Student Handout 2
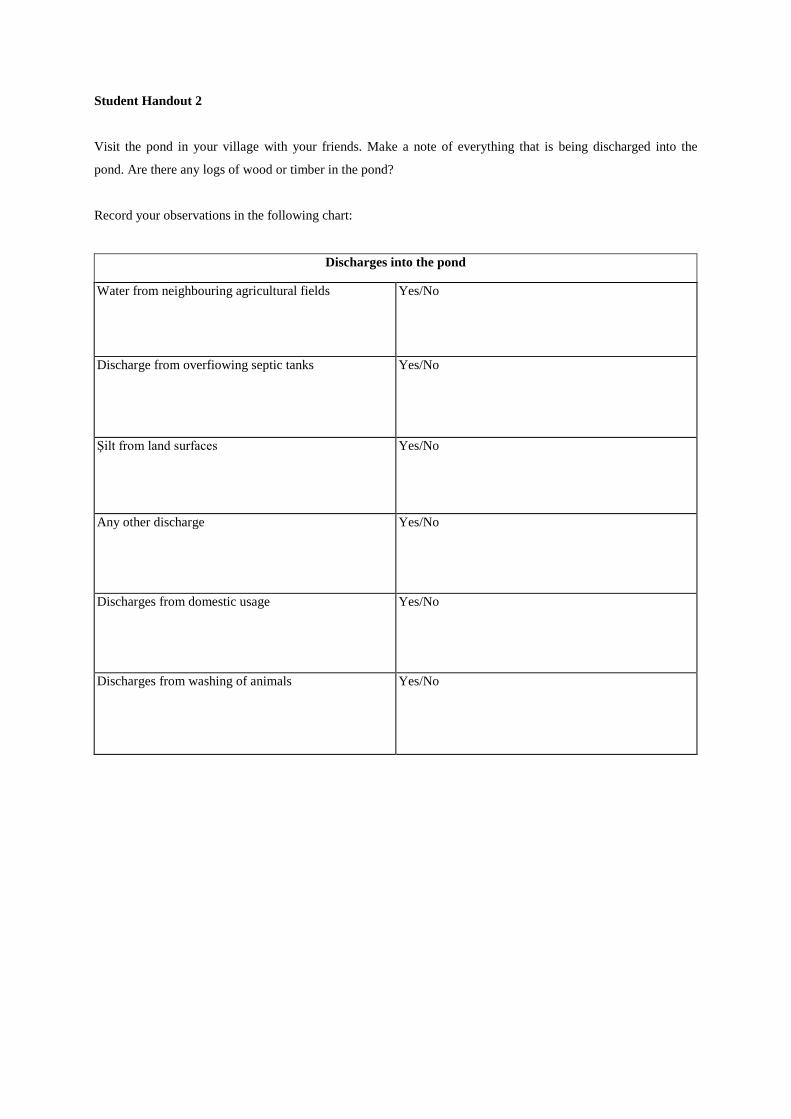
Visit the pond in your village with your friends. Make a note of everything that is being discharged into the
pond. Are there any logs of wood or timber in the pond?
Record your observations in the following chart:
Discharges into the pond
Water from neighbouring agricultural fields Yes/No
Discharge from overfiowing septic tanks Yes/No
Şilt from land surfaces Yes/No
Any other discharge Yes/No
Discharges from domestic usage Yes/No
Discharges from washing of animals Yes/No
Student Handout 3
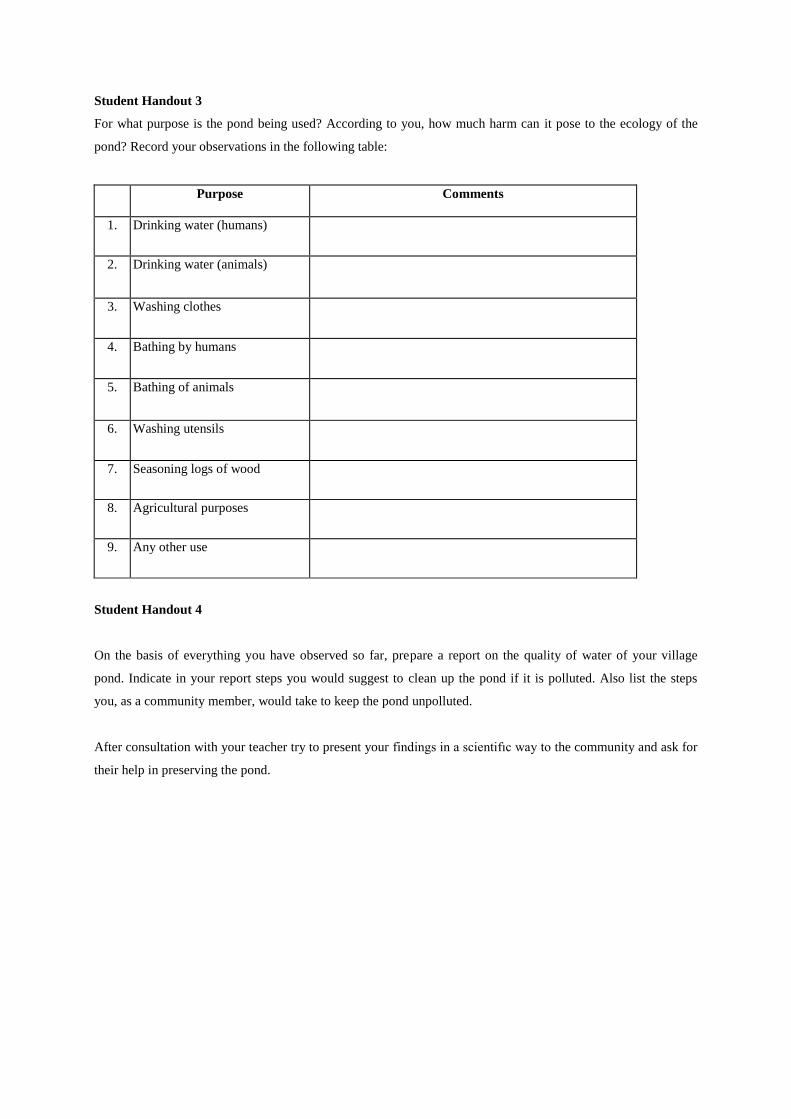
For what purpose is the pond being used? According to you, how much harm can it pose to the ecology of the
pond? Record your observations in the following table:
Purpose Comments
1. Drinking water (humans)
2. Drinking water (animals)
3. Washing clothes
4. Bathing by humans
5. Bathing of animals
6. Washing utensils
7. Seasoning logs of wood
8. Agricultural purposes
9. Any other use
Student Handout 4
On the basis of everything you have observed so far, prepare a report on the quality of water of your village
pond. Indicate in your report steps you would suggest to clean up the pond if it is polluted. Also list the steps
you, as a community member, would take to keep the pond unpolluted.
After consultation with your teacher try to present your findings in a scientifıc way to the community and ask for
their help in preserving the pond.
Why doesn't my Soap Lather?
R N Khejuria
Grade level: Classes VII-VIII
Introduction
If we wash our clothes with water alone, they do not get cleaned. However, if we use some soap or detergent
powder, cleaning becomes easier. Soap is a good cleansing agent. The cleansing action, however, depends on the
quality of the soap as well as on the quality of water that we use.
Educational Objectives
The script involves the following objectives:
Social Values
1. Discuss, with justifıcation, the need to classify surface water according to its designated use, e.g. drinking,
swimming, washing, transportation and agriculture.
2. Discuss methods to make the available pond water more suitable for vvashing and bathing.
Science Process
1. Carry out experiments to test for hard and soft water and observe how hard water can be converted into soft
water.
2. Carry out activities/experiments to prepare soap.
Personal Skills
1. Cooperate as a member of a group in planning and carrying out experiments.
2. Communicate the outcomes of the experiment suitably.
Science Concepts
1. Understand how soap cleans dirty clothes.
2. Understand the cleansing action of synthetic detergents.
3. Explain advantages of soap över synthetic detergent.
4. Explain the difference between hard and soft water.
5. Explain the ways in which it is possible to remove temporary and permanent hardness.
Scientific Concepts involved
1. A molecule of soap is formed of two parts: a hydrocarbon part soluble in Grease and oils but insoluble in
water and an ionic part soluble in water but insoluble in grease and oil.
2. Heating animal fat or vegetable oil with concentrated sodium hydımide solution can make soap.
3. Water is generally of two types, e.g. hard water and soft water.
4. Water from different sources contains different quantities of dissolved salts.
5. Flowing vvater dissolves various mineral salts including bicarbonates, chlorides and sulphates of calcium
and magnesium from the earth. A high concentration of these salts makes water hard.
6. Soft water can be obtained from vvater vvith temporary hardness by boiling.
7. Permanent hardness can be removed by adding certain chemicals like washing soda.
Previous Knowledge
Soap is the most commonly used cleansing agent. Detergents are also used to clean clothes.
Teaching/learning materials
i containers for collecting vvater samples like beakers, test tubes, ete.
ii chemicals like calcium chloride and magnesium chloride to test the hardness of water, and vvashing soda
iii vegetable oil (like castor oil or cotton-seed oil)
iv sodium chloride (common salt)
v sodium hydroxide
vi spirit lamp
vii charts.
Students' Guide
Scenario
Boboona is a village where people usually use pond water for bathing and vvashing clothes. Drinking water is
supplied to the village twice a day for 2 to 3 hours through two public taps. While the tap water is reserved for
drinking purposes, pond water is used for bathing and washing.
Recently villagers noticed that even after using plenty of soap when vvashing with water from the village pond,
clothes were not coming clean. it was a majör cause of concern. They could not use tap water because the supply
was hardly sufficient for drinking and cooking. To solve the problem, the villagers held a meeting and invited
students from the village school to this meeting to find out why soap was not lathering and what remedial action
could be taken.
Your Tasks
To prepare for your presentation to the villagers, work in groups and undertake the following activities:
1. Collect samples of water from different sources.
2. Test for the hardness of water.
3. Hold a discussion in your group on different ways of removing hardness from water.
4. Make a presentation to the community on your fındings about the quality of water from the pond.
5. Devise an experiment to prepare soap in the laboratory or at home.
6. Devise experiments to find out the difference betvveen soap and synthetic detergent.
Information for Students
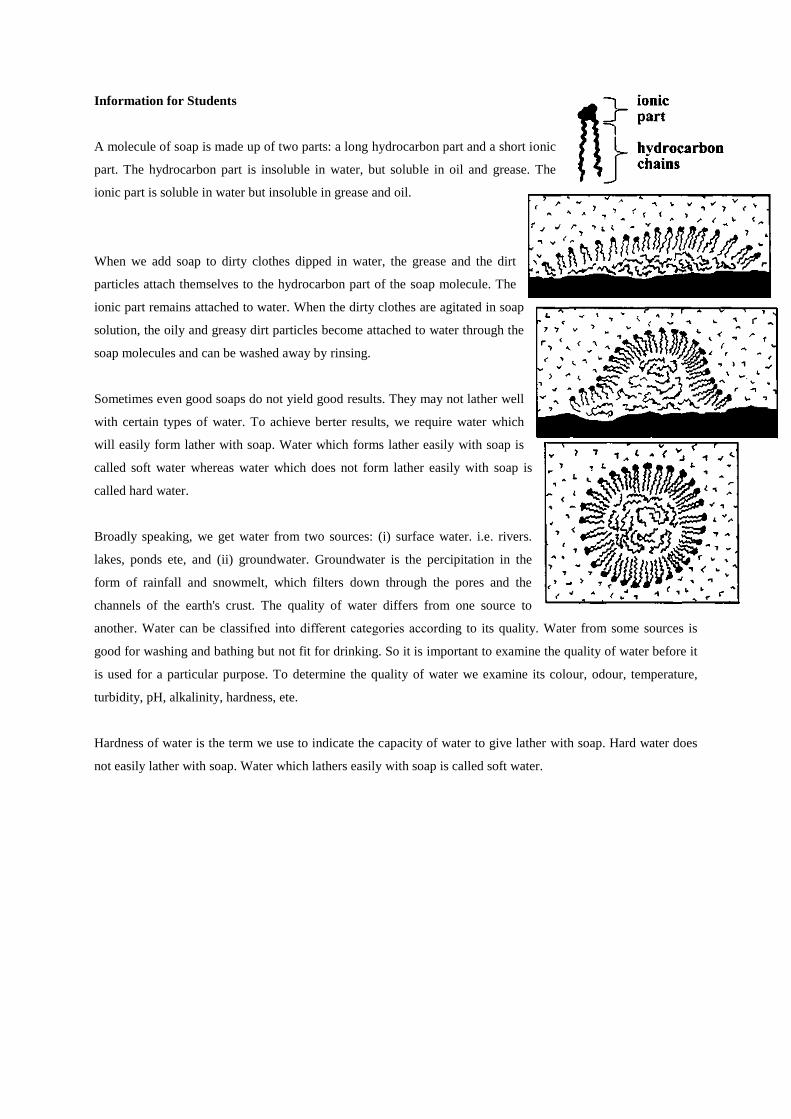
A molecule of soap is made up of two parts: a long hydrocarbon part and a short ionic
part. The hydrocarbon part is insoluble in water, but soluble in oil and grease. The
ionic part is soluble in water but insoluble in grease and oil.
When we add soap to dirty clothes dipped in water, the grease and the dirt
particles attach themselves to the hydrocarbon part of the soap molecule. The
ionic part remains attached to water. When the dirty clothes are agitated in soap
solution, the oily and greasy dirt particles become attached to water through the
soap molecules and can be washed away by rinsing.
Sometimes even good soaps do not yield good results. They may not lather well
with certain types of water. To achieve berter results, we require water which
will easily form lather with soap. Water which forms lather easily with soap is
called soft water whereas water which does not form lather easily with soap is
called hard water.
Broadly speaking, we get water from two sources: (i) surface water. i.e. rivers.
lakes, ponds ete, and (ii) groundwater. Groundwater is the percipitation in the
form of rainfall and snowmelt, which filters down through the pores and the
channels of the earth's crust. The quality of water differs from one source to
another. Water can be classifıed into different categories according to its quality. Water from some sources is
good for washing and bathing but not fit for drinking. So it is important to examine the quality of water before it
is used for a particular purpose. To determine the quality of water we examine its colour, odour, temperature,
turbidity, pH, alkalinity, hardness, ete.
Hardness of water is the term we use to indicate the capacity of water to give lather with soap. Hard water does
not easily lather with soap. Water which lathers easily with soap is called soft water.
Teacher's Guide
Suggested Teaching Strategy
1. Explain to students the difference between hard and soft water.
2. Ask students to collect samples of water from different sources including the village pond and:
i Ask them to identify the water that lathers easily with soap.
ii Ask them why soap lathers differently with water from different sources.
The activities in Student Handout 2 show that it is the presence of calcium and magnesium salts that prevent the
formation of lather. These salts decompose to give calcium and magnesium ions. Therefore, water that contains
calcium and magnesium ions is called hard water. When these ions are accompanied by hydrogen carbonate ions
the vvater is said to be temporarily hard. This is because the calcium and magnesium ions can be removed easily
from vvater in these cases by boiling.
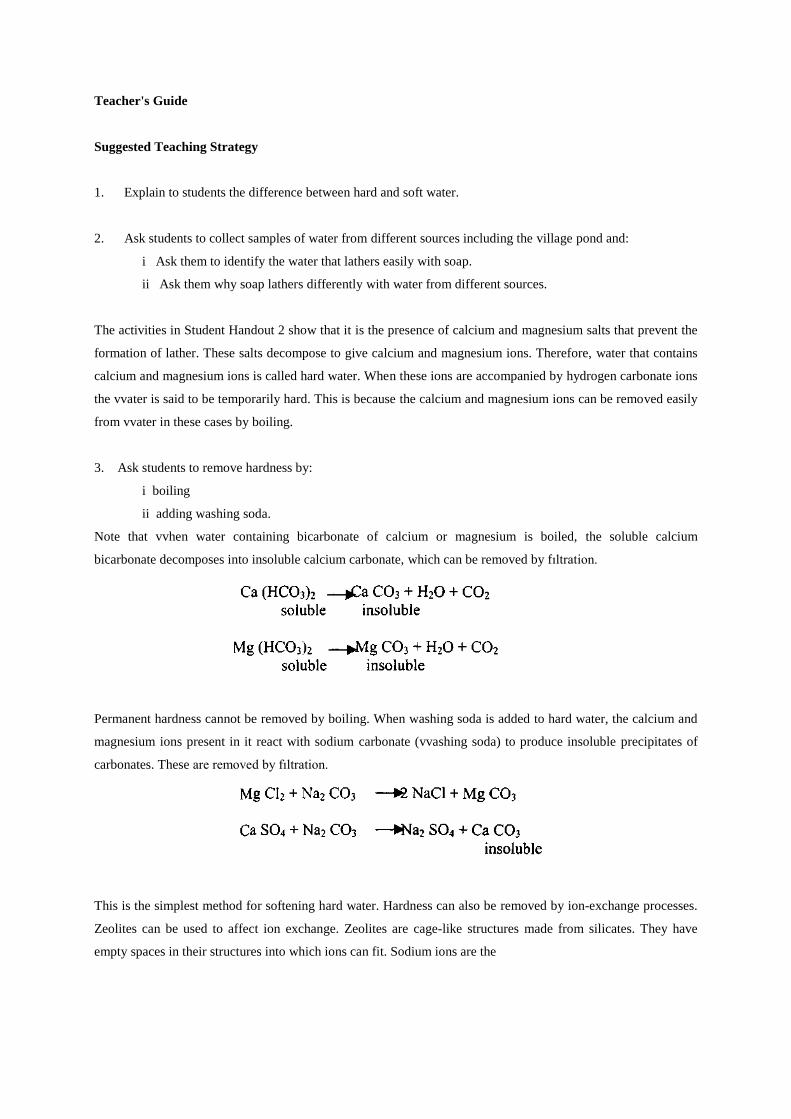
3. Ask students to remove hardness by:
i boiling
ii adding washing soda.
Note that vvhen water containing bicarbonate of calcium or magnesium is boiled, the soluble calcium
bicarbonate decomposes into insoluble calcium carbonate, which can be removed by fıltration.
Permanent hardness cannot be removed by boiling. When washing soda is added to hard water, the calcium and
magnesium ions present in it react with sodium carbonate (vvashing soda) to produce insoluble precipitates of
carbonates. These are removed by fıltration.
This is the simplest method for softening hard water. Hardness can also be removed by ion-exchange processes.
Zeolites can be used to affect ion exchange. Zeolites are cage-like structures made from silicates. They have
empty spaces in their structures into which ions can fit. Sodium ions are the
normal residents in these holes. when hard vvater passes över the zeolite the calcium ions displace the sodium
ions. The zeolite can be regenerated by swamping it with salt water.
4. Explain to students how to prepare soap and ask them to make some under your guidance.
5. Conduct a brainstorming session on the ways and means of making pond vvater fit for bathing and
washing.
Relating Tasks to Objectives
Objectives Tasks
Discuss the most appropriate action to ensure that pond water is made suitable for
washing clothes.
2,3,4
Carry out experiments to test hard and soft vvater and to convert hard water into soft
water.
2.3
Co-operate as a member of a group in planning and carrying out experiments. 1,3,4,5,6
Explain the ways in which it is possible to remove temporary and permanent
hardness.
2,3,6
Devise experiments to fınd out the difference between soap and synthetic detergent. 6
Student Handout 1
Make concentrated soap solution and use it for testing the samples of water collected.
1. Take equal quantities of water from each source in separate containers (e.g. test tubes). Add İmi of
concentrated soap solution to each. Shake the samples for equal periods of time and observe the lather given by
each. Arrange the samples in a sequence from the one that gave the most lather to the one that gave the least.
Record the order in the sequence and the source of each sample.
2. Fiil three additional containers (test tubes) with pond water. Add a pinch of sodium chloride to one and a
pinch of calcium chloride or magnesium chloride to another. Do not add anything to the third test tube. This will
serve as control. Add soap solution to each and shake for equal periods of time. Observe and record which
sample gives the least lather and which the most. Compare the lathers with those obtained previously.
3. Take equal quantities of water from different sources in three beakers. Boil each sample, add equal amounts
of soap solution to each and shake well. Observe and record as before the lather given by each sample. Compare
the lather produced with those in the previous activities.
Student Handout 2
Take five test tubes containing equal volumes of distilled water and label them as 1,2, 3, 4 and 5. Now dissolve
chlorides of sodium, potassium, ammonium, calcium and magnesium in test tubes 1, 2, 3, 4 and 5 respectively.
Prepare a soap solution separately in distilled water. Now pour a small quantity of the soap solution into each of
the test tubes and shake well. Record your observations in the following table.
Test tube Is lather formed?
Yes/no
Is it hard or soft
water?
No. 1
No. 2
No. 3
No. 4
No. 5
1. What inference do you draw from the above experiments?
2. Name the chemicals that prevent the formation of lather.
3. What are the causes of hardness of water?
Student Handout 3
Take two test tubes fılled with equal quantities of distilled water. Mark the test tubes as 1 and 2. Now dissolve
equal amounts of calcium bicarbonate or magnesium bicarbonate in each test tube. Add soap solution (prepared
separately in distilled water) to tube 1. Shake well. Now heat test tube 2 till the water boils and add soap solution
to it. Shake well.
What do you observe? Record your observations in the following table:
Test tube Is lather formed?
Yes/No
Is hardness removed?
Yes/No
No.l
No.2
Student Handout 4
When metal ions are present with chloride or sulphate ions in water, it is said to be permanently hard. Can we
remove this hardness by boiling?
Take equal quantities of distilled water in three test tubes. Label the test tubes 1, 2 and 3. Dissolve a pinch of
calcium chloride or calcium sulphate in each of these test tubes. Add soap solution prepared in distilled water to
test tube 1 and shake well. Is any lather formed?
Heat test tube 2 so that its contents boil. Add soap solution. Shake well. Is any latherformed?
Add washing soda (Na^CCb) to test tube 3. Add soap solution. Shake well. Is any lather formed?
Record your observations in the following table:
Test tube Is any lather
formed?
Yes/No
Has the quality of What is the quality
water changed? ofwater?
Yes/No Hard/Soft
No. 1
No.2
No. 3
1. What is your conclusion?
2. What according to you is the effect of washing soda?

Student Handout 5
Take 4 to 5 test tubes fılled with equal quantities of soft water. Take 4 to 5 different
types of soap available in the market and mark both the soaps and the test tubes as A,
B, C, ... Prepare solutions from each type of soap. Add the solution from each soap to
the test tube with the same label. Shake well and record your observations about the
lather formed in each case. Does every soap solution lather equally well? Repeat the
activity using hard \vater.
Soft water
Hard water
Soap used Gradation in
respect to the
formation of
lather as 1, 2, 3,
4&5.
Which soap
formed gives
the most lather
and which the
least?
Gradation in
respect to the
formation of
lather as 1, 2, 3,
4. &5.
Which soap
formed gives
the most lather
and which the
least?
A
B
C
D
E
Student Handout 6
Soap is the sodium salt of fatty acids. You can prepare soap in the laboratory or at home.
What you need is: vegetable oil (castor or cotton-seed oil), caustic soda (sodium hydroxide), sodium chloride, a
beaker, a spirit lamp and an iron stand with wire gauze.
Take some castor oil in a beaker. Add an equal volume of sodium hydroxide solution to it. Heat the mixture till a
paste of soap is formed. On cooling, the solid soap will separate out. Since castor oil contains glyceryl oleate
ester, the soap formed is sodium oleate.
Student Handout ?
You have learnt that soap is not suitable for washing clothes with hard water because a large amount of soap is
wasted in reaction with the calcium and magnesium ions found in hard water. This results in the formation of an
insoluble precipitate called scum. This scum sticks to the clothes being washed and interferes with the cleaning
ability of the soap. Getting clothes clean is therefore difficult. This can be overcome by using another kind of
cleaning agent known as a synthetic detergent. These detergents are called 'soap-less-soaps' because although
they act like soap in having cleansing properties, they do not contain the chemicals like sodium stearate that
soaps usually have. Synthetic detergents are berter cleansing agents than soaps because they do not form
insoluble calcium and magnesium salts with hard water.
Repeat the activities of Student Handout 3 using detergent instead of soap solution. Record your observations.
Does detergent form lather with hard water? Compare the formation of lather by detergents with the formation of
lather with soap.
Student Handout ?
Synthetic detergents have many advantages över soaps. They can be used with hard water. They are prepared
from the hydrocarbons of petroleum and therefore cut down on the use of vegetable oils. However, detergents
are not biodegradable and therefore remain in water bodies for a long time, making the water unfıt for aquatic
life. The phosphate salts present in synthetic detergents cause the rapid growth of algae in rivers and lakes. This
causes de-oxygenation of the water and is highly harmful for aquatic life.
Since detergents particularly, phosphate detergents, cause pollution of water, is it proper to use them?
Undertake suitable investigations and fınd out which is the cheapest method of making hard water soft.
Medicinal Plants found in the Locality
H R Dubay, V R Sharma and S Mirsi
Grade level: Classes VI – VIII
Introduction
There are many plants growing in our neighbourhood. Some of these plants are said to have medicinal value and
some of their parts are used for curing diseases. However, most of us are not aware of the medicinal properties of
such plants.
Educational Objectives
Social Values
1. Decide, with justification the need to cultivate plants that have medicinal value.
Science Process
1. Explain the manner in which medicinal plants can help combat diseases.
2. Classify different types of medicinal plants.
3. List some of the commonly known medicinal plants and their uses.
Personal Skills
1. Co-operate within a group for undertaking activities related to medicinal plants.
2. Communicate through charts and tables the medicinal plants in your vicinity.
Scientific Concepts involved
1. Srudy of the parts of medicinal plants.
2. Awarenes. of the function of medicinal plants in curing diseases.
Teaching/Iear nig materials
i medicina' plants
ii reference books on medicinal plants
iii seeds and other vegetative parts of these plants, a few basic agricultural tools, manure and earthen pots.
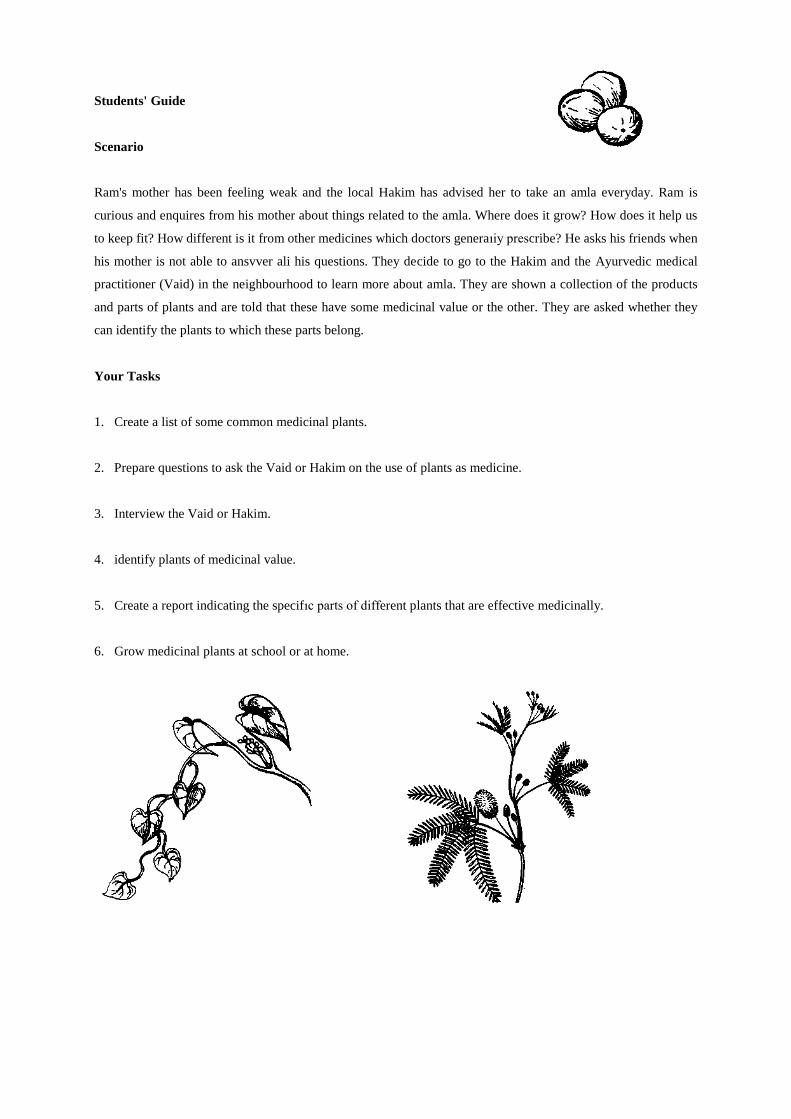
Students' Guide
Scenario
Ram's mother has been feeling weak and the local Hakim has advised her to take an amla everyday. Ram is
curious and enquires from his mother about things related to the amla. Where does it grow? How does it help us
to keep fit? How different is it from other medicines which doctors generaıiy prescribe? He asks his friends when
his mother is not able to ansvver ali his questions. They decide to go to the Hakim and the Ayurvedic medical
practitioner (Vaid) in the neighbourhood to learn more about amla. They are shown a collection of the products
and parts of plants and are told that these have some medicinal value or the other. They are asked whether they
can identify the plants to which these parts belong.
Your Tasks
1. Create a list of some common medicinal plants.
2. Prepare questions to ask the Vaid or Hakim on the use of plants as medicine.
3. Interview the Vaid or Hakim.
4. identify plants of medicinal value.
5. Create a report indicating the specifıc parts of different plants that are effective medicinally.
6. Grow medicinal plants at school or at home.
Teacher's Guide
Suggested Teaching Strategy
1. Conduct a brainstorming session about plants that have medicinal value.
2. Guide students in identifying common medicinal plants like tulsi, amla, onion, garlic, mint, jamun, turmeric,
ginger, lemon, neem from a set of unlabelled pictures.
3. Ask students to prepare questions that they can ask about these plants from the local practitioner of
indigenous medicine.
4. With the help of a local Vaid or Hakim ask students to recognise various parts of the plants identified above.
5. Ask students to create tables, charts ete. about medicinal plants and their medicinal value.
6. Encourage students to cultivate medicinal plants at home.
Relating Tasks to Objectives
Objectives Tasks
Decide with justification the need to cultivate plants that have medicinal value. 1,3
Classify medicinal plants. 2
Co-operate within a group for gathering information. 5
Communicate through charts and tables to illustrate the advantages of medicinal plants. 5
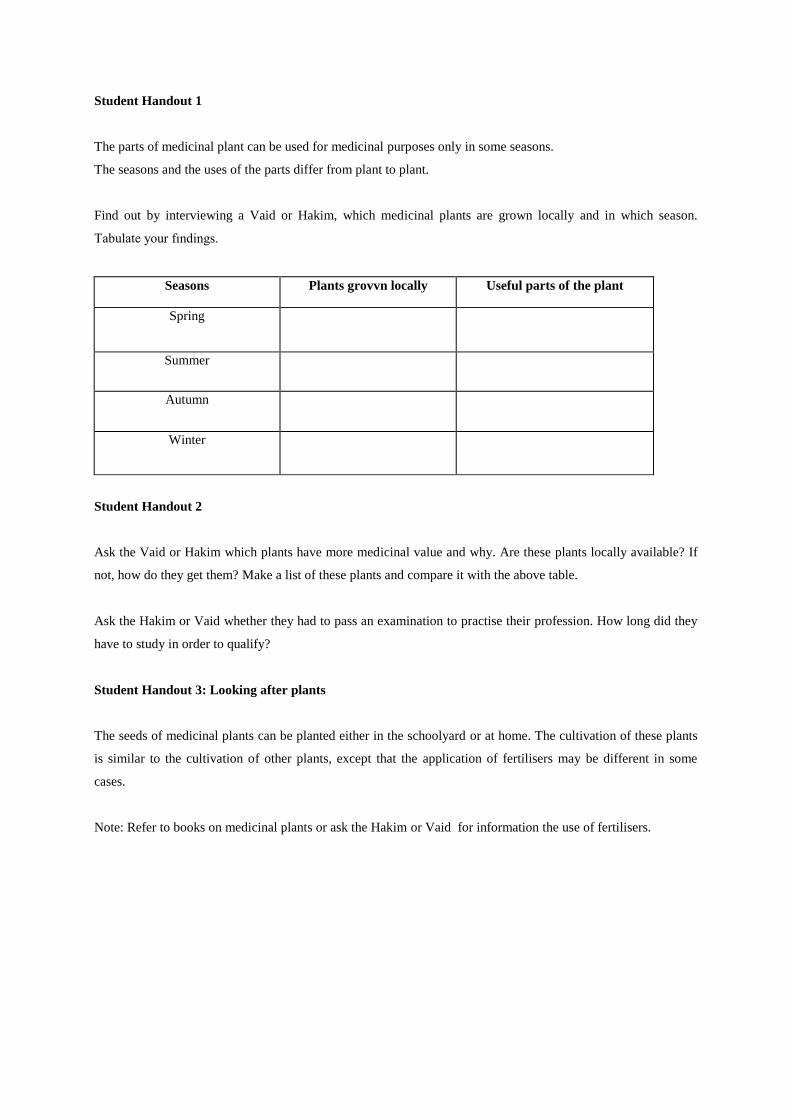
Student Handout 1
The parts of medicinal plant can be used for medicinal purposes only in some seasons.
The seasons and the uses of the parts differ from plant to plant.
Find out by interviewing a Vaid or Hakim, which medicinal plants are grown locally and in which season.
Tabulate your fındings.
Seasons Plants grovvn locally Useful parts of the plant
Spring
Summer
Autumn
Winter
Student Handout 2
Ask the Vaid or Hakim which plants have more medicinal value and why. Are these plants locally available? If
not, how do they get them? Make a list of these plants and compare it with the above table.
Ask the Hakim or Vaid whether they had to pass an examination to practise their profession. How long did they
have to study in order to qualify?
Student Handout 3: Looking after plants
The seeds of medicinal plants can be planted either in the schoolyard or at home. The cultivation of these plants
is similar to the cultivation of other plants, except that the application of fertilisers may be different in some
cases.
Note: Refer to books on medicinal plants or ask the Hakim or Vaid for information the use of fertilisers.

How Safe is mv Glass of Water?
B N Choudhary
Grade Ievel: Classes VI-VIII
Introduction
Water meant for drinking should be transparent, colourless and odourless. in towns and cities, people depend
mainly on tap water or water from tube vvells for drinking purposes. in villages and far-flung areas, other
sources of water like rivers, nallahs. ponds and even pools of rainwater are sometimes used for drinking.The
water from these sources may not always be fit for human consumption. Even a glass of seemingly püre
(transparent) water may not be safe at ali.
The water that seems püre may contain a large number of dissolved impurities and millions of small living
organisms. This impure or polluted water can be a source of diseases like diarrhoea, cholera, typhoid, and
infestations by roundworms, ete.
Educational Objectives
Social Values
1. Decide how people can best determine whether their drinking water is safe.
Science Process
1. Devise simple methods for testing drinking water.
Personal Skills
1. Communicate within groups through discussions and by creating posters, charts. etc. About how to make
water safe for human consumption.
2. Co-operaıe as u member of a group while undertaking experimental work.
3. Record experimental fındings in the correct format.
Science Concepts
1. Understand what is meant by safe water.
2. Explain methods that can be used to eheck the purity of water.
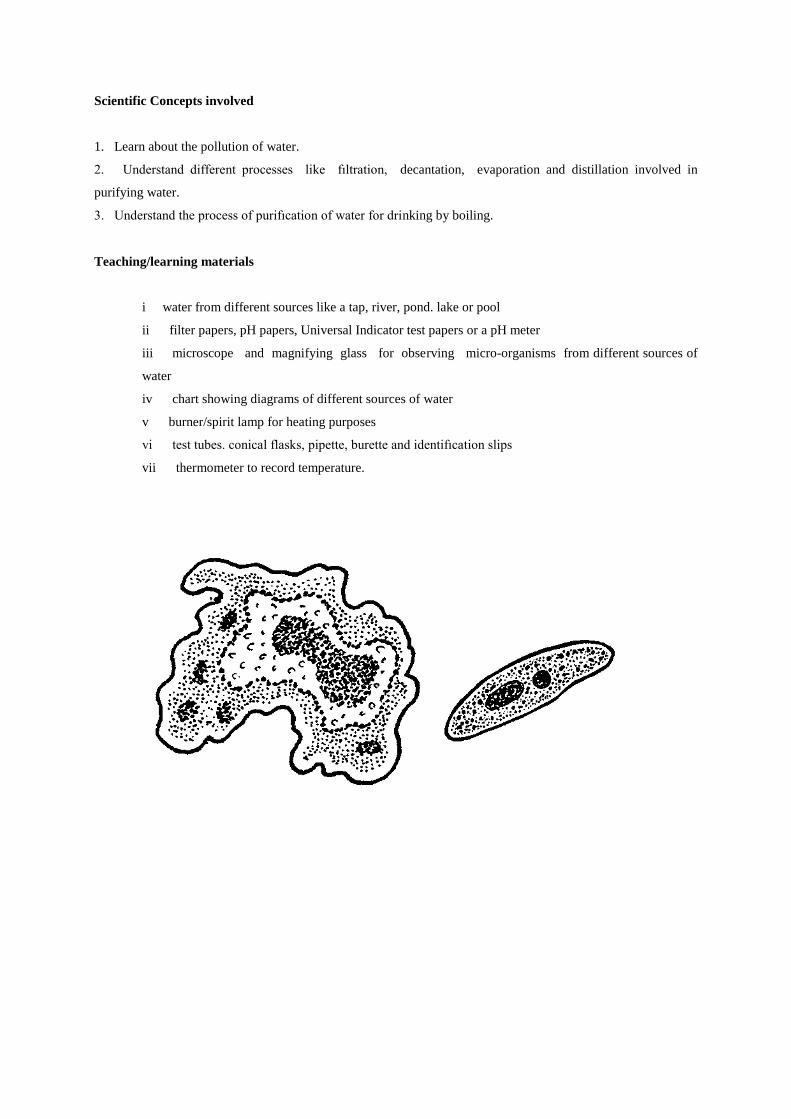
Scientific Concepts involved
1. Learn about the pollution of water.
2. Understand different processes like fıltration, decantation, evaporation and distillation involved in
purifying water.
3. Understand the process of purifıcation of water for drinking by boiling.
Teaching/learning materials
i water from different sources like a tap, river, pond. lake or pool
ii filter papers, pH papers, Universal Indicator test papers or a pH meter
iii microscope and magnifying glass for observing micro-organisms from different sources of
water
iv chart showing diagrams of different sources of water
v burner/spirit lamp for heating purposes
vi test tubes. conical flasks, pipette, burette and identifıcation slips
vii thermometer to record temperature.
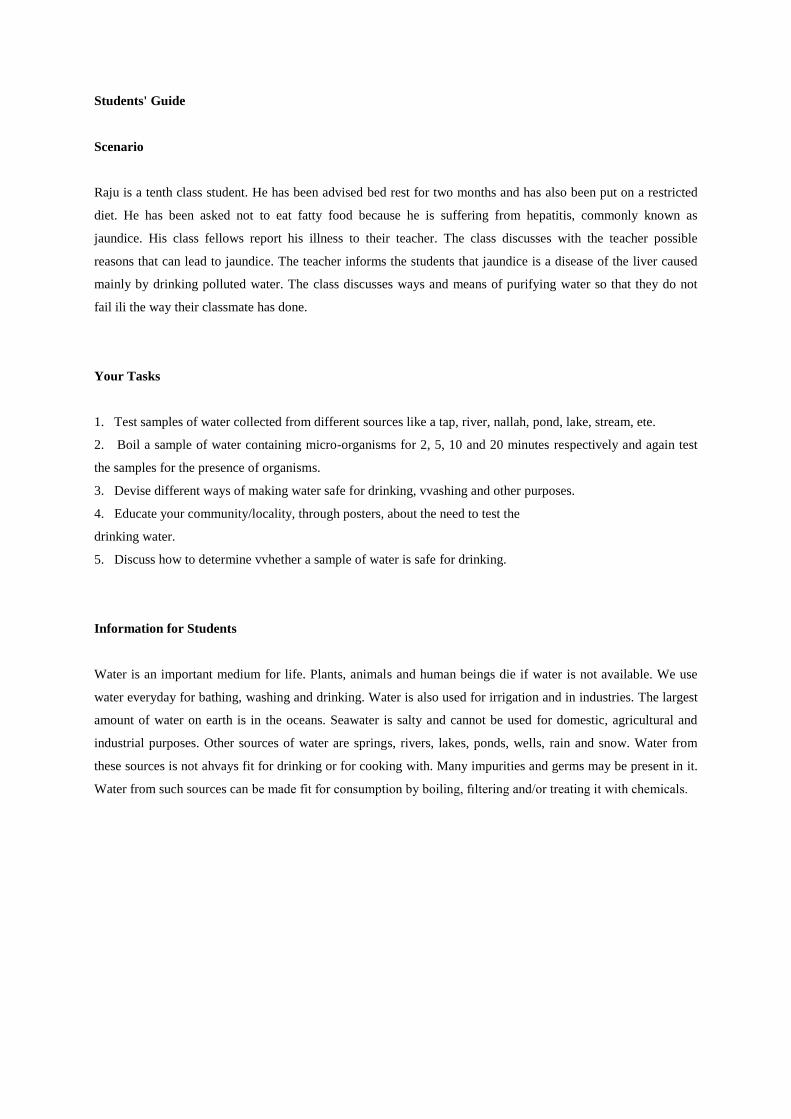
Students' Guide
Scenario
Raju is a tenth class student. He has been advised bed rest for two months and has also been put on a restricted
diet. He has been asked not to eat fatty food because he is suffering from hepatitis, commonly known as
jaundice. His class fellows report his illness to their teacher. The class discusses with the teacher possible
reasons that can lead to jaundice. The teacher informs the students that jaundice is a disease of the liver caused
mainly by drinking polluted water. The class discusses ways and means of purifying water so that they do not
fail ili the way their classmate has done.
Your Tasks
1. Test samples of water collected from different sources like a tap, river, nallah, pond, lake, stream, ete.
2. Boil a sample of water containing micro-organisms for 2, 5, 10 and 20 minutes respectively and again test
the samples for the presence of organisms.
3. Devise different ways of making water safe for drinking, vvashing and other purposes.
4. Educate your community/locality, through posters, about the need to test the
drinking water.
5. Discuss how to determine vvhether a sample of water is safe for drinking.
Information for Students
Water is an important medium for life. Plants, animals and human beings die if water is not available. We use
water everyday for bathing, washing and drinking. Water is also used for irrigation and in industries. The largest
amount of water on earth is in the oceans. Seawater is salty and cannot be used for domestic, agricultural and
industrial purposes. Other sources of water are springs, rivers, lakes, ponds, wells, rain and snow. Water from
these sources is not ahvays fit for drinking or for cooking with. Many impurities and germs may be present in it.
Water from such sources can be made fit for consumption by boiling, fıltering and/or treating it with chemicals.
Teacher's Guide
Suggested Teaching Strategy
1. Hold a brainstorming session on the reasons that can lead to someone getting Jaundice.
2. Discuss ways and means of purifying water for drinking purposes.
3. Instruct students how to carry out different activities for checking the purity and potability of water.
Relating Tasks to Objectives
Objectives Tasks
Decide how people can best determine whether their water is safe for drinking. 1,2,3
Devise methods for checking the purity of water at regular intervals. 1,2,3
Communicate in a group through discussions and vvhile creating posters, charts, ete. 4,5
Co-operate as a member of a group in discussions and vvhile performing
experiments.
1,2,3,4,5
Understand what is meant by safe water. 4
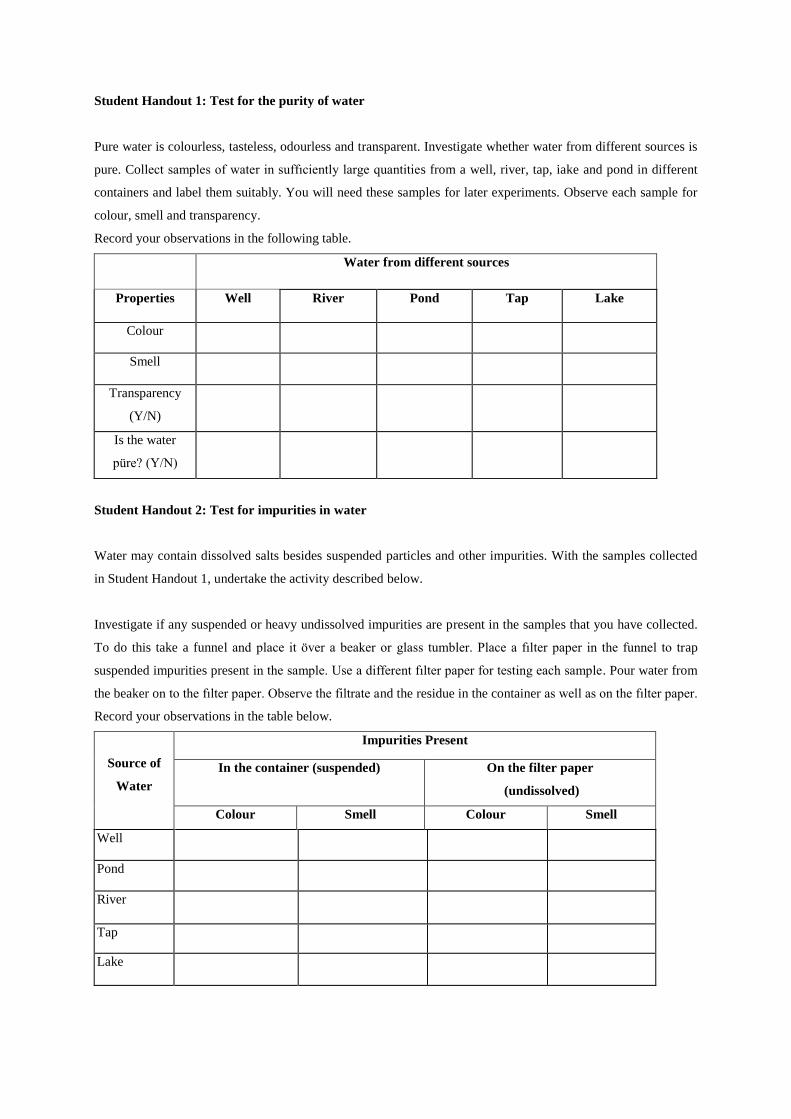
Student Handout 1: Test for the purity of water
Pure water is colourless, tasteless, odourless and transparent. Investigate whether water from different sources is
pure. Collect samples of water in suffıciently large quantities from a well, river, tap, iake and pond in different
containers and label them suitably. You will need these samples for later experiments. Observe each sample for
colour, smell and transparency.
Record your observations in the following table.
Water from different sources
Properties Well River Pond Tap Lake
Colour
Smell
Transparency
(Y/N)
Is the water
püre? (Y/N)
Student Handout 2: Test for impurities in water
Water may contain dissolved salts besides suspended particles and other impurities. With the samples collected
in Student Handout 1, undertake the activity described below.
Investigate if any suspended or heavy undissolved impurities are present in the samples that you have collected.
To do this take a funnel and place it över a beaker or glass tumbler. Place a fılter paper in the funnel to trap
suspended impurities present in the sample. Use a different fılter paper for testing each sample. Pour water from
the beaker on to the fılter paper. Observe the filtrate and the residue in the container as well as on the fılter paper.
Record your observations in the table below.
Source of
Water
Impurities Present
In the container (suspended) On the filter paper
(undissolved)
Colour Smell Colour Smell
Well
Pond
River
Tap
Lake
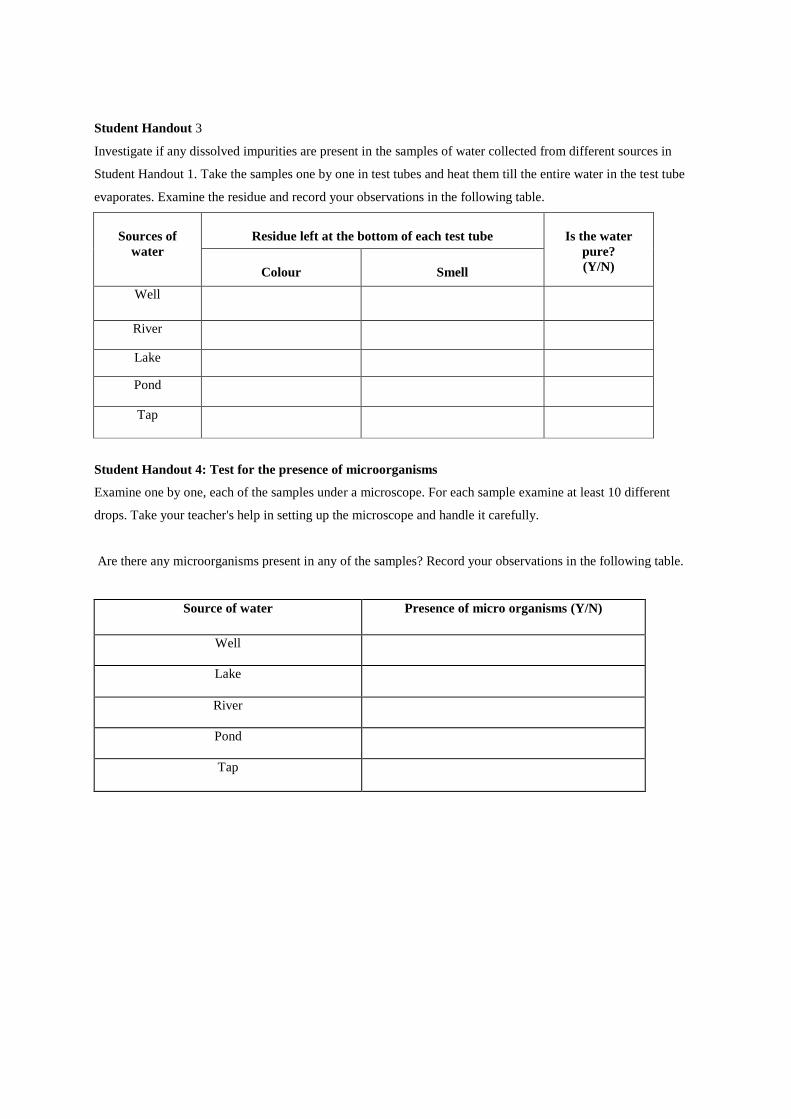
Student Handout 3
Investigate if any dissolved impurities are present in the samples of water collected from different sources in
Student Handout 1. Take the samples one by one in test tubes and heat them till the entire water in the test tube
evaporates. Examine the residue and record your observations in the following table.
Sources of
water
Residue left at the bottom of each test tube
Is the water
pure?
(Y/N)
Colour
Smell
Well
River
Lake
Pond
Tap
Student Handout 4: Test for the presence of microorganisms
Examine one by one, each of the samples under a microscope. For each sample examine at least 10 different
drops. Take your teacher's help in setting up the microscope and handle it carefully.
Are there any microorganisms present in any of the samples? Record your observations in the following table.
Source of water Presence of micro organisms (Y/N)
Well
Lake
River
Pond
Tap
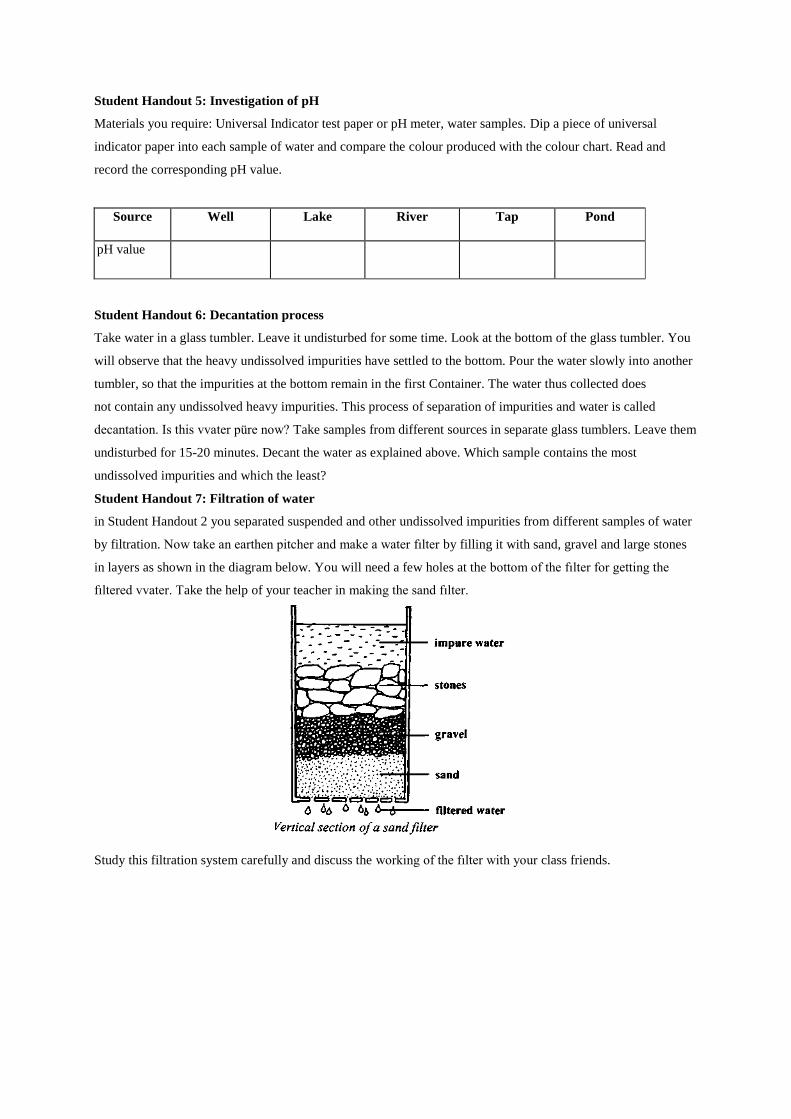
Student Handout 5: Investigation of pH
Materials you require: Universal Indicator test paper or pH meter, water samples. Dip a piece of universal
indicator paper into each sample of water and compare the colour produced with the colour chart. Read and
record the corresponding pH value.
Source Well Lake River Tap Pond
pH value
Student Handout 6: Decantation process
Take water in a glass tumbler. Leave it undisturbed for some time. Look at the bottom of the glass tumbler. You
will observe that the heavy undissolved impurities have settled to the bottom. Pour the water slowly into another
tumbler, so that the impurities at the bottom remain in the first Container. The water thus collected does
not contain any undissolved heavy impurities. This process of separation of impurities and water is called
decantation. Is this vvater püre now? Take samples from different sources in separate glass tumblers. Leave them
undisturbed for 15-20 minutes. Decant the water as explained above. Which sample contains the most
undissolved impurities and which the least?
Student Handout 7: Filtration of water
in Student Handout 2 you separated suspended and other undissolved impurities from different samples of water
by filtration. Now take an earthen pitcher and make a water fılter by filling it with sand, gravel and large stones
in layers as shown in the diagram below. You will need a few holes at the bottom of the fılter for getting the
fıltered vvater. Take the help of your teacher in making the sand fılter.
Study this filtration system carefully and discuss the working of the fılter with your class friends.
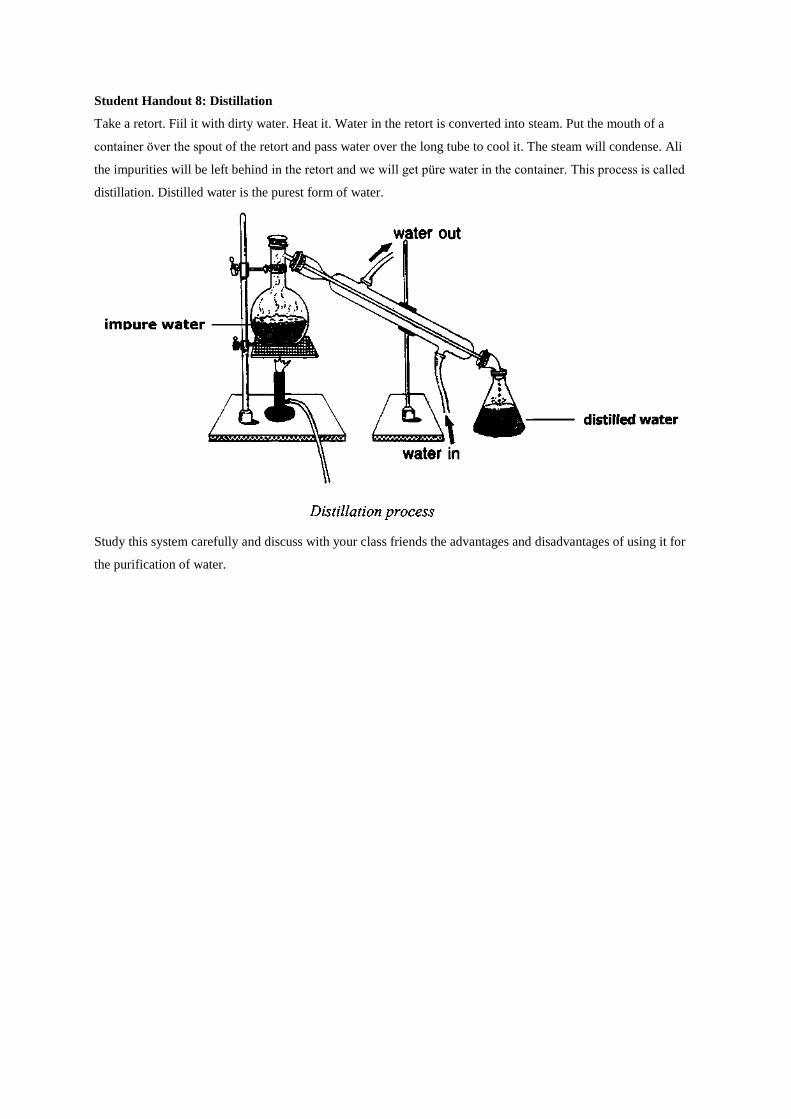
Student Handout 8: Distillation
Take a retort. Fiil it with dirty water. Heat it. Water in the retort is converted into steam. Put the mouth of a
container över the spout of the retort and pass water over the long tube to cool it. The steam will condense. Ali
the impurities will be left behind in the retort and we will get püre water in the container. This process is called
distillation. Distilled water is the purest form of water.
Study this system carefully and discuss with your class friends the advantages and disadvantages of using it for
the purification of water.
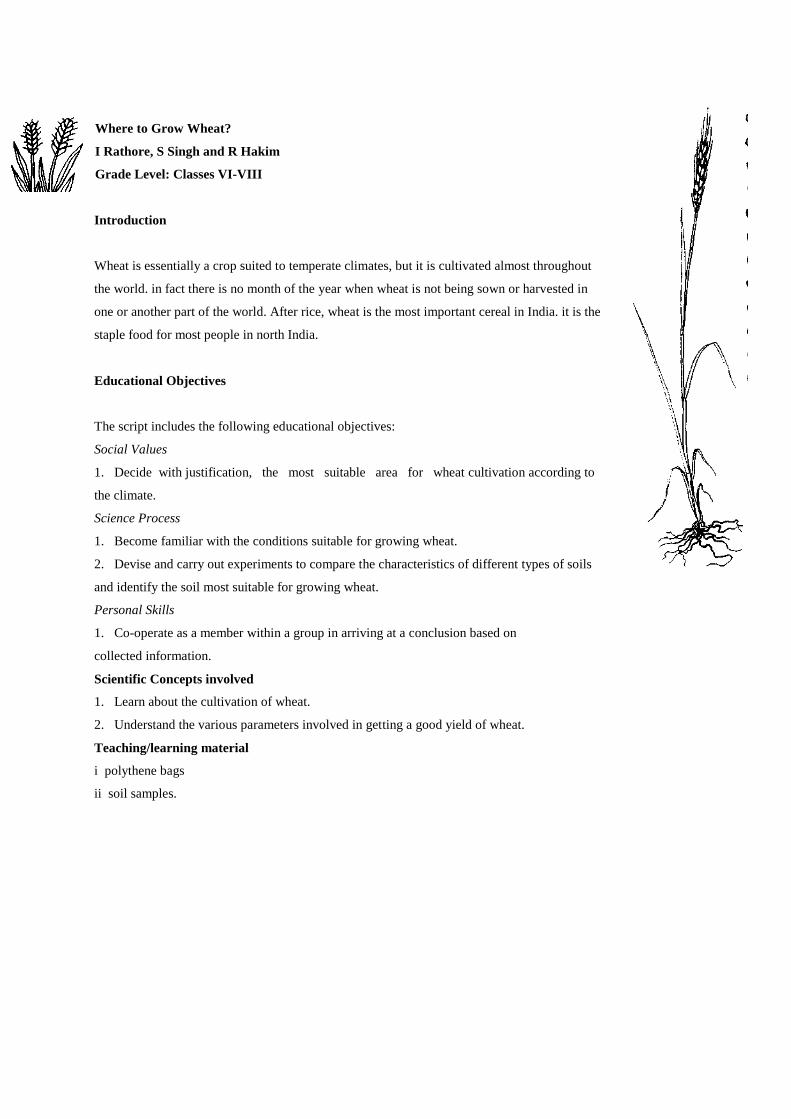
Where to Grow Wheat?
I Rathore, S Singh and R Hakim
Grade Level: Classes VI-VIII
Introduction
Wheat is essentially a crop suited to temperate climates, but it is cultivated almost throughout
the world. in fact there is no month of the year when wheat is not being sown or harvested in
one or another part of the world. After rice, wheat is the most important cereal in India. it is the
staple food for most people in north India.
Educational Objectives
The script includes the following educational objectives:
Social Values
1. Decide with justification, the most suitable area for wheat cultivation according to
the climate.
Science Process
1. Become familiar with the conditions suitable for growing wheat.
2. Devise and carry out experiments to compare the characteristics of different types of soils
and identify the soil most suitable for growing wheat.
Personal Skills
1. Co-operate as a member within a group in arriving at a conclusion based on
collected information.
Scientific Concepts involved
1. Learn about the cultivation of wheat.
2. Understand the various parameters involved in getting a good yield of wheat.
Teaching/learning material
i polythene bags
ii soil samples.

Students' Guide
Scenario
Smali is a village with a growing population. The people are generally
poor and can hardly make both ends meet. Up till now, the land
available for growing crops has not been used to its maximum capacity.
Wheat is the staple food of the villagers. Due to increasing population,
the quantity of wheat produced in the village has become insuffıcient.
So the villagers have decided to increase the acreage under wheat
cultivation. it is important for them to fınd out which areas are suitable
for growing wheat. Your class is approached for advice on the matter. The following information is available
about the various areas that are available for cultivation:
(The areas available are designated as :A', 'B' and 'C'.)
Objectives Area A Area B Area C
Type of soil Clayey Laterite Loamv
Vegetation Grass and shrubs Grass and shrubs Grass
Location Close to the village Partly in the village Entirely in the
village
Distance from
source of water
4km 2 km 1 km
Terrain Low land and
svvampy
Low land and plain Slightly hilly
Your Tasks
in groups of 3 or 4 students, undertake the following tasks:
1. Explain why the cultivation of wheat is important to the villagers.
2. Indicate what conditions are necessary for growing \vheat (collect information
from villagers, books, etc).
3. Devise experiments to determine which type of soil listed in the table above is
suitable for growing wheat.
4. Put fonvard ways in which soil in each area could be improved to increase the
yield of wheat.
5. Comment on the facility for irrigation available in each of the areas.
6. Based on your fındings indicate the area most suitable for grovving wheat.
7. Describe the likely impact the cultivation of wheat on the vacant plot will have
on the villagers and the environment.
Teacher's Guide
Suggested Teaching Strategy
1. After discussing the scenario, hold a brainstorming session to find out the
importance of growing wheat.
2. Ask students to find out the type of soil available in each area and identify the
soil best suited for grovving wheat by referring to books or asking farmers.
3. The students should also be asked to list other requirements like irrigation
facilities, time of sowing, fertilisers, ete. for growing wheat.
4. Ask students to discuss the suitability of each site listed and identify the one that
is best suited for growing wheat.
Information for Teachers
Structure of Soil
Teachers should refer to the "Information for Teachers" in the unit "How can we Manage a Kitchen Garden?" for
some basic information on soils.
The soil available determines what types of plants can be grown on it and the plants in turn affect the soil by the
process of decomposition. The amount of organic matter present in a soil has a direct relation to its \vater
retention capacity. The water content of a soil is very important for plants. as they get most of their water from
the soil.
A brief account of the characteristics of different soil types is given below:
Sand Şilt Loam Clay
Aeration Good Fair Good Poor
Water
filtration
Good Fair Poor Very poor
WorkabiIity Good Fair Fair Poor
Water
retention
Poor Fair Good Good
Ion exchange
capacity
Poor Poor Good Good
Wheat is the leading food erop of our country. It is a Rabi or a winter erop. It requires well-drained soils
receiving on an average 50-75 cm of rainfall annually. Wheat requires rain during its early period of growth. At
the time of ripening though, it requires warm and sunny weather.

Relating Tasks to Objectives
Objectives Tasks
Decide on the suitability of an area for cultivation of wheat. 2, 3, 4, 5, 6
Justify the decision taken for cultivation of wheat and the suitability of
the area chosen.
3, 4, 5, 6, 7
Compare the properties of different types of soil. 3,4,6
Present your knowledge in a suitable form to villagers. 1,7
Student Handout 1
Collect a sample of soil each from the areas which are similar to those marked A, B and C in the Scenario.
Spread a thin layer of these samples and examine them using a magnifying glass. Record your observations.
Indicate what type of soil is present in the three areas.
Sample Area A Area B Area C
Gravel particles
Sand particles
Clay particles
Discuss with your teacher v/hich of these areas is more suitable for grovving wheat and why.
Student Handout 2
Put the samples collected in Student Handout 1 in three different jars. Mark the jars 'A', 'B' and 'C according to
the soil placed in them. Pour water in each jar and stir well. Let the contents settle down. Do you find fıner
particles of clay and organic matter floating on top of the water? Where are the heavier particles? What
constitutes the heavier particles? Record your observations. which of these areas are more suitable for growing
wheat?
Student Handout 3
Soils not only differ in the size and shape of their particles but also in their capacity to hold water. Take soil
samples from the three areas in three different jars or beakers. Mix each sample separately with \vater. Knead
and mould these into shapes.
Which sample is molded easily?
Which is not molded at all?
Which sample has more capacity for holding water?
Which sample is more suitable for growing wheat?

Student Handout 4
Here is a list of some of the requirements for growing wheat:
The crop fıeld should be öpen so that sunlight and air are available in abundance. The fıeld should be protected
from stray cattle and other trespassers like wild animals that may destroy the crop. Appropriate amounts of water
should be available. The soil should contain sufficient nutrients for the healthy growth of plants.
On the basis of the overall information available, identify the area best suited for growing vvheat. What vvill be
the impact of growing wheat on the environment of the area?
Prepare a presentation for the villagers, based on all you have done and observed, on the cultivation of wheat.
Assessment
An assessment of the achievement of the objectives of this instructional material can be done both through
formative as well as summative methods.
Formative Assessment Strategies
Social Values Grade
A. Unable to decide on the suitability or othenvise of an area for growing wheat.
B. Able to justify the decision with regard to suitability of land for growing wheat.
C. Not only able to justify the decision taken but also relate it to economic concerns of the people.
Science Method Grade
A. Not able to effectively analyse the data given in the tabular format and also not able to compare the
properties of the different soils.
B. Able to analyse the tabular data and able to cornpare different soils so that decisions can be made on the area
best suited for grovving wheat.
C. Able to analyse the data and also compare the data so that decisions can be made regarding economic self-
sufficiency with due regard for environmental concerns.
Personal Skills Grade
A. Does not participate in the discussions and depends on others to analyse the data.
B. Willing to participate in the discussions and to put fonvard opinions.
C. Able to lead the discussion and also guide others to formulate an opinion on the basis of various factors
present.
Science Concepts Grade
A. Has little understanding about the grovvth of wheat plants and the part played by the soil in its cultivation.
B. Able to explain the function of soil in the cultivation of wheat.
C. Able to explain the function of soil in maximising the production of wheat.
Summative Assessment Strategies
Social Values Grade
A. Report does not indicate the decision taken with regard to the suitability of an area for grovving wheat.
B. Report justifıes the decision taken in respect of suitability of an area for growing wheat.
C. Report not only justifıes decision taken in respect of suitability of land for growing wheat but also in relation
to the concerns of the people as well as the need for sustainable development.
Science Concept Grade
A. Report either not written or, if produced, shows poor understanding of soil formation or the role of soil in
growing plants.
B. Report shows an understanding of different soils and their advantages.
C. Report shows an understanding of soil and also explains how to treat soil tok maximise production and
illustrates how soil can be treated to maximise the production of wheat.
Why do People in my Locality suffer from Tuberculosis?
I Rathore, S Javed and R Hakim
Grade Level: Classes VI-VIII
Introduction
Tuberculosis (TB) has been one of the world's worst killer diseases. The disease is
caused by a fungus-like bacterium called mycobacterium tuberculosis sometimes
referred to as the tubercle bacillus. Bacilli are rod shaped bacteria. The most
common form of the disease is pulmonary TB that infects the lungs, although other
organs may also be affected by it. This is caused by inhaling the bacteria. The
disease is associated with overcrowded living conditions, particularly where there
is poor ventilation. Though the disease is preventable and treatable it has been
neglected grossly.
Educational Objectives
The script involves the following objectives:
Social Values
1. Decide, with justifıcation, the need for proper ventilation of houses.
2. Decide, with justification, what steps should be taken to eradicate this disease.
3. Highlight the responsibilities of members of society in controlling the disease.
Personal Skills
1. Participate, discuss and co-operate as a member of a group.
2. Make oral and written reports after undertaking various activities.
Science Concepts
1. T B spreads through air and is an air-borne disease.
2. T B is preventable as well as treatable.
Scientific Concepts involved
1. Tuberculosis is caused by the tubercle bacillus, bacilli being rod shaped bacteria.
2. Tuberculosis can affect almost any tissue or organ in the body, but disease of the lungs is the most frequent
form of occurrence.
3. The outcome of infection by the tubercle bacilli depends on a variety of factors. These include the age of the
patient, the state of nutrition and the presence or absence of immunity. Immunity can be acquired by an
individual as a result of a previous mild infection or by vaccination.
Teaching/learning materials
i charts or posters showing general health condition of people living in congested/dark and dingy
areas
ii background information about the causes of the spread of TB
iii audio-visual films on TB
iv x-ray of TB patients to identify the organs affected by the disease.
Students' Guide
Scenario
Akranı is a class VII student. He belongs to a poor family of Gujars. He lives with his parents in Zaoora village
situated in Shopian tehsil. Akram keeps poor health. He has been diagnosed as suffering from TB and has
recently been admitted to the Chest Diseases Hospital in Srinagar for treatment. His friends visit the hospital to
enquire about his health.
Your Tasks
1. Find out from health workers the signs and symptoms of TB and the ways in which it can be transmitted.
2. Working in groups of 3 or 4, make a survey of your locality to fınd if there are any TB patients.
3. in groups, go around the area where you live, and identify various unhygienic sites that could serve as
potential sources of infection. Prepare a map of the locality and indicate such areas.
4. Find out from a health worker or other sources of information how the disease can be treated and prevented.
5. Discuss in groups the responsibility of society towards TB patients as well as the means of prevention of the
disease.
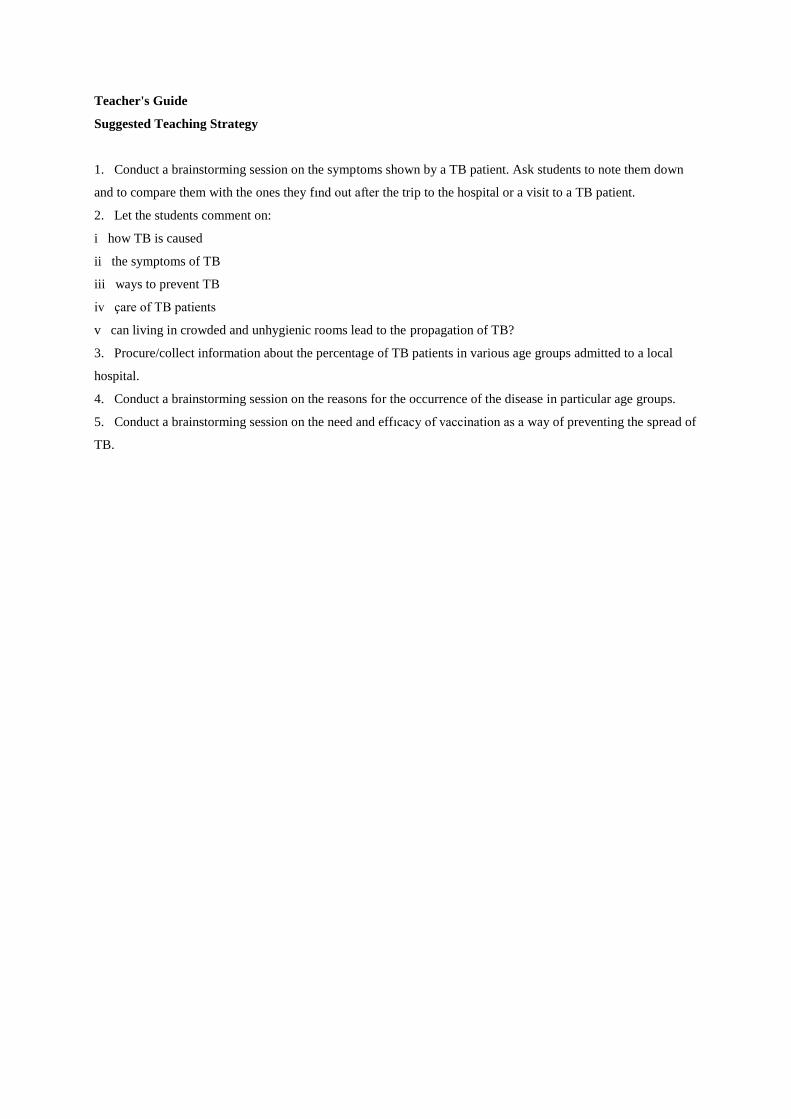
Teacher's Guide
Suggested Teaching Strategy
1. Conduct a brainstorming session on the symptoms shown by a TB patient. Ask students to note them down
and to compare them with the ones they fınd out after the trip to the hospital or a visit to a TB patient.
2. Let the students comment on:
i how TB is caused
ii the symptoms of TB
iii ways to prevent TB
iv çare of TB patients
v can living in crowded and unhygienic rooms lead to the propagation of TB?
3. Procure/collect information about the percentage of TB patients in various age groups admitted to a local
hospital.
4. Conduct a brainstorming session on the reasons for the occurrence of the disease in particular age groups.
5. Conduct a brainstorming session on the need and effıcacy of vaccination as a way of preventing the spread of
TB.

Student Handout 1
Make a survey of your locality and fmd out if there are any TB patients. in case there are any, fmd how many of
them are children, how many are adult males and how many are adult females. What symptoms do TB patients
sho\v? Record your observations/findings in the following table:
Number of TB patients Symptoms
Children
Adult males
Adult females
Student Handout 2
Visit a local hospital and fınd out how many TB patients are children. males (adults) and females (adults). How
many of the patients belong to rural areas and how many tok urban areas? What is the general occupation of
these patients? Get further information about TB patients from a doctor who attends them. Record your fındings
in the following table:
Name of the hospital visited:
Description
Number of
admitted
TB patients Number of TB patients
treated as out-patient cases
of patients Urban Rural Urban Rural
Small children
Adult males
Adult females
Elderly
Others
For all of the above categories of patients:
Ask the doctor about their treatment.
Collect information about the vaccine given to such patients.
Collect information about the antibiotics, if any, given to the patients.
Collect information about how and when the patients caught TB by talking with their attendants.

Student Handout 3
Collect the chest x-ray of a TB patient. Also collect the chest x-ray of any person who is not suffering from TB.
Compare the two x-rays. How are the two different from each other? How are they similar? Record your
observations.
Student Handout 4
For the purposes of completing this handout properly you may seek information from books, clinics, hospitals
and other sources. You may also use the information you have already collected.
1. How can TB be prevented and treated?
2. Whatarethecausesoftuberculosis?
3. Name the bacteria that transmit the disease.
4. Name the organs mostly affected by TB.
5. Which is more infectious, the common cold or tuberculosis?
6. What are the early symptoms of TB?
7. Which of the following are symptoms of TB?
i dry cough
ii appearance of blood in the sputum
iii chest pain
iv shortness of breath
v fever and sweating
vi poor appetite
vii loss of weight.
8. Name the vaccine being used to prevent TB.
9. Name the antibiotic used for the treatment of TB.
10. How can TB be prevented?
11. What is the proper disposal of oral and nasal discharges of TB patients?
Student Handout 5
It has been found that TB is associated with poverty and crowded housing where several persons sleep in one
room. Refugee camps and dormitories for the homeless are two places where it commonly spreads. People
suffering from malnutrition and a weakened immune system have little resistance to the disease. Our Gujars and
Backenvals live along with their cattle, in cattle sheds. Thus the incidence of TB is higher among this
community.
On the basis of this information, prepare a small report on the causes, prevention and treatment of TB. The report
should indicate how the disease can be prevented, particularly among Gujars and Backerwals.

Why is my Tooth Aching?
M A Buchh and S Noor
Grade Level: Classes VI-VIII
Introduction
Teeth are an important part of the body. Good teeth serve many useful purposes. They help us chew the food and
also stimulate the flow of saliva in the mouth. Saliva breaks starchy food into sugar and thus aids digestion.
Saliva flows from three pairs of salivary glands situated in the mouth. it is a colourless fiuid, which contains an
enzyme called ptyalin. Clean and good teeth add to the personal appearance of an individual. People who have
defective teeth cannot chew their food thoroughly. Therefore, teeth are a very precious possession. We should
take çare of our teeth.
Educational Objectives
The script involves the follovving educational objectives:
Social Values
1. Decide, with justifıcation, the need to keep gums and teeth healthy and in good condition.
Science Process
1. Classify teeth into different types.
2. Observe a typical tooth.
3. Undertake activities to fınd what functions different teeth perform.
4. Identify materials that can be used for cleaning teeth.
Personal Skills
1. Participate, discuss and co-operate as a member of a group.
2. Make oral as well as written reports after undertaking the various activities.

Scientific Concepts involved
1. Teeth give expression to the human face.
2. Teeth help us to speak clearly.
3. Teeth help us digest food.
4. Every human being has two sets of teeth for his whole life - temporary or milk teeth and permanent teeth.
5. We have four types of teeth and each of them performs a different function.
6. Teeth decay if they are not kept clean.
7. Decayed teeth cause toothache.
8. Teeth should be cleaned frequently.
Teaching/learning materials
i chart shovving a typical tooth
ii chart showing different types of teeth
iii a mirror
iv miswakh/toothbmsh and paste.

Students' Guide
Scenario
Sonam is in class VII. He frequently complains of toothache. This is affecting his studies. The doctor treating
him has advised extraction of the tooth as it has decayed and cannot be saved. So Sonam is scared. He has also
not done his homework because of his toothache.
The next day in class the teacher explains that bacteria cause tooth decay. Bacteria are microorganisms. The
bacteria putrefy the bits of food that get stuck in the teeth after meals and this leads to tooth decay. This also
causes bad breath and yellowing of the teeth.
Your Tasks
1. Look at your teeth in a mirror and count them. Count your friend's teeth also.
2. Observe and record the different types of teeth.
3. Find out the functions of different types of teeth.
4. Study a tooth and fınd out its different parts and their functions.
5. If some friends in class have suffered from tooth decay, ask them to recall and narrate their experience.
6. Find out the causes of tooth decay.
7. Talk to old persons who have lost their teeth. Can they talk clearly?
8. Find out how having good teeth helps in the digestion of food.
9. Discuss ways and means of keeping teeth clean.

Teacher's Guide
Suggested Teaching Strategy
1. Conduct a brainstorming session on the different types of teeth and their functions.
2. Ask children to talk to an old person who does not possess good teeth and report their experiences.
3. Ask children to talk to persons who have lost several teeth and observe their facial expressions. Ask
them to relate their experiences.
4. Ask children to look in a mirror and count their teeth. Does anyone in the class stili have milk teeth?
5. Ask children to look at their friend's teeth and draw each kind of tooth that they have observed.
6. Conduct a brainstorming session to fınd possible answers to the following questions:
i What is the condition of teeth after eating?
i i What causes dental decay?
iii How does dental decay lead to toothache?
iv How can tooth decay be prevented?
v How can we keep our teeth clean and healthy?
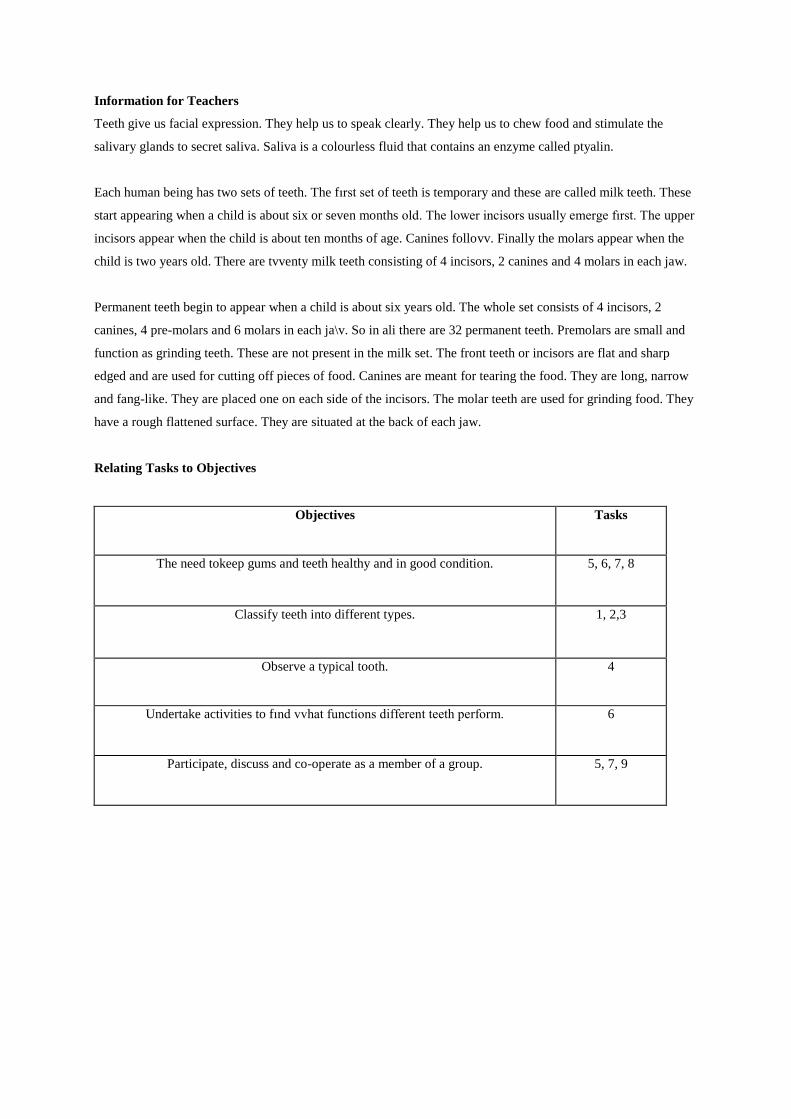
Information for Teachers
Teeth give us facial expression. They help us to speak clearly. They help us to chew food and stimulate the
salivary glands to secret saliva. Saliva is a colourless fluid that contains an enzyme called ptyalin.
Each human being has two sets of teeth. The fırst set of teeth is temporary and these are called milk teeth. These
start appearing when a child is about six or seven months old. The lower incisors usually emerge fırst. The upper
incisors appear when the child is about ten months of age. Canines follovv. Finally the molars appear when the
child is two years old. There are tvventy milk teeth consisting of 4 incisors, 2 canines and 4 molars in each jaw.
Permanent teeth begin to appear when a child is about six years old. The whole set consists of 4 incisors, 2
canines, 4 pre-molars and 6 molars in each ja\v. So in ali there are 32 permanent teeth. Premolars are small and
function as grinding teeth. These are not present in the milk set. The front teeth or incisors are flat and sharp
edged and are used for cutting off pieces of food. Canines are meant for tearing the food. They are long, narrow
and fang-like. They are placed one on each side of the incisors. The molar teeth are used for grinding food. They
have a rough flattened surface. They are situated at the back of each jaw.
Relating Tasks to Objectives
Objectives Tasks
The need tokeep gums and teeth healthy and in good condition. 5, 6, 7, 8
Classify teeth into different types. 1, 2,3
Observe a typical tooth. 4
Undertake activities to fınd vvhat functions different teeth perform. 6
Participate, discuss and co-operate as a member of a group. 5, 7, 9
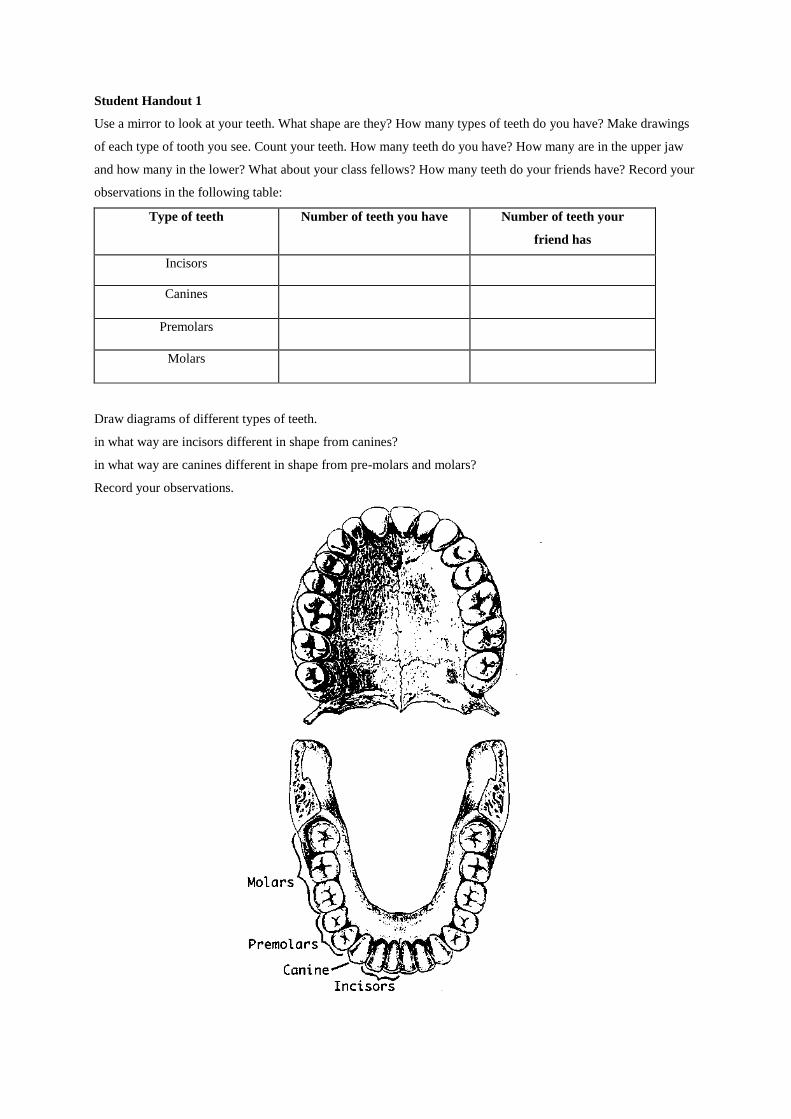
Student Handout 1
Use a mirror to look at your teeth. What shape are they? How many types of teeth do you have? Make drawings
of each type of tooth you see. Count your teeth. How many teeth do you have? How many are in the upper jaw
and how many in the lower? What about your class fellows? How many teeth do your friends have? Record your
observations in the following table:
Type of teeth Number of teeth you have Number of teeth your
friend has
Incisors
Canines
Premolars
Molars
Draw diagrams of different types of teeth.
in what way are incisors different in shape from canines?
in what way are canines different in shape from pre-molars and molars?
Record your observations.

Student Handout 2
We use different types of teeth for different functions. Take a piece of bread. Chew it and record your
observations as you are cutting, tearing and grinding it with your teeth. Which teeth help you in cutting, which in
tearing and which in grinding? Can you grind a piece of bread with the help of your incisors? Complete the
following table:
Teeth Cutting food Tearing food Grinding food
incisors
Canines
Pre-molars
Molars
Student Handout 3
Discuss with you class friends the possible reasons of dental decay. Find answers tok the following questions:
1. What will happen if food particles are left sticking to the teeth?
2. What causes bad breath?
3. Where do the bacteria come from?
4. What causes the decay of teeth?
5. How do cavities form in a tooth?
Student Handout 4
To take çare of the teeth and to know more about the teeth try and answer the follovving:
1. How can you keep your teeth clean and healthy?
2. Can massaging help to keep your gums healthy?
3. How should we massage our gums?
4. How often should a person clean his/her teeth?
5. What materials do you require to keep teeth clean?
6. How should we use a toothbrush or miswakhl

Why should we Preserve the Natural Forest in our Locality?
G A Bhat
Grade level: Classes IX-X
Introduction
A forested area provides a region with economic, scientifıc and
aesthetic value. The practice of concentrating only on the
economic aspects of forest management is posing a threat to the
survival of forests and ali the plant and animals that are a part
of the ecosystem. A forest maintains the land not only by controlling
the rainfall in the area, but also by adding necessary nutrients to the
soil. A forest is also important because it is the home of a number of
insects, plants and animals that survive in a complex food web.
Forests help in keeping our waterways clear by holding the soil and
by preventing floods. We should preserve our forests because they are
an important part of the natural ecosystem and help in the
maintenance of biological diversity.
Educational Objectives
This script includes the follovving educational objectives:
Social Values
1. Decide, with justification, the need for the protection and preservation of different life forms.
Science Process
2. Devise and carry out a field survey and map a maintained forest and compare it with an adjoining deforested
area.
3. Observe and record the physical conditions of the protected and the degraded areas.
4. Collect a variety of insect, plant and animal specimens.
5. Preserve and catalogue the specimens in a scientifıc way.
6. Use scientifıc nomenclature for the identifıcation of local plant, insect and other animal species.
7. Estimate the plant, insect and other animal densities, diversities and abundances in the forest areas.
Personal Skills
1. Communicate and co-operate within a group.
Science Concepts
1. Understand the meaning of habitat. ecosystem, food chain, trophic levels, food web and the interdependence
of organisms.
2. Compare the plant, insect and other animal species present in the two comparable areas (protected and
unprotected).
3. Understand the economic importance of the various plant, insect and other animal species.
Scientific Concepts involved
1. The deforestation of a habitat.
2. The functioning of the food chain and the food web.
3. The importance of trophic levels in an organism's life cycle.
4. The interdependence of organisms for survival.
Teaching/learning materials
i collecting kits
ii pruning scissors
iii plant press/a heavy book
iv camera and films/colouring material and paper
v polythene bags
vi binoculars
vii magnifying glass
viii thermometer
ix survey map of the area.

Students' Guide
Scenario
Harvan is a mountain valley, surrounded by hills. A portion of the landscape continues to have forest cover,
while others have lost such cover due to human intervention. The loss of forest cover has adversely affected the
physical and biological environments. Soil erosion resulting from deforestation has clogged the nearby water
reservoir. There is much silting and the reservoir has becoming shallow. Some of the trout spavvning beds in the
nearby streams have been destroyed due tok this silting. Apart from being a source of timber, Harvan forest is
also valuable as a wildlife habitat, for its scenic beauty and for flood and erosion control. Harvan forest is the
abode of the famous Hangul stag. Undesirable human intervention is posing a threat to its existence in the wild.
Creating awareness about the need to protect and preserve various forms of life can stili save this vvildlife
sanctuary. This can be undertaken by preparing a report on the physical conditions of the degraded and the
protected areas. This could include a list of the different kinds of plants and animals seen in each area and their
number.
Your Tasks
Work in small groups to prepare a report based on the follovving activities:
1. Survey the protected and unprotected areas in your immediate neighbourhood and observe the different flora
and fauna present.
2. Record and identify the damage caused to the physical conditions of the unprotected area, due to
deforestation or any other human activity.
3. Collect herbs and twigs of trees in their flowering stages. Mount them after drying them. Compare the two
areas of study for the presence of species and their abundances.
4. Collect and preserve plants, insects and other animal specimens from the two areas.
5. Group the plants, insects and other animals separately and organise them according to the scientifıc
nomenclature.
6. Ask local people about the uses that the plants you have collected are put to and record this information.
7. Record the temperature difference of the air and the soil in the two areas of study.
8. Ask local people about the nature and habits of the animals you have observed or collected from each area.
9. Find individuals or organisations working for the preservation of forests and wildlife in the chosen forest
area. Discuss with them what they are doing for the protection and the preservation of the forests and/or wildlife.
10. Discuss your ideas in class about the importance of forested areas and the ways
to preserve them.

Teacher's Guide
Suggested Teaching Strategy
1. Exhibit maps of the local forest and hold a brainstorming session on the importance of natural forests in
our lives. The session should also discuss the need to protect the forests.
2. Take the students to the boundary where unprotected and protected forest areas meet. Ask them to üst
the differentiating fearures of the rwo areas.
3. Ask students to use the handouts to make observations about the protected and unprotected forest areas.
4. Ask students to collect plants, insect and other animal specimens and preserve them scientifically. Help
them organise it according to the scientifıc nomenclature.
5. Students should be asked to record the presence of nests and traces of insect and the presence of other
animals in trees at various heights (claw marks, climbing marks, holes, ete).
6. Ask students to draw or take photographs of soil erosion, denudation, human and cattle tracks, soil run-
off and remains of felled trees. Hold a brainstorming session on the need and the ways to deal with the
problems that the students identify for the proteetion of the forests.
Note: If you have more than one unprotected forest area under study, remember tok undertake the activities
deseribed in ali of them and take an average of the results tok get a berter picture of the health of the area. These
pockets of vegetation may be isolated due to factors like human habitation or differing topography. They might
not have a passageway bervveen them for the organisms to move freely, which is crucial to get a uniform
distribution. So different pockets may have different plant, insect and other animal life that may be unique to the
area. This makes the survey of the unprotected areas more important.

Relating Tasks to Objectives
Objectives Tasks
Decide with justifıcation the need for the protection and the
preservation of the various life forms found in the forest.
1,2,3,4,5,6,8,9
Estimate the flora and fauna diversities and their abundance in
the study areas.
3,4,5,6,8,9
Communicate and co-operate within a group. 3,4,5,6,7,8,9,
10
Compare the plant, insect and other animal species in the two
areas of study.
1,3,4,5
Observe and record the physical conditions of the degraded
and the protected areas.
1,2,7
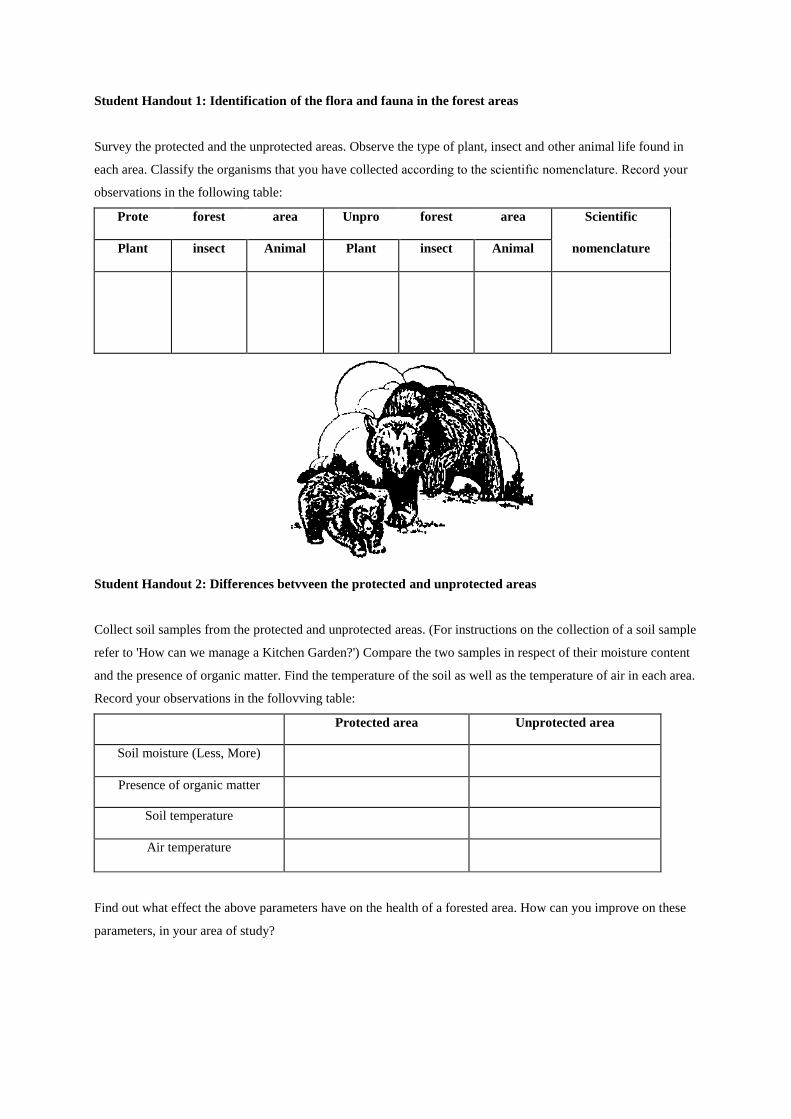
Student Handout 1: Identification of the flora and fauna in the forest areas
Survey the protected and the unprotected areas. Observe the type of plant, insect and other animal life found in
each area. Classify the organisms that you have collected according to the scientifıc nomenclature. Record your
observations in the following table:
Prote forest area Unpro forest area Scientific
Plant insect Animal Plant insect Animal nomenclature
Student Handout 2: Differences betvveen the protected and unprotected areas
Collect soil samples from the protected and unprotected areas. (For instructions on the collection of a soil sample
refer to 'How can we manage a Kitchen Garden?') Compare the two samples in respect of their moisture content
and the presence of organic matter. Find the temperature of the soil as well as the temperature of air in each area.
Record your observations in the follovving table:
Protected area Unprotected area
Soil moisture (Less, More)
Presence of organic matter
Soil temperature
Air temperature
Find out what effect the above parameters have on the health of a forested area. How can you improve on these
parameters, in your area of study?

Student Handout 3
Discuss with the local people the use that they make of the produce from the forests and record the information
that you have collected in the following table:
Products from the forest areas Uses
The Food we must Eat
B A Dar and G P Sharma
Grade level: Class VI-VIH
Introduction
We need food because it gives us energy, it helps build and maintain our body and tok regulate the way it works.
Different foods in our diet keep us healthy. Food containing carbohydrates and fats provide energy, proteins and
minerals help in bodybuilding vhereas minerals, vitamins, fıbre and water help in the functioning of the body. To
keep healthy we need a diet with the proper amounts of carbohydrates, proteins, fats, vitamins, minerals and
water. Such a diet is called a balanced diet.
Educational Objectives
The script includes the follovving objectives:
Social Values
1. Decide, with justification, what food to take and in what quantity.
Science Process
1. Classify the different foods as energy providing, bodybuilding and regulating.
2. Relate different foods with the nutrients contained in them.
Personal Skills
1. Co-operate as a member of a group to arrive at a decision.
2. Communicate orally as well as in vvritten form about what is a balanced diet.
Scientific Concepts involved
1. Food is essential for all living organisms.
2. To stay healthy, we need to eat enough food of the right kind.
3. Not eating a balanced diet leads to malnutrition.
Teaching/learning materials
i different types of food and some common laboratory chemicals
ii charts showing the nutritive value of different food items.
Students' Guide
Scenario
The objectives of 'Health for AH' by 2000 are difficult to achieve
in our country due tok overpopulation and other health related
problems. Nonetheless, it is important that nobody suffers from
malnutrition. A number of people suffer from malnutrition and
other defıciency diseases because of ignorance rather than the
non-availability of necessary nutrition. People generally take food
with lirtle regard to their energy require nents and this adversely affects their health. it is necessary to know what
food one sho ild take to meet our daily nutritional and energy requirements.
Your Tasks
1. Carry out a survey to fınd out the type of food eaten by students in your class.
2. Classify food items according to the nutrients they contain.
3. Identify foods that are rich in nutrients and calories.
4. Prepare a chart indicating the average calorie requirement of students' in your class.
5. Identify students who are taking fewer calories and those that are taking more calories than they require.
6. Undertake tests for the presence of:
i carbohydrates
ii proteins
iii vitamins
iv sugars
v fats.
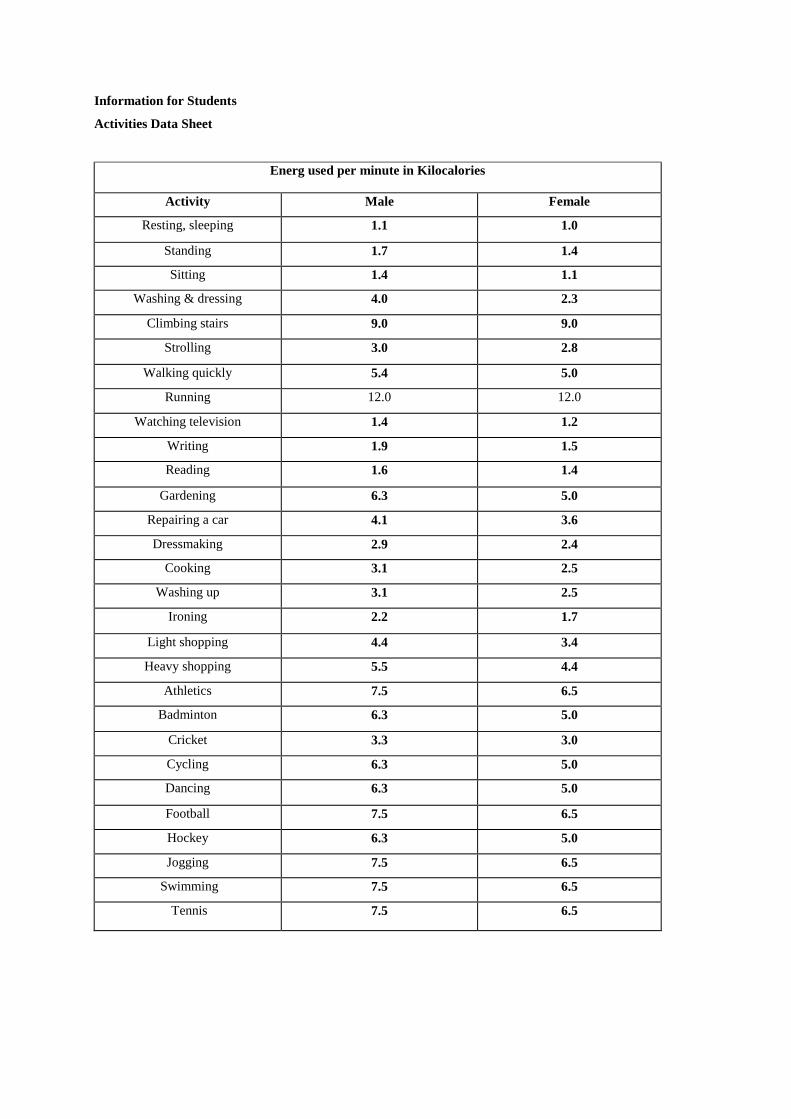
Information for Students
Activities Data Sheet
Energ used per minute in Kilocalories
Activity Male Female
Resting, sleeping 1.1 1.0
Standing 1.7 1.4
Sitting 1.4 1.1
Washing & dressing 4.0 2.3
Climbing stairs 9.0 9.0
Strolling 3.0 2.8
Walking quickly 5.4 5.0
Running 12.0 12.0
Watching television 1.4 1.2
Writing 1.9 1.5
Reading 1.6 1.4
Gardening 6.3 5.0
Repairing a car 4.1 3.6
Dressmaking 2.9 2.4
Cooking 3.1 2.5
Washing up 3.1 2.5
Ironing 2.2 1.7
Light shopping 4.4 3.4
Heavy shopping 5.5 4.4
Athletics 7.5 6.5
Badminton 6.3 5.0
Cricket 3.3 3.0
Cycling 6.3 5.0
Dancing 6.3 5.0
Football 7.5 6.5
Hockey 6.3 5.0
Jogging 7.5 6.5
Swimming 7.5 6.5
Tennis 7.5 6.5
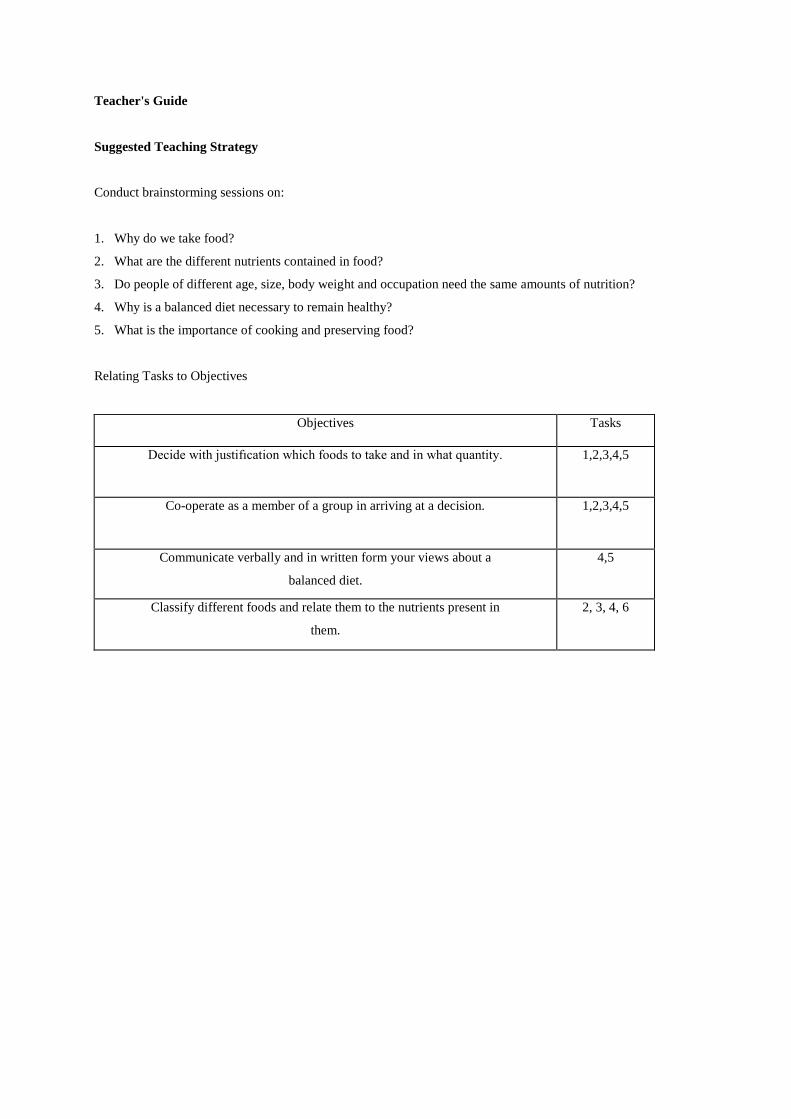
Teacher's Guide
Suggested Teaching Strategy
Conduct brainstorming sessions on:
1. Why do we take food?
2. What are the different nutrients contained in food?
3. Do people of different age, size, body weight and occupation need the same amounts of nutrition?
4. Why is a balanced diet necessary to remain healthy?
5. What is the importance of cooking and preserving food?
Relating Tasks to Objectives
Objectives Tasks
Decide with justifıcation which foods to take and in what quantity. 1,2,3,4,5
Co-operate as a member of a group in arriving at a decision. 1,2,3,4,5
Communicate verbally and in written form your views about a
balanced diet.
4,5
Classify different foods and relate them to the nutrients present in
them.
2, 3, 4, 6

Student Handout 1
Prepare a list of the various kinds of food you ate in the past week. Fiil this information in tables like the one
below, one for each day.
Food group Breakfast Lunch Dinner
Energy giving food
Body building food
Protective food
Student Handout 2
A balanced diet consists of ali the different substances needed by the body like carbohydrates, fats, proteins.
vitamins, minerals, roughage and water, in correct amounts. Does the food you take contain ali of these? To fınd
the answer to this question carry out the following tests:
Testing food for carbohydrates (starch)
Working in groups, collect small samples of various food items that you normally eat. Take çare that the food
items kept for testing do not get mixed. Put each food on a white tile. Cover it with some iodine solution. Iodine
solution is bro\vn in colour. If there is starch in the food, it will turn very dark-blue to almost black. Record your
results in the follovving table:
Food items Colour of the food vvhen
iodine is added?
Does the food contain
starch? (Y/N)
Rice
Cheese
Apple
Bread
Milk
Meat
When iodine is added to anything containing starch, a blue-black colour is always produced. If something has no
starch, the colour of the solution of iodine will not change.
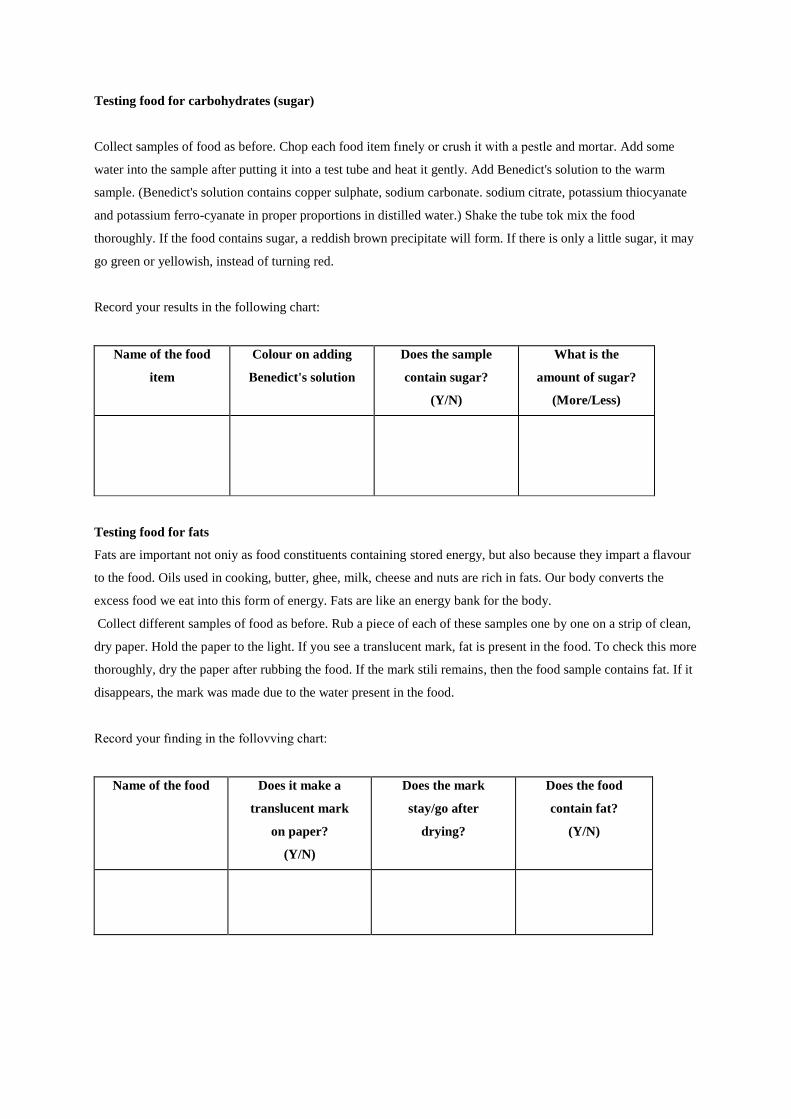
Testing food for carbohydrates (sugar)
Collect samples of food as before. Chop each food item fınely or crush it with a pestle and mortar. Add some
water into the sample after putting it into a test tube and heat it gently. Add Benedict's solution to the warm
sample. (Benedict's solution contains copper sulphate, sodium carbonate. sodium citrate, potassium thiocyanate
and potassium ferro-cyanate in proper proportions in distilled water.) Shake the tube tok mix the food
thoroughly. If the food contains sugar, a reddish brown precipitate will form. If there is only a little sugar, it may
go green or yellowish, instead of turning red.
Record your results in the following chart:
Name of the food
item
Colour on adding
Benedict's solution
Does the sample
contain sugar?
(Y/N)
What is the
amount of sugar?
(More/Less)
Testing food for fats
Fats are important not oniy as food constituents containing stored energy, but also because they impart a flavour
to the food. Oils used in cooking, butter, ghee, milk, cheese and nuts are rich in fats. Our body converts the
excess food we eat into this form of energy. Fats are like an energy bank for the body.
Collect different samples of food as before. Rub a piece of each of these samples one by one on a strip of clean,
dry paper. Hold the paper to the light. If you see a translucent mark, fat is present in the food. To check this more
thoroughly, dry the paper after rubbing the food. If the mark stili remains, then the food sample contains fat. If it
disappears, the mark was made due to the water present in the food.
Record your fınding in the follovving chart:
Name of the food Does it make a
translucent mark
on paper?
(Y/N)
Does the mark
stay/go after
drying?
Does the food
contain fat?
(Y/N)
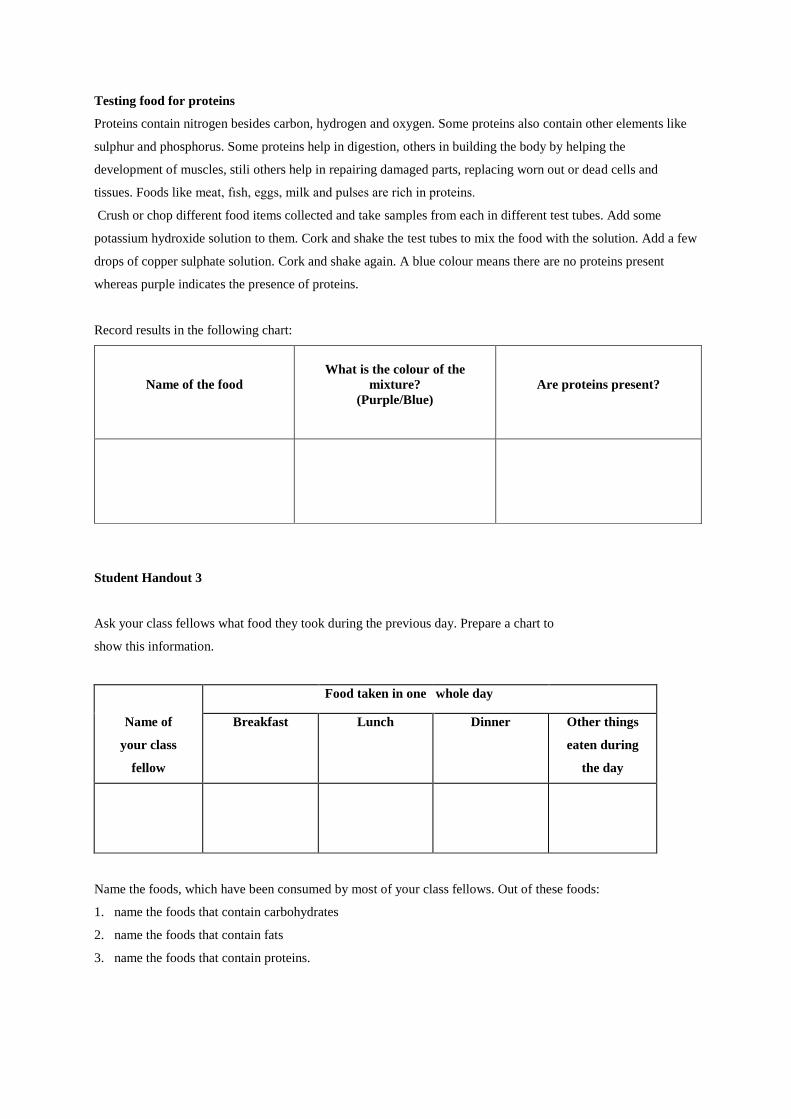
Testing food for proteins
Proteins contain nitrogen besides carbon, hydrogen and oxygen. Some proteins also contain other elements like
sulphur and phosphorus. Some proteins help in digestion, others in building the body by helping the
development of muscles, stili others help in repairing damaged parts, replacing worn out or dead cells and
tissues. Foods like meat, fısh, eggs, milk and pulses are rich in proteins.
Crush or chop different food items collected and take samples from each in different test tubes. Add some
potassium hydroxide solution to them. Cork and shake the test tubes to mix the food with the solution. Add a few
drops of copper sulphate solution. Cork and shake again. A blue colour means there are no proteins present
whereas purple indicates the presence of proteins.
Record results in the following chart:
Name of the food
What is the colour of the
mixture?
(Purple/Blue)
Are proteins present?
Student Handout 3
Ask your class fellows what food they took during the previous day. Prepare a chart to
show this information.
Food taken in one whole day
Name of
your class
fellow
Breakfast Lunch Dinner Other things
eaten during
the day
Name the foods, which have been consumed by most of your class fellows. Out of these foods:
1. name the foods that contain carbohydrates
2. name the foods that contain fats
3. name the foods that contain proteins.

Student Handout 4
Name the nutrients that are present in the following food items:
Sources (food items) Nutrients
Rice
Wheat
Potato
Sugar
Pulses
Egg
Meat
Fish
Milk
Butter
Ghee
Oil
Nuts
Fruits
Carrot
Cabbage
Amla
Student Handout 5
People need different proportions of different types of food in their diet. Quite often people eat more food than
they need. The extra food they eat is stored as fat and causes obesity. There are also people \vho do not get
enough energy in their diet tok balance the energy they use daily. They have no fat stored to draw on, so their
body begins to break down the proteins in their cells to provide energy. Such people suffer from general
weakness and do not grow properly due to the lack of food. Being too fat is not good for health and neither is
being too thin.
Find out the follovving:
1. Are there any obese students in your school?
2. Can they run as fast as the other students?
3. Are there any students who are very weak and seem to be undernourished?
Talk to the obese students and make a list of the food they eat in a day and compare it with the food that the
undernourished and the normal students eat?
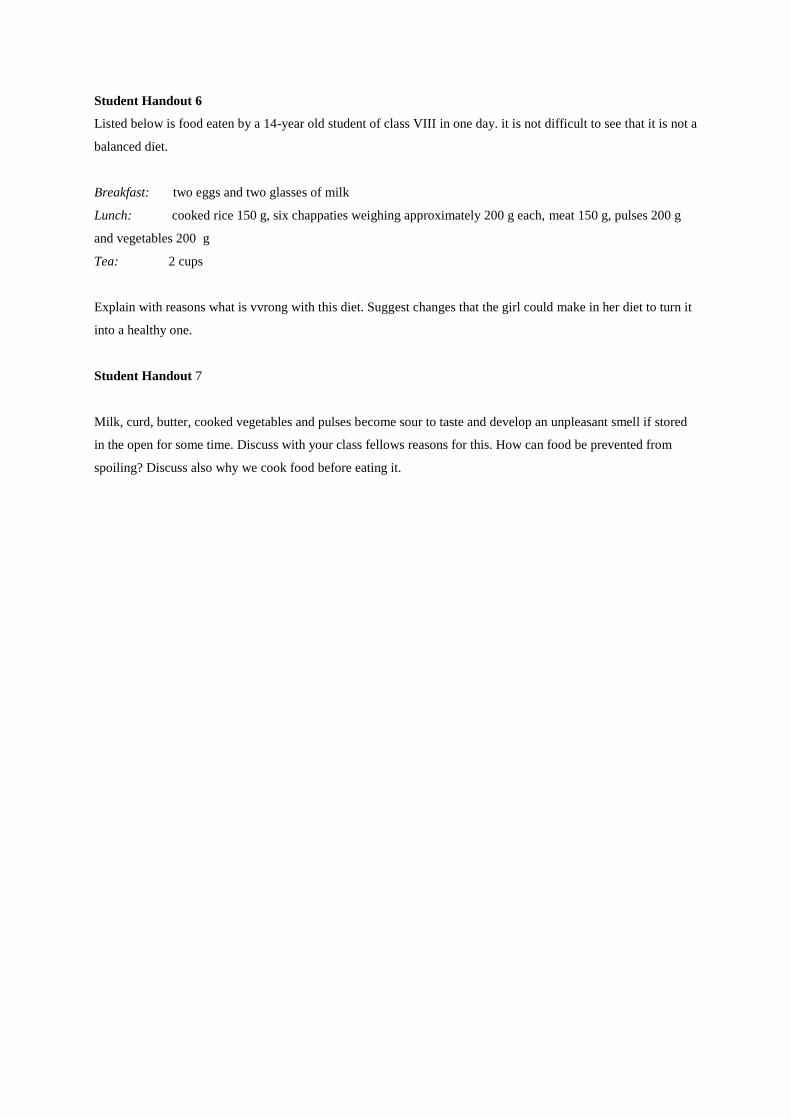
Student Handout 6
Listed below is food eaten by a 14-year old student of class VIII in one day. it is not difficult to see that it is not a
balanced diet.
Breakfast: two eggs and two glasses of milk
Lunch: cooked rice 150 g, six chappaties weighing approximately 200 g each, meat 150 g, pulses 200 g
and vegetables 200 g
Tea: 2 cups
Explain with reasons what is vvrong with this diet. Suggest changes that the girl could make in her diet to turn it
into a healthy one.
Student Handout 7
Milk, curd, butter, cooked vegetables and pulses become sour to taste and develop an unpleasant smell if stored
in the open for some time. Discuss with your class fellows reasons for this. How can food be prevented from
spoiling? Discuss also why we cook food before eating it.
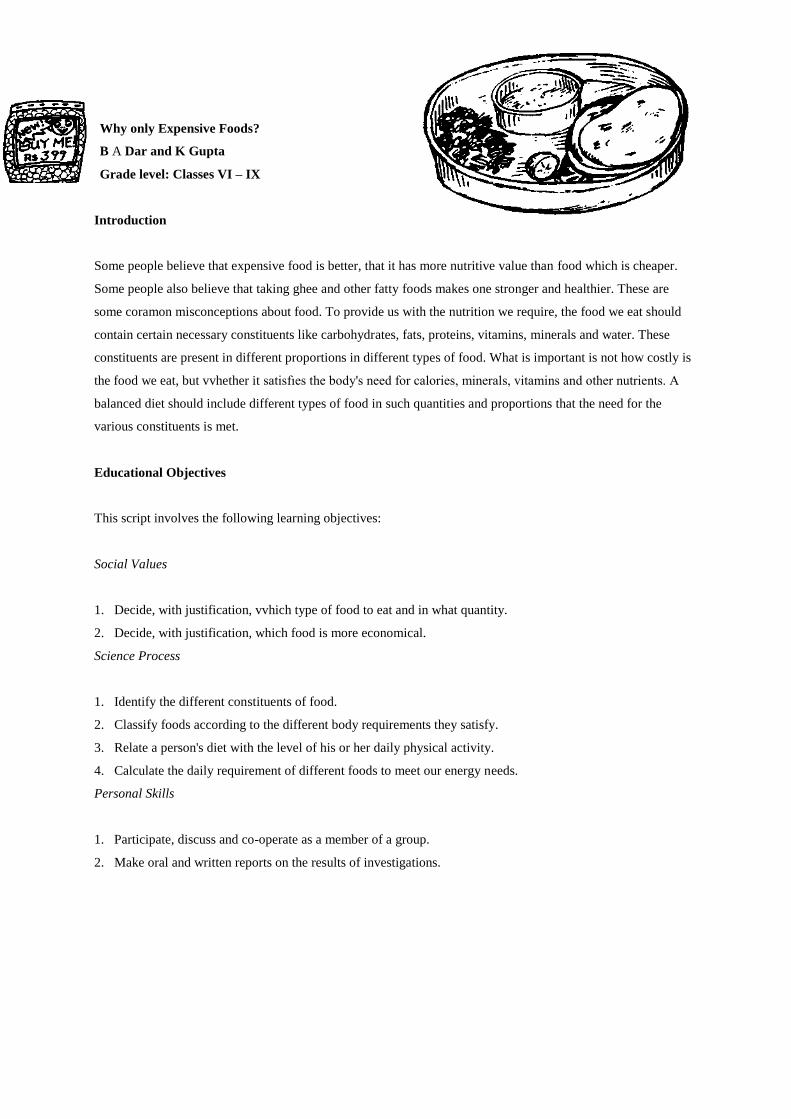
Why only Expensive Foods?
B A Dar and K Gupta
Grade level: Classes VI – IX
Introduction
Some people believe that expensive food is better, that it has more nutritive value than food which is cheaper.
Some people also believe that taking ghee and other fatty foods makes one stronger and healthier. These are
some coramon misconceptions about food. To provide us with the nutrition we require, the food we eat should
contain certain necessary constituents like carbohydrates, fats, proteins, vitamins, minerals and water. These
constituents are present in different proportions in different types of food. What is important is not how costly is
the food we eat, but vvhether it satisfıes the body's need for calories, minerals, vitamins and other nutrients. A
balanced diet should include different types of food in such quantities and proportions that the need for the
various constituents is met.
Educational Objectives
This script involves the following learning objectives:
Social Values
1. Decide, with justification, vvhich type of food to eat and in what quantity.
2. Decide, with justification, which food is more economical.
Science Process
1. Identify the different constituents of food.
2. Classify foods according to the different body requirements they satisfy.
3. Relate a person's diet with the level of his or her daily physical activity.
4. Calculate the daily requirement of different foods to meet our energy needs.
Personal Skills
1. Participate, discuss and co-operate as a member of a group.
2. Make oral and written reports on the results of investigations.
Scientific Concepts involved
1. Food is essential for all living organisms.
2. To keep good health we require different constituents in our food, namely carbohydrates, proteins,
vitamins, minerals, fats, roughage and water.
3. Different foods consist of different constituents. Only some foods contain all the constituents in the
correct proportion required for good health.
4. Food requirements differ from person to person. They also depend on the nature of the activities the
persons engage in.
5. We should take a balanced diet, i.e. a diet that contains different types of food in adequate quantities to
meet our daily requirement of calories, minerals, vitamins and other nutrients.
6. The lack or excess of one or more nutrients in the diet is harmful for our health.
Teaching/learning materials
i different types of vegetables, fruits, cereals, ete.
ii charts showing funetions performed by different constituents of food, average
calorie requirements of an individual and the nutritive values of food items
iii balanced diet sheet for 12 year olds for a normal day
iv food nutrition data sheet
v test tubes.
Students' Guide
Scenario
Parvez works as the driver of a businessman. He observes that his master prefers expensive food items to
cheaper ones while shopping. The businessman explains tok his driver his reasons for buying them. "The cheap
foods are not good. To keep fit one should take expensive food". Parvez follows this advice and begins buying
only costly food items, though he cannot afford them. He soon falls into debt. His son Bilal is in Class VI. Bilal
does not have a proper uniform. He explains to his friends how diffıcult it has become for his father to provide
him things he needs at school. He complains to his friends, "Most of my father's income goes in buying food.
There is hardly any money left to get other things that we need."
Your Tasks
1. Make a survey to find what rype of food students in your class eat normally.
2. Prepare a chart indicating the average calorie requirements of the students in your class.
3. Investigate the advantages and disadvantages of taking
i more calories than required
ii less calories than required
iii the correct amount of calories.
4. Classify food items according to the amount of different nutrients present in
them. Identify foods that contain most of the required nutrients.
5. Undertake a survey to fınd out the cost of foods available in the market and
classify them according to their price. in each case, list and compare the nutrients
present and the roles they play in keeping the body healthy. Discuss which of
these foods we should take and why.
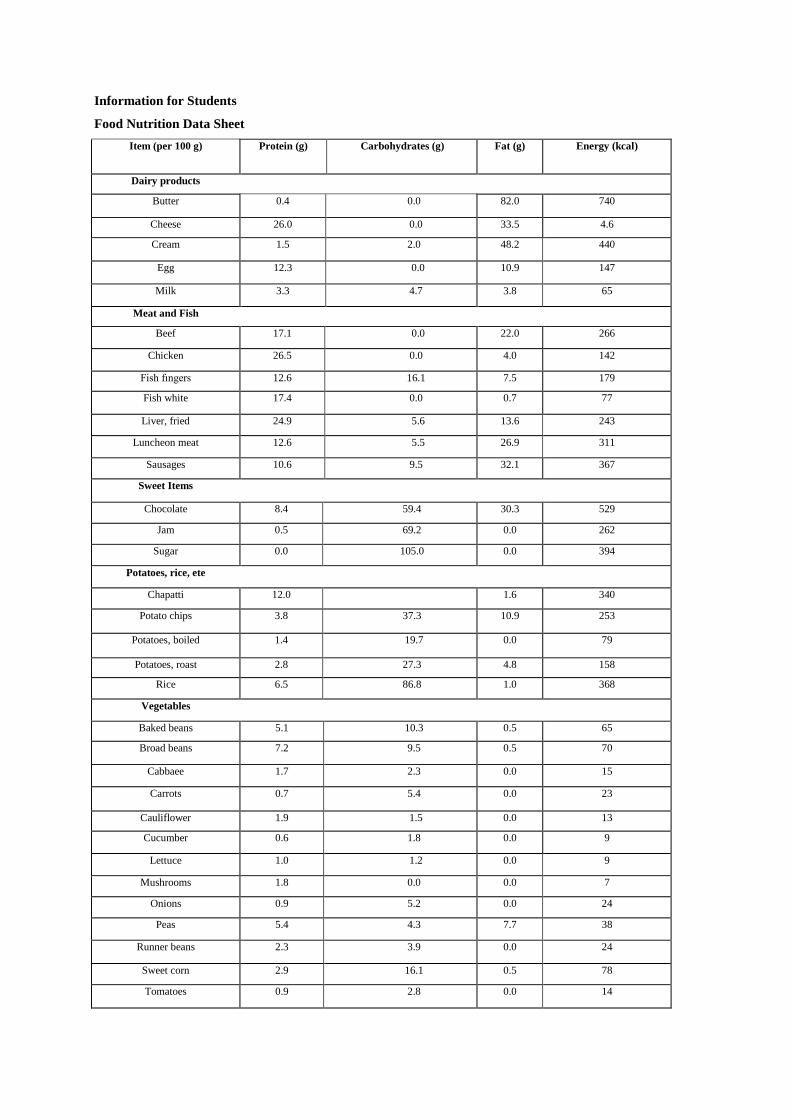
Information for Students
Food Nutrition Data Sheet
Item (per 100 g) Protein (g) Carbohydrates (g) Fat (g) Energy (kcal)
Dairy products
Butter 0.4 0.0 82.0 740
Cheese 26.0 0.0 33.5 4.6
Cream 1.5 2.0 48.2 440
Egg 12.3 0.0 10.9 147
Milk 3.3 4.7 3.8 65
Meat and Fish
Beef 17.1 0.0 22.0 266
Chicken 26.5 0.0 4.0 142
Fish fıngers 12.6 16.1 7.5 179
Fish white 17.4 0.0 0.7 77
Liver, fried 24.9 5.6 13.6 243
Luncheon meat 12.6 5.5 26.9 311
Sausages 10.6 9.5 32.1 367
Sweet Items
Chocolate 8.4 59.4 30.3 529
Jam 0.5 69.2 0.0 262
Sugar 0.0 105.0 0.0 394
Potatoes, rice, ete
Chapatti 12.0 1.6 340
Potato chips 3.8 37.3 10.9 253
Potatoes, boiled 1.4 19.7 0.0 79
Potatoes, roast 2.8 27.3 4.8 158
Rice 6.5 86.8 1.0 368
Vegetables
Baked beans 5.1 10.3 0.5 65
Broad beans 7.2 9.5 0.5 70
Cabbaee 1.7 2.3 0.0 15
Carrots 0.7 5.4 0.0 23
Cauliflower 1.9 1.5 0.0 13
Cucumber 0.6 1.8 0.0 9
Lettuce 1.0 1.2 0.0 9
Mushrooms 1.8 0.0 0.0 7
Onions 0.9 5.2 0.0 24
Peas 5.4 4.3 7.7 38
Runner beans 2.3 3.9 0.0 24
Sweet corn 2.9 16.1 0.5 78
Tomatoes 0.9 2.8 0.0 14
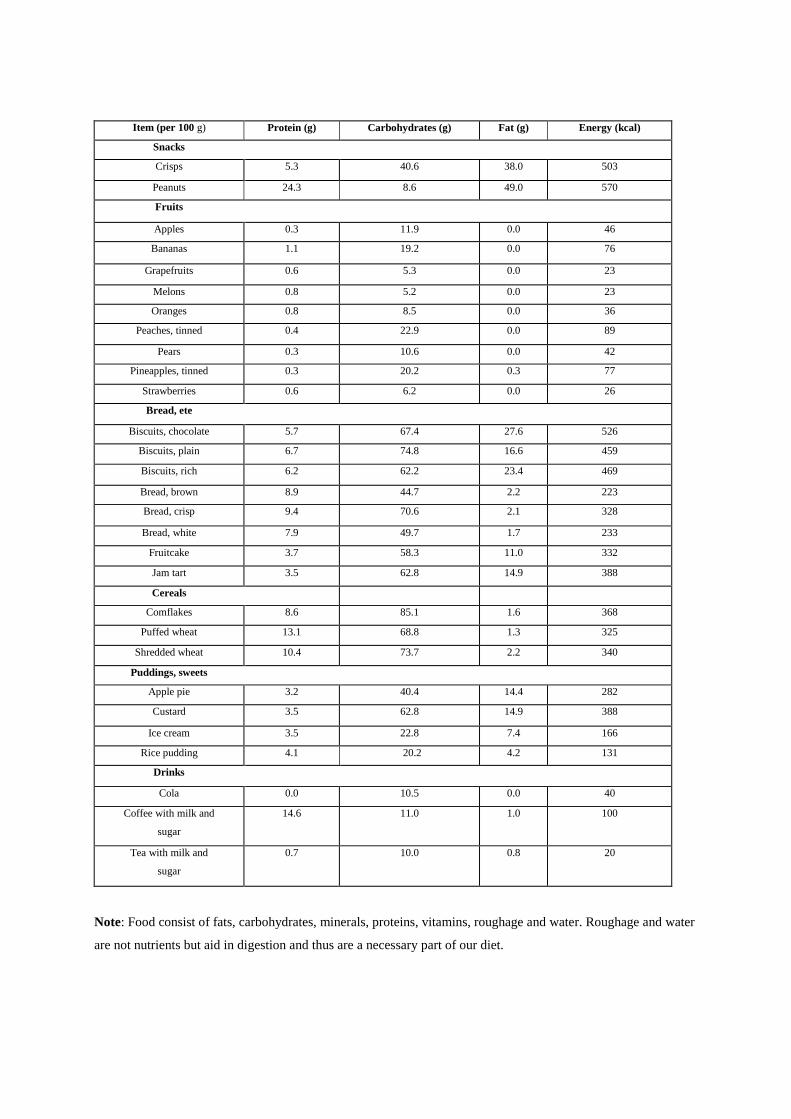
Item (per 100 g) Protein (g) Carbohydrates (g) Fat (g) Energy (kcal)
Snacks
Crisps 5.3 40.6 38.0 503
Peanuts 24.3 8.6 49.0 570
Fruits
Apples 0.3 11.9 0.0 46
Bananas 1.1 19.2 0.0 76
Grapefruits 0.6 5.3 0.0 23
Melons 0.8 5.2 0.0 23
Oranges 0.8 8.5 0.0 36
Peaches, tinned 0.4 22.9 0.0 89
Pears 0.3 10.6 0.0 42
Pineapples, tinned 0.3 20.2 0.3 77
Strawberries 0.6 6.2 0.0 26
Bread, ete
Biscuits, chocolate 5.7 67.4 27.6 526
Biscuits, plain 6.7 74.8 16.6 459
Biscuits, rich 6.2 62.2 23.4 469
Bread, brown 8.9 44.7 2.2 223
Bread, crisp 9.4 70.6 2.1 328
Bread, white 7.9 49.7 1.7 233
Fruitcake 3.7 58.3 11.0 332
Jam tart 3.5 62.8 14.9 388
Cereals
Comflakes 8.6 85.1 1.6 368
Puffed wheat 13.1 68.8 1.3 325
Shredded wheat 10.4 73.7 2.2 340
Puddings, sweets
Apple pie 3.2 40.4 14.4 282
Custard 3.5 62.8 14.9 388
Ice cream 3.5 22.8 7.4 166
Rice pudding 4.1 20.2 4.2 131
Drinks
Cola 0.0 10.5 0.0 40
Coffee with milk and
sugar
14.6 11.0 1.0 100
Tea with milk and
sugar
0.7 10.0 0.8 20
Note: Food consist of fats, carbohydrates, minerals, proteins, vitamins, roughage and water. Roughage and water
are not nutrients but aid in digestion and thus are a necessary part of our diet.
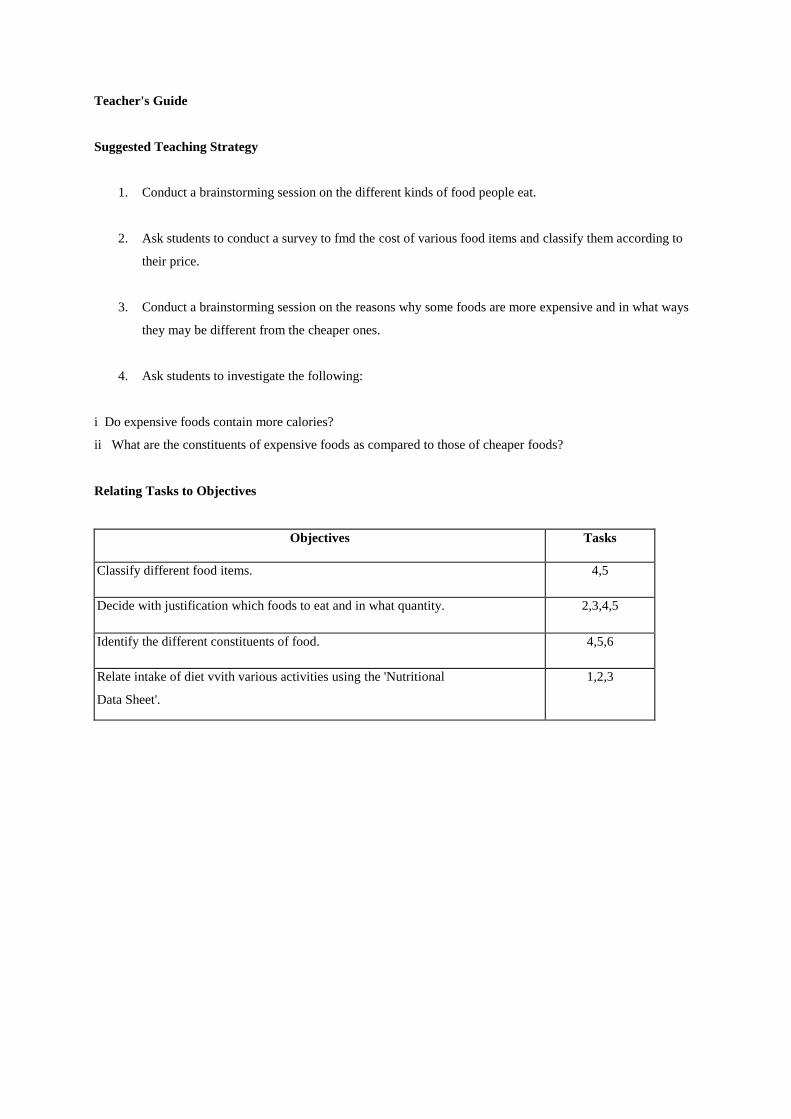
Teacher's Guide
Suggested Teaching Strategy
1. Conduct a brainstorming session on the different kinds of food people eat.
2. Ask students to conduct a survey to fmd the cost of various food items and classify them according to
their price.
3. Conduct a brainstorming session on the reasons why some foods are more expensive and in what ways
they may be different from the cheaper ones.
4. Ask students to investigate the following:
i Do expensive foods contain more calories?
ii What are the constituents of expensive foods as compared to those of cheaper foods?
Relating Tasks to Objectives
Objectives Tasks
Classify different food items. 4,5
Decide with justification which foods to eat and in what quantity. 2,3,4,5
Identify the different constituents of food. 4,5,6
Relate intake of diet vvith various activities using the 'Nutritional
Data Sheet'.
1,2,3
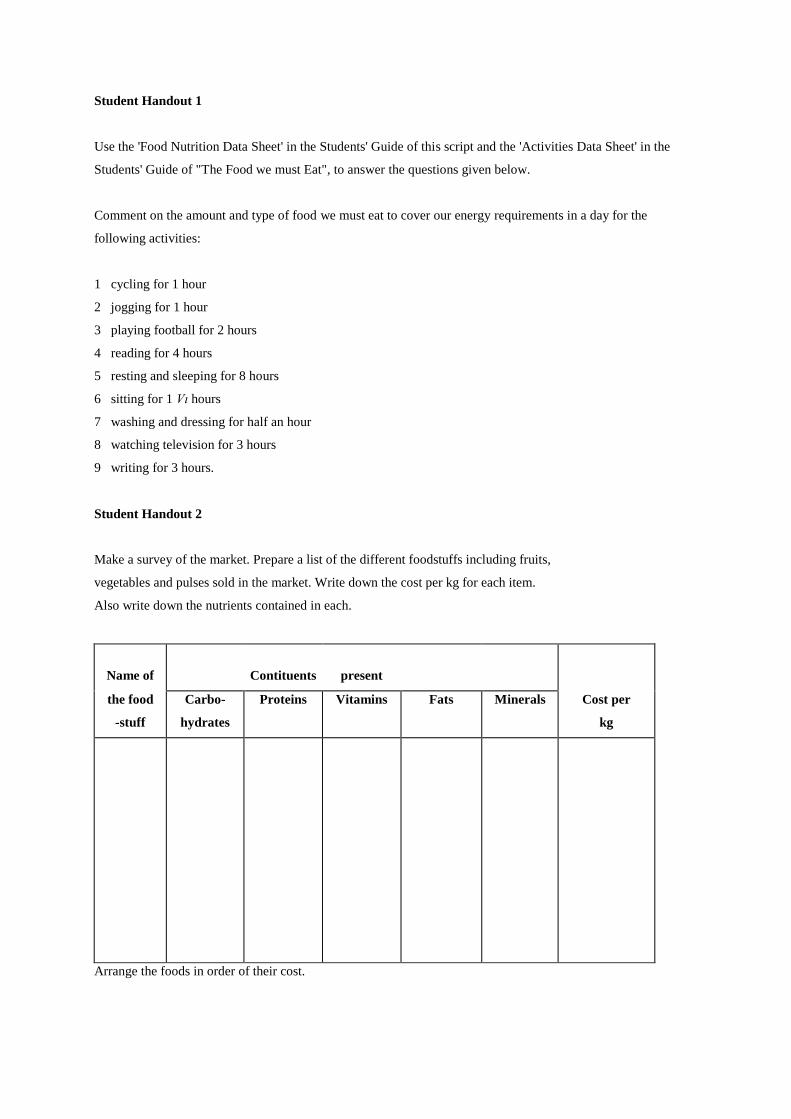
Student Handout 1
Use the 'Food Nutrition Data Sheet' in the Students' Guide of this script and the 'Activities Data Sheet' in the
Students' Guide of "The Food we must Eat", to answer the questions given below.
Comment on the amount and type of food we must eat to cover our energy requirements in a day for the
following activities:
1 cycling for 1 hour
2 jogging for 1 hour
3 playing football for 2 hours
4 reading for 4 hours
5 resting and sleeping for 8 hours
6 sitting for 1 Vı hours
7 washing and dressing for half an hour
8 watching television for 3 hours
9 writing for 3 hours.
Student Handout 2
Make a survey of the market. Prepare a list of the different foodstuffs including fruits,
vegetables and pulses sold in the market. Write down the cost per kg for each item.
Also write down the nutrients contained in each.
Name of
Contituents
present
the food
-stuff
Carbo-
hydrates
Proteins Vitamins Fats Minerals Cost per
kg
Arrange the foods in order of their cost.
Student Handout 3
Keep a record över a day of what you eat and in what quantity. Use the 'Food Nutrition Data Sheet' to fınd your
intake of proteins, carbohydrates, fats, vitamins and minerals. Use the 'Activities Data Sheet to fınd out if your
intake of food is in keeping with your body requirements. Suggest changes in your diet to improve the intake of
the items in which it is defıcient.
Student Handout 4
Find the cost of a kilocalorie of energy obtained from different foodstuffs. Use information obtained through
various activities that you have already done. Use also the 'Food Nutrition Data Sheet' that gives the nutritive
value of different food items.
Name of food
item
Energy value per
kg of edible
portion
Cost per kg Cost per kcal
1. Now arrange the food items in order of 'cost per kilocalorie of energy'.
2. Note that there is a range of prices to get the same amount of energy. Which foods will you prefer to eat to
fulfil your daily energy requirement? Why?
3. Determine whether or not cheap foods are as good as costly ones to fulfil your dietary requirements.

Student Handout 5
At a restaurant near the school, customers pay for what they choose rather than being served a set meal at a fıxed
price. The Headmaster of the school is concerned that students are not choosing items that give them a
nutritionally balanced meal. The school has produced a poster that carries information about the desirable
contents of the mid-day meal. The restaurant has also provided details of the nutritional contents of the different
portions of food on its menu.
What your mid-day meal should give you:
GIRLS from 11-14 years
720 kcal of energy
18 g of protein
4 mg of iron
10 mg of Vitamin C
BOYS from 11-14 years
960 kcal of energy
24 g of protein
4 mg of iron
10 mg of Vitamin C
Note that these energy requirements are only one third of your total daily reguirements.
Prepare different lists of dishes that meet the recommendations made in the school poster. Devise meals that
would süit different tastes and pockets. Which of these is the cheapest meal that is nutritionally balanced as well?
Today's menu Price Energy Protein iron Vitamin C
(per portion) (Rs) (kcal) (g) (mg) (mg)
Baked beans 3.0 140 9 3 5
Banana 2.0 45 0 0 6
Bread 1.00 60 2 0.2 0
Carrots 1.50 20 1 1 0
Chips 3 280 5 2 18
Custard 1.00 90 3 0 0
Dal 2.00 170 11 2.9 0
Egg salad 7.00 110 8 2 30
Mashed potatoes 1.50 180 2 0 6
Orange 10 45 0 1 178
Rice 7.00 680 14 6 0
Sausage 3.00 180 5 1 0

The Jammu and Kashmir State Board of School Education: A Note
The Jammu and Kashmir State Board of School Education (JKBOSE) is an autonomous organisation - a
corporate body established under the J&K State Board of School Education Act, 1975. The main fünction of the
Board is to regulate, control and develop education in the state up to the higher secondary level by providing
varied courses with a view to equipping pupils for different occupations, for education in the universities and
other cultural purposes, and to examine the candidates and tok award certificates to successful candidates and
doing ali other things incidental thereto. The Board prepares and prescribes curricula and textbooks for classes I
tok XII, and conducts public examinations at the end of class X and class XII known as the secondary school
examination and the higher secondary examination respectively. it also holds the Diploma in Elementary
Education examination. it conducts training programmes for master-trainers who are subsequently used to train
other teachers for a cascade effect.
The work of the Board is complicated by the fact that the State of Jammu and Kashmir is large in size and is
made up of three distinct cultural and geographical regions, namely. Jammu, Kashmir and Ladakh. As many as
fourteen languages and dialects are spoken and used in the state. The main languages are: Kashmiri, Dogri,
Phari, Gojri, Balti (Pali), Punjabi and Bodyig. But the mother tongue is not used as the medium of instruction at
any stage of school education in any of the three regions in the State. Certain areas of the state remain
inaccessible by road for more than 5 to 6 months in a year. it is one of the poorest states in India and is
educationally backward. There are över thirteen thousand schools with around 1.4 million children between the
ages of 5 to 18 studying in them. The dropout rate is around 34% for both boys and girls at the primary stage, but
around 30% for boys and 43% for girls at the upper primary stage. The dropout rate is much more at the
secondary stage. The performance of students in (science) examinations continues to be poor. The pass
percentage in science subjects at the secondary stage varies between 14 to 50 in case of boys and 12 to 38 in the
case of girls över different regions of the state. it is recognised that there is a dire and urgent need to improve
science education in the state. Science education can be improved only if we are able to bring about
improvement in the curriculum, teacher education, and evaluation and assessment of performance.

The International Council of Associations for Science Education: A Note
The International Council of Associations for Science Education (ICASE) is an NGO (non-Governmental
organisation) created in 1973 with the help of UNESCO and ICSU (International Council of Science Unions). Its
goal is to form an umbrella linking regional, national and sub-national professional STAs (science teacher
associations/groups) plus other groups interested in promoting science education at the primary and secondary
levels. it undertakes this by means of regional symposia, a quarterly journal, a primary science nev/sletter and by
specialised events and publications planned in conjunction with its member organisations.
ICASE is a voluntary organisation run by an Executive Committee elected by its member associations. The
Executive Committee comprises regional representatives (Africa, Asia, Australasia, Europe, North America and
Latin America/the Caribbean), chairpersons of standing committees (currently - fınance, journal, pre-secondary,
publications and Project 2000+) plus the President, President-elect, Secretary and Treasurer.
ICASE aids its member organisations by linking with other international organisations, e.g. UNESCO, in
developing projects and publications. A major development is Project 2000+ that attempts to promote a more
appropriate science and technology education for ali at the formal, informal and non-formal levels. The
project is guided by a steering committee comprising UNESCO and a group of international NGOs (ICASE,
IOSTE, GASAT, WOCATE and ICSU). ICASE for its part is trying to help its member organisations promote
scientifıc and technological literacy in the classroom by developing teaching materials that are seen to be
relevant and interesting to the students. A majör feature is to guide teachers themselves tok create the materials
and thereby gain ownership of the STL (scientifıc and technological literacy) philosophy for the teaching of
science for ali. These materials are based on local issues and try to relate the learning of scientifıc concepts to
societal concerns and, in so doing, promote problem-solving and decision-making skills.

The Centre for Science Education and Communication: A Note
The Centre for Science Education and Communication (CSEC) at the University of Delhi was established in
1989 in response to the changing relationship between society at large and the University, viewed as a centre for
the pursuit and teaching of science. it is an autonomous institution within the University of Delhi, it is meant to
serve as an institution in which studies can be carried out by teachers and students of the University, and other
interested individuals, for the generation of ideas and materials for the improvement of science education at ali
levels, and for the promotion of a wider interest in science and scientific issues.
The establishment of CSEC was based on the premise that, while the traditional activities in science in the form
of teaching and research should continue to be the principal contribution of the University to society, there is
need for attempting a wider and, in some ways, more direct role. If this premise be accepted, it is evident that
there should be two majör foci of activity of the Centre:
• within the formal streams of science teaching and education - encouraging and managing innovations in the
teaching and learning of science both at the School and the University levels
• outside formal education - aimed at popularising science, increasing public awareness of issues relating to
science and technology, particularly as they affect our daily lives, the environment and matters of public policy.
The interaction of the Centre with schools began in a small way with the Centre organising vvorkshops in
electronics for schoolteachers from the Delhi Administration schools. These were follovved by summer
workshops on selected topics in Chemistry. The participants were school and college teachers.
A longer-term initiative was undertaken by a group comprising teachers from the faculties of science and
education as well as schoolteachers in addressing the problems of primary school mathematics. The School
Mathematics Project started formally in 1992-93. The focus from the start was on the removal of the fear of
mathematics in children, as well as on improving their poor performance in Mathematics at the secondary level.
Some key features of the group's approach are:
• taking cognisance of the child's "initial mathematics"
• emphasis on work with concrete materials, and
• a postponement of written work in the early years of school.
The development of the curriculum has been driven primarily by class teachers, with a plurality of approaches to
solving a problem being actively encouraged. The programme has emphasised the role of concrete manipulations
prior to the introduction of abstraction, has placed a premium on peer interaction between learners, and
encouraged children to articulate verbally the methods they use to solve problems.
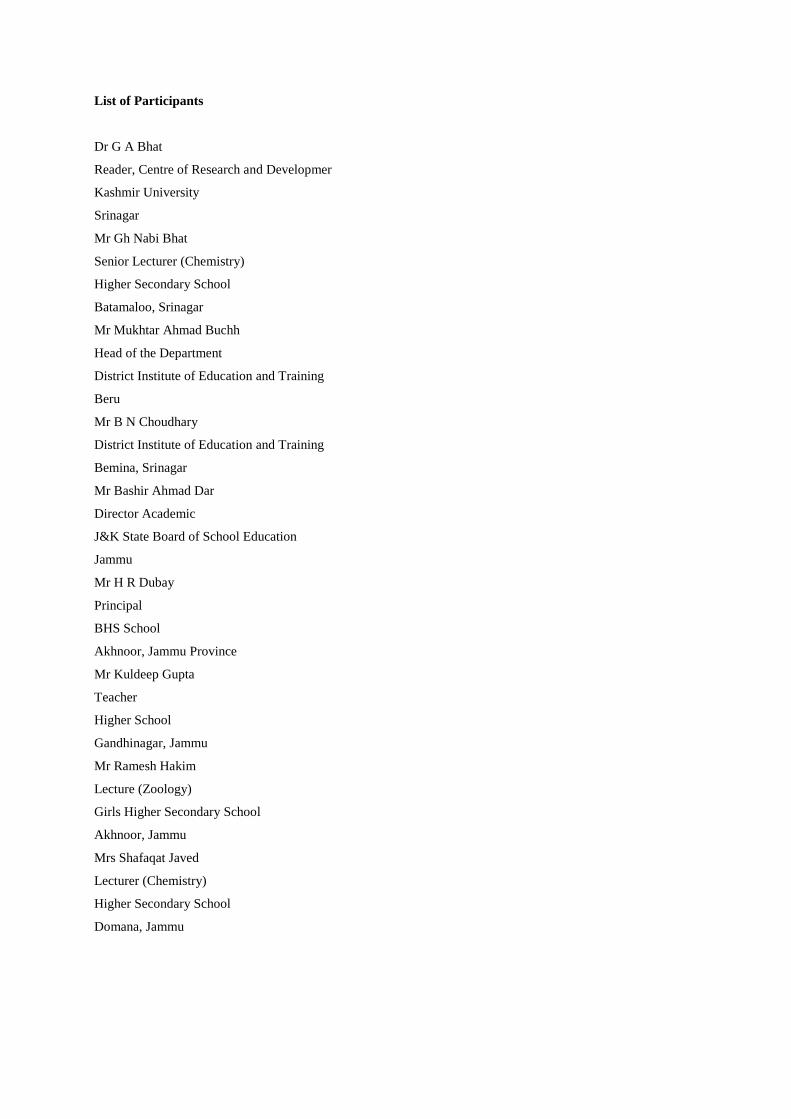
List of Participants
Dr G A Bhat
Reader, Centre of Research and Developmer
Kashmir University
Srinagar
Mr Gh Nabi Bhat
Senior Lecturer (Chemistry)
Higher Secondary School
Batamaloo, Srinagar
Mr Mukhtar Ahmad Buchh
Head of the Department
District Institute of Education and Training
Beru
Mr B N Choudhary
District Institute of Education and Training
Bemina, Srinagar
Mr Bashir Ahmad Dar
Director Academic
J&K State Board of School Education
Jammu
Mr H R Dubay
Principal
BHS School
Akhnoor, Jammu Province
Mr Kuldeep Gupta
Teacher
Higher School
Gandhinagar, Jammu
Mr Ramesh Hakim
Lecture (Zoology)
Girls Higher Secondary School
Akhnoor, Jammu
Mrs Shafaqat Javed
Lecturer (Chemistry)
Higher Secondary School
Domana, Jammu
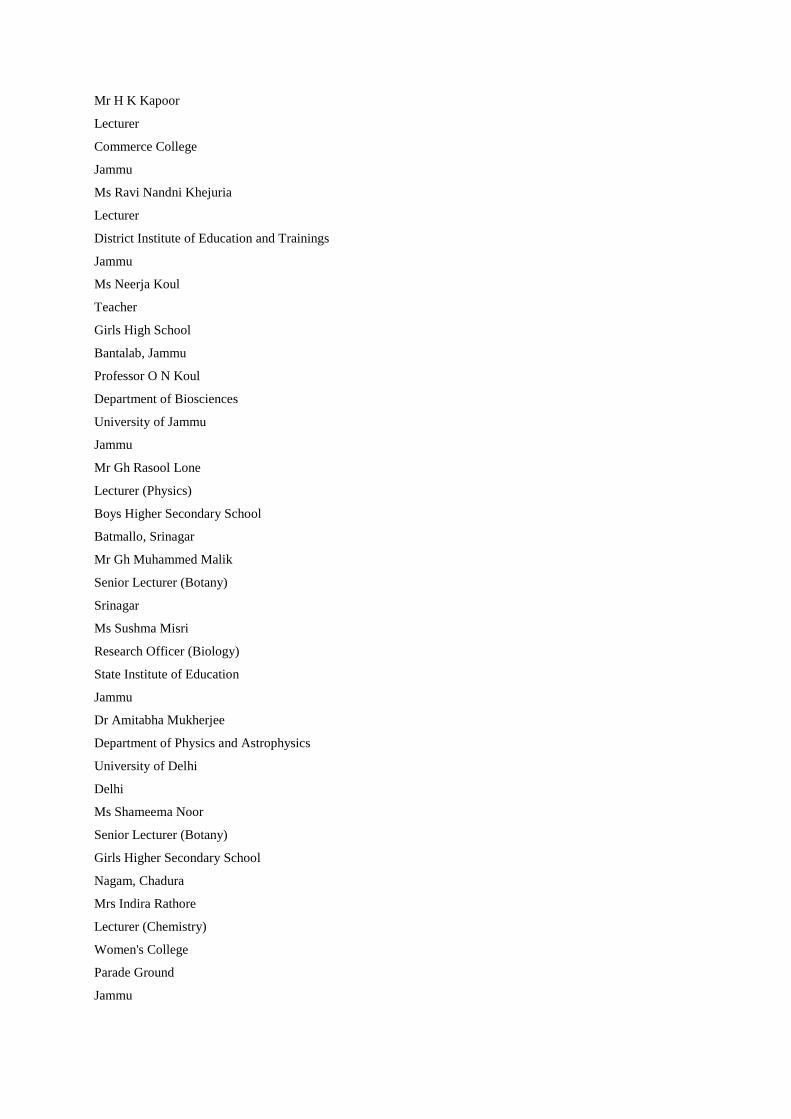
Mr H K Kapoor
Lecturer
Commerce College
Jammu
Ms Ravi Nandni Khejuria
Lecturer
District Institute of Education and Trainings
Jammu
Ms Neerja Koul
Teacher
Girls High School
Bantalab, Jammu
Professor O N Koul
Department of Biosciences
University of Jammu
Jammu
Mr Gh Rasool Lone
Lecturer (Physics)
Boys Higher Secondary School
Batmallo, Srinagar
Mr Gh Muhammed Malik
Senior Lecturer (Botany)
Srinagar
Ms Sushma Misri
Research Officer (Biology)
State Institute of Education
Jammu
Dr Amitabha Mukherjee
Department of Physics and Astrophysics
University of Delhi
Delhi
Ms Shameema Noor
Senior Lecturer (Botany)
Girls Higher Secondary School
Nagam, Chadura
Mrs Indira Rathore
Lecturer (Chemistry)
Women's College
Parade Ground
Jammu
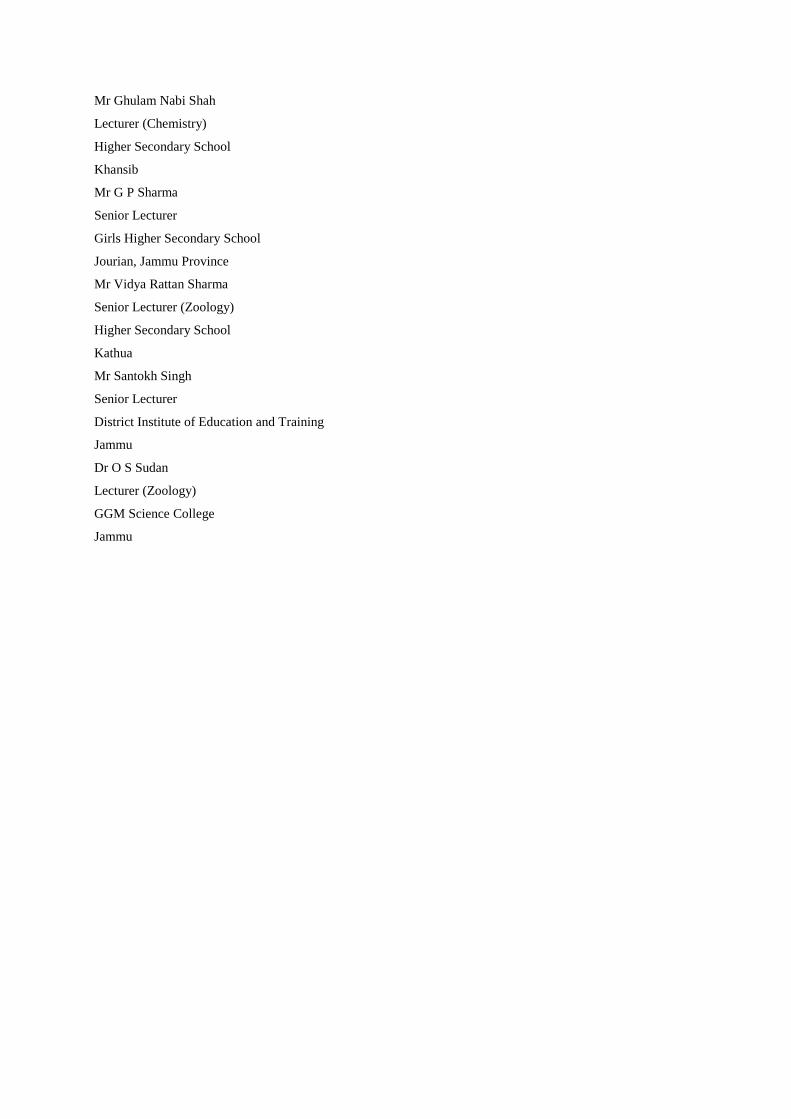
Mr Ghulam Nabi Shah
Lecturer (Chemistry)
Higher Secondary School
Khansib
Mr G P Sharma
Senior Lecturer
Girls Higher Secondary School
Jourian, Jammu Province
Mr Vidya Rattan Sharma
Senior Lecturer (Zoology)
Higher Secondary School
Kathua
Mr Santokh Singh
Senior Lecturer
District Institute of Education and Training
Jammu
Dr O S Sudan
Lecturer (Zoology)
GGM Science College
Jammu