the magazine for today's quilter - this quilt celebrates the … · 2010. 12. 6. · using the...
TRANSCRIPT

From Quilter's World magazine, February 2011, Vol. 33, No. 1, Copyright © 2011 Quilter's World magazine
S P E C I F I C AT I O N S
Skill Level: AdvancedQuilt Size: 33" x 33"
D E S I G N E D & Q U I LT E D BY R e e z e H A N S o N
Frosty CarnationsThis quilt celebrates the traditional flower of the month for January birthdays.
From Quilter's World magazine, February 2011, Vol. 33, No. 1, Copyright © 2011 Quilter's World magazine
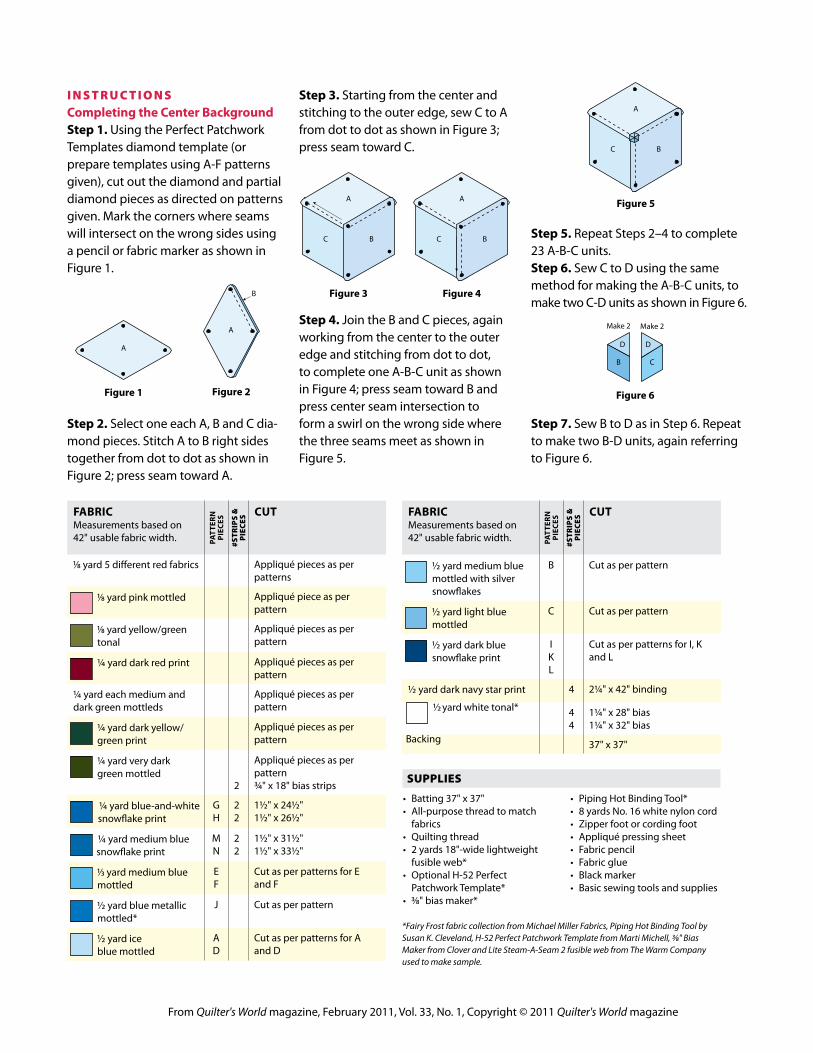
I N S T R U C T I O N SCompleting the Center Background Step 1. Using the Perfect Patchwork Templates diamond template (or prepare templates using A-F patterns given), cut out the diamond and partial diamond pieces as directed on patterns given. Mark the corners where seams will intersect on the wrong sides using a pencil or fabric marker as shown in Figure 1.
Step 2. Select one each A, B and C dia-mond pieces. Stitch A to B right sides together from dot to dot as shown in Figure 2; press seam toward A.
Step 3. Starting from the center and stitching to the outer edge, sew C to A from dot to dot as shown in Figure 3; press seam toward C.
Step 4. Join the B and C pieces, again working from the center to the outer edge and stitching from dot to dot, to complete one A-B-C unit as shown in Figure 4; press seam toward B and press center seam intersection to form a swirl on the wrong side where the three seams meet as shown in Figure 5.
Step 5. Repeat Steps 2–4 to complete 23 A-B-C units. Step 6. Sew C to D using the same method for making the A-B-C units, to make two C-D units as shown in Figure 6.
Step 7. Sew B to D as in Step 6. Repeat to make two B-D units, again referring to Figure 6.2271625106_26_Carnation Chart
FABRICMeasurements based on 42" usable fabric width. PA
TTER
NPI
ECES
#STR
IPS
&
PIEC
ES
CUT
1⁄8 yard 5 diff erent red fabrics Appliqué pieces as per patterns
1⁄8 yard pink mottled Appliqué piece as per pattern
1⁄8 yard yellow/green tonal
Appliqué pieces as per pattern
1/4 yard dark red print Appliqué pieces as per pattern
1/4 yard each medium and dark green mottleds
Appliqué pieces as per pattern
1/4 yard dark yellow/green print
Appliqué pieces as per pattern
1/4 yard very dark green mottled
2
Appliqué pieces as per pattern¾ " x 18" bias strips
1/4 yard blue-and-white snowfl ake print
GH
22
11/2 " x 241/2 "11/2 " x 261/2 "
1/4 yard medium blue snowfl ake print
MN
22
11/2 " x 311/2 "11/2 " x 331/2 "
1⁄3 yard medium blue mottled
eF
Cut as per patterns for e and F
1/2 yard blue metallic mottled*
J Cut as per pattern
1/2 yard ice blue mottled
AD
Cut as per patterns for A and D
FABRICMeasurements based on 42" usable fabric width. PA
TTER
NPI
ECES
#STR
IPS
&
PIEC
ES
CUT
1/2 yard medium blue mottled with silver snowfl akes
B Cut as per pattern
1/2 yard light blue mottled
C Cut as per pattern
1/2 yard dark blue snowfl ake print
IKL
Cut as per patterns for I, K and L
1/2 yard dark navy star print 4 21/4 " x 42" binding
1/2 �yard white tonal* 44
11/4 " x 28" bias11/4 " x 32" bias
Backing 37" x 37"
SUPPLIES
• Batting 37" x 37"• All-purpose thread to match
fabrics• Quilting thread• 2 yards 18"-wide lightweight
fusible web*• Optional H-52 Perfect
Patchwork Template*• 3/8" bias maker*
• Piping Hot Binding Tool*• 8 yards No. 16 white nylon cord• Zipper foot or cording foot• Appliqué pressing sheet• Fabric pencil• Fabric glue• Black marker• Basic sewing tools and supplies
*Fairy Frost fabric collection from Michael Miller Fabrics, Piping Hot Binding Tool by Susan K. Cleveland, H-52 Perfect Patchwork Template from Marti Michell, 3⁄8" Bias Maker from Clover and Lite Steam-A-Seam 2 fusible web from The Warm Company used to make sample.
Figure 1
A
Figure 2
A
B Figure 3
A
C B
Figure 4
A
C B
C
A
Figure 5
B
Figure 6
D D
CB
Make 2 Make 2
From Quilter's World magazine, February 2011, Vol. 33, No. 1, Copyright © 2011 Quilter's World magazine
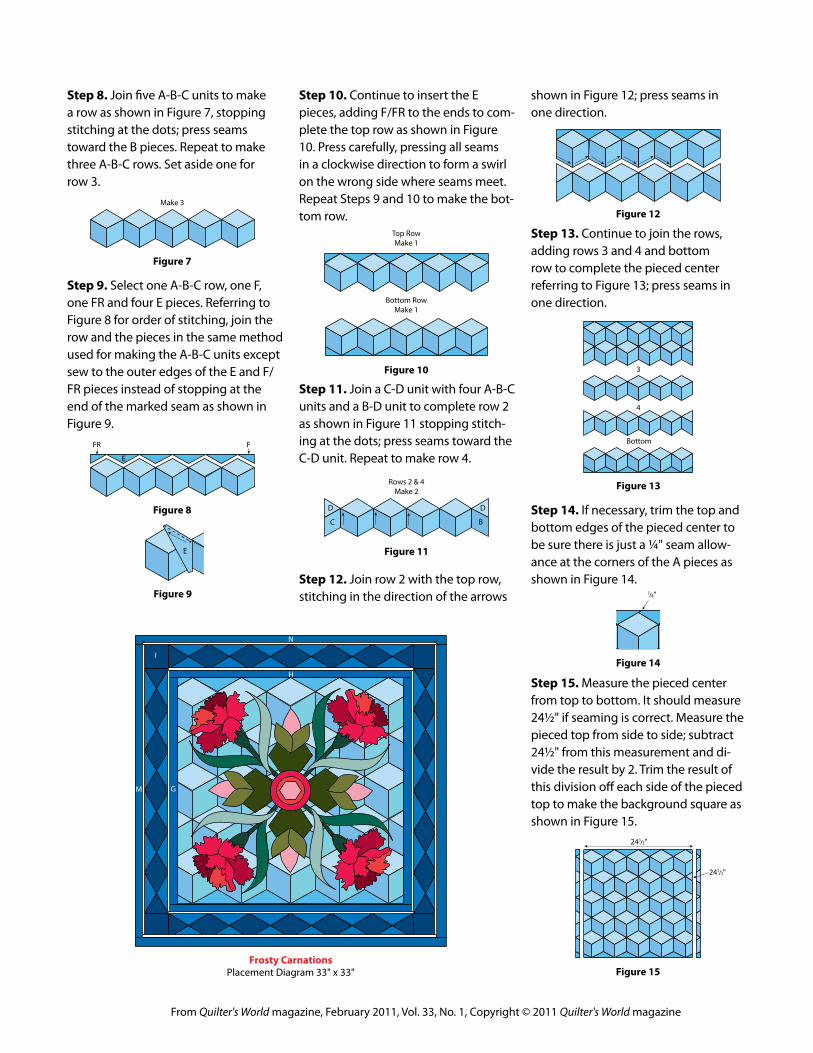
shown in Figure 12; press seams in one direction.
Step 13. Continue to join the rows, adding rows 3 and 4 and bottom row to complete the pieced center referring to Figure 13; press seams in one direction.
Step 14. If necessary, trim the top and bottom edges of the pieced center to be sure there is just a 1/4" seam allow-ance at the corners of the A pieces as shown in Figure 14.
Step 15. Measure the pieced center from top to bottom. It should measure 241/2" if seaming is correct. Measure the pieced top from side to side; subtract 241/2" from this measurement and di-vide the result by 2. Trim the result of this division off each side of the pieced top to make the background square as shown in Figure 15.
Step 10. Continue to insert the e pieces, adding F/FR to the ends to com-plete the top row as shown in Figure 10. Press carefully, pressing all seams in a clockwise direction to form a swirl on the wrong side where seams meet. Repeat Steps 9 and 10 to make the bot-tom row.
Step 11. Join a C-D unit with four A-B-C units and a B-D unit to complete row 2 as shown in Figure 11 stopping stitch-ing at the dots; press seams toward the C-D unit. Repeat to make row 4.
Step 12. Join row 2 with the top row, stitching in the direction of the arrows
Step 8. Join five A-B-C units to make a row as shown in Figure 7, stopping stitching at the dots; press seams toward the B pieces. Repeat to make three A-B-C rows. Set aside one for row 3.
Step 9. Select one A-B-C row, one F, one FR and four e pieces. Referring to Figure 8 for order of stitching, join the row and the pieces in the same method used for making the A-B-C units except sew to the outer edges of the e and F/FR pieces instead of stopping at the end of the marked seam as shown in Figure 9.
Figure 7
Make 3
Figure 8
E
FR F
Figure 9
E
Figure 10
Top RowMake 1
Bottom RowMake 1
Figure 11
C
D
B
D
Rows 2 & 4Make 2
Figure 12
Figure 13
3
4
Bottom
Figure 14Figure 14
1/4"
Figure 15
241/2"
241/2"
Frosty CarnationsPlacement Diagram 33" x 33"
G
H
I
M
N

From Quilter's World magazine, February 2011, Vol. 33, No. 1, Copyright © 2011 Quilter's World magazine
Step 10. Sew the M strips to opposite sides and N strips to the top and bottom of the pieced center to complete the top; press seams to the M and N strips.
Completing the AppliquéStep 1. Trace the flower and leaf shapes onto the paper side of the fus-ible web as directed on each piece for number to cut. Cut the fusible web out of the middle of each traced shape, leav-ing about 1/4" inside the traced line to reduce bulk. Note: Patterns have been reversed for fusible appliqué.Step 2. Cut out shapes on marked lines, leaving a margin around each one. Fuse shapes to the wrong side of fabrics as directed on each piece; cut out shapes on marked lines and re-move paper backing.
Step 3. Fold and crease the pieced top to mark the vertical, horizontal and di-agonal centers as shown in Figure 17.
Step 4. Trace each of the full-size flower motifs onto a piece of paper us-ing a black marker; turn the paper over and transfer the design to the opposite side of the paper. Mark this side as the right side.Step 5. Place the appliqué pressing sheet on your ironing surface; slide one
Adding Borders & PipingStep 1. Sew G strips to opposite sides and H strips to the top and bottom of the background square; press seams toward G and H strips.Step 2. Press each of the four 28" white tonal bias strips in half with wrong sides together along length; cut a 30" length of the white nylon cord. Place it inside the folded bias strip, keeping the cord as close to the fold as possible. Pin the raw edges together, encasing the cord.Step 3. Using a zipper foot or a cord-ing foot on your machine and white thread, machine-baste through both layers of fabric as close to the cord as you can without stitching through the cord. Note: An invisible zipper foot works especially well for this as it has a deep channel just the right size for the cord to run through next to the needle.Step 4. Trim the piping seam to 1/4".Step 5. Pin the piping even with the raw edge of one of the G strips; baste in place. Repeat on the opposite G strip and then on the H strips.Step 6. Join five L pieces with 12 J piec-es and two K pieces to make a pieced border strip as shown in Figure 16; press seams toward J and K pieces. Repeat to make four pieced border strips.
Step 7. Sew a pieced border strip to opposite sides of the pieced center; press seams toward the pieced strips.Step 8. Sew an I square to each end of each remaining pieced border strip; press seams away from I. Sew one of these strips to the top and bottom of the pieced center; press seams toward the pieced strips.Step 9. Cut a 32" length of white nylon cord. Using the 32" white tonal bias strips, prepare four piping strips refer-ring to Steps 2–4. Baste the piping strips to the sides then the top and bot-tom of the pieced center as in Step 5.
Figure 16
JK L
Make 4
Figure 17

From Quilter's World magazine, February 2011, Vol. 33, No. 1, Copyright © 2011 Quilter's World magazine
Figure 18
Step 9. Center and fuse the fused carnation flower motifs onto the diagonal creases of the quilt top 3" from the corners of the pieced back-ground, with flower petals and calyx sitting on top of the end of the stem.Step 10. Tuck the long underneath leaf behind the stem and the long top leaf on top of the stem 3" up from the cen-ter as shown in Figure 19.
Step 11. Center and fuse the fused flower bud motifs 21/2" from the edges of the pieced background, between the carnation flowers on the side and top and bottom creases of the pieced background referring to Figure 20.
Step 12. Center and fuse the hexagon shape to the small circle; trim excess fabric away from behind the hexagon to reduce bulk.Step 13. Center and fuse the circle/hexagon shapes onto the larger circle; trim excess away from behind to re-duce bulk. Step 14. Center and fuse the circle unit on the pieced background on top of the stem pieces as shown in Figure 21; trim away the pieced back-ground/stem layers from behind circles to reduce bulk and complete the appliquéd quilt top. Note: The pieces
will be stitched in place during the quilt-ing process.
Completing the QuiltStep 1. Sandwich the batting between the completed top and prepared back-ing; pin or baste layers together to hold. Step 2. Quilt as desired by hand or machine; remove pins or basting. Trim excess backing and batting even with quilt top.Step 3. Join binding strips on short ends with diagonal seams to make one long strip; trim seams to 1/4" and press seams open. Fold the strip in half along length with wrong sides together; press.Step 4. Sew binding to the right side of the quilt edges, overlapping ends. Fold binding to the back side and stitch in place. QW
Figure 19
3"
Figure 20
21/2"
Figure 21
Quilt in the ditch between the in-ner border and the background to secure the quilt layers. Edge-stitch around each appliqué piece, securing the edges with matching thread at the same time, using a blanket stitch, buttonhole stitch, satin stitch or other decorative stitch of your choice. Fill in the background areas with free-motion swirls to complete quilting in the center of the quilt. Stitch in the ditch around the remaining borders or quilt as desired.
How to Quilt
of the traced full-size flower patterns right side up under the pressing sheet.Step 6. Arrange the cut fabric pieces on the sheet in numerical order, pressing each piece in place on other pieces to form a complete motif; allow to cool and remove from the pressing sheet. Repeat to make four carnation flowers and four flower buds.Step 7. Feed the very dark green bias strips through the 3/8" bias maker us-ing a pin to pull the point of the fabric through. Pin the top of the fabric to the ironing board and press with a hot steam iron as you pull the bias maker along the strips as shown in Figure 18; allow to cool before moving. Repeat with the second strip.
Step 8. Trim bias strips to 141/2". Fold each strip in half to mark the centers. Place the bias strips in place on the creased diagonals of the pieced top and hold in place with a few drops of fabric glue.

From Quilter's World magazine, February 2011, Vol. 33, No. 1, Copyright © 2011 Quilter's World magazine
ACut 23 ice blue mottled
BCut 25 medium blue mottled
with silver snow�akes
CCut 25 light blue mottled
4
5
6
7
Bud BaseCut 4 dark yellow/green
Bud Leaf 6Cut 4 yellow/green tonal
Bud Leaf 7Cut 4 yellow/green tonal
BudCut 4 pink mottled
Bud MotifMake 4 motifs
F R O S T y C A R N AT I O N S T E M P L AT E S
When printing patterns, check to make sure your print settings are
set to print at 100 percent and page scaling displays “None.”
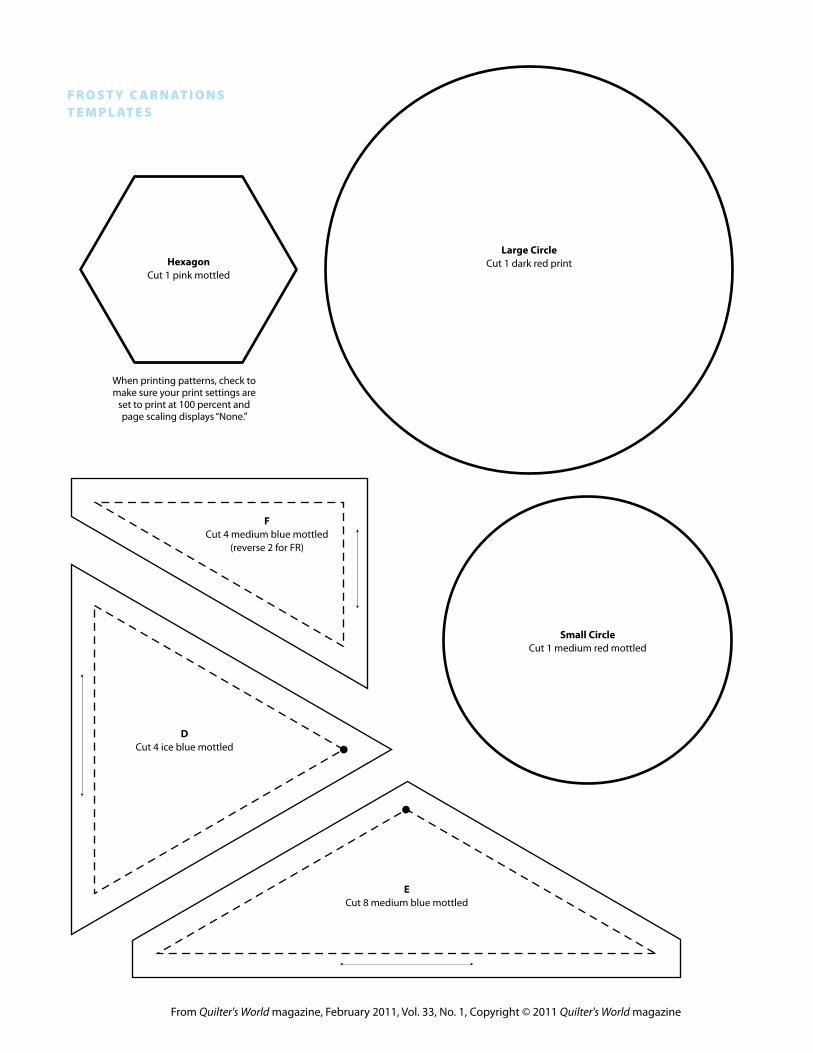
From Quilter's World magazine, February 2011, Vol. 33, No. 1, Copyright © 2011 Quilter's World magazine
HexagonCut 1 pink mottled
Small CircleCut 1 medium red mottled
Large CircleCut 1 dark red print
DCut 4 ice blue mottled
ECut 8 medium blue mottled
FCut 4 medium blue mottled
(reverse 2 for FR)
F R O S T y C A R N AT I O N S T E M P L AT E S
When printing patterns, check to make sure your print settings are
set to print at 100 percent and page scaling displays “None.”
From Quilter's World magazine, February 2011, Vol. 33, No. 1, Copyright © 2011 Quilter's World magazine
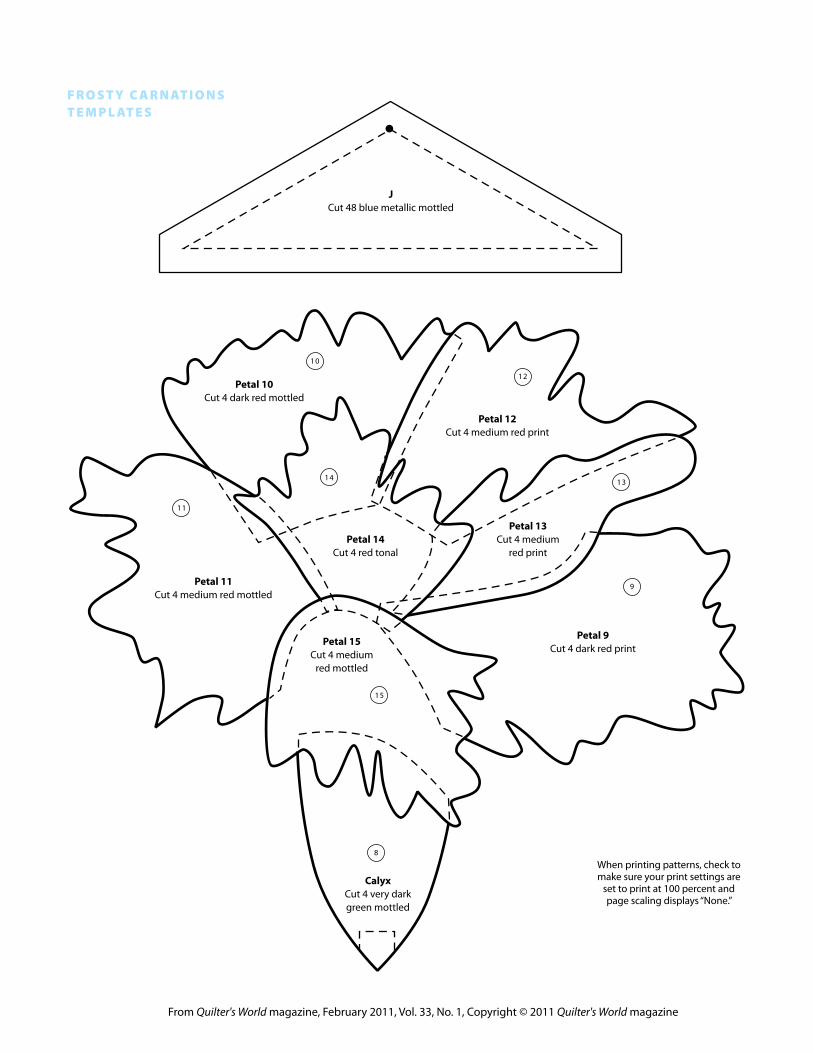
8
15
9
11
10
12
1314
Petal 15Cut 4 medium
red mottled
CalyxCut 4 very dark green mottled
Petal 9Cut 4 dark red print
Petal 13Cut 4 medium
red print
Petal 12Cut 4 medium red print
Petal 14Cut 4 red tonal
Petal 10Cut 4 dark red mottled
Petal 11Cut 4 medium red mottled
JCut 48 blue metallic mottled
F R O S T y C A R N AT I O N S T E M P L AT E S
When printing patterns, check to make sure your print settings are
set to print at 100 percent and page scaling displays “None.”

From Quilter's World magazine, February 2011, Vol. 33, No. 1, Copyright © 2011 Quilter's World magazine
KCut 8 dark blue snow�ake print
LCut 20 dark blue snow�ake print
2
Long Underneath LeafCut 4 dark green mottled
F R O S T y C A R N AT I O N S T E M P L AT E S
When printing patterns, check to make sure your print settings are
set to print at 100 percent and page scaling displays “None.”

From Quilter's World magazine, February 2011, Vol. 33, No. 1, Copyright © 2011 Quilter's World magazine
2
3
Long Top LeafCut 4 medium green mottled
Note: Piece 1 is made from very dark green bias strips
Calyx placement line
Long Underneath Leaf placement line
ICut 4 dark blue snow�ake print
F R O S T y C A R N AT I O N S T E M P L AT E S
When printing patterns, check to make sure your print settings are
set to print at 100 percent and page scaling displays “None.”

From Quilter's World magazine, February 2011, Vol. 33, No. 1, Copyright © 2011 Quilter's World magazine
Quilters-World.com
October 2010
WOODLANDWONDERSOwls & Trees &Leaves—Oh My!
ENROLL INQW UNIVERSITY Sashiko 101
CREATE YOUR OWN INDIAN SUMMER
T H E M A G A Z I N E F O R T O D AY ’ S Q U I LT E R
N E W P R O J E C T S TO U S H E R I N AU T U M N
15
Digital.QuiltersWorld.com
The NEW digital version
of Quilter’s World is now here!
Zoom in on
text and photos!
Instant access to two years of back issues! You’ll be able to easily search for patterns, articles and how-to techniques—it’s all online for as long as you’re a digital subscriber!
Zoom in on just what you want! Whether it’s the current issue or a back issue, you can enlarge photos, text or diagrams to make things clearer and easier on your eyes.
Get a great value! At only pennies a pattern, it’s the smart way to build up your quilting library!
Get your digital subscription to Quilter’s World right now!
$9.97 a year when added to a print subscription, $14.97 per year for digital only
3 reasons to add a digital subscription to Quilter’s World:
When you sign up, you’ll get your first issue (and two-year archive access) immediately!
Quilters-World.comDecember 2009
®
The Magazine
For Quilt Lovers
IMAGINATION
COMES ALIVE
At Happy Hollow
Designs
THINK SMALL
Tiny Projects
That Make
Great Gifts
MAKE A
ONE-BLOCK
WONDER
S H O W Y O U R H O L I D AY S P I R I T W I T H Q U I LT S !
Quilters-World.com
August 2010
MAgic MAzeMake Your Scraps DisappearQW Goes Back To School
Delight in ReD Delicious
t h e M A g A z i n e F o R t o D Ay ’ s Q u i lt e R
pRojec ts you’ll WAnt to Quilt toDAy
16Quilters-World.comFebruary 2010
®
The Magazine
For Quilt Lovers
Selvage SurpriSeS Make a Clever
Treat Bag!
Quilt diva extraordinaire
Amy Bradley
ShoW oFF a modern baby Quilt
e x p l o r e a Q u i lt i n g W i n t e r W o n d e r l a n d
Quilters-World.comJune 2010
®The Magazine For Quilt Lovers
GET BACK TO BASICS: MASTERING YOUR MACHINE
dIMENSIONAl dETAIlSRickrack Does The Trick
GO FOR A SpIN Simple Quilt, Stunning Results
GROW A GARdENBEAUTY
Quilters-World.comApril 2010
®
The Magazine For Quilt Lovers
neW kid on the block—meet QW’s neW editor
think springShowcase Your Piecing Skills
bAby’s First Quilt Welcome a New Addition
butterFlies Are bAck!
2
3
1