the leatherwood camputer - midwayusathe leatherwood® camputer ... there are four indicator rings on...
TRANSCRIPT

The Leatherwood® CAMPUTER™ Automatic Ranging and Trajectory Scope
M-1000
INSTRUCTIONS AND CAM SETTING CHARTS
SPECIFICATIONS M-1000 Power: 2.5 to 10 Variable Objective: 44mm Length: 15.47 in. Weight: 2.031 lb. (32.50 oz.) Eye relief: approx. 3.75 - 3.0 in. Tube: 1” Nitrogen filled, shockproof, waterproof Mounting: Standard Weaver-style rail Caliber range: 17 Rem. – 338 Unltra Magnum Optics: Fully Multi-coated Trajectory Correction Range:250–1000 meters

-
2
THANK YOU for purchasing a Leatherwood Camputer Auto-Ranging scope. Our goal is to provide you with the latest Leatherwood System technology coupled with high quality optics at a price similar to the ordinary
non-compensating hunting scope. The Leatherwood Camputer scope is a
variable power riflescope that automatically compensates for bullet drop. It does this through the use of a unique circular cam that actually raises and lowers the rear of the scope. The effect of this, when aimed at a target, is to correspondingly lower and raise the muzzle of the rifle, and thereby adjust
your aim to eliminate bullet drop due to gravity. The Leatherwood Camputer scope does not rely on fragile, complicated mechanical or unreliable battery-based electronic ranging devices. It also does not require changing the elevation and windage adjustments. By using one trajectory cam that is
incrementally adjustable, the Leatherwood Camputer scope is the most advanced ART (Automatic Ranging & Trajectory) scope. The ART System is in worldwide use and its history is an example of an all out effort to build only the best.
A BRIEF HISTORY OF THE ART SCOPE TECHNOLOGY
The ART scope technology was born out of necessity in the early years of the Vietnam War. Enemy snipers were killing American servicemen, but the US Army was not equipped to deal with the problem. The solution was to place newly trained snipers into battlefield service as soon as possible. Sniper training at that time was a long term process that required long hours on the range teaching recruits to estimate distance and to use the proper amount of “hold-over” (aiming high to compensate for bullet drop) in order to make successful first round hits. About this time, 2
nd Lieutenant James M. Leatherwood entered the Army, and
brought with him his recently patented design for a ranging scope that would raise and lower the rear of the scope similar to an open sight. Moving rapidly, the Army soon had Leatherwood System scopes in the hands of Army snipers. The use of the new scope system had dramatic effects. It was now possible to rapidly train snipers to get first round hits out to 900 meters without having to devote precious time on distance estimation or “hold-over”. Soon, American snipers were dominating the field in Vietnam, and the ART scope system became a legend. Over the years, the ART scope system has been steadily improved under the discerning control of the original inventor, James Leatherwood. An unrelenting insistence on durability and quality resulted in the acceptance of the ART II scope as a standard issue item by the US Army. That was followed by a civilian and law enforcement version, the ART/MPC. These new scopes based on the technology pioneered in the MPC bring a new dimension to long range shooting.
-
3
TABLE OF CONTENTS Section 1. Basic Definitions And Adjustments Page 4
Section 2. The CAMPUTER Ranging System Page 8 Section 3. Setting The Scope For Your Ammunition Page 10 Section 4. Cam setting for unlisted cartridges Page 11 Section 5. Mounting The Scope To The Rifle Page 11 Section 6. Zeroing The Scope Page 12 Section 7 Zeroing The Scope At 100 Yards Page 12
Section 8. The M-1000 No-Math Mil-Dot Reticles Page 13 Section 9. Fine Tuning The System Page 15 Section 10. M-1000 Trajectory Cam Setting Charts Page 16 Section 11. M-1000 Cartridge Chart Page 19 Section 12: Limited Lifetime Warranty Page 20
Contact Information: Website: http://www.hi-luxoptics.com or http://www.leatherwoodoptics.com Technical Support: E-mail to [email protected] Distributor And Dealer Sales Only: E-mail to [email protected] Exclusively manufactured and imported by
Hi-Lux, Inc. 3135 Kshiwa Street Torrance, CA 90505 Tel: (310) 257-8142, Fax:(310) 257-8096
2007 Hi-Lux , Inc.
Leatherwood, CAMPUTER, and AUTO/RANGE are trademarks of James M. Leatherwood. These trademarks are all exclusively licensed to Hi-Lux, Inc. U.S. and foreign patents: #3,340,614; #3,431,652; #3,492,733; #914, 957. Other U.S. and foreign patents are pending.

-
4
1. Basic Definitions and Adjustments A. Eyepiece: The eyepiece is at the rear of the scope, which uses a fast focus dial. By turning the fast focus E.P. either clockwise or counter-clockwise, you can change the scope’s focus to suit your individual eyesight. There is a diopter scale on the E.P.. B. Power Ring: The power ring is located in front of the eyepiece. The power ring has a series of numbers on its outside face that are used to designate the magnification power. The power that lines up with the triangle on the E.P. (A) indicates the magnification to which the scope is set. C. Range Ring: The range ring encircles the power ring and has a scallop shaped, knurled outside face. The range numbers are stamped on the rear face. The distance that lines up with the triangle on the E.P. (A) indicates the zero range when the scope is used in the Auto-Range mode. The range ring has a slotted screw on the top side. This is used to move the ring back and allow you to set the Calibration Ring (D) for a specific caliber and bullet. You can also remove the range ring by loosing the thumbscrew screw for changing to a caliber specific cam. (For more information on caliber specific cams, visit www.hi-luxoptics.com.)
D. Calibration Ring: The calibration ring (D) is located in front of the range ring (C) and also encircles the Trajectory Cam (E). It has a series of numbers and increments marked on its outer surface that are used as a reference scale when setting the scope for a specific ammunition code number. The numbers are marked from 2.5 to 10. The increment is 1. The numbers on the calibration ring multiplied by 100 indicate the range of the scope when used in the Manual

-
5
mode. The cam settings can be changed by loosing the thumbscrew on the calibration ring (D). E. Trajectory Cam: The trajectory cam (E) is immediately in front of the calibration ring (D) and also encircles the power ring (B). It is not perfectly circular, but is a cam whose precise shape has been produced by advanced mathematics and CNC machining. It is engaged to the calibration ring by the thumbscrew on Calibration Ring (D). The Calibration Ring clamps on the Cam. The trajectory cam ring (E) has a small arrow stamped on its outer surface that is used as an index point when setting the trajectory cam to the ammunition code. The trajectory cam rides on a cam follower roller on the base of the scope mount and thereby raises and lowers the rear of the scope. It is this precise action that compensates the bullet drop. You can loose the thumbscrew on the Calibration Ring (D) to move the Cam and set to the desired ammunition code. Warning: Never loosen the screw on the Trajectory Cam (E) unless you want to exchange the Trajectory Cam. (For more information on caliber specific cams, visit www.hi-luxoptics.com.) F. Locking Thumbscrew: The locking thumbscrew is located in front of the Trajectory Cam (E). It is used to lock the Cam when you want to shoot at the desired range. G. Multi-Dial Elevation and Windage Adjustments:
As you see the picture indicated at the left, we have used our patented multiple zero technology on both the elevation and windage adjustments, which are located near the center of the scope. A screw-on turret cap that seals out moisture and dirt covers each adjustment. These adjustments act on the internal cross hairs of
the scope to help you zero your rifle. The top turret adjusts for elevation (up & down), and the right turret adjusts for windage (left & right). Each “click” or stop equals one 1/4 minute of angle, or about 6 mm at a target distance of 100 meters or ¼ Inch at 100 yards. The range of the adjustments for this scope is at Minimum 30 MOA (Minutes of Angle) up & down and left & right from center to center. There are four indicator rings on each turret that can set for as many as five different zeros for five different guns. The adjustment turrets have two main functions:

-
6
(1) The Standard Tactical Adjustment
The factory preset is for the tactical turrets. Both turrets are set at the highest position, and for the maximum adjustment, which is 30 MOA up & down and 30 MOA left & right from center to center.
(2) Zeroing a single cartridge with different guns or different barrels on the same rifle
There is one graduated scale that is engraved on each knob (2,3) and four moveable indicator rings (4). This makes it possible to indicate 5 different zeros with the vertical adjustment and windage adjustments. For purposes of illustration, the range of 250 meters for a zero will be used (refer to sections 6 & 7 on pages 12-13 for more details about zeroing).
1. After removing the knob covers, loosen the 3 setscrews (1) at the top of the elevation and windage knobs. This disconnects the knobs from the adjusting shafts (7).
2. Raise each knob until there is a space about the thickness of a dime between the bottom of the knob and the scope body. Then retighten the setscrews. This is to give plenty of movement to the knobs to get an initial zero.
3. You should now zero the scope at 250 meters or 100 yards (refer to sections 6 & 7 on pages 12-13 for more details about zeroing) for 250 meter zeroing in the conventional manner using the windage and elevation knobs. This should be done using your first load or barrel. Once zero is achieved be sure not to move the knobs. Now go to the next step.
4. Since other loads or barrels may be above or below or left and right of the present load or barrel, it is necessary to retain some movement in either direction with the knobs. A precise way to do this is first loosen the setscrews (1) taking care not to move the knobs. Place a piece of writing paper folded twice (4 thicknesses) between the bottom of each knob and the scope body. This will give about 1/3 turn past the zero mark but still not allow a full turn. This should be enough to cover the different impact points. Remember different loads may have different windage as well as different elevation settings, so you will need to do this for both knobs. Now turn the knobs until the zeros on the scales are aligned with the

-
7
index marks (8) on the scope body. Push each knob down until it bottoms against the paper spacer Retighten the setscrews (1) in each knob. The paper spacer can now be removed by turning the knobs and freeing the paper spacer.
5. Next a zero can be established for the other loads or barrels. Both elevation and windage will possibly change for each load or barrel. This should done by actual shooting.
6. Each indicator ring (4) can be rotated to the appropriate location by inserting a bullet point (or some similar implement) in the notch (5) and rotating it about the knob. They are friction tight: similar to piston rings. Therefore the first ring would be rotated until the center of the notch (5) is above the next zero point for the load or barrel being used. It is highly recommended to write down which ring setting corresponds to the corresponding load or barrel.
7. The initial zero plus 4 indicator ring settings will accommodate up to 5 different guns or barrels.
Note: The elevation knob has 15 minutes of movement in one rotation and is not blocked to just 1 turn in the up direction. This allows a shooter to adjust past one full turn up but still know where his bottom zero is. However the knob is blocked to not rotate a full turn beyond the bottom zero. So if there is any doubt that the knob is on the correct mark, it can be screwed all the way down and then back up to the correct mark. If a zero point is desired that needs more than one full turn up then the shooter needs to make a notation for reference that shows that. You can always move the elevation and windage knobs to the highest position on the shaft (7) to obtain the maximum adjustments, which are 30 MOA up & down and left & right from center to center. H. Mount Cradle: The mount cradle is carefully designed to allow the trajectory cam to move the scope in a vertical plane only. The scope may be rotated slightly within the rings to plumb the crosshairs with the rifle. The mount only allows limited rotation to prevent changing the trajectory cam's relationship to the cam follower roller. I. Cam Follower Roller The trajectory cam is sitting on top of the Cam Follower Roller to make the cam rotate smoothly. There are three different high rollers. The ‘standard’ one, which is installed at the factory on the scope. The ‘medium’ roller which gives you another 20 MOA higher, and lastly, the ‘high’ roller gives you a final 20 MOA, if you need to have extra elevation to zero the rifle. J. Scope Ring:

-
8
There are two scope rings to hold the scope on the cradle. One is the front ring and one is the rear ring. Never loosen or remove the scope rings unless you need to install the high cam follower roller. The factory has provided a special T-10 split wrench in the scope package. K. External Windage Adjustment on the Mount Cradle: On the front ring, there is an External Windage adjustment. If you cannot zero the rifle with the internal scope windage adjustment, you can use this external adjustment to bring the scope internal adjustment back to the optical center, then you will maximize the scope internal elevation adjustment. You can at least have 35 MOA external adjustment on each side.
A. Once you make the windage adjustment, loosen the two big Allen screws under the front and rear rings.
B. Then loosen one set screw and push the other set screw to the left or right as needed. Once you get the windage adjusted to the desired setting,
C. Re-tighten the two big Allen screws under both front and rear rings and make sure the front and rear rings are parallel.
D. Lastly, re-tighten the two set screws. E. *Note: You don’t need to loosen the 8 screws on top of the rings
when you do the external windage adjustment. Please remember that if you need to move your point of impact to the left, then you need to move the external adjustment to the right, and if you need to move your point of impact to the right, then you have to move the external adjustment to the left.
2. The CAMPUTER Ranging System. The combination of the power ring, range ring, calibration ring, and the
trajectory cam ring is the mechanism that we call the CAMPUTER Ranging System.
Auto/Range mode is active when all rings will turn simultaneously. This allows the M-1000 to automatically compensate for bullet trajectory, and occurs when:
A. The two pins on the range ring are connected with the calibration ring,
B. The locking thumbscrew on the range ring, and C. The calibration ring are tightened down
“Manual Mode” allows the shooter to use the variable power (zoom) of the M-1000 without engaging the Trajectory Cam. Therefore there is no automatic compensation for the bullet’s trajectory. To use Manual Mode:
A. Loosen the locking thumbscrew on the range ring with several turns,

-
9
B. And pull back the range ring. This will separate the calibration and trajectory cam rings from the power ring.
Now the calibration and cam rings will turn independently of the power and range rings. This allows the rings to operate as two separate units, thus the scope is in Manual mode.
A. Auto/ Range Mode
In the Auto/ Range Mode, the scope will automatically compensate for bullet drop at all ranges shown on the scope. The aiming reticle is used to "range" the scope in on the target.
See Section 8 for more information on the NO-MATH Mil DOT Reticles. B. Manual Mode In Manual Mode the power and range rings turn independently of the calibration and trajectory cam rings. Simply put, “Zoom” and “Trajectory Compensation” now work independently. Therefore, the scope will not Auto-Range in this mode, and will not automatically compensate for bullet drop. The bottom set of the numbers on the face of Range Ring (C), which range from 2.5 to 10 are still used to denote the power setting, however the range numbers (250 – 1000) that are listed just above the corresponding power settings are moot since the Range Ring is disengaged from the Calibration and Trajectory Ring. Since the calibration ring now operates independently of the “zoom”, you will need to set your range manually. Using the numbers (2.5 – 10) on top of the calibration ring (multiply by 10), you can manually set the range (250-1000 meters). *Note: to use this mode effectively, you must know the range to your target. Reference Section 8 to learn how to use the M-1000’s reticle to determine range. Why Use Manual Mode? Using Manual Mode allows you the flexibility to select the combinations of power and range that best fit your needs. For example, you may want to set the scope on 10 power at a range of 250 meters for more magnification to shoot at small targets. Or perhaps you may want to select a setting of 7 power and 500 meters for a general, all-purpose setting that will allow you to take advantage of any fleeting target when there is not time enough to "Auto-Range" the scope. When the desired range has been selected, the locking thumbscrew may be tightened down to retain it in place.

-
10
3. Setting the Scope for your ammunition. When you have determined the type of ammunition that you want to use, do the following: A. For the M-1000 scope refer to the Cartridge Chart on pages 19-21 to
determine the reference number for setting your scope. If your cartridge is not listed, refer to Sec 4.
B. Loosen the thumbscrew on the Range Ring (C) and pull the Range
Ring to the rear approximately 1/8 of an inch. C. Loosen the locking thumbscrew slightly on the Calibration Ring (D) and
free of the Calibration Ring from the Trajectory Cam (E). D. Find the position on the Calibration Ring (D) that corresponds with your
ammo’s code number. Rotate the Calibration Ring until the small arrow on the Trajectory Cam (E) is in line with the code number’s position on the calibration ring.
E. When the arrow (J) on the trajectory cam is pointing at the correct
ammo’s code number on the Calibration Ring, re-tighten the thumbscrew on the Calibration Ring.
F. Push the two pins on the Range Ring (C) firmly into the Calibration
Ring, and tighten the slotted head thumbscrew on the range ring.
G. The scope has now been calibrated for the particular cartridge that you desire to use. If you wish to change cartridges, bullet weights, bullet style or manufacturer, simply consult the Cam Calibration Chart for the new code number, and reset the Calibration ring as directed above for the new ammunition.
H. Please do not loose the screw on the Trajectory Cam (E). This is a guard screw. You only need to loosen this screw when you want to change the different trajectory cam. We will discuss how to change the cam in different section.
Setting the Ballistic Cam

-
11
4. Selecting a cam setting for Custom/Unlisted loads. Using the Drop Charts on pages 16-18, compare the bullet path of your load to the cam setting drop data using information from sources, such as: 1. Ammunition manufacturers’ printed materials and websites. 2. Reloading manuals, software, or websites such as Sierra, RCBS, Barnes, Hornady. A-Square, Speer, or Nosler. Set the Trajectory Cam once you’ve determined your custom/unlisted load’s Cam Setting:
(1) Loosen the thumbscrew on Range Ring (C) and the thumbscrew on Calibration Ring (D) and pull Range Ring (C) to the rear.
(2) Rotate the Calibration Ring (D) to the left or right in the required
direction until the indicating arrow on the Trajectory Cam (E) points to the desired cam setting number from 250 to 1000. Most common used cam settings are from 300 to 660.
(3) After you get the correct cam setting lined up, re-tighten the
thumbscrew on the Calibration Ring (D), re-engage the locking pins on the Range Ring (C) back into Calibration Ring (D) and retighten the thumbscrew on the Range Ring (C). Now the cam is set for your cartridge.
(4) Please do not loose the screw on the Trajectory Cam (E). This is
a guard screw. You need to loosen this screw only when you want to change the different trajectory cam. We will discuss how to change the cam in different section.
This scope is designed to take advantage of most ballistic efficient loads and bullets. It will work for a wide range of calibers using high ballistic coefficient bullets. There will never be a perfect match, but you should find a setting that will get you within an acceptable accuracy for the rifle and ammunition that is within the hunting accuracy of most shooters and rifles. Also different rifles, barrel length, temperature, air density, etc., will change the bullet path.
5. Mounting the Scope on the Rifle To mount the scope on the rifle: A. Tightly secure the appropriate base to the rifle. The scope mount will
fit any Weaver-style base or picatinny rail and does not require a specific spacing of slots.

-
12
B. Loosen the two thumbnuts and clamps on the right side of the mount. C. Place the scope on the rifle so that the front cross-bolt is down in a
corresponding groove in the base. D. Tighten the thumbnuts securely with finger pressure only. DO NOT
USE PLIERS! Use of pliers or other tools may deform the mount base. For different rifles you may use the two wing nuts provided in the package.
6. Zeroing the Scope To zero the scope, use the following procedure: A. Check the scope to see that the thumbscrews on the range ring and the calibration ring are tightened down and in line with each other. B. Turn the range ring all the way to the right so that the numbers 2.5
and 250 are at the top. C. Set up a target at 250 meters (273 yds) and zero the scope by using
the center crosshairs and the elevation and windage adjustments in the usual manner.
D. When the rifle is shooting "dead-on" at the point of aim at 250 meters,
it is properly zeroed in and ready for use.
7. Zeroing the scope using a 100 yd range
A. If you only have access to a 100 yard range, you can sight in your
scope at 100 yards, so it will have an approximate 250 meter zero.
B. The upper crossbar on the M-1000 reticle can be used as the aiming point for a 100 yd zero as it will be about 5 inches above the aiming point at 100 yards at 2.5x. This is the approximate impact point of most high velocity rounds at 100 yards with a 250 meter zero.
C. Because of the much greater drop of the bullet when shooting at the
longer ranges, it will be necessary to precisely zero at least at 250 meters to properly coordinate the ballistic cam to the actual bullet path. The 100 yard zero should get you fairly close to your final zero.

-
13
D. If you set the scope power on 10x and the cam on 250 meters, the first upper dot will be an approximate impact point at 200 meters.
8. M-1000 Reticle - The No-Math Mil-Dot Reticle
This reticle is based on our “No-Math Mil-Dot” reticle WHICH IS used in our Hi-Lux scope line too. Since the dots are “mil-dot” the shooter can readily determine that the dimensions of the framing bars in the center of the scope. The shooter frames the target in meter or ½ meter or ¼ meter increments. You can turn the M-1000’s reticle to a true Mil-Dot system by turning the power to 10X. A. The reason for framing marks. Up to this point, you have programmed the CAMPUTER with the correct code for the ammunition you are using. This “tells” the scope which portion of the trajectory ring to use. Next, you zeroed the scope, which set the crosshairs at the point of impact at a set distance. Now, in actual use, you must “tell” the scope the distance to the intended target, in order for it to properly compensate for the bullet trajectory. You do this by making use of the framing marks. The framing marks you see in the scope allow you to overlay (“frame”) a known dimension onto an equal known dimension at the target. This dimension at the target can be all or part of the target. If you are shooting at a bullseye or silhouette target for example, you will generally know how high or wide that target is in inches. Likewise, if you are shooting at live game, you will want to know the useful dimensions of that animal. For example, an average sized deer has a chest “kill zone” height of about 18”. Deer and antelope are about 54” tall overall. A wild pig is about 4' long from nose to

-
14
tail. A coyote is about 36” long. Whatever your target is, be prepared to know or estimate one or more average dimensions of that target. B. Using the framing marks. When you locate your target in the scope's field of view, you overlay the appropriate framing mark onto the target. Then, you adjust the magnification of the scope until the framing mark frames the dimension of all or part of the target. Once this is done, you have “told” the scope the distance to the target, and it has already adjusted the trajectory. Then you put the center of the crosshairs on the intended point of impact (no need to “hold-over”), and fire. With very little practice, this procedure becomes one fluid motion…Frame, Aim and Shoot! Example 1: You locate an adult buck in your scope, distance unknown. You know that the chest cavity “kill zone” height just behind the front shoulder is about 18”. You overlay the 18” vertical framing mark on the chest cavity, and adjust the magnification until the framing mark frames this zone. You then put the center of the crosshairs on the point of desired impact, and fire.
Example 2: You see a coyote at an unknown distance. You locate it with your scope, overlay the 1 meter=36” in the reticle horizontal framing mark on it, and adjust magnification until the mark frames the coyote’s length. Put the center of the crosshairs on the desired point of impact, and fire.
Example 3: A six-inch paper bullseye is set at an unknown distance between 250 meters to 1000 meters. Locate it in your scope, overlay the ¼ meter (about 6” in the reticle) horizontal framing mark on it, and adjust the

-
15
magnification until the mark frames the target. Center the crosshairs on the bullseye, and fire.
9. Fine tuning the CAMPUTER Cam System to your rifle and ammunition The Cam Calibration Chart at the end of this manual was developed by actual shooting over various ranges with different cartridges. However, if you are lucky enough to have a place to shoot long range, to obtain optimum
performance from the CAMPUTER system, we recommend that you take the following steps particularly if you feel that the scope is not compensating for bullet drop correctly. A. Place the scope in the Auto-Range mode and zero it in "dead-on" at 250 meters. B. Set up an 18" target at some distance between 250 meters and 1000 meters, or if possible, set up 18" targets at the 250,300, 400, 500, 600, 700, 800, 1000 meter locations. C. Range the scope in on the 18" target and fire a group of at least three shots. D. If the scope is not shooting exactly at the point of aim at the longer ranges, do the following:
1. If shooting low, adjust the cam setting lower. Loose both the
thumbscrews on the calibration and range rings, move the indicating arrow counter-clockwise (left) to the new desired lower cam setting, and then tighten the thumbscrew on the calibration ring. If you want to do the auto/range mode, you need to line up the range ring with the calibration ring and tighten the thumbscrew on the range ring. Now the calibration ring and the power ring are locked up together.
2. If shooting high, adjust the cam setting higher. Loosen both the thumbscrews on the calibration and range rings, move the indicating arrow clockwise (right) to the new desired higher cam setting, and then tighten the thumbscrew on the calibration ring. If you want to do the auto/range mode, you need to line up the range ring with the calibration ring and tighten the thumbscrew on the range ring. Now the calibration ring, the power ring, and the range ring are all locked up together. These three rings will move together. Note: Moving the arrow to the left will add more lift to the trajectory cam, and moving it to the right will decrease the amount of lift.

-
16
E. If you want to switch the M-1000 scope from rifle to rifle or for different barrels, you can use our Multi-Dial indicating rings to return previous zeros by turning the four indicating rings to the appropriate position that have been set previously. Re-zero the rifle using the windage and elevation adjustments. The rifle can be zeroed for a longer-range target as long as the Range ring cam (C) is set for that range. To set the range ring, line up the proper distance increment on the outside face of the range ring with the large arrow on the top surface of the rear scope ring. It should be possible to find a location at which the impact will be approximately within about one (1) or two minutes of angle of the point of aim at all ranges.
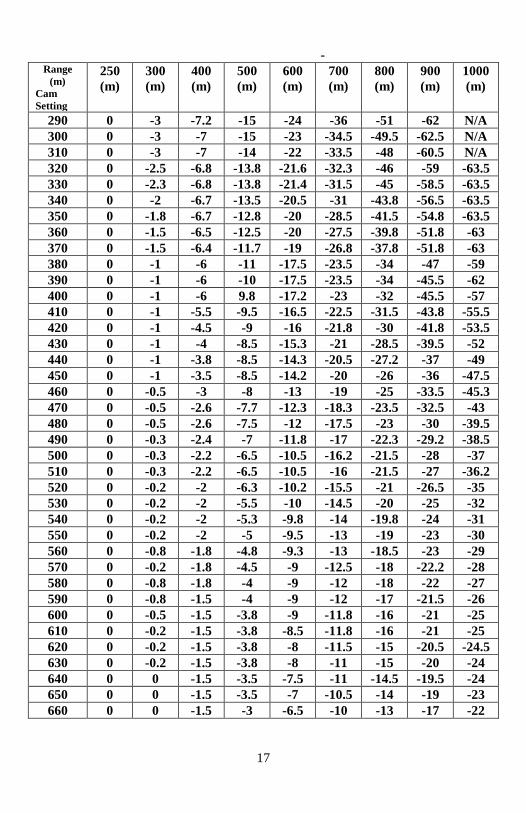
10. M-1000 Trajectory Cam Setting Charts. Many of our original scope settings were determined by actual test firings. There are so many new cartridges and loads that it would be impossible to list, much less shoot them all. However, the new computer programs do a pretty good job of predicting trajectories. So we are now providing a chart that shows the bullet drop for 13 different trajectories, and the cam setting for each. The settings are 20 meters apart. There are settings between each of the ones listed. So, there is a total of around 30 different trajectories to choose from. If you have a ballistic program all you have to do is enter your load data and compute the bullet drop at 100-meter increments and compare the results to the chart. If you don’t , then you can compare drop data with factory data or a handloading book.
M-1000
Chart of Trajectory Paths for Cam Settings
Drop Is In MOA Range
(m)
Cam
Setting
250
(m)
300
(m)
400
(m)
500
(m)
600
(m)
700
(m)
800
(m)
900
(m)
1000
(m)
250 0 -3.2 -8 -15.5 -27 -42 -56 -62 N/A
260 0 -3.2 -7.2 -15 -26 -41 -55 -62 N/A
270 0 -3.2 -7.2 -15 -25 -39 -53 -62 N/A
280 0 -3 -7.2 -15 -24.5 -38 -52 -62 N/A
-
17
Range
(m)
Cam
Setting
250
(m)
300
(m)
400
(m)
500
(m)
600
(m)
700
(m)
800
(m)
900
(m)
1000
(m)
290 0 -3 -7.2 -15 -24 -36 -51 -62 N/A
300 0 -3 -7 -15 -23 -34.5 -49.5 -62.5 N/A
310 0 -3 -7 -14 -22 -33.5 -48 -60.5 N/A
320 0 -2.5 -6.8 -13.8 -21.6 -32.3 -46 -59 -63.5
330 0 -2.3 -6.8 -13.8 -21.4 -31.5 -45 -58.5 -63.5
340 0 -2 -6.7 -13.5 -20.5 -31 -43.8 -56.5 -63.5
350 0 -1.8 -6.7 -12.8 -20 -28.5 -41.5 -54.8 -63.5
360 0 -1.5 -6.5 -12.5 -20 -27.5 -39.8 -51.8 -63
370 0 -1.5 -6.4 -11.7 -19 -26.8 -37.8 -51.8 -63
380 0 -1 -6 -11 -17.5 -23.5 -34 -47 -59
390 0 -1 -6 -10 -17.5 -23.5 -34 -45.5 -62
400 0 -1 -6 9.8 -17.2 -23 -32 -45.5 -57
410 0 -1 -5.5 -9.5 -16.5 -22.5 -31.5 -43.8 -55.5
420 0 -1 -4.5 -9 -16 -21.8 -30 -41.8 -53.5
430 0 -1 -4 -8.5 -15.3 -21 -28.5 -39.5 -52
440 0 -1 -3.8 -8.5 -14.3 -20.5 -27.2 -37 -49
450 0 -1 -3.5 -8.5 -14.2 -20 -26 -36 -47.5
460 0 -0.5 -3 -8 -13 -19 -25 -33.5 -45.3
470 0 -0.5 -2.6 -7.7 -12.3 -18.3 -23.5 -32.5 -43
480 0 -0.5 -2.6 -7.5 -12 -17.5 -23 -30 -39.5
490 0 -0.3 -2.4 -7 -11.8 -17 -22.3 -29.2 -38.5
500 0 -0.3 -2.2 -6.5 -10.5 -16.2 -21.5 -28 -37
510 0 -0.3 -2.2 -6.5 -10.5 -16 -21.5 -27 -36.2
520 0 -0.2 -2 -6.3 -10.2 -15.5 -21 -26.5 -35
530 0 -0.2 -2 -5.5 -10 -14.5 -20 -25 -32
540 0 -0.2 -2 -5.3 -9.8 -14 -19.8 -24 -31
550 0 -0.2 -2 -5 -9.5 -13 -19 -23 -30
560 0 -0.8 -1.8 -4.8 -9.3 -13 -18.5 -23 -29
570 0 -0.2 -1.8 -4.5 -9 -12.5 -18 -22.2 -28
580 0 -0.8 -1.8 -4 -9 -12 -18 -22 -27
590 0 -0.8 -1.5 -4 -9 -12 -17 -21.5 -26
600 0 -0.5 -1.5 -3.8 -9 -11.8 -16 -21 -25
610 0 -0.2 -1.5 -3.8 -8.5 -11.8 -16 -21 -25
620 0 -0.2 -1.5 -3.8 -8 -11.5 -15 -20.5 -24.5
630 0 -0.2 -1.5 -3.8 -8 -11 -15 -20 -24
640 0 0 -1.5 -3.5 -7.5 -11 -14.5 -19.5 -24
650 0 0 -1.5 -3.5 -7 -10.5 -14 -19 -23
660 0 0 -1.5 -3 -6.5 -10 -13 -17 -22

-
18
Remarks: The bullet drop in the chart is MOA and the range is in meters. The MOA drop in the chart is matching the trajectory cam raise for each cam setting. The settings are determined by comparing the bullet drop paths for many calibers. You just have to compare your bullet path with the path listed in the chart and find out the one that is the closest to yours. You can begin to zero your rifle with this initial cam setting.
M-1000
Chart of Trajectory Paths For Cam Settings
Drop Is In Inches
Range
(m)
Cam
Setting
250
(m)
300
(m)
400
(m)
500
(m)
600
(m)
700
(m)
800
(m)
900
(m)
1000
(m)
250 0 -27 -62 -145 -284 N/A N/A N/A N/A
260 0 -24 -58.4 -123 -240 N/A N/A N/A N/A
280 0 -20 -54.7 -111 207 N/A N/A N/A N/A
300 0 -18 -47.5 -104 -196 -277 -388 -505 N/A
320 0 -16 -45.6 -95 -186 -261 -371 -498 N/A
340 0 -14.4 -43.8 -86 -164 -238 -340.4 -454.7 -649.3
360 0 -13.2 -40.1 -77 -153 -205.5 -307.9 -422.4 -612.7
380 0 -12.5 -39.8 -75 -147 -194.6 -280.2 -401.7 -598.7
400 0 -12 -35.8 -72 -136 -186.6 -248.6 390.1 -585.1
420 0 -10 -33.5 -68 -120 -180.5 -226.2 -389.6 -578
440 0 -9.6 -27.9 -59 -104 -177.4 -276 -384 -545
460 0 -8.5 -21 -50 -95 -170 -255 -376 -532
480 0 -8.2 -19 -46 -46 -165 -214 -369 -492
500 0 -8 -17 -44 -86 -150 -205 -304 -471
520 0 -7.8 -17 -44 -82 -147 -201 -286 -441
540 0 -7.6 -17 -43 -80 -143 -196 -282 -400
560 0 7.4 -15 -38 -73 -140 -193 -280 -379
580 0 -7 -14 -37 -73 -129 -189 -256 -369
600 0 -6.5 -14 -37 -68 -108 -185 -240 -297
620 0 -6 -12 -36 -58 -89 -172 -221 -292
640 0 -5.5 -12 -35 -55 -86 -148 -217 -289
660 0 -5 -11 -27 -54 -85 -141 -212 -283.7
Remarks: The bullet drop is in inches and the range is in meters. You can compare the drop with your ballistic data and choose the one that is the closest to yours. Now you can start at this Cam Setting. It the point of impact is high, move you Cam Setting higher. If your point of impact is low, move your Cam Setting lower. If you cannot find out the drop data in this chart that you can

-
19
use, we recommend you to get the drop in MOA and use the MOA drop chart.
11. M-1000 Cartridge Chart.
The following calibers were determined by actual test firings. If your favorite caliber, bullet weight, bullet style or manufacturer is not listed, follow the procedure in the Section 10 to set the scope for your particular cartridge. For an explanation of the abbreviations used here, see Bullet Type abbreviations following the chart.
CARTRIDGE BULLET WEIGHT
(Grains)
MANUFACTURER & BULLET TYPE CAM SETTING
Federal Remington Winchester
17 Remington 25 HPPL 370
222 Remington 50 HPPL 330
222 Remington 50 SP PSP/MC PSP 320
222 Remington 55 FMC 370
223 Remington 55 FMC 390
223 Remington 55 HPPL 380
223 Remington 55 SP PSP 320
223 Remington 68 FMJBT 370
225 Winchester 55 PSP 420
22-250 Rem. 55 HPPL 450
22-250 Rem. 55 SP PSP PSP 450
243 Winchester 80 SP PSP/HPPL PSP 440
243 Winchester 100 HSSP PSPCL PP (SP) 430
6mm Remington 100 PSPCL PP (SP) 450
25-06 Remington 100 PSPCL 450
25-06 Remington 120 PSPCL PEP 460
250 Savage 100 PSP 360
264 Win. Mag. 140 PSPCL PP (SP) 450
270 Winchester 100 PSP PSP 430
270 Winchester 130 HSSP BP PP (SP) 450
270 Winchester 130 PSPCL ST 450
270 Winchester 150 PP (SP) 430
270 Winchester 150 HSSP SPCL 380
7x57 Mauser 140 HSSP 430
280 Remington 150 PSPCL 430
280 Remington 165 SPCL 400
284 Winchester 150 PP (SP) 350
7mm Rem. Mag. 150 HSSP PSPCL PP (SP) 450
7mm Rem. Mag. 175 HSSP PSPCL PP (SP) 450
30-30 Winchester 55 SP Accel 450
30-30 Winchester 150 HSSP OPE PP ST 260
300 Win. Mag. 150 HSSP PSPCL PP (SP) 450
300 Win. Mag. 180 HSSP PSPCL PP (SP) 460
30-06 Springfield 55 PSP Accel 430

-
20
CARTRIDGE BULLET WEIGHT
(Grains)
MANUFACTURER & BULLET TYPE CAM SETTING
Federal Remington Winchester
30-06 Springfield 150 FMJBT 460
30-06 Springfield 150 HSSP PSPCL ST 430
30-06 Springfield 180 FMCBT 350
30-06 Springfield 180 PP (SP) 340
30-06 Springfield 180 BP 325
30-06 Springfield 180 HSSP PSPCL ST 325
30-06 Springfield 180 SPCL PP (SP) 260
30-06 Springfield 200 BTST 325
30-06 Springfield 220 ST 260
30-06 Springfield 220 SPCL PP (SP) 260
308 Win/7.62 NATO 110 PSP 330
308 Win/7.62 NATO 125 PSP 360
308 Win/7.62 NATO 150 MC 340
308 Win/7.62 NATO 150 HSSP PSPCL ST 330
308 Win/7.62 NATO 150 PP (SP) 300
308 Win/7.62 NATO 168 HPBT 420
308 Win/7.62 NATO 180 HSSP PSPCL ST 420
308 Win/7.62 NATO 180 SPCL PP (SP) 420
308 Win/7.62 NATO 200 ST 420
338 Win. Mag. 200 PP (SP) 420
338 Win. Mag. 250 ST PP SP 420
338 Win. Mag. 300 HPBT 430
375 H&H Mag. 270 SP PP (SP) 410
375 H&H Mag. 300 Fail Safe 410
Hornady50Cal A-Max
750 580
SECTION 12: LIMITED LIFETIME WARRANTY
Hi-Lux, Inc. warranties its products against defects arising from faulty workmanship, or materials, for the lifetime of the original purchaser. Any attempt to alter, dismantle or change the standard specifications of the products, will make this warranty null and void. This warranty is made to the original purchaser of the goods, and applies only to the products purchased in the United States. The warranty is not transferable. Warranty obligation is limited to the repair or replacement of any product returned to Hi-Lux, Inc., that is determined by the manufacturer to have defects arising from faulty workmanship, or materials that adversely affect the satisfactory operation of the product. It should be noted that on items containing an etched glass reticle that the occasional appearance of some small particles is common and not a warrantable repair. We only have a one-year warrantee for the electronic components that are contained on the products. Hi-Lux, Inc. reserves the right to request proof of purchase and purchase date. To guarantee warranty service, the enclosed warranty form must be completed

-
21
and returned within ten (10) days of purchase to establish all warranty rights between you, the original purchaser, and Hi-Lux, Inc. We assume no liability for any incidental or consequential damages, or incidental expenses. Some states do not allow the exclusion or limitation of incidental or consequential damages, so the above limitations or exclusion may not apply to you. No warranties are made, or are authorized to be made, other than those expressly contained herein. To file a claim under this warranty, please contact the Customer Service Department of Hi-Lux, Inc. at (310) 257-8142 to obtain a Return Authorization number (RA number). After receiving your RA number, please mark the number on the outside of the package; enclose the defective item with a brief explanation of the problem. Please be sure to include your name, address and phone number. Failure to obtain a RA number may result in either refusal upon delivery, or lengthy delays for warranty repairs and service required for the item returned to us. All returns are to be shipped prepaid direct to Hi-Lux, Inc. including a check or money order in the amount of $15 to cover postage and handling. Attn.: Warranty & Service Dept.
Hi-Lux , Inc. 3135 Kashiwa Street Torrance, CA 90505 Tel: (310) 257-8142, Fax: (310) 257-8096
E-Mail: [email protected]
www.hi-luxoptics.com In the event of a non-warranty repair, you will receive an estimate prior to any work being done. This warranty gives you specific legal rights and you may have other rights, which vary from state to state. As defined by federal law, this is a limited warranty.
BULLET TYPE ABBREVIATIONS
Federal: SP = Soft Point HSSP = “Hi - Shok” Soft Point HP = Hollow Point
Remington HPPL = Hollow Point “Power Lokt PSP/MC = Pointed Soft Point/Metal Case PSP/HPPL = Pointed Soft Point/Hollow Point “Power Lokt PSPCL = Pointed Soft Point “Core Lokt SPCL = Soft Point “Core Lokt” BTSP = Boat Tail Soft Point
Winchester PSP = Pointed Soft Point FMC = Full Metal Case PP(SP)=PowerPoint(Soft Point) PEP = Positive Expanding Point ST = Silver Tip