the history of the earth • new york edition • listening
TRANSCRIPT

The History of the EarthTell It Again!™ Read-Aloud Supplemental Guide
grad
e 1
Core
Know
ledge
Lang
uage
Arts®
• New
York
Editi
on • L
isten
ing &
Lear
ning
™ St
rand


The History of the EarthTransition Supplemental Guide to theTell It Again!™ Read-Aloud Anthology
Listening & Learning™ Strand
GRADE 1
Core Knowledge Language Arts®New York Edition

Creative Commons LicensingThis work is licensed under a Creative Commons Attribution-
NonCommercial-ShareAlike 3.0 Unported License.
You are free:to Share — to copy, distribute and transmit the work
to Remix — to adapt the work
Under the following conditions:Attribution — You must attribute the work in the
following manner:
This work is based on an original work of the Core
Knowledge® Foundation made available through
licensing under a Creative Commons Attribution-
NonCommercial-ShareAlike 3.0 Unported License. This
does not in any way imply that the Core Knowledge
Foundation endorses this work.
Noncommercial — You may not use this work for
commercial purposes.
Share Alike — If you alter, transform, or build upon this
work, you may distribute the resulting work only under
the same or similar license to this one.
With the understanding that: For any reuse or distribution, you must make clear to
others the license terms of this work. The best way to
do this is with a link to this web page:
http://creativecommons.org/licenses/by-nc-sa/3.0/
Copyright © 2013 Core Knowledge Foundation
www.coreknowledge.org
All Rights Reserved.
Core Knowledge Language Arts, Listening & Learning,
and Tell It Again! are trademarks of the Core Knowledge
Foundation.
Trademarks and trade names are shown in this book strictly
for illustrative and educational purposes and are the property
of their respective owners. References herein should not
be regarded as affecting the validity of said trademarks and
trade names.

Table of Contents
The History of the EarthTransition Supplemental Guide to theTell It Again!™ Read-Aloud Anthology
Preface to the Transition Supplemental Guide . . . . . . . . . . . . . . . . . . . . . . . . . . . . . . . . . . . . . . . . . . . . . . v
Alignment Chart for The History of the Earth . . . . . . . . . . . . . . . . . . . . . . . . . . . . . . . . . . . . . . . . . . . . xvii
Introduction to The History of the Earth . . . . . . . . . . . . . . . . . . . . . . . . . . . . . . . . . . . . . . . . . . . . . . . . .1
Lesson 1: Our Home, Earth . . . . . . . . . . . . . . . . . . . . . . . . . . . . . . . . . . . . . . . . . . . . . . . . . . . . . . . . 14
Lesson 2: The Earth Inside-Out, Part I . . . . . . . . . . . . . . . . . . . . . . . . . . . . . . . . . . . . . . . . . . . . . . . . . 34
Lesson 3: The Earth Inside-Out, Part II . . . . . . . . . . . . . . . . . . . . . . . . . . . . . . . . . . . . . . . . . . . . . . . . . 51
Lesson 4: The Earth Inside-Out, Part III . . . . . . . . . . . . . . . . . . . . . . . . . . . . . . . . . . . . . . . . . . . . . . . . . 67
Pausing Point . . . . . . . . . . . . . . . . . . . . . . . . . . . . . . . . . . . . . . . . . . . . . . . . . . . . . . . . . . . . . . . 82
Lesson 5: Minerals . . . . . . . . . . . . . . . . . . . . . . . . . . . . . . . . . . . . . . . . . . . . . . . . . . . . . . . . . . . . . 89
Lesson 6: The Three Types of Rocks . . . . . . . . . . . . . . . . . . . . . . . . . . . . . . . . . . . . . . . . . . . . . . . . . . 105
Lesson 7: Fossils . . . . . . . . . . . . . . . . . . . . . . . . . . . . . . . . . . . . . . . . . . . . . . . . . . . . . . . . . . . . . 127
Lesson 8: Dinosaurs . . . . . . . . . . . . . . . . . . . . . . . . . . . . . . . . . . . . . . . . . . . . . . . . . . . . . . . . . . . 143
Domain Review . . . . . . . . . . . . . . . . . . . . . . . . . . . . . . . . . . . . . . . . . . . . . . . . . . . . . . . . . . . . . 160
Domain Assessment . . . . . . . . . . . . . . . . . . . . . . . . . . . . . . . . . . . . . . . . . . . . . . . . . . . . . . . . . . 165
Culminating Activities . . . . . . . . . . . . . . . . . . . . . . . . . . . . . . . . . . . . . . . . . . . . . . . . . . . . . . . . 168
Appendix . . . . . . . . . . . . . . . . . . . . . . . . . . . . . . . . . . . . . . . . . . . . . . . . . . . . . . . . . . . . . . . . . 175


The History of the Earth: Supplemental Guide | Preface v
© 2013 Core Knowledge Foundation
Preface to the Preface to the Transition Supplemental GuideTransition Supplemental GuideThis preface to the Transition Supplemental Guide provides information about the guide’s purpose and target audience, and describes how it can be used flexibly in various classroom settings.
Please note: The Supplemental Guides for the first three domains in Grade 1 contain modified read-alouds and significantly restructured lessons with regard to pacing and activities. These early Supplemental Guides provided step-by-step, scaffolded instruction with the intention that students receiving instruction from teachers using the Supplemental Guide for the first part of the year would be ready to participate in regular Listening & Learning lessons, and that teachers who have used the Supplemental Guide for the first part of the year would be equipped with the instructional strategies to scaffold the lessons when necessary. This shift from the full Supplemental Guide to the Transition Supplemental Guide affords teachers more autonomy and greater responsibility to adjust their execution of the lessons according to the needs of their classes and individual students.
Transition Supplemental Guides for the remaining domains will still contain Vocabulary Charts and Supplemental Guide activities such as Multiple Meaning Word Activities, Syntactic Awareness Activities, and Vocabulary Instructional Activities. However, the Transition Supplemental Guides do not have rewritten read-alouds and do not adjust the pacing of instruction; the pacing and read-aloud text included in each Transition Supplemental Guide is identical to the pacing and read-aloud text in the corresponding Tell It Again! Read-Aloud Anthology. We have, however, augmented the introductions and extensions of each lesson in the Transition Supplemental Guides so teachers have additional resources for students who need greater English language support. As a result, there are often more activities suggested than can be completed in the allotted time for the introduction or extension activities. Teachers will need to make informed and conscious decisions in light of their particular students’ needs when choosing which activities to complete and which to omit. We strongly recommend that teachers preview the Domain Assessment prior to teaching this domain; this will provide an additional way to inform their activity choices.

vi The History of the Earth: Supplemental Guide | Preface
© 2013 Core Knowledge Foundation
Intended Users and Uses
This guide is intended to be used by general education teachers, reading specialists, English as a Second Language (ESL) teachers, special education teachers, and teachers seeking an additional resource for classroom activities. This guide is intended to be both flexible and versatile. Its use is to be determined by teachers in order to fit the unique circumstances and specific needs of their classrooms and individual students. Teachers whose students would benefit from enhanced oral language practice may opt to use the Transition Supplemental Guide as their primary guide for Listening & Learning. Teachers may also choose individual activities from the Transition Supplemental Guide to augment the content covered in the Tell It Again! Read-Aloud Anthology. For example, teachers might use the Vocabulary Instructional Activities, Syntactic Awareness Activities, and modified Extensions during small-group instruction time. Reading specialists and ESL teachers may find that the tiered Vocabulary Charts are a useful starting point in addressing their students’ vocabulary learning needs.
The Transition Supplemental Guide is designed to allow flexibility with regard to lesson pacing and encourages education professionals to pause and review when necessary. A number of hands-on activities and graphic organizers are included in the lessons to assist students with learning the content.
Transition Supplemental Guide Contents
The Transition Supplemental Guide contains tiered Vocabulary Charts, Multiple Meaning Word Activities, Syntactic Awareness Activities, and Vocabulary Instructional Activities. The Domain Assessments and Family Letters have been modified. In some instances, the activities in the Extensions as well as the activities in the Pausing Point, Domain Review, and Culminating Activities have been modified or rewritten. Please refer to the following sample At a Glance Chart to see how additional support is communicated to the teacher.
The History of the Earth: Supplemental Guide | Preface vii
© 2013 Core Knowledge Foundation
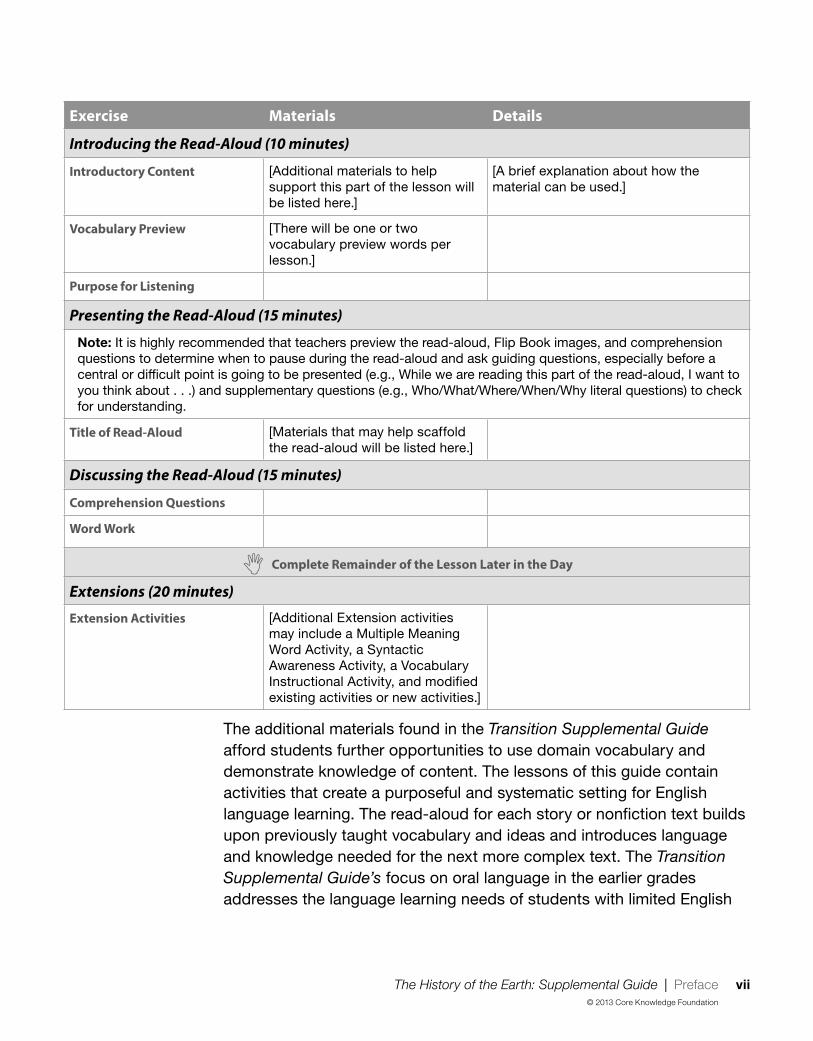
Exercise Materials Details
Introducing the Read-Aloud (10 minutes)
Introductory Content [Additional materials to help support this part of the lesson will be listed here.]
[A brief explanation about how the material can be used.]
Vocabulary Preview [There will be one or two vocabulary preview words per lesson.]
Purpose for Listening
Presenting the Read-Aloud (15 minutes)
Note: It is highly recommended that teachers preview the read-aloud, Flip Book images, and comprehension questions to determine when to pause during the read-aloud and ask guiding questions, especially before a central or diffi cult point is going to be presented (e.g., While we are reading this part of the read-aloud, I want to you think about . . .) and supplementary questions (e.g., Who/What/Where/When/Why literal questions) to check for understanding.
Title of Read-Aloud [Materials that may help scaffold the read-aloud will be listed here.]
Discussing the Read-Aloud (15 minutes)
Comprehension Questions
Word Work
Complete Remainder of the Lesson Later in the Day
Extensions (20 minutes)
Extension Activities [Additional Extension activities may include a Multiple Meaning Word Activity, a Syntactic Awareness Activity, a Vocabulary Instructional Activity, and modified existing activities or new activities.]
The additional materials found in the Transition Supplemental Guide afford students further opportunities to use domain vocabulary and demonstrate knowledge of content. The lessons of this guide contain activities that create a purposeful and systematic setting for English language learning. The read-aloud for each story or nonfiction text builds upon previously taught vocabulary and ideas and introduces language and knowledge needed for the next more complex text. The Transition Supplemental Guide’s focus on oral language in the earlier grades addresses the language learning needs of students with limited English
viii The History of the Earth: Supplemental Guide | Preface
© 2013 Core Knowledge Foundation
language skills. These students—outside of a school setting—may not be exposed to the kind of academic language found in many written texts.
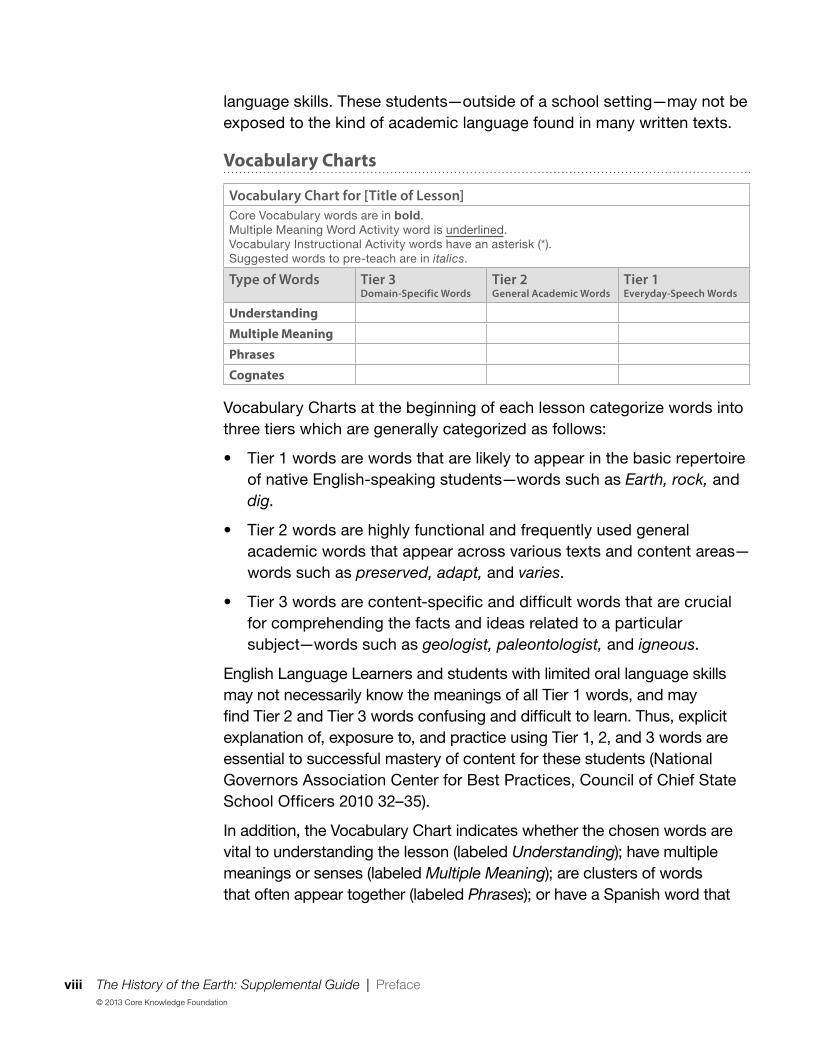
Vocabulary Charts
Vocabulary Chart for [Title of Lesson]Core Vocabulary words are in bold.Multiple Meaning Word Activity word is underlined.Vocabulary Instructional Activity words have an asterisk (*).Suggested words to pre-teach are in italics.
Type of Words Tier 3Domain-Specific Words
Tier 2General Academic Words
Tier 1Everyday-Speech Words
Understanding
Multiple Meaning
Phrases
Cognates
Vocabulary Charts at the beginning of each lesson categorize words into three tiers which are generally categorized as follows:
• Tier 1 words are words that are likely to appear in the basic repertoire of native English-speaking students—words such as Earth, rock, and dig.
• Tier 2 words are highly functional and frequently used general academic words that appear across various texts and content areas—words such as preserved, adapt, and varies.
• Tier 3 words are content-specific and difficult words that are crucial for comprehending the facts and ideas related to a particular subject—words such as geologist, paleontologist, and igneous.
English Language Learners and students with limited oral language skills may not necessarily know the meanings of all Tier 1 words, and may find Tier 2 and Tier 3 words confusing and difficult to learn. Thus, explicit explanation of, exposure to, and practice using Tier 1, 2, and 3 words are essential to successful mastery of content for these students (National Governors Association Center for Best Practices, Council of Chief State School Officers 2010 32–35).
In addition, the Vocabulary Chart indicates whether the chosen words are vital to understanding the lesson (labeled Understanding); have multiple meanings or senses (labeled Multiple Meaning); are clusters of words that often appear together (labeled Phrases); or have a Spanish word that
The History of the Earth: Supplemental Guide | Preface ix
© 2013 Core Knowledge Foundation
sounds similar and has a similar meaning (labeled Cognates). Words in the Vocabulary Chart were selected because they appear frequently in the text of the read-aloud or because they are words and phrases that span multiple grade levels and content areas. Teachers should be aware of and model the use of these words as much as possible before, during, and after each individual lesson. The Vocabulary Chart could also be a good starting point and reference for keeping track of students’ oral language development and their retention of domain-related and academic vocabulary. These lists are not meant to be exhaustive, and teachers are encouraged to include additional words they feel would best serve their students.
Multiple Meaning Word Activities
Multiple Meaning Word Activities help students determine and clarify the different meanings of individual words. This type of activity supports a deeper knowledge of content-related words and a realization that many content words have multiple meanings associated with them. Students with strong oral language skills may be able to navigate through different meanings of some words without much effort. However, students with limited English language proficiency and minimal vocabulary knowledge may be less likely to disambiguate the meanings of words. This is why it is important that teachers have a way to call students’ attention to words in the lesson that have ambiguous meanings, and that students have a chance to explore the nuances of words in contexts within and outside of the lessons.
Syntactic Awareness Activities
Syntactic Awareness Activities focus on sentence structure. During the early elementary grades, students are not expected to read or write lengthy sentences, but they might be able to produce complex sentences in spoken language when given adequate prompting and support. Syntactic Awareness Activities support students’ awareness of the structure of written language, interrelations between words, and grammar. Developing students’ oral language through syntactic awareness provides a solid foundation for written language development in the later elementary grades and beyond.

x The History of the Earth: Supplemental Guide | Preface
© 2013 Core Knowledge Foundation
Vocabulary Instructional Activities
Vocabulary Instructional Activities are included to build students’ general academic, or Tier 2, vocabulary. These words are salient because they appear across content areas and in complex written texts. These activities support students’ learning of Tier 2 words and deepen their knowledge of academic words and the connections of these words to other words and concepts. The vocabulary knowledge students possess is intricately connected to reading comprehension, the ability to access background knowledge, express ideas, communicate effectively, and learn about new concepts.
English Language Learners and Students with Disabilities
The Transition Supplemental Guide assists education professionals who serve students with limited English language skills or students with limited home literacy experience, which may include English Language Learners (ELLs) and students with special needs. Although the use of this guide is not limited to teachers of ELLs and/or students with special needs, the following provides a brief explanation of these learners and the challenges they may face in the classroom, as well as teaching strategies that address those challenges.
English Language Learners
The Transition Supplemental Guide is designed to facilitate the academic oral language development necessary for English Language Learners (ELLs) and to strengthen ELLs’ understanding of the core content presented in the domains.
When teaching ELLs, it is important to keep in mind that they are a heterogeneous group from a variety of social backgrounds and at different stages in their language development. There may be some ELLs who do not speak any English and have little experience in a formal education setting. There may be some ELLs who seem fluent in conversational English, but do not have the academic language proficiency to participate in classroom discussions about academic content. The following is a chart showing the basic stages of second language acquisition; proper expectations for student behavior and performance; and accommodations and support strategies for each stage. Please note that ELLs may have extensive language skills in their

The History of the Earth: Supplemental Guide | Preface xi
© 2013 Core Knowledge Foundation
first language and that they advance to the next stage at various rates depending on their acculturation, motivation, and prior experiences in an education setting.

xii The History of the Earth: Supplemental Guide | Preface
© 2013 Core Knowledge Foundation
Language Development Stage
Comprehension and Production
Accommodations and Support Strategies
Entering • Produces little or no English• Responds in nonverbal ways• Has a minimal receptive
vocabulary in English
• Use predictable phrases for set routines• Use manipulatives, visuals, realia, props• Use gestures (e.g., point, nod) to indicate
comprehension• Use lessons that build receptive and productive
vocabulary, using illustrated pre-taught words• Use pre-taught words to complete sentence
starters• Use simply stated questions that require simple
nonverbal responses (e.g., “Show me . . . ,” “Circle the . . . ”)
• Use normal intonation, emphasize key words, and frequent checks for understanding
• Model oral language and practice formulaic expressions
• Pair with another ELL who is more advanced in oral language skills for activities and discussions focused on the English language
• Pair with same-language peers for activities and discussions focused on content
Emerging
(Beginner)
• Responds with basic phrases• Includes frequent, long
pauses when speaking• Has basic level of English
vocabulary (common words and phrases)
• Use repetition, gestures, and visual aids to facilitate comprehension and students’ responses
• Use manipulatives, visuals, realia, props• Use small-group activities • Use lessons that expand receptive and expressive
vocabulary, especially Tier 2 vocabulary• Use illustrated core vocabulary words• Use pre-identified words to complete cloze
sentences• Use increasingly more difficult question types as
students’ receptive and expressive language skills improve:• Yes/no questions • Either/or questions• Questions that require short answers• Open-ended questions to encourage expressive
responses • Allow for longer processing time and for
participation to be voluntary• Pair with another ELL who is more advanced in
oral language skills for activities and discussions focused on the English language
• Pair with same-language peers for activities and discussions focused on content

The History of the Earth: Supplemental Guide | Preface xiii
© 2013 Core Knowledge Foundation
Transitioning
(Intermediate)
• Speaks in simple sentences• Uses newly learned words
appropriately• With appropriate scaffolding,
able to understand and produce narratives
• Has a much larger receptive than expressive vocabulary in English
• Use more complex stories and books• Continue to focus on Tier 2 vocabulary• Introduce academic terms (e.g., making
predictions and inferences, figurative language)• Use graphic organizers• Use increasingly difficult question types as
students’ receptive and expressive language skills improve: • Questions that require short sentence answers • Why and how questions• Questions that check for literal and abstract
comprehension• Provide some extra time to respond • Pair with high-level English speakers for activities
and discussions focused on the English language
Expanding
(Advanced)
• Engages in conversations• Produces connected narrative• Shows good comprehension• Has and uses expanded
vocabulary in English
• Continue work with academic terms (e.g., making predictions and inferences, figurative language)
• Use graphic organizers• Use questions that require opinion, judgment, and
explanation• Pair with native English speakers
Commanding
(Proficient)
• Uses English that nearly approximates the language of native speakers
• Can maintain a two-way conversation
• Uses more complex grammatical structures, such as conditionals and complex sentences.
• Has and uses an enriched vocabulary in English
• Build high-level/academic language• Expand figurative language (e.g., by using
metaphors and idioms)• Use questions that require inference and
evaluation• Pair with students who have a variety of skills and
language proficiencies
(Adapted from Hirsch and Wiggins 2009, 362–364; New York Department of Education 2013; Smyk et al. 2013)

xiv The History of the Earth: Supplemental Guide | Preface
© 2013 Core Knowledge Foundation
Students with Disabilities and Students with Special Needs
Students with disabilities (SWDs) have unique learning needs that require accommodations and modifications to the general education curriculum. When using the Transition Supplemental Guide with SWDs and students with special needs, it is important to consider instructional accommodations, tools, strategies, and Universal Design for Learning (UDL) Principles, which promote learning for all students through the use of multiple forms of representation, expression, and engagement (Hall, Strangman, and Meyer 2003).
Pacing
Pacing is the purposeful increase or decrease in the speed of instruction. Educators can break lessons into manageable chunks depending on needs of the class and follow the section with a brief review or discussion. This format of instruction ensures that students are not inundated with information. Additionally, you may want to allow students to move around the room for brief periods during natural transition points. When waiting for students to respond, allow at least three seconds of uninterrupted wait time to increase correctness of responses, response rates, and level of thinking (Stahl 1990).
Goals and Expectations
Make sure students know the purpose and the desired outcome of each activity. Have students articulate their own learning goals for the lesson. Provide model examples of desired end-products. Use positive verbal praise, self-regulation charts, and redirection to reinforce appropriate ways for students to participate and behave.
Directions
Provide reminders about classroom rules and routines whenever appropriate. You may assign a partner to help clarify directions. When necessary, model each step of an activity’s instructions. Offering explicit directions, procedures, and guidelines for completing tasks can enhance student understanding. For example, large assignments can be delivered in smaller segments to increase comprehension and completion (Franzone 2009).

The History of the Earth: Supplemental Guide | Preface xv
© 2013 Core Knowledge Foundation
Instruction Format and Grouping
Use multiple instruction formats (e.g., small-group instruction, individual work, collaborative learning, and hands-on instruction). Be sure to group students in logical and flexible ways that support learning.
Instructional Strategies
The following evidence-based strategies can assist students with disabilities in learning content (Scruggs et al. 2010):
• Mnemonic strategies are patterns of letters and sounds related to ideas that enhance retention and recall of information. They can be used as a tool to encode information.
• Spatial organizers assist student understanding and recall of information using charts, diagrams, graphs, and/or other graphic organizers.
• Peer mediation, such as peer tutoring and cooperative learning groups, can assist in assignment completion and enhance collaboration within the classroom.
• Hands-on learning offers students opportunities to gain understanding of material by completing experiments and activities that reinforce content.
• Explicit instruction utilizes clear and direct teaching using small steps, guided and independent practice, and explicit feedback.
• Visual strategies (e.g., picture/written schedules, storymaps, task analyses, etc.) represent content in a concrete manner to increase focus, communication, and expression (Rao and Gagie 2006).

xvi The History of the Earth: Supplemental Guide | Preface
© 2013 Core Knowledge Foundation
References
1. Biemiller, Andrew. 2010. Words Worth Teaching. Columbus: SRA/McGrawHill.
2. Franzone, Ellen L. 2009. “Overview of Task Analysis.” Madison, WI: National Professional Development Center on Autism Spectrum Disorders, Waisman Center, University of Wisconsin.
3. Hall, Tracey, Anne Meyer and Nicole Strangman. 2003. “Differentiated Instruction and Implications for UDL Implementation.” National Center on Accessing the General Curriculum.
4. Hirsch, Jr., E. D. and Alice K. Wiggins. 2009. Core Knowledge Preschool Sequence and Teacher Handbook. Charlottesville, VA: Core Knowledge Foundation.
5. National Governors Association Center for Best Practices, Council of Chief State School Officers. 2010. “Appendix A,” in Common Core State Standards: English Language Arts Standards. Washington DC: National Governors Association Center for Best Practices, Council of Chief State School Officers.
6. New York Department of Education. 2013. New York State Bilingual Common Core Initiative. Accessed October 8. http://www.engageny.org/resource/new-york-state-bilingual-common-core-initiative#progressions.
7. Rao, Shaila M. and Brenda Gagie. 2006. “Learning Through Seeing and Doing: Visual Supports for Children with Autism.” Teaching Exceptional Children 38 (6): 26–33.
8. Scruggs, Thomas E., Margo A. Mastropieri, Sheri Berkeley, and Janet E. Graetz. 2010. “Do Special Education Interventions Improve Learning of Secondary Content? A Meta-Analysis.” Remedial and Special Education 31: 437–449.
9. Smyk, Ekaterina, M. Adelaida Restrepo, Joanna S. Gorin, and Shelley Gray. 2013. “Development and Validation of the Spanish-English Language Proficiency Scale (SELPS).” Language, Speech, and Hearing Services in Schools 44: 252–65.
10. Stahl, Robert J. 1990. “Using ‘Think-Time’ Behaviors to Promote Students’ Information Processing, Learning, and On-Task Participation: An Instructional Module.” Tempe, AZ: Arizona State University.

The History of the Earth: Supplemental Guide | Alignment Chart xvii
© 2013 Core Knowledge Foundation
Alignment Chart for The History of the Earth
The following chart contains core content objectives addressed in this domain. It also demonstrates alignment between the Common Core State Standards and corresponding Core Knowledge Language Arts (CKLA) goals.
Alignment Chart for
The History of the Earth: Supplemental Guide
Lesson
1 2 3 4 5 6 7 8
Core Content Objectives
Identify geographical features of the earth’s surface: oceans and continents
Locate the North Pole, the South Pole, and the equator on a globe
Describe the shape of the earth Explain that much of our knowledge of the earth and its history is the result of the work of many scientists Identify the layers of the earth: crust, mantle, and core (outer and inner)
Describe the crust
Describe the mantle and core inside the earth
Describe volcanoes and geysers Describe how heat, pressure, and time cause many changes inside the earth
Identify common minerals in the earth
Explain how minerals are used by people
Identify the three types of rocks: igneous, sedimentary, and metamorphic Describe how heat, pressure, and time cause the formation of igneous, sedimentary, and metamorphic rocks
Describe fossils
Explain how fossils provide information about the history of the earth
Explain how we know about dinosaurs
Describe various dinosaurs

xviii The History of the Earth: Supplemental Guide | Alignment Chart
© 2013 Core Knowledge Foundation
Alignment Chart for
The History of the Earth: Supplemental Guide
Lesson
1 2 3 4 5 6 7 8
Note: The Language Arts Objectives in the Lessons may change depending on teacher’s choice of activities.
Reading Standards for Informational Text: Grade 1
Key Ideas and Details
STD RI.1.1 Ask and answer questions about key details in a text.
CKLA
Goal(s)
Ask and answer questions (e.g., who, what, where, when), orally or in writing, requiring literal recall and understanding of the details and/or facts of a nonfiction/informational read-aloud
Answer questions that require making interpretations, judgments, or giving opinions about what is heard in a nonfiction/informational read-aloud, including answering why questions that require recognizing cause/effect relationships
STD RI.1.3 Describe the connection between two individuals, events, ideas, or pieces of information in a text.
CKLA
Goal(s)
Describe the connection between two individuals, events, ideas, or pieces of information in a nonfiction/informational read-aloud
Craft and Structure
STD RI.1.4 Ask and answer questions to help determine or clarify the meaning of words and phrases in a text.
CKLA
Goal(s)
Ask and answer questions about unknown words and phrases in nonfiction/informational read-alouds and discussions
Integration of Knowledge and Ideas
STD RI.1.7 Use the illustrations and details in a text to describe its key ideas.
CKLA
Goal(s)
Use illustrations and details in a nonfiction/informational read-aloud to describe its key ideas
STD RI.1.9Identify basic similarities in and differences between two texts on the same topic (e.g., in illustrations, descriptions, or procedures).
CKLA
Goal(s)
Compare and contrast (orally or in writing) similarities and differences within a single nonfiction/informational read-aloud or between two or more nonfiction/informational read-alouds
Range of Reading and Level of Text Complexity
STD RI.1.10 With prompting and support, read informational texts appropriately complex for Grade 1.
CKLA
Goal(s)
Listen to and demonstrate understanding of nonfiction/informational read-alouds of appropriate complexity for Grades 1–3

The History of the Earth: Supplemental Guide | Alignment Chart xix
© 2013 Core Knowledge Foundation
Alignment Chart for
The History of the Earth: Supplemental Guide
Lesson
1 2 3 4 5 6 7 8
Writing Standards: Grade 1
Text Types and Purposes
STD W.1.1Write opinion pieces in which they introduce the topic or name the book they are writing about, state an opinion, supply a reason for the opinion, and provide some sense of closure.
CKLA
Goal(s)
Write opinion pieces in which they introduce the topic or name the book they are writing about, state an opinion, supply a reason for the opinion, and provide some sense of closure
STD W.1.2Write informative/explanatory texts in which they name a topic, supply some facts about the topic, and provide some sense of closure.
CKLA
Goal(s)
Plan and/or draft, and edit an informative/explanatory text that presents information from a nonfiction/informational read-aloud that includes mention of a topic, some facts about the topic, and some sense of closure
Research to Build and Present Knowledge
STD W.1.8With guidance and support from adults, recall information from experiences or gather information from provided sources to answer a question.
CKLA
Goal(s)
With assistance, categorize and organize facts and information within a given domain to answer questions
Speaking and Listening Standards: Grade 1
Comprehension and Collaboration
STD SL.1.1Participate in collaborative conversations with diverse partners about Grade 1 topics and texts with peers and adults in small and large groups.
STD SL.1.1aFollow agreed-upon rules for discussions (e.g., listening to others with care, speaking one at a time about the topics and texts under discussion).
CKLA
Goal(s)
Use agreed-upon rules for group discussion, e.g., look at and listen to the speaker, raise hand to speak, take turns, say “excuse me” or “please,” etc.
STD SL.1.1b Build on others’ talk in conversations by responding to the comments of others through multiple exchanges.
CKLA
Goal(s)
Carry on and participate in a conversation over at least six turns, staying on topic, initiating comments or responding to a partner’s comments, with either an adult or another child of the same age
STD SL.1.1c Ask questions to clear up any confusion about the topics and texts under discussion.
CKLA
Goal(s)
Ask questions to clarify information about the topic in a fiction or nonfiction/informational read-aloud

xx The History of the Earth: Supplemental Guide | Alignment Chart
© 2013 Core Knowledge Foundation
Alignment Chart for
The History of the Earth: Supplemental Guide
Lesson
1 2 3 4 5 6 7 8
STD SL.1.2Ask and answer questions about key details in a text read aloud or information presented orally or through other media.
CKLA
Goal(s)
Ask and answer questions (e.g., who, what, where, when), orally or in writing, requiring literal recall and understanding of the details, and/or facts of a fiction or nonfiction/informational read-aloud
STD SL.1.3Ask and answer questions about what a speaker says in order to gather additional information or clarify something that is not understood.
CKLA
Goal(s)
Ask questions to clarify directions, exercises, classroom routines, and/or what a speaker says about a topic
Presentation of Knowledge and Ideas
STD SL.1.4 Describe people, places, things, and events with relevant details, expressing ideas and feelings clearly.
CKLA
Goal(s)
Describe people, places, things, and events with relevant details, expressing ideas and feelings clearly
STD SL.1.5 Add drawings or other visual displays to descriptions when appropriate to clarify ideas, thoughts, and feelings.
CKLA
Goal(s)
Add drawings or other visual displays to oral or written descriptions when appropriate to clarify ideas, thoughts, and feelings
STD SL.1.6 Produce complete sentences when appropriate to task and situation.
CKLA
Goal(s)
Produce complete sentences when appropriate to task and situation
Language Standards: Grade 1
Vocabulary Acquisition and Use
STD L.1.5With guidance and support from adults, demonstrate understanding of word relationships and nuances in word meanings.
STD L.1.5c Identify real-life connections between words and their use (e.g., note places at home that are cozy).
CKLA
Goal(s)
Identify real-life connections between words and their use (e.g., note places at home that are cozy)
STD L.1.6Use words and phrases acquired through conversations, reading and being read to, and responding to texts, including using frequently occurring conjunctions to signal simple relationships (e.g., because).
CKLA
Goal(s)
Use words and phrases acquired through conversations, reading and being read to, and responding to texts, including using frequently occurring conjunctions to signal simple relationships (e.g., because)

The History of the Earth: Supplemental Guide | Alignment Chart xxi
© 2013 Core Knowledge Foundation
Alignment Chart for
The History of the Earth: Supplemental Guide
Lesson
1 2 3 4 5 6 7 8
Additional CKLA Goals
Prior to listening to a given read-aloud, identify orally what they know and have learned about the topic Discuss personal responses to information pertaining to the read-aloud
Identify new meanings for familiar words and apply them accurately
Use frequently occurring conjunctions, such as and and or Evaluate and select read-alouds on the basis of personal choice for reading
These goals are addressed in all lessons in this domain. Rather than repeat these goals as lesson objectives throughout the domain, they are designated here as frequently occurring goals.

The History of the Earth: Supplemental Guide | Introduction 1
© 2013 Core Knowledge Foundation
The History of the EarthThe History of the EarthTransition Supplemental Guide IntroductionTransition Supplemental Guide Introduction
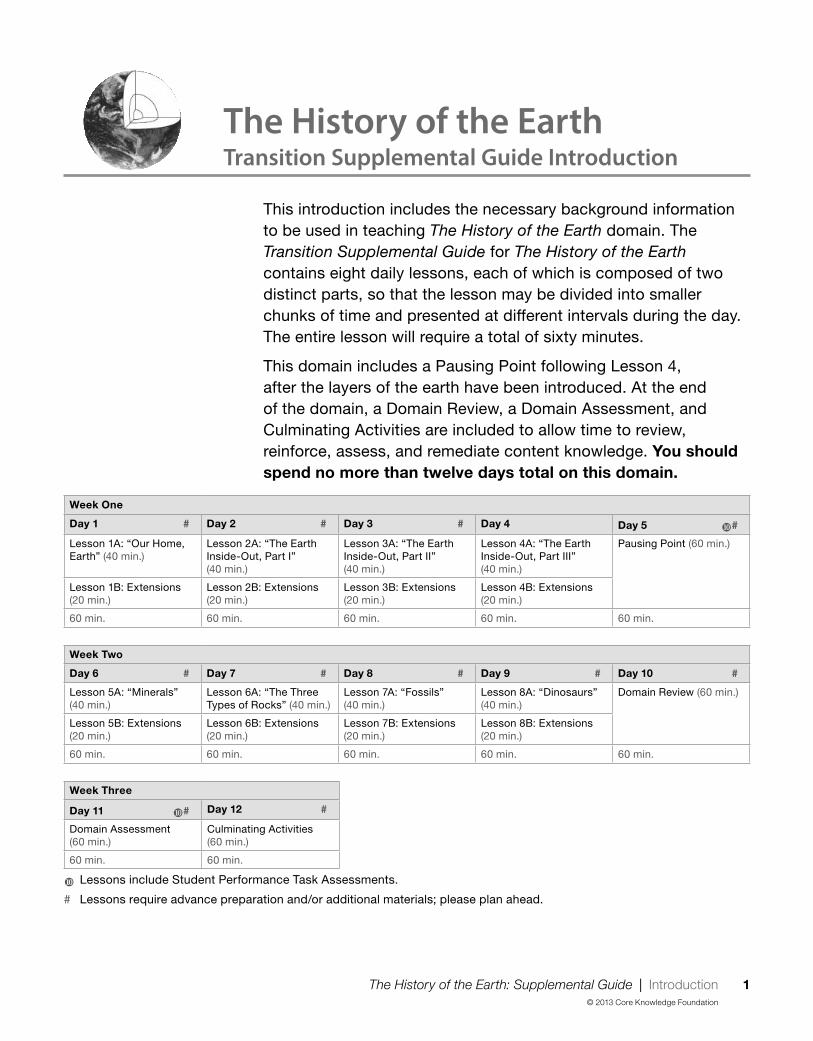
This introduction includes the necessary background information to be used in teaching The History of the Earth domain. The Transition Supplemental Guide for The History of the Earth contains eight daily lessons, each of which is composed of two distinct parts, so that the lesson may be divided into smaller chunks of time and presented at different intervals during the day. The entire lesson will require a total of sixty minutes.
This domain includes a Pausing Point following Lesson 4, after the layers of the earth have been introduced. At the end of the domain, a Domain Review, a Domain Assessment, and Culminating Activities are included to allow time to review, reinforce, assess, and remediate content knowledge. You should
spend no more than twelve days total on this domain.
Week One
Day 1 # Day 2 # Day 3 # Day 4 Day 5 #
Lesson 1A: “Our Home, Earth” (40 min.)
Lesson 2A: “The Earth Inside-Out, Part I” (40 min.)
Lesson 3A: “The Earth Inside-Out, Part II” (40 min.)
Lesson 4A: “The Earth Inside-Out, Part III” (40 min.)
Pausing Point (60 min.)
Lesson 1B: Extensions (20 min.)
Lesson 2B: Extensions (20 min.)
Lesson 3B: Extensions (20 min.)
Lesson 4B: Extensions (20 min.)
60 min. 60 min. 60 min. 60 min. 60 min.
Week Two
Day 6 # Day 7 # Day 8 # Day 9 # Day 10 #
Lesson 5A: “Minerals” (40 min.)
Lesson 6A: “The Three Types of Rocks” (40 min.)
Lesson 7A: “Fossils” (40 min.)
Lesson 8A: “Dinosaurs” (40 min.)
Domain Review (60 min.)
Lesson 5B: Extensions (20 min.)
Lesson 6B: Extensions (20 min.)
Lesson 7B: Extensions (20 min.)
Lesson 8B: Extensions (20 min.)
60 min. 60 min. 60 min. 60 min. 60 min.
Week Three
Day 11 # Day 12 #
Domain Assessment (60 min.)
Culminating Activities (60 min.)
60 min. 60 min.
Lessons include Student Performance Task Assessments.
# Lessons require advance preparation and/or additional materials; please plan ahead.
2 The History of the Earth: Supplemental Guide | Introduction
© 2013 Core Knowledge Foundation
Lesson Implementation
It is important to note that the interactive activities in the Transition Supplemental Guide count on the teacher as the “ideal reader” to lead discussions, model proper language use, and facilitate interactions among student partners.
It is highly recommended that teachers preview the read-aloud, Flip Book images, and comprehension questions to determine when to pause during the read-aloud and ask guiding questions. To check for understanding—especially before a diffi cult point is to be presented—you might say, “While we are reading this part of the read-aloud, I want you to think about…,” or you could ask supplementary questions, such as Who/What/When/Where/Why literal questions to check for understanding.
Student Grouping
Teachers are encouraged to assign partner pairs prior to beginning a domain, and partners should remain together for the duration of the domain. If possible, English Language Learners should be paired with native English speakers, and students who have limited English oral language skills should be paired with students who have strong English language skills. Keep in mind that in some instances, a group of three or a bilingual partner would benefit beginning/entering ELLs. Working with an older student or adult volunteer might be a good arrangement for some students with disabilities. Partnering in this way promotes a social environment where all students engage in collaborative talk and learn from one another.
In addition, there are various opportunities where students of the same home-language work together, fostering their first-language use and existing knowledge to construct deeper meanings about new information.
Graphic Organizers and Domain-Wide Activities
Several different organizers and domain-wide activities are included to aid students in their learning of the content in the History of the Earth domain.
• Response Cards for History of the Earth (two sets)—Set One (Instructional Master 1A-3) is related to heat, pressure, and time and can be used anytime these words are mentioned in the read-aloud and to review lesson content. Set Two (Instructional Master 6A-1)

The History of the Earth: Supplemental Guide | Introduction 3
© 2013 Core Knowledge Foundation
is related to the three types of rocks—igneous, sedimentary, and metamorphic—and can be used in Lesson 6 whenever the three types of rocks are mentioned.
• Idea Webs (Instructional Master 1A-1)—There are three opportunities to complete an Idea Web with students:Earth Idea Web (See Instructional Master 1A-2 for an example of a completed Earth Idea Web.)Rocks Idea Web (See Instructional Master 5A-1 for a completed Rocks Idea Web.)Dinosaur Idea Web (Use Instructional Master 8A-1 for dinosaur images for the Dinosaurs Idea Web.)These Idea Webs provide a visual way to map out content and allow students to contribute using words and pictures.
• Earth Diagram (Instructional Master 3A-1)—Students will draw and write about the three layers of Earth: crust, mantle, and core (outer and inner core).
• Liquid, Solid, Gas Chart (Instructional Master 3A-2)—Students record things that are liquid, solid, and gas to help give them a clear understanding of the three states of matter.
• Venn Diagrams—Lead the class to compare and contrast volcanos and geysers (Instructional Master 4B-1) and the work of a geologist and a paleontologist (Instructional Master 7B-1).
• Fossils Timeline (See Instructional Master 7A-2 for an example of a completed Timeline.)—Create a Timeline to help students understand read-aloud content in Lessons 7 and 8.
Anchor Focus in History of the Earth
This chart highlights two Common Core State Standards as well as relevant academic language associated with the activities in this domain.
Anchor Focus CCSS Description of Focus and Relevant Academic Language
Writing W.1.8 Idea Webs and Venn DiagramsStudents will categorize and organize facts from the read-alouds onto a web or diagram. Relevant academic language:compare, contrast, differences, similarities, summarize, information
Language L.1.1g Use frequently occurring conjunctions (e.g., and, or, but, because)

4 The History of the Earth: Supplemental Guide | Introduction
© 2013 Core Knowledge Foundation
Domain Components
Along with this Anthology, you will need:
• Tell It Again! Media Disk or Tell It Again! Flip Book* for The History of the Earth
• Tell It Again! Image Cards for The History of the Earth
*The Tell It Again! Multiple Meaning Word Posters for The History of the Earth are found at the end of the Tell It Again! Flip Book* for The History of the Earth.
Recommended Resource:
• Core Knowledge Grade 1 Teacher Handbook, edited by E.D. Hirsch, Jr. and Souzanne A. Wright (Core Knowledge Foundation, 2004) ISBN: 978-1890517700
Why The History of the Earth Is Important
In this domain, students will learn about the geographical features of the earth’s surface. They will also learn about the inside of the earth and characteristics of its various layers.
The domain focuses on the geographical features of the earth’s surface and the layers of the earth. Students will learn about the shape of the earth, the North and South Poles, and the equator. Students will also learn the names of the layers of the earth—the crust, the mantle, and the core—and characteristics of each layer. Students will learn how occurrences such as volcanoes and geysers give information about the layers of the earth.
The read-alouds also focus on minerals and rocks. Students will learn about the importance of rocks and minerals in their daily lives. They will also learn about the three types of rocks and characteristics of each type. Students will learn how rocks and minerals are taken from the earth’s crust to be used by people. Students will also learn about fossils and their importance in giving us knowledge about the history of living things on the earth.
We recommend that you provide a collection and visual representations of fossils, rocks, and dinosaur models for tactile
The History of the Earth: Supplemental Guide | Introduction 5
© 2013 Core Knowledge Foundation
learning and fi nd plenty of opportunities for students to interact with these.
Students will get a good introduction to the basics of geology and paleontology, and those in Core Knowledge schools will review and extend their learning about the earth in much greater depth in fourth grade.
What Students Have Already Learned in Core Knowledge
Language Arts During Kindergarten
The following domains, and the specifi c core content that was targeted in those domains, are particularly relevant to the read-alouds students will hear in The History of the Earth. This background knowledge will greatly enhance your students’ understanding of the read-alouds they are about to enjoy:
Plants
• Explain that there are many different kinds and sizes of plants
• Explain that different kinds of plants grow in different environments
• Describe what plants need to live and grow: food, water, air, and sunlight
• Identify the root, stem, branch, leaf, fl ower, fruit, and seed of a plant
Taking Care of the Earth
• Explain that Earth is composed of natural resources (land, water, and air) and that humans, plants, and animals depend on Earth’s natural resources to live
• Identify examples of land, water, and air from their own environments
• Explain that natural resources are things found in nature that are valuable and of great importance to people
• Identify key natural resources, and describe how people use them

6 The History of the Earth: Supplemental Guide | Introduction
© 2013 Core Knowledge Foundation
Core Vocabulary for The History of the Earth
The following list contains all of the core vocabulary words in The History of the Earth in the forms in which they appear in the read-alouds, or, in some instances, in the “Introducing the Read-Aloud” section at the beginning of the lesson. The inclusion of the words on this list does not mean that students are immediately expected to be able to use all of these words on their own. However, through repeated exposure throughout the lessons, they should acquire a good understanding of most of these words and begin to use some of them in conversation.
Lesson 1
equator
geologist
geology
pressure
surface
Lesson 2
core
crust
eroded
layer
mantle
Lesson 3
disasters
liquid
molten
solid
volcano
Lesson 4
destructive
eruption
geysers
lava
magma
Lesson 5
characteristics
gemstones
minerals
traces
Lesson 6
artifacts
igneous
metamorphic
sedimentary
sediments
Lesson 7
fossil
impression
paleontologist
preserved
Lesson 8
debris
excavating
extinct
fossilized
meteor
meteorite

The History of the Earth: Supplemental Guide | Introduction 7
© 2013 Core Knowledge Foundation
In addition to this core vocabulary list, every lesson includes its own Vocabulary Chart. Words in this chart either appear several times in the Read-Aloud or are words and phrases that support broader language growth, which is crucial to the English language development of young students. Most words on the chart are part of the General Service list of the 2000 most common English words or part of the Dale-Chall list of 3000 words commonly known by Grade 4. Moreover, a conscious effort has been made to include words from the Primary Priority Words according to Biemiller’s (2010) Words Worth Teaching. The words on the Vocabulary Chart are not meant to be exhaustive, and teachers are encouraged to add additional words they feel would best serve their group of students.
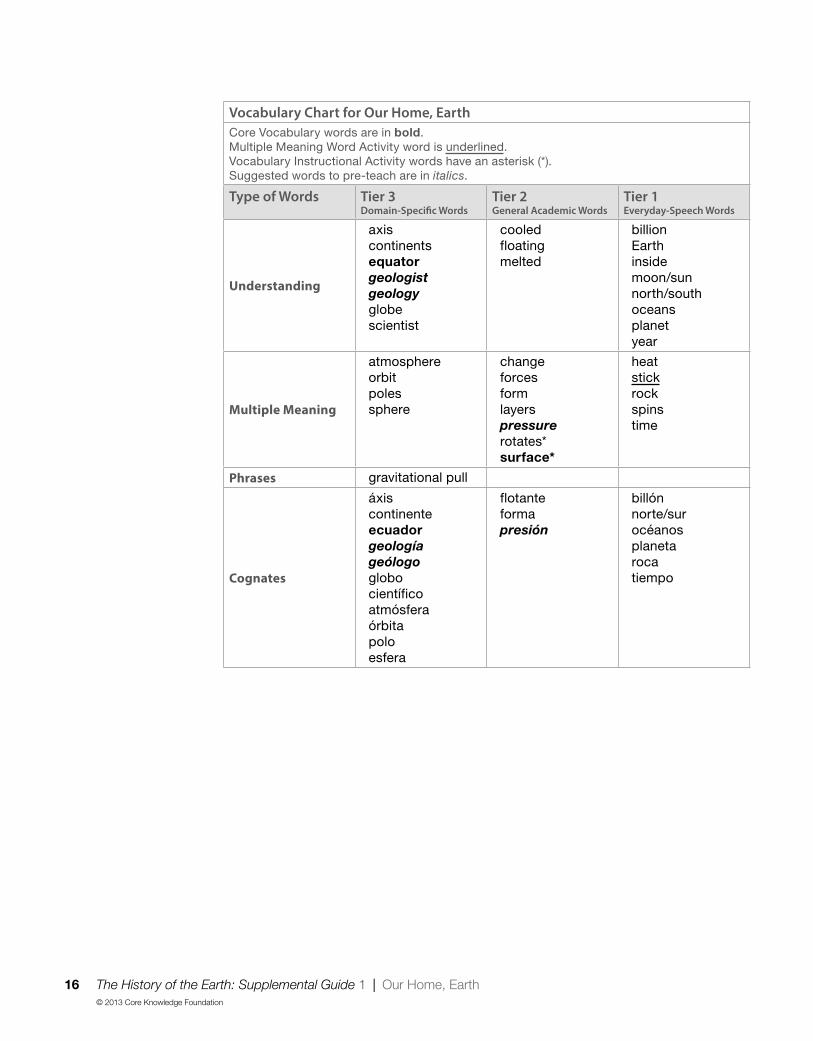
Vocabulary Chart for Our Home, EarthCore Vocabulary words are in bold.Multiple Meaning Word Activity word is underlined.Vocabulary Instructional Activity words have an asterisk (*).Suggested words to pre-teach are in italics.
Type of Words Tier 3Domain-Specific Words
Tier 2General Academic Words
Tier 1Everyday-Speech Words
Understanding
axis continentsequator
geologist
geology
globescientist
cooledfloatingmelted
billion Earthinsidemoon/sunnorth/southoceansplanetyear
Multiple Meaning
atmosphereorbitpolessphere
change forcesformlayerspressure
rotates*surface*
heatstickrockspinstime
Phrases gravitational pull
Cognates
áxiscontinenteecuador
geología
geólogo
globocientífico atmósferaórbitapoloesfera
flotanteformapresión
billónnorte/surocéanosplanetarocatiempo

8 The History of the Earth: Supplemental Guide | Introduction
© 2013 Core Knowledge Foundation
References
1. Beck, Isabel L., Margaret G. McKeown, and Linda Kucan. 2008. Creating Robust Vocabulary: Frequently Asked Questions and Extended Examples. New York: Guilford.
2. Biemiller, Andrew. 2010. Words Worth Teaching. Columbus, OH: SRA/McGrawHill.
3. Dale, Edgar, and Jeanne Chall. 1995. Readability Revisited: The New Dale-Chall Readability Formula.
4. West, Michael. 1953. A General Service List of English Words. London: Longman, Green and Co.
Comprehension Questions
In the History of the Earth domain, there are three types of comprehension questions.
Literal questions assess students’ recall of key details from the read-aloud; these questions are text dependent, requiring students to paraphrase and/or refer back to the portion of the read-aloud in which the specifi c answer to the question is provided. These questions generally address Reading Standards for Literature 1 (RL.1.1) and Reading Standards for Informational Text 1 (RI.1.1).
Inferential questions ask students to infer information from the text and think critically; these questions are also text dependent, but require students to paraphrase and/or refer back to the different portions of the read-aloud that provide information leading to and supporting the inference they are making. These questions generally address Reading Standards for Literature 2–4 (RL.1.2–RL.1.4) and Reading Standards for Informational Text 2–4 (RI.1.2–RI.1.4).
Evaluative questions ask students to build upon what they have learned from the text using analytical and application skills; these questions are also text dependent, but require students to paraphrase and/or refer back to the portion(s) of the read-aloud that substantiate the argument they are making or the opinion they are offering. Evaluative questions might ask students to describe how reasons or facts support specifi c points in a read-aloud,

The History of the Earth: Supplemental Guide | Introduction 9
© 2013 Core Knowledge Foundation
which addresses Reading Standards for Informational Text 8 (RI.1.8). Evaluative questions might also ask students to compare and contrast information presented within a read-aloud or between two or more read-alouds, addressing Reading Standards for Literature 9 (RL.1.9) and Reading Standards for Informational Text 9 (RI.1.9).
The Supplemental Guides include complex texts, thus preparing students in these early years for the increased vocabulary and syntax demands that aligned texts will present in later grades. As all of the readings incorporate a variety of illustrations, Reading Standards for Literature 7 (RL.1.7) and Reading Standards for Informational Text 7 (RI.1.7) are addressed as well.
Student Performance Task Assessments
In the Transition Supplemental Guide for History of the Earth, there are numerous opportunities to assess students’ learning. These assessment opportunities range from informal observations, such as Think Pair Share and some Extension activities, to more formal written assessments. These Student Performance Task Assessments (SPTAs) are identifi ed with this icon: . There is also an end-of-domain summative assessment. Use the Tens Conversion Chart located in the Appendix to convert a raw score on each SPTA into a Tens score. On the same page, you will also fi nd the rubric for recording observational Tens scores.
Above and Beyond
In the Transition Supplemental Guide for History of the Earth, there are numerous opportunities in the lessons and Pausing Points to challenge students who are ready to attempt activities that are above grade level. These activities are labeled “Above and Beyond” and are identifi ed with this icon: ➶.

10 The History of the Earth: Supplemental Guide | Introduction
© 2013 Core Knowledge Foundation
Supplemental Guide Activities
The Supplemental Guide activities that may be particularly relevant to any classroom are the Multiple Meaning Word Activities and accompanying Multiple Meaning Word Posters; Syntactic Awareness Activities; and Vocabulary Instructional Activities. Several multiple meaning words in the read-alouds are underlined to indicate that there is a Multiple Meaning Word Activity associated with them. These activities afford all students additional opportunities to acquire a richer understanding of the English language. Supplemental Guide activities are identifi ed with this icon:
Recommended Resources for The History of the Earth
Trade Book List
The Transition Supplemental Guide includes a number of opportunities in Extensions, the Pausing Point, and the Culminating Activities for teachers to select trade books from this list to reinforce domain concepts through the use of authentic literature. In addition, teachers should consider other times throughout the day when they might infuse authentic domain-related literature.
If you recommend that families read aloud with their child each night, you may wish to suggest that they choose titles from this trade book list to reinforce the domain concepts. You might also consider creating a classroom lending library, allowing students to borrow domain-related books to read at home with their families.
1. Dave’s Down-to-Earth Rock Shop, by Stuart J. Murphy and illustrated by Cat Bowman Smith (HarperCollins, 2005) ISBN 978-0064467292
2. Digging Up Dinosaurs (Let’s-Read-and-Find-Out Science 2), by Aliki (HarperCollins, 1988) ISBN 978-0064450782
3. Dinosaurs (Magic Tree House Guide), by Will Osborne, Mary Pope Osborne, and Sal Murdocca (Random House Books for Young Readers, 2000) ISBN 978-0375802966
The History of the Earth: Supplemental Guide | Introduction 11
© 2013 Core Knowledge Foundation
4. Dinosaurs Before Dark (Magic Tree House, No. 1), by Mary Pope Osborne and illustrated by Sal Murdocca (Random House Books for Young Readers, 1992) ISBN 978-0679824114
5. Earthquake in the Early Morning (Magic Tree House, No. 24), by Mary Pope Osborne and Sal Murdocca (Random House Books for Young Readers, 2001) ISBN 978-0679890706
6. Earthquakes (Let’s-Read-and-Find-Out Science 2), by Franklyn M. Branley and Megan Lloyd (HarperCollins, 2005) ISBN 978-0064451888
7. Exploring Rocks and Minerals (Exploring Earth and Space), by Greg Roza (Powerkids Press, 2012) ISBN 978-1448885763
8. Fossils Tell of Long Ago (Let’s-Read-and-Find-Out Science 2), by Aliki (HarperCollins, 1990) ISBN 978-0064450935
9. Hill of Fire, by Thomas P. Lewis and pictures by Joan Sandin (HarperCollins, 1983) ISBN 978-0064440400
10. Home on Earth: A Song about Earth’s Layers, by Laurie Purdie Salas and illustrated by Viviana Garofoli (Picture Window Books, 2009) ISBN 978-1404852969
11. How to Dig a Hole to the Other Side of the Earth, by Faith McNulty and illustrated by Marc Simont (HarperCollins, 1992)ISBN 978-0874992335
12. If You Find a Rock, by Peggy Christian and photographs by Barbara Hirsch Limber (Sandpiper, 2008) ISBN 978-0152063542
13. Kids Who Walk on Volcanoes, by Paul Otteson (Avalon Travel Publishing, 1996) ISBN 978-1562613082
14. Let’s Go Rock Collecting (Let’s-Read-and-Find-Out Science 2), by Roma Gans and Holly Keller (HarperCollins, 1997)ISBN 978-0064451703
15. The Magic School Bus Inside the Earth, by Joanna Cole and illustrated by Bruce Degen (Scholastic, 1989) ISBN 978-0590407601

12 The History of the Earth: Supplemental Guide | Introduction
© 2013 Core Knowledge Foundation
16. The Magic School Bus in the Time of the Dinosaurs, by Joanna Cole and illustrations by Bruce Degen (Scholastic, 1995) ISBN 978-0590446891
17. Magic Tree House Fact Tracker #1: Dinosaurs: A Nonfi ction Companion to Magic Tree House #1: Dinosaurs Before Dark, by Will Osborne, Mary Pope Osborne, and illustrated by Sal Murdocca (Random House Books for Young Readers, 2000) ISBN 978-0375802966
18. My Visit to the Dinosaurs (Let’s-Read-and-Find-Out Science 2), by Aliki (HarperCollins, 1985) ISBN 978-0064450201
19. The Pebble in My Pocket: A History of Our Earth, by Meredith Hooper and illustrations by Chris Coady (Viking Juvenile, 1996) ISBN 978-0670862597
20. Planet Earth/Inside Out, by Gail Gibbons (Morrow Junior Books, 1995) ISBN 978-0688096809
21. Rocks in His Head, by Carol Otis Hurst and James Stevenson (HarperCollins, 2001) ISBN 978-0060294038
22. Sabertooths and the Ice Age: A Nonfi ction Companion to Sunset of the Sabertooth, by Mary Pope Osborne, Natalie Pope Boyce, and Sal Murdocca (Random House Books for Young Readers, 2005) ISBN 978-0375823800
23. Sunset of the Sabertooth (Magic Tree House, No. 7), by Mary Pope Osborne and Sal Murdocca (Random House Books for Young Readers, 1996) ISBN 978-0679863731
24. Vacation Under the Volcano (Magic Tree House, No. 13), by Mary Pope Osborne and Sal Murdocca (Random House Books for Young Readers, 1998) ISBN 978-0679890508
25. Volcanoes (Let’s-Read-and-Find-Out Science 2), by Franklyn M. Branley and Megan Lloyd (Collins, 2008) ISBN 978-0064451895
26. Volcanoes: Mountains That Blow Their Tops, by Nicholas Nirgiotis (Grosset and Dunlap, 1996) ISBN 978-0448411439
27. Wonderful World of Dinosaurs, by Christina Wilsdon (Disney Press, 2012) ISBN 978-1423168485
The History of the Earth: Supplemental Guide | Introduction 13
© 2013 Core Knowledge Foundation
Websites and Other Resources
Student Resources
1. Earth from Space http://visibleearth.nasa.gov/view_cat.php?categoryID=1484
2. Caillou the Paleontologist http://pbskids.org/caillou/immersivegames/?gameID=4
3. American Museum of Natural History http://www.amnh.org
4. Animated Geyser http://www.classzone.com/books/earth_science/terc/content/visualizations/es1403/es1403page01.cfm
Teacher Resources
1. Geological Society of America http://www.geosociety.org
2. Geology http://www.geology.com

14 The History of the Earth: Supplemental Guide 1 | Our Home, Earth
© 2013 Core Knowledge Foundation
Lesson Objectives
Core Content Objectives
Students will:
Identify geographical features of the earth’s surface: oceans and continents
Locate the North Pole, the South Pole, and the equator on a globe
Describe the shape of the earth
Explain that much of our knowledge of the earth and its history is the result of the work of many scientists
Language Arts Objectives
The following language arts objectives are addressed in this lesson. Objectives aligning with the Common Core State Standards are noted with the corresponding standard in parentheses. Refer to the Alignment Chart for additional standards addressed in all lessons in this domain.
Students will:
Draw pictures and write simple sentences to depict details from the read-aloud “Our Home, Earth” (W.1.2)
Clarify directions by asking classmates about the directions for an activity in which they are drawing a scene from the read-aloud (SL.1.3)
Write and illustrate details from the read-aloud “Our Home, Earth” and discuss with one or more peers (SL.1.5)
Discuss personal responses to what is inside the earth
Identify new meanings of familiar words, such as stick, and apply them accurately
Our Home, EarthOur Home, Earth 1

The History of the Earth: Supplemental Guide 1 | Our Home, Earth 15
© 2013 Core Knowledge Foundation
Core Vocabulary
equator, n. The imaginary line around the center of the earth, halfway between the North and South PolesExample: Isabelle is from Ecuador, which is a country in South America near the equator.Variation(s): none
geologist, n. Someone who studies the history of the earth Example: Geologists study rocks to fi nd out more about Earth’s history.Variation(s): geologists
geology, n. The scientifi c study of the earth and how it has changed over timeExample: If you are interested in volcanoes and earthquakes, you may be interested in studying geology.Variation(s): none
pressure, n. The continuous force of one object on anotherExample: The heavy weight of the books put pressure on the shelf, causing it to break.Variation(s): pressures
surface, n. The topmost layer or the outside (exterior) of somethingExample: She wiped the surface of the table with a wet cloth after dinner.Variation(s): surfaces
16 The History of the Earth: Supplemental Guide 1 | Our Home, Earth
© 2013 Core Knowledge Foundation
Vocabulary Chart for Our Home, EarthCore Vocabulary words are in bold.Multiple Meaning Word Activity word is underlined.Vocabulary Instructional Activity words have an asterisk (*).Suggested words to pre-teach are in italics.
Type of Words Tier 3Domain-Specifi c Words
Tier 2General Academic Words
Tier 1Everyday-Speech Words
Understanding
axis continentsequator
geologist
geology
globescientist
cooledfloatingmelted
billion Earthinsidemoon/sunnorth/southoceansplanetyear
Multiple Meaning
atmosphereorbitpolessphere
change forcesformlayerspressure
rotates*surface*
heatstickrockspinstime
Phrases gravitational pull
Cognates
áxiscontinenteecuador
geología
geólogo
globocientífico atmósferaórbitapoloesfera
flotanteformapresión
billónnorte/surocéanosplanetarocatiempo

The History of the Earth: Supplemental Guide 1 | Our Home, Earth 17
© 2013 Core Knowledge Foundation
Note: Introducing the Read-Aloud and Extensions may have activity options that exceed the time allocated for that part of the lesson. To remain within the time periods allocated for each portion of the lesson, you will need to make conscious choices about which activities to include based on the needs of your students.
Exercise Materials Details
Introducing the Read-Aloud (10 minutes)
Domain Introduction Suggested Trade Book: Millions, Billions, & Trillions by David A. Adler or How Much Is a Million? by David M. Schwartz
Consider reading aloud a trade book to help students understand the idea of billions.
Where Are We? Globe, ball Use the ball and globe to help students understand that the earth is a sphere.
chart paper, markers, tape; set of stacking cups or blocks
Illustrate the relationship of where students live on the earth and where the earth fits in the universe by writing the corresponding location names on the chart or by labeling a series of stacking blocks or cups with the relevant locations.
Vocabulary Preview: Geologist/
Geology, Pressure
Image 1A-1
Purpose for Listening Instructional Masters 1A-1 and 1A-2 (Earth Idea Web), chart paper, markers, tape
Create an Earth Idea Web as a framework for students to capture the read-aloud material.
Instructional Master 1A-3 (Response Cards, Set One); envelope or zip-top bag—one per student
Have students prepare their Response Cards in advance of the read-aloud. Ask students to hold up the appropriate response card when heat, pressure or time is discussed. Use the cards for the geology chant: Heat! Pressure! Time!

18 The History of the Earth: Supplemental Guide 1 | Our Home, Earth
© 2013 Core Knowledge Foundation
Exercise Materials Details
Presenting the Read-Aloud (15 minutes)
Our Home, Earth Globe Use the globe to demonstrate the earth’s rotation on its axis and the earth’s orbit around the sun.
Earth Idea Web, markers Pause throughout the read-aloud to have students summarize what they learned about the earth. Record student observations on the Earth Idea Web. Illustrate each written observation with a small drawing. (See Instructional Master 1A-2 for an example of what a completed Earth Idea Web might look like.)
Discussing the Read-Aloud (15 minutes)
Comprehension Questions Response Cards: Set One Have students use their Response Cards to answer Question 7.
Word Work: Surface familiar classroom objects Place the objects on the surfaces of classroom tables and desks prior to the follow-up activity. If necessary, review the names of the objects with students before the Naming activity.
Complete Remainder of the Lesson Later in the Day
Extensions (20 minutes)
Multiple Meaning Word
Activity: Stick
Poster 1M (Stick)
Syntactic Awareness Activity:
Conjunction and
Vocabulary Instructional
Activity: Word Web: Rotates
chart paper, tape, markers: green, yellow and red; small ball, globe
Drawing the Read-Aloud drawing paper, drawing tools
Take-Home Material
Family Letter Instructional Masters 1B-1–3
Advance Preparation
For the Domain Introduction, locate a trade book that explains big numbers to young children. [Suggested trade books: Millions, Billions, & Trillions by David A. Adler and How Much Is a Million? by David M. Schwartz]

The History of the Earth: Supplemental Guide 1 | Our Home, Earth 19
© 2013 Core Knowledge Foundation
Create an Earth Idea Web using Instructional Master 1A-2 as a guide. [Note: The class will be fi lling in this web throughout this lesson. Instructional Master 1A-2 is an example of what a complete Idea Web might look like.]
➶ Above and Beyond: Make a copy of a blank Idea Web (Instructional Master 1A-1) for any student who is prepared to complete this graphic organizer on their own.
Make a copy of Instructional Master 1A-3 for each student. This will be their Response Cards, Set One (Heat, Pressure, Time). Have students cut out their Response Cards, Set One and write their name on the back of each card. [Note: Set Two will be introduced after the Pausing Point.] When Response Cards are not in use, have students place them in an envelope or plastic zip-top bag.
For Word Work, locate familiar classroom items, such as a stapler, marker, book bin, etc., and place them on the surfaces of classroom tables and desks before starting this activity.
For the Vocabulary Instructional Activity, use chart paper and a black marker to draw a large circle for the Word Web; write rotates in the center of the circle. You will also need a green, red, and yellow marker for this activity. A globe and small ball are needed to help explain the meaning of rotates.
Notes to Teacher
It may be diffi cult for students to understand the idea that the earth is rotating because they cannot feel the movement. If necessary, explain to students that we do not feel the earth move because the motion is very smooth and everything else is moving at the same time. Remind students that they know that the earth is moving because the sun and stars seem to move across the sky over time.

20 The History of the Earth: Supplemental Guide 1A | Our Home, Earth
© 2013 Core Knowledge Foundation
Note: Introducing the Read-Aloud may have activity options that exceed the time allocated for this part of the lesson. To remain within the time periods allocated for this portion of the lesson, you will need to make conscious choices about which activities to include based on the needs of your students.
Introducing the Read-Aloud 10 minutes
Domain Introduction 5 minutes
Tell students that this domain is titled “The History of the Earth.” Review with students that history refers to things that happened in the past, and Earth is the planet where we live. Explain that scientists know that the planet Earth has existed for many, many years. Tell students that many scientists believe the planet Earth is billions of years old. Explain to students that a billion is a very, very long number, which means that Earth is very, very old. Emphasize that scientists are always discovering new things about the earth, and our universe. The history of the earth tells of the fascinating things that are or have been a part of the earth since its beginning. Tell students that they will be learning about rocks and minerals, fossils, volcanoes, and geysers.
Where Are We? 10 minutes
Show students a globe, and tell them that it is a model, or a small copy, of the earth. We use models to learn about things that are too big or too far away to study in the classroom. Tell students that you will use the globe to help them learn about the earth, the planet where we live.
Review with students details about where they live. Point to the appropriate location on the globe as you say the following:
• You live in (your city)
• (Your city) is in the state of (your state)
Our Home, EarthOur Home, Earth 1A
YouCity
StateCountry
ContinentPlanet
Solar System
The History of the Earth: Supplemental Guide 1A | Our Home, Earth 21
© 2013 Core Knowledge Foundation
• (Your state) is in the country of the United States of America
• The United States of America is on the continent of North America
• North America is on planet Earth
Explain that even though it seems that the ground we stand on is fl at and still, we actually live on only a tiny part of a huge sphere, or ball, just like this globe. This huge sphere is called Earth.
Remind students that they already learned about the solar system—our home in space—in the Astronomy domain, and that Earth, the planet on which we live, is just one of eight planets within the solar system. Tell students that in learning about the history of the earth, they are going to learn a lot more about our planet.
Tell students that the earth is covered by both land and water. Point out the colors used to distinguish land and water on your classroom globe. Preview with students that another name for the land of the earth is the continents of the earth. Tell students that they will learn about the seven continents of the earth in this domain. Preview with students that another name for the water of the earth is the oceans of the earth. Tell students that they will learn about the fi ve oceans of the earth in this domain.
Vocabulary Preview 5 minutes
Geologist/Geology
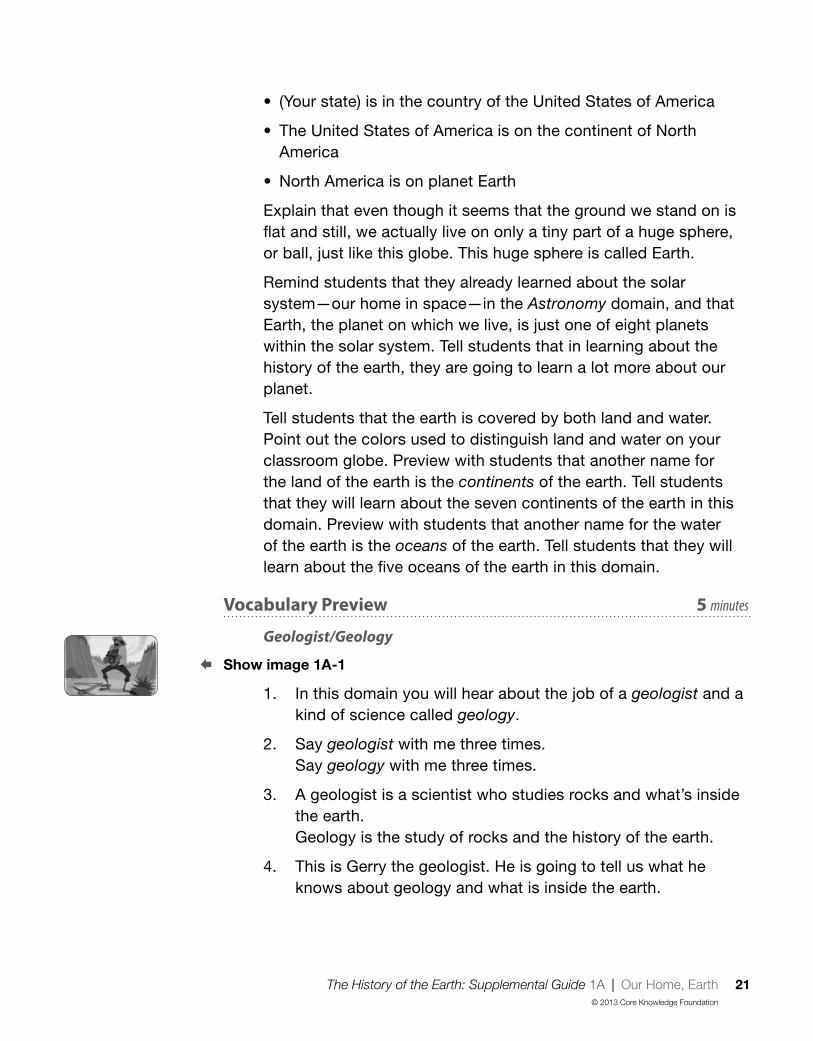
Show image 1A-1
1. In this domain you will hear about the job of a geologist and a kind of science called geology.
2. Say geologist with me three times.Say geology with me three times.
3. A geologist is a scientist who studies rocks and what’s inside the earth.Geology is the study of rocks and the history of the earth.
4. This is Gerry the geologist. He is going to tell us what he knows about geology and what is inside the earth.
22 The History of the Earth: Supplemental Guide 1A | Our Home, Earth
© 2013 Core Knowledge Foundation
Marcos thought it would be interesting to be a geologist, so he checked out several books about geology from the library.
5. Do you think you would like to study geology when you are in high school or college? Do you think you would like to be a geologist when you grow up?
Pressure
1. Today you will hear how pressure causes many changes to the earth.
2. Say pressure with me three times.
3. Pressure is the force you use when you push on something. [Have partner pairs press their hands against one another to create pressure.]
4. Denise broke a hard-boiled egg by putting pressure on the shell with her hands. [Demonstrate a squeezing motion with your hands.]April’s mother used her hand to put pressure on her daughter’s arm, so her cut would stop bleeding.
5. What do you think would happen if you put pressure on a balloon by squeezing it between your hands? Turn and tell your partner what you think would happen. Use the word pressure when you talk with your partner.
Purpose for Listening
Tell students that today they are going to meet an interesting scientist who knows a lot about the earth. Tell them to listen carefully to learn more about the earth.

The History of the Earth: Supplemental Guide 1A | Our Home, Earth 23
© 2013 Core Knowledge Foundation
Presenting the Read-Aloud 15 minutes
Our Home, Earth
Show image 1A-1: Gerry the Geologist
Hello, kids! My name is Gerry and I’m a geologist. 1 A geologist
is a type of scientist. A scientist studies and learns all about the
world in which we live. Geologists are scientists who study rocks
and what’s inside the earth.
Show image 1A-2: Collage of rocks
That’s right: rocks! From pebbles to stones to boulders, from a
grain of sand to the highest mountain, rocks are everywhere. And
I want you to know all about rocks, from how they are created to
how they are used in people’s everyday lives.
Show image 1A-3: Jeweled crown
People used rocks to make the jewels on this crown.
Show image 1A-4: Rock wall
People use rocks to make buildings, walls, and streets.
Show image 1A-5: Marble statue of Abraham Lincoln
A sculptor carved a big rock to make this sculpture of Abraham
Lincoln.
Show image 1A-6: Rocky mountain vista
Geologists use rocks to learn about the earth. In the ancient
Greek language, the word geo means earth, and –ology means
“the study of.” When we combine these word parts, we have geo-
ology, or just geology, which is the study of the earth. 2 Since the
earth is mostly made of rock, we geologists spend most of our
time studying rocks. Many of the rocks we see on the surface
of the earth, from mountains down to pebbles, are created by
incredible forces at work deep inside the earth. 3 Thus, geologists
study not only rocks, but also the forces at work inside the earth
and on the earth’s surface. We study the whole earth.
1 Let’s call him “Gerry the Geologist!”
Do you hear how the beginning
sound of “Gerry” and “Geologist”
are the same? That’s called
alliteration.
2 Geology is the study of what? What
does each part of the word geology
mean?
3 The surface of the earth is the
outside of the earth. We walk and
live on the surface of the earth.
Have you ever wondered about
what’s inside the earth, or under
the surface where we walk and
live?

24 The History of the Earth: Supplemental Guide 1A | Our Home, Earth
© 2013 Core Knowledge Foundation
Show image 1A-7: Outer space
Some scientists believe the history of the earth begins a little
over four-and-a-half billion years ago. 4 That’s a long time—a very,
very, very long time—ago. Before that, some scientists believe the
materials that now make up Earth were orbiting, or fl oating around,
our newly formed sun as billions of little bits and pieces. Over
many, many years, it is believed by some scientists that these
fl oating bits and pieces gradually stuck together until they made
up Earth, as well as its neighbor, the moon, and the other planets.
When it was newly formed, Earth was basically one big ball of
hot, melted rocks. Over time, however, some of these materials
cooled and hardened, allowing the planet Earth to become what it
is today.
Show image 1A-8: Diagram of the solar system
Maybe you already know that Earth is a planet. Earth is one of
eight major planets that orbits the sun. 5 Do you know the names
of any of the other planets? 6 I do! Mercury, Venus, Mars, Jupiter,
Saturn, Uranus, and Neptune.
Like the other planets in the solar system, Earth is trapped
in the gravitational pull of the sun. This causes Earth to orbit, or
revolve, around the sun. It takes one year, about 365 days, for
Earth to complete an orbit around the sun. 7
Show image 1A-9: World map
The earth’s orbit around the sun is not the only way Earth
moves in space, however.
This map shows the earth’s north and south poles. 8 The north
and south poles are imaginary points at the northernmost and
southernmost parts of the earth. The axis of rotation is like an
imaginary line or “stick” going right through the earth at the north
and south poles. 9 There is not really a “stick” running through the
earth around which it turns. The axis is an imaginary line around
which earth rotates. The earth rotates, or spins, in the same way
4 [Write the number four-and-a-half
billion (4,500,000,000) out for
students so that they can get a
sense of how long ago the earth’s
history began.] That’s a very, very,
very long time ago!
5 [Point to Earth on the diagram.]
Earth is the third planet from the
sun.
6 [Pause for responses and point out
each planet on the diagram.]
7 [Ask two students to demonstrate
by having one student be a
stationary sun and the other be the
orbiting Earth.]
8 [Point to the north and south poles
in the diagram.] Tell students there
is a star marking the North Pole
and a circle marking the South
Pole.
9 Here, the word stick means a long,
thin piece of wood. The word stick
also has other meanings. The
word stick also means to attach
something to a surface using glue
or tape, kind of like a sticker.

The History of the Earth: Supplemental Guide 1A | Our Home, Earth 25
© 2013 Core Knowledge Foundation
that a globe spins—on its axis. It takes one day, or twenty-four
hours, for Earth to make a complete rotation. 10
The map also shows the equator, an imaginary line around
the middle of the earth. 11 The equator divides the earth into two
equal halves. The area along the equator receives the most direct
sunlight and is therefore generally the warmest area on the surface
of the earth.
Show image 1A-10: Earth from space
Earth is sphere-shaped, like a ball, and it is surrounded by
a thick blanket of air, called an atmosphere, where clouds fl oat
around. Most of the earth’s surface is covered with water in the
form of the fi ve oceans: 12 Pacifi c, Atlantic, Indian, Arctic, and
Southern (or Antarctic). And between these oceans there is land
in the form of seven continents: North America, South America,
Europe, Africa, Asia, Australia, and Antarctica.
People haven’t always known that the earth is round or that it
rotates on its axis as well as orbits the sun; they haven’t always
known that there are fi ve oceans and seven continents, or that
most of the surface is covered in water. It has taken hundreds of
years for scientists and explorers to develop all the knowledge
about the earth that I just described in the last few minutes. But
this barely begins to scratch the surface of what we now know
about the history of the earth. 13
Show image 1A-11: Heat, pressure, and time
There are three important words you need to keep in mind
whenever you are thinking about geology, which is the study of the
earth. Heat is the fi rst. You can feel heat from a fl ame or from the
sun on a sunny day. Heat causes many changes to the earth.
12 [Point out the oceans and
continents that are visible as you
read.]
10 [Use a globe to demonstrate
rotation.] It takes one day for Earth
to go all the way around its axis. As
the earth rotates, it also orbits the
sun. [You may wish to demonstrate
both motions of Earth by turning
around and around as you walk in
a circle around a student volunteer
playing the stationary sun.]
11 [Point to the equator on the map.
Tell students that the word equator
sounds like the word equal. We can
remember that the equator cuts
the world into two equal halves.]
13 “This barely begins to scratch the
surface” is a phrase that people
say when they mean that there is
so much more left to learn about
something.

26 The History of the Earth: Supplemental Guide 1A | Our Home, Earth
© 2013 Core Knowledge Foundation
The second word is pressure, like the force you use when
you push on something. 14 Pressure, or the force of weight, also
causes many changes to the earth.
Time is the third important geology word to remember. To
understand geology, you need to think about time in a whole new
way. Forget about minutes, hours, and days. These amounts of
time don’t mean much in geology. Geologists think in terms of
many, many years. 15 It takes a long time for pressure and heat to
do what they do.
Show image 1A-12: Grand Canyon with view of Colorado River
The Grand Canyon, located in Arizona, provides a lot of clues
about the earth’s formation and history. It took millions of years for
the rushing water in the river to carve through the rocks to make
this canyon. No other place on earth allows me to see and study so
many different layers of rock at the same time. The rock on the upper
rim of the Grand Canyon is estimated by some scientists to be about
230 million years old, whereas the rock layers at the very bottom of
the canyon are estimated to have formed over two billion years ago.
That rock is half as old as the earth is believed to be itself!
Remember: heat, pressure, and time are the main factors of
geology. If you understand those three words, then you are ready to
move ahead and learn many things about the history of the earth. 16
Discussing the Read-Aloud 15 minutes
Comprehension Questions 10 minutes
If students have diffi culty responding to questions, reread pertinent passages of the read-aloud and/or refer to specifi c images. If students give one-word answers and/or fail to use read-aloud or domain vocabulary in their responses, acknowledge correct responses by expanding students’ responses using richer and more complex language. Ask students to answer in complete sentences by having them restate the question in their responses.
1. Literal What does Gerry the Geologist study? (Gerry the Geologist studies rocks to learn about the earth.)
15 Remember how long ago four-and-
a-half billion years was!
16 [Have students chant three times,
“Heat! Pressure! Time!”]
14 [Pause for students to push their
hands together using pressure.]

The History of the Earth: Supplemental Guide 1A | Our Home, Earth 27
© 2013 Core Knowledge Foundation
2. Evaluative How are rocks used by people? (Rocks are important to people because they are used in jewelry making, in building, and in art.) How have you ever used rocks? (Answers may vary.)
3. Literal What is the shape of the earth? (The earth is shaped like a sphere, which is just like the shape of a ball.)
4. Literal What do we call the land and water that cover the surface of the earth? (The land and water that cover the surface of the earth are called continents and oceans.)
5. Literal What are the North and South Poles? (The North Pole is the northernmost point on the earth. The South Pole is the southernmost point on the earth.) [Have a student locate the North Pole on the globe. Ask another student to locate the South Pole on the globe.]
6. Literal What is the equator? (The equator is an imaginary line around the middle of the earth at that divides the earth into two equal halves.) [Have a student locate the equator on the globe.]
7. Literal What are the three important words that Gerry said you need to remember when thinking about geology? (The three words you should remember when thinking about geology are heat, pressure, and time.)
8. Inferential When we talk about the history of the earth are we talking about a short time or a very long time? (When we talk about the history of the earth, we are talking about a very long time of billions of years.)
[Please continue to model the Think Pair Share process for students, as necessary, and scaffold students in their use of the process.]
I am going to ask a question. I will give you a minute to think about the question, and then I will ask you to turn to your neighbor and discuss the question. Finally, I will call on several of you to share what you discussed with your partner.
9. Evaluative Think Pair Share: Would you like to be a geologist like Gerry? Why or why not? (Answers may vary.)

28 The History of the Earth: Supplemental Guide 1A | Our Home, Earth
© 2013 Core Knowledge Foundation
10. After hearing today’s read-aloud and questions and answers, do you have any remaining questions? [If time permits, you may wish to allow for individual, group, or class research of the text and/or other resources to answer these questions.]
Word Work: Surface 5 minutes
1. In the read-aloud you heard, “Many of the rocks we see on the surface of the earth, from mountains down to pebbles, are created by incredible forces at work deep inside the earth.”
2. Say the word surface with me.
3. The surface of something is the outside or top of it. [Point out some surfaces in the classroom.]
4. I put the tea kettle on the surface of the stove.
5. Have you ever put something on the surface of an object, such as a table or desk? Try to use the word surface when you tell about it. [Ask two or three students. If necessary, guide and/or rephrase the students’ responses: “I put on the surface of . . . ”]
6. What’s the word we’ve been talking about?
Note: Place familiar items, such as a stapler, marker, book bin, etc., on the surfaces of classroom tables and desks before doing this activity.
Use a Naming activity for follow-up. Directions: I have placed several objects on surfaces in the classroom. I would like you to identify what is on each surface. For example, I might ask, “What is on the surface of the desk?” Be sure to begin your responses with “ is on the surface of the desk.”
Complete Remainder of the Lesson Later in the Day

The History of the Earth: Supplemental Guide 1B | Our Home, Earth 29
© 2013 Core Knowledge Foundation
Note: Extensions may have activity options that exceed the time allocated for this part of the lesson. To remain within the time periods allocated for this portion of the lesson, you will need to make conscious choices about which activities to include based on the needs of your students.
Extensions 20 minutes
Multiple Meaning Word Activity: Stick 5 minutes
Sentence in Context
Note: You may choose to have students hold up one, two, or three fi ngers to indicate which image shows the meaning being described, or have a student walk up to the poster and point to the image being described.
1. [Show Poster 1M (Stick).] In the read-aloud you heard, “The
axis of rotation is like an imaginary line or “stick” going right
through the earth at the north and south poles.” Here, stick means a long, thin piece of wood. We can imagine the Earth’s axis as a stick stuck through the earth. Which image shows this meaning?
2. Stick can also mean to poke or push with a pointed object. Which image on the poster shows this meaning?
3. Stick can also mean to attach something using glue or tape. Which image on the poster shows this meaning?
4. Now with your partner, make a sentence for each meaning of stick. Remember to use complete sentences. I will call on some of you to share your sentences.
Our Home, EarthOur Home, Earth 1B

30 The History of the Earth: Supplemental Guide 1B | Our Home, Earth
© 2013 Core Knowledge Foundation
Syntactic Awareness Activity 5 minutes
Conjunction and
Note: The purpose of these syntactic activities is to help students understand the direct connection between grammatical structures and the meaning of text. These syntactic activities should be used in conjunction with the complex text presented in the read-alouds. There may be variations in the sentences created by your class. Allow for these variations, and restate students’ sentences so that they are grammatical.
1. Conjunctions are a kind of word we use to connect words and phrases.
2. We use the conjunction and to join words and phrases that share similar ideas, or have ideas that are alike.
3. Listen to Gerry the Geologist’s sentences about the formation of the earth from the read-aloud. I will emphasize the word and as I read:
Some scientists believe the history of the earth begins a little
over four-and-a-half billion years ago. That’s a long time—a very,
very, very long time—ago. Before that, some scientists believe
the materials that now make up Earth were orbiting, or fl oating
around, our newly formed sun as billions of little bits and pieces.
Over many, many years, it is believed by some scientists that these
fl oating bits and pieces gradually stuck together until they made
up Earth, as well as its neighbor, the moon, and the other planets.
When it was newly formed, Earth was basically one big ball of hot,
melted rocks. Over time, however, some of these materials cooled
and hardened, allowing the planet Earth to become what it is
today.
4. Notice that in this paragraph, Gerry the Geologist uses the word and when he talks about two facts or ideas that go together. For example, he uses and when he says that the materials cooled and hardened. If he did not use and, he would have said, “The materials cooled. The materials hardened.”

The History of the Earth: Supplemental Guide 1B | Our Home, Earth 31
© 2013 Core Knowledge Foundation
5. Now let’s listen to two short sentences:David plays soccer.David plays basketball.We can combine these sentences using the word and.David plays soccer and basketball.
6. Because David plays both sports, we can use the word and to connect the two sports that David plays.
7. Let’s listen to two more sentences:Jody has milk after school. Jody has cookies after school.How can we combine these sentences?Jody has milk and cookies after school.
8. Tell your partner about two things you will do after school today, using the word and. Make sure you listen carefully to what your partner says so that you can share what they say with the class.
Vocabulary Instructional Activity
Word Web: Rotates
Materials: chart paper, yellow marker (things that rotate),
green marker (similar words/synonyms), red marker (non-
examples or opposites)
1. In the read-aloud you heard, “The earth rotates, or spins, in the same way that a globe spins—on its axis”. [Use the globe to show students how the center stick “holds” the globe in place. Explain that the stick is like the imaginary axis around which the globe rotates. Invite a student volunteer to make the globe rotate or turn.]
2. Say rotates with me three times.
3. When something rotates, it spins on its axis.
4. The earth rotates or spins all the way back to the place it started every twenty-four hours.
5. We will make a Word Web for the word rotates.
6. Tell me what you think of when you hear the word rotates.

32 The History of the Earth: Supplemental Guide 1B | Our Home, Earth
© 2013 Core Knowledge Foundation
• For examples of things that rotate—such as the stars, planets, a Ferris wheel, and a carousel—draw or write the examples above and below the circle, and use yellow lines to connect them to the circle.
• For words that have a similar meaning to rotates—such as orbits, go around, and turns—write these words or place pictures to the left of rotates, and use green lines to connect them to the center.
7. Tell me what you think is the opposite of rotates.
• For words that are non-examples or have opposite senses to rotate—such as still, stay or remain in place—write these words to the right of rotates, and use red lines to connect them to the center.
8. Talk with your partner using the word rotates and what you have learned about the word rotates from the Word Web. Try to use complete sentences.
[Throughout this domain, encourage students to continue thinking about the word rotates, and add additional words that are related to, similar to, and the opposite of rotates.]
Drawing the Read-Aloud 15 minutes
• Ask students to think back to the Read-Aloud that they listened to earlier in the day: “Our Earth, Home.” Review Flip Book images as necessary. Give each student a piece of paper.
• Directions: Fold your paper in half. Then, draw two things that you remember from the Read-Aloud. After drawing, use the sound-spelling correspondences that you have learned to write a word, a phrase, or a sentence about each of the things you have drawn.”
• Remind students that asking questions is one way to make sure everyone knows what to do. Tell students: “Think of a question about the directions I just gave you. For example, you could ask, ‘How many things do we draw?’ Turn to your neighbor and ask your own question. I will call on several of you to share your questions with the class.”

The History of the Earth: Supplemental Guide 1B | Our Home, Earth 33
© 2013 Core Knowledge Foundation
• Circulate around the room, asking students to identify what they have drawn and to read what they have written. Encourage students to use read-aloud vocabulary as they describe their drawings.
• Have students share their drawings and writing with their partner or home-language peers. Have students compare their drawings to see if they drew the same things or different things.
Take-Home Material
Family Letter
Send home Instructional Masters 1B-1–3.

34 The History of the Earth: Supplemental Guide 2 | The Earth Inside-Out, Part I
© 2013 Core Knowledge Foundation
Lesson Objectives
Core Content Objectives
Students will:
Explain that much of our knowledge of the earth and its history is the result of the work of many scientists
Identify the layers of the earth: crust, mantle, and core (outer and inner)
Describe the crust
Language Arts Objectives
The following language arts objectives are addressed in this lesson. Objectives aligning with the Common Core State Standards are noted with the corresponding standard in parentheses. Refer to the Alignment Chart for additional standards addressed in all lessons in this domain.
Students will:
With assistance, categorize and organize information about the earth’s crust (W.1.8)
Clarify information about “The Earth Inside-Out, Part I,” by asking questions that begin with what (SL.1.2)
Orally retell important facts and information from “The Earth Inside-Out, Part I” (SL.1.4)
The Earth Inside-Out, The Earth Inside-Out, Part IPart I 2

The History of the Earth: Supplemental Guide 2 | The Earth Inside-Out, Part I 35
© 2013 Core Knowledge Foundation
Core Vocabulary
core, n. The center of the earthExample: It is impossible to journey to the earth’s core because it is too hot for humans.Variation(s): none
crust, n. The hard, thick, outer covering of the earthExample: The workers drilled a few inches into the earth’s crust.Variation(s): none
eroded, v. Worn away Example: The writing on the Sphinx had been eroded by the wind and sand.Variation(s): erode, erodes, eroding
layer, n. A part that lies over or under another Example: The baker added a thin layer of chocolate to the cake.Variation(s): layers
mantle, n. The layer of the earth between the crust and the coreExample: The mantle is the layer beneath the earth’s crust that wraps around Earth’s core.Variation(s): none

36 The History of the Earth: Supplemental Guide 2 | The Earth Inside-Out, Part I
© 2013 Core Knowledge Foundation
Vocabulary Chart for The Earth Inside-Out, Part ICore Vocabulary words are in bold.Multiple Meaning Word Activity word is underlined.Vocabulary Instructional Activity words have an asterisk (*).Suggested words to pre-teach are in italics.
Type of Words Tier 3Domain-Specifi c Words
Tier 2General Academic Words
Tier 1Everyday-Speech Words
Understanding
bedrockclaycontinentsgeologistgeologyglobepickax
compactederoded
remnanttexturethick/thinthicknessvaries*
inner/outermilesoceansplanetundergroundwater
Multiple Meaning
core
crust
mantle
changelayer*
soilsurface
aircolorhard/harderlandrockshovel
Phraseshistory of the earth
period of time
Cognates
continentegeologíageólogoglobocorazón
manto
erosionado
remanentevariar*
océanosplanetaairecolorroca

The History of the Earth: Supplemental Guide 2 | The Earth Inside-Out, Part I 37
© 2013 Core Knowledge Foundation
Note: Introducing the Read-Aloud and Extensions may have activity options that exceed the time allocated for that part of the lesson. To remain within the time periods allocated for each portion of the lesson, you will need to make conscious choices about which activities to include based on the needs of your students.
Exercise Materials Details
Introducing the Read-Aloud (10 minutes)
What Have We Already
Learned?
Globe; stickers: one dot, one star; scissors, clear tape, red yarn
Use the star sticker to mark off the North Pole on the globe and the dot to mark off the South Pole. Attach the red yarn as a reminder of the equator.
Response Cards: Set One Use these Response Cards when students say their geology chant.
Vocabulary Preview: Eroded,
Crust
Images 2A-8 and 2A-9
Image 2A-4
Purpose for Listening clear box with a lid, and a small object that will not roll
Use the box to review the word surface and pre-teach the prepositions in and on. Place the object in the clear box. Next, place the box on a different surface. Repeat, as necessary, until students have an understanding of the words surface, in, and on.
Presenting the Read-Aloud (15 minutes)
The Earth Inside-Out, Part I U.S. map, globe Use the map and globe to refer to the places named in the read-aloud.
yardstick or ruler Use the yardstick or measuring tape to show students different depths.
glass container, potting soil, red clay, and rocks
Use the glass container, soil, rocks and clay to model topsoil, clay, and bedrock.
Discussing the Read-Aloud (15 minutes)
Comprehension Questions Image 2A-4
Word Work: Layer
Complete Remainder of the Lesson Later in the Day

38 The History of the Earth: Supplemental Guide 2 | The Earth Inside-Out, Part I
© 2013 Core Knowledge Foundation
Exercise Materials Details
Extensions (20 minutes)
Multiple Meaning Word
Activity: Change
Poster 2M (Change)
Syntactic Awareness Activity:
Conjunctions or
Vocabulary Instructional
Activity: Varies
Earth’s Crust Instructional Master 2B-1; chart paper, chalkboard, or whiteboard; drawing and writing tools; clear box and small object
Use the clear box and small object (from Purpose for Listening) to teach the prepositions on, in and above prior to completing the Instructional Master.
Advance Preparation
Bring in one dot sticker, one star sticker, red yarn, a clear box with a lid and an object small enough to fi t inside the box, a ruler or yardstick, a glass jar, potting soil, red clay, and rocks.
Make a copy of Instructional Master 2B-1 for each student. Students will draw and write about things that are found in, on, and above Earth’s crust.
Notes to Teacher
Students may struggle with this content material if they do not understand prepositions such as on, in, and above. Be sure that students are clear about the meanings of these frequently used prepositions.
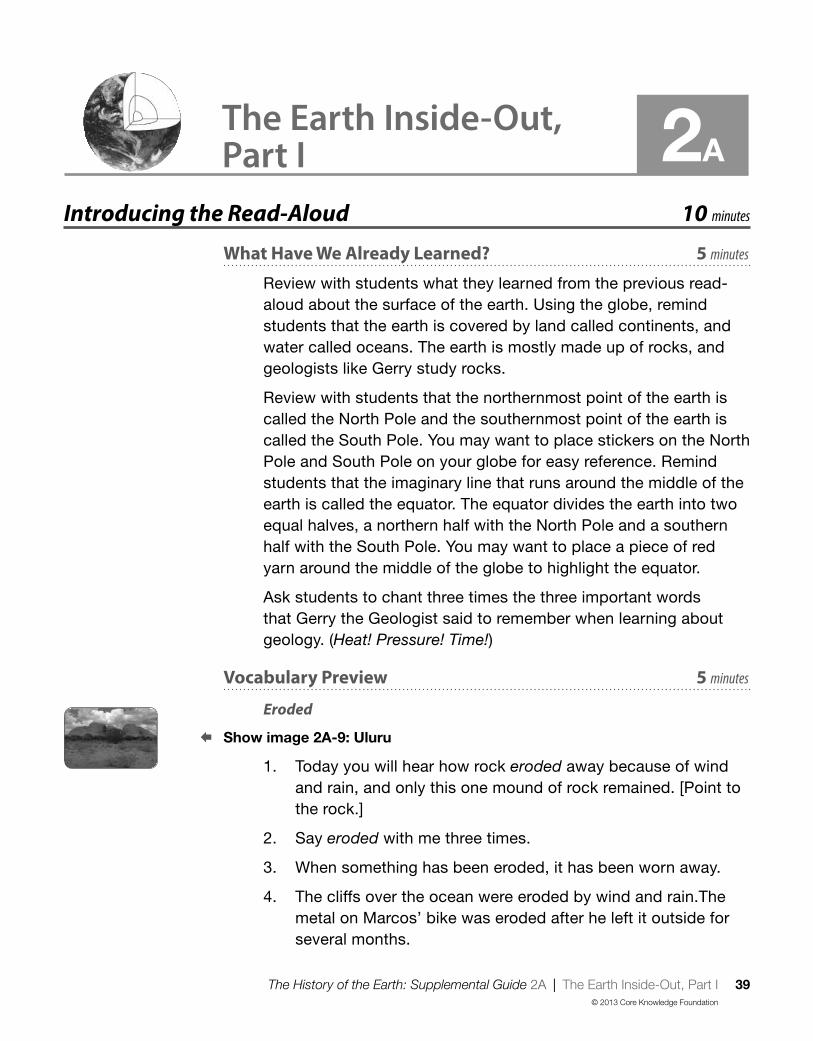
The History of the Earth: Supplemental Guide 2A | The Earth Inside-Out, Part I 39
© 2013 Core Knowledge Foundation
Introducing the Read-Aloud 10 minutes
What Have We Already Learned? 5 minutes
Review with students what they learned from the previous read-aloud about the surface of the earth. Using the globe, remind students that the earth is covered by land called continents, and water called oceans. The earth is mostly made up of rocks, and geologists like Gerry study rocks.
Review with students that the northernmost point of the earth is called the North Pole and the southernmost point of the earth is called the South Pole. You may want to place stickers on the North Pole and South Pole on your globe for easy reference. Remind students that the imaginary line that runs around the middle of the earth is called the equator. The equator divides the earth into two equal halves, a northern half with the North Pole and a southern half with the South Pole. You may want to place a piece of red yarn around the middle of the globe to highlight the equator.
Ask students to chant three times the three important words that Gerry the Geologist said to remember when learning about geology. (Heat! Pressure! Time!)
Vocabulary Preview 5 minutes
Eroded
Show image 2A-9: Uluru
1. Today you will hear how rock eroded away because of wind and rain, and only this one mound of rock remained. [Point to the rock.]
2. Say eroded with me three times.
3. When something has been eroded, it has been worn away.
4. The cliffs over the ocean were eroded by wind and rain.The metal on Marcos’ bike was eroded after he left it outside for several months.
The Earth Inside-Out, The Earth Inside-Out, Part IPart I 2A
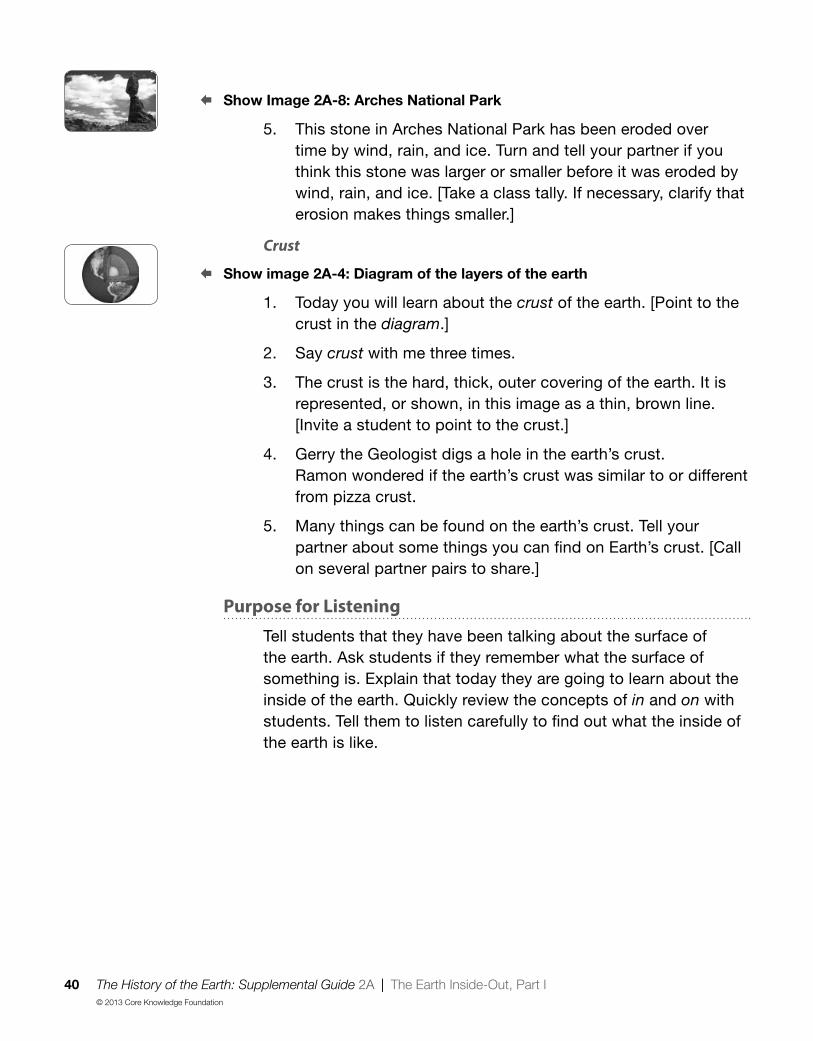
40 The History of the Earth: Supplemental Guide 2A | The Earth Inside-Out, Part I
© 2013 Core Knowledge Foundation
Show Image 2A-8: Arches National Park
5. This stone in Arches National Park has been eroded over time by wind, rain, and ice. Turn and tell your partner if you think this stone was larger or smaller before it was eroded by wind, rain, and ice. [Take a class tally. If necessary, clarify that erosion makes things smaller.]
Crust
Show image 2A-4: Diagram of the layers of the earth
1. Today you will learn about the crust of the earth. [Point to the crust in the diagram.]
2. Say crust with me three times.
3. The crust is the hard, thick, outer covering of the earth. It is represented, or shown, in this image as a thin, brown line. [Invite a student to point to the crust.]
4. Gerry the Geologist digs a hole in the earth’s crust.Ramon wondered if the earth’s crust was similar to or different from pizza crust.
5. Many things can be found on the earth’s crust. Tell your partner about some things you can fi nd on Earth’s crust. [Call on several partner pairs to share.]
Purpose for Listening
Tell students that they have been talking about the surface of the earth. Ask students if they remember what the surface of something is. Explain that today they are going to learn about the inside of the earth. Quickly review the concepts of in and on with students. Tell them to listen carefully to fi nd out what the inside of the earth is like.
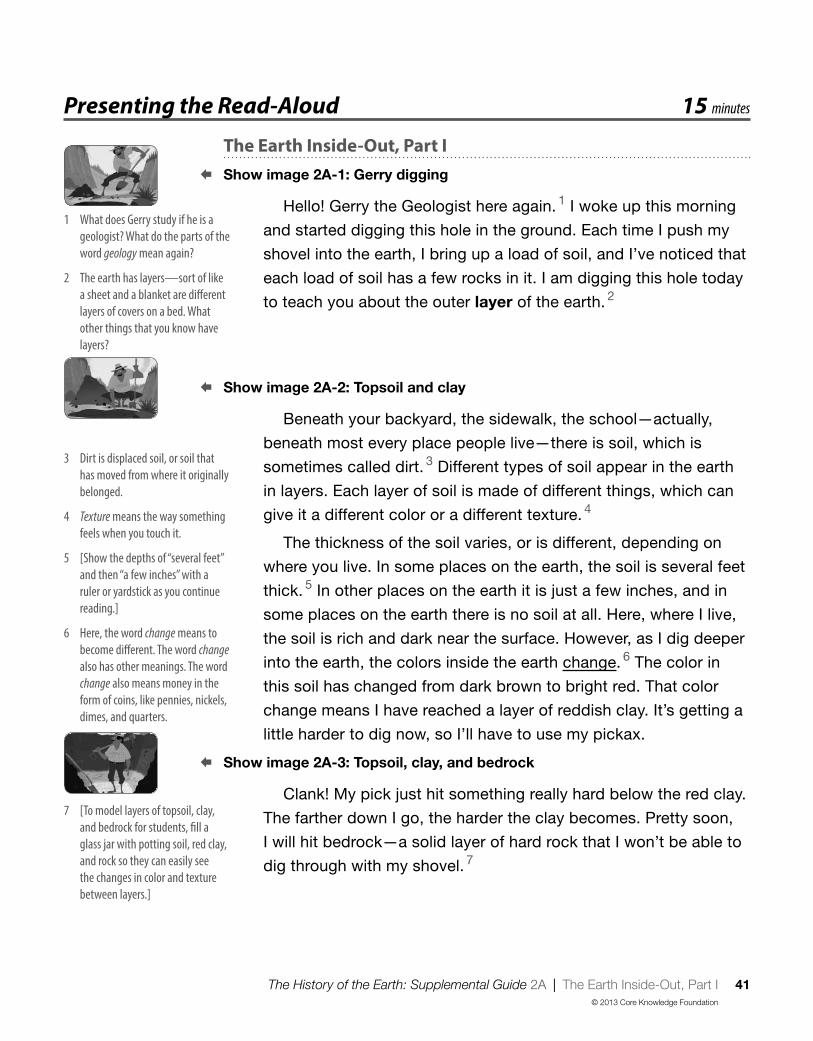
The History of the Earth: Supplemental Guide 2A | The Earth Inside-Out, Part I 41
© 2013 Core Knowledge Foundation
Presenting the Read-Aloud 15 minutes
The Earth Inside-Out, Part I
Show image 2A-1: Gerry digging
Hello! Gerry the Geologist here again. 1 I woke up this morning
and started digging this hole in the ground. Each time I push my
shovel into the earth, I bring up a load of soil, and I’ve noticed that
each load of soil has a few rocks in it. I am digging this hole today
to teach you about the outer layer of the earth. 2
Show image 2A-2: Topsoil and clay
Beneath your backyard, the sidewalk, the school—actually,
beneath most every place people live—there is soil, which is
sometimes called dirt. 3 Different types of soil appear in the earth
in layers. Each layer of soil is made of different things, which can
give it a different color or a different texture. 4
The thickness of the soil varies, or is different, depending on
where you live. In some places on the earth, the soil is several feet
thick. 5 In other places on the earth it is just a few inches, and in
some places on the earth there is no soil at all. Here, where I live,
the soil is rich and dark near the surface. However, as I dig deeper
into the earth, the colors inside the earth change. 6 The color in
this soil has changed from dark brown to bright red. That color
change means I have reached a layer of reddish clay. It’s getting a
little harder to dig now, so I’ll have to use my pickax.
Show image 2A-3: Topsoil, clay, and bedrock
Clank! My pick just hit something really hard below the red clay.
The farther down I go, the harder the clay becomes. Pretty soon,
I will hit bedrock—a solid layer of hard rock that I won’t be able to
dig through with my shovel. 7
1 What does Gerry study if he is a
geologist? What do the parts of the
word geology mean again?
2 The earth has layers—sort of like
a sheet and a blanket are diff erent
layers of covers on a bed. What
other things that you know have
layers?
3 Dirt is displaced soil, or soil that
has moved from where it originally
belonged.
4 Texture means the way something
feels when you touch it.
5 [Show the depths of “several feet”
and then “a few inches” with a
ruler or yardstick as you continue
reading.]
6 Here, the word change means to
become diff erent. The word change
also has other meanings. The word
change also means money in the
form of coins, like pennies, nickels,
dimes, and quarters.
7 [To model layers of topsoil, clay,
and bedrock for students, fi ll a
glass jar with potting soil, red clay,
and rock so they can easily see
the changes in color and texture
between layers.]

42 The History of the Earth: Supplemental Guide 2A | The Earth Inside-Out, Part I
© 2013 Core Knowledge Foundation
I dug this hole to show you that there are different layers of soil
and rock beneath your feet. The farther you go into the earth, the
more things change. The dark soil on top is fairly easy to dig into
with a shovel, but the deeper layer of clay is harder to dig because
it has been compacted—or squished—by the weight or pressure
of everything above it. 8
Show image 2A-4: Diagram of the layers of the earth
This diagram shows you what the inside of the earth would
look like if you could cut out a big chunk of it. The crust is the
outermost layer of the earth, represented here by a thin, brown
line. 9 I have been digging into the very outermost portion of the
crust today.
Most of the earth is rock, and most of that rock is beneath
the crust in the other three layers: the mantle (red), the outer
core (orange), and the inner core (yellow). The distance from
the surface—where you and I live—all the way to the middle of
the inner core, is nearly four thousand miles. 10 This is one thick
planet!
Show image 2A-5: Earth’s crust
I will teach you more about the mantle, outer core, and inner
core next time. For now, let’s focus on the thinnest layer: the crust.
The earth’s crust is between three and twenty miles, depending on
where you are on earth. 11 Most people, plants, and animals live on
the surface, or outermost edge of the crust.
Remember, the earth’s surface is covered by oceans and
continents. Everything alive on earth lives in, on, or above these
oceans and continents on the crust. For example, you and your
dog live on the crust. Worms and moles, on the other hand, live
underground, or in the crust. Birds fl y in the air above the crust,
and fi sh swim in the water that is fl owing on the crust.
8 Remember pressure is one of the
three words Gerry said we should
keep in mind. Pressure, or pushing,
from top layers is one reason
deeper layers of soil are harder to
dig.
9 [Point to each layer in the diagram
as you read about it.]
10 [Show students the distance from
New York to California on the map.]
That is one thousand miles farther
than the width of the United
States!
11 Three miles would be about the
distance from here to ;
twenty miles would be about the
distance from here to .
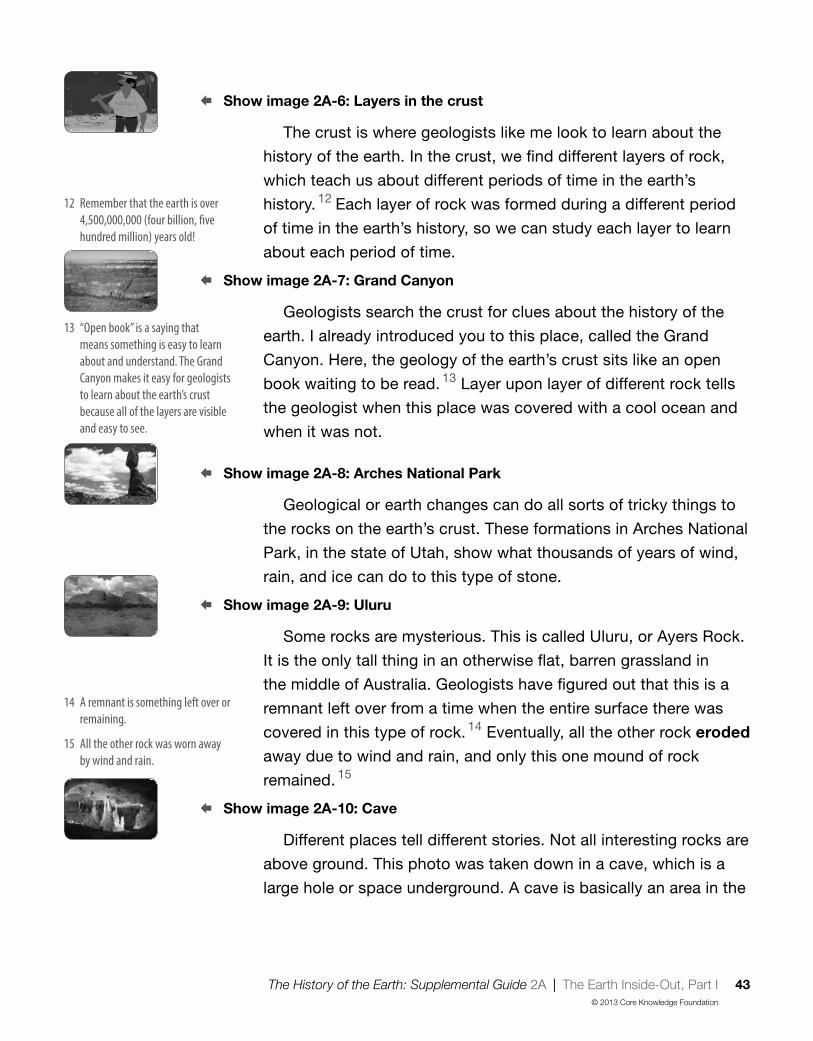
The History of the Earth: Supplemental Guide 2A | The Earth Inside-Out, Part I 43
© 2013 Core Knowledge Foundation
Show image 2A-6: Layers in the crust
The crust is where geologists like me look to learn about the
history of the earth. In the crust, we fi nd different layers of rock,
which teach us about different periods of time in the earth’s
history. 12 Each layer of rock was formed during a different period
of time in the earth’s history, so we can study each layer to learn
about each period of time.
Show image 2A-7: Grand Canyon
Geologists search the crust for clues about the history of the
earth. I already introduced you to this place, called the Grand
Canyon. Here, the geology of the earth’s crust sits like an open
book waiting to be read. 13 Layer upon layer of different rock tells
the geologist when this place was covered with a cool ocean and
when it was not.
Show image 2A-8: Arches National Park
Geological or earth changes can do all sorts of tricky things to
the rocks on the earth’s crust. These formations in Arches National
Park, in the state of Utah, show what thousands of years of wind,
rain, and ice can do to this type of stone.
Show image 2A-9: Uluru
Some rocks are mysterious. This is called Uluru, or Ayers Rock.
It is the only tall thing in an otherwise fl at, barren grassland in
the middle of Australia. Geologists have fi gured out that this is a
remnant left over from a time when the entire surface there was
covered in this type of rock. 14 Eventually, all the other rock eroded
away due to wind and rain, and only this one mound of rock
remained. 15
Show image 2A-10: Cave
Different places tell different stories. Not all interesting rocks are
above ground. This photo was taken down in a cave, which is a
large hole or space underground. A cave is basically an area in the
12 Remember that the earth is over
4,500,000,000 (four billion, fi ve
hundred million) years old!
13 “Open book” is a saying that
means something is easy to learn
about and understand. The Grand
Canyon makes it easy for geologists
to learn about the earth’s crust
because all of the layers are visible
and easy to see.
14 A remnant is something left over or
remaining.
15 All the other rock was worn away
by wind and rain.

44 The History of the Earth: Supplemental Guide 2A | The Earth Inside-Out, Part I
© 2013 Core Knowledge Foundation
earth’s crust that has been hollowed out for one reason or another,
usually as a result of underground water fl owing in and dissolving
the rock over millions of years. Caves are really amazing places to
explore!
Show image 2A-11: Gerry with shovel looking at hole he dug
People usually do not think too much about what is happening
underground, deep below our feet, but the fact is that what
happens deep underground has everything to do with what we
see in the world around us. Next time, we will take a closer look at
what’s happening in those other layers. I’d better go ahead and fi ll
in this hole now. See you next time!
Discussing the Read-Aloud 15 minutes
Comprehension Questions 10 minutes
If students have diffi culty responding to questions, reread pertinent passages of the read-aloud and/or refer to specifi c images. If students give one-word answers and/or fail to use read-aloud or domain vocabulary in their responses, acknowledge correct responses by expanding students’ responses using richer and more complex language. Ask students to answer in complete sentences by having them restate the question in their responses.
1. Literal What is inside the earth ? (There are layers and a lot of rock inside the earth.)
Show image 2A-4: Diagram of the layers of the earth
2. Literal [Point to each layer as you ask each question.] What is the name of the outermost layer? (The name of the outermost layer is the crust.) What is the name of the next layer? (The name of the next layer is the mantle.) What is the name of the next layer? (The name of the next layer is the outer core.) What is the name of the innermost layer? (The name of the innermost layer is the inner core.)
3. Literal Was Gerry digging in the crust, mantle, or core? (Gerry was digging in the crust.)
4. Literal On which layer of the earth do we live? (We live on the crust.)

The History of the Earth: Supplemental Guide 2A | The Earth Inside-Out, Part I 45
© 2013 Core Knowledge Foundation
5. Literal What kinds of things are found in the crust of the earth? (Soil, rocks, and small animals are found in the crust of the earth.)
6. Inferential Why do geologists study the layers of rock in the earth’s crust? (Geologists study the layers of rock in the earth’s crust to learn about different time periods in the history of the earth.)
[Please continue to model the Question Pair Share process for students, as necessary, and scaffold students in their use of the process.]
7. Evaluative What? Pair Share: Asking questions after a read-aloud is one way to see how much everyone has learned. Think of a question you can ask your neighbor about the read-aloud that starts with the word what. For example, you could ask, “What did you learn about in today’s read-aloud?” Turn to your neighbor and ask your what question. Listen to your neighbor’s response. Then your neighbor will ask a new what question, and you will get a chance to respond. I will call on several of you to share your questions with the class.
8. After hearing today’s read-aloud and questions and answers, do you have any remaining questions? [If time permits, you may wish to allow for individual, group, or class research of the text and/or other resources to answer these questions.]
Word Work: Layer 5 minutes
1. In the read-aloud you heard, “I am digging this hole today to teach you about the outer layer of the earth.”
2. Say the word layer with me.
3. A layer is a part that lies over or under another part [Quickly review over and under with students.]
4. I spread a layer of jam on the slice of bread.
5. Have you ever worn more than one layer of clothing? Try to use the word layer when you tell about it. [Ask two or three students. If necessary, guide and/or rephrase the students’ responses: “I wore a layer of and a layer of .”]
6. What’s the word we’ve been talking about?

46 The History of the Earth: Supplemental Guide 2A | The Earth Inside-Out, Part I
© 2013 Core Knowledge Foundation
Use a Making Choices activity for follow-up. Directions: I will describe two different layers of something. You will decide which layer you prefer or would like better. Be sure to use the word layer in your answer. Remember to answer in complete sentences. (Answers may vary for all.)
1. Would you rather have a layer of mustard or a layer of ketchup on a sandwich?
2. Would you rather walk barefoot on a layer of rocks or a layer of grass?
3. Would you rather wear one layer or several layers of clothing on a very cold day?
4. Would you rather the ground be covered with a layer of snow or a layer of leaves?
5. Would you rather try to dig through a layer of soil or a layer of rock?
Complete Remainder of the Lesson Later in the Day

The History of the Earth: Supplemental Guide 2B | The Earth Inside-Out, Part I 47
© 2013 Core Knowledge Foundation
Note: Extensions may have activity options that exceed the time allocated for this part of the lesson. To remain within the time periods allocated for this portion of the lesson, you will need to make conscious choices about which activities to include based on the needs of your students.
Extensions 20 minutes
Multiple Meaning Word Activity 5 minutes
Sentence in Context: Change
Note: You may choose to have students hold up one or two fi ngers to indicate which image shows the meaning being described, or have a student walk up to the poster and point to the image being described.
1. [Show Poster 2M (Change).] In the read-aloud you heard Gerry the Geologist say, “ . . . as I dig deeper into the earth, the colors inside the earth change.” Here, change means to become different. Which image on the poster shows this meaning?
2. Change also describes money in the form of coins such as pennies, nickels, dimes, and quarters. Which picture shows this type of change?
3. Now with your partner, make a sentence for each meaning of change. Try to use complete sentences. I will call on some of you to share your sentences with the class.
Syntactic Awareness Activity 5 minutes
Conjunctions: Or
Note: The purpose of these syntactic activities is to help students understand the direct connection between grammatical structures and the meaning of text. These syntactic activities should be used
The Earth Inside-Out, The Earth Inside-Out, Part IPart I 2B

48 The History of the Earth: Supplemental Guide 2B | The Earth Inside-Out, Part I
© 2013 Core Knowledge Foundation
in conjunction with the complex text presented in the read-alouds. There may be variations in the sentences created by your class. Allow for these variations and restate students’ sentences so that they are grammatical.
1. Conjunctions are a kind of word we use to connect words and phrases.
2. We use the conjunction or to join words and phrases that are different possibilities or choices.
3. Listen to Gerry the Geologist’s sentences about the earth’s crust from the read-aloud. I will emphasize the word or as I read his sentences to you:I dug this hole to show you that there are different layers of soil and rock beneath your feet. The farther you go into the earth, the more things change. The dark soil on top is fairly easy to dig into with a shovel, but the deeper layer of clay is harder to dig because it has been compacted—or squished—by the weight or pressure of everything above it.
4. Notice that in this paragraph, Gerry the Geologist uses the word or when he talks about two possibilities why the layer of clay is harder—the clay has been compacted or squished. Gerry also talks about two possibilities how the clay got squished—by weight or pressure.
5. We hear the word or when making choices:Would you like a red crayon or a blue crayon?The word or tells us that we must choose only one crayon.
6. Let’s listen to another example:Do you prefer chocolate ice cream or vanilla ice cream?The word or tells us that we must make a choice and choose one ice cream fl avor.

The History of the Earth: Supplemental Guide 2B | The Earth Inside-Out, Part I 49
© 2013 Core Knowledge Foundation
Use a Making Choices activity for follow-up. Directions: Listen to the following questions that contain choices, and choose one. Use complete sentences and explain why you would choose this option to your partner.
1. Do you like hot weather or cold weather better?
2. Would you rather eat an apple or an orange?
3. Would you rather play soccer or basketball?
Vocabulary Instructional Activity 5 minutes
Word Work: Varies
1. In the read-aloud you heard, “The thickness of the soil varies,
or is different, depending on where you live.”
2. Say the word varies with me.
3. Varies means changes, or becomes different. Another form of the word varies is vary.
4. The school lunch menu varies, or changes, from day to day.
5. What other things can vary from day to day? Try to use the word varies when you tell about it. [Ask two or three students. If necessary, guide and/or rephrase the students’ responses: “Something that varies from day to day is . . .”]
6. What’s the word we’ve been talking about?
Use a Making Choices activity for follow-up. Directions: I will name a few things. If what I say varies, say, “That varies.” If what I say does not vary, say, “That does not vary.”
1. time school starts in the morning
2. time school gets out in the afternoon
3. the weather
4. weekend activities
5. bedtime
6. favorite television shows

50 The History of the Earth: Supplemental Guide 2B | The Earth Inside-Out, Part I
© 2013 Core Knowledge Foundation
Earth’s Crust (Instructional Master 2B-1) 15 minutes
Show image 2B-1: Living things and Earth’s crust
• Tell students that the tree and dog are on the crust, the roots and soil are in the crust, and the birds are above the crust. Review with students the meanings of the prepositions on, in, and above as necessary.
• Ask students to think about what they learned from the read-aloud about the crust of the earth. Have students brainstorm things that they heard about in the read-aloud or have observed above the crust. Record students’ responses on chart paper, a chalkboard, or a whiteboard. Tell students that you are going to write down what they say, but that they are not expected to be able to read what you write because they are still learning all the rules for decoding. Emphasize that you are writing what they say so that you don’t forget. Tell them that you will read the words to them.
• Follow the same procedures for fi lling in “on the crust” and “in the crust.”
• Once the chart has been completed, read it to the class.
• Have students make their own drawing on Instructional Master 2B-1 that shows things on, in, and above Earth’s crust. Then have students label what they have drawn using the sound-spelling correspondences taught thus far.

The History of the Earth: Supplemental Guide 3 | The Earth Inside-Out, Part II 51
© 2013 Core Knowledge Foundation
Lesson Objectives
Core Content Objectives
Students will:
Explain that much of our knowledge of the earth and its history is the result of the work of many scientists
Identify the layers of the earth: crust, mantle, and core (outer and inner)
Describe the mantle and core inside the earth
Describe volcanoes
Describe how heat, pressure, and time cause many changes inside the earth
Language Arts Objectives
The following language arts objectives are addressed in this lesson. Objectives aligning with the Common Core State Standards are noted with the corresponding standard in parentheses. Refer to the Alignment Chart for additional standards addressed in all lessons in this domain.
Students will:
Write and illustrate a diagram of the layers of the earth, based on the read-aloud “The Earth Inside-Out, Part II,” and discuss with one or more peers (W.1.5)
Orally retell important facts and information from “The Earth Inside-Out, Part II” (SL.1.4)
Use frequently occurring conjunctions, such as and
The Earth Inside-Out, The Earth Inside-Out, Part IIPart II 3

52 The History of the Earth: Supplemental Guide 3 | The Earth Inside-Out, Part II
© 2013 Core Knowledge Foundation
Core Vocabulary
disasters, n. Events that cause much damage or sufferingExample: Volcanic eruptions, earthquakes, and hurricanes are examples of natural disasters.Variation(s): disaster
liquid, adj. Moving or fl owing freelyExample: There is liquid rock deep inside the earth.Variation(s): none
molten, adj. Made liquid by heatExample: It takes very high temperatures to melt metals into molten forms.Variation(s): none
solid, adj. Keeps its shapeExample: They put the water in the freezer so that it would become solid ice.Variation(s): none
volcano, n. A mountain formed by the lava, gases, and ash forced out from an opening in the earth’s crust Example: When a volcano erupts, lava fl ows out from it.Variation(s): volcanoes

The History of the Earth: Supplemental Guide 3 | The Earth Inside-Out, Part II 53
© 2013 Core Knowledge Foundation
Vocabulary Chart for The Earth Inside-Out, Part II Core Vocabulary words are in bold.Multiple Meaning Word Activity word is underlined.Vocabulary Instructional Activity words have an asterisk (*).Suggested words to pre-teach are in italics.
Type of Words Tier 3Domain-Specifi c Words
Tier 2General Academic Words
Tier 1Everyday-Speech Words
Understanding
asheruptsgeologicgeologistlavamagmamolten
volcano
gooeyinwardliquid
buildshottermetalmountain
Multiple Meaning
corecrustdisasters
mantle
layerpressurereleasesolid*
surface
ballcenterdeepfire
Phrases
inner core/outer corecracks and crevices
Cognates
geológicogeólogo lava corazónmantovolcán
desastres
líquido
presiónsólido*
montaña bolacentro

54 The History of the Earth: Supplemental Guide 3 | The Earth Inside-Out, Part II
© 2013 Core Knowledge Foundation
Note: Introducing the Read-Aloud and Extensions may have activity options that exceed the time allocated for that part of the lesson. To remain within the time periods allocated for each portion of the lesson, you will need to make conscious choices about which activities to include based on the needs of your students.
Exercise Materials Details
Introducing the Read-Aloud (10 minutes)
What Have We Already
Learned?
Image 3A-1; globe Use the image to assist students in naming the layers of the earth. Use the globe to locate the North Pole, South Pole, and equator.
Instructional Master 3A-1 (Diagram of Earth’s Layers); chart paper, tape, markers: black and brown
Create a diagram of Earth’s layers to record student observations about the different layers of the earth. Have students color the crust brown and add details about the crust to the diagram. (See an example of a suggested completed diagram on Instructional Master 3A-1: Completed Earth Diagram.)
Essential Background
Information or Terms
Instructional Master 3A-2 (Solid-Liquid-Gas Chart); chart paper, markers, tape
Create a Solid-Liquid-Gas Chart to capture examples of each form of matter. Have students suggest additional examples beyond those mentioned in the Anthology. Add examples to the chart throughout the domain.
Two differently shaped clear containers, water, an empty balloon
Use the water and containers to explain liquids. Fill the balloon with air to demonstrate gas.
ice cubes, plastic containers Have students place ice cubes in the plastic containers. Put the containers in different areas of the classroom, and observe how the cubes change over time from a solid to a liquid to a gas.
Vocabulary Preview: Mantle,
Core
Image 3A-1
Purpose for Listening Image 3A-1

The History of the Earth: Supplemental Guide 3 | The Earth Inside-Out, Part II 55
© 2013 Core Knowledge Foundation
Exercise Materials Details
Presenting the Read-Aloud (15 minutes)
The Earth Inside-Out, Part II U.S. map Use the U.S. map to show students locations and distances mentioned in the text.
Diagram of Earth’s Layers Continue adding details and student comments, with accompanying illustrations, to this diagram.
Whiteboard or chalkboard Use the whiteboard or chalkboard to write out the large numbers mentioned in the text.
jar of molasses, spoon Use the molasses and spoon to demonstrate the word gooey.
Discussing the Read-Aloud (15 minutes)
Comprehension Questions Image 3A-1 Use the image to point out the different layers of Earth mentioned in questions 1–4.
Word Work: Solid
Complete Remainder of the Lesson Later in the Day
Extensions (20 minutes)
Riddles for Core Content Image Cards 1–5 Use the Image Cards as visual answers to core content riddles.
The Layers of the Earth Instructional Master 3B-1; writing tools, crayons, colored pencils or markers in red, yellow, brown, and orange
Advance Preparation
Bring in differently shaped clear containers, water, an empty balloon, plastic containers, a few ice cubes. Also bring in a jar of molasses, and a spoon to demonstrate the word gooey. Note: Be sure to check with your school’s policy regarding food distribution and allergies.
Create a Diagram of Earth’s Layers using Instructional Master 3A-1 as a guide. [Note: The class will be fi lling in this diagram throughout this lesson. Refer to Instructional Master 3A-1: Completed Earth Diagram for an example of what a completed diagram might look like.]

56 The History of the Earth: Supplemental Guide 3 | The Earth Inside-Out, Part II
© 2013 Core Knowledge Foundation
➶ Above and Beyond: Make a copy of Instructional Master 3A-1 for students who are ready to fi ll in this diagram with their own drawing and writing.
Create a Solid-Liquid-Gas Chart using Instructional Master 3A-2 as a guide.
➶ Above and Beyond: Make a copy of Instructional Master 3A-2 for students who are ready to fi ll in this chart on their own.
Make a copy of Instructional Master 3B-1 for each student. Students will identify and color in the crust (brown), mantle (red), outer core (orange), and inner core (yellow) of Earth.
Notes to Teacher
You may wish to pause during the Read-Aloud at image 3A-3: Diagram of a volcano, to point out the relationship between magma and lava. Students may need extra support to understand that magma is extremely hot, molten rock that erupts out of the volcano. When this rock reaches the earth’s surface, it is called lava. Lava is fl owing, liquid rock that cools and hardens into solid rock.

The History of the Earth: Supplemental Guide 3A | The Earth Inside-Out, Part II 57
© 2013 Core Knowledge Foundation
Note: Introducing the Read-Aloud may have activity options that exceed the time allocated for this part of the lesson. To remain within the time periods allocated for this portion of the lesson, you will need to make conscious choices about which activities to include based on the needs of your students.
Introducing the Read-Aloud 10 minutes
What Have We Already Learned? 5 minutes
Review with students what they learned from the previous read-aloud about the outermost layer of the earth, the crust. Using the globe, remind students that the land and water on the surface of the crust are called continents and oceans. Have students assist you in locating the North Pole, the South Pole, and the equator.
Show image 3A-1: Diagram of the layers of the earth
Using the diagram, assist students in naming the layers of the earth: crust, mantle, outer core, and inner core. Remind students that we live on the crust, and that the crust is where geologists look to learn about the history of the earth. The many layers of rock found in the crust can teach us about different periods of time in Earth’s history.
Ask students to chant and clap three times the three important words that Gerry the Geologist said to remember when studying geology. (Heat! Pressure! Time!) Heat, pressure, and time are important because they cause many changes to the earth.
Essential Background Information or Terms 10 minutes
Explain to students that all things on Earth can be described as being solid, liquid, or gas. Explain that if something is a solid, it keeps its shape. Tell students that if you pick up a book and hand it to someone else, it will still keep its same shape. It keeps its shape because the book is a solid.
The Earth Inside-Out, The Earth Inside-Out, Part IIPart II 3A

58 The History of the Earth: Supplemental Guide 3A | The Earth Inside-Out, Part II
© 2013 Core Knowledge Foundation
Explain that if something is a liquid, it can be poured. It doesn’t keep its shape, but takes on the shape of its container. Show students two differently shaped clear containers. Have students watch as you pour water from one container to another. Tell students that water is a liquid because it takes the shape of whatever container it is in.
Explain that if something is a gas, it is often hard to see. Explain that the air around us is a gas. It is not solid because it does not keep its shape, and it is not liquid because it cannot be poured.
Explain that heat can change things from solids to liquids to gases. Tell students that an ice cube is the solid form of water. When heated, an ice cube can melt and become water. When we boil water, it heats up and becomes water vapor, which is a gas.
Vocabulary Preview 5 minutes
Mantle
Show image 3A-1: Diagram of the layers of the earth
1. Today you will learn about the layer under Earth’s crust called the mantle. [Point to the mantle in the diagram.]
2. Say mantle with me three times.
3. The mantle is the fi rst layer beneath the earth’s crust.
4. Mikayla thought it was interesting that the rock inside the mantle moved around. Artie explained to his brother that the earth’s mantle was very thick, almost 1,800 miles thick!
5. [Point to the mantle.] In this diagram, the mantle is red. Tell your partner about the differences between Earth’s crust and Earth’s mantle.
Core
1. Today you will also learn about Earth’s core and that the core has two parts: the outer core and the inner core. [Point to the outer and inner core in the diagram.]
2. Say core with me three times.
3. The core is the center of an object.

The History of the Earth: Supplemental Guide 3A | The Earth Inside-Out, Part II 59
© 2013 Core Knowledge Foundation
4. Jose was surprised to learn that the earth’s inner core is a solid metal ball.
5. [Point to the core.] In this diagram, the outer core is orange. What color is the inner core? Tell your partner about the differences between the mantle and the core.
Purpose for Listening
Explain to students that in today’s read-aloud they will hear that inside the earth are solids and liquids. Tell students to listen carefully to fi nd out more from Gerry the Geologist about the other layers of the earth: the mantle and core.

60 The History of the Earth: Supplemental Guide 3A | The Earth Inside-Out, Part II
© 2013 Core Knowledge Foundation
Presenting the Read-Aloud 15 minutes
The Earth Inside-Out, Part II
Show image 3A-1: Diagram of the layers of the earth 1
Today, we are going to pretend that we can journey deep, deep
into the earth, all the way to the very center, nearly four thousand
miles from where you are sitting right now.
The fi rst stop is the layer beneath the crust, which is called the
mantle. The mantle is a whopping 1,800 miles thick and contains
most of the earth’s rock. 2 Because most of the earth is made of
rock, that means that most of the earth is contained within the
mantle.
The mantle is mostly made of solid rock. The closer to the
crust, the cooler and harder the mantle tends to be. But as you go
deeper, closer to the core, the mantle gets hotter and becomes
soft and gooey. Heat closer to the core causes the rock inside the
mantle to move around quite a bit. But in most places, it is still
solid rather than liquid. 3
The mantle surrounds the core, or center, of the earth. The core
has two parts: the inner core and the outer core. The inner core
is a solid metal ball. 4 The outer core is also metal, but it is not
solid—it is made up of melted, or molten, metal. 5 This means that
deep down inside the earth—thousands of miles beneath your
feet—there is a giant sea of red-hot, molten metal surrounding a
solid metal ball.
Scientists believe that the very center of the earth—the inner
core—is actually hotter than the surface of the sun, which is a
blazing 10,000 °F! 6 The inner core is much hotter than the outer
core. It may seem strange, therefore, that the outer core of the
earth is molten metal, yet the inner core—at the very center of the
earth where it is hottest—is a solid ball of metal, which by the way
is just a bit smaller than the moon!
1 [Point to the layers in the diagram
as they are named in the read-
aloud.]
2 [Show students the distance from
New York to Colorado on a map,
and tell them that it is roughly the
thickness of the mantle.]
3 Did you hear the word heat again?
Heat causes parts of the mantle to
move around. Remember, solids
keep their shape, while liquids
move around and can be poured.
4 What does it mean if the inner core
is solid?
5 If metal is molten, heat has
changed it from solid to liquid.
6 A really hot day in the United
States is about 100 °F, so 10,000 °F
is extremely hot! [Write out the
two numbers so that students can
see just how much bigger 10,000
is.]

The History of the Earth: Supplemental Guide 3A | The Earth Inside-Out, Part II 61
© 2013 Core Knowledge Foundation
The reason that the inner core is solid has to do with the
incredible pressure of the earth’s entire weight pressing inward.
The more pressure you put on something, the more heat you
need to cause that thing to boil or melt. This is why the metal at
the very center of the earth—the inner core—is solid instead of
liquid. Despite the intense heat, there is simply too much pressure
caused by the weight of the rest of the earth, so the center of the
earth cannot melt, and it remains solid. 7
Show image 3A-2: San Bernardino Mountains
The crust upon which we live is constantly being changed
and reshaped due to heat and pressure caused by activity in the
earth’s mantle and core. The San Bernardino Mountains that you
see in this picture, along with many other mountains along the
West Coast of the United States, from Mexico to Alaska, were
created by changes inside the earth.
Show image 3A-3: Diagram of a volcano
Remember, the parts of the mantle that are closest to the core
are soft and gooey. That hot, gooey material in the mantle does
not always stay in the mantle. Sometimes it rises up to the surface.
Every so often, some of that extremely hot molten rock, or magma,
pushes up through the mantle and forces its way into cracks and
crevices in the crust.
Over time, the magma collects in a magma chamber, such as
the one near the bottom of the picture. The heat in the magma
chamber releases gas from the magma, which builds up and
creates pressure. The pressure builds and builds until . . . one
day . . . BOOM! 8 The magma erupts in a volcano of lava, ash, gas,
and fi re. Once it is released from the earth, the magma becomes
lava—fl owing liquid rock, which fl ows across the ground until it
cools and hardens into rock once again. 9
7 Did you hear the word pressure
again? Pressure causes the inner
core to be solid rather than liquid.
8 Did you hear the words heat and
pressure again? Heat and pressure
cause volcanoes to erupt.
9 The eruption of lava, ash, gas, and
fi re forms a mountain called a
volcano.
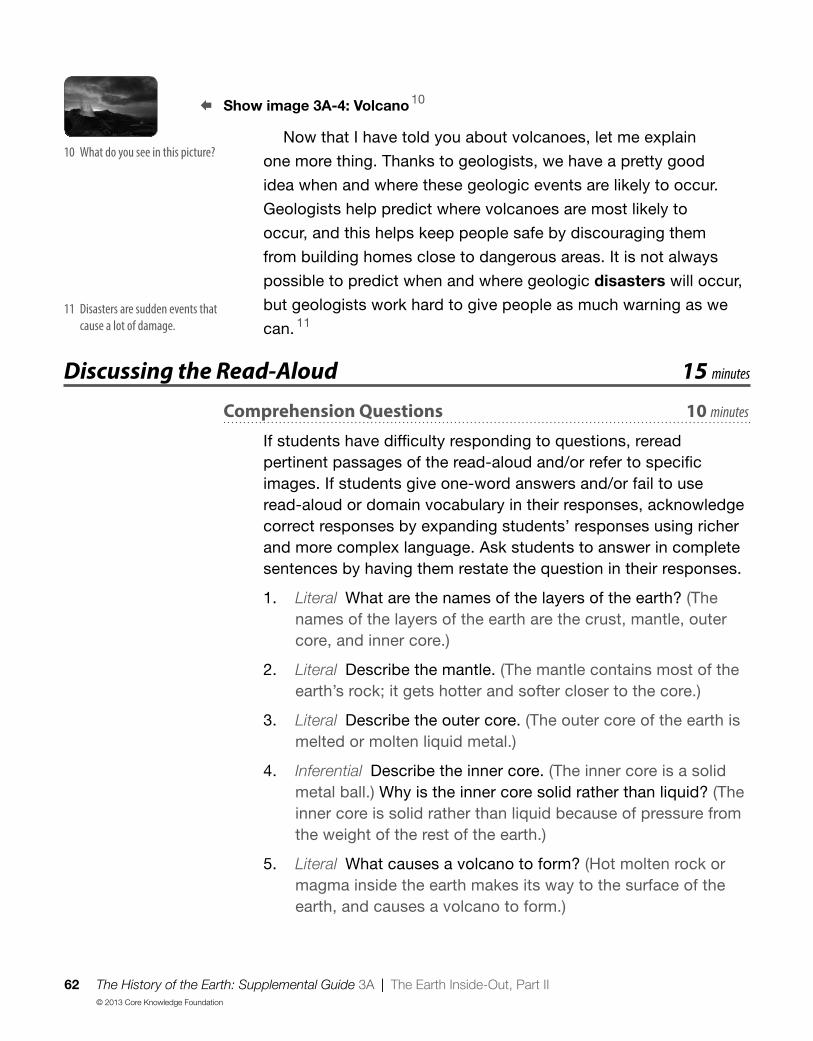
62 The History of the Earth: Supplemental Guide 3A | The Earth Inside-Out, Part II
© 2013 Core Knowledge Foundation
Show image 3A-4: Volcano 10
Now that I have told you about volcanoes, let me explain
one more thing. Thanks to geologists, we have a pretty good
idea when and where these geologic events are likely to occur.
Geologists help predict where volcanoes are most likely to
occur, and this helps keep people safe by discouraging them
from building homes close to dangerous areas. It is not always
possible to predict when and where geologic disasters will occur,
but geologists work hard to give people as much warning as we
can. 11
Discussing the Read-Aloud 15 minutes
Comprehension Questions 10 minutes
If students have diffi culty responding to questions, reread pertinent passages of the read-aloud and/or refer to specifi c images. If students give one-word answers and/or fail to use read-aloud or domain vocabulary in their responses, acknowledge correct responses by expanding students’ responses using richer and more complex language. Ask students to answer in complete sentences by having them restate the question in their responses.
1. Literal What are the names of the layers of the earth? (The names of the layers of the earth are the crust, mantle, outer core, and inner core.)
2. Literal Describe the mantle. (The mantle contains most of the earth’s rock; it gets hotter and softer closer to the core.)
3. Literal Describe the outer core. (The outer core of the earth is melted or molten liquid metal.)
4. Inferential Describe the inner core. (The inner core is a solid metal ball.) Why is the inner core solid rather than liquid? (The inner core is solid rather than liquid because of pressure from the weight of the rest of the earth.)
5. Literal What causes a volcano to form? (Hot molten rock or magma inside the earth makes its way to the surface of the earth, and causes a volcano to form.)
11 Disasters are sudden events that
cause a lot of damage.
10 What do you see in this picture?

The History of the Earth: Supplemental Guide 3A | The Earth Inside-Out, Part II 63
© 2013 Core Knowledge Foundation
6. Inferential Why is it important for scientists to study volcanoes and keep people informed about them? (It is important for scientists to study volcanoes so they can learn more about them and help keep people safe from geological disasters.)
[Please continue to model the Think Pair Share process for students, as necessary, and scaffold students in their use of the process.]
I am going to ask a question. I will give you a minute to think about the question, and then I will ask you to turn to your neighbor and discuss the question. Finally, I will call on several of you to share what you discussed with your partner.
7. Evaluative Think Pair Share: How are the crust, mantle, and core of the earth alike? (They are all layers of the earth and they all contain rock.) How are they different? (The crust, mantle, and core are different because some parts are solid and some parts are liquid. The crust, mantle, and core are also different because some parts are hotter than others.)
8. After hearing today’s read-aloud and questions and answers, do you have any remaining questions? [If time permits, you may wish to allow for individual, group, or class research of the text and/or other resources to answer these questions.]
Word Work: Solid 5 minutes
1. In the read-aloud you heard, “Heat closer to the core causes
the rock inside the mantle to move around quite a bit. But in
most places, it is still solid rather than liquid.”
2. Say the word solid with me.
3. If something is solid, it keeps its shape.
4. It was so cold outside last night that the water puddle became solid ice.
5. What things have you seen that are solid? Try to use the word solid when you tell about it. [Ask two or three students. If necessary, guide and/or rephrase the students’ responses: “ is solid.”]
6. What’s the word we’ve been talking about?

64 The History of the Earth: Supplemental Guide 3A | The Earth Inside-Out, Part II
© 2013 Core Knowledge Foundation
Use a Making Choices activity for follow-up. Directions: I will name an object. If it is something that is solid, you will say, “The object is solid.” If it is something that is not solid, you will say, “The object is not solid.”
1. book (A book is solid.)
2. milk (Milk is not solid.)
3. water (Water is not solid.)
4. desk (A desk is solid.)
5. shoe (A shoe is solid.)
6. steam coming out of a hot bowl of soup (Steam coming out of a hot bowl of soup is not solid.)
Complete Remainder of the Lesson Later in the Day

The History of the Earth: Supplemental Guide 3B | The Earth Inside-Out, Part II 65
© 2013 Core Knowledge Foundation
Extensions 20 minutes
Riddles for Core Content 10 minutes
• Show students Image Card 1 (Heat), and remind them that they learned about heat, the fi rst of the three forces that change the earth.
• Show students Image Card 2 (Pressure), and remind them that they learned about pressure, the second of the three forces that change the earth.
• Show students Image Card 3 (Time), and remind them that they learned about time, the third of three forces that change the earth.
• Show students Image Card 4 (Earth’s Layers), and ask them to name the layers of the earth. [From outside to inside: crust, mantle, outer core, inner core.]
• Show students Image Card 5 (Volcano), and ask them to tell you what they see in the image. [Volcanoes occur when heat and pressure build over time until magma erupts and then lava or fl owing, liquid rock covers the ground until it cools into rock again.]
• Tell students that you are also going to say a riddle about each of these Image Cards. Tell them to listen carefully to see if they can guess the correct answer. Ask students the following riddles:
1. Some people measure me with a clock, but I cannot be seen. What am I? (time)
2. I shoot gooey rock or magma. When it hits the earth’s crust, it cools and we call it lava. What am I? (volcano)
3. I have layers, like a bed, but I am shaped like a ball. People and animals live on my crust. What am I? (Earth)
The Earth Inside-Out, The Earth Inside-Out, Part IIPart II 3B

66 The History of the Earth: Supplemental Guide 3B | The Earth Inside-Out, Part II
© 2013 Core Knowledge Foundation
4. You can feel me when you stand outside on a sunny day or put your hand near a heater. What am I? (heat)
5. If you put your hands together and push, you can feel me. What am I? (pressure)
The Layers of the Earth (Instructional Master 3B-1) 10 minutes
Give each student a copy of Instructional Master 3B-1.
Explain that the worksheet has a diagram of the layers of the earth. Have students point to and name the crust on the diagram. Have students color the crust brown. Have students point to and name the mantle on the diagram. Have students color the mantle red. Have students point to and name the outer core on the diagram. Have students color the outer core orange. Have students point to and name the inner core on the diagram. Have students color the inner core yellow. Ask students which layer is coolest and which layer is hottest. Ask students which is the layer of the earth where we live. If time permits, have students draw people, plants, and animals on the surface of the crust.
➶ Above and Beyond: On the back of the paper, have students write a sentence about each layer, using the sound-spelling correspondences taught thus far. Have students share their sentences with a partner.
The History of the Earth: Supplemental Guide 4 | The Earth Inside-Out, Part III 67
© 2013 Core Knowledge Foundation
Lesson Objectives
Core Content Objectives
Students will:
Explain that much of our knowledge of the earth and its history is the result of the work of many scientists
Describe volcanoes and geysers
Describe how heat, pressure, and time cause many changes inside the earth
Language Arts Objectives
The following language arts objectives are addressed in this lesson. Objectives aligning with the Common Core State Standards are noted with the corresponding standard in parentheses. Refer to the Alignment Chart for additional standards addressed in all lessons in this domain.
Students will:
Orally compare and contrast geysers and volcanoes (RI.1.9)
Clarify information about “The Earth, Inside-Out, Part III,” by asking questions that begin with what (SL.1.2)
Orally retell important facts and information from “The Earth Inside-Out, Part III” (SL.1.4)
The Earth Inside-Out, The Earth Inside-Out, Part IIIPart III 4
68 The History of the Earth: Supplemental Guide 4 | The Earth Inside-Out, Part III
© 2013 Core Knowledge Foundation
Core Vocabulary
destructive, adj. Causing damage or ruinExample: The destructive storm fl ooded the streets of the town.Variation(s): none
eruption, n. The act of exploding suddenlyExample: The volcanic eruption was very loud.Variation(s): eruptions
geysers, n. Places on the earth where hot water and steam shoot up from inside the earth onto its surfaceExample: Many people travel to see the geysers in Yellowstone National Park.Variation(s): geyser
lava, n. Molten or liquid rock on the earth’s surfaceExample: After the lava rushed down the mountainside, it began to cool and harden.Variation(s): none
magma, n. Molten or liquid rock that is deep inside the mantle of the earthExample: The hot magma slowly made its way to the crust of the earth.Variation(s): none

The History of the Earth: Supplemental Guide 4 | The Earth Inside-Out, Part III 69
© 2013 Core Knowledge Foundation
Vocabulary Chart for The Earth Inside-Out Part IIICore Vocabulary words are in bold.Multiple Meaning Word Activity word is underlined.Vocabulary Instructional Activity words have an asterisk (*).Suggested words to pre-teach are in italics.
Type of Words Tier 3Domain-Specifi c Words
Tier 2General Academic Words
Tier 1Everyday-Speech Words
Understanding
geysers
Hawaiilava
magma
mineralsvolcanicvolcano
destructive*
graduallyinhabitedintensepredictreliable seepsspewingspurtstickier
islandoceanunderwaterwater
Multiple Meaning
eruption
gurglelandslides
raresputtersteam
bubblepile
PhrasesMount St. HelensOld Faithful
Cognates
lava
mineralesvolcánvolcánicoerupción
destructivo*
gradualmentehabitadointensepredecirraro(a)
islaocéanopila

70 The History of the Earth: Supplemental Guide 4 | The Earth Inside-Out, Part III
© 2013 Core Knowledge Foundation
Note: Introducing the Read-Aloud and Extensions may have activity options that exceed the time allocated for that part of the lesson. To remain within the time periods allocated for each portion of the lesson, you will need to make conscious choices about which activities to include based on the needs of your students.
Exercise Materials Details
Introducing the Read-Aloud (10 minutes)
What Have We Already
Learned?
Images 3A-1 and 4A-1; Diagram of Earth’s Layers
Review the diagram with students and add any additional comments.
Student Response Cards: Set One You may want to have students hold up the corresponding Response Card during the geology chant.
Vocabulary Preview: Volcano,
Geyser
Image 4A-7; additional images of volcanoes
Image 4A-11; additional images of geysers
Purpose for Listening Tell students to also listen for information about geysers.
Presenting the Read-Aloud (15 minutes)
The Earth Inside-Out, Part III U.S. map; globe Use the map and globe to help students locate the sites mentioned in the Read-Aloud.
Diagram of how Hawaii formed Show students the diagram to help them understand the relationship between volcanic activity and island formation.
[Optional] Old Faithful webcam Bring geysers to life by watching the Old Faithful webcam out of Yellowstone National Park.
Discussing the Read-Aloud (15 minutes)
Comprehension Questions
Word Work: Destructive
Complete Remainder of the Lesson Later in the Day

The History of the Earth: Supplemental Guide 4 | The Earth Inside-Out, Part III 71
© 2013 Core Knowledge Foundation
Exercise Materials Details
Extensions (20 minutes)
Venn Diagram Instructional Master 4B-1, chart paper, markers, tape
Complete a Venn diagram with students to compare and contrast volcanoes and geysers.
Domain-Related Trade Book trade book about volcanoes; drawing paper, drawing tools
Advance Preparation
Bring in additional images of volcanoes and geysers.
Create a Venn Diagram to compare and contrast volcanoes and geysers using Instructional Master 4B-1 as a guide.
➶ Above and Beyond: Make a copy of Instructional Master 4B-1 for students who are ready to complete this diagram on their own.
Find a trade book about volcanoes to read aloud to the class.
Notes to Teacher
Be sure to emphasize that volcanic activity is a result of the interplay between heat, pressure, and time.
The geyser, Old Faithful, erupts every 35 to 120 minutes. You might want to have students work on another activity while they wait to view an eruption on the webcam. Another option is to watch archived videos of past eruptions of Old Faithful.
For additional resources about volcanoes and geysers, you may wish to refer to these websites:
http://www.nps.gov/yell/photosmultimedia/yellowstonelive.htm
http://www.britannica.com/EBchecked/topic/232281/geyser
http://www.smithsonianmag.com/travel/What-Were-Still-Learning-About-Hawaii.
html

72 The History of the Earth: Supplemental Guide 4A | The Earth Inside-Out, Part III
© 2013 Core Knowledge Foundation
Introducing the Read-Aloud 10 minutes
What Have We Already Learned? 5 minutes
Show image 3A-1: Diagram of the earth’s layers
Using the diagram, have students name the layers of the earth: crust, mantle, outer core, and inner core. Remind students that heat causes hot rock to move around in the mantle, and sometimes rise up through the surface of the crust. This causes a volcano to form.
Show image 4A-1: Volcano
Tell students that this is an image of a volcano. Have students describe what they see in the image.
Ask students to chant and clap three times the three important words that Gerry the Geologist said to remember when studying geology. (Heat! Pressure! Time!) Tell students that heat, pressure, and time are important because they cause changes to the earth that may result in volcanoes.
Vocabulary Preview 5 minutes
Volcano
Image 4A-7: Eruption of Mount St. Helens
1. Today you will hear about a volcano that erupted called Mount St. Helens. [Point to Mount St. Helens in the image.]
2. Say volcano with me three times.
3. A volcano is a mountain formed by the eruption of lava, gases, and ash from an opening in the earth’s crust.
4. Rocks and ash exploded out from Mount St. Helens when this mighty volcano erupted. Marva built a model volcano for the science fair.
The Earth Inside-Out, The Earth Inside-Out, Part IIIPart III 4A

The History of the Earth: Supplemental Guide 4A | The Earth Inside-Out, Part III 73
© 2013 Core Knowledge Foundation
5. [Show additional images of volcanoes.] What do you see coming out from a volcano? What would you hear? What would you smell?
Geyser
Image 4A-11: Old Faithful
1. Today you will hear about a famous geyser called Old Faithful. [Point to Old Faithful in the image.]
2. Say geyser with me three times.
3. A geyser is a place where hot water and steam shoot up from inside the earth onto its surface. A geyser forms when water seeps into the earth and comes in contact with the earth’s hot mantle. The heat from the mantle causes the water to change to steam and erupt through cracks in the earth’s crust.
4. Mira’s father explained that some small geysers bubble all day long in water pools, instead of shooting water into the air. Phillip would like to visit Yellowstone National Park to see geysers.
5. [Show additional images of geysers.] What do you see coming out from a geyser?
Purpose for Listening
Tell students that Gerry the Geologist will be telling them more about volcanoes in today’s read-aloud. Tell them to listen carefully to learn more about some famous hot spots.

74 The History of the Earth: Supplemental Guide 4A | The Earth Inside-Out, Part III
© 2013 Core Knowledge Foundation
Presenting the Read-Aloud 15 minutes
The Earth Inside-Out, Part III
Show image 4A-2: Hawaii
Ah, Hawaii. I just love this place. The land is beautiful, the
people are friendly, the weather is perfect, and the surfi ng is
terrifi c. Personally, however, my favorite part of Hawaii is the
volcanoes. If you like volcanoes—and all geologists do—then
there is really no better place than Hawaii!
When most people think of volcanoes, they think of the top
blowing off a mountain and lava fl owing out everywhere. 1 Volcanic
activity actually comes in many different forms, not all of which are
as spectacular as a mountaintop eruption. 2
Show image 4A-3: World map with Hawaii circled 3
Hawaii is made up of eight major islands, seven of which are
inhabited. 4 The islands of Hawaii were formed by volcanic activity.
In other words, if it weren’t for volcanoes, Hawaii would not be
there at all.
Show image 4A-4: Island volcano
Hawaii is one of the best known volcanic hot spots in the whole
world. A hot spot is a place where there has been continuous
volcanic activity for a long time. 5 In Hawaii’s case, the volcanic
activity started underwater. In fact, most volcanic activity occurs
underwater, deep down near the ocean fl oor. Down there, the crust
is fairly thin, so it’s easier for magma to seep up from the mantle. 6
When a volcano erupts underwater, the lava that it releases
cools very quickly. Over time—millions of years—this lava piles
up. 7 That is what happened in Hawaii. Over time, the lava
continually erupting from the hot spot built up a pile that now
reaches from the deep ocean fl oor all the way to the ocean
surface, where it became new, dry land. 8
3 [Show students where Hawaii is
located on a globe.]
4 Inhabited means that people live
there.
5 Why do you think it’s called a hot
spot?
6 Magma is molten or liquid rock
that is deep inside the earth in the
mantle. What is it called once it
comes to the surface of the earth?
(lava)
1 Lava is molten or liquid rock that
has come to the earth’s surface.
2 or explosion
7 Did you hear the word time? It
takes a very long time for lava to
pile up into mountains.
8 So, how did Hawaii form?

The History of the Earth: Supplemental Guide 4A | The Earth Inside-Out, Part III 75
© 2013 Core Knowledge Foundation
Show image 4A-5: Volcanoes National Park
Hawaiian volcanoes erupt gradually, or little by little. The lava
bubbles and gurgles and sputters rather than shooting up out
of the earth all at once. There is still plenty of volcanic activity
on some Hawaiian islands, which means the island chain is still
growing.
Show image 4A-6: Mount St. Helens prior to eruption
Now let’s compare the Hawaiian volcano to another type of
volcano—the kind where a mountaintop explodes! This volcano
erupted in the state of Washington, which is on the West Coast of
the United States. 9 This is what Mount St. Helens looked like until
the year 1980. Mount St. Helens proves that it is generally fairly
easy to predict where a volcano will erupt; the hard part is fi guring
out when.
Show image 4A-7: Eruption of Mount St. Helens
Mount St. Helens has erupted many times over the course of
forty thousand or so years, and during this time the mountain’s
size and shape has changed. Magma is constantly building up
within Mount St. Helens. Unlike the magma in the Hawaiian
volcanoes, however, the magma in this area is much stickier
than the magma in Hawaii, so it does not gurgle and sputter
through little vents. Instead, the magma gets stuck, and incredible
pressure builds up within the mountain. Eventually, the pressure
becomes so intense that the mountain cannot hold it anymore,
and . . . BOOM! 10
The eruption of Mount St. Helens was the most destructive
volcanic eruption in U.S. history. 11 Hundreds of homes were
destroyed and thousands of acres of forest were leveled when this
mighty volcano erupted. In an instant, the top and one side of the
mountain were literally blown away. Lava was not the main problem
with Mount St. Helens. Rather, it was the immense amount of rock
and ash that exploded into the air, as well as the landslides that
followed as the mountain came crashing down into the valley below.
9 [Point out the state of Washington
on a U.S. map.]
10 Did you hear the word pressure?
Pressure caused the volcano to
erupt.
11 The word destructive means
causing damage.

76 The History of the Earth: Supplemental Guide 4A | The Earth Inside-Out, Part III
© 2013 Core Knowledge Foundation
Show image 4A-8: Mount St. Helens today
This is what Mount St. Helens looks like today. It’s still tall
enough to rise above the clouds, but if you compare this to the
fi rst picture you saw, you can see that it is not the same mountain
it used to be. Mount St. Helens has erupted several more times
after that day in 1980, and it still erupts occasionally to this day.
Show image 4A-9: Yellowstone Caldera
Here is another place in the United States where there is lots of
volcanic activity. This place is called Yellowstone National Park.
Yellowstone is mostly in Wyoming, with parts of it extending into
Idaho and Montana. Yellowstone National Park is home to many
interesting and beautiful sites. 12 Like Hawaii, Yellowstone is
situated on top of a hot spot, a place where there is lots of magma
close to the surface. In Yellowstone, the magma has stayed
underground and has not erupted onto the surface.
Show image 4A-10: Hot springs and geysers
Yellowstone is famous for its geysers. A geyser is a rare
geologic event that occurs when water seeps down through
cracks into the crust and meets up with hot rocks. When the
water touches the hot rocks it turns into steam. 13 As more water
seeps in, more steam is created, and pressure begins to build.
Eventually, all this heat and pressure forces the steam to fi nd a
way back out. 14 As in other types of volcanic activity that you
have learned about, this process is caused by the build-up and
release of pressure underground.
The result is a geyser—steam and water spewing up out of the
earth. 15 These particular geysers are relatively small. They spurt
and bubble all day long in water pools, or springs, which have a
pretty, bluish-green color created by certain minerals that collect
there.
12 [Point out Wyoming, Idaho, and
Montana on a U.S. map.]
13 Heat causes the liquid water to
become a gas called steam, like the
steam that comes out of a hot bowl
of soup.
14 Did you hear the words heat and
pressure? Heat and pressure cause
geysers to erupt.
15 Lava spews out of a volcano. What
spews out of a geyser?

The History of the Earth: Supplemental Guide 4A | The Earth Inside-Out, Part III 77
© 2013 Core Knowledge Foundation
Show image 4A-11: Old Faithful
This geyser has a name: it’s called Old Faithful. The word
faithful means trustworthy or reliable. 16 Old Faithful got its name
because you can count on the fact that it is going to erupt several
times each day. It is not possible to predict exactly when it will
erupt, but it typically blows its lid about every ninety minutes, give
or take a few.
Old Faithful spews out steam and hot water for anywhere from
one to fi ve minutes. It can spew as much as 8,000 gallons of water
up to 185 feet in the air. Every day during the summer, when the
park is full of visitors, hundreds of people gather around to watch
the world’s most famous geyser.
Show image 4A-12: Volcano
Although they come in many forms, shapes, and sizes,
all volcanoes and geysers have two things in common: they
are the earth’s way of releasing heat and pressure from deep
underground, and each one tells us a little more about the history
of the earth. And one other thing: all volcanoes and geysers are
extremely hot, so always keep a safe distance and admire them
from afar!
Discussing the Read-Aloud 15 minutes
Comprehension Questions 10 minutes
If students have diffi culty responding to questions, reread pertinent passages of the read-aloud and/or refer to specifi c images. If students give one-word answers and/or fail to use read-aloud or domain vocabulary in their responses, acknowledge correct responses by expanding students’ responses using richer and more complex language. Ask students to answer in complete sentences by having them restate the question in their responses.
1. Literal What is a hot spot? (A hot spot is a place where there is lots of volcanic activity.)
16 Why do you think the geyser might
be called Old Faithful? What does it
mean to be reliable?

78 The History of the Earth: Supplemental Guide 4A | The Earth Inside-Out, Part III
© 2013 Core Knowledge Foundation
2. Inferential How did volcanoes form the islands of Hawaii? (The islands were formed because of lava from volcanoes. The lava built up a pile over time that reaches from the ocean fl oor all the way to the ocean surface, where it became dry land.)
3. Literal In which layer of the earth does magma form? (Magma forms in the mantle.)
4. Literal Once magma erupts to the surface of the crust, what is it called? (Once magma erupts to the surface of the crust, it is called lava.)
5. Literal What is a geyser? (A geyser is a place where steam and water erupt from the earth.)
6. Evaluative What is Old Faithful? (Old Faithful is a well-known geyser in Yellowstone National Park.) Do you think Old Faithful is a good name for this geyser? Why or why not? (Answers may vary.)
7. Evaluative How is a volcano like a geyser? How are they different? (Volcanoes and geysers are both eruptions caused by heat and pressure inside the earth. They are different because a volcano is an eruption of lava, whereas a geyser is an eruption of steam and hot water.)
8. Inferential Why do scientists study volcanoes and geysers? (Scientists study volcanoes and geysers to learn more about the history of the earth and to help keep people safe.)
[Please continue to model the Question? Pair Share process for students, as necessary, and scaffold students in their use of the process.]
9. Evaluative What? Pair Share: Asking questions after a read-aloud is one way to see how much everyone has learned. Think of a question you can ask your neighbor about the read-aloud that starts with the word what. For example, you could ask, “What did you learn about in today’s read-aloud?” Turn to your neighbor and ask your what question. Listen to your neighbor’s response. Then your neighbor will ask a new what question, and you will get a chance to respond. I will call on several of you to share your questions with the class.

The History of the Earth: Supplemental Guide 4A | The Earth Inside-Out, Part III 79
© 2013 Core Knowledge Foundation
10. After hearing today’s read-aloud and questions and answers, do you have any remaining questions? [If time permits, you may wish to allow for individual, group, or class research of the text and/or other resources to answer these questions.]
Word Work: Destructive 5 minutes
1. In the read-aloud you heard, “The eruption of Mount St. Helens was the most destructive volcanic eruption in U.S. history.”
2. Say the word destructive with me.
3. Destructive means causing damage.
4. The destructive winds of the thunderstorm took some tiles off the roof of our school.
5. Have you observed events in nature that were destructive? Try to use the word destructive when you tell about it. [Ask two or three students. If necessary, guide and/or rephrase the students’ responses: “The was very destructive.”]
6. What’s the word we’ve been talking about?
Use a Making Choices activity for follow-up. Directions: I will describe a situation. If I describe something that is destructive, you will say, “That’s destructive.” If I describe something that is not destructive, you will say, “That’s not destructive.”
1. The forest fi re burned the homes of many animals. (That’s destructive.)
2. The winds of the hurricane blew a tree onto my neighbor’s car. (That’s destructive.)
3. We saw a beautiful rainbow after the thunderstorm. (That’s not destructive.)
4. The tornado blew the roof off the grocery store. (That’s destructive.)
5. The grass changed from brown to green after the spring rains. (That’s not destructive.)
Complete Remainder of the Lesson Later in the Day

80 The History of the Earth: Supplemental Guide 4B | The Earth Inside-Out, Part III
© 2013 Core Knowledge Foundation
Note: Extensions may have activity options that exceed the time allocated for this part of the lesson. To remain within the time periods allocated for this portion of the lesson, you will need to make conscious choices about which activities to include based on the needs of your students.
Extensions 20 minutes
Venn Diagram (Instructional Master 4B-1, optional) 15 minutes
Volcanoes Geysers Create a Venn diagram with two overlapping circles on chart paper, a chalkboard, or a whiteboard. Label the circles with simple drawings of a volcano and a geyser. Ask students to think about how volcanoes and geysers are alike. (Both have eruptions; both are caused by heat, pressure, and time; etc.) Record students’ responses in the overlapping part of the circles. Tell students that you are going to write down what they say, but that they are not expected to be able to read what you write because they are still learning all the rules for decoding. Emphasize that you are writing what they say so that you don’t forget. Tell them that you will read the words to them.
Next, ask students to think about volcanoes and how they are different from geysers. (Volcanoes erupt with lava; volcanoes create mountains; etc.) Record these responses in the “volcano” circle.
Next, ask students to think about geysers and how they are different from volcanoes. (Geysers erupt with steam and hot water; geysers may not be as destructive; etc.) Record these responses in the “geyser” circle. As students share, expand their responses using richer and more complex language, including, if possible, any read-aloud vocabulary.
Read the completed Venn diagram to the class.
The Earth Inside-Out, The Earth Inside-Out, Part IIIPart III 4B

The History of the Earth: Supplemental Guide 4B | The Earth Inside-Out, Part III 81
© 2013 Core Knowledge Foundation
➶ Above and Beyond: Instructional Master 4B-1 has been included if you have students who are ready to create the Venn diagram on their own, using the sound-spelling correspondences taught thus far.
Domain-Related Trade Book 20 minutes
• Refer to the list of recommended trade books in the Introduction at the front of this Supplemental Guide, and choose one trade book about volcanoes to read aloud to the class.
• Explain to students that the person who wrote the book is called the author. Tell students the name of the author. Explain to students that the person who makes the pictures for the book is called an illustrator. Tell students the name of the illustrator. Show students where they can fi nd this information on the cover of the book or on the title page.
• As you read, use the same strategies that you have been using when reading the read-aloud selections—pause and ask occasional questions; rapidly clarify critical vocabulary within the context of the read-aloud; etc.
• After you fi nish reading the trade book aloud, lead students in a discussion as to how the story or information in this book relates to the read-alouds in this domain.
• Provide students with drawing paper, drawing tools, and writing tools. Have students draw one detail they remember from the trade book. Ask students to label their picture or write a sentence to go along with their drawing. Have students share their drawing and writing with their partner or with home-language peers.

82 The History of the Earth: Supplemental Guide PP | Pausing Point
© 2013 Core Knowledge Foundation
Note to Teacher
You should pause here and spend one day reviewing, reinforcing, or extending the material taught thus far.
You may have students do any combination of the activities listed below, but it is highly recommended you use the Mid-Domain Student Performance Task Assessment to assess students’ knowledge of the layers of the earth. The other activities may be done in any order. You may also choose to do an activity with the whole class or with a small group of students who would benefi t from the particular activity.
Core Content Objectives Up to This Pausing Point
Students will:
Identify geographical features of the earth’s surface: oceans and continents
Locate the North Pole, the South Pole, and the equator on a globe
Describe the shape of the earth
Explain that much of our knowledge of the earth and its history is the result of the work of many scientists
Identify the layers of the earth: crust, mantle, and core (outer and inner)
Describe the crust
Describe the mantle and core inside the earth
Describe volcanoes and geysers
Describe how heat, pressure, and time cause many changes inside the earth
Pausing PointPausing Point PP

The History of the Earth: Supplemental Guide PP | Pausing Point 83
© 2013 Core Knowledge Foundation
Student Performance Task Assessment
The Layers of the Earth (Instructional Master PP-1)
Directions: Label the layers of the earth. Color the crust brown, the mantle red, the outer core orange, and the inner core yellow.
Activities
The Earth’s Surface
Materials: Globe
Use the globe to review the shape of the earth. Have students locate the continents, oceans, North Pole, South Pole, and equator.
Image Review
Show the Flip Book images from any read-aloud again, and have students retell the read-aloud using the images.
Riddles for Core Content
Materials: Image Cards 1–6
Divide the class into six groups. Give each group an Image Card. Ask the group to look at and name their image card. Invite each group to show the class their image card and name the image. Tell the students to listen carefully to the riddles. If their Image Card is the answer to the riddle, the members of their group should stand up and say, “I am ” [insert name of image]. If their Image Card is not the answer, they should stay seated.
• When water seeps into the ground over magma, I shoot a powerful spray of steam into the air. What am I? I am a geyser. [Image Card 6 (Geyser).]
• Some people measure me with a clock, but I cannot be seen. What am I? I am time. [Image Card 3 (Time).]
• I shoot gooey rock from the outer core through cracks in the mantle due to pressure and heat. When my gooey rock or magma hits the earth’s crust, it cools and we call it lava. What am I? I am a volcano. [Image Card 5 (Volcano)].

84 The History of the Earth: Supplemental Guide PP | Pausing Point
© 2013 Core Knowledge Foundation
• I have four different names. When I am put all together, I make up the earth. What am I? I am the earth’s layers. [Image Card 4 (Earth’s Layers)].
• I come in many forms. You can feel me when you stand outside on a sunny day or put your hand near a warm radiator. What am I? I am heat. [Image Card 1 (Heat)].
• If you put your hands together and push, you can feel me. What am I? I am pressure. [Image Card 2 (Pressure)].
Domain-Related Trade Book or Student Choice
Materials: Trade book
Read a trade book to review a particular concept; refer to the books listed in the Introduction. You may also choose to have students select a read-aloud to be heard again.
Exploring Student Resources
Materials: Domain-related student websites
Pick appropriate websites from the Internet for further exploration of the layers of the earth.
Videos Related to History of the Earth
Materials: Videos about the layers of the earth
Carefully peruse the Internet for short (5-minute), age-appropriate videos about the layers of the earth.
Prepare some questions related to the content presented in the videos.
Discuss how watching a video is the same as and different from listening to a storybook or read-aloud.
Have students ask and answer questions using question words who, what, when, where, and why regarding what they see in the videos.

The History of the Earth: Supplemental Guide PP | Pausing Point 85
© 2013 Core Knowledge Foundation
Layers of the Earth: Peach
Materials: Peach
Bring in a fresh peach that has been cut into halves, and use it as a model of the layers of the earth. Point to the skin of the peach, and ask students what it might represent. (crust) Point to the fl eshy fruit, and ask students what it might represent. (mantle) Point to the pit, and ask students what it might represent. (core)
Note: Be sure to follow your school’s policy regarding food distribution and allergies.
Layers of the Earth: Hard-boiled Egg
Materials: Hard-boiled egg
Bring in a hard-boiled egg, and use it as a model of the layers of the earth. Point to the eggshell, and ask students what it might represent. (crust) Point to the white interior, and ask students what it might represent. (mantle) Point to the yellow yolk, and ask students what it might represent. (core)
Note: Be sure to follow your school’s policy regarding food distribution and allergies.
Model the Earth’s Layers
Materials: yellow, orange, red, and brown modeling dough;
paper plates; small pieces of paper; and writing tools
Divide students into groups of fi ve. Give one student in each group some yellow dough for the inner core. Ask the student to shape it into a tight ball. Provide the next student with a similar-sized amount of orange dough for the outer core and ask them to layer the orange dough around the yellow dough or inner core. Provide the third student with a larger amount of red dough and have them layer it over the orange dough to represent the earth’s mantle. Next, give the fourth student a smaller amount of brown dough to create the earth’s thin crust. Have each group place their model on a paper plate and ask the fi fth student to cut the ball in half with a plastic knife. Working as a group, have students label their model by writing inner core, outer core, mantle and crust on small pieces of paper and placing them on top of the corresponding model layers.

86 The History of the Earth: Supplemental Guide PP | Pausing Point
© 2013 Core Knowledge Foundation
Ask each group to show the class their model, name one layer of the earth, and to tell their classmates something they learned about that layer.
Newspaper Reporters
Materials: chart paper, tape, drawing and writing tools
Tell students that they are going to pretend to be newspaper reporters describing the eruption of Old Faithful. Explain that they are going to use the questions words who, what, when, where, and why as the starting point for their story. Write the question words on a large piece of chart paper. Go down the list of question words, and write down student responses as they relate, the geyser Old Faithful.
➶ Above and Beyond: Provide paper and writing tools to any student who is prepared to complete this exercise on their own.
Class Book: The History of the Earth
Materials: Drawing paper, drawing tools
Tell the class or a group of students that they are going to make a class book to help them remember what they have learned thus far in this domain. Have students brainstorm important information about features of the earth’s surface, the layers of the earth, volcanoes, and geysers. Have each student choose one idea to draw a picture of, and then write a caption for the picture. Bind the pages to make a book to put in the class library for students to read again and again. You may choose to add more pages upon completion of the entire domain before binding the book.
Heat, Pressure, and Time
Materials: Response Card: Set One
Have students hold up the associated Response Card in response to the chant, Heat! Pressure! Time!
Explain to students that you are going to create a movement for each response card.
For heat, have students rub their hands together. Explain that rubbing their hands together quickly produces a little bit of heat.

The History of the Earth: Supplemental Guide PP | Pausing Point 87
© 2013 Core Knowledge Foundation
For pressure, have students use their hands to press against their thighs. Ask the students if they can feel the pressure on their legs.
For time, have students say “tick-tock, tick-tock” to pretend to be a clock.
Have students practice these signals until they are comfortable using them.
Tell students that you are going to play a word game. Explain that you will say a word and they are to give the signal for that word: heat, pressure or time. Tell students that you are going to call on volunteers to explain how the word they selected from the choices of heat, pressure or time is related to the word you said.
Suggested words: magma, core, volcano, eruption, steam, geyser, lava, island
Letter to a Geologist
Materials: Writing paper, writing tools
As a class, brainstorm ideas and then write a letter to Gerry or a real geologist. The students may talk about the cool things that geologists do, or ask questions that they still have about the history of the earth.
You may also ask students to write individual letters if they are ready to do this activity on their own.
Create a Geyser
Materials: small plastic bottle with a narrow neck, warm water,
liquid soap, effervescent tablets, large tub or sink
Note: This experiment is messy and may be best completed outside.
Have student volunteers break the effervescent tablet into small pieces. Put the pieces aside for a few minutes and then fi ll the bottle about ¾ full with warm water. Explain to students that the water in a real geyser is extremely hot because it has been heated by the magma underground, but hot water could cause burns, so warm water is being used instead. Ask a volunteer to add a few drops of liquid soap to the bottle and to place the bottle in the tub
88 The History of the Earth: Supplemental Guide PP | Pausing Point
© 2013 Core Knowledge Foundation
or sing. Have a student volunteer drop the pieces of effervescent tablet into the bottle and immediately place their palm fi rmly over the top of the bottle. Explain to students that when a hand is placed over the bottle, the pressure in the bottle increases. Have the student release their hand and watch the soap shoot out of the bottle.

The History of the Earth: Supplemental Guide 5 | Minerals 89
© 2013 Core Knowledge Foundation
Lesson Objectives
Core Content Objectives
Students will:
Explain that much of our knowledge of the earth and its history is the result of the work of many scientists
Identify common minerals in the earth
Explain how minerals are used by people
Language Arts Objectives
The following language arts objectives are addressed in this lesson. Objectives aligning with the Common Core State Standards are noted with the corresponding standard in parentheses. Refer to the Alignment Chart for additional standards addressed in all lessons in this domain.
Students will:
Compare and contrast different types of rocks (RI.1.9)
Draw pictures and write sentences to describe the characteristics of a classmate (W.1.2)
With assistance, categorize, and organize facts and information within a given domain to answer questions (W.1.8)
Describe different kinds of rocks in detail (SL.1.4)
Write and illustrate detailed descriptions of different types of rocks and discuss with one or more peers (SL.1.5)
Core Vocabulary
characteristics, n. Some things that make people or things different from othersExample: Two characteristics of winter are that it is the coldest season and that sometimes it can snow.Variation(s): characteristic
MineralsMinerals 5

90 The History of the Earth: Supplemental Guide 5 | Minerals
© 2013 Core Knowledge Foundation
gemstones, n. Precious stones that can be cut, polished, and used in jewelryExample: We were amazed at the brilliant colors of the gemstones on display in the museum.Variation(s): gemstone
minerals, n. Natural substances found in rocks or in the groundExample: Minerals such as diamonds and gold come in many shapes and sizes.Variation(s): mineral
traces, n. Very small amountsExample: After three days, there were still traces of snow on the ground.Variation(s): trace
Vocabulary Chart for MineralsCore Vocabulary words are in bold.Multiple Meaning Word Activity word is underlined.Vocabulary Instructional Activity words have an asterisk (*).Suggested words to pre-teach are in italics.
Type of Words Tier 3Domain-Specifi c Words
Tier 2General Academic Words
Tier 1Everyday-Speech Words
Understanding
geologistgemstones
minerals
characteristics*
collection dissolvesenvironmentspureskillstexture
beautifulcolordiamondsaltsize
Multiple Meaning
crystalsfacetspolishtraces
clearcomposedcommonscratchshapestudytypevariations
clearcutglassrocks
Phrasesearth’s crust magnifying
glasses
Cognates
geólogominerales
cristalfacetastrazas
característicos*
coleccióndisolvespurotexturaclarocomúnestudiotipovariaciones
diamontessalcolorrocas

The History of the Earth: Supplemental Guide 5 | Minerals 91
© 2013 Core Knowledge Foundation
Note: Introducing the Read-Aloud and Extensions may have activity options that exceed the time allocated for that part of the lesson. To remain within the time periods allocated for each portion of the lesson, you will need to make conscious choices about which activities to include based on the needs of your students.
Exercise Materials Details
Introducing the Read-Aloud (10 minutes)
What Have We Already
Learned?
Instructional Masters 1A-1 and 5A-1 (Rocks Idea Web); chart paper, markers, and tape
Create a Rocks Idea Web to document what students already know about rocks.
Essential Background
Information or Terms
chocolate chip cookies with at least one additional add-in ingredient such as nuts, raisins, or berries; one napkin or paper towel per student
Use the cookies to explain the relationship between rocks and minerals.
[Optional alternative] three colors of modeling dough per student
Substitute “cookies” made of modeling dough. Use different colors of dough to represent the minerals in the rocks.
Vocabulary Preview: Minerals,
Crystals
Image 5A-5 Use the ruby and sapphire images to support student understanding of the vocabulary preview question.
Image 5A-4 Use the image to help students understand the vocabulary term crystals.
Purpose for Listening
Presenting the Read-Aloud (15 minutes)
Minerals Rocks Idea Web Pause throughout the read-aloud to add additional details and new information to the Rocks Idea Web. (See Instructional Master 5A-1 for an example of what a completed Rocks Idea Web might look like.)
Discussing the Read-Aloud (15 minutes)
Comprehension Questions Images 5A-3–7, 5A-9 Use the images as prompts to remind students of the names of some of the minerals they heard about during the read-aloud.
Word Work: Characteristics
Complete Remainder of the Lesson Later in the Day

92 The History of the Earth: Supplemental Guide 5 | Minerals
© 2013 Core Knowledge Foundation
Exercise Materials Details
Extensions (20 minutes)
Rocks Book Instructional Masters 5B-1 and 5B-2; small/medium-sized rocks, chart paper, drawing tools; magnifying glasses
The class will create a Rocks Characteristics Chart as they examine different rocks. The class will use their new information to create a class Rocks Book.
Rock Sort six copies of Instructional Master 5B-3, drawing tools, six small boxes or bins for sorting, rocks
Have students examine rocks and sort them by different characteristics.
Take-Home Material
Family Letter Instructional Masters 5B-4 and 5B-5
Advance Preparation
Bring in one cookie per student and an extra cookie to use for discussion, along with one napkin or paper towel per student; or bring in three colors of modeling dough as an alternative. Note: Be sure to check with your school’s policy regarding food distribution and allergies.
Create a Rocks Idea Web using Instructional Master 5A-1 as a guide. [Note: The class will be fi lling in this web throughout this lesson. Instructional Master 5A-1 is an example of what a completed Rocks Idea Web might look like.]
➶ Above and Beyond: Make a copy of a blank Idea Web (Instructional Master 1A-1) for any student who is prepared to complete this graphic organizer on their own.
For the Rocks Book, gather one rock per student. Small or medium-sized rocks are best suited for this activity. Organize the rocks into groups of four. These rocks will also be used for the Rock Sort.
Create a Characteristics of Rocks Chart using Instructional Master 5B-1 as a guide.
➶ Above and Beyond: Make a copy of Instructional Master 5B-1 for students who are ready to complete this chart on their own.
Make a copy of Instructional Master 5B-2 for each student. This will be their page in the class’s Rock Book.

The History of the Earth: Supplemental Guide 5 | Minerals 93
© 2013 Core Knowledge Foundation
For the Rock Sort, use the rocks from the Rocks Book. Read over the class Rocks Book to select the six description words that students used most often to describe their rocks. Using index cards or small pieces of paper, write one of those six words on each card, add a small supporting illustration to help students remember what is written on the card, and then attach the card with tape to one of the six bins or boxes. Place the bins around the classroom. Make one copy of Instructional Master 5B-3 (Rock Comparison Line) for each group of four students.
Notes to Teacher
Students may be confused about the difference between rocks and minerals. Rocks are made up of minerals, often several different ones, but minerals are pure substances that are found in rocks or by themselves in nature. Minerals are the same all the way through, so we call them a sample or a specimen, not a rock.

94 The History of the Earth: Supplemental Guide 5A | Minerals
© 2013 Core Knowledge Foundation
Note: Introducing the Read-Aloud may have activity options that exceed the time allocated for this part of the lesson. To remain within the time periods allocated for this portion of the lesson, you will need to make conscious choices about which activities to include based on the needs of your students.
Introducing the Read-Aloud 10 minutes
What Have We Already Learned? 5 minutes
Review with students what they learned about rocks in the previous read-alouds. Most of the earth is made of rocks, and there are many different types of rocks on the earth.
Essential Background Information or Terms 5 minutes
Note: Be sure to follow your school’s policy regarding food distribution and allergies.
Tell students that rocks are made of minerals. Show students a cookie with at least two visible ingredients, such as chocolate chips, nuts, berries, etc. Tell them to pretend that the cookie is a rock. The chocolate chips, nuts, berries, raisins, etc., are the minerals that make up the rock. Sometimes we fi nd minerals by themselves in nature, just like chocolate chips can be eaten by themselves. Mostly, minerals are found in rocks, just like when there are chocolate chips in cookies. Most rocks contain several different minerals. You may wish to pass out cookies to students and have them describe the size, shape, color, and texture of the cookies to their partners. Remind students that the cookie is similar to a rock and the chocolate chips, etc., are similar to minerals found in rocks or by themselves in nature.
MineralsMinerals 5A

The History of the Earth: Supplemental Guide 5A | Minerals 95
© 2013 Core Knowledge Foundation
Vocabulary Preview 5 minutes
Minerals
Show image 5A-5
1. Today you will learn that most rocks contain several different minerals.
2. Say minerals with me three times.
3. Minerals are natural substances found in rocks or in the ground.
4. Diamonds are a type of mineral. Gold is also a type of mineral.Ika liked the way minerals made some stones look very bright and colorful, such as red rubies.
5. Look at this picture; the ruby and sapphire get their bright colors from minerals. [Point to the ruby, and explain that it gets its color from a red mineral. Point to the sapphire, and explain that it gets its color from a blue mineral.] Turn and tell your partner how you think minerals help to make a rock special.
Crystals
Show image 5A-4: Varieties of quartz
1. Today you will hear that some minerals form perfect crystals. [Point to the image on the top left.]
2. Say crystals with me three times.
3. Crystals are small pieces of minerals and rocks that have many sides and distinct shapes.
4. When Lillian took the container of ice cream out of her freezer, she found tiny ice crystals on the top. Tyrell knew it was cold outside when he saw ice crystals on his window.
5. Look at this image and tell me whether you see any crystals. [Call on different volunteers to point out the crystals.]

96 The History of the Earth: Supplemental Guide 5A | Minerals
© 2013 Core Knowledge Foundation
Purpose for Listening
Tell students that in the next read-aloud, Gerry the Geologist is going to share some special rocks and minerals with them. Tell students to listen carefully to hear all of the different ways rocks can be described.

The History of the Earth: Supplemental Guide 5A | Minerals 97
© 2013 Core Knowledge Foundation
Presenting the Read-Aloud 15 minutes
Minerals
Show image 5A-1: Gerry with his rock collection
As a geologist, it is my job to study rocks. There are many,
many different kinds of rocks out there in the world. And I have
collected quite a few rocks during my time as a geologist!
Show image 5A-2: Polished gemstones 1
Here are some of the rocks and minerals from my collection. I
have polished these in a special machine called a rock tumbler,
which makes them shiny and really brings out the color. In this pile
alone, I can see amethyst, tiger’s eye, rose quartz, turquoise, red
jasper, agate, unakite, onyx . . . whoa! Sorry, I get carried away
sometimes.
Show image 5A-3: Milky quartz
Minerals are the building blocks of rocks. All rocks contain
minerals. Sometimes you can fi nd pure minerals unmixed with
other minerals, but most rocks contain several different minerals.
There are over three thousand different types of minerals, and
scientists still discover new ones from time to time.
Minerals come in all different shapes, sizes, colors, and
textures. We use these different characteristics to divide minerals
into groups. 2 Some of these mineral groups are quite common,
whereas others are very unusual and even diffi cult to describe. I
will tell you about a few of the best-known minerals.
For instance, this is a picture of the mineral quartz. Quartz is the
most common mineral in the earth’s crust—not the most common
in the whole earth, just the most common mineral in the crust. 3
This picture shows a type of quartz called milky quartz.
Show image 5A-4: Varieties of quartz
Quartz comes in many varieties. Those are clear quartz crystals
on the top left. 4 Some minerals form into perfect crystals like
1 What colors do you see?
2 Characteristics are ways we can
describe and group things.
3 What is the crust of the earth?
4 Crystals are small pieces of
minerals and rocks that have many
sides and distinct shapes.

98 The History of the Earth: Supplemental Guide 5A | Minerals
© 2013 Core Knowledge Foundation
these, and some don’t. It all depends on where and how they are
formed within the earth.
Crystals can come in all different sizes. Some are as small as a
pea; some are the size of your arm or longer.
As for the color variations in different types of quartz, these are
largely caused by the addition of very small amounts of various
types of metals into the mineral. 5 For instance, the beautiful purple
color of amethyst is caused by traces of iron and aluminum metal. 6
Show image 5A-5: Ruby and sapphire
Examples of rare gemstones are some varieties of
corundum—a mineral composed mostly of aluminum and
oxygen. 7 Red corundum is known as ruby, and blue corundum
is known as sapphire. Rubies and sapphires are among the most
beautiful mineral crystals on earth.
Show image 5A-6: Emerald
Here is another beauty. This is called emerald. Emerald is a
variety of the mineral beryl, which also comes in many different
colors, including green, blue, yellow, and red. Deep-green emerald
is my favorite. 8
Show image 5A-7: Diamonds
And here is one of the most famous minerals. Do you know
what these beauties are called? 9 These are diamonds. A diamond
is the hardest mineral in the whole world. A diamond is hard
enough to cut through glass or scratch other minerals. The
diamond on the left is a raw diamond, fresh from the earth. The
diamond on the right has been cut and polished. The sides of a
cut diamond are called facets.
Show image 5A-8: Jeweler looking at diamond
You need special equipment and skills to cut and polish diamonds
or other gemstones such as rubies and emeralds. People who cut
diamonds look through powerful magnifying glasses as they do their
work. This is so they can see all the tiny little facets, or sides. 10
5 Color variations are color
diff erences. Variations is another
form of the word vary, just like
varies.
6 Traces are small amounts.
7 A gemstone is a stone that is cut
and polished to be used in jewelry.
Can you fi nd the gemstones in the
image?
8 [Have a student point to the
gemstone.]
9 [Pause for students to answer.]
10 [Explain that the inset shows
what the jeweler sees through the
magnifying glass.]

The History of the Earth: Supplemental Guide 5A | Minerals 99
© 2013 Core Knowledge Foundation
Show image 5A-9: Salt
Here is one mineral that we use every day! Have you ever heard of
salt? 11 Salt, or sodium chloride, is a common mineral that is found in
the oceans and in the earth. Sodium chloride is called table salt when
we use it in food and rock salt when we use it to make roads safer
during winter storms.
Some people put table salt on food to make it taste better. In
fact, salt is an extremely important nutrient for people as well as
animals. Your body needs salt—not too much, but just enough.
Too much salt is bad for you. If you eat too much salt, your body
will tell you so because you will feel thirsty.
Salt appears in many forms in nature. Rock salt can be found
in the form of halite crystals, like the rectangular-shaped crystal
pictured on the left in the image. You can’t see salt in water
because it dissolves, but you’ll know it’s there if you ever taste
ocean water. 12
Show image 5A-10: Gerry pointing to a blackboard
Why do all these different minerals look the way they do?
Each has its own story—and it gets pretty complicated—but you
can bet that there were three basic things in common: 13 heat,
pressure, and time. These three factors play a role in the formation
of every mineral.
Show image 5A-11: Gerry with his rock collection
An important thing to remember about the rocks you fi nd in
nature is that you should leave them there so that other people can
also enjoy them. If every person took even one rock, there soon
would not be very many rocks left! Without rocks, environments
change dramatically. 14 If the environment changes, the plants and
animals that live there might have a hard time fi nding food and
shelter.
Now I’ve told you a bit about some of my favorite minerals. Take
a look at the ground the next time you go outside, and you might
actually see something interesting!
11 [Pause for students to answer.
Sprinkle some table salt in each
student’s hand so that each student
can taste salt.]
12 When salt mixes with water, the
salt dissolves in the water to form
saltwater.
13 Do you know what three things
Gerry is thinking of?
14 Environments are places where
living things live.

100 The History of the Earth: Supplemental Guide 5A | Minerals
© 2013 Core Knowledge Foundation
Discussing the Read-Aloud 15 minutes
Comprehension Questions 10 minutes
If students have diffi culty responding to questions, reread pertinent passages of the read-aloud and/or refer to specifi c images. If students give one-word answers and/or fail to use read-aloud or domain vocabulary in their responses, acknowledge correct responses by expanding students’ responses using richer and more complex language. Ask students to answer in complete sentences by having them restate the question in their responses.
1. Inferential Why does Gerry the Geologist have so many rocks? (Gerry the Geologist studies rocks.)
2. Literal What are minerals? (Minerals are what rocks are made of.)
3. Literal What were the names of some of the minerals that you heard about? [You may want to show images 5A-3 through 5A-7 and image 5A-9 as clues.] (Some of the minerals were quartz, ruby, sapphire, emerald, diamond, and salt.)
4. Literal What is a gemstone? (A gemstone is a stone that is cut and polished to be used as jewelry.)
5. Literal Where might you fi nd the mineral salt? (Salt is found in the oceans and in the earth.)
6. Inferential How is salt used by people? (Table salt is used to fl avor food and rock salt is used to make roads safer during winter storms.)
[Please continue to model the Think Pair Share process for students, as necessary, and scaffold students in their use of the process.]
I am going to ask a question. I will give you a minute to think about the question, and then I will ask you to turn to your neighbor and discuss the question. Finally, I will call on several of you to share what you discussed with your partner.
7. Evaluative Think Pair Share: Which of the minerals that you heard about is your favorite? Why? (Answers may vary.)
8. After hearing today’s read-aloud and questions and answers, do you have any remaining questions? [If time permits, you may wish to allow for individual, group, or class research of the text and/or other resources to answer these questions.]

The History of the Earth: Supplemental Guide 5A | Minerals 101
© 2013 Core Knowledge Foundation
Word Work: Characteristics 5 minutes
1. In the read-aloud you heard Gerry say, “Minerals come in all different shapes, sizes, colors, and textures. We use these different characteristics to divide minerals into groups.”
2. Say the word characteristics with me.
3. Characteristics means more than one characteristic. A characteristic is something that makes a person, thing, or group different from others.
4. Some characteristics of diamonds are that they are colorless and that they can scratch other minerals. Some characteristics of Gerry the Geologist are that he has black hair and a mustache, and loves to study rocks.
5. What are some characteristics of your neighbor? Remember that characteristics can include the way your neighbor looks and the way your neighbor acts. Try to use the word characteristics when you tell about it. [Ask two or three students. If necessary, guide and/or rephrase the students’ responses: “Characteristics of are . . .”]
6. What’s the word we’ve been talking about?
Use a Drawing/Writing activity for follow-up. Directions: I am going to give you a piece of drawing paper. I would like for you to draw your neighbor, including their characteristics. For example, if your neighbor has brown hair and loves to play soccer, include brown hair and soccer in your drawing. After you have drawn your picture, write a sentence about your neighbor using the sound-spelling correspondences you have learned thus far.
Give students time to share their drawings and sentences with a partner or the entire class.
Complete Remainder of the Lesson Later in the Day

102 The History of the Earth: Supplemental Guide 5B | Minerals
© 2013 Core Knowledge Foundation
Note: Extensions may have activity options that exceed the time allocated for this part of the lesson. To remain within the time periods allocated for this portion of the lesson, you will need to make conscious choices about which activities to include based on the needs of your students.
Extensions 20 minutes
Rocks Book (Instructional Masters 5B-1 and 5B-2) 20 minutes
• Divide students into groups of four.
• Give each group four small/medium rocks of different types.
• Remind students that minerals are the building blocks of rocks and that most rocks contain several different minerals.
• Explain that today the class is going to look closely at different rocks and then make a class book to remember their observations.
• Review with students the characteristics of rocks and minerals. (shape, size, color, and texture)
• Brainstorm descriptive vocabulary for each characteristic. Write each of the characteristics on the chart and then write the descriptive words students suggest. Ideas for descriptive words include the following.
Characteristics of Rocks
Shape Size Color Texture
curvy large shiny roughround medium dull smoothoval small bright bumpy
sharp tiny dark jaggedmany facets gigantic -colored cracked
peaked huge sparkly grainysquare enormous pale fl at
MineralsMinerals 5B

The History of the Earth: Supplemental Guide 5B | Minerals 103
© 2013 Core Knowledge Foundation
• Give each student Instructional Master 5B-2. Have each student select a rock to draw and describe.
• After drawing and coloring in their rock, students should write a sentence describing their rock using the sound/spelling correspondences taught thus far.
• Compile the student pages together into a class Rock Book by using two binder clips to secure the loose pages together.
• Have the class select a title for the book. Write the title on a piece of construction paper, and use it as a cover for the book.
Rock Sort (Instructional Master 5B-3) 20 minutes
• Select the six descriptive words from the class’s Rocks Book that students used most often to describe their rocks. Write one word on each card, add a small supporting illustration to help students remember what is written on the card, and then attach each card to a bin. Place the bins around the classroom.
• Divide students into groups of four.
• Give each group four small/medium rocks of different types.
• Explain to students that they are going to sort their rocks as a class. Remind students that minerals are the building blocks of rocks and that most rocks have two or more minerals.
• Walk around the room and read the bin labels with the students.
• Hold up the sample rock, and ask students which bin is the most appropriate for sorting the rock. Call on two or three students to explain their thinking. If student answers differ, but are equally appropriate, point out that one rock can be sorted by many different characteristics. Place your sample rock in an appropriate bin. Repeat this procedure, as necessary, with the other sample rocks.
• Explain to students that you are going to name a characteristic on one of the bins. Tell students that if they have a rock that matches that characteristic, they should raise it into the air. Confi rm that all raised rocks match the named characteristic, and then have students place their rocks into the appropriate bin.

104 The History of the Earth: Supplemental Guide 5B | Minerals
© 2013 Core Knowledge Foundation
• Continue this process until all the rocks have been sorted into bins.
• Assign one bin to each group. Have students use Instructional Master 5B-3 to organize their rocks along the horizontal comparison line from those rocks that least demonstrate the characteristic identifi ed to those that most demonstrate the characteristic.
• Have each group present their comparison chart to another group.
Take-Home Material
Family Letter
Send home Instructional Masters 5B-4 and 5B-5

The History of the Earth: Supplemental Guide 6 | The Three Types of Rocks 105
© 2013 Core Knowledge Foundation
Lesson Objectives
Core Content Objectives
Students will:
Explain that much of our knowledge of the earth and its history is the result of the work of many scientists
Identify the three types of rocks: igneous, sedimentary, and metamorphic
Describe how heat, pressure, and time cause the formation of igneous, sedimentary, and metamorphic rocks
Language Arts Objectives
The following language arts objectives are addressed in this lesson. Objectives aligning with the Common Core State Standards are noted with the corresponding standard in parentheses. Refer to the Alignment Chart for additional standards addressed in all lessons in this domain.
Students will:
Compare and contrast the three types of rocks (RI.1.9)
With assistance, categorize and organize rocks into the following categories: igneous, sedimentary, and metamorphic (W.1.8)
Clarify information about “The Three Types of Rocks,” by asking questions that begin with what (SL.1.2)
Orally retell important facts and information from “The Three Types of Rocks” (SL.1.4)
The Three Types of RocksThe Three Types of Rocks 6

106 The History of the Earth: Supplemental Guide 6 | The Three Types of Rocks
© 2013 Core Knowledge Foundation
Core Vocabulary
artifacts, n. Items made by people from a long time agoExample: The archaeologists collected artifacts from King Tut’s tomb.Variation(s): artifact
igneous, adj. A type of rock that forms when molten rock cools, hardens, and turns solidExample: Obsidian and granite are two types of igneous rocks.Variation(s): none
metamorphic, adj. A type of rock that has formed from another rock as a result of heat and pressureExample: Marble is a metamorphic rock formed from limestone, a sedimentary rock.Variation(s): none
sedimentary, adj. A type of rock that has formed as the result of layers of sediment pressed togetherExample: Coal is a type of sedimentary rock.Variation(s): none
sediments, n. Tiny pieces of material that sink to the bottom of a liquidExample: Sediments settled at the bottom of the swimming pool.Variation(s): sediment

The History of the Earth: Supplemental Guide 6 | The Three Types of Rocks 107
© 2013 Core Knowledge Foundation
Vocabulary Chart for The Three Types of RocksCore Vocabulary words are in bold.Multiple Meaning Word Activity word is underlined.Vocabulary Instructional Activity words have an asterisk (*).Suggested words to pre-teach are in italics.
Type of Words Tier 3Domain-Specifi c Words
Tier 2General Academic Words
Tier 1Everyday-Speech Words
Understanding
artifacts
igneous
magmametamorphic
miningsedimentary
sediments*
sludge
crushdecayedintrudesliquid/solidphenomenasubmergedtransformationunique
floating harden
Multiple Meaning
eruptformation
coollayerssettle*sinksurfaceweight
fireglassrocks
Phrasesmagma chambervolcanic glass
Cognates
artefactos
igneo
metamórfico
mineríasedimentario
sedimentos*
formación
líquidos/sólidotransformaciónúnico
rocas

108 The History of the Earth: Supplemental Guide 6 | The Three Types of Rocks
© 2013 Core Knowledge Foundation
Note: Introducing the Read-Aloud and Extensions may have activity options that exceed the time allocated for that part of the lesson. To remain within the time periods allocated for each portion of the lesson, you will need to make conscious choices about which activities to include based on the needs of your students.
Exercise Materials Details
Introducing the Read-Aloud (10 minutes)
What Have We Already
Learned?
Image Cards 1–3; Response Cards: Set One
Use the Image Cards as clues to remind students about the Heat! Pressure! Time! Chant. Have students hold up the related Response Card as they discuss the interplay of these three things on the earth.
Interactive Read-Aloud Instructional Master 6A-1 (Response Card: Set Two)
In advance of the activity, have students cut out Response Cards: Set Two and add them to their envelope or bag. During the activity, have students point to the related card when you say the rock type aloud and then perform the corresponding action.
Vocabulary Preview: Igneous,
Sedimentary, Metamorphic
Images 6A-2 and 6A-4
Images 6A-10 and 6A-12
Images 6A-15 and 6A-16
Purpose for Listening
Presenting the Read-Aloud (15 minutes)
The Three Types of Rocks Response Cards (Set Two) Have students hold up their Response Cards when they hear the words igneous, sedimentary, or metamorphic in addition to or in place of the actions listed in the Interactive Read-Aloud.
Response Cards (Set One) Have students hold up their heat, pressure, or time card when they hear those words in the read-aloud.
clear container, water, bits of rock and dirt
Use the materials to demonstrate how sediments sink.
U.S. Map Use the map to show students locations mentioned in the Read-Aloud.

The History of the Earth: Supplemental Guide 6 | The Three Types of Rocks 109
© 2013 Core Knowledge Foundation
Exercise Materials Details
Discussing the Read-Aloud (15 minutes)
Comprehension Questions Response Cards (Set Two) Consider rephrasing questions 2–4 to allow students to answer by holding up the appropriate card for igneous, sedimentary, or metamorphic. For example, a modified question 2 might read, Which rock type is formed from hot magma that cools and hardens? [Igneous]
Word Work: Sediments
Complete Remainder of the Lesson Later in the Day
Extensions (20 minutes)
Multiple Meaning Word
Activity: Sink
Poster 3M (Sink)
Syntactic Awareness Activity:
Conjunctions but
Vocabulary Instructional
Activity: Settle
Image 6A-9; chart paper, markers, tape, index cards
Create a Horizontal Word Wall to compare words related to sinking and floating.
Three-Column Chart: Types of
Rocks
Image Cards 7–9; Instructional Master 6B-1
Create a three-column chart to record student observations of the different types of rocks.
Forming Three Types of Rock Three colors of chocolate chips (one bag per color) or three colors of crayon shavings (one cup per color); heat source or pan of hot water, aluminum pan, three zip-top bags, clear jar, aluminum foil, Response Cards
Model the formation of igneous, sedimentary, and metamorphic rocks using chocolate chips or crayon shavings.
Response Cards: Sets One and Two
Have students use their Response Cards when discussing the types of rocks and how each type was formed using heat, pressure, and/or time.
Advance Preparation
Bring in a glass jar, potting soil, red clay, and rocks to demonstrate how sediments sink.
For the Vocabulary Instructional Activity, create a Horizontal Word Wall by drawing a horizontal line from left to right on a large piece
110 The History of the Earth: Supplemental Guide 6 | The Three Types of Rocks
© 2013 Core Knowledge Foundation
of chart paper. Write each of the following words on an individual index card: settle, rise, submerge, descend, sink, fl oat, go up, go down, and ascend.
Create a Three-Column Chart: Types of Rocks, using Instructional Master 6B-1 as a guide. Use Image Cards 7(Igneous), 8 (Sedimentary) and 9 (Metamorphic) for the column titles.
➶ Above and Beyond: Make a copy of Instructional Master 6B-1 for students who are ready to fi ll in the chart on their own, using the sound/spelling correspondences taught thus far.
For the Formation of Rocks extension, bring in three colors of chocolate chips (one bag per color; e.g. white chocolate chips, semi-sweet chocolate chips, mint, etc.) or create three colors of crayon shavings (one cup per color). Have a heat source ready or have a pan of hot water available. You will also need an aluminum pan, three zip-top bags, a clear jar, and a few pieces of aluminum foil. Note: Be sure to check with your school’s policy regarding food distribution and allergies.

TThe History of the Earth: Supplemental Guide 6A | The Three Types of Rocks 111
© 2013 Core Knowledge Foundation
Note: Introducing the Read-Aloud may have activity options that exceed the time allocated for this part of the lesson. To remain within the time periods allocated for this portion of the lesson, you will need to make conscious choices about which activities to include based on the needs of your students.
Introducing the Read-Aloud 10 minutes
What Have We Already Learned? 5 minutes
Review with students the three words that Gerry the Geologist said they should always keep in mind when thinking about rocks: heat, pressure, and time. Use Image Cards 1–3 as clues. Ask students to share how heat, pressure, and time affect things on the earth, such as volcanoes, geysers, and the layers of the earth. Remember to repeat and expand upon each response using richer and more complex language, including, if possible, any read-aloud vocabulary.
Tell students that all rocks can be sorted into three categories because of how they were formed by heat, pressure, and time.
Interactive Read-Aloud 5 minutes
Tell students that you will need their help during the read-aloud. Preview actions that you would like students to do whenever you say certain words during the read-aloud:
• Igneous: Whenever students hear the word igneous, they should hold up their index fi nger like it is a candle and pretend to blow out the fl ame to demonstrate the heat of fi re.
• Sedimentary: Whenever students hear the word sedimentary, they should continuously place one fl attened hand on top of the other to demonstrate the formation of layers.
• Metamorphic: Whenever students hear the word metamorphic, they should hold out both hands and then clasp them tightly together to demonstrate pressure.
The Three Types of RocksThe Three Types of Rocks 6A

112 The History of the Earth: Supplemental Guide 6A | The Three Types of Rocks
© 2013 Core Knowledge Foundation
Vocabulary Preview 5 minutes
Igneous
Show image 6A-2: Granite surface
1. Today you will hear about three types of rocks. One type is called igneous rock.
2. Say igneous with me three times.
3. Igneous is a type of rock that forms when magma cools, hardens, and turns solid.
4. Isai’s house had countertops made of granite, a common igneous rock.Maribel explained to her mother that the word igneous came from the Latin word for “fi re.”
Show image 6A-4: Half Dome, Yosemite National Park
5. This big igneous rock is called Half Dome, and it is located in Yosemite National Park in California. Describe this igneous rock to your partner.
Sedimentary
Show image 6A-10: Coal
1. Another type of rock is sedimentary rock.
2. Say sedimentary with me three times.
3. Sedimentary rock forms when layer upon layer of small, solid materials are pressed together.
4. Alexander explained to his friend that some sedimentary rock is made from decayed plants that have been under pressure for many years.[Point to the picture.] Coal is a type of sedimentary rock.
Show image 6A-12
5. This type of sedimentary rock is called sandstone. Do you see the layers in the sandstone?

TThe History of the Earth: Supplemental Guide 6A | The Three Types of Rocks 113
© 2013 Core Knowledge Foundation
Metamorphic
Show image 6A-15: Limestone to marble
1. The third type of rock is metamorphic rock.
2. Say metamorphic with me three times.
3. Metamorphic rock is a type of rock that forms when igneous or sedimentary rocks undergo intense heat and pressure and change into new rocks.
4. Many statues are made from marble, a kind of metamorphic rock. [Point to the Lincoln Memorial.]Jose explained to Arias that the word metamorphic came from the Greek word for transformation, or change.
Show image 6A-16
5. Name the different types of rocks with me: igneous, sedimentary, and metamorphic. Tell your partner how these three rocks look different.
Purpose for Listening
Tell students to listen carefully to learn about the three types of rocks and how they were formed.
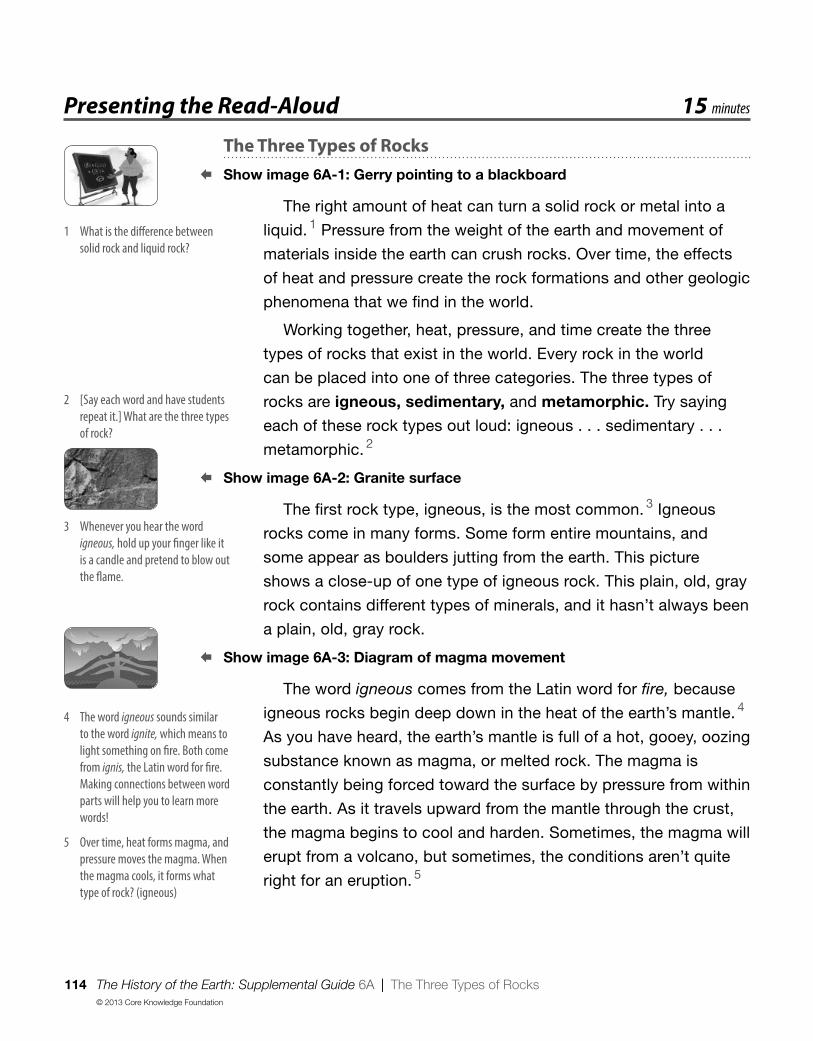
114 The History of the Earth: Supplemental Guide 6A | The Three Types of Rocks
© 2013 Core Knowledge Foundation
Presenting the Read-Aloud 15 minutes
The Three Types of Rocks
Show image 6A-1: Gerry pointing to a blackboard
The right amount of heat can turn a solid rock or metal into a
liquid. 1 Pressure from the weight of the earth and movement of
materials inside the earth can crush rocks. Over time, the effects
of heat and pressure create the rock formations and other geologic
phenomena that we fi nd in the world.
Working together, heat, pressure, and time create the three
types of rocks that exist in the world. Every rock in the world
can be placed into one of three categories. The three types of
rocks are igneous, sedimentary, and metamorphic. Try saying
each of these rock types out loud: igneous . . . sedimentary . . .
metamorphic. 2
Show image 6A-2: Granite surface
The fi rst rock type, igneous, is the most common. 3 Igneous
rocks come in many forms. Some form entire mountains, and
some appear as boulders jutting from the earth. This picture
shows a close-up of one type of igneous rock. This plain, old, gray
rock contains different types of minerals, and it hasn’t always been
a plain, old, gray rock.
Show image 6A-3: Diagram of magma movement
The word igneous comes from the Latin word for fi re, because
igneous rocks begin deep down in the heat of the earth’s mantle. 4
As you have heard, the earth’s mantle is full of a hot, gooey, oozing
substance known as magma, or melted rock. The magma is
constantly being forced toward the surface by pressure from within
the earth. As it travels upward from the mantle through the crust,
the magma begins to cool and harden. Sometimes, the magma will
erupt from a volcano, but sometimes, the conditions aren’t quite
right for an eruption. 5
1 What is the diff erence between
solid rock and liquid rock?
2 [Say each word and have students
repeat it.] What are the three types
of rock?
4 The word igneous sounds similar
to the word ignite, which means to
light something on fi re. Both come
from ignis, the Latin word for fi re.
Making connections between word
parts will help you to learn more
words!
5 Over time, heat forms magma, and
pressure moves the magma. When
the magma cools, it forms what
type of rock? (igneous)
3 Whenever you hear the word
igneous, hold up your fi nger like it
is a candle and pretend to blow out
the fl ame.

TThe History of the Earth: Supplemental Guide 6A | The Three Types of Rocks 115
© 2013 Core Knowledge Foundation
Show image 6A-4: Half Dome, Yosemite National Park
This formation is called Half Dome, and it is located in Yosemite
National Park in California. When you look at Half Dome, you are
looking at an old magma chamber. A magma chamber is a pocket,
or place, in the earth’s crust where magma collects. As more magma
enters the chamber, it gets hotter and pressure builds, and the
magma can force its way up to the surface in the form of a volcano.
Or, sometimes, as in the case of Half Dome, the magma just
gathers in the chamber and stays there without erupting. For
whatever geologic reason, the heat and pressure did not get great
enough to force the magma through the crust and onto the surface
in the form of lava. Instead, the magma cooled and hardened within
the chamber. Over time, the rocks and soil around the chamber
eroded away, leaving beautiful Half Dome alone sticking high up
above the earth. Half Dome is certainly a big igneous rock! 6
Show image 6A-5: Sill
Another type of igneous formation occurs when magma
intrudes, or pushes itself, between two existing layers of rock. This
means that not all the layers in this mountain were formed one
on top of the other. Rather, some of the layers forced their way in
between other rocks.
Show image 6A-6: Obsidian
This is my favorite type of igneous rock: obsidian, better known as
volcanic glass. Volcanic glass forms when certain types of lava cool
and harden, becoming smooth, shiny, and glass-like. 7 Only certain
types of lava under certain conditions become volcanic glass.
Show image 6A-7: Obsidian spearhead
Some Native Americans used volcanic glass to make
arrowheads and spearheads. If you break a piece of volcanic
glass, you will fi nd that it is incredibly sharp and strong. Every
now and then I fi nd ancient artifacts like this when I’m out rock
hunting. 8
6 Did you hear the word igneous?
Blow out the fi re!
7 Characteristics of volcanic glass are
smooth, shiny, and glass-like.
8 Artifacts are objects made by
people long ago. Which type of
rock have you heard about so
far: igneous, sedimentary, or
metamorphic? [Prompt students
to repeat igneous in unison and
pretend to blow out the fl ame.]

116 The History of the Earth: Supplemental Guide 6A | The Three Types of Rocks
© 2013 Core Knowledge Foundation
Show image 6A-8: Bryce Canyon
After igneous, the second major rock type is sedimentary. 9
Sedimentary rocks are not formed like igneous rocks, which form
from cooled magma. In fact, heat does not play much of a role
at all in the formation of sedimentary rocks. Instead, pressure
and time are the most important factors in the formation of
sedimentary rocks. 10
Show image 6A-9: Sediments
The word sediments refers to tiny little particles, such as dirt or
rock, which are carried along in water, ice, wind, or landslides. 11
If you dump a spoonful of sand into a glass of water, for instance,
you will see the sand gradually sink down and settle on the bottom
of the glass, much in the same way that sediments settle on the
bottoms of lakes and oceans. 12 Sediments are always fl oating
around in lakes, oceans, and rivers. Over time, sediments in lake
water settle and form a thick sludge on the bottom of a lake. As
more and more sediments settle on the bottom, more and more
weight presses down on the sludge. Over time, the pressure from
the weight of the upper sediments can cause the sludge to harden
into rock. Through time and pressure, layers of sediments are
turned into sedimentary rock. 13
Show image 6A-10: Coal
Coal is a type of sedimentary rock that comes from decayed
plants that have been under pressure for many years. 14 Coal is
an important energy source. People burn coal in order to create
electricity for homes and to make energy to power machines in
9 Whenever you hear the word
sedimentary, place one fl attened
hand over the other over and over
again.
10 Of heat, pressure, and time, which
two are most important in forming
sedimentary rocks?
11 Sediments are little tiny pieces
of dirt and rock. Do you hear the
word sediment in sedimentary?
[Demonstrate for students how
sediments sink to the bottom by
dropping bits of dirt and rock into a
glass of water. Have students watch
how the dirt slowly sinks to the
bottom of the glass.]
12 Here, the word sink means to go
below the surface of water or
mud. The word sink also has other
meanings. The word sink also
means a wide bowl in the kitchen
or bathroom that has a faucet for
water and a drain at the bottom.
13 How are sedimentary rocks
formed? (Time and pressure
turn layers of sediment into
sedimentary rock.) [Prompt
students to repeat the word
sedimentary in unison and place
their hands one over the other.]
14 Remember that decayed means
that the plants have died and their
remains have gone back into the
soil.

TThe History of the Earth: Supplemental Guide 6A | The Three Types of Rocks 117
© 2013 Core Knowledge Foundation
factories. People get coal and other important rocks, minerals, and
metals by mining them from the earth. One way to mine coal is by
digging a mineshaft, or tunnel, deep down into the earth.
Show image 6A-11: Iron ore
Another sedimentary rock is called iron ore. An ore is a
rock that contains valuable minerals or metals. There are many
different types of ores in the world, but iron ore is one of the most
important. Iron ore is the source of iron, a strong metal which is
used to make steel. Steel, in turn, is used to build bridges, cars,
buildings, tools, and other things you see and use every day.
Show image 6A-12: Bryce Canyon
Sandstone is one common type of sedimentary rock. 15
Wherever you fi nd sandstone, there is a good chance that you
are walking in a place that used to be completely underwater. At
one time or another, every place on earth has been completely
submerged in water. Thus, sandstone is quite common throughout
the world. This photo was taken in Bryce Canyon, in the state of
Utah, which is known for its unique sandstone formations. 16
Show image 6A-13: Antelope Canyon
Here is another sandstone canyon I thought you would like to see.
Antelope Canyon, in Arizona, is a very special place. 17 It is known as
a slot canyon, which is formed over many, many years as water from
rain and fl oods rushes through the sandstone, causing it to erode.
Show image 6A-14: Limestone cliffs
These cliffs are made of limestone, another type of sedimentary
rock. Limestone is interesting because it is composed mainly of
minerals left over from ancient sea creatures like clams, oysters,
and other shellfi sh. When these creatures died, their shells sank
down to the ocean fl oor and settled with the other sediments.
Over time, the churning oceans ground the shells into a fi ne white
powder. The powder settled and more shells and sediments put
pressure on it. It took many, many years, but eventually all the
powdery shell leftovers were compressed into limestone. 18
17 [Locate Arizona on a map for
students.]
15 Did you hear the word
sedimentary? Make layers of
sediments with your hands!
16 [Locate Utah on a map for
students.]
18 Did you hear the words pressure
and time? With pressure and a
long, long period of time, the
shells of sea creatures turned into
sedimentary rock. Which two types
of rocks have you learned about so
far? Hint: One is formed by cooled
magma and the other is made of
sediments.

118 The History of the Earth: Supplemental Guide 6A | The Three Types of Rocks
© 2013 Core Knowledge Foundation
Show image 6A-15: Limestone to marble
If limestone is subjected to intense pressure for an even longer
period of time, it can turn into another kind of rock called marble.
Marble is very hard, and it often has a beautiful, pure white
color. People have used marble for thousands of years to make
fi ne buildings and sculptures.
Marble is known as a metamorphic rock, which is the third and
least common type of rock. 19 Metamorphic comes from the Greek
word for transformation, or change. Metamorphic rocks are formed
when other types of rocks undergo intense heat and pressure and
change, or metamorphose, into new kinds of rocks. 20
Show image 6A-16: Three types of rock
Congratulations! You are becoming a geologist! Now you
know about the three rock types: igneous, sedimentary, and
metamorphic. Won’t everyone be impressed when you tell them
about the new words you learned?
Discussing the Read-Aloud 15 minutes
Comprehension Questions 10 minutes
1. Literal What are the three types of rocks? (The three types of rocks are metamorphic, sedimentary, and igneous.)
2. Inferential How are igneous rocks formed? Remember: igneous means “fi re.” (Igneous rocks are formed from hot magma or lava that cools and hardens.)
3. Inferential How are sedimentary rocks formed? (Sediments settle and form a thick sludge on the bottom of a lake that thickens over time. The pressure from the weight of the sediments makes it harden into sedimentary rocks.)
4. Inferential How are metamorphic rocks formed? (Metamorphic rocks are formed when heat and pressure change igneous and sedimentary rocks into new rocks.)
19 Whenever you hear the word
metamorphic, hold out both
hands and then clasp them tightly
together.
20 What’s the third type of rock,
formed when heat and pressure
change igneous and sedimentary
rocks into new kinds of rocks?

TThe History of the Earth: Supplemental Guide 6A | The Three Types of Rocks 119
© 2013 Core Knowledge Foundation
5. Evaluative How are the three types of rocks similar? How are they different? (The three types of rocks are similar because they are all found in the earth and are formed over time. The three types of rocks are formed differently. Igneous rocks are formed when heat forms magma and pressure moves the magma towards the surface of the earth. Sedimentary rocks are formed when layers of sediments are pressed together over time. Metamorphic rocks are formed when other types of rocks undergo intense heat and pressure.)
[Please continue to model the Question? Pair Share process for students, as necessary, and scaffold students in their use of the process.]
6. Evaluative What? Pair Share: Asking questions after a read-aloud is one way to see how much everyone has learned. Think of a question you can ask your neighbor about the read-aloud that starts with the word what. For example, you could ask, “What did you learn about in today’s read-aloud?” Turn to your neighbor and ask your what question. Listen to your neighbor’s response. Then your neighbor will ask a new what question, and you will get a chance to respond. I will call on several of you to share your questions with the class.
7. After hearing today’s read-aloud and questions and answers, do you have any remaining questions? [If time permits, you may wish to allow for individual, group, or class research of the text and/or other resources to answer these questions.]
Word Work: Sediments 5 minutes
1. The read-aloud said, “Sediments are always fl oating around in lakes, oceans, and rivers.”
2. Say the word sediments with me.
3. Sediments are tiny particles of dirt or rock that are moved by wind or water. [You may want to put some sediment in a plastic container of water for students to observe.]
4. When you go swimming in a lake, your feet kick up sediments that are on the bottom of the lake.

120 The History of the Earth: Supplemental Guide 6A | The Three Types of Rocks
© 2013 Core Knowledge Foundation
5. What are some other places that you might see sediments? Try to use the word sediments when you tell about it. [Ask two or three students. If necessary, guide and/or rephrase the students’ responses: “I saw sediments in . . . ”]
6. What’s the word we’ve been talking about?
Use a Making Choices activity for follow-up. Directions: I will describe some objects. If I describe sediments, you will say, “Those are sediments.” If I do not describe sediments, you will say, “Those are not sediments.”
1. I noticed tiny specks of dirt in my glass of water. (Those are sediments.)
2. The ants crawled through the blades of grass. (Those are not sediments.)
3. The wind blew small bits of dust all over the car. (Those are sediments.)
4. Dad cleaned the small grains of sand out of the bathtub. (Those are sediments.)
5. The museum has many large gemstones. (Those are not sediments.)
Complete Remainder of the Lesson Later in the Day

The History of the Earth: Supplemental Guide 6B | The Three Types of Rocks 121
© 2013 Core Knowledge Foundation
Note: Extensions may have activity options that exceed the time allocated for this part of the lesson. To remain within the time periods allocated for this portion of the lesson, you will need to make conscious choices about which activities to include based on the needs of your students.
Extensions 20 minutes
Multiple Meaning Word Activity 5 minutes
Sentence in Context: Sink
Note: You may choose to have students hold up one or two fi ngers to indicate which image shows the meaning being described or have a student walk up to the poster and point to the image being described.
1. [Show Poster 3M (Sink).] In the read-aloud you heard Gerry the Geologist say, “If you dump a spoonful of sand into a glass of water, for instance, you will see the sand gradually sink down and settle on the bottom of the glass, much in the same way that sediments settle on the bottoms of lakes and oceans.” Here, sink means to go down below the surface of mud or water. Which picture shows this?
2. A sink is also something in the kitchen or bathroom that has a faucet for water and a drain at the bottom. People use the sink to wash their hands and dishes. Which picture shows this type of sink?
3. Now with your partner, make a sentence for each meaning of sink. Try to use complete sentences. I will call on some of you to share your sentences with the class.
The Three Types of RocksThe Three Types of Rocks 6B

122 The History of the Earth: Supplemental Guide 6B | The Three Types of Rocks
© 2013 Core Knowledge Foundation
Syntactic Awareness Activity 5 minutes
Conjunction but
Note: The purpose of these syntactic activities is to help students understand the direct connection between grammatical structures and the meaning of text. These syntactic activities should be used in conjunction with the complex text presented in the read-alouds. There may be variations in the sentences created by your class. Allow for these variations, and restate students’ sentences so that they are grammatical.
1. Conjunctions are a kind of word we use to connect words and phrases.
2. We use the conjunction but to join phrases when the second phrase describes something that is unexpected or different from the fi rst phrase.
3. Listen to Gerry the Geologist’s sentence from the read-aloud about how igneous rocks are formed. I will emphasize the word but as I read the selection to you:Sometimes, the magma will erupt from a volcano, but sometimes, the conditions aren’t quite right for an eruption.
4. Notice that in this sentence, Gerry the Geologist uses the word but when he talks about how the magma might erupt. However, sometimes the magma does not erupt.
5. The word but is also used to explain things:There are many different types of ores in the world, but iron ore is one of the most important.The word but tells us that while there are many different kinds of ores, iron is a special one.
6. Let’s listen to another example:Deidra was going to go to the pool party, but it was cancelled due to rain. The word but explains that before the rain happened, Deidra was going to go to the pool party; however, it was cancelled due to the rain.
7. Turn and tell your partner about something you would have done, but could not, using the word but. For example, “I was

The History of the Earth: Supplemental Guide 6B | The Three Types of Rocks 123
© 2013 Core Knowledge Foundation
going to play outside, but it was too dark.” Make sure you listen to what your partner says, so you can tell the class.
Vocabulary Instructional Activity 5 minutes
Horizontal Word Wall: Settle
Show image 6A-9: Sediments
1. In the read-aloud you heard, “If you dump a spoonful of sand into a glass of water . . . you will see the sand gradually sink down and settle on the bottom of the glass, much in the same way that sediments settle on the bottoms of lakes and oceans.”
2. Settle means to sink to the bottom.
3. Let’s create a Horizontal Word Wall to show different words that describe sinking and fl oating. [Show students the chart paper and point, out the horizontal line.]
4. [Hold up the card for the word fl oat, and read the word aloud.] Float is a word to describe when something does not sink but stays above the surface of the water. [Tape the card for fl oat on the left-hand side of the line.]
5. [Hold up the card for the word sink, and read the word aloud.] Sink is a word to describe when something goes down below the surface of the water. [Tape the card for sink on the right-hand side of the line.]
6. [Hold up the card for the word settle, and read the word aloud.] Should I put settle closer to the word sink or closer to the word fl oat? [Tape the card near the word sink on the right-hand side of the line.]
7. [Repeat this process with the remaining cards: submerge, descend, rise, go up, go down, and ascend. When all the cards have been attached to the Word Wall, read over the words with students.]
8. With your partner choose two opposite words from the Horizontal Word Wall, and make a sentence for each word.
[Display the Horizontal Word Wall throughout the domain, and encourage students to add additional words to the wall.]

124 The History of the Earth: Supplemental Guide 6B | The Three Types of Rocks
© 2013 Core Knowledge Foundation
Three-Column Chart: Types of Rocks
(Instructional Master 6B-1) 15 minutes
Igneous Sedimentary Metamorphic
Image Card 7 Image Card 8 Image Card 9
Found all over the earth
Found all over the earth
Found all over the earth
Formed over time Formed over time Formed over time
Most common type Least common type
Heat forms magma, and pressure moves the magma or lava to the surface where it cools and hardens into igneous rock.
Formed when layers of sediment are pressed together for a long time
Heat and pressure change igneous or sedimentary rocks into metamorphic rocks.
Examples: mountains and boulders; Half Dome; obsidian; arrowheads
Examples: coal; iron ore; sandstone; limestone
Example: marble
• Tell students that you will use this chart to write down what they learned about the three different types of rocks. Tell students that you are going to write down what they say, but that they are not expected to be able to read what you write because they are still learning all the rules for decoding. Emphasize that you are writing what they say so that you don’t forget. Tell them that you will read the words to them.
• Point to the column for igneous rock. Ask students to discuss with their partner what they learned about igneous rocks and choose one fact to share with the rest of the class. Write down what students share about igneous rocks.
• Follow the same procedures for fi lling in the columns for the other two types of rocks.
• Once the chart has been completed, read it to the class.

The History of the Earth: Supplemental Guide 6B | The Three Types of Rocks 125
© 2013 Core Knowledge Foundation
Forming Three Types of Rocks 20+ minutes
Note: This activity requires adult supervision. In the interest of time, you may wish to complete this activity during the Culminating Activities section at the end of the domain.
[Optional] This activity can be completed with crayon shavings instead of chocolate chips.
• Using the Response Cards: Sets One and Two, review with students the three types of rocks (igneous, sedimentary, and metamorphic) and how each is formed (heat, time, and pressure).
• Tell students that you are going to use different-colored chocolate chips (or crayon shavings) to demonstrate how each type of rock is formed using heat, pressure, and time.
• To create igneous rocks, melt one color of chocolate chips. This can be done using a stove or hot plate, or by placing the chips on aluminum foil in a pan of very hot water. Allow the melted chips to cool. Remind students that igneous rocks are formed from magma (melted rock) that has been heated and then cooled, similar to how these chocolate chips have been melted and then cooled.
• To create sedimentary rocks, place each color of chocolate chips into separate plastic bags. Students can crush these chips inside the bag using their feet or hands. Next, layer each color of crushed chips into a clear jar. Have students help you press down on these layers using their hands to simulate the formation of sedimentary rocks. Remind students that sedimentary rocks are formed when pressure is applied to sediments over a long period of time, similar to how the crushed chips are layered and being pressed down upon.
• To create metamorphic rocks, fi rst place some crushed chocolate chips from the sedimentary rocks onto a piece of aluminum foil. Next, have students apply pressure to the chips using their hands or feet. Then, place the foil in a pan of very hot water to melt the layers. Allow the melted layers to cool. Remind students that metamorphic rocks are igneous or sedimentary rocks that undergo extreme amounts of heat and pressure,
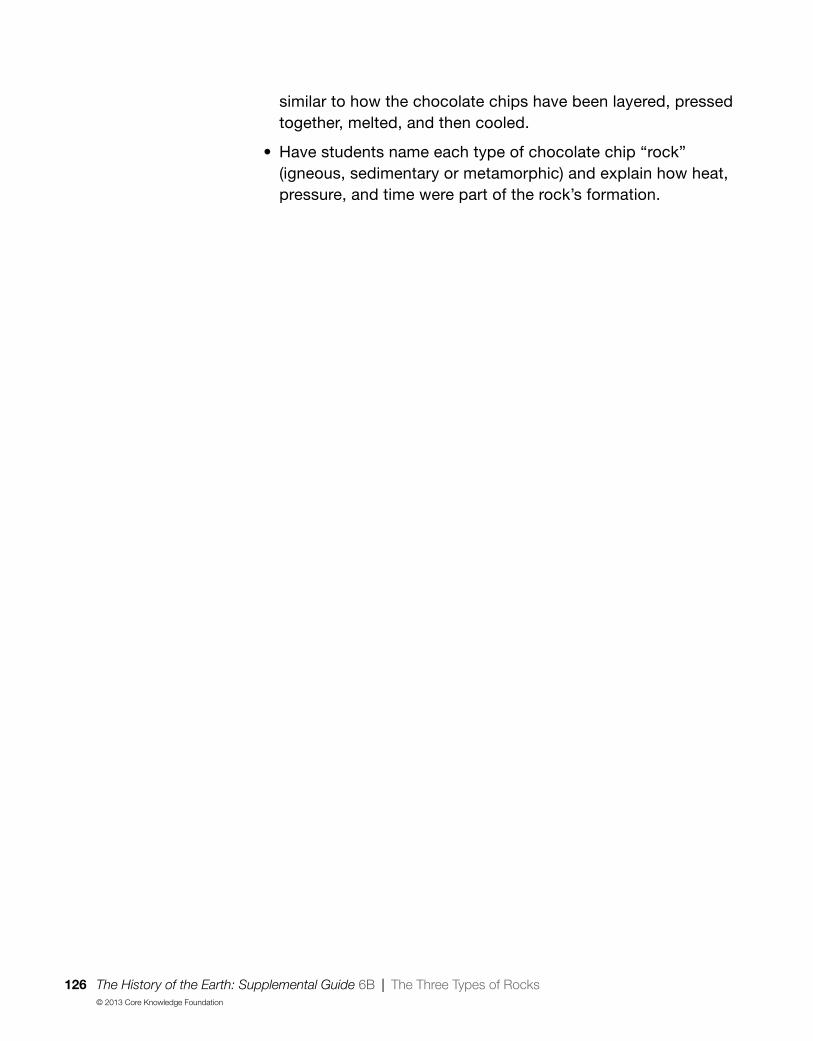
126 The History of the Earth: Supplemental Guide 6B | The Three Types of Rocks
© 2013 Core Knowledge Foundation
similar to how the chocolate chips have been layered, pressed together, melted, and then cooled.
• Have students name each type of chocolate chip “rock” (igneous, sedimentary or metamorphic) and explain how heat, pressure, and time were part of the rock’s formation.
The History of the Earth: Supplemental Guide 7 | Fossils 127
© 2013 Core Knowledge Foundation
Lesson Objectives
Core Content Objectives
Students will:
Explain that much of our knowledge of the earth and its history is the result of the work of many scientists
Describe how heat, pressure, and time cause many changes inside the earth
Describe fossils
Explain how fossils provide information about the history of the earth
Language Arts Objectives
The following language arts objectives are addressed in this lesson. Objectives aligning with the Common Core State Standards are noted with the corresponding standard in parentheses. Refer to the Alignment Chart for additional standards addressed in all lessons in this domain.
Students will:
Describe the connection between layers of sediment and sedimentary rock and fossils (RI.1.3)
Write and illustrate details about something the student thinks should be preserved and explain the reason for his or her choice (W.1.1)
Clarify information about “Fossils,” by asking questions that begin with what (SL.1.2)
Write and illustrate details from the read-aloud “Fossils” and discuss with one or more peers (SL.1.5)
Use frequently occurring conjunctions, such as or
Evaluate and select read-alouds on the basis of personal choice for rereading
FossilsFossils 7

128 The History of the Earth: Supplemental Guide 7 | Fossils
© 2013 Core Knowledge Foundation
Core Vocabulary
fossil, n. The remains or trace of an animal or plant from a long time agoExample: The scientists found a large fi sh fossil.Variation(s): fossils
impression, n. A mark or shape made by pressing on a surfaceExample: The children’s feet made impressions on the wet sand.Variation(s): impressions
paleontologist, n. Someone who studies living things from long ago by looking at fossils Example: The paleontologist traveled to many different places to study fossils.Variation(s): paleontologists
preserved, v. Kept in good condition over a long period of timeExample: The cold temperature of the refrigerator preserved the fruits and vegetables.Variation(s): preserve, preserves, preserving
Vocabulary Chart for FossilsCore Vocabulary words are in bold.Multiple Meaning Word Activity word is underlined.Vocabulary Instructional Activity words have an asterisk (*).Suggested words to pre-teach are in italics.
Type of Words Tier 3Domain-Specifi c Words
Tier 2General Academic Words
Tier 1Everyday-Speech Words
Understanding
amphibianexoskeletonfossils
fossilizedpaleontologist
reptilesedimentstrilobite
buriedestimatepreserved*
rottedtimeline
bonesdead/dieddinosaurlobsters/crabs
Multiple Meaning
impression
layerssoilspread
fishplantsail
Phrases
basic geologic factorsgeologic periodssedimentary rocksfossil record
time periods
Cognates
anfibiofósil
fosilizadopaleontologista
reptil sedimentos
estimarimpresión
preservado*
dinosaurioplanta

The History of the Earth: Supplemental Guide 7 | Fossils 129
© 2013 Core Knowledge Foundation
Note: Introducing the Read-Aloud and Extensions may have activity options that exceed the time allocated for that part of the lesson. To remain within the time periods allocated for each portion of the lesson, you will need to make conscious choices about which activities to include based on the needs of your students.
Exercise Materials Details
Introducing the Read-Aloud (10 minutes)
What Have We Already
Learned?
chart paper, markers Record student responses of what Gerry the Geologist has taught them.
What Do We Know? Instructional Master 7A-1 (Plant and Animal T-Chart); chart paper, markers
Use the T-Chart to record the plants and animals named by students.
Vocabulary Preview:
Paleontologist, Fossils
Image 7A-1
Image 7A-3; Image Cards 10 (Trilobite), 12 (Fish Fossils), 13 (Fern Fossil)
Purpose for Listening
Presenting the Read-Aloud (15 minutes)
Fossils Image Cards 10–13 ; Instructional Master 7A-2 (Fossil Timeline), chart paper, markers
Create a Fossil Timeline using the chart paper and Image Cards to help students understand what the different fossils tell us about the history of the earth.
Discussing the Read-Aloud (15 minutes)
Comprehension Questions Images 7A-5, 7A-6, 7A-7, 7A-9 Use the images to help scaffold student understanding of the comprehension questions.
Word Work: Preserved
Complete Remainder of the Lesson Later in the Day
Extensions (20 minutes)
Venn Diagram Instructional Master 7B-1 (Venn Diagram), chart paper, markers
Complete a Venn diagram with students to compare and contrast a geologist (Gerry) to a paleontologist (Pam).

130 The History of the Earth: Supplemental Guide 7 | Fossils
© 2013 Core Knowledge Foundation
Exercise Materials Details
Fossil Museum [Optional] Fossil dough: 1 cup wet, used coffee grounds, ½ cup cold coffee, ½ cup salt, 1 1/3 cups flour, medium-sized bowl, wax or parchment paper, wire baking rack; toy insects, leaves, shells, or stones.
Make homemade fossils with students by creating impressions in dough with toy insects, leaves, shells, or stones. Note: You may wish to continue this activity during Culminating Activities.
Fossils Timeline; homemade fossils; index cards, writing tools
Create a classroom museum by having students sort, label, and display their homemade fossils.
Domain-Related Trade Book trade book about fossils; drawing paper, drawing tools
Advance Preparation
Create a Plants and Animals T-Chart, using Instructional Master 7A-1 as a guide.
➶ Above and Beyond: Make copies of Instructional Master 7A-1 for students who are ready to complete this chart on their own.
Create a Fossils Timeline, using Instructional Master 7A-2 as a guide. The Timeline should follow this order:
Image Card 10
Image Card 11
Image Card 12
Image Card 13
For the Venn Diagram, create a large Venn Diagram, using Instructional Master 7B-1 as a guide.
➶ Above and Beyond: Make individual copies of Instructional Master 7B-1 for students who are ready to complete this activity on their own.
For the Fossil Museum, gather any fossils students made at home and brought to school. [Optional] You may wish to prepare additional fossils using the following ingredients: 1 cup wet, used coffee grounds; ½ cup cold coffee; ½ cup salt; and 1 1/3 cups fl our. For this activity, you will also need a medium-sized bowl,
The History of the Earth: Supplemental Guide 7 | Fossils 131
© 2013 Core Knowledge Foundation
parchment, or waxed paper and a wire rack. Students will enjoy pressing toy insects, leaves, shells, or stones into the dough to create imprints. Note: Be sure to check with your school’s policy regarding food distribution and allergies.
Find a trade book about fossils to read-aloud to the class.
Notes to Teacher
Remind students that Gerry the Geologist studies non-living things that are related to the history of the earth: rocks, minerals, volcanoes, and geysers. Pam the Paleontologist studies living things that were living on the earth many years ago. Plants and animals are living things. Fossils are preserved examples of those living things that provide clues to what life was like on earth during that period of time.
When creating the Fossil Timeline during the read-aloud, be sure to explain to students that paleontologists determine when the animals and plants lived by looking at the rock layer in which that plant or animal fossil was found.

132 The History of the Earth: Supplemental Guide 7A | Fossils
© 2013 Core Knowledge Foundation
Note: Introducing the Read-Aloud may have activity options that exceed the time allocated for this part of the lesson. To remain within the time periods allocated for this portion of the lesson, you will need to make conscious choices about which activities to include based on the needs of your students.
Introducing the Read-Aloud 10 minutes
What Have We Already Learned? 10 minutes
What Has Gerry the Geologist Taught Us?
There are three types of rocks: igneous, sedimentary and metamorphic.
Heat, pressure and time are the three forces of geology.
Minerals are small parts of rocks. All rocks have one or more minerals. Some minerals are crystals.
The earth is a sphere. The globe is a model of the earth.
The earth’s surface is covered by continents and oceans.
The earth has four layers: a thin crust, the mantle, the outer core and the inner core.
Heat, pressure, and time cause volcanic activity: volcanoes and geysers.
Review with students the type of scientist Gerry is and what he studies. Have students share the things that Gerry the Geologist has taught them, such as the three types of rocks, various minerals, volcanoes, geysers, etc. Tell students that all of these things are not living; they are not plants or animals.
Explain that there are other scientists called paleontologists, who study things that were living on the earth many years ago. Have students say the word paleontologist three times. Remind students that plants and animals are living things.
FossilsFossils 7A

The History of the Earth: Supplemental Guide 7A | Fossils 133
© 2013 Core Knowledge Foundation
What Do We Know? 5 minutes
Have students name plants or animals that live on the earth now. Tell them that today they will meet a friend of Gerry’s who will tell them about plants and animals that lived on the earth many, many years ago.
Vocabulary Preview 5 minutes
Paleontologist
Show Image 7A-1: Pam the Paleontologist
1. In today’s read-aloud you will meet Pam. Pam is a paleontologist.
2. Say paleontologist with me three times.
3. A paleontologist is a scientist who studies life that existed on earth long ago.
4. The paleontologist found something in a rock from thousands of years ago. The paleontologist will use clues from the rock to fi nd out what life was like a long, long time ago on earth.
5. Gerry is a geologist. Pam is a paleontologist. They both are scientists, but they study different things. Turn and tell your partner which type of scientist, paleontologist or geologist, you would prefer to be when you grow up.
Fossils
Show image 7A-3: Fossilized shell
1. Paleontologists study something called fossils. [Point to the fossilized shell.]
2. Say fossil with me three times.
3. A fossil is the preserved body or imprint of a plant or animal that lived a long time ago. Fossils give paleontologists clues about what life on Earth was like a long time ago.
4. Henry found a fossil of a seashell when he was walking with his dad on a small island.
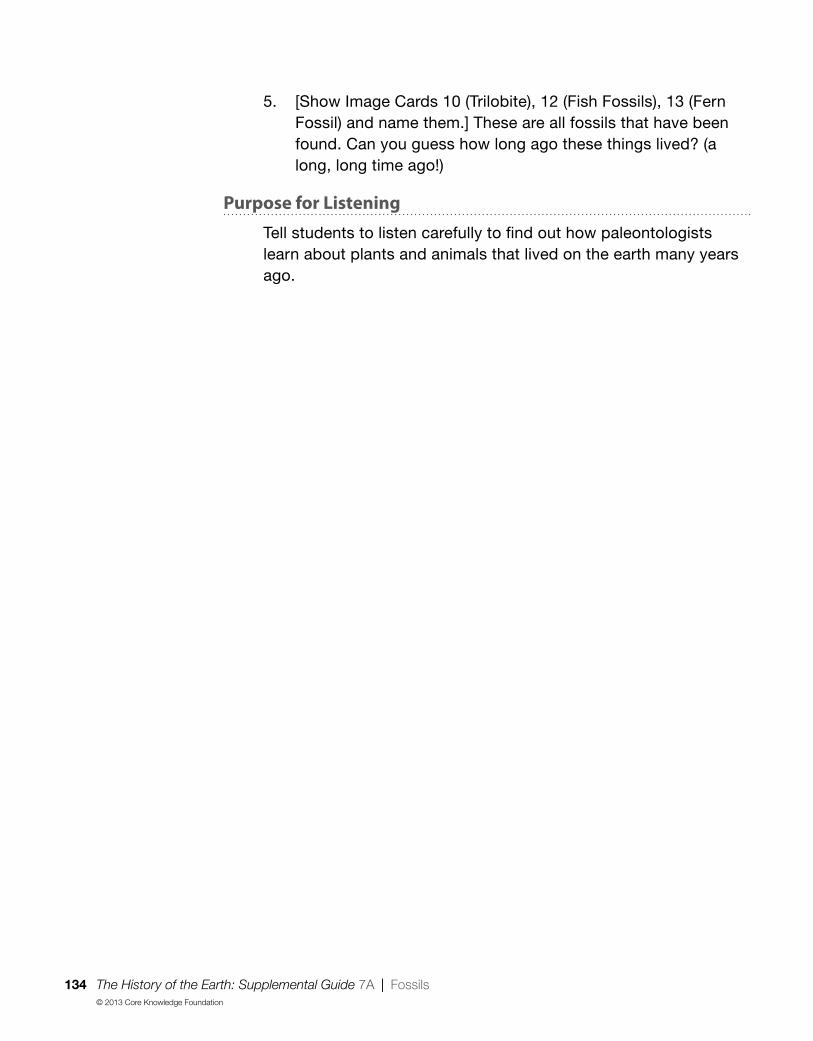
134 The History of the Earth: Supplemental Guide 7A | Fossils
© 2013 Core Knowledge Foundation
5. [Show Image Cards 10 (Trilobite), 12 (Fish Fossils), 13 (Fern Fossil) and name them.] These are all fossils that have been found. Can you guess how long ago these things lived? (a long, long time ago!)
Purpose for Listening
Tell students to listen carefully to fi nd out how paleontologists learn about plants and animals that lived on the earth many years ago.
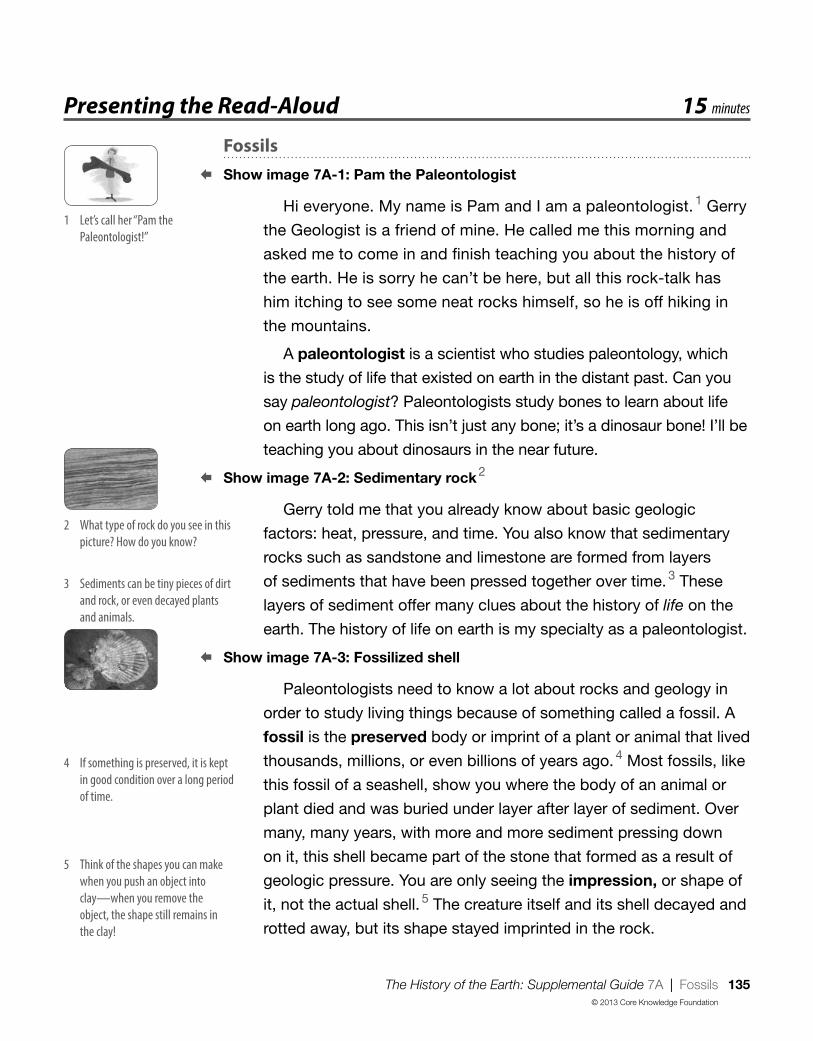
The History of the Earth: Supplemental Guide 7A | Fossils 135
© 2013 Core Knowledge Foundation
5 Think of the shapes you can make
when you push an object into
clay—when you remove the
object, the shape still remains in
the clay!
Presenting the Read-Aloud 15 minutes
Fossils
Show image 7A-1: Pam the Paleontologist
Hi everyone. My name is Pam and I am a paleontologist. 1 Gerry
the Geologist is a friend of mine. He called me this morning and
asked me to come in and fi nish teaching you about the history of
the earth. He is sorry he can’t be here, but all this rock-talk has
him itching to see some neat rocks himself, so he is off hiking in
the mountains.
A paleontologist is a scientist who studies paleontology, which
is the study of life that existed on earth in the distant past. Can you
say paleontologist? Paleontologists study bones to learn about life
on earth long ago. This isn’t just any bone; it’s a dinosaur bone! I’ll be
teaching you about dinosaurs in the near future.
Show image 7A-2: Sedimentary rock 2
Gerry told me that you already know about basic geologic
factors: heat, pressure, and time. You also know that sedimentary
rocks such as sandstone and limestone are formed from layers
of sediments that have been pressed together over time. 3 These
layers of sediment offer many clues about the history of life on the
earth. The history of life on earth is my specialty as a paleontologist.
Show image 7A-3: Fossilized shell
Paleontologists need to know a lot about rocks and geology in
order to study living things because of something called a fossil. A
fossil is the preserved body or imprint of a plant or animal that lived
thousands, millions, or even billions of years ago. 4 Most fossils, like
this fossil of a seashell, show you where the body of an animal or
plant died and was buried under layer after layer of sediment. Over
many, many years, with more and more sediment pressing down
on it, this shell became part of the stone that formed as a result of
geologic pressure. You are only seeing the impression, or shape of
it, not the actual shell. 5 The creature itself and its shell decayed and
rotted away, but its shape stayed imprinted in the rock.
2 What type of rock do you see in this
picture? How do you know?
3 Sediments can be tiny pieces of dirt
and rock, or even decayed plants
and animals.
1 Let’s call her “Pam the
Paleontologist!”
4 If something is preserved, it is kept
in good condition over a long period
of time.

136 The History of the Earth: Supplemental Guide 7A | Fossils
© 2013 Core Knowledge Foundation
Show image 7A-4: Fossil hunter
As you dig down into the earth, the soil and rocks are divided
into layers. These layers represent different geologic periods, or
times during which the crust and surface of the earth changed.
For instance, if you fi nd a layer of sandstone on dry land, then
you know that there may have been an ocean or river over land at
some point in the distant past. 6 We can estimate how old certain
fossils may be thanks to our understanding of geology and rock
layers.
Fossils are usually found in layers of sedimentary rocks, though
they can be found in other rock formations as well. It looks like the
paleontologist in this picture has found a good place for fossil hunting.
He has to dig very carefully to make sure he keeps the fossils in good
condition.
Every fossil is part of the earth’s fossil record. The fossil record
includes everything we have learned about the history of life from
studying fossils. The fossil record is what paleontologists study
in order to fi gure out what life on earth was like many years ago.
Paleontologists can determine when the animals and plants imprinted
in the fossils lived based on the rock layers in which they were found.
They use information from all fossils to create a timeline of life on
earth. 7 Today, I would like to show you several different fossils from
different time periods during the history of the earth.
Show image 7A-5: Trilobite
This is a fossil of a trilobite, an animal that some scientists
believe lived about 550 million years ago. Trilobites may look like
insects, but they are more closely related to lobsters and crabs.
Trilobites came in many varieties, from a half-inch up to twenty-
eight inches in length. 8 They had antennas, lots of legs, and a hard
outer shell called an exoskeleton. That exoskeleton is important
because it meant that dead trilobites were easily fossilized when
they became buried in the sand.
6 That means that by examining
rocks in our area, scientists can tell
if there used to be an ocean where
our city is now and how long ago
that was.
7 A timeline shows the order in
which plants and animals existed,
from long ago to today.
8 [Show these lengths with a ruler or
yardstick.]

The History of the Earth: Supplemental Guide 7A | Fossils 137
© 2013 Core Knowledge Foundation
Show image 7A-6: Cooksonia fossil
At about this same time, the fossil record estimates that the fi rst
plants appeared on land. Back then, there was no soil on the land,
because soil contains dead, decayed plants. Since these were the
fi rst plants on land, no plants had yet died in order to create soil.
The fi rst plants did not have the same characteristics as plants
today. These plants were less than half an inch tall and they had no
roots, leaves, fl owers, or seeds, but they were plants nevertheless. 9
Show image 7A-7: Fish fossils
Soon came the Age of Fish. Many different types of fi sh ruled
the waters.
Show image 7A-8: Tetrapod recreation
Also during this time, plant and animal life on land began
to spread rapidly. The fi rst soils developed on land, allowing
new types of plants with leaves, stems, and roots to grow. With
new plants came new land creatures ready to eat those plants.
Tetrapods, the fi rst amphibians, made their way onto the beaches.
An amphibian is an animal that lives part of its life in water and
part on land, like a frog.
Paleontologists have found many tetrapod fossils. An artist drew
this picture using a tetrapod fossil, which shows what a real tetrapod
might have looked like. Do you think any of this tetrapod’s body parts
look like they belong to a fi sh? 10
Show image 7A-9: Fern fossil
Then, lush forests full of trees and plants, such as ferns, began
to grow.
Show image 7A-10: First reptiles
As forests increased, so too did the variety and sizes of
animals. The fi rst giant reptiles appeared. Of course, the one in
this picture—called a dimetrodon—is just a model that someone
made, but they based this model on fossilized dimetrodon bones
found in the earth. Paleontologists call the body part sticking up
on its back a sail because it looks like the sail on a boat.
9 [Show the height of less than half
an inch with a ruler.]
10 [Pause for students to answer.]

138 The History of the Earth: Supplemental Guide 7A | Fossils
© 2013 Core Knowledge Foundation
Dimetrodon was not a dinosaur, but it certainly looked like one, and
dinosaurs were soon to follow. We will learn more about dinosaurs next
time. That is as far as the fossil record will take us today!
Discussing the Read-Aloud 15 minutes
Comprehension Questions 10 minutes
1. Literal What do paleontologists like Pam study? (Paleontologists study the history of life on the earth.)
2. Literal What is a fossil? (A fossil is the preserved body or imprint of a plant or animal that lived long, long ago.)
3. Literal Are fossils formed over a short period of time or a very long period of time? (Fossils are formed over a very long period of time.)
Show image 7A-5: Trilobite
4. Inferential What does this fossil tell us about the history of the earth? (Animals called trilobites lived long, long, long ago.)
Show image 7A-6: Cooksonia fossil
5. Inferential What does this fossil tell us about the history of the earth? (The fi rst plants lived on the earth long, long ago.)
Show image 7A-7: Fish fossils
6. Inferential What does this fossil tell us about the history of the earth? (Fish lived on the earth long, long ago.)
Show image 7A-9: Fern fossil
7. Inferential What does this fossil tell us about the history of the earth? (Ferns lived on the earth long, long ago.)
[Please continue to model the Question? Pair Share process for students, as necessary, and scaffold students in their use of the process.]
8. Evaluative What? Pair Share: Asking questions after a read-aloud is one way to see how much everyone has learned. Think of a question you can ask your neighbor about the read-aloud that starts with the word what. For example, you could ask, “What did you learn about in today’s read-aloud?” Turn

The History of the Earth: Supplemental Guide 7A | Fossils 139
© 2013 Core Knowledge Foundation
to your neighbor and ask your what question. Listen to your neighbor’s response. Then your neighbor will ask a new what question and you will get a chance to respond. I will call on several of you to share your questions with the class.
9. After hearing today’s read-aloud and questions and answers, do you have any remaining questions? [If time permits, you may wish to allow for individual, group, or class research of the text and/or other resources to answer these questions.]
Word Work: Preserved 5 minutes
1. In the read-aloud you heard, “A fossil is the preserved body or imprint of a plant or animal that lived thousands, millions, or even billions of years ago.”
2. Say the word preserved with me.
3. If something is preserved, it is kept in good condition over time.
4. My mother preserved the pictures by putting them in a photo album.
5. Why is it important that things be preserved? Try to use the word preserved when you tell about it. [Ask two or three students. If necessary, guide and/or rephrase the students’ responses: “ should be preserved because . . .”]
6. What’s the word we’ve been talking about?
Use a Sharing Activity for follow-up. Directions: We often talk about how important it is that the earth be preserved for everyone to enjoy. For example, the oceans, the trees, and the rocks should be preserved. Think of one place on the earth that you think should be preserved for everyone to enjoy. Turn and tell your partner about that one thing that you think should be preserved. I will call on several of you to share, and we will see if any of you came up with the same places.
Complete Remainder of the Lesson Later in the Day

140 The History of the Earth: Supplemental Guide 7B | Fossils
© 2013 Core Knowledge Foundation
Note: Extensions may have activity options that exceed the time allocated for this part of the lesson. To remain within the time periods allocated for this portion of the lesson, you will need to make conscious choices about which activities to include based on the needs of your students.
Extensions 20 minutes
Venn Diagram: Comparing Geology and Paleontology
(Instructional Master 7B-1) 15 minutes
• Show students the Venn diagram and explain that, as a class, you will use it to compare and contrast the work of a geologist and a paleontologist. Remind students that to compare is to tell how things are similar and to contrast is to tell how things are different.
• Ask students: “How is the work of a geologist and a paleontologist the same?” Write student responses where the two circles intersect. Possible responses include the following:
• Both are scientists.
• Both study the history of the earth.
• Ask students: “How is the work of a geologist different from the work of a paleontologist?” Write responses in the appropriate section. Possible responses include the following:
• Geologists study non-living things related to the earth, such as rocks and what is inside the earth.
• Paleontologists use fossils to study plants and animals that lived on earth.
FossilsFossils 7B

The History of the Earth: Supplemental Guide 7B | Fossils 141
© 2013 Core Knowledge Foundation
Fossil Museum 20 minutes
• [Optional] Considering making fossils in the classroom with students. The fossils need time to dry, so the museum component of this extension could be completed as one of the Culminating Activities for this domain. The dough recipe below will produce approximately eight fossils the size of a saucer.
Homemade Fossil Recipe: Make dough by combining 1 cup wet, used coffee grounds, ½ cup cold coffee, ½ cup salt and 1 1/3 cups fl our in a medium-sized bowl. Have students mix these ingredients together with their hands until mix resembles modeling dough. Add more fl our if dough is sticky. Work with students to divide the dough into balls and place each ball onto parchment or waxed paper. Have students use their hands to fl atten their ball of dough and then press toy insects, leaves, shells, or stones into the dough to create imprints. Allow the fossils to dry overnight on a wire rack.
• Gather all the fossils together, and count the total number of fossils. Divide the students into groups based on the number of fossils. Each group should have at least one fossil.
• Discuss the characteristics of fossils with students. (Most fossils form after a plant or animal is buried under layers of sediment. Pressure on the sediment preserves the body or imprint of the plant or animal, leaving a fossil.)
• Explain to students that they are going to examine and label the fossils and then make a fossil display.
• Give each group writing tools and index cards. Ask the group to look closely at their fossil and to determine if it is a plant or an animal fossil.
• Have each group write a label for each of their fossils, using the sound-spelling correspondences taught thus far.
• Ask students how the fossil display should be organized (e.g., plant fossils and animal fossils). Make index card labels for the categories, and place them on a tabletop or clear surface. Invite students to display their fossils and the corresponding labels in the “museum.”
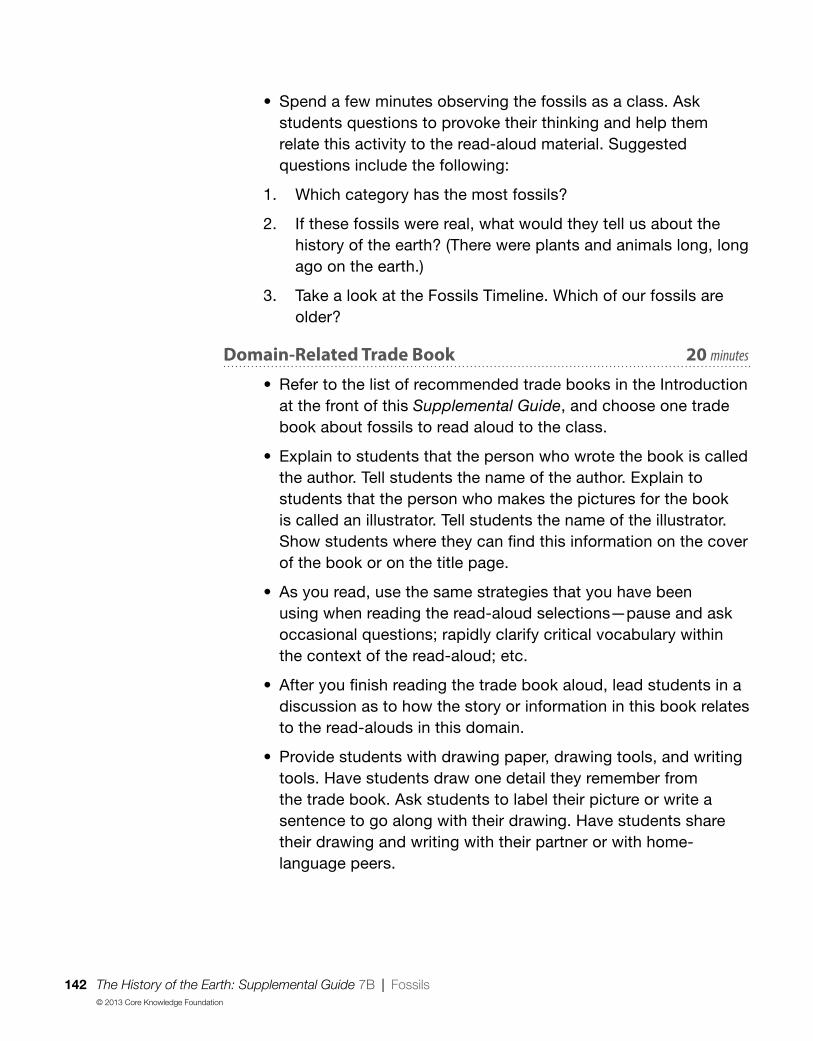
142 The History of the Earth: Supplemental Guide 7B | Fossils
© 2013 Core Knowledge Foundation
• Spend a few minutes observing the fossils as a class. Ask students questions to provoke their thinking and help them relate this activity to the read-aloud material. Suggested questions include the following:
1. Which category has the most fossils?
2. If these fossils were real, what would they tell us about the history of the earth? (There were plants and animals long, long ago on the earth.)
3. Take a look at the Fossils Timeline. Which of our fossils are older?
Domain-Related Trade Book 20 minutes
• Refer to the list of recommended trade books in the Introduction at the front of this Supplemental Guide, and choose one trade book about fossils to read aloud to the class.
• Explain to students that the person who wrote the book is called the author. Tell students the name of the author. Explain to students that the person who makes the pictures for the book is called an illustrator. Tell students the name of the illustrator. Show students where they can fi nd this information on the cover of the book or on the title page.
• As you read, use the same strategies that you have been using when reading the read-aloud selections—pause and ask occasional questions; rapidly clarify critical vocabulary within the context of the read-aloud; etc.
• After you fi nish reading the trade book aloud, lead students in a discussion as to how the story or information in this book relates to the read-alouds in this domain.
• Provide students with drawing paper, drawing tools, and writing tools. Have students draw one detail they remember from the trade book. Ask students to label their picture or write a sentence to go along with their drawing. Have students share their drawing and writing with their partner or with home-language peers.
The History of the Earth: Supplemental Guide 8 | Dinosaurs 143
© 2013 Core Knowledge Foundation
Lesson Objectives
Core Content Objectives
Students will:
Understand that much of our knowledge of the earth and its history is the result of the work of many scientists
Describe fossils
Explain how fossils provide information about the history of the earth
Explain how we know about dinosaurs
Describe various dinosaurs
Language Arts Objectives
The following language arts objectives are addressed in this lesson. Objectives aligning with the Common Core State Standards are noted with the corresponding standard in parentheses. Refer to the Alignment Chart for additional standards addressed in all lessons in this domain.
Students will:
Describe the connection between layers of sediment, sedimentary rock, fossils, and dinosaurs (RI.1.3)
Compare and contrast different types of dinosaurs (RI.1.9)
Write and illustrate details about a favorite dinosaur and explain the reason for their choice (W.1.1)
Write and illustrate details from the read-aloud “Dinosaurs” and discuss with one or more peers (SL.1.5)
Identify new meanings of familiar words, such as plate, and apply them accurately
DinosaursDinosaurs 8
144 The History of the Earth: Supplemental Guide 8 | Dinosaurs
© 2013 Core Knowledge Foundation
Core Vocabulary
debris, n. The scattered pieces of something that has been broken or destroyedExample: A pile of debris remained after the volcano erupted. Variation(s): none
excavating, v. Making a hole to uncover something by digging Example: The paleontologists are excavating the dinosaur bones from the side of the mountain.Variation(s): excavate, excavates, excavated
extinct, adj. No longer living or existingExample: Dinosaurs are extinct.Variation(s): none
fossilized, adj. Made into a fossilExample: The fossilized remains of dinosaur bones are dug up and studied.Variation(s): none
meteor, n. A piece of rock from spaceExample: The meteor left a bright trail as it streaked through the sky.Variation(s): meteors
meteorite, n. A meteor that has landed on EarthExample: A meteorite was found in the desert.Variation(s): meteorites
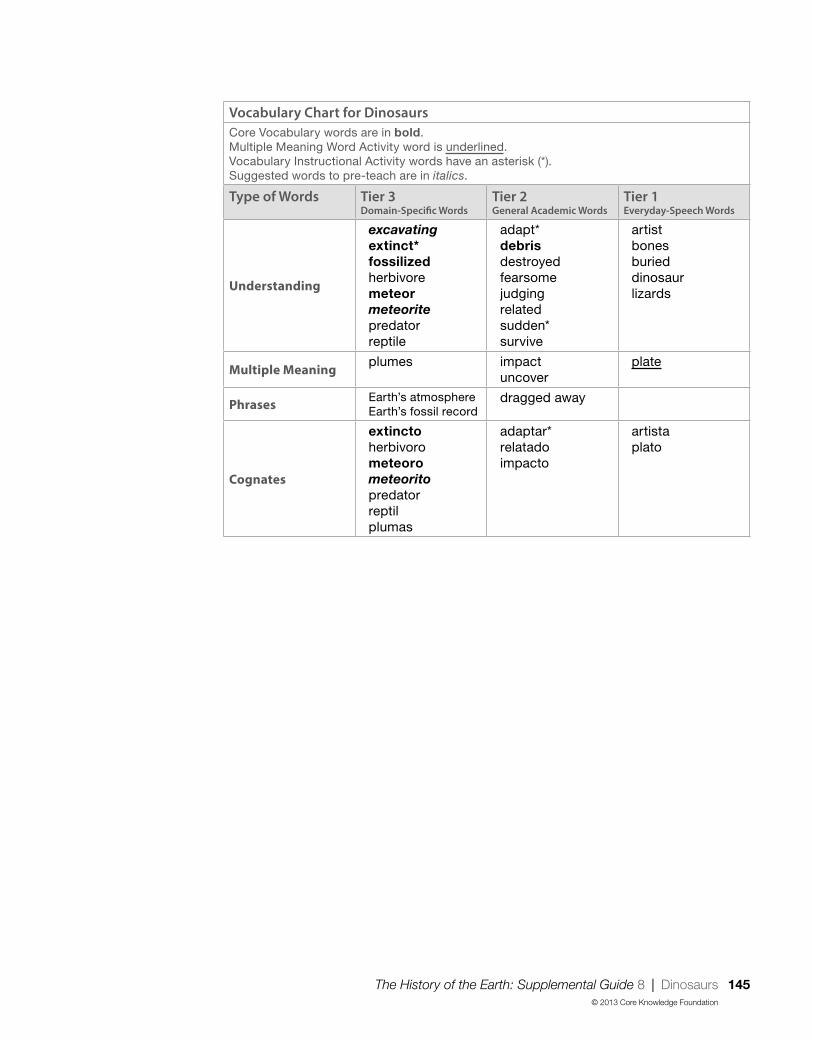
The History of the Earth: Supplemental Guide 8 | Dinosaurs 145
© 2013 Core Knowledge Foundation
Vocabulary Chart for DinosaursCore Vocabulary words are in bold.Multiple Meaning Word Activity word is underlined.Vocabulary Instructional Activity words have an asterisk (*).Suggested words to pre-teach are in italics.
Type of Words Tier 3Domain-Specifi c Words
Tier 2General Academic Words
Tier 1Everyday-Speech Words
Understanding
excavating
extinct*
fossilized
herbivoremeteor
meteorite
predatorreptile
adapt*debris
destroyedfearsomejudgingrelatedsudden*survive
artistbonesburieddinosaurlizards
Multiple Meaningplumes impact
uncoverplate
PhrasesEarth’s atmosphereEarth’s fossil record
dragged away
Cognates
extincto
herbivorometeoro
meteorito
predatorreptilplumas
adaptar*relatadoimpacto
artistaplato

146 The History of the Earth: Supplemental Guide 8 | Dinosaurs
© 2013 Core Knowledge Foundation
Note: Introducing the Read-Aloud and Extensions may have activity options that exceed the time allocated for that part of the lesson. To remain within the time periods allocated for each portion of the lesson, you will need to make conscious choices about which activities to include based on the needs of your students.
Exercise Materials Details
Introducing the Read-Aloud (10 minutes)
What Have We Already
Learned?
Fossils Timeline Use the Fossils Timeline to help students remember the order in which some scientists believe that living things inhabited the earth.
Layered cookies, such as a vanilla wafer cookies, and napkin: one per student
Have students pretend the wafer is rock and the soil is the cream. The layers represent different geologic times when changes happened to the earth’s crust.
Vocabulary Preview:
Excavating, Meteorite
Image 8A-4
Images 8A-11 and 8A-10
Purpose for Listening Instructional Master 1A-1 (Dinosaurs Idea Web); chart paper, makers, tape
Create a Dinosaurs Idea Web. Ask students what they already know about dinosaurs.
Presenting the Read-Aloud (15 minutes)
Dinosaurs Dinosaurs Idea Web; Instructional Master 8A-1 (Dinosaur Image Sheet)
Pause throughout the read-aloud to record student observations about dinosaurs on the chart. Add the dinosaur images from the Dinosaur Image Sheet.
yardstick Use the yardstick to help students conceptualize the different dinosaur measurements mentioned in the read-aloud.
U.S. Map Use the map to show students locations mentioned in the read-aloud.
Discussing the Read-Aloud (15 minutes)
Comprehension Questions Images 8A-1, 8A-3 Use the images to help support student understanding of the comprehension questions.
Word Work: Extinct Images 8A-2, 8A-3, 8A-7, 8A-9 Consider reviewing the names and images of the dinosaurs prior to the Sharing activity for follow-up.

The History of the Earth: Supplemental Guide 8 | Dinosaurs 147
© 2013 Core Knowledge Foundation
Exercise Materials Details
Complete Remainder of the Lesson Later in the Day
Extensions (20 minutes)
Multiple Meaning Word
Activity: Plate
Poster 4M (Plate)
Syntactic Awareness Activity:
Conjunctions because
Vocabulary Instructional
Activity: Adapt
chart paper, markers, tape, index cards
Create a Horizontal Word Wall to compare words related to the process of change.
Domain-Related Trade Book trade book about dinosaurs; drawing paper, drawing tools
Advance Preparation
Bring in vanilla wafer cookies and napkins. Note: Be sure to check with your school’s policy regarding food distribution and allergies.
Create a Dinosaurs Idea Web, using Instructional Master 1A-1 as a guide. [Note: The class will be fi lling in this web throughout this lesson. Use Instructional Master 8A-1 for images of dinosaurs.]
➶ Above and Beyond: Make a copy of a blank Idea Web (Instructional Master 1A-1) for students who are prepared to complete this graphic organizer on their own.
For the Vocabulary Instructional Activity, create a Horizontal Word Wall by drawing a horizontal line from left to right on a large chart paper. Write each of the following words on individual index cards: adapt, remain the same, change, modify, adjust, to get used to, keep on, continue, hold on, and wait.
Find a trade book about dinosaurs to read aloud to the class.
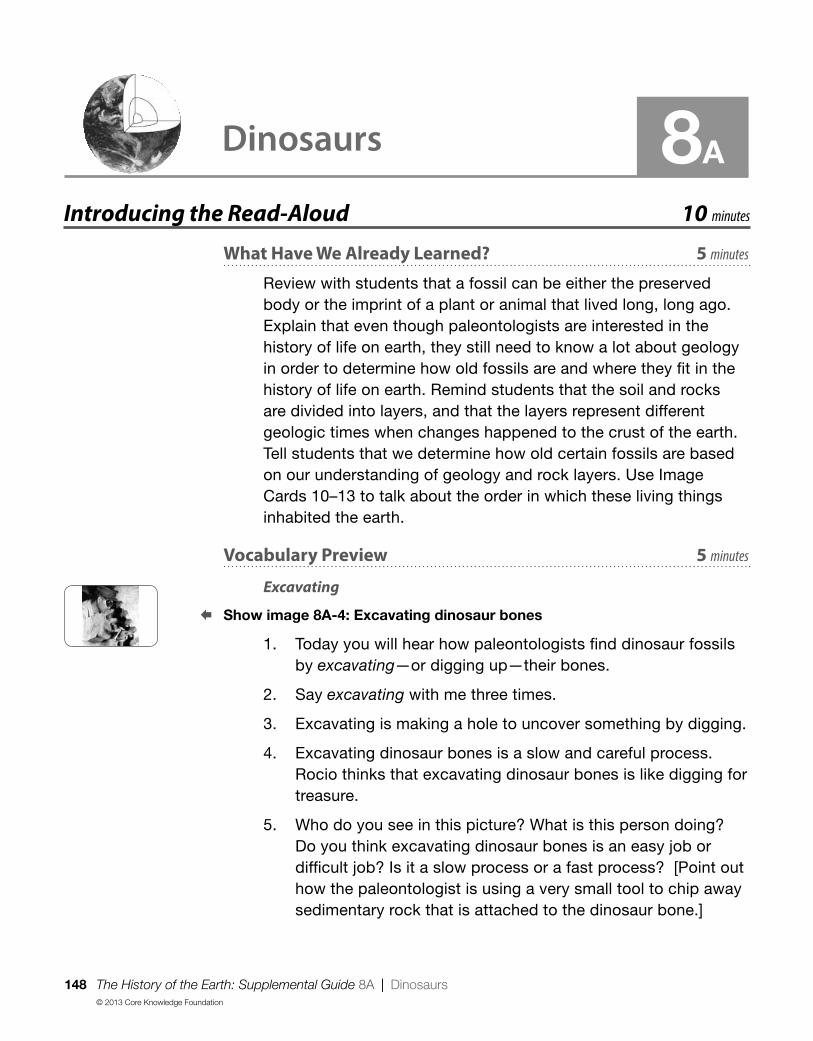
148 The History of the Earth: Supplemental Guide 8A | Dinosaurs
© 2013 Core Knowledge Foundation
Introducing the Read-Aloud 10 minutes
What Have We Already Learned? 5 minutes
Review with students that a fossil can be either the preserved body or the imprint of a plant or animal that lived long, long ago. Explain that even though paleontologists are interested in the history of life on earth, they still need to know a lot about geology in order to determine how old fossils are and where they fi t in the history of life on earth. Remind students that the soil and rocks are divided into layers, and that the layers represent different geologic times when changes happened to the crust of the earth. Tell students that we determine how old certain fossils are based on our understanding of geology and rock layers. Use Image Cards 10–13 to talk about the order in which these living things inhabited the earth.
Vocabulary Preview 5 minutes
Excavating
Show image 8A-4: Excavating dinosaur bones
1. Today you will hear how paleontologists fi nd dinosaur fossils by excavating—or digging up—their bones.
2. Say excavating with me three times.
3. Excavating is making a hole to uncover something by digging.
4. Excavating dinosaur bones is a slow and careful process.Rocio thinks that excavating dinosaur bones is like digging for treasure.
5. Who do you see in this picture? What is this person doing? Do you think excavating dinosaur bones is an easy job or diffi cult job? Is it a slow process or a fast process? [Point out how the paleontologist is using a very small tool to chip away sedimentary rock that is attached to the dinosaur bone.]
DinosaursDinosaurs 8A

The History of the Earth: Supplemental Guide 8A | Dinosaurs 149
© 2013 Core Knowledge Foundation
Meteorite
Show image 8A-11: Recovered meteorite
1. Today you will hear that the dinosaur extinction might have been caused by a giant meteorite from outer space. [Point to the meteorite.]
2. Say meteorite with me three times.
3. A meteorite is a meteor, or a piece of space rock, that falls from space to the earth’s surface.
4. Karina saw a piece of meteorite when she visited the natural history museum.
Show image 8A-10
5. Do you remember hearing about meteors in the Astronomy domain? Tell your partner what you know about meteors. (They are not stars; they fl y around in space; they burn up when they enter Earth’s atmosphere; they look like shooting stars.)
Purpose for Listening
Tell students to listen carefully to learn more about dinosaurs.

150 The History of the Earth: Supplemental Guide 8A | Dinosaurs
© 2013 Core Knowledge Foundation
Presenting the Read-Aloud 15 minutes
Dinosaurs
Hey there, fellow scientists! It’s Pam the Paleontologist again.
Last time I was here, I gave you a whirlwind tour of the history
of life on earth right up through the time of the dimetrodons, the
fi rst giant reptiles that had big sails on their backs. The age of the
dimetrodons was followed by a time known as the Age of Reptiles.
This era, according to some scientists, began approximately 245
million years ago. 1
Show image 8A-1: Tyrannosaurus Rex skeleton
This is a Tyrannosaurus Rex, or T. Rex as some people call
it. It was one of the largest and most fearsome predators ever
to walk the earth. 2 We can tell by its teeth that the T. Rex was a
meat eater. We also know that it was over forty feet long and up to
twenty feet tall. Judging by the size of its bones, it weighed about
seven tons, or more than two average-sized cars.
Show image 8A-2: T. Rex and Triceratops 3
This painting shows T. Rex facing off against a triceratops, a
dinosaur with long horns and a shield-like plate on its head. 4 Keep
in mind when you look at artwork like this, that nobody today really
knows what dinosaurs looked like. We have only seen their bones.
Artists use information supplied by scientists today to try to make
good guesses about what dinosaurs looked like when they were
alive. They do all this based on their bones! Many people think of
dinosaurs as giant reptiles, and in fact, the word dinosaur means
“terrifying lizard.” However, many paleontologists now believe
that dinosaurs are more closely related to birds than they are to
lizards. Whatever the case may be, there are no dinosaurs on earth
anymore. They have all been extinct—dead and gone—for many,
many years. 5 Now there are just fossilized bones of dinosaurs
buried in the earth’s crust.
1 This is a very, very long time
ago—long before humans existed.
Dinosaurs and humans never lived
on the earth together.
2 A predator is an animal that eats
other animals.
3 How are these two dinosaurs alike,
and how are they diff erent?
4 Here, the word plate means a fl at,
hard piece that covers the bodies of
some animals. The word plate also
has other meanings. The word plate
can also mean a fl at and usually
round dish that is used for eating or
serving food.
5 If something is extinct, is it still
around today?

The History of the Earth: Supplemental Guide 8A | Dinosaurs 151
© 2013 Core Knowledge Foundation
Show image 8A-3: Stegosaurus 6
Here is my personal favorite: the stegosaurus. Like the
triceratops, the stegosaurus was a herbivore, or plant eater, but it
had some pretty good ways of defending itself against the likes of
T. Rex and other meat eaters. Stegosaurus had hard, sharp plates
on its back, which would have made it diffi cult to bite. But just in
case anyone tried, the stegosaurus also had a spiky tail that could
really do some damage.
Show image 8A-4: Excavating dinosaur bones
How do we fi nd and learn about these incredible animals?
Some scientists believe that dinosaurs ruled the earth for more
than 100 million years, and their fossilized bones can be found in
many parts of the world, including the United States. 7 Dinosaur
fossils are hard to fi nd, and excavating—or digging up—their
bones is not as easy as you might think.
Once paleontologists fi nd an area that is likely to have dinosaur
bones, we move in with our tools and begin careful excavation.
Paleontologists must use sharp little knives and small brushes to
gradually scrape away the sedimentary rock surrounding the fossils. It
will take this paleontologist days and maybe even weeks to excavate
this one bone. It’s slow work, but to me there is nothing more exciting
in the world than carefully uncovering a bone that may have been
buried in rock for 100 million years.
Show image 8A-5: Large excavation
Here a paleontologist is excavating a large collection of bones
from the sandstone cliffs of Dinosaur National Monument, an area
located in the states of Colorado and Utah, where we have uncovered
hundreds and thousands of dinosaur bones. 8
Can you see all the bones in this picture? That was one big
dinosaur! But what did it really look like? It’s hard to tell because,
over time, the bones have moved around and become broken. As
a paleontologist, I sometimes feel like I spend half my life putting
puzzles together. Often we only fi nd a few bones—the rest of the
6 How would you describe this
dinosaur?
7 Fossilized means that over a long
period of time the bones have
become like a fossil or rock.
8 [Locate Colorado and Utah on a U.S.
map for students.]

152 The History of the Earth: Supplemental Guide 8A | Dinosaurs
© 2013 Core Knowledge Foundation
skeleton was long since destroyed or perhaps even dragged away
by a predator many, many years ago. Other times, lots of different
dinosaur bones can be mixed in together. We paleontologists have
to use our detective skills to fi gure out which bones belonged to
which type of dinosaur.
Show image 8A-6: Excavating Camarasaurus
In fact, those bones belonged to a mighty Camarasaurus. I
knew as soon as I saw its head. This plant eater was sixty feet
long and weighed about twenty tons. 9 A real whopper!
Show image 8A-7: Camarasaurus illustration
Here is one artist’s idea of what the Camarasaurus looked like.
It could use its long tail to fend off predators. Good thing you don’t
have to worry about these things anymore!
Show image 8A-8: Compsognathus 10
Not all dinosaurs were huge. In fact, some were really small.
Take the compsognathus. This little critter stood just two feet tall
and scurried around on two little bird-like legs. 11 Compsognathus
was a meat eater that fed on little lizards. We know this because
paleontologists found parts of fossilized lizard in the stomach
cavity of a compsognathus fossil.
Show image 8A-9: Tyrannosaurus Rex skeleton
What happened to the dinosaurs? You can’t go and see a
live T. Rex today at the zoo because dinosaurs are extinct. 12
Some scientists believe dinosaurs all died about 65 million years
ago. According to fossil records, the extinction of the dinosaurs
was quite sudden. Why? That’s something paleontologists have
been trying to answer ever since the fi rst dinosaur bones were
discovered and identifi ed nearly two hundred years ago.
9 A ton is a unit of weight equal
to 2,000 pounds. That means
this dinosaur weighed the same
amount as 10 cars when it was
alive! [Show students a yardstick
and tell them that this dinosaur
was as long as twenty yardsticks.]
10 How would you describe this
dinosaur?
11 Two feet is less than the length of
one yardstick.
12 Remember, extinct means that
there are no more dinosaurs left.

The History of the Earth: Supplemental Guide 8A | Dinosaurs 153
© 2013 Core Knowledge Foundation
Show image 8A-10: Meteor
For years, many scientists believed that extraordinary geologic
events, such as super volcanoes, must have had something to
do with it. These days, however, many scientists believe that the
dinosaur extinction was caused by a giant meteorite from outer
space. 13 There are billions of meteors, or burning chunks of debris
in outer space. Some meteors are quite large, but most are tiny,
between the size of a sand grain and a baseball. Meteors are
whizzing around all over the place in outer space. Occasionally, a
meteor crashes toward Earth. When this happens, the meteor hits
the atmosphere at an incredible speed and usually burns up as it
enters the uppermost parts of earth’s atmosphere. 14 Occasionally,
bits and pieces of meteors survive their trip through the
atmosphere and actually fall to earth. This is very rare, but it does
happen from time to time, and it is possible to fi nd pieces of them
on the ground. When part of a meteor survives the trip through the
atmosphere and lands on Earth, the meteor becomes a meteorite,
or space rock that has landed on Earth.
Show image 8A-11: Recovered meteorite
Now, let’s go back to dinosaur extinction. Some scientists think
that the dinosaur extinction was caused by a giant meteorite from
outer space. When the meteorite struck the earth, it sent massive
plumes of debris up into the atmosphere. 15 This debris would
have blocked out the light and energy of the sun, causing much of
the earth’s plant life to die and severely lowering the temperature.
Most creatures at the time would have been unable to adapt, and
they would have died out before the skies had a chance to clear.
Whether this is true or not remains to be seen, though
geologists have discovered at least one very large crater that
was caused by a meteorite impact about the time the dinosaurs
became extinct. Whatever the case, we know that dinosaurs
became extinct, making way for new kinds of life on earth. I, for
one, will continue to study the earth’s fossil record, and I am sure
13 A meteorite is a piece of rock that
falls from space to the earth.
14 [Remind students that they learned
in the Astronomy domain that this
creates a streak of light in the night
sky that some people think is a
shooting star.]
15 It sent large amounts of bits and
pieces of objects from the earth up
into the atmosphere.

154 The History of the Earth: Supplemental Guide 8A | Dinosaurs
© 2013 Core Knowledge Foundation
we will fi nd the answer some day, because the clues about the
history of the earth are all there in the rocks. Ask my friend Gerry
the Geologist, and he will tell you the same thing!
Discussing the Read-Aloud 15 minutes
Comprehension Questions 10 minutes
Show image 8A-1: Tyrannosaurus Rex skeleton
1. Inferential What is the name of this dinosaur? (The name of this dinosaur is Tyrannosaurus Rex.) Pretend that you are a paleontologist. How would you describe a Tyrannosaurus Rex to someone? (A Tyrannosaurus Rex was a very large dinosaur. It was a predator and ate meat.)
2. Inferential What does it mean when someone says that dinosaurs are extinct? (When someone says that dinosaurs are extinct, it means that there are no living dinosaurs left.)
Show image 8A-3: Stegosaurus
3. Literal What is the name of this dinosaur? (The name of this dinosaur is Stegosaurus.) Pretend that you are a paleontologist. How would you describe a Stegosaurus to someone? (A Stegosaurus was a plant eater with sharp plates on its back and a spiky tail.)
4. Inferential Do we know what dinosaurs really looked like? (No, we do not know what dinosaurs really looked like.) Why not? (Dinosaurs are extinct. They lived many, many years ago and only their bones have been found.)
5. Inferential How do we know anything about dinosaurs if they are extinct? (Paleontologists have found and studied fossilized dinosaur bones.)
6. Evaluative What do some scientists think caused dinosaurs to become extinct? (Some scientists think a meteorite caused dinosaurs to become extinct.) Do you think scientists will ever be sure? (Answers may vary.)
[Please continue to model the Think Pair Share process for students, as necessary, and scaffold students in their use of the process.]

The History of the Earth: Supplemental Guide 8A | Dinosaurs 155
© 2013 Core Knowledge Foundation
I am going to ask a question. I will give you a minute to think about the question, and then I will ask you to turn to your neighbor and discuss the question. Finally, I will call on several of you to share what you discussed with your partner.
7. Evaluative Think Pair Share: What would it be like to fi nd a dinosaur bone? (Answers may vary.)
8. After hearing today’s read-aloud and questions and answers, do you have any remaining questions? [If time permits, you may wish to allow for individual, group, or class research of the text and/or other resources to answer these questions.]
Word Work: Extinct 5 minutes
1. In the read-aloud you heard, “[Dinosaurs] have all been extinct—dead and gone—for many, many years.”
2. Say the word extinct with me.
3. If a plant or an animal is extinct, there are none left or living.
4. Some animals are protected so that they don’t become extinct.
5. Are there some animals that you think are in danger of becoming extinct? What can we do to protect animals today from becoming extinct? Try to use the word extinct when you tell about it. [Ask two or three students. If necessary, guide and/or rephrase the students’ responses: “We can protect animals today from becoming extinct by . . .”]
6. What’s the word we’ve been talking about?
Use a Sharing Activity for follow-up. Directions: Think about the dinosaurs you heard about in the read-aloud. [Review Flip Book images as necessary.] All dinosaurs are extinct. Turn and tell your partner which dinosaur you wish could still be living today instead of being extinct. See if your partner is thinking about the same dinosaur as you. Use the word extinct when you are talking to your partner.
Complete Remainder of the Lesson Later in the Day

156 The History of the Earth: Supplemental Guide 8B | Dinosaurs
© 2013 Core Knowledge Foundation
Note: Extensions may have activity options that exceed the time allocated for this part of the lesson. To remain within the time periods allocated for this portion of the lesson, you will need to make conscious choices about which activities to include based on the needs of your students.
Extensions 20 minutes
Multiple Meaning Word Activity 5 minutes
Sentence in Context: Plate
Note: You may choose to have students hold up one or two fi ngers to indicate which image shows the meaning being described, or have a student walk up to the poster and point to the image being described.
1. [Show Poster 4M (Plate).] In the read-aloud you heard, “This painting shows T. Rex facing off against a triceratops, a dinosaur with long horns and a shield-like plate on its head.” Here, plate means one of the fl at, hard pieces that covers the bodies of some animals. Which image shows this meaning of plate?
2. Plate can also mean a fl at and usually round dish that is used for eating or serving food. Which picture shows this type of plate?
3. Now with your partner, make a sentence for each meaning of plate. Try to use complete sentences. I will call on some of you to share your sentences with the class.
Syntactic Awareness Activity 5 minutes
Conjunction because
Note: The purpose of these syntactic activities is to help students understand the direct connection between grammatical structures
DinosaursDinosaurs 8B

The History of the Earth: Supplemental Guide 8B | Dinosaurs 157
© 2013 Core Knowledge Foundation
and the meaning of text. These syntactic activities should be used in conjunction with the complex text presented in the read-alouds. There may be variations in the sentences created by your class. Allow for these variations, and restate students’ sentences so that they are grammatical.
1. Conjunctions are a kind of word we use to connect words and phrases.
2. We use the conjunction because to join two phrases when the second phrase explains something from the fi rst phrase.
3. Listen to Pam the Paleontologist’s sentence about dinosaurs from the read-aloud. I will emphasize the word because as I read the selection to you:You can’t go and see a T. Rex today at the zoo because dinosaurs are extinct.
4. Notice that in this sentence, Pam the Paleontologist uses the word because when she explains why you cannot go see a T. Rex at the zoo.
5. The word because is used to give a reason for something:I will continue to study the earth’s fossil record, and I am sure we will fi nd the answer [to why dinosaurs are extinct], because the clues about the history of the earth are all there in the rocks. Pam the Paleontologist uses the word because to tell us why she is sure that someday we will fi nd the answer to why the dinosaurs became extinct.
6. Let’s listen to another example:Jinyi wanted to go to bed early because she had to wake up early for a fi eld trip. The word because explains why Jinyi wanted to go to bed early.
7. Turn and tell your partner why you would or would not want to go to bed early, using the word because. Make sure you listen to what your partner says, so you can tell the class.
158 The History of the Earth: Supplemental Guide 8B | Dinosaurs
© 2013 Core Knowledge Foundation
Vocabulary Instructional Activity 5 minutes
Horizontal Word Wall: Adapt
1. In today’s read-aloud you heard, “Now, let’s go back to dinosaur extinction. Some scientists think that the dinosaur extinction was caused by a giant meteorite from outer space. (. . .) Most creatures [were not able to] adapt, and they died out.” Here adapt means to change in a way that helps you deal with new or different conditions.
2. Let’s create a Horizontal Word Wall that describes the process of change. [Show students the chart paper, and point out the horizontal line.]
3. [Hold up the card for the phrase remain the same, and read it aloud.] Remain the same means nothing changes. [Tape the card on the left-hand side of the line.]
4. [Hold up the card for the word change, and read the word aloud.] Change is a word to describe when things are different or new. [Tape the card on the right-hand side of the line.]
5. [Hold up the card for the word adapt, and read the word aloud.] Should I put adapt closer to remain the same or closer to the word change? [Tape the card near the word change on the right-hand side of the line.]
6. [Repeat this process with the remaining cards: modify, adjust, get used to, keep on, continue, hold on, and wait. When all the cards have been attached to the Word Wall, read over the words with students.]
7. With your partner, choose two opposite words from the Horizontal Word Wall, and make a sentence for each word.
[Display the Horizontal Word Wall throughout the domain, and encourage students to add additional words to the wall.]
Domain-Related Trade Book 20 minutes
• Refer to the list of recommended trade books in the Introduction at the front of this Supplemental Guide, and choose one trade book about dinosaurs to read aloud to the class.

The History of the Earth: Supplemental Guide 8B | Dinosaurs 159
© 2013 Core Knowledge Foundation
• Explain to students that the person who wrote the book is called the author. Tell students the name of the author. Explain to students that the person who makes the pictures for the book is called an illustrator. Tell students the name of the illustrator. Show students where they can fi nd this information on the cover of the book or on the title page.
• As you read, use the same strategies that you have been using when reading the read-aloud selections—pause and ask occasional questions; rapidly clarify critical vocabulary within the context of the read-aloud; etc.
• After you fi nish reading the trade book aloud, lead students in a discussion as to how the story or information in this book relates to the read-alouds in this domain.
• Provide students with drawing paper, drawing tools, and writing tools. Have students draw one detail they remember from the trade book. Ask students to label their picture or write a sentence to go along with their drawing. Have students share their drawing and writing with their partner or with home-language peers.

160 The History of the Earth: Supplemental Guide DR | Domain Review
© 2013 Core Knowledge Foundation
Note to Teacher
You should spend one day reviewing, reinforcing, or extending the material taught thus far. You may have students do any combination of the activities provided, in either whole-group or small-group settings.
Core Content Objectives Addressed in This Domain
Students will:
Identify geographical features of the earth’s surface: oceans and continents
Describe the shape of the earth
Locate the North Pole, the South Pole, and the equator on a globe
Explain that much of our knowledge of the earth and its history is the result of the work of many scientists
Identify the layers of the earth: crust, mantle, and core (outer and inner)
Describe the crust
Describe the mantle and core inside the earth
Describe volcanoes and geysers
Describe how heat, pressure, and time cause many changes inside the earth
Identify common minerals in the earth
Explain how minerals are used by people
Identify the three types of rocks: metamorphic, sedimentary, and igneous
Describe fossils
Domain ReviewDomain Review DR

The History of the Earth: Supplemental Guide DR | Domain Review 161
© 2013 Core Knowledge Foundation
Explain how rocks and fossils provide information about the history of the earth
Explain how we know about dinosaurs
Describe various dinosaurs
Activities
Image Review
Show the Flip Book images from any read-aloud again, and have students retell the read-aloud using the images.
Teacher Choice and Comprehension Review
Select a read-aloud that students would benefi t from hearing again. Preview the comprehension questions to select one literal question and one inferential question to share with students. Explain to students that before re-reading the read-aloud, you will preview or tell them two comprehension questions that you will ask them to answer at the end. Ask them to listen carefully to this re-reading of the read-aloud to see if they can answer one or both questions. At the end of the read-aloud, repeat the literal question, and have partner pairs discuss the answer. Call on one or two partner pairs to share. Next, repeat the inferential question, and have partner pairs discuss their response. Call on one or two partner pairs to share.
Where in the World?
Materials: Globe
Have partner pairs locate the following:
• continents
• oceans
• North Pole and South Pole
• equator
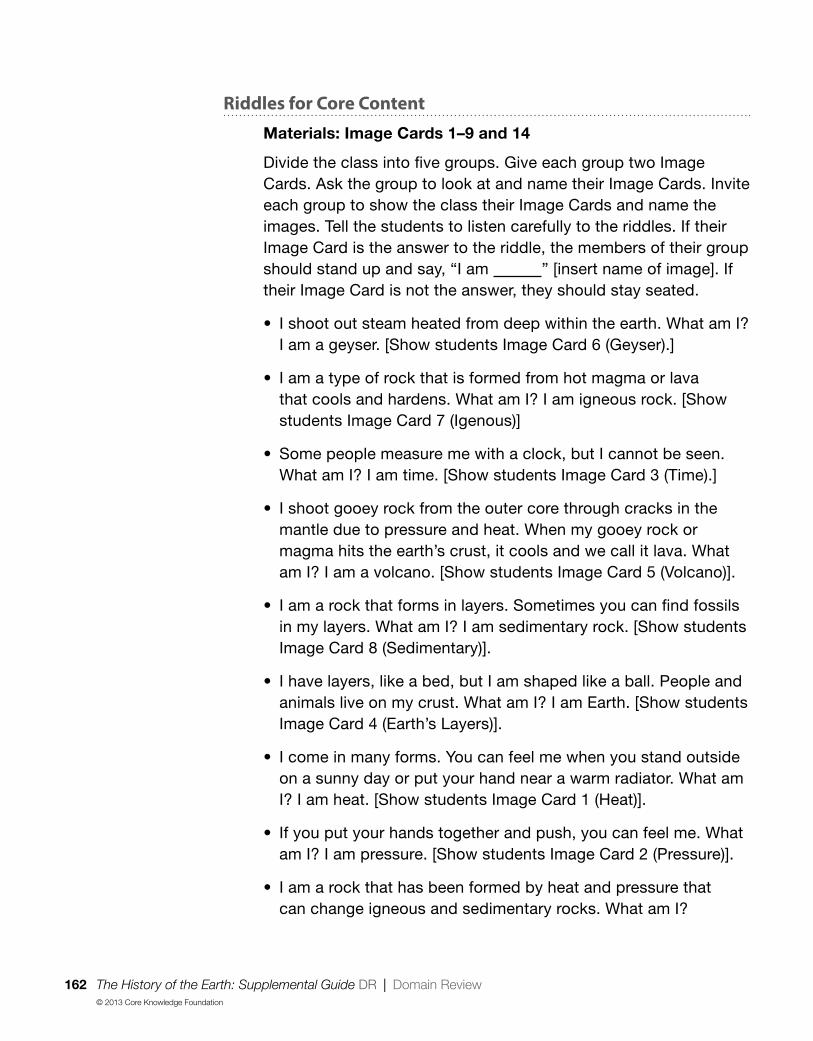
162 The History of the Earth: Supplemental Guide DR | Domain Review
© 2013 Core Knowledge Foundation
Riddles for Core Content
Materials: Image Cards 1–9 and 14
Divide the class into fi ve groups. Give each group two Image Cards. Ask the group to look at and name their Image Cards. Invite each group to show the class their Image Cards and name the images. Tell the students to listen carefully to the riddles. If their Image Card is the answer to the riddle, the members of their group should stand up and say, “I am ” [insert name of image]. If their Image Card is not the answer, they should stay seated.
• I shoot out steam heated from deep within the earth. What am I? I am a geyser. [Show students Image Card 6 (Geyser).]
• I am a type of rock that is formed from hot magma or lava that cools and hardens. What am I? I am igneous rock. [Show students Image Card 7 (Igenous)]
• Some people measure me with a clock, but I cannot be seen. What am I? I am time. [Show students Image Card 3 (Time).]
• I shoot gooey rock from the outer core through cracks in the mantle due to pressure and heat. When my gooey rock or magma hits the earth’s crust, it cools and we call it lava. What am I? I am a volcano. [Show students Image Card 5 (Volcano)].
• I am a rock that forms in layers. Sometimes you can fi nd fossils in my layers. What am I? I am sedimentary rock. [Show students Image Card 8 (Sedimentary)].
• I have layers, like a bed, but I am shaped like a ball. People and animals live on my crust. What am I? I am Earth. [Show students Image Card 4 (Earth’s Layers)].
• I come in many forms. You can feel me when you stand outside on a sunny day or put your hand near a warm radiator. What am I? I am heat. [Show students Image Card 1 (Heat)].
• If you put your hands together and push, you can feel me. What am I? I am pressure. [Show students Image Card 2 (Pressure)].
• I am a rock that has been formed by heat and pressure that can change igneous and sedimentary rocks. What am I?

The History of the Earth: Supplemental Guide DR | Domain Review 163
© 2013 Core Knowledge Foundation
I am a metamorphic rock. [Show students Image Card 9 (Metamorphic)].
• My fossilized skeleton is very large because I was a very large dinosaur who was a predator and ate meat. What am I? I am a T-Rex. [Show students Image Card 14 (T-Rex Skeleton)].
Idea Webs
Materials: Instructional Master 1A-1; chart paper, markers,
tape
Reproduce a blank Idea Web on fi ve large pieces of chart paper. Write the following terms in the center of the hexagons: dinosaurs, Earth’s layers, rocks, minerals, or volcano/geyser.
Divide students into fi ve groups. Give each group an Idea Web. Have students brainstorm everything that comes to mind when they hear the word on the center of their Idea Web. Have them record their responses on the chart, using the sound/spelling correspondences they know so far. When all the groups are fi nished, pair up groups and ask them to review their Idea Webs and add any new details suggested by the other group.
Rock Cycle Song (Tune: Row, Row, Row Your Boat)
Sedimentary rock
has been formed in layers—
Often found near water sources
with fossils from decayers.
Then there’s igneous rock,
here since Earth was born.
molten lava, cooled and hardened—
that is how it’s formed.
These two types of rocks
can also be transformed;

164 The History of the Earth: Supplemental Guide DR | Domain Review
© 2013 Core Knowledge Foundation
with pressure, heat, and time
metamorphic they’ll become.
Heat, Pressure, and Time
Materials: Image Cards 1–3
Give three students the Image Cards for heat, pressure, and time. Review what the Image Cards represent. Have the three students stand in various locations around the room.
Tell the class that you are going to say a word. They will decide how heat, pressure, or time are connected to the word, and then walk to and stand with the person holding that Image Card. After the students have walked to the various locations, have them explain how the two words are connected. For example, if you say the word fossil, one student may walk to the Image Card of “pressure” and say, “It takes pressure to form a fossil.” A second student may walk to the Image Card of “time” and say, “It takes a very long time for a fossil to form.”
Another variation is to use the signals explained in the Pausing Point.
Information Station
Display all of the charts created and trade books presented during this domain. Divide students into groups and assign each group one chart or book. Ask each group to prepare a short spoken statement about what is the important information in that chart or book. Tell students that they are going to share that information from their book or chart with their classmates. Have half the groups stand next to their book or chart; that is their “station.” At the same time, the other half of the class will visit the stations to hear the information. Then have groups change roles.

The History of the Earth: Supplemental Guide DA | Domain Assessment 165
© 2013 Core Knowledge Foundation
This domain assessment evaluates each student’s retention of domain and academic vocabulary words and the core content targeted in The History of the Earth. The results should guide review and remediation the following day.
There are three parts to this assessment. You may choose to do the parts in more than one sitting if you feel this is more appropriate for your students. Part I (vocabulary assessment) is divided into two sections: the fi rst assesses domain-related vocabulary and the second assesses academic vocabulary. Parts II and III of the assessment address the core content targeted in The History of the Earth.
Part I (Instructional Master DA-1)
Directions: I am going to say a sentence using a word you have heard in the read-alouds and in the domain. First I will say the word, and then I will use it in a sentence. If I use the word correctly in my sentence, circle the smiling face. If I do not use the word correctly in my sentence, circle the frowning face. I will say each sentence two times. Let’s do number one together.
1. Extinct: Dinosaurs are extinct; that means there are no more dinosaurs living on the earth anymore. (smiling face)
2. Mantle: The mantle is the topmost layer of the earth where we live. (frowning face)
3. Inner Core: The inner core is a solid metal ball in the center of the earth. (smiling face)
4. Volcanos: Volcanos are mountains formed by lava, gases, and ash. (smiling face)
5. Paleontologist: A paleontologist is a scientist who studies what earth was like long ago by looking at fossils. (smiling face)
6. Crust: The crust is a layer of liquid rock deep inside the earth. (frowning face)
Domain AssessmentDomain Assessment DA

166 The History of the Earth: Supplemental Guide DA | Domain Assessment
© 2013 Core Knowledge Foundation
7. Geologist: A geologist is a scientist who studies clouds and the sky. (frowning face)
8. Fossils: Fossils are the imprint in rocks of animals and plants from a long, long time ago. (smiling face)
9. Solid: Something is solid when it takes the shape of whatever container it is in. (frowning face)
10. Pressure: Pressure happens when two forces push on each other. (smiling face)
Directions: Now I am going to read more sentences using other words you have heard and practiced. First I will say the word, and then I will use it in a sentence. If I use the word correctly in my sentence, circle the smiling face. If I do not use the word correctly in my sentence, circle the frowning face. I will say each sentence two times.
11. Varies: When something varies, it always stays the same. (frowning face)
12. Characteristics: The characteristics of rocks include their colors, textures, shapes, and sizes. (smiling face)
13. Preserved: When something is preserved, it becomes rotten. (frowning face)
14. Destructive: Something that is destructive is harmful and causes damage. (smiling face)
15. Surface: The surface of the earth is covered with land and water. (smiling face)
Part II (Instructional Master DA-2)
Directions: I am going to read some sentences to you. If the sentence is correct, circle ‘T’ for true. If the sentence is not correct, circle the ‘F’ for false. I will say each sentence two times.
1. The earth’s surface is covered with continents and oceans. (T)
2. The equator is an imaginary line that runs from the North Pole to the South Pole. (F)
3. The earth is shaped like a sphere or a ball. (T)
The History of the Earth: Supplemental Guide DA | Domain Assessment 167
© 2013 Core Knowledge Foundation
4. We know about the history of the earth because of the work of geologists and paleontologists. (T)
5. Heat, pressure, and time cause many changes inside the earth. (T)
6. The earth has two layers: the crust and the core. (F)
7. The core of the earth is cold. (F)
8. People live on the crust of the earth. (T)
9. A volcano and a geyser are the same thing. (F)
10. Salt is a type of mineral. (T)
11. All rocks can be put into three groups: igneous, sedimentary, and metamorphic. (T)
12. We know that dinosaurs lived on the earth because their fossils have been found. (T)
13. Fossils are pieces of rock from the present-day, not from the past. (F)
Part III (Instructional Master DA-3)
Directions: Locate the North Pole, and draw a star on the North Pole. Locate the South Pole, and draw a circle on the South Pole. Locate the equator, and draw a red line on it.
On the back of the paper, draw a picture of and write a sentence about the most interesting thing that you learned about the history of the earth.

168 The History of the Earth: Supplemental Guide CA | Culminating Activities
© 2013 Core Knowledge Foundation
Note to Teacher
Please use this fi nal day to address class results of the Domain Assessment. Based on the results of the Domain Assessment and students’ Tens scores, you may wish to use this class time to provide remediation opportunities that target specifi c areas of weakness for individual students, small groups, or the whole class.
Alternatively, you may also choose to use this class time to extend or enrich students’ experiences with domain knowledge. A number of enrichment activities are provided below in order to provide students with opportunities to enliven their experiences with domain concepts.
Remediation
You may choose to regroup students according to particular areas of weakness as indicated from Domain Assessment results and students’ Tens scores.
Remediation opportunities include the following:
• targeting Review Activities;
• revisiting lesson Extensions; and
• rereading and discussing select read-alouds.
Enrichment
Domain-Related Trade Book or Student Choice
Materials: Trade book
Read an additional trade book to review fossils or dinosaurs; refer to the books listed in the Introduction. You may also choose to have the students select a read-aloud to be heard again.
Culminating ActivitiesCulminating Activities CA
The History of the Earth: Supplemental Guide CA | Culminating Activities 169
© 2013 Core Knowledge Foundation
Syntactic Awareness Video: Conjunction Junction
Show students the Schoolhouse Rock! “Conjunction Junction” video, widely available on a number of teaching websites.
Exploring Student Resources
Materials: Domain-related student websites
Pick appropriate websites from the Internet for further exploration of fossils and dinosaurs.
Videos Related to History of the Earth
Materials: Videos about fossils and dinosaurs
Carefully peruse the Internet for short (5-minute), age-appropriate videos about fossils and dinosaurs.
Prepare some questions related to the content presented in the videos.
Discuss how watching a video is the same as and different from listening to a storybook or read-aloud.
Have students ask and answer questions using question words who, what, when, where, and why regarding what they see in the videos.
Volcano Camera
Website: http://hvo.wr.usgs.gov/cams/
Visit the Hawaiian Volcano Observatory’s volcano cameras to obtain fi rsthand views of the Mauna Loa or Kilauea volcanoes of Hawaii.
Lava in a Cup
Materials: (per student or small group) clear plastic drinking
cup, ¼ cup vegetable oil, 1 teaspoon of salt, water,
food coloring (optional)
Ask students to explain the difference between lava and magma. If necessary, remind students that magma is hot, molten rock under the surface of the earth, and lava is magma that has erupted from a volcano and is cooling on the surface of the earth.

170 The History of the Earth: Supplemental Guide CA | Culminating Activities
© 2013 Core Knowledge Foundation
Explain to students that they are going to make lava. Give each student, partner pair or group a cup. Fill the cups ¾ full with water. Add 5 drops of food coloring [optional]. Add ¼ cup vegetable oil to each cup. Sprinkle 1 teaspoon salt on top of the water. Watch the lava move up and down in the cup. Add additional salt to keep the lava moving.
Fossils
Materials: Clay, objects with distinct shapes to press into the
clay
Have students create their own fossils by pressing common objects into clay, such as plastic dinosaurs, etc. Have students remove the object and allow the clay to harden for a few hours. Have students discuss what the imprint left in the clay could tell someone who has never seen the actual object. You may also fi nd directions on various websites for more sophisticated projects.
Be sure to talk about what fossils are, how they are formed, and what information they give.
Organize Your Fossils!
Materials: Fossils Timeline, Image Cards 10–14, large sheet of
chart paper with a horizontal line down the middle,
[Optional] clock or watch
Display the Fossils Timeline. Review the Image Cards on the chart with the students, and remove each card after discussion. Remind students that the Dinosaurs (Image Card 14) came after reptiles appeared. Divide the class into fi ve groups. Give each group one of the Image Cards. Have the groups discuss their Image Card and check to see that each group can identify what is pictured on their card.
Tell students that the goal of this game is to see how quickly the class can organize a Fossil Timeline that is the same as the original Fossils Timeline. Ask each group to select a representative who will hold their Image Card and stand on the chart paper that represents a timeline. Place the chart paper on the fl oor and write 550 million years ago on the left side and 245 million years ago on the right side. Ask the

The History of the Earth: Supplemental Guide CA | Culminating Activities 171
© 2013 Core Knowledge Foundation
representatives to prepare their cards and explain that when you say, “Organize Your Fossils,” each representative should go stand on the timeline paper in the order that their fossils appeared on earth. [Optional] If you are timing the formation, to compare with subsequent rounds, start your watch or look at your clock now. Check over the positioning and, if relevant, announce how long it took. Repeat as necessary.
[Note: this game can be repeated as many times as there are students in each group, so everyone can have a turn standing on the timeline.]
Rock and Mineral Collections
If your school has a rock or mineral collection, you may want to share it with your class.
If feasible, you may invite students to bring in interesting rocks to share with the class.
Response Card Memory Game
Materials: Student Response Cards (Sets One and Two)
Working with their partner, students will combine their Response Card Sets to create a twelve-card memory game. Students mix up their cards and lay them face down on the carpet or table. The youngest student goes fi rst; he or she turns over two cards and looks to see if they are a match. If the cards are a match, the student names the card pair and puts those cards aside. If the cards are not a match, they return to play, but the student can earn another turn by explaining the relationship between the two cards. For example, if the student turns over the card for heat and the card for igneous rock, they might say, “Igneous rocks are formed by heat.” Students play until all the cards have been matched.

172 The History of the Earth: Supplemental Guide CA | Culminating Activities
© 2013 Core Knowledge Foundation
Same Rocks, Diff erent Sort
Materials: [from Lesson 5] four small/medium-sized rocks
of different types per group, a few extra rocks for
samples, six small bins, boxes or containers, index
cards with labels, markers, tape, one copy per
group of Instructional Master 5B-3.
Advance preparation: Remove the cards from the sorting bins, and then select six different description words from the class’s Rocks Book. Write one word on each card, add a small supporting illustration to help students remember what is written on the card, and then attach each card to a bin. Place the bins around the classroom.
Divide students into groups of four. Give each group four small/medium rocks of different types. Explain to students that they are going to sort rocks again but will use different characteristics to group the rocks. Walk around the room, and read the bin labels with the students. Explain to students that you are going to name a characteristic on one of the bins. Tell students that if they have a rock that matches that characteristic, they should raise it into the air. Confi rm that all raised rocks match the named characteristic,and then have student place their rocks into the appropriate bin. Continue this process until all the rocks have been sorted into various bins.
Assign one bin to each group. Have students use Instructional Master 5B-3 to organize their rocks along the horizontal comparison line from those rocks that most demonstrate the characteristic identifi ed to those that least demonstrate the characteristic. Have each group present their comparison chart to another group.
Letter to a Geologist or a Paleontologist
As a class, brainstorm ideas and then write a letter to Gerry the Geologist, Pam the Paleontologist, or to a real scientist. The students might want to write about what they have learned about those professions or ask questions they may still have about the history of the earth.

The History of the Earth: Supplemental Guide CA | Culminating Activities 173
© 2013 Core Knowledge Foundation
You may also ask students to write individual letters if they are ready to do this activity on their own.

174 The History of the Earth: Supplemental Guide CA | Culminating Activities
© 2013 Core Knowledge Foundation

The History of the Earth: Supplemental Guide 175
© 2013 Core Knowledge Foundation
For Teacher Reference Only:
Instructional Masters forThe History of the Earth

176 The History of the Earth: Supplemental Guide
© 2013 Core Knowledge Foundation

Name
The History of the Earth: Supplemental Guide 177
© 2013 Core Knowledge Foundation
1A-1

178 The History of the Earth: Supplemental Guide
© 2013 Core Knowledge Foundation

Name
The History of the Earth: Supplemental Guide 179
© 2013 Core Knowledge Foundation
1A-2
Earth
solar
system
history
billions of
years
globe
rocks
geology
forces
sun
sun
orbit
heat
“study of the earth”
pressure time
1 + 2 + 3
equator
north
south
poles
Completed Earth Idea Web

180 The History of the Earth: Supplemental Guide
© 2013 Core Knowledge Foundation

Name
The History of the Earth: Supplemental Guide 181
© 2013 Core Knowledge Foundation
1A-3

182 The History of the Earth: Supplemental Guide
© 2013 Core Knowledge Foundation

The History of the Earth: Supplemental Guide 183
© 2013 Core Knowledge Foundation
Dear Family Member,
Over the next several weeks, your child will be learning about geology, the scientifi c study of the history of the earth. S/he will learn about the earth’s surface, the layers of the earth (crust, mantle, inner core and outer core), as well as volcanoes and geysers.
Below are some suggestions for activities that you may do at home to help your child continue learning about the history of the earth.
1. Looking Inside the Earth
Have your child color the layers of the earth on the attached activity page. After s/he has colored the layers, work together to cut and glue the labels for each layer. Discuss the names of the layers, and use this activity page as a guide for the next activity.
2. Make and Eat a Model of the Earth
There are many fun ways to make a model of the earth. Use the activity page included in this letter as a guide to the earth’s layers. Here are few ideas to get you started:
• Pizza: Use a round pizza crust to represent the earth’s crust. Have your child spread pizza sauce on most of the crust. Next, have your child spread grated orange cheese from the center of the pizza, out about fi ve inches; this is the outer core. To represent the earth’s inner core, have your child place a piece of pepperoni or a slice of tomato in the middle of the orange “outer core” cheese circle. To represent the earth’s mantle, use mozzarella cheese to create a circle around the “outer core”. Bake the pizza, review the layers of the earth, and enjoy a slice of Earth pizza!
• Fruit: Cut a watermelon in half, width-wise. The watermelon rind represents the earth’s crust. The watermelon’s fruit represents the earth’s mantle. Scoop out enough fruit to fi t an orange into the watermelon. Cut an orange in half, width-wise, and place it in the watermelon; the orange represents the outer core. Cut a slice of banana to represent the inner core. Use a toothpick to hold the banana in place in the middle of the orange. Review the parts of the model with your child.
1B-1

184 The History of the Earth: Supplemental Guide
© 2013 Core Knowledge Foundation
3. Volcanic Eruption
Help your child construct a small volcano by taping a cup to a plate or piece of cardboard and then building a volcano around the cup using modeling dough. When the volcano is complete, it is time for an eruption! These next steps are messy because the liquid will fl ow over the top and sides of the volcano, so consider placing the volcano outdoors or in a sink or bathtub. To create an eruption, have your child place a spoonful of baking soda in the cup. Help your child measure out ¼ cup of vinegar. Slowly pour the vinegar into the cup and watch the eruption! Discuss with your child that volcanic eruptions are caused by heat and pressure building up over time, inside the earth.
4. Read Aloud Each Day
Set aside time to read to your child each day. I have included a list of books related to the history of the earth.
Be sure to let your child know how much you enjoy hearing about what s/he has been learning at school.
Recommended Resources for The History of the Earth
Trade Book List
1. Dave’s Down-to-Earth Rock Shop, by Stuart J. Murphy and illustrated by Cat Bowman Smith (HarperCollins, 2005) ISBN 978-0064467292
2. Digging Up Dinosaurs (Let’s-Read-and-Find-Out Science 2), by Aliki (HarperCollins, 1988) ISBN 978-0064450782
3. Dinosaurs (Magic Tree House Guide), by Will Osborne, Mary Pope Osborne, and Sal Murdocca (Random House Books for Young Readers, 2000) ISBN 978-0375802966
4. Dinosaurs Before Dark (Magic Tree House, No. 1), by Mary Pope Osborne and illustrated by Sal Murdocca (Random House Books for Young Readers, 1992) ISBN 978-0679824114
Baking Soda
The History of the Earth: Supplemental Guide 185
© 2013 Core Knowledge Foundation
1B-1
5. Earthquake in the Early Morning (Magic Tree House, No. 24), by Mary Pope Osborne and Sal Murdocca (Random House Books for Young Readers, 2001) ISBN 978-0679890706
6. Earthquakes (Let’s-Read-and-Find-Out Science 2), by Franklyn M. Branley and Megan Lloyd (HarperCollins, 2005) ISBN 978-0064451888
7. Exploring Rocks and Minerals (Exploring Earth and Space), by Greg Roza (Powerkids Press, 2012) ISBN 978-1448885763
8. Fossils Tell of Long Ago (Let’s-Read-and-Find-Out Science 2), by Aliki (HarperCollins, 1990) ISBN 978-0064450935
9. Hill of Fire, by Thomas P. Lewis and pictures by Joan Sandin (HarperCollins, 1983) ISBN 978-0064440400
10. Home on Earth: A Song about Earth’s Layers, by Laurie Purdie Salas and illustrated by Viviana Garofoli (Picture Window Books, 2009) ISBN 978-1404852969
11. How to Dig a Hole to the Other Side of the Earth, by Faith McNulty and illustrated by Marc Simont (HarperCollins, 1992) ISBN 978-0874992335
12. If You Find a Rock, by Peggy Christian and photographs by Barbara Hirsch Limber (Sandpiper, 2008) ISBN 978-0152063542
13. Kids Who Walk on Volcanoes, by Paul Otteson (Avalon Travel Publishing, 1996) ISBN 978-1562613082
14. Let’s Go Rock Collecting (Let’s-Read-and-Find-Out Science 2), by Roma Gans and Holly Keller (HarperCollins, 1997) ISBN 978-0064451703
15. The Magic School Bus Inside the Earth, by Joanna Cole and illustrated by Bruce Degen (Scholastic, 1989) ISBN 978-0590407601
16. The Magic School Bus in the Time of the Dinosaurs, by Joanna Cole and illustrations by Bruce Degen (Scholastic, 1995) ISBN 978-0590446891
cont.
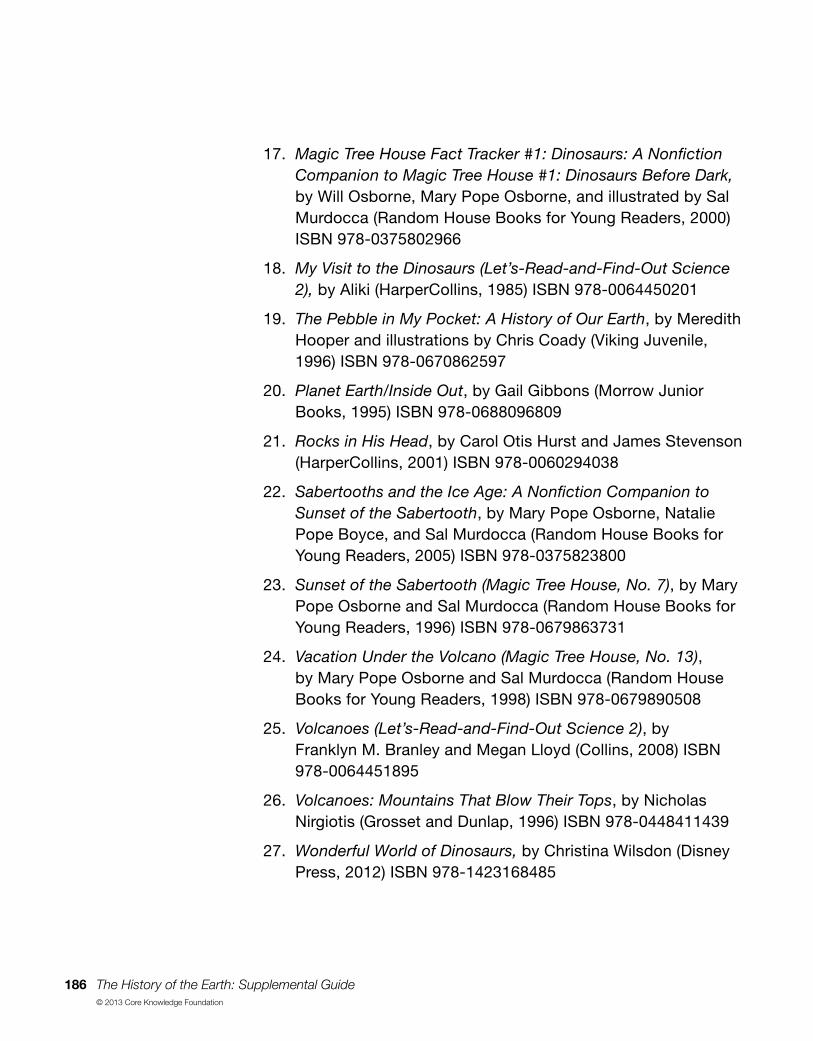
186 The History of the Earth: Supplemental Guide
© 2013 Core Knowledge Foundation
17. Magic Tree House Fact Tracker #1: Dinosaurs: A Nonfi ction Companion to Magic Tree House #1: Dinosaurs Before Dark, by Will Osborne, Mary Pope Osborne, and illustrated by Sal Murdocca (Random House Books for Young Readers, 2000) ISBN 978-0375802966
18. My Visit to the Dinosaurs (Let’s-Read-and-Find-Out Science 2), by Aliki (HarperCollins, 1985) ISBN 978-0064450201
19. The Pebble in My Pocket: A History of Our Earth, by Meredith Hooper and illustrations by Chris Coady (Viking Juvenile, 1996) ISBN 978-0670862597
20. Planet Earth/Inside Out, by Gail Gibbons (Morrow Junior Books, 1995) ISBN 978-0688096809
21. Rocks in His Head, by Carol Otis Hurst and James Stevenson (HarperCollins, 2001) ISBN 978-0060294038
22. Sabertooths and the Ice Age: A Nonfi ction Companion to Sunset of the Sabertooth, by Mary Pope Osborne, Natalie Pope Boyce, and Sal Murdocca (Random House Books for Young Readers, 2005) ISBN 978-0375823800
23. Sunset of the Sabertooth (Magic Tree House, No. 7), by Mary Pope Osborne and Sal Murdocca (Random House Books for Young Readers, 1996) ISBN 978-0679863731
24. Vacation Under the Volcano (Magic Tree House, No. 13), by Mary Pope Osborne and Sal Murdocca (Random House Books for Young Readers, 1998) ISBN 978-0679890508
25. Volcanoes (Let’s-Read-and-Find-Out Science 2), by Franklyn M. Branley and Megan Lloyd (Collins, 2008) ISBN 978-0064451895
26. Volcanoes: Mountains That Blow Their Tops, by Nicholas Nirgiotis (Grosset and Dunlap, 1996) ISBN 978-0448411439
27. Wonderful World of Dinosaurs, by Christina Wilsdon (Disney Press, 2012) ISBN 978-1423168485
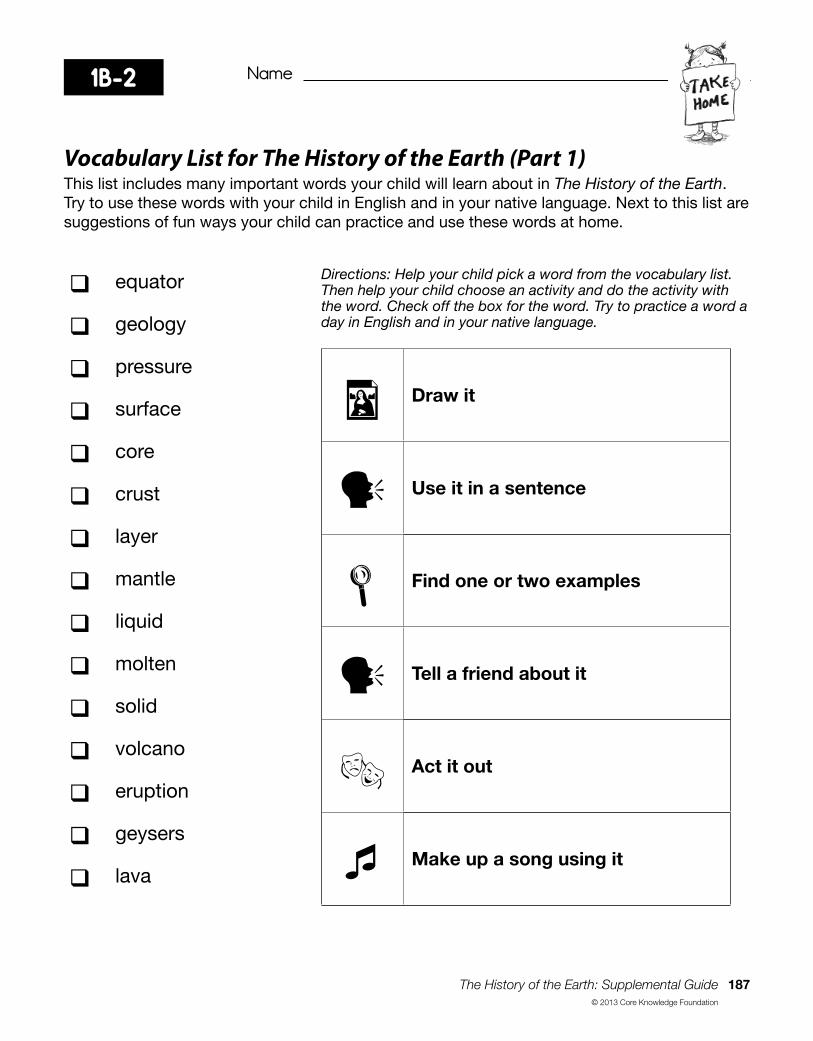
Name
The History of the Earth: Supplemental Guide 187
© 2013 Core Knowledge Foundation
1B-2
Vocabulary List for The History of the Earth (Part 1)This list includes many important words your child will learn about in The History of the Earth. Try to use these words with your child in English and in your native language. Next to this list are suggestions of fun ways your child can practice and use these words at home.
Directions: Help your child pick a word from the vocabulary list. Then help your child choose an activity and do the activity with the word. Check off the box for the word. Try to practice a word a day in English and in your native language.
Draw it
Use it in a sentence
Find one or two examples
Tell a friend about it
Act it out
Make up a song using it
equator
geology
pressure
surface
core
crust
layer
mantle
liquid
molten
solid
volcano
eruption
geysers
lava

188 The History of the Earth: Supplemental Guide
© 2013 Core Knowledge Foundation

The History of the Earth: Supplemental Guide 189
© 2013 Core Knowledge Foundation
1B-3D
irect
ions
: Col
or t
he c
rust
bro
wn,
the
man
tle r
ed, t
he o
uter
cor
e or
ange
, and
the
inne
r co
re y
ello
w. C
ut o
ut t
he la
bel
s fo
r ea
ch p
art
of t
he e
arth
, and
the
n ta
pe
or g
lue
the
app
rop
riate
lab
el t
o th
e m
atch
ing
colo
r.
bro
wn
red
ora
ng
e
ye
llo
w
cru
st
ma
ntl
eo
ute
r c
ore
inn
er
co
re

190 The History of the Earth: Supplemental Guide
© 2013 Core Knowledge Foundation

Name
The History of the Earth: Supplemental Guide 191
© 2013 Core Knowledge Foundation
2B-1D
irect
ions
: Dra
w p
ictu
res
of t
hing
s th
at a
re fo
und
ab
ove
the
crus
t, o
n th
e cr
ust,
or
in t
he c
rust
of t
he e
arth
.

192 The History of the Earth: Supplemental Guide
© 2013 Core Knowledge Foundation

Name
The History of the Earth: Supplemental Guide 193
© 2013 Core Knowledge Foundation
3A-1
Earth Diagram

194 The History of the Earth: Supplemental Guide
© 2013 Core Knowledge Foundation

Name
The History of the Earth: Supplemental Guide 195
© 2013 Core Knowledge Foundation
3A-1
inner core
outer core
mantle
crust
Earth Diagram
Geologists look
at the crust
We live on the
crust
rocks
contains
most of
earth’s rock
solid
hotter
and softer
closer to
the core
molten liquid
land and water
pressure
pressure
[yellow]
[orange]
[red]
[brown]
pressure
animals live on
the crust
continents
oceans
Completed Earth Diagram

196 The History of the Earth: Supplemental Guide
© 2013 Core Knowledge Foundation

Name
The History of the Earth: Supplemental Guide 197
© 2013 Core Knowledge Foundation
3A-2S
oli
d
Liq
uid
Ga
s
air
juic
eb
ook

198 The History of the Earth: Supplemental Guide
© 2013 Core Knowledge Foundation

Name
The History of the Earth: Supplemental Guide 199
© 2013 Core Knowledge Foundation
Dire
ctio
ns: P
oint
to
and
nam
e ea
ch la
yer
with
the
tea
cher
. The
n, c
olor
the
cru
st b
row
n, t
he m
antle
red
, the
out
er c
ore
oran
ge, a
nd t
he in
ner
core
yel
low
. 3B-1

200 The History of the Earth: Supplemental Guide
© 2013 Core Knowledge Foundation

Name
The History of the Earth: Supplemental Guide 201
© 2013 Core Knowledge Foundation
3B-1D
irect
ions
: Poi
nt t
o an
d n
ame
each
laye
r w
ith t
he t
each
er. C
olor
the
cru
st b
row
n, t
he m
antle
red
, the
out
er c
ore
oran
ge, a
nd t
he in
ner
core
yel
low
. Answer Key
bro
wn
red
ora
ng
e
ye
llo
w

202 The History of the Earth: Supplemental Guide
© 2013 Core Knowledge Foundation

Name
The History of the Earth: Supplemental Guide 203
© 2013 Core Knowledge Foundation
Dire
ctio
ns: T
hink
ab
out
how
vol
cano
es a
nd g
eyse
rs a
re s
imila
r an
d h
ow t
hey
are
diff
eren
t. D
raw
or
writ
e ho
w t
hey
are
alik
e in
the
ove
rlap
pin
g p
art
of t
he t
wo
circ
les.
Dra
w o
r w
rite
how
vol
cano
es a
re d
iffer
ent
from
gey
sers
in t
he c
ircle
un
der
the
vol
cano
. Dra
w o
r w
rite
how
gey
sers
are
diff
eren
t fr
om v
olca
noes
in t
he c
ircle
und
er t
he g
eyse
r.4B-1

204 The History of the Earth: Supplemental Guide
© 2013 Core Knowledge Foundation

Name
The History of the Earth: Supplemental Guide 205
© 2013 Core Knowledge Foundation
PP-1D
irect
ions
: Lab
el t
he la
yers
by
colo
ring
the
crus
t b
row
n, t
he m
antle
red
, the
out
er c
ore
oran
ge, a
nd t
he in
ner
core
ye
llow
.

206 The History of the Earth: Supplemental Guide
© 2013 Core Knowledge Foundation

Name
The History of the Earth: Supplemental Guide 207
© 2013 Core Knowledge Foundation
PP-1 Answer KeyD
irect
ions
: Lab
el t
he la
yers
by
colo
ring
the
crus
t b
row
n, t
he m
antle
red
, the
out
er c
ore
oran
ge, a
nd t
he in
ner
core
ye
llow
.
bro
wn
red
ora
ng
e
ye
llo
w

208 The History of the Earth: Supplemental Guide
© 2013 Core Knowledge Foundation
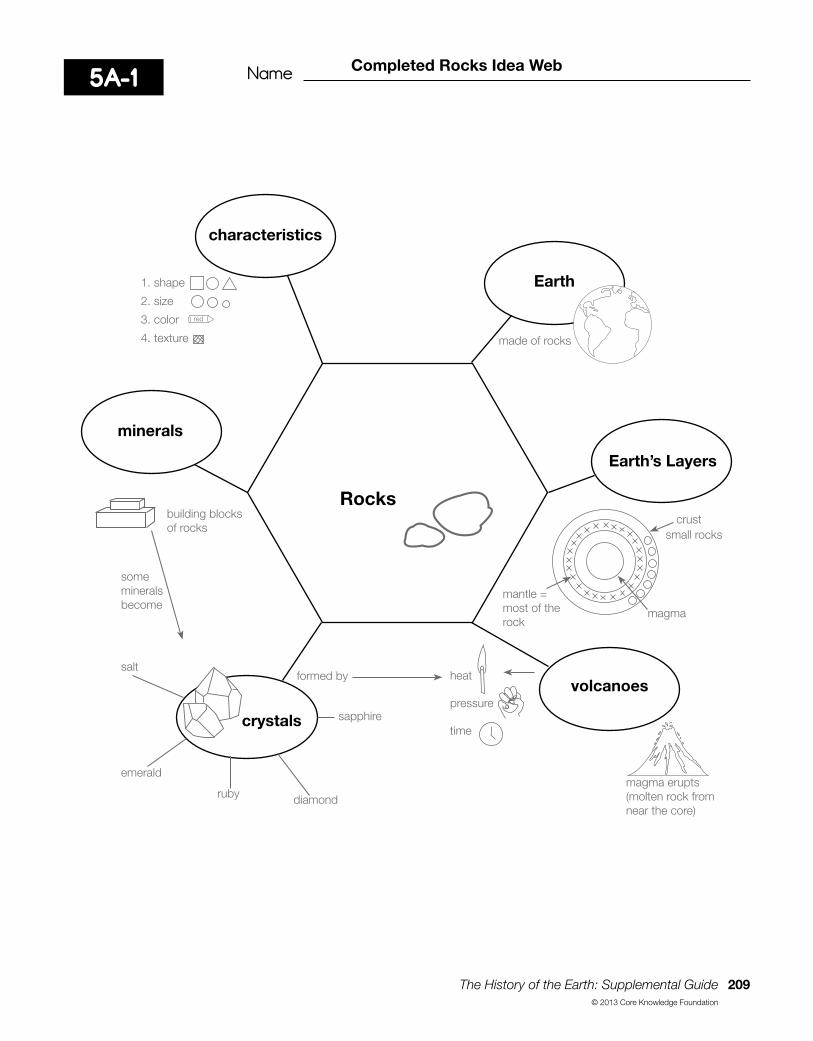
Name
The History of the Earth: Supplemental Guide 209
© 2013 Core Knowledge Foundation
5A-1
Rocks
minerals
crystals
Earth’s Layers
volcanoes
Earth
characteristics
made of rocks
building blocks
of rocks
some
minerals
become
salt
emerald
rubydiamond
sapphire
formed by
magma erupts
(molten rock from
near the core)
heat
pressure
time
1. shape
2. size
3. color
4. texture
red
crust
small rocks
magma
mantle =
most of the
rock
Completed Rocks Idea Web

210 The History of the Earth: Supplemental Guide
© 2013 Core Knowledge Foundation

Name
The History of the Earth: Supplemental Guide 211
© 2013 Core Knowledge Foundation
5B-1C
ha
rac
teri
stic
s o
f R
ock
s
Sh
ap
eS
ize
Co
lor
Te
xtu
re

212 The History of the Earth: Supplemental Guide
© 2013 Core Knowledge Foundation
Name
The History of the Earth: Supplemental Guide 213
© 2013 Core Knowledge Foundation
5B-2D
irect
ions
: Dra
w a
nd c
olor
you
r ro
ck. W
rite
a se
nten
ce o
r se
nten
ces
des
crib
ing
your
roc
k us
ing
the
des
crip
tive
wor
ds
from
the
Cha
ract
eris
tics
of R
ocks
Cha
rt
Rock Drawing

214 The History of the Earth: Supplemental Guide
© 2013 Core Knowledge Foundation
Name
The History of the Earth: Supplemental Guide 215
© 2013 Core Knowledge Foundation
5B-3
Le
ast
Mo
st

216 The History of the Earth: Supplemental Guide
© 2013 Core Knowledge Foundation

The History of the Earth: Supplemental Guide 217
© 2013 Core Knowledge Foundation
Dear Family Member,
I hope your child is enjoying our study of the history of the earth. Today your child learned about minerals. Soon s/he will learn that all rocks can be sorted into three groups: igneous, sedimentary, and metamorphic. S/he will also learn what fossils and dinosaurs tell us about life on earth many, many years ago.
Below are some suggestions for activities that you may do at home to continue to enjoy learning about the history of the earth.
1. Making Rock Crystals
Today your child learned that most rocks are made up of two or more minerals and that some minerals form into perfect crystals with many sides and distinct shapes. Experiment with creating your own sugar or salt crystals at home using the recipe on the other side of this sheet.
2. Homemade Fossils
Fossils are the preserved body or imprint of a plant or animal that lived long, long ago. Create homemade fossil dough by mixing 1 cup wet, used coffee grounds, ½ cup cold coffee, ½ cup salt, and 1 1/3 cups fl our. Add more fl our if dough is sticky. Divide dough into balls, and place each ball onto waxed paper or a cutting board. Have your child fl atten the ball and then press toy insects, leaves, shells, or stones into the dough to create imprints. Allow the fossils to dry overnight. Have your child bring his or her completed fossil to school to add to the class fossil museum.
3. Read Aloud Each Day
Continue to read to your child books about minerals, rock types, fossils, and dinosaurs.
Be sure to let your child know how much you enjoy hearing about what s/he has been learning at school.
5B-4
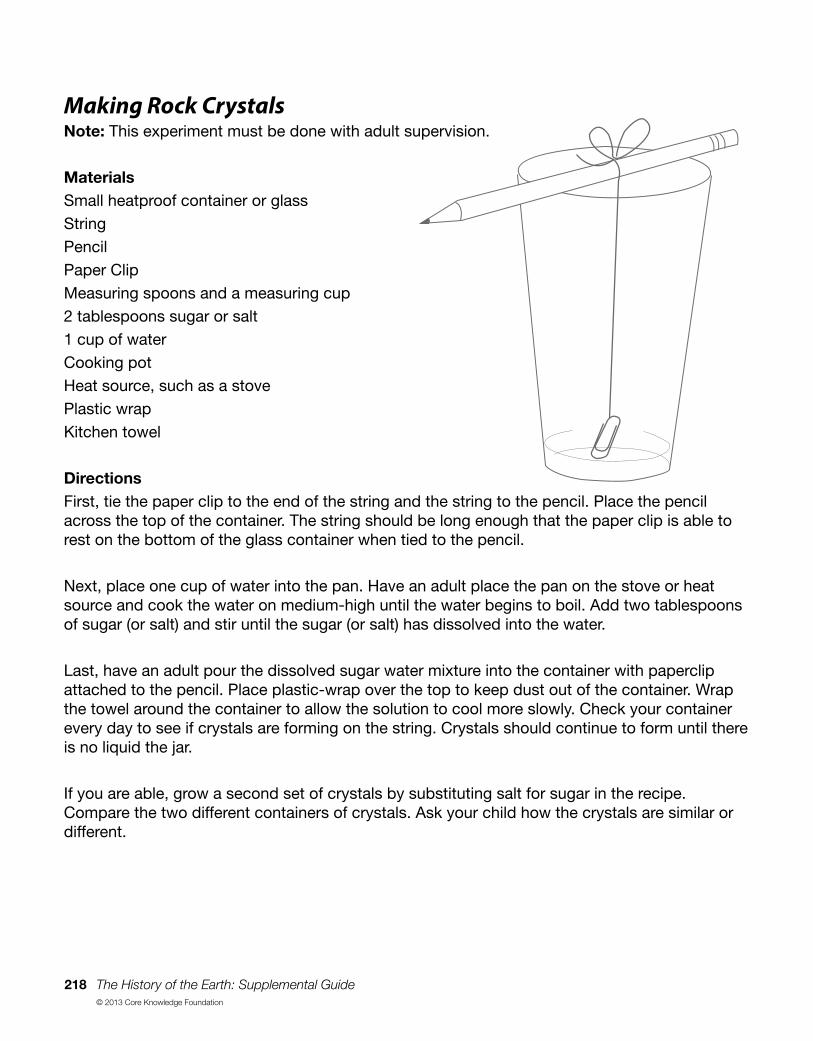
218 The History of the Earth: Supplemental Guide
© 2013 Core Knowledge Foundation
Making Rock CrystalsNote: This experiment must be done with adult supervision.
Materials
Small heatproof container or glassStringPencil Paper ClipMeasuring spoons and a measuring cup2 tablespoons sugar or salt1 cup of waterCooking potHeat source, such as a stovePlastic wrapKitchen towel
Directions
First, tie the paper clip to the end of the string and the string to the pencil. Place the pencil across the top of the container. The string should be long enough that the paper clip is able to rest on the bottom of the glass container when tied to the pencil.
Next, place one cup of water into the pan. Have an adult place the pan on the stove or heat source and cook the water on medium-high until the water begins to boil. Add two tablespoons of sugar (or salt) and stir until the sugar (or salt) has dissolved into the water.
Last, have an adult pour the dissolved sugar water mixture into the container with paperclip attached to the pencil. Place plastic-wrap over the top to keep dust out of the container. Wrap the towel around the container to allow the solution to cool more slowly. Check your container every day to see if crystals are forming on the string. Crystals should continue to form until there is no liquid the jar.
If you are able, grow a second set of crystals by substituting salt for sugar in the recipe. Compare the two different containers of crystals. Ask your child how the crystals are similar or different.

Name
The History of the Earth: Supplemental Guide 219
© 2013 Core Knowledge Foundation
5B-5
Vocabulary List for The History of the Earth (Part 2)This list includes many important words your child will learn about in The History of the Earth. Try to use these words with your child in English and in your native language. Next to this list are suggestions of fun ways your child can practice and use these words at home.
Directions: Help your child pick a word from the vocabulary list. Then help your child choose an activity and do the activity with the word. Check off the box for the word. Try to practice a word a day in English and in your native language.
Draw it
Use it in a sentence
Find one or two examples
Tell a friend about it
Act it out
Make up a song using it
characteristics
minerals
traces
artifacts
igneous
metamorphic
sedimentary
fossil
impression
paleontologist
preserved
debris
excavating
extinct
meteor

220 The History of the Earth: Supplemental Guide
© 2013 Core Knowledge Foundation
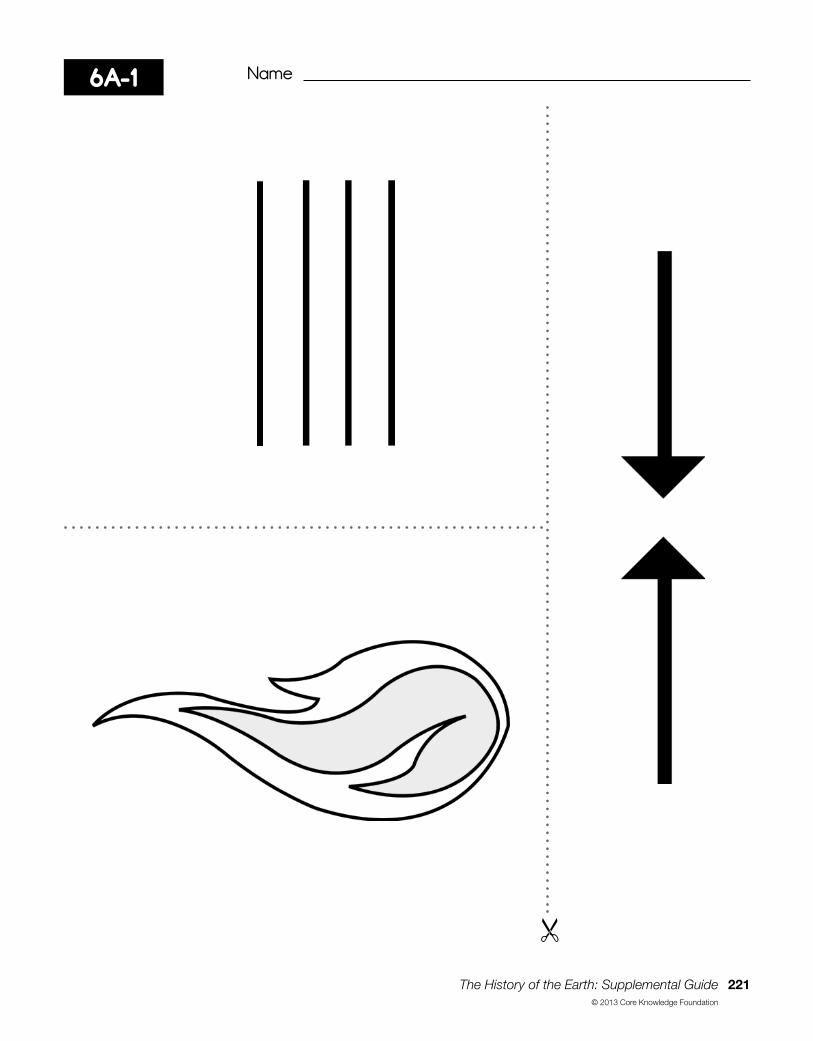
Name
The History of the Earth: Supplemental Guide 221
© 2013 Core Knowledge Foundation
6A-1

222 The History of the Earth: Supplemental Guide
© 2013 Core Knowledge Foundation

Name
The History of the Earth: Supplemental Guide 223
© 2013 Core Knowledge Foundation
Dire
ctio
ns: I
n th
e fi r
st c
olum
n, d
raw
pic
ture
s of
and
/or
writ
e ab
out
igne
ous
rock
s. In
the
sec
ond
col
umn,
dra
w a
nd/o
r w
rite
abou
t se
dim
enta
ry r
ocks
. In
the
last
col
umn,
dra
w a
nd/o
r w
rite
abou
t m
etam
orp
hic
rock
s.6B-1

224 The History of the Earth: Supplemental Guide
© 2013 Core Knowledge Foundation

Name
The History of the Earth: Supplemental Guide 225
© 2013 Core Knowledge Foundation
7A-1
Plants Animals

226 The History of the Earth: Supplemental Guide
© 2013 Core Knowledge Foundation

Name
The History of the Earth: Supplemental Guide 227
© 2013 Core Knowledge Foundation
7A-2F
oss
il T
ime
lin
e
Ima
ge
Ca
rd 1
0
Tri
lob
ite
Ima
ge
Ca
rd 1
1
Co
ok
so
nia
fo
ssil
Ima
ge
Ca
rd 1
2
Fis
h f
ossil
Ima
ge
Ca
rd 1
3
Fe
rn f
ossil
550
mill
ion
year
s ag
o24
5 m
illio
n ye
ars
ago
rep
tile
s a
pp
ear
fore
st
pla
nts
age o
f fi s
h
soil
NO
roots
leaves
fl ow
ers
seed
s
fi rst
pla
nts
YE
S
roots
leaves
fl ow
ers
seed
s
so
il
Completed Fossil Timeline

228 The History of the Earth: Supplemental Guide
© 2013 Core Knowledge Foundation

Name
The History of the Earth: Supplemental Guide 229
© 2013 Core Knowledge Foundation
7B-1
Ge
olo
gis
tP
ale
on
tolo
gis
t

230 The History of the Earth: Supplemental Guide
© 2013 Core Knowledge Foundation

Name
The History of the Earth: Supplemental Guide 231
© 2013 Core Knowledge Foundation
7B-1
Ge
olo
gis
tP
ale
on
tolo
gis
t
sc
ien
tist
ge
olo
gy
rock
s an
d w
hat
is
insi
de
the
eart
h geys
ers
min
eral
s
pa
leo
nto
log
y
life
that
live
d o
n ea
rth
pla
nts
anim
als
volc
anoe
s
Completed Venn Diagram

232 The History of the Earth: Supplemental Guide
© 2013 Core Knowledge Foundation

The History of the Earth: Supplemental Guide 233
© 2013 Core Knowledge Foundation
8A-1
T
. Re
xS
teg
osa
uru
s
Ca
ma
rasa
uru
sC
om
pso
gn
ath
us

234 The History of the Earth: Supplemental Guide
© 2013 Core Knowledge Foundation

The History of the Earth: Supplemental Guide 235
© 2013 Core Knowledge Foundation
NameDA-1
1. 2. 3. 4. 5. 6. 7. 8. 9. 10.
Dire
ctio
ns: L
iste
n to
you
r te
ache
r’s in
stru
ctio
ns.

236 The History of the Earth: Supplemental Guide
© 2013 Core Knowledge Foundation
11. 12. 13. 14. 15.

Name
The History of the Earth: Supplemental Guide 237
© 2013 Core Knowledge Foundation
DA-1
1. 2. 3. 4. 5. 6. 7. 8. 9. 10.
Dire
ctio
ns: L
iste
n to
you
r te
ache
r’s in
stru
ctio
ns.
Answer Key
238 The History of the Earth: Supplemental Guide
© 2013 Core Knowledge Foundation
11. 12. 13. 14. 15.
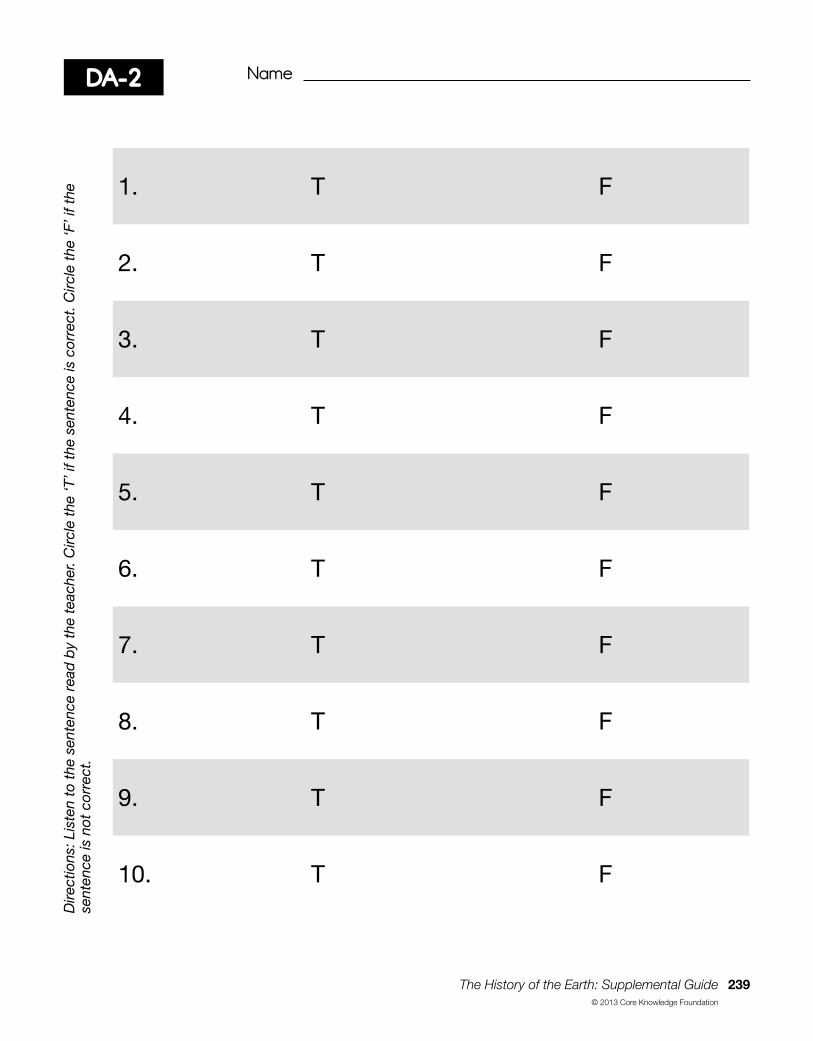
Name
The History of the Earth: Supplemental Guide 239
© 2013 Core Knowledge Foundation
Dire
ctio
ns: L
iste
n to
the
sen
tenc
e re
ad b
y th
e te
ache
r. C
ircle
the
‘T’ i
f the
sen
tenc
e is
cor
rect
. Circ
le t
he ‘F
’ if t
he
sent
ence
is n
ot c
orre
ct.
DA-2
1. T F
2. T F
3. T F
4. T F
5. T F
6. T F
7. T F
8. T F
9. T F
10. T F

240 The History of the Earth: Supplemental Guide
© 2013 Core Knowledge Foundation
11. T F
12. T F
13. T F

Name
The History of the Earth: Supplemental Guide 241
© 2013 Core Knowledge Foundation
DA-2D
irect
ions
: Lis
ten
to t
he s
ente
nce
read
by
the
teac
her.
Circ
le t
he ‘T
’ if t
he s
ente
nce
is c
orre
ct. C
ircle
the
‘F’ i
f the
se
nten
ce is
not
cor
rect
. Answer Key
1. T F
2. T F
3. T F
4. T F
5. T F
6. T F
7. T F
8. T F
9. T F
10. T F

242 The History of the Earth: Supplemental Guide
© 2013 Core Knowledge Foundation
11. T F
12. T F
13. T F

Name
The History of the Earth: Supplemental Guide 243
© 2013 Core Knowledge Foundation
Dire
ctio
ns: L
abel
the
Nor
th P
ole
with
a s
tar
and
the
Sou
th P
ole
with
a c
ircle
. Lab
el t
he e
qua
tor
by
colo
ring
it re
d. O
n th
e b
ack
of t
he p
aper
, writ
e a
sent
ence
and
dra
w a
pic
ture
of t
he m
ost
inte
rest
ing
thin
g yo
u le
arne
d a
bou
t th
e hi
stor
y of
the
ear
th.
DA-3

244 The History of the Earth: Supplemental Guide
© 2013 Core Knowledge Foundation

Name
The History of the Earth: Supplemental Guide 245
© 2013 Core Knowledge Foundation
DA-3
red
Dire
ctio
ns: L
abel
the
Nor
th P
ole
with
a s
tar
and
the
Sou
th P
ole
with
a c
ircle
. Lab
el t
he e
qua
tor
by
colo
ring
it re
d. O
n th
e b
ack
of t
he p
aper
, writ
e a
sent
ence
and
dra
w a
pic
ture
of t
he m
ost
inte
rest
ing
thin
g yo
u le
arne
d a
bou
t th
e hi
stor
y of
the
ear
th.
Answer Key

246 The History of the Earth: Supplemental Guide
© 2013 Core Knowledge Foundation

Tens Recording Chart
Use this grid to record Tens scores. Refer to the Tens Conversion Chart that follows.
Name
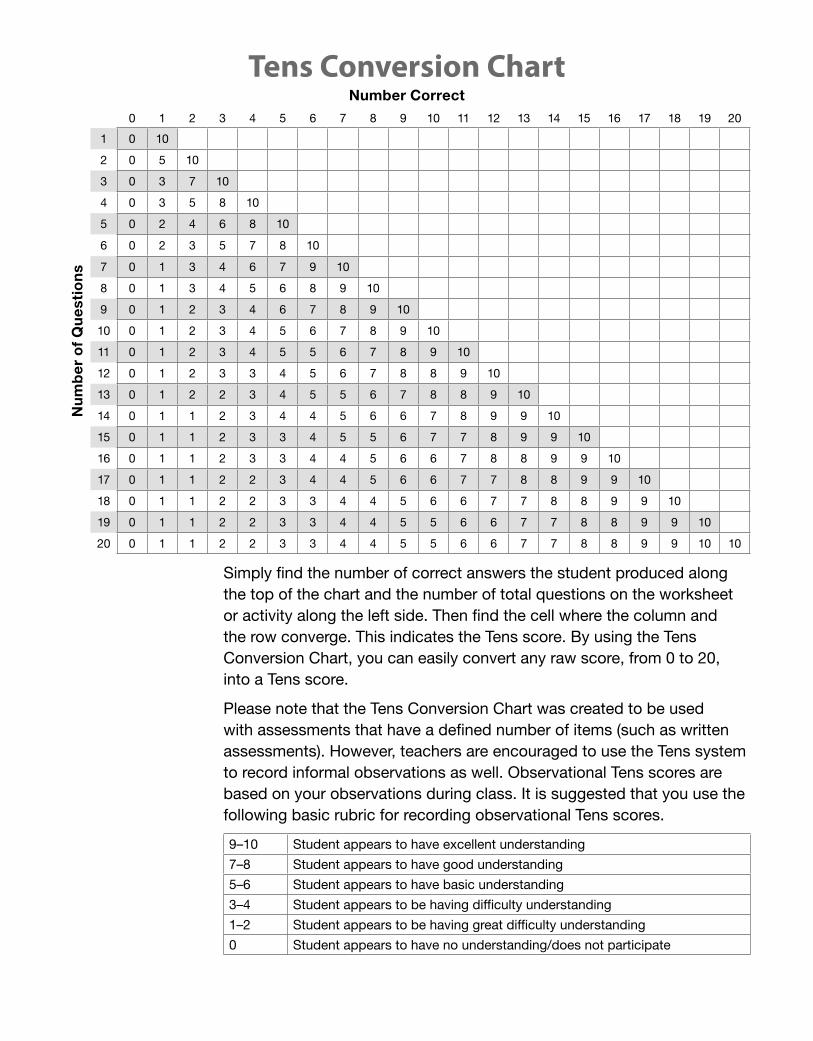
Tens Conversion ChartNumber Correct
0 1 2 3 4 5 6 7 8 9 10 11 12 13 14 15 16 17 18 19 20
Nu
mb
er
of
Qu
esti
on
s
1 0 10
2 0 5 10
3 0 3 7 10
4 0 3 5 8 10
5 0 2 4 6 8 10
6 0 2 3 5 7 8 10
7 0 1 3 4 6 7 9 10
8 0 1 3 4 5 6 8 9 10
9 0 1 2 3 4 6 7 8 9 10
10 0 1 2 3 4 5 6 7 8 9 10
11 0 1 2 3 4 5 5 6 7 8 9 10
12 0 1 2 3 3 4 5 6 7 8 8 9 10
13 0 1 2 2 3 4 5 5 6 7 8 8 9 10
14 0 1 1 2 3 4 4 5 6 6 7 8 9 9 10
15 0 1 1 2 3 3 4 5 5 6 7 7 8 9 9 10
16 0 1 1 2 3 3 4 4 5 6 6 7 8 8 9 9 10
17 0 1 1 2 2 3 4 4 5 6 6 7 7 8 8 9 9 10
18 0 1 1 2 2 3 3 4 4 5 6 6 7 7 8 8 9 9 10
19 0 1 1 2 2 3 3 4 4 5 5 6 6 7 7 8 8 9 9 10
20 0 1 1 2 2 3 3 4 4 5 5 6 6 7 7 8 8 9 9 10 10
Simply fi nd the number of correct answers the student produced along the top of the chart and the number of total questions on the worksheet or activity along the left side. Then fi nd the cell where the column and the row converge. This indicates the Tens score. By using the Tens Conversion Chart, you can easily convert any raw score, from 0 to 20, into a Tens score.
Please note that the Tens Conversion Chart was created to be used with assessments that have a defi ned number of items (such as written assessments). However, teachers are encouraged to use the Tens system to record informal observations as well. Observational Tens scores are based on your observations during class. It is suggested that you use the following basic rubric for recording observational Tens scores.
9–10 Student appears to have excellent understanding
7–8 Student appears to have good understanding
5–6 Student appears to have basic understanding
3–4 Student appears to be having diffi culty understanding
1–2 Student appears to be having great diffi culty understanding
0 Student appears to have no understanding/does not participate

The History of the Earth: Supplemental Guide 249
© 2013 Core Knowledge Foundation
CORE KNOWLEDGE LANGUAGE ARTS
SERIES EDITOR-IN-CHIEF
E. D. Hirsch, Jr.
PRESIDENT
Linda Bevilacqua
EDITORIAL STAFFCarolyn Gosse, Senior Editor - PreschoolKhara Turnbull, Materials Development ManagerMichelle L. Warner, Senior Editor - Listening & Learning
Mick AndersonRobin BlackshireMaggie BuchananPaula CoynerSue FultonSara HuntErin KistRobin LueckeRosie McCormickCynthia PengLiz PettitEllen SadlerDeborah SamleyDiane Auger SmithSarah Zelinke
DESIGN AND GRAPHICS STAFFScott Ritchie, Creative Director
Kim BerrallMichael DoneganLiza GreeneMatt LeechBridget MoriartyLauren Pack
CONSULTING PROJECT MANAGEMENT SERVICESScribeConcepts.com
ADDITIONAL CONSULTING SERVICESAng BlanchetteDorrit GreenCarolyn Pinkerton
ACKNOWLEDGMENTSThese materials are the result of the work, advice, and encouragement of numerous individuals over many years. Some of those singled out here already know the depth of our gratitude; others may be surprised to fi nd themselves thanked publicly for help they gave quietly and generously for the sake of the enterprise alone. To helpers named and unnamed we are deeply grateful.
CONTRIBUTORS TO EARLIER VERSIONS OF THESE MATERIALSSusan B. Albaugh, Kazuko Ashizawa, Nancy Braier, Kathryn M. Cummings, Michelle De Groot, Diana Espinal, Mary E. Forbes, Michael L. Ford, Ted Hirsch, Danielle Knecht, James K. Lee, Diane Henry Leipzig, Martha G. Mack, Liana Mahoney, Isabel McLean, Steve Morrison, Juliane K. Munson, Elizabeth B. Rasmussen, Laura Tortorelli, Rachael L. Shaw, Sivan B. Sherman, Miriam E. Vidaver, Catherine S. Whittington, Jeannette A. Williams
We would like to extend special recognition to Program Directors Matthew Davis and Souzanne Wright who were instrumental to the early development of this program.
SCHOOLSWe are truly grateful to the teachers, students, and administrators of the following schools for their willingness to fi eld test these materials and for their invaluable advice: Capitol View Elementary, Challenge Foundation Academy (IN), Community Academy Public Charter School, Lake Lure Classical Academy, Lepanto Elementary School, New Holland Core Knowledge Academy, Paramount School of Excellence, Pioneer Challenge Foundation Academy, New York City PS 26R (The Carteret School), PS 30X (Wilton School), PS 50X (Clara Barton School), PS 96Q, PS 102X (Joseph O. Loretan), PS 104Q (The Bays Water), PS 214K (Michael Friedsam), PS 223Q (Lyndon B. Johnson School), PS 308K (Clara Cardwell), PS 333Q (Goldie Maple Academy), Sequoyah Elementary School, South Shore Charter Public School, Spartanburg Charter School, Steed Elementary School, Thomas Jeff erson Classical Academy, Three Oaks Elementary, West Manor Elementary.
And a special thanks to the CKLA Pilot Coordinators Anita Henderson, Yasmin Lugo-Hernandez, and Susan Smith, whose suggestions and day-to-day support to teachers using these materials in their classrooms was critical.

250 The History of the Earth: Supplemental Guide
© 2013 Core Knowledge Foundation
CREDITSEvery eff ort has been taken to trace and acknowledge copyrights. The editors tender their apologies for any accidental infringement where
copyright has proved untraceable. They would be pleased to insert the appropriate acknowledgment in any subsequent edition of this
publication. Trademarks and trade names are shown in this publication for illustrative purposes only and are the property of their respective
owners. The references to trademarks and trade names given herein do not aff ect their validity.
The Word Work exercises are based on the work of Beck, McKeown, and Kucan in Bringing Words to Life (The Guilford Press, 2002).
All photographs are used under license from Shutterstock, Inc. unless otherwise noted.
EXPERT REVIEWERTerri Woods
WRITERSMichael L. Ford
ILLUSTRATORS AND IMAGE SOURCESCover: Steve Morrison; Title Page: Steve Morrison; Domain Icon: Shutterstock; Take-
Home Icon: Core Knowledge Staff; 1A-1: Andy Erekson; 1A-2: Shutterstock; 1A-3: Ikiwaner
/ Wikimedia Commons / Creative Commons Attribution-Share Alike 3.0 Unported,
http://creativecommons.org/licenses/by-sa/3.0/deed.en / Modified from Original;
1A-4: Shutterstock; 1A-5: Shutterstock; 1A-6: Shutterstock; 1A-7: NASA/JPL-Caltech ;
1A-8: Shutterstock; 1A-9: Shutterstock; 1A-10: Shutterstock; 1A-11: Shutterstock; 1A-
12: Shutterstock; 2A-1: Andy Erekson; 2A-2: Andy Erekson; 2A-3: Andy Erekson; 2A-4:
Shutterstock; 2A-5: Exactostock / SuperStock ; 2A-6: Andy Erekson; 2A-7: Shutterstock;
2A-8: Shutterstock; 2A-9: Shutterstock; 2A-10: Shutterstock; 2A-11: Andy Erekson; 2B-1:
Shutterstock; 3A-1: Shutterstock; 3A-2: Shutterstock; 3A-3: Shutterstock; 3A-4: Shutterstock;
4A-1: Shutterstock; 4A-2: Shutterstock; 4A-3: Shutterstock; 4A-4: Shutterstock; 4A-5:
Shutterstock; 4A-6: U.S. Geological Survey; 4A-7: U.S. Forest Service/J. Vallance; 4A-
8: Shutterstock; 4A-9: Shutterstock; 4A-10: Shutterstock; 4A-11: Shutterstock; 4A-12:
Shutterstock; 5A-1: Andy Erekson; 5A-2: Shutterstock; 5A-3: Shutterstock; 5A-4: Shutterstock;
5A-5: Shutterstock; 5A-6: Shutterstock; 5A-7: Shutterstock; 5A-8: Shutterstock; 5A-9:
Shutterstock; 5A-10: Andy Erekson; 5A-11: Andy Erekson; 6A-1: Andy Erekson; 6A-2:
Shutterstock; 6A-3: Shutterstock; 6A-4: U.S. Geological Survey/D.L. Peck; 6A-5: USGS Photo
by P. Carrara Aug 28, 1985; 6A-6: Shutterstock; 6A-7: Shutterstock; 6A-8: Shutterstock;
6A-9: Shutterstock; 6A-10: Shutterstock; 6A-11: Shutterstock; 6A-12: Shutterstock; 6A-13:
Shutterstock; 6A-14: Shutterstock; 6A-15: Shutterstock; 6A-16: Shutterstock; 7A-1: Andy
Erekson; 7A-2: Shutterstock; 7A-3: Shutterstock; 7A-4: Shutterstock; 7A-5: Shutterstock;
7A-6: Shutterstock; 7A-7: Shutterstock; 7A-8: Katy Cummings; 7A-9: Shutterstock; 7A-10:
Shutterstock; 8A-1: Shutterstock; 8A-2: Shutterstock; 8A-3: Shutterstock; 8A-4: U.S.
Geological Survey/W.R. Hansen; 8A-5: National Park Service; 8A-6: National Park Service;
8A-7: Katy Cummings; 8A-8: Katy Cummings; 8A-9: Shutterstock; 8A-10: Shutterstock; 8A-11:
Shutterstock; 1A-2: Core Knowledge Staff; 1A-3: Shutterstock; 1A-3 (cont): Core Knowledge
Staff; 1B-3: Shutterstock; 2B-1: Shutterstock; 3A-1 (completed): Core Knowledge Staff;
3A-2: Core Knowledge Staff; 3B-1: Shutterstock; 3B-1 Answer Key: Shutterstock; 4B-1: Core
Knowledge Staff; PP-1: Shutterstock; PP-1 Answer Key: Shutterstock; 5A-1 (completed):
Core Knowledge Staff; 5B-4: Shutterstock; 5B-4 back: Core Knowledge Staff; 6A-1: Core
Knowledge Staff; 6B-1: Core Knowledge Staff; 7A-2: Shutterstock; 7A-2 (cooksonia fossil):
Shutterstock; 7B-1 (paleontologist): Andy Erekson; 7B-1 (geologist): Andy Erekson; 7B-1
(paleontologist) Answer Key: Andy Erekson; 7B-1 (geologist) Answer Key: Andy Erekson;
8A-1: Shutterstock; 8A-1 (compsognathus): Katy Cummings; 8A-1 (camarasaurus): Katy
Cummings; DA-3: Shutterstock; DA-3 Answer Key: Shutterstock
Regarding the Shutterstock items listed above, please note: “No person or entity shall
falsely represent, expressly or by way of reasonable implication, that the content herein
was created by that person or entity, or any person other than the copyright holder(s) of
that content.”


The History of the Earth Tell It Again!™ Read-Aloud Supplemental Guide
Listening & Learning™ StrandGrAdE 1
The Core Knowledge Foundationwww.coreknowledge.org