the genius of geometry - lockhart learning
TRANSCRIPT

The Genius
of Geometry The Montessori Method for Staying in Shape
by
Betsy A. Lockhart
Second Edition
“The theorem itself is not interesting to a child who hears it enunciated without
understanding it and without being able to appreciate its aims, having to tire his mind by
studying the solution he is given. However, discovering a relationship oneself,
formulating a theorem and possessing the words to describe it correctly, is something
truly able to fire the imagination. A single one of these discoveries is sufficient to open
up a brilliant, unexpected path to the mind. And so interest is aroused – and where there
is interest, indefinite conquests are assured.” Maria Montessori
Psychogeometry, p55-56
All rights reserved. No part of this book may be reproduced in any
manner without the written permission of the author.
For information address:
PO Box 3443, Evergreen, Colorado 80437
© 2019 Betsy A. Lockhart

The Genius of Geometry
lockhart-learning.com
Introduction
ii
Thoughts before Beginning
The Joy of Geometry
Montessori geometry and math curricula are nothing short of awe-inspiring; Dr. Montessori had a
unique ability to understand complex relationships so completely that she could make them understood
to others in simple and concrete ways. This awe is perhaps even more keen for those who themselves
were trained following a more traditional pedagogy. Those who were able to follow patterns established
by algorithms and procedures were “good at math” and were able to be successful with completing
problems of ever-increasing complexity, to be able to continue to be “good at math.” But consider:
those who learn math and geometry by rules and algorithms can very successfully work with concepts
without appreciating their elegance interrelationships, much like a plow horse wearing blinders can
successfully till a field for planting without enjoying the beauty of the surrounding countryside. I
vividly remember the day when I came to the stunning realization, thanks to the Montessori bead
cabinet, that x2 is a square and x3 is a cube! I really understood for the first time why one could not
combine x2 and 2x – they are as unalike as apples and oranges. Having a degree in engineering, I had
fancied myself an accomplished mathematician; however, the reality that math is a reflection of
geometry (and visa versa) was something that I had not come to on my own. I am quite convinced that
my teachers and professors had never revealed this relationship because they, themselves, were largely
unaware of the connections. Fortunately, we are not left to discover these amazing relationships
ourselves! With Montessori as our guide, we can discover along with the master.
The Importance of Discovery
In Montessori’s work on Geometry, Psychogeometry, editor Benedetto Scoppola (2011) reiterates the
importance of exploration and self-discovery. “Geometry, suitably represented by materials with precise
relationships between the various parts of the figures, is a discipline that lends itself to the autonomous
discovery of the relationships themselves. … When a relationship is ‘discovered’, as is often the case in
Psychogeometry, its subsequent investigation, through study, reasoning, and the introduction of
appropriate vocabulary, becomes a natural development of the discovery itself and is therefore pursued
almost effortlessly.” (p. xvi-xvii) Montessori herself said, “Discovery is the driving force behind
interest.” (p. 55). Modern-day neuropsychologists would express this a little differently, saying that
when the brain begins to “wonder and wander” it creates the very neural pathways that will later be used
for learning and internalizing a related concept.
Montessori identifies her magnum opus on geometry as not being a scope-and sequence for geometric
discovery, intended to be consumed from page 1 to the appendix; nor is it a textbook where the
instruction “tells”, leading directly to the inevitable “test”. It is a systematic laying of breadcrumbs for
children (and adults) to discover great geometric truths. How, then, to implement this amazing body of
work with fidelity? There is no one right approach. This album organizes Montessori’s materials into
lessons that flow from the 0-dimensional figure (the point) through to 3-dimensional figures (solids). At
each stage, we explore geometric characteristics, naturally integrating technical vocabulary with these
concepts, and discovering how to create and measure these figures. We uncover key geometric
relationships to concepts that have come before and to natural and man-made constructs. We sow seeds
of interest and of knowledge that will posture the child for future success in geometry, in arithmetic, and
in algebra.

The Genius of Geometry
lockhart-learning.com
Introduction
iii
Geometry Instruction in the Modern Era
In the modern age, with great emphasis on educational standards, it can be hard to patiently trust that
children will make discoveries in time to do well on standardized tests! This concern can drive well-
intentioned guides to rely on worksheets and textbooks to teach required concepts, shunting Montessori
geometry experiences to a side-rail of “someday” or “enrichment”. Rest assured - the Montessori
curriculum is not a random exploration of esoteric geometric relationships leading to the internalization
of unrelated and seemingly irrelevant facts about geometry. This is a thoughtfully planned, guided
exploration, designed to weave hands-on and abstract experiences together; these experiences lead to the
furthering of higher-order thinking, observation skills, and mastery of concepts that both meet current
standards and provide knowledge that many outside of Montessori will not encounter until middle or
high school. Knowing that Montessori geometry instruction meets current standards AND postures the
child for great future success, guides can confidently make time for discoveries and expansive lessons,
and “trust to the spontaneous organizational power of the human intellect”, as Montessori said.
Montessori’s Levels of Learning
Montessori was clear that children’s understanding of geometric concepts should follow a pattern of
experiencing the concept sensorially first before applying reason to the concept. Then and only then the
child should proceed to the level of deriving formulas, measuring, and calculating size. Montessori’s
identification of three levels of learning in geometry has parallels to the 3-period lesson, in which
children are shown a concept (often a technical term and its meaning), asked to recognize that concept or
term, and finally asked to recall the concept or term independently. Modern neuroscience research
bears up this type of phased learning as being highly effective, whether it is all accomplished in a single
sitting (the 3-period lesson) or over a matter of days, weeks, or years (the spiral staircase). Lessons in
this album may progress through one or all three levels in a single lesson. Throughout, the levels are
called out in the write-ups, to better enable guides to give lessons intentionally.
The (Often) Unrecognized Importance of the Sensorial Level of Learning
Montessori is clear in her assertion that children learn best from real and concrete experiences. Modern
educational pedagogies are gravitating towards project-based learning and other similar programs, yet
this idea that learning must be rooted in the work of the hand largely remains a counter-cultural idea.
Traditional education circumvents the first stages of learning prescribed by Montessori or treats them
superficially, with demonstrations where students only observe the concrete, jumping as quickly as
possible into calculations: “Here is the formula – plug in the values and produce the right answer.”
Through concrete experiences, Montessori materials reinstate sensory learning, enabling the child to use
his reasoning mind to discover principles that others are merely required to memorize.
What does neuroscience tell us about the work of the hand? Bendetto Scappola, editor and translator of
Montessori’s Psychogeometry (2011), is a professor in the mathematics department of the University of
Rome Tor Vergata. His research spans the gamut of levels of sophistication and ranges from pure
mathematical research to research on how children learn math concepts. In the course of doing research
on the neuroscience of learning in mathematics, he conducted an experiment in which he showed young
children two squares, one larger than the other. He told the children to imagine that an ant was going
around the perimeter of each square, asking which ant would travel farther. His findings were telling.
All of the five-year-olds failed to answer correctly because, according to Montessori’s Planes of
Development, it is developmentally inappropriate for these 1st Plane children to use their imagination in

The Genius of Geometry
lockhart-learning.com
Introduction
iv
that manner. Among the seven-year-olds, however, all with prior Montessori experience were able to
correctly answer that the ant walking the perimeter of the larger square would travel farther. Scappola
concluded that this was proof of muscle memory (which had been built by tracing scores of metal insets
of all sizes and shapes in 3-6 classrooms) being reawakened in new applications!
Anyone who has worked with upper elementary children knows that they are no longer willing to
patiently trace the outer edge of various shapes – they are past the period where this work has meaning
for them, so we must help children connect concretely in other ways, reawakening any muscle memories
built as young children and building new concrete experiences through a new level of sensory
experiences that interact with their growing intellect. This Sensorial level of learning receives heavy
emphasis in the first section of the album but continues even through the most esoteric lessons. We
hope that the depth and breadth of knowledge that children gain from these activities, not to mention the
joy with which they engage in the discovery, will expand the heart and mind of the guide as well!
We have addressed, in some small part, the why and the how of the Montessori upper elementary
geometry curriculum. It is time to get to the curriculum itself. Get ready to be inspired!

The Genius of Geometry
lockhart-learning.com
Introduction
v
Assessment and Review One- and Two-Dimensional Figures 1
Presentation One: Point, Line, Line Segment, Ray, Angle 2
Nomenclature and Measuring 2
The Rationale for Constructions 5
Constructions 7
Bisecting a Line Segment
Bisecting an Angle
Copying an Angle with a Straight Edge and Compass
Presentation Two: 3- and 4-Sided Figures 13
Nomenclature: Triangles by Sides and by Angles and Quadrilaterals 13
Quadrilateral Family Tree and Venn Diagram 17
Constructions 19
Equilateral Triangle
Isosceles Triangle
Scalene Triangle
Square
Parallelogram
Isosceles Trapezoid
Presentation Three: Regular Polygons 31
Nomenclature 31
Construction of a Regular Hexagon (Inscribed in a Circle) 34
Presentation Four: Circles 36
Parts of a Circle: radius, diameter, circumference, semicircle, semi-circumference, chord 36
Constructions to introduce other terms and concepts 42
Intersecting circles
Parallel and Perpendicular Lines
Creating Polygons
The Annulus
Relationship Between a Circle and a Straight Line: chord, secant, tangent, external line
Relationship Between Two Circles:
external, externally tangent, internally tangent, intersecting, concentric, internal

The Genius of Geometry
lockhart-learning.com
Introduction
vi
Geometric Relationships Symmetry, Congruence, Similarity, and Equivalence 52 Presentation One: Symmetry 53
Presentation Two: Equality, Congruence, and Similarity 56
Presentation Three: Equivalence 62
Measurement in One Dimension Length and Perimeter in English and Metric Units 67 Presentation One: Conversion Between Units of Measure – Even Conversions 70
Sequence A – English units 70
Sequence B – Metric Units 74
Presentation Two: Conversion Between Units of Measure – Uneven Conversions 75
Sequence A – English units 75
Sequence B – Metric Units 77
Presentation Three: Applied Linear Measurement: Perimeter 78
Measurement in Two Dimensions 81 Area of Plane Figures
Presentation One: The Concept of Area - Sensorial 83
Experiencing Area and perimeter of a rectangle
Presentation Two: Area Represents Multiplication – Mathematical Reasoning 86
Formulaic Reasoning for Area and perimeter
Presentation Three: Area of a Parallelogram 89
Sensorial and Mathematical Reasoning
Presentation Four: Area of a Parallelogram 93
Formulaic Reasoning
Presentation Five: Area of an Isosceles Triangle 97
Sensorial and Mathematical Reasoning
Presentation Six: Area of an Isosceles Triangle 103
Formulaic Reasoning
Presentation Seven: Area of a Right Triangle and of an Obtuse Angle Scalene Triangle 108
Sensorial, Mathematical, and Formulaic Reasoning
Presentation Eight: Area of a Triangle Using Metal Insets of Equivalent Figures 117
Presentation Nine: Area of a Rhombus 120
Presentation Ten: Area of a Trapezoid 128
Presentation Eleven: Area of a Decagon 134
Presentation Twelve: Area of a Pentagon 143
Presentation Thirteen: Circumference (perimeter) of a Circle 148
Presentation Fourteen: Area of a Circle 155
Presentation Fifteen: Relationship - the Apothem to the Side of a Regular Polygon 159
Presentation Sixteen: Pythagorean Theorem 161
Presentation Seventeen: Pythagorean Theorem II: Discoveries: Constructive Triangles 165
Presentation Eighteen: Pythagorean Theorem III: Euclid’s Proof and Theorem 169

The Genius of Geometry
lockhart-learning.com
Introduction
vii
Surface Area of Planar Figures 178 Presentation One: Review of Nomenclature and Properties of Regular Solids 179
Presentation Two: Polyhedrons 182
Presentation Three: Classification of Solids 186
Presentation Four: Surface Area 188
Measurement in Three Dimensions 197 Volume
Some thoughts on Volumetric Measurement of Capacity and Weight 198
Presentation One: The Concept of Volume – Sensorial and Reasoning 201
Measuring Units
Presentation Two: The Concept of Volume – Formula and Calculation 205
Rectangular Prisms
Presentation Three: Formulaic Representation of Surface Area for Rectangular Prisms 209
Volume and Surface Area of a Cube
Presentation Four: Volume and Surface Area of Prisms with Non-Rectangular Bases 217
Triangular Prism
Presentation Five / Six: Volume and Surface Area of Prisms with Non-Rectangular Bases 223
Rhombic and Hexagonal Prisms
Presentation Seven: Volume and Surface Area of Regular Prisms 229
Consolidating Learning
Presentation Eight: Volume and Surface Area of a Cylinder 233
A circular Prism
Presentation Nine: Volume and Surface Area of Pyramids 236
Presentation Ten: Volume and Surface Area of Cone 241
Presentation Eleven: Volume and Surface Area of Sphere 244
Presentation Twelve: Introduction to Solids of Rotation 249
Appendix Arrangement of Insets in Drawers 253
Vocabulary List A 254
Instructions for Drawing The Pentagon from a Pentagonal Pyramid 255
Advanced Construction: The Pentagon 256
Formula for Area 258
Polyhedrons 259
Formula for Volume and Surface Area 260
Golden Rectangle 261
The Golden Spiral 263
The Fibonacci Series 265
Golden Triangle 266

1 The Genius of Geometry
lockhart-learning.com
Assessment and Review of Concepts
Assessment and Review One- and Two- Dimensional Figures
Children entering upper elementary from a Montessori lower elementary classroom will have had
extraordinary preparation in Geometry – far more than their contemporaries who have been prepared
through traditional pedagogies. It is important that we acknowledge what they have already learned and
fill any gaps that arose either through lack of opportunity or incomplete internalization, before
proceeding into important areas of calculating area and volume. We also have children who enter
Montessori for the first time at the upper elementary level; we must establish what aspects of geometry
these children learned abstractly, and what of that they understand concretely. These children will often
benefit from retracing concepts that were taught to them abstractly using the concrete materials, to bring
them to a new level of understanding.
In this first section of the album, we reach to meet the needs of both levels of prior learning by providing
new experiences for children to engage with concepts concretely, to honor prior experiences without
repeating them, and to plug gaps in learning.
Lessons in this first section serve both as an assessment and as a review of prior learning. They are
structured to have a guided inquiry style, often asking leading questions of the children throughout the
lesson to access children’s episodic, semantic or procedural memory and put it to work integrating the
new ideas. Activities in the lessons and in follow-ups promote children engaging with the materials to
apply their knowledge in a new, more “grown-up” manner. For example, a lesson reviewing types of
triangles might be followed by work constructing triangles with a straight edge and compass, utilizing
the child’s knowledge of these shapes while drawing his attention to details with work-of-the-hand. The
concept is clarified, illuminated, and internalized.
The sequence in this assessment section is designed to follow the sequence of shapes identified by
Montessori, emphasizing those shapes that will be preeminent in study of Area. The general pattern:
- the guide introduces / refreshes technical vocabulary related to a particular figure
- the child explores to discover how the new figure relates to previous figures and verbalizes the
relationship
- constructions reinforce the relationship and the vocabulary.
As such, it loosely follows the pattern of a 3-period lesson. The child creates a Book of Discoveries,
which will serve as a glossary and a reference throughout the remainder of the geometric studies, and
perhaps throughout the remainder of his academic career.

2 The Genius of Geometry
lockhart-learning.com
Assessment and Review of Concepts
Presentation 1: Nomenclature and Measuring: Point, Line, Line Segment, Ray, and Angle.
Materials: very sharp pencil
paper
nomenclature tickets: words and definitions
geometric stick box
protractor and ruler
compass and plain white paper to demonstrate constructions
Direct Aim: to insure that key concepts presented in lower elementary have been properly encoded and
fill any gaps that are identified. Key concepts include:
- a point has no dimensions.
- 2 points define a line or line segment
o a line goes on infinitely
o a line segment has a fixed length
- a ray is a 1-sided line. It has an endpoint, but continues from the endpoint infinitely
- an angle is made up or two rays
o an angle is the area between the rays, not the rays themselves
o just as a ray has an endpoint, the angle has a vertex, but continues from the vertex
infinitely
o As the angle moves farther from the endpoint, the distance between the two rays
grows; however, the size of the angle does not change. CCSS.MATH.CONTENT.4.G.A.2 Classify two-dimensional figures based on the presence or absence
of parallel or perpendicular lines, or the presence or absence of angles of a specified size. Recognize
right triangles as a category, and identify right triangles.
CCSS.MATH.CONTENT.5.G.B.3
Understand that attributes belonging to a category of two-dimensional figures also belong to all
subcategories of that category. For example, all rectangles have four right angles and squares are
rectangles, so all squares have four right angles.
CCSS.MATH.CONTENT.5.G.B.4
Classify two-dimensional figures in a hierarchy based on properties.
Indirect Aim: Improve a variety of skills:
- reasoning (to sort figures according to the number of dimensions)
- recognizing relationships between figures, to begin to think of geometry as a system
- additional skills from constructions
o fine motor
o seeing the compass as a measuring tool (not just an arc/circle drawing tool)
o reading and following directions
1. Invite a group of students to a lesson. Ask them what shape they remember from prior lessons as
being the smallest shape. Accept all answers, leading the children to the conclusion that whatever
shape is named, however small it is, there is always one shape that is even smaller: the point.

3 The Genius of Geometry
lockhart-learning.com
Assessment and Review of Concepts
2. With a very sharp pencil, illustrate a point. Ask the children how long, wide, and deep this point is.
Discuss that a true point is even smaller than what was just drawn. Points have no length, no width,
and no depth. They are said to be 0-dimensional. Lay out pertinent tickets:
point .
smallest geometric figure
0-dimensional figure
Please note that each figure should be illustrated in front of the children. It is important that they
watch the guide draw each figure with the proper drawing tools and with great care and precision.
Placing prepared tickets are a wonderful, efficient way to engage children whose preferred modality
is visual or kinesthetic, but they are supplementary to the teacher carefully drawing figures as the
children watch his/her care and precision.
3. Ask the children to name a figure that has 1 dimension: length. (Children will likely respond that a
line has only length.)
4. Ask the children where lines come from. They may recall from lower elementary lessons that many,
many points placed next to one another make up a line. (For children new to Montessori,
demonstrate this by placing a quantity of Golden Beads in a line on the rug.) Lines can be straight or
curved.
5. Explain and illustrate all 3 one-dimensional figures: line, line segment, and ray. (Use a ruler or
straight edge to illustrate the figures, demonstrating precise drawings.) Experiment with paper and
pencil to reveal the truth that despite the fact that it takes many points to make a line it takes only 2
points to define a straight line. As soon as we have 2 points, we can connect them with a line
segment. If we place arrows on the endpoints of the line segment, indicating a continuation to an
infinite distance, the line segment now represents a line. We can’t actually draw a line, because it
goes on infinitely – we would never finish! If we put an arrow on only one end of a line segment, the
drawing now represents a ray; a ray has one endpoint and radiates out along a straight path to eternity.
6. Lay our pertinent tickets:
line line segment ray
is a straight 1-dimensional
figure; it has infinite length
is a straight 1-dimensional
figure; it has only length
is a straight 1-dimensional
figure; it has infinite length
has no beginning or end;
length is infinite
has a beginning and an
end; length is finite
has a beginning but no end;
length is infinite
Ask the children to discuss how the 3 one-dimensional figures are alike and how they are different.
7. If desired, and if children’s interest is sustained, review the terms used to describe particular types of
lines: parallel, perpendicular, and oblique; however, be certain to keep focus on the idea that a line is
a one-dimensional figure that extends infinitely in 2 directions; a ray is a one-dimensional figure that
extends from an endpoint infinitely in one direction; and a line-segment is a one-dimensional figure
that is bounded by 2 endpoints.

4 The Genius of Geometry
lockhart-learning.com
Assessment and Review of Concepts
8. There are many, many 2-dimensional figures. Ask the children to name some. Accept all answers.
(Children will likely name figures that are polygons: closed figures.) For today’s lesson, we will talk
about a 2-dimensional figure that most have not really thought much about before: the angle.
We tend not to think of the angle as a 2-dimensional figure because it is not a polygon – it is not a
closed figure. It is the amount of a turn between 2 rays or 2 line segments with a common endpoint.
Use the geometric stick box to illustrate an angle, being sure that the children understand that the
angle is the space between the 2 rays; the length of the rays themselves makes no difference.
9. Explain an angle, illustrating with a drawing of a 45º angle. Using a protractor, precisely measure the
angle and a compass to draw the arc that represents the angle. Color the arc or the angle red if
desired.
angle
2-dimensional figure
measured in degrees.
is the amount of a turn
between two rays that have
a common endpoint.
Draw another 45º angle for which the line segments or rays are considerably longer or considerably
shorter. Show that while one drawing is bigger than the other, the two angles are equal.
If desired, and if children’s interest is sustained, review the terms used to describe particular types of
angles: acute, right, obtuse, whole, and reflexive; however, be certain to keep focus on the idea that
an angle is a 2-dimensional figure that is bounded by 2 rays, that continues out from the vertex
infinitely.
10. Collect up all but the word tickets. Mix them thoroughly and then make a stack of illustration tickets,
a stack of tickets indicating the number of dimensions in the figure, and a stack of definition tickets.
11. Lay out the illustration tickets in a random order in a vertical column and invite the children to match
them with their corresponding terms (2nd period). Ask the children to do the same with the tickets
indicating the number of dimensions in the figure, noting that there is one 0-dimensional figure, three
1-dimensional figures, and one 2-dimensional figure. Finally, ask the children to complete the layout
with the definition tickets.
12. Explain the follow-up activity.
NOTE: this lesson is unique in that it has 2 parts. The first part has the children capture the name,
sketch, number of dimensions, and definition of each of the 5 figures from today’s lesson. This should
not be copy work! Children should leave the lesson area to complete as much from memory, using
effortful retrieval, as possible. Then they can return to check their work against the layout.
Once children have completed their follow-up activity, the group re-convenes to demonstrate
constructions. This might be within a short time of the conclusion of the lesson or it might be on
another day (not too far in the future!).

5 The Genius of Geometry
lockhart-learning.com
Assessment and Review of Concepts
Follow-up, Part One: Terms for Figures
Children will create a Book of Discoveries, which will serve as a glossary throughout the remainder of
the geometric studies. This can be a bound marble composition book, a spiral bound book or a loose-
leaf book assembled and kept from week to week. For this lesson:
Children write the name and illustrate for each of the five figures discussed today.
Below the illustration, they write a definition for the figure including the number of dimensions the
figure has. Children should first use their own words to write the definitions from memory; once
they have written as much as they recall from the lesson, they can consult the tickets, adding any
factual information that they were missing. In so doing, children exercise effortful recall of learning
from the lesson and from prior years’ work in geometry, the first step to internalization. CCSS.MATH.CONTENT.4.G.A.1
Draw points, lines, line segments, rays, angles (right, acute, obtuse), and perpendicular and parallel lines. Identify these in
two-dimensional figures
Please note: some children will be more drawn to geometry if they are allowed to decorate these figures.
Psychogeometry (p. 38-39) has some lovely examples that may inspire children’s creativity. Allowing
children to use color to decorate their work is a time-honored Montessori tradition.
Optional Follow-up Challenge building on Part One: Terms for Figures
Children can extend their definitions to include types of lines (parallel, perpendicular, and oblique) and
types of angles (acute, right, obtuse, straight, reflexive, and whole). This can be done whether the
concepts were reviewed in the lesson or not, if they have been presented in previous year(s) or if
children have access to a good geometry reference for research.
Children can draw and/or measure a variety of teacher- or child-provided angles, or all of the angles
represented in fraction insets. For example, ¼ has a 90º angle at its vertex; ½ has a 180º angle at its
vertex (much harder to see).
Note that using a conventional protractor is a complex skill that must be demonstrated if children are
not familiar with the tool! If children have little prior experience with protractors, it is not enough to
simply tell children to read off the number of degrees as one might read length on a ruler because
protractors typically have 2 sets of measurements annotated on each mark, to allow the user to turn the
angle clockwise or counterclockwise - a given point on the protractor might be labeled both 45º and
135º. Add to that difficulty the fact that protractors may be circular (360º) or semicircular (180º).
If children are new to protractor use, begin by building children’s ability to recognize common angles
(0º, 45º, 90º, 180º, 270º, 360º). This knowledge will help children logic through which number
represents the angle being measured (45º vs. 135º, for example). This can be demonstrated with the
stick box and practiced with 3-part cards.
Follow-up, Part Two: The Rationale for Constructions
Montessori spoke emphatically about the need to awaken the “active Ego” through constructive energy.
She believed, and modern neurological research supports, that passive learning, even when well
understood, does not stand the test of time. Essentially, we must do something with what we learn if we
are going to retain it.
Constructions are the ultimate “do something” in geometry – the work of the hand. In order to complete
many of these constructions, one must really understand the definition and properties of the figure(s)
being constructed or deconstructed. For example, to perform a construction of an isosceles triangle, one
must know that two legs must be of equal length. More than that, the act of constructing gives the child

6 The Genius of Geometry
lockhart-learning.com
Assessment and Review of Concepts
a visceral experience of equal length as the matching lengths are marked out with a compass. In so
doing, children come to see the compass as a measuring tool rather than as an arc-striker.
Montessori herself advocated for children completing constructions as part of their exploration of
shapes. Constructions are a new skill for children; it will require practice to master the use of a compass
in particular, and in the process, the child’s pincer grasp and pencil control will be strengthened.
(BONUS: Simply because it is so repeatable and so open-ended, this is an activity that is well-suited to
the first weeks of school, when the guide is striving to get to know the class while keeping many
children with sometimes disparate needs engaged in meaningful work.)
If Montessori’s belief in the importance of the work of the hand is insufficient reasoning to convince the
busy teacher of the merits of including constructions in the child’s academic experience, consider just a
few of the Common Core State Standards for geometry:
Grade 4 CCSS.MATH.CONTENT.4.G.A.1: Draw points, lines, line segments, rays, angles (right, acute, obtuse), and
perpendicular and parallel lines. Identify these in two-dimensional figures.
CCSS.MATH.CONTENT.4.G.A.2: Classify two-dimensional figures based on the presence or absence of
parallel or perpendicular lines, or the presence or absence of angles of a specified size. Recognize right
triangles as a category, and identify right triangles.
To make constructions a pleasurable experience, and to better insure children’s success and desire to
repeat, please be certain to have high-quality tools for the children to use, especially compasses. If
budget is a limiting factor, consider purchasing just a couple of professional-quality compasses to be
checked out when used – children will see them as the special instruments that they are!
When teaching constructions, it is well to demonstrate the construction while the children watch. Do not
allow them to mimic the motions during the demonstration; it will prevent them from seeing the all-
important relationships that are being illustrated and it will slow the lesson to a frustrating crawl. It is
important that they see the whole process and hear the words that explain what the construction is
accomplishing in isolation, and then try it for themselves. If needed or desired, do a second step-by-step
demonstration with children concurrently working on their own constructions. Finally, provide the
directions and illustrations below for independent work (and for practice in reading and following
directions!). After the children have a sense of how the directions and illustrations work, many will be
able to work independently without needing to see a demonstration first.
The following pages have illustrated instructions for completing constructions that reinforce the
properties of a point, line segment, and angle. There will be others following each Assessment and
Review lesson. Please note that these sheets can be laminated and placed in the classroom to guide
children’s activity. They are not intended to be worksheets; children’s constructions should each be on a
full sized sheet of plain white paper, later added to their Book of Discoveries. (Constructions can be
done directly into the binding of the Book of Discoveries if the book-binding doesn’t create a logistical
problem with the constructions.
Other constructions that children can then pursue if interested include:
- constructing a line parallel to another line
- reproducing a line with straight edge and compass
- doubling a line
- doubling an angle

7 The Genius of Geometry
lockhart-learning.com
Assessment and Review of Concepts
Bisecting a Line Segment
Cutting the Line Segment into 2 Equal Pieces
• With the paper in portrait orientation, draw a horizontal line segment of any length. Label one end
A, and the other end C.
• Open the compass to any width that is more than half the length of the line. Put the point of the
compass on point A and strike an arc from well above the line to well below the line. The arc
represents a group of points (called the locus of points) that are the same distance from point A.
• Without changing the compass setting, put the point of the compass on point C and again strike an
arc from well above the line to well below the line. The arc represents the locus of points that are the
same distance from point C.
• There are 2 places where the arcs intersect. These are 2 points that are exactly the same distance
from both points A and C. Connect those two points with a straight edge. Label the intersection of
the new segment and line segment AC point B.
. .
• Use the compass to confirm that the segment just drawn does cut line segment AC into 2 equal
pieces. Place the point of the compass on point B. Close the compass a bit so that the pencil just
touches point A. Without marking on the page, rotate the compass 180º. If the pencil tip just
touches point C, then the line has been exactly bisected! (Fun fact: it is the perpendicular bisector!)
For more fun, bisect each half of the line segment to cut it into 4ths! Can you cut it into 8ths?
Thinking questions: can a ray or a line be bisected? Why or why not?
How could you use this technique to divide a rectangular piece of blacktop in half?

8 The Genius of Geometry
lockhart-learning.com
Assessment and Review of Concepts
Control of Error: Bisecting a Line Segment
Cutting the Line Segment into 2 Equal Pieces
For more fun:
Thinking questions:
Rays and lines cannot be bisected because they go on forever. How do you take half of forever?
Activity Hint: to divide a rectangular piece of blacktop in half, divide one side in half using a friend,
some chalk, and a sturdy rope.

52 The Genius of Geometry
lockhart-learning.com
Symmetry, Congruence, Similarity, and Equivalence
Geometric Relationships Symmetry, Congruence, Similarity, Equivalence
“We do not… offer material for the clear and concrete demonstration of what is taught in an abstract
fashion in most schools. We simply offer geometric shapes, in the form of the material objects, which
have a relationship with each other. These shapes can be moved and handled, lending themselves to
demonstrating or revealing evident correspondences when they are brought together and compared.
This stimulates mental activity, because the eye sees and the mind perceives things that a teacher does
not know how to convey to an immature and inactive mind. Mental processes that are apparently
premature and far advanced for the child’s age, thus become possible.
…
Superior mental work begins with the evident, material periphery. Having observed truths as a natural
result of things the mind then begins reasoning and logically examining them, soon leading to the realms
of abstraction. Did not the first geometricians draw their knowledge from things? Did not the
correspondences and relationships between things stimulate certain active and interested minds, leading
them to formulate the axioms and theorems?”
Maria Montessori (2011)
Psychogeometry p. 56
In this section of the album, we develop children’s understanding of symmetry, congruence and
similarity, concepts that are often tested for elementary children. Please check the standards to which your school adheres. Here is one pertinent Common Core standard for Grade 4:
CCSS.MATH.CONTENT.4.G.A.3: Recognize a line of symmetry for a two-dimensional figure as a line across
the figure such that the figure can be folded along the line into matching parts. Identify line-symmetric figures
and draw lines of symmetry.
However, these concepts are developed neither just for their own sake, nor to satisfy educational
standards. Use of the Montessori didactic materials, precisely designed and manufactured to enable
children to discover relationships between figures, concurrently develop children’s awareness of how
one figure can transform into another equivalent figure, which is the cornerstone to lessons on
computational area that are to come.

56 The Genius of Geometry
lockhart-learning.com
Symmetry, Congruence, Similarity, and Equivalence
Presentation 2: Equality, Congruence, and Similarity
Materials: Metal insets - There are 10 square red insets with green frames and white backgrounds. 5 squares divided into triangles (undivided square, divided along 1 diagonal, divided along 2 diagonals, divided along 2
diagonals with midpoints of opposing sides joined, divided along 2 diagonals with opposing mid-points joined and
adjacent mid-points joined.)
5 squares divided into quadrilaterals (divided by one pair of opposing mid-points, divided by both pairs of opposing mid-
points, divided by mid-points of opposing sides and bi-sectors of the squares, divided by mid-points of opposite
sides and bi-sectors of squares using both pairs of opposite sides

57 The Genius of Geometry
lockhart-learning.com
Symmetry, Congruence, Similarity, and Equivalence
Direct Aim: to learn the meaning of the terms equal, congruent, and similar and see them in geometric
figures, and learn how to represent these concepts with mathematical symbols.
Indirect Aim: to reinforce the concept of symmetry
To encourage flexible thinking (fractions are not always round)
Preparation for equivalency
NOTE: Congruence and similarity are presented before equivalency because they are more concrete.
Equivalency requires some mental manipulation of shapes. Equivalency is far less straightforward
conceptually, although the materials make this concept MUCH more approachable than mere paper-
pencil activities. These concepts, as well as the concept of scale between 2 similar objects, are
addressed by standards and often appear on standardized tests. The wise guide is up to date on the
exact expectations in these areas and adapts follow-up activities accordingly.
1. Invite a group of students to a lesson. Review prior learning by asking questions that require
effortful retrieval of vocabulary that will be used in this lesson: types of triangles by sides and
angles, squares and rectangles, as well as the concept of line / reflection symmetry
2. Today’s lesson is about how shapes relate to one another. But before we begin with that, let’s
explore how we express relationships in math. Show the children a simple mathematical
relationship (number sentence) such as:
2 + 5 = 7
3. Ask the children to explain what that number sentence means by creating a short story problem for
which this would be a mathematical illustration.
Explore the meaning of +. Explore the meaning of =. These symbols have specific meaning.
4. EQUAL (lay out supporting word / definition tickets as the presentation unfolds)
In math, the symbol = (and the word equals) means is the same quantity as.
In geometry, the symbol = (and the word equals) means is the exact same figure.
A B
Show a line segment AB. We can say that AB = BA because they are the same line segment. We are
just giving the line segment 2 different names. Position may change, but as long as the figure
doesn’t change we say that it is equal.
5. CONGRUENT (lay out supporting word / definition tickets as the presentation unfolds)
There is a term in geometry that is in some ways like the term equal. The term is congruent. Two
figures are congruent if they are of identical size and of identical shape. A technical definition of
congruence says that every point on one figure corresponds to a single point on the second figure.
They can vary in position or orientation, but they are alike in every way. The symbol for congruent
looks like an equal sign with a squiggle on top: Ask the children to explain in their own words what the difference is between equal and congruent.
Be certain that they understand that in geometry, a figure can only equal itself; when we say that
shapes are congruent, we are comparing 2 or more shapes.

58 The Genius of Geometry
lockhart-learning.com
Symmetry, Congruence, Similarity, and Equivalence
Choose the metal inset square that has been divided into 2 equal rectangles. Show that the two
rectangles are congruent – same size, same shape. Choose the metal inset square that has been
divided into 2 equal triangles. Show that the two triangles are congruent – same size, same shape.
Show that even though the rectangle and the triangle are each ½ of the square, they are not
congruent. They are different shapes. Place the two rectangles and/or the two triangles on the rug
with between them.
6. SIMILAR (lay out supporting word / definition tickets as the presentation unfolds)
Another term in geometry says that the shape is the same, the angles are the same, but the size – the
lengths of the sides – is different. That term is similar. Two figures are similar if a person could
take a photograph of one of the figures and enlarge or shrink it to be identical to the other figure.
The symbol for similar is . It looks like the squiggle from the top of the congruent symbol.
Choose the inset with the full-size square and the inset with the square that has been divided into
fourths. Place the unit-square and the ¼ square on the rug. Explore how the two have the same
angles – place the small square against the large square and slide it to show that the angles are the
same. Explore how the two figures are the same shape. <They are both squares because they each
have 4 equal sides and 4 right angles.> Place the two figures on the rug with the symbol between
them.
Choose the inset with the full-size triangle and the inset with the triangle that has been divided into
fourths. Place the unit-triangle and the ¼ triangle on the rug. Explore how the two have the same
angles – place the small triangle into the now-empty whole triangle frame. Slide the triangle first to
the top of the inset, then to the lower right vertex, and finally to the lower left vertex. <The small
triangle has all of the same angles that the larger triangle has. Only the length of the sides is
different .> Place the two square figures and/or the two triangular figures on the rug with the symbol
between them. (This concludes the first period of the lesson.)
7. Choose pairs of figures from the divided square and the divided triangle and explore through dialog
if each pair is congruent, similar or neither. Ensure that the dialog reiterates the definitions of
congruent and similar. Place each example of congruent or similar under the proper heading. Place
any pair that is neither congruent nor similar on a different rug. Continue until children are
answering with confidence. (This is the second period of the lesson.)
59 The Genius of Geometry
lockhart-learning.com
Symmetry, Congruence, Similarity, and Equivalence
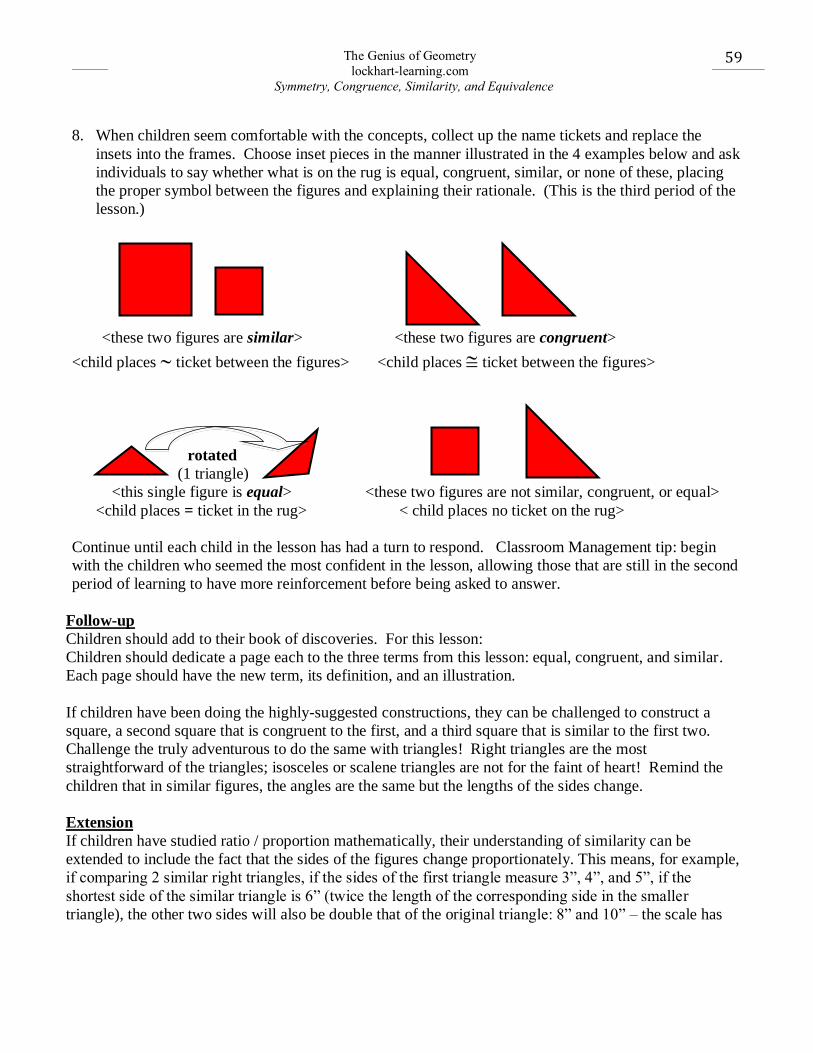
8. When children seem comfortable with the concepts, collect up the name tickets and replace the
insets into the frames. Choose inset pieces in the manner illustrated in the 4 examples below and ask
individuals to say whether what is on the rug is equal, congruent, similar, or none of these, placing
the proper symbol between the figures and explaining their rationale. (This is the third period of the
lesson.)
<these two figures are similar> <these two figures are congruent>
<child places ticket between the figures> <child places ticket between the figures>
rotated
(1 triangle)
<this single figure is equal> <these two figures are not similar, congruent, or equal>
<child places = ticket in the rug> < child places no ticket on the rug>
Continue until each child in the lesson has had a turn to respond. Classroom Management tip: begin
with the children who seemed the most confident in the lesson, allowing those that are still in the second
period of learning to have more reinforcement before being asked to answer.
Follow-up
Children should add to their book of discoveries. For this lesson:
Children should dedicate a page each to the three terms from this lesson: equal, congruent, and similar.
Each page should have the new term, its definition, and an illustration.
If children have been doing the highly-suggested constructions, they can be challenged to construct a
square, a second square that is congruent to the first, and a third square that is similar to the first two.
Challenge the truly adventurous to do the same with triangles! Right triangles are the most
straightforward of the triangles; isosceles or scalene triangles are not for the faint of heart! Remind the
children that in similar figures, the angles are the same but the lengths of the sides change.
Extension
If children have studied ratio / proportion mathematically, their understanding of similarity can be
extended to include the fact that the sides of the figures change proportionately. This means, for example,
if comparing 2 similar right triangles, if the sides of the first triangle measure 3”, 4”, and 5”, if the
shortest side of the similar triangle is 6” (twice the length of the corresponding side in the smaller
triangle), the other two sides will also be double that of the original triangle: 8” and 10” – the scale has

60 The Genius of Geometry
lockhart-learning.com
Symmetry, Congruence, Similarity, and Equivalence
changed. (NOTE: scale factor is a concept that NCTM says should be taught. It will also be addressed
in Area and Volume)
The concept of proportionality can also be used to explain why a square and a rectangle, while both being
comprised of 4 right angles, cannot be similar.
Children with this understanding can calculate the lengths of missing sides of similar figures, if desired.
They can also solve real-world story problems like the following:
At a secret location somewhere in northern California, there is a tree that is believed to be the tallest in
the world. They have given the tree a name: Hyperion. (This part is true.)
One day, Smokey the Bear was wandering through the Northern California woods, and he happened
upon Hyperion. Smokey he decided he wanted to confirm know how tall Hyperion actually is. Now bears
are good at climbing trees, but this was a mighty tall tree, and Smokey had fires to put out (and salmon to
catch) so Smokey decided that if he used his brain, he might not have to climb all the way to the top of the
tree.
Smokey was really smart about ratios! He knew that he could use ratios to figure out how tall the tree
is. Knowing that telephone poles in the park were about 10 feet taller than he was, Smokey walked and
walked until he was standing in a spot where he could look up and see the top of the telephone pole
appear in line with the top of the tree. He measured the distance from himself to the pole and from
himself to the tree. He drew a quick sketch:

61 The Genius of Geometry
lockhart-learning.com
Symmetry, Congruence, Similarity, and Equivalence
Height of
Hyperion?
10 feet
5 feet
190 feet
Set up the ratio that represents the size of these two similar triangles so that Smokey (who is also really
good at arithmetic) can solve for the height of the tree.
Solution: 5
10=
190
?
Solve by equivalent fractions: Solve by finding the cross products:
5
10𝑥
38
38=
190
380 190 𝑥 10 = 5 𝑥 ? → 1900
5= 380
The approximate height of Hyperion is 380’.

78 The Genius of Geometry
lockhart-learning.com
Measurement in One Dimension
Measurement in One Dimension
Length and Perimeter in English and Metric Units
Presentation 3: Applied Linear Measurement: Perimeter
Materials: Geometric Cabinet
Ruler with English and metric units
Paper, clipboard or other hard surface, pencil, colored pencils, Book of Discoveries for each
student (keep in reserve until needed.
Direct Aim: to understand the concept of perimeter as the line that bounds a 2-dimensional figure
To learn to measure perimeter
Indirect Aim: to enhance children’s association of 1-dimensional measurements with length, even non-
contiguously linear length (the sum of a series of line segments)
To review the nomenclature of 2-dimensional figures before beginning Area
To build an impression of area
To increase children’s accuracy in measurement
NOTE: Children should measure the length of line segments or linear edges of 3-dimensional objects
first. It is not necessary that they be skilled at converting from one measurement to another or from one
measurement system to another to be successful with perimeter measurements. Perimeter is preliminary
to area: children should have the key understandings and experiences from this lesson well in hand
before moving on to Area. Converting between units often takes closely spaced repetition staged at
intervals over a couple of years for all of its manifestations to become truly internalized.
1. Invite a group of students to a lesson. Initiate a discussion of measurement of length. Steer the
conversation to include the importance of accuracy in measurement.
2. Open the Geometric Cabinet triangle drawer. Set the equilateral triangle and its frame on the rug.
Remove the triangle from the frame. Ask the children what the figure is. <Saying that it is a triangle is
sufficient. They need not name it by sides or angles – if they do, that is great.>
3. Agree that it is a triangle. Express that all of the figures in the Geometric Cabinet are meant to
represent 2-dimensional shapes. It is the surface of the wooden triangular shape that is actually the
triangle – the paint layer, if you will.
4. Carefully trace around the outside edge of the triangle inset. Return the inset to the rug. Place the
drawing on the rug next to the triangle. Point to the drawing and ask the children to name it. <They
will probably say that it is a triangle.> Ponder their answer a moment, then shade in the figure. “I can
agree that this is a triangle.

79 The Genius of Geometry
lockhart-learning.com
Measurement in One Dimension
5. Again, carefully trace around the outside edge of the triangle inset. Place it adjacent to the wooden
triangular inset and the drawing and ask again for them to name it. “The paint layer of the wooden
inset is a triangle. The shaded in drawing is a triangle. What is this?”
6. Name the paper with the tracing of the triangle. “This is the outside edge of the triangle. It is called
its perimeter.”
7. This is a word that we use both in geometry and in life. Give examples of the use of the word
perimeter in the children’s environments, i.e., the fence runs along the perimeter of the playground.
8. “In geometry, we say that the perimeter bounds a 2-dimensional shape like a fence line sometimes
bounds a property. When I traced the outside edges of the triangle the first time and then shaded it in,
my shading was bounded or limited by the perimeter – I stayed inside the lines.”
9. “The second time that I traced the outside edge of the triangle, I did not shade it in. All I drew was the
perimeter. Sometimes the perimeter bounds an area and sometimes it stands alone.”
10. Recall children’s experiences in early childhood or elementary, tracing the perimeter of shapes with
their fingers to learn about the shapes.
11. Explain that one way to say how big something is involves saying how big around it is. The Giant
Sequoia is the world’s most massive tree, am some think that it is the largest living organism on earth.
It can be up to 110’ around the outside. At that size, it would take about 20 adults with fully arms
outstretched to encircle the tree!
12. Another way to think of perimeter is to think of an imaginary arthropod, an imaginary insect, Pete
the perimeter ant. (Optional: draw Pete on the third triangle, where only the perimeter appears.)
Pete’s favorite thing to do in the world is to walk the perimeters of figures. He walks around the
outside edge and then tells us how far he has gone.
13. Take the isosceles triangle and one of the scalene triangles from the Geometric Cabinet and lay them
on the rug below the equilateral triangle. “Let’s invite Pete to look at the equilateral triangle, the
isosceles triangle, and one of the scalene triangles and compare their perimeters.” Take guesses as to
which has the longest perimeter and which has the shortest – which triangle will be the longest walk
for Pete. Classroom management tip: Some may ask to run their fingers around the perimeter to
calibrate. If so, that would be wonderful, but if the lesson is time-limited, that may need to be
discouraged for during the lesson.
14. Measure one side of the triangle in cm and write its measurement on the paper drawing of the
perimeter including units. Measure the second side and then the third side and do the same. Comment
on the fact that all three sides have the same length. Ask what type of triangle has 3 sides of equal
length. (Equilateral> Sum the three sides and write the total length of the perimeter including units.
15. Repeat the process for the other triangles. Which offered Pete the longest walk? The shortest?

80 The Genius of Geometry
lockhart-learning.com
Measurement in One Dimension
16. Time permitting, have each child choose one shape from the Geometric Cabinet that is comprised
exclusively of straight sides. Each child will:
i. trace the perimeter of his/her figure into the Book of Discoveries in red
ii. write the name of the figure above the tracing
iii. shade the inside of the perimeter in another color of his/her own choosing.
iv. write the name of the figure adjacent to the figure using the color of the shading.
v. measure each segment of the perimeter in cm, writing the length of each segment on
the drawing as they go
vi. sum the segments to find the total perimeter of the figure
vii. write “perimeter = ______cm” in red next to the figure
17. Children can compare their results.
Follow-up
1. If children do not complete their entry in their Books of Discovery during the lesson, they should do
so as part of the follow-up.
2. Children can measure the perimeter of various elements in the environment. Montessori geometry
materials lend themselves beautifully to this, but are universally better measured in metric; other
elements will be better suited to English units. If children are to choose what to measure, place the
constraint on their choices that they measure the perimeter of 2-dimensional surfaces only. They can
measure the perimeter of the carpeted area of the classroom because carpet is (kind of) 2-dimensional.
They can measure the perimeter of a desktop but not of a desk. If they have the option to choose
English or metric units, show them that one system of measurement will usually work better than the
other.
3. An important activity to put in front of the children is giving them problems for which the perimeter
is provided but one side of the figure is not. This is an ultimate confirmation that they understand the
concept. (And it often appears on standardized tests.)

81 The Genius of Geometry lockhart-learning.com
Measurement in Two Dimensions - Area
MeasurementinTwoDimensions
AreaofPlaneFiguresandSurfaceAreaofPlanarSolids
In Psychogeometry, Montessori talks about how the child’s sensorial experiences lead to his ability to “logic out” relationships, theorems, and formulas - - mysterious combinations of letters and numbers that those who are traditionally educated memorize as a first-entrée to Area. The Montessori materials and experiences make the relationship between physical reality and abstract formulas elegantly evident – it is literally “child’s play”! Montessori educators and parents alike, seeing the elegance and beauty of the Montessori area and volume materials for the first time, express a longing wish that they had been offered that experience in their childhood years. Many have a common reaction, “They made us memorize all that stuff!” often followed by, “I finally understand what they were trying to teach us!” As lessons begin to place heavier reliance on linking physical relationships to calculations and algebraic expressions, we are reminded that the upper elementary child’s reasoning brain is exploding. It itches to be exercised! From where does this reasoning arise? It is built on experience. The ways in which the sensorial experiences enable reason should not be regarded superficially or dismissively. When we understand the logic and reasoning behind any process, we discover mathematical relationships. We no longer need to submit to mindlessly following an algorithm to obtain the right answer; deep, authentic knowledge and understanding belong to us! In this section, the yellow area materials offer new sensorial experiences as children manipulate the wooden materials and paper representations of these materials to come into a personal relationship with rectangles, parallelograms, and triangles, arguably the building blocks of all other regular 2-dimensional figures. These materials, and the more abstract metal insets, lend themselves brilliantly to transitioning to abstract reasoning. Initially, the sensorial and reasoning experiences are broken out into separate lessons: children experience the shapes and their areas sensorially, coming to a key understanding about how 2-dimensional measurement differs from linear measurement. They may determine the area of a particular figure simply, by counting squares. They move into more and more abstract thought in the subsequent lesson on that same figure as they move through the Reasoning Level to the point of being able to find area completely abstractly on the Measuring and Calculating Level. As the children progress through more and more figures, gaining more experiences on which they can base their reasoning, the levels of learning will be combined into a single lesson, usually one lesson for each figure. Please note, these lessons have been written to depict a generalized sequence!! Some children seemingly naturally see the relationships, while others need more guided support. If the children begin

82 The Genius of Geometry lockhart-learning.com
Measurement in Two Dimensions - Area
to spontaneously intuit relationships, keep their pace and skip to the next lesson – don’t hold them back! On the flip side, if during a lesson that combines Sensorial, Reasoning, and Computation Levels it becomes clear that the children are working hard to understand the just the Sensorial or just the Reasoning concepts, stop there and give them an opportunity to do follow-up geared just to that level before proceeding. The bottom line is this: observe children during the lessons and modify the lesson stopping point according to their demonstrated comprehension of the new isolated difficulty. While this section is all about learning to measure the Area of a wide variety of figures, experience with calculating perimeter of each figure is included in each lesson, interleaving new learning with prior learning to maximize deep comprehension and long-term retention. Remember that we learn by similarities but store by differences! Have fun with these amazing area materials!

102 The Genius of Geometry lockhart-learning.com
Measurement in Two Dimensions - Area
Presentation 4: Area of a Parallelogram - Formulaic Reasoning Materials: Yellow Area material – rectangle with black grid, undivided parallelogram, divided parallelogram Book of Discoveries and pencil for each child drafting tape or dry erase marker Direct Aim: to find the formulaic representation for the area of a parallelogram to find the formulaic representation for the perimeter of a parallelogram Indirect Aim: to reinforce the difference between linear measurements and the measurement of area 1. Invite a group of students to a lesson. Review prior learning by having children do and verbalize how
they transformed a parallelogram into a rectangle. Ask why we chose to do such an oddly specific thing. <Since we know how to find the area of a rectangle, if we could transform the parallelogram into a rectangle, we can find its area!>
2. Express the idea that we would like to be able to get the area of the parallelogram directly from the parallelogram, without having to do the transformation.
3. Place a length of drafting tape along the base of the rectangle. (Alternatively, draw lightly along the
base with a dry-erase marker). Place a length of drafting tape along the height of the rectangle. (Alternatively, draw lightly along the height with a dry-erase marker). Transform the rectangle back into a parallelogram. This replicates the illustrations in the child’s Book of Discoveries from the previous lesson.
4. Examine the drafting tape on the base. Note that the base of what was the rectangle is also the base of the parallelogram. Compare the base of the undivided rectangle and the undivided parallelogram to show that they are equivalent.
5. Examine the drafting tape on the height and note that the height of what was the rectangle is also the true height of the parallelogram. Compare the heights of the undivided rectangle and the undivided parallelogram by standing them both on their bases to show that they are the same height; confirm that they are equivalent.

103 The Genius of Geometry lockhart-learning.com
Measurement in Two Dimensions - Area
6. Remind the children that the true height of any figure is measured vertically – along one of the black grid lines. Help the children verbalize the relationship: A parallelogram is equivalent to a rectangle if the base of the rectangle is equal to the base of the parallelogram and the height of the rectangle is equal to the height of the parallelogram .
7. Discuss the diagonal edge of the parallelogram: measure it to see that it is not the same length as the true height. Give this edge the name slant height. True height ≠ slant height. Slant height is always more than true height.
8. We found that the area of this parallelogram was 50 sq. units. Place the tickets for the base and height accordingly.
\
8. Let’s think back to when we were calculating the area of the rectangle (rather than counting squares). What was the process for calculating the area of the rectangle? Place the tickets accordingly:
A
= b
x h
50sq.units
= 10units
x 5units
1. Shall we try to form a general process, a rule, for finding the area of a parallelogram?
We know that this parallelogram has the same base, the same height, and the same area as this rectangle – they are completely equivalent. After we transformed the parallelogram into a rectangle, the two figures were also congruent. The rule for finding the area of a rectangle is to multiply the length of the base by the length of the height: A= b x h, so this must be true for the parallelogram as well. Let’s see if that works on our parallelogram:
2. Place the tickets “b” and “h” appropriately on the parallelogram.
10units
10units
5units
h
b
5units

104 The Genius of Geometry lockhart-learning.com
Measurement in Two Dimensions - Area
3. Pull down tickets to show the formula A=bh.
A
= b
x h 4. Let’s try a real-life example.
The logo of the US Postal Service is a parallelogram with an eagle inside it. They use this logo on stamps and also on their mail trucks. If the height of the parallelogram on a delivery truck is 2’ and the base of the parallelogram is 3’, what would the area of the parallelogram be? A = b x h A = 3’ x 2’ A = 6 sq. feet
5. Practice with more examples until the children seem confident; then, “up the ante”: Here’s a tricky one. Remember the Postal Service logo? What if they put the logo onto a billboard? Now the base of the parallelogram is 30 meters and the area is 600 square meters. What would the height of the parallelogram be? A = b x h 600 sq. meters = 30 meters x h 600 = 30 x 20, so the height is 20 meters! Note that this kind of problem satisfies standards for finding missing operands.
Most children will find this entire discussion to a small step from the previous lesson. If that is the case, extend the discussion to include perimeter. If, on the other hand, this seems to be challenging, stop here and give the children parallelograms with a variety of different dimensions, asking that they calculate the area of each.
6. We now know that the parallelogram on the billboard is 30 meters wide at the base and we know that its true height is 20 meters. We know its area: 600 square meters. What if we wanted to enclose the logo with a red parallelogram? Draw and label the parallelogram.
A = 600 square meters 20 m. 30 meters
We want to know how long the strip would be: its perimeter. Remind the children that the perimeter is how far Pete the Perimeter Ant would walk if he walked around the entire parallelogram. Trace the perimeter of the parallelogram. Do we have enough information to know how long that stripe would be? If necessary, re-engage children in a discussion on the differences between true height and slant height. Give the children the algebraic symbol hs to indicate slant height and ht to indicate true height.

105 The Genius of Geometry lockhart-learning.com
Measurement in Two Dimensions - Area
7. Provide the children with the slant height of the parallelogram: 22 meters.
22 m. A = 600 square meters 20 m. 30 meters
8. Guide the children to calculate the perimeter of the parallelogram: p = b + hs + b + hs p = 30 meters + 22 meters + 30 meters + 22 meters p = 104 meters
9. Give the children one or more parallelograms and ask them to calculate the Area and perimeter of each. For example, use a parallelogram that has a base of 12 light years and a true height of 4 light years, with a slant height of 5 light years. <p = 34 light years and A = 48 square light years>
Follow-Up Children should find the perimeter and area of a variety of parallelograms. - At least one should be a parallelogram from the classroom (such as one in the geometric cabinet) so
that the child experiences taking the measurements himself, experimenting with whether English or metric units better serve his calculations.
- A few should be parallelograms with the perimeter and/or provided but with a key measurement missing.
- A best practice is to intermingle these with finding the perimeter and area of a rectangle and a square, to be sure that new learning is interleaving with existing knowledge.

128 The Genius of Geometry lockhart-learning.com
Measurement in Two Dimensions - Area
Presentation 10: Area of a Trapezoid Materials: Metal Inset Plate 6 – undivided and divided trapezoid insets with 2 trapezoidal frames and a rectangular frame. Direct Aim: to discover the method of finding the area of a trapezoid Indirect Aim: to continue to see geometric figures as composites of other figures To expect that all of geometry is about relationships and that all formulas are rooted in
concrete meaning.
1. Sensorial Level Invite a group of students to a lesson. Begin the lesson with effortful retrieval. Ask the children to calculate the area and perimeter of a couple of figures with provided “measurements” (not actual size). Good options are to give them a rhombus and a parallelogram (one in which there is a “÷2” component and one that has none). An even better option is to have them do the calculation for area and perimeter for the rhombus, but for the parallelogram, give a problem with a missing element, as in:
A parallelogram has an area of 50 square parsecs and a perimeter of 26 parsecs. The true height is 8 parsecs and the slant height is 10 parsecs. How long is the base? <This can be solved either from knowing that the area is base x true height (50 = b x 10) or from knowing that the perimeter is base + slant height + base + slant height (26 = b + 8 + b + 8). In both cases, the base can be calculated to be 5 parsecs. If some solve by area and some solve by perimeter, it would be interesting to have them describe their process to each other.)
2. Lay out the metal inset plate 6. Ask the children to name the shape and describe its characteristics.
(What makes a trapezoid a trapezoid?) Regarding then divided trapezoid, ask what shapes make up the trapezoid. <2 right triangles, a rectangle and another trapezoid.>
6
3. Ask if any of those 4 pieces are congruent to any others. <The 2 right angle triangles are congruent
to one another> Ask if any of the pieces are similar to one another. <Since the 2 right angle triangles are congruent to one another, they are also similar to one another. The two trapezoids are NOT similar. They have the same base angles but their top angles are not the same.> Ask if any of the 4 pieces are equivalent to one another. <Only the 2 right-angle triangles are equivalent.>
4. Ask if anyone thinks they can say where the height – the true height – should be measured. <It would
be along a line that is perpendicular to the base – stand the trapezoid up to demonstrate. If there is any doubt about this, cut out a right triangle that matches the base angle of the trapezoid: “Where is the height of that triangle measured?”> Ask where the slant height should be measured. <It is the length of the two slanted sides>

129 The Genius of Geometry lockhart-learning.com
Measurement in Two Dimensions - Area
5. Ask if anyone thinks they know where the base is measured. <The child will almost undoubtedly indicate the long horizontal line at the bottom of the figure.> Agree with that choice; then, rotate the figure 180º so the small horizontal line is now at the bottom of the figure and ask once again if anyone can show where the base is to be measured. If, as is likely, at least some of the children indicate that the short horizontal line on which the figure is resting is the base, say, “But a minute ago you told me that the long line was the base… did the Area change when I rotated the figure? The height didn’t change… “ Take whatever comments the children offer in response.
6. “I wonder if there can be 2 bases for this figure…let’s see what we find when we research the Area.”
7. Reasoning Level
As always, we want first to prove that nothing changes in the “value” of the trapezoid when we cut it into pieces. We want to prove equivalence between the undivided and the divided trapezoid. Ask a child to do this. <The child will remove the undivided trapezoid and transfer the pieces into the adjacent frame, and will place the undivided trapezoid into the frame formerly occupied by the divided trapezoid,>
6 6
Equivalence is proven! Ask the child or another child to transfer all the pieces back to their original location.
8. Once we have proven that it is ok to divide the figure - that it does not affect the area of the figure -
we want to discover how this figure relates to a rectangle. Luckily, we have a rectangular frame right here to help us! Ask a volunteer to transfer the divided trapezoid inset into the rectangular frame.
NOTE: there are a couple of ways that this can be accomplished. The best orientation is as shown above, where the longer base of the small trapezoid is at the bottom of the rectangular figure. The next steps can be done no matter how the pieces are oriented in the frame, but the visual is stronger with this orientation.

130 The Genius of Geometry lockhart-learning.com
Measurement in Two Dimensions - Area
9. “Did all of the pieces fit into the frame? What can we say about the trapezoid and the rectangle?” <The pieces fit – the trapezoid and rectangle are equivalent.”>
10. Mark the height of the rectangle only (on the small right angle triangle) and transfer that back into the
trapezoidal frame. “How does the height of the rectangle compare to the height of the trapezoid? <Children will say that it is half of the height of the trapezoid.> Agree that it appears to be half. Ask if anyone can prove that it is half. < Stack the second triangle: show that it takes 2 right triangles to fill the frame’s height.>
Return all pieces to the rectangular frame.
11. Mark the base of the rectangle only and transfer that back into the trapezoidal frame. For the first time, the base of the rectangle corresponds to more than one measurement on the original figure: here, the base of the rectangle is equivalent to the sum of the longer base and the shorter base. b h/2 B
12. Some children will benefit from seeing the trapezoid transformed back into a rectangle and then back again into a trapezoid. Some will really need to manipulate the pieces themselves to internalize the equivalence. The follow-up suggests children cutting their own pieces and completing the transformation for their Book of Discoveries. For this figure, that is highly suggested!
13. Help the children verbalize the relationship: A regular trapezoid is equivalent to a rectangle if the base of the rectangle is the sum of the top and bottom bases of the trapezoid and the height of the rectangle is ½ the height of the trapezoid.

131 The Genius of Geometry lockhart-learning.com
Measurement in Two Dimensions - Area
14. Formula / Calculation Level So, it is important to have both the short base and the long base lengths after all! And of course, we need the true height. We can just call the true height h or ht. (Place that label on the trapezoid). Since there are two bases, mathematicians agreed to call the big base (the bottom) the major base and the smaller base (the top) the minor base. We symbolize these with a capital B and lower case b. (Illustration is enlarged for clarity.)
b ht B And now, let’s label the rectangle. B and b transfer directly – we can still see those sides as we look at the base of the rectangle. The height of the rectangle, however, is only half of the height of the trapezoid.
ht 2
B b
15. Remind the children that they just said that to find the area of the trapezoid, add the lengths of the two bases and then multiply by half of the true height. Point out how that relates to the labels on the rectangle. Ask how to represent that as an equation. < A = (B + b) x (h/2). >
16. Let’s try this by measuring our undivided trapezoidal insert: Measurements major base = B = 10 cm A = (B + b) x (h /2) minor base = b = 5 cm height = h = 4.2 cm A = (10 cm + 5 cm) x 4.2 cm 2 A = 15 cm x 2.1 cm A = 31.5 cm2
17. “Before we leave this, let’s look at that formula for just a moment. In the past, we have seen when one part of the formula or another is divided by 2, that we can use the commutative and associative law to change the formulas around a bit to make our calculations easier. Remember, we found 3 ways to represent the area of a triangle.” Ask a volunteer to share. A triangle: half the height x the base: b x h 2
height x half of the base: b x h 2 half the product of the height and the base: b x h 2 All three of these equations will give the same answer.

132 The Genius of Geometry lockhart-learning.com
Measurement in Two Dimensions - Area
The trapezoid is a little trickier because the formula isn’t all multiplication – it is a mix of addition and multiplication. That means we have to be a little careful.
18. The equation from the insets is A = (B + b) x (h) 2
The first parentheses encloses the base of the rectangle, the second set of parentheses encloses the height of the rectangle. Remember that area is always the multiplication of 2 quantities – don’t lose the 2-ness of area just because there are now 3 terms! Step through the following changes to the formula, each time asking if it is ok to make the change. At each step, give the children the opportunity to say why the step is “legal”. Any time the children can’t justify the step, plug the measurements of the trapezoid back into the equation to see if the area still calculates to 31.5 cm2: A = (B + b) x (h) x (1/2) < This is justified because h/2 = h x ½. It is just decomposing the product.>
A = (B + b) x (1/2) x (h) < This is justified because of the commutative law for multiplication.>
A = (B + b) x (1/2) x (h) < This is justified because of the commutative law for multiplication.>
A = (B + b) x (h) < This is justified because we just multiplied the first 2 terms 2 together.> So, we have 2 ways that we can represent the area of the trapezoid: (B + b) x (h) and (B + b) x (h) 2 2 Confirm that the new formula also results in an area of 31.5 cm2. Ask if it would be ok to divide just B or just b by 2. Referbacktotheinsetwherethetrapezoidhasbeenconvertedtoarectangle;explainthatB+bhastosticktogether–itisthebase.Takinghalfofonlypartofthebaseisnotok!Takinghalfofthewholebaseisok;takinghalfoftheheightisok.Butitisnotoktotakehalfofjustpartofthebaseorpartoftheheight.
19. Explore why one formula might be easier to work with than another. Example One: B = 5 in b = 3 in h = 17.5 in B + b = 8 in, which is easily divided by 2.
The height, 17.5 in, is less easily mentally divisible by 2.
Use A = (B + b) x (h) 2 = 4 in x 17.5 in A = 70 sq. in.

133 The Genius of Geometry lockhart-learning.com
Measurement in Two Dimensions - Area
Example Two: B = 150 m b = 75 m h = 200 m B + b = 225 Use A = (B + b) x (h) 2 = 225 m x 100 m A = 22,500 sq. m.
20. Ask what additional measurement is needed if the children are to calculate the perimeter. <They will additionally need to know the length of the slant heights.>
Follow-Up 1. Children can recreate key points in this lesson for their Book of Discoveries by tracing the metal
insets to show that the area of a trapezoid can be related to the area of a rectangle, resulting in a formula that is half of the product of the sum of the major and minor bases times the height.
2. Children should find the perimeter and area of a variety of trapezoids – some teacher provided and some to be measured trapezoids in the classroom. Remember that when providing trapezoids for the children, it is important to provide the measurements for the major and minor bases, the true height AND the slant heights (to enable the calculation of perimeter). The first of the measured trapezoids should be the inset used in the lesson, for the sake of familiarity with the first set of numbers. Intermingled with trapezoids should be a rhombus or two, a triangle and a parallelogram or rectangle, to be sure that those formulae remain in active memory.

178 The Genius of Geometry lockhart-learning.com
Measurement in Two Dimensions - Area
Surface Area of Planar Solids By the time a child reaches the upper elementary level in a Montessori school, he will typically have had a multitude of encounters with geometric solids in the early childhood and lower elementary classrooms. At some point in time, he is likely to have been able to identify these solids blindfolded! However, that does not necessarily translate to confident identification of the solids and their properties by age 9. Perhaps because encounters with the solids are well separated in time, or perhaps because the experience was largely sensorial, that knowledge is often not at the child’s fingertips and needs to be refreshed. We begin, then, with a review of nomenclature, properties, and etymology. Why etymology? Most upper elementary children are no longer inherently fascinated by words just because they feel lovely in the mouth or because they are a way of organizing their environment and their world. Etymology is a way to bring back some of the word fascination that characterized first-plane and first-half-of-second-plane children. (The appendix provides the etymology of most geometric terms for ready reference.) Many educators jump straight from nomenclature to volume, integrating surface area almost as an afterthought. Montessori herself expressed no opinion on the sequence with which to teach these concepts. It is the preference of the author to follow nomenclature with a study of surface area as a means of further solidifying and the concept and practie of finding the area of a 2-dimensional figure and as a means of drawing the child’s attention to what makes up any given solid. This will make the concept and practice of finding the volume of solids more logical and thus, more straightforward for the reasoning brain of the upper elementary child. Of course, there is the ever-present and very real concern that children be prepared to meet expectations for standardized testing. We owe it to our children and their families to adequately prepare them to meet expectations; this may drive a teacher to teach a child how to find the volume of a cube and rectangular prism well before he has completed the sequence that leads to those concepts. This can be done by teaching the concept with 1 cm cubes or even completely abstractly without significantly detracting to the Montessori lessons on the same subject that will come later, as long as no more abstract instruction is given than is strictly necessary. Teach what children need to know to meet standards while adhering to the Montessori spiral curriculum! As in the earlier sections, we will proceed from the Sensorial Level to the Reasoning Level, the Formula Level, and the Calculation (application) Level, per the direction of Dr. Montessori. Ready to leap into the third dimension? Buckle in!

197 The Genius of Geometry lockhart-learning.com
Measurement in Three Dimensions - Volume
MeasurementinThreeDimensions
Volume
By this point in our geometric adventure, children have amassed a great deal of knowledge - concrete and abstract. They have sowed many seeds along the way. The concept of volume should come fairly readily – it is the amount that it takes to fill the paper “gloves” that the children made in previous lessons! The concept that needs to be driven home in these first lessons, before even the Reasoning Level is achieved, is that Surface Area is a 2-D measurement of the surface of a 3-D solid; Volume is a 3-D measurement of the material that is bounded by the Surface Area.
Area (including Surface Area) is something x something. – 2 dimensions, 2 somethings. Volume is something x something x something. – 3 dimensions, 3 somethings.
If children have been graphing on 2D Cartesian coordinates (x, y) this is an awesome time to introduce the third dimension (x, y, z)!
It is also true that throughout the study of area and surface area, children have been flirting with Algebra, even using it and manipulating equations at times. There has been no attempt to generalize these algebraic concepts, only to use them. That is, we may establish the formula for the perimeter of a square to be s + s + s + s, and we may even take note of the fact that this is the same as 4 x s or 4s (something that the children have experienced because of the definition of multiplication as repeated addition), but we do not overtly apply algebraic principles to change the formula for the perimeter of the rectangle, b+ h + b + h to 2h + 2b or to 2(h+b). If the children notice this spontaneously, we allow it, of course; if the children are far enough along in their mathematics studies that they are completing this kind of early algebraic manipulations in their math studies, we apply it, of course. But we do not show the simplified equations in geometry; that would essentially be teaching an algebraic short cut! This flirting with Algebra through the study of 2-dimensional measurement does prepare the children for some pretty heady algebraic expressions. Shortly we will be looking at pyramids and discussing true and slant height of the solid, and relating that to the true height of the side of the surface! And more! While these equations and all of the different letters for different variables may appear daunting, remember that the children have come to it step-wise. They have mastered a great deal over time and they are ready. It can be tempting, when seeing these algebraic equations, to default to abstract teaching processes. This is an unfortunate choice. While children who are unafraid of math and geometry can be 100% successful with “plug it into the formula and crank it out” processes, this teaching approach does not engage their reasoning mind. It relegates understanding to “because I said so”. They have such deep understanding of how math and geometry are interrelated; rushing to abstraction at this point is like ceasing a hike 100 yards from the summit of the mountain. It takes so little at this point to make the final ascent! Let’s go for it!

205 The Genius of Geometry lockhart-learning.com
Measurement in Three Dimensions - Volume
Presentation 2: The Concept of Volume – Formula and Calculation Rectangular Prisms Materials: if available, grey prism – 20 cm x 10 cm x 10 cm (not all classrooms have this)
Box with 5 yellow prisms, each 20 cm x 10 cm x 2 cm Box of 2 cm cubes Other prisms (such as brown stair) for follow-up
Direct Aim: to consolidate prior learning and derive and use correct mathematical expression in algebraic form.
Indirect Aim: preparation for further studies in volume Continue to build comfort with use and manipulation of algebraic expressions
1. Review
Invite a group of students to a lesson. Ask for a summary of the last lesson, including: - the concept of Volume - appropriate units for measuring Volume - conceptually how Volume differs from Surface Area and Area - appropriate units for measuring Area
2. Place out the box of 2 cm cubes and, if available, the gray prism. If the grey prism is not
available, use the box in which the yellow volume prisms are held in its place, being sure to say that the shape of the box is a prism.
3. We want to find the Volume of the prism (or the Volume that can be held in this box). Begin to take out unit cubes, very methodically, one at a time. After a bit (or as soon as the children object), say, “This is going to take a LONG time, and I am not sure we have enough cubes. I wonder if there is a better way to do this.”
4. Formula Level Bring out the stack of 5 yellow prisms. The top prism is unmarked, with the remaining prisms stacked in the order shown to the right.
5. If the grey prism is available, superimpose the stack of prisms on it in each direction to show congruency. Because they are congruent, we can use the stack of yellow prisms to help us find the volume of the grey prism. If we can find the volume of the yellow prisms, we will have found the volume of the grey prism.
If the grey prism is not available, simply say that the yellow prisms
altogether are the volume of the interior of the box. Just as we worked with divided figures with Area, we will work with divided figures with Volume.

206 The Genius of Geometry lockhart-learning.com
Measurement in Three Dimensions - Volume
6. Let’s see if there is some way that we can represent the individual measuring cubes without having to actually use them. First, we will mark off the top layer along the edges to show where measuring cubes would help us measure the length and width of this prism.
Move the top layer to the bottom of the stack to reveal the prism with tick marks. 7. Tipping the top prism up on the side closest to you, begin to pull the top prism only towards you,
dragging it across the top of the rest of the prism. During this action, say, “If the ink was still dry from the tick marks, we could drag these tick marks along the vertical axis…. to make a set of parallel lines in this direction. This would help us measure the length of the prism.” Pull off the marked layer to reveal the length-marked layer.
8. Restack the prisms. Tipping the top prism up on either the right or left side, begin to pull the top 2 prisms only across the figure, dragging it across the top of the rest of the prism. During this action, say, “And again, if the ink was still dry from the tick marks, we could drag these tick marks along the horizontal axis…. to make a set of parallel lines in this direction. This would help us measure the width of the prism.” Pull off the marked layer to reveal the width-marked layer.
9. Move the top prism to the bottom of the stack and restack the prisms. “We now have a length-marked layer on top, and a width-marked layer next. If we were to take those two prisms and make a projection* of their lines onto a third prism, what would that look like?” *NOTE – if children did not participate in the lesson on Euler’s proof of the Pythagorean theorem, either explain what a projection is or change the language to not use that term. Simple alternative language has children imagine that all of the parts of the prism that are yellow are transparent – only the black lines are visible. Ask the children to imagine what it would look like if looking straight down on the 2 stacked prisms.
10. Bring the grid-marked layer to the top of the stack of prisms and restack. Ask what it would look like if the grid was actually a cutting guide – if we cut through all layers right along the lines. <It would be just like the unit measuring cubes.>
Bring out a single cube and compare to confirm. 11. “Let’s figure out how many cubes are in this first layer. It is 10 cubes long and 5 cubes wide.
How many cubes would that be? <50 cubes> Shown in plan (top) view
“How did you arrive at that number?” <Most will say that they multiplied 10 x 5. Reiterate that they were multiplying length by width.>
“How many layers are there?” <5 layers>
“With 5 layers, each of which has 50 cubes, how many cubes would there be if we replicated the entire prism?” <250 cubes>
“How did you arrive at that number?” <Most will say that they multiplied 50 x 5. Reiterate that they were multiplying the number of cubes in one layer by the number of layers.>
“To find the volume of the prism, then, you multiplied the length by the width, and then
multiplied that number by the height or number of layers.”
5 cubes
10cubes

207 The Genius of Geometry lockhart-learning.com
Measurement in Three Dimensions - Volume
13. Label the large prism with tickets to show the following notation for parts of a solid: AB = area of the base l = the length of the base /solid w = width of the base or depth of the solid H = height of the solid
The base of the solid is actually its base area, which we write AB. The base of this solid is a rectangle. When we find the area of a rectangle, a 2-dimensional figure, we talk about multiplying the base by the height. But when we are finding the area of a rectangle as the base of a solid, we use terms length and width. This may seem a bit perplexing, but it is actually to avoid confusion. If we used the area terms, when we talked about the height, it would really get confusing. We wouldn’t know if we were talking about this length (indicate the width of the base) or the height of the solid! The height of a solid measures from the base area up to the top of the figure, and it is written with a capital H to remind us that it is the height of the solid.
14. A moment ago, you told me that to find the volume of the prism, you multiplied the length by the width, and then multiplied that number by the height or number of layers. Who can express that as a formula, using some of the terms on the tickets?” Create new tickets to build the equation as shown:
V = l x w x H
15. There is another equally good way to express Volume using the one ticket that we didn’t use before. Ask for a volunteer to provide that equation and build it with new tickets, as before. Allow spacing to support the idea that l x w = AB in a visual impressionistic manner.
V = AB x H
16. Calculation Level Reasoning told us that the Volume of the large prism is 250 cubic units. Ask the children what measurements of l, w, and H should be used in the first formula to calculate the Volume. <l = 10 units, w = 5 units and H = 5 layers = 5 units.> Place number tickets on top of the letters in the first algebraic expression:
250 units3
= 10 units
x 5 units
x 5 units

208 The Genius of Geometry lockhart-learning.com
Measurement in Three Dimensions - Volume
Remember that we discovered that there was a second way to express the volume of the prism.
V = AB x H We know H (and V, actually). How do we fine AB? Is it by measuring or calculating? <The area of the base, a rectangle, is found by calculations to be 50 square units. Again place number tickets on top of the letters in the algebraic expression.
250 units3
= 50 units3
x 5 units
17. This shows that the two formulas are equivalent – equal valued. Sometimes we are going to
find it more convenient to use one form than the other, so they are both handy to keep around. Remind the children that in algebra we don’t need to use x to represent multiplication. Here are the two forms of the equation that we want to put into our Book of Discoveries:
V = l w H V = AB H
18. Choose another rectangular prism such as the brown stair. As a group, measure the figure in cm
and calculate its Volume using both formulae, paying careful attention to the units.
Follow Up 1. Children should draw a sketch of a rectangular prism in their Book of Discoveries, labeling the
parts and writing in the two forms of the equation for the Volume of a rectangular prism. 2. The children can measure and find the volume of different prisms in the environment. Of course,
all Montessori materials are best measured in cm. It is well to supplement these real experiences with teacher provided prisms with unit that could not be measured easily, such as a flat-roofed adobe building that has interior square footage of 200 square feet and a wall height of 8 feet, or even an arbitrary prism with length 8 miles, width 20 miles and height 2 miles.