the farm tractor in the forest - maine. · pdf file"the farm tractor in the forest"...
TRANSCRIPT

The Form Troctor in the Forest

"The Farm Tractor i n the Forest" i s a m a n u a l f o r w o o d l o t o w n e r s a n d s m a l l s c a l e w o o d s c o n t r a c t o r s . I t o u t l i n e s t h e t y p e o f m o d i f i c a t i o n s a n d a u x i l i a r y e q u i p m e n t t h a t m a y b e n e e d e d i f a f a r m t r a c t o r i s t o b e u s e f u l i n a f o r e s t r y o p e r a t i o n . G u i d e l i n e s f o r p l a n n i n g o f f o r e s t r y o p e r a t i o n s a n d s a f e w o r k t e c h n i q u e s a r e a l s o p r o v i d e d . T h e l a s t s e c t i o n s o f t h e b o o k c o v e r t h e e c o n o m i c a s p e c t s o f f a r m -t r a c t o r - l o g g i n g a n d p r o v i d e e x a m p l e s o f h o w t o c a l c u l a t e c o s t s t o c o m p a r e d i f f e r e n t l o g g i n g s y s t e m s . T h e o r i g i n a l v e r s i o n o f t h i s b o o k w a s p r i n t e d i n S w e d e n . I l l u s t r a t i o n s a n d m o s t r e f e r e n c e s r e f l e c t c u r r e n t S w e d i s h c o n d i t i o n s . H o w e v e r , i n s o m e p l a c e s m i n o r c h a n g e s h a v e b e e n m a d e i n t h e E n g l i s h v e r s i o n t o r e f l e c t c o n d i t i o n s i n N o r t h A m e r i c a .
® T h e N a t i o n a l B o a r d o f F o r e s t r y , S w e d e n W r i t t e n b y : M i l t o n N i l s s o n i l l u s t r a t i o n s : N i l s F o r s h e d C o v e r p h o t o : M i l t o n N i l s s o n R e f e r e n c e g r o u p : T h o r s t e n A n d e r s s o n
K a r l - G u n n a r L i n d q v i s t B e r t i l S v e n s s o n
P r o j e c t l e a d e r : K a r l - G o r a n E n a n d e r B e n g t P e t t e r s s o n
E d i t o r : B e n g t P e t t e r s s o n E n g l i s h t r a n s l a t i o n : F o r e s t E x t e n s i o n S e r v i c e
N . B . D e p a r t m e n t o f N a t u r a l R e s o u r c e s R . R . # 5 F r e d e r i c t o n , N e w B r u n s w i c k C a n a d a E 3 B 4 X 6
L F A L L F 1 4 6 8 2 0 2 7 P r i n t e d b y : A B F a i t h s T r y c k e r i , V a r n a m o , S w e d e n 1 9 8 2 I S B N 9 1 - 8 5 7 4 8 - 2 5 - 0

The National Board of Forestry, Sweden published The Farm Tractor in the Forest by Milton Nilsson in 1982. In August 2017 the Swedish Forest Agency, successor organization to the National Board of Forestry, granted Vincent Seiwert of Bombadil Tree Farm, Ashland, Maine, U.S.A. permission to reproduce and disseminate The Farm Tractor in the Forest for noncommercial purposes as he deems appropriate.
You may download, save, print, and/or share this PDF version, prepared by Vincent Seiwert from his English translation copy of the book, in its entirety or in part, so long as you abide by the same noncommercial purpose restriction.
07 September 2017

Contents W h e n c a n 1 u s e m y f a r m t r a c t o r i n t h e f o r e s t ? 2 T h e b a s i c f a r m t r a c t o r 4 T h e f o r e s t r y e q u i p p e d f a r m t r a c t o r 8 T h e p o w e r t a k e o f f s h a f t 1 3 T h e t r a c t o r t r a i l e r 1 6 W i n c h e s 2 0
M o u n t i n g a m e c h a n i c a l w i n c h o n a f a r m t r a c t o r 2 3
C r a n e s 2 6 M o u n t i n g t h e c r a n e a n d a t t a c h i n g t h e t r a i l e r 3 1
G r a p p l e l o a d e r s 3 7 A c c e s s o r i e s 3 8 C a b l e s 4 6 C o n t r o l a n d m a i n t e n a n c e o f e q u i p m e n t 5 4 P e r s o n a l s a f e t y e q u i p m e n t 6 0 O f f - r o a d d r i v i n g t e c h n i q u e 6 1 P l a n n i n g t h e h a r v e s t o p e r a t i o n 6 6 C h o i c e o f l o g g i n g m e t h o d 7 0
S h o r t w o o d t o s t r i p r o a d 7 4 T r e e l e n g t h o r t r e e s e c t i o n s t o s t r i p r o a d 7 8 T r e e l e n g t h t o l a n d i n g 8 0 S h o r t w o o d t o l a n d i n g 8 6
E c o n o m y 9 2

A l m o s t a n y f a r m t r a c t o r c a n b e p u t t o a v a r i e t y o f f o r e s t r y u s e s b u t d o n o t e x p e c t i t t o r e p l a c e a s k i d d e r o r o t h e r s p e c i a l i z e d m a c h i n e d e s i g n e d s p e c i f i c a l l y f o r f o r e s t r y . T h i s h a n d b o o k o u t l i n e s s o m e o f t h e s a f e t y f e a t u r e s a n d e q u i p m e n t t h a t c a n b e a d d e d t o a f a r m t r a c t o r b e i n g a d a p t e d f o r w o o d s w o r k . W h e n c o m b i n e d w i t h p r o p e r w o r k t e c h n i q u e s , t h i s e q u i p m e n t i s s u i t a b l e f o r s m a l l s c a l e f o r e s t r y o p e r a t i o n s .

S o m e f a c t o r s t o c o n s i d e r
3

The basic farm tractor T h i s i l l u s t r a t i o n s h o w s a t r a c t o r e q u i p p e d t o m e e t S w e d i s h f a r m s a f e t y s t a n d a r d s . S t a n d a r d s m a y v a r y i n o t h e r j u r i s d i c t i o n s . I t m a y b e w o r t h w h i l e c o n s i d e r i n g i n s t a l l a t i o n o f t h i s t y p e o f s a f e t y e q u i p m e n t e v e n i f i t i s n o t r e q u i r e d b y l a w i n y o u r c o u n t r y .
If used on public highways, the tractor must comply with local traffic regulations.
4

The Cab The tractor should be equipped with an approved cab or roll-over protection structure for safety reasons. In northern climates, a good heater- -defroster is necessary when working in the winter. Air conditioning may be appropriate in other
If a tractor with a cab is operated on frozen lakes or rivers, it should have an escape hatch or removable roof on the cab.
5

The Seat A farmer or woodlot owner may spend over1,000 hiours per year on tfie seat of the tractor. Unless the machine has a properly designed seat, the operator may end up with backache, disc degeneration, stomach or kidney problems resulting from the vibration and bouncing of the tractor.
A well-designed seat will support the operator's backbone in a natural way, allowing it to absorb machine vibrations. The seat should have adjustable dampening or springs adaptable to the weight of the operator. It should be adjustable both horizontally and vertically. It is not enough to just have a well-designed seat. The seat must be maintained and checked regularly to ensure the springs or dampening systems are working properly.
Steps For safety reasons the tractor should have perforated, anti-slip steps designed to prevent accumulation of soil, snow or ice.
If the tractor does not have anti-slip steps, it is relatively easy to weld on a strip of expanded metal to give the steps anti-slip properties.
6

The power take off (PTO) The power take off should have a permanently fixed shield. A pipe-shaped shield on the PTO shaft should cover all moving parts. If the PTO shield on the tractor is made of expanded metal the operator has a better view of the hitch when hooking up a trailer.
The tow hook The tow hook should be mounted as close to the tractor axle as possible to minimize the risk of a back roll-over (back flip) or a side roll-over of the tractor. The hook should be designed so that the trailer cannot disconnect accidentally.
Some tractors have a combined farm-equipment drawbar and a hydraulically controlled tow hook. The drawbar should be removed to increase clearance for forestry work.
For safety and convenience Two-Way radio Forest work involves many dangerous activities. A two-way radio in the tractor can be used to summon help in an emergency.
Anyone working alone in the woods should carry a portable transmitter in his pocket to use in an emergency. Make sure someone is monitoring a base-station tuned to the frequency of your transmitter
A two-way radio is also a convenience. It can be used to tell visitors where you are working, tell the family when you will be home for dinner, or seek advice from a friend or co-worker elsewhere in the forest
7

The forestry equipped farm tractor E q u i p p i n g a f a r m t r a c t o r f o r f o r e s t w o r k d o e s N O T m a k e i t i n t o a s k i d d e r . S u c h a c o n v e r s i o n i s n o t e c o n o m i c a l .
T h e e q u i p m e n t a d d e d t o t h e t r a c t o r s h o u l d b e e a s y t o d i s c o n n e c t w h e n t h e t r a c t o r i s n e e d e d f o r f a r m w o r k . T h e t y p e o f e q u i p m e n t s e l e c t e d w i l l r e f l e c t t h e a m o u n t o f f o r e s t w o r k c o n t e m p l a t e d a n d t h e e c o n o m i c r e t u r n f r o m f o r e s t p r o d u c t s .
F e w m a n u f a c t u r e r s p r o v i d e s t a n d a r d i z e d f o r e s t r y e q u i p m e n t f o r f a r m t r a c t o r s . T h e o w n e r w i t h a c c e s s t o a w o r k s h o p a n d w e l d i n g e q u i p m e n t s h o u l d h a v e l i t t l e t r o u b l e f a b r i c a t i n g b a s i c e q u i p m e n t l i k e a b e l l y p l a n , r a d i a t o r p r o t e c t o r a n d o t h e r s m a l l i t e m s .
Basic equipment for the forestry-equipped tractor includes:
Tire chains
8

Protective screen A metal mesh screen will protect the rear window and rear section of the tractor when loading with a crane.
Screens should be installed on both rear and side windows when a grapple loader is used.
First aid kit The kit should contain first aid bandages, band-aids and gauze bandages.
Belly pans Belly pans are necessary to protect the motor, transmission and front axle. The protective pans should be made of metal at least 10 mm thick. Cun/ing the pans increases their strength and improves protection against knocks and blows. Curved belly pans reduce the risk of hanging up on stumps or other obstacles.

Tire chains Tire ciiains improve tiie off-road capabiiities of a farm tractor. Some jurisdictions restrict their use on public roads because of potential damage to the road surface. Instructions for mounting tire chains are found on page 45.
Chains with V-shaped studs (lugs)
Chains with studded rings
Valve stem protection Valve stems are easily damaged in off-road work. If a tractor is to be used in the woods, weld valve protectors onto the tire rims before the tires are mounted. The valve protector may cover just the valve stem or the whole rim.
Fully covering protective disc, bolted to the rim.
Because of the danger of explosion, never weld a rim when it has a tire mounted on it.
1 0

Radiator protector This metal mesh screen must be strong enough to prevent branches from puncturing the radiator.
Equipment box A box for the chainsaw, fuel and oil containers and small logging equipment can be installed on the front of the tractor. DO NOT store this equipment on the floor of the tractor cab. Make sure the equipment box does not obscure headlights or licence plates.
Engine side guard Removable metal screens or sheet metal protectors will shield the motor compartment during woods operations. An approved container with extra fuel could be mounted on this screen.
1 1

Headlight protection Provide protection for fieadiigfits, fiasfiers and position iigfits wfien worl<ing in tfie forest.
Fire extinguisher Spiiied fuei or dry materiai from tfie forest fioor can easiiy catcfi fire. Carry a fire extinguistier designed for use on gas, oii, eiectric and wood/paper fires. A 6 Kg type fire extinguisfier is recommended.
Tractor stability Increasing tfie distance between tfie wheels improves the stability of the tractor. Some front axles are designed to be extended. Rear rims can be installed "inside out" to increase the distance between the wheels. Special extenders are also available for rear wheel mounts.
J 1 I 1 J
p
I r ] f y I
I I
1 2

The power take off shaft A p o w e r t a k e o f f ( P T O ) s h a f t i s n o r m a l l y m a d e u p o f t h e f o l l o w i n g c o m p o n e n t s :
Universal Yoke with an Yoke with an Universal Outer yoke joint cross inside pipe outside pipe joint cross Outer yoke
Keyway and clamp bolt for key-way shaft
Outside yokes The outer yokes can have different dimensions, profiles and fasteners.
Clamp bolt for Round hole with key-way shaft. dowel hole.
It is therefore important to know the correct dimensions, profile and fastener type when ordering a PTO shaft.
Tapped hole Bayonet joint Lock pin
Universal joints There are three different kinds of universal joints on the market. Only the conventional universal joint is used for winches and cranes.
Conventional universal joint
Double universal joint
Wide angle universal joint
1 3

The conventional universal joint can operate at an angle of up to 35°. This is sufficient to permit lifting or lowering a winch or a crane.
fi/leasure Correct shaft length It is important to make sure that the shaft is the correct length so that it is not damaged or pulled apart when the hitch is raised or lowered. If the shaft is too long, cut it, remove burr and lubricate.
Cut Remove burr Lubricate
Lubrication PTO shaft will last ionger if properly lubricated. Insufficient lubrication can result in damage to bearings, overheating and increased telescopic resistance. Lubricate as recommended below:
Once a day Once a week Once a day
1 4

PTO shaft shields The PTO shaft must be fully covered by a protective shield. The universal joints at the tractor end and machine end must have permanently mounted shields. The pipe shaped PTO shield must be fastened with two chains, one in each end, to prevent rotation. A damaged shield must be immediately replaced. Never wait to replace a damaged shield.
Permanent shield on the tractor
Permanent shield on the machine
The permanent shield over the tractor PTO should withstand a heavy blow (1,200 Newton). The shield should never be removed. If the shield is made of a metal mesh or stretch metal, you can see through while hitching on a trailer.
When the tractor PTO is not in use, the PTO outlet cover should be in place.
If a section of the PTO shaft is damaged it is generally cheaper to purchase a new shaft or use used spare parts rather than repair the broken component.

The tractor trailer A t r a i l e r i s a s i n g l e a x l e v e h i c l e t h a t m a y b e e q u i p p e d w i t h e i t h e r s i n g l e o r b o g i e w h e e l s . W a g o n s h a v e m u l t i p l e a x l e s a n d a r e n o t s u i t e d f o r f o r e s t r y o p e r a t i o n s .
T r a i l e r s a r e b e t t e r i n t h e f o r e s t b e c a u s e p a r t o f t h e w e i g h t o f t h e l o a d i s o n t h e t r a c t o r , i n c r e a s i n g t r a c t i o n . A t r a c t o r - t r a i l e r c o m b i n a t i o n i s m o r e m a n e u v e r a b l e t h a n a t r a c t o r - w a g o n c o m b i n a t i o n .
r o
A good trailer for forest work will have:
Grabbing pin Bogie
1 6

Five-ton capacity A five-ton traiier stiouid suit most farm tractors.
Piatform A smaii platform sfiould be provided for use wfien adjusting the load.
Swivei eyelet A revolving eyelet improves off-road handling.
Bogie The bogie should be equipped with wheels which have valve stem protectors and tires approximately 8.50x12. The bogie pivot should be slightly toward the rear of centre to allow the bogie to easily "climb" an obstacle.
Good ground clearance The trailer should have good ground clearance, low loading height and a "clean" underside.
1 7

Adjustable bunks Adjustable bunks make it possible to carry products of varying lengtfis.
Load width Keeping bunk ends inside tfie wheel spacing will reduce the chance of damaging trees along the trail.
3 ^ m XT
1 ^
I
1 8

Dump beam A dump beam (described on page 43) can mai(e unloading easier.
Anti-slide device Anti-siide devices on the beams pro
be 2 cm higher than the anti-siide device.
1 9
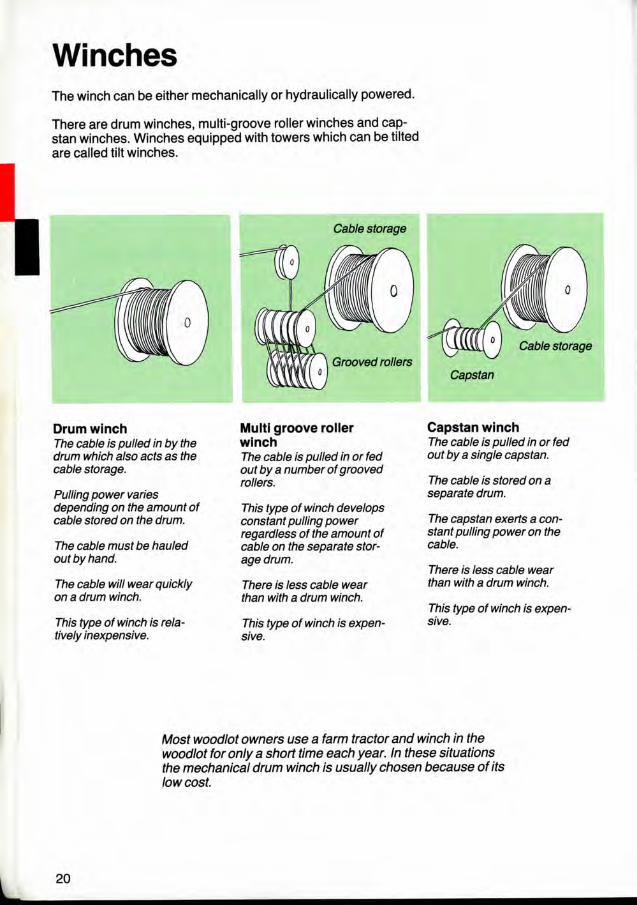
Winches T h e w i n c h c a n b e e i t h e r m e c h a n i c a l l y o r h y d r a u l i c a l l y p o w e r e d .
T h e r e a r e d r u m w i n c h e s , m u l t i - g r o o v e r o l l e r w i n c h e s a n d c a p s t a n w i n c h e s . W i n c h e s e q u i p p e d w i t h t o w e r s w h i c h c a n b e t i l t e d a r e c a l l e d t i l t w i n c h e s .
Drum winch The cable is pulled in by the drum which also acts as the cable storage.
Pulling power varies depending on the amount of cable stored on the drum.
The cable must be hauled out by hand.
The cable will wear quickly on a drum winch.
This type of winch is relatively inexpensive.
Cable storage
0
Multi groove roller winch The cable is pulled in or fed out by a number of grooved rollers.
This type of winch develops constant pulling power regardless of the amount of cable on the separate storage drum.
There is less cable wear than with a drum winch.
This type of winch is expensive.
Capstan winch The cable is pulled in or fed out by a single capstan.
The cable is stored on a separate drum.
The capstan exerts a constant pulling power on the cable.
There is less cable wear than with a drum winch.
This type of winch is expensive.
Most woodlot owners use a farm tractor and winch in the woodlot for only a short time each year. In these situations the mechanical drum winch is usually chosen because of its low cost.
2 0

Chain and sprocl<et drive
Tractor power Winch power tal<e off tal<e in
Mechanical drum winch A mechanical drum winch consists of a drum mounted on a frame with adjustable support legs. Usually the winch frame can be mounted on the three-point hitch of a farm tractor.
The winch is powered by the tractor PTO. There is usually a chain and sprocket drive mechanism with some
form of friction clutch to transfer power to the cable drum.
The cable drum usually has a friction brake to prevent speeding and tangling when the cable is being pulled out.
Always follow the manufacturer's specifications when adjusting the clutch or friction brake.
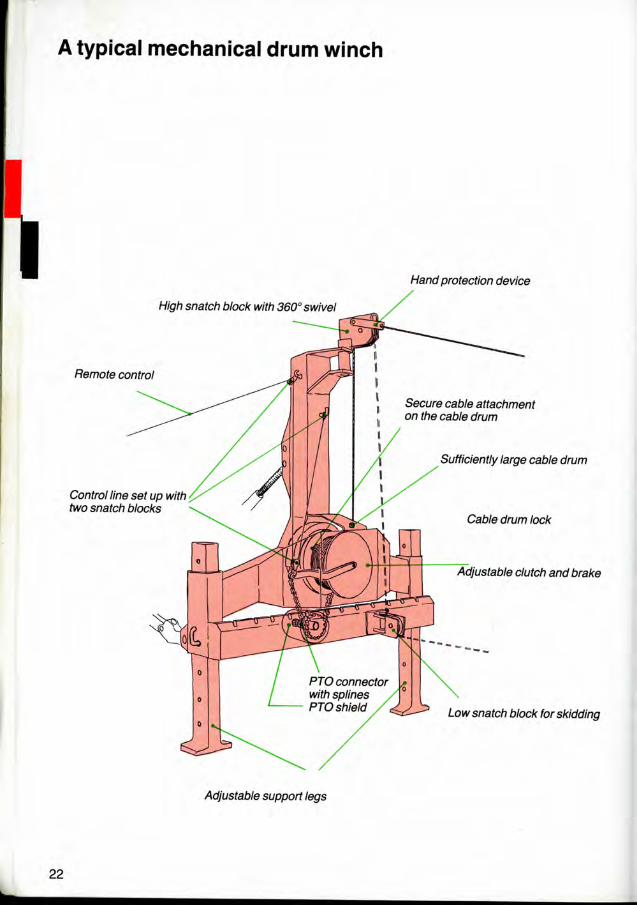
A typical mechanical drum winch
Hand protection device
Higti snatcti biocl< witti 360° swivel
Adjustable support legs
2 2

Mounting a mechanical winch on a farm tractor
1. Attach the top link to the tractor.
2. Place the winch on the ground behind the tractor. The top side will end up facing the tractor. Divide the PTO shaft and attach one half to the tractor, the other to the winch. If the tractor has two PTO's, use the one which turns at 540 revolutions per minute.
2 3

4. Tip tlie wincii up and fasten tfie top linl<. Sfiorten tfie sway bars so the winch does not sway sideways.
5. Raise the winch untii the PTO iniet on the winch is ievei with the outiet on the tractor. This is usuaiiy the point at which the PTO shaft is shortest.

7. Mounting ttie PTO stiaft: Piece ttie two stiaft sections next to eacfi other and mal<e sure the shaft is long enough even when the winch is lifted. Cut the shaft if it is too long. Lower the winch. Remove the tractor PTO section. Push the two sections together and refasten the tractor PTO section. Attach the PTO shield halves so that they do not rotate.
8. For remote control attach a control line or radio control unit. If you use a control line, make sure it does not interfere with winch operations.
If a radio control unit is used, connect the radio to the tractor battery and install an antenna on the roof of the cab.
9. Adjust the winch clutch and brake according to manufacturer's specifications.
2 5

Cranes A cable crane consists of a winch attached to a crane frame which has a lifting boom.
Some cranes are designed to allow the crane frame and boom to be removed so that the winch can be used alone.
Lifting boom
Crane frame
Winch unit
Cranes mounted on tractors are more common than cranes mounted on wagons or trailers. The tractor-mounted crane results in less total vehicle length.
The trailer mounted crane has the advantage of being easily separated from the tractor. But the PTO shaft is longer and more exposed to stress. The trailer unit is less stable in early stages of loading.
The winch used is usually a mechanical drum type powered by the tractor PTO. The winch must have an automatic brake that will engage if the controls for the clutch or friction brake are released.
A crane should be equipped for remote control with a control line.
Warning: Do not use a one-channel radio remote control for loading and unloading operations since this kind of unit lacks an emergency stop function.
2 6

Crane specifications Recommended measurements are indicated in tlie si<etcli.
Adjustable support legs
2 7
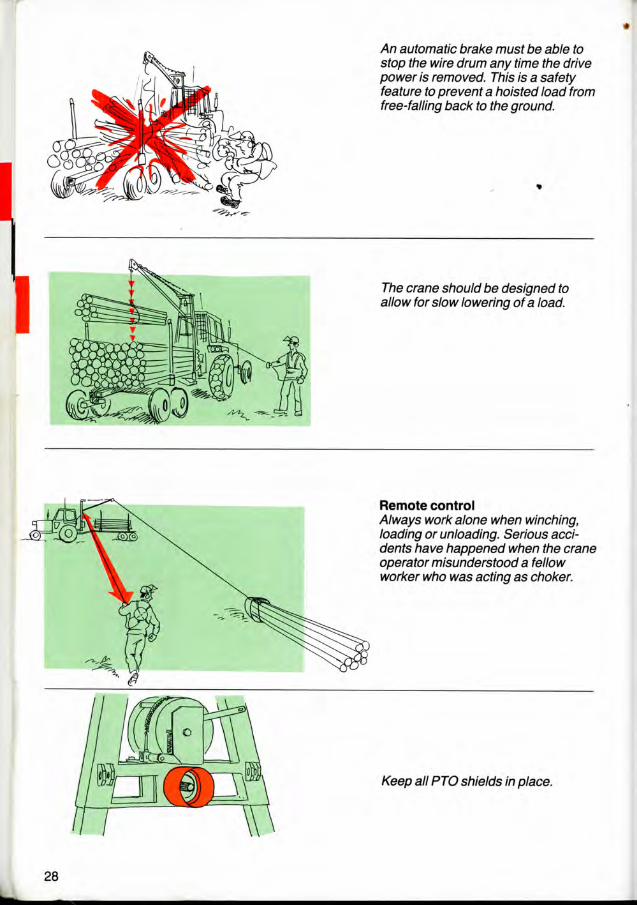
An automatic braise must be abie to stop the wire drum any time the drive power is removed. This is a safety feature to prevent a hoisted ioad from free-faiiing bacl< to the ground.
The crane shouid be designed to aiiow forsiow towering of a ioad.
2 8

The power intake stiaft shouid have splines. Avoid threaded shafts because they are difficult to disconnect.
Read the manufacturer's manual before adjusting the clutch and brake.
2 9

The drum diameter shouid be at ieast 10 times greater than the cabie diameter.
•
The adjustable support legs on the crane shouid have springloaded locl< pins which cannot shake loose. The legs should not extend below the crane frame when locked in the "up" • position to allow freemovement of the trailer drawbar.
3 0

Mounting the crane and attaching the trailer
2. Attach half the PTO shaft to the tractor and half to the crane. If there are two PTO connections on the tractor, use the one set to turn at 540 revolutions per minute.
3. Lower the crane support legs 20 cm. Remove lifting boom and place the crane frame on the ground. Attach the two lower links of the hitch. Extend the sway bars if necessary.
4. Tip the crane up and attach the top link of the hitch. Shorten the sway bars so that the crane will not sewing sideways.

5. Check that the PTO shaft is the proper iength even with the crane in the raised position on the hitch. If the shaft is too long, cut it and its protective cover to the proper length. Remove the part of the shaft attached to the tractor. Connect the two halves of the shaft and re-attach the tractor end. Attach the pipe-shaped shields so that they will not rotate.
w o o d .
6. Adjust the lifting boom according to » the iength of wood to be loaded. For three metre wood, a boom length of about230 cm is recommended. For saw logs, 280 cm would be about right.
7. Raise the crane support legs and lower the crane frame. Attach the lifting boom and outer snatch block if it is removable.
8. Thread the cable through all blocks on the crane. Instructions for unwinding cable are on page 47.

9. Attach the cable to the cable drum according to manufacturer's instructions.
10. Measure the desired length of cable. Tape the cable on either side of where it will be cut. Cut with a cold chisel.
I
Cable eyelet
Wedge
Slide hook
11. Attach the slide hook and cable eyelet as shown on page 48.
12. Wind the cable onto the cable drum, making sure the cable is evenly distributed as it rolls in. A load on the cable helps maintain even tension.
3 3

13. Attach and tension the iifting boom stabiiizer chains either iifting the boom by hand or by using the winch.
14. Use a cranio to adjust the iower linl<s to ievei the crane frame. Raise the crane so that the traiier can be attached to the drawbar.
15. Lower the crane untii it touches the traiier centrai beam (ioading position). Adjust the top linl< of the hitch so that the crane is vertical. Checl< that the top iinl< is not worn. Locl< the top iinl<.
16. Adjust the boom angle using the stabiiizer chains. A boom angle of about 110 degrees is best for loading.
3 4

17. Secure any surplus chain with shacl<les. Use cotter pins to lock the shackles holding the stabilizer chains.
18. Adjust the winch according to manufacturer's instructions and mount remote control line. A two snatch-block arrangement will increase leverage and make control easier.
19. Adjust the bunks on the trailer and fasten them in place. The end of the lifting boom shouid be directly above the mid-point of the load.
20. If you are going to use a dump beam, it should be connected to the trailer centre beam right below the end of the lifting boom.
3 5

21. When the crane is not in use, secure the end of the cabie to the crane frame with a safety snap-hool(.
22. If the crane is to remain on the tractor for a long time, it shouid be attached to a special frame by two articulated bars instead of to the top link of the three-point hitch. This provides four attachment points and makes the crane more stable. The top link of the hitch would only be used
' when connecting or disconnecting the crane unit. The special frame must not be attached to the tractor cab. Remember welding on the tractor cab and safety frame is unsafe.
3 6

Grapple loaders A g r a p p l e l o a d e r o n a f a r m t r a c t o r I s n o t a g o o d s o l u t i o n f r o m e r g o n o m i c a l p o i n t o f v i e w . T h e o p e r a t o r w o u l d b e f o r c e d t o s i t i n a t w i s t e d p o s i t i o n o r s t a n d o n h i s k n e e s o n t h e s e a t w h e n o p e r a t i n g t h e l o a d e r . S u c h p o s i t i o n s c o u l d a f f e c t t h e o p e r a t o r ' s b a c k a n d j o i n t s i f l o n g t i m e p e r i o d s a r e i n v o l v e d .
T h e g r a p p l e l o a d e r c a n n o t b e u s e d t o w i n c h w o o d f r o m t h e s t u m p t o a t r a i l d u r i n g a t h i n n i n g o p e r a t i o n . A s e p a r a t e w i n c h u n i t w o u l d h a v e t o b e p u r c h a s e d f o r t h i s .
A g r a p p l e l o a d e r - e q u i p p e d f a r m t r a c t o r d o e s n o t h a v e t h e c a p a b i l i t i e s o f s p e c i a l l y d e s i g n e d f o r e s t r y f o r w a r d e r s . S t a b i l i t y i s l i m i t e d i n o f f - r o a d s i t u a t i o n s a n d t h e g r a p p l e r e a c h i s s e l d o m m o r e t h a n f i v e m e t r e s . T h e g r a p p l e l o a d e r w i l l p r o b a b l y r e q u i r e a s p e c i a l h y d r a u l i c p u m p a n d t a n k i f t h e u n i t i s m o u n t e d o n a f a r m t r a c t o r .
A g r a p p l e l o a d e r i s e x p e n s i v e a n d a l a r g e a m o u n t o f w o r k w o u l d h a v e t o b e d o n e t o j u s t i f y p u r c h a s i n g s u c h e q u i p m e n t .
If a g r a p p l e l o a d e r i s s u i t e d t o y o u r n e e d s , t h e r e a r e t w o t y p e s t o c o n s i d e r :
Tractor mounted grapple loader Advantages: This type of unit can reach wood in front of the tractor. The tractor can be easiiy disconnected from the trailer. Stability is better in early stages of loading and the vehicle combination is short.
Trailer mounted grapple loader Advantages: In transport position the grapple can be hooked right to the load and is not affected by turning actions. Disconnecting the trailer also disconnects the grapple from the tractor.
Disadvantages: The grapple must be hooked to the front of the tractor during transport. If the grapple is hooked to the load on the trailer it can be twisted and damaged when turning unless it has a so-called "flotation"position. A swinging grapple can damage residual trees.
Disadvantages: This grapple will not reach wood in front of the tractor and has limited stability until there is some wood on the trailer. The vehicle combination is long and the hydraulic connections between the tractor and trailer are more exposed to damage.

Accessories Control equipment: Remote control line
Radio Radio controi eliminates ttie need for control lines. Single channel radio units for controlling mechanical winches are relatively inexpensive. Make sure the control unit will stop the winch without any delay. For safety reasons radio controls should not be used when loading or unloading with a crane.
3 8

Skidding and loading
Eyelet and slide hook An eyelet on the end of the cable Is easy to push under a bundle of pulp-wood. The eyelet hooks into a slide hook which is designed to minimize cable wear. The hook releases automatically when tension is removed from the cable. If you use skid tongs, attach them to the eyelet with a screw shackle.
Slide hooi
A slide hook of pipe This type of hook does not slide as easily along the cable. This makes it slower to work with.
Bundle hook A sturdy metal hook helps pull the cable under a bundle of wood. You can easily make this type of hook yourself
Skid tongs There are several models of skid tongs which are used for both skidding and loading logs.
Unless you have a remote controlled winch, use skid tongs with springs so that the long teeth dig into the wood even when there is no tension on the cable.

Skid pan A skid pan can be made out of any light material such as aluminum or fibreglass. A recycled car hood is sometimes suitable. The skid pan makes winching easier and prevents damage to the residual trees and the ground. Skid pans used with cranes should be detachable from the cable (see page 88).
Skid cones Skid cones are useful for hauling large, de-limbed stems. Several cones can be used together, each attached to the top of a stem to be choked. Sliding blocks on the chokers bring all the cones together for skidding.
Corner hook A corner hook can be used to quickly change the hauling direction. NOTE: It is not strong enough to be used as a snatch block.
Strap Several types of straps are available for use with snatch blocks. The most convenient is in the form of a loop which can be attached to any size tree.

Snatch blocks There are both "open" arid "closed" snatch blocks. The cable can be removed from the "open" block without opening the block. (1)A "closed" block must be opened to insert or remove the cable. (2)
Closed blocks with twistable halves (3) open in such a way that the cable cannot get between the wheel and the side wall of the block. Ball-bearings make this type of block easy to open.
Loading and unloading Picaroon A picaroon allows you to stand back while guiding a load. This reduces the risk of injury if the load should slip or fall.
Lifting hooks Swedish lifting hooks are useful when handling roundwood. (Note: This is not a pulp hook wich has the handle perpendicular to the hook).
Rope hook A branch with a hook on it makes a handy tool for catching the cable when loading or unloading with a crane. A hook holder can be made simply by welding a piece of pipe to the crane frame. Drive a nail in the end of the branch and it will serve as a primitive picaroon for guiding a load.
4 1

Id Eyelet, preferably
spllced^^
.5-4 m steel cable diameter 8 mm
Load straps If you use a dump beam to unload your trailer you should have one more set of load straps and binders than you have assortments of wood.
If you are fonvarding softwood pulp and hardwood pulp, for example, you would need at ieast three sets of straps and binders (see illustration page 91).
1.5-2 m steel chain diameter 9 mm
Cabie choker
Cable strap
Runner, can be removed
Chain choker Runner (permanent—cannot
be removed)
Chokers A c h o k e r i s m a d e u p o f a r u n n e r , a s t r a p a n d a n e n d p i e c e .
Cable chokers are less expensive than chain chokers but wear out more quickly. Cable tends to twist and create sharp wire ends that could injure the operator. Safety mittens with reinforced palms are recommended when using cable chokers.
Chain chokers are recommended for rocky or bare ground conditions or any time large stems are being winched. Chain chokers are heavy but oniy a few are needed when winching large logs. They are easy to lose in underbrush so paint them a bright color.
The choker cable or chain should be of smaller diameter than the main winch cabie. If the load is too heavy, the choker will break protecting the more expensive winch cable.
4 2
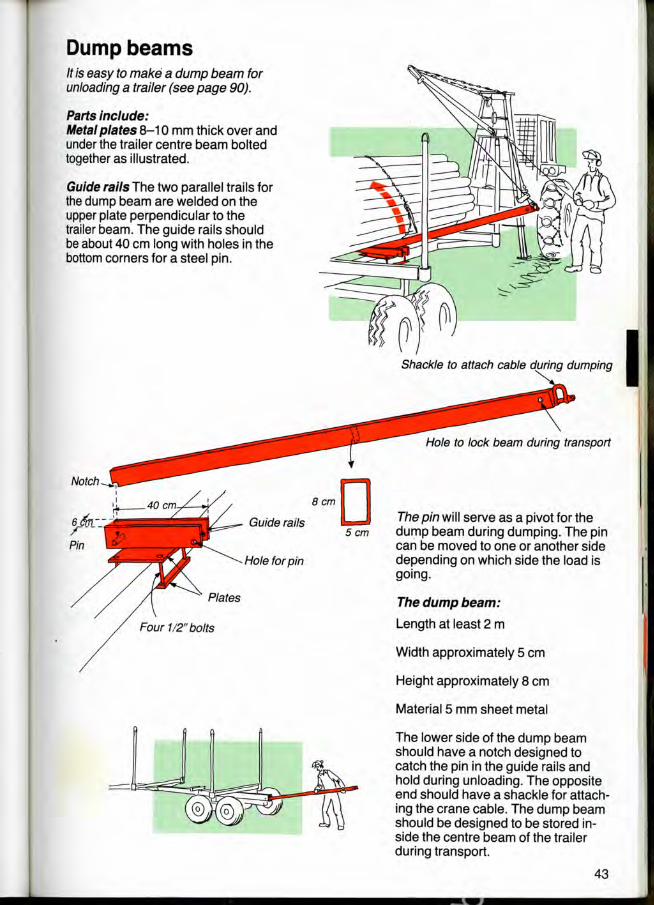
Dump beams It Is easy to make a dump beam for unloading a trailer (see page 90).
Parts i n c l u d e : Metal p l a t e s 8 - 1 0 m m t h i c k o v e r a n d u n d e r t h e t r a i l e r c e n t r e b e a m b o l t e d t o g e t h e r a s i l l u s t r a t e d .
Guide r a i l s T h e t w o p a r a l l e l t r a i l s f o r t h e d u m p b e a m a r e w e l d e d o n t h e u p p e r p l a t e p e r p e n d i c u l a r t o t h e t r a i l e r b e a m . T h e g u i d e r a i l s s h o u l d b e a b o u t 4 0 c m l o n g w i t h h o l e s i n t h e b o t t o m c o r n e r s f o r a s t e e l p i n .
Shackle to attach cable during dumping
Notch
Plates
Four 1/2" bolts
Hole to lock beam during transport
The pin w i l l s e r v e a s a p i v o t f o r t h e d u m p b e a m d u r i n g d u m p i n g . T h e p i n c a n b e m o v e d t o o n e o r a n o t h e r s i d e d e p e n d i n g o n w h i c h s i d e t h e l o a d i s g o i n g .
The d u m p b e a m :
L e n g t h a t l e a s t 2 m
W i d t h a p p r o x i m a t e l y 5 c m
H e i g h t a p p r o x i m a t e l y 8 c m
M a t e r i a l 5 m m s h e e t m e t a l
T h e l o w e r s i d e o f t h e d u m p b e a m s h o u l d h a v e a n o t c h d e s i g n e d t o c a t c h t h e p i n i n t h e g u i d e r a i l s a n d h o l d d u r i n g u n l o a d i n g . T h e o p p o s i t e e n d s h o u l d h a v e a s h a c k l e f o r a t t a c h i n g t h e c r a n e c a b l e . T h e d u m p b e a m s h o u l d b e d e s i g n e d t o b e s t o r e d i n s i d e t h e c e n t r e b e a m o f t h e t r a i l e r d u r i n g t r a n s p o r t .
4 3

Hydraulic dump beam The hydraulic dump beam is attached to the tractor hydraulic system. It can tip in two directions, depending on which end of the beam is bolted to the trailer frame.
A trailer with a hydraulic dump beam is expensive.
U-bolt lock (clamp lock) Back to back lock
Cable locks and screw shackles Back to back locks and screw shackles are handy to have in the tool box. Back to back locks can be used to mend a broken cable. Shackles can repair things like broken tire chains. The U-bolt lock (top left) can damage cable and should not be used.
Screw shackle
4 4

Tire ctiains can be difficult to install and tighten. Try the following technique.
Place the chains behind the wheel with the inside down and the locks fon/vard. Loop a piece of wire over the top of the tire and attach it to the chain locks. Drive slowly fonvard until the chains are in place. Fasten the locks and remove the loop of wire. Fasten any loose pieces of chain with screw shackles.
4 5

Cables 7 wire core
6 core cable with centre core. The centre core in this case has the same composition as the outer cores.
Right hand Lang's lay cable
A cable can perform many jobs. It can pull or skid a ioad or lift the load onto a trailer. There are many types of cabie for many different uses. This book deals only with types suited for winch and crane operations.
A cable is made up of a number of cores which in turn are made up of steel wires twisted together. The cores are twisted around a central core. For winching, the central core should be steel to provide extra support and prevent the cabie from being flattened, bent or deformed under pressure. Steel-cored cable is stronger than hemp-cored cabie and also somewhat stiffer.
There are different ways to twist the cores. If the cabie is twisted the same way as the wires in the individual cores it is called a "Lang's lay".
If the cable is twisted the opposite way to the wires in the individual cores, it is called an "ordinary lay".
Ordinary lay is recommended for winching because it is less likely to twist under stress and has better resistance to exterior wear.
The more individual wires there are in the cable, the greater the flexibility. A 222 wire cable with a steel core should be just as flexible as a 144 wire cabie with a hemp core.

When a cable is working it is constantly exposed to bending, stretching and squeezing. This makes the cores move in relation to each other as well as movement within the cores. This creates friction and inside wear. To reduce this wear the centre core is saturated with a lubricant during the manufacturing process. A lubrication effect can also be obtained by coating the individual wires with zinc. This process is expensive and reduces (somewhat) the strength of the cable.
All cables will wear out eventually, if they are improperly mounted, they will wear more rapidly and the winch owner will face substantial replacement costs more often than necessary.
Use proper techniques when winding or unwinding a cable.
Proper unwinding using a capstan
Right Wrong
Avoid twists or other similar stress of the cable. The diameter of the cable drum or of the disc in a snatch block should not be less than 20 times the cable diameter.
The cable drum should have an alignment device or a pressure roller which will evenly wind up the cable on the drum without crossing over.
There is less wear of the cable end if a slide hook-eyelet combination is used instead of a hook on the cable.
Pressure mller.
4 7

Mounting of slide hook and cable eyelet
Tape the cable before cutting to keep cores in place.
f^ount the slide hook with the hook facing the cable.
Insert the taped end until you can see it in the hole.
4 8
Cut the cabie with a sharp cold chisel.
Mount the cable eyelet.
1
L* /
6
Insert the wedge and pull the cabie. Use the winch to further pull the wedge into place.

If you are using anothier type of hook the cable eyelet must have an eye ring as protection and be fastened with at least three back to back locks.
A back to back lock has two bolts with nuts and two jaws with a recess for the cable.
The distance between the locks should be at least three times the cable diameter
So called U-bolt locks are not recommended if the wood will be lifted from the ground.
The U-bolt lock can damage the cable if it is tightened too much.
A crane cable must be at least 8 mm in diameter. IVIake sure you get enough cable when you purchase a winch or a crane. The cable should be at least 45 metres long.
A damaged cable should be replaced or repaired immediately.
Eye ring
At least 3 times cable diameter
Back to back lock
The cable must be securely fastened to the cable drum. A number of methods are available. A hole in the drum sidewall and a knot, lock screw or a U-bolt lock can be used.
Always use safety mittens when you work with cables
4 9

Splicing C a b l e b r e a k s d o o c c u r a n d t h e c a b l e h a s t o b e s p l i c e d o r d i s c a r d e d . S p l i c i n g i s n o t d i f f i c u l t , b u t i t i s d i f f i c u l t t o e x p l a i n i n w o r d s . G o o d s p l i c i n g r e q u i r e s s o m e t r a i n i n g t o d o s u c c e s s f u l l y . U s e a c a b l e w i t h a s t e e l c o r e w h e n y o u a r e t r a i n i n g b e c a u s e t h e s t e e l c o r e p r o v i d e s m o r e s t a b i l i t y . T h e r e a r e l o n g s p l i c e s a n d s h o r t s p l i c e s . A l o n g s p l i c e s h o u l d b e a p p r o x i m a t e l y 1 , 0 0 0 t i m e s t h e d i a m e t e r o f t h e c a b l e .
F o r e x a m p l e , i f t h e c a b l e d i a m e t e r i s 8 m m , a l o n g s p l i c e w o u l d c o v e r 8 m e t r e s o f c a b l e . Y o u c a n m a k e a s h o r t e r s p l i c e i f t h e c a b l e i s n o t u s e d f o r l i f t i n g o r c a r r y i n g .
T h e m o s t c o m m o n c a b l e s h a v e 6 o r 8 c o r e s p l u s a c e n t r e c o r e . T h e f o l l o w i n g i n s t r u c t i o n s t e l l h o w t o m a k e a l o n g a n d a s h o r t ( e y e l e t ) s p l i c e o n a 6 c o r e c a b l e .
Y o u w i l l n e e d t h e f o l l o w i n g t o o l s : A h a m m e r a n d a n v i l C o l d c h i s e l S c r e w d r i v e r
S t a r t b y r e m o v i n g a l l d a m a g e d c a b l e . M a k e s u r e t h a t t h e c o r e s d o n o t o p e n u p . U s e t a p e t o h o l d t h e c o r e s t o g e t h e r .
Long splice a p p r o ' ^ ' ' ^ ^ * ^ 1. Open up (separate) the cable in
ftvo halves with three cores in one half and three cores plus centre core in the other half.
Open up at least 1 metre at each end of the cabie.
2. Move the four cable halves into each other. Place a half with three cores (a) next to a half with three cores plus centre core (c).
5 0

3. Fit and twist ttie tiaives together. Unwind (b) and twist (c) into the availabie space. Do the same with (d) and (a). Leave approximately 30 cm of (a) and (c).
On one side, (b) and (c), you have wire halves with centre cores and on the other side, (a) and (d), you have wire halves with only cores. Cut (b) and (d) so that they are approximately 30 cm long.
4. Start with the side which has only cores. Divide the 30 cm long wire halves so that each core is separate. t\/lake sure that the cores are parallel where the halves meet.
5. Twist one core in each direction. Unwind core a' to the left and twist core d ' to the left into the empty core space. Continue untii 5 cm remains.
Then unwind core d^ to the right and twist in core a^ to the right in the empty core space. Continue until only 5 cm remains.
Cores a^d^ will be lying side by side.
5 1

6. Make a knot on the cores. Insert the left core (a^) over and under the right core (d^).
7. Lock the cores. Place the screw driver under the two cores where the core to be locked comes up. Push the core through.
I 8. Cut off the loose ends.
9. Repeat the same procedure for core ends a' d ' and a^ d'.
10. Twist in the centre cores following the same procedure explained under points 4-5. Move the centre cores approximately 6 cm to the right so that the centre cores are separated. Knot and lock the moved cores.
11. Lock the centre cores at least twice.
^ ^ ^ ^ ^
12. Lock the remaining cores as explained in points 6-8.
5 2

Short splice (eye splice)
1. Divide tfie cabie in ttie same manner as for a iong splice.
Put the two halves together and twist them together to create a loop.
2. Separate the individual cores, fi^ake sure they are parallel with each other close to the place where the loop starts.
Cut the centre core leaving a shorf^^^^^ stump which is inserted in the cable centre.
I
3. Take core (a) and insert it under the closest meeting core. Do the same thing with cores (b) and (c). Turn the loop and proceed the same way with three remaining cores.
4. Repeat the procedure once or twice.
Cut off the loose core ends as closely to the cable as possible.
5 3

Walk around the vehicle and check for leaks.
Check the radiator. Make sure it contains enough anti-freeze or other coolant.
Check oil and lubricate tractor in accordance with manufacturer's instructions.
Make sure that you have enough fuel. Ventilating the fuel system can be cumbersome and cold.
Check tire pressure and tire chains.
5 4

Check all lights and reflectors.
Check the PTO shield—is it intact and well fastened?
Check the following details on the winch or the crane loader:
1. Are the links tightened so that the winch or the loader will not bounce against the wheels?
2. Is the top link properly locked?
3. Is the cable secured and the cable eyelet wedge well fixed?
4. Is the loading boom fastened?
5. Are the support legs fastened?
6. Is the cable in good condition?
7. Is the cabie hook in good condition?
5 5

Make sure you have the necessary tools and equipment for a day's work:
Chainsaw
Snatch block strap
Prying bar
Axe
Tool box
Remote controi line caddy or remote radio control equipment
Skid tongs
Bundle hook
Picaroon
Load strapping chains and binders (if you use a crane loader and trailer).
Start the motor, check the oil pressure and make sure the generator is charging.
Operation on highway, check the brake pedals to see if they are joined together.
5 6

While driving Check the temperature gauge and other instruments on a reguiar basis.
Check your rear view mirror reguiariy to see that nothing has come ioose and that you are not obstructing traffic.
NOTE—no passengers—you are responsible.
Tell somebody where you are going and when you plan to come back or make sure somebody knows where you are going and how long you will be away
5 7
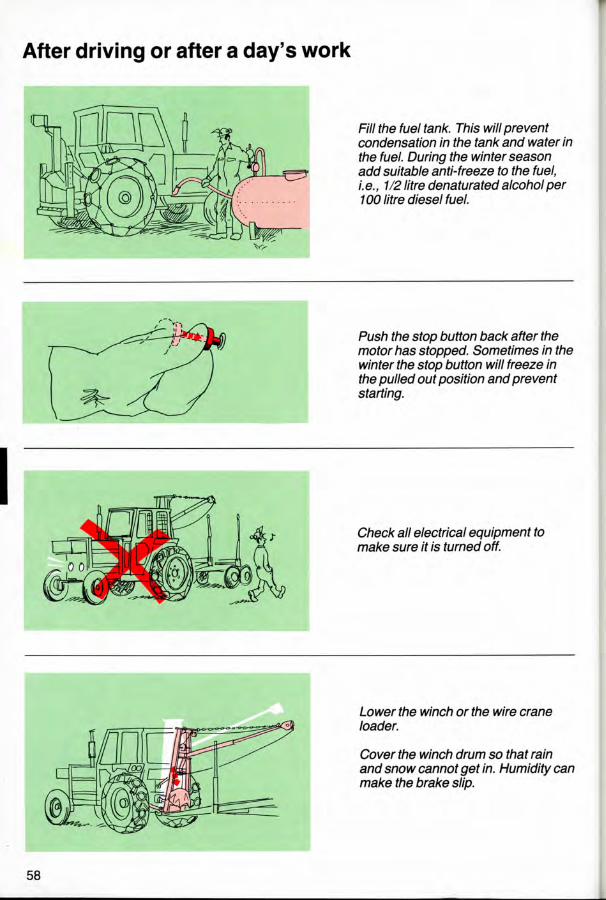
After driving or after a day's work
Fill the fuel tanl<. This will prevent condensation in the tanf< and water in the fuel. During the winter season add suitable anti-freeze to the fuel, i. e., 1/2 litre denaturated alcohol per 100 litre diesei fuei.
Push the stop button back after the motor has stopped. Sometimes in the winter the stop button will freeze in the pulled out position and prevent starting.
Lower the winch or the wire crane
Cover the winch drum so that rain and snow cannot get in. Humidity can make the brake slip.
58

Push in the coid weather start button on the injection pump. Leave the revolutions per minute (rpm) control at least the half-way mark. Store the battery at room temperature.
Clean windows, reflectors and headlights.
Remove the ignition key and lock the tractor.
Follow the instructions in the tractor and equipment manuals.
5 9

Personal safety equipment T o w o r k w i t h a f o r e s t r y e q u i p p e d f a r m t r a c t o r y o u s h o u l d h a v e t h e f o l l o w i n g s a f e t y e q u i p m e n t a n d c l o t h i n g :
H a r d h a t The hard hat should be well ventilated as you will be using it inside and outside the tractor.
F i r s t a i d Keep the first aid i<it handy so that it can be easily reached by either hand or both hands.
S a f e t y b o o t s Safety boots should have steel toes—this will protect the toes.
E a r p r o t e c t o r s ( E a r m u f f s ) M a / c e sure that your ear protectors guard against chainsaw as well as tractor noises.
S a f e t y m i t t e n s Safety mittens should protect your hands while working with the winch wire. This type of safety mitten has a double palm.
Pants with leg pads.
If you are felling as well as forwarding you shouid, of course, have a complete set of safety equipment.
6 0

Off-road driving technique A f a r m t r a c t o r u s e d i n f o r e s t r y i s e x p o s e d t o a h a r s h e r w o r k e n v i r o n m e n t t h a n i n a g r i c u l t u r e . T h e e m p h a s i s i s o n s t a b i l i t y , s t e e r i n g c a p a b i l i t i e s , g r o u n d c l e a r a n c e , d r i v i n g c a p a b i l i t i e s , b r a k e s a n d a b i l i t y t o b o u n c e o f f o b s t a c l e s . T h e d r i v e t e c h n i q u e u s e d f o r a t r a c t o r d i f f e r s s u b s t a n t i a l l y f r o m t h a t u s e d i n a c a r . T h e m a x i m u m s p e e d i s 3 0 k m / h o u r . T h e r e a r e m o r e g e a r s a n d t h e b r a k e s c a n b e u s e d t o b r a k e t h e v e h i c l e o r t o t u r n t h e v e h i c l e ( s t e e r i n g b r a k e s ) .
The brake pedals should be connected when the tractor is operating on a highway. Steering brakes are used only during off-road driving.
Brake pedals mounted together— Separate brake pedals—steering normal brakes. brakes.
6 1

Select a suitable low gear going downhill. This will prevent a jack-l<nife accident.
Never drive downhill in neutral or with the clutch disengaged.
If you drive uphill with a ioad, select a gear ahead of time and use it the whole way up the hill. Changing gears part way up a hill can be difficult.

Avoid driving across a slope.
Do not use steering braises when turning a sharp bend at high speed. The tractor couid jack-i<nife.
Do not rest your foot on the dutch pedal when you are driving, it can create abnormal wear on bearings and clutch plates.
6 3

Crossing a smaii ditcli witti an empty traiier sliouid be done at a 45° angie to the ditch.
If you have to cross a ditch with a loaded traiier, fiii the ditch with wood. Do not forget to remove the wood when you have finished in the area.
Remember that the traiier will "cut corners".
6 4

Towing and salvage
When towing another tractor, speed shouid be iow (not over 20 l<m/hour).
If you have misjudged the soil conditions, the tractor may s / n / c and rest on the belly pan. First try to drive baci<-wards. Place a big pulp sticl< behind the rear wheels and carefully back until the tractor is on the pulp stick. Place slash and wood under the wheels and in the ruts. Remove the pulp stick. Continue the salvage by backing. Never place a pulp stick in front of the rear tires with the intension to drive fon/\/ard. The tractor could turn over.
Should you get stuck with a tractor equipped with a winch, you can winch yourself backwards. Use a double cable attached as low as possible. The use of a double cable doubles the pulling force of the winch without increasing the stress on the cable.
Should you be able to drive fon^/ard, you can attach a chain to one of the rear axles. The chain should be placed above the front axle to prevent turning over.
Drive carefully so that you do not damage your rear axle.
6 5

Planning the harvest operation I t i s i m p o r t a n t t h a t y o u p l a n y o u r h a r v e s t i n g a r e a a h e a d o f t i m e . W i t h n o p l a n n i n g y o u c a n e a s i l y l o s e s u b s t a n t i a l a m o u n t s o f m o n e y .
Management plan
Co-operation between neiglibouring landowners can mai<e good economic sense. Maybe there are opportunities to share roads, landings and fonvarding equipment.
The forest management pian is a big heip. The management pian can heip you estimate volume, labour requirements, etc.
6 6

Divide your forest into natural logging areas
A logging area is defined by: Natural logging boundary lines as ridges, hills, swamps and watercourses and available roads. The woodlot should be divided into winter and summer losing areas. A winter area is an area where the wood is preferat forwarded fi frozen ground to avoid soft ground conditionl
If the terrain is favourable, it is easy to plan a good road networl<.
If the terrain is difficult with soft, wet areas, ridges, hills and watercourses, detailed planning is necessary to minimize costs.
6 7

Planning the strip road system
strip road Connecting road
Assembly road
I Assembly roads Tlie assembly roads should be placed in the lower sections of the area. Solid ground and a good surface structure are essential because many loads will be carried on these roads.
strip roads The distance between the strip roads depends on which logging method you choose. It can range from 65-100 metres when winching in a thinning to 15 metres in a clear-cut.
6 8

The strip roads shouid be approxi-mateiyA metres wide, in curves the width shouid be increased to 4.5 metres because the traiier wiii cut the corner.
The strip roads shouid be as iong as possible. On a siope the road shouid be placed as close to the straight uphill line as possible. Roads across slopes increase the risk of roiling over and damage to residual trees.
Flag the strip roads to make it easier to see which trees have to be cut to create the road. Use different coloured tapes to mark assembly roads and strip roads. Have the knot face the road centre. l\/lark the boundaries of the logging area with distinctive coloured tapes.
Connecting roads Connecting roads should permit driving between strip roads (no turning at rear end).
6 9

Choice of logging method Farm tractor and forwarder I If you are producing 3 metre wood, this
method is simple to use.
If you are producing pulpwood in random iength you can bring out bigger winch loads with this method.
Shortwood to strip road
Tree length or tree sections to strip road
Only farm tractor 1 1 1 If you have a distance between the logging
area and the landing (truck road) which is less than 500 metres you can use this method.
I V If you have a fon/varding distance of up to 2 km between logging area and landing (truck road), this method can be suitable.
Tree length to landing
Assortments to landing
7 0

71

What kind of method suits me?
Method
I. Shortwood to strip road
Equipment Suitable Maximum Can be used in Requires winching terrain thinning ciear- directed distance transport cut feiiing
W i n c h S l < i d p a n T i r e c h a i n s B e l l y p a n V a l v e s t e m p r o t e c t o r s , e t c . P T O s h a f t R e m o t e c o n t r o l d e v i c e o r r a d i o
4 0 - 6 0 m - Y e s H e s i t a n t l y
A d v a n t a g e
Requires Worlton Da bunching landing tO! in stand loc
Y e s N o N o
II. W i n c h 4 0 - 6 0 m — Y e s H e s i Y e s Tree length or C h o k e r s t a n t l y tree sections ( S k i d p a n ) to strip road T i r e c h a i n s to strip road
B e l l y p a n , v a l v e s t e m p r o t e c t o r s , e t c . P T O s h a f t R e m o t e c o n t r o l d e v i c e o r r a d i o
ill. W i n c h 4 0 - 6 0 m A p p r o x , H e s i t a n t l y Y e s Y e s Tree length to C h o k e r s 5 0 0 m landing T i r e c h a i n s
B e l l y p a n V a l v e s t e m p r o t e c t o r s , e t c . P T O s h a f t R e m o t e c o n t r o l d e v i c e o r r a d i o
IV. C r a n e 4 0 m 1 - 2 k m Y e s Y e s A d v a n t Shortwood to S k i d p a n a g e landing T r a i l e r
L o a d s t r a p s B i n d e r s
Y e s N o N c
N o Y e s Y e
Y e s Y e s N c
P T O s h a f t R e m o t e c o n t r o l d e v i c e D u m p b e a m T i r e c h a i n s B e l l y p a n V a l v e p r o t e c t o r , e t c .
72

jsed in I ciear-
cut
H e s i t a n t l y
Requires directed felling
A d v a n t a g e
Requires Work on Damage Risk of Capacity bunching landing to saw- damage of winch in stand logs toresi- skid pan
dual stand
Load size
Y e s N o N o S m a l l A p p r o x . 0 . 6 m ^ p i l e d n o t b a r k e d
Equipment costs (approximate) 1982
W i t h l i n e c o n t r o l A p p r o x . 8 , 8 0 0 S E K ( $ 1 , 8 0 0 U . S . ) W i t h r a d i o A p p r o x . 1 1 , 0 0 0 S E K ( $ 2 , 3 0 0 U . S . )
H e s i t a n t l y
Y e s
/ Y e s Y e s
Y e s A d v a n t a g e
Y e s N o N o Y e s A p p r o x . 0 . 7 - 1 . 0 m ^ s t a c k e d n o t b a r k e d
W i t h l i n e r e m o t e c o n t r o l A p p r o x . 8 , 6 0 0 S E K ( $ 7 5 0 U . S . ) W i t h r a d i o 1 0 , 9 0 0 S E K ( $ 2 , 2 5 0 U . S . )
N o Y e s Y e s Y e s A p p r o x . 1 . 0 - 2 . 0 m ^ s t a c k e d n o t b a r k e d
S a m e a s a b o v e
Y e s Y e s N o S m a l l A p p r o x . A p p r o x . 5 W i t h l i n e r e m o t e 0 . 6 m ^ m ^ c o n t r o l A p p r o x . s t a c k e d s t a c k e d 1 7 , 0 0 0 S E K ( $ 4 , 0 0 0 n o t n o t U . S . ) b a r k e d b a r k e d R e m o t e c o n t r o l w i t h
o n l y o n e c h a n n e l i s a S a f e t y R i s k !
(
7 3

r
Method I: Shortwood to strip road M a n y t i m e s i t i s a n a d v a n t a g e t o p r o c e s s t h e t r e e s i n t o 3 m e t r e l e n g t h s o r s o m e o t h e r s t a n d a r d l e n g t h i n t h e s t a n d r a t h e r t h a n h a n d l i n g t r e e s e c t i o n s o r t r e e l e n g t h s .
Advantages: You do not always have to use directed felling although the method usually is recommended. You can winch directly with the tractor without using a snatch block. There is no need to cut bolts and winch the remainder across the strip road which is common practice when you winch tree sections and tree length. In difficult areas with a lot of boulders it is easier to handle three metre wood with a corner hook or snatch block than to handle longer assortments.
Disadvantages: You cannot use the maximum capacity of the winch since the wood is cut up in 3 metre sections.

T
Work method a. Start by cutting out the strip road b . and the wood zones c. Then layout the winch trails. d. Clean and cut out the winch trails. e . Use directed felling where feasible. Do not overdo this
because the biggest piece of wood which you have to handle is a 3 metre bolt. Forcing the tree into a predetermined direction can cause problems in a dense stand with a lot of branches.
1. Pile the wood with one assortment in each pile. g. Raise the piles off the ground but do not use the saleable
assortments. h . The finished winching trail should be straight.
75

Winching Position tlie tractor in tlie middle of tfie wincfi trail moutfi preferably in a 45° angle to the direction of winching. Recommended motor speed is approximately 900 rev/min. Lower the winch support legs. If the winch is vertical, the cable is easy to pull out. Use radio or a control line for remote control. A radio can be used up to a distance of 100 metres. A line with a retraction device ("line caddy") will reach 45 m from the tractor.
You shouid use a skid pan if you are winching 3 metre wood. The skid pan will substantially reduce the risk of getting the load stuck. The skid pan will also reduce friction and damage to residual trees.
Pull the skid pan with the cabie when you are going out to fetch a load. Do not carry the skid pan.
Turn the skid pan so that it faces the direction of winching. Pull out a few extra metres of cable before choking the bundle. Face the winch. Keep the slide hook in one hand and the cable eyelet in the other. Insert the cable under the wood from the front of the wood bundle.

Unless the cable draw point is in the middle of the bundle, the sl<id pan will not go straight.
Walk behind the load when you are winching. Stop if there is a risk of getting stuck and adjust the direction by pulling the skid pan sideways.
A skid pan can be used to winch a bundle up on another bundle if storage space is limited.
You can leave two bundles, one behind the other, near the strip road. Make sure the loader can reach them.

Method II: Tree length or tree section to strip road I n a t h i n n i n g o p e r a t i o n y o u c a n p r o c e s s t h e t r e e s i n t o r a n d o m l e n g t h o r 6 o r 9 m e t r e l e n g t h s a n d t h e n w i n c h t h e w o o d o u t t o t h e s t r i p r o a d .
Advantages: Wood cut in tree sections (6 metre) do not require winching of any wood across the strip road. S / c / d pans can be used. You wiii get more wood voiume persl<idpan ioad than if you are winching 3 metre wood.
Disadvantages: The method requires bucl<ing at strip road side. If you are winching tree iength you wiii have to carry heavy chol<ers along the winch trail. Tree iength winching can damage the residual stand. It requires some manual pre-bunching and directed felling.

Work method Basically the same as for Method I. a . Start by cutting out the strip road b . and the wood zones. c. Then lay out the winch trails. d. Clean and cut out the entire winch trail. e . Make sure you fell each tree so that it falls on an angle
across the trail with the top at the side of the trail. This will leave less slash in the trail. Wherever possible fell to make bunching easier.
f. Cut and bunch any stems which are longer than 9 metres. Place the bunch on a support.
g. Wherever possible have only one assortment per bunch. h . The finished winch trail should be straight. i. If you are winching wood ionger than 6 metres you must
use a snatch block attached to the other side of the strip road. In other aspects as for Method I.
j . Bucking the wood is done after the winching.

Method III: Tree length to landing T h i s i s a s u i t a b l e m e t h o d w h e n t h e s a m e p e r s o n c u t s a n d s k i d s o u t t h e w o o d . T h e d i s t a n c e b e t w e e n t h e l o g g i n g s i t e a n d t h e l a n d i n g s h o u l d n o t e x c e e d 5 0 0 m e t r e s . T h e m e t h o d i s m o s t s u i t a b l e f o r a w i n t e r - c o n d i t i o n , c l e a r c u t o p e r a t i o n .
Advantages: You can make the final decision on how to buck the tree at the landing. Properly used, the method will leave no wood under the snow.
Disadvantages: The size and configuration of the landing will determine whether this method can be used. If used when the ground is bare, soil is likely to stick to the trees creating problems when bucking. Chokers are heavy to carry along the trail. It is heavy work to handle pulpwood on the landing.
Work mel a. Cut out tt b . Fell the ti
pattern m towards \ The swa\ will redu( damaget Itisimpo be handl prevent \ snowed i
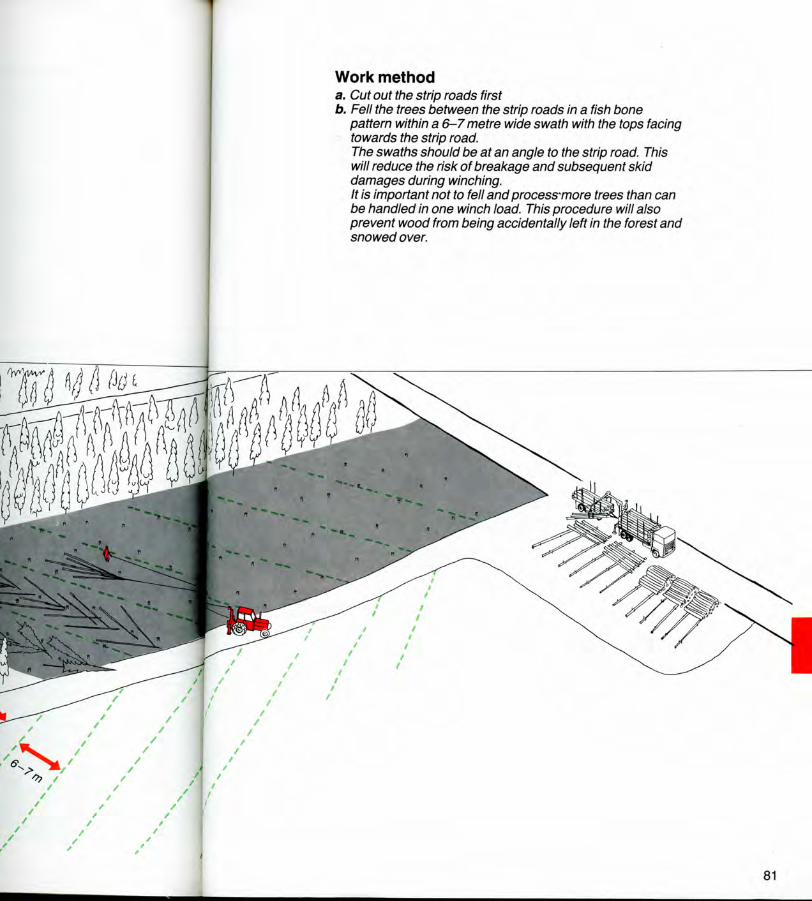
Work method a . Cut out the strip roads first b . Feii the trees between the strip roads in a fish bone
pattern within a 6-7 metre wide swath with the tops facing towards the strip road. The swaths should be at an angle to the strip road. This will reduce the risk of breakage and subsequent skid damages during winching. It is important not to fell and process-more trees than can be handled in one winch load. This procedure will also prevent wood from being accidentally left in the forest and snowed over.
8 1


Preparation Limb and remove ttie top in a normai manner but ieave 2 or more branch stubs 5-10 cm in iength approxi-mateiy 10 cm from the top. Toss the tops aside.
Choking Position the tractor straight in iine with the winch direction. Lower the support iegs. If the winch is vertical, the cable is easy to pull out. Decide the number of stems that can be winched at one time. Bring that number of chokers in one hand and the winch cabie in the other. Pull the cable up to the last stem. Attach the choker first to the stems and then to the cabie. The stems nearest to the tractor should be winched first. Material lying beneath other stems should be removed last. The choker is attached with a single loop behind the branch stubs left at the top of the stem. Small stems might require a double loop. Do not take too big loads.
Winching Suitable motor speed is 900 rev/ minute. Because of the danger of the cable breaking or the choker slipping, a controi iine or radio should be used. Do not start winching with a tense cabie. Do not drag the clutch. Check to make sure stems are not lost. Do not winch the load too far.
8 3

Skidding Attach the cable to the lower block and lock the winch drum. Lift the winch and stabilizer legs and secure them. The greatest resistance during skidding occurs when the load starts to move. Therefore, try to have the tractor positioned on solid and fiat ground.
If you get stuck, you can drop the load, drive the tractor fonvard and then winch the ioad.
The landing Lay out your landing so that you get at ieast two tiers with sawlogs first and then a few tiers with pulpwood. Use tree length runners. Anchor the runners so that you can drive across them with the tractor. The use of runners facilitates marking for cross cutting, bucking, rolling and piling. If pulpwood is scaled on the landing it should be placed along the truck road.
8 4

Bucking When you arrive at the ianding, you shouid drop the ioad in front of the first pile. Drive the tractor with the winch disengaged past all the other piles. Lower the winch on the support legs. Lay out the winch control line on the ground. Cut off the sawlogs and winch the rest of the load fon/vard to the next pile. Finally remove the chokers and manually pile the pulpwood or use a wood grapple or fork mounted on your front end loader if you have one.
hAanuaipiling of wood is heavy work. Sometimes you can push the wood together using the lower part of the winch while backing towards the pile. The best solution is a wood grapple or fork attached to a front end loader.

Method IV: Shortwood to landing T h e d i s t a n c e b e t w e e n t h e s t r i p s r o a d s w i l l d e p e n d o n t h e c o n d i t i o n o f t h e t e r r a i n . A d i s t a n c e o f 6 0 m e t r e s b e t w e e n s t r i p s r o a d s i s a d e q u a t e i n a t h i n n i n g o p e r a t i o n . T h e s t r i p s r o a d s s h o u l d b e 3 - 4 m e t r e s w i d e . T h e d i s t a n c e b e t w e e n w i n c h t r a i l s s h o u l d b e 6 - 1 2 m e t r e s d e p e n d i n g o n t r e e h e i g h t a n d s t a n d d e n s i t y . T h e w i n c h t r a i l s s h o u l d b e l a i d o u t a t a n a n g l e t o t h e s t r i p s r o a d s o t h a t t h e w o o d c a n b e w i n c h e d a t a n a n g l e t o w a r d s t h e t r a i l e r . T h e c r a n e ( l o a d e r ) w i l l f u n c t i o n b e s t u n d e r t h e s e c i r c u m s t a n c e s .
Advantages: You can decide when the wood is ready for truci<ing. You do not require a storage zone aiong the strip road since you can ioad the traiier at once.
Disadvantages: A fairiy fiatpiace to position the tractor is required, uniess you have a hydrauiic controi on your ioading beam. A farm tractor with a traiier cannot drive everywhere a fon/varder can operate.
86

Work method a. F i r s t c u t o u t t h e s t r i p r o a d . B r a n c h e s s h o u l d b e l e f t i n t h e
s t r i p r o a d t o i m p r o v e f l o t a t i o n . R e m e m b e r t o l i m b b r a n c h y t o p s s o t h a t a f a r m t r a c t o r c a n g e t b y . W o o d f r o m t h e s t r i p r o a d s h o u l d b e b u n c h e d a n d p l a c e d a l o n g a n d p a r a l l e l t o t h e s t r i p r o a d s o t h a t i t c a n b e c h o k e d i n t h e m i d d l e . F o r e a s e o f l o a d i n g a n d c h o k i n g , b u n d l e s s h o u l d b e p l a c e d a b o u t 0 . 5 m e t r e s a w a y f r o m t h e m a i n s t r i p r o a d .
b. C l e a n a n d c u t o u t t h e e n t i r e w i n c h t r a i l . c. U s e d i r e c t e d f e l l i n g w h e r e i t i s f e a s i b l e a n d r e d u c e t h e
w i n c h i n g d i s t a n c e b y f e l l i n g t o w a r d s t h e s t r i p r o a d . d. P l a c e t h e b u n d l e s o n p r o p e r s u p p o r t s s o t h a t t h e y c a n b e
c h o k e d w i t h a s k i d p a n . D o n o t u s e s a l e a b l e a s s o r t m e n t s f o r s u p p o r t s . B u n d l e s s h o u l d n o t c o n t a i n a v o l u m e e x c e e d i n g 0 . 5 m ^ s t a c k e d w o o d .
e. P o s i t i o n t h e t r a c t o r o n f l a t g r o u n d w h e r e t h e c r a n e w i l l w o r k b e s t . L o w e r t h e u p p e r p a r t o f t h e t r a i l e r s t a k e s o n t h e w i n c h i n g s i d e . U s e a s k i d p a n . I
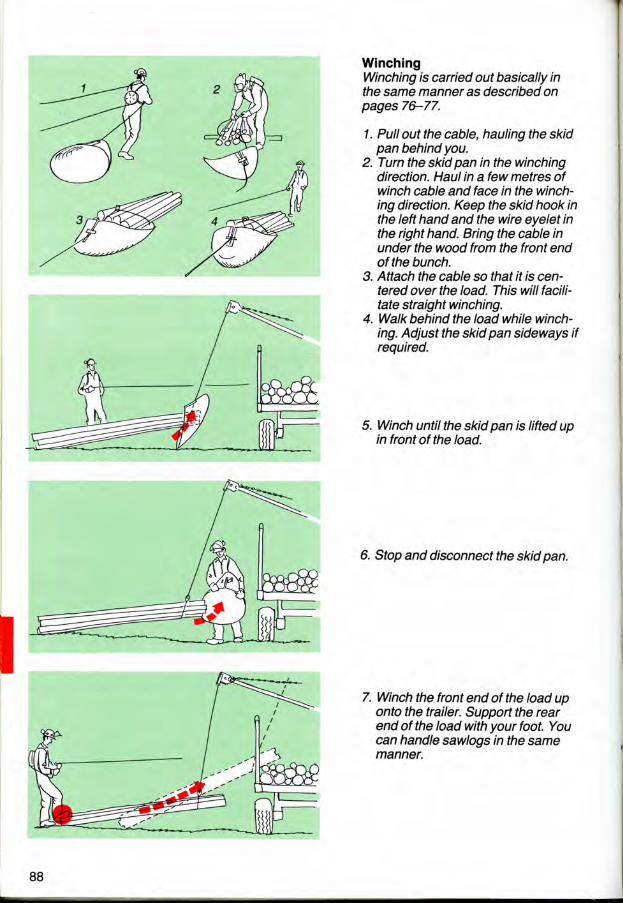
Winching Winching is carried out basically in the same manner as described on pages 76-77.
1. Pull out the cable, hauling the si<id pan behind you.
2. Turn the sl<idpan in the winching direction, l-iaul in a few metres of winch cabie and face in the winching direction. Keep the sl<id hook in the left hand and the wire eyelet in the right hand. Bring the cable in under the wood from the front end of the bunch.
3. Attach the cabie so that it is centered over the ioad. This will facilitate straight winching.
4. Walk behind the load while winching. Adjust the skid pan sideways if required.
5. Winch until the skid pan is lifted up in front of the ioad.
6. Stop and disconnect the skid pan.
7. Winch the front end of the load up onto the trailer. Support the rear end of the load with your foot. You can handle sawlogs in the same manner.

Loading 1. Move the cable to the middle of the
load.
2. Lift the load and swing it around with the aid of a picaroon and then lower it.
3. Disconnect the slide hook and remove the cable.
4. Manually adjust the wood if required. Try to keep the ends even. Remember the tighter the load, the easier it is to unload it at the landing. A platform to stand on makes adjustment easier.
5. When the load is adjusted strap it using a binder. Make sure that the binder is on the same side where the dump beam will be attached.
89

Unloading 1. Place runners in position.
2. Re-strap the load to make it as tight as possible.
3. Connect the cable to the dump beam.
4. Lower the crane support legs.
5. Release the stakes on the dump side.
6. Use remote control when unloading. This way, you can work outside the risk zone.

7. Leave the strap and binder on the dumped ioad. Piece two pulpwood sticl<s with their tops down leaning against the load. This will not only make it easier to remove the strap after another load has been added but also keep the wood together. You will need at least three sets of ioad straps if you are working with two assortments.
Other ways of unloading If your trailer is equipped with a hydrauiic tip beam you can unload using the hydraulic power of the tractor.

Economy G e n e r a l l y b y d o i n g f o r e s t w o r k y o u r s e l f , y o u a r e a v o i d i n g s o m e o f t h e c o s t s o f h i r i n g a c o n t r a c t o r t o d o t h e j o b .
Y o u r h o u r l y " s a l a r y " i s d e p e n d e n t o n : - H o w m u c h w o r k y o u c a n d o - H o w m u c h p e r s o n a l o v e r h e a d c o s t s y o u
h a v e - H o w m u c h y o u p l a n t o d o y o u r s e l f a n d
h o w m u c h a c o n t r a c t o r w i l l d o .
Y o u s h o u l d , i n t h e o r y , d o t h e k i n d o f w o r k w h i c h g i v e s t h e b e s t h o u r l y r e t u r n ( s a l a r y ) . Y o u s h o u l d d o a c t i v i t i e s w h e r e y o u c a n p r o d u c e a l o t w i t h l o w e q u i p m e n t c o s t .
T h e t y p e o f w o r k y o u d o i n t h e f o r e s t w i l l d e p e n d o n a n u m b e r o f c i r c u m s t a n c e s . I t c a n d e p e n d o n o t h e r w o r k o p p o r t u n i t i e s , w h a t y o u e n j o y d o i n g , w h a t y o u a r e m o s t i n t e r e s t e d i n d o i n g , w h a t k i n d o f e q u i p m e n t t h a t y o u h a v e a n d s o o n .
I f y o u h a v e n o o t h e r w o r k a n d t h e r e i s t i m e a v a i l a b l e f o r f o r e s t r y w o r k , y o u c a n t h e n d o a l l t h e w o r k y o u r s e l f a s l o n g a s i t i s c h e a p e r t h a n h i r i n g a c o n t r a c t o r .
I n t h e f o l l o w i n g c a l c u l a t i o n s a p p r o x i m a t e p r i c e s , d i f f e r e n t e q u i p m e n t a l t e r n a t i v e s a n d d i f f e r e n t a n n u a l h a r v e s t i n g v o l u m e s a r e i d e n t i f i e d .
T h e c o s t s p e r s o l i d c u b i c m e t e r i n c l u d e d e p r e c i a t i o n , i n t e r e s t a t 1 0 % p e r y e a r , r e p a i r s a n d m a i n t e n a n c e . T h e p r i c e l e v e l r e f e r s t o 1 9 8 2 .
F i r s t , a f e w w o r d s a b o u t d e p r e c i a t i o n . I f y o u o n l y h a r v e s t 1 0 0 m ^ o f w o o d / y e a r , y o u r e q u i p m e n t w i l l n o t b e w o r n v e r y m u c h . B u t i f y o u h a r v e s t 1 , 0 0 0 m ^ o f w o o d / y e a r t h e w e a r o n y o u r e q u i p m e n t w i l l b e s u b s t a n t i a l . T h e e q u i p m e n t c a n a l s o b e c o m e o b s o l e t e a n d u n e c o n o m i c a l b e c a u s e b e t t e r , m o r e e f f i c i e n t e q u i p m e n t h a s b e e n d e v e l o p e d . T h i s n e w e q u i p m e n t m a y i n c r e a s e p r o d u c t i o n , s i m p l i f y t h e w o r k a n d r e d u c e t h e c o s t s .
T o f i g u r e o u t y o u r o w n c o s t s y o u s h o u l d m a k e a c a l c u l a t i o n l i k e t h e f o l l o w i n g : ( N O T E : i n M a y 1 9 8 2 o n e S E K ( S w e d i s h c r o w n ) = a b o u t 2 0 c e n t s , C a n a d i a n D o l l a r , a b o u t 2 3 c e n t s U n i t e d S t a t e s D o l l a r a n d 1 0 p e n c e . G r e a t B r i t a i n P o u n d .
Calculation example Conditions P r i c e L e v e l : 1 9 8 2 I n t e r e s t : 1 0 % D e p r e c i a t i o n t i m e a n d d e p r e c i a t i o n c o s t s :
Equipment Purchase Price
Depreciation time and costs for an annuai harvest of 100 m^ 400 m' 800 m^ Year S E K / m ' Year S E K / m ' Year SEK/m
Forestry attach for farm tractor 2 , 3 0 0 1 0 3 . 7 0 6 1 . 3 0 4 0 . 9 0 Winch 3 , 9 0 0 1 0 6 . 3 0 6 2 . 2 0 4 1 . 5 0 Sk\d pan (giass fibre) 6 6 0 8 1 . 2 0 3 0 . 7 0 1 0 . 9 0 Crane 4 , 5 0 0 1 0 7 . 3 0 6 2 . 6 0 4 1 . 8 0 Remote controi line 6 8 0 1 0 1 . 1 0 6 0 . 4 0 4 0 . 3 0 Trailer (5 ton) 7 , 0 0 0 1 5 9 . 2 0 8 3 . 3 0 6 2 . 0 0 Chokers 3 0 0 1 0 0 . 5 0 6 0 . 2 0 4 0 . 1 0 Dump beam 4 0 0 1 0 0 . 6 5 6 0 . 2 0 4 0 . 1 5 Hand tools 7 0 0 1 0 1 . 1 0 6 0 . 4 0 3 0 . 3 5 Chainsaw 2 , 7 0 0 6 6 . 2 0 4 2 . 1 0 3 1 . 3 5 N o d e p r e c i a t i o n i s c a l c u l a t e d o n t h e f a r m t r a c t o r h e r e s i n c e i t i s e x p e c t e d t o b e u s e d p r i m a r i l y i n a g r i c u l t u r e w o r k .
92

Method I Short wood to strip road Felling production: 1 m 7 h o u r Average winch distance: 2 5 m e t r e s Winching production: 4 m V h o u r Forwarding distance ( t r a n s p o r t t o t r u c k ) : 2 5 0 m Forwarding costs: 1 7 S E K / m ^ Equipment: C h a i n s a w , f o r e s t r y e q u i p p e d f a r m t r a c t o r , w i n c h , r e m o t e c o n t r o l l i n e , s k i d p a n ,
h a n d t o o l s Equipment costs ( e x c l u d i n g t r a c t o r ) : 1 0 , 9 4 0 S E K Operating costs: F a r m t r a c t o r 1 2 S E K / h o u r ,
C h a i n s a w 3 S E K / h o u r Salary cost ( i n c l u d i n g f r i n g e b e n e f i t p a y a b l e b y t h e o p e r a t o r ) : 5 0 S E K Working hours per day: 6
Costs SEK/m ' for annual harvest of: 100 m' 400 m' 800 m'
Felling costs C h a i n s a w d e p r e c i a t i o n 6 . 2 0 2 . 1 0 1 . 3 5 C h a i n s a w o p e r a t i o n a l c o s t s 3 . 0 0 3 . 0 0 3 . 0 0 S a l a r y 5 0 . 0 0 5 0 . 0 0 5 0 . 0 0
( 5 9 . 2 0 ) ( 5 5 . 1 0 ) ( 5 4 . 3 5 )
Winching costs E q u i p m e n t d e p r e c i a t i o n 1 3 . 4 0 5 . 0 0 3 . 9 5 T r a c t o r , o p e r a t i o n a l c o s t s 3 . 0 0 3 . 0 0 3 . 0 0 S a l a r y 1 2 . 5 0 1 2 . 5 0 1 2 . 5 0
( 2 8 . 9 0 ) ( 2 0 . 5 0 ) ( 1 9 . 4 5 )
Forwarding costs 1 7 . 0 0 1 7 . 0 0 1 7 . 0 0 1 0 5 . 1 0 9 2 . 6 0 9 0 . 8 0
Man-day requirements ( e x c l u d i n g f o r w a r d i n g ) F e l l i n g 1 7 67 1 3 4 W i n c h i n g 4 1 7 3 4 Note: m^=cubic metre solid volume
93

Method II Tree length or tree sections to trail Felling production: 1 m ^ h o u r Average wincii distance: 2 5 m Winch production: 5 m V h o u r Forwarding distance ( t r a n s p o r t t o t r u c k r o a d ) : 2 5 0 m Forwarding cost: 1 7 S E K / m ^ Equipment: C h a i n s a w , f o r e s t r y e q u i p p e d f a r m t r a c t o r , w i n c h r e m o t e c o n t r o l l i n e , s k i d p a n ,
c h o k e r s , h a n d t o o l s Equipment costs ( e x c l u d i n g t r a c t o r ) : 1 1 , 2 4 0 S E K Operating costs: F a r m t r a c t o r 1 2 S E K / h o u r
C h a i n s a w 3 S E K / h o u r Salary costs: ( i n c l u d i n g f r i n g e b e n e f i t s p a y a b l e b y t h e o p e r a t o r ) : 5 0 S E K / h o u r Work hours per day: 6
Costs S E K / m ' for an annual harvest of: 100 m' 200 m' 800 m'
Felling costs C h a i n s a w d e p r e c i a t i o n 6 . 2 0 2 . 1 0 1 . 3 5 C h a i n s a w o p e r a t i o n a l c o s t s 3 . 0 0 3 . 0 0 3 . 0 0 S a l a r y 5 0 . 0 0 5 0 . 0 0 5 0 . 0 0
( 5 9 . 2 0 ) ( 5 5 . 1 0 ) ( 5 4 . 3 5 )
Winching costs E q u i p m e n t d e p r e c i a t i o n 1 3 . 9 0 5 . 2 0 4 . 0 5 T r a c t o r o p e r a t i o n a l c o s t s 2 . 4 0 2 . 4 0 2 . 4 0 S a l a r y 1 0 . 0 0 1 0 . 0 0 1 0 . 0 0
2 6 . 3 0 1 7 . 6 0 1 6 . 4 5
Forwarding costs 1 7 . 0 0 1 7 . 0 0 1 7 . 0 0 1 0 2 . 5 0 8 9 . 7 0 8 7 . 8 0
Man-day requirements F e l l i n g 17 67 1 3 4 W i n c h i n g 4 14 2 7 Note: m3=cubic metre solid volume
94
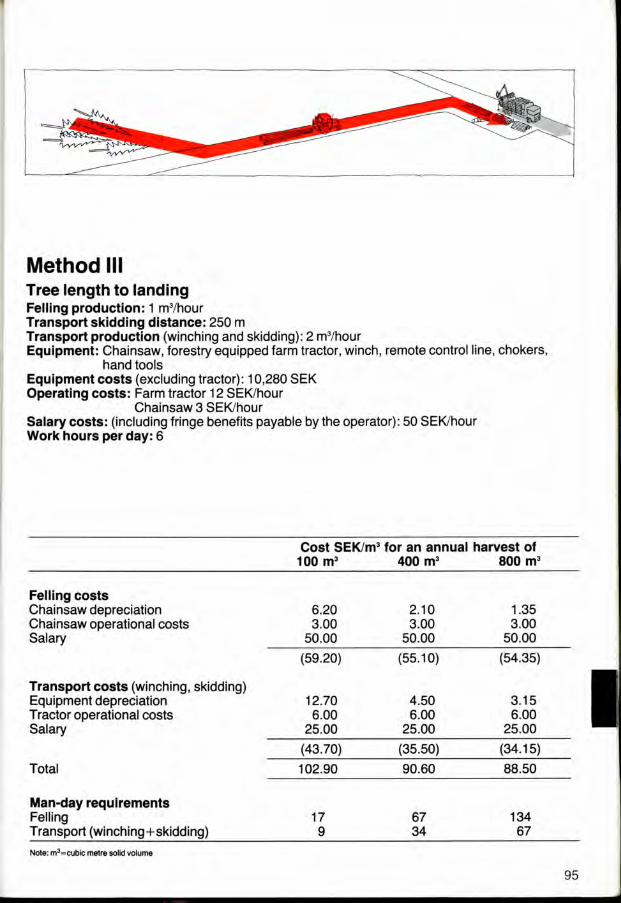
Method III Tree length to landing Felling production: 1 m 7 h o u r Transport skidding distance: 2 5 0 m Transport production ( w i n c h i n g a n d s l < i d d i n g ) : 2 m ^ h o u r Equipment: C h a i n s a w , f o r e s t r y e q u i p p e d f a r m t r a c t o r , w i n c h , r e m o t e c o n t r o l l i n e , c h o k e r s ,
h a n d t o o l s Equipment costs ( e x c l u d i n g t r a c t o r ) : 1 0 , 2 8 0 S E K Operating costs: F a r m t r a c t o r 1 2 S E K / h o u r
C h a i n s a w 3 S E K / h o u r Salary costs: ( i n c l u d i n g f r i n g e b e n e f i t s p a y a b l e b y t h e o p e r a t o r ) : 5 0 S E K / h o u r Work hours per day: 6
Cost S E K / m ' for an annual harvest of 1 0 0 m' 4 0 0 m' 8 0 0 m'
Felling costs C h a i n s a w d e p r e c i a t i o n 6 . 2 0 2 . 1 0 1 . 3 5 C h a i n s a w o p e r a t i o n a l c o s t s 3 . 0 0 3 . 0 0 3 . 0 0 S a l a r y 5 0 . 0 0 5 0 . 0 0 5 0 . 0 0
( 5 9 . 2 0 ) ( 5 5 . 1 0 ) ( 5 4 . 3 5 )
Transport costs ( w i n c h i n g , s k i d d i n g ) E q u i p m e n t d e p r e c i a t i o n 1 2 . 7 0 4 . 5 0 3 . 1 5 T r a c t o r o p e r a t i o n a l c o s t s 6 . 0 0 6 . 0 0 6 . 0 0 S a l a r y 2 5 . 0 0 2 5 . 0 0 2 5 . 0 0
( 4 3 . 7 0 ) ( 3 5 . 5 0 ) ( 3 4 . 1 5 ) T o t a l 1 0 2 . 9 0 9 0 . 6 0 8 8 . 5 0
Man-day requirements F e l l i n g 1 7 6 7 1 3 4 T r a n s p o r t ( w i n c h i n g - i - s k i d d i n g ) 9 3 4 6 7
I Note: m^=cubic metre solid volume
9 5

Method IV Shortwood to landing ( t r u c k r o a d ) Felling production: 1 m ' / h o u r Transport distance: 2 5 0 m Transport production: 2 . 5 m V h o u r Equipment: C h a i n s a w , f o r e s t r y e q u i p p e d t r a c t o r , c r a n e , t r a i l e r , d u m p b e a m , r e m o t e c o n t r o l
l i n e , s k i d p a n , l o a d s t r a p s ( c h a i n s ) , b i n d e r s , h a n d t o o l s Equipment costs ( e x c l u d i n g t r a c t o r ) : 1 9 , 3 9 0 S E K Operating costs: F a r m t r a c t o r 1 2 S E K / h o u r
C h a i n s a w 3 S E K / h o u r Salary costs: ( i n c l u d i n g f r i n g e b e n e f i t s p a y a b l e b y t h e o p e r a t o r ) : 5 0 S E K Work hours per day: 6
Costs S E K / m ' for an annual harvest of: 100 m' 200 m' 400 m'
Felling costs C h a i n s a w d e p r e c i a t i o n C h a i n s a w o p e r a t i n g c o s t s S a l a r y
Transport costs ( w i n c h i n g , f o n w a r d i n g )
E q u i p m e n t d e p r e c i a t i o n T r a c t o r o p e r a t i n g c o s t s S a l a r y
T o t a l
Man-day requirements F e l l i n g T r a n s p o r t
6 . 2 0 2 . 1 0 1 . 3 5 3 . 0 0 3 . 0 0 3 . 0 0
5 0 . 0 0 5 0 . 0 0 5 0 . 0 0 ( 5 9 . 2 0 ) ( 5 5 . 1 0 ) ( 5 4 . 3 5 )
2 4 . 2 5 8 . 9 0 6 . 4 0 4 . 8 0 4 . 8 0 4 . 8 0
2 0 . 0 0 2 0 . 0 0 2 0 . 0 0 ( 4 9 . 0 5 ) ( 3 3 . 7 0 ) ( 3 1 . 2 0 )
1 0 8 . 2 5 8 8 . 8 0 8 5 . 5 5
1 7 6 7 1 3 4 7 2 7 5 4
T h i s e q u i p m e n t i s m o r e v e r s a t i l e t h a n t h e e q u i p m e n t u s e d i n M e t h o d s l - l l l . Y o u c a n , f o r i n s t a n c e , u s e t h e c r a n e t o l o a d o t h e r i t e m s l i k e c e m e n t p i p e s , f e r t i l i z e r s , e t c . Note: M^=cubice metre solid volume
9 6

On the next page you can make your own calculations using your figures and conditions.

Make your own calculations T o g e t a n a p p r e c i a t i o n o f y o u r o w n h a r v e s t i n g c o s t s y o u s h o u l d m a k e y o u r o w n c a l c u l a t i o n s , b a s e d o n y o u r o w n s i t u a t i o n a n d c o s t s .
T h e c o s t s t h a t y o u s h o u l d i n c l u d e a r e :
Machine and equipment costs, i . e . , t h e d e p r e c i a t i o n c o s t s f o r y o u r e q u i p m e n t . N o t e t h a t t h e d e p r e c i a t i o n c o s t s f o r t h e t r a c t o r m a y n o t b e i n c l u d e d s i n c e t h e s e c o s t s n o r m a l l y a r e a l r e a d y a l l o c a t e d t o t h e f a r m i n g s e c t o r b f t h e e n t e r p r i s e . D e p r e c i a t i o n c o s t s f o r t h e f a r m t r a c t o r c o u l d b e b a s e d o n t h e d i f f e r e n t e s t i m a t e d u s e s o f t h e t r a c t o r . M a c h i n e c o s t s i n c l u d e t h e o p e r a t i n g c o s t s , i . e . , g a s , o i l , r e p a i r s , e t c .
Saiary costs, i . e . , y o u r o w n o r y o u r e m p l o y e e s r e n u m e r a t i o n f o r f e l l i n g a n d t r a n s p o r t w o r k . I n t h e c a s e s w h e r e y o u e m p l o y a c o n t r a c t o r f o r t h e t r a n s p o r t f r o m t h e s t r i p r o a d s i d e t o t h e t r u c k r o a d ( f o n w a r d i n g ) a c o n t r a c t o r c o s t w i l l b e a d d e d . I t i s n o r m a l l y e s t i m a t e d a s a n a m o u n t p e r m ' t a k e n o u t .
The depreciation costs p e r y e a r c a n b e o b t a i n e d f r o m t h e t a b l e b e l o w . E s t i m a t e a r e a s o n a b l e w r i t e o f f t i m e , i n y e a r s , t h e n i d e n t i f y t h e d e p r e c i a t i o n f a c t o r a n d m u l t i p l y t h e p u r c h a s e p r i c e w i t h t h e f a c t o r . T h i s w i l l g i v e y o u t h e a n n u a l d e p r e c i a t i o n c o s t s .
B y d i v i d i n g t h e a n n u a l d e p r e c i a t i o n c o s t s b y t h e e s t i m a t e d a n n u a l h a r v e s t i n g v o l u m e y o u w i l l g e t t h e d e p r e c i a t i o n c o s t s p e r m ' s o l i d v o l u m e .
D e p r e c i a t i o n f a c t o r s f o r a 1 0 % i n t e r e s t l e v e l .
Years to Depreciation depreciate factor
1 1 . 1 0 0 0 0 2 0 . 5 7 6 1 9 3 0 . 4 0 2 1 1 4 0 . 3 1 5 4 7 5 0 . 2 6 3 8 0 6 0 . 2 2 9 6 1 7 0 . 2 0 5 4 1 8 0 . 1 8 7 4 4 9 0 . 1 7 3 6 4
10 0 . 1 6 2 7 5 11 0 . 1 5 3 9 6 12 0 . 1 4 6 7 6 13 0 . 1 4 0 7 8 14 0 . 1 3 5 7 5 15 0 . 1 3 1 4 7
Example of equipment costs P r i c e l e v e l : 1 9 8 2 I n t e r e s t : 1 0 % D e p r e c i a t i o n t i m e a n d d e p r e c i a t i o n c o s t s :
Equipment Purchase Depreciation time and costs for an annual harvest of Price 100 m'solid 400 m'solid 800 m' solid
Y e a r S E K m ' Y e a r S E K m ' Y e a r S E K m ' Forestry attach, for
tractor 2 , 3 0 0 1 0 3 . 7 0 6 1 . 3 0 4 0 . 9 0 Winch 3 , 9 0 0 1 0 6 . 3 0 6 2 . 2 0 4 1 . 5 0 Skid pan (glass fibre) 6 6 0 8 1 . 2 0 3 0 . 7 0 1 0 . 9 0 Wire crane (loader) 4 , 5 0 0 1 0 7 . 3 0 6 2 . 6 0 4 1 . 8 0 Remote control line 6 8 0 1 0 1 . 1 0 6 0 . 4 0 4 0 . 3 0 Trailer (5 ton) 7 , 0 0 0 1 5 9 . 2 0 8 3 . 3 0 6 2 . 0 0 Chokers 3 0 0 1 0 0 . 5 0 6 0 . 2 0 4 0 . 1 0 Dump beam 4 0 0 1 0 0 . 6 5 6 0 . 2 0 4 0 . 1 5 Hand tools 7 0 0 1 0 1 . 1 0 6 0 . 4 0 3 0 . 3 5 Chainsaw 2 , 7 0 0 6 6 . 2 0 4 2 . 1 0 3 1 . 3 5
N o d e p r e c i a t i o n i s c a l c u l a t e d o n t h e f a r m t r a c t o r h e r e s i n c e i t i s e x p e c t e d t o b e u s e d p r i m a r i l y i n a g r i c u l t u r e w o r k .
9 8

Calculations 1. Depreciation costs
E q u i p m e n t P u r c h a s e p r i c e
D e p r e c i a t i o n
Y e a r s
D e p r e c i a t i o n
F a c t o r
D e p r e c i a t i o n
C o s t P e r F a c t o r
A n n u a l H a r v e s t
m '
D e p r e c i a t i o n
C o s t P e r m '
( E x a m p l e : T r a i l e r 7 , 0 0 0 1 5 0 . 1 3 1 4 7 = 9 2 0 : 1 0 0 = 9 . 2 0 )
© T o t a l d e p r e c i a t i o n c o s t s m ' .... 2. Production
2 . 1 F e l l i n g m ' / h o u r 2 . 2 T r a n s p o r t
A l t I . W i n c h i n g m 7 h o u r A l t I I . W i n c h i n g + fonA /a rd ing t o l a n d i n g m 7 h o u r
3. Operational costs ( f u e l , o i l , r e p a i r s , e t c . ) 3 . 1 C h a i n s a w / h o u r : ( 2 . 1 ) m 7 h o u r = . 3 . 2 T r a c t o r / h o u r : ( 2 . 2 ) m 7 h o u r = .
@ T o t a l o p e r a t i o n a l c o s t s / m ' ....
4. Salary costs 4 . 1 F e l l i n g / h o u r : ( 2 . 1 ) m V h o u r = . 4 . 2 T r a n s p o r t
A l t I . W i n c h i n g / h o u r : ( 2 . 2 ) m ^ h o u r = . F o n v a r d i n g b y c o n t r a c t o r ( s t r i p r o a d t o l a n d i n g ) / m ' = .
A l t I I . T h e c o m p l e t e t r a n s p o r t w o r k s t u m p t o l a n d i n g . / h o u r : ( 2 . 2 ) m 7 h o u r = .
0 T o t a l s a l a r y c o s t s / m ' ....
5. Total c o s t s / m ' ( e x c l u d i n g t r a c t o r d e p r e c i a t i o n ) ( 0 , @, 0 ) =
6. Man-day requirements F e l l i n g : a n n u a l h a r v e s t m ' : ( 2 . 1 ) m ' / h o u r • h o u r s / d a y = d a y s T r a n s p o r t : a n n u a l h a r v e s t m ' : ( 2 . 2 ) m 7 h o u r • h o u r s / d a y = d a y s
N o t e : m ^ = c u b i c m e t r e s o l i d v o l u m e . 9 9

«
Y o u a n d y o u r l o g g i n g e q u i p m e n t r e p r e s e n t v a l u a b l e a s s e t s w h i c h a r e a v a i l a b l e o n d e m a n d . I n c a s e o f s t o r m d a m a g e y o u w i l l b e a b l e t o q u i c k l y h a r v e s t d a m a g e d t r e e s a n d r e d u c e t h e d a n g e r o f i n s e c t a t t a c k o r l o s s e s d u e t o r o t . S h o u l d g o o d p r i c e s o c c u r f o r s p e c i f i c i t e m s y o u r r e s o u r c e s c a n q u i c k l y b e p u t t o w o r k t o t a k e a d v a n t a g e o f t h e o p p o r t u n i t i e s .
1 0 0

T h i s s e r i e s o f h a n d b o o k s f o r w o o d l o t s i n c l u d e s :
The Chainsaw Use and l\/laintenance T r a n s l a t e d t o E n g l i s h , F r e n c h , S p a n i s h , D u t c h a n d F i n n i s h .
The Farm Tractor in the Forest T r a n s l a t e d t o E n g l i s h , F r e n c h a n d G e r m a n .
The handbooks, except for the Dutch translation, can be ordered from:
The National Board of Forestry S-551 8 3 J 6 N K 6 P I N G S W E D E N
For North America the handbooks translated to English and French can also be ordered from:
Forest Extension Service N.B. Department of National Resources R.R. # 5 Fredricton, N.B. CANADA E3B 4X6

The farm tractor in the forest
The tractor and its equipment
Power take-off shafts
Trailers
Winches
Cranes
Aids
Cables
Control and maintenance
Driving technique
Planning
Logging methods
Economy
^ - v - ^ ^
I S B N 9 1 - 8 5 7 4 8 - 2 5 - 0
» Skogsstyrelsen ^ The National
Board of Forestry, Sweden