the exposure field guide
TRANSCRIPT
MICHAEL FREEM
AN
Reference
Post-processingThe Tw
elveStyle
TechnicalFast-track &
Foolproof
MICHAEL FREEMAN THE EXPOSURE FIELD GUIDEThe essential handbook to getting the perfect exposure in photography; any subject, anywhere
THE EXPOSURE FIELD GUIDE
Choosing the exposure for a photograph is both alarmingly simple and infinitely complex; in fact, it’s one of photography’s most absorbing paradoxes.
Exposure is at the very heart of photography. It has always been a subject of fascination to aspiring amateurs and professional photographers alike. Developments in digital technology have transformed the ways in which exposures can be manipulated, and this in turn has forced photographers to think about what they can achieve by understanding the variables of aperture, ISO, and time.
In this book, best-selling author Michael Freeman, takes you through this difficult and fast-moving area using unique workflow il lustrations, histograms, and clear, visual examples to explore the subtleties of the subject and enable you to shoot with confidence.
Divided into six sections—Fast-track & Foolproof, Technical, The Twelve, Style, Post-processing, and Reference—the book will provide you with the necessary instruction to get perfect exposure anywhere and with any subject matter.
“A true guru of digital photography, Michael
Freeman has mastered all the principles he
teaches.” Digital Photographer Magazine
$15.95

MICHAEL FREEMAN THE EXPOSURE FIELD GUIDE


MICHAEL FREEMAN THE EXPOSURE FIELD GUIDEThe essential handbook to getting the perfect exposurein photography; any subject, anywhere

Introduction 6
Fast-track & Foolproof 8The Basic Method 10The Key Decisions 12Decision Flow 14Think Brightness, Exposure 16
Technical 18Light on the Sensor 20Exposure Terms 22Exposure and Noise 24Sensor Dynamic Range 26Highlight Clipping and Roll-O! 28Scene Dynamic Range 30Contrast, High and Low 34Metering Modes—
Basic and Weighted 36Metering Modes—
Smart and Predictive 38Metering Adjustments 40Objectively Correct 42Handheld Meter 44Gray Card 46Key Tones, Key Concept 48Scene Priorities 50Exposure and Color 52Exposing for Color 54Bracketing 56
The Twelve 58First Group (The Range Fits) 601 Range fi ts—Average
Key Tones Average 622 Range Fits—Bright
Key Tones Bright 663 Range Fits—Dark
Key Tones Dark 70Second Group (Low Range) 724 Low—Average Average 745 Low—Bright Bright 786 Low—Dark Dark 80Third Group (High Range) 827 High—Key Average
Key Tones Average 848 High—Large Brighter
Against Dark 889 High—Small Brighter
Against Dark 9010 High—Edge-Lit
Edge-Lit Subject 9211 High—Large Darker
Against Bright 9812 High—Small Darker
Against Bright 102
Style 106Mood, Not Information 108Personalized Exposure 110Memory Tones 112Envision 114
CONTENTSFocal Press is an imprint of Elsevier
30 Corporate Drive, Suite 400, Burlington, MA 01803, USA
Copyright © 2011 The Ilex Press Ltd. All rights reserved
This book was conceived, designed, and produced byIlex Press Limited210 High Street, Lewes, BN7 2NS, UK
Publisher: Alastair CampbellCreative Director: Peter BridgewaterManaging Editor: Natalia Price-CabreraEditorial Assistant: Tara GallagherEditor: Steve LuckSenior Designer: James HollywellDesigner: JC LanawayColor Origination: Ivy Press ReprographicsIndex: Indexing Specialists Ltd.
No part of this publication may be reproduced, stored in a retrieval system or transmitted in any form or by any means electronic, mechanical, photocopying, recording or otherwise without the prior written permission of the publisher.
Permissions may be sought directly from Elsevier’s Science & Technology Rights Department in Oxford, UK:Phone (+44) (0) 1865 843830; Fax (+44) (0) 1865 853333; Email: [email protected]. Alternatively visit the Science and Technology Books website at www.elsevierdirect.com/rights for further information
Notice No responsibility is assumed by the publisher for any injury and/or damage to persons or property as a matter of products liability, negligence or otherwise, or from any use or operation of any methods, products, instructions or ideas contained in the material herein
Trademarks/Registered TrademarksBrand names mentioned in this book are protected by their respective trademarks and are acknowledged
Library of Congress Cataloging-in-Publication Data: A catalog record for this book is available from the Library of Congress.
ISBN: 978-0-240-81774-3
For information on all Focal Press publications visit our website at: www.focalpress.com
Printed and bound in China
10 11 12 13 14 5 4 3 2 1

The Twelve 58FirstGroup(TheRangeFits) 601Rangefits—Average
KeyTonesAverage 622RangeFits—Bright
KeyTonesBright 663RangeFits—Dark
KeyTonesDark 70SecondGroup(LowRange) 724Low—AverageAverage 745Low—BrightBright 786Low—DarkDark 80ThirdGroup(HighRange) 827High—KeyAverage
KeyTonesAverage 848High—LargeBrighter
AgainstDark 889High—SmallBrighter
AgainstDark 9010High—Edge-Lit
Edge-LitSubject 9211High—LargeDarker
AgainstBright 9812High—SmallDarker
AgainstBright 102
Style 106Mood,NotInformation 108PersonalizedExposure 110MemoryTones 112Envision 114
TheZoneSystem 118WhatZonesMean 122ZoneThinking 128ExposingforBlack-and-White 130HighKey 132LightandBright 134Flare 136HighlightGlow 138LowKey 140InPraiseofShadows 142DeepShadowChoices 144AnotherKindofLowKey 146Silhouette 148IrrelevantHighlightsandShadows 150Brightnessandattention 152Post-processing 154ChoosingExposureLater 156Exposure,Brightness,
andLightness 158SelectiveExposure 162PostExposureControl 164HDRImaging 168ExposureBlending 174BlendingbyHand 178
ReferenceGlossary 180Index 188
CONTENTS

Choosing the exposure for a photograph is both alarmingly simple and infinitely
complex; in fact, it’s one of photography’s most absorbing paradoxes.
It is simple because there is ultimately only one dosage of light, controlled as it always has been, since the first view cameras carrying wet plates, by a shutter speed, an aperture, and a film speed. There are no qualifications or subsets, just a fraction of a second, an ƒ-stop, and an ISO sensitivity. However much agonizing and philosophizing anyone puts into the equation, choosing the exposure still comes back to the same three simple settings—nothing else.
It is also complex because it affects everything about the image and its effect on those who see it. It reaches deep into what the photographer intended and why the photograph was taken in the first place. There are endless subtleties in the brightness, readability, and mood of every part of every scene, as witnessed by the different exposure decisions that different photographers take.
Understanding how and why exposure works as it does is worth a lot of effort, not only because it helps you to get it “right” at will and with total confidence, but also because it helps you decide what “right” is—and that’s much more important in photography.
Introduction
RICH CONTRAST
Prayers in a Burmese temple, lit by strong afternoon sunlight. The dynamic range is very high, but that’s all to the good, because keeping the shadows almost pitch black helps the subject pop out. Overexposure would be the worst thing possible.


Fast-track & FoolprooFWhen it comes to photography, you should beware
of any self-proclaimed “system.” Systems tend to be
invented and promoted either by photographers who
have a very particular way of working that might suit
themselves perfectly but is not necessarily adaptable,
or by people who have little experience of the
practicalities of shooting.

I write this knowing full well that I’m presenting here what looks suspiciously
like just such a creature. The difference is, and my justification also is, that this is a distillation of the ways in which many professionals make exposure decisions. Most professionals, of course, do not use what they would ever themselves call a system, but when you live, breathe, and shoot photographs for a living, day in and day out, you develop and hone ways of working that behave very much like a system. Well, I would say that, wouldn’t I?
As usual, my model for this book is the way in which professional photographers do things. “Professional” means someone who shoots on assignment regularly for a living, and I believe this is important. Not that professionals have any special dispensation to take better photographs. That kind of talent can rest innately with anyone, and be improved by anyone, though, of course, successful professionals are exploiting that skill. No, what makes the professional approach worth following is that we do photography all the time, and under pressure to deliver the goods every time.
In a slightly unusual departure from most of my books, I’ve carved out a short and succinct first chapter that is partly a summary of what follows, and partly a way of stressing the decision flow. After this I’ll go into much more detail about individual aspects of exposure, all of which will take much longer to read than to do. Here, for the next few pages, I want to be completely practical and acknowledge that when you are shooting there is usually not much time at all for anything. Exposure decisions normally have
to be made very quickly indeed, often without consciously thinking them through. But the decision flow is still there, however there is a short amount of time for it. This, then, is how it really is...
GOOD FLARE
Although usually considered a fault, and something that manufacturers try to reduce with lens coatings, breaking the rules can sometimes help mood and composition. A string of flare polygons over a Montana Lake.
HOLD THE WHITES
Overall, the different blocks of brightness average out, but it was critical to avoid clipping the highlights on the two foreground shirts in this Bali scene. The Tw
elveR
eferenceP
ost-p
rocessing
StyleTechnical
FAST-T
RA
CK
&
FOO
LPR
OO
F
9

I’m taking a slightly different approach in this book by trying to explain everything
at the start, and as concisely as possible. There are many different aids to exposure,
and as many preferences among photographers for choosing camera settings. Camera manufacturers are well aware that this is the crucial issue for most photographers, so they have developed a raft of technical solutions, with each trying to outperform the others. The result is a wonderful choice, but also a chaotic array of methods, many encumbered by jargon.
I plan to cut through this nonsense, and my model is, as always, the way professionals like myself think and work. Being a professional photographer does not mean that the work is any better than that of a dedicated amateur. Actually, often the opposite is the case. What it does mean, though, is constant and realistic attention to shooting on a daily basis.
Let’s start with the absolute summary, as concise as I can make it. Yes, there are all kinds of decisions embedded in each of the steps, but I will explain these later in the book. I’ve also had to allow for the many ways in which a modern digital camera allows the exposure to be set. An important point here is that it is usually less important which method you use than being thoroughly familiar with it.
In time sequence, this looks like the Decision Flow chart (opposite), which is a streamlined version of the full flow shown on the following pages. Follow the sequence and you will get the exposure as good as it possibly can be. The only qualifications are these: the first and last are mechanical, while all the rest require judgment and improve with experience... except number three which can take a lifetime.
the Basic Method
Summary
1. SETTINGS Make sure all the relevant camera settings are as you require them.
2. METERING MODE Set your preferred metering mode and know how it will perform under the lighting conditions.
3. KNOW WHAT YOU WANT Imagine in advance how you want the brightness distribution of the image to be.
4. SCAN FOR PROBLEMS Quickly assess what the issues and likely problems will be, particularly the scene’s dynamic range relative to the sensor’s capability and if the light levels are low.
5. KEY TONES Identify the areas of the scene that are the most important for brightness.
6. RISK OF CLIPPING If the scene’s dynamic range exceeds the sensor’s performance, decide whether to make changes, or to settle for a compromise exposure and/or rely on post-processing.
7. METER & EXPOSE Use the appropriate metering mode, adjusting up or down if necessary.
8. REVIEW Review the result on the screen. If it needs improving, re-shoot if appropriate.
10

MAin FLOw
Key TOne(S)
exPOSe FOR Key
Review
AdjuST iSO/ ShuTTeR/APeRTuRe
LOw LighT Add LighT
CheCK PRObLeMS
ChAnge LighT OR COMPOSiTiOn
COMPROMiSe exPOSuRe
ReLy On SPeCiALPOST-PROCeSSing
RiSK OF CLiPPing
The Twelve
Reference
Po
st-pro
cessingStyle
TechnicalFA
ST-TR
AC
K &
FO
OLP
RO
OF
11

the key Decisions
Let’s expand on this bare-bones summary from the last pages.
1. SettingsBefore you shoot, have camera settings exactly as you need them:• Metering mode: Choose between auto
or manual, depending on your preference.• File format: Raw, TIFF, or JPEG, or a combination
such as Raw + JPEG.• Instant review turned on after each shot (this is
just a recommendation).• Highlight clipping warning: Some people find this
distracting, but others value it as a rapid aid to controlling one of digital photography’s special exposure problems.
• Histogram readily accessible: With some camera manufacturers this is overlaid on the review image, which is certainly distracting, but it is useful to have available at one click.
2. Metering methodKnow exactly how your chosen metering mode behaves. Most cameras offer a choice between, say, average center-
weighted, smart predictive, and spot. Some camera models use very smart methods, such as comparing the distribution of tones with a large bank of previously analyzed images. If you choose to rely on an advanced system, make sure that you know how consistently it behaves for you. If it over- or underexposes for certain kinds of composition and lighting that you favor,
3. What do you want? Know clearly what the photograph is about—what caught your eye, what attracts you about the shot, and what you
want to convey. Have in your mind’s eye how bright it should be overall, and how the distribution of brightness should look. Naturally, this is the million-dollar question.
4. Likely problems Scan the scene for exposure issues. Think about what is in front of the camera before letting the metering
system loose on it. For example, is there a major hotspot that is likely to blow out? Does it matter if it does? Most problems occur because the dynamic range of the scene is greater than the sensor can capture in one exposure.
simply be aware, so that you can adjust with confidence. If you use a simple method, still know how it behaves in different situations. You may need to make adjustments at any time, which is why this is returned to at point 7.
12

7. Apply meteringThis depends on your preferred way of working with the camera settings. One method is to use a
dedicated metering technique to measure and set the key tones, such as spot-metering, to measure an area precisely. Another is to decide from experience how much more or less exposure from the default is needed and to set it accordingly, typically by using an exposure compensation button.
6. Is clipping likely? Is there a conflict? If there’s a conflict between points 4 and 5, work out how to resolve it. The choice is
between changing the light or the composition, or accepting either a compromise in the exposure, relying on special post-processing, or both. For example, if a portrait is backlit and the background has to be heavily clipped for the exposure to be right for the face, you might want to add foreground shadow fill, accept a clipped background, or change the composition. As another example, if there is a small bright hotspot doing nothing special for a shot, you might re-frame to crop it out. A compromise exposure means accepting either shadows that are too dark or overexposed highlights, which may be perfectly acceptable, depending on the effect you want (see point 3). The third alternative, which can sometimes
8. Review, reshootReview on the camera screen, adjust, and re-shoot if necessary—and if there’s time. This is all about the kind of
shooting you are doing and the situation you are in. If the action is fast and either continuous or unpredictable, it would be a very bad idea to check the camera screen after each shot. If you are shooting a landscape as the sun slowly sinks and you have plenty of time, you can afford to check everything thoroughly and shoot variations.
5. Key tonesDecide on the important subject (or subjects) and how bright it (or they) should be. In a portrait, this is likely
to be the face, but it ultimately depends on your creative judgment. If it is a face, is it Caucasian, or East Asian (which needs to be lighter than mid-tone) or black, (which needs to be darker than mid-tone)? The key tone may be only a part of the key subject, or in some circumstances it may be another part of the scene, such as a background.
be combined with a compromise exposure, is to rely on special post-processing techniques, such as exposure blending or even HDR (High Dynamic Range), which might in turn call for multiple exposures that can be digitally blended.
The Twelve
Reference
Po
st-pro
cessingStyle
TechnicalFA
ST-TR
AC
K &
FO
OLP
RO
OF
13
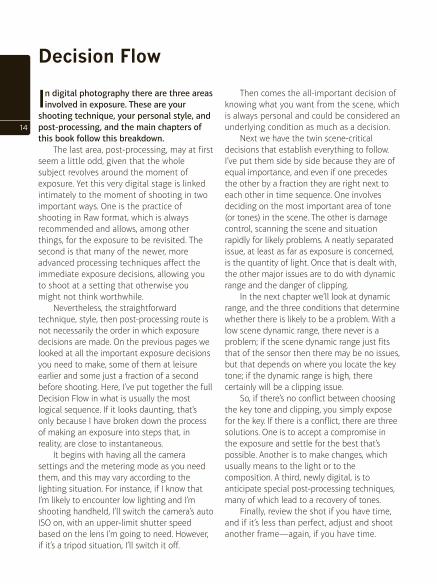
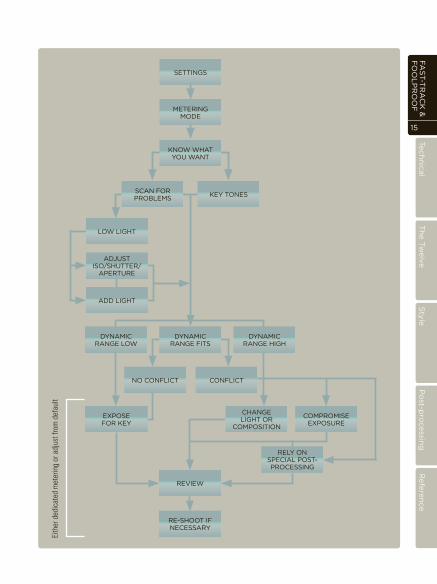
Decision Flow
In digital photography there are three areas involved in exposure. These are your
shooting technique, your personal style, and post-processing, and the main chapters of this book follow this breakdown.
The last area, post-processing, may at first seem a little odd, given that the whole subject revolves around the moment of exposure. Yet this very digital stage is linked intimately to the moment of shooting in two important ways. One is the practice of shooting in Raw format, which is always recommended and allows, among other things, for the exposure to be revisited. The second is that many of the newer, more advanced processing techniques affect the immediate exposure decisions, allowing you to shoot at a setting that otherwise you might not think worthwhile.
Nevertheless, the straightforward technique, style, then post-processing route is not necessarily the order in which exposure decisions are made. On the previous pages we looked at all the important exposure decisions you need to make, some of them at leisure earlier and some just a fraction of a second before shooting. Here, I’ve put together the full Decision Flow in what is usually the most logical sequence. If it looks daunting, that’s only because I have broken down the process of making an exposure into steps that, in reality, are close to instantaneous.
It begins with having all the camera settings and the metering mode as you need them, and this may vary according to the lighting situation. For instance, if I know that I’m likely to encounter low lighting and I’m shooting handheld, I’ll switch the camera’s auto ISO on, with an upper-limit shutter speed based on the lens I’m going to need. However, if it’s a tripod situation, I’ll switch it off.
Then comes the all-important decision of knowing what you want from the scene, which is always personal and could be considered an underlying condition as much as a decision.
Next we have the twin scene-critical decisions that establish everything to follow. I’ve put them side by side because they are of equal importance, and even if one precedes the other by a fraction they are right next to each other in time sequence. One involves deciding on the most important area of tone (or tones) in the scene. The other is damage control, scanning the scene and situation rapidly for likely problems. A neatly separated issue, at least as far as exposure is concerned, is the quantity of light. Once that is dealt with, the other major issues are to do with dynamic range and the danger of clipping.
In the next chapter we’ll look at dynamic range, and the three conditions that determine whether there is likely to be a problem. With a low scene dynamic range, there never is a problem; if the scene dynamic range just fits that of the sensor then there may be no issues, but that depends on where you locate the key tone; if the dynamic range is high, there certainly will be a clipping issue.
So, if there’s no conflict between choosing the key tone and clipping, you simply expose for the key. If there is a conflict, there are three solutions. One is to accept a compromise in the exposure and settle for the best that’s possible. Another is to make changes, which usually means to the light or to the composition. A third, newly digital, is to anticipate special post-processing techniques, many of which lead to a recovery of tones.
Finally, review the shot if you have time, and if it’s less than perfect, adjust and shoot another frame—again, if you have time.
14
Eith
er d
edic
ated
met
erin
g or
adj
ust f
rom
def
ault
SeTTingS
MeTeRing MOde
KnOw whAT yOu wAnT
SCAn FOR PRObLeMS Key TOneS
LOw LighT
AdjuST iSO/ShuTTeR/
APeRTuRe
Add LighT
dynAMiC RAnge LOw
dynAMiC RAnge FiTS
dynAMiC RAnge high
nO COnFLiCT COnFLiCT
ChAnge LighT OR
COMPOSiTiOn
COMPROMiSe exPOSuRe
exPOSe FOR Key
Review
ReLy On SPeCiAL POST-PROCeSSing
Re-ShOOT iF neCeSSARy
The Twelve
Reference
Po
st-pro
cessingStyle
TechnicalFA
ST-TR
AC
K &
FO
OLP
RO
OF
15