the effective use of the goaltender in practice
TRANSCRIPT


The Effective Use of the Goaltender in Practice - Presenters Keith Allain & Joe Bertagna 1
The Effective Use of the Goaltender In PracticeAs coaches you will make a connection between what goalies do in a game, how they play andhow they practice. The first thing you've got to understand is what the goaltender does at agame before you can decide how to use him at practice. In a game, the goaltender spends verylittle time making saves. If he plays for an hour and makes 25 saves, he will have spent roughly 25 seconds in the act of making saves. What he does most of the time is prepare formaking those saves. He spends a lot of time watching and thinking.
Understanding the Position
1. Time spent making saves vs. preparing for saves
Don't confuse the thinking part of the goalie's game with being too deliberate. Because certainly in a game the goaltender has to be very spontaneous and we all know goalies whothink so much that they are a second behind what they should be doing. But goalies shouldspend a lot of time looking at the play, analyzing what might happen, so when the time comesto make that save we're making it easier, we're in the right place.
2. Finding the puck
A goalkeeper spends a lot of time just trying to find the puck. Bobbing and weaving, lookingaround, trying to see where the puck is and dealing with the opponent's options.
3. Dealing with opponents' options
Use a computer as an analogy. The goalie looking at the guy with the puck and he's logged inall the guy's options. As the play changes- and the play changes every time the guy moves oryour teammates move towards him-the options change. Sometimes they are eliminated, sometimes new options come in, but his mind is working like that.
4. Playing off teammates
A goalie plays off teammates a lot- what they do, how they position themselves, what theymight do next. And not only where they are, but who they are-which teammates and what theircapabilities are. And I think that's universal. This is true at any level.

5. Following one puck for a long time
Goalies spend a lot of time following one puck-just the ability to stay with that puck while it'sbeing moved around, after it comes off the body, knowing where the puck is. It's a very basicskill. Like the guy that's down and out and somehow, like he has eyes in the back of his head,spins around and makes it look like a spectacular save. A lot of those aren't as spectacular asyou think because if a goalie is in a certain position where he can't see the puck and he knowsthere's an empty net behind him, then he immediately realizes that the one area of risk is overthere. So he's just going to spin around and fill that space and somebody shoots it into his arm.How in the world did he see that puck? Well, he didn't see it. Just by process of elimination, ifit wasn't there, it must be here.
6. Making decisions
We've all seen goaltenders who are great athletes physically - in great shape. They can do a lotof physical things. But you put them in a situation where they have to think and they are constantly making the wrong decision. A great deal of what we're doing is thinking and thenexecuting and after a goal is scored you might ask, did he get beat because he didn't executeproperly or because he made the wrong decision?
7. Two ways of teaching goalies:
• Gather information, make decisions, execute.
The goalie is constantly gathering information that's nothing more than looking, seeing, assessing. And when we say making decisions, you're really making half-decisions. The gameisn't that finite. But as you analyze what's out there you'll say to yourself, "If he goes this way,I'm going to do this." Or "if this guy breaks I'm going to throw up two pads." This takes abouta second. You scan everything and assessing these options and you're making all these half-decisions and then you execute when they make the first move.
• Before, during, after the "save".
The other way we sometimes describe it is to break down the goalie's task by isolating beforethe shot, during or at the point of the shot, and what happens after the shot.
Typical Practice
1. Saves, saves, saves...or nothing
In a typical practice, the goalie's chore is reduced to making saves. He gets 200 shots in a typical practice. And the message the goalie gets sometimes is what you give him at practice.If you say it's goalie time and what follows is just this self-defense period where it's nothing butshots, then the message is all you have to do is react well. And they don't get the time in thoserapid-fire shooting drills to work on their positioning, their stance and to prepare for thoseshots. It's been said that we teach our goalies with the Guilt and Volume Method. It's whereyou feel guilty that you haven't done anything with your goalie, so you tell everybody to get apuck and for the next 20 minutes you just shoot on him.
The Effective Use of the Goaltender in Practice - Presenters Keith Allain & Joe Bertagna 2

2. Shooters and the goalie
What you'll also see in practice is that there is nothing between the people with the puck andthe goalie. As we mentioned, just finding the puck in a game is a chore. And yet at practice, theabundance of the drills make it very easy for the goaltender to see the puck. And there are nooptions. Usually in practice you describe the drill. It may require a number of passes, but eventually the shot comes from this guy and even the dumbest goalie is going to realize hedoesn't have to anticipate the passes, because he knows who is going to finally shoot. So ofcourse you take away the major part of the goalkeeper's work. In the game, he doesn't knowwho is going to shoot and that indecision changes the whole process.
3. No options
The ability to stay with one puck for a long time during the game is the opposite of staying withmany pucks for a short time during practice. Of course, you don't want to do slow drills. Youhave to keep a pace, doing high tempo drills, etc. You can't mold your practice to just the goalkeeper. But keep in mind that the price of that is the goalie doesn't get a chance to set upbetween those pucks. He has no incentive to follow the puck after he stops it. He just wants tostop it and move to the next one, then the next one. And goalies can get very sloppy playingthat way. Because in the game it's the opposite. In the game it's just one puck and you have tofind it and know where it is all the time and stay with it after the shot.
4. Many pucks, each for a short time
We mentioned making decisions. A lot of times the whole practice is reactive for the goaltender.Something happens, the goalie reacts. And that eliminates those times where a goalie can purposely make the first move, feign a move, or force them an with the puck to do something.So they've got to have the chance to work on their decision making and their ability to workunder pressure.
5. No decisions; reactions only
In the typical practice, your goaltenders are just not involved when you're talking about teamthings like penalty killing, power play, breakout, face offs. The goalie is the player in the bestposition to see. If you have certain rules about where guys are supposed to be. They can makesome noise and move people around. A lot of coaches feel that's not goalie stuff. Let them juststay there and stop the puck. They don’t need to know all that other stuff. But they can do a lotfor the team if you start treating them like hockey player’s and not just as goalies.
6. Not included in certain discussions
(treated as a goalie, not a hockey player)
We've all heard that you've got to be crazy to be a goalie, and it's great joking material. But itgoes beyond joking when you talk to people involved in youth hockey programs and they can'tget kids to come out for goalie. It's not very attractive when they start hearing these jokes.Words can hurt individually, and they can also hurt your program, because all of the suddenwe've made it very unattractive for them to be there. It seems like they are not included in certain things. And some goalies live up to the reputation-they exclude themselves from thegroup. In a sense, then, your practice is a reverse of what happens in a game. In a game thereis a lot of preparation, indecision, a lot going on in your mind, and then the explosion comes.You watch, you observe, you analyze, you explode. In practice, there is a lot of exploding, physical reaction, and no time to think, no drills that allow you to do that.
The Effective Use of the Goaltender in Practice - Presenters Keith Allain & Joe Bertagna 3

Solutions
1. Understand the position
If you as coaches understand the reality of the position a little better, you can drop in some ofthe drills that make it a little more realistic. You can do drills where there is a deliberate screen,an exaggerated screen, where the whole purpose of that drill is to get them to locate the puck.And get them to do it low. Some kids are standing up high, trying to look over people. Anexample of a realistic warm-up drill is for players to come out of each corner, they do a give andgo, skate to the far blue line and shoot. That's your warm-up, outside, long shot, from an angle.After the guy shoots, instead of sending him to the other corner, tell him to go to the far postand stand there as a rebounder for the next shooter. Because if you don't, the goalie starts theday just kicking shots where ever he wants. He doesn't have to worry about a rebound. So justtell the players, take your shot, go to the far post, if you get a quick rebound then bang it home.But if you don't, go right back in line. You want to create a presence that the goaltender nowhas to think about what he's doing there. He will now want to control the first shot a little bitbetter. You're giving him an incentive to play that simple drill in a way that is more realistic andit's not a disruptive change to what you may already be doing.
2. Treat the goalie as another player
If you have meetings, if you use handouts, if you stop a practice to talk about team systems toteam concepts, make sure he's listening and he's part of it. And the goalie's part is not justgoing to the net and stopping it and shooting it the length of the ice, but you need to let thegoaltender know, if you're coaching older players, if you have an idea of what power play system the opponent is using, let the goaltender know that before the game. What are the tendencies of the other team? A goalie will want to know these things. On a lot of power playsthe goalie can be very helpful if he's aggressive with the stick or in the crease, so he's not giving up that post-to-post goal mouth pass. What does the other team like to do on face-offs?Does the center tie somebody up and somebody comes in off the boards and picks up the puck?The goalie needs to know these things. You've got to treat them just like the other players onthe team.
The Effective Use of the Goaltender in Practice - Presenters Keith Allain & Joe Bertagna 4

3. Allow for one real drill daily
It makes sense to take ten minutes at the start of every practice or at some point where youwant to do things with the rest of your team, where the goalie will know it will be there everyday, it's his time. If it's a Monday practice, give them something to work on with their feet.Tuesday they've got to work on something with their gloves. Whatever-feet, gloves, stick, pads.Break things down in four areas. They can do shadow drills, they can pass the puck to eachother-but let them know they have a time that is theirs. If you get a goaltender who talks aboutnot being a practice goalie-and you hear that all the time-you've got to make the connection tothe kid about what he does at practice and how the rest of the team benefits. Some goalies feelthat they can do something less at practice, because they will play better in games. They've gotto make the connection that if it's easy to score on them in practice, they're not pushing theirteammates to work on their skills to score. Then they get in a game, after beating the goalie atwill in practice, and they have trouble putting the puck in the net. They can't figure it out,because everything seems to work okay at practice. It's because the goalie is not working atpractice. And if the goalie pushes at practice, it pushes the rest of the team and that shows inthe game. It is important that coaches incorporate at least 1 "real" drill for the goalie in eachpractice.
4. Goalie Days are more than just shots
Another thing to consider is to create a "goalie day" where the focus is on meeting the goaliesneeds in that particular practice.
5. Set up 10 minute goalie time for them to work alone
(with schedule set by days: feet, hands, stick, pads...)
6. Pre-game warm-up
Pre-game warm-ups. The traditional warm-up is to have everybody come in and shoot a puckon the goalie. I don't know why, but it's universally accepted that that's a good warm-up. In athree- to five-minute warm-up, don’t just have everybody shoot a puck on the goalie. Whatgood does it do for the guy who gets the two or three shots? And what good is it for the goaliewhen some of them miss the net, some of them go right into him, and some he may have tomove and stretch and touch the puck?
If you've got a short warm-up, skate them a little bit, send them to the goal, have one kid withthe pucks, slide pucks. Or maybe two kids, have one guy in deep, have one slide it and havethem go up and down. Some goalies are worried about looking bad at warm-ups so they cutthe angle down so they don't get beat, which is not the purpose of the warm-up. Tell the goalieto stay back on the goal line so he has to move, and then maybe gradually start to move outand work on that. But when you get in the game, the first shift, he's looking, he's down, he'sup, he's poking, diving. Nothing that he did in warm-up prepares him for that. So don't do awarm-up, because everybody is doing it that way, particularly with the goaltender.
The Effective Use of the Goaltender in Practice - Presenters Keith Allain & Joe Bertagna 5

Five Ideas to improve your Goaltender
Why five ideas?
• Hockey goalies are the single most important position in all of team sports.
• Many coaches are uncomfortable working with their goalies.
• We have all been to clinics and listened to great discussions regarding the technical aspects of goaltending, hopefully this discussion will give you some concrete practical applications.
1. Skating
"Skating is the key. Goalies must be able to move in all directions, as quickly as possible, toreact/recover and make an abrupt, balanced transition from on move to another, while stayingin their stance ready to make a save." Mitch Korn
• The single most important skill for playing goal.
• Work on your goalies skating every day.
• Your goalie must move while maintaining a good "ready position", minimizing any holes.
• Concentrate on quality repetitions to create proper muscle memory.
2. Positioning
"When I am on my game, I only need to move an inch in either direction to make a save. If yousee me making spectacular saves I am struggling with my game." Bernie Parent
• A well-positioned goalie has the most likely chance to be hit by a shot.
• You want your goalie to be centered, square, and out on the angle.
• You must be constantly aware of your goalies positioning during games and practices.
3. Make your Practices "Goalie Friendly"
"Skill as it pertains to basketball, is the knowledge and the ability to quickly and properly to executethe fundamentals. Being able to do them is not enough. They must be done quickly. And beingable to do them quickly isn't enough either. They must be done quickly and precisely at the righttime. You must learn in practice to react properly, almost instinctively." John Wooden
• A proper warm-up is important.
• Make shooting drills as game like as possible. Provide traffic, rebound opportunities,shooters under pressure with options, and competition.
• Your whole team will benefit from practicing in this manner.
The Effective Use of the Goaltender in Practice - Presenters Keith Allain & Joe Bertagna 6

4. Help your Goalie evaluate his Performance
"Experience is a cruel teacher, it gives you the test first and the lesson after."
• Goals against often offer great lessons, take advantage of them.
• Develop measurable standards or goals for each game.
• Encourage an honest dialogue to get your goalie thinking about and questioning his thought process.
• Analyze situations that arose in the game, what did the goalie see, what if anything might he have done differently?
5. Develop a Work Ethic
"How does a goalie go about gaining confidence? There is only one way. And that is from work-ing hard; hard enough to realize you are giving maximum effort and can't be expected to givemore. If you cheat on yourself, if you are giving less than your best, you know it. And with thisknowledge, it is very difficult to feel confident. There are no short cuts. No magic." Joe Bertagna
• Goaltenders work ethic is often overlooked, many times coaches allow their goalies to be lazy.
• Demand consistency in terms of effort.
• Your goalie must be the team leader in setting the work standards for the team.
• By competing hard for every shot, your goalie challenges his teammates to be better every day.
The Effective Use of the Goaltender in Practice - Presenters Keith Allain & Joe Bertagna 7
The Effective Use of the Goaltender in Practice - Presenters Keith Allain & Joe Bertagna 8
Coaches' Clipboard
Notes:________________________________________________
_____________________________________________________
_____________________________________________________
_____________________________________________________
_____________________________________________________
_____________________________________________________
_____________________________________________________
_____________________________________________________
_____________________________________________________
_____________________________________________________
_____________________________________________________
_____________________________________________________
_____________________________________________________
_____________________________________________________
_____________________________________________________
_____________________________________________________

The Effective Use of the Goaltender in Practice - Presenters Keith Allain & Joe Bertagna 9
Drills
Objective• Control skating in the crease, centering on puck
Five Puck Goalie Skate
Place five pucks in an arc just outside the crease.Goalie skates in the arc stopping and centering oneach puck, using a controlled shuffle skate, forabout 20 seconds. On coaches whistle the goalienow skates from one puck to the other, using a t-glide. The coach decides which puck the goaliemoves to always changing the goalies course,always stopping to be centered and square on thepuck.
Key Elements• Shuffle Skate• T-glide• Body Control• Transition Skating
Variations• At the end of 20 seconds the goalie starts at one post and comes out to poke check the pucks one at a time returning to the post each time until all but one puck remains on the final puck the goalie must cover the puck for whistle.
Objective• Goalie warm up with shots from different angles
Wave Shooting Warm up
Players in diagonal corners with pucks. On coacheswhistle three players leave from each corner. Thefirst player skates up boards and takes a long angleshot. The second player skates up the boards andat center ice cuts to the middle and takes a long shotfrom the middle. The third player skates up boardsat center cuts across ice and takes shot from farangle.
Key Elements• Long Warm up Shots• Changing Angles• High Volume of Shots
Goalie• Good drill for getting the feel of the puck and rink
awareness in terms of angles.

The Effective Use of the Goaltender in Practice - Presenters Keith Allain & Joe Bertagna 10
Drills
Objective• Reading the rush
2 on 2 Read the Rush
2 lines of forwards in diagonal corners of rink and 2lines of defensemen in the opposite diagonal corners of the rink. On whistle, one end starts bythe defenseman skating towards middle of ice andpassing to forward skating up boards. Forwardskates around center circle and comes back againstdefenseman 1 on 1. On next whistle, other endbegins same sequence. At same time, the defense-man who just played the 1 on 1 tries to join the rushand make a play with forward from the oppositeend. The original forward has to backcheck. The drillis continuous with whistle starting the alternate end.
Key Elements• Defensive Awareness• Communication• Offensive Awareness• Reading the Rush• Gap Control
Goalie• Situational awareness; communicate with the
defenseman
Objective• Warm up shot from middle angle
Variation Outside Shot (C Skate Shooting Warm up)
Pucks and players in all four corners. x1 leaves lineand skates around the face off circle as shown at thetop of the circle he receives pass from the next inline and then circles back the other way into centerice. He then comes down the middle taking a warmup shot on the goalie.
Key Elements• Skaters turning on to both sides• Creating proper passing angle• Controlled shots from middle• Encourage shots off a move
Variations• Players start skating from the boards to the middle
of the ice and receive the puck from the next player in line, skating up thru the middle of the ice around a cone placed between the faceoff dot and the red line in the neutral zone, skating down the outside for an angle shot on goal.
Goalie• Follow player thru center ice, get feel for the puck
and mid ice positioning

The Effective Use of the Goaltender in Practice - Presenters Keith Allain & Joe Bertagna 11
Drills
Objective• Game Simulation 2 on 1, 3 on 1
One Puck Game Simulation - 2 on 1 (One Puck Continuous Drill 2 on 1)
Four even groups of forwards positioned at thebluelines, one defenseman starts at one blueline.The goalie starts with a puck on the whistle two forwards at the same end on the blueline as thedefenseman skate into position on the half boardsto recieve the outlet pass from the goalie. The twoforwards attack the defenseman 2 on 1 down the iceto the other end as they enter the zone the two forwards at this blue line skate into position alongwith the next defenseman that will play the following2 on 1 back the other way.
1. Goalie can make the outlet pass.2. Loose puck can be taken by waiting forwards.3. Offensive forwards pressure the puck or continue
play until puck clears the blueline.4. If a goal is scored the puck is retrieved by the
defenseman and is to break out the forwardsthat are on the half boards in position.
Key Elements• Forwards support each other• Attack offensive zone,go to the net• Gap control• Force Forwards Outside/Poor angle• Puck Pursuit / Positioning
Variations• Can add 3 forwards to make the drill 3 on 1
Goalie• Game like situation 2 on 1, Goalie can make the out
let pass to the forwards.
The Effective Use of the Goaltender in Practice - Presenters Keith Allain & Joe Bertagna 12
Drills
Objective• Game Simulation 2 on 2, 3 on 2
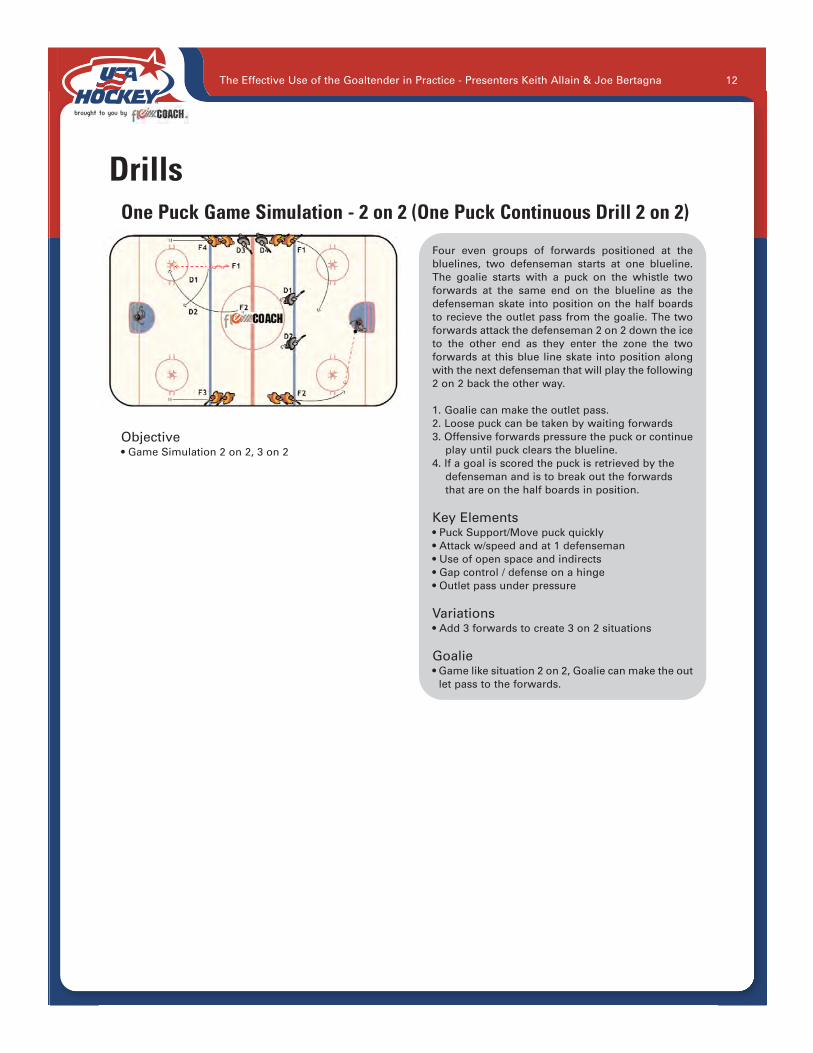
One Puck Game Simulation - 2 on 2 (One Puck Continuous Drill 2 on 2)
Four even groups of forwards positioned at thebluelines, two defenseman starts at one blueline.The goalie starts with a puck on the whistle two forwards at the same end on the blueline as thedefenseman skate into position on the half boardsto recieve the outlet pass from the goalie. The twoforwards attack the defenseman 2 on 2 down the iceto the other end as they enter the zone the two forwards at this blue line skate into position alongwith the next defenseman that will play the following2 on 2 back the other way.
1. Goalie can make the outlet pass.2. Loose puck can be taken by waiting forwards3. Offensive forwards pressure the puck or continue
play until puck clears the blueline.4. If a goal is scored the puck is retrieved by the
defenseman and is to break out the forwardsthat are on the half boards in position.
Key Elements• Puck Support/Move puck quickly• Attack w/speed and at 1 defenseman• Use of open space and indirects• Gap control / defense on a hinge• Outlet pass under pressure
Variations• Add 3 forwards to create 3 on 2 situations
Goalie• Game like situation 2 on 2, Goalie can make the out
let pass to the forwards.

The Effective Use of the Goaltender in Practice - Presenters Keith Allain & Joe Bertagna 13
Drills
Objective• Passing and puck support with proper positioning
Passing 1
Players are positioned on opposite diagonal blue-lines with one player positioned at the oppositefaceoff circle in each end. On the whistle the players at the blueline start with a puck, skatingtoward the player positioned at the faceoff dot andpasses it to that player and supports the pass toreceive the pass back,. Skating up thru the neutralzone with the puck, passing the puck to the last player in the line of where he started. The playernow receives the puck back and finishes with anangle shot on goal.
Key Elements• Passing/Receiving• Skating• Puck Support• Shooting/Scoring• Goalie Warm up
Variations• The player at the beginning can start backwards,
receiving a pass from the next player in line,pivoting to begin the same sequence.
Goalie• Follow player thru center ice, get feel for the puck and mid ice positioning; adjusting his angles based on the players skating movement for an angle shot.
Objective• Goalie Skating Fundamentals
X Skating Drill
Start on one post T-Glide out to far opposite side ofthe crease to get set. Then shuffle back to the nearpost. Continue to do the same on the opposite side.
Key Elements• Transition Skating• Body Control• T-glide• Set and square body to the puck• Conditioning
The Effective Use of the Goaltender in Practice - Presenters Keith Allain & Joe Bertagna 14
Drills
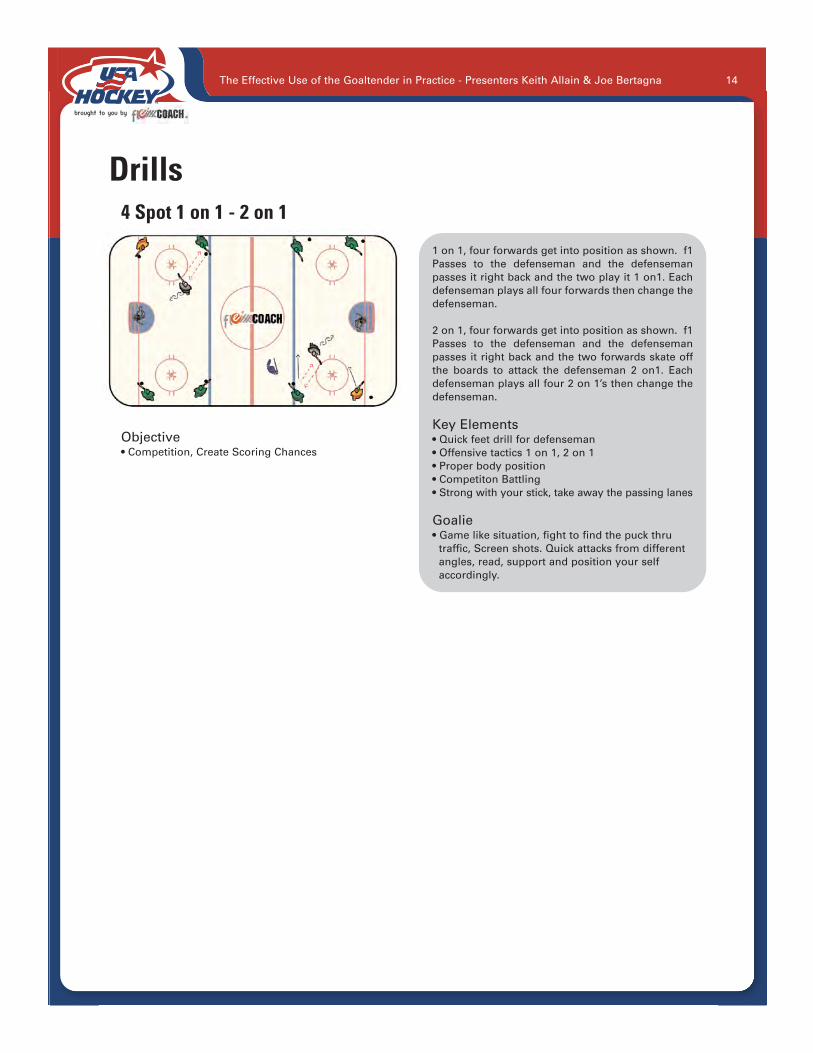
Objective• Competition, Create Scoring Chances
4 Spot 1 on 1 - 2 on 1
1 on 1, four forwards get into position as shown. f1Passes to the defenseman and the defensemanpasses it right back and the two play it 1 on1. Eachdefenseman plays all four forwards then change thedefenseman.
2 on 1, four forwards get into position as shown. f1Passes to the defenseman and the defensemanpasses it right back and the two forwards skate offthe boards to attack the defenseman 2 on1. Eachdefenseman plays all four 2 on 1’s then change thedefenseman.
Key Elements• Quick feet drill for defenseman• Offensive tactics 1 on 1, 2 on 1• Proper body position• Competiton Battling• Strong with your stick, take away the passing lanes
Goalie• Game like situation, fight to find the puck thru
traffic, Screen shots. Quick attacks from different angles, read, support and position your self accordingly.

On Ice Presentations
The Effective Use of the Goaltender in Practice - Presenters Keith Allain & Joe Bertagna 15
___________________________________________
___________________________________________
___________________________________________
___________________________________________
___________________________________________
___________________________________________
___________________________________________
___________________________________________
___________________________________________
___________________________________________
___________________________________________
___________________________________________
___________________________________________
___________________________________________
___________________________________________
___________________________________________
___________________________________________
___________________________________________
___________________________________________
___________________________________________

WARREN STRELOW MENTOR PROGRAM GOALTENDING SESSION
BEGINNER LEVEL Objectives: Stance & Movement – Develop proper stance and fundamentals while using T- push and parallel shuffle. Fundamental Saves – Continued development of movement while working on proper use of stick and recovery. Shooting Drill – Introducing angle work and depth. Practice Time: 30 Minute Practice Practice Structure: Time Stance & Movement Drills 15/15 Fundamental Saves 10/25 Shooting Drill 5/ 30 Stance & Movement Drills 15/15 Middle Out T – push (4 x 6 reps) Three Puck Movement T – push (4 x 5 reps each way) Off Post Small Shuffle Work (4 x 4 reps) Fundamental Saves 10/25 Middle Out Stick Work (3 x 6 reps) Triggered Movement Half Butterfly & Stick Saves (3 x 6 reps) Shooting Drill 5/30 Lateral Cut Phase 1
NATIONAL TEAM DEVELOPMENT PROGRAM GOALTENDER DRILLS
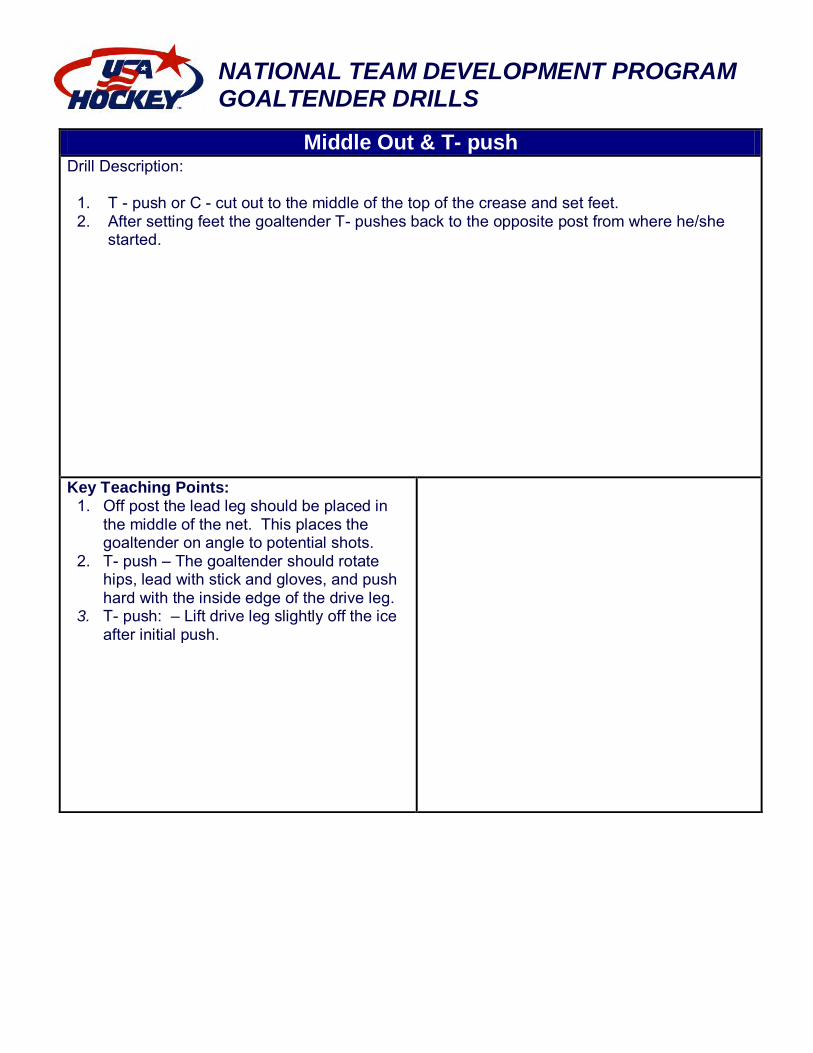
Middle Out & T- push Drill Description:
1. T - push or C - cut out to the middle of the top of the crease and set feet. 2. After setting feet the goaltender T- pushes back to the opposite post from where he/she
started.
Key Teaching Points: 1. Off post the lead leg should be placed in
the middle of the net. This places the goaltender on angle to potential shots.
2. T- push – The goaltender should rotate hips, lead with stick and gloves, and push hard with the inside edge of the drive leg.
3. T- push: – Lift drive leg slightly off the ice after initial push.

NATIONAL TEAM DEVELOPMENT PROGRAM
GOALTENDER DRILLS
3 PUCK MOVEMENT SEQUENCE ( T- PUSH) Drill Description: Puck placement:
1. Puck 1 is the post (Drill begins from Puck 1). 2. Puck 2 is the near side corner of the top of the crease. 3. Puck 3 is the far side corner of the top of the crease.
Goalie Movement
1. T- push or C – cut out to Puck 2 and set feet. 2. T- push across to Puck 3 and set feet. 3. T- push back to Puck 1 and set feet.
Repeat sequence 3 times.
Key Teaching Points: 1. T- push: Turn head, rotate hips and lead
with stick and gloves. 2. T- push: – Lift drive leg slightly off the ice
after initial push.
3. Set feet in position and square up to the
potential shot angle.
●
● ●

NATIONAL TEAM DEVELOPMENT PROGRAM
GOALTENDER DRILLS
OFF POST SMALL SHUFFLE WORK Drill Description: Note: Goaltender starts from set position on the post.
1. The goaltender comes off the post through the middle of the net to the top of the crease corner angel on the opposite side of where he/she started and sets feet.
2. The goaltender small shuffles across the top of the crease until he/she reaches the puck in
the middle of the slot. 3. The goaltender then rotates hips and T – pushes back to opposite side post. 4. Repeat drill from opposite post
Place a puck 3 feet above the top of the crease in the middle of the slot. Repeat the drill for 4 - 6 reps.
Key Teaching Points: 1. Off post the goaltender should shift body
through the middle of the net while moving out to the corner angle.
2. Small shuffles should be used while
maintaining stance position. 3. Rotate hips and lead with stick and gloves
when T – pushing back to opposite post. 4. T- push – Lift drive leg slightly off the ice
after initial push.

NATIONAL TEAM DEVELOPMENT PROGRAM
GOALTENDER DRILLS
MIDDLE OUT STICK WORK Drill Description: 1. X1 stands with pucks 2 feet above the hash marks in the middle of the slot. 2. Goaltender is positioned on the post. 3. Goaltender T - pushes or C - cuts out to the middle of the top of the crease and sets feet. 4. X1 shoots on the ice at the goaltender’s five hole. 5. Goaltender directs puck into corner and recovers to rebound. Repeat the drill 4 times from each post for a total of 8 reps.
Key Teaching Points: 1. Off post the lead leg should be placed
towards the middle of the net. This places the goaltender on angle to potential shots.
2. Stick saves – there should not be a lot of movement with the goaltenders arm. The goaltender needs to slightly turn wrist to direct puck into desired location.
X1
••••
NATIONAL TEAM DEVELOPMENT PROGRAM
GOALTENDER DRILLS
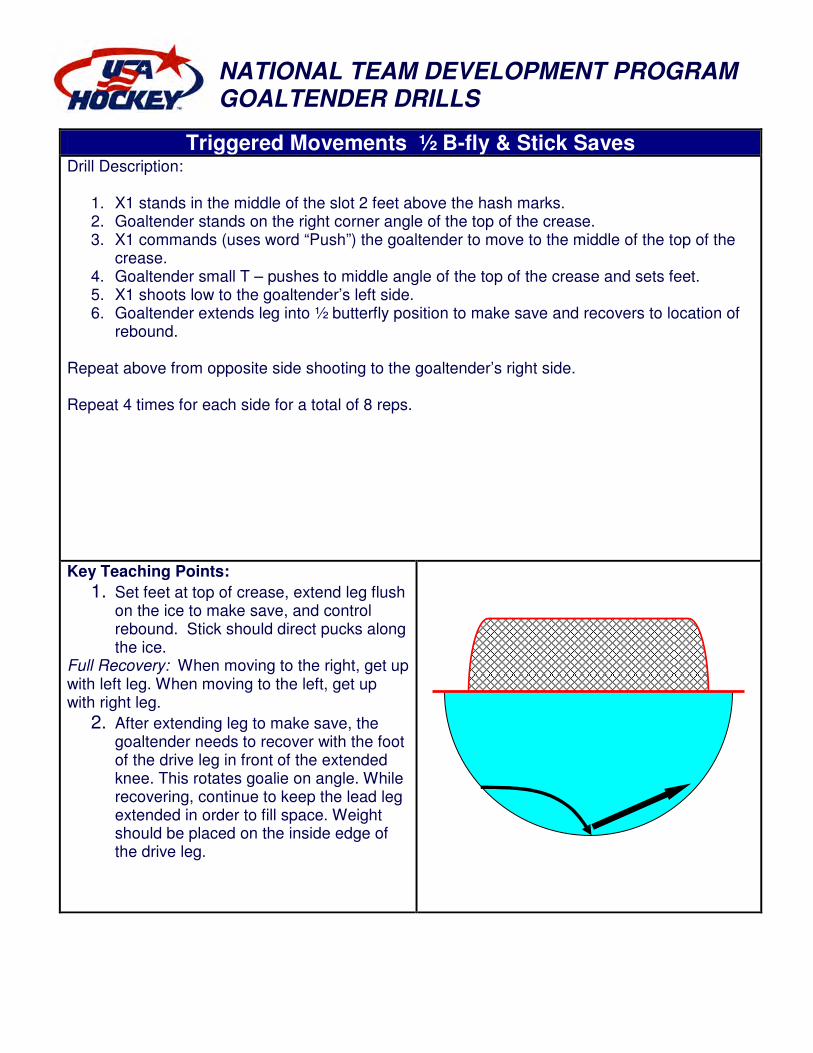
Triggered Movements ½ B-fly & Stick Saves Drill Description:
1. X1 stands in the middle of the slot 2 feet above the hash marks. 2. Goaltender stands on the right corner angle of the top of the crease. 3. X1 commands (uses word “Push”) the goaltender to move to the middle of the top of the
crease. 4. Goaltender small T – pushes to middle angle of the top of the crease and sets feet. 5. X1 shoots low to the goaltender’s left side. 6. Goaltender extends leg into ½ butterfly position to make save and recovers to location of
rebound. Repeat above from opposite side shooting to the goaltender’s right side. Repeat 4 times for each side for a total of 8 reps.
Key Teaching Points:
1. Set feet at top of crease, extend leg flush on the ice to make save, and control rebound. Stick should direct pucks along the ice.
Full Recovery: When moving to the right, get up with left leg. When moving to the left, get up with right leg.
2. After extending leg to make save, the goaltender needs to recover with the foot of the drive leg in front of the extended knee. This rotates goalie on angle. While recovering, continue to keep the lead leg extended in order to fill space. Weight should be placed on the inside edge of the drive leg.

WARREN STRELOW MENTOR PROGRAM GOALTENDING SESSION
BEGINNER LEVEL Objectives: Stance & Movement – Develop proper stance and fundamentals while using T- push and parallel shuffle. Fundamental Saves – Continued development of movement while working on proper use of stick and recovery. Shooting Drill – Introducing angle work and depth. Practice Time: 30 Minute Practice Practice Structure: Time Stance & Movement Drills 15/15 Fundamental Saves 10/25 Shooting Drill 5/ 30 Stance & Movement Drills 15/15 Middle Out T – push (4 x 6 reps) Out, Over, & Back (2 x 4 reps) Off Post Small Shuffle Work (4 x 4 reps) Fundamental Saves 10/25 Middle Out Stick Work (3 x 6 reps) Wildcat Butterfly Series Shooting Drill 5/30 Post Awareness

NATIONAL TEAM DEVELOPMENT PROGRAM GOALTENDER DRILLS
Middle Out & T- push Drill Description:
1. T - push or C - cut out to the middle of the top of the crease and set feet. 2. After setting feet the goaltender T- pushes back to the opposite post from where he/she
started.
Key Teaching Points: 1. Off post the lead leg should be placed in
the middle of the net. This places the goaltender on angle to potential shots.
2. T- push – The goaltender should rotate hips, lead with stick and gloves, and push hard with the inside edge of the drive leg.
3. T- push: – Lift drive leg slightly off the ice after initial push.

NATIONAL TEAM DEVELOPMENT PROGRAM GOALTENDER DRILLS
OUT, OVER, & BACK Drill Description:
1. Goaltender T - pushes or C - cuts out to the middle of the top of the crease and sets feet. 2. The goaltender small T - pushes to the corner angle of the top of the crease on the side
from where he/she started from and sets feet. 3. The goaltender then rotates hips and T – pushes back to opposite side post. 4. Repeat drill from opposite post.
Repeat drill 2X each way for a total of 4 reps.
Key Teaching Points: 1. Off post the lead leg should be placed in the
middle of the net. This places the goaltender on angle to potential shots.
2. Once arriving at the top of the crease the goaltender’s heals should be on the red, feet should be set for approximately 1 – 2 seconds and square to the potential shot angle.
3. Movements should be crisp and explosive.
4. T – push – Slightly lift drive leg off the ice after pushing off.
1
2
3

NATIONAL TEAM DEVELOPMENT PROGRAM
GOALTENDER DRILLS
OFF POST SMALL SHUFFLE WORK Drill Description: Note: Goaltender starts from set position on the post.
1. The goaltender comes off the post through the middle of the net to the top of the crease corner angel on the opposite side of where he/she started and sets feet.
2. The goaltender small shuffles across the top of the crease until he/she reaches the puck in
the middle of the slot. 3. The goaltender then rotates hips and T – pushes back to opposite side post. 4. Repeat drill from opposite post
Place a puck 3 feet above the top of the crease in the middle of the slot. Repeat the drill for 4 - 6 reps.
Key Teaching Points: 1. Off post the goaltender should shift body
through the middle of the net while moving out to the corner angle.
2. Small shuffles should be used while
maintaining stance position. 3. Rotate hips and lead with stick and gloves
when T – pushing back to opposite post. 4. T- push – Lift drive leg slightly off the ice
after initial push.

NATIONAL TEAM DEVELOPMENT PROGRAM
GOALTENDER DRILLS
MIDDLE OUT STICK WORK Drill Description: 1. X1 stands with pucks 2 feet above the hash marks in the middle of the slot. 2. Goaltender is positioned on the post. 3. Goaltender T - pushes or C - cuts out to the middle of the top of the crease and sets feet. 4. X1 shoots on the ice at the goaltender’s five hole. 5. Goaltender directs puck into corner and recovers to rebound. Repeat the drill 4 times from each post for a total of 8 reps.
Key Teaching Points: 1. Off post the lead leg should be placed
towards the middle of the net. This places the goaltender on angle to potential shots.
2. Stick saves – there should not be a lot of movement with the goaltenders arm. The goaltender needs to slightly turn wrist to direct puck into desired location.
X1
••••
NATIONAL TEAM DEVELOPMENT PROGRAM GOALTENDER DRILLS
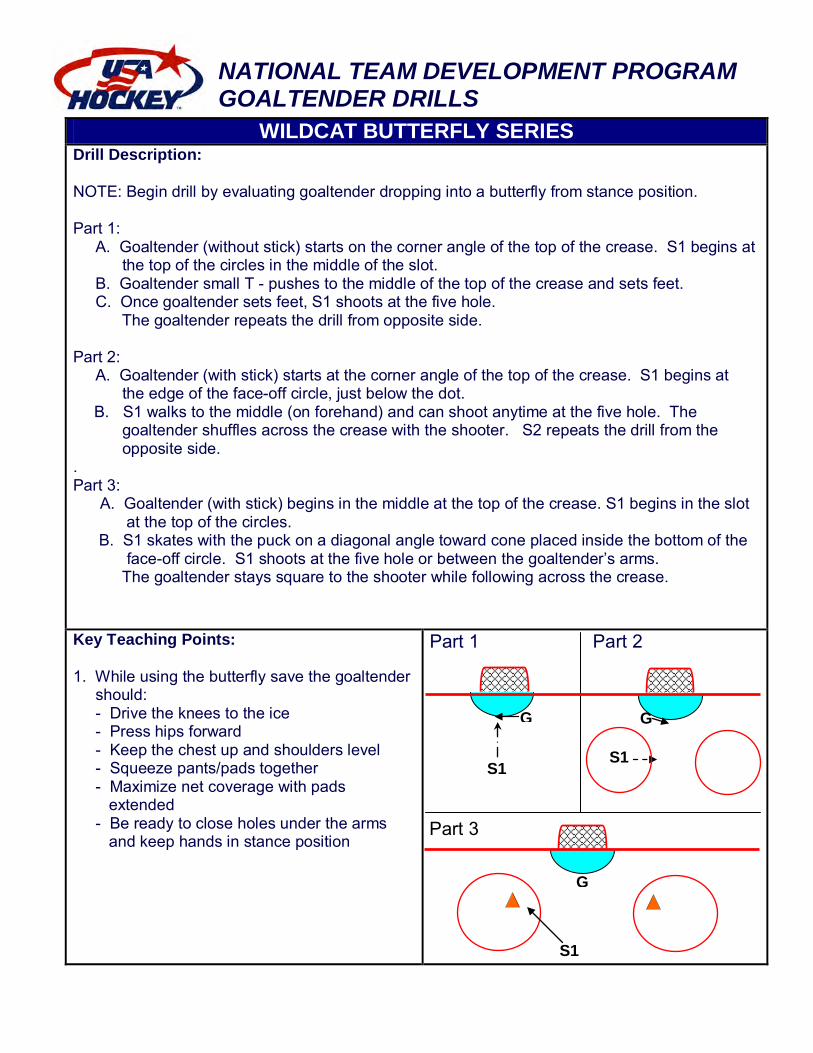
WILDCAT BUTTERFLY SERIES Drill Description: NOTE: Begin drill by evaluating goaltender dropping into a butterfly from stance position. Part 1: A. Goaltender (without stick) starts on the corner angle of the top of the crease. S1 begins at the top of the circles in the middle of the slot. B. Goaltender small T - pushes to the middle of the top of the crease and sets feet. C. Once goaltender sets feet, S1 shoots at the five hole. The goaltender repeats the drill from opposite side. Part 2: A. Goaltender (with stick) starts at the corner angle of the top of the crease. S1 begins at the edge of the face-off circle, just below the dot.
B. S1 walks to the middle (on forehand) and can shoot anytime at the five hole. The goaltender shuffles across the crease with the shooter. S2 repeats the drill from the opposite side. . Part 3: A. Goaltender (with stick) begins in the middle at the top of the crease. S1 begins in the slot at the top of the circles.
B. S1 skates with the puck on a diagonal angle toward cone placed inside the bottom of the face-off circle. S1 shoots at the five hole or between the goaltender’s arms. The goaltender stays square to the shooter while following across the crease.
Key Teaching Points: 1. While using the butterfly save the goaltender should: - Drive the knees to the ice - Press hips forward - Keep the chest up and shoulders level - Squeeze pants/pads together - Maximize net coverage with pads extended - Be ready to close holes under the arms and keep hands in stance position
Part 1 Part 2
S1
G
S1
G
Part 3
G
S1
NATIONAL TEAM DEVELOPMENT PROGRAM GOALTENDER DRILLS
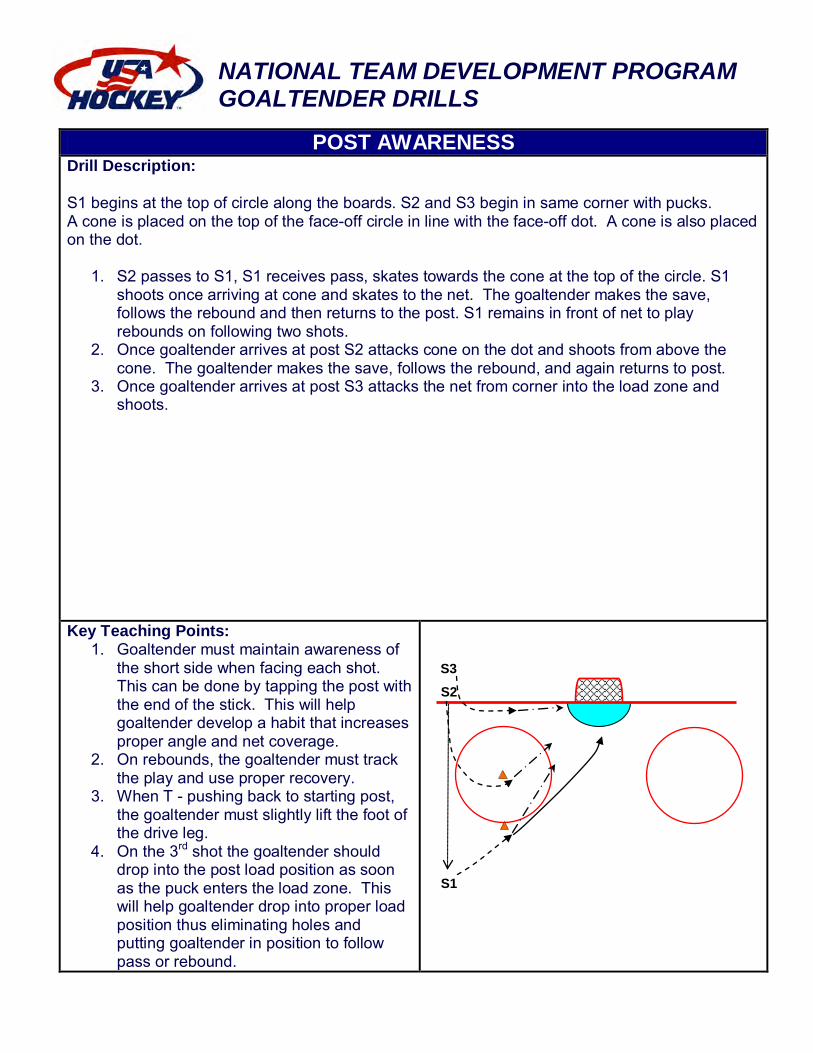
POST AWARENESS Drill Description: S1 begins at the top of circle along the boards. S2 and S3 begin in same corner with pucks. A cone is placed on the top of the face-off circle in line with the face-off dot. A cone is also placed on the dot.
1. S2 passes to S1, S1 receives pass, skates towards the cone at the top of the circle. S1 shoots once arriving at cone and skates to the net. The goaltender makes the save, follows the rebound and then returns to the post. S1 remains in front of net to play rebounds on following two shots.
2. Once goaltender arrives at post S2 attacks cone on the dot and shoots from above the cone. The goaltender makes the save, follows the rebound, and again returns to post.
3. Once goaltender arrives at post S3 attacks the net from corner into the load zone and shoots.
Key Teaching Points: 1. Goaltender must maintain awareness of
the short side when facing each shot. This can be done by tapping the post with the end of the stick. This will help goaltender develop a habit that increases proper angle and net coverage.
2. On rebounds, the goaltender must track the play and use proper recovery.
3. When T - pushing back to starting post, the goaltender must slightly lift the foot of the drive leg.
4. On the 3rd shot the goaltender should drop into the post load position as soon as the puck enters the load zone. This will help goaltender drop into proper load position thus eliminating holes and putting goaltender in position to follow pass or rebound.
S1
S2
S3

NATIONAL TEAM DEVELOPMENT PROGRAM
GOALTENDER DRILLS
LATERAL CUT DRILL Drill Description: In both ends five cones are placed on the ice as shown below. Phase 1
1. Shooter begins at the red line and skates down the boards. 2. Just before the first cone (along boards) the shooter cuts to the middle and shoots
somewhere prior to arriving at the second cone (middle cone). Phase 2
1. Shooter begins at the red line and skates down the boards. 2. Just before the first cone (along boards) the shooter cuts to the middle. The shooter has
the option to shoot between the first and second cone (middle cone) or to continue the path and shoot at some point between the second and third cone (low cone).
Alternate sides with the drill. Team drill that can be done at both ends at the same time. Have shooters lined up at the red line on both sides of center ice.
Key Teaching Points: 1. The goaltender sets up on the shooter as the
shooter moves down the wall and across the ice.
2. The goaltender must be patient and stay on feet at the top of the crease taking away as much net as possible.
3. In phase two, when the puck is carried between cones 2 and 3 the goaltender must continue to stay on his/her feet and be patient moving with the puck.
S1
Phase 1
Phase 2

WARREN STRELOW MENTOR PROGRAM GOALTENDING SESSION
INTERMEDIATE LEVEL Objectives: Stance & Movement – Develop proper stance and fundamentals while using T- push, small T – push, full recovery, and butterfly slide. Fundamental Saves – Continued development of movement while working on proper use of gloves, chest and zone work. Shooting drill – Angle work, depth and recovery. Practice Time: 30 Minute Practice Practice Structure: Time Stance & Movement Drills 12/12 Fundamental Saves 10/22 Shooting Drill 8/30 Stance & Movement Drills 12/12 Out, Over, & Back (4 x 4 reps) Out, Over, Full Recovery & Back (4 x 4 reps) Middle Out Butterfly Slide (4 x 4 reps) Fundamental Saves 10/22 Glove & Tracking 1 (5 x 6 reps) Zone Work with Chest Shot (4 x 6 reps) Shooting Drill 8/30 Three Cone Angle Shooting

NATIONAL TEAM DEVELOPMENT PROGRAM GOALTENDER DRILLS
OUT, OVER, & BACK Drill Description:
1. Goaltender T - pushes or C - cuts out to the middle of the top of the crease and sets feet. 2. The goaltender small T - pushes to the corner angle of the top of the crease on the side
from where he/she started from and sets feet. 3. The goaltender then rotates hips and T – pushes back to opposite side post. 4. Repeat drill from opposite post.
Repeat drill 2X each way for a total of 4 reps.
Key Teaching Points: 1. Off post the lead leg should be placed in the
middle of the net. This places the goaltender on angle to potential shots.
2. Once arriving at the top of the crease the goaltender’s heals should be on the red, feet should be set for approximately 1 – 2 seconds and square to the potential shot angle.
3. Movements should be crisp and explosive.
4. T – push – Slightly lift drive leg off the ice after pushing off.
1
2
3

NATIONAL TEAM DEVELOPMENT PROGRAM
GOALTENDER DRILLS
Middle Out & Butterfly Slide Drill Description:
1. T - push or C - cut out to the middle of the top of the crease and set feet. 2. After setting feet the goaltender butterfly slides back to just outside the opposite post from
where he/she started.
Key Teaching Points: 1. Off post the lead leg should be placed in
the middle of the net. This places the goaltender on angle to potential shots.
2. Butterfly slide – The goaltender should rotate hips, lead with stick and gloves, and push hard with the inside edge of the drive leg.
3. Butterfly slide – Bring drive leg and lead leg together flush on the ice.
4. Butterfly slide - Goaltender should catch skate edge just outside of the post. This will keep goaltender square to the shooter and in position to move in another direction. If the goaltender hits the post it will push him/her off angle and limit his/her ability to move in another direction while also causing a small opening on the post side for the shooter.

NATIONAL TEAM DEVELOPMENT PROGRAM
GOALTENDER DRILLS
GLOVE AND TRACKING DRILL 1 Drill Description: 1. Shooters S1 and S2 are placed inside at the top of the circles in line with the hash marks. 2. Passers P1 and P2 are below the goal line with pucks. 3. The goaltender begins the drill on the post near P1. 4. P1 passes the puck to either S1 or S2. The shooter catches and shoots the puck to score, with the majority of the shots high to test the goaltender’s hands. It is important for the goaltender to explode off the post, moving center out and then setting feet for shot. Repeat the drill 4 times from each side for a total of 8 reps.
Key Teaching Points: 1. The goaltender should move middle out
while moving to the top of the crease in order to get ‘on angle’ quickly.
2. The goaltender must gap out as far as possible to the top of the crease. However, the goaltender must set feet before the shot is taken.
3. The goaltender must do a great job tracking the puck off the stick and reacting.
P1 P2
S2 S1

NATIONAL TEAM DEVELOPMENT PROGRAM
GOALTENDER DRILLS
ZONE WORK WITH CHEST SHOT Drill Description: X1 and X2 are standing on the face-off dots with pucks. 1. Goaltender starts on the post. 2. Goaltender travels to opposite post along the goal line while looking into all 4 zones behind
the net. 3. After arriving at opposite post the goaltender C - cuts out and sets feet on angle with the
shooter. 4. X1 or X2 shoot at goaltender’s chest after he/she sets his/her feet. 5. Goaltender smothers shot in chest then fully recovers to near side post. Repeat drill 3 times each way for a total of 6 reps. Note: In zone 1 & 4 the goaltender is positioned on the post. In zone 2 and 3 the goaltender is positioned in the middle of the net with his/her head looking over his/her shoulder into the zone where the puck could be located.
Key Teaching Points: 1. The goaltender places himself /herself on
the goal line in the middle of the net when the puck is in zone 2 or zone 3.
2. Chest shots – goaltender should absorb puck with chest and use glove to cradle puck
in.
Zone 1
Zone 2
Zone 3
Zone 4
NATIONAL TEAM DEVELOPMENT PROGRAM
GOALTENDER DRILLS
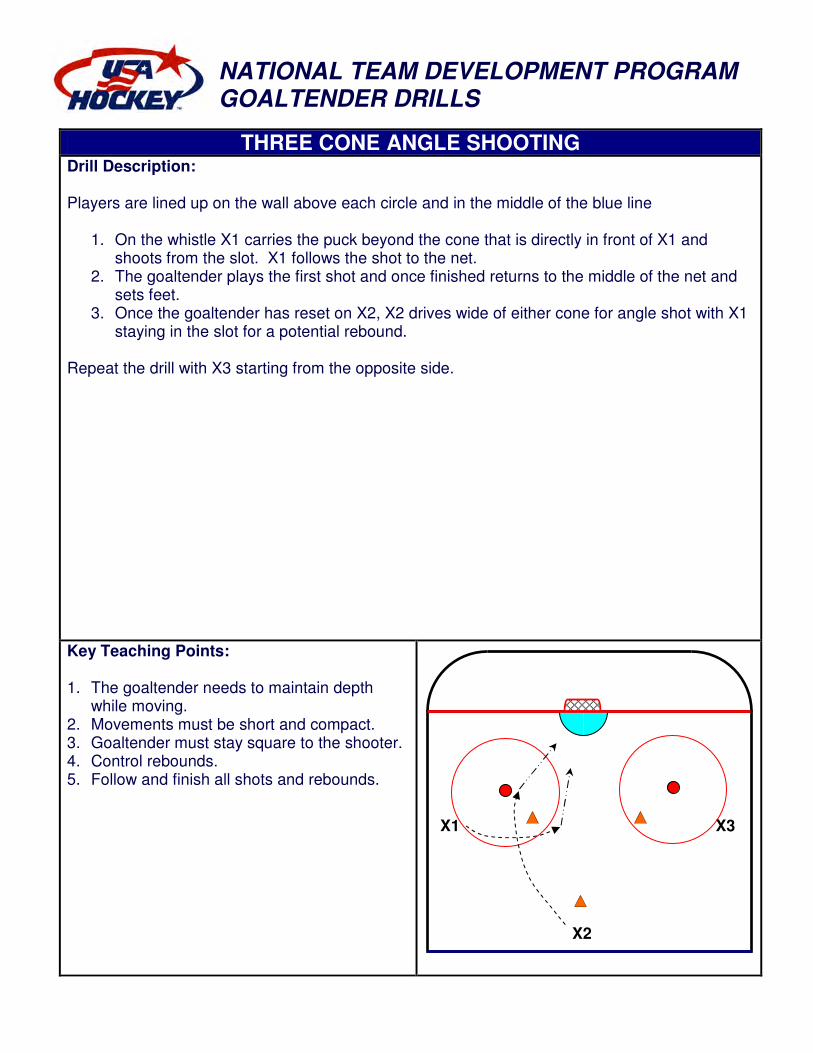
THREE CONE ANGLE SHOOTING Drill Description: Players are lined up on the wall above each circle and in the middle of the blue line
1. On the whistle X1 carries the puck beyond the cone that is directly in front of X1 and shoots from the slot. X1 follows the shot to the net.
2. The goaltender plays the first shot and once finished returns to the middle of the net and sets feet.
3. Once the goaltender has reset on X2, X2 drives wide of either cone for angle shot with X1 staying in the slot for a potential rebound.
Repeat the drill with X3 starting from the opposite side.
Key Teaching Points: 1. The goaltender needs to maintain depth
while moving. 2. Movements must be short and compact. 3. Goaltender must stay square to the shooter. 4. Control rebounds. 5. Follow and finish all shots and rebounds.
X1
X2
X3

WARREN STRELOW MENTOR PROGRAM GOALTENDING SESSION
INTERMEDIATE LEVEL Objectives: Stance & Movement – Develop proper stance and fundamentals while using T- push, small T – push, full recovery, and butterfly slide. Fundamental Saves – Continued development of movement while working on proper use of gloves, chest and zone work. Shooting drill – Angle work, depth and recovery. Practice Time: 30 Minute Practice Practice Structure: Time Stance & Movement Drills 12/12 Fundamental Saves 12/24 Shooting Drill 6/30 Stance & Movement Drills 12/12 Out, Over, & Back (4 x 4 reps) Out, Over, Full Recovery & Back (4 x 4 reps) Out, Over, & Butterfly Slide Back (4 x 4 reps) Fundamental Saves 12/24 Glove & Tracking 1 (5 x 6 reps) Butterfly & Full Recovery (4 x 6 reps) Butterfly & On Ice Recovery (4 x 6 reps) Shooting Drill 6/30 Three Cone Angle Shooting

NATIONAL TEAM DEVELOPMENT PROGRAM GOALTENDER DRILLS
OUT, OVER, & BACK Drill Description:
1. Goaltender T - pushes or C - cuts out to the middle of the top of the crease and sets feet. 2. The goaltender small T - pushes to the corner angle of the top of the crease on the side
from where he/she started from and sets feet. 3. The goaltender then rotates hips and T – pushes back to opposite side post. 4. Repeat drill from opposite post.
Repeat drill 2X each way for a total of 4 reps.
Key Teaching Points: 1. Off post the lead leg should be placed in the
middle of the net. This places the goaltender on angle to potential shots.
2. Once arriving at the top of the crease the goaltender’s heals should be on the red, feet should be set for approximately 1 – 2 seconds and square to the potential shot angle.
3. Movements should be crisp and explosive.
4. T – push – Slightly lift drive leg off the ice after pushing off.
1
2
3

NATIONAL TEAM DEVELOPMENT PROGRAM GOALTENDER DRILLS
OUT, OVER, FULL RECOVERY & BACK Drill Description:
1. Goaltender T - pushes or C - cuts out to the middle of the top of the crease and sets feet. 2. The goaltender small T - pushes to the corner angle of the top of the crease on the side
from where he/she started from, sets feet, butterfly’s, and fully recovers. 3. The goaltender then rotates hips and T – pushes back to opposite side post. 4. Repeat drill from opposite post.
Repeat drill 2X each way for a total of 4 reps. Key Teaching Points: 1. Off post the lead leg should be placed in the
middle of the net. This places the goaltender on angle to potential shots.
2. Once arriving at the top of the crease the goaltender’s heals should be on the red, feet should be set for approximately 1 – 2 seconds and square to the potential shot angle.
3. Butterfly – Goaltender’s knees should drive into ice, butt and chest are up.
4. Full Recovery – Drive leg foot needs to be brought out in front of lead leg.
5. Movements should be crisp and explosive.
6. T – push – Slightly lift drive leg off the ice after pushing off.
1
2
3

NATIONAL TEAM DEVELOPMENT PROGRAM GOALTENDER DRILLS
OUT, OVER, BUTTERFLY SLIDE BACK Drill Description:
1. Goaltender T - pushes or C - cuts out to the middle of the top of the crease and sets feet. 2. The goaltender small T - pushes to the corner angle of the top of the crease on the side
from where he/she started from and sets feet. 3. The goaltender then rotates hips and butterfly slides back to just outside opposite side post. 4. Repeat drill from opposite post.
Repeat drill 2X each way for a total of 4 reps. Key Teaching Points: 1. Off post the lead leg should be placed in the
middle of the net. This places the goaltender on angle to potential shots.
2. Once arriving at the top of the crease the goaltender’s heals should be on the red, feet should be set for approximately 1 – 2 seconds and square to the potential shot angle.
3. Butterfly slide – Bring drive leg and lead leg together flush on the ice.
4. Butterfly slide - Goaltender should catch skate edge just outside of the post. This will keep goaltender square to the shooter and in position to move in another direction. If the goaltender hits the post it will push him/her off angle and limit his/her ability to move in another direction while also causing a small opening on the post side for the shooter.
1
2
3

NATIONAL TEAM DEVELOPMENT PROGRAM
GOALTENDER DRILLS
GLOVE AND TRACKING DRILL 1 Drill Description: 1. Shooters S1 and S2 are placed inside at the top of the circles in line with the hash marks. 2. Passers P1 and P2 are below the goal line with pucks. 3. The goaltender begins the drill on the post near P1. 4. P1 passes the puck to either S1 or S2. The shooter catches and shoots the puck to score, with the majority of the shots high to test the goaltender’s hands. It is important for the goaltender to explode off the post, moving center out and then setting feet for shot. Repeat the drill 4 times from each side for a total of 8 reps.
Key Teaching Points: 1. The goaltender should move middle out
while moving to the top of the crease in order to get ‘on angle’ quickly.
2. The goaltender must gap out as far as possible to the top of the crease. However, the goaltender must set feet before the shot is taken.
3. The goaltender must do a great job tracking the puck off the stick and reacting.
P1 P2
S2 S1

NATIONAL TEAM DEVELOPMENT PROGRAM
GOALTENDER DRILLS
BUTTERFLY FULL RECOVERY DRILL Drill Description: Full Recovery - Goaltender recovers onto both feet after going down onto ice to make a save. A1 is standing in the middle of the slot 2 feet above the top of the circle. A2 is standing on top of the face-off circle to the goaltenders left. A3 is standing on top of the face-off circle to the goaltenders right. All shooters have pucks. For all shots goaltender stands at the top of the crease. A1 shoots low to the goalie’s left side. Goaltender makes save in ½ butterfly then recovers to his/her feet. Goaltender then small T-pushes over to A2. A2 shoots low. Goaltender makes save then recovers to his/her feet. The goaltender will then small T-push back to the middle for the next shot from A1. A1 shoots low to the goalie’s right side. Goaltender makes save in ½ butterfly then recovers to his/her feet. Goaltender then small T-pushes over to A3. A3 shoots low. Goaltender makes save then recovers to his/her feet. The goaltender will then small T-push back to the middle for the next shot from A1.
Key Teaching Points: Goaltender is in his/her stance at the top of the crease.
Track puck into pads or stick and control rebounds. Full Recovery: When moving to the right, get up with left leg. When moving to the left, get up with right leg. After extending leg to make save, the goaltender needs to recover with the foot of the drive leg in front of the extended knee. This rotates goaltender on angle. While recovering, continue to keep the lead leg extended in order to fill space. Weight should be placed on the inside edge of the drive leg.
G
A2
A1
A3 ∴∴∴∴
∴∴∴∴
∴∴∴∴

NATIONAL TEAM DEVELOPMENT PROGRAM
GOALTENDER DRILLS
ON ICE BUTTERFLY RECOVERY DRILL Drill Description: On Ice Recovery - After leaving feet goaltender moves to next shot while maintaining on ice body position. The goaltender uses the inside edge of the drive foot to move quickly while maximizing net coverage. B1 is standing in the middle of the slot at the top of the circle. B2 is standing 3 feet above the top of the crease to the goaltender’s left. B3 is standing 3 feet above the top of the crease to the goaltender’s right. All shooters have pucks. B1 shoots low to the goalie’s left side. Goaltender makes save in ½ butterfly then on ice recovers over to B2. B2 shoots when goaltender pushes off of his/her drive edge. Goaltender makes save then recovers to his/her feet. The goaltender will then T-push back to the middle for the next shot from B1. B1 shoots low to the goalie’s right side. Goaltender makes save in ½ butterfly then on ice recovers over to B3. B3 shoots when goaltender pushes off of his/her drive edge. Goaltender makes save then recovers to his/her feet. The goaltender will then small T-push back to the middle for the next shot from B1.
Key Teaching Points: For the 2nd shot the goaltender should slide back towards the post. This will take away net from the shooter.
After extending leg to make 1st shot save, the goaltender needs to recover with the foot of the drive leg in front of the extended knee. This rotates goaltender on angle. While recovering, continue to keep the lead leg extended and flush on the ice in order to fill space. Weight should be placed on the inside edge of the drive leg. After pushing off of the inside edge of the outside leg the goalie must bring the outside leg flush onto the ice.
G B2 B3
B1
∴∴∴∴
∴∴∴∴
∴∴∴∴

NATIONAL TEAM DEVELOPMENT PROGRAM
GOALTENDER DRILLS
THREE CONE ANGLE SHOOTING Drill Description: Players are lined up on the wall above each circle and in the middle of the blue line
1. On the whistle X1 carries the puck beyond the cone that is directly in front of X1 and shoots from the slot. X1 follows the shot to the net.
2. The goaltender plays the first shot and once finished returns to the middle of the net and sets feet.
3. Once the goaltender has reset on X2, X2 drives wide of either cone for angle shot with X1 staying in the slot for a potential rebound.
Repeat the drill with X3 starting from the opposite side.
Key Teaching Points: 1. The goaltender needs to maintain depth
while moving. 2. Movements must be short and compact. 3. Goaltender must stay square to the shooter. 4. Control rebounds. 5. Follow and finish all shots and rebounds.
X1
X2
X3

WARREN STRELOW MENTOR PROGRAM GOALTENDING SESSION
ADVANCED LEVEL Objectives: Stance & Movement – Develop proper stance and fundamentals while using T- push, small T – push, and on-ice recovery. Fundamental Saves – Continued development of on-ice recovery, full recovery, and post load. Shooting Drill – Proper movement and read of potential wrap around shot. Also cover pass outs and a simulation of a 2 vs. 1 rush against. Practice Time: 30 Minute Practice Practice Structure: Time Stance & Movement Drills 6/6 Fundamental Saves 14/20 Shooting Drill 10/30 Stance & Movement Drills 6/6 Master Top of Crease (4 x 4 reps) Out, On-Ice Recovery & Back (4 x 4 reps) Fundamental Saves 14/20 Ayers On-Ice Recovery (4 x 4 reps each way) Butterfly and Full Recovery (3 x 6 reps) USA Post Load (3 x 4 reps each way) Shooting Drill 10/30 Wrap Read (3 x 4 reps) Pass Out & 2 vs. 1 Simulation (3 x 4 reps)

NATIONAL TEAM DEVELOPMENT PROGRAM GOALTENDER DRILLS
MASTER TOP OF CREASE Drill Description:
1. The goaltender comes off the post through the middle of the net to the top of the crease corner angle on the opposite side of where he/she started and sets feet.
2. Small T- push to the middle of the top of the crease and set feet. 3. Small T- push to the opposite side corner of the top of the crease and set feet. 4. T-push across to the corner angle of the top of the crease where he/she started from and
set feet. 5. T-push or 1 shuffle push back to near side post.
Note: Goaltender should wait 1 second before beginning each movement. Repeat drill 2X each way for a total of 4 reps. Key Teaching Points: 1. Off post - Goaltender should shift body
through the middle of the net while moving out.
2. T – push – Rotate hips and lead with stick and gloves.
3. T – push – Lift drive leg slightly off the ice after initial push.
4. T- push must be crisp and explosive. Rotate feet and body square to angle once arriving at desired spot.
1
2 3
4
5

NATIONAL TEAM DEVELOPMENT PROGRAM GOALTENDER DRILLS
OUT, ON ICE RECOVERY, & BACK Drill Description:
1. Goaltender T - pushes or C - cuts out to the middle of the top of the crease and sets feet. 2. The goaltender drops into butterfly then on-ice recovers over to the corner angle of the top
of the crease on the side from where he/she started from, catches edge, fully recovers, and sets feet.
3. The goaltender then rotates hips and T – pushes back to opposite side post. 4. Repeat drill from opposite post.
Repeat drill 2X each way for a total of 4 reps. Key Teaching Points: 1. Off post the lead leg should be placed in the
middle of the net. This places the goaltender on angle to potential shots.
2. Once arriving at the top of the crease the goaltender’s heals should be on the red, feet should be set for approximately 1 – 2 seconds and square to the potential shot angle before dropping into butterfly.
3. On Ice Recovery - The goaltender needs to recover with the foot of the drive leg in front of the lead leg. This rotates goaltender on angle. While recovering, continue to keep the lead leg extended and flush on the ice in order to fill space. Weight should be placed on the inside edge of the drive leg. Goaltender also needs to lead with stick and gloves.
4. T – push – Slightly lift drive leg off the ice after pushing off.
1
2 3
4

NATIONAL TEAM DEVELOPMENT PROGRAM GOALTENDER DRILLS
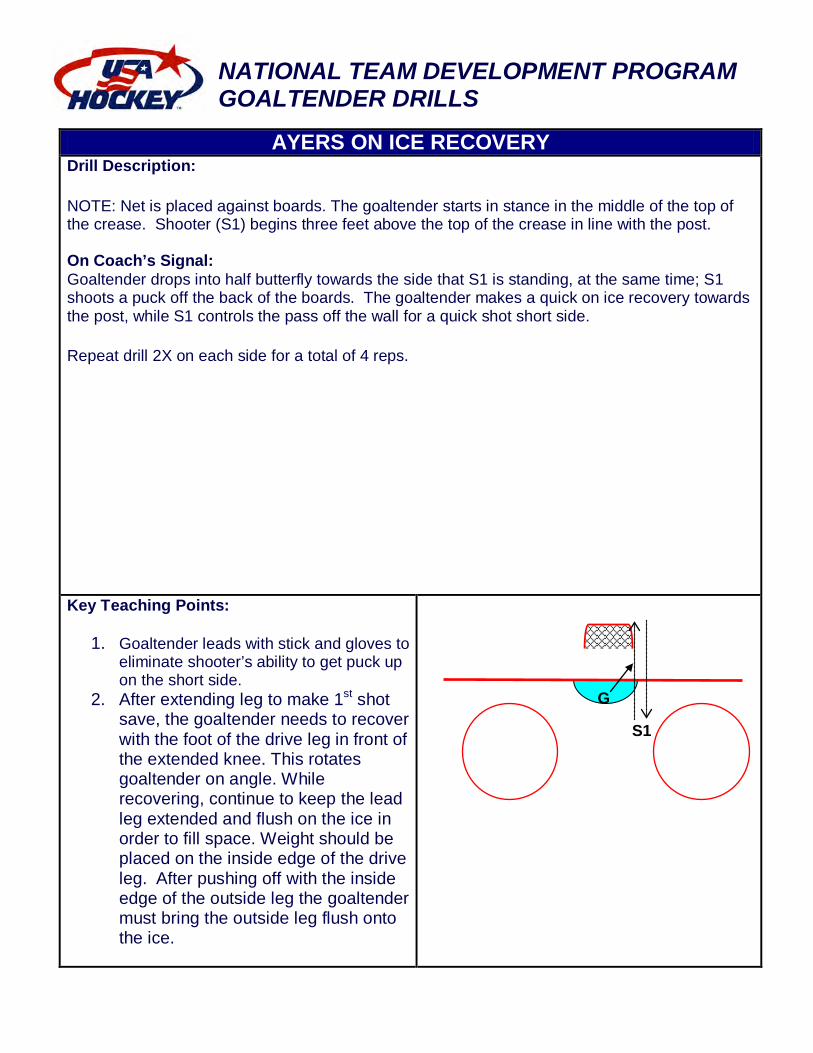
AYERS ON ICE RECOVERY Drill Description: NOTE: Net is placed against boards. The goaltender starts in stance in the middle of the top of the crease. Shooter (S1) begins three feet above the top of the crease in line with the post. On Coach’s Signal: Goaltender drops into half butterfly towards the side that S1 is standing, at the same time; S1 shoots a puck off the back of the boards. The goaltender makes a quick on ice recovery towards the post, while S1 controls the pass off the wall for a quick shot short side. Repeat drill 2X on each side for a total of 4 reps. Key Teaching Points:
1. Goaltender leads with stick and gloves to eliminate shooter’s ability to get puck up on the short side.
2. After extending leg to make 1st shot save, the goaltender needs to recover with the foot of the drive leg in front of the extended knee. This rotates goaltender on angle. While recovering, continue to keep the lead leg extended and flush on the ice in order to fill space. Weight should be placed on the inside edge of the drive leg. After pushing off with the inside edge of the outside leg the goaltender must bring the outside leg flush onto the ice.
S1
G

NATIONAL TEAM DEVELOPMENT PROGRAM
GOALTENDER DRILLS
BUTTERFLY FULL RECOVERY DRILL Drill Description: Full Recovery - Goaltender recovers onto both feet after going down onto ice to make a save. A1 is standing in the middle of the slot 2 feet above the top of the circle. A2 is standing on top of the face-off circle to the goaltenders left. A3 is standing on top of the face-off circle to the goaltenders right. All shooters have pucks. For all shots goaltender stands at the top of the crease. A1 shoots low to the goalie’s left side. Goaltender makes save in ½ butterfly then recovers to his/her feet. Goaltender then small T-pushes over to A2. A2 shoots low. Goaltender makes save then recovers to his/her feet. The goaltender will then small T-push back to the middle for the next shot from A1. A1 shoots low to the goalie’s right side. Goaltender makes save in ½ butterfly then recovers to his/her feet. Goaltender then small T-pushes over to A3. A3 shoots low. Goaltender makes save then recovers to his/her feet. The goaltender will then small T-push back to the middle for the next shot from A1.
Key Teaching Points: Goaltender is in his/her stance at the top of the crease.
Track puck into pads or stick and control rebounds. Full Recovery: When moving to the right, get up with left leg. When moving to the left, get up with right leg. After extending leg to make save, the goaltender needs to recover with the foot of the drive leg in front of the extended knee. This rotates goaltender on angle. While recovering, continue to keep the lead leg extended in order to fill space. Weight should be placed on the inside edge of the drive leg.
G
A2
A1
A3 ∴∴∴∴
∴∴∴∴
∴∴∴∴
NATIONAL TEAM DEVELOPMENT PROGRAM GOALTENDER DRILLS
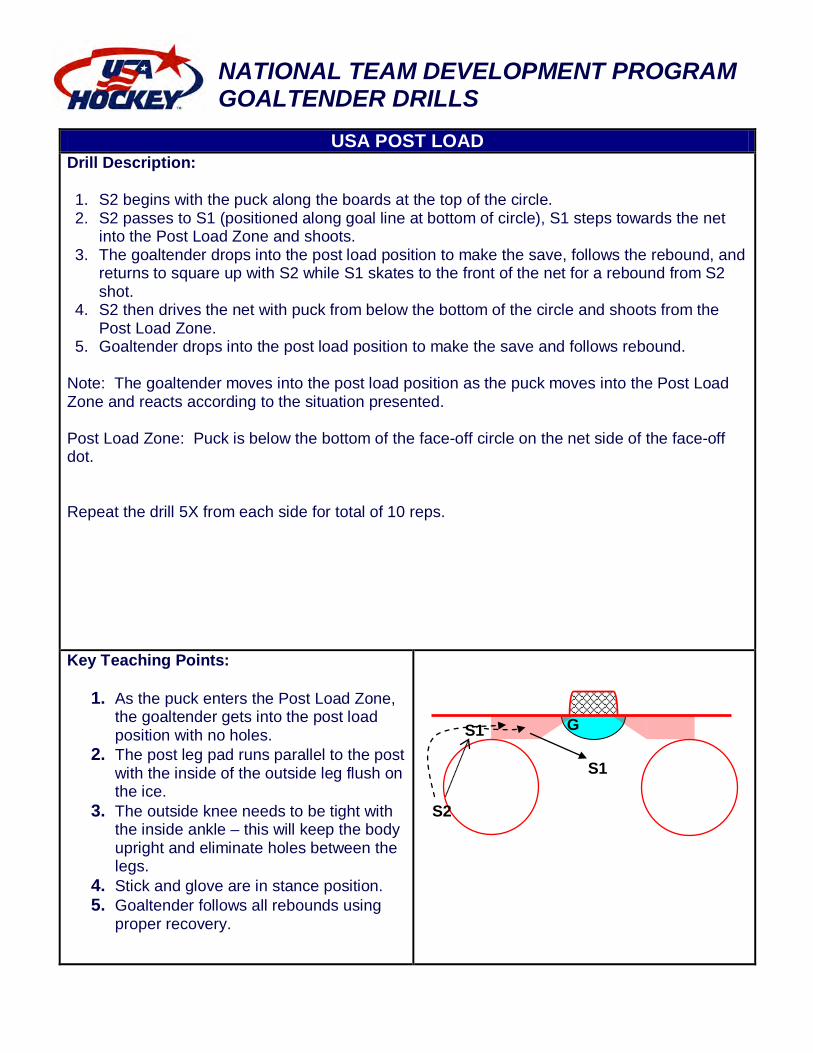
USA POST LOAD Drill Description: 1. S2 begins with the puck along the boards at the top of the circle. 2. S2 passes to S1 (positioned along goal line at bottom of circle), S1 steps towards the net
into the Post Load Zone and shoots. 3. The goaltender drops into the post load position to make the save, follows the rebound, and
returns to square up with S2 while S1 skates to the front of the net for a rebound from S2 shot.
4. S2 then drives the net with puck from below the bottom of the circle and shoots from the Post Load Zone.
5. Goaltender drops into the post load position to make the save and follows rebound. Note: The goaltender moves into the post load position as the puck moves into the Post Load Zone and reacts according to the situation presented. Post Load Zone: Puck is below the bottom of the face-off circle on the net side of the face-off dot. Repeat the drill 5X from each side for total of 10 reps. Key Teaching Points:
1. As the puck enters the Post Load Zone, the goaltender gets into the post load position with no holes.
2. The post leg pad runs parallel to the post with the inside of the outside leg flush on the ice.
3. The outside knee needs to be tight with the inside ankle – this will keep the body upright and eliminate holes between the legs.
4. Stick and glove are in stance position. 5. Goaltender follows all rebounds using
proper recovery.
S1
S2
G
S1

NATIONAL TEAM DEVELOPMENT PROGRAM GOALTENDER DRILLS
WRAP READ Drill Description: Cones are positioned on the goal line 3 feet from each side of the net. S1 begins at the top of the circle with puck. S2 begins at the top of the circle on the opposite side. 1. S1 drives behind net with the puck:
• If S1 skates on the board side of the cone S1 must continue around the net and pass to S2.
• If S1 skates on the net side of the cone S1 can wrap puck for stuff attempt or pass to S2. NOTE: S2 is always ready for the pass in shooting position. S2 can go to the net for rebound if S1 wraps puck.
Key Teaching Points: 1. Goaltender must follow S1 and READ which
path S1 takes around the cone. 2. Goaltender should stay on feet if S1
takes the path along the boards. 3. If S1 takes the path near the net the
goaltender can slide across to stop the wrap, HOWEVER, goaltender must maintain net awareness and the ability to use his/her edges.
G 1 2
S2 S1
NATIONAL TEAM DEVELOPMENT PROGRAM GOALTENDER DRILLS
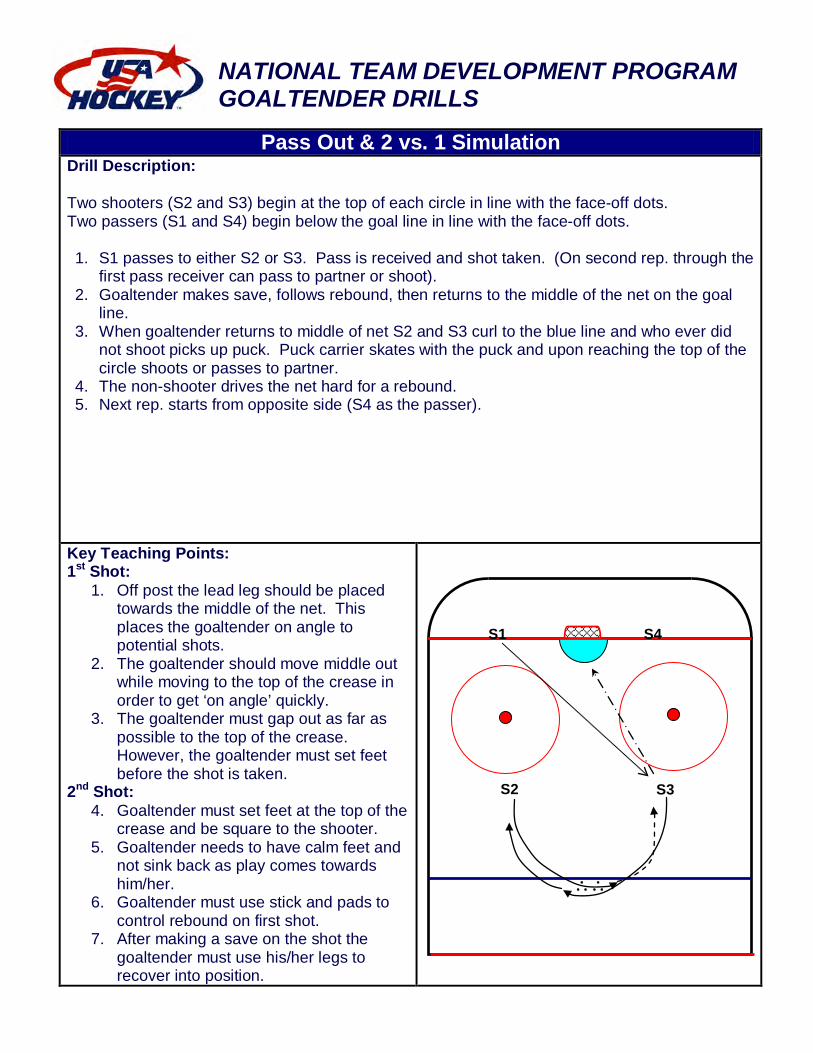
Pass Out & 2 vs. 1 Simulation Drill Description: Two shooters (S2 and S3) begin at the top of each circle in line with the face-off dots. Two passers (S1 and S4) begin below the goal line in line with the face-off dots. 1. S1 passes to either S2 or S3. Pass is received and shot taken. (On second rep. through the
first pass receiver can pass to partner or shoot). 2. Goaltender makes save, follows rebound, then returns to the middle of the net on the goal
line. 3. When goaltender returns to middle of net S2 and S3 curl to the blue line and who ever did
not shoot picks up puck. Puck carrier skates with the puck and upon reaching the top of the circle shoots or passes to partner.
4. The non-shooter drives the net hard for a rebound. 5. Next rep. starts from opposite side (S4 as the passer).
Key Teaching Points: 1st Shot:
1. Off post the lead leg should be placed towards the middle of the net. This places the goaltender on angle to potential shots.
2. The goaltender should move middle out while moving to the top of the crease in order to get ‘on angle’ quickly.
3. The goaltender must gap out as far as possible to the top of the crease. However, the goaltender must set feet before the shot is taken.
2nd Shot: 4. Goaltender must set feet at the top of the
crease and be square to the shooter. 5. Goaltender needs to have calm feet and
not sink back as play comes towards him/her.
6. Goaltender must use stick and pads to control rebound on first shot.
7. After making a save on the shot the goaltender must use his/her legs to recover into position.
S1 S4
S2 S3
∴∴

WARREN STRELOW MENTOR PROGRAM GOALTENDING SESSION
ADVANCED LEVEL Objectives: Stance & Movement – Develop proper stance and fundamentals while using T- push, small T – push, and on-ice recovery. Fundamental Saves – Continued development of on-ice recovery, full recovery, and post load. Shooting Drill – Proper movement and read of potential wrap around shot. Also cover pass outs and a simulation of a 2 vs. 1 rush against. Practice Time: 30 Minute Practice Practice Structure: Time Stance & Movement Drills 6/6 Fundamental Saves 14/20 Shooting Drill 10/30 Stance & Movement Drills 6/6 LA Movement & Read 1 (2 x 4 reps) LA Movement & Read 1 (2 x 4 reps) Out, On-Ice Recovery & Back (2 x 4 reps) Fundamental Saves 14/20 Ayers On-Ice Recovery (4 x 4 reps each way) Appert Full Recovery (3 x 4 reps each way) USA Post Load (3 x 4 reps each way) Shooting Drill 10/30 The Ranford (5 x 4 reps each way)

NATIONAL TEAM DEVELOPMENT PROGRAM GOALTENDER DRILLS
LA MOVEMENT & READ 1 Drill Description: Coach triggers all movement with the word “GO” When the goaltenders feet are set they turn their head to read the play.
1. On coaches command goaltender C - cuts out to the near side corner of the top of the crease, sets feet, and turns head to evaluate play.
2. On coaches command goaltender one shuffle pushes back to the starting post. 3. On coaches command goaltender T - pushes or C - cuts out to the middle of the top of the
crease, sets feet, and turns head to evaluate play. 4. On coaches command goaltender T - pushes back to the starting post. 5. On coaches command goaltender T – pushes out to the opposite side corner of the top of
the crease, sets feet, and turns head to evaluate play. 6. On coaches command goaltender T - pushes back to the starting post. 7. Once arriving at post goaltender 1 shuffle pushes across to opposite post and begins
sequence from opposite side. Repeat the drill for a total of 4 reps.
Key Teaching Points: 1. Off post the lead leg should be placed in the
middle of the net. This places the goaltender on angle to potential shots.
2. Once arriving at the top of the crease the goaltender’s heals should be on the red, feet should be set, and goaltender should turn head to read puck holders options.
3. Movements should be crisp and explosive.
4. T – push – Slightly lift drive leg off the ice after pushing off.

NATIONAL TEAM DEVELOPMENT PROGRAM GOALTENDER DRILLS
LA MOVEMENT & READ 2 Drill Description: Coach triggers all movement with the word “GO” When the goaltenders feet are set they turn their head to read the play.
1. On coaches command goaltender C - cuts out to the near side corner of the top of the crease, sets feet, and turns head to evaluate play.
2. On coaches command goaltender butterfly’s, fully recovers, and one shuffle pushes back to the starting post.
3. On coaches command goaltender T - pushes or C - cuts out to the middle of the top of the crease, sets feet, and turns head to evaluate play.
4. On coaches command goaltender butterfly’s, fully recovers, and T - pushes back to the starting post.
5. On coaches command goaltender T – pushes out to the opposite side corner of the top of the crease, sets feet, and turns head to evaluate play.
6. On coaches command goaltender butterfly’s, fully recovers, and T - pushes back to the starting post.
7. Once arriving at post goaltender 1 shuffle pushes across to opposite post and begins sequence from opposite side.
Repeat the drill for a total of 4 reps. Key Teaching Points: 1. Off post the lead leg should be placed in the
middle of the net. This places the goaltender on angle to potential shots.
2. Once arriving at the top of the crease the goaltender’s heals should be on the red, feet should be set, and goaltender should turn head to read puck holders options.
3. Full Recovery: When moving to the right, get up with left leg. When moving to the left, get up with right leg. The goaltender needs to recover with the foot of the drive leg in front of the lead leg.
4. Movements should be crisp and explosive.
5. T – push – Slightly lift drive leg off the ice after pushing off.

NATIONAL TEAM DEVELOPMENT PROGRAM GOALTENDER DRILLS
OUT, ON ICE RECOVERY, & BACK Drill Description:
1. Goaltender T - pushes or C - cuts out to the middle of the top of the crease and sets feet. 2. The goaltender drops into butterfly then on-ice recovers over to the corner angle of the top
of the crease on the side from where he/she started from, catches edge, fully recovers, and sets feet.
3. The goaltender then rotates hips and T – pushes back to opposite side post. 4. Repeat drill from opposite post.
Repeat drill 2X each way for a total of 4 reps. Key Teaching Points: 1. Off post the lead leg should be placed in the
middle of the net. This places the goaltender on angle to potential shots.
2. Once arriving at the top of the crease the goaltender’s heals should be on the red, feet should be set for approximately 1 – 2 seconds and square to the potential shot angle before dropping into butterfly.
3. On Ice Recovery - The goaltender needs to recover with the foot of the drive leg in front of the lead leg. This rotates goaltender on angle. While recovering, continue to keep the lead leg extended and flush on the ice in order to fill space. Weight should be placed on the inside edge of the drive leg. Goaltender also needs to lead with stick and gloves.
4. T – push – Slightly lift drive leg off the ice after pushing off.
1
2 3
4
NATIONAL TEAM DEVELOPMENT PROGRAM GOALTENDER DRILLS
AYERS ON ICE RECOVERY Drill Description: NOTE: Net is placed against boards. The goaltender starts in stance in the middle of the top of the crease. Shooter (S1) begins three feet above the top of the crease in line with the post. On Coach’s Signal: Goaltender drops into half butterfly towards the side that S1 is standing, at the same time; S1 shoots a puck off the back of the boards. The goaltender makes a quick on ice recovery towards the post, while S1 controls the pass off the wall for a quick shot short side. Repeat drill 2X on each side for a total of 4 reps. Key Teaching Points:
1. Goaltender leads with stick and gloves to eliminate shooter’s ability to get puck up on the short side.
2. After extending leg to make 1st shot save, the goaltender needs to recover with the foot of the drive leg in front of the extended knee. This rotates goaltender on angle. While recovering, continue to keep the lead leg extended and flush on the ice in order to fill space. Weight should be placed on the inside edge of the drive leg. After pushing off with the inside edge of the outside leg the goaltender must bring the outside leg flush onto the ice.
S1
G

NATIONAL TEAM DEVELOPMENT PROGRAM GOALTENDER DRILLS
APPERT FULL RECOVERY Drill Description: S1 and S2 are 2 feet above each face-off dot. S1 starts with two pucks. Goaltender begins at the top of the crease square to S1.
1. S1 shoots the first puck low to the goaltender’s far side. When the puck hits the goaltender’s pads, S1 passes the second puck to S2.
2. The goaltender makes the save on the first shot, fully recovers, and T-pushes across to face shot from S2.
3. S2 receives pass and shoots. 4. Goaltender makes the save and follows rebound.
Key Teaching Points:
1. Goaltender is in his/her stance at the top of the crease.
2. Track puck into pads or stick and control rebounds.
3. Full Recovery: When moving to the right, get up with the left leg. When moving to the left, get up with the right leg.
4. After extending leg to make save, the goaltender needs to recover with the foot of the drive leg in front of the extended knee. This rotates the goaltender on angle. Weight should be placed on the inside edge of the drive leg.
G
S1 S2

NATIONAL TEAM DEVELOPMENT PROGRAM GOALTENDER DRILLS
USA POST LOAD Drill Description: 1. S2 begins with the puck along the boards at the top of the circle. 2. S2 passes to S1 (positioned along goal line at bottom of circle), S1 steps towards the net
into the Post Load Zone and shoots. 3. The goaltender drops into the post load position to make the save, follows the rebound, and
returns to square up with S2 while S1 skates to the front of the net for a rebound from S2 shot.
4. S2 then drives the net with puck from below the bottom of the circle and shoots from the Post Load Zone.
5. Goaltender drops into the post load position to make the save and follows rebound. Note: The goaltender moves into the post load position as the puck moves into the Post Load Zone and reacts according to the situation presented. Post Load Zone: Puck is below the bottom of the face-off circle on the net side of the face-off dot. Repeat the drill 5X from each side for total of 10 reps. Key Teaching Points:
1. As the puck enters the Post Load Zone, the goaltender gets into the post load position with no holes.
2. The post leg pad runs parallel to the post with the inside of the outside leg flush on the ice.
3. The outside knee needs to be tight with the inside ankle – this will keep the body upright and eliminate holes between the legs.
4. Stick and glove are in stance position. 5. Goaltender follows all rebounds using
proper recovery.
S1
S2
G
S1
NATIONAL TEAM DEVELOPMENT PROGRAM GOALTENDER DRILLS
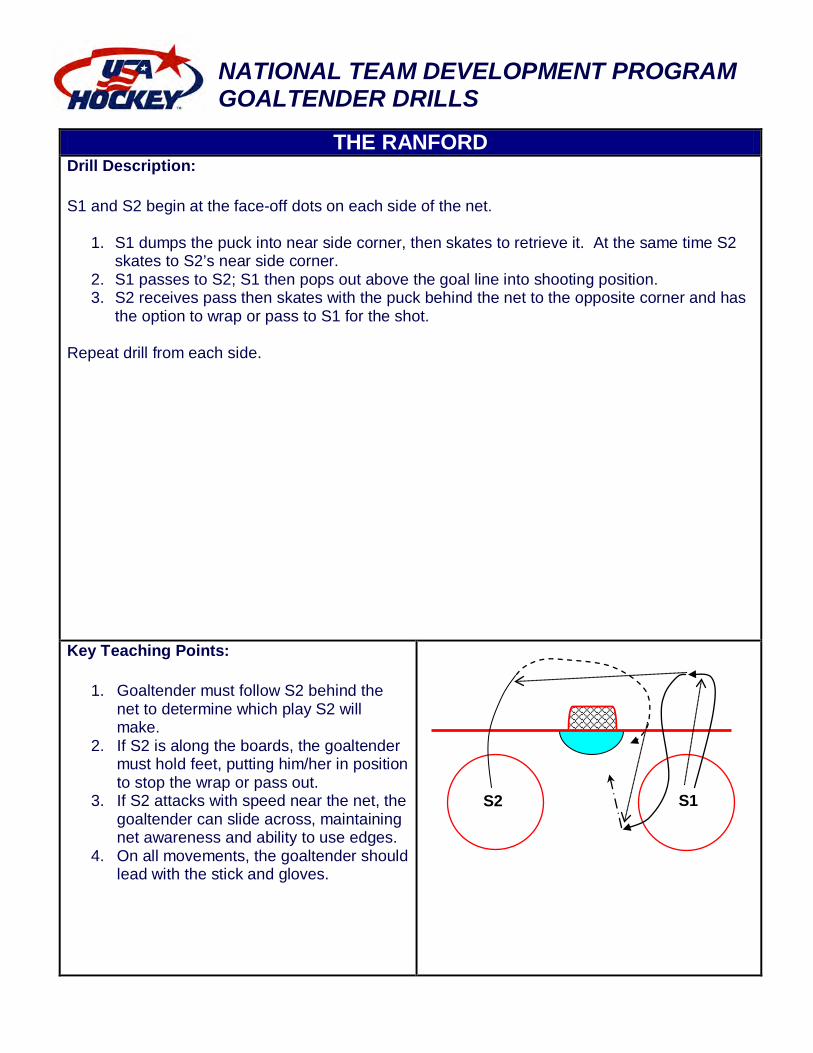
THE RANFORD Drill Description: S1 and S2 begin at the face-off dots on each side of the net.
1. S1 dumps the puck into near side corner, then skates to retrieve it. At the same time S2 skates to S2’s near side corner.
2. S1 passes to S2; S1 then pops out above the goal line into shooting position. 3. S2 receives pass then skates with the puck behind the net to the opposite corner and has
the option to wrap or pass to S1 for the shot. Repeat drill from each side.
Key Teaching Points:
1. Goaltender must follow S2 behind the net to determine which play S2 will make.
2. If S2 is along the boards, the goaltender must hold feet, putting him/her in position to stop the wrap or pass out.
3. If S2 attacks with speed near the net, the goaltender can slide across, maintaining net awareness and ability to use edges.
4. On all movements, the goaltender should lead with the stick and gloves.
S1 S2