the drascombe flotilla - drascombe association - home … · replica 2015 the drascombe flotilla an...
TRANSCRIPT
REPLICA 2015
THE DRASCOMBE FLOTILLA
AN INTRODUCTION BY THE DESIGNER
Contrary to popular belief, boats of the “Drascombe“ flotilla were not de-signed to appeal in the market for nostalgic reasons. It all started when I had sold my boat-building concern in 1964 and had retired to a remote farmstead on the top of Dartmoor. After a while I decided to indulge in the pleasure of design-ing and building a boat to suit my own requirements and being out of the boot business, I was entirely free of thoughts of “what will sell“.
My family did not share my passion for sailing small boats. In fact, it had to come to the point when I went sailing alone.
Quite simply, if we were going to enjoy our leisure time on the water as a family, I had to design a boat that they could enjoy, and to do this, the first re-quirement was that they should have complete confidence in the craft. The design began to shape by my thinking solely of our own needs which were.
1. Ability to trail and for the family to handle on and off the trailer.
2. First rate sea-keeping qualities.
3. A good motor boat for, to start with, it was going to be a question of fishing and pottering under power.
4. I wanted the boat to be lively enough for me to enjoy a good hard sail once I had put the family on the beach.
It was uphill work but eventually the first “Drascombe Lugger“ was launched in 1965.
The half-decked open boot with a high bulwark did wonders for confidence. The loose-footed yawl rig, with all sails stowing aloft and out of the way, gave the space needed for a family. By making the boat balanced under jib and mizzen as well as under full sail, the motor could be cut and fishing lines streamed without fear of hearing that sickening crunch as boom strikes female head. The hard turn to the bilge gave a powerful hull well able to carry sail. Her generous sheer kept her dry.
In short, we started to enjoy our boating together.
But it was not until 1967 that I was persuaded that other men might also have my problem. So at Earls Court in 1968 the first wooden production Dras-combe Lugger was sold, within 29 minutes of the doors being opened to the public.
The first G.R.P. Lugger came out in 1969. By 1970 the “stretched“ version, the Longboat, was in full production. This boat was primarily for youth training
1
REPLICA 2015
but the clamour for some shelter led to the “Cruiser“ version coming out in 1971.
There followed in 1972 the 15ft. 6in. Dabber - basically a double-ender with the upper two planks being allowed to flare away to form a V-shaped transom. The balanced hull form, vee‘d at both ends, needs only a shallow rudder hung on the transom.
The Driver came along in 1974 - an 18ft. open boat with a standing lug yawl rig and petrol or diesel inboard engine. She was withdrawn in 1978 when the escalating costs of inboard installations had priced her out of reach of most people.
The Drifter was introduced to the public in 1977 after a year of prototype trials which proved that her shallow draft design was even more efficient than had been hoped for. Although no longer than the Longboat, the Drifter is beam-ier, deeper and heavier, with accommodation for two or four people. She can be fitted for an outboard in a well or with a sturdy diesel inboard and full electric cabin and navigation lamps.
The Scaffie came out in September 1978 and was an instant success. Slightly smaller than the Dabber, the aim was to save money by simplifying. With one sail and no centreplate she is indeed a simple boat but lacks nothing of the essential Drascombe character.
January 1979 saw the well tried Cruiser Longboat replaced by the Coaster, using the same hull but with completely redesigned deck and cabin layout and a more comprehensive specification included in the standard craft.
For the Record:
1968—69 lan Brinkworth cruised the Greek archipelago in his Lugger.
1969—70 David Pyle sailed his Lugger from Emsworth, England to DarwinAustralia.
1970 Ken Duxbury and his wife cruised the Aegean in their Lugger.
1971 The same intrepid couple sailed their Lugger from Greece toEngland.
1973 Geoff Stewart sailed on open Longboat from England to Jamaica.
There have been numerous crossings of the English Channel and the Irish Sea by various Drascombe boats but —
DON‘T FORGET —THE SEA HAS NO MERCY
and although the boats are seaworthy enough, when the chips are down, safety depends on the skill and experience of the crew. Good sailing and good Luck!
J.L. WATKINSON.
2


REPLICA 2015
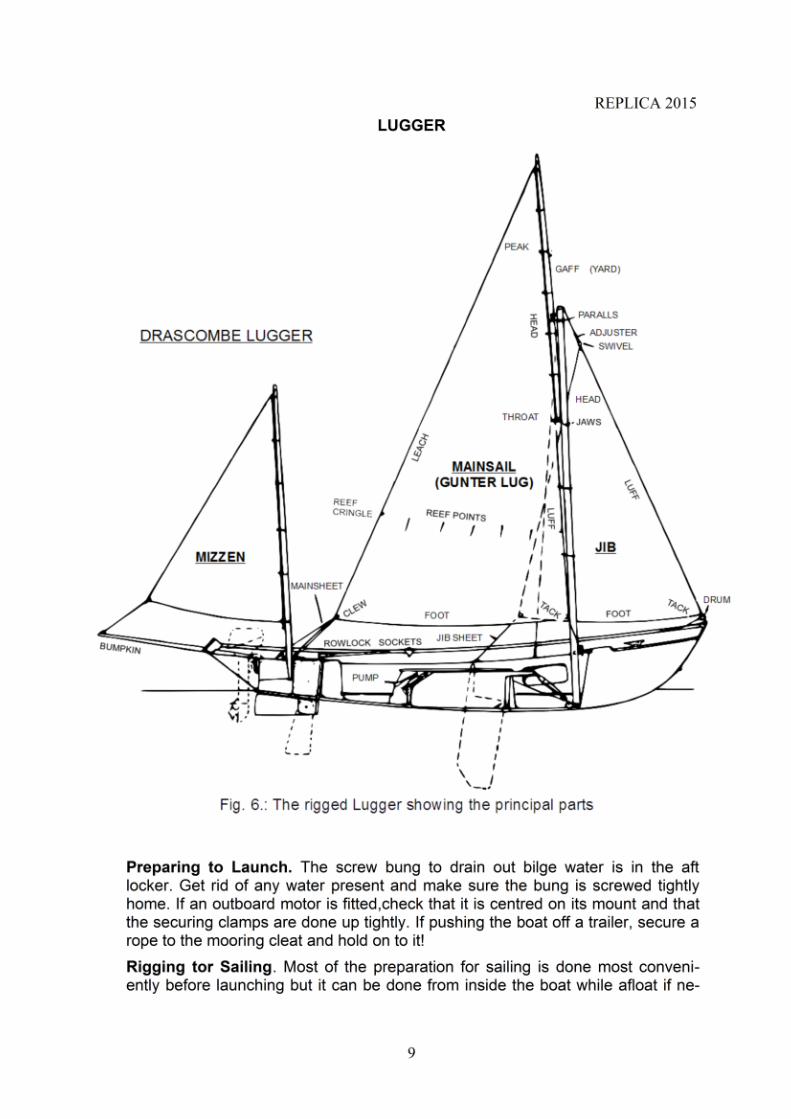
360 degrees for reverse some careful adjustment may be needed to avoid touch-ing a gunwale. If pushing the boat off a trailer, secure a line to the mooring cleat and hold on to it!
Rigging tor Sailing. Most of the preparation for sailing is done most conveni-ently before launching but it can be done from inside the boat while afloat, if ne-cessary. The main halyard is the only rigging that goes up with the mast and this is rove through a swivel block shackled to the bail on the after side of the mast band. Tie the ends together to make sure you do not loose it. With the mast gate open place the heel of the mast in its step and raise the mast into place. Swing down the gate and secure it.
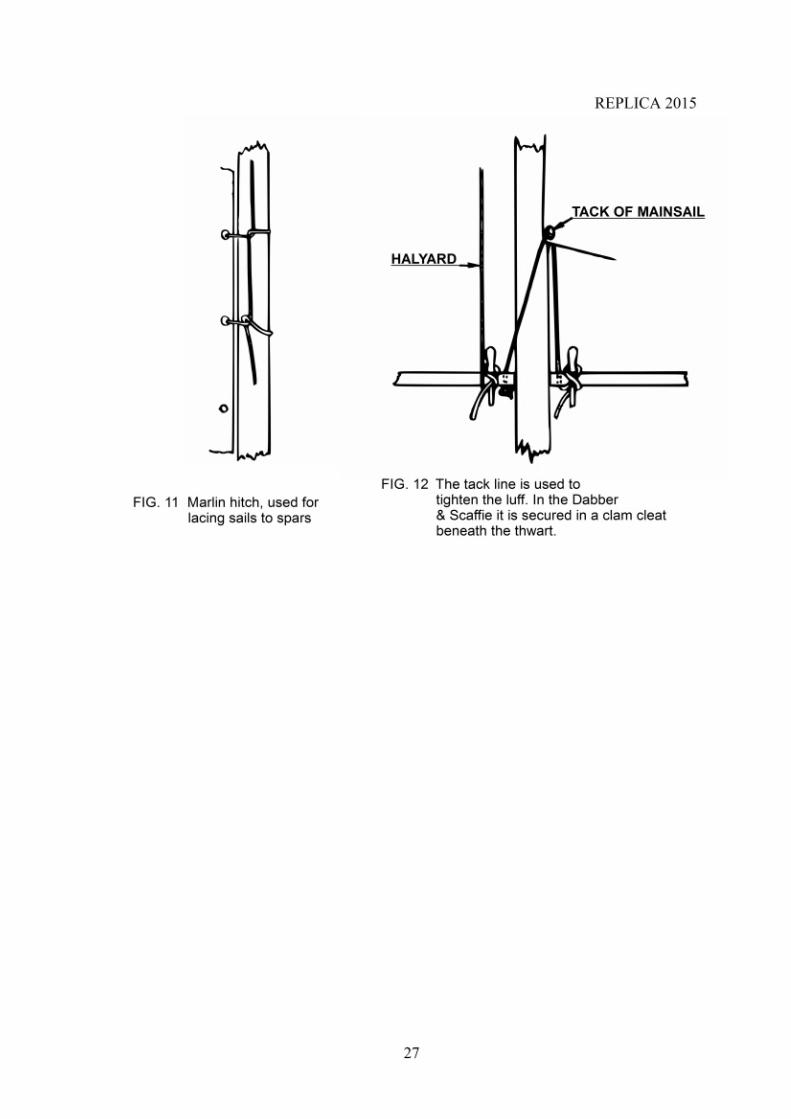
The sail has to be lashed to its yard. Lash the throat first to the lower end and then haul out the peak until folds appear parallel to the spar, before securing it. Lace the head of the sail to the yard with the marlin hitch (Fig.11) but not too tightly. The lacing must stop the sail from bowing away from the spar but should be just slack enough to permit some movement.
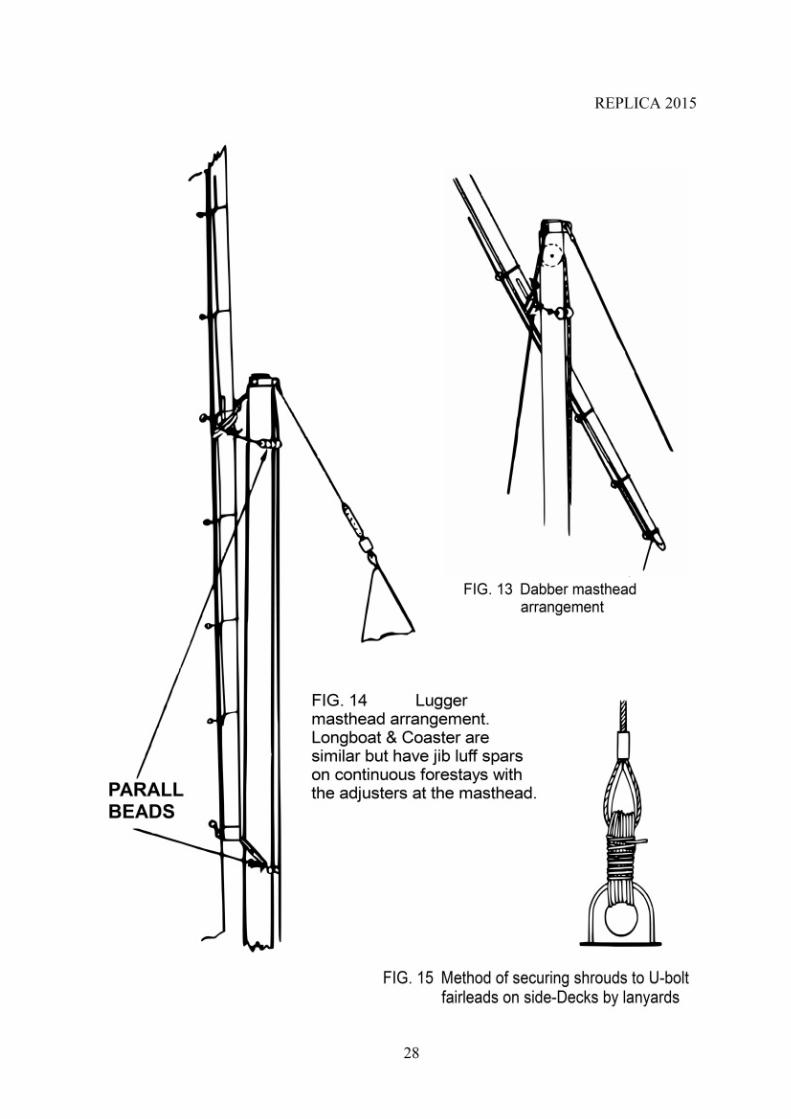
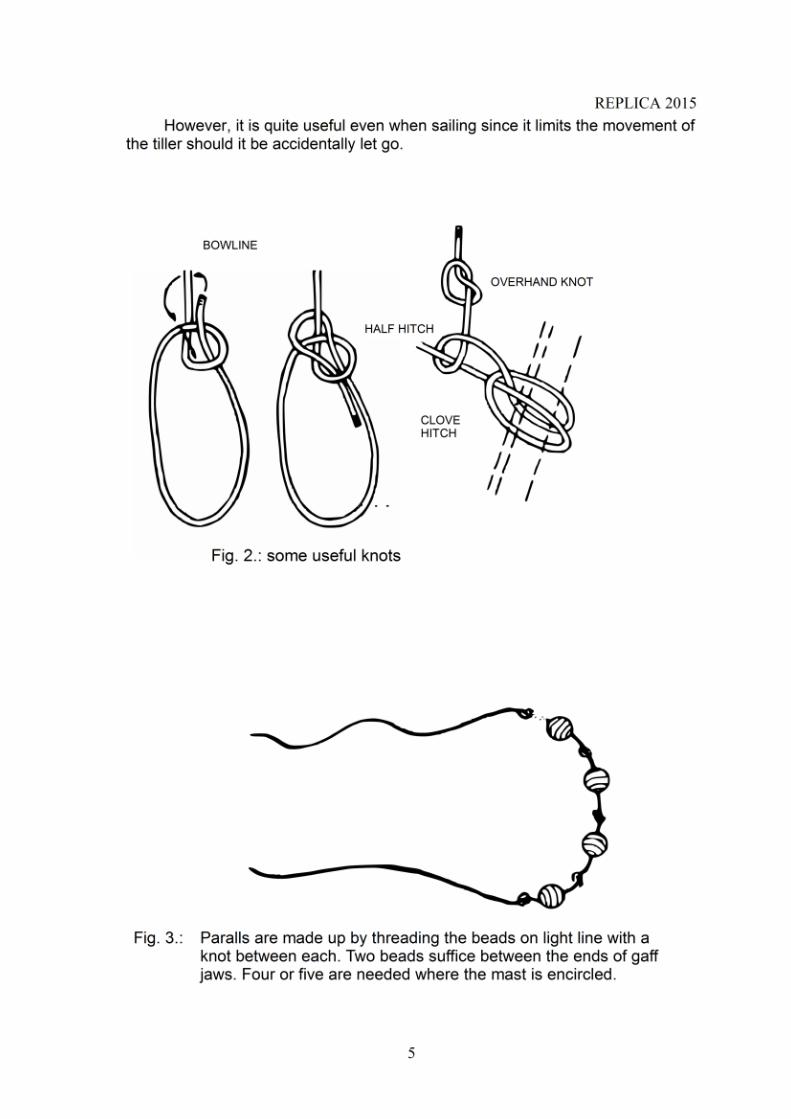
Bend the halyard to the yard with a clove hitch with its end secured as shown in Fig.2 and loosely attach the yard to the mast with a parall made fast to either side of the clove hitch. Paralls are made up by threading the brown balls on to a short length of line with a knot between each (Fig.3). Reeve off the tack downhaul, starting with a knot under the mast thwart on the starboard side up aft of the mast, through the tack eye on the sail down through the thwart to port. Prevent it from unreeving by tying a knot. Reeve off the mainsheet as shown.
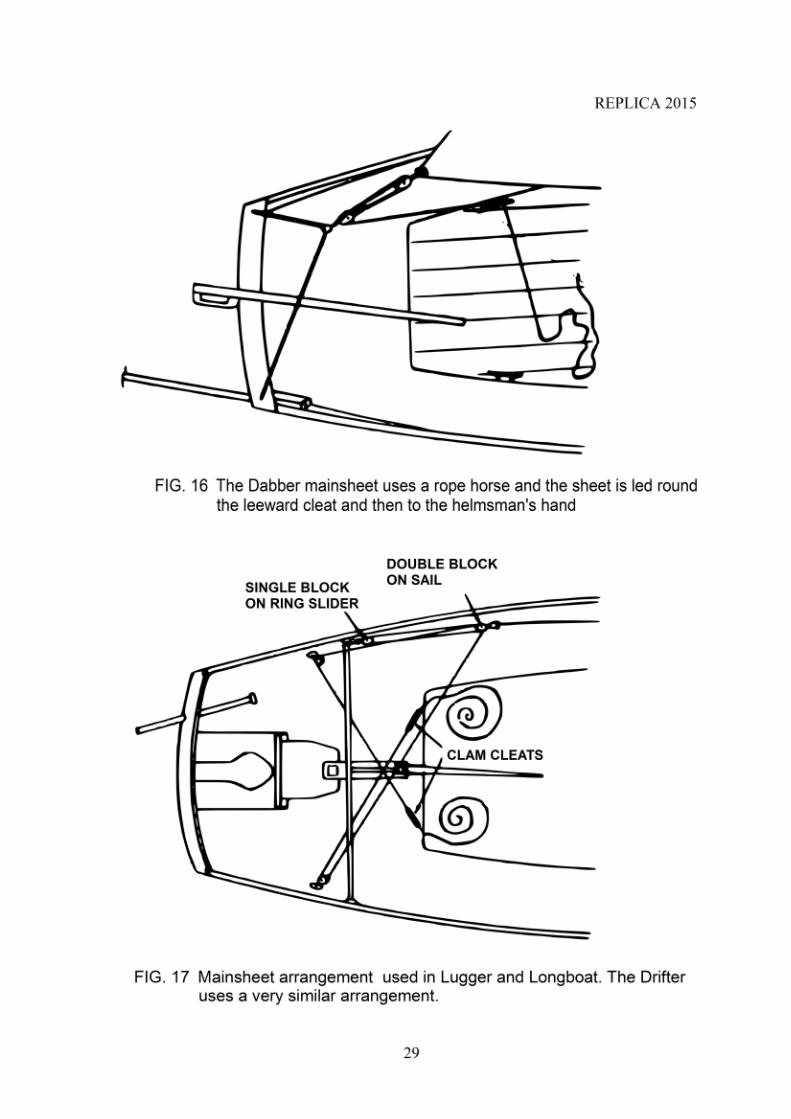
The becket block to which one end of the sheet is secured runs on a rope horse between the two posts by means of the small stainless steel block fixed to it. Tighten the horse and secure in the cleat provided. Fit the double block to the clew of the sail by means of the large carabine clip and shackle the single block to the top of the rudder. Then reeve off the sheet so that it leads from the rudder head forward along the tiller.
When ready, hoist the mainsail as high as it will go and belay it on the be-laying pin beside the mast. Pull hard on the end of the tack downhaul until folds extend up the sail from lack to peak and then cleat it beneath the thwart. It needs to be set up harder in fresh winds than in light.
Sail the Scaffie with same curvature in the mainsail at all times, keeping it full of wind. In hard puffs you have no jib to keep way on while you ease the mainsail but it you let the boat stop you lose control. Therefore do not hesitate to reef in good time (Page 23). Just put her beam to the sea, lower the sail and take one or two reefs. It is quite quick and she will have drifted only a short dis-tance to leeward by the time you have hoisted the sail and got under way.
There is a length of shock cord with hooks which should be rigged from the underside of the fixed part of the tiller to the stainless steel eye just abaft the grating in the after deck. When under power it is best to unship the wood tiller and steer with the motor. The shock cord will hold the rudder straight.
4

REPLICA 2015
To set up the shrouds take one side and pass several turns of the lanyard through the U-bolt fairlead which is fitted on the side bench. Tension slightly and secure with two or three half-hitches(Fig.15). Do the same the other side, pulling the mast central and bending it somewhat aft. Finally reeve off the forestay lan-yard through the shackle in the stemhead fitting and pull it up as hard as you can before securing. This should tension all three wires and leave the mast standing straight without bearing hard on the thwart in any direction. Note that the forestay is always set up to the stemhead and not to the end of the bowsprit.
The mainsail has to be lashed to its yard and the mizzen to its mast. The method is the same tor both. First secure the lower corner (in the case of the mainsail, the throat cringle to the lower end of the yard) and stretch the sail along the spar. Tension the top lanyard until the sail shows slight creasing parallel to the spar and secure the peak. Then lace to the spar with the marlin hitch (Fig.11) but not too tightly. The lacing is only to stop it from bowing away and should be slack enough to permit some movement of the sail relative to the spar.
Ship the bowsprit through the hole in the stern and the bumpkin through the hole in the corner of the transom and you are ready to go. Step the mizzen mast through the transom cap into its step and tie its sheet to its clew. Pass the sheet through the bullseye on the bumpkin, back to the clam cleat on the after deck via the bullseye on the side of the mast. Tie the jib halyard to the head of the jib and slip the loop at the tack of the jib over the end of the bowsprit. Hoist away on the halyard and belay to the belaying pin on the thwart with a good amount of ten-sion. The jib sheet may conveniently be secured to the clew by means of a double overhand knot as explained in Fig. 5 on Pg. 8. Pass the ends through the fairleads on the side bench and either put a knot at each end or tie the ends to-gether.
Ship the rudder in shallow water and fix the tiller by holding the thin end high in the air while passing it down over the rudder head until it engages with the notch in the rudder. You may then raise the tiller a considerable distance be-fore it comes clear of the circular arc on the rudder and hence in danger of com-ing off.
After shipping the tiller adjust the length of the mainsheet horse (the length of line across the transom on which the lower block runs) to give it about a foot of slack. (Fig. 16).
Before hoisting the mainsail first reeve off the mainsheet (Fig. 16) and shackle it to the clew but do not secure the end other than with a knot to stop it from being lost through the lower block. Pass the tack downhaul, which is single length of line approximately 4ft. long, up through one of the holes in the thwart, tying a knot in its end to hold it there, through the tack cringle on the sail and down through the other hole opposite (Fig.12) but do not draw tight. Attach the halyard to the yard by taking two turns round the yard immediately below the tri-angular chocks, and secure with two half hitches (Fig.2)
Temporarily attach the other end to make certain it does not vanish up through the masthead sheave. Loosely attach the yard to the mast with the parall beads on their short length of line (Fig.13). Hoist the sail up quickly to the masthead, tensioning the luff to avoid a poke in the eye from the yard as it goes
7

REPLICA 2015
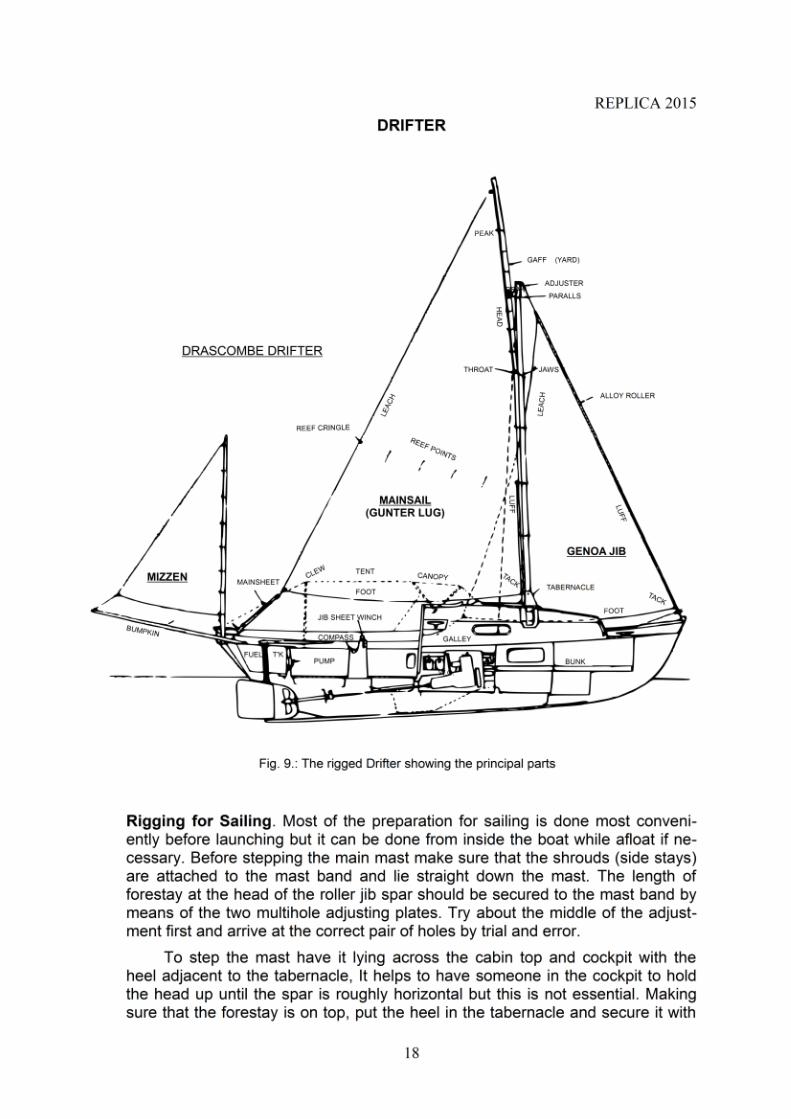
cessary. Before stepping the main mast make sure that the shrouds (side stays) are attached to the mast band and lie straight down the mast.
The head of the jib should be shackled to the swivel of the furling gear and the swivel attached to the jib forestay by means of the two multi-hole adjusting plates. Try about the middle of the adjustment first and arrive at the correct pair of holes by trial and error (Fig,14).
To step the mast have it lying in the boat with its heel under the mast thwart and secure one end of the main halyard to the mooring cleat. Lift the mast, insert the heel in its step and raise until it fits into the half-round notch in the thwart. Take up the slack in the halyard and secure it to a belaying pin. The mast is now secured while you attach the tack of the jib, with the furling gear drum secured to it (the top of the furling gear drum has a hole in it through which the furling line is knotted) to the stemhead casting.
The pair of link plates which connect the narrow slot in the bottom of the spindle of the drum to the stemhead casting are important to allow sufficient free-dom of movement. They should just reach without bending the mast forwards. If it is not right, lower the mast and adjust the length at the head of the jib. Set up the shrouds by passing several turns of the lanyards through the U-bolt fairleads which are fitted on the side benches and finish with two or three half-hitches (Fig. 15). Set them up before securing the jib tack, so that they pull the mast evenly aft about a ¼ in. from the thwart. Finally heave down on the jib luff and secure to the stem head, thus tightening the shrouds and leaving the mast with about two degrees aft rake.
Roll up the jib by hand, passing the furling line round and round as you do so. With the jib fully rolled up pass the line a couple of times round the drum and then lead it through the hole in the guide and aft along the gunwale capping to the cleat on the port side. Middle the jib sheet and make it fast to the jib clew. A good way to secure it is by means of the double overhand knot as explained in Fig. 5). Lead the sheets aft outside the shrouds through the fairleads on the side benches and either put a knot in each end or tie the two ends together. To set the jib it is only necessary to release the furling line and pull on one of the sheets. The furling line will he wound up on the drum as the sail unrolls.
The mainsail has to be lashed to its yard and the mizzen to its mast. The method is the same for both. First secure the lower corner (in the case of the mainsail, the throat cringle to the pin at the lower end of the yard) and stretch the sail along the spar. Tension the top lanyard until the sail shows slight creasing parallel to the spar and secure the peak. Then lace to the spar with the marlin hitch (Fig.11). but not too tightly. The lacing is only to stop it from bowing away and should be slack enough to permit some movement of the sail relative to the spar.
Step the mizzen mast and ship the bumpkin through the transom board. The mizzen sheet is secured to the clew by means of a bowline or round turn and two half-hitches, passed through the bullseye on the bumpkin and back through the small hole in the transom board to the clam cleat on the after deck.
The main halyard is secured to the yard by a clove hitch immediately below the small triangular chocks which stop it from slipping upwards. (Fig. 2).
10

REPLICA 2015
One set of parall beads is then used to retain the galvanised steel jaws to the mast and another set to hold the yard upright against the mast (Fig. 14). This second set is conveniently secured to the turns of the clove hitch which holds the halyard so that the yard lies an inch or two back from the mast.
Further paralls are used to stop the luff from bowing away from the mast (Fig. 6). It is important that they are adjusted in length to hold the luff and head in a fair continuous line and that they do not hold the luff too tightly to the mast.
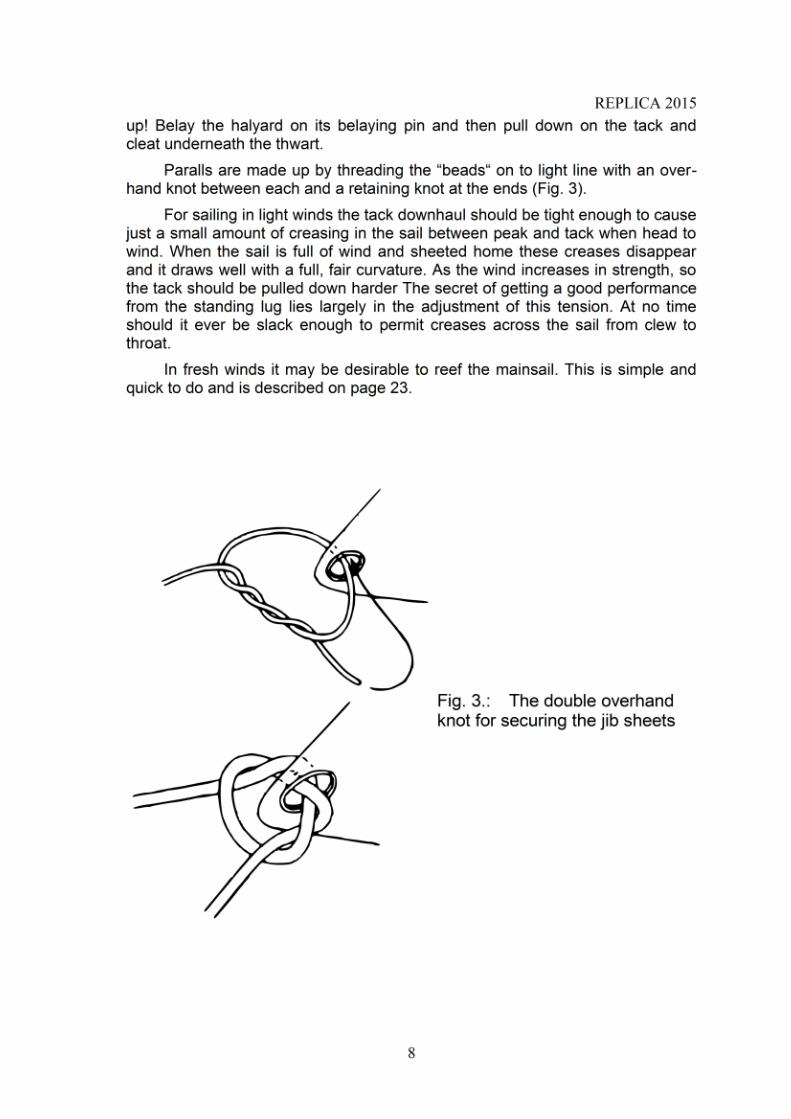
Paralls are made up by threading the ‘beads“ on to light line with an over-hand knot between each and a retaining knot at the ends. To secure the gaff jaws to the mast it is sufficient to use two beads, while where the parall goes right round the mast four beads are necessary (Fig. 3).
Hoist the mainsail right up and secure the halyard to a belaying pin. Then pass the tack downhaul (which is a single length of line about 4ft. long) up through one hole in the mast thwart, the end knotted under the thwart, through the tack cringle and down through the other hole (Fig. 12). It should be tensioned according to wind strength and secured to the other belaying pin. In light winds the tension should be sufficient to cause just a suspicion of vertical creasing down the luff of the sail, while in fresh winds it should be increased to cause very marked folds in the region of the luff where the sail is head to wind. These folds should vanish when the sail is sheeted home and full of wind.
Reeve off the double-ended mainsheet (Fig.17), leaving roughly equal amounts of surplus line on each side. The system permits the sheet to be cleated in settled weather but leaves the helmsman with freedom to jerk one end free and release the sheet instantly if a sudden puff demands it. While sailing it sometimes happens that all the letting out is done on one tack and all the pulling in from the other side, leading to all the spare line accumulating on one side. If this happens the first opportunity should be taken to equalise matters.
11


REPLICA 2015
To step the mast have it lying in the boat with its heel under the mast thwart and secure one end of the main halyard to the mooring cleat. Lift the mast, insert the heel in its step and raise until it fits into the half-round notch in the thwart. Take up the slack in the halyard and secure it to a belaying pin. The mast is now secured while you offer up the forestay with the roller spar on it, to the stemhead casting. It should just reach without bending the mast forwards. If it is not right lower the mast and adjust the length at the head of the stay. Set up the shrouds by passing several turns of the lanyards through the U-bolt fairleads (which are fitted on the side benches) and finish with two or three halt-hitches (Fig. 15). Set them up before securing the forestay, so that they pull the mast evenly aft about a ¼ in. from the thwart. Finally heave down on the roller jib spar and secure the bottom of the forestay to the after hole in the stem head, thus tightening the shrouds and leaving the mast with about two degrees aft rake.
Shackle the head of the jib to the light halyard in the luff spar and hoist it up the groove until the tack can be secured by means of the split pin just above the drum. Tighten the halyard and secure it in the cleat before passing the tail of it down through the hole in the drum and out through the other hole to its working position. Secure the short length of line which stops the unit from turning to the foremost eye inside the gunwale. Roll up the sail by hand, passing all the free line round and round as you do so. With the jib rolled up, take two or three turns round the drum before leading the line through the guide and aft along the gun-wale where it is secured on a cleat.
Middle the jib sheet and make it fast to the jib clew. A convenient way of do-ing this is by the use of a double overhand knot (Fig. 5). Lead the sheets aft out -side the shrouds through the adjustable fairleads on the side benches and either put a knot in each end or tie the two ends together. To set the jib it is only neces-sary to release the furling line and pull on one of the sheets. The furling line will be wound up on the drum as the sail unrolls.
The mainsail has to be lashed to its yard and the mizzen to its mast. The method is the same for both. First secure the lower corner (in the case of the mainsail, the throat cringle to the pin at the lower end of the yard) and stretch the sail along the spar. Tension the top lanyard until the sail shows slight creasing parallel to the spar and secure the peak. Then lace to the spar with the marlin hitch (Fig. 11) but not too tightly. The lacing is only to stop it from bowing away and should be slack enough to permit some movement of the sail relative to the spar.
Step the mizzen mast and ship the bumpkin through the transom board. The mizzen sheet is secured to the clew by means of a bowline or round turn and two half-hitches, passed through the bullseye on the bumpkin and back through the small hole in the transom board to the clam cleat on the after deck.
The main halyard is secured to the yard by a clove hitch (Fig. 2) immedi-ately below the small triangular chocks which stop it from slipping upwards. One set of parall beads is then used to retain the galvanised steel jaws to the mast and another set to hold the yard upright against the mast (Fig. 14). This second set is conveniently secured to the turns of the clove hitch which holds the halyard so that yard lies an inch or two back from the mast.
13
REPLICA 2015
Further paralls are used to stop the luff from bowing away from the mast (Fig. 7). It is important that they are adjusted in length to hold the luff and head in a fair continuous line and that they do not hold the luff too tightly to the mast.
Paralls are made up by threading the ‘beads“ on to tight line with an over-hand knot between each and a retaining knot at the ends. To secure the gaff jaws to the mast it is sufficient to use two beads, while where the parall goes right round the mast four beads are necessary (Fig. 3)
Hoist the mainsail right up and secure the halyard to a belaying pin. Then pass the tack downhaul (which is a single length of line about 4ft. long) up through one hole in the mast thwart, knotting the end under the thwart, through the tack cringle and down through the other hole (Fig. 12). It should be tensioned according to wind strength and secured to the other belaying pin. In light winds the tension should be sufficient to cause just a suspicion of vertical creasing down the luff of the sail, while in fresh winds it should be increased to cause very marked folds in the region of the luff where the sail is head to wind. These folds should vanish when the sail is sheeted home and full of wind.
Reeve off the double-ended mainsheet as shown (Fig. 17). leaving roughly equal amounts oh surplus line on each side. The system permits the sheet to be cleated in settled weather but leaves the helmsman with freedom to jerk one end free and release the sheet instantly if a sudden puff demands it. While sailing it sometimes happens that all the letting out is done on one tack and all the pulling in from the other side, leading to all the spare line accumulating an one side. If this happens the first opportunity should be taken to equalise matters.
The bearing-out spar may be used to keep the mainsail flat when reaching or running before the wind. The thin end is slipped into the pocket at the clew and the jaws set on the mast as high as is necessary to give the desired curvature to the sail. It is shipped on the windward side and a length of line made fast on the mast thwart prevents it from riding up the mast.
14


REPLICA 2015
To step the mast have it lying across the cabin top and cockpit with the heel adjacent to the tabernacle. It helps to have someone in the cockpit to hold the head up until the spar is roughly horizontal but this is not essential. Making sure that the forestay is on top, line up the two black bullseyes on the aft face with the holes in the tabernacle and secure with the pin right through. Raise the mast to vertical and attach the forestay fitting at the lower end of the roller jib spar to the stemhead. Take a turn or two of the lanyards from the shrouds through the U-bolt fairleads which are fitted on the side decks, to avoid excessive side strain on the tabernacle. If the mast sits well in its tabernacle and leans aft with about two degrees of rake, the forestay is correctly adjusted. If it is too upright or has too much rake, lower it and change the length of the stay by the adjuster at the masthead. Finally set up the shrouds by taking several turns of the lanyards through the fairleads and securing with half-hitches (Fig.15). The second shroud to be set up should need its lanyard tightening as hard as you can pull in order to pull the mast up straight.
Shackle the head of the jib to the light halyard in the luff spar and hoist it up the groove until the tack can be secured by means of the split pin just above the drum. Tighten the halyard and secure it in the cleat before passing the tail of it down through the hole in the drum and out through the other hole to its working position. Secure the short length of line which stops the unit from turning to the foremost eye inside the gunwale. Roll up the sail by hand, passing all the free line round and round as you do so. With the jib rolled right up, take two or three turns round the drum before leading the line through the guide, aft along the gunwale and across to its cleat on the aft face of the bridge deck.
Middle the jib sheet and make it fast to the jib clew. A double overhand knot (Fig.5) is a convenient way to do this. Lead the sheets aft outside the shrouds through the adjustable fairleads on the side bench and either put a knot in each end or tie the two ends together. To set the jib it is only necessary to release the furling line and pull on one of the sheets. The furling line will be wound up on the drum as the sail unrolls.
The mainsail has to be lashed to its yard and the mizzen to its mast. The method is the same for both. First secure the lower corner (in the case of the mainsail, the throat cringle to the pin at the lower end of the yard) and stretch the sail along the spar. Tension the top lanyard until the sail shows slight creasing parallel to the spar and secure the peak. Then lace to the spar with the marlin hitch (Fig.11) but not too tightly. The lacing is only to stop it from bowing away and should be slack enough to permit some movement of the sail relative to the spar.
Step the mizzen mast and ship the bumpkin through the transom board. The mizzen sheet is secured to the clew by means of a bowline or round turn and two half-hitches, passed through the bullseye on the bumpkin and back through the small hole in the transom board to the clam cleat on the after deck.
The main halyard is secured to the yard by a clove hitch immediately below the small triangular chocks which stop it from slipping upwards. One set of parall beads is then used to retain the galvanised steel jaws to the mast and another set to hold the yard upright against the mast (Fig. 14). This second set is con-
16

REPLICA 2015
veniently secured to the turns of the clove hitch witch holds the halyard so that the yard lies an inch or two back from the mast.
Further paralls are used to stop the luff from bowing away from the mast (Fig. 8). It is important that they are adjusted in length to hold the luff and head in a fair continuous line and that they do not hold the luff too tightly to the mast. Paralls should pass outside the fall of the main halyard.
Paralls are made up by threading the “beads“ on to light line with an over-hand knot between each with a retaining knot at the ends. To secure the gaff jaws to the mast it is sufficient to use two beads, while where the parall goes right round the mast four beads are necessary.
Lead the tail of the main halyard down the fore side of the mast, through the sheave in the heel of the mast and aft to a cleat on the after edge of the cabin top. Secure the light line at the tack of the mainsail to the bullseye on the mast just above the tabernacle and hoist the mainsail. The tension in the halyard must be varied to suit the strength of the wind. In light breezes there should be just a suspicion of vertical creasing down the luff of the sail, while for strong winds the tension should be increased to cause pronounced folds down the luff when the sail is head to wind, These folds vanish when the sail is sheeted home and full of wind. The sail should have plenty of fullness for light winds and for reaching but be sheeted hard enough to keep it fairly flat for close-hauled sailing and flatter still in fresh winds.
Reeve off the mainsheet as shown (Fig. 8), the fall passing through the bullseye on the rudder stock to a cleat on the tiller. The system permits the sheet to be cleated in settled weather but leaves the helmsman free to jerk the end free to release the sheet instantly if a sudden puff demands it.
Oars are best stowed one on each side with the looms right in the bows and the blade aft. The twin hatches each have a securing line to prevent any possibility of their being lost overboard. The lines are led forward to cleats in the cabin where they may be secured.
17
REPLICA 2015
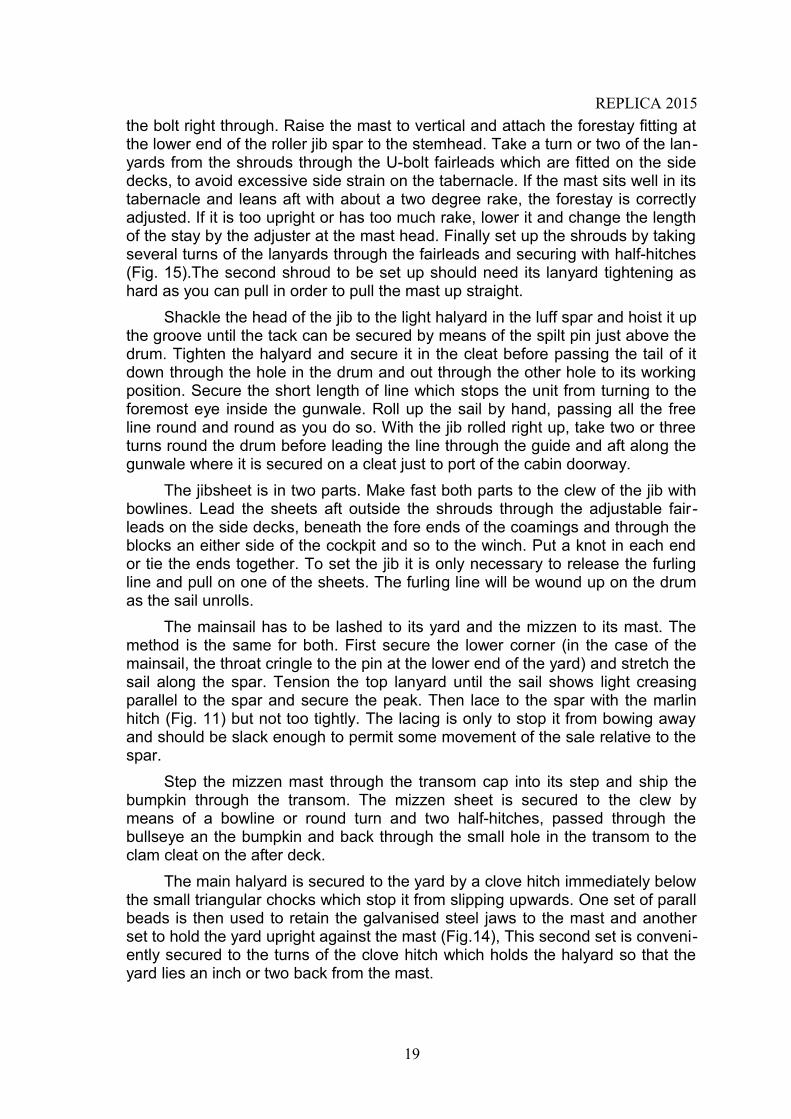
the bolt right through. Raise the mast to vertical and attach the forestay fitting at the lower end of the roller jib spar to the stemhead. Take a turn or two of the lan-yards from the shrouds through the U-bolt fairleads which are fitted on the side decks, to avoid excessive side strain on the tabernacle. If the mast sits well in its tabernacle and leans aft with about a two degree rake, the forestay is correctly adjusted. If it is too upright or has too much rake, lower it and change the length of the stay by the adjuster at the mast head. Finally set up the shrouds by taking several turns of the lanyards through the fairleads and securing with half-hitches (Fig. 15).The second shroud to be set up should need its lanyard tightening as hard as you can pull in order to pull the mast up straight.
Shackle the head of the jib to the light halyard in the luff spar and hoist it up the groove until the tack can be secured by means of the spilt pin just above the drum. Tighten the halyard and secure it in the cleat before passing the tail of it down through the hole in the drum and out through the other hole to its working position. Secure the short length of line which stops the unit from turning to the foremost eye inside the gunwale. Roll up the sail by hand, passing all the free line round and round as you do so. With the jib rolled right up, take two or three turns round the drum before leading the line through the guide and aft along the gunwale where it is secured on a cleat just to port of the cabin doorway.
The jibsheet is in two parts. Make fast both parts to the clew of the jib with bowlines. Lead the sheets aft outside the shrouds through the adjustable fair-leads on the side decks, beneath the fore ends of the coamings and through the blocks an either side of the cockpit and so to the winch. Put a knot in each end or tie the ends together. To set the jib it is only necessary to release the furling line and pull on one of the sheets. The furling line will be wound up on the drum as the sail unrolls.
The mainsail has to be lashed to its yard and the mizzen to its mast. The method is the same for both. First secure the lower corner (in the case of the mainsail, the throat cringle to the pin at the lower end of the yard) and stretch the sail along the spar. Tension the top lanyard until the sail shows light creasing parallel to the spar and secure the peak. Then lace to the spar with the marlin hitch (Fig. 11) but not too tightly. The lacing is only to stop it from bowing away and should be slack enough to permit some movement of the sale relative to the spar.
Step the mizzen mast through the transom cap into its step and ship the bumpkin through the transom. The mizzen sheet is secured to the clew by means of a bowline or round turn and two half-hitches, passed through the bullseye an the bumpkin and back through the small hole in the transom to the clam cleat on the after deck.
The main halyard is secured to the yard by a clove hitch immediately below the small triangular chocks which stop it from slipping upwards. One set of parall beads is then used to retain the galvanised steel jaws to the mast and another set to hold the yard upright against the mast (Fig.14), This second set is conveni-ently secured to the turns of the clove hitch which holds the halyard so that the yard lies an inch or two back from the mast.
19

REPLICA 2015
Further paralls are used to stop the luff from bowing away from the mast as shown (Fig. 9). It is important that they are adjusted in length to hold the luff and head in a fair continuous line and that they do not hold the luff too tightly to the mast. Paralls should pass outside the fall of the main halyard.
Paralls are made up by threading the “beads“ on to light line with an over-hand knot between each and a retaining knot at the ends (Fig. 3). To secure the gaff jaws to the mast it is sufficient to use two beads, while where the parall goes right round the mast four beads are necessary.
Lead the halyard down the fore side of the mast, through the sheave in the heel and aft via the port hand fairlead on the coaming to the porthand cleat on the after edge of the cabin top. Pass the tack downhaul through the bullseye on the mast and aft to the middle cleat via the double block shackled to the star-board side of the tabernacle. The reefing downhaul is shackled to the port side of the tabernacle and passes up through the reef cringle in the luff of the sail be-fore being led aft via the double block to the starbord cleat.
Hoist the mainsail right up and adjust the tension in the luff by means of the tack downhaul. The tension in the luff must be varied to suit the strength of the wind. In light breezes there should be just a suspicion of vertical creasing down the luff of the sail while for strong winds the tension should be increased to cause pronounced folds down the luff when the sail is head to wind. These folds vanish when the sail is sheeted home and full of wind.
Reeve off the double-ended mainsheet (Fig. 17), leaving roughly equal amounts of surplus line on each side. The system permits the sheet to be cleated in settled weather but leaves the helmsman with freedom to jerk one end free and release the sheet instantly if a sudden puff demands it. While sailing it sometimes happens that all the letting out is done on one tack and all the pulling in from the other side, leading to all the spare line accumulating on one side. If this happens, the first opportunity should be taken to equalise matters.
To stow the mainsail it is simplest to leave the yard up and down the mast and stuff the bulk of the sail into the sail bag. If this is done make sure that the bag is well secured against blowing off in a strong wind.
It is recommended that the anchor and warp be stowed in the locker be-neath the forward part of the cockpit sole. It is not necessary to carry the anchor forward prior to anchoring. Instead, take the warp forward in good time and lead the end aft from the stemhead fairlead outside everything to the cockpit. Shackle it to the anchor chain. Arriving at the desired position for the anchor, drop it straight over from the cockpit.
A similar procedure may be used when picking up a mooring and it is par-ticularly helpful when single-handed. Secure a length of line about the length of the boat to the mooring cleat and lead the other end aft to the cockpit outside the shrouds. You can then secure to the mooring buoy without leaving the helm. A large spring hook such as the “Grabbit“ boathook has, makes it even easier.
20

REPLICA 2015
make sternway it is essential to let go the mizzen sheet quickly to give the rudder a chance to swing the stern one way or the other.
You will almost never get in irons if you take care to always sheet the jib smartly home on the new tack while the boat still has way on. The mainsail can be dealt with later it necessary.
Mainsails on the Lugger, Longboat and Drifter may be cleated in moderate breezes and may be tacked without attention. In the case of the Dabber the fall of the mainsheet must be transferred to the cleat on the new lee side - not cleated to leeward but with a dry turn round the horn of the cleat and then across to the helmsman‘s hand (Fig. 16)
It must never be forgotten, even in the case of the Drifter, that it is danger-ous to cleat the mainsheet in strong or gusty winds. In a severe knockdown any of the boats may be swamped.
In sailing the boats with centreplates use should be made of the fact that the centre of pressure on the plate moves aft as it is hoisted. In fresh winds it sometimes helps to pull the plate just a little up when close hauled, while with the wind abeam or further astern the plate needs to be about half up. If broad reach-ing in fresh conditions it may make steering easier if the mizzen is completely furled. In very severe weather use the jib only.
REEFING
The standing lug sails of the Dabber and the Driver are very simple and are very powerful sails, but they are a little more difficult to hoist and lower than the gunter lug sails of the other boats. To reef the standing lugs in fresh winds it is best to lower the yard right down and re-hoist when the reef has been tied and the sheet and tack downhaul shifted. The gunter sails may be lowered the appropriate amount and reefed as they stand. To maintain maximum control it is best to clip the upper sheet block into the reef cringle without first unclipping it from the clew cringle The sail may then be sheeted home and the tack downhaul and reef points dealt with at leisure, When reefing it is usually best to heave-to by hauling the jib aback, using the windward sheet. With the jib aback and the mizzen sheeted in, any of the Drascombe boats will lie more or less stopped and the helm may be left untended. In the case of the single-sailed Scaffie, she will lie beam on to the sea quite comfortably when the sail is lowered.
The Open Longboat, Coaster and Drifter are all fitted with luff spars allow-ing the headsail to be reefed and in their case the first reduction in sail is usually made by rolling up about one-third or a little more. However, if the wind is abaft the beam it may be better to reef or lower the mainsail while retaining full head-sail.
22

REPLICA 2015
Scaffie 1 ½ to 3 h.p
Dabber 2 to 4 h.p
Lugger 4 to 6 h.p
Longboat 6 to 8 h.p
Coaster 6 to 8 h.p
Drifter 8 to 10 h.p
INBOARD ENGINE
The Drifter may be fitted with a Sabb 6 - 8 h.p. diesel engine in place of an outboard and in this case the fuel tank is fitted where the outboard well otherwise is. It has a fuel cock, which is best left open when the boat is in commission to lessen the chance of an air bubble getting into the supply pipe. It also has a drain cock at the lowest point to permit occasional removal of water which col -lects there.
The variable pitch and reversing propeller fitted to the Sabb is controlled by a winch handle fitted into the socket on the starboard side of the compass bin-nacle. Between ahead and astern the propeller blades are in neutral but there is also a clutch on the engine which disconnects the shaft and stops the propeller from rotating. It should be used when charging batteries but not under way or when in the vicinity of swimmers, nets and so forth.
Please read the manufacturer‘s handbooks very carefully before filling up with fuel and starting the engine. During the first few hours of run-ning frequently check the tightness of the holding down bolts and if vibration should noticeably increase at any time look to this first. Do not forget to give the stern tube greasers a turn after every few hours running and make sure you have grease aboard to re-fill the cups when required. Check the oil level and the water in the battery.
Immediately after starting up, lean over the stern and check that cooling water is coming out of the exhaust pipe. With rubber exhaust hose it is important not to run for long without water keeping it cool. Also the water-cooled engine is likely to seize up if run without proper cooling. The first thing to check is that the seacock at the water intake is open and that nothing is obstructing water entry. After that check the water pump.
Diesel engines are very sensitive to air or dirt in the fuel and to avoid the possibility of air locks in the system it is usual to leave the cock on the fuel tank open. Fuel should be filtered when put into the tank and any accumulation of wa-ter in the bottom of the tank removed from time to time. If it becomes necessary to bleed air from the fuel system, do so in strict accordance with the manufac-turer‘s instructions.
24

REPLICA 2015
Finally we would stress that these are brief general comments based on use of the engines in Drascombe boats and the engine manufacturer‘s hand-book supplied with the boat should be followed with care.
BUOYANCY
All boats in the range rely on expanded polystyrene foam to provide buoy-ancy in the swamped condition. No compartment is intended to be airtight and drains are provided to allow water to escape from lockers and buoyancy com-partments.
Sufficient volume of expanded polystyrene is put into each boat to keep her afloat and support the crew in the water but it is rarely possible for the crew to bail out a swamped boat.
TRAILERS
Modern boat trailers are reliable and very tolerant of abuse. It they do let you down it is very probably because you have not given them the small amount of maintenance that they call for.
You may immerse them in salt water to launch or recover boats but never do so if the hubs are warm immediately after a long, fast trip. Do keep the hubs well packed with grease and also grease the hitch from time to time. Braked trail-ers need to have the brake mechanism cleaned and oiled to ensure it works freely.
Remember to apply the spacer which stops the brakes from coming on when you have to reverse.
lt makes sense to carry a spare wheel (correctly inflated to the pressure shown on the plate on the trailer) and if you do a lot of trailing you may think it prudent to carry spare wheel bearings as well. You will probably never need them but if you should do so they could save you a long and frustrating delay.
To recover a trailer on a steep slip, tow it out of the water by attaching it to the car with a length of rope. Then block its wheels and back down to hitch up directly.
MAINTENANCE
Built from fibreglass mouldings and having oiled teak wood trim, your Dras-combe boat needs very little maintenance in order to preserve her in good condi-tion. The sails are of terylene (dacron) and the rigging is of stainless steel wire or synthetic cordage, so that rot and corrosion find little or nothing to attack. How-ever, she will soon lose her good looks if allowed to get dirty and scratched and the boat-proud owner will make sure the mouldings stay clean by occasionally washing with warm water and detergent. A mild abrasive powder can be used to shift any stubborn marks, while petrol may be used for oil and grease. It helps to keep the fibreglass from getting dirty if it is given a good polish with a wax polish such as used for cars.
25
REPLICA 2015
Minor scratches will have no effect on durability, but severe scratching or abrasion which reveals the glass fibres should be dealt with. A coat of polyureth-ane paint will give protection but for best results the scratches should be filled and sandpapered flush before painting. For filling use a polyester paste or we can supply matching gel coat kits. When painting fibreglass mouldings, it is es-sential to prepare the surface for the paint to key firmly. Special primers can be obtained from the paint manufacturers and must be used exactly in accordance with the instructions. Alternatively, the surface may be rubbed down lightly with a fine grade of sandpaper.
Spidery fine cracks, usually radiating from a central point, are known as “star-crazing“ and are the result of the impact of a hard object on the surface coat of coloured, un-reinforced resin - the “gel coat“. They are almost never structurally significant but may be opened out and filled with gel coat if desired.
Left to itself, the teak will bleach to a pale greyish brown and many people prefer its appearance thus. To maintain a rich dark brown, an occasional rub over with a rag soaked in boiled Iinseed oil is all that is required. The floorboards are treated with a special preservative and will weather to a pleasing grey shade. They need no attention other than an occasional rub to keep them clean. The spars, however, are varnished with polyurethane varnish and need a rub down and another coat whenever they show signs of wear - normally once a year.
Centreplate and rudder are of mild steel, galvanised by the hot dip process, and they should last several years before needing any attention. When they show signs of rust they may be re-galvanised or treated with a good quality anti-rust paint and several coats of marine paint or antifouling.
Should you have the misfortune to bend the steel stock of a rudder by run-ning hard aground, the simplest way to straighten it is to careen the boat on a beach and apply an equal force in the opposite direction. You may need to cramp a stout piece of timber to the blade to do this or you may be able to muster sufficient strong men. If this is not feasible and the rudder is bent too badly to come up through its trunk you have no alternative to removing the tiller fitting in order to drop it through the bottom (having first secured a line to it!). Boats fitted with aluminium alloy tiller fittings present no problem. since they can be unclamped. In earlier boats which have an integrally welded tiller fitting, how-ever, the only answer is a hacksaw. After straightening the stock the top will then need to be welded back on.
26