the digital slr guide: beyond point-and-shoot digital photography
TRANSCRIPT
The Digital SLR Guide: Beyond Point-and-Shoot Digital Photography
Jon Canfi eld

The Digital SLR Guide: Beyond Point-and-Shoot Digital Photography
Jon Canfi eld
Peachpit Press1249 Eighth StreetBerkeley, CA 94710510/524-2178800/283-9444510/524-2221 (fax)
Find us on the Web at: www.peachpit.comTo report errors, please send a note to [email protected]
Peachpit Press is a division of Pearson Education
Copyright © 2007 by Jon Canfi eld
All photographs by Jon Canfi eld unless otherwise noted.
Acquisitions Editor: Pamela Pfi ffnerProject Editor: Susan RimermanProduction Editor: Lisa BraziealDevelopment Editor: Corbin CollinsTech Editor: Jeff GreeneIndexer: Karin Arrigoni Composition: Danielle FosterCover Design: Mimi HeftCover Production: Andreas SchuellerCover Photograph: Tamara Murray, iStockphoto.com
Notice of Rights
All rights reserved. No part of this book may be reproduced or transmitted in any form by any means, electronic, mechani-cal, photocopying, recording, or otherwise, without the prior written permission of the publisher. For information on getting permission for reprints and excerpts, contact [email protected].
Notice of Liability
The information in this book is distributed on an “As Is” basis without warranty. While every precaution has been taken in the preparation of the book, neither the author nor Peachpit shall have any liability to any person or entity with respect to any loss or damage caused or alleged to be caused directly or indirectly by the instructions contained in this book or by the computer software and hardware products described in it.
Trademarks
Many of the designations used by manufacturers and sellers to distinguish their products are claimed as trademarks. Where those designations appear in this book, and Peachpit was aware of a trademark claim, the designations appear as requested by the owner of the trademark. All other product names and services identifi ed throughout this book are used in editorial fashion only and for the benefi t of such companies with no intention of infringement of the trademark. No such use, or the use of any trade name, is intended to convey endorsement or other affi liation with this book.
ISBN 0-321-49219-6
9 8 7 6 5 4 3 2 1
Printed and bound in the United States of America

DedicationTo Barbara, Evelyn, Bob, and Wayne. It’s a blessing
to have two wonderful sets of parents.
AcknowledgmentsA book like this doesn’t happen in a vacuum, with the writer just
providing text and images. Compared to the work others put in, I
think I’m a minor cog in the wheel. I’d like to start out by thanking a
great group of people at Peachpit who are really responsible for what
you hold in your hands. Acquisitions editor Pam Pfi ffner took a rough
idea and helped turn it into an innovative new book. And, when
things were at their most hectic, there was always a call from Pam
to keep me going. Corbin Collins did a fantastic job as development
editor, keeping the book on track and readable. Technical editor Jeff
Greene, with whom I’ve had the pleasure of working previously, did
his usual great work to verify accuracy. Editor Susan Rimerman kept
everything moving smoothly to make sure this project met the dead-
lines. And Nancy Davis, Lisa Brazieal, and everyone else at Peachpit,
thank you for all your support and help in making this book happen.
I also had a great deal of support from others, including Sally
Smith Clemens and Jennifer Colucci at Olympus, Scott Heath at
Canon, John Nack at Adobe, and Teresa Weaver at Apple Computer.
And a special thanks to Tony Sweet and Laurence Chen for provid-
ing some of the images used in this book.
Finally, there are friends and others who have provided feed-
back, encouragement, and support with my writing. Rob Sheppard,
Chris Robinson, Wes Pitts, and George Schaub have all given me the
opportunity to write for the best magazines in the fi eld. In addition
to being excellent photographers and writers, they are fantastic
people—a rare combination. Friends like Charlotte Lowrie, Peter
Burian, Ellen Anon, and Tony Chor have all let me bounce ideas
off them with honest feedback. Jim Miotke at BetterPhoto.com
has given me the opportunity to teach with some of the best photo-
graphers in the business, helping me learn to present information
in a way that people seem to appreciate.
My family is my inspiration, always supporting my crazy schedules
and bad habit of taking on too much at once. My wife Kathy, son Ken,
and daughter Erin fi ll me with pride, while our Lab brothers, Luke and
Clay, keep me entertained and always provide photo opportunities.
Finally, and perhaps most importantly, I want to thank you! Thank
you for picking up this book among the other options available
to you and for reading my other books and articles. I hope this
book exceeds your expectations.
Introduction ix
1. Digital SLR Basics 1
Introducing Digital SLR Cameras 1
Price 4
Image Sensors 10
Camera Features 15
Deciphering a Data Sheet 19
2. Mastering Digital SLR Controls 23
Using Program Mode 23
Using Aperture Settings 27
Using Shutter Speed Settings 31
Choosing ISO Settings 39
Image Capture Options 41
Focus Modes 43
3. Selecting and Using Lenses 45
Lens Basics 45
Zoom Lenses 47
Wide-Angle Lenses 48
Standard Lenses 54
Telephoto Lenses 55
Specialty Lenses 57
Table of Contents
vi Table of Contents
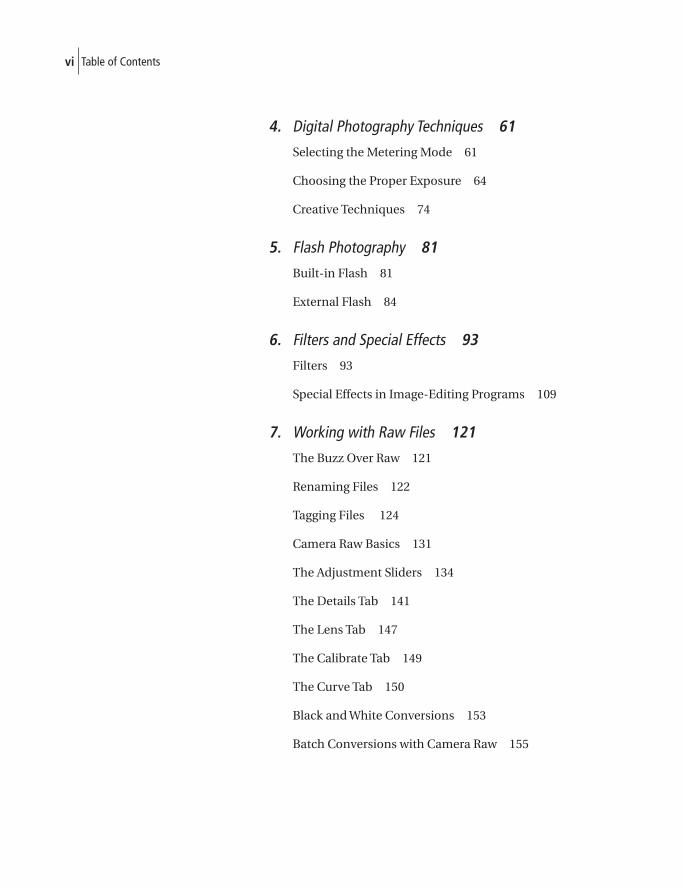
4. Digital Photography Techniques 61
Selecting the Metering Mode 61
Choosing the Proper Exposure 64
Creative Techniques 74
5. Flash Photography 81
Built-in Flash 81
External Flash 84
6. Filters and Special Effects 93
Filters 93
Special Effects in Image-Editing Programs 109
7. Working with Raw Files 121
The Buzz Over Raw 121
Renaming Files 122
Tagging Files 124
Camera Raw Basics 131
The Adjustment Sliders 134
The Details Tab 141
The Lens Tab 147
The Calibrate Tab 149
The Curve Tab 150
Black and White Conversions 153
Batch Conversions with Camera Raw 155

viiTable of Contents
8. Image Editing 161
Basic Color Correction 161
Adjusting Levels 167
Adjusting Contrast 171
Sharpening Your Images 173
A. Resources 181
Cameras 181
Lenses and Filters 183
Accessories 185
Memory Cards 187
Magazines 188
Web Sites 190
Instruction 191
B. Glossary 193
Index 199
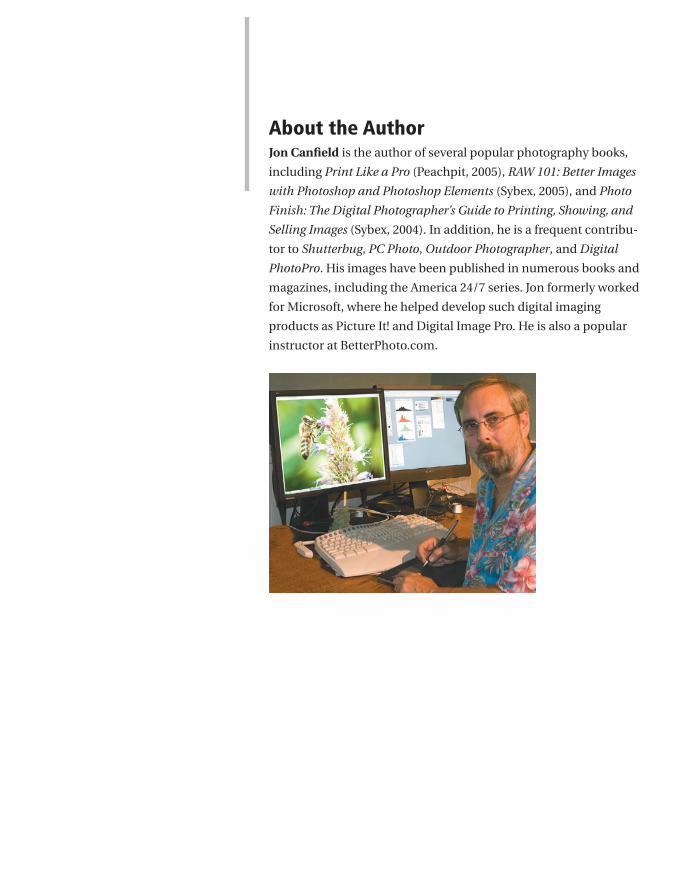
About the AuthorJon Canfi eld is the author of several popular photography books,
including Print Like a Pro (Peachpit, 2005), RAW 101: Better Images
with Photoshop and Photoshop Elements (Sybex, 2005), and Photo
Finish: The Digital Photographer’s Guide to Printing, Showing, and
Selling Images (Sybex, 2004). In addition, he is a frequent contribu-
tor to Shutterbug, PC Photo, Outdoor Photographer, and Digital
PhotoPro. His images have been published in numerous books and
magazines, including the America 24/7 series. Jon formerly worked
for Microsoft, where he helped develop such digital imaging
products as Picture It! and Digital Image Pro. He is also a popular
instructor at BetterPhoto.com.
A few years ago, the cost of a digital SLR kept it out of the hands of
everyone but pros or well-heeled enthusiasts. With prices dropping
into the affordable range for many photographers, dSLR sales are
now exploding. Most of the people that I see using a dSLR aren’t
doing much more than treating it as a large point-and-shoot
camera—very seldom, if ever, taking the camera off Program mode.
The prospect of shooting in advanced modes isn’t made much
easier by reading the manuals that come with most cameras.
When this book was fi rst being planned, I looked at the other options
available, and there were some good ones. What would set this one
apart from the others? To start with, most of the books already avail-
able focus on either a specifi c camera or principals of photography.
I wanted something different. Thanks to the efforts of Peachpit,
what you’re holding in your hands is that different book. It’s really
designed for those who are just getting started with a dSLR. If you
haven’t bought one yet, you’ll fi nd information that will help you
select the right one. The bulk of the book, though, is about taking
advantage of the features that a digital SLR provides over a compact
digital camera (sometimes called a digicam).
Along with that information you’ll fi nd chapters devoted to help-
ing you get the most from your images after the shoot, including
how to work with raw images to get the maximum quality your new
camera is capable of and performing basic Photoshop tasks.
Everything here applies to you regardless of the brand of cam-
era you select—Canon, Nikon, Olympus, Pentax, or Sony—it’s
the common features that are covered here. When you’re ready
to go into detail for your specifi c camera, there are companion
guides, called ShortCuts, that you can download directly from the
Peachpit Bookstore at www.peachpit.com. And you can register
Introduction

x
this book at the site (www.peachpit.com/title/0321492196) and
receive a bonus ShortCut from my book Print Like a Pro: A Digital
Photographer’s Guide.
Digital photography has brought new life to the photography world
with the immediate feedback and control over how your photos are
presented and shared. It’s my hope that this book will give you a
fast start to getting the most from your new camera and capturing
images that you’re proud to share.
I’d love to hear from you, whether it’s questions or comments,
or just to say hi. You can reach me through my Web site at
www.joncanfi eld.com.
Introduction
With the price of digital SLR (dSLR) cameras continually decreasing,
you may be ready to make the move from your point-and-shoot
camera to one that gives you many of the features that professional
photographers use on a daily basis. Today’s dSLR cameras are not
only fully equipped but affordable as well. If you’re getting serious
about photography—or if you just want better pictures—then a dSLR
may be right for you.
But how do you know what to look for when buying a camera? This
chapter helps you decide what features are important and how to
assess their value. I can’t tell you every nuance about every individ-
ual camera model, however. Rather than get into specifi cs for each
camera, I cover the main features to consider when you go shop-
ping for your fi rst digital SLR. Remember that the camera models
mentioned in this book may vary from what’s currently available.
The rapidly changing market produces new cameras with head-
spinning frequency. Once you’ve made a decision on basic features,
compare current models to make your purchase.
Introducing Digital SLR CamerasWhat makes a camera a digital SLR, anyway? And how is it different
than a point-and-shoot camera?
If you’re familiar with fi lm cameras, then you know that SLR stands
for single lens refl ex, a system which uses mirrors and lenses to
capture an image. When a photographer looks through a lens on an
SLR camera, the image he sees enters the camera, hits a mirror, and
then bounces through a prism onto a focusing screen. Just before
the shutter is snapped, the mirror swings out of the way to expose
the image onto a piece of fi lm. With an SLR, the photographer sees
exactly what the camera sees.
1 Digital SLR Basics
2 Chapter One
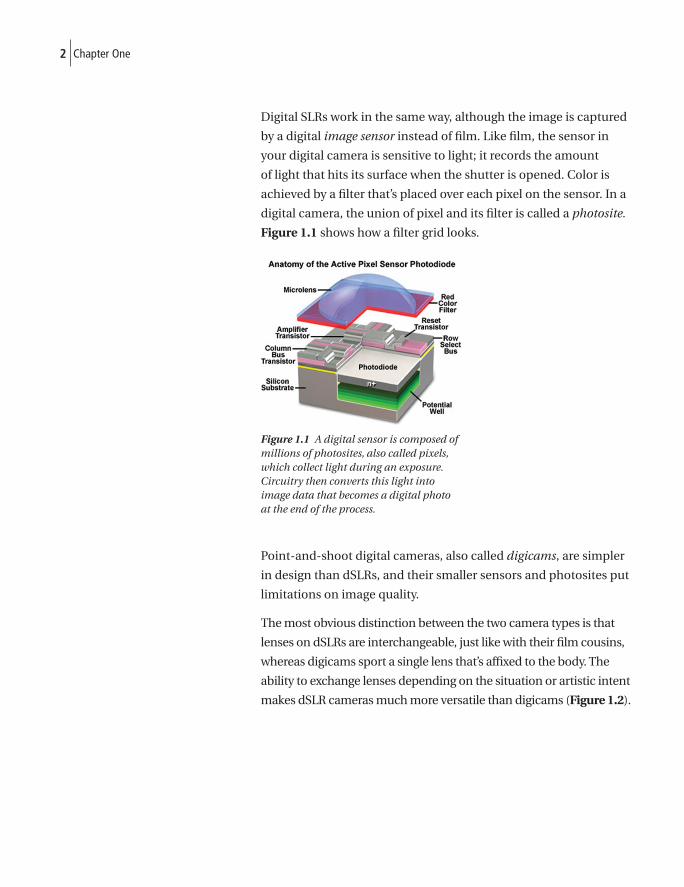
Digital SLRs work in the same way, although the image is captured
by a digital image sensor instead of fi lm. Like fi lm, the sensor in
your digital camera is sensitive to light; it records the amount
of light that hits its surface when the shutter is opened. Color is
achieved by a fi lter that’s placed over each pixel on the sensor. In a
digital camera, the union of pixel and its fi lter is called a photosite.
Figure 1.1 shows how a fi lter grid looks.
Figure 1.1 A digital sensor is composed of millions of photosites, also called pixels, which collect light during an exposure. Circuitry then converts this light into image data that becomes a digital photo at the end of the process.
Point-and-shoot digital cameras, also called digicams, are simpler
in design than dSLRs, and their smaller sensors and photosites put
limitations on image quality.
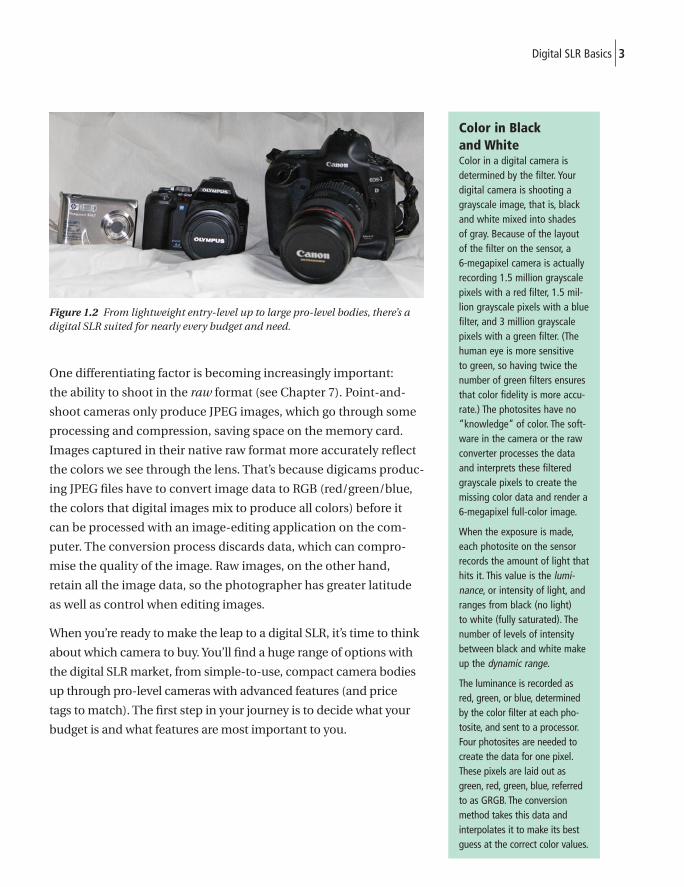
The most obvious distinction between the two camera types is that
lenses on dSLRs are interchangeable, just like with their fi lm cousins,
whereas digicams sport a single lens that’s affi xed to the body. The
ability to exchange lenses depending on the situation or artistic intent
makes dSLR cameras much more versatile than digicams (Figure 1.2).
3Digital SLR Basics
Figure 1.2 From lightweight entry-level up to large pro-level bodies, there’s a digital SLR suited for nearly every budget and need.
One differentiating factor is becoming increasingly important:
the ability to shoot in the raw format (see Chapter 7). Point-and-
shoot cameras only produce JPEG images, which go through some
processing and compression, saving space on the memory card.
Images captured in their native raw format more accurately refl ect
the colors we see through the lens. That’s because digicams produc-
ing JPEG fi les have to convert image data to RGB (red/green/blue,
the colors that digital images mix to produce all colors) before it
can be processed with an image-editing application on the com-
puter. The conversion process discards data, which can compro-
mise the quality of the image. Raw images, on the other hand,
retain all the image data, so the photographer has greater latitude
as well as control when editing images.
When you’re ready to make the leap to a digital SLR, it’s time to think
about which camera to buy. You’ll fi nd a huge range of options with
the digital SLR market, from simple-to-use, compact camera bodies
up through pro-level cameras with advanced features (and price
tags to match). The fi rst step in your journey is to decide what your
budget is and what features are most important to you.
Color in Black and WhiteColor in a digital camera is determined by the filter. Your digital camera is shooting a grayscale image, that is, black and white mixed into shades of gray. Because of the layout of the filter on the sensor, a 6-megapixel camera is actually recording 1.5 million grayscale pixels with a red filter, 1.5 mil-lion grayscale pixels with a blue filter, and 3 million grayscale pixels with a green filter. (The human eye is more sensitive to green, so having twice the number of green filters ensures that color fidelity is more accu-rate.) The photosites have no “knowledge” of color. The soft-ware in the camera or the raw converter processes the data and interprets these filtered grayscale pixels to create the missing color data and render a 6-megapixel full-color image.
When the exposure is made, each photosite on the sensor records the amount of light that hits it. This value is the lumi-nance, or intensity of light, and ranges from black (no light) to white (fully saturated). The number of levels of intensity between black and white make up the dynamic range.
The luminance is recorded as red, green, or blue, determined by the color filter at each pho-tosite, and sent to a processor. Four photosites are needed to create the data for one pixel. These pixels are laid out as green, red, green, blue, referred to as GRGB. The conversion method takes this data and interpolates it to make its best guess at the correct color values.
4 Chapter One
PriceFor most people, price is the most important issue when looking at
a camera. Until a couple of years ago, you’d have to budget well over
$1,000 to purchase a digital SLR and basic lens. Today a full-featured
camera can be found for less than $600. Cameras in this entry-level
category, such as the Canon EOS Digital Rebel line and the Olympus
E Series, are optimized for ease of use while still giving you a number
of advanced features and access to the full line of lenses.
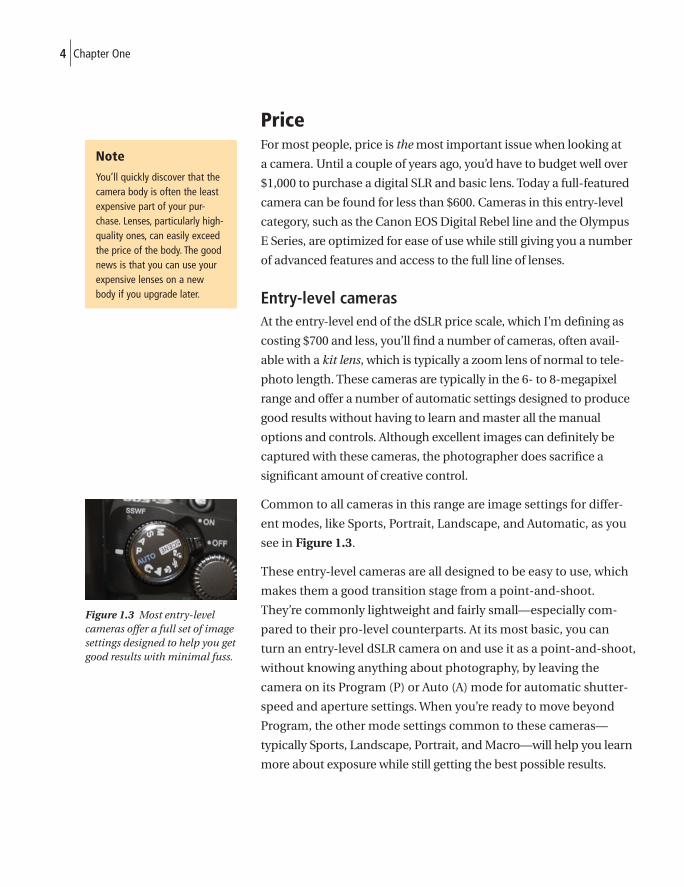
Entry-level camerasAt the entry-level end of the dSLR price scale, which I’m defi ning as
costing $700 and less, you’ll fi nd a number of cameras, often avail-
able with a kit lens, which is typically a zoom lens of normal to tele-
photo length. These cameras are typically in the 6- to 8-megapixel
range and offer a number of automatic settings designed to produce
good results without having to learn and master all the manual
options and controls. Although excellent images can defi nitely be
captured with these cameras, the photographer does sacrifi ce a
signifi cant amount of creative control.
Common to all cameras in this range are image settings for differ-
ent modes, like Sports, Portrait, Landscape, and Automatic, as you
see in Figure 1.3.
These entry-level cameras are all designed to be easy to use, which
makes them a good transition stage from a point-and-shoot.
They’re commonly lightweight and fairly small—especially com-
pared to their pro-level counterparts. At its most basic, you can
turn an entry-level dSLR camera on and use it as a point-and-shoot,
without knowing anything about photography, by leaving the
camera on its Program (P) or Auto (A) mode for automatic shutter-
speed and aperture settings. When you’re ready to move beyond
Program, the other mode settings common to these cameras—
typically Sports, Landscape, Portrait, and Macro—will help you learn
more about exposure while still getting the best possible results.
Note
You’ll quickly discover that the camera body is often the least expensive part of your pur-chase. Lenses, particularly high-quality ones, can easily exceed the price of the body. The good news is that you can use your expensive lenses on a new body if you upgrade later.
Note
You’ll quickly discover that the camera body is often the least expensive part of your pur-chase. Lenses, particularly high-quality ones, can easily exceed the price of the body. The good news is that you can use your expensive lenses on a new body if you upgrade later.
Figure 1.3 Most entry-level cameras offer a full set of image settings designed to help you get good results with minimal fuss.
5Digital SLR Basics
Also common to cameras in this category is built-in fl ash for shoot-
ing in low light. The integrated fl ash pops up from the camera body
(Figure 1.4) when needed, either automatically, based on shutter
speed, or manually when you want to add a bit of fi ll light to an
image. Although not as fl exible or powerful as an external fl ash, you
can’t beat the convenience of having one always available.
Figure 1.4 Pop-up fl ash is standard on all entry-level and most mid-level cameras, but not the pro-level bodies.
Entry-level dSLR cameras normally allow you to capture images at a
rate of 3 frames per second, making it easier to photograph moving
objects. Most have enough onboard memory to record a dozen or
more images before fi lling the memory buffer and slowing down in
order to record the images to your memory card (see the “Memory
Cards” sidebar).
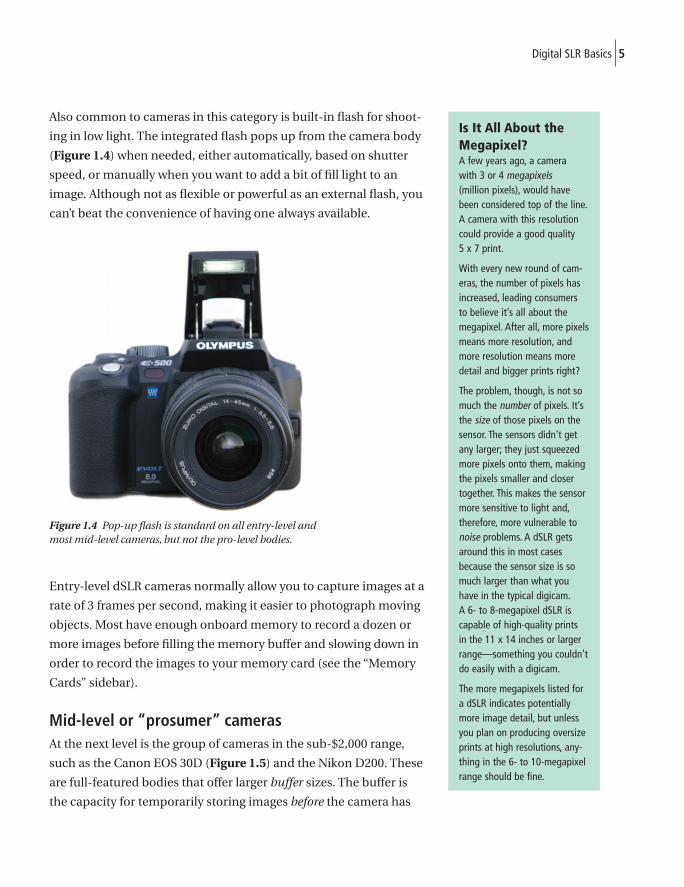
Mid-level or “prosumer” camerasAt the next level is the group of cameras in the sub-$2,000 range,
such as the Canon EOS 30D (Figure 1.5) and the Nikon D200. These
are full-featured bodies that offer larger buffer sizes. The buffer is
the capacity for temporarily storing images before the camera has
Is It All About the Megapixel?A few years ago, a camera with 3 or 4 megapixels(million pixels), would have been considered top of the line. A camera with this resolution could provide a good quality 5 x 7 print.
With every new round of cam-eras, the number of pixels has increased, leading consumers to believe it’s all about the megapixel. After all, more pixels means more resolution, and more resolution means more detail and bigger prints right?
The problem, though, is not so much the number of pixels. It’s the size of those pixels on the sensor. The sensors didn’t get any larger; they just squeezed more pixels onto them, making the pixels smaller and closer together. This makes the sensor more sensitive to light and, therefore, more vulnerable to noise problems. A dSLR gets around this in most cases because the sensor size is so much larger than what you have in the typical digicam. A 6- to 8-megapixel dSLR is capable of high-quality prints in the 11 x 14 inches or larger range—something you couldn’t do easily with a digicam.
The more megapixels listed for a dSLR indicates potentially more image detail, but unless you plan on producing oversize prints at high resolutions, any-thing in the 6- to 10-megapixel range should be fine.
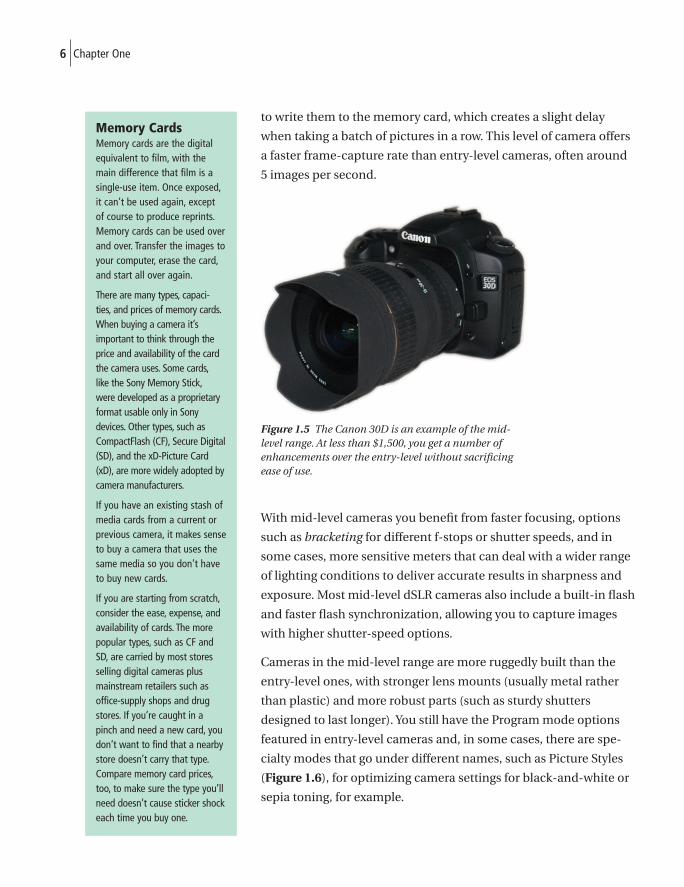
6 Chapter One
to write them to the memory card, which creates a slight delay
when taking a batch of pictures in a row. This level of camera offers
a faster frame-capture rate than entry-level cameras, often around
5 images per second.
Figure 1.5 The Canon 30D is an example of the mid-level range. At less than $1,500, you get a number of enhancements over the entry-level without sacrifi cing ease of use.
With mid-level cameras you benefi t from faster focusing, options
such as bracketing for different f-stops or shutter speeds, and in
some cases, more sensitive meters that can deal with a wider range
of lighting conditions to deliver accurate results in sharpness and
exposure. Most mid-level dSLR cameras also include a built-in fl ash
and faster fl ash synchronization, allowing you to capture images
with higher shutter-speed options.
Cameras in the mid-level range are more ruggedly built than the
entry-level ones, with stronger lens mounts (usually metal rather
than plastic) and more robust parts (such as sturdy shutters
designed to last longer). You still have the Program mode options
featured in entry-level cameras and, in some cases, there are spe-
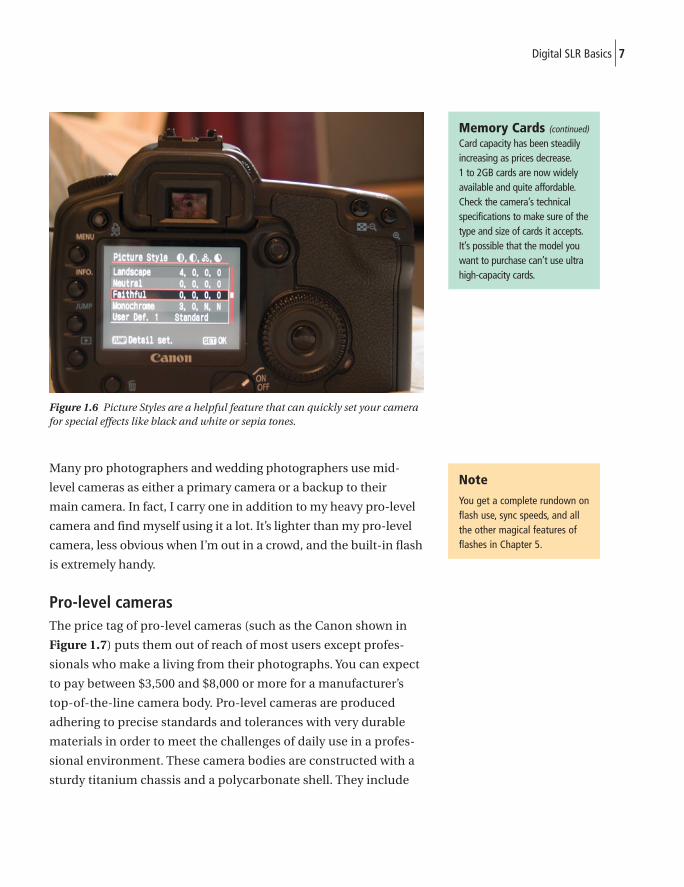
cialty modes that go under different names, such as Picture Styles
(Figure 1.6), for optimizing camera settings for black-and-white or
sepia toning, for example.
Memory CardsMemory cards are the digital equivalent to film, with the main difference that film is a single-use item. Once exposed, it can’t be used again, except of course to produce reprints. Memory cards can be used over and over. Transfer the images to your computer, erase the card, and start all over again.
There are many types, capaci-ties, and prices of memory cards. When buying a camera it’s important to think through the price and availability of the card the camera uses. Some cards, like the Sony Memory Stick, were developed as a proprietary format usable only in Sony devices. Other types, such as CompactFlash (CF), Secure Digital (SD), and the xD-Picture Card (xD), are more widely adopted by camera manufacturers.
If you have an existing stash of media cards from a current or previous camera, it makes sense to buy a camera that uses the same media so you don’t have to buy new cards.
If you are starting from scratch, consider the ease, expense, and availability of cards. The more popular types, such as CF and SD, are carried by most stores selling digital cameras plus mainstream retailers such as office-supply shops and drug stores. If you’re caught in a pinch and need a new card, you don’t want to find that a nearby store doesn’t carry that type. Compare memory card prices, too, to make sure the type you’ll need doesn’t cause sticker shock each time you buy one.
7Digital SLR Basics
Figure 1.6 Picture Styles are a helpful feature that can quickly set your camera for special effects like black and white or sepia tones.
Many pro photographers and wedding photographers use mid-
level cameras as either a primary camera or a backup to their
main camera. In fact, I carry one in addition to my heavy pro-level
camera and fi nd myself using it a lot. It’s lighter than my pro-level
camera, less obvious when I’m out in a crowd, and the built-in fl ash
is extremely handy.
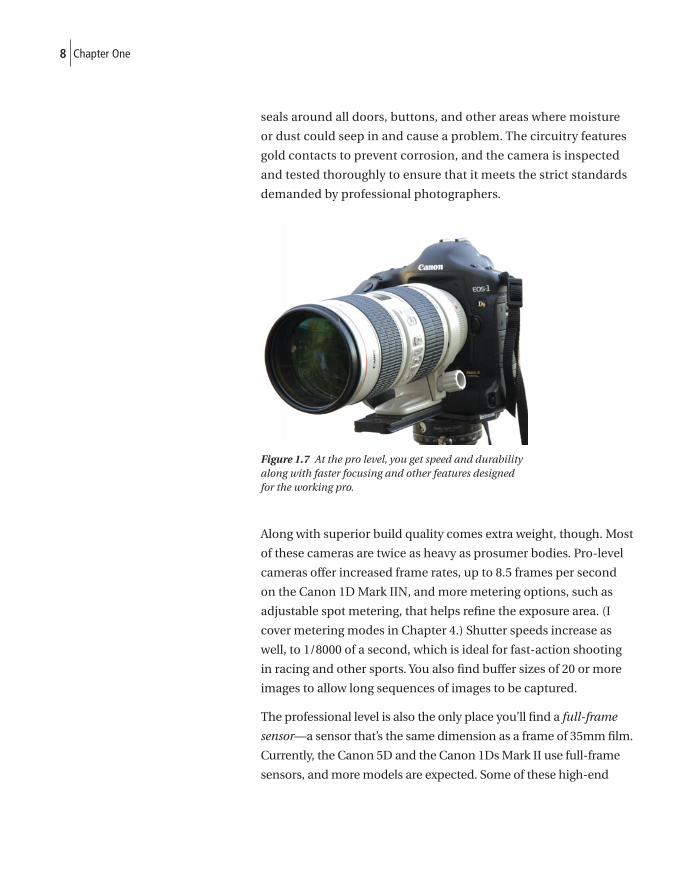
Pro-level camerasThe price tag of pro-level cameras (such as the Canon shown in
Figure 1.7) puts them out of reach of most users except profes-
sionals who make a living from their photographs. You can expect
to pay between $3,500 and $8,000 or more for a manufacturer’s
top-of-the-line camera body. Pro-level cameras are produced
adhering to precise standards and tolerances with very durable
materials in order to meet the challenges of daily use in a profes-
sional environment. These camera bodies are constructed with a
sturdy titanium chassis and a polycarbonate shell. They include
Note
You get a complete rundown on flash use, sync speeds, and all the other magical features of flashes in Chapter 5.
Note
You get a complete rundown on flash use, sync speeds, and all the other magical features of flashes in Chapter 5.
Memory Cards (continued)
Card capacity has been steadily increasing as prices decrease. 1 to 2GB cards are now widely available and quite affordable. Check the camera’s technical specifications to make sure of the type and size of cards it accepts. It’s possible that the model you want to purchase can’t use ultra high-capacity cards.
8 Chapter One
seals around all doors, buttons, and other areas where moisture
or dust could seep in and cause a problem. The circuitry features
gold contacts to prevent corrosion, and the camera is inspected
and tested thoroughly to ensure that it meets the strict standards
demanded by professional photographers.
Figure 1.7 At the pro level, you get speed and durability along with faster focusing and other features designed for the working pro.
Along with superior build quality comes extra weight, though. Most
of these cameras are twice as heavy as prosumer bodies. Pro-level
cameras offer increased frame rates, up to 8.5 frames per second
on the Canon 1D Mark IIN, and more metering options, such as
adjustable spot metering, that helps refi ne the exposure area. (I
cover metering modes in Chapter 4.) Shutter speeds increase as
well, to 1/8000 of a second, which is ideal for fast-action shooting
in racing and other sports. You also fi nd buffer sizes of 20 or more
images to allow long sequences of images to be captured.
The professional level is also the only place you’ll fi nd a full-frame
sensor—a sensor that’s the same dimension as a frame of 35mm fi lm.
Currently, the Canon 5D and the Canon 1Ds Mark II use full-frame
sensors, and more models are expected. Some of these high-end
9Digital SLR Basics
bodies include dual memory-card slots—usually for CF and SD
cards—giving you more memory options and allowing you to write
different image formats to different cards.
Although built to handle the needs of a working pro, there are
valid reasons for the amateur photographer to consider a pro-level
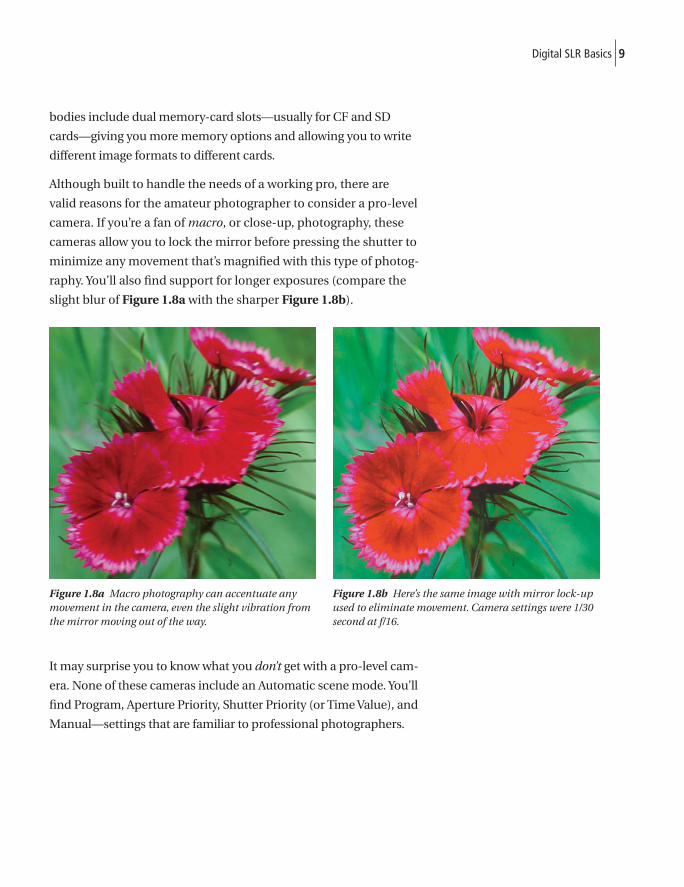
camera. If you’re a fan of macro, or close-up, photography, these
cameras allow you to lock the mirror before pressing the shutter to
minimize any movement that’s magnifi ed with this type of photog-
raphy. You’ll also fi nd support for longer exposures (compare the
slight blur of Figure 1.8a with the sharper Figure 1.8b).
Figure 1.8a Macro photography can accentuate any movement in the camera, even the slight vibration from the mirror moving out of the way.
Figure 1.8b Here’s the same image with mirror lock-up used to eliminate movement. Camera settings were 1/30 second at f/16.
It may surprise you to know what you don’t get with a pro-level cam-
era. None of these cameras include an Automatic scene mode. You’ll
fi nd Program, Aperture Priority, Shutter Priority (or Time Value), and
Manual—settings that are familiar to professional photographers.
10 Chapter One
You won’t fi nd a built-in fl ash with pro-level bodies either, which
I fi nd disappointing. Regardless of your photography level, some-
times a built-in fl ash is perfect for the task at hand. Instead,
photographers at this level are expected to use sophisticated (and
bulky) external light units.
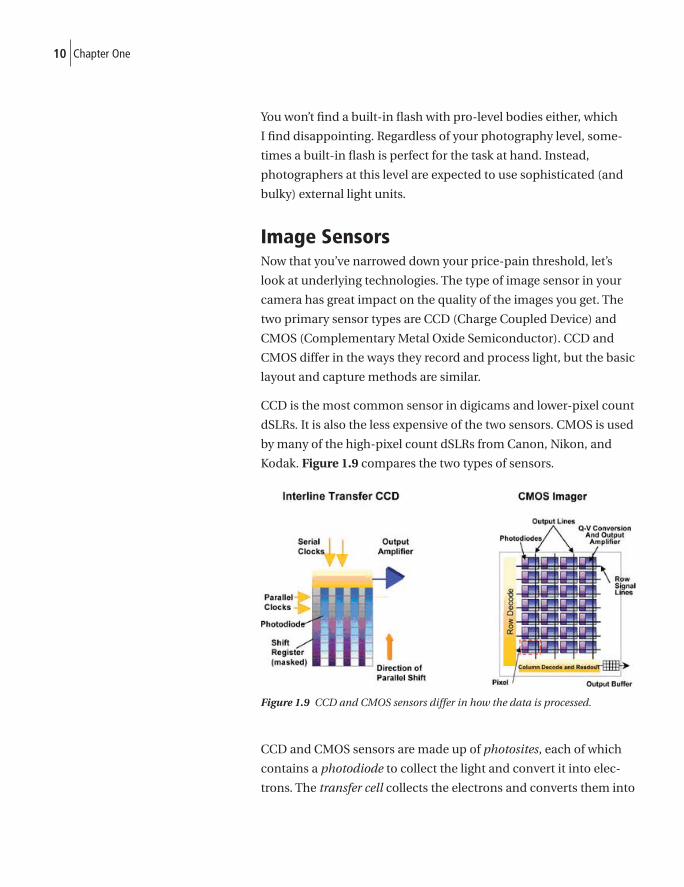
Image SensorsNow that you’ve narrowed down your price-pain threshold, let’s
look at underlying technologies. The type of image sensor in your
camera has great impact on the quality of the images you get. The
two primary sensor types are CCD (Charge Coupled Device) and
CMOS (Complementary Metal Oxide Semiconductor). CCD and
CMOS differ in the ways they record and process light, but the basic
layout and capture methods are similar.
CCD is the most common sensor in digicams and lower-pixel count
dSLRs. It is also the less expensive of the two sensors. CMOS is used
by many of the high-pixel count dSLRs from Canon, Nikon, and
Kodak. Figure 1.9 compares the two types of sensors.
Figure 1.9 CCD and CMOS sensors differ in how the data is processed.
CCD and CMOS sensors are made up of photosites, each of which
contains a photodiode to collect the light and convert it into elec-
trons. The transfer cell collects the electrons and converts them into
11Digital SLR Basics
the digital values that make up the image. CMOS does more of the
computational work at the photosite itself instead of making the
transfer cell carry the load. The advantages and disadvantages to
CCD and CMOS sensors are as follows:
• Image quality. In the beginning, the cameras that used CCD
sensors had better noise-handling characteristics, which
reduced the grain-like image degradation resulting from low
light and high ISO speed ratings, than those using CMOS (see
nearby “Noise” sidebar for more). When comparing sensors
of the same size, the photodiodes on a CCD are larger and
more sensitive to light, resulting in a cleaner image. However,
the newest CMOS sensors have excellent built-in noise
reduction that surpasses most CCD sensors. In fact, current
CMOS-equipped cameras from Canon have some of the best
noise-reducing characteristics of any camera available.
• Resolution. When compared to CCD, CMOS excels because each
photosite can be read directly to the sensor, and camera makers
can support multiple resolutions from the same sensor. For exam-
ple, the Kodak DCS Pro SLR series cameras can record 14-mega-
pixel, 6-megapixel, or 3-megapixel images. With a CCD-equipped
camera, all 14 megapixels of information would need to be read
and converted. The camera would then need to discard the excess
data. This wastes processing time and battery power. CMOS, on
the other hand, simply reads the required number of photosites
and converts only those necessary to record the image.
• Power consumption. CMOS technology has the advantage of
lower power consumption than CCD because most of the pro-
cessing is done on the sensor itself instead of in a separate trans-
fer cell. This reduces the power required to move and convert
data. The reduction in power results in more images captured per
battery charge, which translates into longer battery life.
• Cost. The biggest drawback to CCD sensor technology is the cost.
CCD dSLR camera sensors require a large silicon-wafer footprint.
CMOS, on the other hand, is less expensive to produce because
it’s designed to require a smaller wafer in manufacturing.
NoiseWhen you read reviews about digital cameras, one thing that’s mentioned a lot is digital noise,sometimes just referred to as noise. It’s not often though that anyone explains what noise is. If you’re used to taking photos with film, you know that faster films with high ISO numbers have more grain because the film contains larger silver halide crystals which increase its sen-sitivity to light. In digital pho-tography when you increase the ISO setting you’re making the sensor more sensitive to light, just as you would by changing to a faster film. The increase in sensitivity causes more electric-ity to flow to each photosite which leads to the digital equivalent of grain—noise. Noise is especially problematic in dark areas of an image and with longer exposures. The good news is that you can reduce the effect of noise easily during image editing and I will show you how to do that later in the book.
12 Chapter One
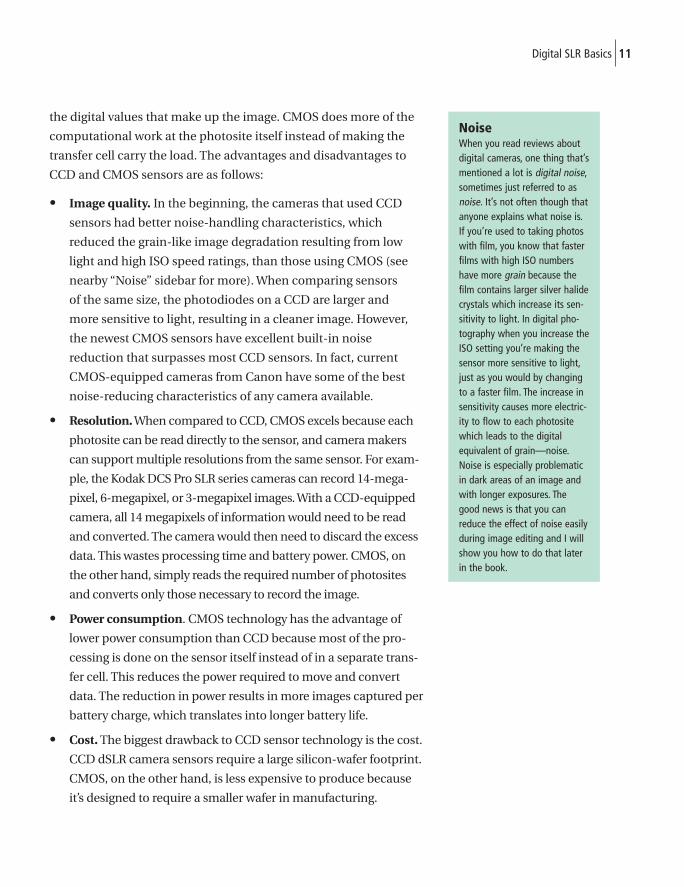
How sensors workPhotosites are laid out in a grid of rows and columns as shown in
Figure 1.10. Each photosite contains a photodiode, which collects
the light as photons, and a holding cell to store that light as elec-
trons. An exception to the typical grid is the method used by Fuji
to increase the dynamic range by using two photodiodes for each
photosite. In most cameras, a mosaic of color fi lters is laid over
each photosite to provide color information to the image. The most
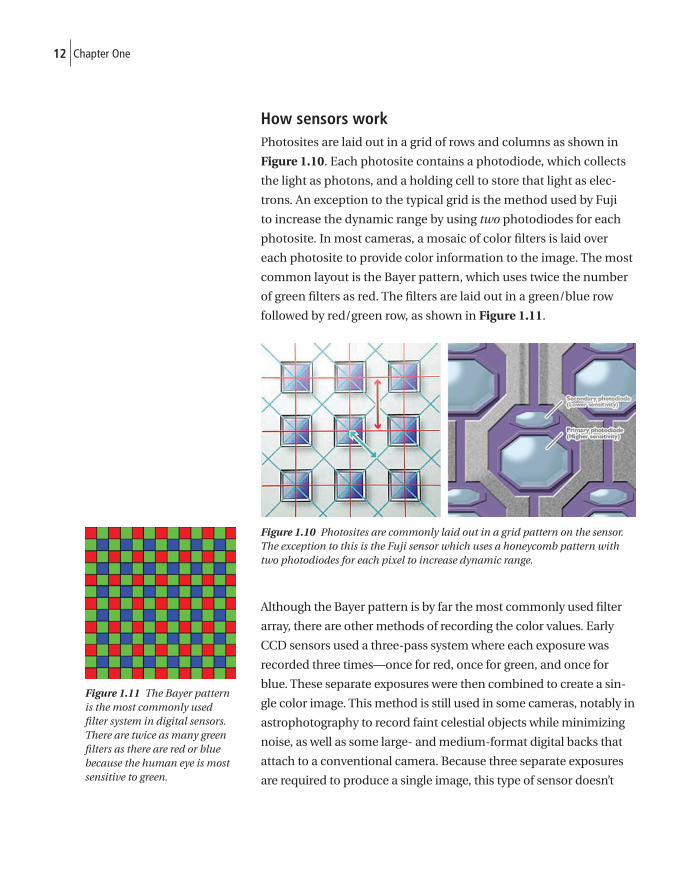
common layout is the Bayer pattern, which uses twice the number
of green fi lters as red. The fi lters are laid out in a green/blue row
followed by red/green row, as shown in Figure 1.11.
Figure 1.10 Photosites are commonly laid out in a grid pattern on the sensor. The exception to this is the Fuji sensor which uses a honeycomb pattern with two photodiodes for each pixel to increase dynamic range.
Although the Bayer pattern is by far the most commonly used fi lter
array, there are other methods of recording the color values. Early
CCD sensors used a three-pass system where each exposure was
recorded three times—once for red, once for green, and once for
blue. These separate exposures were then combined to create a sin-
gle color image. This method is still used in some cameras, notably in
astrophotography to record faint celestial objects while minimizing
noise, as well as some large- and medium-format digital backs that
attach to a conventional camera. Because three separate exposures
are required to produce a single image, this type of sensor doesn’t
Figure 1.11 The Bayer pattern is the most commonly used fi lter system in digital sensors. There are twice as many green fi lters as there are red or blue because the human eye is most sensitive to green.
13Digital SLR Basics
work for handheld photography. In fact, it often requires that they be
connected to a computer that does the processing work of combin-
ing each of the separate exposures into one image.
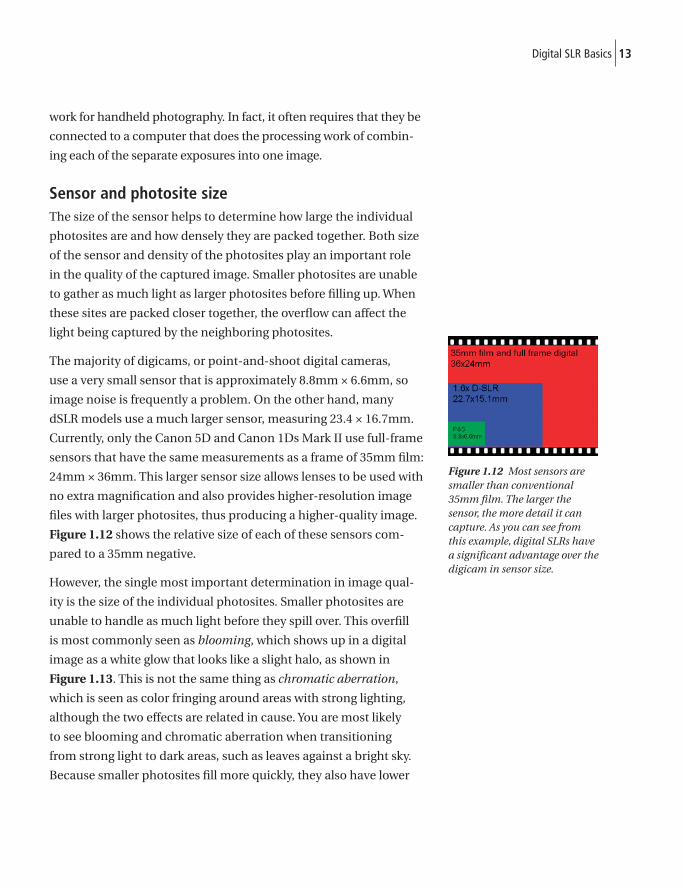
Sensor and photosite sizeThe size of the sensor helps to determine how large the individual
photosites are and how densely they are packed together. Both size
of the sensor and density of the photosites play an important role
in the quality of the captured image. Smaller photosites are unable
to gather as much light as larger photosites before fi lling up. When
these sites are packed closer together, the overfl ow can affect the
light being captured by the neighboring photosites.
The majority of digicams, or point-and-shoot digital cameras,
use a very small sensor that is approximately 8.8mm × 6.6mm, so
image noise is frequently a problem. On the other hand, many
dSLR models use a much larger sensor, measuring 23.4 × 16.7mm.
Currently, only the Canon 5D and Canon 1Ds Mark II use full-frame
sensors that have the same measurements as a frame of 35mm fi lm:
24mm × 36mm. This larger sensor size allows lenses to be used with
no extra magnifi cation and also provides higher-resolution image
fi les with larger photosites, thus producing a higher-quality image.
Figure 1.12 shows the relative size of each of these sensors com-
pared to a 35mm negative.
However, the single most important determination in image qual-
ity is the size of the individual photosites. Smaller photosites are
unable to handle as much light before they spill over. This overfi ll
is most commonly seen as blooming, which shows up in a digital
image as a white glow that looks like a slight halo, as shown in
Figure 1.13. This is not the same thing as chromatic aberration,
which is seen as color fringing around areas with strong lighting,
although the two effects are related in cause. You are most likely
to see blooming and chromatic aberration when transitioning
from strong light to dark areas, such as leaves against a bright sky.
Because smaller photosites fi ll more quickly, they also have lower
Figure 1.12 Most sensors are smaller than conventional 35mm fi lm. The larger the sensor, the more detail it can capture. As you can see from this example, digital SLRs have a signifi cant advantage over the digicam in sensor size.

14 Chapter One
dynamic range—there are fewer levels of light held before the
photosite is saturated to full white. Although it’s always best to
choose a camera that minimizes these artifacts, I discuss later how
to correct some of them in Adobe Photoshop.
Figure 1.13 Blooming and chromatic aberration occurs when a photosite is fl ooded with more light than it can handle. Here you can see blooming on the chrome area (if you take your eyes off the cute doggie).
Figure 1.14 shows the difference between two cameras with the
same resolution but different sensor sizes. The image on the left
was taken with a digicam using the small sensor typical in these
models. The image on the right was taken with a dSLR with a much
larger sensor. The dSLR image is more resolute, has better color
rendition, and contains smoother transitions along the edges where
the tonality changes.
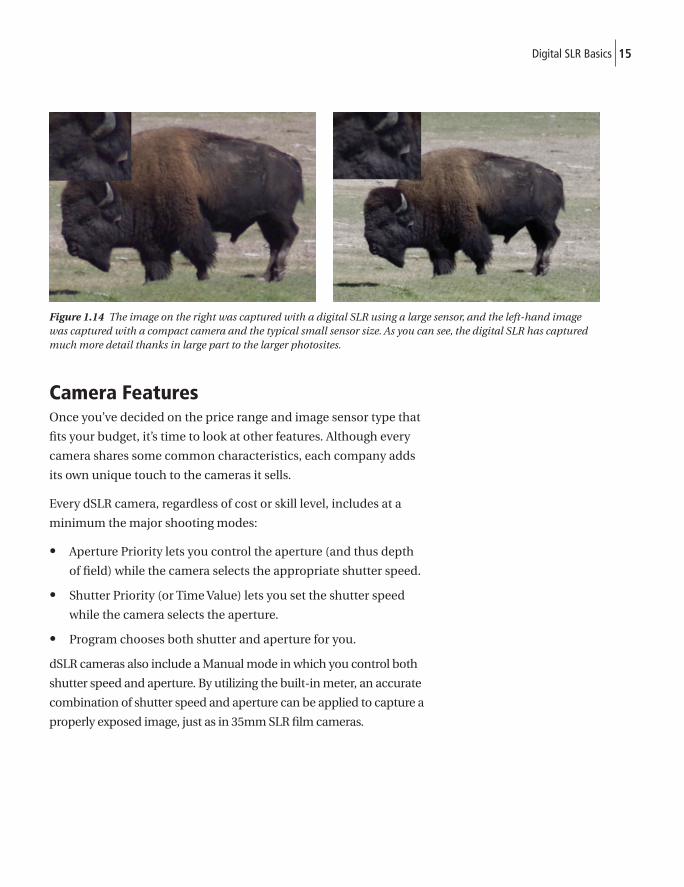
15Digital SLR Basics
Figure 1.14 The image on the right was captured with a digital SLR using a large sensor, and the left-hand image was captured with a compact camera and the typical small sensor size. As you can see, the digital SLR has captured much more detail thanks in large part to the larger photosites.
Camera FeaturesOnce you’ve decided on the price range and image sensor type that
fi ts your budget, it’s time to look at other features. Although every
camera shares some common characteristics, each company adds
its own unique touch to the cameras it sells.
Every dSLR camera, regardless of cost or skill level, includes at a
minimum the major shooting modes:
• Aperture Priority lets you control the aperture (and thus depth
of fi eld) while the camera selects the appropriate shutter speed.
• Shutter Priority (or Time Value) lets you set the shutter speed
while the camera selects the aperture.
• Program chooses both shutter and aperture for you.
dSLR cameras also include a Manual mode in which you control both
shutter speed and aperture. By utilizing the built-in meter, an accurate
combination of shutter speed and aperture can be applied to capture a
properly exposed image, just as in 35mm SLR fi lm cameras.
16 Chapter One
You should also be able to choose between manual focus and auto-
focus, and every dSLR I’ve come across lets you choose whether
you want continuous auto-focus for tracking moving subjects or
single auto-focus for stationary subjects.
Finally, you have a choice of metering modes. All cameras have some
form of matrix metering, where the entire scene is evaluated by the
camera’s meter and averaged for the best exposure, and a center-
weighted metering mode, where just the central portion of the image
is considered for exposure. I cover metering modes in Chapter 4.
For example, some cameras have an anti-shake feature that mini-
mizes vibration, especially at slower shutter speeds, resulting in
sharper images. Canon and Nikon both offer anti-shake with some
of their lenses (see Chapter 3). Pentax and Sony build the stabiliza-
tion into the camera body itself, so any lens you use is stabilized.
Get ready for the wonderful world of dust. Compact cameras don’t
have this problem because you never remove the lens and the system
remains sealed from outside elements. With a dSLR, however, every
time you change lenses you expose the sensor to dust in the air. And,
because a sensor is electrically charged, it acts like a magnet. You’ll
know that you have dust on your sensor when you see spots in your
photos (Figure 1.15) that remain constant from one image to the
next. In Chapter 8 you learn how to use an image-editing program to
remove dust from your photos.
A couple of manufacturers incorporate dust removal into the
camera itself. The Olympus E Series has a “Supersonic Wave Filter”
which vibrates the sensor briefl y on start-up to shake any dust off
the sensor before you start your photographic session.
17Digital SLR Basics
Figure 1.15 Dust on the sensor can be a problem for most cameras. Olympus uses a special fi lter to remove dust when you turn the camera on.
Lens selectionOwners of Canon EOS and Nikon fi lm SLR cameras will be happy to
know that your existing lenses will work with the new digital body,
making your purchase decision that much easier. If you’re just getting
into SLR photography, the types of lenses available for the camera
body should be high on your list of priorities when you select a body.
Almost all dSLR cameras are sold as a kit that includes the camera
body and a default lens. Most lenses chosen by the manufacturer
are zoom lenses and address a wide range of situations from regular
18 Chapter One
portrait or scene photography to adequate telephoto uses. These
lenses are absolutely fi ne, but you may want to explore other options.
The type of photography you are interested in will drive your lens
choice. Landscape photography fans will want to look into a system
with good wide-angle lenses, while the wildlife fan is going to want
a selection of telephoto lenses to get closer to elusive subjects. The
nuances of these specialty lenses vary (see Chapter 3).
A fi nal consideration with lens selection is the availability of
third-party lenses such as those from Sigma, Tamron, and Tokina.
These companies make lenses for Canon and Nikon as well as for
Olympus, Pentax, and Sony. But you’ll fi nd the widest selection of
lenses for Canon and Nikon brands.
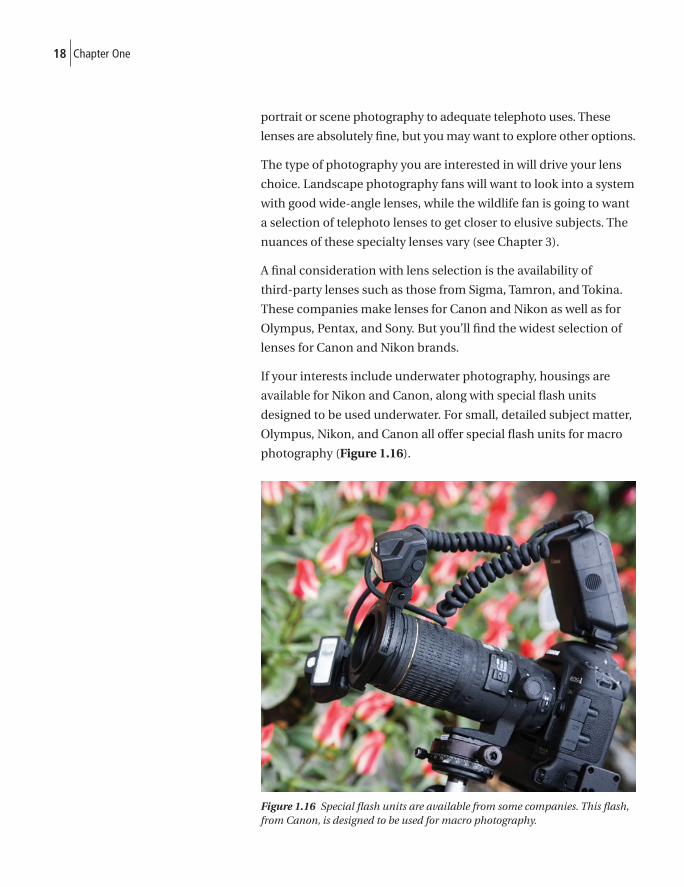
If your interests include underwater photography, housings are
available for Nikon and Canon, along with special fl ash units
designed to be used underwater. For small, detailed subject matter,
Olympus, Nikon, and Canon all offer special fl ash units for macro
photography (Figure 1.16).
Figure 1.16 Special fl ash units are available from some companies. This fl ash, from Canon, is designed to be used for macro photography.
19Digital SLR Basics
Deciphering a Data SheetWhen you shop for a dSLR, you’ll fi nd a bewildering array of
options. Salespeople will hand you data sheets that describe in
sometimes painful detail what the camera can do. In this section,
I explain the major areas to look for when you go shopping for that
fi rst dSLR. By the way, this book’s Glossary is another source of
information for unfamiliar terms.
Recording mediumThe recording medium is the type of memory card used by the cam-
era, such as CF (Compact Flash) memory cards. The most common
card is Type I (3.3mm thick), whereas some, such as the MicroDrive,
are Type II (5mm thick). Devices equipped with Type II slots can
also accept Type I cards, but not vice-versa. Other common types of
memory cards used in dSLRs are SD (Secure Digital) and xD Picture
Cards (see “Memory Cards” sidebar earlier in this chapter).
Aspect ratioThe 3:2 aspect (width to height) ratio is the most common for digi-
tal photographs and is the same ratio that a traditional 35mm fi lm
camera uses. Other available ratios you’ll fi nd are 4:3 and 16:9.
Color fi lter systemMost dSLR image sensors use an RGB fi lter to record a single color
on each photosensor to produce an accurate image. The exception
is the Foveon X3 sensor which uses a color-separation beam-splitter
prism assembly and utilizes all the light and records all colors at all
locations on the sensor. This technology is currently featured in the
Sigma line of dSLR cameras.
Recording and image formatA dSLR should take and store photos in both JPEG and raw formats.
This means that images are written to the memory card in a way that
can be understood by image-editing programs. Although JPEG is a
widely accepted format in virtually every software application, raw
20 Chapter One
fi les are proprietary to each individual manufacturer and require
their software, or a licensed third-party application, to convert to
an editable fi le.
File sizeMost cameras support saving JPEG fi les in various sizes up to a
limit, normally given as maximum fi le size. This is the recom-
mended manner for capture to ensure the best quality enlarge-
ments. Shooting smaller fi les is quicker, allows more images to
be stored on a card, and is ideal for Web use.
Image-processing parametersSome cameras enable you to create preset custom settings that can
be quickly recalled for shooting specifi c situations, eliminating the
need to select each individual setting from the menus every time
you want to use them.
InterfaceThe interface is how the camera is connected to your computer.
You’ll fi nd either USB 2.0 or FireWire (IEEE 1394) as options. Be
sure your computer has a FireWire port if you choose a camera with
a FireWire interface.
White balanceWith most dSLRs, the white balance, measured in degrees Kelvin,
can be set for the appropriate light source. Presets for daylight,
shade, cloudy, tungsten, fl uorescent, and fl ash are common
options. All digital cameras also provide an Auto preset where the
camera can more accurately determine the proper white balance
based on the current light source. Finally, most cameras also let you
create a custom setting for a mixed light source or specifi c lighting
situation, such as in a studio.
21Digital SLR Basics
Viewfi nder coverageMost viewfi nders don’t show you the entire image being captured.
More expensive pro-level dSLRs often have 100-percent viewfi nder
coverage. This is a tremendous advantage for properly evaluating
composition and framing.
Magnifi cationThe magnifi cation level in the viewfi nder relates to how large the
scene appears when you look through the eyepiece. A magnifi ca-
tion of .8x is considered very good.
Viewfi nder informationThis is a listing of all the information that can be displayed in the
viewfi nder around the frame. Thankfully, you’ll never see all of it
at once. Chapter 4 has more details on reading the information in
your viewfi nder.
Depth-of-fi eld previewLandscape and macro photographers in particular fi nd a depth-of-
fi eld preview very helpful. This works by closing the aperture down
to the selected setting to let you see what areas of your scene are in
focus before you take the shot.
Eyepiece shutterFor long exposures, it’s helpful to cover the eyepiece to keep stray
light from entering. Some pro cameras have a built-in shutter, and
others come with a simple cover you can snap on.
ISO speed rangeThe speed range refers to the different range of ISO (International
Organization for Standardization) fi lm speed settings you can
use. Many dSLR cameras can go as high as ISO 3200. Remember
though, just as in 35mm photography, the higher the ISO setting,
22 Chapter One
the more noise (graininess) issues you’ll have with the image. You
can use higher ISO settings in lower light situations to increase the
sensitivity of the sensor just as you would by using faster fi lm with
a traditional camera. I cover ISO in more detail in Chapter 2.
Exposure compensationExposure compensation, in the form of f-stops, adjusts the cam-
era to automatically add or subtract some light from the exposure
setting you’re using. This is useful when shooting very bright,
backlit subjects or very dark scenes. Essentially, it instructs the
camera to overexpose or underexpose an image based on what
the camera would incorrectly perceive as the correct exposure
setting. Bracketing is a feature that enables the camera to take a
set of images, usually three, with different settings to increase the
chances of capturing one correctly exposed image.
Noise reduction for long exposureBuilt-in noise reduction works by taking a second image without
opening the shutter. This is called the dark. The camera then com-
pares the dark and the real image, and wherever there are matching
pixels, or noise, they are removed and replaced with dark pixels.

It might surprise you to know that digital SLRs share many of the
same features as their compact digicam cousins, but in an odd twist
of irony, it’s often easier to access most of the controls on a digital
SLR than on a compact camera. Where the digicams tend to force
you to go through multiple levels of menus on the LCD screen to
get to settings such as ISO, aperture, and shutter speed, the SLR has
quick access via buttons or dials to let you make changes while you
shoot without distraction.
In this chapter, I will show you the common controls that you’ll fi nd
on most digital SLRs, with special attention to the controls you’ll
fi nd yourself accessing frequently.
Using Program ModeThe fi rst stop for almost everyone is Program mode. Usually identi-
fi ed with a P (Figure 2.1), this mode puts all control in the hands
of the camera. Both aperture and shutter speed are set automati-
cally, based on how the camera senses the available light, which lets
you concentrate on learning how to compose and focus—ideal for
someone just moving into a full-featured camera.
Letting the camera chooseProgram mode is often the easiest way to get used to a new camera,
allowing you to concentrate on focusing, metering, composition,
and just capturing images.
You’ll fi nd Program mode useful when your camera supports auto-
matic fl ash settings as well. The camera, in addition to setting the
shutter speed and aperture, automatically determines the proper
output from the external fl ash to give you the extra light needed for a
successful image. Note that this is not true in Canon dSLR cameras.
2 Mastering Digital SLR Controls
Figure 2.1 The Setting dial on a typical digital SLR, with Program, Aperture, Shutter, Manual, and Scene mode settings.
24 Chapter Two
With Canons, the fl ash only pops up automatically in scene modes
such as Auto (green square), Portrait, Macro, and Night mode.
Program Shift modesEven with Program mode selected, most cameras include a feature
known as Program Shift or Shiftable Program. In this mode, you can
control either the shutter speed or aperture, and the camera adjusts
the other setting to keep the exposure consistent. Although this
sounds very similar to Aperture Priority and Shutter Priority modes,
the difference is that once you capture the image in Program Shift
mode, the camera resets back to the default Program mode settings.
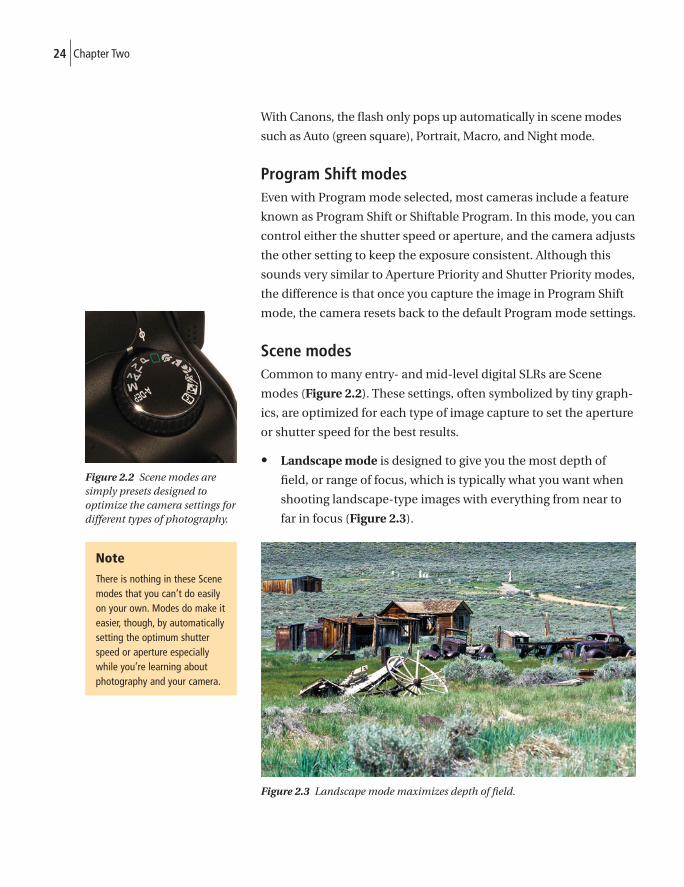
Scene modesCommon to many entry- and mid-level digital SLRs are Scene
modes (Figure 2.2). These settings, often symbolized by tiny graph-
ics, are optimized for each type of image capture to set the aperture
or shutter speed for the best results.
• Landscape mode is designed to give you the most depth of
fi eld, or range of focus, which is typically what you want when
shooting landscape-type images with everything from near to
far in focus (Figure 2.3).
Figure 2.3 Landscape mode maximizes depth of fi eld.
Figure 2.2 Scene modes are simply presets designed to optimize the camera settings for different types of photography.
Note
There is nothing in these Scene modes that you can’t do easily on your own. Modes do make it easier, though, by automatically setting the optimum shutter speed or aperture especially while you’re learning about photography and your camera.
25Mastering Digital SLR Controls
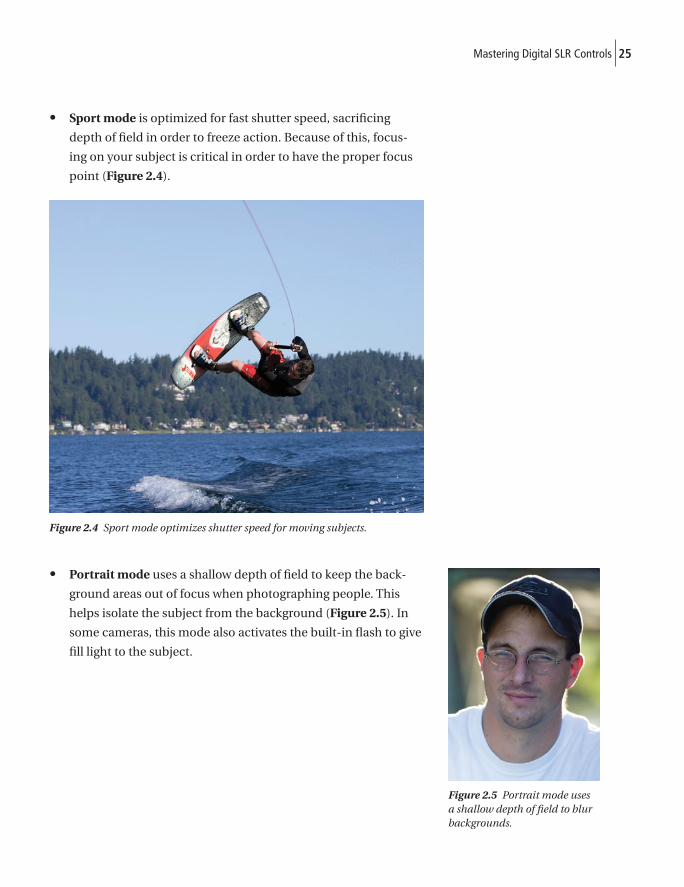
• Sport mode is optimized for fast shutter speed, sacrifi cing
depth of fi eld in order to freeze action. Because of this, focus-
ing on your subject is critical in order to have the proper focus
point (Figure 2.4).
Figure 2.4 Sport mode optimizes shutter speed for moving subjects.
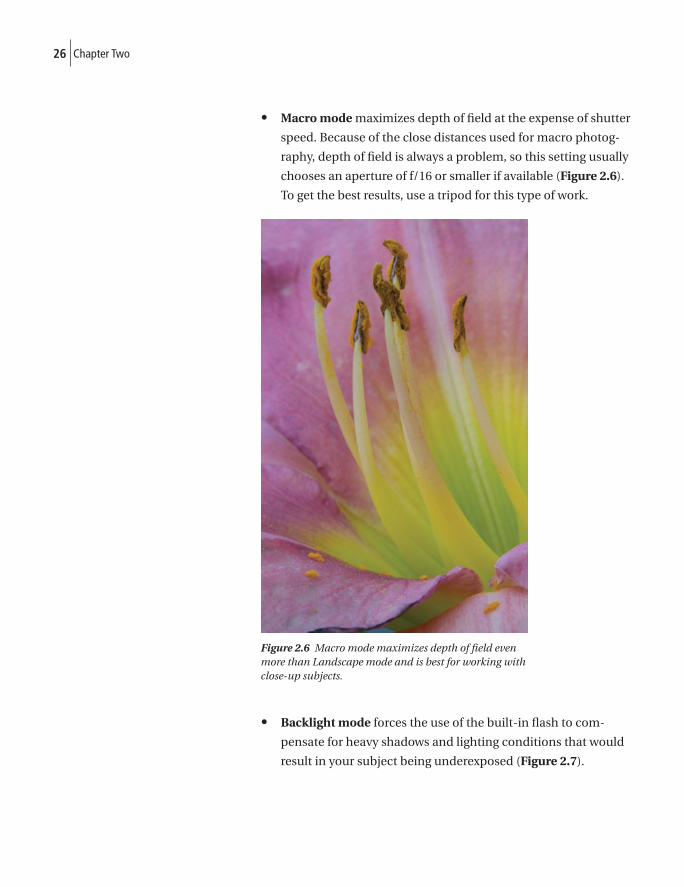
• Portrait mode uses a shallow depth of fi eld to keep the back-
ground areas out of focus when photographing people. This
helps isolate the subject from the background (Figure 2.5). In
some cameras, this mode also activates the built-in fl ash to give
fi ll light to the subject.
Figure 2.5 Portrait mode uses a shallow depth of fi eld to blur backgrounds.
26 Chapter Two
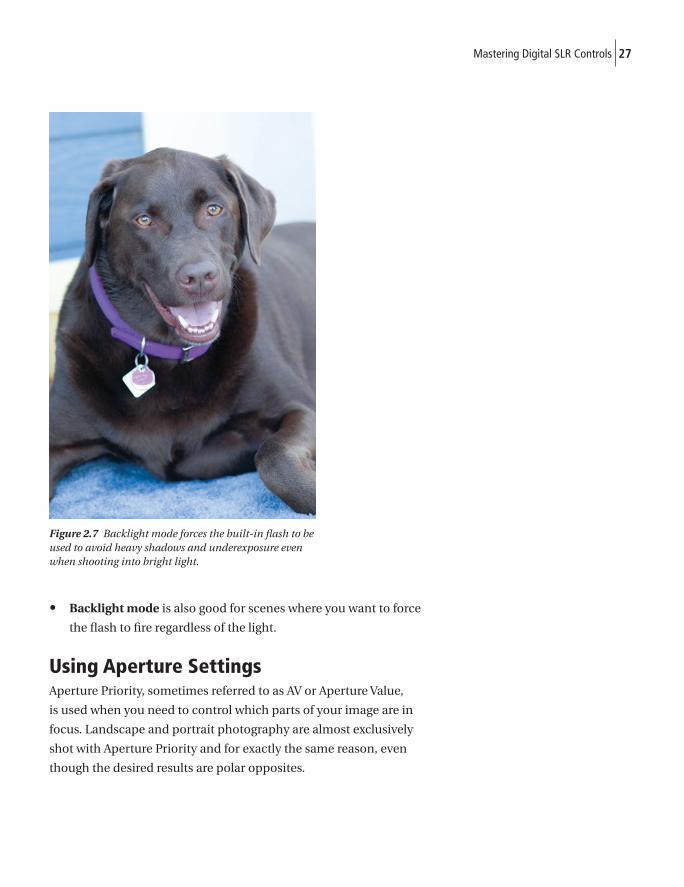
• Macro mode maximizes depth of fi eld at the expense of shutter
speed. Because of the close distances used for macro photog-
raphy, depth of fi eld is always a problem, so this setting usually
chooses an aperture of f/16 or smaller if available (Figure 2.6).
To get the best results, use a tripod for this type of work.
Figure 2.6 Macro mode maximizes depth of fi eld even more than Landscape mode and is best for working with close-up subjects.
• Backlight mode forces the use of the built-in fl ash to com-
pensate for heavy shadows and lighting conditions that would
result in your subject being underexposed (Figure 2.7).
27Mastering Digital SLR Controls
Figure 2.7 Backlight mode forces the built-in fl ash to be used to avoid heavy shadows and underexposure even when shooting into bright light.
• Backlight mode is also good for scenes where you want to force
the fl ash to fi re regardless of the light.
Using Aperture SettingsAperture Priority, sometimes referred to as AV or Aperture Value,
is used when you need to control which parts of your image are in
focus. Landscape and portrait photography are almost exclusively
shot with Aperture Priority and for exactly the same reason, even
though the desired results are polar opposites.
28 Chapter Two
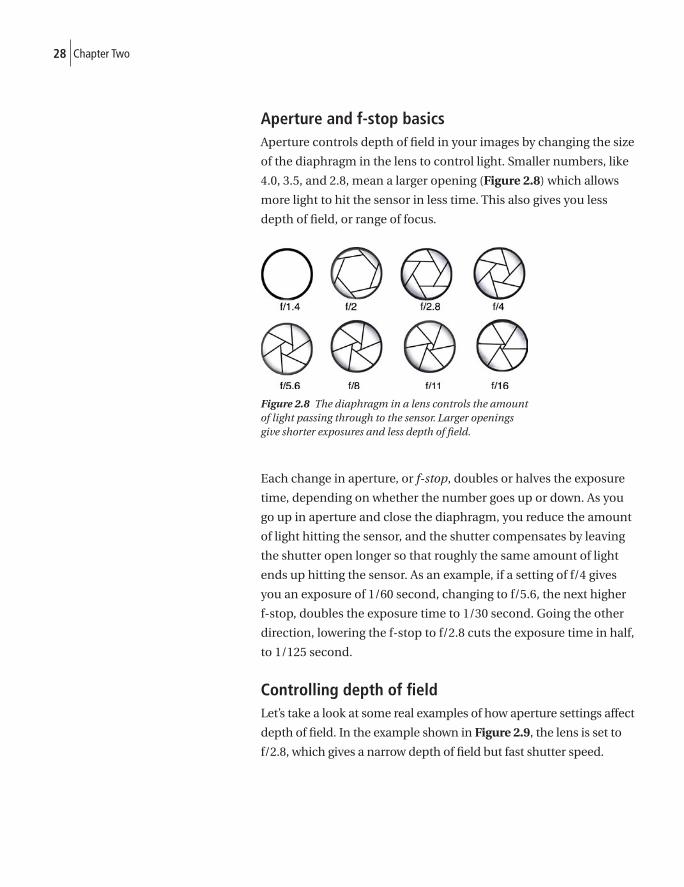
Aperture and f-stop basicsAperture controls depth of fi eld in your images by changing the size
of the diaphragm in the lens to control light. Smaller numbers, like
4.0, 3.5, and 2.8, mean a larger opening (Figure 2.8) which allows
more light to hit the sensor in less time. This also gives you less
depth of fi eld, or range of focus.
Figure 2.8 The diaphragm in a lens controls the amount of light passing through to the sensor. Larger openings give shorter exposures and less depth of fi eld.
Each change in aperture, or f-stop, doubles or halves the exposure
time, depending on whether the number goes up or down. As you
go up in aperture and close the diaphragm, you reduce the amount
of light hitting the sensor, and the shutter compensates by leaving
the shutter open longer so that roughly the same amount of light
ends up hitting the sensor. As an example, if a setting of f/4 gives
you an exposure of 1/60 second, changing to f/5.6, the next higher
f-stop, doubles the exposure time to 1/30 second. Going the other
direction, lowering the f-stop to f/2.8 cuts the exposure time in half,
to 1/125 second.
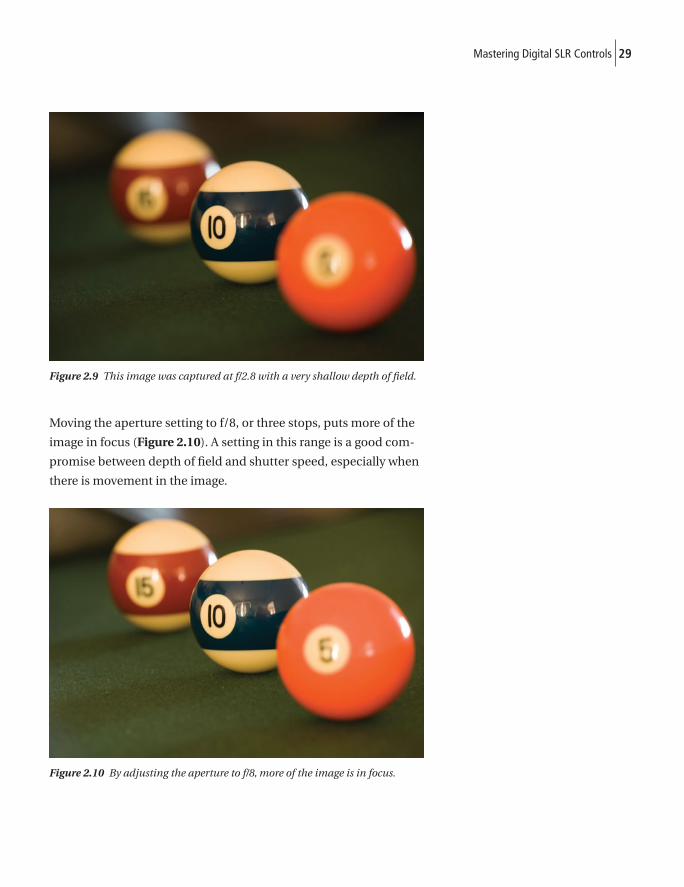
Controlling depth of fi eldLet’s take a look at some real examples of how aperture settings affect
depth of fi eld. In the example shown in Figure 2.9, the lens is set to
f/2.8, which gives a narrow depth of fi eld but fast shutter speed.
29Mastering Digital SLR Controls
Figure 2.9 This image was captured at f/2.8 with a very shallow depth of fi eld.
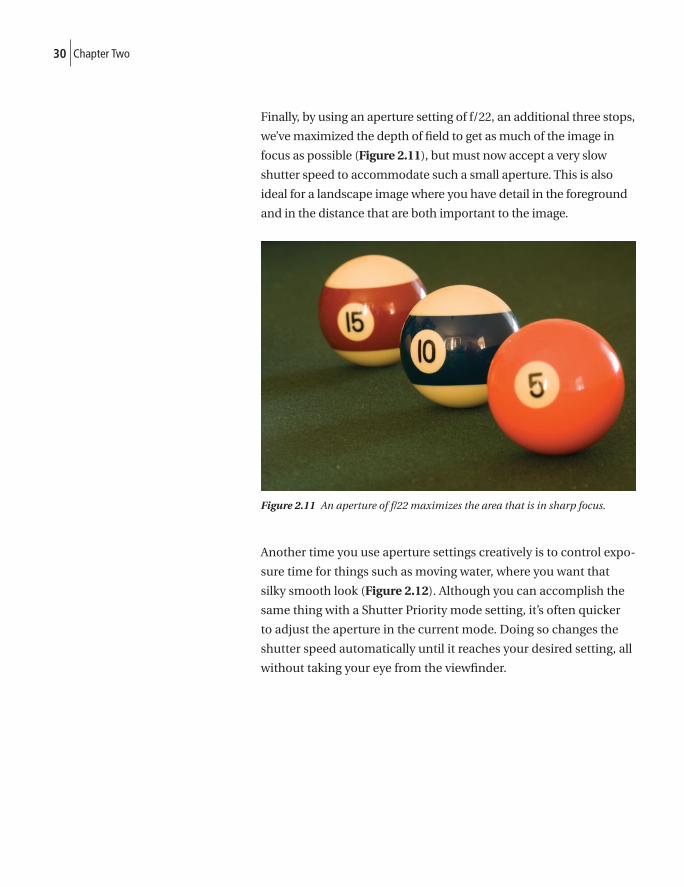
Moving the aperture setting to f/8, or three stops, puts more of the
image in focus (Figure 2.10). A setting in this range is a good com-
promise between depth of fi eld and shutter speed, especially when
there is movement in the image.
Figure 2.10 By adjusting the aperture to f/8, more of the image is in focus.
30 Chapter Two
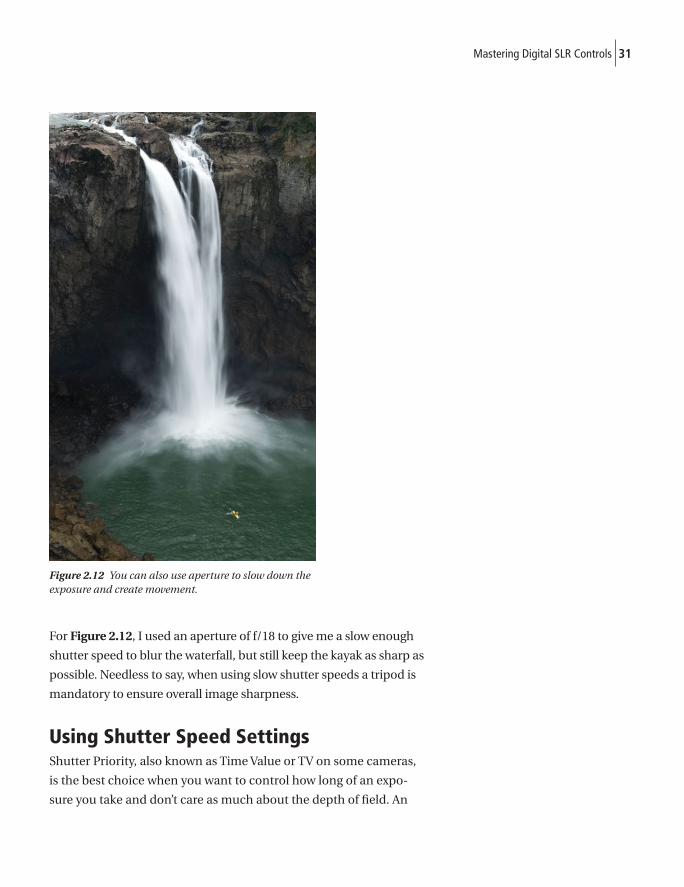
Finally, by using an aperture setting of f/22, an additional three stops,
we’ve maximized the depth of fi eld to get as much of the image in
focus as possible (Figure 2.11), but must now accept a very slow
shutter speed to accommodate such a small aperture. This is also
ideal for a landscape image where you have detail in the foreground
and in the distance that are both important to the image.
Figure 2.11 An aperture of f/22 maximizes the area that is in sharp focus.
Another time you use aperture settings creatively is to control expo-
sure time for things such as moving water, where you want that
silky smooth look (Figure 2.12). Although you can accomplish the
same thing with a Shutter Priority mode setting, it’s often quicker
to adjust the aperture in the current mode. Doing so changes the
shutter speed automatically until it reaches your desired setting, all
without taking your eye from the viewfi nder.
31Mastering Digital SLR Controls
Figure 2.12 You can also use aperture to slow down the exposure and create movement.
For Figure 2.12, I used an aperture of f/18 to give me a slow enough
shutter speed to blur the waterfall, but still keep the kayak as sharp as
possible. Needless to say, when using slow shutter speeds a tripod is
mandatory to ensure overall image sharpness.
Using Shutter Speed SettingsShutter Priority, also known as Time Value or TV on some cameras,
is the best choice when you want to control how long of an expo-
sure you take and don’t care as much about the depth of fi eld. An
32 Chapter Two
example of this type of image capture is sports photography, where
you really want to freeze the subject in motion. Another is where
the wind is blowing, and you want to avoid the blurring of trees,
fl owers, and grasses.
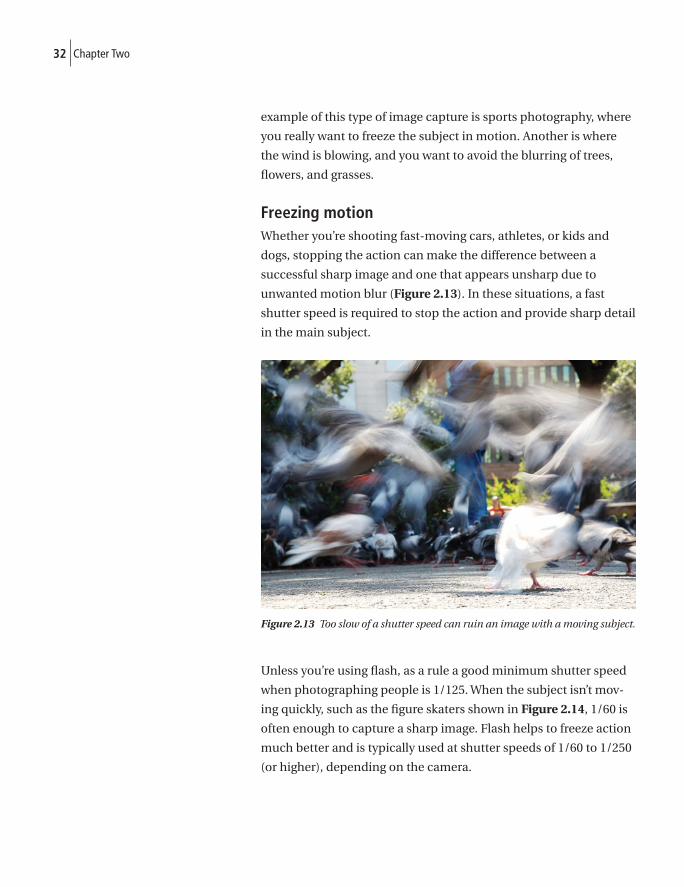
Freezing motionWhether you’re shooting fast-moving cars, athletes, or kids and
dogs, stopping the action can make the difference between a
successful sharp image and one that appears unsharp due to
unwanted motion blur (Figure 2.13). In these situations, a fast
shutter speed is required to stop the action and provide sharp detail
in the main subject.
Figure 2.13 Too slow of a shutter speed can ruin an image with a moving subject.
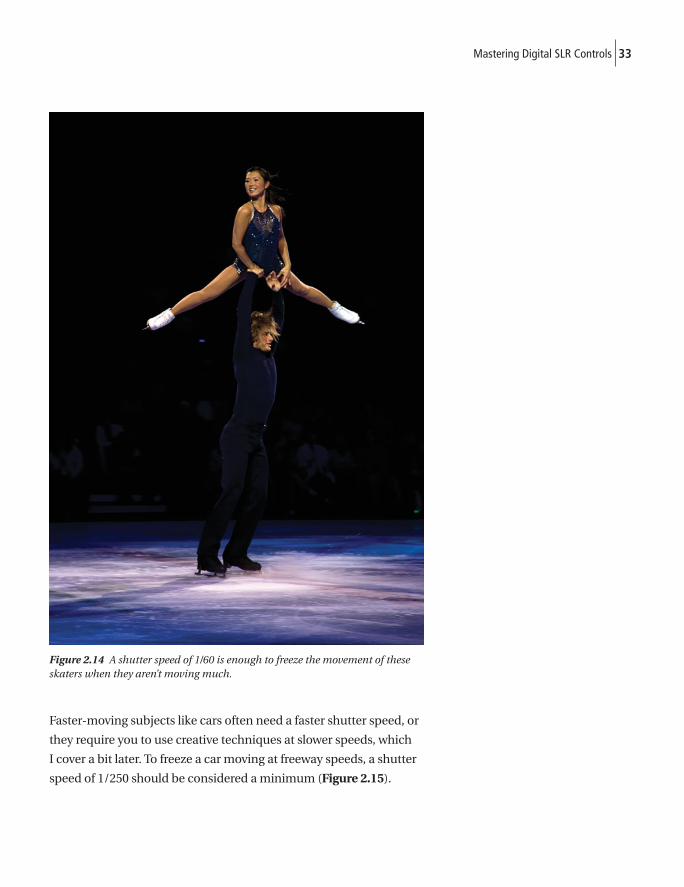
Unless you’re using fl ash, as a rule a good minimum shutter speed
when photographing people is 1/125. When the subject isn’t mov-
ing quickly, such as the fi gure skaters shown in Figure 2.14, 1/60 is
often enough to capture a sharp image. Flash helps to freeze action
much better and is typically used at shutter speeds of 1/60 to 1/250
(or higher), depending on the camera.
33Mastering Digital SLR Controls
Figure 2.14 A shutter speed of 1/60 is enough to freeze the movement of these skaters when they aren’t moving much.
Faster-moving subjects like cars often need a faster shutter speed, or
they require you to use creative techniques at slower speeds, which
I cover a bit later. To freeze a car moving at freeway speeds, a shutter
speed of 1/250 should be considered a minimum (Figure 2.15).
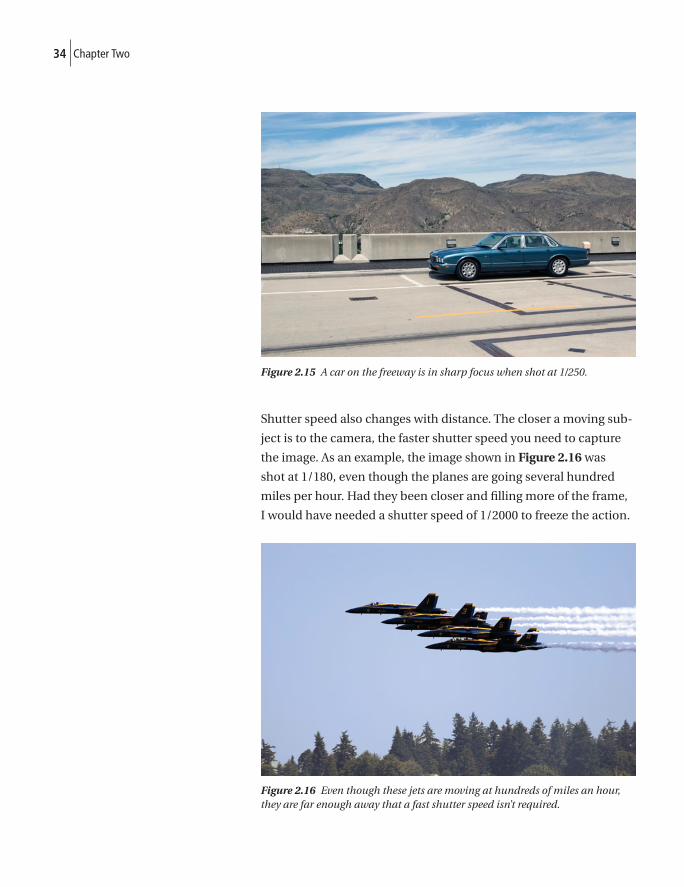
34 Chapter Two
Figure 2.15 A car on the freeway is in sharp focus when shot at 1/250.
Shutter speed also changes with distance. The closer a moving sub-
ject is to the camera, the faster shutter speed you need to capture
the image. As an example, the image shown in Figure 2.16 was
shot at 1/180, even though the planes are going several hundred
miles per hour. Had they been closer and fi lling more of the frame,
I would have needed a shutter speed of 1/2000 to freeze the action.
Figure 2.16 Even though these jets are moving at hundreds of miles an hour, they are far enough away that a fast shutter speed isn’t required.
35Mastering Digital SLR Controls
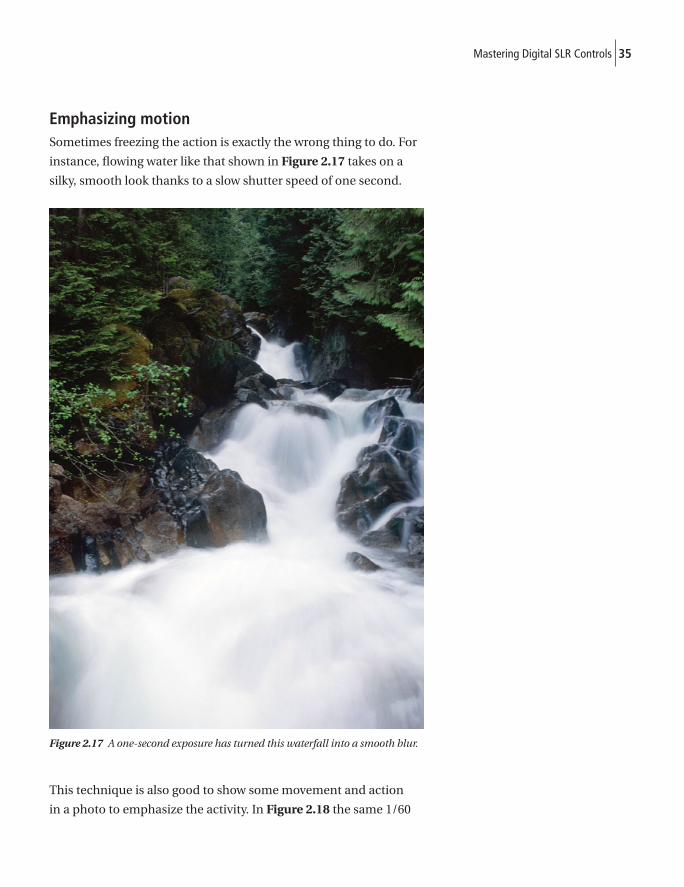
Emphasizing motionSometimes freezing the action is exactly the wrong thing to do. For
instance, fl owing water like that shown in Figure 2.17 takes on a
silky, smooth look thanks to a slow shutter speed of one second.
Figure 2.17 A one-second exposure has turned this waterfall into a smooth blur.
This technique is also good to show some movement and action
in a photo to emphasize the activity. In Figure 2.18 the same 1/60
36 Chapter Two
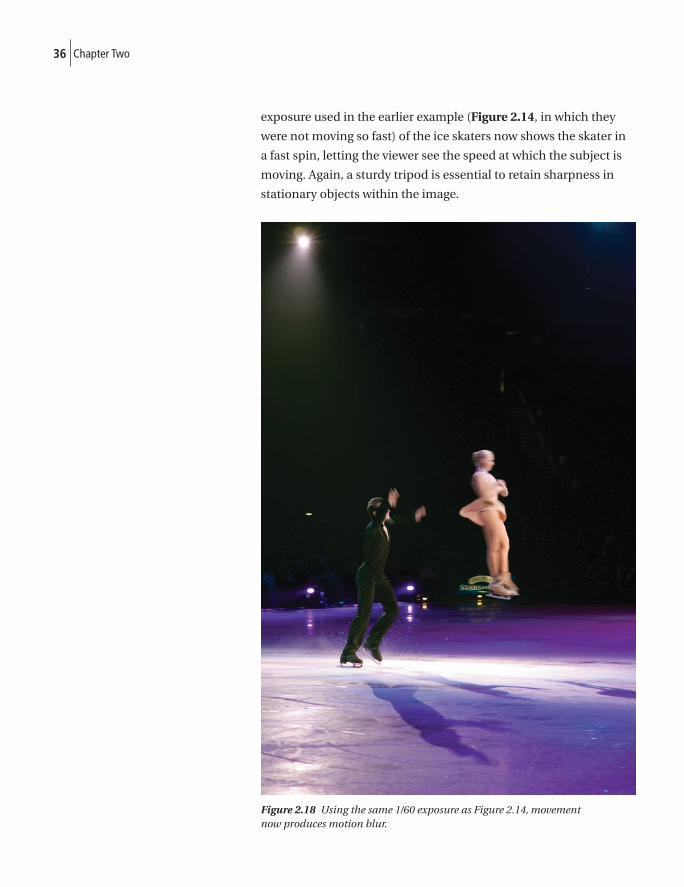
exposure used in the earlier example (Figure 2.14, in which they
were not moving so fast) of the ice skaters now shows the skater in
a fast spin, letting the viewer see the speed at which the subject is
moving. Again, a sturdy tripod is essential to retain sharpness in
stationary objects within the image.
Figure 2.18 Using the same 1/60 exposure as Figure 2.14, movement now produces motion blur.
37Mastering Digital SLR Controls
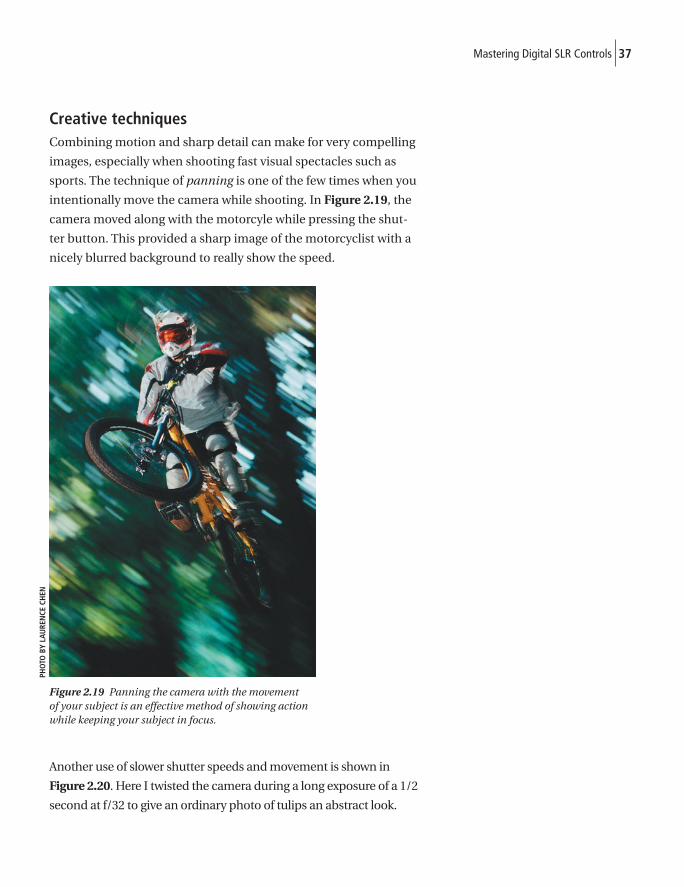
Creative techniquesCombining motion and sharp detail can make for very compelling
images, especially when shooting fast visual spectacles such as
sports. The technique of panning is one of the few times when you
intentionally move the camera while shooting. In Figure 2.19, the
camera moved along with the motorcyle while pressing the shut-
ter button. This provided a sharp image of the motorcyclist with a
nicely blurred background to really show the speed.
Figure 2.19 Panning the camera with the movement of your subject is an effective method of showing action while keeping your subject in focus.
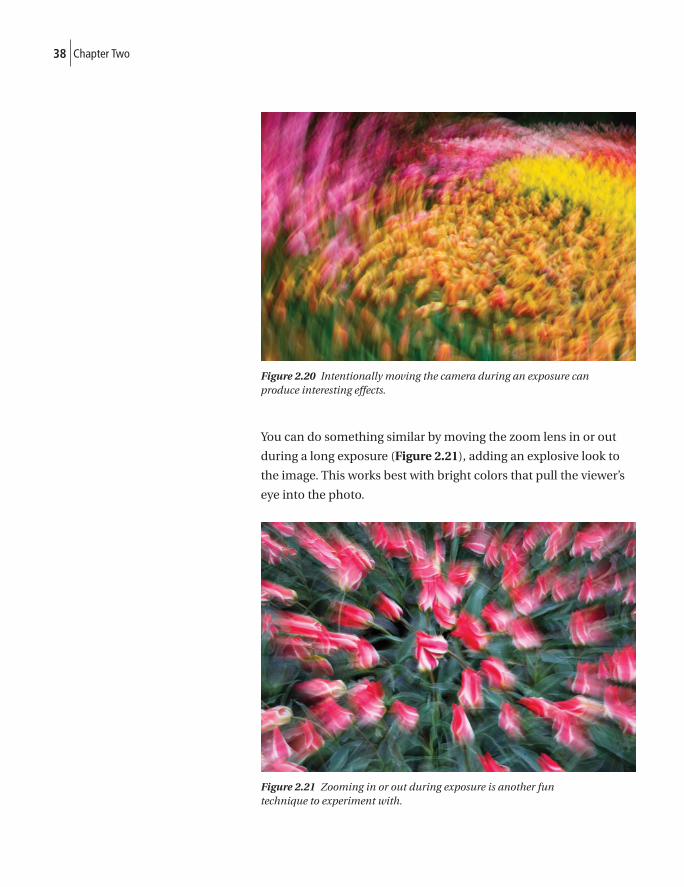
Another use of slower shutter speeds and movement is shown in
Figure 2.20. Here I twisted the camera during a long exposure of a 1/2
second at f/32 to give an ordinary photo of tulips an abstract look.
PHO
TO B
Y LA
URE
NCE
CH
EN
38 Chapter Two
Figure 2.20 Intentionally moving the camera during an exposure can produce interesting effects.
You can do something similar by moving the zoom lens in or out
during a long exposure (Figure 2.21), adding an explosive look to
the image. This works best with bright colors that pull the viewer’s
eye into the photo.
Figure 2.21 Zooming in or out during exposure is another fun technique to experiment with.
39Mastering Digital SLR Controls
Choosing ISO SettingsIf you’re used to shooting with a compact digital camera, you’ve
probably learned to stay away from anything but the lowest ISO
settings, such as 100 or 200, because of noise problems associated
with more light-sensitive ratings of 400 or higher.
Luckily, digital SLRs are much better in this regard, and images
shot at ISO settings of 400 and as high as 1600 are very usable. Why
would you want to use these higher settings? There are two main
reasons. The fi rst is to give you more exposure options in low-light
conditions, and the second is for creative techniques.
ISO basicsMost digital SLRs have a low-end ISO setting of 100 or 200, and
the image quality is optimized for these settings. You see the least
amount of noise when shooting at these settings because there is
less of an electrical charge going to the sensor to capture the image
than there would be at a higher ISO. This is a result of the increased
heat and electrical activity required of the sensor to record the
image data. Under normal lighting conditions and when using a
fl ash, this is all fi ne. But when the light starts to fade, at low ISOs
you fi nd that you either can’t get an exposure reading at all or the
exposure (shutter speed) must be so slow that a sharp image isn’t
possible without a tripod. This is particularly problematic with low-
end zoom lenses with small maximum apertures that come with
many entry-level digital SLRs.
In cases like this, it’s time to increase the ISO setting of your cam-
era. Like changing the exposure by adjusting the aperture or shutter
speed, increasing the ISO works to add (or subtract) light to the
image. It works a bit differently though—rather than changing the
depth of fi eld, or the amount of time the shutter is open, increas-
ing the ISO changes how sensitive the sensor is to the light that hits
it during the exposure. Going from ISO 200 to ISO 400 doubles the
sensor’s sensitivity and gives you an additional stop of exposure
latitude. In other words, if you have an exposure of 1/30 at f/5.6
40 Chapter Two
with an ISO of 200, by changing to ISO 400 your new exposure will
be 1/60 at f/5.6 or 1/30 at f/8. However, the downside is that the
increased sensor sensitivity also increases noise, or grain, in the
image. The image degradation caused by noise increases propor-
tionally with each increase in ISO sensitivity.
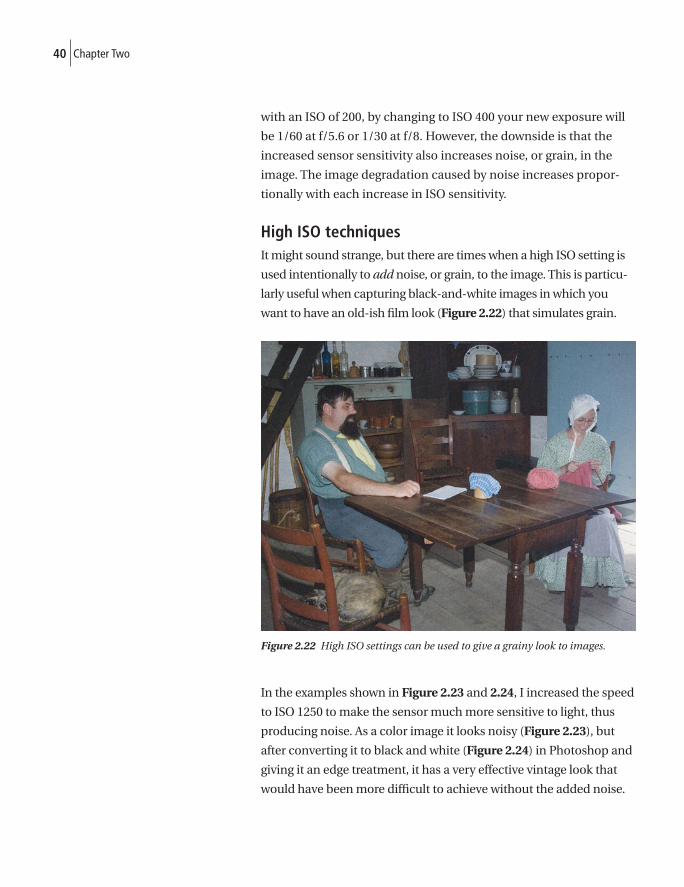
High ISO techniquesIt might sound strange, but there are times when a high ISO setting is
used intentionally to add noise, or grain, to the image. This is particu-
larly useful when capturing black-and-white images in which you
want to have an old-ish fi lm look (Figure 2.22) that simulates grain.
Figure 2.22 High ISO settings can be used to give a grainy look to images.
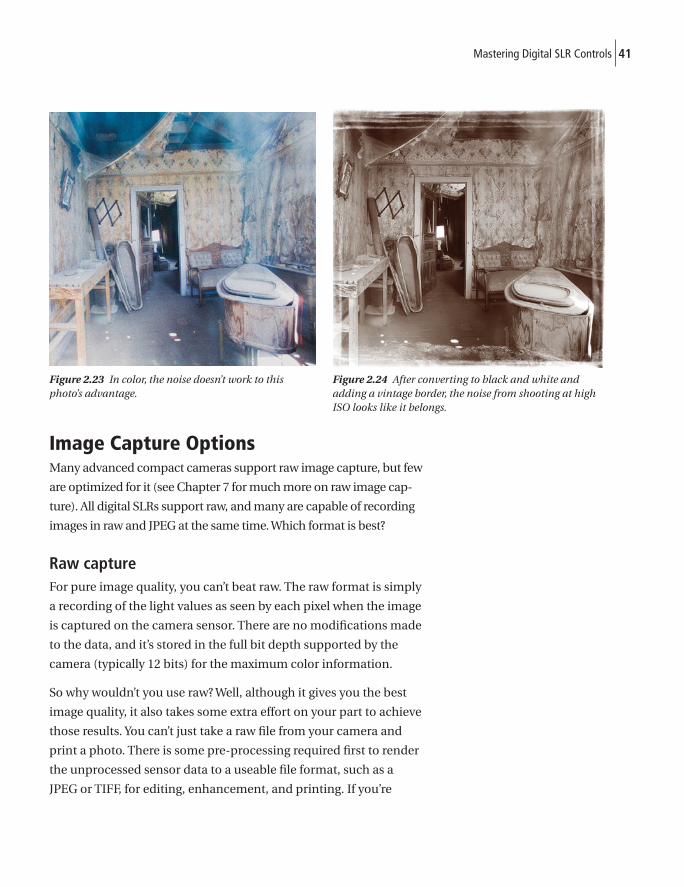
In the examples shown in Figure 2.23 and 2.24, I increased the speed
to ISO 1250 to make the sensor much more sensitive to light, thus
producing noise. As a color image it looks noisy (Figure 2.23), but
after converting it to black and white (Figure 2.24) in Photoshop and
giving it an edge treatment, it has a very effective vintage look that
would have been more diffi cult to achieve without the added noise.
41Mastering Digital SLR Controls
Image Capture OptionsMany advanced compact cameras support raw image capture, but few
are optimized for it (see Chapter 7 for much more on raw image cap-
ture). All digital SLRs support raw, and many are capable of recording
images in raw and JPEG at the same time. Which format is best?
Raw captureFor pure image quality, you can’t beat raw. The raw format is simply
a recording of the light values as seen by each pixel when the image
is captured on the camera sensor. There are no modifi cations made
to the data, and it’s stored in the full bit depth supported by the
camera (typically 12 bits) for the maximum color information.
So why wouldn’t you use raw? Well, although it gives you the best
image quality, it also takes some extra effort on your part to achieve
those results. You can’t just take a raw fi le from your camera and
print a photo. There is some pre-processing required fi rst to render
the unprocessed sensor data to a useable fi le format, such as a
JPEG or TIFF, for editing, enhancement, and printing. If you’re
Figure 2.23 In color, the noise doesn’t work to this photo’s advantage.
Figure 2.24 After converting to black and white and adding a vintage border, the noise from shooting at high ISO looks like it belongs.
42 Chapter Two
doing hundreds of photos for, let’s say, a kid’s soccer event, you very
likely do not want to spend the time needed to process all these
images. In cases like this, it makes more sense to shoot in JPEG,
which, when accurately exposed in-camera, I consider to be “good
enough” much of the time.
When you’re ready to explore what the raw format has to offer, see
Chapter 7, which goes into much more detail on raw formats and
using the image-conversion software that it requires.
JPEG settingsJPEG is the most useable fi le format around for photos. Every
online photo lab, Wal-Mart, kiosk, and other photo-printing
location supports JPEG photos directly. If your images are taken
in JPEG, then you can take the memory card out of your camera,
pop it into their machine, and it spits out all the photos you want
with minimal fuss or effort.
So, why wouldn’t you use JPEG? The biggest reason is image quality.
When you shoot with JPEG, you start out by throwing away image
information. dSLR cameras, in raw mode, are capable of recording
in 12-bit (128 tonal values) color; that’s 4,096 color values per pixel.
Shooting in JPEG mode reduces that to 8-bit color (28 tonal values),
or 256 color values per pixel. JPEG also compresses your images. In
theory, this sounds great. After all, you can store more images on a
memory card and print them at a nearby store. But in order to com-
press those images, additional information is thrown away, which
reduces the quality of the image. So, it’s a trade-off.
Finally, JPEG is a processed fi le. When you capture an image in your
camera, it is fi rst captured as a raw image, no matter which format
you’re shooting. But if you store them as JPEG, for every image the
camera automatically takes the raw fi le, applies image settings such
as white balance, saturation, sharpening, and compression, and then
converts that to the JPEG format before storing it on the memory
43Mastering Digital SLR Controls
card. The biggest drawback to this process is the lack of control you
have over the fi nal product. When capturing in JPEG, you’re trusting
the camera to choose the right settings for optimizing the image. For
example, if you have the incorrect white balance set on the camera,
the image is processed with an inaccurate color shift and saved. With
raw, you can set the white balance to any value since it is not saved
as a separate image until the raw fi le is processed and saved into an
editable format such as a JPEG, TIFF, or PSD fi le.
Focus ModesAnother major area of difference between a compact digicam
and a digital SLR is in the ability to select focus modes. Whereas a
compact camera focuses on a subject and then captures the image,
a dSLR can easily shoot in Continuous Focus mode, tracking a mov-
ing subject and keeping it in focus until, and even after, you press
the shutter button.
Continuous FocusContinuous Focus, sometimes called Servo, or AI, or Predictive
Auto Focus, is designed for sports and wildlife photography where
the subject is moving and the photographer is panning the camera
along with the subject prior to capturing the image. This mode
works on most cameras by pressing the shutter button halfway
to activate the metering and focus tracking. (Some cameras have
alternative ways to activate focus.) Depending on your camera, one
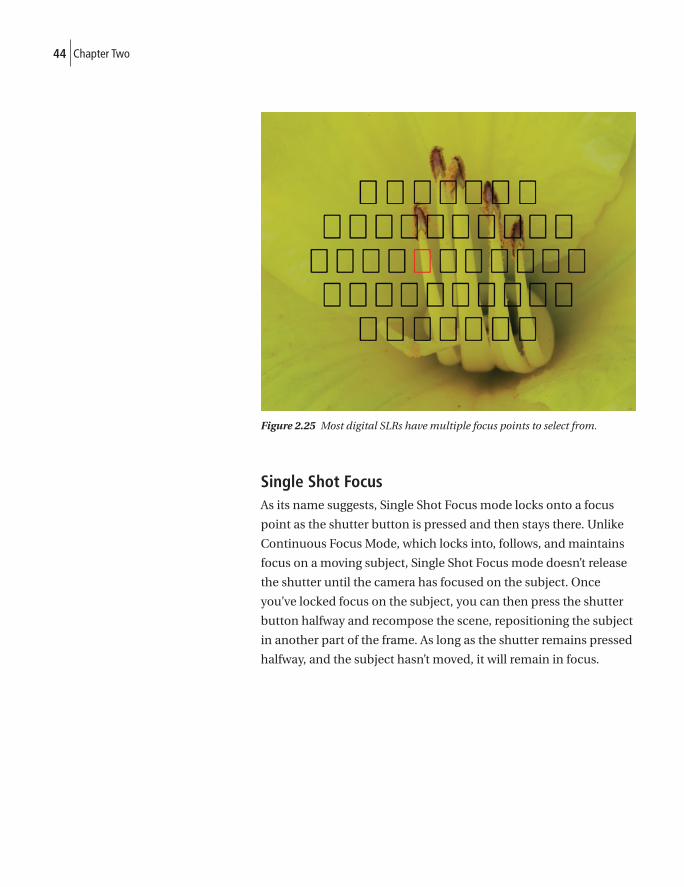
or more focus points (Figure 2.25) will lock onto the subject, and as
it moves the lens will change focus to keep the subject sharp.
When you’re ready to capture the image, press the shutter the rest
of the way down. You need to be careful when using Continuous
Focus mode. It’s entirely possible and all too easy to end up with
photos that are out of focus and blurry (trust me, I have hundreds
of examples). Unless your subject is moving, I suggest you use
Single Shot Focus mode (see the next section), which requires your
camera to be in focus before taking the photo.
Note
If you do plan to shoot in JPEG, you have the option to select a quality level. I highly recom-mend that you use the highest quality level setting to retain as much information as possible. After all, you spent a good chunk of money to improve your photos, so why save them at anything less than the best possible quality?
44 Chapter Two
Figure 2.25 Most digital SLRs have multiple focus points to select from.
Single Shot FocusAs its name suggests, Single Shot Focus mode locks onto a focus
point as the shutter button is pressed and then stays there. Unlike
Continuous Focus Mode, which locks into, follows, and maintains
focus on a moving subject, Single Shot Focus mode doesn’t release
the shutter until the camera has focused on the subject. Once
you’ve locked focus on the subject, you can then press the shutter
button halfway and recompose the scene, repositioning the subject
in another part of the frame. As long as the shutter remains pressed
halfway, and the subject hasn’t moved, it will remain in focus.
Lens selection is one of the most obvious differences between a
digicam (a compact digital camera) and a dSLR. The choice of avail-
able SLR lenses is extensive, ranging from wide-angle and fi sheye
lenses up through super telephoto lenses. And along with the wide
choice of these different focal lengths, you’ll fi nd an even larger
range in prices, depending on lens quality and features.
In this chapter, I cover the different lens types available and give
examples of the types of photos you can capture with each. Lenses
are broken down into zoom, wide-angle, standard, and telephoto
focal lengths, and there is also a section on specialty lenses.
Lens BasicsModern lenses are complex creations with specialized coatings on
the glass to optimize color quality and image sharpness. Figure 3.1
shows a cross-section illustration of a zoom lens. As you can see,
multiple lens elements make up a modern lens.
These lens elements direct the light coming into the lens to create
an image on the sensor in your camera. Early lenses, and many of
the less expensive lenses available today, have no coatings on the
lens elements, which causes the light to scatter as it travels through
the lens to the sensor, resulting in images that look soft or have
color problems called chromatic aberration. In the past, many pros
avoided zoom lenses in favor of fi xed-length, or prime, lenses to
avoid these issues. In recent years, though, the quality of zoom lenses
has improved greatly to the point where many of the better zooms on
the market now rival the prime lenses they compete against.
3 Selecting and Using Lenses
46 Chapter Three
The other major component of a lens is the diaphragm, which is the
iris-type opening at the camera end of a lens. By changing the size
of the opening in the diaphragm, you control how much light enters
the lens, and therefore how much depth of fi eld, or area of focus, is
captured. The size of the opening is the aperture of the lens.
When you start to examine the variety of lenses available on the
market, you fi nd two things very quickly. First, there’s a wide range of
focal lengths, or lens sizes, available for most dSLR cameras. Second,
you could easily mortgage your house to purchase some of these
lenses. Fast lenses—those with large maximum apertures of f/2.8 or
f/4—and telephoto lenses can be extremely expensive and heavy to
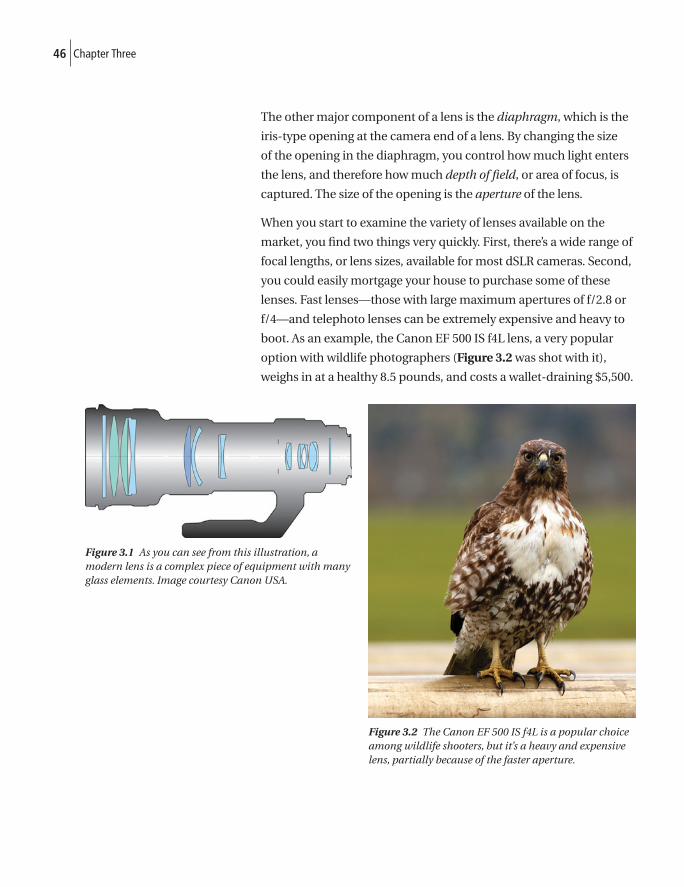
boot. As an example, the Canon EF 500 IS f4L lens, a very popular
option with wildlife photographers (Figure 3.2 was shot with it),
weighs in at a healthy 8.5 pounds, and costs a wallet-draining $5,500.
Figure 3.1 As you can see from this illustration, a modern lens is a complex piece of equipment with many glass elements. Image courtesy Canon USA.
Figure 3.2 The Canon EF 500 IS f4L is a popular choice among wildlife shooters, but it’s a heavy and expensive lens, partially because of the faster aperture.
47Selecting and Using Lenses
Zoom LensesZoom lenses are a popular compromise for many users. The advan-
tages are obvious—you get the equivalent of many different focal
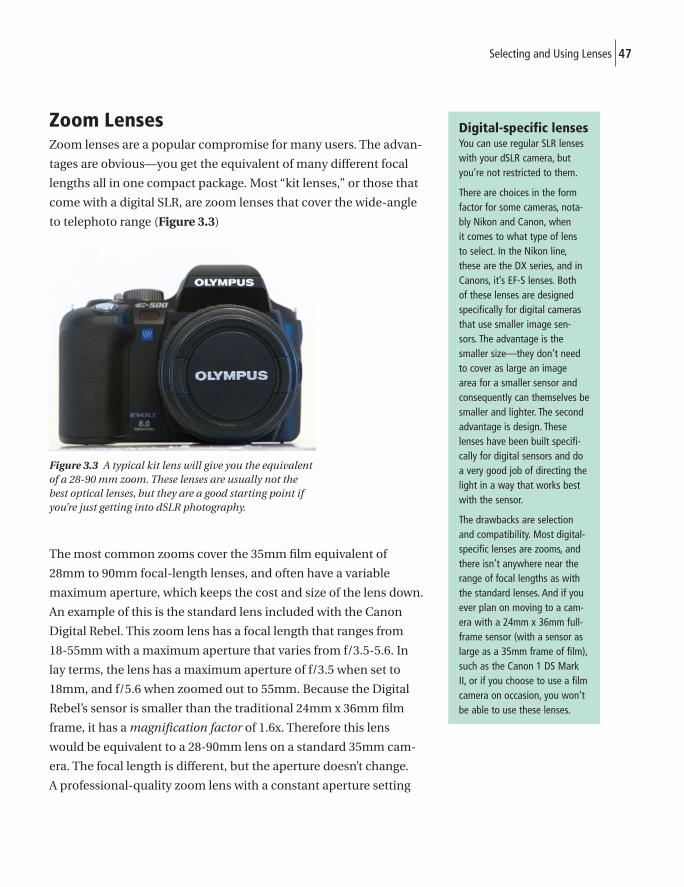
lengths all in one compact package. Most “kit lenses,” or those that
come with a digital SLR, are zoom lenses that cover the wide-angle
to telephoto range (Figure 3.3)
Figure 3.3 A typical kit lens will give you the equivalent of a 28-90 mm zoom. These lenses are usually not the best optical lenses, but they are a good starting point if you’re just getting into dSLR photography.
The most common zooms cover the 35mm fi lm equivalent of
28mm to 90mm focal-length lenses, and often have a variable
maximum aperture, which keeps the cost and size of the lens down.
An example of this is the standard lens included with the Canon
Digital Rebel. This zoom lens has a focal length that ranges from
18-55mm with a maximum aperture that varies from f/3.5-5.6. In
lay terms, the lens has a maximum aperture of f/3.5 when set to
18mm, and f/5.6 when zoomed out to 55mm. Because the Digital
Rebel’s sensor is smaller than the traditional 24mm x 36mm fi lm
frame, it has a magnifi cation factor of 1.6x. Therefore this lens
would be equivalent to a 28-90mm lens on a standard 35mm cam-
era. The focal length is different, but the aperture doesn’t change.
A professional-quality zoom lens with a constant aperture setting
Digital-specific lensesYou can use regular SLR lenses with your dSLR camera, but you’re not restricted to them.
There are choices in the form factor for some cameras, nota-bly Nikon and Canon, when it comes to what type of lens to select. In the Nikon line, these are the DX series, and in Canons, it’s EF-S lenses. Both of these lenses are designed specifically for digital cameras that use smaller image sen-sors. The advantage is the smaller size—they don’t need to cover as large an image area for a smaller sensor and consequently can themselves be smaller and lighter. The second advantage is design. These lenses have been built specifi-cally for digital sensors and do a very good job of directing the light in a way that works best with the sensor.
The drawbacks are selection and compatibility. Most digital-specific lenses are zooms, and there isn’t anywhere near the range of focal lengths as with the standard lenses. And if you ever plan on moving to a cam-era with a 24mm x 36mm full-frame sensor (with a sensor as large as a 35mm frame of film), such as the Canon 1 DS Mark II, or if you choose to use a film camera on occasion, you won’t be able to use these lenses.
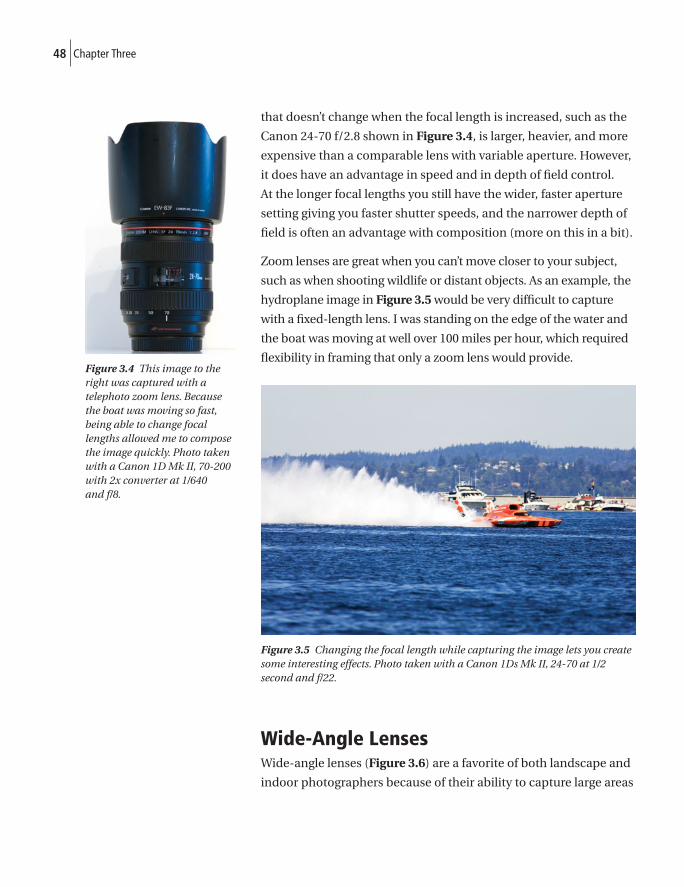
48 Chapter Three
that doesn’t change when the focal length is increased, such as the
Canon 24-70 f/2.8 shown in Figure 3.4, is larger, heavier, and more
expensive than a comparable lens with variable aperture. However,
it does have an advantage in speed and in depth of fi eld control.
At the longer focal lengths you still have the wider, faster aperture
setting giving you faster shutter speeds, and the narrower depth of
fi eld is often an advantage with composition (more on this in a bit).
Zoom lenses are great when you can’t move closer to your subject,
such as when shooting wildlife or distant objects. As an example, the
hydroplane image in Figure 3.5 would be very diffi cult to capture
with a fi xed-length lens. I was standing on the edge of the water and
the boat was moving at well over 100 miles per hour, which required
fl exibility in framing that only a zoom lens would provide.
Figure 3.5 Changing the focal length while capturing the image lets you create some interesting effects. Photo taken with a Canon 1Ds Mk II, 24-70 at 1/2 second and f/22.
Wide-Angle LensesWide-angle lenses (Figure 3.6) are a favorite of both landscape and
indoor photographers because of their ability to capture large areas
Figure 3.4 This image to the right was captured with a telephoto zoom lens. Because the boat was moving so fast, being able to change focal lengths allowed me to compose the image quickly. Photo taken with a Canon 1D Mk II, 70-200 with 2x converter at 1/640 and f/8.

49Selecting and Using Lenses
in a single image. Wide-angle is generally considered to be anything
less than the 50mm focal length equivalent on 35mm fi lm.
Wide-angle lenses in the 24-35mm focal length range are the most
popular, letting you capture more in the frame without the distor-
tion problems sometimes seen in wider lenses. True landscape fans
will tell you that you can never get too wide, though, so 14-20mm
is a popular choice with the outdoor crowd. To give you a practical
example, the images shown in Figures 3.7 through 3.10 were all shot
from exactly the same location with the same aperture. Figure 3.7
was shot with a 50mm focal length and represents what is consid-
ered the normal focal length. Figure 3.8 was captured at 35mm and
still shows normal perspective, but with more of the house in the
frame. In Figure 3.9, we’ve gone down to 24mm, and you can start
to see the effects of wider angles where there is more of the fore-
ground included in the scene, and the house is smaller. In the last
example, Figure 3.10, you see the effect of photographing the scene
with a 15mm lens. There is much more foreground included and
the house has receded into the background. Remember, these were
all photographed from exactly the same location.
Figure 3.6 Wide-angle lenses, such as this 15-30mm zoom lens, are favorites with landscape and indoor photographers because of their ability to capture large areas in a frame.
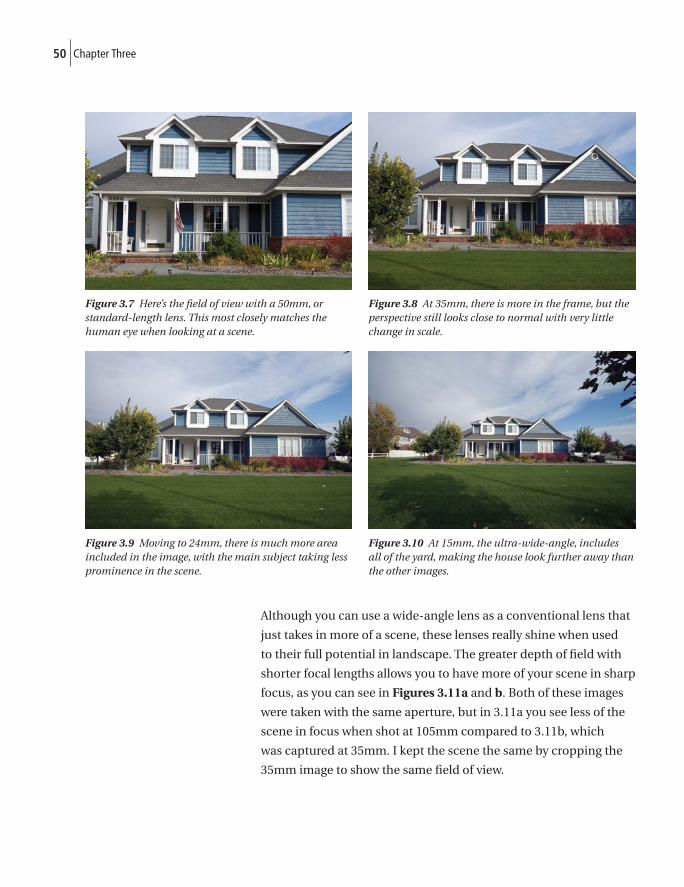
50 Chapter Three
Although you can use a wide-angle lens as a conventional lens that
just takes in more of a scene, these lenses really shine when used
to their full potential in landscape. The greater depth of fi eld with
shorter focal lengths allows you to have more of your scene in sharp
focus, as you can see in Figures 3.11a and b. Both of these images
were taken with the same aperture, but in 3.11a you see less of the
scene in focus when shot at 105mm compared to 3.11b, which
was captured at 35mm. I kept the scene the same by cropping the
35mm image to show the same fi eld of view.
Figure 3.7 Here’s the fi eld of view with a 50mm, or standard-length lens. This most closely matches the human eye when looking at a scene.
Figure 3.8 At 35mm, there is more in the frame, but the perspective still looks close to normal with very little change in scale.
Figure 3.9 Moving to 24mm, there is much more area included in the image, with the main subject taking less prominence in the scene.
Figure 3.10 At 15mm, the ultra-wide-angle, includes all of the yard, making the house look further away than the other images.
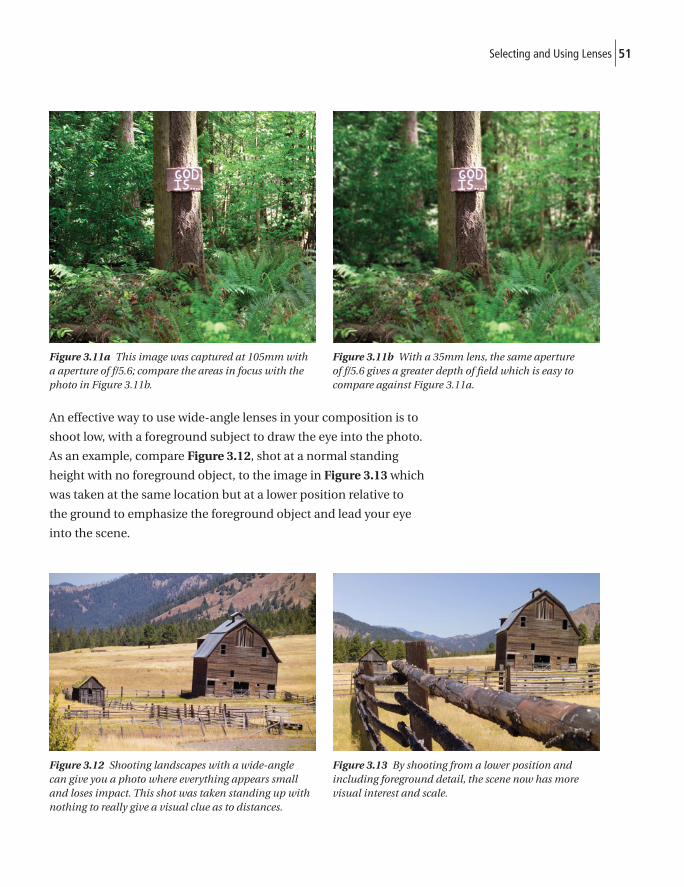
51Selecting and Using Lenses
An effective way to use wide-angle lenses in your composition is to
shoot low, with a foreground subject to draw the eye into the photo.
As an example, compare Figure 3.12, shot at a normal standing
height with no foreground object, to the image in Figure 3.13 which
was taken at the same location but at a lower position relative to
the ground to emphasize the foreground object and lead your eye
into the scene.
Figure 3.11a This image was captured at 105mm with a aperture of f/5.6; compare the areas in focus with the photo in Figure 3.11b.
Figure 3.11b With a 35mm lens, the same aperture of f/5.6 gives a greater depth of fi eld which is easy to compare against Figure 3.11a.
Figure 3.12 Shooting landscapes with a wide-angle can give you a photo where everything appears small and loses impact. This shot was taken standing up with nothing to really give a visual clue as to distances.
Figure 3.13 By shooting from a lower position and including foreground detail, the scene now has more visual interest and scale.
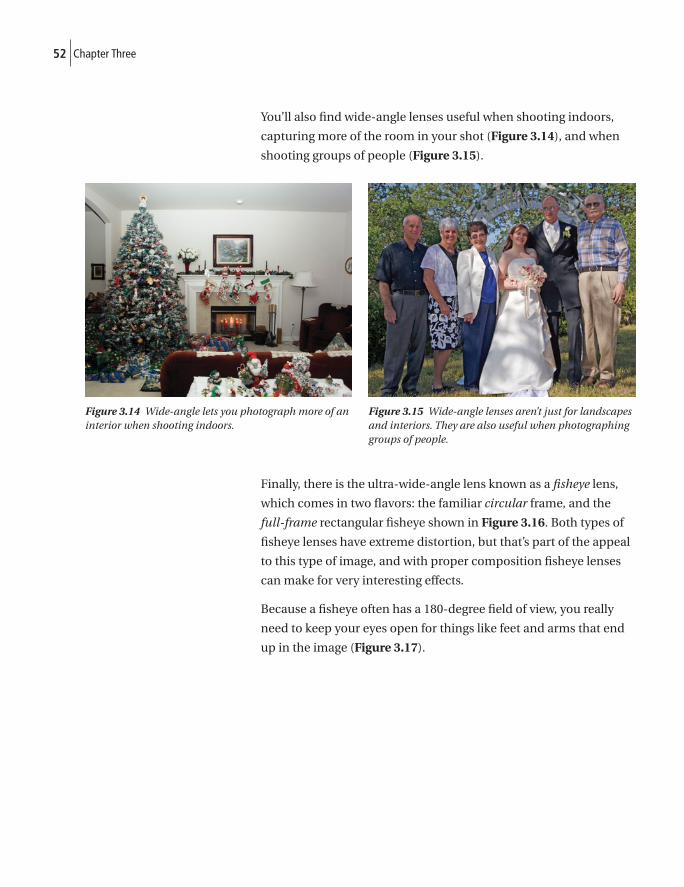
52 Chapter Three
You’ll also fi nd wide-angle lenses useful when shooting indoors,
capturing more of the room in your shot (Figure 3.14), and when
shooting groups of people (Figure 3.15).
Finally, there is the ultra-wide-angle lens known as a fi sheye lens,
which comes in two fl avors: the familiar circular frame, and the
full-frame rectangular fi sheye shown in Figure 3.16. Both types of
fi sheye lenses have extreme distortion, but that’s part of the appeal
to this type of image, and with proper composition fi sheye lenses
can make for very interesting effects.
Because a fi sheye often has a 180-degree fi eld of view, you really
need to keep your eyes open for things like feet and arms that end
up in the image (Figure 3.17).
Figure 3.14 Wide-angle lets you photograph more of an interior when shooting indoors.
Figure 3.15 Wide-angle lenses aren’t just for landscapes and interiors. They are also useful when photographing groups of people.
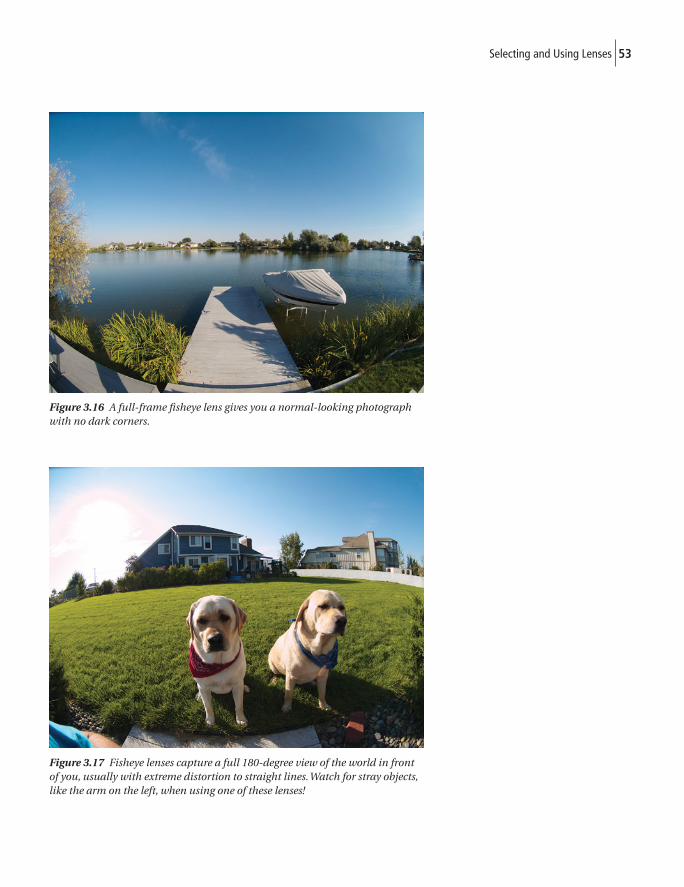
53Selecting and Using Lenses
Figure 3.16 A full-frame fi sheye lens gives you a normal-looking photograph with no dark corners.
Figure 3.17 Fisheye lenses capture a full 180-degree view of the world in front of you, usually with extreme distortion to straight lines. Watch for stray objects, like the arm on the left, when using one of these lenses!
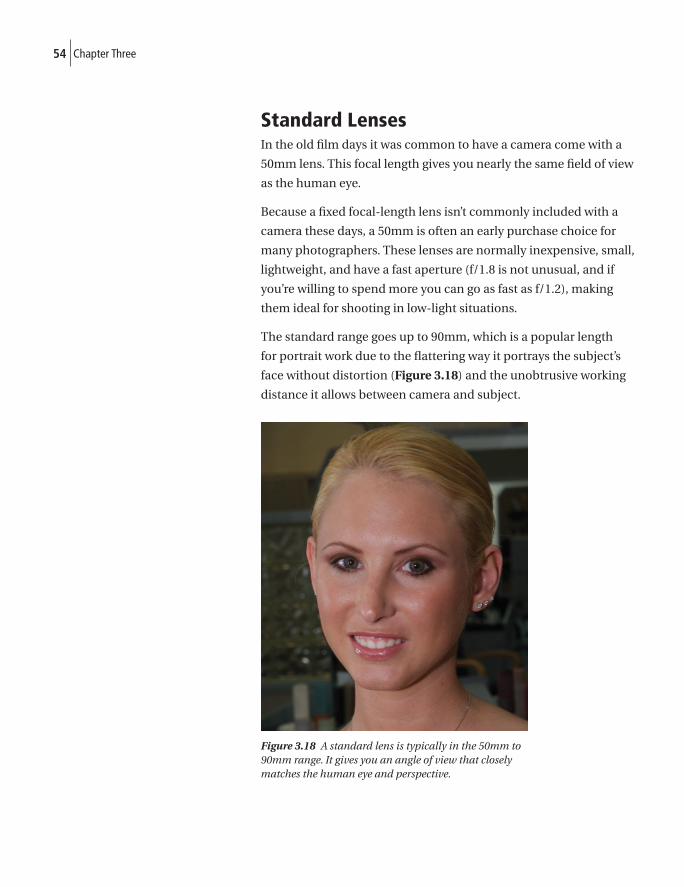
54 Chapter Three
Standard LensesIn the old fi lm days it was common to have a camera come with a
50mm lens. This focal length gives you nearly the same fi eld of view
as the human eye.
Because a fi xed focal-length lens isn’t commonly included with a
camera these days, a 50mm is often an early purchase choice for
many photographers. These lenses are normally inexpensive, small,
lightweight, and have a fast aperture (f/1.8 is not unusual, and if
you’re willing to spend more you can go as fast as f/1.2), making
them ideal for shooting in low-light situations.
The standard range goes up to 90mm, which is a popular length
for portrait work due to the fl attering way it portrays the subject’s
face without distortion (Figure 3.18) and the unobtrusive working
distance it allows between camera and subject.
Figure 3.18 A standard lens is typically in the 50mm to 90mm range. It gives you an angle of view that closely matches the human eye and perspective.
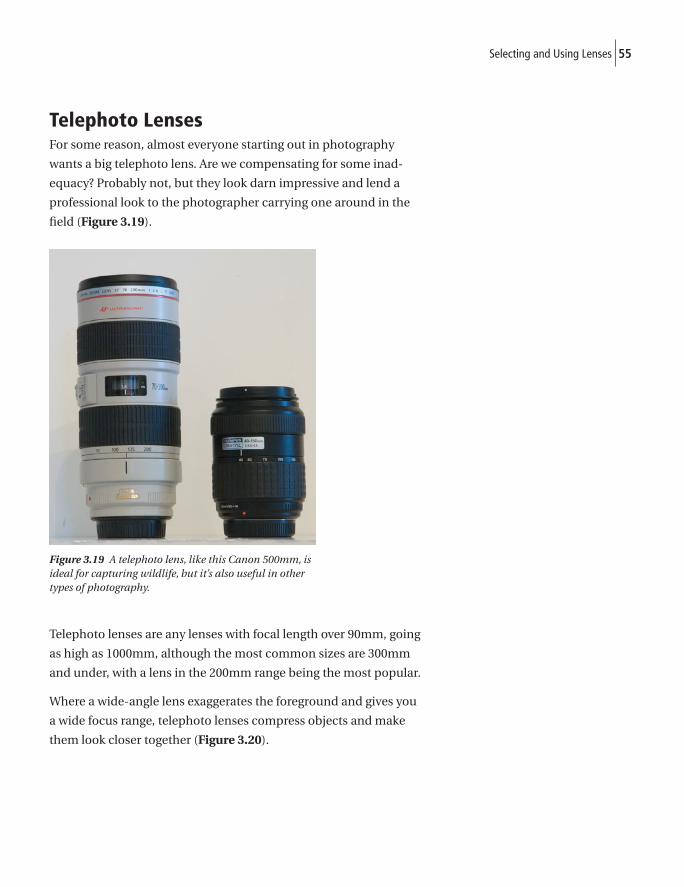
55Selecting and Using Lenses
Telephoto LensesFor some reason, almost everyone starting out in photography
wants a big telephoto lens. Are we compensating for some inad-
equacy? Probably not, but they look darn impressive and lend a
professional look to the photographer carrying one around in the
fi eld (Figure 3.19).
Figure 3.19 A telephoto lens, like this Canon 500mm, is ideal for capturing wildlife, but it’s also useful in other types of photography.
Telephoto lenses are any lenses with focal length over 90mm, going
as high as 1000mm, although the most common sizes are 300mm
and under, with a lens in the 200mm range being the most popular.
Where a wide-angle lens exaggerates the foreground and gives you
a wide focus range, telephoto lenses compress objects and make
them look closer together (Figure 3.20).
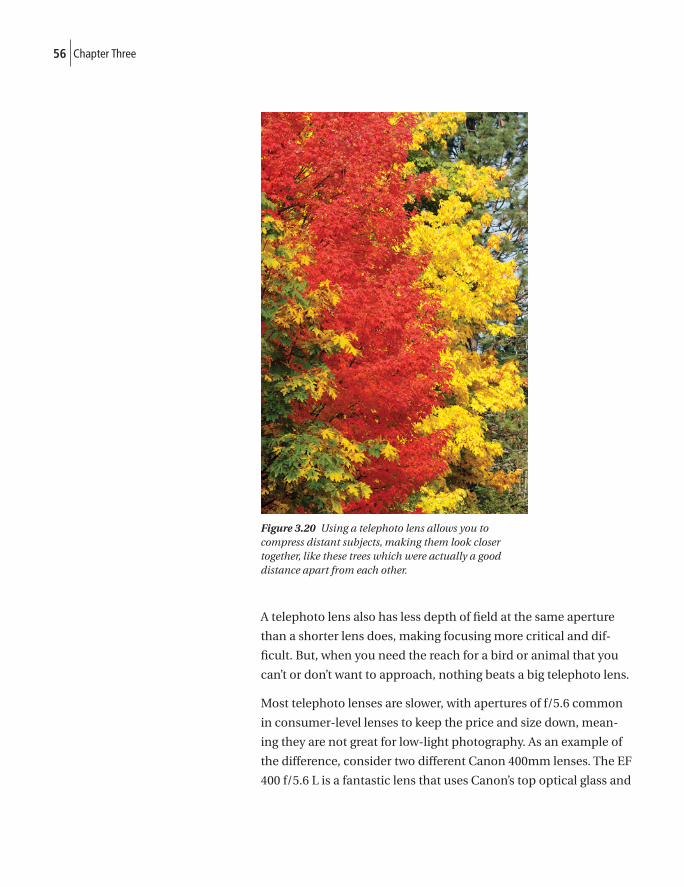
56 Chapter Three
Figure 3.20 Using a telephoto lens allows you to compress distant subjects, making them look closer together, like these trees which were actually a good distance apart from each other.
A telephoto lens also has less depth of fi eld at the same aperture
than a shorter lens does, making focusing more critical and dif-
fi cult. But, when you need the reach for a bird or animal that you
can’t or don’t want to approach, nothing beats a big telephoto lens.
Most telephoto lenses are slower, with apertures of f/5.6 common
in consumer-level lenses to keep the price and size down, mean-
ing they are not great for low-light photography. As an example of
the difference, consider two different Canon 400mm lenses. The EF
400 f/5.6 L is a fantastic lens that uses Canon’s top optical glass and
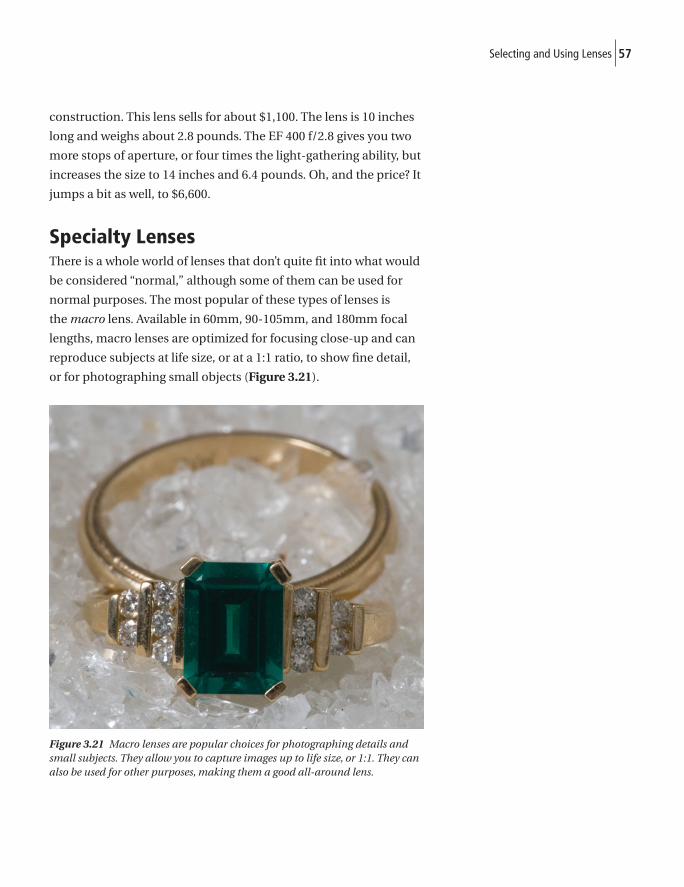
57Selecting and Using Lenses
construction. This lens sells for about $1,100. The lens is 10 inches
long and weighs about 2.8 pounds. The EF 400 f/2.8 gives you two
more stops of aperture, or four times the light-gathering ability, but
increases the size to 14 inches and 6.4 pounds. Oh, and the price? It
jumps a bit as well, to $6,600.
Specialty LensesThere is a whole world of lenses that don’t quite fi t into what would
be considered “normal,” although some of them can be used for
normal purposes. The most popular of these types of lenses is
the macro lens. Available in 60mm, 90-105mm, and 180mm focal
lengths, macro lenses are optimized for focusing close-up and can
reproduce subjects at life size, or at a 1:1 ratio, to show fi ne detail,
or for photographing small objects (Figure 3.21).
Figure 3.21 Macro lenses are popular choices for photographing details and small subjects. They allow you to capture images up to life size, or 1:1. They can also be used for other purposes, making them a good all-around lens.
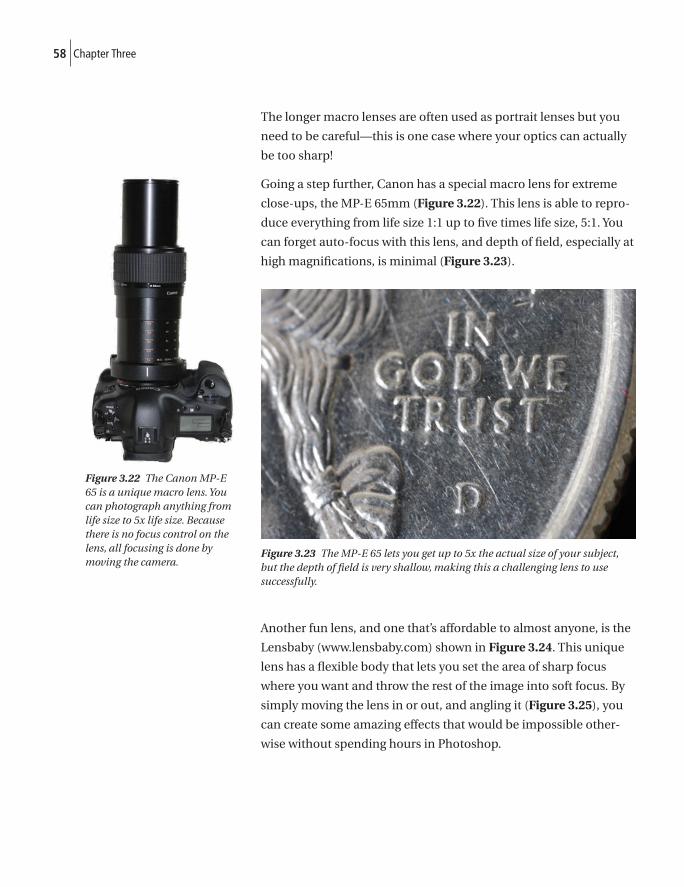
58 Chapter Three
The longer macro lenses are often used as portrait lenses but you
need to be careful—this is one case where your optics can actually
be too sharp!
Going a step further, Canon has a special macro lens for extreme
close-ups, the MP-E 65mm (Figure 3.22). This lens is able to repro-
duce everything from life size 1:1 up to fi ve times life size, 5:1. You
can forget auto-focus with this lens, and depth of fi eld, especially at
high magnifi cations, is minimal (Figure 3.23).
Figure 3.23 The MP-E 65 lets you get up to 5x the actual size of your subject, but the depth of fi eld is very shallow, making this a challenging lens to use successfully.
Another fun lens, and one that’s affordable to almost anyone, is the
Lensbaby (www.lensbaby.com) shown in Figure 3.24. This unique
lens has a fl exible body that lets you set the area of sharp focus
where you want and throw the rest of the image into soft focus. By
simply moving the lens in or out, and angling it (Figure 3.25), you
can create some amazing effects that would be impossible other-
wise without spending hours in Photoshop.
Figure 3.22 The Canon MP-E 65 is a unique macro lens. You can photograph anything from life size to 5x life size. Because there is no focus control on the lens, all focusing is done by moving the camera.

59Selecting and Using Lenses
The image shown in Figure 3.26 was used as my holiday card last
year. The Lensbaby let me capture the center of the poinsettia in
sharp focus while throwing the edges into soft focus, giving me an
interesting effect that lets my image stand out from the typical shot.
Tip
Don’t go wild with lenses when you’re just starting out. By learning to use one or two lenses well, you’ll have a bet-ter understanding of what you want and need in a lens before shelling out a lot of money that you might not need to spend at all. I suggest getting two zoom lenses that cover the 24mm to 300mm range and learning your system inside out before moving on to other lenses.
Figure 3.24 The Lensbaby is available for different camera systems, and it’s one of the most unusual and fun tools you can carry around.
Figure 3.25 By moving the Lensbaby in or out and bending it, you can control which areas of your image are in focus and which are soft. It’s a fun way to experiment with new looks.
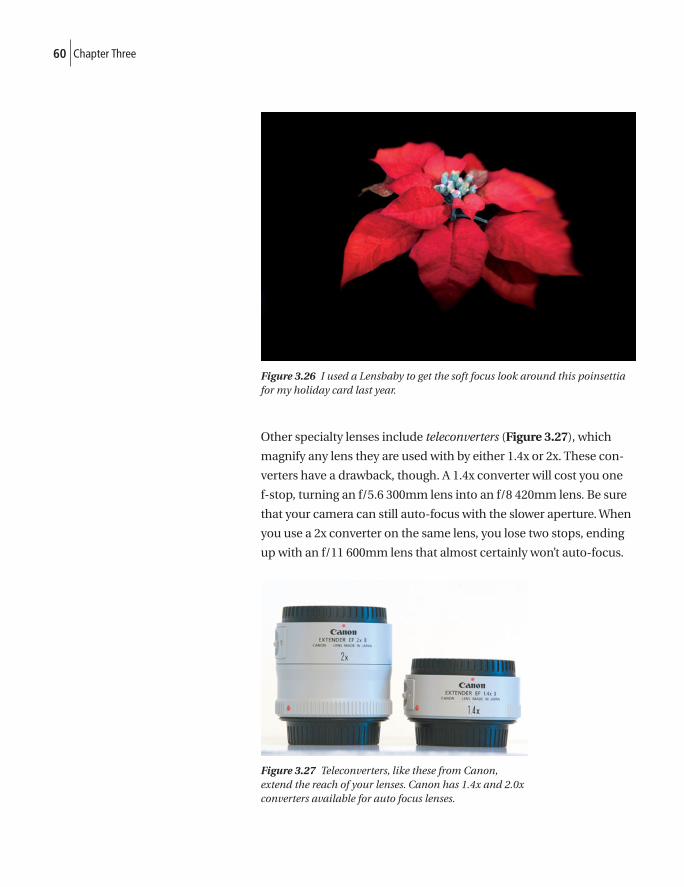
60 Chapter Three
Figure 3.26 I used a Lensbaby to get the soft focus look around this poinsettia for my holiday card last year.
Other specialty lenses include teleconverters (Figure 3.27), which
magnify any lens they are used with by either 1.4x or 2x. These con-
verters have a drawback, though. A 1.4x converter will cost you one
f-stop, turning an f/5.6 300mm lens into an f/8 420mm lens. Be sure
that your camera can still auto-focus with the slower aperture. When
you use a 2x converter on the same lens, you lose two stops, ending
up with an f/11 600mm lens that almost certainly won’t auto-focus.
Figure 3.27 Teleconverters, like these from Canon, extend the reach of your lenses. Canon has 1.4x and 2.0x converters available for auto focus lenses.
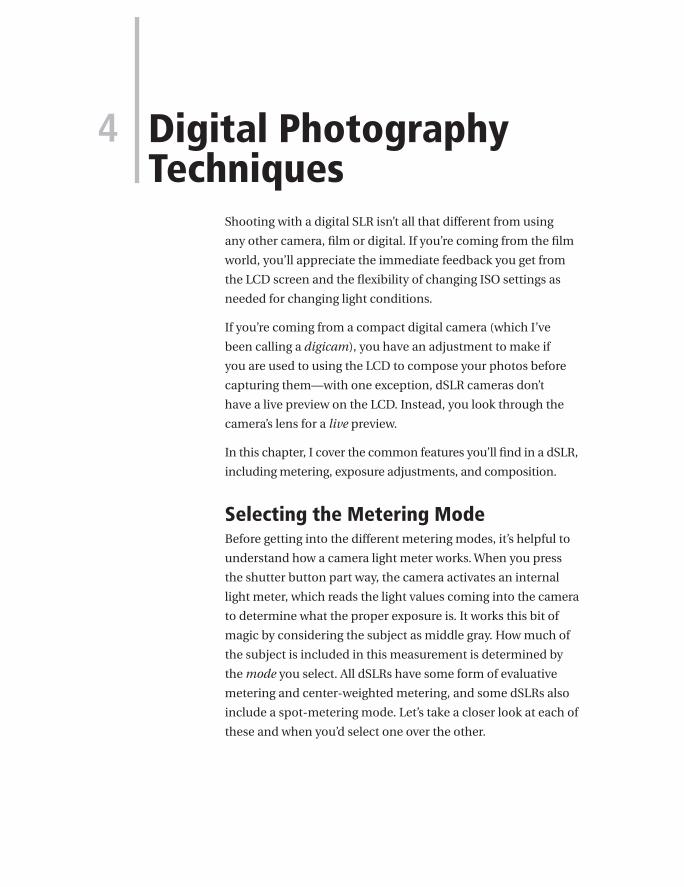
Shooting with a digital SLR isn’t all that different from using
any other camera, fi lm or digital. If you’re coming from the fi lm
world, you’ll appreciate the immediate feedback you get from
the LCD screen and the fl exibility of changing ISO settings as
needed for changing light conditions.
If you’re coming from a compact digital camera (which I’ve
been calling a digicam), you have an adjustment to make if
you are used to using the LCD to compose your photos before
capturing them—with one exception, dSLR cameras don’t
have a live preview on the LCD. Instead, you look through the
camera’s lens for a live preview.
In this chapter, I cover the common features you’ll fi nd in a dSLR,
including metering, exposure adjustments, and composition.
Selecting the Metering ModeBefore getting into the different metering modes, it’s helpful to
understand how a camera light meter works. When you press
the shutter button part way, the camera activates an internal
light meter, which reads the light values coming into the camera
to determine what the proper exposure is. It works this bit of
magic by considering the subject as middle gray. How much of
the subject is included in this measurement is determined by
the mode you select. All dSLRs have some form of evaluative
metering and center-weighted metering, and some dSLRs also
include a spot-metering mode. Let’s take a closer look at each of
these and when you’d select one over the other.
4 Digital Photography Techniques
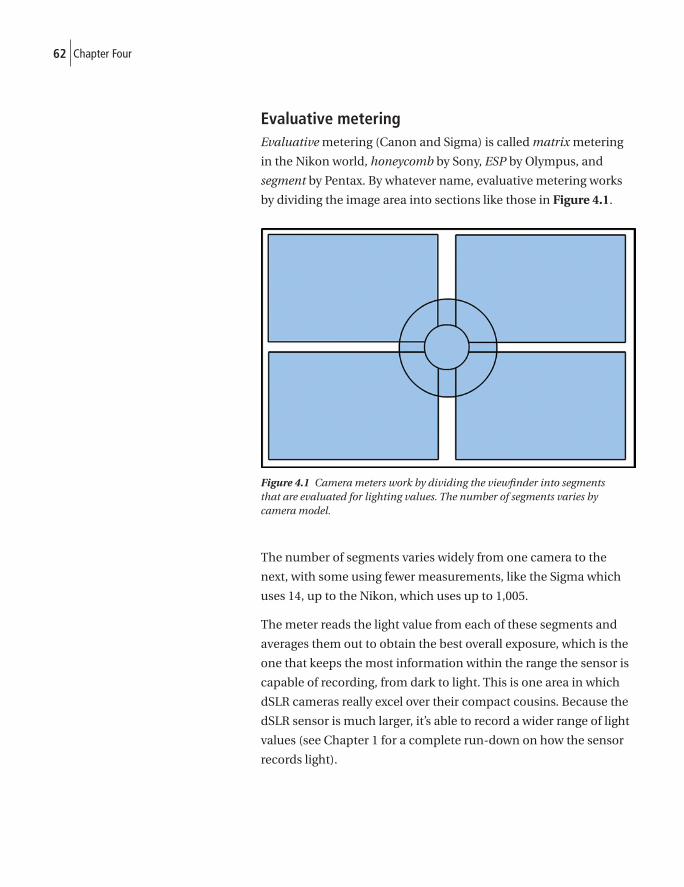
62 Chapter Four
Evaluative meteringEvaluative metering (Canon and Sigma) is called matrix metering
in the Nikon world, honeycomb by Sony, ESP by Olympus, and
segment by Pentax. By whatever name, evaluative metering works
by dividing the image area into sections like those in Figure 4.1.
Figure 4.1 Camera meters work by dividing the viewfi nder into segments that are evaluated for lighting values. The number of segments varies by camera model.
The number of segments varies widely from one camera to the
next, with some using fewer measurements, like the Sigma which
uses 14, up to the Nikon, which uses up to 1,005.
The meter reads the light value from each of these segments and
averages them out to obtain the best overall exposure, which is the
one that keeps the most information within the range the sensor is
capable of recording, from dark to light. This is one area in which
dSLR cameras really excel over their compact cousins. Because the
dSLR sensor is much larger, it’s able to record a wider range of light
values (see Chapter 1 for a complete run-down on how the sensor
records light).
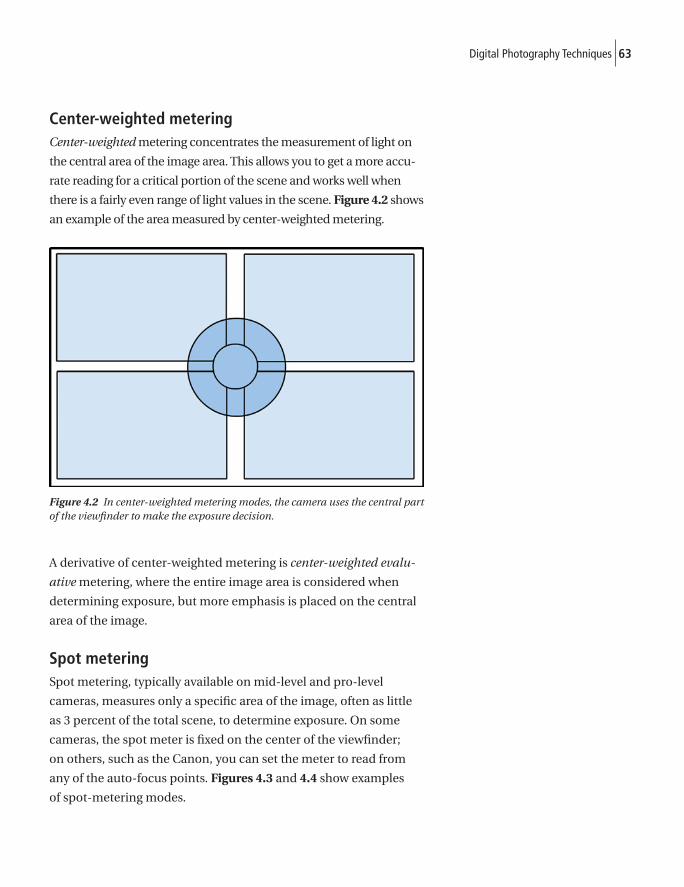
63Digital Photography Techniques
Center-weighted meteringCenter-weighted metering concentrates the measurement of light on
the central area of the image area. This allows you to get a more accu-
rate reading for a critical portion of the scene and works well when
there is a fairly even range of light values in the scene. Figure 4.2 shows
an example of the area measured by center-weighted metering.
Figure 4.2 In center-weighted metering modes, the camera uses the central part of the viewfi nder to make the exposure decision.
A derivative of center-weighted metering is center-weighted evalu-
ative metering, where the entire image area is considered when
determining exposure, but more emphasis is placed on the central
area of the image.
Spot meteringSpot metering, typically available on mid-level and pro-level
cameras, measures only a specifi c area of the image, often as little
as 3 percent of the total scene, to determine exposure. On some
cameras, the spot meter is fi xed on the center of the viewfi nder;
on others, such as the Canon, you can set the meter to read from
any of the auto-focus points. Figures 4.3 and 4.4 show examples
of spot-metering modes.
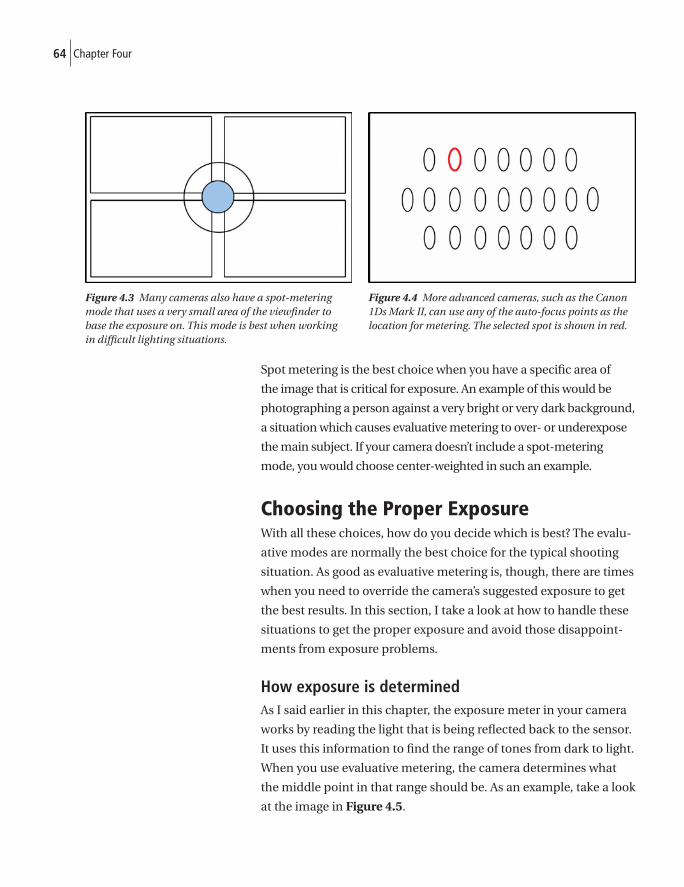
64 Chapter Four
Spot metering is the best choice when you have a specifi c area of
the image that is critical for exposure. An example of this would be
photographing a person against a very bright or very dark background,
a situation which causes evaluative metering to over- or underexpose
the main subject. If your camera doesn’t include a spot-metering
mode, you would choose center-weighted in such an example.
Choosing the Proper ExposureWith all these choices, how do you decide which is best? The evalu-
ative modes are normally the best choice for the typical shooting
situation. As good as evaluative metering is, though, there are times
when you need to override the camera’s suggested exposure to get
the best results. In this section, I take a look at how to handle these
situations to get the proper exposure and avoid those disappoint-
ments from exposure problems.
How exposure is determinedAs I said earlier in this chapter, the exposure meter in your camera
works by reading the light that is being refl ected back to the sensor.
It uses this information to fi nd the range of tones from dark to light.
When you use evaluative metering, the camera determines what
the middle point in that range should be. As an example, take a look
at the image in Figure 4.5.
Figure 4.3 Many cameras also have a spot-metering mode that uses a very small area of the viewfi nder to base the exposure on. This mode is best when working in diffi cult lighting situations.
Figure 4.4 More advanced cameras, such as the Canon 1Ds Mark II, can use any of the auto-focus points as the location for metering. The selected spot is shown in red.
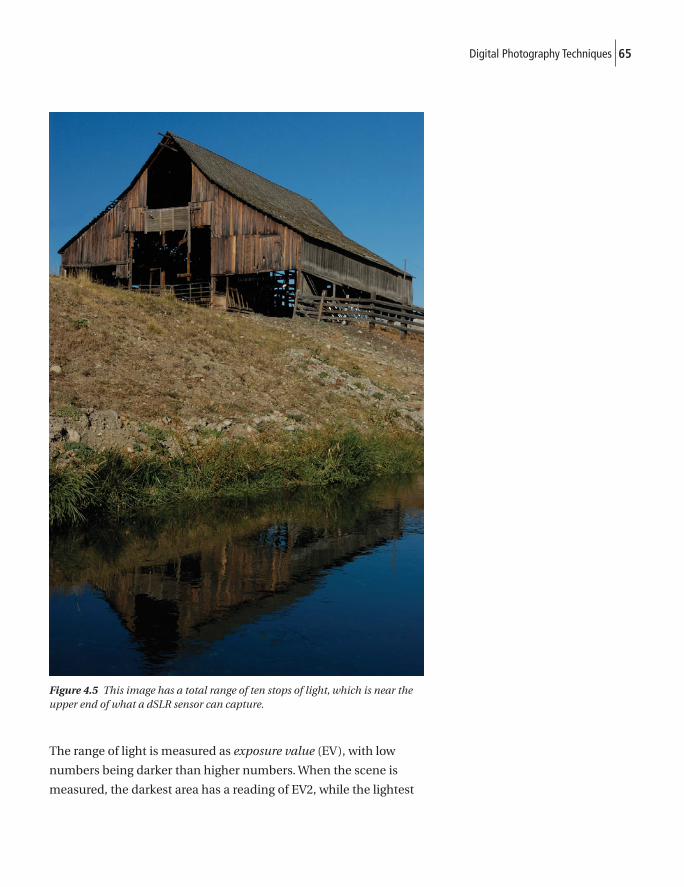
65Digital Photography Techniques
Figure 4.5 This image has a total range of ten stops of light, which is near the upper end of what a dSLR sensor can capture.
The range of light is measured as exposure value (EV), with low
numbers being darker than higher numbers. When the scene is
measured, the darkest area has a reading of EV2, while the lightest
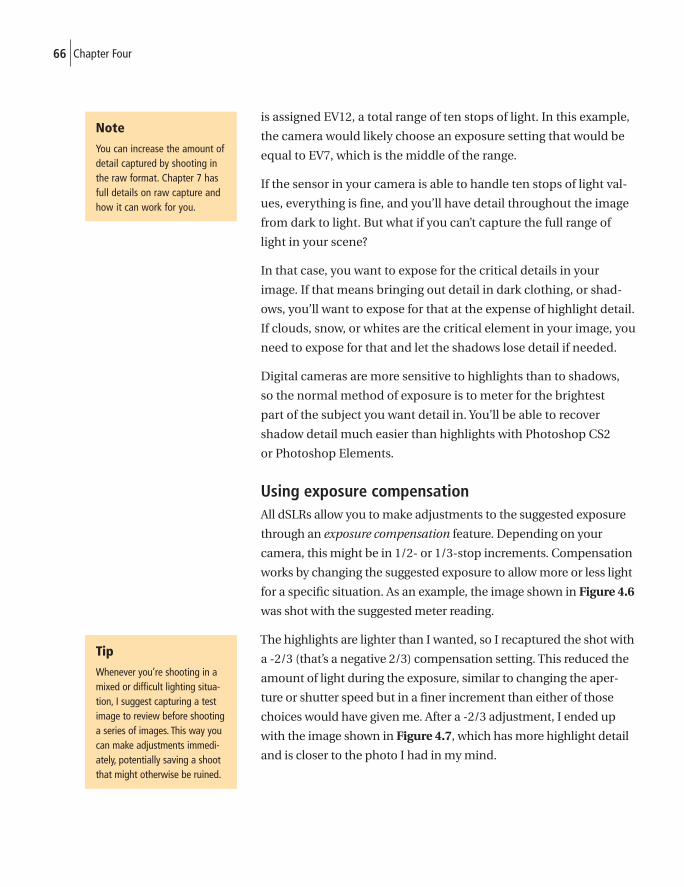
66 Chapter Four
is assigned EV12, a total range of ten stops of light. In this example,
the camera would likely choose an exposure setting that would be
equal to EV7, which is the middle of the range.
If the sensor in your camera is able to handle ten stops of light val-
ues, everything is fi ne, and you’ll have detail throughout the image
from dark to light. But what if you can’t capture the full range of
light in your scene?
In that case, you want to expose for the critical details in your
image. If that means bringing out detail in dark clothing, or shad-
ows, you’ll want to expose for that at the expense of highlight detail.
If clouds, snow, or whites are the critical element in your image, you
need to expose for that and let the shadows lose detail if needed.
Digital cameras are more sensitive to highlights than to shadows,
so the normal method of exposure is to meter for the brightest
part of the subject you want detail in. You’ll be able to recover
shadow detail much easier than highlights with Photoshop CS2
or Photoshop Elements.
Using exposure compensationAll dSLRs allow you to make adjustments to the suggested exposure
through an exposure compensation feature. Depending on your
camera, this might be in 1/2- or 1/3-stop increments. Compensation
works by changing the suggested exposure to allow more or less light
for a specifi c situation. As an example, the image shown in Figure 4.6
was shot with the suggested meter reading.
The highlights are lighter than I wanted, so I recaptured the shot with
a -2/3 (that’s a negative 2/3) compensation setting. This reduced the
amount of light during the exposure, similar to changing the aper-
ture or shutter speed but in a fi ner increment than either of those
choices would have given me. After a -2/3 adjustment, I ended up
with the image shown in Figure 4.7, which has more highlight detail
and is closer to the photo I had in my mind.
Tip
Whenever you’re shooting in a mixed or difficult lighting situa-tion, I suggest capturing a test image to review before shooting a series of images. This way you can make adjustments immedi-ately, potentially saving a shoot that might otherwise be ruined.
Tip
Whenever you’re shooting in a mixed or difficult lighting situa-tion, I suggest capturing a test image to review before shooting a series of images. This way you can make adjustments immedi-ately, potentially saving a shoot that might otherwise be ruined.
Note
You can increase the amount of detail captured by shooting in the raw format. Chapter 7 has full details on raw capture and how it can work for you.
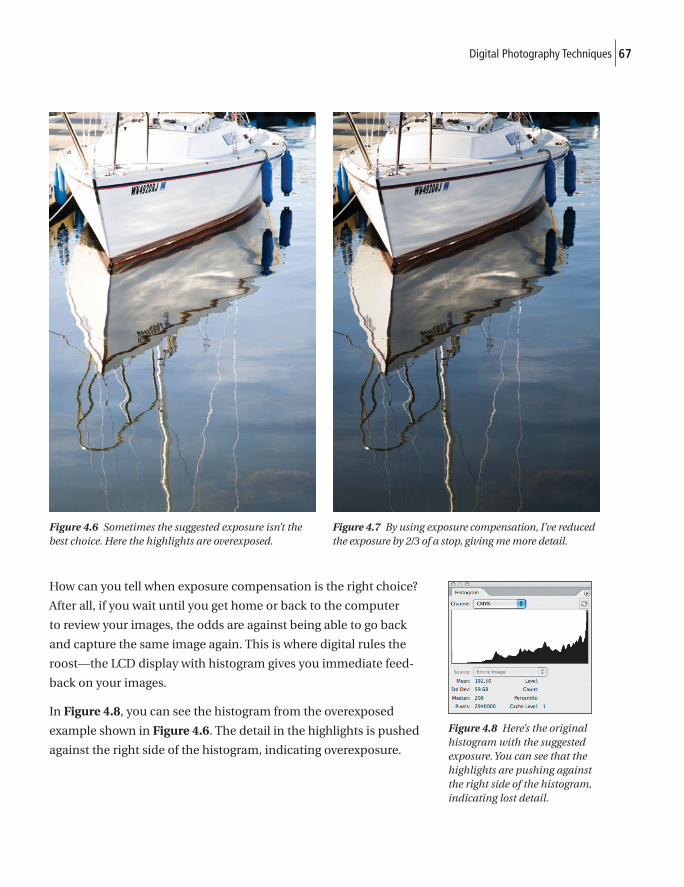
67Digital Photography Techniques
How can you tell when exposure compensation is the right choice?
After all, if you wait until you get home or back to the computer
to review your images, the odds are against being able to go back
and capture the same image again. This is where digital rules the
roost—the LCD display with histogram gives you immediate feed-
back on your images.
In Figure 4.8, you can see the histogram from the overexposed
example shown in Figure 4.6. The detail in the highlights is pushed
against the right side of the histogram, indicating overexposure.
Figure 4.6 Sometimes the suggested exposure isn’t the best choice. Here the highlights are overexposed.
Figure 4.7 By using exposure compensation, I’ve reduced the exposure by 2/3 of a stop, giving me more detail.
Figure 4.8 Here’s the original histogram with the suggested exposure. You can see that the highlights are pushing against the right side of the histogram, indicating lost detail.
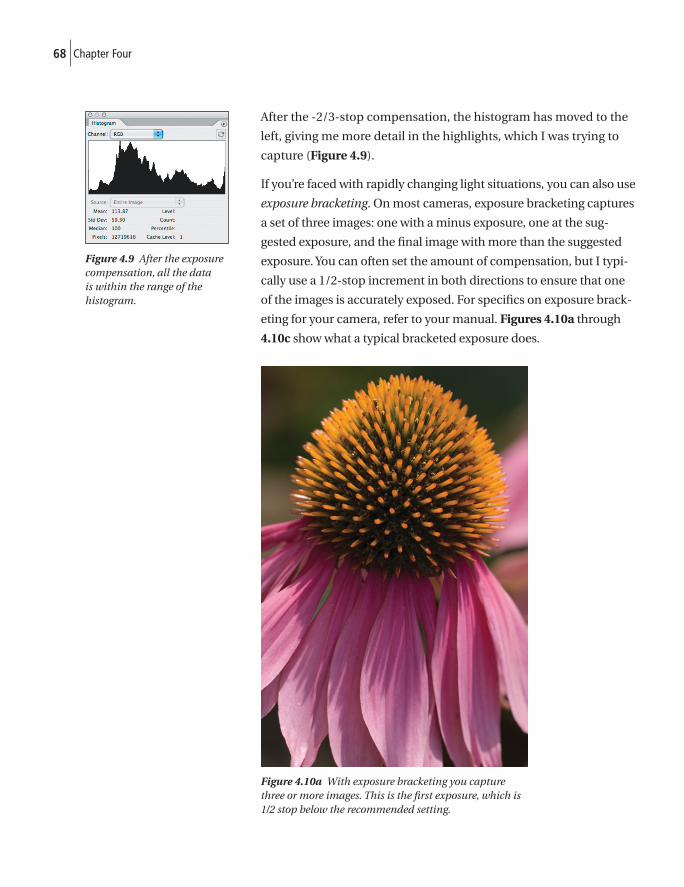
68 Chapter Four
After the -2/3-stop compensation, the histogram has moved to the
left, giving me more detail in the highlights, which I was trying to
capture (Figure 4.9).
If you’re faced with rapidly changing light situations, you can also use
exposure bracketing. On most cameras, exposure bracketing captures
a set of three images: one with a minus exposure, one at the sug-
gested exposure, and the fi nal image with more than the suggested
exposure. You can often set the amount of compensation, but I typi-
cally use a 1/2-stop increment in both directions to ensure that one
of the images is accurately exposed. For specifi cs on exposure brack-
eting for your camera, refer to your manual. Figures 4.10a through
4.10c show what a typical bracketed exposure does.
Figure 4.10a With exposure bracketing you capture three or more images. This is the fi rst exposure, which is 1/2 stop below the recommended setting.
Figure 4.9 After the exposure compensation, all the data is within the range of the histogram.
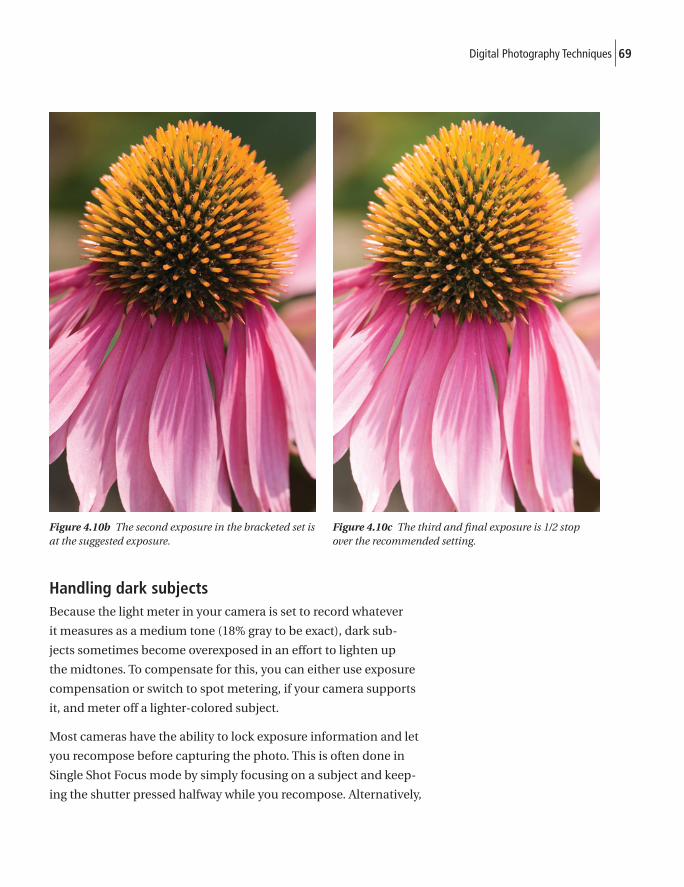
69Digital Photography Techniques
Handling dark subjectsBecause the light meter in your camera is set to record whatever
it measures as a medium tone (18% gray to be exact), dark sub-
jects sometimes become overexposed in an effort to lighten up
the midtones. To compensate for this, you can either use exposure
compensation or switch to spot metering, if your camera supports
it, and meter off a lighter-colored subject.
Most cameras have the ability to lock exposure information and let
you recompose before capturing the photo. This is often done in
Single Shot Focus mode by simply focusing on a subject and keep-
ing the shutter pressed halfway while you recompose. Alternatively,
Figure 4.10b The second exposure in the bracketed set is at the suggested exposure.
Figure 4.10c The third and fi nal exposure is 1/2 stop over the recommended setting.
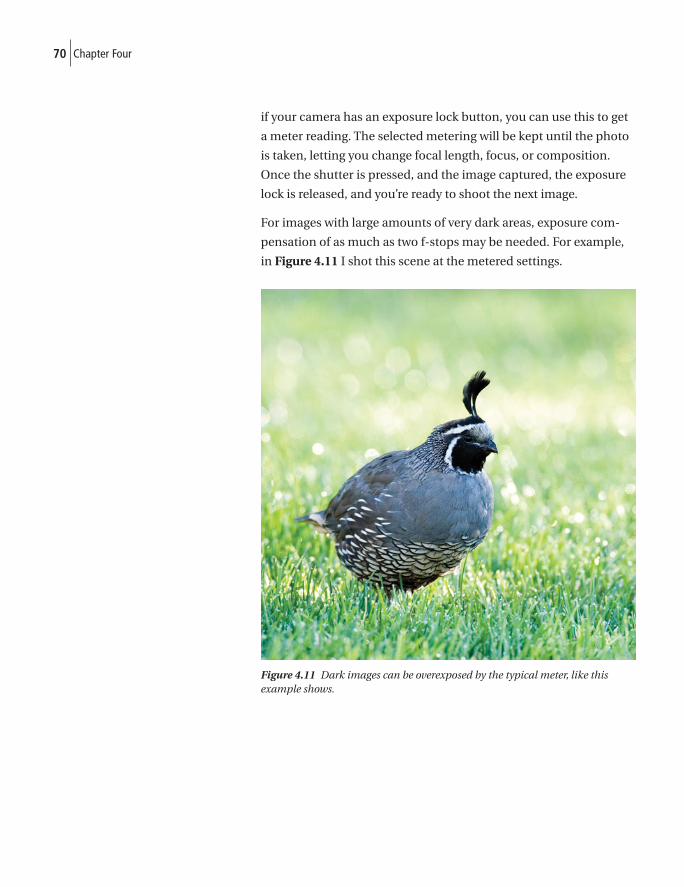
70 Chapter Four
if your camera has an exposure lock button, you can use this to get
a meter reading. The selected metering will be kept until the photo
is taken, letting you change focal length, focus, or composition.
Once the shutter is pressed, and the image captured, the exposure
lock is released, and you’re ready to shoot the next image.
For images with large amounts of very dark areas, exposure com-
pensation of as much as two f-stops may be needed. For example,
in Figure 4.11 I shot this scene at the metered settings.
Figure 4.11 Dark images can be overexposed by the typical meter, like this example shows.
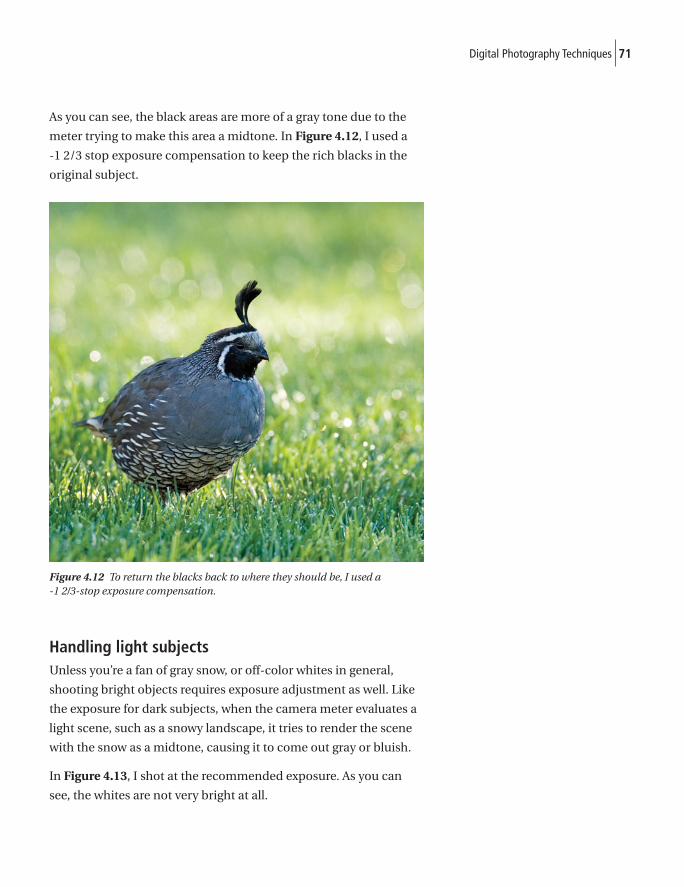
71Digital Photography Techniques
As you can see, the black areas are more of a gray tone due to the
meter trying to make this area a midtone. In Figure 4.12, I used a
-1 2/3 stop exposure compensation to keep the rich blacks in the
original subject.
Figure 4.12 To return the blacks back to where they should be, I used a -1 2/3-stop exposure compensation.
Handling light subjectsUnless you’re a fan of gray snow, or off-color whites in general,
shooting bright objects requires exposure adjustment as well. Like
the exposure for dark subjects, when the camera meter evaluates a
light scene, such as a snowy landscape, it tries to render the scene
with the snow as a midtone, causing it to come out gray or bluish.
In Figure 4.13, I shot at the recommended exposure. As you can
see, the whites are not very bright at all.
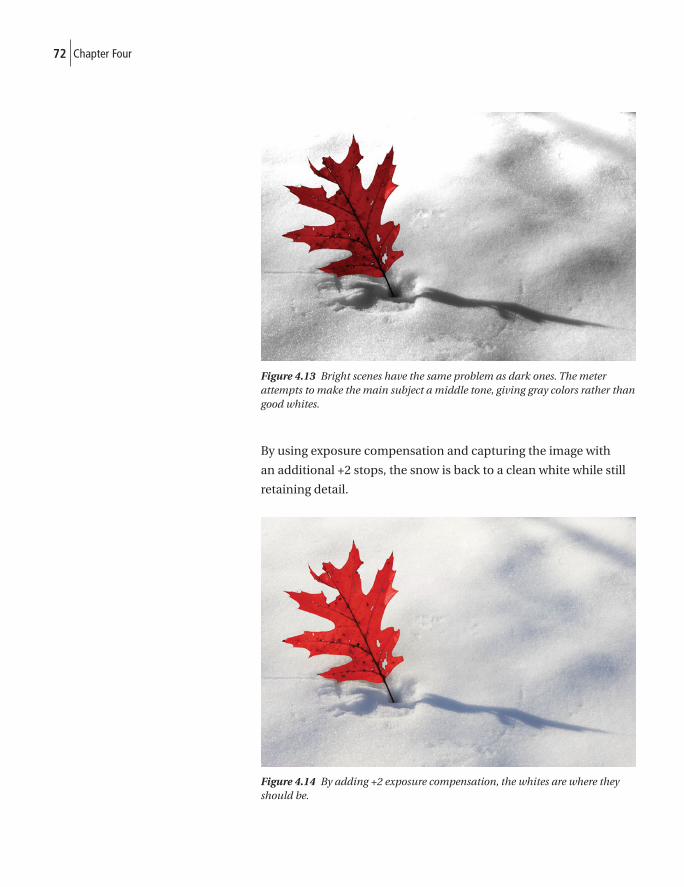
72 Chapter Four
Figure 4.13 Bright scenes have the same problem as dark ones. The meter attempts to make the main subject a middle tone, giving gray colors rather than good whites.
By using exposure compensation and capturing the image with
an additional +2 stops, the snow is back to a clean white while still
retaining detail.
Figure 4.14 By adding +2 exposure compensation, the whites are where they should be.

73Digital Photography Techniques
BacklightingBacklit scenes are the most diffi cult ones for a camera meter to han-
dle properly. You typically have a very bright light source, such as the
sun, overwhelming the meter with light. To compensate, the camera
meter attempts to bring the brightest light into range, which means
you often have only a silhouette of the person or other subject.
In cases like this, using center-weighted or spot metering is the best
option, since you’ll usually be able to meter off just the subject and
exclude the bright background. For example, Figure 4.15 shows a
photo captured at the camera’s evaluative reading.
By switching to spot metering, I’m able to change what the main
source of light is and come up with the image shown in Figure 4.16.
This is a change of three full stops from the original reading, and
although I’ve lost detail in the brightest areas of the image, I can
now see what the subject is.
Tip
The best solution with back-lighting is to use a flash to help fill in the light. You’ll find more on flash photography in Chapter 5.
Tip
The best solution with back-lighting is to use a flash to help fill in the light. You’ll find more on flash photography in Chapter 5.
Figure 4.15 In the typical backlight situation, the camera meter is overwhelmed by the background light, making the main subject underexposed.
Figure 4.16 By switching to spot metering, I can get a better exposure setting, giving me details in the subject at the expense of the background.
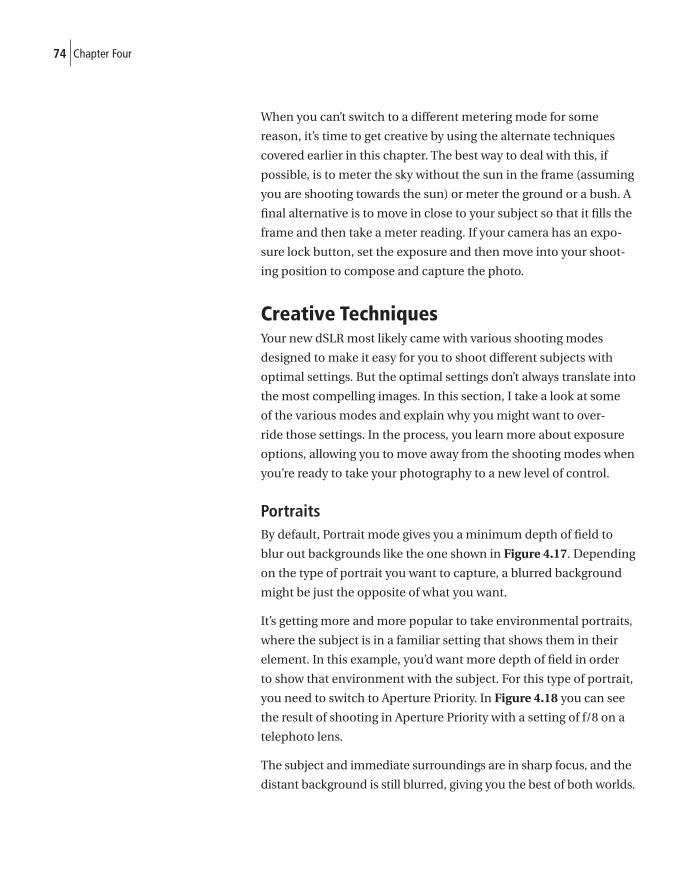
74 Chapter Four
When you can’t switch to a different metering mode for some
reason, it’s time to get creative by using the alternate techniques
covered earlier in this chapter. The best way to deal with this, if
possible, is to meter the sky without the sun in the frame (assuming
you are shooting towards the sun) or meter the ground or a bush. A
fi nal alternative is to move in close to your subject so that it fi lls the
frame and then take a meter reading. If your camera has an expo-
sure lock button, set the exposure and then move into your shoot-
ing position to compose and capture the photo.
Creative TechniquesYour new dSLR most likely came with various shooting modes
designed to make it easy for you to shoot different subjects with
optimal settings. But the optimal settings don’t always translate into
the most compelling images. In this section, I take a look at some
of the various modes and explain why you might want to over-
ride those settings. In the process, you learn more about exposure
options, allowing you to move away from the shooting modes when
you’re ready to take your photography to a new level of control.
PortraitsBy default, Portrait mode gives you a minimum depth of fi eld to
blur out backgrounds like the one shown in Figure 4.17. Depending
on the type of portrait you want to capture, a blurred background
might be just the opposite of what you want.
It’s getting more and more popular to take environmental portraits,
where the subject is in a familiar setting that shows them in their
element. In this example, you’d want more depth of fi eld in order
to show that environment with the subject. For this type of portrait,
you need to switch to Aperture Priority. In Figure 4.18 you can see
the result of shooting in Aperture Priority with a setting of f/8 on a
telephoto lens.
The subject and immediate surroundings are in sharp focus, and the
distant background is still blurred, giving you the best of both worlds.
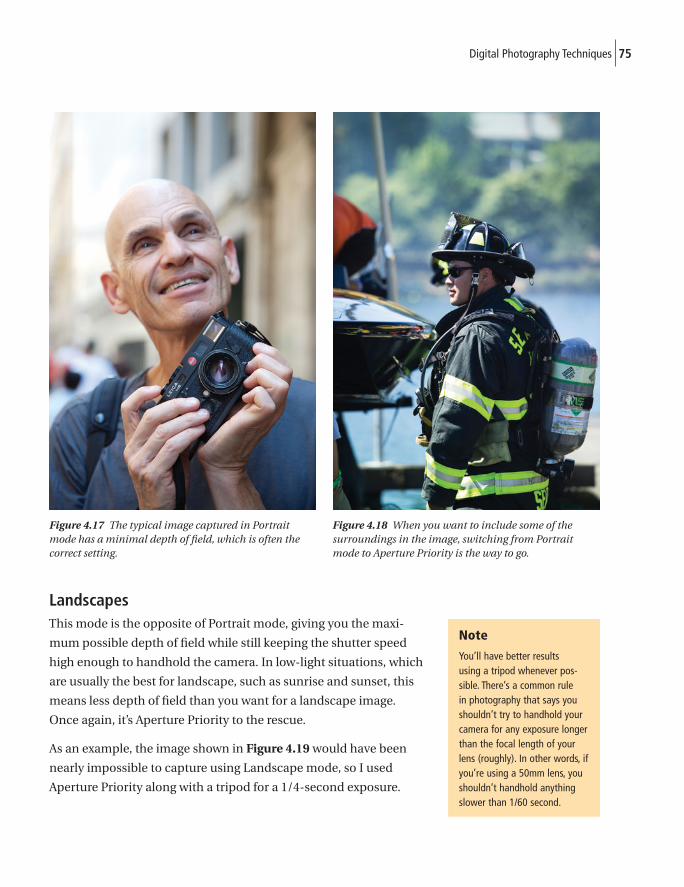
75Digital Photography Techniques
LandscapesThis mode is the opposite of Portrait mode, giving you the maxi-
mum possible depth of fi eld while still keeping the shutter speed
high enough to handhold the camera. In low-light situations, which
are usually the best for landscape, such as sunrise and sunset, this
means less depth of fi eld than you want for a landscape image.
Once again, it’s Aperture Priority to the rescue.
As an example, the image shown in Figure 4.19 would have been
nearly impossible to capture using Landscape mode, so I used
Aperture Priority along with a tripod for a 1/4-second exposure.
Note
You’ll have better results using a tripod whenever pos-sible. There’s a common rule in photography that says you shouldn’t try to handhold your camera for any exposure longer than the focal length of your lens (roughly). In other words, if you’re using a 50mm lens, you shouldn’t handhold anything slower than 1/60 second.
Figure 4.17 The typical image captured in Portrait mode has a minimal depth of fi eld, which is often the correct setting.
Figure 4.18 When you want to include some of the surroundings in the image, switching from Portrait mode to Aperture Priority is the way to go.
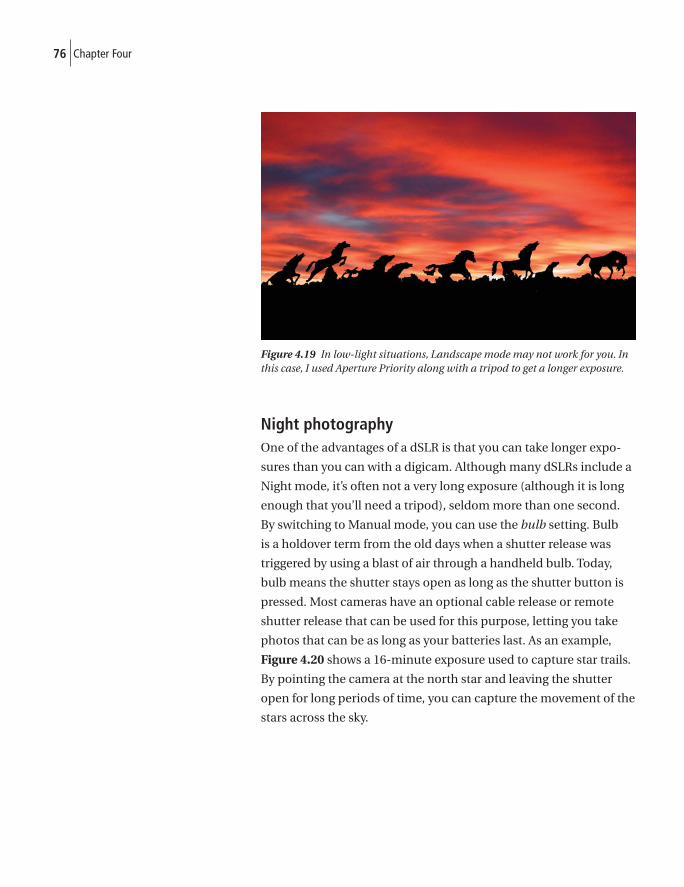
76 Chapter Four
Figure 4.19 In low-light situations, Landscape mode may not work for you. In this case, I used Aperture Priority along with a tripod to get a longer exposure.
Night photographyOne of the advantages of a dSLR is that you can take longer expo-
sures than you can with a digicam. Although many dSLRs include a
Night mode, it’s often not a very long exposure (although it is long
enough that you’ll need a tripod), seldom more than one second.
By switching to Manual mode, you can use the bulb setting. Bulb
is a holdover term from the old days when a shutter release was
triggered by using a blast of air through a handheld bulb. Today,
bulb means the shutter stays open as long as the shutter button is
pressed. Most cameras have an optional cable release or remote
shutter release that can be used for this purpose, letting you take
photos that can be as long as your batteries last. As an example,
Figure 4.20 shows a 16-minute exposure used to capture star trails.
By pointing the camera at the north star and leaving the shutter
open for long periods of time, you can capture the movement of the
stars across the sky.
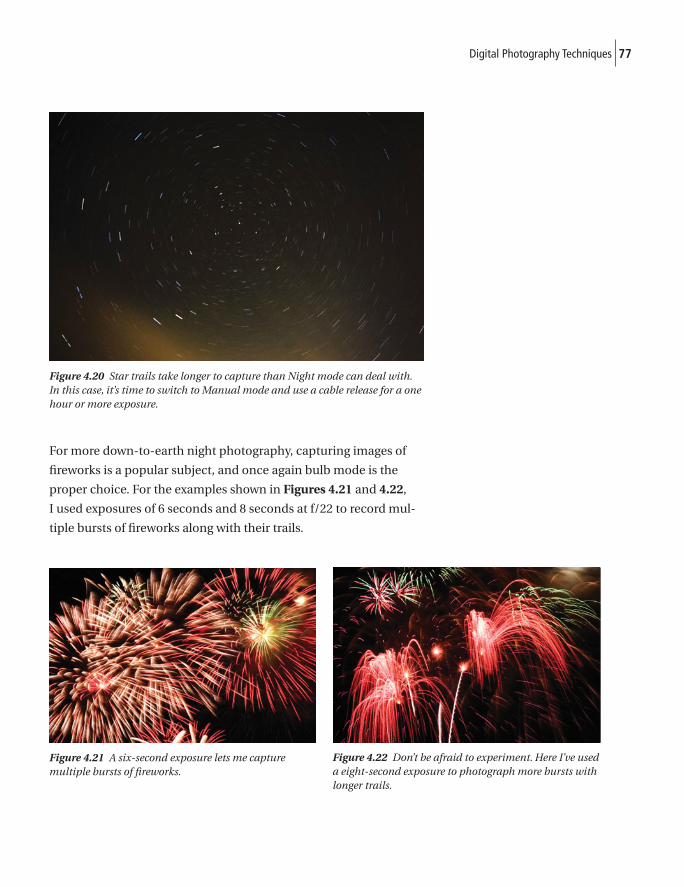
77Digital Photography Techniques
Figure 4.20 Star trails take longer to capture than Night mode can deal with. In this case, it’s time to switch to Manual mode and use a cable release for a one hour or more exposure.
For more down-to-earth night photography, capturing images of
fi reworks is a popular subject, and once again bulb mode is the
proper choice. For the examples shown in Figures 4.21 and 4.22,
I used exposures of 6 seconds and 8 seconds at f/22 to record mul-
tiple bursts of fi reworks along with their trails.
Figure 4.21 A six-second exposure lets me capture multiple bursts of fi reworks.
Figure 4.22 Don’t be afraid to experiment. Here I’ve used a eight-second exposure to photograph more bursts with longer trails.
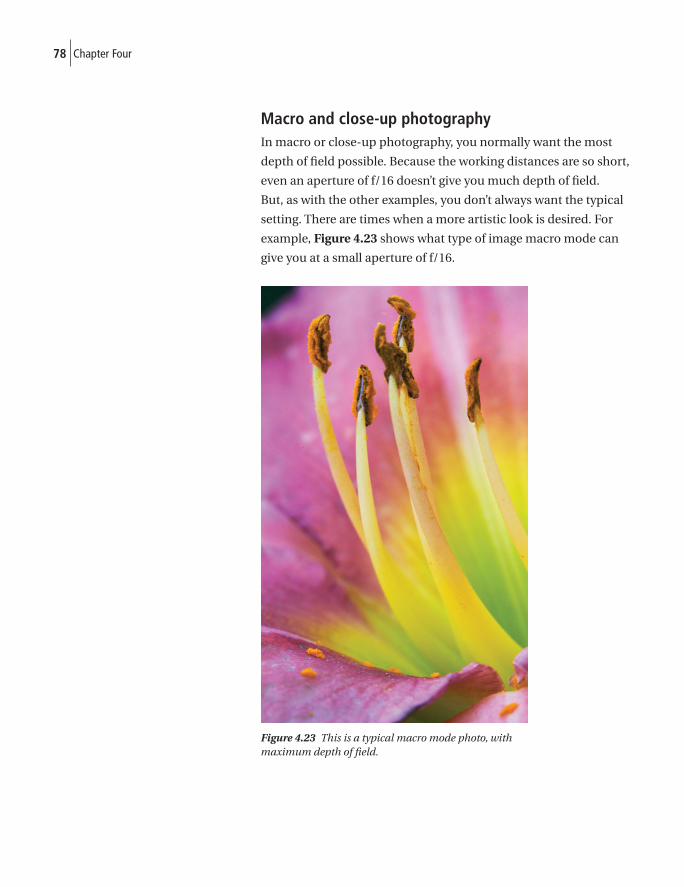
78 Chapter Four
Macro and close-up photographyIn macro or close-up photography, you normally want the most
depth of fi eld possible. Because the working distances are so short,
even an aperture of f/16 doesn’t give you much depth of fi eld.
But, as with the other examples, you don’t always want the typical
setting. There are times when a more artistic look is desired. For
example, Figure 4.23 shows what type of image macro mode can
give you at a small aperture of f/16.
Figure 4.23 This is a typical macro mode photo, with maximum depth of fi eld.
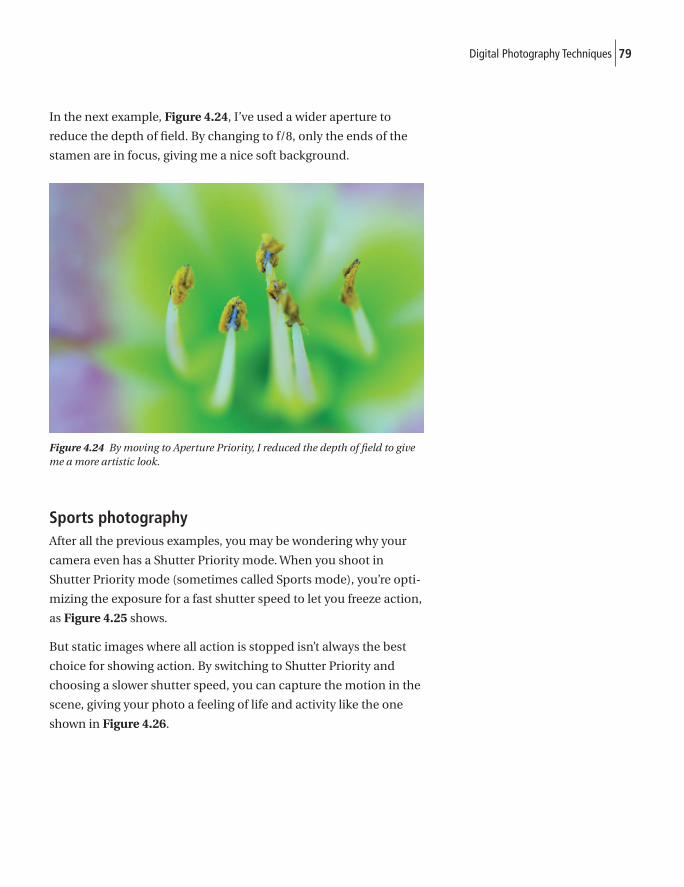
79Digital Photography Techniques
In the next example, Figure 4.24, I’ve used a wider aperture to
reduce the depth of fi eld. By changing to f/8, only the ends of the
stamen are in focus, giving me a nice soft background.
Figure 4.24 By moving to Aperture Priority, I reduced the depth of fi eld to give me a more artistic look.
Sports photographyAfter all the previous examples, you may be wondering why your
camera even has a Shutter Priority mode. When you shoot in
Shutter Priority mode (sometimes called Sports mode), you’re opti-
mizing the exposure for a fast shutter speed to let you freeze action,
as Figure 4.25 shows.
But static images where all action is stopped isn’t always the best
choice for showing action. By switching to Shutter Priority and
choosing a slower shutter speed, you can capture the motion in the
scene, giving your photo a feeling of life and activity like the one
shown in Figure 4.26.
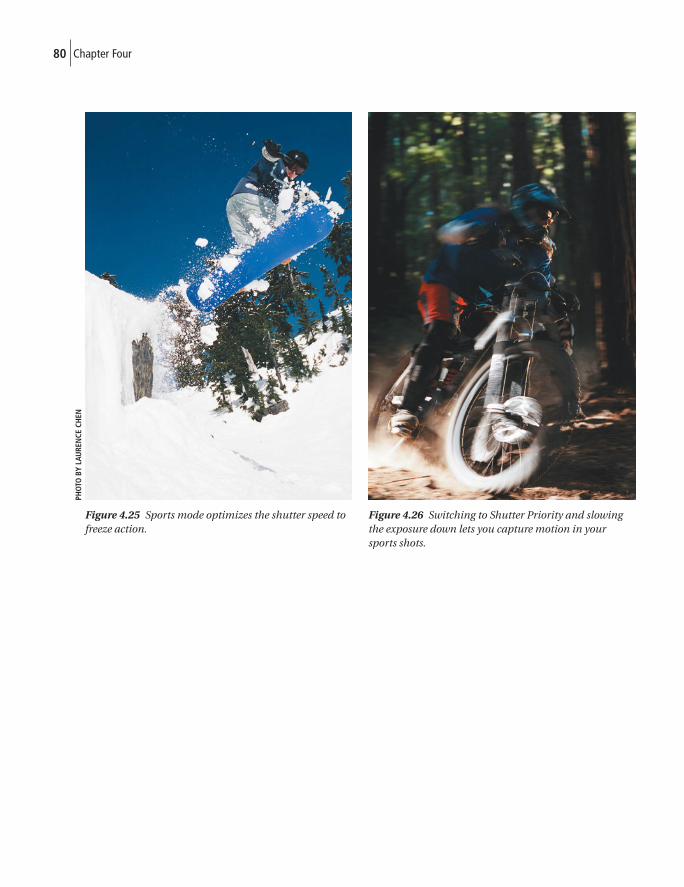
80 Chapter Four
Figure 4.25 Sports mode optimizes the shutter speed to freeze action.
Figure 4.26 Switching to Shutter Priority and slowing the exposure down lets you capture motion in your sports shots.
PHO
TO B
Y LA
URE
NCE
CH
EN
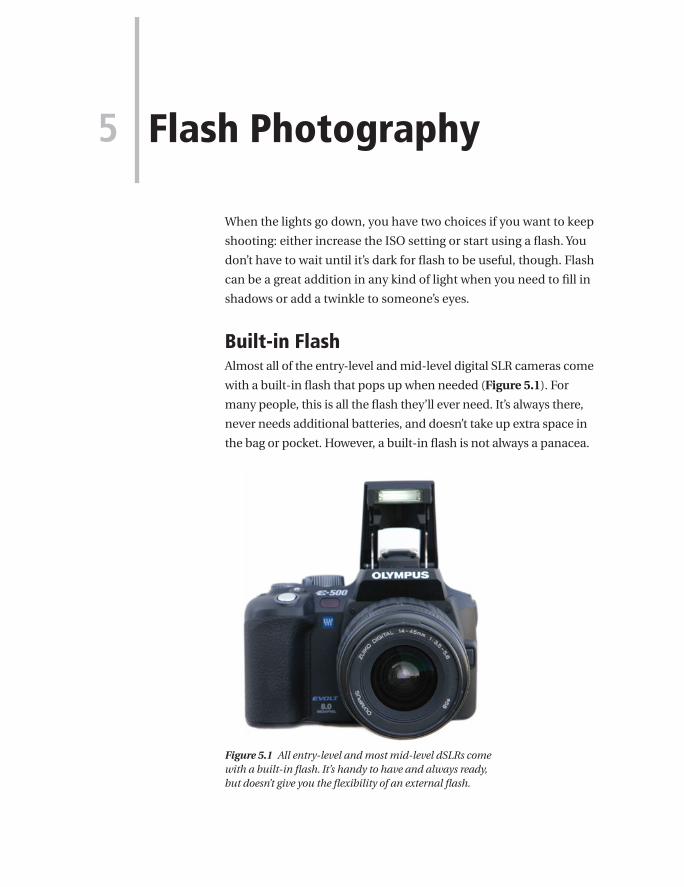
When the lights go down, you have two choices if you want to keep
shooting: either increase the ISO setting or start using a fl ash. You
don’t have to wait until it’s dark for fl ash to be useful, though. Flash
can be a great addition in any kind of light when you need to fi ll in
shadows or add a twinkle to someone’s eyes.
Built-in FlashAlmost all of the entry-level and mid-level digital SLR cameras come
with a built-in fl ash that pops up when needed (Figure 5.1). For
many people, this is all the fl ash they’ll ever need. It’s always there,
never needs additional batteries, and doesn’t take up extra space in
the bag or pocket. However, a built-in fl ash is not always a panacea.
Figure 5.1 All entry-level and most mid-level dSLRs come with a built-in fl ash. It’s handy to have and always ready, but doesn’t give you the fl exibility of an external fl ash.
5 Flash Photography
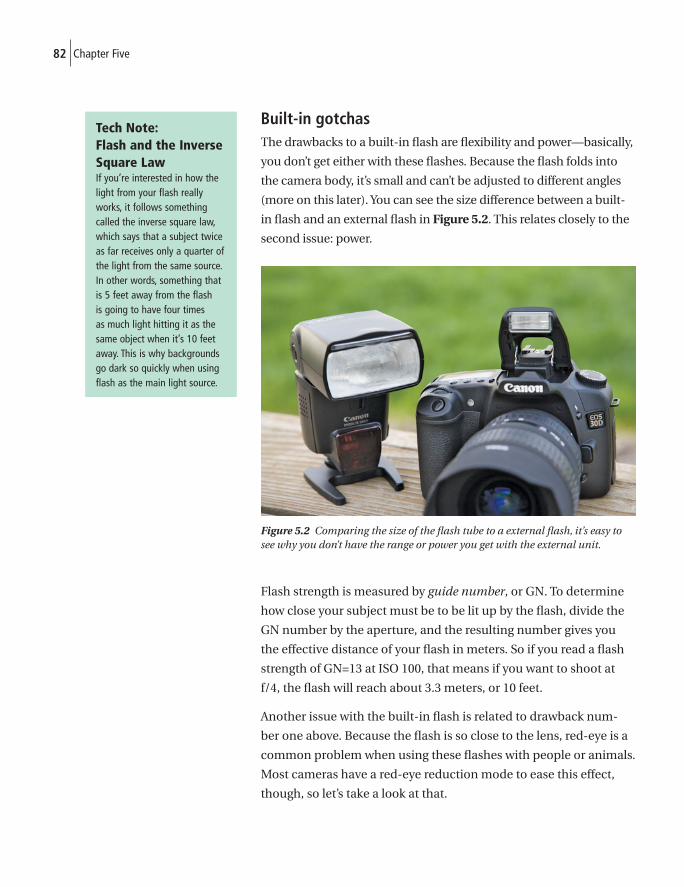
82 Chapter Five
Built-in gotchasThe drawbacks to a built-in fl ash are fl exibility and power—basically,
you don’t get either with these fl ashes. Because the fl ash folds into
the camera body, it’s small and can’t be adjusted to different angles
(more on this later). You can see the size difference between a built-
in fl ash and an external fl ash in Figure 5.2. This relates closely to the
second issue: power.
Figure 5.2 Comparing the size of the fl ash tube to a external fl ash, it’s easy to see why you don’t have the range or power you get with the external unit.
Flash strength is measured by guide number, or GN. To determine
how close your subject must be to be lit up by the fl ash, divide the
GN number by the aperture, and the resulting number gives you
the effective distance of your fl ash in meters. So if you read a fl ash
strength of GN=13 at ISO 100, that means if you want to shoot at
f/4, the fl ash will reach about 3.3 meters, or 10 feet.
Another issue with the built-in fl ash is related to drawback num-
ber one above. Because the fl ash is so close to the lens, red-eye is a
common problem when using these fl ashes with people or animals.
Most cameras have a red-eye reduction mode to ease this effect,
though, so let’s take a look at that.
Tech Note: Flash and the Inverse Square LawIf you’re interested in how the light from your flash really works, it follows something called the inverse square law, which says that a subject twice as far receives only a quarter of the light from the same source. In other words, something that is 5 feet away from the flash is going to have four times as much light hitting it as the same object when it’s 10 feet away. This is why backgrounds go dark so quickly when using flash as the main light source.
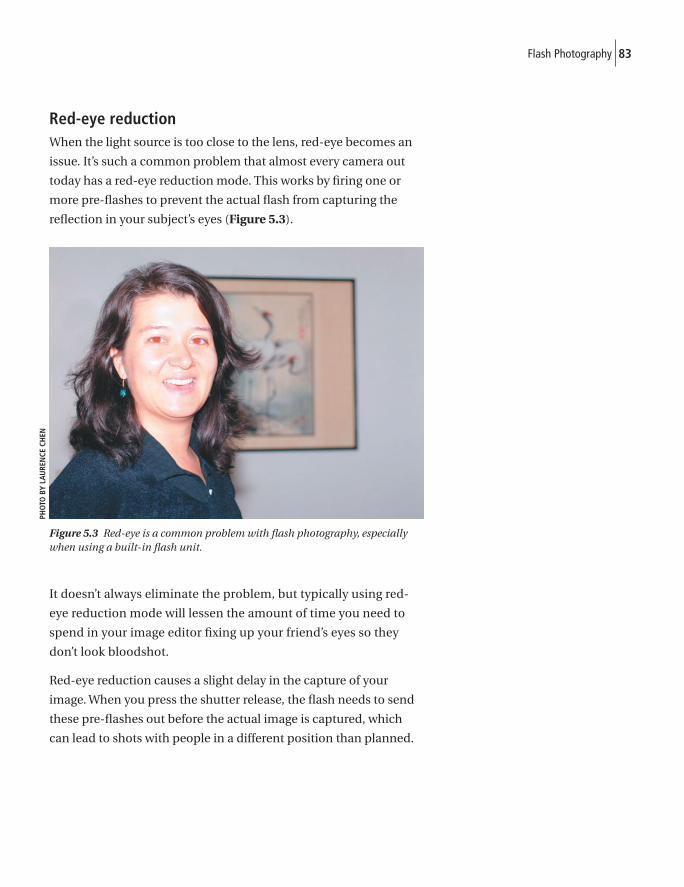
83Flash Photography
Red-eye reductionWhen the light source is too close to the lens, red-eye becomes an
issue. It’s such a common problem that almost every camera out
today has a red-eye reduction mode. This works by fi ring one or
more pre-fl ashes to prevent the actual fl ash from capturing the
refl ection in your subject’s eyes (Figure 5.3).
Figure 5.3 Red-eye is a common problem with fl ash photography, especially when using a built-in fl ash unit.
It doesn’t always eliminate the problem, but typically using red-
eye reduction mode will lessen the amount of time you need to
spend in your image editor fi xing up your friend’s eyes so they
don’t look bloodshot.
Red-eye reduction causes a slight delay in the capture of your
image. When you press the shutter release, the fl ash needs to send
these pre-fl ashes out before the actual image is captured, which
can lead to shots with people in a different position than planned.
PHO
TO B
Y LA
URE
NCE
CH
EN
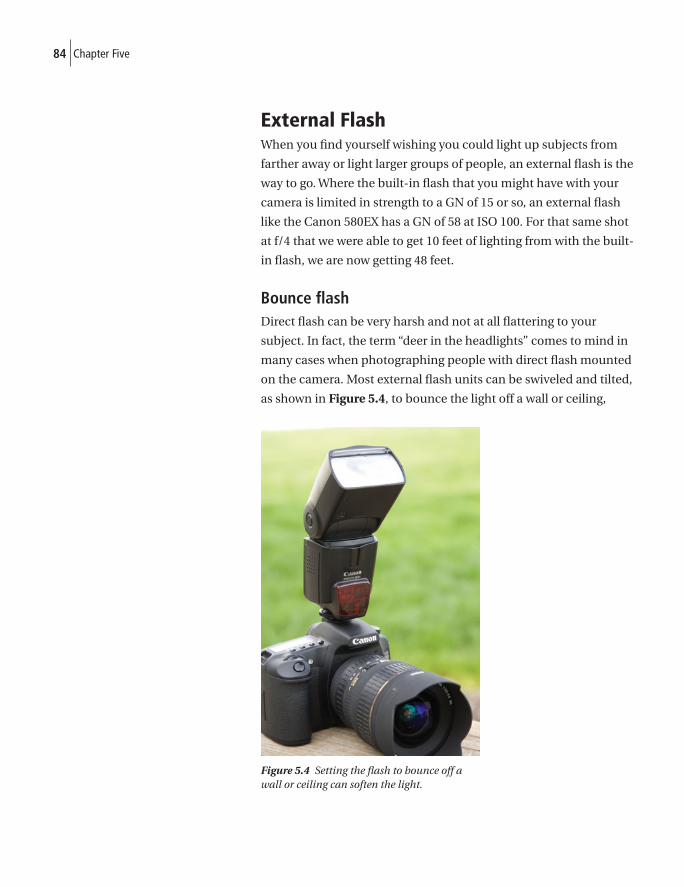
84 Chapter Five
External FlashWhen you fi nd yourself wishing you could light up subjects from
farther away or light larger groups of people, an external fl ash is the
way to go. Where the built-in fl ash that you might have with your
camera is limited in strength to a GN of 15 or so, an external fl ash
like the Canon 580EX has a GN of 58 at ISO 100. For that same shot
at f/4 that we were able to get 10 feet of lighting from with the built-
in fl ash, we are now getting 48 feet.
Bounce fl ashDirect fl ash can be very harsh and not at all fl attering to your
subject. In fact, the term “deer in the headlights” comes to mind in
many cases when photographing people with direct fl ash mounted
on the camera. Most external fl ash units can be swiveled and tilted,
as shown in Figure 5.4, to bounce the light off a wall or ceiling,
Figure 5.4 Setting the fl ash to bounce off a wall or ceiling can soften the light.
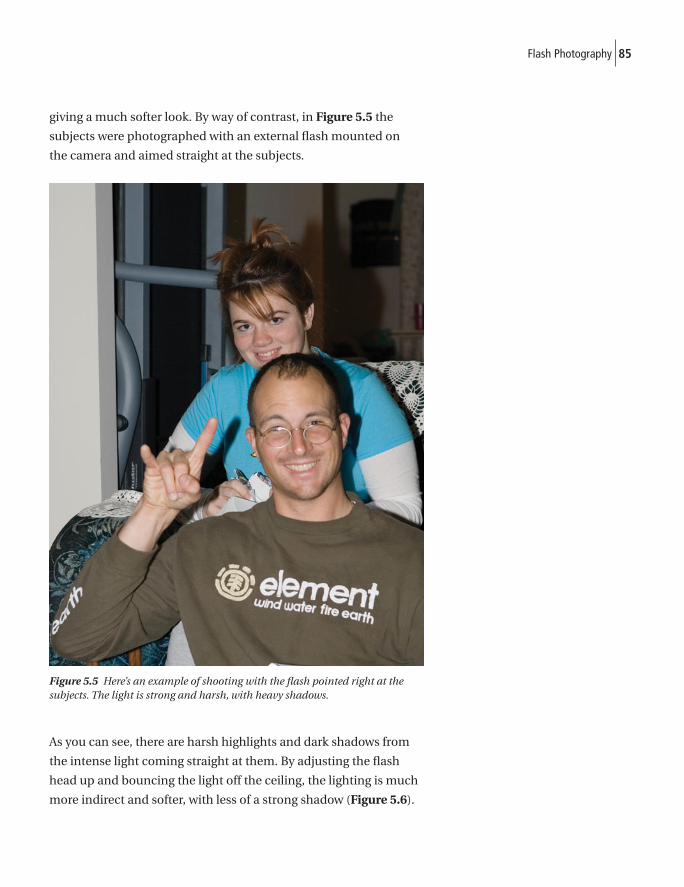
85Flash Photography
giving a much softer look. By way of contrast, in Figure 5.5 the
subjects were photographed with an external fl ash mounted on
the camera and aimed straight at the subjects.
Figure 5.5 Here’s an example of shooting with the fl ash pointed right at the subjects. The light is strong and harsh, with heavy shadows.
As you can see, there are harsh highlights and dark shadows from
the intense light coming straight at them. By adjusting the fl ash
head up and bouncing the light off the ceiling, the lighting is much
more indirect and softer, with less of a strong shadow (Figure 5.6).
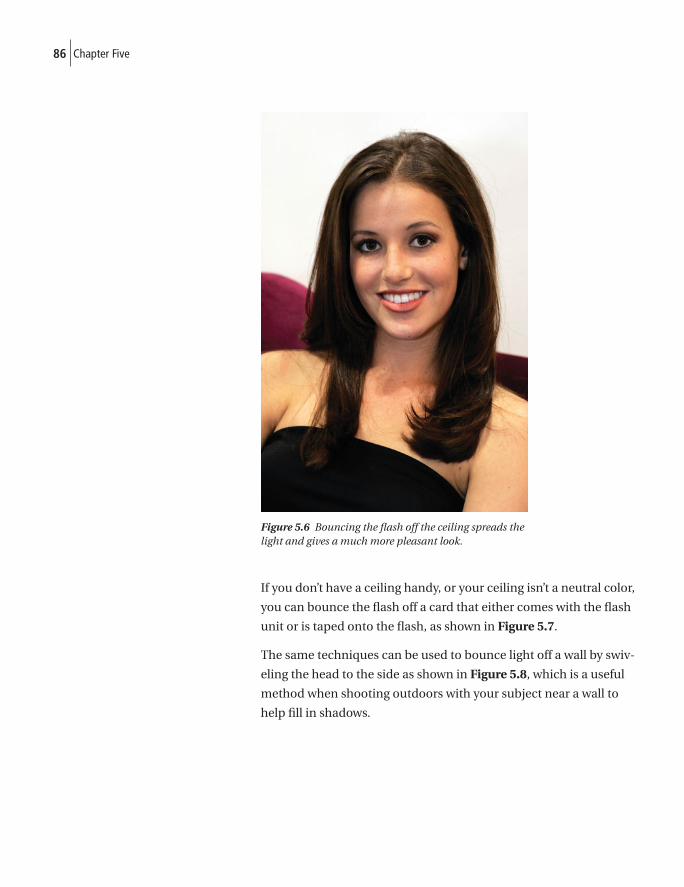
86 Chapter Five
Figure 5.6 Bouncing the fl ash off the ceiling spreads the light and gives a much more pleasant look.
If you don’t have a ceiling handy, or your ceiling isn’t a neutral color,
you can bounce the fl ash off a card that either comes with the fl ash
unit or is taped onto the fl ash, as shown in Figure 5.7.
The same techniques can be used to bounce light off a wall by swiv-
eling the head to the side as shown in Figure 5.8, which is a useful
method when shooting outdoors with your subject near a wall to
help fi ll in shadows.
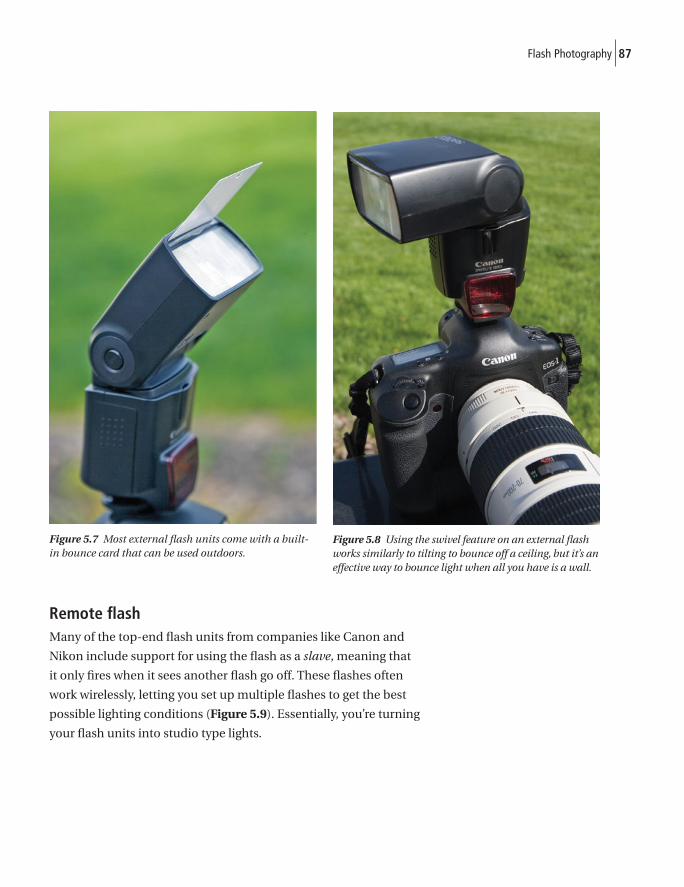
87Flash Photography
Remote fl ashMany of the top-end fl ash units from companies like Canon and
Nikon include support for using the fl ash as a slave, meaning that
it only fi res when it sees another fl ash go off. These fl ashes often
work wirelessly, letting you set up multiple fl ashes to get the best
possible lighting conditions (Figure 5.9). Essentially, you’re turning
your fl ash units into studio type lights.
Figure 5.7 Most external fl ash units come with a built-in bounce card that can be used outdoors.
Figure 5.8 Using the swivel feature on an external fl ash works similarly to tilting to bounce off a ceiling, but it’s an effective way to bounce light when all you have is a wall.
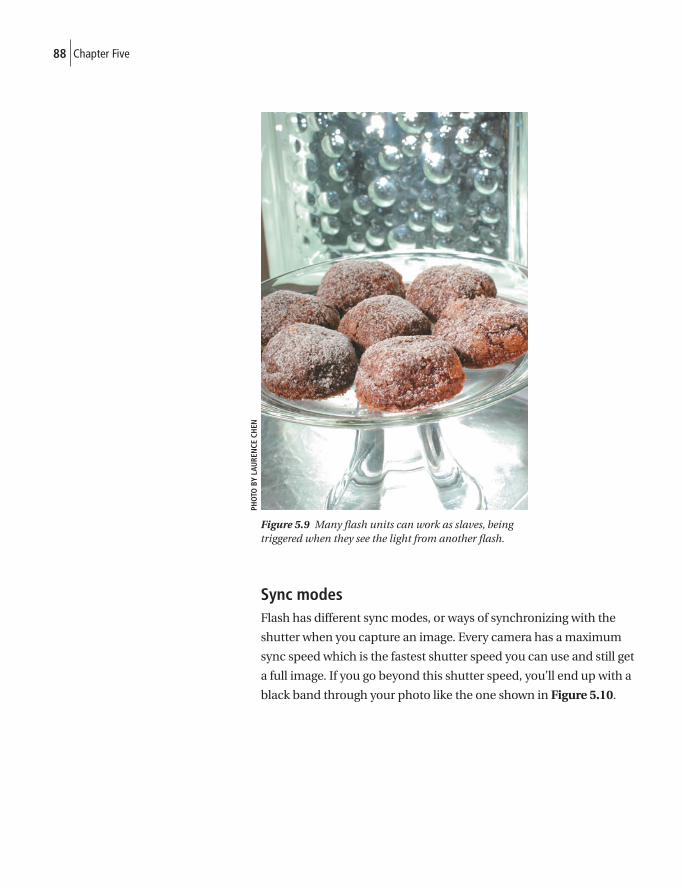
88 Chapter Five
Figure 5.9 Many fl ash units can work as slaves, being triggered when they see the light from another fl ash.
Sync modesFlash has different sync modes, or ways of synchronizing with the
shutter when you capture an image. Every camera has a maximum
sync speed which is the fastest shutter speed you can use and still get
a full image. If you go beyond this shutter speed, you’ll end up with a
black band through your photo like the one shown in Figure 5.10.
PHO
TO B
Y LA
URE
NCE
CH
EN
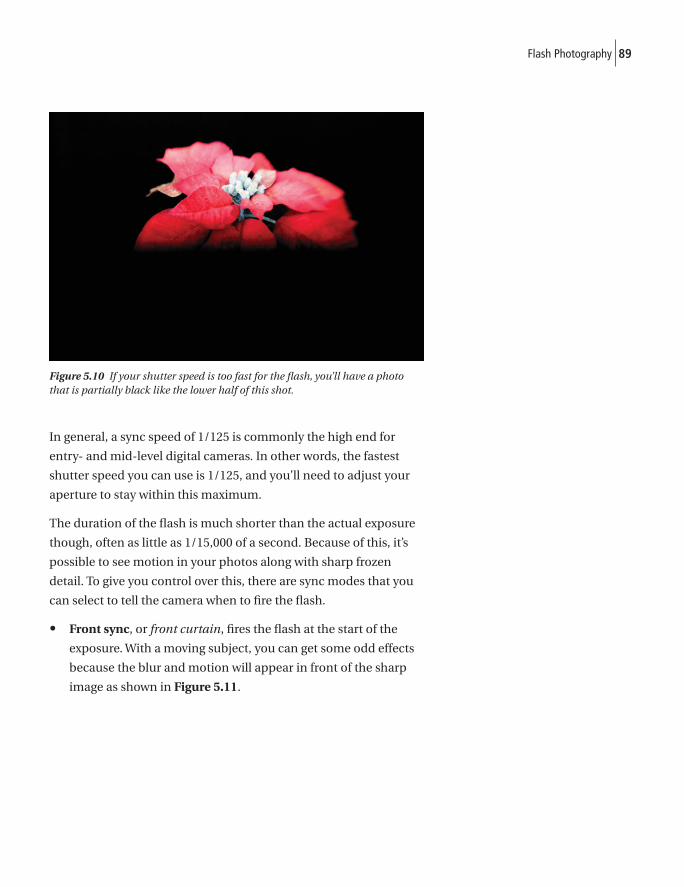
89Flash Photography
Figure 5.10 If your shutter speed is too fast for the fl ash, you’ll have a photo that is partially black like the lower half of this shot.
In general, a sync speed of 1/125 is commonly the high end for
entry- and mid-level digital cameras. In other words, the fastest
shutter speed you can use is 1/125, and you’ll need to adjust your
aperture to stay within this maximum.
The duration of the fl ash is much shorter than the actual exposure
though, often as little as 1/15,000 of a second. Because of this, it’s
possible to see motion in your photos along with sharp frozen
detail. To give you control over this, there are sync modes that you
can select to tell the camera when to fi re the fl ash.
• Front sync, or front curtain, fi res the fl ash at the start of the
exposure. With a moving subject, you can get some odd effects
because the blur and motion will appear in front of the sharp
image as shown in Figure 5.11.
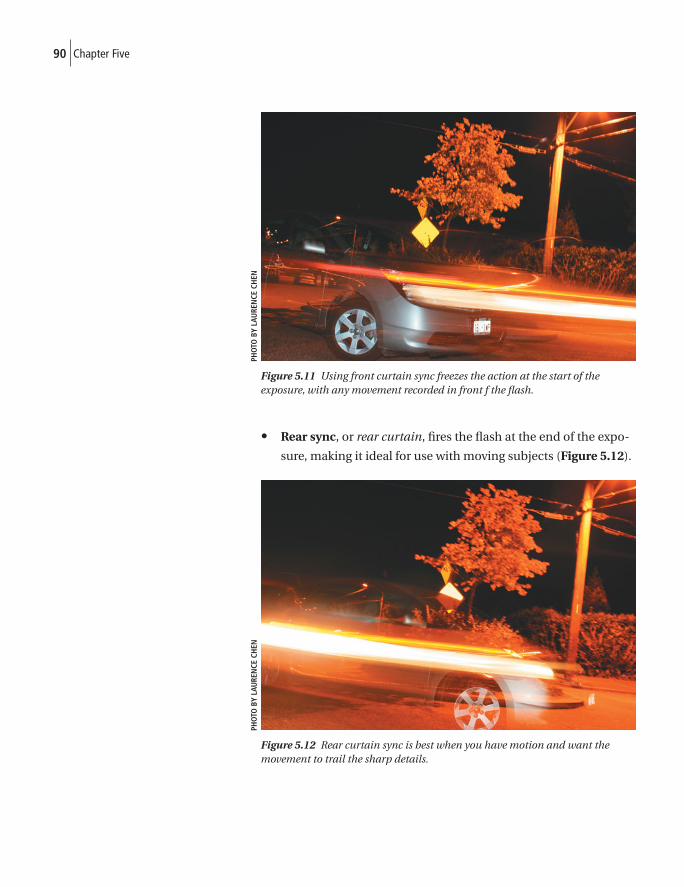
90 Chapter Five
Figure 5.11 Using front curtain sync freezes the action at the start of the exposure, with any movement recorded in front f the fl ash.
• Rear sync, or rear curtain, fi res the fl ash at the end of the expo-
sure, making it ideal for use with moving subjects (Figure 5.12).
Figure 5.12 Rear curtain sync is best when you have motion and want the movement to trail the sharp details.
PHO
TO B
Y LA
URE
NCE
CH
ENPH
OTO
BY
LAU
REN
CE C
HEN
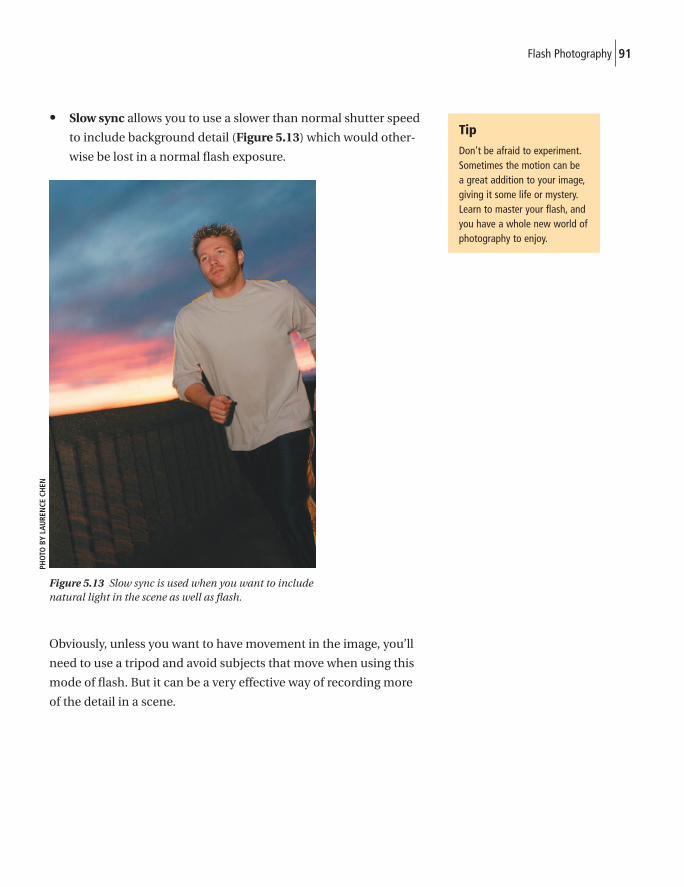
91Flash Photography
• Slow sync allows you to use a slower than normal shutter speed
to include background detail (Figure 5.13) which would other-
wise be lost in a normal fl ash exposure.
Figure 5.13 Slow sync is used when you want to include natural light in the scene as well as fl ash.
Obviously, unless you want to have movement in the image, you’ll
need to use a tripod and avoid subjects that move when using this
mode of fl ash. But it can be a very effective way of recording more
of the detail in a scene.
Tip
Don’t be afraid to experiment. Sometimes the motion can be a great addition to your image, giving it some life or mystery. Learn to master your flash, and you have a whole new world of photography to enjoy.
Tip
Don’t be afraid to experiment. Sometimes the motion can be a great addition to your image, giving it some life or mystery. Learn to master your flash, and you have a whole new world of photography to enjoy.
PHO
TO B
Y LA
URE
NCE
CH
EN

This page intentionally left blank
There are some looks and effects in photography that can still be best
achieved by using special equipment on the camera. Read on to fi nd
out how to use fi lters and special effects to spice up your images.
FiltersIt might surprise you to know that fi lters still have a very valuable
place in the digital camera bag. Sure, you can simulate many of
the effects of a fi lter in Photoshop after the fact, but not everything
lends itself to software adjustments. In some cases, you’ll have
better results from the beginning by using the appropriate tools
with your camera when you go out to photograph.
UV fi ltersI’ll be very up front on this one. I am not a fan of UV (ultraviolet) fi l-
ters. Most of them are sold with a lens by a salesperson in a camera
store looking for a quick profi t. This usually goes along with, “Do
you want a UV fi lter to protect that lens?”—the theory being that
when you drop your expensive new lens or something pokes it, the
fi lter will prevent the glass element of the lens from being damaged.
This is probably true—it will likely prevent damage to the glass, but
so will using the lens hood, which does do an even better job (trust
me on this one—I’ve had enough practice to know that a lens hood
does protect a lens when you drop it).
But the biggest issue I have with the typical UV fi lter that is pushed
on the unsuspecting buyer is quality. You’ve just spent a good
amount of money to buy the best lens you could afford, and now
the salesperson wants you to slap a cheap piece of glass in front of
it? Does that really make sense?
Filters and Special Effects
6
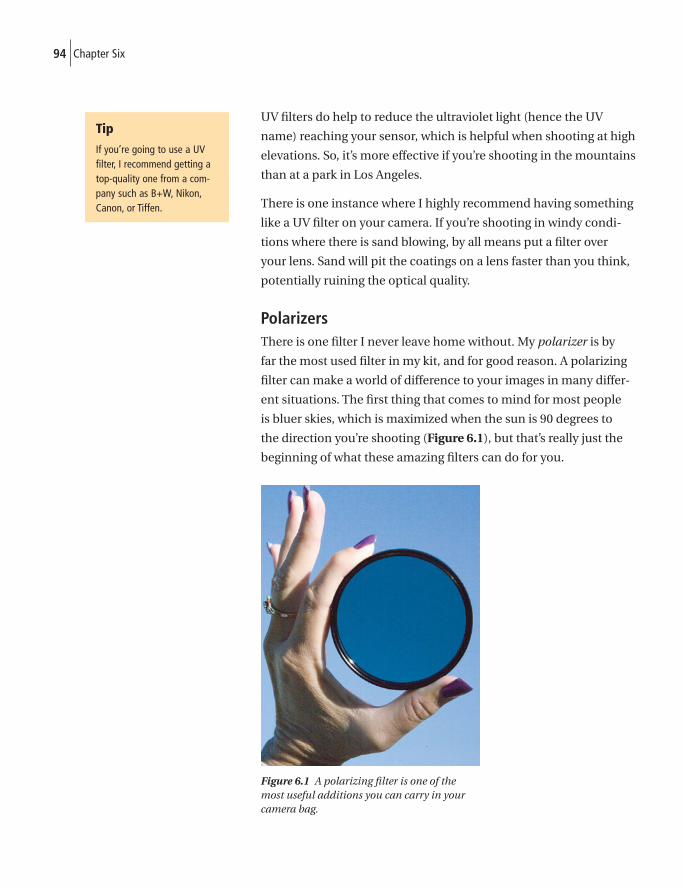
94 Chapter Six
UV fi lters do help to reduce the ultraviolet light (hence the UV
name) reaching your sensor, which is helpful when shooting at high
elevations. So, it’s more effective if you’re shooting in the mountains
than at a park in Los Angeles.
There is one instance where I highly recommend having something
like a UV fi lter on your camera. If you’re shooting in windy condi-
tions where there is sand blowing, by all means put a fi lter over
your lens. Sand will pit the coatings on a lens faster than you think,
potentially ruining the optical quality.
PolarizersThere is one fi lter I never leave home without. My polarizer is by
far the most used fi lter in my kit, and for good reason. A polarizing
fi lter can make a world of difference to your images in many differ-
ent situations. The fi rst thing that comes to mind for most people
is bluer skies, which is maximized when the sun is 90 degrees to
the direction you’re shooting (Figure 6.1), but that’s really just the
beginning of what these amazing fi lters can do for you.
Figure 6.1 A polarizing fi lter is one of the most useful additions you can carry in your camera bag.
Tip
If you’re going to use a UV filter, I recommend getting a top-quality one from a com-pany such as B+W, Nikon, Canon, or Tiffen.
Tip
If you’re going to use a UV filter, I recommend getting a top-quality one from a com-pany such as B+W, Nikon, Canon, or Tiffen.
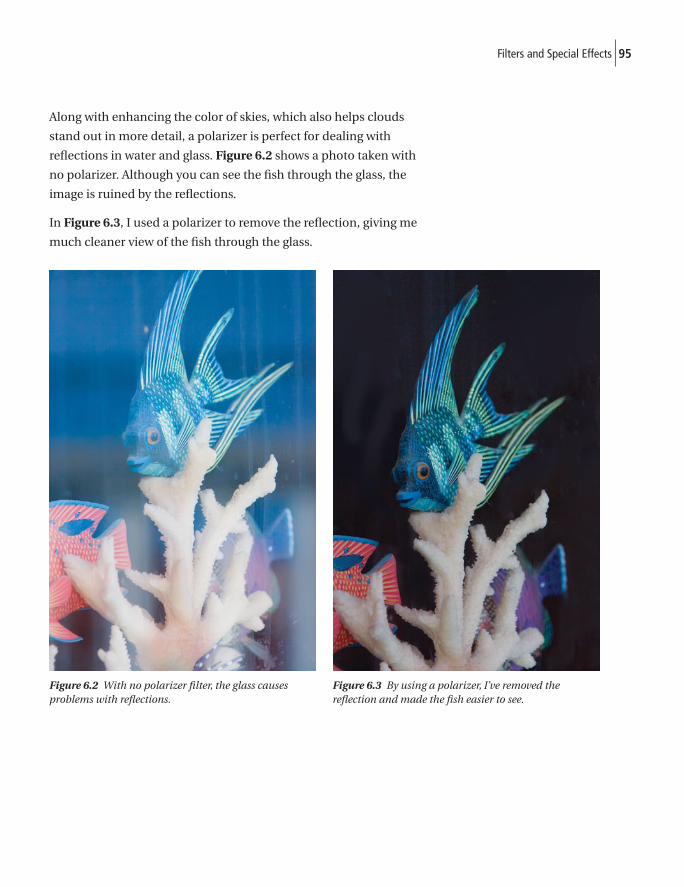
95Filters and Special Effects
Along with enhancing the color of skies, which also helps clouds
stand out in more detail, a polarizer is perfect for dealing with
refl ections in water and glass. Figure 6.2 shows a photo taken with
no polarizer. Although you can see the fi sh through the glass, the
image is ruined by the refl ections.
In Figure 6.3, I used a polarizer to remove the refl ection, giving me
much cleaner view of the fi sh through the glass.
Figure 6.2 With no polarizer fi lter, the glass causes problems with refl ections.
Figure 6.3 By using a polarizer, I’ve removed the refl ection and made the fi sh easier to see.
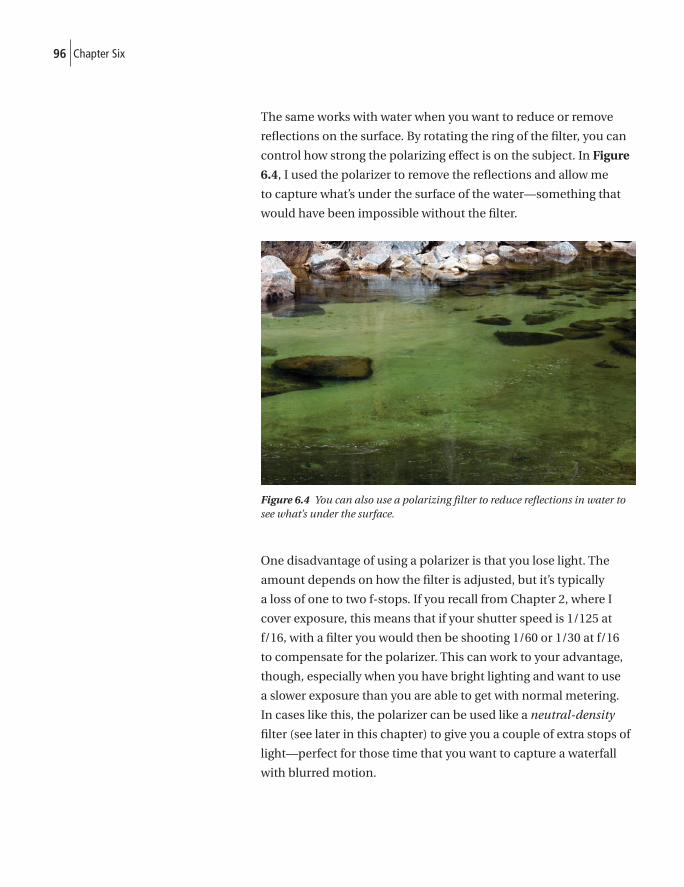
96 Chapter Six
The same works with water when you want to reduce or remove
refl ections on the surface. By rotating the ring of the fi lter, you can
control how strong the polarizing effect is on the subject. In Figure
6.4, I used the polarizer to remove the refl ections and allow me
to capture what’s under the surface of the water—something that
would have been impossible without the fi lter.
Figure 6.4 You can also use a polarizing fi lter to reduce refl ections in water to see what’s under the surface.
One disadvantage of using a polarizer is that you lose light. The
amount depends on how the fi lter is adjusted, but it’s typically
a loss of one to two f-stops. If you recall from Chapter 2, where I
cover exposure, this means that if your shutter speed is 1/125 at
f/16, with a fi lter you would then be shooting 1/60 or 1/30 at f/16
to compensate for the polarizer. This can work to your advantage,
though, especially when you have bright lighting and want to use
a slower exposure than you are able to get with normal metering.
In cases like this, the polarizer can be used like a neutral-density
fi lter (see later in this chapter) to give you a couple of extra stops of
light—perfect for those time that you want to capture a waterfall
with blurred motion.
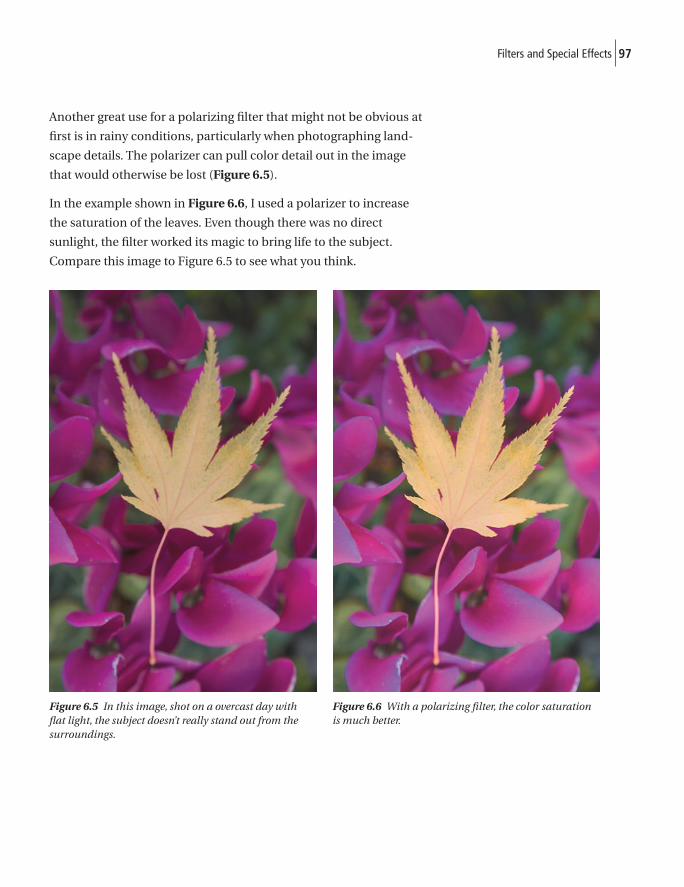
97Filters and Special Effects
Another great use for a polarizing fi lter that might not be obvious at
fi rst is in rainy conditions, particularly when photographing land-
scape details. The polarizer can pull color detail out in the image
that would otherwise be lost (Figure 6.5).
In the example shown in Figure 6.6, I used a polarizer to increase
the saturation of the leaves. Even though there was no direct
sunlight, the fi lter worked its magic to bring life to the subject.
Compare this image to Figure 6.5 to see what you think.
Figure 6.5 In this image, shot on a overcast day with fl at light, the subject doesn’t really stand out from the surroundings.
Figure 6.6 With a polarizing fi lter, the color saturation is much better.
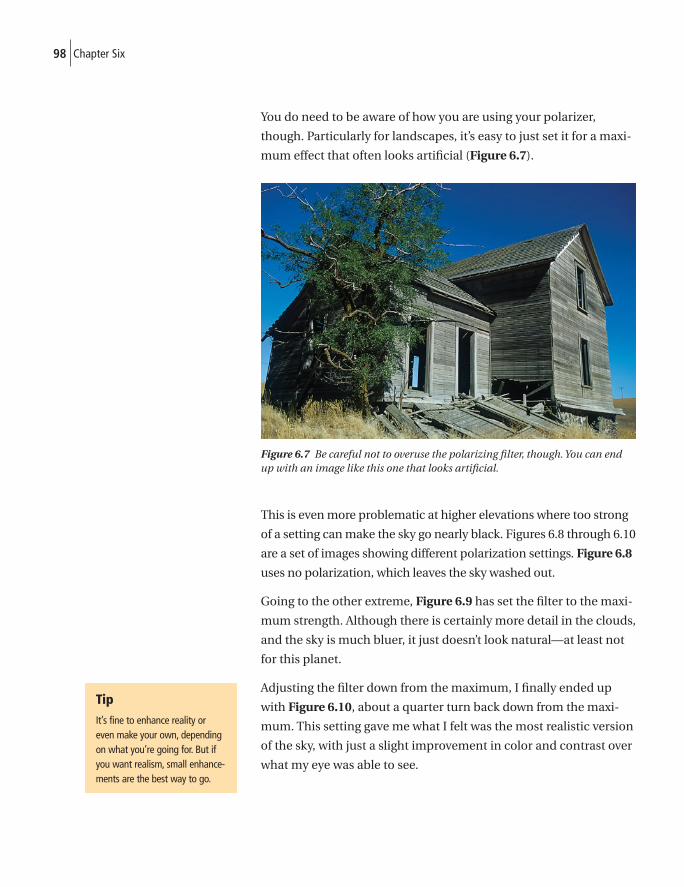
98 Chapter Six
You do need to be aware of how you are using your polarizer,
though. Particularly for landscapes, it’s easy to just set it for a maxi-
mum effect that often looks artifi cial (Figure 6.7).
Figure 6.7 Be careful not to overuse the polarizing fi lter, though. You can end up with an image like this one that looks artifi cial.
This is even more problematic at higher elevations where too strong
of a setting can make the sky go nearly black. Figures 6.8 through 6.10
are a set of images showing different polarization settings. Figure 6.8
uses no polarization, which leaves the sky washed out.
Going to the other extreme, Figure 6.9 has set the fi lter to the maxi-
mum strength. Although there is certainly more detail in the clouds,
and the sky is much bluer, it just doesn’t look natural—at least not
for this planet.
Adjusting the fi lter down from the maximum, I fi nally ended up
with Figure 6.10, about a quarter turn back down from the maxi-
mum. This setting gave me what I felt was the most realistic version
of the sky, with just a slight improvement in color and contrast over
what my eye was able to see.
Tip
It’s fine to enhance reality or even make your own, depending on what you’re going for. But if you want realism, small enhance-ments are the best way to go.
Tip
It’s fine to enhance reality or even make your own, depending on what you’re going for. But if you want realism, small enhance-ments are the best way to go.
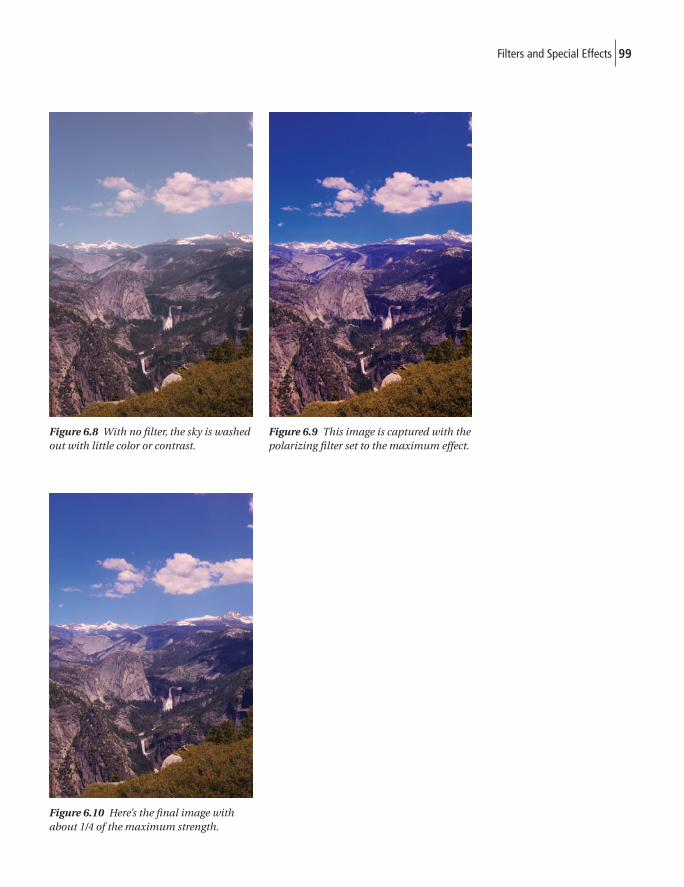
99Filters and Special Effects
Figure 6.8 With no fi lter, the sky is washed out with little color or contrast.
Figure 6.9 This image is captured with the polarizing fi lter set to the maximum effect.
Figure 6.10 Here’s the fi nal image with about 1/4 of the maximum strength.
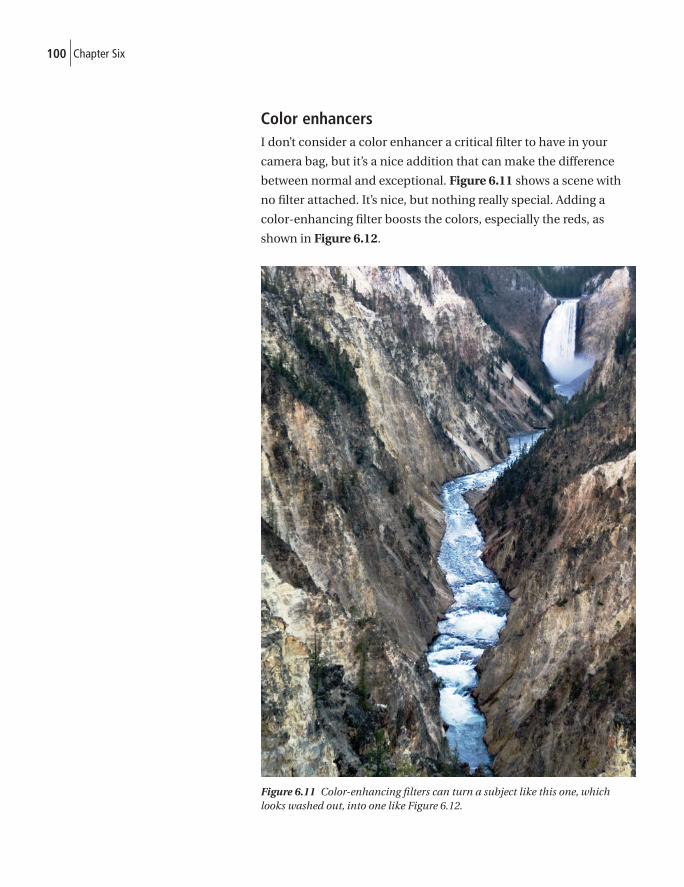
100 Chapter Six
Color enhancersI don’t consider a color enhancer a critical fi lter to have in your
camera bag, but it’s a nice addition that can make the difference
between normal and exceptional. Figure 6.11 shows a scene with
no fi lter attached. It’s nice, but nothing really special. Adding a
color-enhancing fi lter boosts the colors, especially the reds, as
shown in Figure 6.12.
Figure 6.11 Color-enhancing fi lters can turn a subject like this one, which looks washed out, into one like Figure 6.12.
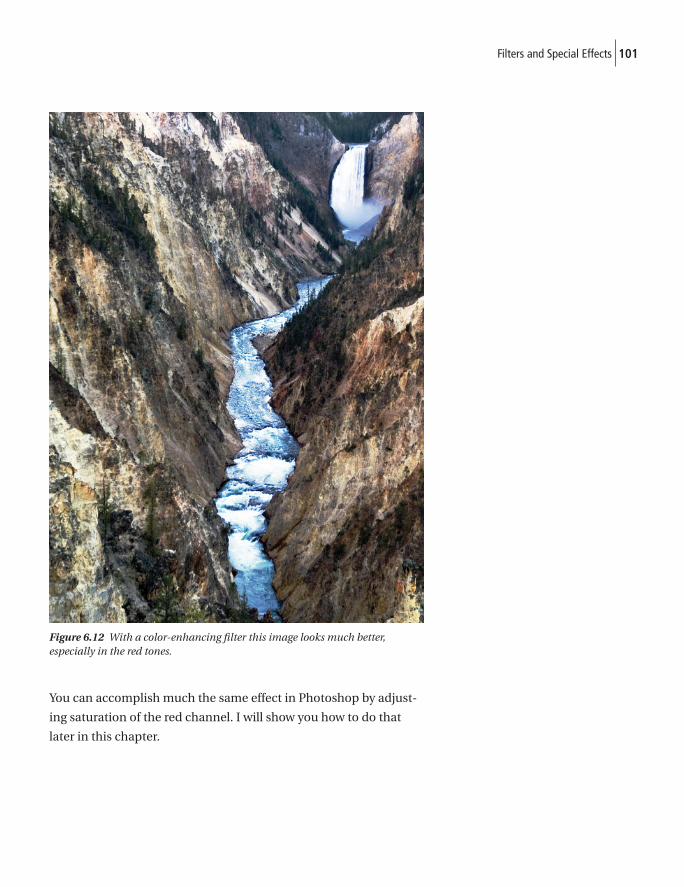
101Filters and Special Effects
Figure 6.12 With a color-enhancing fi lter this image looks much better, especially in the red tones.
You can accomplish much the same effect in Photoshop by adjust-
ing saturation of the red channel. I will show you how to do that
later in this chapter.
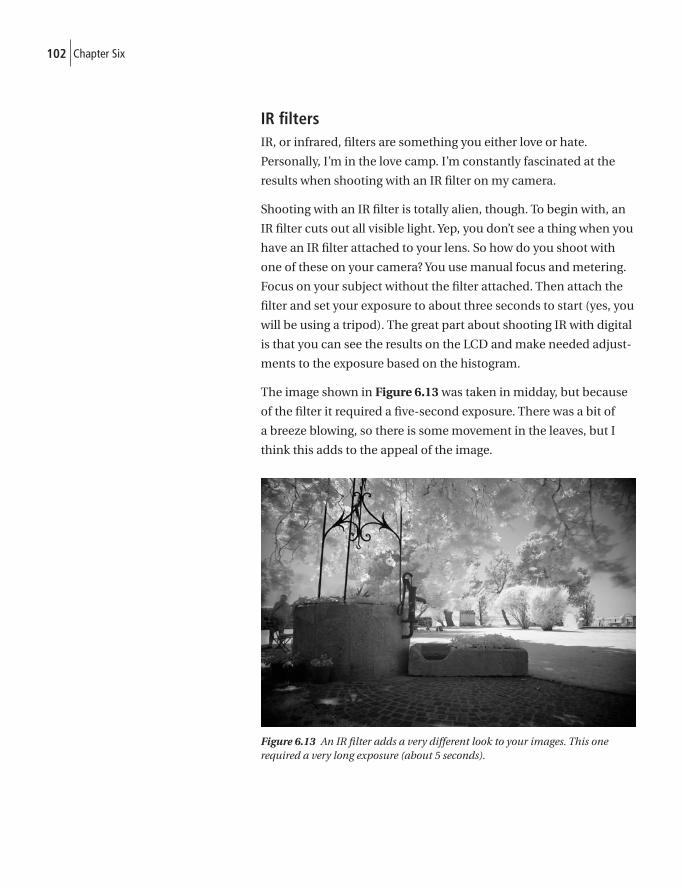
102 Chapter Six
IR fi ltersIR, or infrared, fi lters are something you either love or hate.
Personally, I’m in the love camp. I’m constantly fascinated at the
results when shooting with an IR fi lter on my camera.
Shooting with an IR fi lter is totally alien, though. To begin with, an
IR fi lter cuts out all visible light. Yep, you don’t see a thing when you
have an IR fi lter attached to your lens. So how do you shoot with
one of these on your camera? You use manual focus and metering.
Focus on your subject without the fi lter attached. Then attach the
fi lter and set your exposure to about three seconds to start (yes, you
will be using a tripod). The great part about shooting IR with digital
is that you can see the results on the LCD and make needed adjust-
ments to the exposure based on the histogram.
The image shown in Figure 6.13 was taken in midday, but because
of the fi lter it required a fi ve-second exposure. There was a bit of
a breeze blowing, so there is some movement in the leaves, but I
think this adds to the appeal of the image.
Figure 6.13 An IR fi lter adds a very different look to your images. This one required a very long exposure (about 5 seconds).
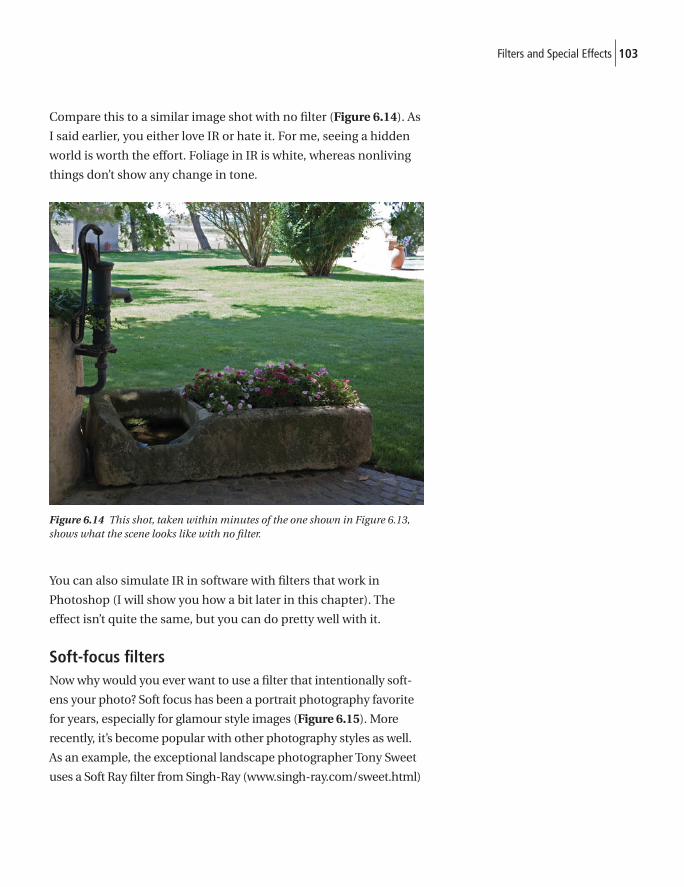
103Filters and Special Effects
Compare this to a similar image shot with no fi lter (Figure 6.14). As
I said earlier, you either love IR or hate it. For me, seeing a hidden
world is worth the effort. Foliage in IR is white, whereas nonliving
things don’t show any change in tone.
Figure 6.14 This shot, taken within minutes of the one shown in Figure 6.13, shows what the scene looks like with no fi lter.
You can also simulate IR in software with fi lters that work in
Photoshop (I will show you how a bit later in this chapter). The
effect isn’t quite the same, but you can do pretty well with it.
Soft-focus fi ltersNow why would you ever want to use a fi lter that intentionally soft-
ens your photo? Soft focus has been a portrait photography favorite
for years, especially for glamour style images (Figure 6.15). More
recently, it’s become popular with other photography styles as well.
As an example, the exceptional landscape photographer Tony Sweet
uses a Soft Ray fi lter from Singh-Ray (www.singh-ray.com/sweet.html)
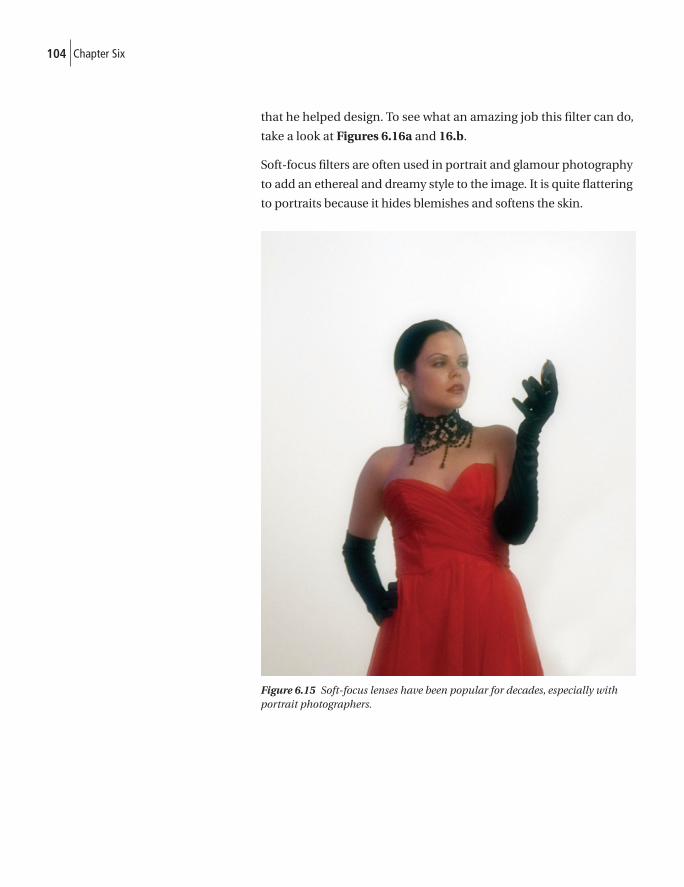
104 Chapter Six
that he helped design. To see what an amazing job this fi lter can do,
take a look at Figures 6.16a and 16.b.
Soft-focus fi lters are often used in portrait and glamour photography
to add an ethereal and dreamy style to the image. It is quite fl attering
to portraits because it hides blemishes and softens the skin.
Figure 6.15 Soft-focus lenses have been popular for decades, especially with portrait photographers.
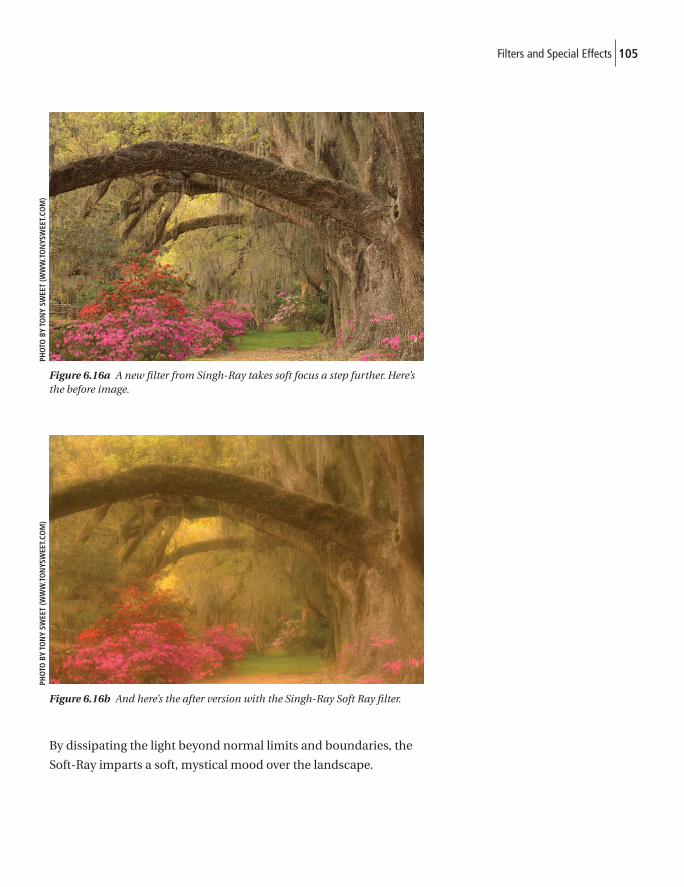
105Filters and Special Effects
Figure 6.16a A new fi lter from Singh-Ray takes soft focus a step further. Here’s the before image.
Figure 6.16b And here’s the after version with the Singh-Ray Soft Ray fi lter.
By dissipating the light beyond normal limits and boundaries, the
Soft-Ray imparts a soft, mystical mood over the landscape.
PHO
TO B
Y TO
NY
SWEE
T (W
WW
.TO
NYS
WEE
T.CO
M)
PHO
TO B
Y TO
NY
SWEE
T (W
WW
.TO
NYS
WEE
T.CO
M)
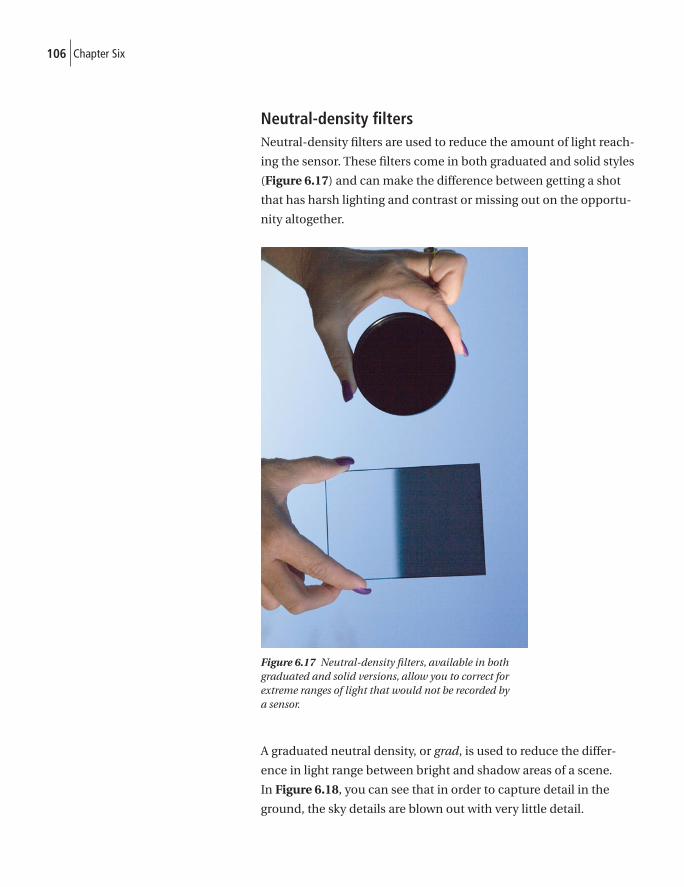
106 Chapter Six
Neutral-density fi ltersNeutral-density fi lters are used to reduce the amount of light reach-
ing the sensor. These fi lters come in both graduated and solid styles
(Figure 6.17) and can make the difference between getting a shot
that has harsh lighting and contrast or missing out on the opportu-
nity altogether.
Figure 6.17 Neutral-density fi lters, available in both graduated and solid versions, allow you to correct for extreme ranges of light that would not be recorded by a sensor.
A graduated neutral density, or grad, is used to reduce the differ-
ence in light range between bright and shadow areas of a scene.
In Figure 6.18, you can see that in order to capture detail in the
ground, the sky details are blown out with very little detail.
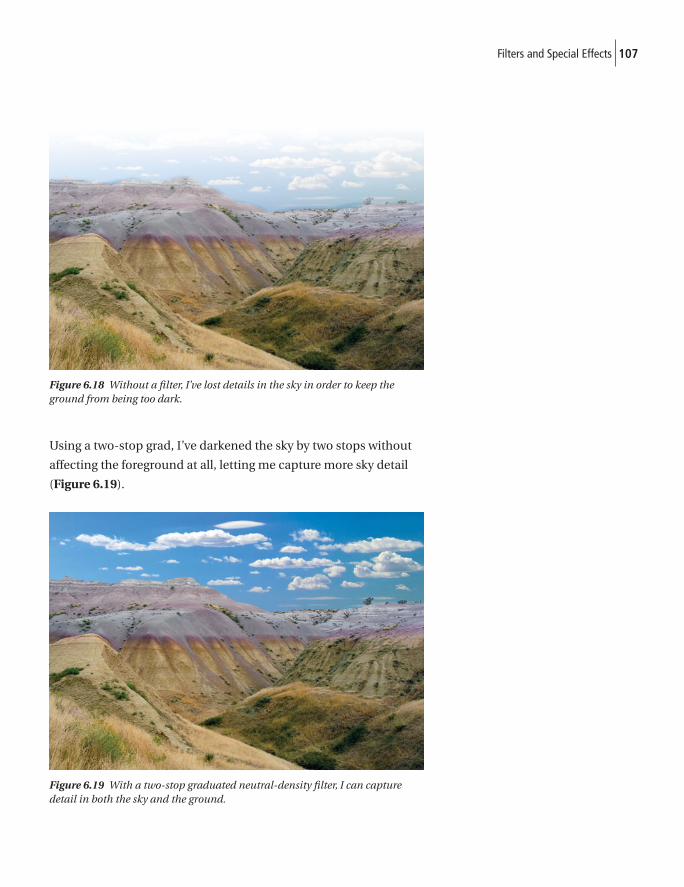
107Filters and Special Effects
Figure 6.18 Without a fi lter, I’ve lost details in the sky in order to keep the ground from being too dark.
Using a two-stop grad, I’ve darkened the sky by two stops without
affecting the foreground at all, letting me capture more sky detail
(Figure 6.19).
Figure 6.19 With a two-stop graduated neutral-density fi lter, I can capture detail in both the sky and the ground.
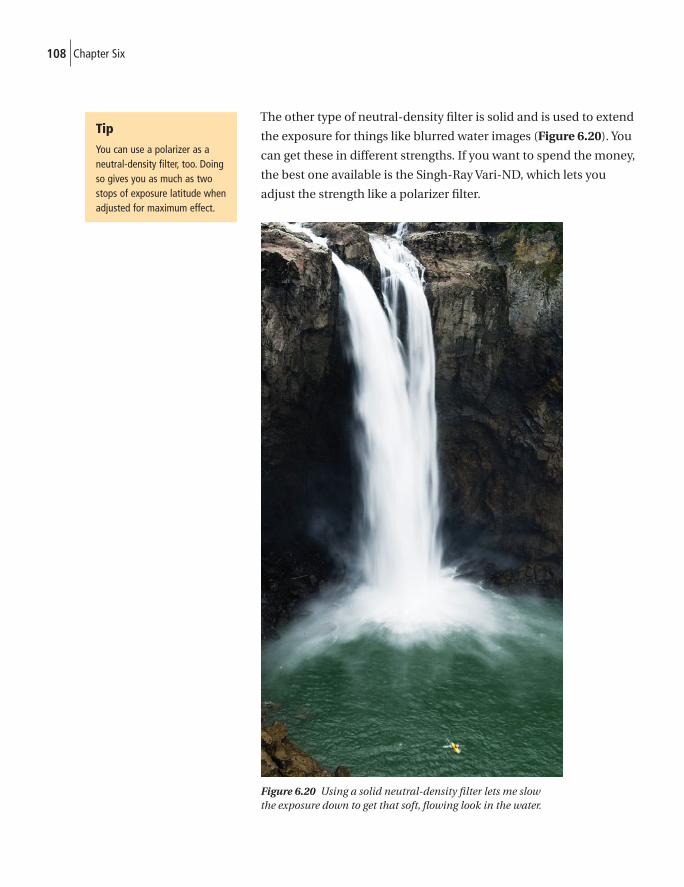
108 Chapter Six
The other type of neutral-density fi lter is solid and is used to extend
the exposure for things like blurred water images (Figure 6.20). You
can get these in different strengths. If you want to spend the money,
the best one available is the Singh-Ray Vari-ND, which lets you
adjust the strength like a polarizer fi lter.
Figure 6.20 Using a solid neutral-density fi lter lets me slow the exposure down to get that soft, fl owing look in the water.
Tip
You can use a polarizer as a neutral-density filter, too. Doing so gives you as much as two stops of exposure latitude when adjusted for maximum effect.
Tip
You can use a polarizer as a neutral-density filter, too. Doing so gives you as much as two stops of exposure latitude when adjusted for maximum effect.
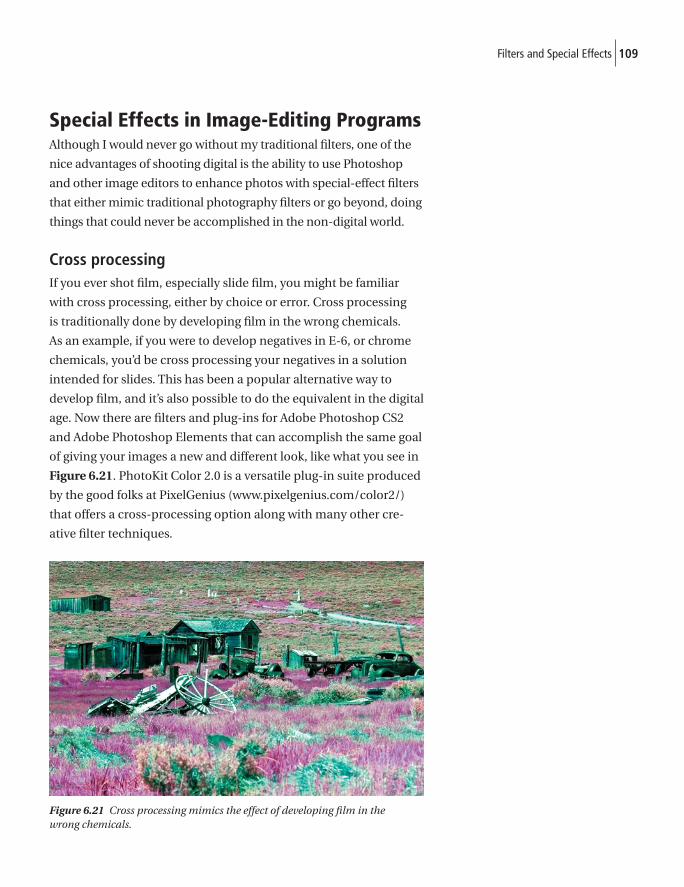
109Filters and Special Effects
Special Effects in Image-Editing ProgramsAlthough I would never go without my traditional fi lters, one of the
nice advantages of shooting digital is the ability to use Photoshop
and other image editors to enhance photos with special-effect fi lters
that either mimic traditional photography fi lters or go beyond, doing
things that could never be accomplished in the non-digital world.
Cross processingIf you ever shot fi lm, especially slide fi lm, you might be familiar
with cross processing, either by choice or error. Cross processing
is traditionally done by developing fi lm in the wrong chemicals.
As an example, if you were to develop negatives in E-6, or chrome
chemicals, you’d be cross processing your negatives in a solution
intended for slides. This has been a popular alternative way to
develop fi lm, and it’s also possible to do the equivalent in the digital
age. Now there are fi lters and plug-ins for Adobe Photoshop CS2
and Adobe Photoshop Elements that can accomplish the same goal
of giving your images a new and different look, like what you see in
Figure 6.21. PhotoKit Color 2.0 is a versatile plug-in suite produced
by the good folks at PixelGenius (www.pixelgenius.com/color2/)
that offers a cross-processing option along with many other cre-
ative fi lter techniques.
Figure 6.21 Cross processing mimics the effect of developing fi lm in the wrong chemicals.
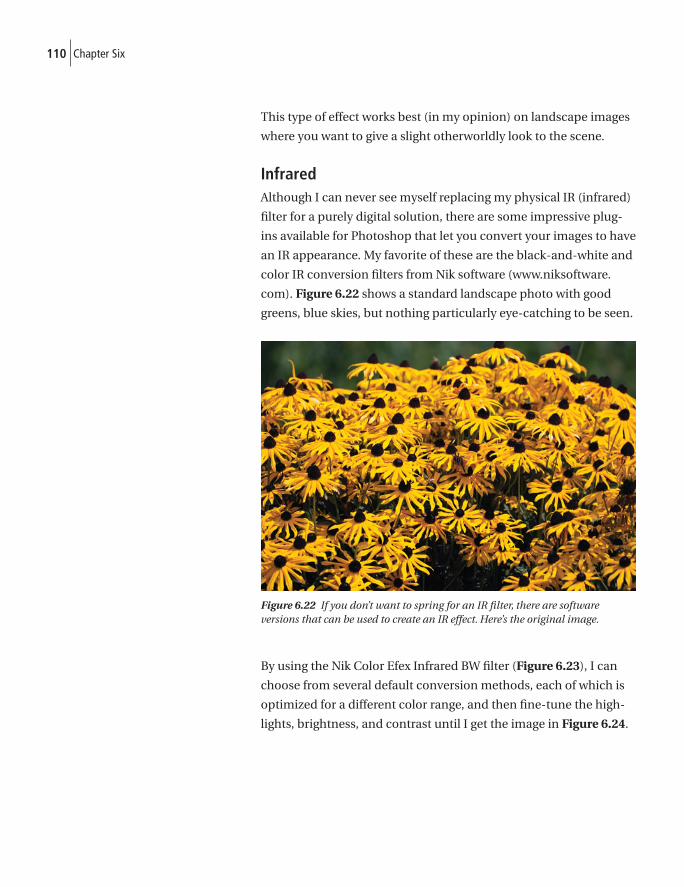
110 Chapter Six
This type of effect works best (in my opinion) on landscape images
where you want to give a slight otherworldly look to the scene.
InfraredAlthough I can never see myself replacing my physical IR (infrared)
fi lter for a purely digital solution, there are some impressive plug-
ins available for Photoshop that let you convert your images to have
an IR appearance. My favorite of these are the black-and-white and
color IR conversion fi lters from Nik software (www.niksoftware.
com). Figure 6.22 shows a standard landscape photo with good
greens, blue skies, but nothing particularly eye-catching to be seen.
Figure 6.22 If you don’t want to spring for an IR fi lter, there are software versions that can be used to create an IR effect. Here’s the original image.
By using the Nik Color Efex Infrared BW fi lter (Figure 6.23), I can
choose from several default conversion methods, each of which is
optimized for a different color range, and then fi ne-tune the high-
lights, brightness, and contrast until I get the image in Figure 6.24.

111Filters and Special Effects
Figure 6.23 Using the Nik Color Efex Infrared BW fi lter, I can select from different options to create an IR image.
Figure 6.24 Here’s the fi nal result after using the Nik fi lter to convert the image used in Figure 6.22.
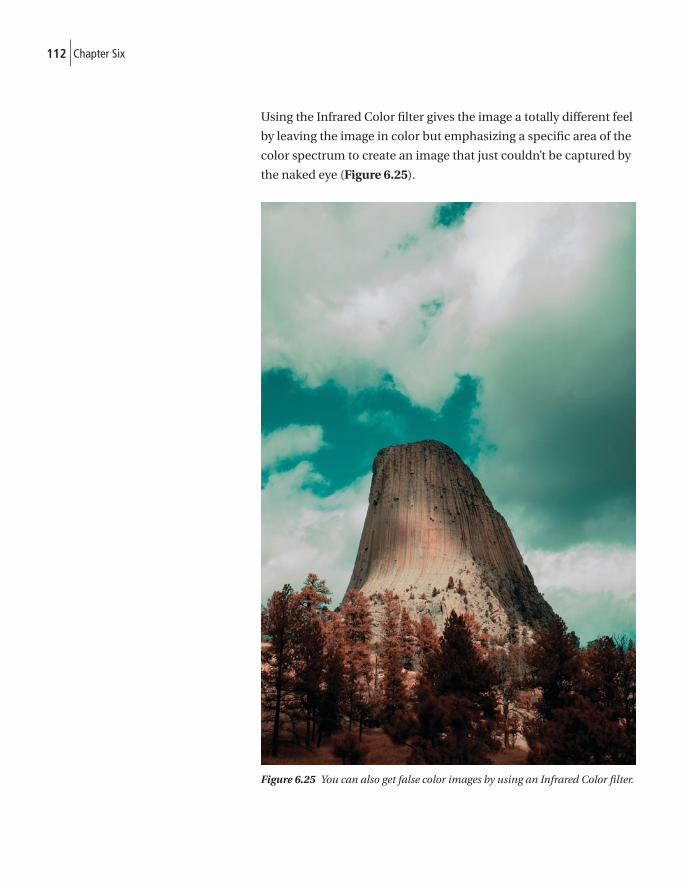
112 Chapter Six
Using the Infrared Color fi lter gives the image a totally different feel
by leaving the image in color but emphasizing a specifi c area of the
color spectrum to create an image that just couldn’t be captured by
the naked eye (Figure 6.25).
Figure 6.25 You can also get false color images by using an Infrared Color fi lter.
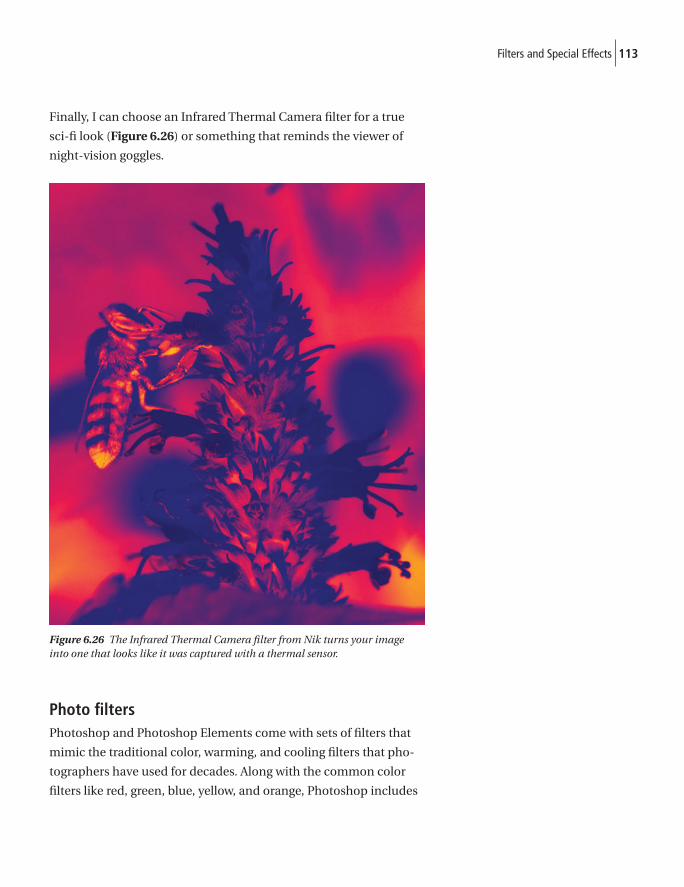
113Filters and Special Effects
Finally, I can choose an Infrared Thermal Camera fi lter for a true
sci-fi look (Figure 6.26) or something that reminds the viewer of
night-vision goggles.
Figure 6.26 The Infrared Thermal Camera fi lter from Nik turns your image into one that looks like it was captured with a thermal sensor.
Photo fi ltersPhotoshop and Photoshop Elements come with sets of fi lters that
mimic the traditional color, warming, and cooling fi lters that pho-
tographers have used for decades. Along with the common color
fi lters like red, green, blue, yellow, and orange, Photoshop includes

114 Chapter Six
a variety of warming and cooling fi lters and some unusual ones,
such as emerald green and underwater. You can also create your
own from a color picker. To use these photo fi lters, select Layer >
New Adjustment Layer > Photo Filter… (Figure 6.27).
Figure 6.27 Photo Filters, available in both Photoshop and Elements, offer a number of standard photo fi lters.
To control how strong the effect is, adjust the Density slider below
the preview window. I usually fi nd that a density of 40-70% is best
and have never needed to use 100%.
Black-and-white conversionsBlack and white is going through a huge surge in popularity these
days, with many cameras supporting black-and-white conversion
directly in the camera. Unless you’re shooting raw though, I highly
recommend shooting in color mode to give you the most fl exibility
with your image fi les. You can always convert your images to black and
white in an image-editing program on your computer, and you never
know when you might want to use that photo in color someday.
In Photoshop Elements versions prior to 5.0, black-and-white
conversion was limited to grayscale, which leaves quite a bit to be
desired. Grayscale conversion is essentially just a desaturation of
the image (Figure 6.28).
Photoshop CS2 users have the much more powerful Channel Mixer
at their disposal, but along with power comes a bit of confusion.
To use the Channel Mixer, select Layer > New Adjustment Layer >
Channel Mixer… to open the dialog shown in Figure 6.29.
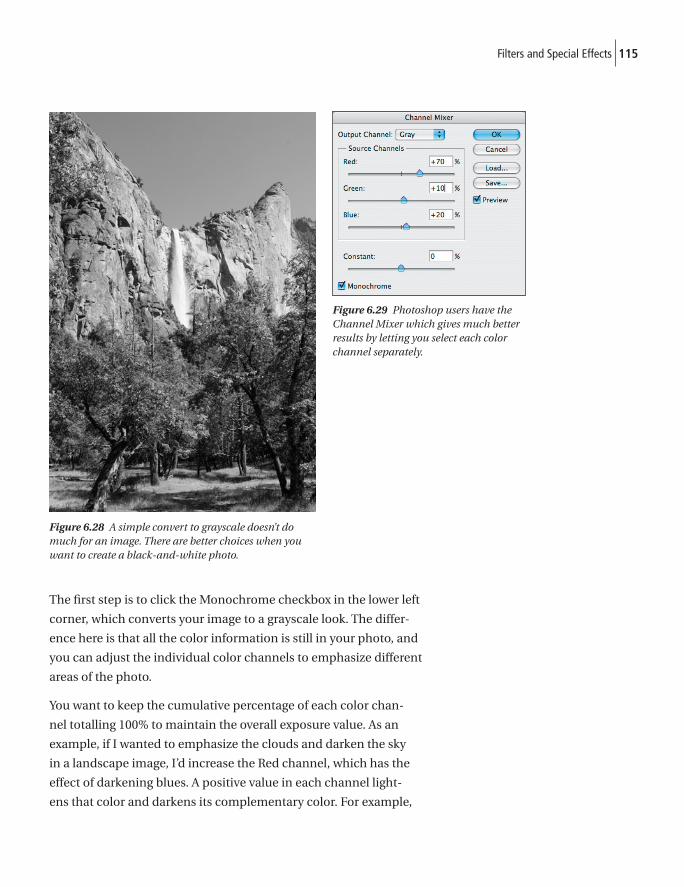
115Filters and Special Effects
The fi rst step is to click the Monochrome checkbox in the lower left
corner, which converts your image to a grayscale look. The differ-
ence here is that all the color information is still in your photo, and
you can adjust the individual color channels to emphasize different
areas of the photo.
You want to keep the cumulative percentage of each color chan-
nel totalling 100% to maintain the overall exposure value. As an
example, if I wanted to emphasize the clouds and darken the sky
in a landscape image, I’d increase the Red channel, which has the
effect of darkening blues. A positive value in each channel light-
ens that color and darkens its complementary color. For example,
Figure 6.28 A simple convert to grayscale doesn’t do much for an image. There are better choices when you want to create a black-and-white photo.
Figure 6.29 Photoshop users have the Channel Mixer which gives much better results by letting you select each color channel separately.
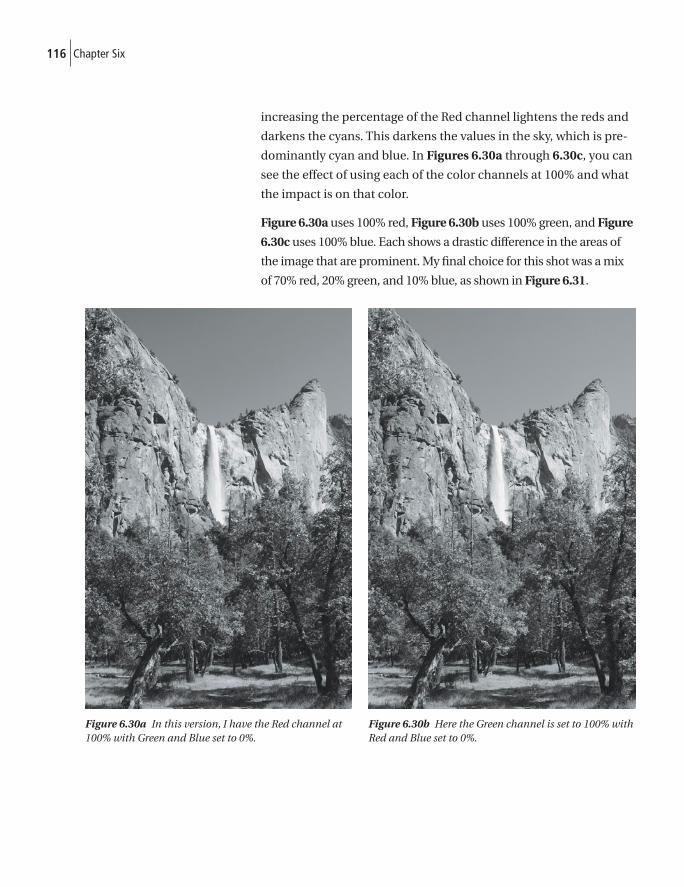
116 Chapter Six
increasing the percentage of the Red channel lightens the reds and
darkens the cyans. This darkens the values in the sky, which is pre-
dominantly cyan and blue. In Figures 6.30a through 6.30c, you can
see the effect of using each of the color channels at 100% and what
the impact is on that color.
Figure 6.30a uses 100% red, Figure 6.30b uses 100% green, and Figure
6.30c uses 100% blue. Each shows a drastic difference in the areas of
the image that are prominent. My fi nal choice for this shot was a mix
of 70% red, 20% green, and 10% blue, as shown in Figure 6.31.
Figure 6.30a In this version, I have the Red channel at 100% with Green and Blue set to 0%.
Figure 6.30b Here the Green channel is set to 100% with Red and Blue set to 0%.
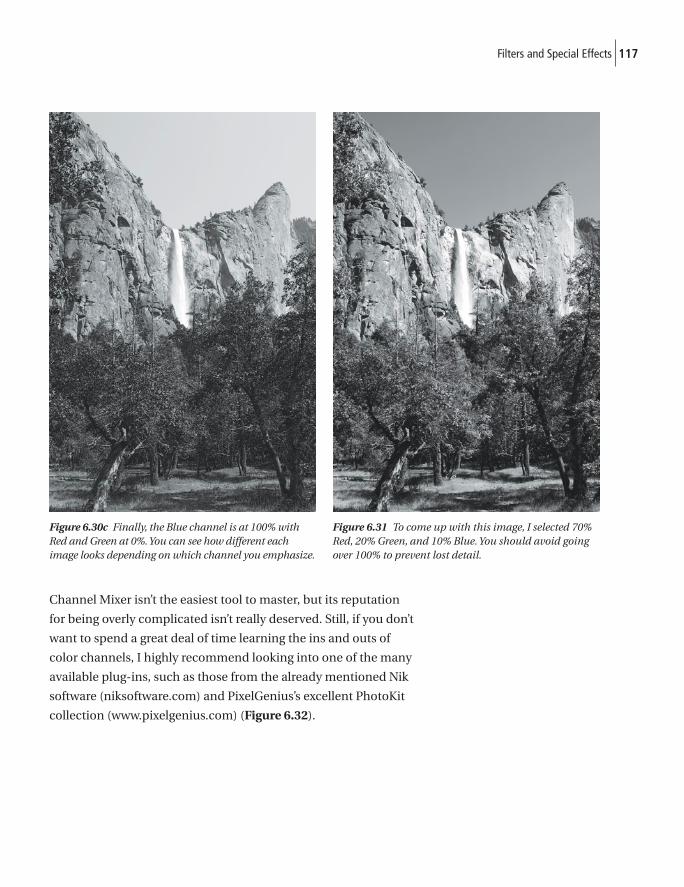
117Filters and Special Effects
Channel Mixer isn’t the easiest tool to master, but its reputation
for being overly complicated isn’t really deserved. Still, if you don’t
want to spend a great deal of time learning the ins and outs of
color channels, I highly recommend looking into one of the many
available plug-ins, such as those from the already mentioned Nik
software (niksoftware.com) and PixelGenius’s excellent PhotoKit
collection (www.pixelgenius.com) (Figure 6.32).
Figure 6.30c Finally, the Blue channel is at 100% with Red and Green at 0%. You can see how different each image looks depending on which channel you emphasize.
Figure 6.31 To come up with this image, I selected 70% Red, 20% Green, and 10% Blue. You should avoid going over 100% to prevent lost detail.
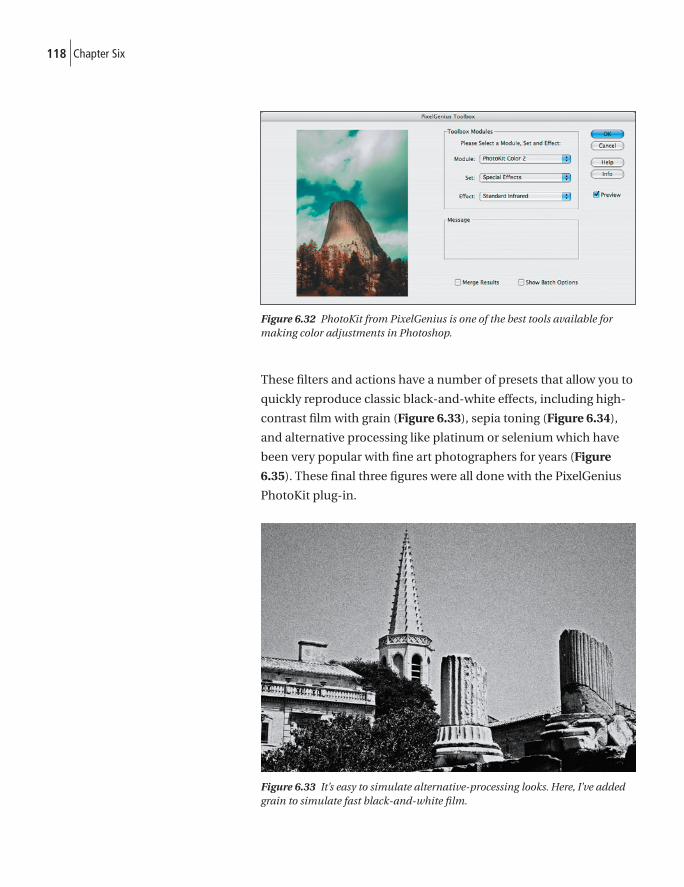
118 Chapter Six
Figure 6.32 PhotoKit from PixelGenius is one of the best tools available for making color adjustments in Photoshop.
These fi lters and actions have a number of presets that allow you to
quickly reproduce classic black-and-white effects, including high-
contrast fi lm with grain (Figure 6.33), sepia toning (Figure 6.34),
and alternative processing like platinum or selenium which have
been very popular with fi ne art photographers for years (Figure
6.35). These fi nal three fi gures were all done with the PixelGenius
PhotoKit plug-in.
Figure 6.33 It’s easy to simulate alternative-processing looks. Here, I’ve added grain to simulate fast black-and-white fi lm.
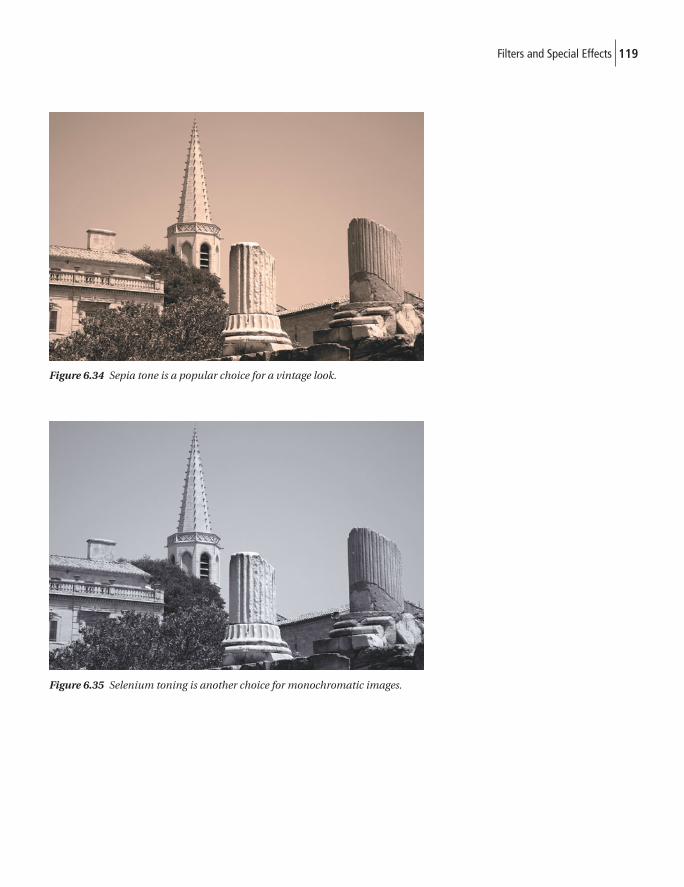
119Filters and Special Effects
Figure 6.34 Sepia tone is a popular choice for a vintage look.
Figure 6.35 Selenium toning is another choice for monochromatic images.

This page intentionally left blank
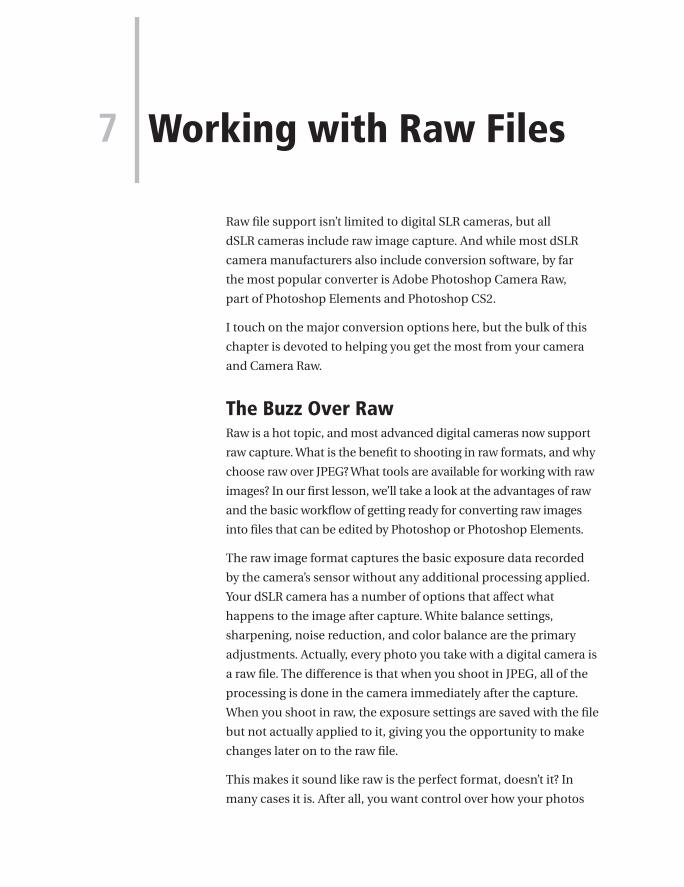
Raw fi le support isn’t limited to digital SLR cameras, but all
dSLR cameras include raw image capture. And while most dSLR
camera manufacturers also include conversion software, by far
the most popular converter is Adobe Photoshop Camera Raw,
part of Photoshop Elements and Photoshop CS2.
I touch on the major conversion options here, but the bulk of this
chapter is devoted to helping you get the most from your camera
and Camera Raw.
The Buzz Over RawRaw is a hot topic, and most advanced digital cameras now support
raw capture. What is the benefi t to shooting in raw formats, and why
choose raw over JPEG? What tools are available for working with raw
images? In our fi rst lesson, we’ll take a look at the advantages of raw
and the basic workfl ow of getting ready for converting raw images
into fi les that can be edited by Photoshop or Photoshop Elements.
The raw image format captures the basic exposure data recorded
by the camera’s sensor without any additional processing applied.
Your dSLR camera has a number of options that affect what
happens to the image after capture. White balance settings,
sharpening, noise reduction, and color balance are the primary
adjustments. Actually, every photo you take with a digital camera is
a raw fi le. The difference is that when you shoot in JPEG, all of the
processing is done in the camera immediately after the capture.
When you shoot in raw, the exposure settings are saved with the fi le
but not actually applied to it, giving you the opportunity to make
changes later on to the raw fi le.
This makes it sound like raw is the perfect format, doesn’t it? In
many cases it is. After all, you want control over how your photos
7 Working with Raw Files

122 Chapter Seven
look, and the extra fl exibility is hard to beat. There are times when
shooting raw isn’t the best choice, though, such as event photo-
graphy where you might be doing on-site printing—think Little
League games, prom photos, and school photos, for example. Here
the goal is to quickly take the photo and output a print, perhaps
with no computer present. You certainly don’t want to invest the
time to edit several hundred images on the spot. Photo journalism
is another area where raw is not a good choice. Most news services
have specifi c guidelines on how to submit images—JPEG only, cer-
tain compression and sharpening settings, and so on.
Every digital camera that supports a raw format includes some
form of conversion software, ranging from the very good to the
barely adequate. Photoshop CS2 and Photoshop Elements 4.0 users
have one of the best raw converters included with the program:
Adobe Camera Raw. But, because Photoshop isn’t the program
for everyone, I also look at other converters, including the ones
included with Canon and Nikon cameras.
Renaming FilesBefore you can start working with your raw fi les, you need to get them
onto your computer. This is the fi rst step in your workfl ow, and taking
the time to do things in a standardized way will make life easier.
Establishing a standard naming system will do more to help the ini-
tial workfl ow than almost anything else you can do. The name your
camera assigns to an image is less than intuitive. Imagine brows-
ing through thousands of images with names like _E7U2349.CR2
or DCS22893.NEF and you can easily see the benefi t of giving your
images more understandable and memorable names.
Luckily, Photoshop CS2 and Photoshop Elements 5.0 both make
the renaming process painless. Photoshop Elements 5.0 running
on a Windows PC has a Rename function that can be found in the
Organizer (Figure 7.1). If you’re using Photoshop CS2, or Elements
on the Mac, go to the Adobe Bridge feature and select Tools > Batch
Rename to display a dialog box like the one shown in Figure 7.2.
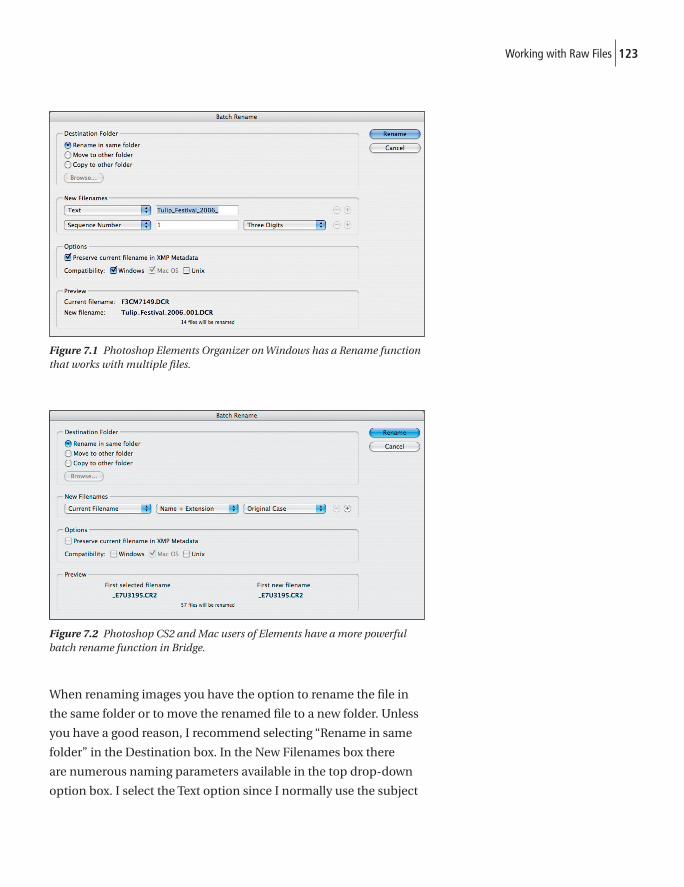
123Working with Raw Files
Figure 7.1 Photoshop Elements Organizer on Windows has a Rename function that works with multiple fi les.
Figure 7.2 Photoshop CS2 and Mac users of Elements have a more powerful batch rename function in Bridge.
When renaming images you have the option to rename the fi le in
the same folder or to move the renamed fi le to a new folder. Unless
you have a good reason, I recommend selecting “Rename in same
folder” in the Destination box. In the New Filenames box there
are numerous naming parameters available in the top drop-down
option box. I select the Text option since I normally use the subject
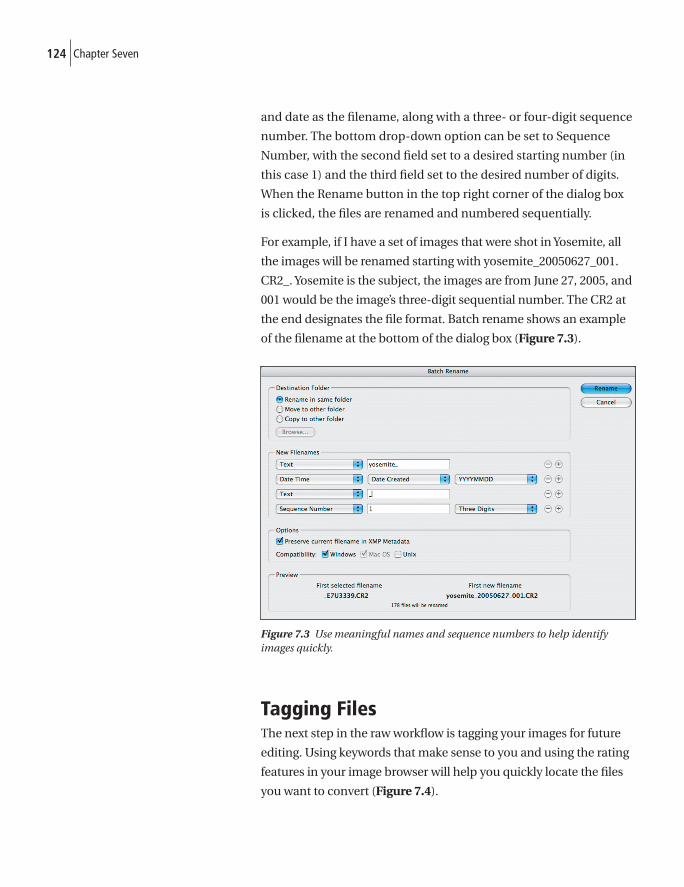
124 Chapter Seven
and date as the fi lename, along with a three- or four-digit sequence
number. The bottom drop-down option can be set to Sequence
Number, with the second fi eld set to a desired starting number (in
this case 1) and the third fi eld set to the desired number of digits.
When the Rename button in the top right corner of the dialog box
is clicked, the fi les are renamed and numbered sequentially.
For example, if I have a set of images that were shot in Yosemite, all
the images will be renamed starting with yosemite_20050627_001.
CR2_. Yosemite is the subject, the images are from June 27, 2005, and
001 would be the image’s three-digit sequential number. The CR2 at
the end designates the fi le format. Batch rename shows an example
of the fi lename at the bottom of the dialog box (Figure 7.3).
Figure 7.3 Use meaningful names and sequence numbers to help identify images quickly.
Tagging Files The next step in the raw workfl ow is tagging your images for future
editing. Using keywords that make sense to you and using the rating
features in your image browser will help you quickly locate the fi les
you want to convert (Figure 7.4).

125Working with Raw Files
Figure 7.4 Keywords and ratings can help you quickly sort and fi nd images that match your needs.
Selecting images for conversionWouldn’t it be great if every image we took was perfect and worthy
of printing or sharing? It would certainly save time and effort. After
all, if all our shots were perfect, we’d probably take fewer photos.
And, we’d know up front that every photo we took was going to be
converted from raw to TIFF for touchup and other work.
Because every image isn’t perfect, many serious photographers
tend to shoot many variations of the same subject. Slight changes
to composition, depth of fi eld, and other creative aspects of an
image are common and result in a large number of fi les to review.
Selecting by keywordIf you’ve been diligent about assigning keywords, or tags, to your
images as you add them to your collection, the easiest way to select
images for further processing is by keyword selection. For the fol-
lowing lessons, I’ll be using Adobe Bridge (Figure 7.5), which is part
of Photoshop CS2 on Mac and Windows and the Macintosh version
of Elements; and Adobe Organizer (Figure 7.6), which is part of the
Windows version of Elements.
126 Chapter Seven
Figure 7.5 Keywording in Bridge is done in the Keywords Panel shown here.
Figure 7.6 Organizer, included with the Windows version of Elements, uses tags, which are the same as keywords.
127Working with Raw Files
In Bridge, keywords can be searched by clicking Edit > Find in the
option bar to bring up the Find dialog box. By clicking the + button
in the Criteria fi eld, up to 13 search fi elds can be used utilizing 11
different criteria. One of these criteria is Keywords. For example,
the search shown in Figure 7.7 will only fi nd images that contain
Luke and Clay as keywords if the “If all criteria are met” option is
selected in the Match window at the bottom of the Find dialog box.
Figure 7.7 You can combine keywords to fi nd multiple items by using AND to fi nd all images that include both keywords.
If Clay is removed from the search, then all images that contain
Luke will be returned (Figure 7.8).
Figure 7.8 You can refi ne a search by modifying the criteria. Here, I’ve removed Clay and only the images containing Luke are shown.
Bridge has quite a bit more fl exibility in its search settings. To
change the matching requirements, select “If any criteria are met.”
128 Chapter Seven
This will fi nd and display any images that have the keywords Luke
or Clay, as shown in Figure 7.9.
Figure 7.9 Unlike AND, using OR fi nds all images that have either keyword.
The Bridge search dialog also lets you specify other criteria to
search by, including by Rating or Label (Figure 7.10).
Figure 7.10 In Bridge you can also search by ratings or labels.
Organizer uses a system that is a bit different—one that I have a love-
hate relationship with. Rather than using a Search dialog, you simply
check the boxes next to the tags, or keywords, that you want to fi nd.
I love the simplicity of this method. Clicking one or more tags allows
you to build a complex selection without much effort (Figure 7.11).
The hate part of my relationship comes when I’m trying to locate the
desired tags from a large collection of icons in the Tag window.
Figure 7.11 Organizer provides a very visual method of selecting tags for search queries.
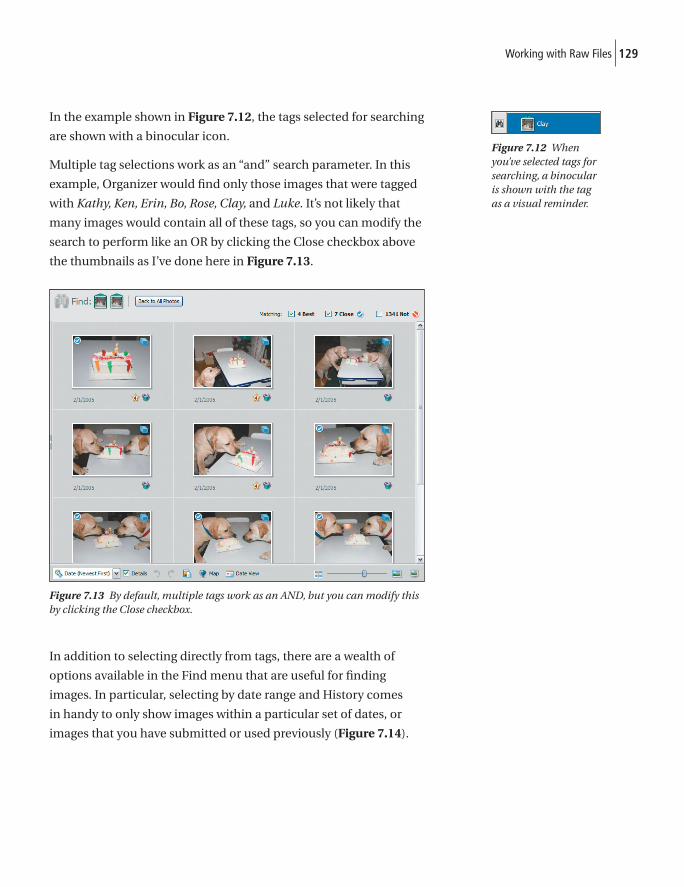
129Working with Raw Files
In the example shown in Figure 7.12, the tags selected for searching
are shown with a binocular icon.
Multiple tag selections work as an “and” search parameter. In this
example, Organizer would fi nd only those images that were tagged
with Kathy, Ken, Erin, Bo, Rose, Clay, and Luke. It’s not likely that
many images would contain all of these tags, so you can modify the
search to perform like an OR by clicking the Close checkbox above
the thumbnails as I’ve done here in Figure 7.13.
Figure 7.13 By default, multiple tags work as an AND, but you can modify this by clicking the Close checkbox.
In addition to selecting directly from tags, there are a wealth of
options available in the Find menu that are useful for fi nding
images. In particular, selecting by date range and History comes
in handy to only show images within a particular set of dates, or
images that you have submitted or used previously (Figure 7.14).
Figure 7.12 Whenyou’ve selected tags for searching, a binocular is shown with the tag as a visual reminder.
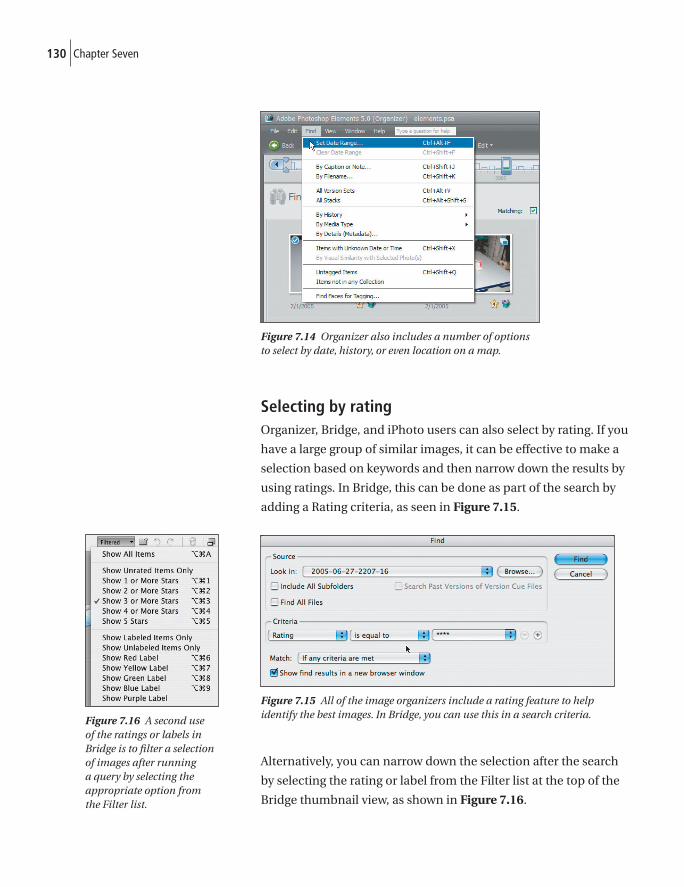
130 Chapter Seven
Figure 7.14 Organizer also includes a number of options to select by date, history, or even location on a map.
Selecting by ratingOrganizer, Bridge, and iPhoto users can also select by rating. If you
have a large group of similar images, it can be effective to make a
selection based on keywords and then narrow down the results by
using ratings. In Bridge, this can be done as part of the search by
adding a Rating criteria, as seen in Figure 7.15.
Figure 7.15 All of the image organizers include a rating feature to help identify the best images. In Bridge, you can use this in a search criteria.
Alternatively, you can narrow down the selection after the search
by selecting the rating or label from the Filter list at the top of the
Bridge thumbnail view, as shown in Figure 7.16.
Figure 7.16 A second use of the ratings or labels in Bridge is to fi lter a selection of images after running a query by selecting the appropriate option from the Filter list.
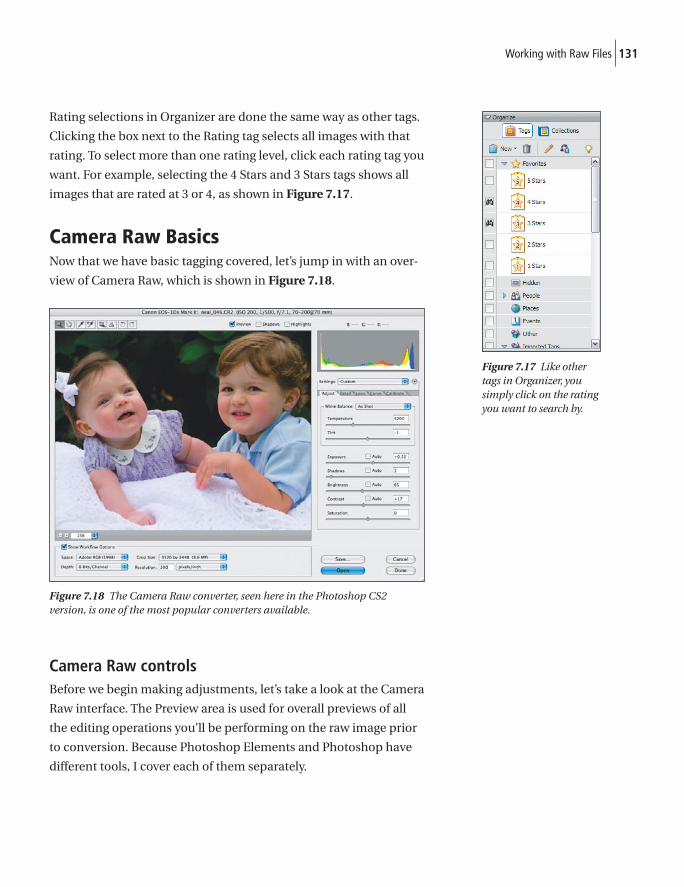
131Working with Raw Files
Rating selections in Organizer are done the same way as other tags.
Clicking the box next to the Rating tag selects all images with that
rating. To select more than one rating level, click each rating tag you
want. For example, selecting the 4 Stars and 3 Stars tags shows all
images that are rated at 3 or 4, as shown in Figure 7.17.
Camera Raw BasicsNow that we have basic tagging covered, let’s jump in with an over-
view of Camera Raw, which is shown in Figure 7.18.
Figure 7.18 The Camera Raw converter, seen here in the Photoshop CS2 version, is one of the most popular converters available.
Camera Raw controlsBefore we begin making adjustments, let’s take a look at the Camera
Raw interface. The Preview area is used for overall previews of all
the editing operations you’ll be performing on the raw image prior
to conversion. Because Photoshop Elements and Photoshop have
different tools, I cover each of them separately.
Figure 7.17 Like other tags in Organizer, you simply click on the rating you want to search by.
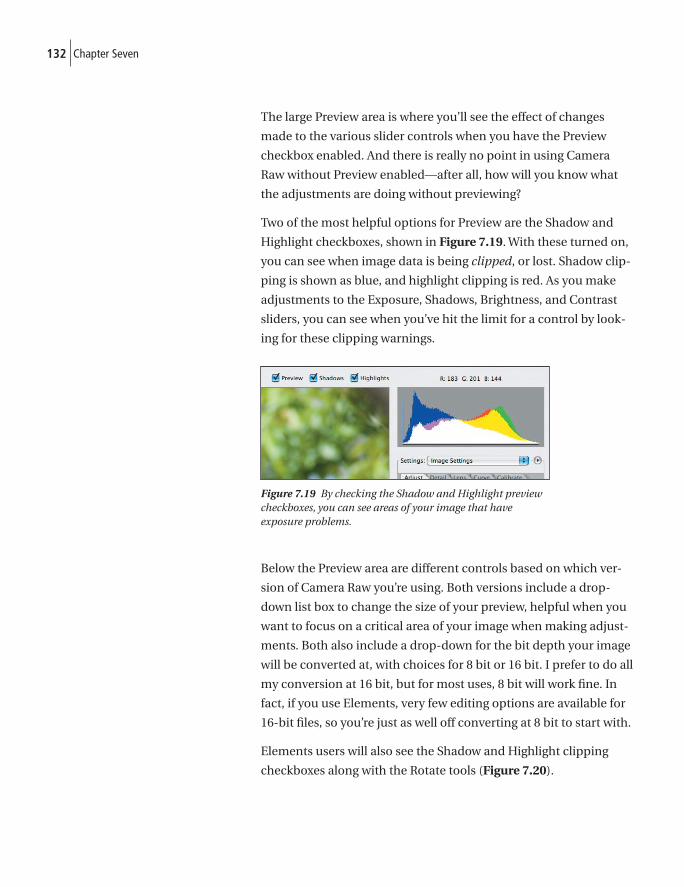
132 Chapter Seven
The large Preview area is where you’ll see the effect of changes
made to the various slider controls when you have the Preview
checkbox enabled. And there is really no point in using Camera
Raw without Preview enabled—after all, how will you know what
the adjustments are doing without previewing?
Two of the most helpful options for Preview are the Shadow and
Highlight checkboxes, shown in Figure 7.19. With these turned on,
you can see when image data is being clipped, or lost. Shadow clip-
ping is shown as blue, and highlight clipping is red. As you make
adjustments to the Exposure, Shadows, Brightness, and Contrast
sliders, you can see when you’ve hit the limit for a control by look-
ing for these clipping warnings.
Figure 7.19 By checking the Shadow and Highlight preview checkboxes, you can see areas of your image that have exposure problems.
Below the Preview area are different controls based on which ver-
sion of Camera Raw you’re using. Both versions include a drop-
down list box to change the size of your preview, helpful when you
want to focus on a critical area of your image when making adjust-
ments. Both also include a drop-down for the bit depth your image
will be converted at, with choices for 8 bit or 16 bit. I prefer to do all
my conversion at 16 bit, but for most uses, 8 bit will work fi ne. In
fact, if you use Elements, very few editing options are available for
16-bit fi les, so you’re just as well off converting at 8 bit to start with.
Elements users will also see the Shadow and Highlight clipping
checkboxes along with the Rotate tools (Figure 7.20).
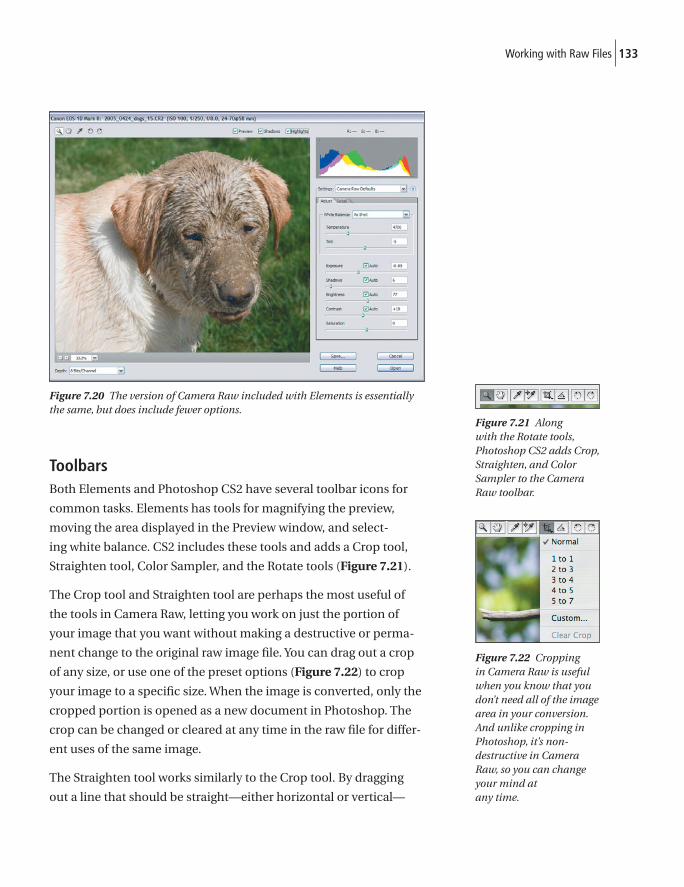
133Working with Raw Files
Figure 7.20 The version of Camera Raw included with Elements is essentially the same, but does include fewer options.
ToolbarsBoth Elements and Photoshop CS2 have several toolbar icons for
common tasks. Elements has tools for magnifying the preview,
moving the area displayed in the Preview window, and select-
ing white balance. CS2 includes these tools and adds a Crop tool,
Straighten tool, Color Sampler, and the Rotate tools (Figure 7.21).
The Crop tool and Straighten tool are perhaps the most useful of
the tools in Camera Raw, letting you work on just the portion of
your image that you want without making a destructive or perma-
nent change to the original raw image fi le. You can drag out a crop
of any size, or use one of the preset options (Figure 7.22) to crop
your image to a specifi c size. When the image is converted, only the
cropped portion is opened as a new document in Photoshop. The
crop can be changed or cleared at any time in the raw fi le for differ-
ent uses of the same image.
The Straighten tool works similarly to the Crop tool. By dragging
out a line that should be straight—either horizontal or vertical—
Figure 7.21 Along with the Rotate tools, Photoshop CS2 adds Crop, Straighten, and Color Sampler to the Camera Raw toolbar.
Figure 7.22 Cropping in Camera Raw is useful when you know that you don’t need all of the image area in your conversion. And unlike cropping in Photoshop, it’s non-destructive in Camera Raw, so you can change your mind at any time.
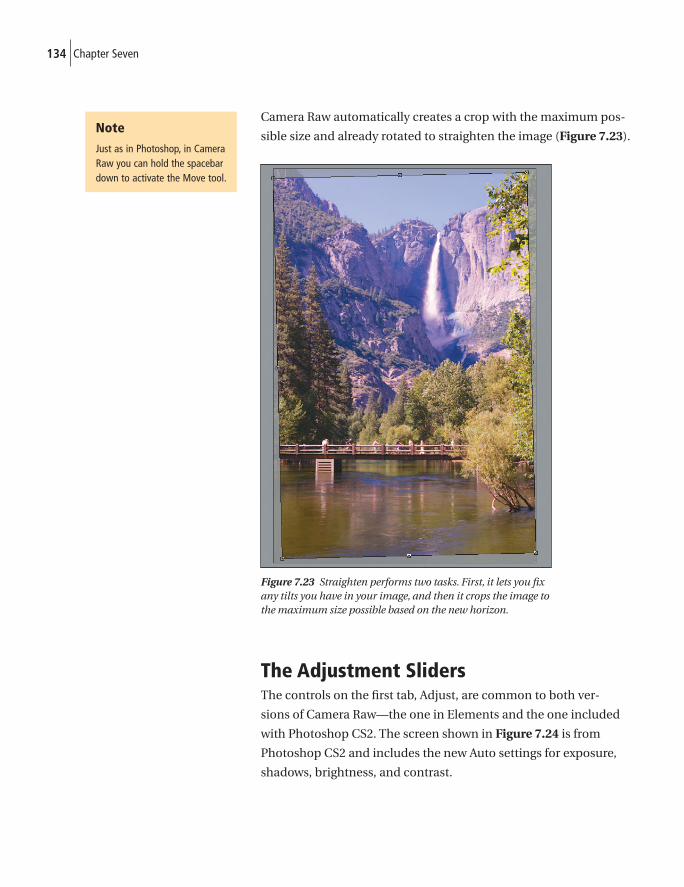
134 Chapter Seven
Camera Raw automatically creates a crop with the maximum pos-
sible size and already rotated to straighten the image (Figure 7.23).
Figure 7.23 Straighten performs two tasks. First, it lets you fi x any tilts you have in your image, and then it crops the image to the maximum size possible based on the new horizon.
The Adjustment SlidersThe controls on the fi rst tab, Adjust, are common to both ver-
sions of Camera Raw—the one in Elements and the one included
with Photoshop CS2. The screen shown in Figure 7.24 is from
Photoshop CS2 and includes the new Auto settings for exposure,
shadows, brightness, and contrast.
Note
Just as in Photoshop, in Camera Raw you can hold the spacebar down to activate the Move tool.
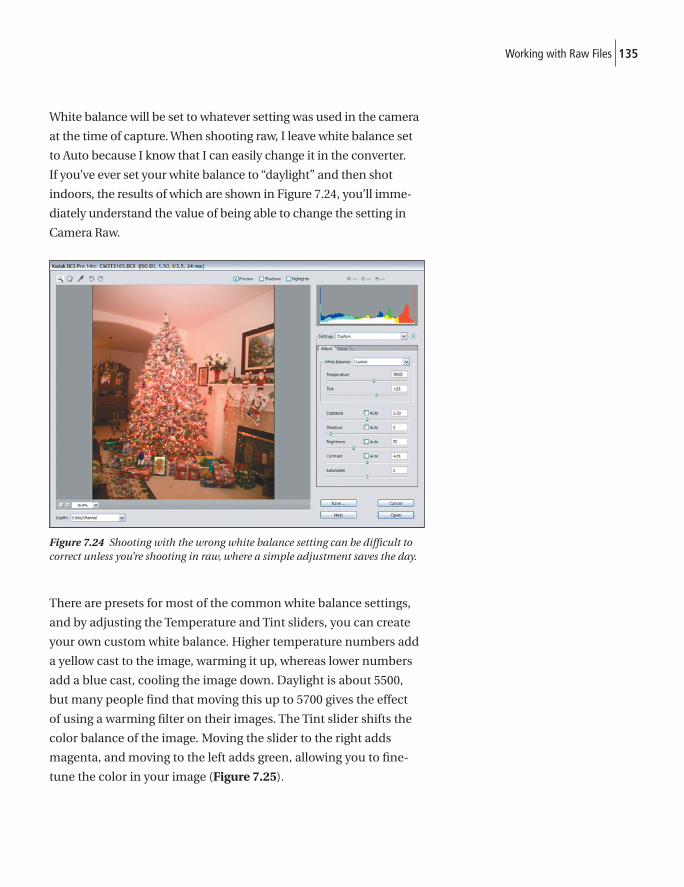
135Working with Raw Files
White balance will be set to whatever setting was used in the camera
at the time of capture. When shooting raw, I leave white balance set
to Auto because I know that I can easily change it in the converter.
If you’ve ever set your white balance to “daylight” and then shot
indoors, the results of which are shown in Figure 7.24, you’ll imme-
diately understand the value of being able to change the setting in
Camera Raw.
Figure 7.24 Shooting with the wrong white balance setting can be diffi cult to correct unless you’re shooting in raw, where a simple adjustment saves the day.
There are presets for most of the common white balance settings,
and by adjusting the Temperature and Tint sliders, you can create
your own custom white balance. Higher temperature numbers add
a yellow cast to the image, warming it up, whereas lower numbers
add a blue cast, cooling the image down. Daylight is about 5500,
but many people fi nd that moving this up to 5700 gives the effect
of using a warming fi lter on their images. The Tint slider shifts the
color balance of the image. Moving the slider to the right adds
magenta, and moving to the left adds green, allowing you to fi ne-
tune the color in your image (Figure 7.25).
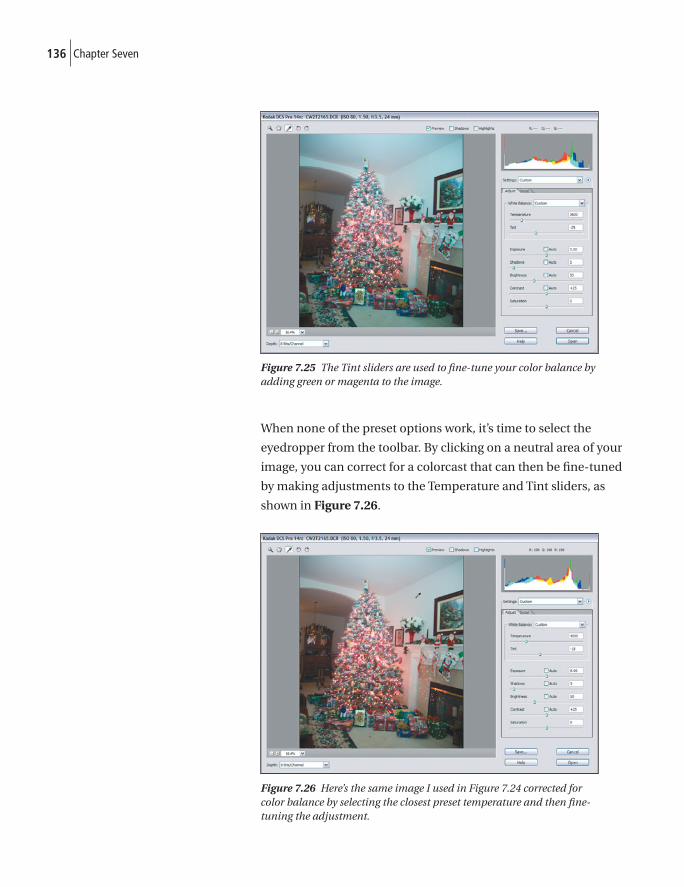
136 Chapter Seven
Figure 7.25 The Tint sliders are used to fi ne-tune your color balance by adding green or magenta to the image.
When none of the preset options work, it’s time to select the
eyedropper from the toolbar. By clicking on a neutral area of your
image, you can correct for a colorcast that can then be fi ne-tuned
by making adjustments to the Temperature and Tint sliders, as
shown in Figure 7.26.
Figure 7.26 Here’s the same image I used in Figure 7.24 corrected for color balance by selecting the closest preset temperature and then fi ne-tuning the adjustment.
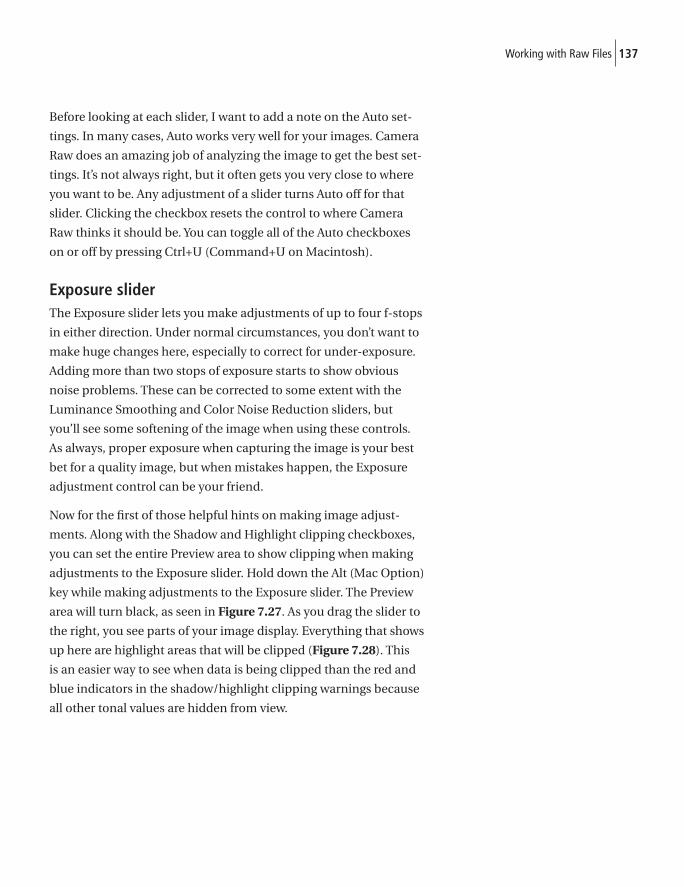
137Working with Raw Files
Before looking at each slider, I want to add a note on the Auto set-
tings. In many cases, Auto works very well for your images. Camera
Raw does an amazing job of analyzing the image to get the best set-
tings. It’s not always right, but it often gets you very close to where
you want to be. Any adjustment of a slider turns Auto off for that
slider. Clicking the checkbox resets the control to where Camera
Raw thinks it should be. You can toggle all of the Auto checkboxes
on or off by pressing Ctrl+U (Command+U on Macintosh).
Exposure sliderThe Exposure slider lets you make adjustments of up to four f-stops
in either direction. Under normal circumstances, you don’t want to
make huge changes here, especially to correct for under-exposure.
Adding more than two stops of exposure starts to show obvious
noise problems. These can be corrected to some extent with the
Luminance Smoothing and Color Noise Reduction sliders, but
you’ll see some softening of the image when using these controls.
As always, proper exposure when capturing the image is your best
bet for a quality image, but when mistakes happen, the Exposure
adjustment control can be your friend.
Now for the fi rst of those helpful hints on making image adjust-
ments. Along with the Shadow and Highlight clipping checkboxes,
you can set the entire Preview area to show clipping when making
adjustments to the Exposure slider. Hold down the Alt (Mac Option)
key while making adjustments to the Exposure slider. The Preview
area will turn black, as seen in Figure 7.27. As you drag the slider to
the right, you see parts of your image display. Everything that shows
up here are highlight areas that will be clipped (Figure 7.28). This
is an easier way to see when data is being clipped than the red and
blue indicators in the shadow/highlight clipping warnings because
all other tonal values are hidden from view.
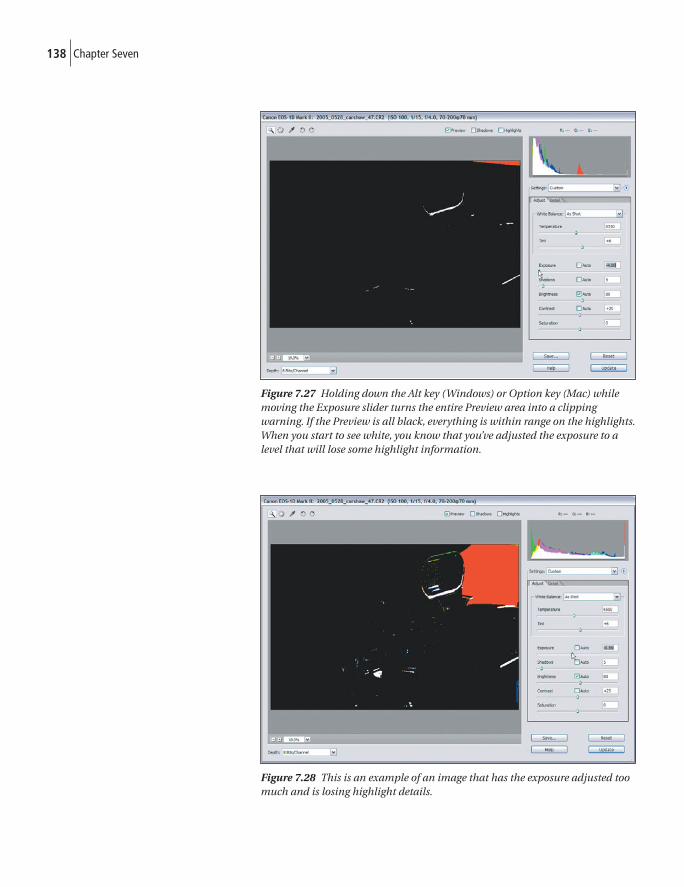
138 Chapter Seven
Figure 7.27 Holding down the Alt key (Windows) or Option key (Mac) while moving the Exposure slider turns the entire Preview area into a clipping warning. If the Preview is all black, everything is within range on the highlights. When you start to see white, you know that you’ve adjusted the exposure to a level that will lose some highlight information.
Figure 7.28 This is an example of an image that has the exposure adjusted too much and is losing highlight details.
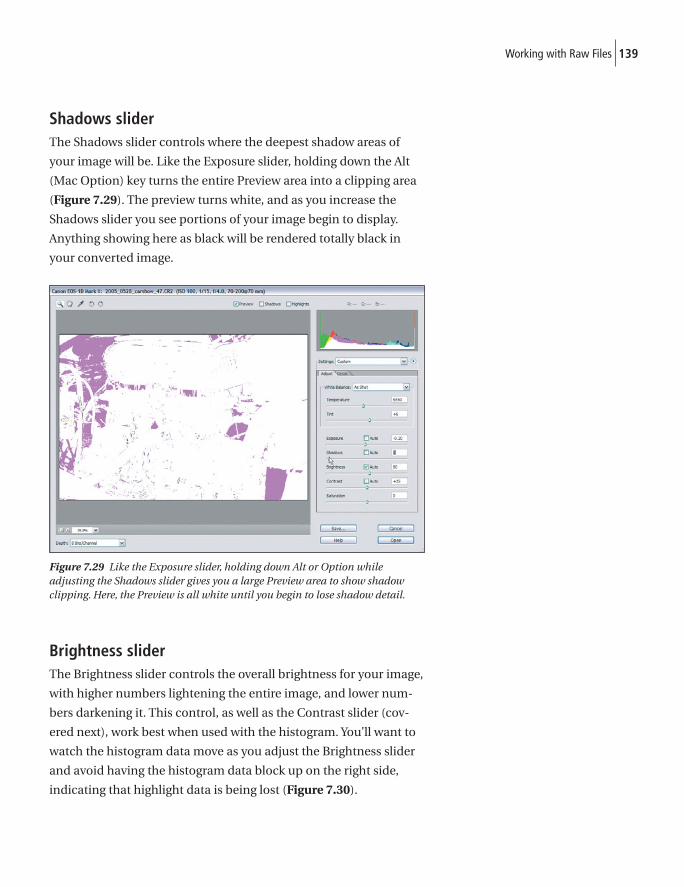
139Working with Raw Files
Shadows sliderThe Shadows slider controls where the deepest shadow areas of
your image will be. Like the Exposure slider, holding down the Alt
(Mac Option) key turns the entire Preview area into a clipping area
(Figure 7.29). The preview turns white, and as you increase the
Shadows slider you see portions of your image begin to display.
Anything showing here as black will be rendered totally black in
your converted image.
Figure 7.29 Like the Exposure slider, holding down Alt or Option while adjusting the Shadows slider gives you a large Preview area to show shadow clipping. Here, the Preview is all white until you begin to lose shadow detail.
Brightness sliderThe Brightness slider controls the overall brightness for your image,
with higher numbers lightening the entire image, and lower num-
bers darkening it. This control, as well as the Contrast slider (cov-
ered next), work best when used with the histogram. You’ll want to
watch the histogram data move as you adjust the Brightness slider
and avoid having the histogram data block up on the right side,
indicating that highlight data is being lost (Figure 7.30).
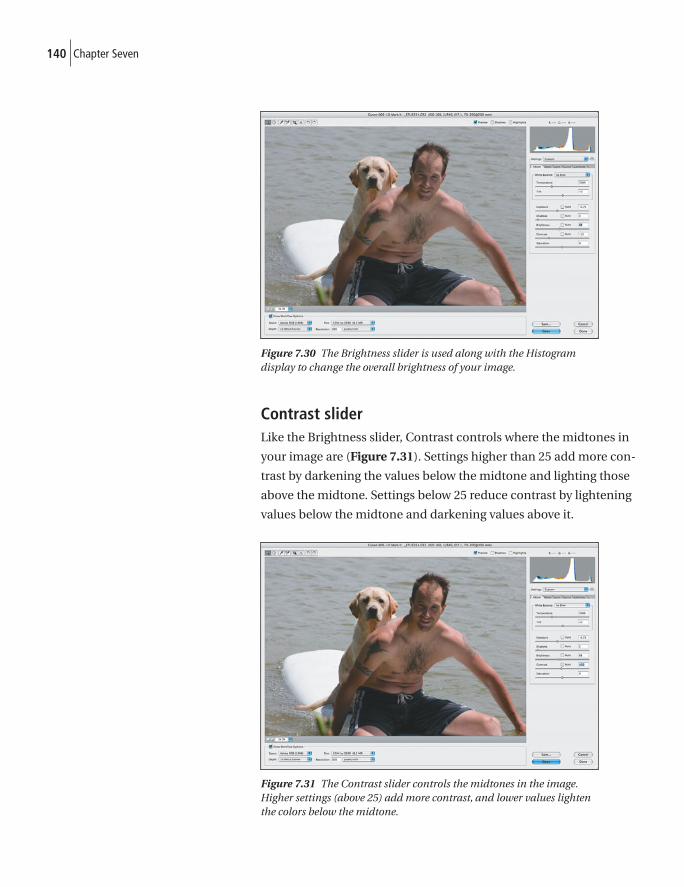
140 Chapter Seven
Figure 7.30 The Brightness slider is used along with the Histogram display to change the overall brightness of your image.
Contrast sliderLike the Brightness slider, Contrast controls where the midtones in
your image are (Figure 7.31). Settings higher than 25 add more con-
trast by darkening the values below the midtone and lighting those
above the midtone. Settings below 25 reduce contrast by lightening
values below the midtone and darkening values above it.
Figure 7.31 The Contrast slider controls the midtones in the image. Higher settings (above 25) add more contrast, and lower values lighten the colors below the midtone.
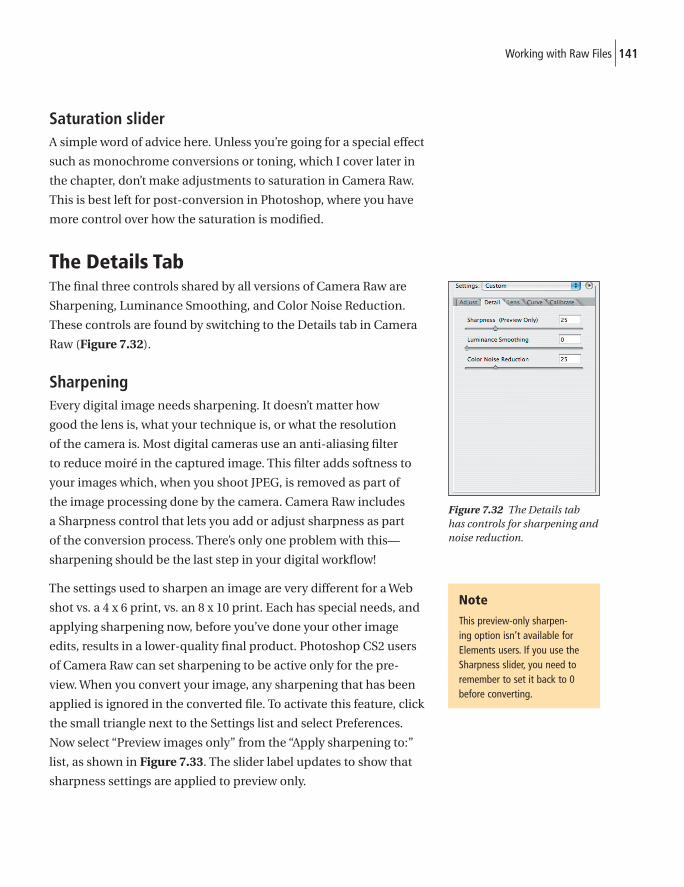
141Working with Raw Files
Saturation sliderA simple word of advice here. Unless you’re going for a special effect
such as monochrome conversions or toning, which I cover later in
the chapter, don’t make adjustments to saturation in Camera Raw.
This is best left for post-conversion in Photoshop, where you have
more control over how the saturation is modifi ed.
The Details TabThe fi nal three controls shared by all versions of Camera Raw are
Sharpening, Luminance Smoothing, and Color Noise Reduction.
These controls are found by switching to the Details tab in Camera
Raw (Figure 7.32).
SharpeningEvery digital image needs sharpening. It doesn’t matter how
good the lens is, what your technique is, or what the resolution
of the camera is. Most digital cameras use an anti-aliasing fi lter
to reduce moiré in the captured image. This fi lter adds softness to
your images which, when you shoot JPEG, is removed as part of
the image processing done by the camera. Camera Raw includes
a Sharpness control that lets you add or adjust sharpness as part
of the conversion process. There’s only one problem with this—
sharpening should be the last step in your digital workfl ow!
The settings used to sharpen an image are very different for a Web
shot vs. a 4 x 6 print, vs. an 8 x 10 print. Each has special needs, and
applying sharpening now, before you’ve done your other image
edits, results in a lower-quality fi nal product. Photoshop CS2 users
of Camera Raw can set sharpening to be active only for the pre-
view. When you convert your image, any sharpening that has been
applied is ignored in the converted fi le. To activate this feature, click
the small triangle next to the Settings list and select Preferences.
Now select “Preview images only” from the “Apply sharpening to:”
list, as shown in Figure 7.33. The slider label updates to show that
sharpness settings are applied to preview only.
Note
This preview-only sharpen-ing option isn’t available for Elements users. If you use the Sharpness slider, you need to remember to set it back to 0 before converting.
Note
This preview-only sharpen-ing option isn’t available for Elements users. If you use the Sharpness slider, you need to remember to set it back to 0 before converting.
Figure 7.32 The Details tab has controls for sharpening and noise reduction.
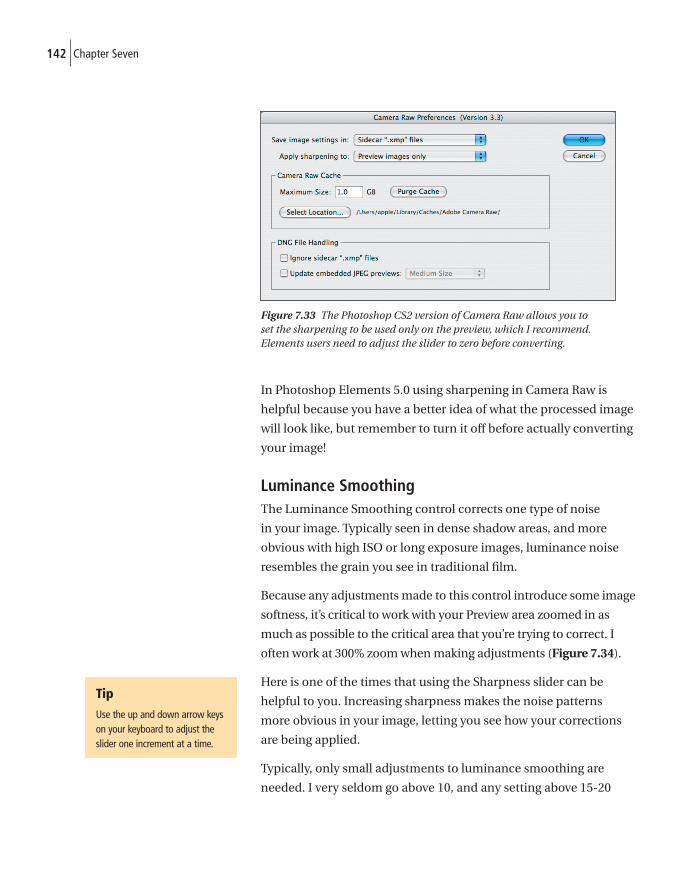
142 Chapter Seven
Figure 7.33 The Photoshop CS2 version of Camera Raw allows you to set the sharpening to be used only on the preview, which I recommend. Elements users need to adjust the slider to zero before converting.
In Photoshop Elements 5.0 using sharpening in Camera Raw is
helpful because you have a better idea of what the processed image
will look like, but remember to turn it off before actually converting
your image!
Luminance SmoothingThe Luminance Smoothing control corrects one type of noise
in your image. Typically seen in dense shadow areas, and more
obvious with high ISO or long exposure images, luminance noise
resembles the grain you see in traditional fi lm.
Because any adjustments made to this control introduce some image
softness, it’s critical to work with your Preview area zoomed in as
much as possible to the critical area that you’re trying to correct. I
often work at 300% zoom when making adjustments (Figure 7.34).
Here is one of the times that using the Sharpness slider can be
helpful to you. Increasing sharpness makes the noise patterns
more obvious in your image, letting you see how your corrections
are being applied.
Typically, only small adjustments to luminance smoothing are
needed. I very seldom go above 10, and any setting above 15-20
Tip
Use the up and down arrow keys on your keyboard to adjust the slider one increment at a time.
Tip
Use the up and down arrow keys on your keyboard to adjust the slider one increment at a time.
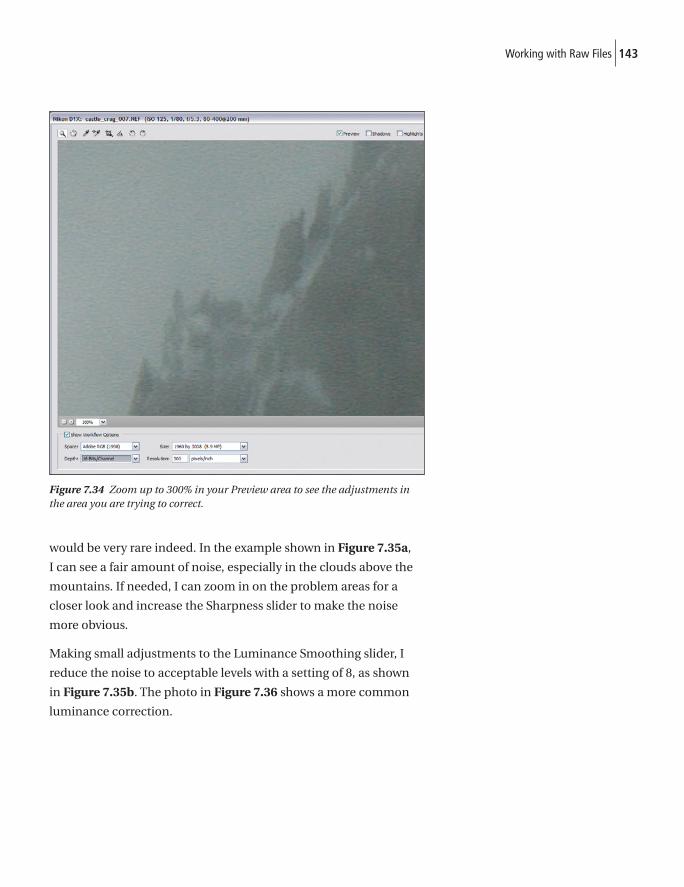
143Working with Raw Files
would be very rare indeed. In the example shown in Figure 7.35a,
I can see a fair amount of noise, especially in the clouds above the
mountains. If needed, I can zoom in on the problem areas for a
closer look and increase the Sharpness slider to make the noise
more obvious.
Making small adjustments to the Luminance Smoothing slider, I
reduce the noise to acceptable levels with a setting of 8, as shown
in Figure 7.35b. The photo in Figure 7.36 shows a more common
luminance correction.
Figure 7.34 Zoom up to 300% in your Preview area to see the adjustments in the area you are trying to correct.
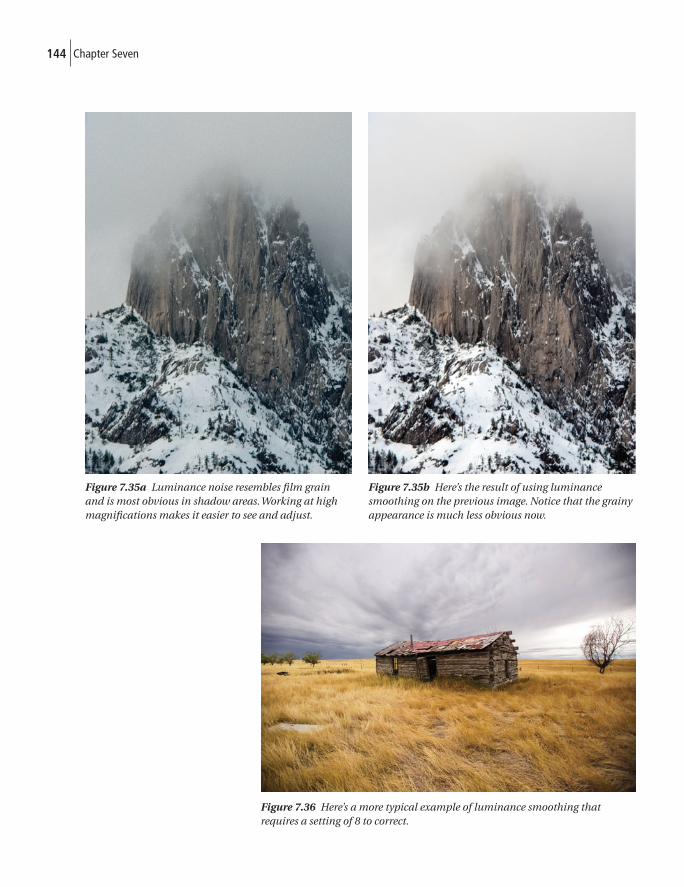
144 Chapter Seven
Figure 7.35a Luminance noise resembles fi lm grain and is most obvious in shadow areas. Working at high magnifi cations makes it easier to see and adjust.
Figure 7.35b Here’s the result of using luminance smoothing on the previous image. Notice that the grainy appearance is much less obvious now.
Figure 7.36 Here’s a more typical example of luminance smoothing that requires a setting of 8 to correct.
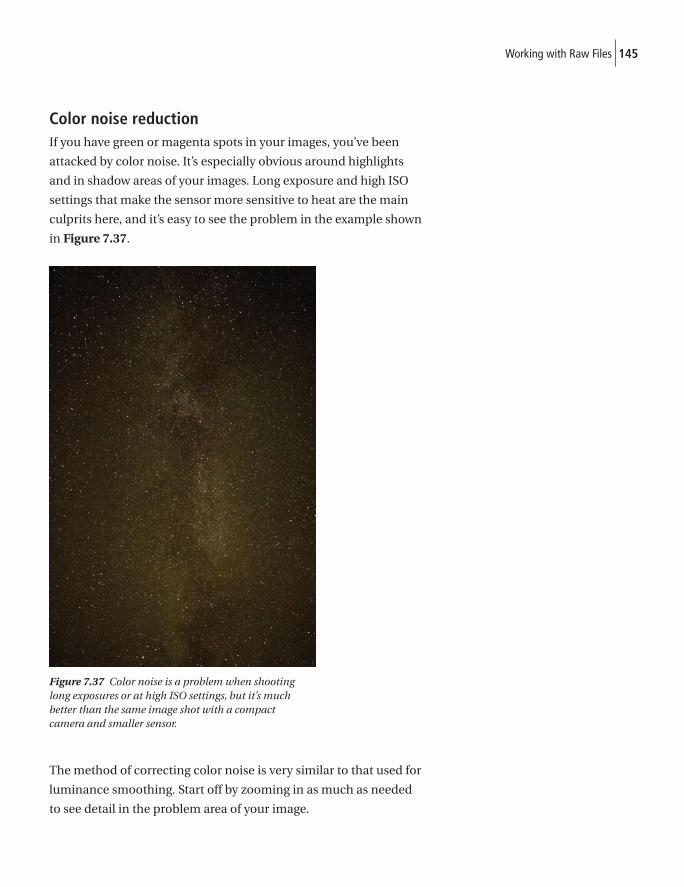
145Working with Raw Files
Color noise reductionIf you have green or magenta spots in your images, you’ve been
attacked by color noise. It’s especially obvious around highlights
and in shadow areas of your images. Long exposure and high ISO
settings that make the sensor more sensitive to heat are the main
culprits here, and it’s easy to see the problem in the example shown
in Figure 7.37.
Figure 7.37 Color noise is a problem when shooting long exposures or at high ISO settings, but it’s much better than the same image shot with a compact camera and smaller sensor.
The method of correcting color noise is very similar to that used for
luminance smoothing. Start off by zooming in as much as needed
to see detail in the problem area of your image.
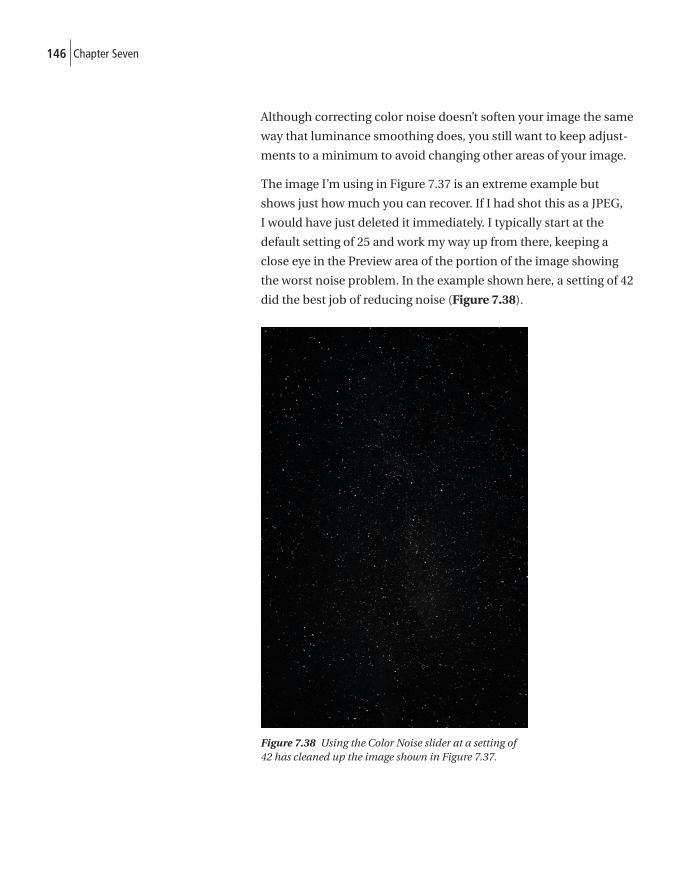
146 Chapter Seven
Although correcting color noise doesn’t soften your image the same
way that luminance smoothing does, you still want to keep adjust-
ments to a minimum to avoid changing other areas of your image.
The image I’m using in Figure 7.37 is an extreme example but
shows just how much you can recover. If I had shot this as a JPEG,
I would have just deleted it immediately. I typically start at the
default setting of 25 and work my way up from there, keeping a
close eye in the Preview area of the portion of the image showing
the worst noise problem. In the example shown here, a setting of 42
did the best job of reducing noise (Figure 7.38).
Figure 7.38 Using the Color Noise slider at a setting of 42 has cleaned up the image shown in Figure 7.37.
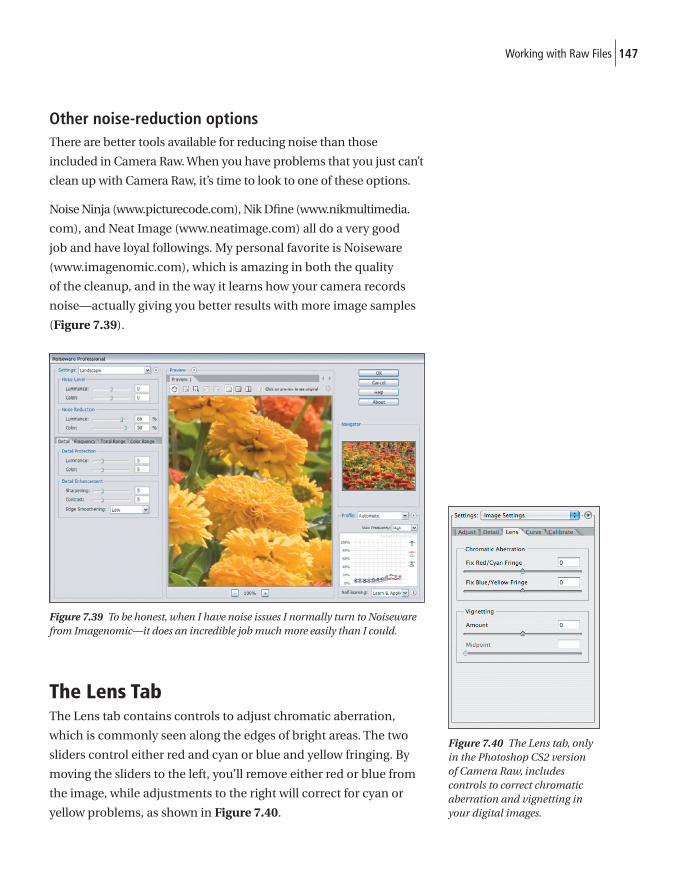
147Working with Raw Files
Other noise-reduction optionsThere are better tools available for reducing noise than those
included in Camera Raw. When you have problems that you just can’t
clean up with Camera Raw, it’s time to look to one of these options.
Noise Ninja (www.picturecode.com), Nik Dfi ne (www.nikmultimedia.
com), and Neat Image (www.neatimage.com) all do a very good
job and have loyal followings. My personal favorite is Noiseware
(www.imagenomic.com), which is amazing in both the quality
of the cleanup, and in the way it learns how your camera records
noise—actually giving you better results with more image samples
(Figure 7.39).
Figure 7.39 To be honest, when I have noise issues I normally turn to Noiseware from Imagenomic—it does an incredible job much more easily than I could.
The Lens TabThe Lens tab contains controls to adjust chromatic aberration,
which is commonly seen along the edges of bright areas. The two
sliders control either red and cyan or blue and yellow fringing. By
moving the sliders to the left, you’ll remove either red or blue from
the image, while adjustments to the right will correct for cyan or
yellow problems, as shown in Figure 7.40.
Figure 7.40 The Lens tab, only in the Photoshop CS2 version of Camera Raw, includes controls to correct chromatic aberration and vignetting in your digital images.

148 Chapter Seven
The Vignetting control can correct for darkening seen at the edges
of images with some lenses (Figures 7.41a and 7.41b). An alterna-
tive use for the control is to add vignetting to draw attention to the
center of your image. The Midpoint slider controls how far from
the center of the image the vignetting adjustments occur (Figure 7.42).
Figure 7.41a Wide-angle lenses, especially with fi lters, can lead to darkening or vignetting at the corners.
Figure 7.41b Using the Vignette control you can remove or greatly reduce the amount of vignetting in the shot.
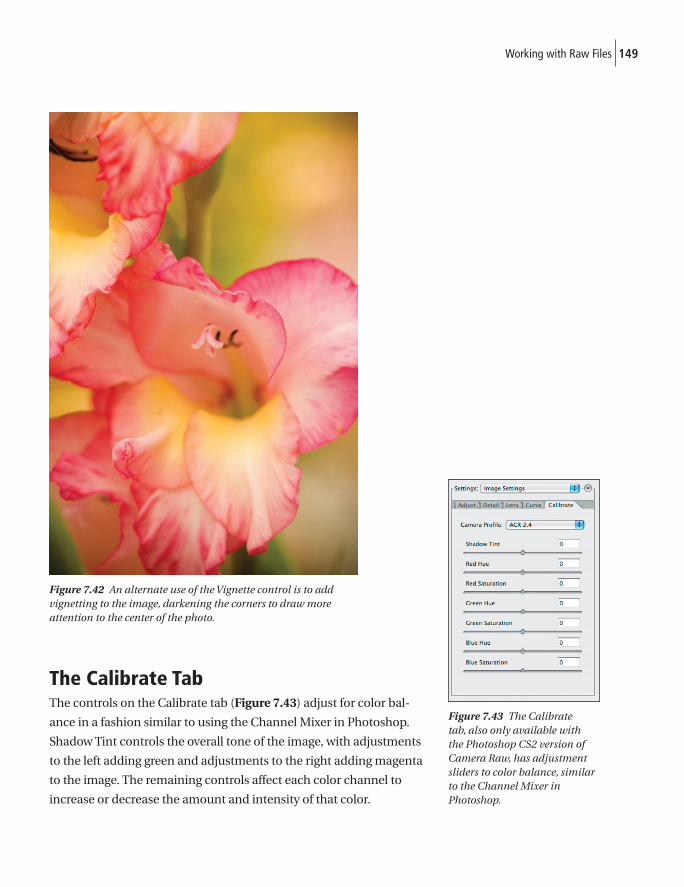
149Working with Raw Files
Figure 7.42 An alternate use of the Vignette control is to add vignetting to the image, darkening the corners to draw more attention to the center of the photo.
The Calibrate TabThe controls on the Calibrate tab (Figure 7.43) adjust for color bal-
ance in a fashion similar to using the Channel Mixer in Photoshop.
Shadow Tint controls the overall tone of the image, with adjustments
to the left adding green and adjustments to the right adding magenta
to the image. The remaining controls affect each color channel to
increase or decrease the amount and intensity of that color.
Figure 7.43 The Calibrate tab, also only available with the Photoshop CS2 version of Camera Raw, has adjustment sliders to color balance, similar to the Channel Mixer in Photoshop.
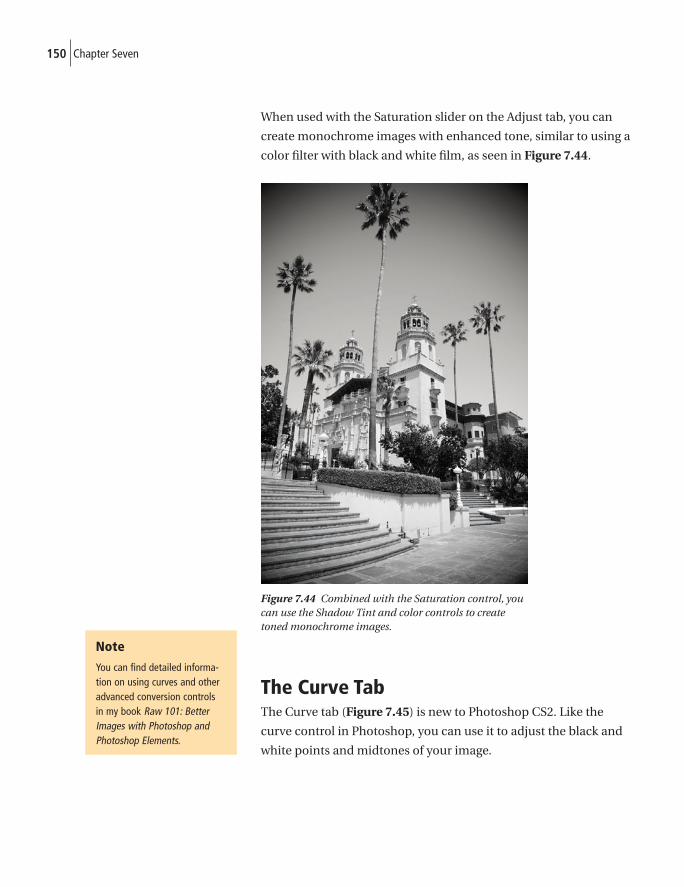
150 Chapter Seven
When used with the Saturation slider on the Adjust tab, you can
create monochrome images with enhanced tone, similar to using a
color fi lter with black and white fi lm, as seen in Figure 7.44.
Figure 7.44 Combined with the Saturation control, you can use the Shadow Tint and color controls to create toned monochrome images.
The Curve TabThe Curve tab (Figure 7.45) is new to Photoshop CS2. Like the
curve control in Photoshop, you can use it to adjust the black and
white points and midtones of your image.
Note
You can find detailed informa-tion on using curves and other advanced conversion controls in my book Raw 101: Better Images with Photoshop and Photoshop Elements.
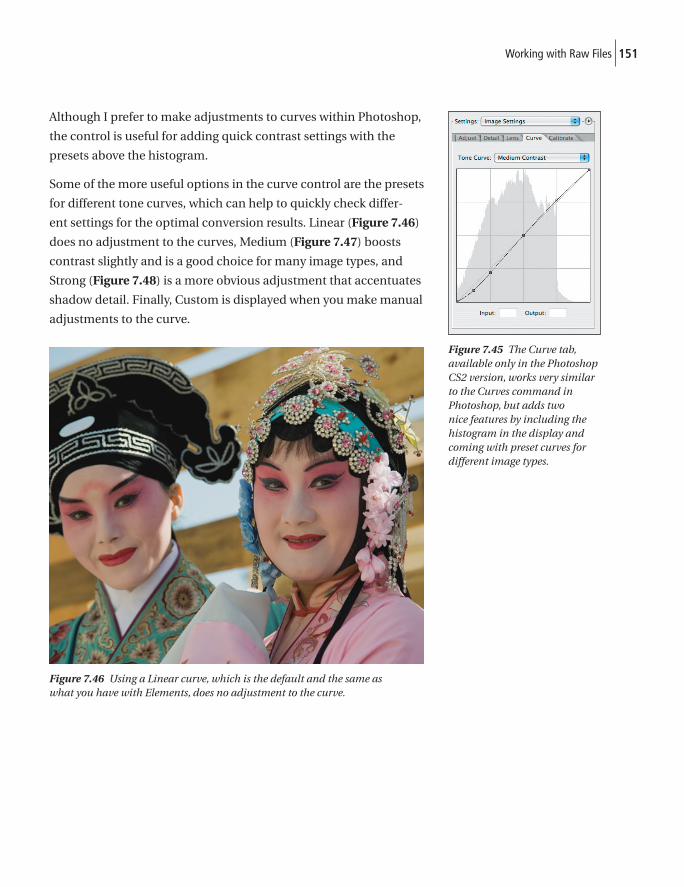
151Working with Raw Files
Although I prefer to make adjustments to curves within Photoshop,
the control is useful for adding quick contrast settings with the
presets above the histogram.
Some of the more useful options in the curve control are the presets
for different tone curves, which can help to quickly check differ-
ent settings for the optimal conversion results. Linear (Figure 7.46)
does no adjustment to the curves, Medium (Figure 7.47) boosts
contrast slightly and is a good choice for many image types, and
Strong (Figure 7.48) is a more obvious adjustment that accentuates
shadow detail. Finally, Custom is displayed when you make manual
adjustments to the curve.
Figure 7.46 Using a Linear curve, which is the default and the same as what you have with Elements, does no adjustment to the curve.
Figure 7.45 The Curve tab, available only in the Photoshop CS2 version, works very similar to the Curves command in Photoshop, but adds two nice features by including the histogram in the display and coming with preset curves for different image types.
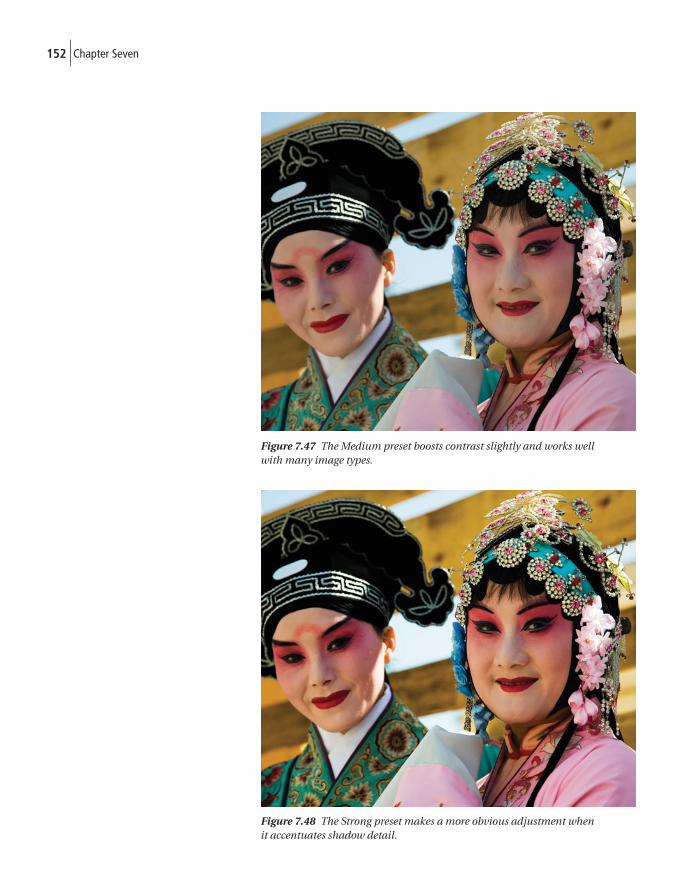
152 Chapter Seven
Figure 7.47 The Medium preset boosts contrast slightly and works well with many image types.
Figure 7.48 The Strong preset makes a more obvious adjustment when it accentuates shadow detail.
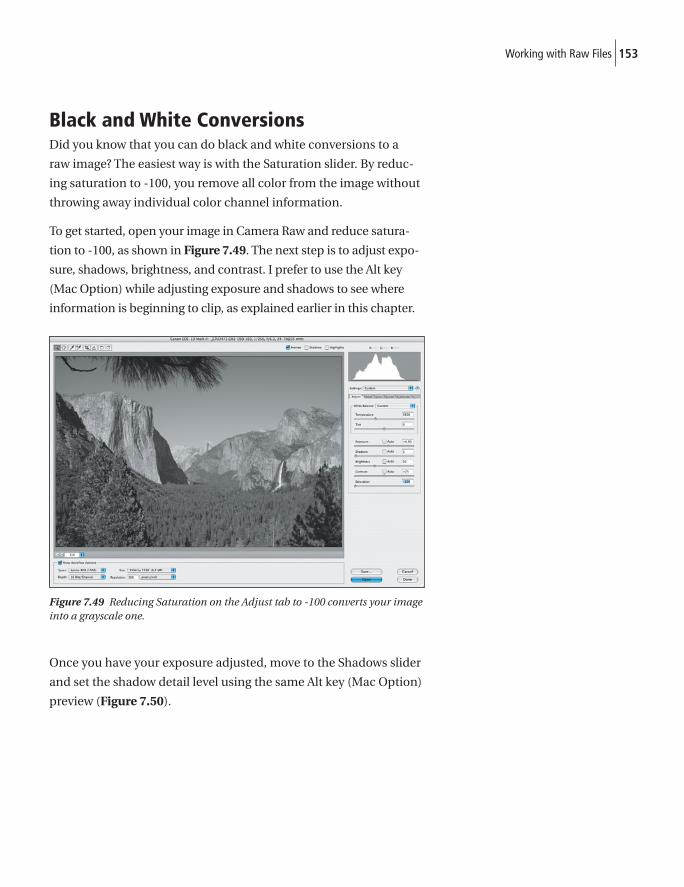
153Working with Raw Files
Black and White ConversionsDid you know that you can do black and white conversions to a
raw image? The easiest way is with the Saturation slider. By reduc-
ing saturation to -100, you remove all color from the image without
throwing away individual color channel information.
To get started, open your image in Camera Raw and reduce satura-
tion to -100, as shown in Figure 7.49. The next step is to adjust expo-
sure, shadows, brightness, and contrast. I prefer to use the Alt key
(Mac Option) while adjusting exposure and shadows to see where
information is beginning to clip, as explained earlier in this chapter.
Figure 7.49 Reducing Saturation on the Adjust tab to -100 converts your image into a grayscale one.
Once you have your exposure adjusted, move to the Shadows slider
and set the shadow detail level using the same Alt key (Mac Option)
preview (Figure 7.50).
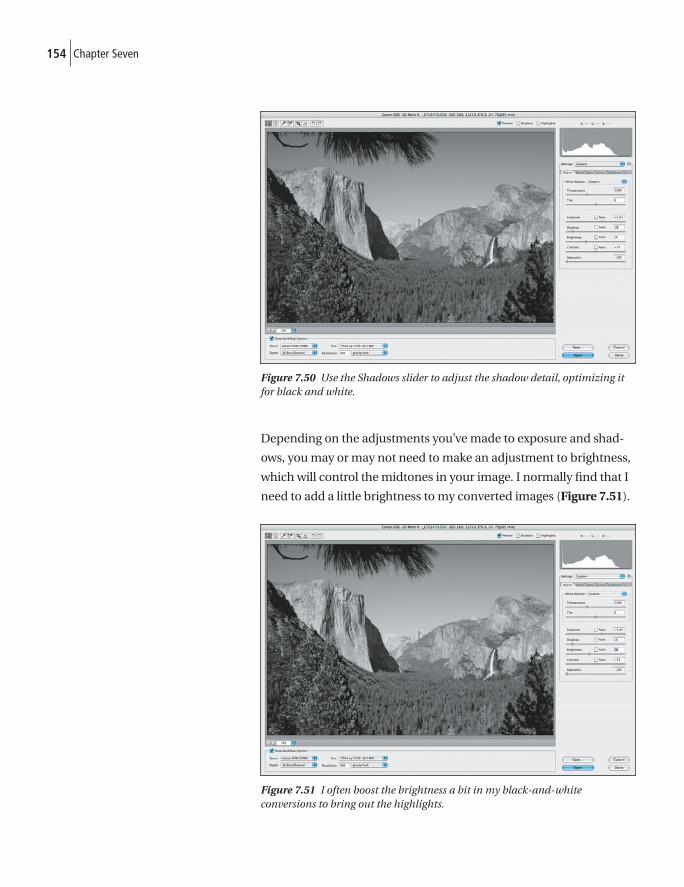
154 Chapter Seven
Figure 7.50 Use the Shadows slider to adjust the shadow detail, optimizing it for black and white.
Depending on the adjustments you’ve made to exposure and shad-
ows, you may or may not need to make an adjustment to brightness,
which will control the midtones in your image. I normally fi nd that I
need to add a little brightness to my converted images (Figure 7.51).
Figure 7.51 I often boost the brightness a bit in my black-and-white conversions to bring out the highlights.
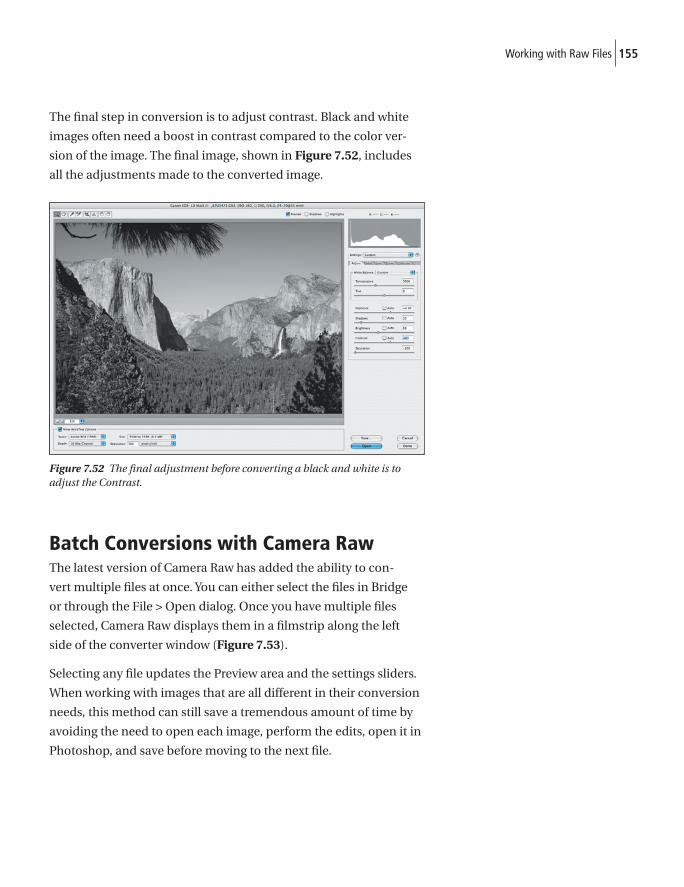
155Working with Raw Files
The fi nal step in conversion is to adjust contrast. Black and white
images often need a boost in contrast compared to the color ver-
sion of the image. The fi nal image, shown in Figure 7.52, includes
all the adjustments made to the converted image.
Figure 7.52 The fi nal adjustment before converting a black and white is to adjust the Contrast.
Batch Conversions with Camera RawThe latest version of Camera Raw has added the ability to con-
vert multiple fi les at once. You can either select the fi les in Bridge
or through the File > Open dialog. Once you have multiple fi les
selected, Camera Raw displays them in a fi lmstrip along the left
side of the converter window (Figure 7.53).
Selecting any fi le updates the Preview area and the settings sliders.
When working with images that are all different in their conversion
needs, this method can still save a tremendous amount of time by
avoiding the need to open each image, perform the edits, open it in
Photoshop, and save before moving to the next fi le.
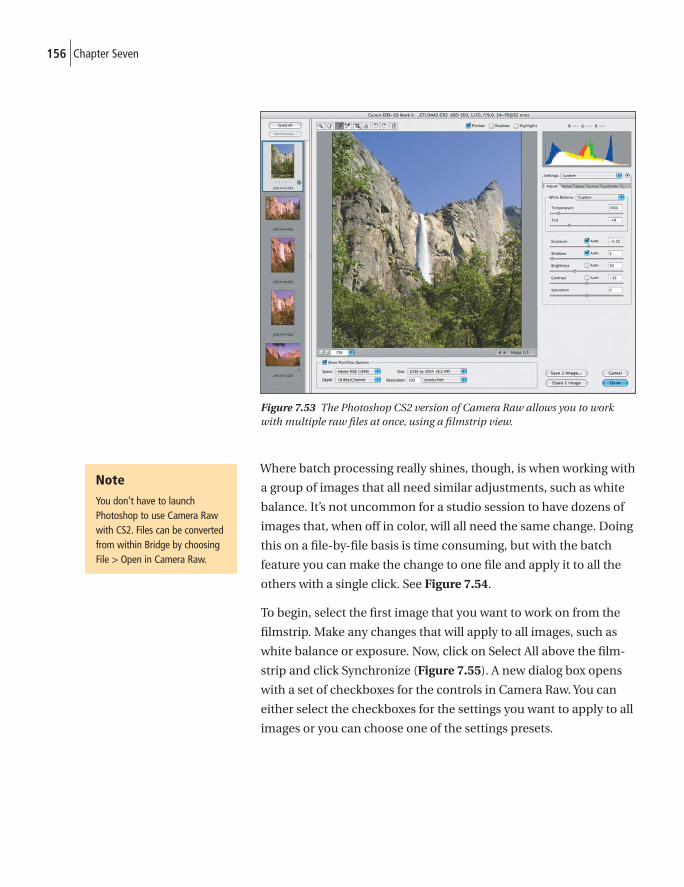
156 Chapter Seven
Figure 7.53 The Photoshop CS2 version of Camera Raw allows you to work with multiple raw fi les at once, using a fi lmstrip view.
Where batch processing really shines, though, is when working with
a group of images that all need similar adjustments, such as white
balance. It’s not uncommon for a studio session to have dozens of
images that, when off in color, will all need the same change. Doing
this on a fi le-by-fi le basis is time consuming, but with the batch
feature you can make the change to one fi le and apply it to all the
others with a single click. See Figure 7.54.
To begin, select the fi rst image that you want to work on from the
fi lmstrip. Make any changes that will apply to all images, such as
white balance or exposure. Now, click on Select All above the fi lm-
strip and click Synchronize (Figure 7.55). A new dialog box opens
with a set of checkboxes for the controls in Camera Raw. You can
either select the checkboxes for the settings you want to apply to all
images or you can choose one of the settings presets.
Note
You don’t have to launch Photoshop to use Camera Raw with CS2. Files can be converted from within Bridge by choosing File > Open in Camera Raw.
Note
You don’t have to launch Photoshop to use Camera Raw with CS2. Files can be converted from within Bridge by choosing File > Open in Camera Raw.
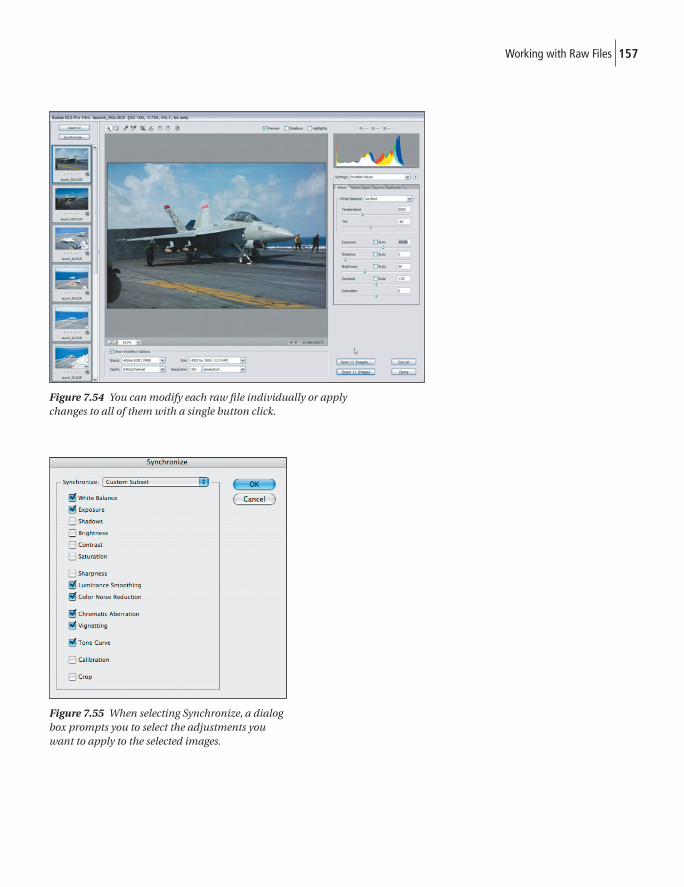
157Working with Raw Files
Figure 7.54 You can modify each raw fi le individually or apply changes to all of them with a single button click.
Figure 7.55 When selecting Synchronize, a dialog box prompts you to select the adjustments you want to apply to the selected images.
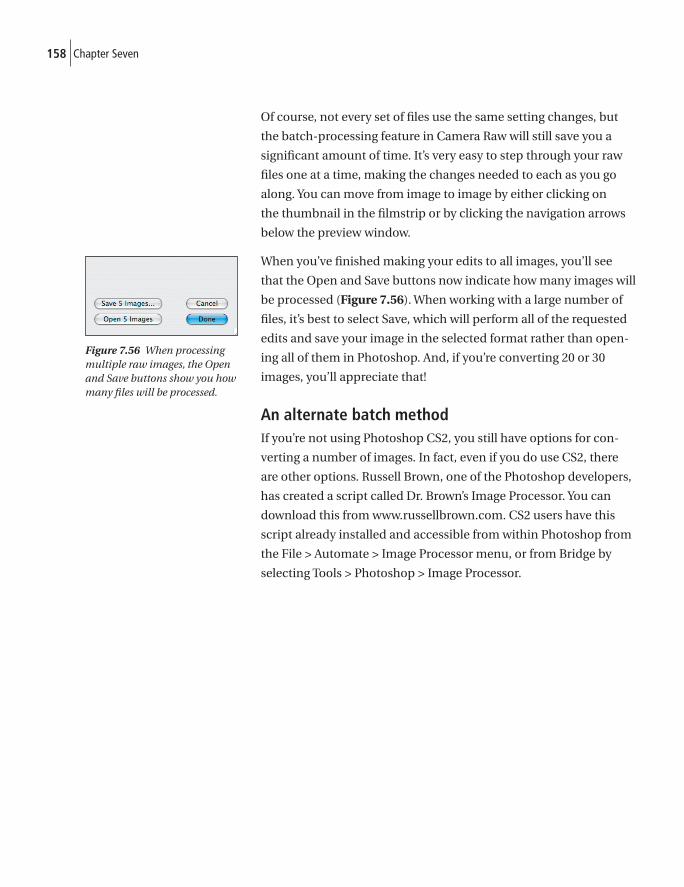
158 Chapter Seven
Of course, not every set of fi les use the same setting changes, but
the batch-processing feature in Camera Raw will still save you a
signifi cant amount of time. It’s very easy to step through your raw
fi les one at a time, making the changes needed to each as you go
along. You can move from image to image by either clicking on
the thumbnail in the fi lmstrip or by clicking the navigation arrows
below the preview window.
When you’ve fi nished making your edits to all images, you’ll see
that the Open and Save buttons now indicate how many images will
be processed (Figure 7.56). When working with a large number of
fi les, it’s best to select Save, which will perform all of the requested
edits and save your image in the selected format rather than open-
ing all of them in Photoshop. And, if you’re converting 20 or 30
images, you’ll appreciate that!
An alternate batch methodIf you’re not using Photoshop CS2, you still have options for con-
verting a number of images. In fact, even if you do use CS2, there
are other options. Russell Brown, one of the Photoshop developers,
has created a script called Dr. Brown’s Image Processor. You can
download this from www.russellbrown.com. CS2 users have this
script already installed and accessible from within Photoshop from
the File > Automate > Image Processor menu, or from Bridge by
selecting Tools > Photoshop > Image Processor.
Figure 7.56 When processing multiple raw images, the Open and Save buttons show you how many fi les will be processed.
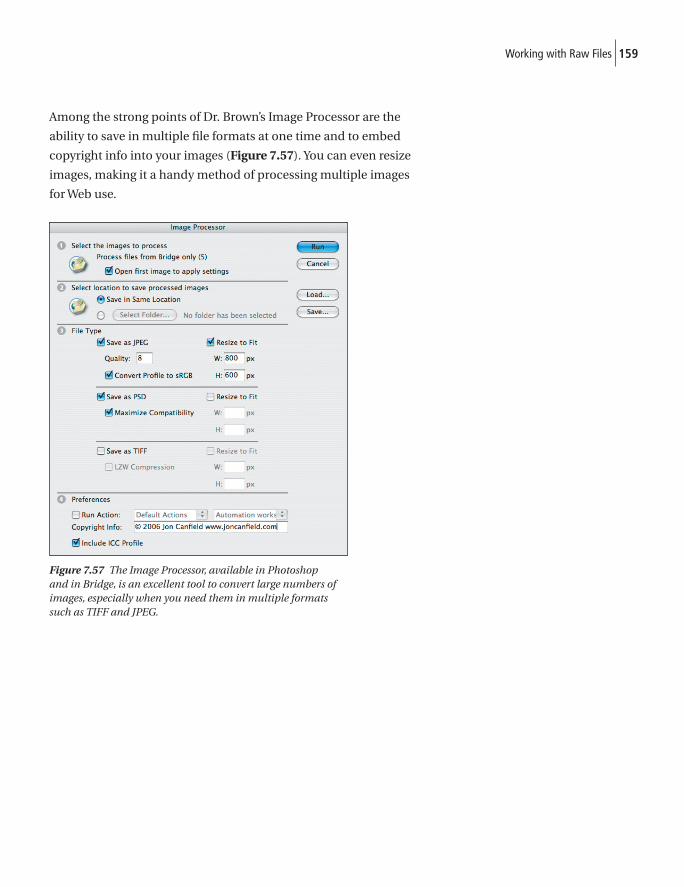
159Working with Raw Files
Among the strong points of Dr. Brown’s Image Processor are the
ability to save in multiple fi le formats at one time and to embed
copyright info into your images (Figure 7.57). You can even resize
images, making it a handy method of processing multiple images
for Web use.
Figure 7.57 The Image Processor, available in Photoshop and in Bridge, is an excellent tool to convert large numbers of images, especially when you need them in multiple formats such as TIFF and JPEG.

This page intentionally left blank
Regardless of your choice in cameras or computer operating systems,
you’ll be editing your digital images to some degree, even if your only
interest is sharing with family and friends or doing basic printing.
For the vast majority of users, this means using Photoshop or
Photoshop Elements, both of which are available for Macintosh
and Windows. In this chapter, I cover the common editing tasks for
tonal correction and color balance that you’ll fi nd yourself doing
over and over again.
Basic Color CorrectionWhether you shoot raw or JPEG, you’ll often fi nd that the color bal-
ance on your images is not exactly what you were expecting. Unless
you use an 18% gray card or the Expo Disc (www.expodisc.com)
to set a custom white balance in your camera, a slight color cast
in your images is common (Figure 8.1). Setting a custom white
balance calibrates the camera to the precise color temperature
of the light source illuminating the subject.
The image shown in Figure 8.1, although captured with the camera
white balance preset of Daylight, is a little cool—or slightly blue in
tone—due to mixed lighting conditions. When I open the image
in Adobe Photoshop Camera Raw, I see that the color temperature
is set to 5500K, which is the Daylight setting. By making a slight
upward adjustment to 5800K, the cool cast is removed, and the
skin tones now have a pleasant and more natural-looking tone, as
shown in Figure 8.2.
The previous example used a raw image (discussed in Chapter 7) to
make the adjustment to color temperature. But what about those
times when you shoot JPEG, and what about those images shot
before you learned the advantages of raw? For JPEG images, the key
8 Image Editing

162 Chapter Eight
to correct color balance is matching the camera’s white balance to
the light source accurately at the time of capture.
A second common problem with color balance is the color cast made
by refl ections from sources such as water, grass, and so on. These
are much more diffi cult to correct because you’ll often fi nd large
portions of the photo that look accurate, yet you still need to make
adjustments to areas of the image with unwanted color casts caused
by the refl ections. In cases like this, using Photoshop layer masks on
adjustment layers is the best approach to color correction.
Using auto correctionBoth Photoshop and Elements offer controls that help with cor-
recting color balance problems automatically. Photoshop CS2 has
a single command, Auto Color, that does a scan of your image and
attempts to make corrections based on content type. Photoshop
Elements, on the other hand, has several auto-correction options
that make it easier to fi x a number of common problems.
Figure 8.1 Even when setting a white balance that matches your conditions, it’s not uncommon to have slight differences in the color temperature that you can improve.
Figure 8.2 After correcting the color balance, the cast in the previous image is easier to detect.
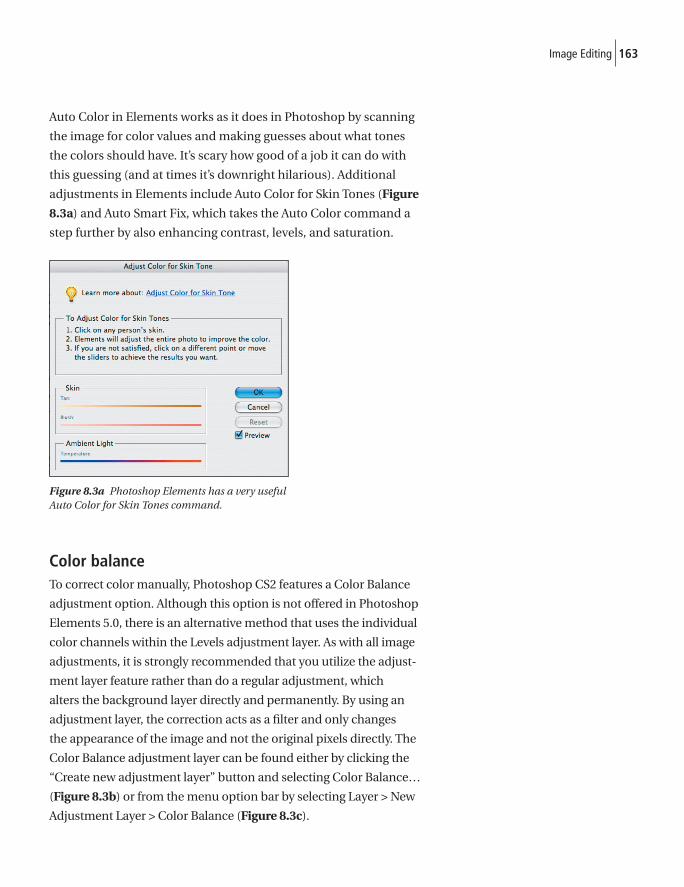
163Image Editing
Auto Color in Elements works as it does in Photoshop by scanning
the image for color values and making guesses about what tones
the colors should have. It’s scary how good of a job it can do with
this guessing (and at times it’s downright hilarious). Additional
adjustments in Elements include Auto Color for Skin Tones (Figure
8.3a) and Auto Smart Fix, which takes the Auto Color command a
step further by also enhancing contrast, levels, and saturation.
Figure 8.3a Photoshop Elements has a very useful Auto Color for Skin Tones command.
Color balanceTo correct color manually, Photoshop CS2 features a Color Balance
adjustment option. Although this option is not offered in Photoshop
Elements 5.0, there is an alternative method that uses the individual
color channels within the Levels adjustment layer. As with all image
adjustments, it is strongly recommended that you utilize the adjust-
ment layer feature rather than do a regular adjustment, which
alters the background layer directly and permanently. By using an
adjustment layer, the correction acts as a fi lter and only changes
the appearance of the image and not the original pixels directly. The
Color Balance adjustment layer can be found either by clicking the
“Create new adjustment layer” button and selecting Color Balance…
(Figure 8.3b) or from the menu option bar by selecting Layer > New
Adjustment Layer > Color Balance (Figure 8.3c).
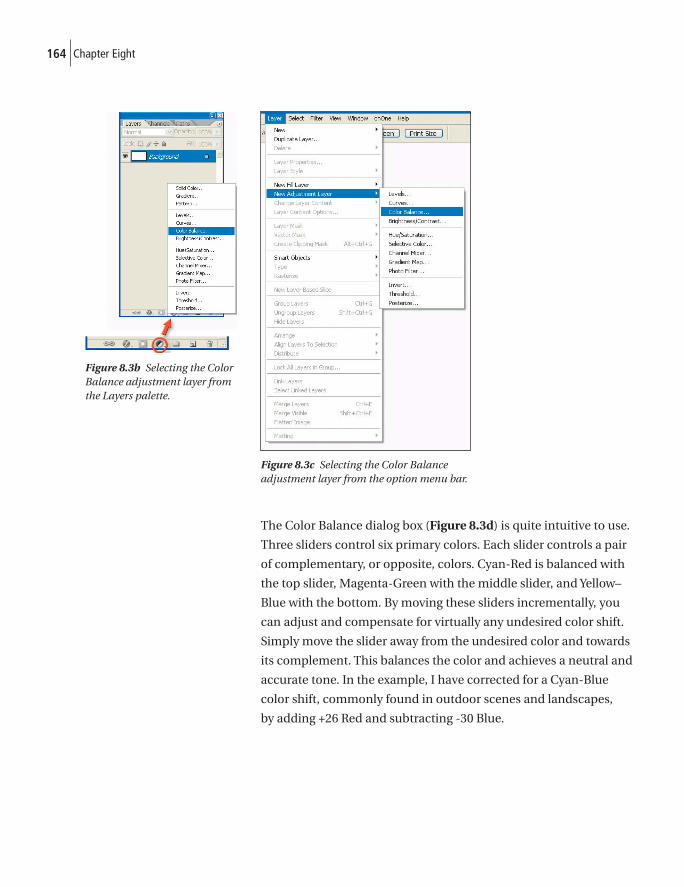
164 Chapter Eight
Figure 8.3c Selecting the Color Balance adjustment layer from the option menu bar.
The Color Balance dialog box (Figure 8.3d) is quite intuitive to use.
Three sliders control six primary colors. Each slider controls a pair
of complementary, or opposite, colors. Cyan-Red is balanced with
the top slider, Magenta-Green with the middle slider, and Yellow–
Blue with the bottom. By moving these sliders incrementally, you
can adjust and compensate for virtually any undesired color shift.
Simply move the slider away from the undesired color and towards
its complement. This balances the color and achieves a neutral and
accurate tone. In the example, I have corrected for a Cyan-Blue
color shift, commonly found in outdoor scenes and landscapes,
by adding +26 Red and subtracting -30 Blue.
Figure 8.3b Selecting the Color Balance adjustment layer from the Layers palette.
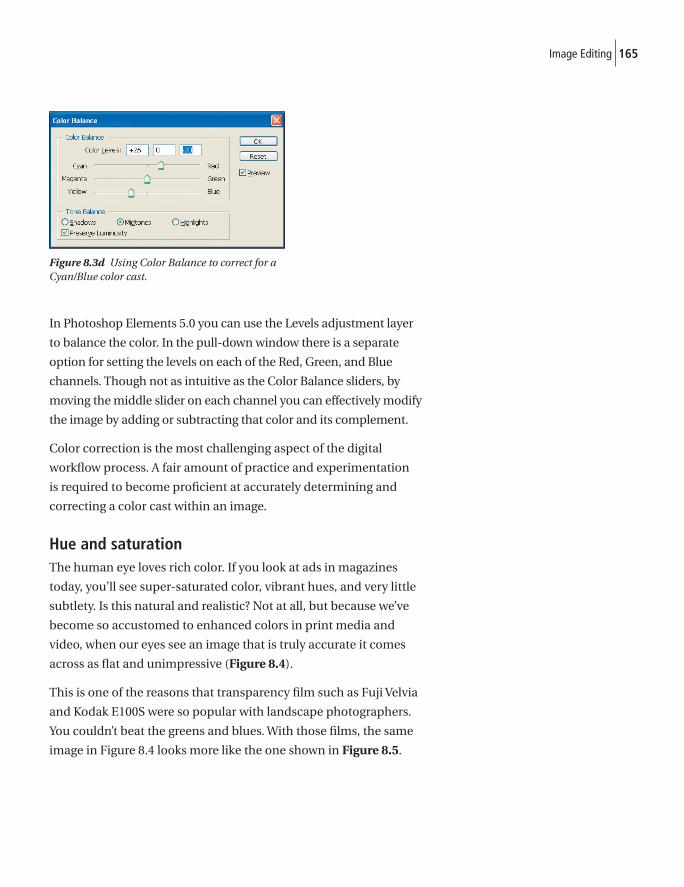
165Image Editing
Figure 8.3d Using Color Balance to correct for a Cyan/Blue color cast.
In Photoshop Elements 5.0 you can use the Levels adjustment layer
to balance the color. In the pull-down window there is a separate
option for setting the levels on each of the Red, Green, and Blue
channels. Though not as intuitive as the Color Balance sliders, by
moving the middle slider on each channel you can effectively modify
the image by adding or subtracting that color and its complement.
Color correction is the most challenging aspect of the digital
workfl ow process. A fair amount of practice and experimentation
is required to become profi cient at accurately determining and
correcting a color cast within an image.
Hue and saturationThe human eye loves rich color. If you look at ads in magazines
today, you’ll see super-saturated color, vibrant hues, and very little
subtlety. Is this natural and realistic? Not at all, but because we’ve
become so accustomed to enhanced colors in print media and
video, when our eyes see an image that is truly accurate it comes
across as fl at and unimpressive (Figure 8.4).
This is one of the reasons that transparency fi lm such as Fuji Velvia
and Kodak E100S were so popular with landscape photographers.
You couldn’t beat the greens and blues. With those fi lms, the same
image in Figure 8.4 looks more like the one shown in Figure 8.5.
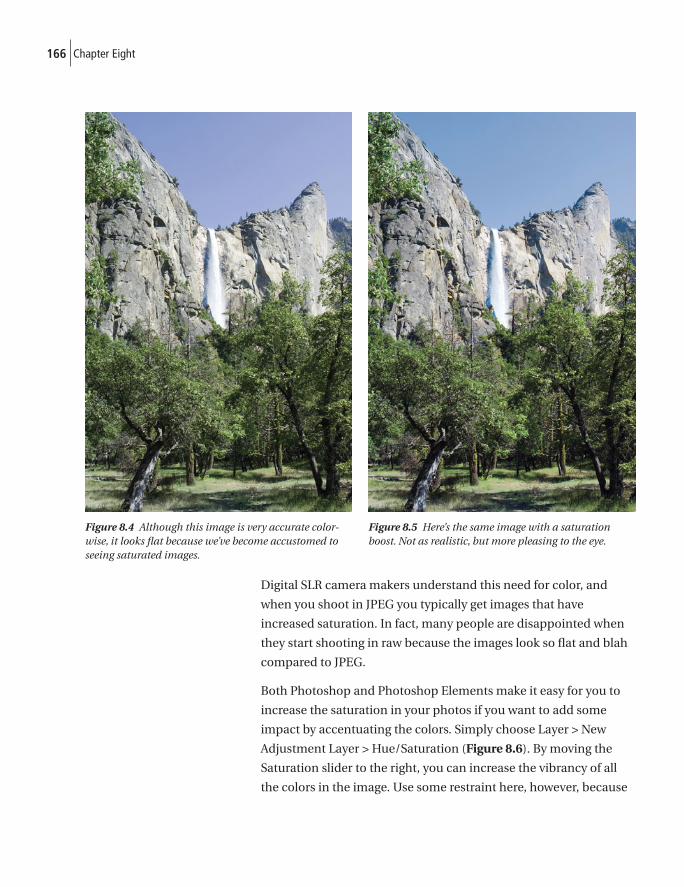
166 Chapter Eight
Digital SLR camera makers understand this need for color, and
when you shoot in JPEG you typically get images that have
increased saturation. In fact, many people are disappointed when
they start shooting in raw because the images look so fl at and blah
compared to JPEG.
Both Photoshop and Photoshop Elements make it easy for you to
increase the saturation in your photos if you want to add some
impact by accentuating the colors. Simply choose Layer > New
Adjustment Layer > Hue/Saturation (Figure 8.6). By moving the
Saturation slider to the right, you can increase the vibrancy of all
the colors in the image. Use some restraint here, however, because
Figure 8.4 Although this image is very accurate color-wise, it looks fl at because we’ve become accustomed to seeing saturated images.
Figure 8.5 Here’s the same image with a saturation boost. Not as realistic, but more pleasing to the eye.
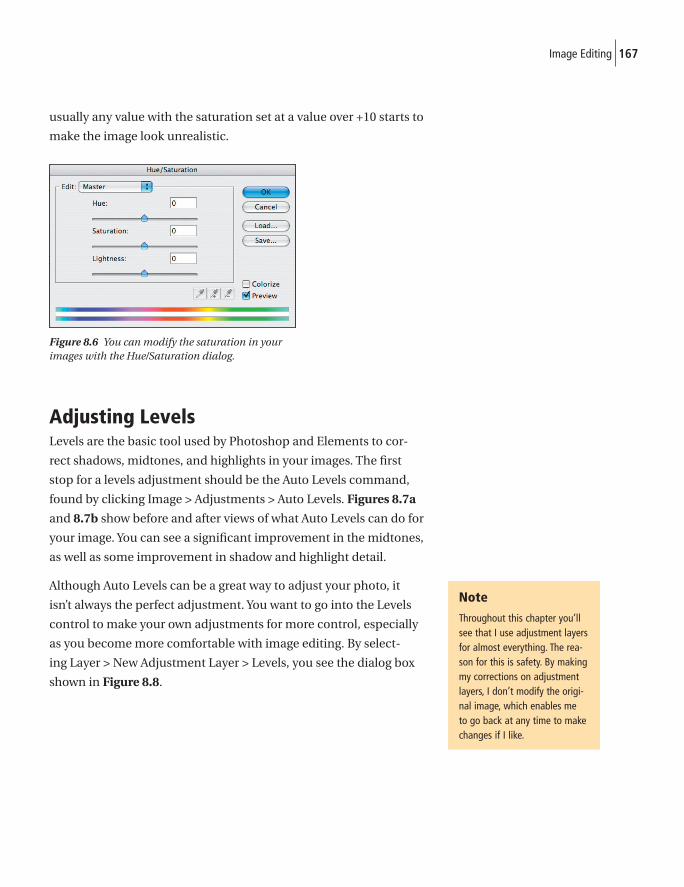
167Image Editing
usually any value with the saturation set at a value over +10 starts to
make the image look unrealistic.
Figure 8.6 You can modify the saturation in your images with the Hue/Saturation dialog.
Adjusting LevelsLevels are the basic tool used by Photoshop and Elements to cor-
rect shadows, midtones, and highlights in your images. The fi rst
stop for a levels adjustment should be the Auto Levels command,
found by clicking Image > Adjustments > Auto Levels. Figures 8.7a
and 8.7b show before and after views of what Auto Levels can do for
your image. You can see a signifi cant improvement in the midtones,
as well as some improvement in shadow and highlight detail.
Although Auto Levels can be a great way to adjust your photo, it
isn’t always the perfect adjustment. You want to go into the Levels
control to make your own adjustments for more control, especially
as you become more comfortable with image editing. By select-
ing Layer > New Adjustment Layer > Levels, you see the dialog box
shown in Figure 8.8.
Note
Throughout this chapter you’ll see that I use adjustment layers for almost everything. The rea-son for this is safety. By making my corrections on adjustment layers, I don’t modify the origi-nal image, which enables me to go back at any time to make changes if I like.
Note
Throughout this chapter you’ll see that I use adjustment layers for almost everything. The rea-son for this is safety. By making my corrections on adjustment layers, I don’t modify the origi-nal image, which enables me to go back at any time to make changes if I like.
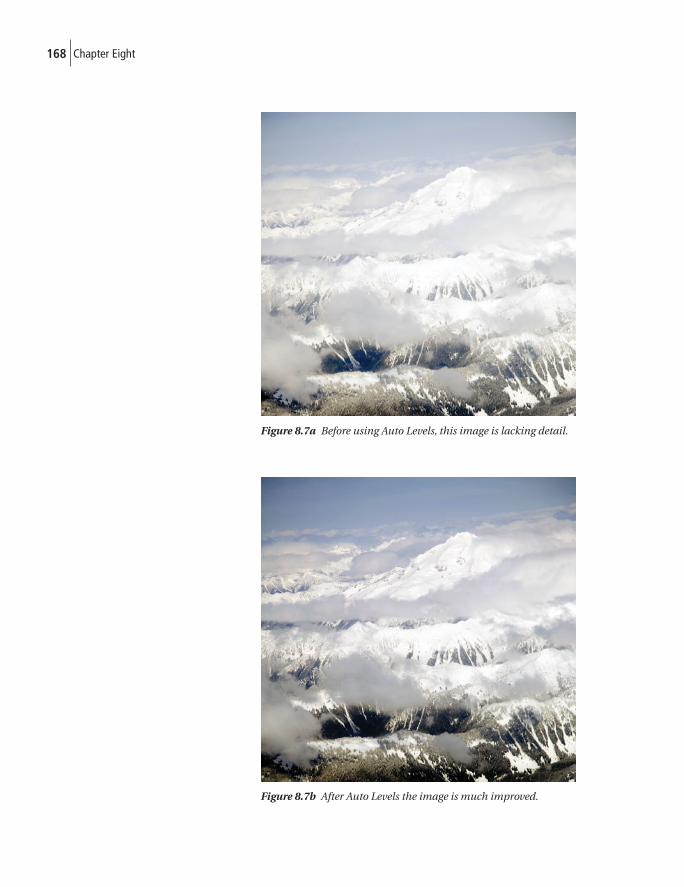
168 Chapter Eight
Figure 8.7a Before using Auto Levels, this image is lacking detail.
Figure 8.7b After Auto Levels the image is much improved.
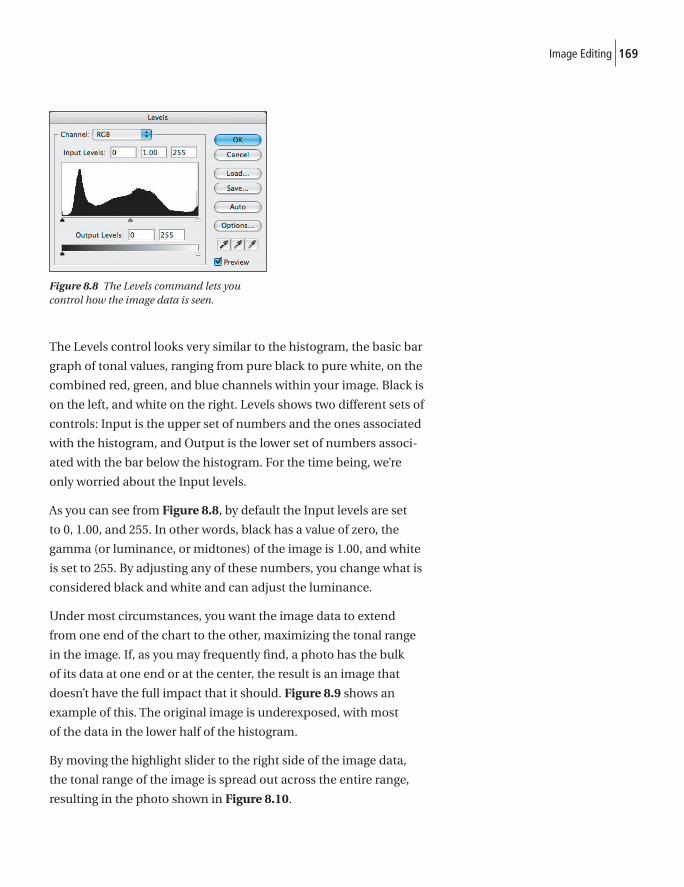
169Image Editing
Figure 8.8 The Levels command lets you control how the image data is seen.
The Levels control looks very similar to the histogram, the basic bar
graph of tonal values, ranging from pure black to pure white, on the
combined red, green, and blue channels within your image. Black is
on the left, and white on the right. Levels shows two different sets of
controls: Input is the upper set of numbers and the ones associated
with the histogram, and Output is the lower set of numbers associ-
ated with the bar below the histogram. For the time being, we’re
only worried about the Input levels.
As you can see from Figure 8.8, by default the Input levels are set
to 0, 1.00, and 255. In other words, black has a value of zero, the
gamma (or luminance, or midtones) of the image is 1.00, and white
is set to 255. By adjusting any of these numbers, you change what is
considered black and white and can adjust the luminance.
Under most circumstances, you want the image data to extend
from one end of the chart to the other, maximizing the tonal range
in the image. If, as you may frequently fi nd, a photo has the bulk
of its data at one end or at the center, the result is an image that
doesn’t have the full impact that it should. Figure 8.9 shows an
example of this. The original image is underexposed, with most
of the data in the lower half of the histogram.
By moving the highlight slider to the right side of the image data,
the tonal range of the image is spread out across the entire range,
resulting in the photo shown in Figure 8.10.

170 Chapter Eight
This adjustment has created some exposure problems in the
midtones, however, and as you can see in Figure 8.10 they’re a
little too light. To correct this, I drag the gamma, or midpoint,
slider down to restore some contrast and shadow detail to the
image, as shown in Figure 8.11.
Figure 8.9 This image is underexposed with much of the image data on the lower end of the histogram.
Figure 8.10 After adjusting the highlights there is more detail seen, but the midtones need correction.
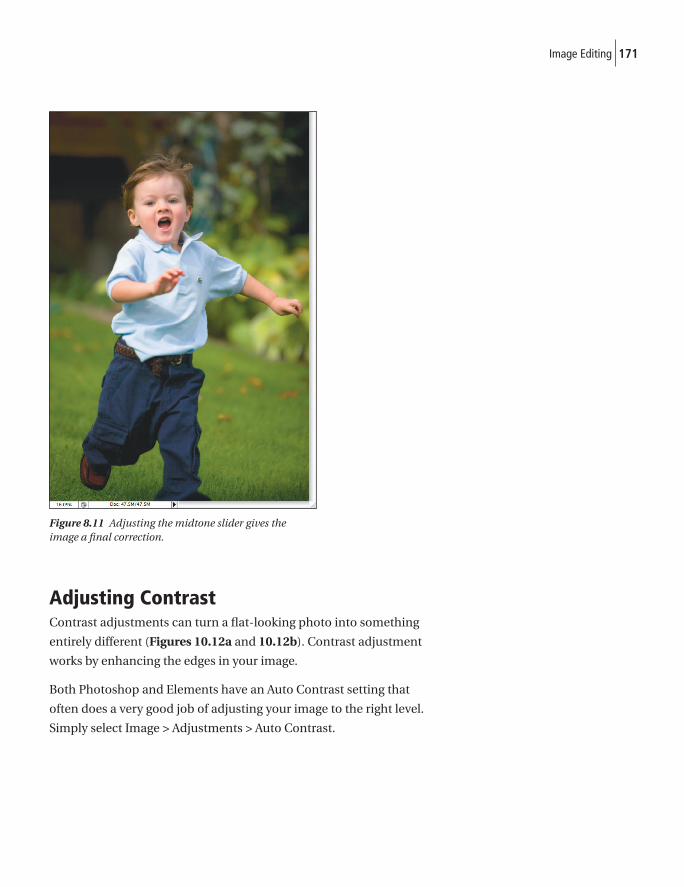
171Image Editing
Figure 8.11 Adjusting the midtone slider gives the image a fi nal correction.
Adjusting ContrastContrast adjustments can turn a fl at-looking photo into something
entirely different (Figures 10.12a and 10.12b). Contrast adjustment
works by enhancing the edges in your image.
Both Photoshop and Elements have an Auto Contrast setting that
often does a very good job of adjusting your image to the right level.
Simply select Image > Adjustments > Auto Contrast.
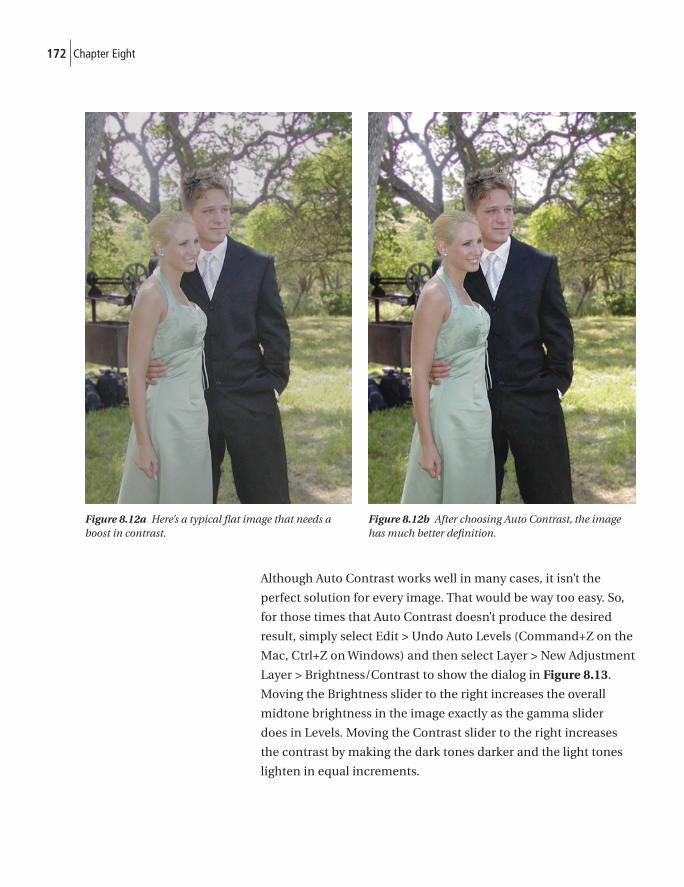
172 Chapter Eight
Although Auto Contrast works well in many cases, it isn’t the
perfect solution for every image. That would be way too easy. So,
for those times that Auto Contrast doesn’t produce the desired
result, simply select Edit > Undo Auto Levels (Command+Z on the
Mac, Ctrl+Z on Windows) and then select Layer > New Adjustment
Layer > Brightness/Contrast to show the dialog in Figure 8.13.
Moving the Brightness slider to the right increases the overall
midtone brightness in the image exactly as the gamma slider
does in Levels. Moving the Contrast slider to the right increases
the contrast by making the dark tones darker and the light tones
lighten in equal increments.
Figure 8.12a Here’s a typical fl at image that needs a boost in contrast.
Figure 8.12b After choosing Auto Contrast, the image has much better defi nition.

173Image Editing
Although this can be a quick fi x in many images, the Levels adjust-
ment allows much more control by enabling you to move the
Shadow and Highlight sliders independently of one another for a
more customized contrast adjustment. In most cases, only a slight
highlight increase is warranted to prevent the loss of highlight
detail. A heftier increase in the shadows can then be applied with-
out further affecting the highlights.
In summary, Brightness/Contrast can provide quick, wholesale
adjustments, but Levels offers the most accurate control.
Figure 8.13 If Auto Contrast doesn’t work the way you want, you can choose the Brightness/Contrast command to make the adjustment manually.
Sharpening Your ImagesIf there’s one thing about editing digital photos that frustrates
people, it’s how to sharpen them. There are two unwritten truths in
digital photography:
• Every digital photo needs to be sharpened.
• Everyone oversharpens their images until they learn how to do
it correctly.
Luckily, I’m going to teach you how to get past truth number two.
Unsharp Mask explainedThe term Unsharp Mask is often confusing. If you came from
a traditional fi lm and darkroom background, you’re familiar
with the process of masking during development. But for digital
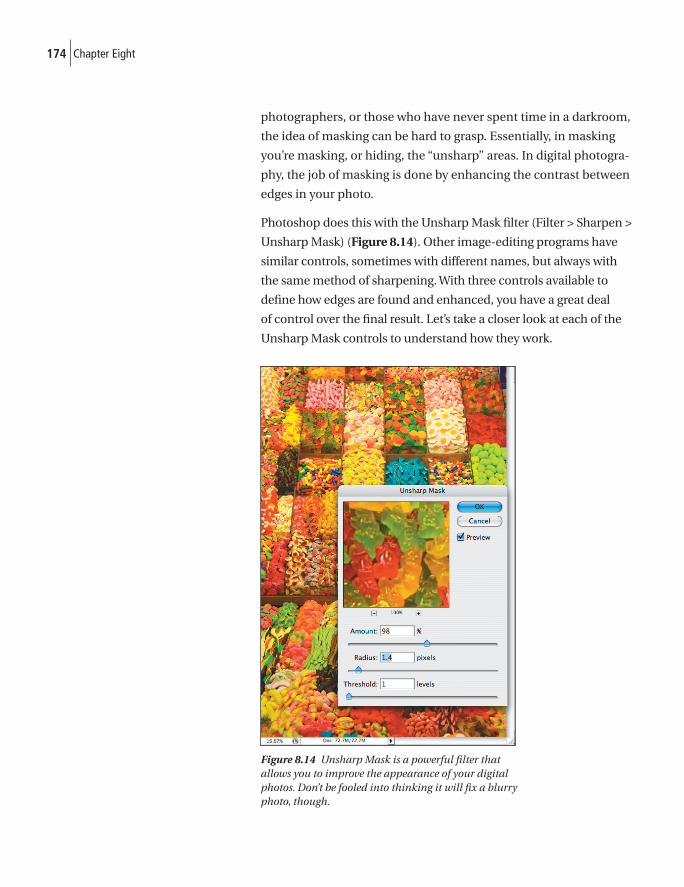
174 Chapter Eight
photographers, or those who have never spent time in a darkroom,
the idea of masking can be hard to grasp. Essentially, in masking
you’re masking, or hiding, the “unsharp” areas. In digital photogra-
phy, the job of masking is done by enhancing the contrast between
edges in your photo.
Photoshop does this with the Unsharp Mask fi lter (Filter > Sharpen >
Unsharp Mask) (Figure 8.14). Other image-editing programs have
similar controls, sometimes with different names, but always with
the same method of sharpening. With three controls available to
defi ne how edges are found and enhanced, you have a great deal
of control over the fi nal result. Let’s take a closer look at each of the
Unsharp Mask controls to understand how they work.
Figure 8.14 Unsharp Mask is a powerful fi lter that allows you to improve the appearance of your digital photos. Don’t be fooled into thinking it will fi x a blurry photo, though.
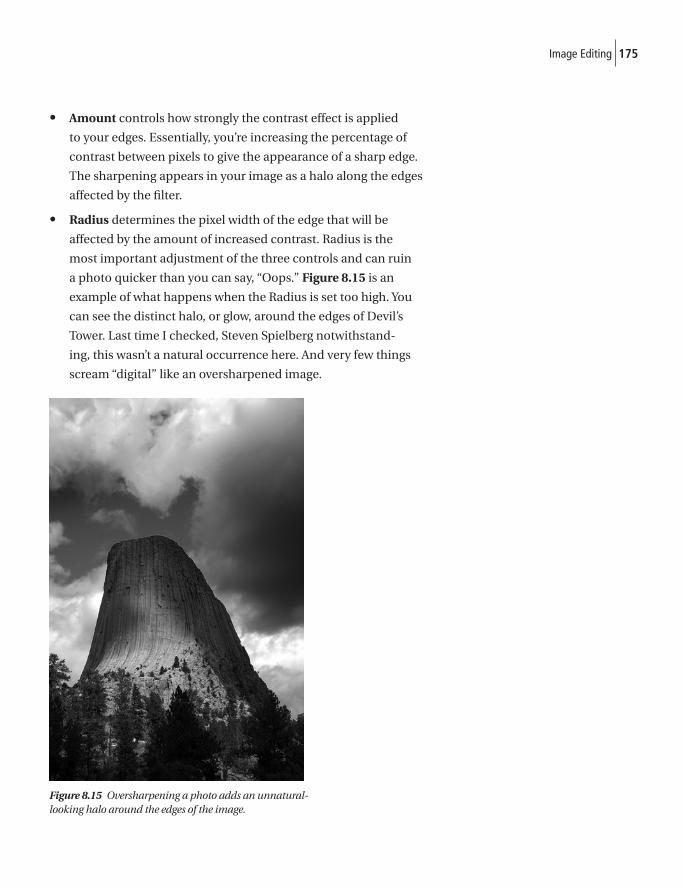
175Image Editing
• Amount controls how strongly the contrast effect is applied
to your edges. Essentially, you’re increasing the percentage of
contrast between pixels to give the appearance of a sharp edge.
The sharpening appears in your image as a halo along the edges
affected by the fi lter.
• Radius determines the pixel width of the edge that will be
affected by the amount of increased contrast. Radius is the
most important adjustment of the three controls and can ruin
a photo quicker than you can say, “Oops.” Figure 8.15 is an
example of what happens when the Radius is set too high. You
can see the distinct halo, or glow, around the edges of Devil’s
Tower. Last time I checked, Steven Spielberg notwithstand-
ing, this wasn’t a natural occurrence here. And very few things
scream “digital” like an oversharpened image.
Figure 8.15 Oversharpening a photo adds an unnatural-looking halo around the edges of the image.
176 Chapter Eight
• Threshold defi nes what constitutes an edge by determining
how much difference in tonal value is required between adja-
cent pixels for them to be considered an edge. A low setting of 3
is adequate for most images and means that any adjoining pix-
els with a difference in tonal value of 3 or more will be consid-
ered an edge that will have contrast applied to it for sharpening.
A higher setting requires the fi lter to look for a greater difference
in tonal values between adjacent pixels and reduces the num-
ber of edges, resulting in less overall sharpening. Threshold val-
ues range from 0-255, with 0 requiring no tonal difference (all
pixels are edges) and sharpening applied to the entire image.
With a setting of 255, no pixels qualify as an edge, and the image
receives no sharpening at all.
Now, by themselves these controls aren’t hard to understand or
master. It’s the interaction among them that can lead to hair loss
and increased stress. You see, changing Radius affects how strongly
Amount appears, and adjusting Threshold can magnify or reduce
the effect of both Amount and Radius. Luckily, the controls are
presented in the general order of use. You will typically make
adjustments to Amount fi rst, to get a rough value for how much
sharpening to apply to the photo. Then, by adjusting Radius, you
control how prominent that sharpening is. Finally, you can fi ne
tune the results with the Threshold control.
The sharpening process in actionSharpening differs based on the intended output—including size and
media. It makes sense then that you don’t want to apply sharpening to
your fi le until all other editing tasks, including resizing, are completed.
In Figure 8.16, you see an original image with no sharpening
applied. Edges are soft, and detail tends to blur together slightly,
giving the entire image the appearance of being a bit out of focus.
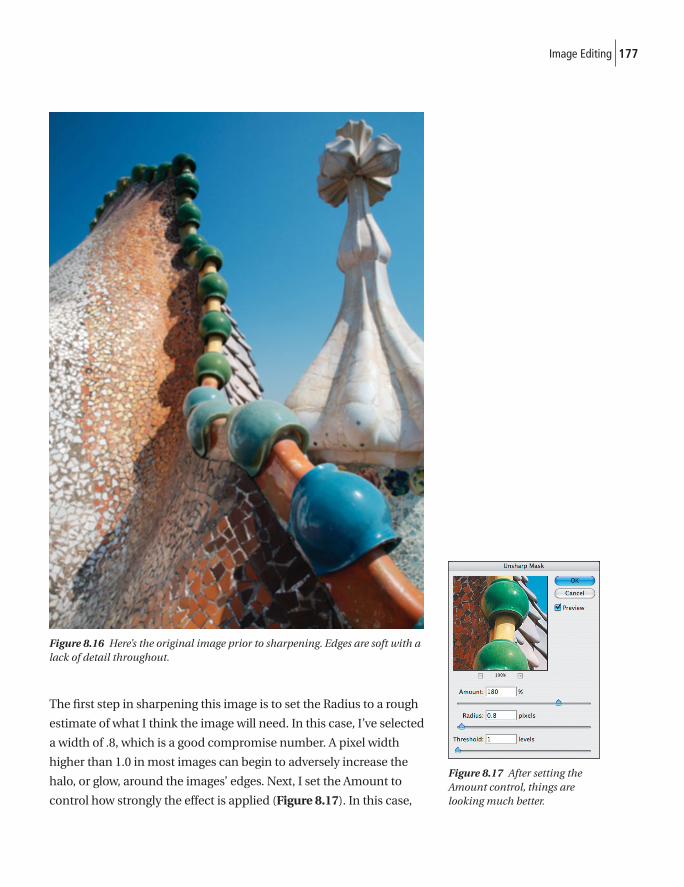
177Image Editing
Figure 8.16 Here’s the original image prior to sharpening. Edges are soft with a lack of detail throughout.
The fi rst step in sharpening this image is to set the Radius to a rough
estimate of what I think the image will need. In this case, I’ve selected
a width of .8, which is a good compromise number. A pixel width
higher than 1.0 in most images can begin to adversely increase the
halo, or glow, around the images’ edges. Next, I set the Amount to
control how strongly the effect is applied (Figure 8.17). In this case,
Figure 8.17 After setting the Amount control, things are looking much better.
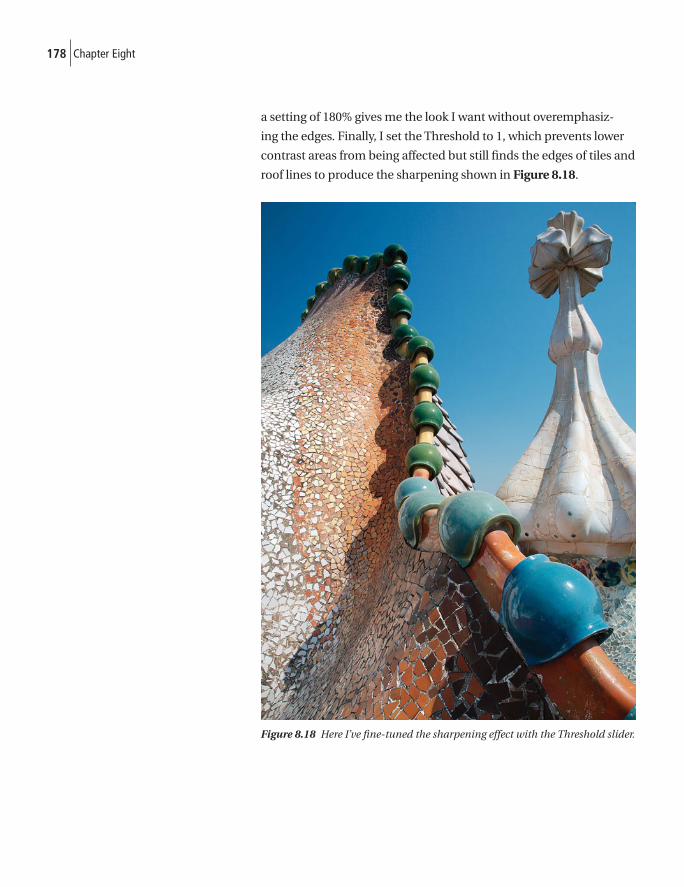
178 Chapter Eight
a setting of 180% gives me the look I want without overemphasiz-
ing the edges. Finally, I set the Threshold to 1, which prevents lower
contrast areas from being affected but still fi nds the edges of tiles and
roof lines to produce the sharpening shown in Figure 8.18.
Figure 8.18 Here I’ve fi ne-tuned the sharpening effect with the Threshold slider.
179Image Editing
A few sharpening guidelinesAlthough every image situation is unique, there are some general
guidelines that will help you with using the sharpening tools. I go into
these in great detail in my book Print Like a Pro (Peachpit Press, 2006),
where I have an entire chapter devoted to the magic of sharpening.
• People are soft. People don’t need to look as sharp as other sub-
jects. Lower Radius and Amount settings are better when doing
portraits. Particularly with women and children, you normally
want to avoid enhancing contrast in the skin. The only key ele-
ment that you should be going for is sharpness in the eyes. If your
software supports it, select the eyes and sharpen them separately.
• High detail, low radius. Highly detailed images work best
with low Radius settings in the range of .4 to 1.0, and a higher
Amount setting in the 200%–275% range. Keeping the Threshold
at a low setting of 0–3 is normally the best choice here.
• Low detail, high radius. Images with low detail, or ones that you
want to avoid strong edges in, such as portraits, require higher
Radius setting, often in the 2–4 range. Conversely, you want to
lower the Amount to 75–150% on average to avoid overempha-
sizing the edges. Increasing the Threshold setting to a range of
7–12 is typical for this type of image.

This page intentionally left blank
In this appendix, I’ve compiled a list of companies and products
that you should fi nd useful as you begin to explore the world of
digital SLR photography and image editing. This list is by no means
complete, (that would be a book of its own!), but is a compilation of
what I feel are some of the best products in their categories.
CamerasCanon and Nikon are the two giants in the fi eld, but there are several
other quality dSLRs that you may want to look at.
Canonwww.canon.com
1-800-OK-CANON (general information)
1-800-828-4040 (support number)
One Canon Plaza
Lake Success, NY 11042
Canon offers a complete line of cameras, lenses, fl ashes, and other
accessory products as well as photo printers.
Nikonwww.nikonusa.com
1300 Walt Whitman Road
Melville, NY 11747
Nikon has a complete line of cameras, lenses, fl ashes, and other
accessory products and scanners.
A Resources

182 Appendix A
Olympuswww.olympusamerica.com
1-888-553-4448
3500 Corporate Parkway
Center Valley, PA 18-34
Olympus is the primary maker of 4/3 camera systems, including a
full line of lenses, fl ashes, memory cards, and photo printers.
Pentaxwww.pentax.com
1-800-877-0155
600 12th Street Suite 300
Golden, CO 80401
Pentax has several models of digital SLRs along with a wide line-up of
lenses. You’ll also fi nd fl ashes, light meters, and other accessories.
Samsungwww.samsungcamera.com
1-201-902-0347
40 Seaview Drive
Secaucus, NJ 07094
A Pentax by any other name would likely be the Samsung Digimax.
Both camera systems offer the same features and accessories.
Sigmawww.sigmaphoto.com
1-800-896-6858
15 Fleetwood Court
Ronkonkoma, NY 11779
Sigma makes the SD series of digital SLRs which use the Foveon
sensor (covered in Chapter 1). They also have a complete line of
lenses and fl ash accessories.

183Resources
Sonywww.sonystyle.com
1-877-865-SONY
A year ago, this would have been Konica-Minolta. That highly
respected brand is now marketed by Sony under the Alpha label.
A full line-up of lenses, fl ashes, and accessories are available for
the Alpha.
Lenses and FiltersThe camera body is just the beginning of your journey in digital
SLR photography.
Lensbabieswww.lensbabies.com
1-877-536-7222
516 SE Morrison St. Suite M4
Portland, OR 97214
Possibly the most fun you’ll have with a lens on your camera.
Lensbabies are available for a variety of camera mounts.
Sigmawww.sigmaphoto.com
1-800-896-6858
15 Fleetwood Court
Ronkonkoma, NY 11779
In addition to cameras, Sigma has a wide range of lenses for differ-
ent brands of cameras, including Canon, Nikon, and Olympus.

184 Appendix A
Tamronwww.tamron.com
1-631-858-8400
10 Austin Blvd.
Commack, NY 11725
Tamron has a full line of lenses for Canon, Nikon, Pentax, and Sony
(Konica-Minolta).
Tokinawww.thkphoto.com
1-800-421-1141
2360 Mira Mar Ave.
Long Beach, CA 90815
Tokina lenses are available for Canon, Nikon, Pentax, and Sony
(Konica-Minolta).
Singh-Raywww.singh-ray.com
1-800-486-5501
221 SE Highway 31
Arcadia, FL 34266
Far and away the highest quality fi lters I’ve ever used. They’re
pricey, but you can’t beat them for optical goodness.
Hoyawww.thkphoto.com
1-800-421-1141
2360 Mira Mar Ave.
Long Beach, CA 90815
Good quality fi lters at a reasonable price. I’m especially fond of
their IR fi lters.

185Resources
B+Wwww.schneideroptics.com
1-800-228-1254
7701 Haskell Ave.
Van Nuys, CA 91406
Another high-quality line of fi lters, very popular with pro photo-
graphers everywhere.
Tiffenwww.tiffen.com
1-631-273-2500
90 Oser Avenue
Hauppauge, NY 11788
Affordable fi lters, along with a wide range of special-effects fi lters.
AccessoriesThe more you get into photography, the more stuff you seem to
need. Here are some good places to get that stuff.
Bogen Manfrottowww.bogenimaging.us
1-201-818-9500
565 East Crescent Avenue
Ramsey, NJ 07446
A full line-up of camera bags, tripods, lightmeters, fl ashes, and more.
Kirk Enterpriseswww.kirkphoto.com
1-800-626-5074
333 Hoosier Dr.
Angola, IN 46703
Camera accessories, tripods, tripod heads.

186 Appendix A
Really Right Stuffwww.reallyrightstuff.com
1-888-777-5557
205 Higuera St.
San Luis Obispo, CA 93401
Tripods, tripod heads, mounting plates, and panoramic tools.
Gitzowww.bogenimaging.us
1-201-818-9500
565 East Crescent Avenue
Ramsey, NJ 07446
High end tripods, including lightweight carbon fi ber models.
Velbonwww.velbon-tripod.com
1-973-428-9800
ToCAD America
300 Webro Rd.
Parsippany, NJ 07054
Tripods and tripod heads.
Giottowww.giottos.com
1-973-808-9010
16 Chapin Road
Pine Brook, NJ 07058
Tripod heads and sensor- and lens-cleaning accessories.
Photographic Solutionswww.photosol.com
Sensor Swab cleaning products.

187Resources
Visible Dustwww.visibledust.com
The Sensor Brush is my favorite for getting rid of dust from the sensor.
Memory CardsOh, you think you got one that’ll be big enough. Eventually you’ll
think again.
Lexarwww.lexar.com
1-510-413-1200
47300 Bayside Parkway
Fremont, CA 94538
Compact Flash, SD, xD, and memory card readers.
SanDiskwww.sandisk.com
1-408-801-1000
601 McCarthy Blvd.
Milpitas, CA 95035
Compact Flash, SD, xD, Memory Stick, and memory card readers.
Kingston Technologywww.kingston.com
1-877-546-4786
17600 Newhope St.
Fountain Valley, CA 92708
Compact Flash, SD, memory card readers, and portable media.
188 Appendix A
ATPwww.atpinc.com
1-408-732-5000
750 North Mary Ave.
Sunnyvale, CA 94085
Compact Flash, SD, xD, and memory card readers.
Delkin Deviceswww.delkin.com
1-800-637-8087
13350 Kirkham Way
Poway, CA 92064
Compact Flash, SD, xD, Memory Stick, card readers, batteries, and
LCD shades.
MagazinesMagazines are a terrifi c way to stay current with everything
photographic.
PC Photowww.pcphotomag.com
1-310-820-1500
Werner Publishing Corporation
12121 Wilshire Blvd., 12th Floor
Los Angeles, CA 90025-1176
One of my favorite general digital photography magazines.
Popular Photographywww.popphoto.com
1-212-767-6000
1633 Broadway
New York, NY 10019
A good all-around magazine covering photography.
189Resources
Outdoor Photographerwww.outdoorphotographer.com
1-310-820-1500
Werner Publishing Corporation
12121 Wilshire Blvd., 12th Floor
Los Angeles, CA 90025-1176
The best magazine for outdoor photography.
Digital Photo Prowww.digitalphotopro.com
1-310-820-1500
Werner Publishing Corporation
12121 Wilshire Blvd., 12th Floor
Los Angeles, CA 90025-1176
Geared towards the pro and more advanced shooter.
Shutterbugwww.shutterbug.com
1-321-269-3212
1419 Chaffee Drive Suite 1
Titusville, FL 32780
Excellent coverage of a wide range of photo topics.
American PHOTOwww.popphoto.com/americanphoto
1-212-767-6000
1633 Broadway
New York, NY 10019
Another fi ne magazine covering a range of photography topics.

190 Appendix A
Web SitesHere are a number of Web sites that you’ll fi nd interesting and use-
ful. The Web is a very dynamic place, so by the time you read this,
some may be gone, and there will certainly be new sites to explore.
www.fredmiranda.comPhoto reviews and a very active community of photographers.
www.photoworkshop.comGreat info on this site, especially for Canon users. Full access
requires a subscription.
www.dpreview.comVery active community of posters, and up-to-date product reviews.
www.photographyblog.comAn English site, with good reviews and updated news.
www.photomigrations.comDevoted to nature and wildlife photographers, image critiques,
forums, and monthly articles.
www.nanpa.orgThe home of the North American Nature Photographers Association.
www.microsoft.com/prophotoMicrosoft has several photo related web sites, this one is the best of the
bunch and always has topics of interest to a wide variety of people.
www.joncanfi eld.comNeed I say more? I had to include my own site!

191Resources
InstructionSometimes the fastest way to get the best information is straight
from the horse’s mouth.
BetterPhoto.comwww.betterphoto.com
Without a doubt, the premier online photography instruction site
with lessons on all aspects of digital photography.
Lepp Institutewww.leppinstitute.com
Three- and fi ve-day classroom sessions with some of the top
photographers and instructors in the country.
Santa Fe Workshopswww.sfworkshop.com
A wide range of courses on digital and fi lm photography in a
beautiful location.
New York Institute of Photographywww.nyip.com
The original correspondence photography school, and still one
of the best.
Great American Photography Workshopswww.gapweb.com
Great instructors in some of the most beautiful locations in
the country.

This page intentionally left blank
AE Auto-exposure.
AF Auto-focus.
ambient light In any scene ambient is natural light.
aperture An opening within the lens that controls how much light
reaches the sensor. Apertures come in f-stops, such as f/5.6 or f/22.
Each successive f-stop, as the number goes up, decreases the light
reaching the sensor by half. Aperture also affects exposure and
depth of fi eld. The lower the aperture number, the faster the lens.
Aperture Priority mode An automatic mode available in most
dSLR cameras in which you choose the aperture and the camera
chooses the correct shutter speed.
artifacts Unwelcome visual distortions in an image, such as
blooming, chromatic aberrations, noise, and JPEG compression.
aspect ratio A measurement of the relation between the width and
the height of an image. Most digital cameras (along with 35mm
cameras) use a 3:2 aspect ratio, though other ratios, such as 4:3 and
16:9, are also found.
blooming When overexposed pixels affect neighboring pixels,
causing a brightening type of distortion.
brightness The intensity of light shown in an image.
buffer The camera’s onboard memory, available for storing images
before the data writes to a memory card.
B Glossary
194 Appendix B
CCD Charge Coupled Device, a type of sensor used in dSLR
cameras. Light enters the camera and strikes the CCD, and the
CCD converts the light into a digital image. In a separate part of
the camera, the image undergoes digital-to-analog conversion.
CCD sensors are generally more expensive than CMOS sensors.
CMOS Complementary Metal Oxide Semiconductor, a type of
sensor used in dSLR cameras. Cameras with CMOS sensors are
generally less expensive than those with CCD sensors. CMOS works
in a similar way to CCD, but does more of the computational work
at the sensor, rather than in a different part of the camera.
clipping Image data that is lost due to pushing pixels past their
exposure limits, such as shadow clipping and highlight clipping.
contrast The gradation of tones from darkest to lightest in an image.
continuous shooting speed How many images per second the
camera is capable of capturing.
depth of fi eld The area of an image measured from the nearest
point to the camera to the farthest point away that is in focus. A
large depth of fi eld, which is determined by the aperture, means
much, if not all, of the image is in focus; small depth of fi eld means
only a certain area of the image is in focus.
depth-of-fi eld preview Closes the aperture down to the selected
setting to let you see what areas of your scene will be in focus when
you take the picture.
digicam Point-and-shoot digital camera.
DPI Dots per inch, a measurement of inkjet printer resolution.
The larger the DPI, the higher the resolution of the printed image.
Not to be confused with PPI, or pixels per inch.
dSLR Digital single-lens refl ex, a type of digital camera that is
the subject of this book. dSLRs are digital versions of 35mm single-
lens refl ex cameras, the most popular kind of camera used for
professional-quality photography.

195Glossary
exposure The amount of light that the camera allows to reach the
sensor, controlled by aperture and shutter speed.
exposure compensation Used to adjust for dark or bright subjects.
Modifi es the automatic exposure by adding or subtracting light
from the exposure setting.
f-stop A series of preset apertures, stated in fractures such as f/5.6
and f/8. As the numbers go up, each f-stop reduces the width of the
aperture by half.
focal length Measured in mm (millimeter), the distance from the
optical center of the lens to the sensor when the image is “in focus.”
The shorter the focal length, the larger the fi eld of view.
full-frame sensor An image sensor on a dSLR camera that is the
same size as a frame of 35mm fi lm, or 24mm x 36mm.
grayscale An image made up solely of black and white tones.
highlights The lightest pixels in a digital image.
histogram A graph of the distribution of colors in an image, with
the colors graphed horizontally (x-axis) and the amount of each
color represented on the y-axis.
hue What we usually think of as color. A color’s hue is that color
aspect that makes it different from other colors.
image editor A program, such as Adobe Photoshop or other
proprietary ones that come with most cameras, that allows many
aspects of a digital image to be edited.
image sensor The digital equivalent of fi lm. A sensor collects the
photons that pass through the camera and creates an image of
pixels from it.
196 Appendix B
ISO In fi lm photography, ISO (International Standards
Organization) is the rating of the fi lm’s speed, such as 100 speed,
400 speed, and so on. The higher the fi lm speed, the more sensitive
it is to light, but the grainier the picture will be. dSLR cameras have
kept ISO ratings but have applied them to the sensitivity of the sen-
sor. Increasing the ISO setting allows for photography in lower light
situations, but again, with grainier results.
JPEG Joint Photographic Experts Group. JPEG is thought of as a fi le
format for digital images, but is more correctly defi ned as a method
of compression in which data is discarded to make the fi le smaller.
luminance A measure of the intensity of light in an image, arrived
at by averaging the lowest RGB values and the highest ones.
maximum burst How many images you can capture before the
camera pauses to write the images to a memory card.
megapixel One million pixels. The more pixels, the higher the
potential resolution of a camera.
memory card A small card used to store the images captured by
your camera. Sony Memory Stick, CompactFlash (CF), Secure Digital
(SD), and the xD-Picture Card (xD) are all common memory cards.
midtone A tonal value that lies halfway between an image’s
shadows and its highlights.
noise The digital equivalent of grain in fi lm, caused by making the
image sensor too sensitive.
PPI Pixels per inch in a digital image. The higher the PPI, the better
the image quality. 300 ppi is a very common resolution that produces
high-quality prints. Not to be confused with DPI.
pan To move the camera sideways to follow a moving object.
photodiode The element in an image sensor that collects the light
and converts it into electrons.
197Glossary
photosite The union of a pixel and its color fi lter on an image sensor.
pixel Short for picture element. A single point in a digital image that
is assigned a specifi c tone and color. Millions of pixels enable smooth
transitions of tone and color to produce accurate renditions of an
image. The term also refers to points of light on a monitor screen that
make up a digital image.
prime lens A lens with a fi xed focal length.
raw An image format in which no processing is done by the camera;
a raw image is a recording of the raw light values that hit the sensor.
recycling time The amount of time it takes the fl ash to prepare for
a second image.
resolution The number of pixels in an image measured in PPI
RGB Red, green, and blue. Digital-imaging systems, such as digital
cameras, use combinations of pixels in these three colors to make
all other colors.
saturation A measure of the intensity of color in an image. High
saturation means the image has less gray in its tones; low saturation
images have a lot of gray.
shadow The darkest parts of an image.
Shutter Priority mode An automatic mode available in most dSLR
cameras in which you choose the shutter speed and the camera
chooses the correct aperture.
shutter speed The duration that light is allowed to reach the
sensor, measured in fractions of a second, such as 1/60. A fast
shutter speed means that the shutter, which normally blocks light
from reaching the sensor, is opened for a very brief period. Longer
shutter speeds leave the shutter open for longer, allowing more
light to reach the sensor.
tilt The movement of the front of the camera as it is angled up
and down.

198 Appendix B
white balance A variety of settings that allow the camera to
compensate for different sources of light illuminating the
scene (daylight, shade, cloudy, twilight, tungsten light, fl ash,
and custom).
zoom lens A lens with an adjustable focal length covering all
ranges.
3:2 aspect, 194:3 aspect, 198-bit color, 4212-bit color, 4216:9 aspect, 19
Aaccessories, 185–187adjustment layers, 163–165, 167adjustment sliders, 134–141Adobe Bridge feature, 122, 125–130, 156American PHOTO, 189Amount control, 175–179anti-aliasing fi lter, 141anti-shake feature, 16aperture, 28, 46, 193Aperture Priority mode, 15, 27, 74–76,
79, 193aperture settings, 27–31Aperture Value (AV), 27artifacts, 14, 193aspect ratio, 19, 193ATP Electronics, 188Auto Color command, 162–163Auto Color for Skin Tones command, 163Auto Contrast command, 171–173auto correction, 162–163auto-exposure, 193auto-focus, 193Auto Levels command, 167–168, 172Auto preset, 20Auto settings, Camera Raw, 134–135, 137Auto Smart Fix command, 163automatic fl ash, 23–24automatic mode, 23–27AV (Aperture Value), 27
BBacklight mode, 26–27backlighting, 73–74backlit scenes, 22, 73–74balance
color. See color balancewhite, 20, 135, 161, 162, 198
batch conversions, 155–159Batch Rename command, 122–124Bayer pattern, 12BetterPhoto.com site, 191bit depth, 132black and white conversions, 114–119,
153–155black-and-white fi lters, 110–111, 185black-and-white photos, 40–41black points, 150–152blooming, 13, 14, 193blurred background, 25, 37, 74blurred images
sharpening and, 174, 176water, 31, 35, 108
blurred motion, 32, 36, 96Bogen Manfrotto, 185bounce fl ash, 84–87bracketing, 6, 22, 68–69Bridge feature, 122, 125–130, 156bright scenes, 71–72brightness
adjusting, 154, 172–173described, 193
Brightness/Contrast command, 172–173
Brightness slider, 139–140, 172–173Brown, Russell, 158–159buffer, 5–6, 193buffer sizes, 5–6, 8bulb setting, 76–77B+W fi lters, 185
Ccable release, 76Calibrate tab, 149–150camera controls, 23–44
aperture settings, 27–31automatic mode, 23–27Camera Raw, 131–133focus modes, 43–44image capture options, 41–43ISO settings, 39–41Program mode, 23–27
Index

200 Index
JPEG images, 161–162Tint slider, 135–136
Color Balance dialog box, 164–165color casts, 161–162, 165color channels, 114–117color correction, 161–167color fi lters, 3, 19, 100–101color noise reduction, 137, 141, 145–146Color Noise Reduction slider, 137, 141,
145–146color temperature, 135, 136, 161–162CompactFlash (CF), 6compensation, 66–68Complementary Metal Oxide
Semiconductor. See CMOScompression, 3, 42, 193, 196computer interface, 20Continuous Focus mode, 43–44continuous shooting speed, 194contrast
adjusting, 140, 155, 171–173Auto Contrast command, 171–173black-and-white images, 155curve adjustments, 151–152described, 194image edges, 174–176, 179
Contrast slider, 140, 172Crop tool, 133cross processing, 109–110curve adjustments, 150–152Curve tab, 150–152Cyan-Red slider, 164
Ddark images, 69–71data sheets, 19–22Daylight setting, 161Delkin Devices, 188Density slider, 114depth of fi eld
aperture and, 28, 46, 51controlling, 28–31described, 194focal length and, 48, 50, 56, 58Landscape mode, 24, 75Macro mode, 26Portrait mode, 25, 74Sport mode, 25
depth-of-fi eld preview, 21, 194Details tab, 141–147
camera controls (continued)scene modes, 24–27shutter speed settings, 31–38
Camera Raw. See also raw fi lesadjustment sliders, 134–141Auto settings, 134–135, 137basics, 131–134batch conversions, 155–159Calibrate tab, 149–150Curve tab, 150–152Details tab, 141–147Highlights option, 132Lens tab, 147–149Luminance Smoothing control,
137, 142–144Preview area, 131–132saturation and, 141Shadows option, 132Sharpness control, 141–142toolbars in, 133–134
Camera Raw controls, 131–133cameras, fi lm, 47. See also digital camerasCanon cameras, 4, 181captures, raw, 41–42CCD (Charge Coupled Device), 10, 194CCD sensors, 10–12, 194center-weighted metering, 16, 63, 73CF (CompactFlash), 6Channel Mixer command, 114–117Charge Coupled Device. See CCDchromatic aberration, 13, 14, 45,
147–149, 193clipping, 132, 137–139, 194close-up photography, 78–79CMOS (Complementary Metal Oxide
Semiconductor), 10–11, 194CMOS sensors, 10–11, 194color
8-bit, 4212-bit, 42auto correction, 162–163enhancing, 100–101hue, 165–167RGB, 3, 197saturation, 97, 165–167
color balanceadjusting manually, 163–165adjusting with Calibrate tab,
149–150auto correction, 162–163
201Index
diaphragm, 46digicams, 2–3, 10, 13–14, 194digital cameras. See also dSLR
accessories for, 185–187controls on. See camera controlsdata sheets for, 19–22entry-level, 4–5features, 15–18fi lters for. See fi ltersinterface, 20lenses for. See lensesmid-level, 5–7point-and-shoot, 2, 4price of, 4–10pro-level, 7–10“prosumer,” 5–7resources for, 181–188weight of, 4, 8
digital image sensor, 2digital noise. See noiseDigital Photo Pro, 189digital photography. See photographydigital SLR. See dSLRdigital-specifi c lenses, 47DPI (dots per inch), 194dpreview.com site, 190dSLR (digital SLR). See also digital cameras
basics, 1–22costs, 4–10described, 194
dSLR sensor, 62, 65dust, removing, 16–17dust brushes, 187dynamic range, 3, 12, 14
Eedges, sharpening, 174–179editing. See image editingeffects. See special effectsEV (exposure value), 65–66evaluative metering, 62Expo Disc, 161exposure
adjusting with Levels fi lter, 169–170auto-exposure, 193backlighting, 73–74basics, 64–66choosing, 64–74clipping, 132, 137–139, 194dark subjects, 69–71
described, 195light subjects, 71–72long, 22raw images, 132, 137–139, 145
exposure bracketing, 6, 22, 68–69exposure compensation, 22, 66–69, 195exposure lock button, 70Exposure slider, 137–138exposure value (EV), 65–66external fl ash, 23, 84–91eyepiece shutter, 21
Ff-stops, 28, 96, 193, 195fi les. See also images
JPEG, 3, 20raw. See raw fi lessize of, 20tagging, 124–131
fi ll fl ash, 5, 25, 73fi lm camera, 47fi lter grid, 2fi lters, 93–108. See also special effects
anti-aliasing, 141black-and-white, 110–111, 185color, 3, 19, 100–101infrared, 102–103, 112neutral-density, 96, 103–108Nik, 110–113overview, 93Photoshop, 113–114polarizing, 94–99, 108resources for, 183–185RGB, 19Singh-Ray, 103–105, 108, 184soft-focus, 103–105Unsharp Mask, 173–176UV, 93–94
FireWire interface, 20FireWire port, 20fi reworks, 77fi sheye lenses, 52–53fl ash
automatic, 23–24bounce, 84–87built-in, 5, 6, 10, 25, 26–27, 81–83external, 23, 84–91fi ll, 5, 25, 73freezing action, 32inverse square law, 82
202 Index
fl ash (continued)remote, 87–88slave fl ash units, 87–88sync modes, 88–91
fl ash photography, 81–91fl ash synchronization, 6fl ash units, 18focal length, 45–50, 54, 195focus
auto-focus, 193soft, 103–105, 179
focus modes, 43–44formats
image, 19–20JPEG, 3, 19, 42–43, 196raw, 3, 19–20, 41–42, 197recording, 19–20
Foveon X3 sensor, 19fredmiranda.com site, 190freezing motion, 32–34front curtain, 89–90full-frame sensors, 8, 195
GGiotto accessories, 186Gitzo tripods, 186glow, 13, 175, 177GN (guide number), 82graduated neutral density, 106–107grain, fi lm, 11, 22, 40, 118grayscale conversions, 114–115grayscale images, 3, 153, 195Great American Photography
Workshops, 191guide number (GN), 82
Hhalos, 13, 175, 177highlight clipping, 132–133, 194highlights, 66, 67, 170, 195Highlights option, 132histogram
Brightness slider, 139–140Contrast slider, 140described, 195exposure compensation, 67, 68
honeycomb metering, 61Hoya fi lters, 184hue, 165–167, 195Hue/Saturation dialog, 166–167
IIEEE 1394 interface, 20image capture options, 41–43image editing, 161–179
basic color correction, 161–167brightness adjustments, 139–140,
154, 172–173contrast adjustment, 140, 171–173cropping images, 133exposure adjustments, 169–170level adjustment, 167–171luminance smoothing, 137, 142–144rotating images, 133sharpening. See sharpening
imagesstraightening images, 133–134
image editor, 195image format, 19–20image-processing parameters, 20Image Processor command, 158–159image sensors, 2, 10–15, 195images. See also fi les
black-and-white, 40–41blurred. See blurred imagescropping, 133dark, 69–71grayscale, 3, 153JPEG, 3, 161–162, 166light, 71–72raw, 3rotating, 133selecting by keyword, 125–130selecting by rating, 130–131sharpening. See sharpening
imagesstraightening, 133–134test, 66
infrared (IR) fi lters, 102–103, 112infrared plug-ins, 110–113Infrared Thermal Camera fi lter, 113Input levels, 169instruction, 191interface, camera, 20International Organization for
Standardization. See ISOinverse square law, 82IR. See infraredISO ratings, 196ISO settings, 11, 39–41ISO speed range, 21–22

203Index
Jjoncanfi eld.com site, 190JPEG compression, 3, 42, 193, 196JPEG fi les, 3, 20JPEG format, 3, 19, 42–43, 196JPEG images, 3, 161–162, 166JPEG settings, 42–43
Kkeywords, 124–130Kingston Technology, 187Kirk Enterprises, 185kit lenses, 4, 47
LLandscape mode, 24, 75–76landscape photography, 18, 51, 75–76layer masks, 162layers, adjustment, 163–165, 167Layers palette, 164LCD display, 61lens hood, 93Lens tab, 147–149Lensbaby lenses, 58–60, 183lenses, 45–60
basics, 45–46choosing, 17–18cost of, 4diaphragm in, 28digital-specifi c, 47fi sheye, 52–53fi xed-length, 45interchangeable, 2kit, 4, 47Lensbaby, 58–60, 183macro, 57–58prime, 45, 197resources for, 183–185Sigma, 183specialty, 57–60standard, 54Tamron, 184teleconverters, 60telephoto, 46, 55–57third-party, 18Tokina, 184wide-angle, 48–53, 148zoom, 45, 47–48, 198
Lepp Institute, 191levels, adjusting, 167–171
Levels adjustment layer, 163–165Lexar memory cards, 187light images, 71–72light meter, 61lighting. See also highlights
backlit scenes, 22, 73–74daylight, 161intensity of, 3metering modes, 16, 61–64ultraviolet, 94
luminance, 3, 141–144, 196Luminance Smoothing control, 137,
141, 142–144
Mmacro lenses, 57–58Macro mode, 26macro photography, 9, 18, 26, 78–79magazines, 188–189Magenta-Green slider, 164magnifi cation factor, 47magnifi cation level, 21Manual mode, 15matrix metering, 16, 62maximum burst, 196media cards, 6megapixels, 3, 5, 196memory, 5, 193memory cards, 6–7, 19, 187–188, 196metering modes, 16, 61–64microsoft.com/prophoto site, 190Midtone slider, 171midtones
adjusting in Curve tab, 150–152adjusting with Brightness slider, 172adjusting with Contrast slider, 140adjusting with Levels, 167,
170–171adjusting with Shadows slider, 154described, 196
motionblurred, 32, 36, 96emphasizing, 35–36freezing, 32–34panning, 37, 196sports photography, 79–80sync modes, 89–91
Nnanpa.org site, 190Neat Image tool, 147

204 Index
neutral-density fi lters, 96, 103–108New York Institute of Photography, 191night photography, 76–77Nik Dfi ne tool, 147Nik fi lters, 110–113Nikon cameras, 181noise
described, 196ISO settings and, 22, 39, 40overview, 11sensors and, 5, 11
Noise Ninja tool, 147noise reduction
CCD vs. CMOS sensors, 11with Color Noise Reduction slider,
137, 141, 145–146for long exposure, 22with Luminance Smoothing
control, 142–144raw images, 145–147third-party tools for, 147
Noiseware tool, 147
OOlympus cameras, 4, 182Organizer, 126, 128–131Outdoor Photographer, 189Output levels, 169overcast conditions, 97overexposure, 69oversharpening, 175
Ppanning, 37, 196PC Photo, 188Pentax cameras, 182Photo Filter command, 114photodiodes, 10–12, 196Photographic Solutions, 186photography, 61–80
creative techniques, 74–80exposure selection, 64–74fl ash, 81–91instruction in, 191landscape, 18, 51, 75–76macro/close-up, 9, 18, 26, 78–79magazines, 188–189metering modes, 16, 61–64night, 76–77portrait, 74–75
sports, 79–80wildlife, 18, 46, 48, 55, 190
photographyblog.com site, 190PhotoKit Color suite, 109–110PhotoKit plug-ins, 117–118photomigrations.com site, 190photos. See imagesPhotoshop CS2
adjusting brightness, 139–140adjusting contrast, 140–141, 171–173adjusting exposure, 137–139adjustment sliders, 134–141batch conversions, 155–158batch rename feature, 122–124black-and-white conversions,
114–119, 153–155Camera Raw converter, 131–132chromatic aberration, 147–149color balance, 135–136, 149–150color correction, 161–167color noise reduction, 145–147cropping images, 133curve adjustments, 150–152fi lters, 113–114keyword searches, 125–130levels adjustments, 167–171luminance smoothing, 142–144rotating images, 133sharpening images, 141–142,
173–179straightening images, 133–134toolbars, 133–134Vignetting control, 148–149white balance, 135
Photoshop Elementsadjusting brightness, 139–140adjusting contrast, 140–141, 171–173adjusting exposure, 137–139adjustment sliders, 134–141batch rename feature, 122–124Camera Raw converter, 132–133color balance, 135–136color correction, 161–167color noise reduction, 145–147fi lters, 113–114grayscale conversions, 114–115keyword searches, 125–130levels adjustments, 167–171luminance smoothing, 142–144sharpening images, 141–142,
173–179

205Index
toolbars, 133–134white balance, 135
photosites, 2, 3, 10–15, 197photoworkshop.com site, 190Picture Styles mode, 6–7pixels, 2, 3, 5, 197pixels per inch (PPI), 196plug-ins, 110–113, 117–118point-and-shoot cameras, 2, 4polarizing fi lters, 94–99, 108Popular Photography, 188Portrait mode, 25portraits, 74–75, 103–104, 179power consumption, 11PPI (pixels per inch), 196Predictive Auto Focus, 43presets, 20, 135–136, 151–152previews
depth-of-fi eld, 21, 194live, 61raw images, 131–132
prime lenses, 45, 197processing, cross, 109–110Program mode, 23–27Program Priority mode, 15Program Shift mode, 24“prosumer” cameras, 5–7
Qquality, 11, 13, 20, 41–43
RRadius control, 175, 176–177, 179rainy conditions, 97ratings, 124–125, 128, 130–131raw captures, 41–42raw fi les, 121–159. See also Camera Raw
overview, 121–122renaming process for, 122–124selecting, 125–131tagging, 124–131
raw format, 3, 19–20, 41–42, 197raw images
adjustment sliders, 134–141black-and-white conversions,
153–155capturing, 42, 121chromatic aberration, 147–149color balance, 149–150color temperature, 135, 136,
161–162
cropping, 133curve adjustments, 150–152exposure, 132, 137–139, 145image editing and, 3luminance smoothing, 142–144noise reduction, 145–147previewing, 131–132sharpening, 141–142straightening, 133–134
Really Right Stuff, 186rear curtain, 90recording format, 19–20recording medium, 19recycling time, 197red-eye reduction, 83refl ections, 95–96remote shutter release, 76resolution, 5, 11, 197resources, 181–191RGB color, 3, 197RGB fi lter, 19Rotate tools, 133
SSamsung cameras, 182SanDisk memory cards, 187Santa Fe Workshops, 191saturation, 97, 141, 165–167, 197Saturation slider, 141, 150, 153, 166Scene modes, 24–27SD (Secure Digital), 6search feature, 127–131segment metering, 61selenium toning, 118, 119sensors, 10–15
CCD, 10–12, 194CMOS, 10–11, 194digital image, 2dSLR, 62, 65Foveon X3, 19full-frame, 8image, 2, 10–15, 195noise and, 5, 11overview, 12–13photosite size and, 13–15size of pixels on, 5
sepia tones, 7, 118, 119Setting dial, 23shadow clipping, 132–133, 139, 194Shadow Tint control, 149–150shadows, 66, 132, 139, 173, 197

206 Index
Shadows option, 132Shadows slider, 139, 153–154sharpening images, 173–179
guidelines for, 179oversharpening, 175process for, 176–178with Sharpness control, 141–142Unsharp Mask fi lter, 173–176
Sharpness control, 141–142Shiftable Program mode, 24Shutter Priority mode, 15, 30, 31, 79,
80, 197shutter release, 76shutter speed, 31–38, 89, 197Shutterbug, 189Sigma cameras, 182Sigma lenses, 183Singh-Ray fi lters, 103–105, 108, 184single lens refl ex (SLR), 1–2Single Shot Focus mode, 44skin tones, 163slave fl ash, 87–88SLR (single lens refl ex), 1–2soft-focus fi lters, 103–105Soft Ray fi lter, 103–105Sony cameras, 183Sony Memory Stick, 6special effects, 109–119. See also fi lters
black and white conversions, 114–119, 153–155
cross processing, 109–110infrared plug-ins, 110–113
specialty lenses, 57–60specifi cations, 19–22Sports mode, 25, 79, 80sports photography, 79–80spot metering, 63–64, 73standard lenses, 54star trails, 76–77Straighten tool, 133–134Sweet, Tony, 103Synchronize command, 156–157
Ttagging fi les, 124–131Tamron lenses, 184teleconverters, 60telephoto lenses, 46, 55–57temperature, color, 135, 136, 161–162
Temperature slider, 135, 136test images, 66Threshold control, 176, 178, 179Tiffen fi lters, 185tilt movement, 197Time Value mode, 15, 31Tint slider, 135–136Tokina lenses, 184tonal range, 169transfer cell, 10–11tripods, 26, 31, 36, 75, 76Type I cards, 19Type II cards, 19
Uultraviolet light, 94Undo Auto Levels command, 172Unsharp Mask fi lter, 173–176USB 2.0 interface, 20UV fi lters, 93–94
VVelbon tripods, 186viewfi nder information, 21vignetting, 147–149Visible Dust brushes, 187
Wwater
blurring, 31, 35, 108refl ections on, 95–96underwater photography, 18
web sites, 190–191weighted metering mode, 16, 61–64white balance, 20, 135, 161, 162, 198white points, 150–152wide-angle lenses, 48–53, 148wildlife photography, 18, 46, 48, 55, 190windy conditions, 94
XxD-Picture Card (xD), 6
YYellow-Blue slider, 164
Zzoom lenses, 45, 47–48, 198zooming in/out, 38, 142–143