the complete how to tattoo guide
TRANSCRIPT
According to a study written in a body art magazine, about 60% of people who get tattooedregret their decision at a later stage of life. I also read an article written by a lady with multi-ple tattoos, that her regrets concerned her first tattoo, thus confirming my own observationsabout tattooing. I have a theory which may seem a bit conceited, but if I can prevent a singleperson from getting a tattoo which they are going to regret, and instead to help them realizea beautiful piece of art, which they will enjoy for the rest of their lives. I would be very happy!
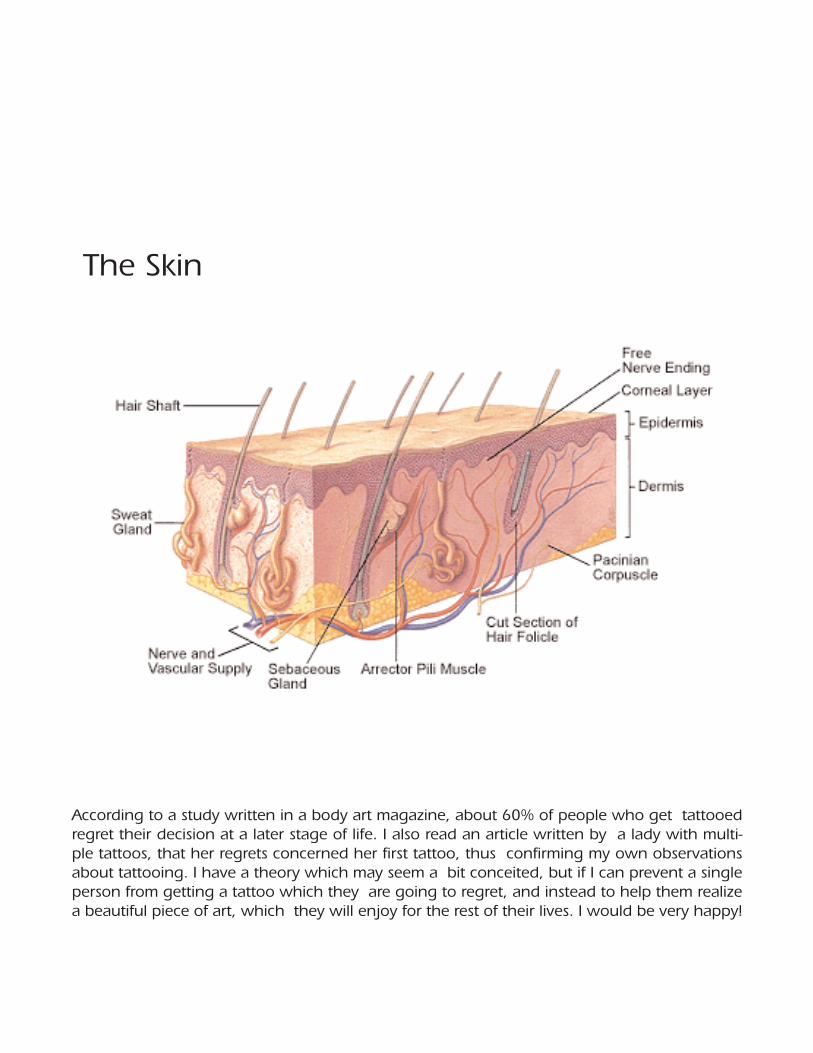
The Skin
The lady I mentioned above also wrote that she did not want to make the same mistakeagain, so she spent a lot more time selecting a design which she liked now, but tried tovisualize liking the design in fifty years time. If you think about it, it’s picking the design thatis one of the most important parts of the process of getting tattooed. Most people who gettattooed go to a tattooist and choose the design off the wall or out of a book. At that par-ticular moment they think it’s a beautiful choice, but what about in the future? Peoplechange, your taste in almost everything changes. What I like now or what I like in 4 or 5years from now could be miles apart, so here I am stuck with a tattoo, which I regret!!! Ifyou personalize your design the chance of future regrets will probably be brought to a mini-mum, and keep in mind that the decision to get tattooed is a permanent one. So take yourtime....
This is crucial. A tattoo application must be as clinical as a hospital, there are to many risksinvolved by ignoring the hygiene. Sterilization is the key issue in safe tattooing. To think thatall new needles are sterile is a myth! All needles have to be Autoclave sterilized new orused, this is the only way to make sure that they are save. The tubes where the needle/barrides in needs to be sterilized as well.
• Make sure the tattooist uses the next items for every new tattoo application! • New sterilized needles • New sterilized tubes. • New ink and inkpads. • Wears operating-gloves. • Uses new salve and spatula
It can’t be said enough, be careful with your health you only got one!!
A mark of a lifetime by Dee Dee
Why did I want to get a tattoo? I wanted to get something that I would enjoy having for along time, and something that symbolizes myself. The first thing I did was research; Isearched the web and used the yellow pages as my resources. Next to that I visited tattoostudios in the area, and spoke with some of the artists and viewed their portfolios. After thatI asked about their sterilization procedures and the experience of the tattooist. I did myresearch for about 2 weeks and finally I made a decision to go to Red Dragon Tattoo, andhave an artist at Red Dragon called Ed to do my tattoo, and made an appointment. Theatmosphere at the studio was warm and inviting, and the staff was friendly and helpful.When I went in to get the tattoo done I had to fill out forms and talk with Ed. He askedwhat I wanted, and after I told him I brought in a couple of designs I wanted to have done.I showed him a black rose, and the Chinese symbol for compassion. Since I am a teacher Iwanted a design that symbolizes myself. Ed told me that he was going to
set up, and would be with me in ten minutes. I waited anxiously and after a while Ed calledme to the back. He asked me if this was my first time and I told him it was. He smiled andshowed me the package of needles, and explained to me all the needles were new and theinstruments were autoclaved. After that he sterilized the area on my back shoulder and shavedit. He then told me that he was going to do a line to show me how it would feel, becausethere was going to be a lot of outlining. (It didn’t hurt at all.) After the test he began on mytattoo, and I was not in any pain at all it just felt like an annoying pinch and then just numb-ness. The total tattoo took about 30 minutes, Ed bandaged me up and put some A and D oint-ment on the tattoo. He told me to leave the bandage on for about 2 hours, and then to washit 3 times a day in very warm water with my fingertips and a mild soap. And apply A and Dointment after each time I’ve washed the tattoo. When all was done Ed escorted me to thelobby, and went over a Tattoo Care Pamphlet with me. When your tattoo is healing it is impor-tant to stay out of direct sunlight, and you cannot exercise nor swim for 2 weeks.
I feel that if you do choose to get a tattoo you should do your research first. Also make sureyou really want to get a tattoo, it is a mark for a lifetime. If you regret it and want to have itremoved, it is very expensive and there is light scarring.
Important Questions to Ask Your Tattoo Artist BeforeGetting Tattooed
DO YOU:
• Thoroughly wash your hands with antibacterial solution immediately before and after eachtattoo application?
• Wear latex gloves during the tattooing procedure? • Use single service materials and equipment (i.e., each needle and tube set is individually
packaged, dated and sealed, and autoclave sterilized), and set up and open them in front of the client?
• Use sterile disposable needles? • Have an FDA-regulated autoclave on site? • Sanitize your work space with an EPA (Environmental Protection Agency)-approved
veridical disinfectant, preferably one that kills tuberculosis, before and after each client? • Thoroughly rinse tube/needle set from tattoo machine using an ultrasonic tank before
discarding? • Properly dispose of contaminated materials? • Measure how the person who you talk with answers your questions—are they considerate
and thorough, or are they annoyed by your inquisitiveness? You have a right to have yourquestions answered thoroughly in advance. When you get there, check out the studio— make sure it looks and feels clean. If you get there and you’re uncomfortable,you can leave.
Lets Do It... tattoos for you...

INTO THE SKIN
Tattoo needles will pierce the skin approximately. 1/16 of an inch, in the dermis. THESKIN.is made up of layers. As a tattooist you must be concerned with the first five epidermalskin layers. The layer designations are Epidermis, Fibrosis, Dermis, Subcutaneous Fat, andMuscle.
The Epidermis or outer layer is responsible for protection against the environment.
The Dermis or middle layer is primarily responsible for structure and support and theSubcutaneous Fat layer is primarily responsible for insulation and shock absorbency. TheEpidermis is divided into three sub layers: the STRATUM CORNEUM, the SQUAMOUS CELLlayer and the BASIL CELL layer.
The STRATUM CORNEUM consists of several layers of dead SQUAMOUS cells and varies inthickness depending on location on the body. The thickest layers being on the bottom ofthe feet. The Stratum Corneum becomes thicker with age and exposure to the environmentand thus more susceptible to wrinkles and creases.
It is also important to use Sun Blocks that tend to reside in this layer. It is desirable to stopthe ultraviolet light from the sun at the surface of the skin rather than allowing it to pene-trate into the skin. UV from the sun that penetrates into the skin can cause several types ofdamage including fading of tattoo ink.
The SQUAMOUS CELL layer is the middle layer of the epidermis and is the center for newskin growth.
Skin cells grow and multiply in this layer and are constantly pushed outward to eventuallydie and become part of the STRATUM CORNEUM
The BASIL CELL layer is the birthplace of new epidermal skin cells. Basil cells receive a chem-ical message when the skin is damaged or when the stratum corneum loses too many cellsand becomes thinner than it is supposed to be. This results in the basil cells dividing anddifferentiating to form new skin cells and start the outward movement that results in newskin production.
When you are tattooed, the skin is stretched taught. This prevents knotting in the outlining.The ink is deposited in the dermis region, and when healed the ink can be seen due to thetransparency of the skin cells.
Tattoo ink must be deposited in the dermis (just below the epidermis layer), because if theink is too shallow in the skin, in the outer layers, it will fade with time, as those skin cells arereplaced, and if it is too deep, it will loose its form with time in the fat layer.
Fat cells contract and grow with age, and (how fat you are)! and the ink will move, causinga distorted image. Stencils are applied to unstressed skin, the area should be in a naturalstate, don’t flex your muscles while the stencil is being applied.
Once the stencil is in place, the skin is continually stretched taught, while the tattooing hap-pens. If the skin is not stretched, the needles can actually bounce off the skin, and not pen-etrate, or the needles can catch the skin, tearing it, either case results in a poor tattoo.

A CLEAN and ORGANIZED workspace
The workspace of a tattoo parlor, or shop must be kept as clean as possible. Take some timeto set up your shop, so that all the tools will be in your reach. A shop would have the basics: (1) A clean floor, no carpet, tile is preferred. It can be cleanedand disinfected quite easily; carpet is a breeding ground for viruses and germs. (2) A sinkwith running water...for hand washing, equipment washing. (3) A comfortable chair for youand for your client, footstools, tables, barber chairs, dentist chairs, whatever fits your needs.(4) A worktable, something big enough to hold all your supplies, and equipment. (5)Lighting is very important, good light can make or break a tattoo. (6) Equipment:Autoclave, or dry heat sterilizer, ultra sonic cleaner, tattoo machine, power supply, thermaltransfer stencil maker (optional), impulse heat sealer,
This list is just some of the major equipment needed for professional results.
Cleaning your work area.
All surfaces must be disinfected with a cleaner before tattooing occurs. The floor should bekept clean, and spilled ink or blood should be cleaned and disinfected. The worktableshould be cleaned between customers, and all equipment touched, i.e. power supplyknobs, ultra sonic switches, light switches, should be cleaned. Clean disposable towels should be used for each client, and waste should be disposed of
properly, on regular waste container, and one biological waste container, or sharps contain-er. STERILIZATION Dry heat sterilizer
The most important part of the tattoo process is clean and sterile equipment. There is onlyone way to guarantee sterile needles, tubes, grips, ink, and other equipment, and that isextreme heat for a prolonged period of time.
IF you are planning to start tattooing and can afford to buy a tattoo gun and power supply,but not the equipment for cleaning and sterilization. Keep saving because your doing noone any favors spreading disease. You risk transmitting disease, to your clients, yourself, anddamaging the art of tattooing in general.
The only sterilization that will be discussed here is autoclave and dry heat sterilization. Gassterilization, glass bead sterilization. Boiling water, pressure cooker, and chemical sterilizationare not commonplace in a tattoo studio, and in some cases unsafe for the operator andclients.
Before you can sterilize an instrument it must be clean, any ink, blood, etc. left upon a nee-dle or tube can actually shield that portion of the instrument from sterilization.
Sterile equipment should be kept in sterile sealed pouches until the ultimate time of apply-ing the actual tattoo Autoclave Sterilization: Autoclaves range from 200 dollar stove top ster-ilizers to timed cycle shop units around 2000 dollars. All autoclaves work the same way,steam heat and pressure.
Autoclaves have a sealed chamber, which is capable of withstanding pressure and heat.Most autoclaves operate at approximately. 275 degrees Fahrenheit (135 degrees Celsius) ata pressure of 15-25 lbs. When the whole chamber reaches these requirements
sterilization occurs in approximately. 20 minutes. Certified autoclaves are designed so thewhole chamber reaches the appropriate temperature, unlike ordinary pressure cookers.
Tools are usually sealed in nyclave tubing, and heat-sealed at both ends. This tubing helpsprevent your instruments from rusting, and also provides for handling outside of the auto-clave, assuring sterilization until the package is opened.
Most tubing or pouches have a process indicator strip, which changes color when the tem-perature needed for sterilization is reached.
This indication does not indicate sterilization, but only that the temp was reached, to steril-ize tools they must remain at this temperature for a prolonged period.
Autoclaves must be periodically tested using a spore test to ensure proper sterilization.
Dry Heat Sterilizers: As with autoclaves dry heat sterilizers use extreme heat to kill bacteria.Dry heat sterilizers use no water, and use no pressure, so they operate at a higher tempera-ture.
Dry heat sterilization occurs at around 160-180 degrees centigrade (320-360 F) after 30minutes at this temperature. Dry heat has an advantage over steam processes, steam tendsto dull sharp edges, and needles oxidize rapidly due to the moisture.
Spore testing vs. indicator strips: A frequently asked question, or misconception is the colorchanging strip or sticker you see on sterile pouches.
The strips change color to give a visual indication that the item inside the pouch was steril-ized. The strip does not change color due to sterilization, but only upon exposure to temper-atures that promote sterilization. The strips would change color if you put them in yourtoaster, prob. catch on fire also...The strips only indicate temperature, and sterilizing aninstrument takes time and temp. And in the case of an autoclave, pressure. Spore testing....spore testing should be done routinely to ensure your auto clave is working. A spore test isnothing more than two pouches full of spores. One pouch is your control, it will not beplaced in the autoclave, the other pouch can be placed in your autoclave, and run thruyour normal cycle. The two pouches will then be sent to a lab, where they will be placed inpetrie dishes and grown. The control package of spores should grow, and the ones you ster-ilized should not.... if this is the case your autoclave is working properly, but if you sporesyou sterilized grow, then your autoclave is not working and should be repaired. The sporesused in this test are generally Bacillus stearothermophilis. Any of the Bacillus type spores arevery resistant to being killed.
One thing to remember that in order to get a proper steam pressure / temperature correla-tion, ALL of the air must be purged from the autoclave. Any air in the autoclave will reducethe temperature at a given pressure and reduce the effectiveness of the steam sterilization.Also all surfaces to be sterilized must be exposed to the live steam. Sterilization is done at 15 to 17 psi for 20 to 30 minutes. According to Corning, Pyrex glass-ware should be steam sterilized at 121C for no more than 15 minutes. With 100% livesteam (all air has been purged) at 15 psi is 121 C / 250 F and at 17 psi is 123 C / 252 F.
How It’s DONE A tattoo is nothing more than ink deposited under the skin. How it gets there is anothermatter all together. The following will be an overview of how modern tattooing, achievesthe desired effects.
Once the tattoo gun is set up, cleaned and disinfected, clean sterile needles are installed inthe needle tube. The needles are not hollow, and are approximately. 1 inch long, and sol-dered upon a needle bar. For outlining a single needle is used, or 3 needles solderedtogether, these are just examples 2 needles up to 15 could be used to create a line. Thetube, which the needle bar is inserted, acts as a guide, and an ink reservoir. The needles arethen set for the proper overhang from the tube tip.
Now that the gun is set, and the client has been prepared, the ink is dispensed into dispos-able caps. This prevents contamination of the ink from one client to the next.
The ink is not reused, and any excess is thrown away. The gun is turned on, and dippedinto the ink cap paying care not to damage the needle tips. Ink is sucked into the tube tipreservoir. The gun is then ran momentarily next to some paper towel to clean out theexcess, and now tattooing will proceed.
Outlining is usually the first step in the tattoo process. The needles extend into the skinapproximately. 1/16 th of an inch, depositing ink in the dermis region of the skin.
The skin is stretched tight with one hand, while the other operated the gun; power isturned off and on via a foot switch. The stretching of the skin is vital is providing a smoothclean line. The artist moves his gun forward, or to the side. This keeps the needle againstthe back of the tube keeping the lines straight. The machine is slightly angled back and thestenciled lines are followed until the design is completed.
The next step is shading. Shading is done many ways, for example a square tipped tube isinstalled on the gun, and a flat set of 6 needles is installed. The needles are very slightlyfanned to help keep them from wobbling in the tube. With the skin stretched the artist willstart at the darkest area of the shading, and move toward the lighter section all the time lift-ing the needles further out of the skin till the needles loose contact at the end of the shad-ing.
Sprayed water can also be used to dilute the ink as it goes in to give a lighter gray orwashed appearance. Coloring is achieved by using the same needle set up for shading or around set of needles in a much larger grouping.
The skin is stretched and the artist will move his gun in small circles until an area is covered.When the skin is stretched the artist should not see any missed areas, if so he will have tocarefully ink the missed areas, then when the skin is released the colored areas will looksmooth.
When coloring a single pass with the needles is desired otherwise heavy scabbing couldoccur lifting much of the ink out of the skin, leaving spots with no color.
At this point when the tattoo is finished it’s the customer’s aftercare that will make or breakthe tattoo. The artist will apply a antiseptic cream to the tattoo, and cover with a bandageof some sort. The bandage must be left on for 2 hours, to keep dirt out of the wounds asthey scab. Then the bandages must be removed, and the area washed, gently.
As many times a day as possible afterwards till healed the tattoo should be covered bywater-based lotion (not Vaseline). Avoid soaking tattoo in water, chlorinated and salt waterespecially. And do not pick the scabs. Picking the scabs may pull ink out of the skin thusruining the tattoo.
Cleaning and Skin preparationSkin cannot be sterilized, but it can be clean and disinfected. The skin must be shavedbefore tattooing occurs, be careful to avoid causing irritation to the skin, use a good shav-ing cream. After the skin is shaved and all the remaining soap and residue is removed itstime to start. Disinfect the skin prior to applying the stencil. Use liquid bactine, or witchhazel...now your ready to tattoo.
Dipping into the ink... Ink is a one time use commodity, only once per customer.
Keep your ink in a container, and dispense the appropriate amount into a disposable cup foruse on a customer, and throw away any excess.
Ink comes premixed, or in powder form. When using premixed ink shake well before dis-pensing, and if the ink is clumpy, or too pasty, you may have to add some alcohol to thin itout. A neat little trick is to place a few stainless steel balls in your inkbottles to aid in themixing when you shake your bottle, sort of like a paint can.
Powdered ink should be dry heat sterilized before mixing with a thinning agent. Powderedink is then mixed with sterilized filtered water, alcohol, and glycol. Others thin their ink withwitch hazel or Listerine. Most powdered ink dispersions come with a technical sheet describ-ing a mixture ratio.
A scale and a small mixer will greatly aid in getting a good ink consistency. Place the appro-priate amount of ink in a disposable cup. In the cup mix the ink with a sterile stirring stick toensure consistency. Dip your running gun into the ink well and let the ink fill the reservoir ofyour needle tube tip.... your now ready to apply some ink. Or just place the end of yourtube in the ink well and do not run your gun...this will ensure you don’t fishhook your nee-dles by bouncing them off your plastic ink cup.
First we will cover using pre-made needles soldered onto bars. IF the needles have not beensterilized yet, do so before use, refer to sterilization. Remove the sterile tube and needlecombination. Slightly bend the needle with the low point of the bend on the opposite sideof the soldered needles.
Bend the needle bar about a three-inch distance from the eye to the end so you have a veryslight bow. The bend should not be more than 1/8 of an inch to 1⁄4 of an inch from astraight line. This adds a degree of tension to keep the needle bar on the armature and pro-vided a bow for the rubber bands to find a nitch
1. Needle installation: With a fully assembled tattoo gun, place a new or disinfected rubber grommet onto the nub on the armature bar. Looking at the front of the gun, place the loop of the needle bar over this grommet, with the open end facing left. This positions the needles toward the back of the tube.

2. Tube installation: Slide the appropriate tube up over the needle bar assembly, pay extreme care to when the tips of the needles approach the tube tip, slide the needle tips thru and tighten the yoke on the tube.
3. Move your armature bar up and down to ensure free movement. 4. Install a few rubber bands around your machine, these should be at mid coil, and wrap
around your needle bar. The rubber bands provide tension for your needle bar and keep the loop tight on your grommet and keep the needle from walking.
5. If working off your tube, adjust the tube up or down so the needle tips barely extend out when the armature bar is up. Move the armature bar down and ensure the needles extend a minimum of 1/16 of an inch. With practice you may want to increase the overhang of your needles when you are comfortable with depth control.
6. The gap of your points basically determines your needle movement, so you can determine your needle stroke by adjusting your point distance.
7. On flat needles it is important to fan the needle tips so the outer needles are in contact with the needle tube tip. This prevents needle wobbling. After a few uses tube tips \should be filed to remove wear marks from the needle movement.
Your MACHINE A tattoo machine works using a basic principle. Two coils are attached to a spring, and thusattached to a power supply. When the gun is in a state with no power applied a springholds two contacts together. The lower contact point is also attached to the coils, and thetattoo needle. When power is applied to the circuit, the coils become magnetic, pulling thearmature bar, and spring down, and the contacts break, opening the electrical circuit. Thespring forces the armature bar upwards, bringing the contacts together, completing the cir-cuit again. This causes the coils to pick up and pull down the armature bar, breaking thecontacts, well over and over again moving the needle up and down...to fast in most casesfor the human eye to see, the hum you hear are the contacts making and breaking. To understand how to set up your tattoo gun, you must understand what all the parts ofthe gun do:
1. Tattoo gun frame...This is what holds it all together...some frames are made of stainless steel, others aluminum, and so on...the shapes and weights of the frames greatly affect the vibration of the working gun. A heavier gun will absorb more energy from the coils, thus reducing the vibration felt by the person holding it. Some artists choose their guns based upon weight...lighter gives you less fatigue, but heavier makes for bettershading...The particular frame pictured has a built in yoke, the yoke is what thecoils rest upon, the negative point of contact. (The two holes in the bottom of the frame). This frame has a standard screw operated chuck. (The screw head closest to the coils) This chuck is where the top of the tube is inserted, and thus tightened after needle depth has been determined.
2. Coils, most conventional tattoo guns are equipped with two matching coils. The coils vary in size and number of wraps, but in most cases are between 8 wrap and 12 wrap coils...wraps being the number of times the wire is coiled around the hollow spool, which is the body of the coil. Inside this hollow spool is a core, which moves up ordown depending on the magnetic flux developed by the outside coils, attached to this core is a spring to return it to its normal state condition when power is not applied.
3. Capacitor.... The capacitor saves the points of the gun reducing sparking. 4. Front and Rear binding posts The front binding post usually contains a contact screw
made of sterling silver. The contact screw can have a removable contact point at the end of the threads. The contact screw can be adjusted up and down to lengthen or tighten the gap between your points. An old guide is a dimes thickness between points for a liner, and a nickels thickness for shading. The rear binding post will serve as the positive attachment to your powers supply. As with the front both binding posts have rubber grommets to electrically isolate them from the gun frame.
5. Armature Bar This rests on the top of the coils, and bolts to the machine spring with contact points. This bar will move up and down moving the needle bar. At the end of the bar is a small nipple. A rubber grommet is placed on this nipple and the eyelet of the needle bar is placed over the rubber grommet.
6. Machine Springs: This spring provides the return tension for the armature bar after it lowers when the points make contact and drive the armature bar downward.
7. Rubber bands They are applied around the machine all the way from the back of the frame (near the power connection), to the front of the needle bar. The rubber bands give the needle bar tension so the needles do not vibrate quite so much, move front to
8. Washers Use these for proper spacing 9. Tube: the tube has two to three basic parts...
The tube itself is nothing more than a round piece of tubing (preferably stainless steel). Theend of the tube is formed to accept various tips, from flared round tips, to flat tips, there isno limit to what type of tip you can use, only your imagination and trials.
The last part of the tube is the grip; the grip can be part of the tube, or a separate piece.Grips can be made of stainless steel, aluminum, plastic, rubber.... any material that cannotwithstand the temperatures of an autoclave should be treated as one time use disposable.
Needle bar ...The needle bar is a stainless steel heavy gauged wire approximately. ...5 5/8long with one end forming a loop, and the other end being round or flat depending on thetype of needle cluster to be soldered on to it.
Needle Cluster...The needles for tattooing are not like the needles used in a hypodermicsyringe. The needles are not hollow, and are generally about an inch long and finer than astandard straight pin. There is no cap at the end of the needle.
One needle soldered to a needle bar would be a single, three needles soldered together ina triangle would be considered a tight or semi tight 3, the above could be used as liners.
Other needle types could be 6 needles soldered in a row, flat, this is called a flat 6, com-monly used as a shader. There are many variations on needles including singles tight andsemi-tight 3,4,5s.... flat 3,4,5,6,7 up to 14, magnum 5,6,7-15, floppy 8s, round shaders, etc.Refer to making needles for more information.
So those are the basic parts of a tattoo gun, setting it up: When working with a client, youmust take extreme care to ensure your equipment is clean, disinfected, and sterilized whenin use. Before assembling your gun to work on a client, all parts should have been
autoclaved where applicable, disinfected, and cleaned. Wear latex gloves during the assem-bly process, because once you remove parts from there sterile packages, they are no longersterile, so utmost care must be taken not to contaminate them.
Take the assembled gun, ensure it is clean, and wipe it down with a cleaning agent and dis-infect. Attach a rubber grommet to the end of the armature bar. Select the needle assemblyyou plan on using, slightly bend the needle bar, just barely, almost can’t see it. (This provid-ed a solid contact for the rubbberbands, and proper contact of the needles and the tip.
Insert the desired needle bar and needle assembly thru the tube clamping assembly andonto the rubber grommet with the opening in the loop facing left (as looking at the front ofthe machine). Carefully insert the needle bar assembly into the proper tube, and slide thetube up until the needles approach the tube tip, at this point be very careful not to damageyour needle tips when guiding them through the tip. Insert the tube into the chuck andtemporarily tighten.
Check the contact points to ensure they are in good condition. Pitted or worn contactsshould be replaced. If you are using this gun as a liner, set the contacts approximately thewidth of a dime apart (width of a nickel for a shader), and tighten the screw, which holdsthe contact screw in place.
Place rubber bands around your gun, to tension the needle bar toward the back of thetube. Look at this point; the needle bar should not be rubbing the tube.
Move your armature bar up and down to assure free movement, and to assure your needlebar loop is seated on your grommet. If you plan to work off your tube, adjust your tube sothe needles are 1/16 of an inch out when the armature bar is pulled down.
If you are working off your needles let the needles overhand the end of your tip a 32 nd ofan inch or so...or whatever you are comfortable with.
Attach your power supply and your ready to use your gun. Turn on your power, and listento your gun, a smooth sound with needle movement between 1/16 th of an inch and3/32nd of an inch. Turn the contact adjusting screw up or down to achieve your proper set-ting for your desired speed, or voltage. When setting down your gun, have a clean disinfec-ted area for storage, or a clean slot in your ultrasonic cleaner.
Tuning your power supply to your Machine Power supplies, most tattoo guns are DC, and most power supplies come in two forms reg-ulated, and non-regulated. Regulated means that the output voltage will always be whatyour setting says, if you choose 13 volts then the output will be 13 volts, nonregulatedmachines will give you an average of 13 volt output.
The regulated machines are more expensive, but save contacts and provide smoother run-ning machines, and better tattoos. Attach your power supply to your gun; you should alsohave a footswitch setup so that it works as the on/off switch for power to your gun. Ensurethat your gap has been set...
Tip: liners contacts should be set the width of a dime apart, and shaders should be set thewidth of a nickel apart. Turn on your power supply, set the output voltage to your desired
speed, the higher the voltage the faster the machine will run, a fast smooth machine isgood for lining, and a slower machine is preferred for shading, but practice will determineyour use.
Step on your foot switch; ensure proper operation of your gun by observing needle barmovement, and needle tip movement. Look for needle wiggle, or shimmy, this will have tobe corrected. Now listen to your gun, does it sound smooth, choppy, weak, or no sound atall. If your points are too far apart, the machine will not operate, turn in your contact screwuntil a nice smooth hum is achieved. This is the proper setting for that voltage, observe nee-dle bar movement of between 1/16 th of an inch and 3/32nds of an inch at this time...yourmachine is now tuned.
Making stencils and applying them You have a design, now you have to decide how large or small it will be.
When the customer decides, the easiest way to reduce or enlarge a line drawing is with acopier machine or computer; scanning the image into a computer using a photo-editingprogram to shrink, retouch, or flip the image, then print it out.
Next using spirit master paper packs insert the image into a thermal transfer stencil makerand in a few seconds you will have a purple line stencil ready for application.
Well that is the fastest and easiest way to make stencils, there are many other tried and test-ed methods: (1) Skin scribes, hectographic surgical pencils...use these to draw a design directly upon
the skin...commonly used for basic shapes like hearts, stars, banners, free hand work. Toensure maximum sterility, hectrographic pencils should be sharpened between uses andrubbed with alcohol. (2) Carbon paper transfer...draw a design on a piece of paper, then apply speed stick to
the desired area of the skin. Lay carbon paper over it, and trace over your design. And youwill have a crude stencil on the skin. (3) Another method is using tracing paper use your original design and trace it with car-
bon paper and tracing paper underneath. The carbon will form a stencil on the tracingpaper, and you can lay the tracing paper against the skin using water or speed stick toapply a stencil. REMEMBER to reverse the original design so your tattoo is not reversed.Using a printer...scan in a design to your computer, flip the image using a pint program,and print it out onto tracing paper. Apply speed stick or water to the desired area receivingthe stencil, and press and you have a stencil. (In color if you desire) Using spirit paper with-out a stencil machine, just trace your design thru and get great stencils like the pros.
Applying a stencil, skin prep. Area preparation. Shave the area; be sure to use a disposable razor and plenty or lubricatingshaving cream. If the area gets a razor burn the client may not be able to tolerate getting atattoo.
Clean the area with soap and water, then a green soap solution, and last with a triple anti-septic, like bactine antiseptic/anesthetic liquid. Most artists use speed stick to apply
stencils, water, and alcohol-based products are also used. Apply the speed stick to just wetthe skin, then carefully apply the stencil, peel back the paper and with any luck you’ll havea crisp stencil facing the correct direction, and positioned properly, at this point show clientplacement before any ink is applied.
During the tattoo work from the bottom of the piece to the top, with the constant wipingand spraying stencils tend to fade. They fade when you don’t want them too, but staybright and vivid when you’re done and want the purple stuff gone so you can continue.Use a mixture of green soap and 80% rubbing alcohol sprayed over the area to remove thepurple stencil.
Tattoo Styles Tattoos are not all the same; in fact one can say that each tattoo is a one of a kind.
Whether a tattoo is chosen from flash or custom drawn a tattoo is very personal, but mosttattoos can fit into certain genres. Over time tattoos have evolved into many styles, someprimitive some modern, but all an artistic interpretation of an idea.
Here is an overview of some of the more popular stylesof tattoos and tattooing
1. Abstract Art-Freeform is a modern style involving no outlines and a Picasso like appearance.
2. Black and Gray work is thought to be the true test of a tattoo artist. Shading is heavy and the illusion of a 3D form is achieved without the use of color. This style is derived from prison tattoo, but mechanically far exceeds the expectations of a crude jailhouse
3. Grey wash is a method of diluting black ink with water to achieve the grays from light to black.
4. Biomechanical is a form of work showing humans meshed with machines. A common theme is the flesh being ripped away exposing the mechanical inner workings of an arm, for example. Artists such as H.R. Giger and Clive Barker inspire these works.
5. Celtic designs are intricate knots, which represent people and animals from, Welsh, Breton, Gaelic, and Cornish folklore. They are intricate weavings of a singleline.knotwork.
6. Color is a general term covering any style of tattooing involving color. Color can be subtle or vivid depending on the client and the piece.
7. Evil has been a very popular tattoo theme for a long time. Images of spiders, skulls, devils, demons, and death play with are fascination of mortality, death, isolation, and fear. Shading is heavy in this type of work as well as fine detail.
8. Fantasy Art This generally covers fairies, dragons, angels, women, armored knights, unicorns, and wizards to name a few. These are generally done in splendid colorsto convey.
9. Fineline is a modern tattoo style, as tattoo machines have gotten better, and inks and technique have improved, more detail is being added to pieces. Common themes are portraits, animals, biomechanical, and any fine picture, even UPC code bars.
10. Gangster/Biker tattoos are symbols or permanent patches signifying allegiance to a club or gang. Commonly these are Old English script on the stomach, back, neck, or chest, the name of the gang or gang remembers gang name. Teardrops under the eye symbolize people killed, as well as spider webs on the elbows.
11. Haida is the design of the American Indian and Eskimo. Generally tribal flat pieces of animals, totems, birds, and use a few major color.
12. Memorial are ways to immortalize a love one that has passed, or a child’s name. These are typically crosses, flowers, scrolls..Etc.
13. New School is generally regarded as starting in the 1980s; it’s a culmination of every tattoo style into one piece. Generally different subject matters are mixed.such has an alien and a car.
14. Oriental.Yakuza is a Japanese style. It is usually colorful and detailed, and contrary to European and American tattooing styles, this style uses the whole body as a motif. No sticker tattoos here, the work is planned out to cover the whole body before the work begins. Tattooing in Japan was outlawed for the working class and the Yakuza (Japanese gangsters) took tattooing in as a secret symbol.
15. Portraits are some of the finest forms of modern fineline tattooing. The artist is extremely skilled in interpreting a photo to skin art. Some results are breathtaking and found in many tattoo magazines. The key to successfully inking portraits is knowing exactly how much detail is too much. To much detail can lead to fuzziness or much after a few years.
16. Prison tattoos served as a badge or a warning, it showed fearlessness, much like the warriors tattoos in early times. These tattoos are generally threatening featuring skulls, knife, women, or symbols representing crimes and death. Today’s black and gray tattooing style stems from jailhouse tattooing. Generally these tattoos were black because black was the only ready color available. The black could be from pen ink, the carbon collected from a burning toothbrush, or metal debris. Most are crudely applied and spawned a tattoo machine made of cassette player motors and such.
17. Religious/Spiritual tattooing has been the basis of almost all tattooing from the beginning of tattooing itself. The oldest man discovered. A.k.a. the iceman, who was frozen where he lay, had tattoos on the back of his knees; believe to be talisanment or spiritual. The Egyptians gave tattooing very religious meanings, the dead were often tattooed so they would have information in the afterlife, priests were often buried with tattooed women who would serve as the canvas of the information he would need in the afterlife. Women were often tattooed to aid in fertility. Christians during the time of Christ and shortly after would tattoo a cross under their hand on the wrist; this was a badge and a way to determine who were true believers and who were roman spies.
18. Most of these types of tattoos were very primitive, but lead to some the earliest forms of FLASH, religious tattoos were carved and formed from clay and the image would be stamped onto the subject to serve as the stencil for tattooing.
19. Sailor/Traditional is usually a very basic design, popular in the 1800s to present day. Typical works would be mermaids, daggers, flowers, ships, anchors, snakes, birds, and panthers...but with this style the absolute minimum is put into the tattoo, just enough to convey what it is and the meaning. Later these designs, which line the walls as flash in most tattoo studios, have been reinvented with more detail and artistic flair.
20. Tribal tattoos cover a huge spectrum of different cultures, from Polynesian, Micronesia,or Indian. They are generally black in color, sold bold geometric designs thatcomplement the shape of the body they are placed on. Common themes are triangles, and curving lines. Modern interpretations have lead to geometric animals, fish, or even skulls. This is also referred to as Flat Tattooing. Waycool Tattoo
21. Wild Style can be recognized from its similarity to graffiti on the buildings of most major cities. It can be a tag on human skin. Very similar to that of the skateboard cultureartwork.
Outlining ...After the stencil is applied.... note, start from the bottom. Why do you start from the bottom, well as the outlining process progresses? Wiping andcleaning the area will occur, and thus the stencil fades or goes away completely. If you startfrom the bottom of a design the maximum life of the stencil can be obtained. Each designmay merit its own starting spot so this guideline is flexible per design.
When working with a client the artist should try to gauge the person’s reaction to the initialneedle poke. Some people are squeamish and others just don’t feel it. If this is the person’sfirst tattoo, care should be taken to pick an area of the outline where little damage can bedone if the client pulls away or moves suddenly during the initial lining.
People’s nerves are often more of a factor than the actual pain of the needle. Explain to theclient the sensation they will feel and try to put them in the most relaxed state they can bein mentally before you begin.
Lining can make or break a tattoo. The line must be true and solid. A light hand of theimproper needle depth can leave an outline fuzzy, splotchy, dot-to-dot looking...or withpractice smooth like a pencil line.
The skin should be stretched taught; this is one of the major causes of a bad line.Depending on how you set your gun. The needles should extend just slightly out of thetube (nozzle). This will ensure proper depth (1/16 th of an inch) of the needle penetration.(See setting up your gun/needle settings)
If you prefer to work off your needle, do not let the tube tip touch the skin, rather watchyour needle depth.
The needles should feel like they are skimming along the surface, do not press but let gravi-ty use the weight of the machine to work the needles into the skin. Move the gun in fluentmotions, do not stop and start.
Visualize your line from start to finish and ensure you have enough ink in the tip to com-plete the line without stopping.
At the end of your line gradually pull the needles out of the skin to avoid ink pooling at theend of lines. Tips of flames claws.etc.
Your needles should be inspected under a loupe, and the tips should be straight and sharp,no blunt ends, bent needle tips, no foreign material (i.e. paper towel).
If the machine seems to snag in the skin, make sure the speed of the machine is proper,possible speed it up, and if the needles bounce, make certain the skin is stretched tight.Gapped lines may indicate bad points...and watch your ink, and clean up often so you cansee what you are doing. ENSURE YOU DO NOT HAVE FISH HOOKED NEEDLES THIS WILLBE UNCOMFORTABLE FOR THE CLIENT, TEND TO SCAR, and MAKE IT HARD TO APPLY INK.
FinelineHow the hell do they do that.... Some portraits can be the size of a quarter, and show tonsof detail...some can be a image from a photograph that looks like a photograph in the skin.In all cases the tattoo artist has mastered his instrument. This is one of the most advancedstages of tattooing...done with mainly a single needle, or small groupings. The tattoo is art,shading is crucial, placement is crucial, and most importantly...knowing what will age grace-fully and what wont. Skin is only so forgiving, over time blending of the ink will occur, sothe amount of detail in a small area has to take this into account...
Graywork Get out your distilled water in a spray bottle The tattoo is black and gray, gray ink can beused or diluted black ink can be used
Shading Okay, the outline is done; time to start shading Shading is the most visually stunning aspectof a tattoo. The shading adds a sense of depth and brings the two dimensional tattoo tolife. Black shading can be done many ways, the most important part of shading is knowingyour design, knowing the layout of your picture, understanding where you want the lightsource to originate, and what would cause a shadow. If your shading is consistent, thereshould be no confusion on depth of high points and low points in the design. Shading isusually archived using large needle groups, round or flat, from 6 flat to 14 round. Small cir-cles can be used like coloring, and shading should always start at the darkest area andmove towards the lighter regions. When moving the needles toward the lighter regions theneedles should be pulled out of the skin ever so slightly until at the point where the shad-ing ends the needles stop penetrating the skin.
Coloring Lets fill in the color, do you have good ink? Ink, ink, ink! Quality is very important,no matter how good your technique; poor ink can lead to poor coloring. Choose your inkbased upon experience, and the sage advice of other tattooists. Coloring is usually donewith multiple needle tips, and done in small circles starting from your darkest ink to yourlightest...why? Well, when the needles penetrate the skin. They leave holes when youdeposit the dark ink (like purple / royal blue) the ink fills the bottom of the hole...When youwipe the area clean you spread the ink and any hole will fill with the ink you are cleaningaway...and if you wipe dark ink into a hole with light ink in it, you will mask the light ink,and the healed tattoo will be ruined. Mixing ink on the skin is tricky but using the abovetechnique colors can actually be mixed, or faded. The holes will hold a color;
example yellow...and when red is introduced. (Watered down) an orange transition can beachieved. Flame tips, and claws Don’t leave a blob at the tip of the flames or claws Whenoutlining and coming to the end of a stroke, such as a claw tip or a flame tip; great caremust be taken not to leave a blob. The needle should be lifted out of the skin at the end ofthe stroke, and the joining stroke must be lifted the same way. The joint will then appear tobe a crisp union of the two.
I have really dark skin, what can I expect from a tattoo?? Dark skin poses problems for tat-tooing. The pigment in the skin will shield the ink from showing thru to the surface of theskin, and most light colors will have problems showing up at all. Other common problemswith African American skin types is swelling, extreme swelling may occur during the tattooprocess, but this tends to subside in a few hours after the irritation of the needles hasstopped. This can pose a problem for the tattooist, with the extreme skin swell, outliningcan actually appear to vanish. The tendency is to try to pound in more ink, but advice is towait it out, or schedule a few sessions. The ink is there; it will show up when the swellinggoes away. Coloring my have to be done in sessions also because spots can be missed dueto the swelling. Extremely dark skin will show black and red ink, but not as bright as lightskin. Lighter colors such as white tend to not show up, although success has been touted inthis field.
Is there anyway to kill the pain of tattooing? No matter what —— tattooing hurts a little,some people find the pain a meaningful part of the process, yet others certainly don’t.Solarcaine, applied a half hour before the process can dull the pain. Some artists use topicalanesthetics... Meditation and hypnotherapy are also used for pain management