the complete guide to vermicomposting · 1 vermicompostingthe complete guide to with the worm...
TRANSCRIPT

1
VermiCOMPOSTINGThe Complete Guide to
With the Worm Factory® 360
With Excerpts From These Two Books:
Amy StewartAuthor of “The Earth Moved” New York Times Best-seller
Jeff LowenfelsAward Winning Garden
Writer, Author of “Teaming With Microbes”
Forward by:
2
Mission Statement Table of ContentsNature’s Footprint, Inc. believes that vermicomposting is one of the most efficient ways to recycle and minimize society’s overall impact on the earth and improve our soil. Our goal is to inform and educate others regarding the benefits of vermicomposting and integrate this form of recycling and waste minimization into household composting and gardening practices.
www.naturesfootprint.com©2013 All Rights Reservedv.06172015
Worm Factory® 360 Parts ........................................... 4Obtaining Worms ....................................................... 5Quick Assembly .......................................................... 6Preparing Bedding ...................................................... 7Starting Your First Feeding Tray ................................. 8An Active Feeding Tray ............................................... 9Adding A Second Tray ................................................ 9Self-Sorting Upward Migrating System ...................... 10Harvesting Compost ................................................... 11Vermicomposting Goals .............................................. 12
Understanding Basic Concepts of Composting ............14Finding A Good Location For Your Vermicomposter.. 16Adding Worms .............................................................16Feeding Your Worms ....................................................17The Difference Between Browns and Greens as Compost Ingredients ....................................................18Adding Additional Trays ..............................................20Bedding ........................................................................20Mineral Rock Dust ......................................................22Acidity ..........................................................................22Aerobic Vs. Anaerobic ..................................................22Monitoring the Health of Your System ........................23Managing Moisture in the Worm Factory® 360 ..........24Controlling Bedding Temperature ...............................26When Should You Harvest Your Worm Compost? ......28Compost Harvesting Steps ...........................................28Storing Your Worm Compost ......................................29Using Finished Vermicompost .....................................30Leachate Vs Compost Tea. ...........................................32A Living Ecosystem .....................................................34How to Deal With Fruit Flies and Fungus Gnats........42About Worms ...............................................................44
Section 2 - Managing Your Worm Factory 360
Section 1 - A Quick Start and Set-Up Guide
How to Fatten Worms for Fishing ...............................50What to Do If You Go On Vacation ............................50Insulating and Heating a Worm Composter ................51Excerpt - Teaming With Microbes ..................................53Excerpt - The Earth Moved ...........................................58Glossary ........................................................................62Resources ......................................................................66Index.............................................................................68
Section 3 - Appendix

3
A Quick Start and Set-Up Guide
Section 1
3
4
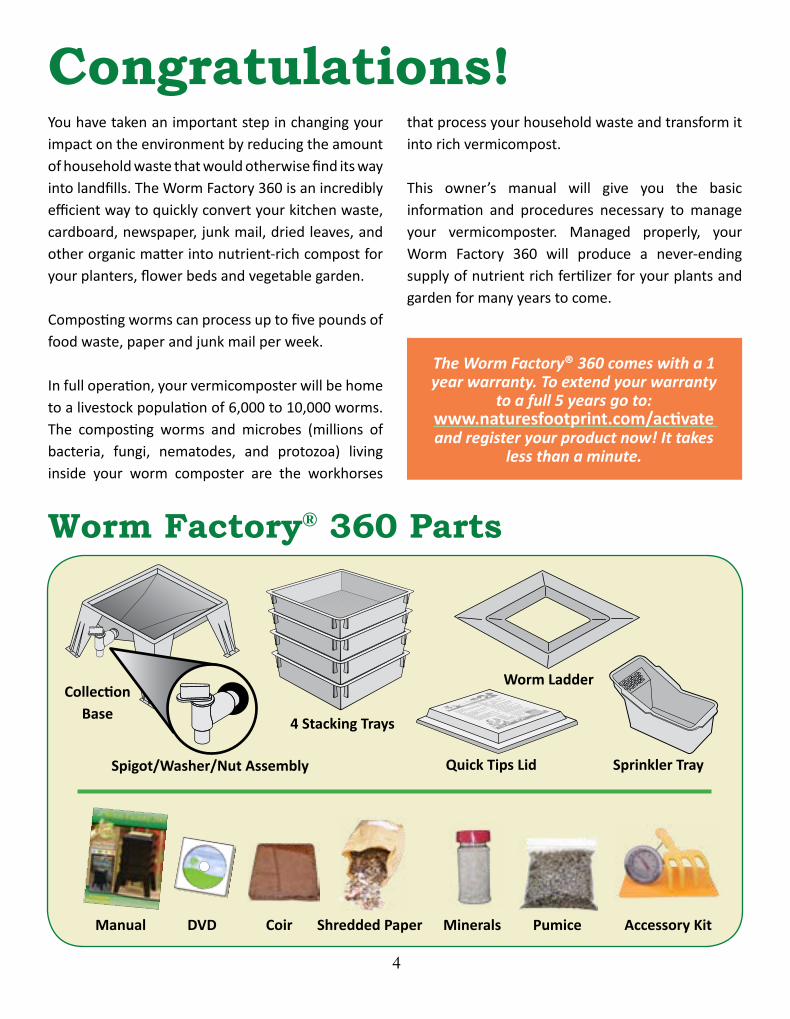
You have taken an important step in changing your impact on the environment by reducing the amount of household waste that would otherwise find its way into landfills. The Worm Factory 360 is an incredibly efficient way to quickly convert your kitchen waste, cardboard, newspaper, junk mail, dried leaves, and other organic matter into nutrient-rich compost for your planters, flower beds and vegetable garden.
Composting worms can process up to five pounds of food waste, paper and junk mail per week.
In full operation, your vermicomposter will be home to a livestock population of 6,000 to 10,000 worms. The composting worms and microbes (millions of bacteria, fungi, nematodes, and protozoa) living inside your worm composter are the workhorses
that process your household waste and transform it into rich vermicompost.
This owner’s manual will give you the basic information and procedures necessary to manage your vermicomposter. Managed properly, your Worm Factory 360 will produce a never-ending supply of nutrient rich fertilizer for your plants and garden for many years to come.
Worm Factory® 360 Parts
Congratulations!
Worm Ladder
Spigot/Washer/Nut Assembly
4 Stacking Trays
Quick Tips Lid
CollectionBase
Manual DVD Coir Shredded Paper Accessory KitPumiceMinerals
Sprinkler Tray
The Worm Factory® 360 comes with a 1 year warranty. To extend your warranty
to a full 5 years go to:www.naturesfootprint.com/activate and register your product now! It takes
less than a minute.

5
Obtaining Worms You will need a supply of worms for your Worm Factory 360. There are many thousands of varieties of earthworms, but only a few will work in a worm composter. Most of the earthworms found in your garden are not suitable for your worm composter.
We suggest that you use “red wiggler” worms (Eisenia fetida). They eat only decaying organic matter and live only in the top few inches of the soil. They are voracious eaters and reproduce rapidly in a worm composter.
WormVoucher
Worm Voucher:Some vermicomposters come with a purchased “worm voucher”. If this is the case, follow the instructions on the voucher.
Worms by mail: Composting worms are regularly delivered by USPS Priority Mail. Canadian orders are delivered by Canada Post. For a list of worm suppliers, go to www.findworms.com.
Worms from local worm farms:Go to www.findworms.com to find a worm farmer near you.
Worms from a friend: It is possible to obtain worms from a friend who has an active worm composter.
Worms from a bait shop: Not all fishing worms are suitable for composting. Many bait shops sell “red wigglers” for bait. Be sure to check for the correct scientific Eisenia fetida name before you purchase.
Municipal Recycling Programs: Many municipal recycling programs can help you find a local source of composting worms.
NOTE: It is important to have your vermicomposter set up with bedding to receive the worms when they arrive.
Another worm that can be used for compostingis the European (Belgian) Nightcrawlers (Eiseniahortensis). This variety reproduces slower but makes a great fishing worm.
We recommend starting with 1 pound (approximately 800-1,000 worms) of worms for a healthy working population. You can start with fewer worms but it will take longer for your system to reach full operating capacity. The following instructions assume you will start your Worm Factory 360 with 1 pound of worms.
There are many ways to get worms for your worm composter:

6
Quick Assembly
Set aside the remaining trays.
6
The remaining trays are added one at a time as they are needed. It may take three or four months to put all four trays into operation.
Add the lidQuick Tips Lid
StackingTray
WormLadder
CollectionBase
Your vermicomposter is now ready to add bedding materials and worms.
Note: The Lid ships nested inside the base. Remove the lid before placing the worm ladder in the base.
Install the Worm LadderSet the worm ladder inside the base. The Worm Ladder helps worms that have fallen into the collection tray back into the working trays.
2
Add a stacking trayThis tray will be referred to as the “Starting Tray.”
3
4
Next:Preparing for
Worms
Set the collection base1

7
CoirCoir is ground coconut fiber. It is the most desirable bedding material because it retains moisture and improves the quality of the worm castings that go into your garden.
PumicePumice is a lightweight, porous, volcanic rock which provides excellent aeration and drainage for your vermicomposter.
Shredded PaperShredded paper, cardboard, newsprint, egg cartons and other types of paper provide an excellent source of carbon, increase aeration, and are an easy source of food for your worms.
Place the end of the brick of coir in a bowl. Pour 1 cup of water over the brick and let it soak until it begins to break apart. Crumble off the loosened coir equal to half the brick. Add more water if needed. Coir should be moist but NOT wet. Set aside the unused ½ brick of coir to use later. Add one or two cupfuls of garden soil
or compost to the bedding mixture. This material contains organic organisms that will inoculate your worm composter with the beneficial microbes worms depend on to help them digest their food.
Note: Coir and pumice make excellent bedding material, however, they are not required.
1
24
Mix together the moistened Coir, ½ Pumice, ½ Shredded Paper, 1 Tbspg Minerals that came with your Worm Factory 360.
3 Use this mixture in the starting tray. Store the unused Coir, Pumice, shredded paper and minerals to use later when adding your second tray.
Preparing Bedding
Next:Starting your
1st tray
Prepare your bedding before your worms arrive. This bedding material is provided to make sure your worms get off to a good start. For more details about the bedding process, read page 20.
Included with your Worm Factory 360:

8
Cover the bottom of the first starting tray with one or two sheets of dry newsprint. You’ll only do this on your very first tray!
Place the moist newspaper cover on top of the bedding and food in the starting tray and wait for your worms to arrive.
Add the moist bedding mixture, spreading it evenly on top of the dry newspaper. Add 2 or 3 cups of food in one corner of the tray.
For food suggestions, see page 17.
Select 5-10 full pages of newspaper (no slick color paper), fold the paper so it will fit into the feeding tray. Wet the paper until it is damp but not dripping. You have just created a moist newspaper cover.
Place the lid on the worm composter. It is best to not disturb the worms for the first two or three days while they adjust to their new environment. Your worms will want to explore their new home. Leave a light on for the first 2 or 3 days. This will discourage the worms from exploring outside the composter.
When the worms arrive remove the moist newspaper cover. Add the worms, including all of the bedding included with the worms, on top of the moist bedding. Replace the moist newspaper cover.
Starting Your First Feeding Tray
Read more about adding worms on page 16.
Leave the worms alone for two or three days then open the lid and peek in. Lift the moist newspaper cover and look around in your bin. Are the worms actively moving around in their food? If so, GOOD! If not, leave the worms alone, then check them again in 2 or 3 days. Once you see the worms actively feeding, you can start adding more food.
To provide the worms with an adequate food supply, add enough food over the next 4-6 weeks to fill the feeding tray. When the feeding tray is filled to within an inch of the top of the tray, it is time to add another tray.
Note:From now on, the starting tray will be referred to as the “feeding tray”. This tray will always be on top and is shown in the illustration by the color green.
7
9
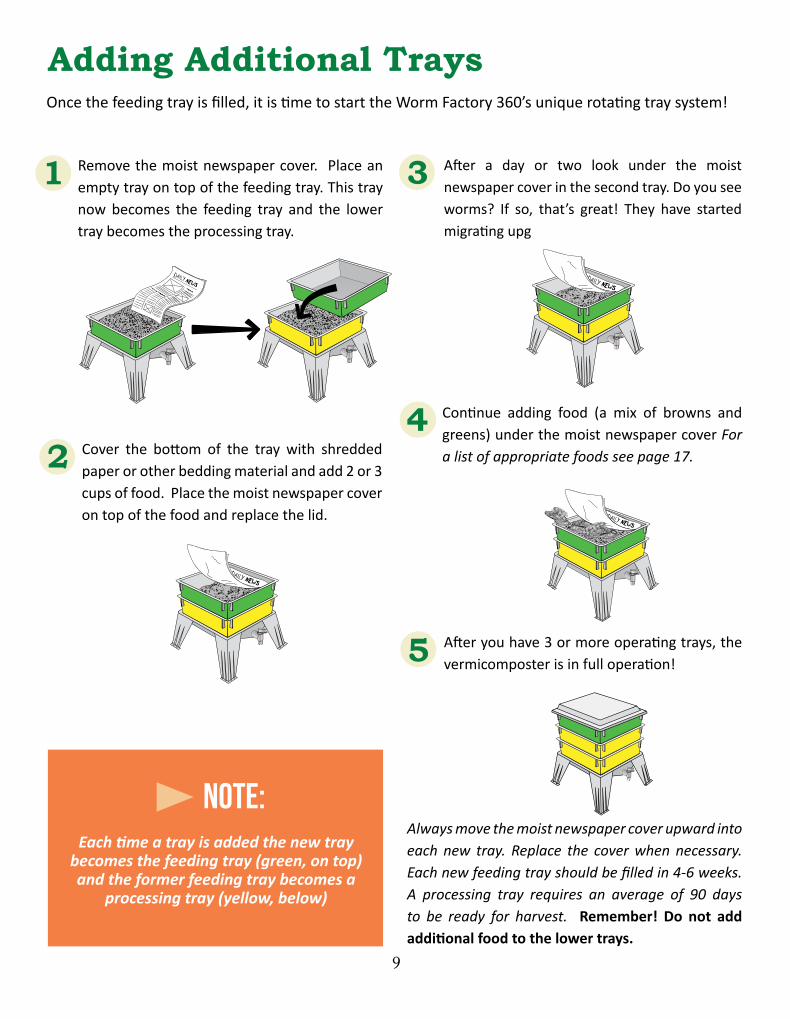
Remove the moist newspaper cover. Place an empty tray on top of the feeding tray. This tray now becomes the feeding tray and the lower tray becomes the processing tray.
Cover the bottom of the tray with shredded paper or other bedding material and add 2 or 3 cups of food. Place the moist newspaper cover on top of the food and replace the lid.
Continue adding food (a mix of browns and greens) under the moist newspaper cover For a list of appropriate foods see page 17.
After you have 3 or more operating trays, the vermicomposter is in full operation!
Adding Additional Trays
After a day or two look under the moist newspaper cover in the second tray. Do you see worms? If so, that’s great! They have started migrating upg
Always move the moist newspaper cover upward into each new tray. Replace the cover when necessary. Each new feeding tray should be filled in 4-6 weeks. A processing tray requires an average of 90 days to be ready for harvest. Remember! Do not add additional food to the lower trays.
Note:Each time a tray is added the new tray
becomes the feeding tray (green, on top) and the former feeding tray becomes a
processing tray (yellow, below)
Once the feeding tray is filled, it is time to start the Worm Factory 360’s unique rotating tray system!

1010
This page demonstrates the movement of worms and excess moisture
Self-Sorting Upward Migrating System
As the worms process the food
in the lower trays, they will migrate upward
to the newer food, removing
themselves from the lower processing trays.
Always harvest your vermicompost
from the bottom
processing tray.
Gravity pulls excess moisture down to the collection base.
Food always gets added to the top
feeding tray.

11
Remove the lid and turn it upside down to use as a tray. Transfer all the trays except the bottom “processing” trays onto the lid, keeping the trays in the same order that they were on the collection base. Place the bottom “processing” tray still on the base, on top of the “feeding” tray. Return all the trays to the collection base.
Harvesting Vermicompost
If outside remove the lid. If inside remove the lid and place a light over the vermicomposter. Stir the compost. This will drive the worms down into the feeding tray below.
To speed up the process remove about 1 inch of vermicompost every 1-2 hours into a separate container, stirring the remaining material each time. When the ‘finished’ tray is empty, it is in the correct position to become the new ‘feeding’ tray.
For more information on harvesting vermicompost see page 29.
Congratulations! You just completed the first successful rotation of your Worm Factory 360.
Finished Tray
Feeding Tray
Processing Tray
Processing Tray
4-10 hrs
StirOccasionally
Processing Tray
Finished Tray
Feeding Tray
Processing TrayProcessing Tray
Note:Always replace the processing trays on the collection base in the same order to
maintain proper rotation.
When harvesting compost or anytime it becomes necessary to move the Worm Factory 360, keep in mind that a fully operating system can weigh about 60 pounds. Lift the Worm Factory 360 as one unit or remove the upper trays before moving. DO NOT
PUSH, PULL OR DRAG the Worm Factory 360! It is not designed to be moved in this manner. This can cause stress fractures to the legs. Any damage that results from moving it in this manner will not be covered under our warranty.

12
Vermicomposting Goals As you begin working with your vermicomposter, experience will be the best teacher. Following the instructions in this manual will ensure that you will become a successful vermicomposter.
After about four months, you should reach the following goals:
The majority of the contents of the bottom processing tray should be converted into dark crumbly vermicompost ready to harvest and use in the garden.
You should have an active top “feeding” tray and two or more processing trays in different stages of composting.
After 90 days your worm population should show signs of increasing and you will be feeding larger amounts of food. When you see the worms actively moving around in the top layers of the food you know you need to feed more.
The majority of the worms will have migrated to the trays above. The worms are drawn up to the food as you add new food to the upper tray.
You may see other beneficial insects in the vermicomposter. These insects help breakdown the food for the worms to eat and indicate your system is working properly. (refer to the section, A Living Ecosystem on page 34)
You may be getting small amounts of leachate draining from the processing trays into the collection base.
It is important to remember that these are goals. It may take more time
depending on your vermicomposting needs and management style.
1 gallon sprinkler tray