the closing disclosure form - usa digital · pdf fileusa digital solutions, inc. closing...
TRANSCRIPT

THE CLOSING DISCLOSURE FORM CFPB 2015
Impact/SQL
Version 10.0.172.NET
Initial v10 IPT/UAT Release Date: 01/30/2015
10835 N. 25th Avenue, Suite 350
Phoenix, AZ 85029
602.866.8199
www.digisolaz.com


USA Digital Solutions, Inc. Closing Disclosure Form v10.0.172 Manual 4/10/2015
Table of Contents
Introduction to the Closing Disclosure Form Changes .......................................................................... 1
Name and Address File (NAF) ................................................................................................................... 2
Closing Disclosure Form ............................................................................................................................ 3
Dates/Transaction Information .................................................................................................................. 3
Type of Closing ..................................................................................................................................... 3
Transaction Type Behavior ................................................................................................................... 3
Rescission Period Checkbox ................................................................................................................ 4
Property Information .................................................................................................................................. 5
Buyers/Borrowers ...................................................................................................................................... 6
Lenders ..................................................................................................................................................... 7
Short Name ........................................................................................................................................... 7
Mortgage Broker ................................................................................................................................... 7
Lender Licensing Information ................................................................................................................ 8
Loan Terms ........................................................................................................................................... 9
Agents ..................................................................................................................................................... 10
Agent Licensing Information ................................................................................................................ 10
Closing Disclosure Form Data Entry ....................................................................................................... 11
File Options (ONLY w/ NM Property or WA State Requirements) ...................................................... 14
Commissions (Lender #1 only) ........................................................................................................... 15
Payoffs (Lender #1 only) ..................................................................................................................... 18
Title Insurance Premiums ................................................................................................................... 19
Lender’s Policy Information ............................................................................................................. 20
Owner’s Policy Information ............................................................................................................. 23
CDF Header ........................................................................................................................................ 24
Loan Terms ......................................................................................................................................... 25
Loan Amount ................................................................................................................................... 26
Interest Rate .................................................................................................................................... 27
[Time Period] Principal & Interest.................................................................................................... 28
Prepayment Penalty ........................................................................................................................ 30
Balloon Payment ............................................................................................................................. 30
Projected Payments ............................................................................................................................ 31
Estimated Taxes and Insurance...................................................................................................... 32
Costs at Closing .................................................................................................................................. 33
Loan Costs .......................................................................................................................................... 34

USA Digital Solutions, Inc. Closing Disclosure Form v10.0.172 Manual 4/10/2015
A. Origination Charges .................................................................................................................... 35
A.1 Points .................................................................................................................................... 35
Add Line ...................................................................................................................................... 37
Add Roll Up Line ......................................................................................................................... 37
B. Did Not Shop For ........................................................................................................................ 38
C. Did Shop For............................................................................................................................... 40
Other Costs ......................................................................................................................................... 40
E. Taxes and Other Government Fees ........................................................................................... 41
F. Prepaids ...................................................................................................................................... 43
Homeowner’s Insurance Premium .............................................................................................. 43
Mortgage Insurance Premium ..................................................................................................... 43
Prepaid Interest ........................................................................................................................... 44
Property Taxes ............................................................................................................................ 44
G. Initial Escrow Pmt ....................................................................................................................... 45
Homeowner’s Insurance ............................................................................................................. 45
Mortgage Insurance .................................................................................................................... 46
Property Taxes ............................................................................................................................ 46
Aggregate Adjustment ................................................................................................................. 46
H. Other ........................................................................................................................................... 47
J. Total Closing Costs ..................................................................................................................... 50
Calculating Cash to Close ............................................................................................................... 51
Summaries of Transactions – Not on Refinance Transaction Types w/ Optional CDF Forms Option
Selected .............................................................................................................................................. 53
K. Due From Borrower .................................................................................................................... 54
Sections K through N Roll Up Lines ............................................................................................ 57
L. Paid Already ................................................................................................................................ 58
M. Due to Seller............................................................................................................................... 60
N. Due From Seller ......................................................................................................................... 62
Payoffs and Payments – Only on Refinance Transaction Types with Optional CDF Forms Option
Selected .............................................................................................................................................. 64
Loan Disclosures ................................................................................................................................. 65
Security Interest .................................................................................................................................. 66
Loan Calculations and Other Disclosures ........................................................................................... 67
Contact Information ............................................................................................................................. 68
Additional Contacts ......................................................................................................................... 68
Closing Disclosure Form Tracking ...................................................................................................... 69

USA Digital Solutions, Inc. Closing Disclosure Form v10.0.172 Manual 4/10/2015
CDF Versions .................................................................................................................................. 70
Approved ..................................................................................................................................... 72
Delivery ....................................................................................................................................... 73
Closing Disclosure Form – Additional Lender(s) ................................................................................. 74
Print – Closing Disclosure ................................................................................................................... 75
Print – Closing Disclosure Tracking .................................................................................................... 77
Print – Tolerance Worksheet............................................................................................................... 78
Print – Settlement Statement, Title Instructions, Lender Summary & Balance Statement ................. 79
Appendix A - Troubleshooting ................................................................................................................ 80

USA Digital Solutions, Inc. Closing Disclosure Form v10.0.172 Manual 4/10/2015 Page 1 of 80
Introduction to the Closing Disclosure Form Changes
The Consumer Financial Protection Bureau (CFPB) has directed that the consumer lending and
settlement industries begin using a new process and set of forms for transactions relating to consumer
real estate-related loan applications received on 8/1/2015 and later. These forms replace the disclosures
and HUD-1 forms required previously. The new Loan Estimate and Closing Disclosure forms are
introduced in the CFPB’s Final Rule for “Integrated Mortgage Disclosures under the Real Estate
Settlement Procedures Act (Regulation X) and the Truth In Lending Act (Regulation Z)”, published
11/20/2013.
The Final Rule can be found, at the CFPB page: http://www.consumerfinance.gov/regulations/integrated-
mortgage-disclosures-under-the-real-estate-settlement-procedures-act-regulation-x-and-the-truth-in-
lending-act-regulation-z/.
Additional guidance can be found on another CFPB page: http://www.consumerfinance.gov/regulatory-
implementation/tila-respa/.
USA Digital Solutions, Inc. has incorporated the requirements of the Closing Disclosure Form (CDF)
into the Impact/SQL Escrow module, with a new set of data entry screens triggered with the “CDF” Type
of Closing selection on the first screen of Initial Questions (Dates/Transaction Information). There
are changes to the Dates/Transaction Information, Property, Lender and Agents screens, in addition
to completely new data entry screens which replace the w/GFE HUD screens. The Name and Address
File (NAF) has also been updated, coincident with the addition of the CDF, both to speed its operation
and with additional data fields to assist with the CDF. Please note that the payee shortcuts utilized in the
other file types are not utilized in CDF files.
This documentation is designed to explain the CDF Type of Closing, to current Impact Escrow module
users. It is not designed to explain the CFBP regulations.
The existing Residential file non-GFE and with-GFE, worksheet and HUD, and Commercial file types
of closing (data entry formats), continue to be in place in Impact/SQL Escrow. The Residential file with-
GFE type of closing continues to be required, after 8/1/2015, for reverse mortgages, home equity lines of
credit (HELOCs) and mortgages secured by a mobile home or by a dwelling that is not attached to real
property.
For a full explanation of the balance of the Escrow module functionality, the user is referred to the Escrow
Manual.

USA Digital Solutions, Inc. Closing Disclosure Form v10.0.172 Manual 4/10/2015 Page 2 of 80
Name and Address File (NAF)
The Name and Address File (NAF) has been modified in version 10 of Impact/SQL. The look of the
NAF has changed somewhat (screen samples are shown below).
The basic functionality is the same as before, but the following points should be noted:
A search will not begin until the user clicks on the Search button (or hits ENTER after a minimum
number of characters have been entered – as the Search button has the focus). This lets all of
the desired search option fields be completed by the user before the search is conducted.
The search is much faster than with earlier versions of Impact/SQL.
The Details side of the screen can be hidden, to provide more room for the Name and Address
information presented. The Details side of the screen can be called up, or hidden, with the
Show Details checkbox, at the bottom of the screen. The Full Details button, at the bottom of
the Details window, will bring up the NAF Entity screen where full information on the entity can
be seen (and edited by authorized users). The Info button can also be used to bring up the
NAF Entity screen for a particular NAF entry.
The Item tab, on the NAF Entity screen, presents the
information displayed on the Details side of the Name and
Address File screen; the License tab presents Company
and Contact License Information as shown to the left.
Licensing Information tabs are available on entries of the
categories Lender, Payoff Lender, Mortgage Broker and
Real Estate Broker. The Licensing Information is used
on the Lender and Agent party screens and on the
Contacts tabs of those parties’ screens on CDF files.

USA Digital Solutions, Inc. Closing Disclosure Form v10.0.172 Manual 4/10/2015 Page 3 of 80
Closing Disclosure Form
Dates/Transaction Information
Type of Closing The Type of Closing field, near the top of the Dates/Transaction Information screen, is used to identify
that the file being worked up is to follow the Closing Disclosure Form regulations. The user should select
the CDF (Closing Disclosure Form) entry from the dropdown list to get the new functionality. Only
Residential files can have the CDF Type of Closing selected. CDF entry is enabled, and can be set as
the default entry Type (at the appropriate time) in Utilities, Setup Options, Escrow Functions, Data Entry.
NOTE: A file can be switched from another Type of Closing to CDF, but all data except Parties,
Property, Payoffs and Deposit information will be lost. Similarly, if a CDF file is switched to
another Type of Closing, all data except that noted above will be lost.
NOTE #2: A CDF file with more than three Lenders &/or Agents, switched to another Type of
Closing, will lose all Lenders beyond the first two and the Mortgage Broker (or the first three if no
Mortgage Broker is assigned) and all Agents beyond the first three that may have been
established. This same behavior also occurs if a Commercial file is switched to a Residential file
– a change unrelated to the CDF functionality, but introduced at the same time. Only the first
Property on a Commercial file is kept if the file is switched to a Residential file.
Transaction Type Behavior The selection, on a CDF file, of a Transaction Type which is coded (via Utilities) to be a Refinance type,
will result in some changes in the Lender’s Loan Terms and CDF screens. These changes will be
discussed in detail in the applicable sections in this documentation. There are two variations of how the
CDF can be presented for Refinance transactions, and both will be explained later in this documentation.
Should a file’s Transaction Type be changed to a Refinance-flagged type, the user will receive the
following warning message, detailing the changes that will be made to the file:
If the user is sure of the change, they should click on Yes.

USA Digital Solutions, Inc. Closing Disclosure Form v10.0.172 Manual 4/10/2015 Page 4 of 80
Rescission Period Checkbox There is a checkbox, in the lower right of the Dates/Transaction Information screen, labelled “This
order has a rescission period”. It should be checked if that is the situation. Transactions with a
rescission period must have the CDF provided to all parties who have the right of rescission, not just the
borrower. This checkbox, when combined with the “Print Buyer/Borrower names” Confirm Receipt
checkbox, on the Loan Calculations and Other Disclosures screen, will override the absence of the
“Show on CDF” checkbox, on the Parties screen, and will print all Buyer/Borrower names on the receipt
confirmation schedule.
There are no other changes on the Dates/Transaction Information screen.

USA Digital Solutions, Inc. Closing Disclosure Form v10.0.172 Manual 4/10/2015 Page 5 of 80
Property Information
The Property main screen has been altered to include three new fields: Appraisal Type, Appraised
Value and Appraisal Description. They are located mid-screen, just above the Unit, Lot and Block
fields. The appraisal fields are used, on non-sale/refinance transactions, to change the label in the
Closing Information section, at the top of page 1 of the CDF, from “Sales Price” to either “Appraised
Prop. Value” or “Estimated Prop. Value”. And they provide for the presentation of the appraised value
rather than a sales price (which has been the field – from the first screen of Initial Questions – used in
prior HUD presentations).
The Appraisal Type field has a dropdown listing of options the user can select from, as shown below. If
“Other” is selected, the Appraisal Description field will open up for user input.
The Property screen has also been altered to include a Personal Property tab (on both GFE and CDF
file types). The CDF does include a line for a value of personal property being included in a sale
transaction (Page 3, Section K, line 2), and the amount added to the Personal Property tab will feed the
summary total on that line, if the Show on Statements checkbox is checked.. Personal property being
conveyed may also be detailed directly on line K.2, if not detailed here. This functionality also applies to
GFE files (HUD line 102), with this new release of Impact/SQL.
The user should enter the Amount of any personal property being conveyed in the transaction.
The Show on Statements checkbox should be checked if the amount on this screen is to be included on
the GFE HUD (line 102) or CDF (K.2) as entered here.
The Description field is used to detail the personal property being conveyed. It will be used on an
addendum to the CDF, but not on line K.2.

USA Digital Solutions, Inc. Closing Disclosure Form v10.0.172 Manual 4/10/2015 Page 6 of 80
Buyers/Borrowers
The New Buyer party screen includes a relabeled checkbox with the label “Show On CDF”. This field is
at the top of the screen, to the right of the Entity Type selection box, as shown below. On non-CDF files
it is labeled “Show on HUD”.
Checking this box will ensure the party is presented on page 1 of the CDF as a Buyer/Borrower. If there
is insufficient room at the top of page 1 of the CDF for all checked parties, they will be reflected on an
addendum.
If unchecked on one or more buyer/borrower, but the “This order has a rescission period” checkbox (on
the first screen of Initial Questions), and the “Print Buyer/Borrower names” checkbox (on the Loan
Calculations and Other Disclosures screen) are both checked, then all buyer/borrower names will be
generated on the Receipt Confirmation schedule.
That is the only change made to the Parties screens.

USA Digital Solutions, Inc. Closing Disclosure Form v10.0.172 Manual 4/10/2015 Page 7 of 80
Lenders
There is no limit to the number of lenders that can be added to a CDF file. The GFE limit of three has
been removed. As was noted earlier, if more than three lenders are added to a CDF file, and the file is
subsequently switched to another Type of Closing, lenders over the first three (two and mortgage
broker) will be lost.
The Lender party type screen has been altered, for CDF files, in a few ways: Short Name, Mortgage
Broker, Licensing Information and Loan Terms.
Short Name A Short Name field has been added below the Full Name field. The Short Name field is used on the
Contact Information table of the CDF, due to the limited space available.
The system will automatically copy the Full Name and truncate it after 30 characters to fill the Short
Name field when the user TABs out of the Full Name field (or if the Full Name is filled via the NAF). As
this could lead to an unclear name, the field is editable by the user. If the Full Name field is modified, the
Short Name field’s contents will also change, and, if it had been edited, may need to be re-edited.
Mortgage Broker The traditional GFE approach of having the third lender assumed to be the Mortgage Broker has been
altered. Any lender can be flagged as the Mortgage Broker via the checkbox on the Lender entry
screen. Only one lender can be the mortgage broker for the file. Once a Mortgage Broker is selected,
the checkbox will not appear for other lenders; and, the Loan Terms and Proposed Insured tabs will be
removed from the Mortgage Broker screen. The screen shot below is not reproducible, but shows all tabs
for demonstration purposes.

USA Digital Solutions, Inc. Closing Disclosure Form v10.0.172 Manual 4/10/2015 Page 8 of 80
When a lender entry is selected as the mortgage broker, and the user saves the entry, a prompt will be
received letting the user know that any existing CDF charge entries for the lender will be lost, as shown
below.
If a lender has been selected to be the mortgage broker, but it is then determined that another lender
should be the mortgage broker, the user must uncheck the Mortgage Broker checkbox on the original
broker before the checkbox will be available on the other lender to be checked. The same message
about losing CDF entries will be received upon saving after the new selection.
Lender Licensing Information There is now a tab on the New/Edit Lender screen that is for License Information. This information is
included in the CDF Contact Information table (page 5 of the CDF). Licensing information may also be
entered on lender contacts (on the Contacts tab). The licensing information may be entered into the
NAF (by a NAF administrator), for ease and consistency of data entry on files.
On the Lender screen, there are two sets of License Information: Company License Information and
Attention To License Information. These fields are used to enter the license ID(s) for the firm and the
specific loan officer. The Nationwide Mortgage Licensing System & Registry (NMLS) License ID is
entered in the first field. If the company or loan officer has a state or other agency licensing requirement,
that information is entered into the next two fields: the Other License ID goes in the field of that name,
and the issuing authority is identified in the Other License Issued By field.
On the Contacts tab, of the New/Edit Lender screen, additional contacts at the lender can be entered.
On the New/Edit Contact screen, there are three fields for the specific contact’s license information that
mirror those shown above; just for the contact – not the Company.

USA Digital Solutions, Inc. Closing Disclosure Form v10.0.172 Manual 4/10/2015 Page 9 of 80
Loan Terms The Lender’s Loan Terms screen has been substantially altered, for CDF files. There is less information
on this tab for CDF files than that on GFE files. The selections made here appear on page 1 of the CDF,
under the Loan Information and Loan Terms headings. The Loan Terms tab will not appear on
Mortgage Brokers.
There is additional loan information entered through the CDF screens. Those data entry screens will be
discussed later in this documentation.
The Loan Term is entered via two fields - a number field and a selection box of either “Years” or
“Months”. If the loan term is a whole number of years, that number should be entered and “Years”
selected. Otherwise, the number of months should be entered and “Months” selected.
The Interest Rate entered is the initial interest rate on the loan. The rate should be entered with a
decimal amount for fractions of a percent. For example, 4.25% would be entered as “4.25”, not “.0425”.
The Purpose field is filled via a selection from the dropdown listing available, or by manually typing an
entry. The choices on the dropdown listing are: Construction, Purchase, Refinance and Home Equity
Loan. The listing of available items cannot be edited, but the field can be manually filled with other text.
The Product field is also filled via a selection from the dropdown listing. The choices on the dropdown
listing are: Fixed Rate, Adjustable Rate, Step Rate and Other. With the Other selection, the field below
the Product selection box can be filled with a manually typed product name (if the product involved does
not appear on the dropdown’s listing).
The initial principal and interest (P&I) payment amount is entered in the P&I Amount field.
On Refinance transactions (Transaction Type selection is classified as Refinance type via Utilities),
there are two variations of the CDF tree-view (and resulting documents) available. The first will continue
to use the full CDF, with only the Borrower’s Summaries of Transactions screens K and L, and a full
Calculating Cash to Close section. The other substitutes a Payoffs and Payments schedule, along with
a shorter Calculating Cash To Close section. The “Use Optional Closing Disclosure forms for
transactions not involving a seller” checkbox option, at the bottom of the screen, will be enabled if a
refinance transaction type is selected. If checked, the CDF tree-view (discussed later in this
documentation) will be altered so that the Summaries of Transactions section of the tree-view
(Summary screen and screens K, L, M & N) are removed and are replaced with a Payoffs and
Payments screen, and the alternative Calculating Cash to Close screen will be presented. If a
refinance transaction type is selected but the “Use Optional Closing Disclosure” checkbox is not
checked, only the Seller Payoffs and Seller’s screens of the Summaries of Transactions section (M &
N) will be removed.

USA Digital Solutions, Inc. Closing Disclosure Form v10.0.172 Manual 4/10/2015 Page 10 of 80
Agents
There are no limits on the number of Agents that can be added to a file. The GFE limit of three has been
removed. There are still the three categories of Agents (Listing, Selling and Other). As was noted earlier,
if more than three agents are added to a CDF file, and the file is subsequently switched to another Type
of Closing, agents over the first three will be lost.
Agent Licensing Information There is now a tab on the Agent screen that is for License Information. This information is included in
the CDF Contact Information table, on page 5. Licensing information may also be entered on agent
contacts (on the Contacts tab). The licensing information may be entered into the NAF (by a NAF
administrator), for ease and consistency of data entry on files.
This set of fields is identical to the licensing fields on the Lender screens.
On the Contacts tab, of the New/Edit Agent screen, additional contacts at the agent’s office can be
entered. On the New/Edit Contact screen, there are three fields for the specific contact’s license
information that mirror those shown above; just for the contact – not the Company.

USA Digital Solutions, Inc. Closing Disclosure Form v10.0.172 Manual 4/10/2015 Page 11 of 80
Closing Disclosure Form Data Entry
The Closing Disclosure Form data entry routine is quite different from the HUD and Worksheet data
entry screens. There is a tree-view on the left side of the screen that presents the data entry screen
headings under each lender/loan established for the file. The listing of data entry categories is the same
for all lenders except for the first lender’s list, which includes the Commissions and Payoff screens. The
Mortgage Broker (if one lender was identified as such) will not appear in the tree-view. Starting with the
CDF Header entry, on the CDF data entry tree-view, the screens presented are in the order of the
finished CDF. Data entry will not necessarily be done in that sequence, but this documentation will go
through the tree-view in sequence.
When first opened, the Closing Disclosure Form will display the tree-view fully expanded, with the
lenders presented in the order they are on the Parties screen. The first lender’s heading will be
highlighted and a summary of that lender’s loan information will be presented on the right side of the
screen. In the screen shot below the first lender’s tree-view is presented and limited charge information
has been entered. The sample below reflects a sale/resale transaction’s tree-view.
The Save & Exit icon, at the top left of the screen, is used to save any changes and return to the
Escrow desktop.
The Print icon is used to print the Closing Disclosure, Closing Disclosure Tracking, Settlement
Statement, Title Instructions, Lender Summary, Tolerance Worksheet, and Balance Statement.
The discussion of the printing and versioning of the Closing Disclosure, and other documents in this set,
is found near the end of this documentation, after the data entry discussion.
The Docs icon is used to open the Escrow Documents Menu for the selected file. Impact/SQL users
will be familiar with the escrow document routine reached with this icon.

USA Digital Solutions, Inc. Closing Disclosure Form v10.0.172 Manual 4/10/2015 Page 12 of 80
The File Notes icon will open the File Notes screen, introduced in version 8.5 (054).
The Disburse icon has two options under it: Create & Print Checks and Create & Print Individual
Checks. Impact/SQL users will be familiar with the disbursements screens reached via those options, so
they will not be described in this documentation. If a user does not have disbursement permissions, they
will not see the icon.
The Previous and Next icons are not used on the CDF entry screens, and so are grayed out.
The Jump icon is used to move from the CDF screens back to the Initial Questions screens.
The Up and Down icons are used to move up and down the tree-view of CDF entry screens.
The Warnings icon, at the top right of the CDF screen, will pull up a listing of potential issues with the
data in its present form. The Warnings window will display the Section that the data should be in, the
Lender involved and a Description of the potential issue. A sample is shown here.
The Section entries are links (in blue) that will take the user to the section identified, for the lender
identified. The link, when clicked on, will give focus to the section, of the appropriate lender, but will not
close the Warnings window. The Warnings window can be moved to a second monitor, if available, so
the items can be worked without closing the Warnings window. The Warnings window can then be
updated with the Refresh icon, in the upper right corner once a change is made to the data.
Use the Close icon to close the Warnings window.
The Warnings icon may be replaced with another icon under certain situations.
If there is a critical data error (for example, a title insurance charge does not have a designated target on
the CDF, or imported data exceeds the available lines) the icon will be replaced with the Critical Error
icon. The Warning window will explain the issue.
If there is a tolerance issue, the icon will be replaced with the Tolerance Violation icon. This will
indicate that there are one or more charges which have had a Loan Estimate amount entered on them,
and the Tolerance Category of “Zero Percent” selected, and the Total Amount entered is not the same
as the Loan Estimate amount. Or, it will indicate that the aggregate of charges with the “Ten Percent”
tolerance category selected is greater than the Loan Estimate amounts by more than 10%. If no Loan
Estimate amount is entered on a charge, the validation testing is not done and no warning issued. Again,
the Warnings window will explain the issue(s).
The order of warning icon priority and presentation is Critical Error, then Tolerance Violation,
and then Warnings.

USA Digital Solutions, Inc. Closing Disclosure Form v10.0.172 Manual 4/10/2015 Page 13 of 80
The Add New Lender icon, above the tree-view, is used to add another party to the file. When
clicked, the default party type selected will be Lender, but any party type can be selected.
The Edit Lender icon, at the top right of the data window (next to the lender name) is used to take the
user to the Edit Lender screen, where the currently selected lender and its loan information can be
edited.
If no lender has been added to a file, and the user goes to the Closing Disclosure Form entry screens, the
following screen will present, rather than that shown earlier. The user can click on the link in the middle
of the screen or the Add New Lender icon, above the tree-view area, to add a lender to the file.
Each of the data entry screens will be discussed in the following pages; in the order they are presented in
the tree-view.

USA Digital Solutions, Inc. Closing Disclosure Form v10.0.172 Manual 4/10/2015 Page 14 of 80
File Options (ONLY w/ NM Property or WA State Requirements) If the property on a particular file is in New Mexico, or if the system is configured to “Enable Washington
State Requirements”, the first entry on the tree-view will be File Options. New Mexico charges sales
tax on commissions, and Washington on settlement charges and policy premiums, and the treatment of
those taxes must be taken into account. Users not involved with such situations will not see this screen.
The File Options screen is used to identify where any calculated sales tax is to be presented on the
Closing Disclosure. The options, as can be seen on the screen shot below, are to include the tax with the
charge, aggregate the tax per CDF section or aggregate all the sales tax into a specific CDF section (B, C
or H). The default selection will be ”Tax included in amount”.
The sales tax will be included in the Company’s fee slip/fee check automatically.
USA Digital Solutions, Inc. Closing Disclosure Form v10.0.172 Manual 4/10/2015 Page 15 of 80
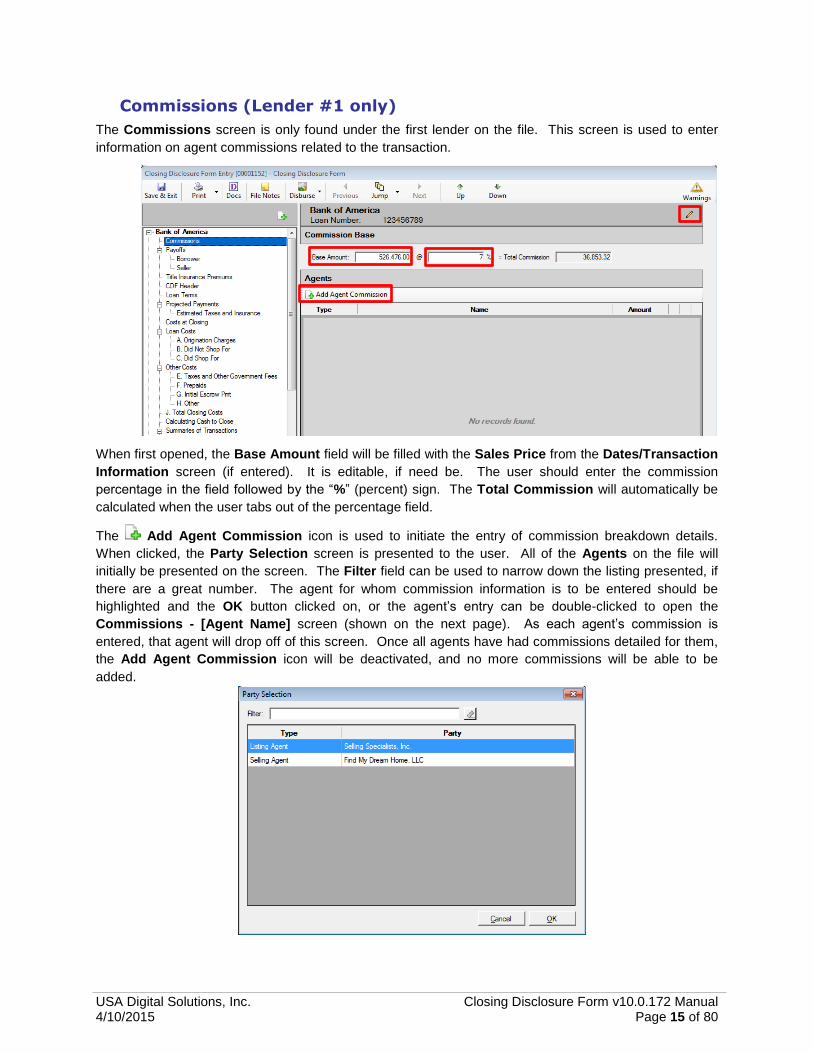
Commissions (Lender #1 only)
The Commissions screen is only found under the first lender on the file. This screen is used to enter
information on agent commissions related to the transaction.
When first opened, the Base Amount field will be filled with the Sales Price from the Dates/Transaction
Information screen (if entered). It is editable, if need be. The user should enter the commission
percentage in the field followed by the “%” (percent) sign. The Total Commission will automatically be
calculated when the user tabs out of the percentage field.
The Add Agent Commission icon is used to initiate the entry of commission breakdown details.
When clicked, the Party Selection screen is presented to the user. All of the Agents on the file will
initially be presented on the screen. The Filter field can be used to narrow down the listing presented, if
there are a great number. The agent for whom commission information is to be entered should be
highlighted and the OK button clicked on, or the agent’s entry can be double-clicked to open the
Commissions - [Agent Name] screen (shown on the next page). As each agent’s commission is
entered, that agent will drop off of this screen. Once all agents have had commissions detailed for them,
the Add Agent Commission icon will be deactivated, and no more commissions will be able to be
added.

USA Digital Solutions, Inc. Closing Disclosure Form v10.0.172 Manual 4/10/2015 Page 16 of 80
There are three tabs on the Commissions [Agent Name] screen: Information, Sub-Agents and Notes.
The Information tab is where the agent’s commission is calculated or manually entered. Depending on
system configuration, the Agent Percent will either be a percentage of the base amount or of the total
commission. The percentage can be taken out to four (4) decimal places. Once a value is entered in the
Agent % field, the Agent Amount will calculate, and will be defaulted to the Seller Amount field. It can
be manually split or moved by the user.
When an amount is entered into the Paid by Others field, and the user then tabs out of the field, the
system will bring up the Paid by Others (Payors) screen, on which details of which party(ies) to the file
is(are) paying the charge, and whether it is POC’d. The full amount must be detailed before leaving the
Paid by Others (Payors) screen. The ellipse button after the Paid by Others field will bring up the Paid
by Other (Payors) screen for subsequent editing after initial completion.
If there are Credits or Funding considerations, they are addressed in the middle section of the screen. If
the charge is to be withheld from the loan, the Withhold from Loan checkbox should be checked. The
amount of a seller credit is entered into the Seller to Borrower field.
If the charge is POC’d by the borrower or seller, details are entered in the POC section of this screen. If
the Borrower or Seller paid the charge outside of closing, the amount(s) they paid would go in their
respective fields. The user may enter a substitute Description in the field of that name.
The right side of the top section of the
screen will contain sales tax fields if the
property is in New Mexico, which taxes
commissions. The tax percentage should
be entered and the tax will be computed
and entered for the party(ies) indicated as
responsible for the commission.

USA Digital Solutions, Inc. Closing Disclosure Form v10.0.172 Manual 4/10/2015 Page 17 of 80
Sub Agents – an unlimited number of sub-agent entries can be made. When the Sub Agents tab is
clicked on, a listing of existing entries will be presented, and at that top of the tab the Add Sub Agent
icon is used to bring up the Sub Agent data entry screen, shown here.
The Amount can either be entered directly, or calculated as a percentage of the agent’s total – by
entering a percentage figure in the Percent field at the top of the screen. The Description field, in the
middle of the sub agent screen, is used to enter a description that will carry through to the sub-agents’
checks. The NAF can be used to fill the payee information, when the cursor is in either the Company
Name or Agent’s Name fields. Alternatively, the Search icon, next to the Company Name field, will
bring up the Party Selection screen, from which the user can select the payee for the sub agent amount.
Notes – notes entered on an agent commission, via the Notes tabs, will present on the Settlement
Statement, and will present on the Commission Breakdown CDF addendum.
Once one or more agent commissions have been entered, the main Commissions screen will reflect that
information, as shown below.
The icons to the right of each agent commission entry are used to:
Edit the Agent,
Edit the Commission, or
Delete the Commission.

USA Digital Solutions, Inc. Closing Disclosure Form v10.0.172 Manual 4/10/2015 Page 18 of 80
Payoffs (Lender #1 only) The Payoffs screen will present a listing of all of the payoffs entered on the file, both for the Borrower
and the Seller, as entered. Selecting the Payoffs>Borrower or Payoffs>Seller tree-view entries will
limit the payoffs presented on the right side of the screen to the selected party type. The Payoffs>Seller
entry will not be presented on files with a Refinance Transaction Type.
The New Payoff icon/button is available on any of the three tree-view selections, and either party type
(Borrower or Seller), whose payoff is being entered, can be selected on the payoff entry screen
regardless of which tree-view entry point the user took.
Borrower payoffs entered will appear on the Payoffs and Payments screen if the Lender’s Loan Terms
“Use Optional Closing Disclosure forms for transactions not involving a seller” option is checked on
a file with a Refinance Transaction Type.
The Payoff Details screen is near-identical to that of other file types within Impact/SQL, which the users
are familiar with, and so will not be explained in detail here. The only difference is the Payoff First
Mortgage checkbox.
The Payoff First Mortgage checkbox should be used to flag the primary lien payoff.
USA Digital Solutions, Inc. Closing Disclosure Form v10.0.172 Manual 4/10/2015 Page 19 of 80
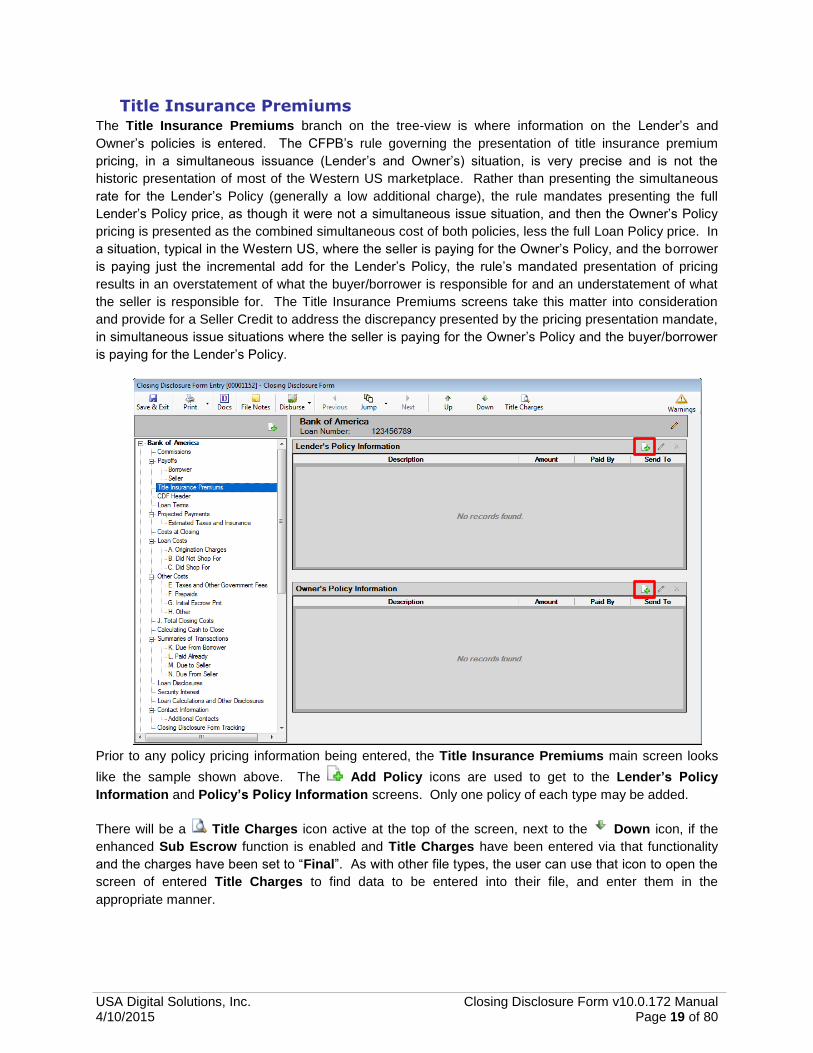
Title Insurance Premiums The Title Insurance Premiums branch on the tree-view is where information on the Lender’s and
Owner’s policies is entered. The CFPB’s rule governing the presentation of title insurance premium
pricing, in a simultaneous issuance (Lender’s and Owner’s) situation, is very precise and is not the
historic presentation of most of the Western US marketplace. Rather than presenting the simultaneous
rate for the Lender’s Policy (generally a low additional charge), the rule mandates presenting the full
Lender’s Policy price, as though it were not a simultaneous issue situation, and then the Owner’s Policy
pricing is presented as the combined simultaneous cost of both policies, less the full Loan Policy price. In
a situation, typical in the Western US, where the seller is paying for the Owner’s Policy, and the borrower
is paying just the incremental add for the Lender’s Policy, the rule’s mandated presentation of pricing
results in an overstatement of what the buyer/borrower is responsible for and an understatement of what
the seller is responsible for. The Title Insurance Premiums screens take this matter into consideration
and provide for a Seller Credit to address the discrepancy presented by the pricing presentation mandate,
in simultaneous issue situations where the seller is paying for the Owner’s Policy and the buyer/borrower
is paying for the Lender’s Policy.
Prior to any policy pricing information being entered, the Title Insurance Premiums main screen looks
like the sample shown above. The Add Policy icons are used to get to the Lender’s Policy
Information and Policy’s Policy Information screens. Only one policy of each type may be added.
There will be a Title Charges icon active at the top of the screen, next to the Down icon, if the
enhanced Sub Escrow function is enabled and Title Charges have been entered via that functionality
and the charges have been set to “Final”. As with other file types, the user can use that icon to open the
screen of entered Title Charges to find data to be entered into their file, and enter them in the
appropriate manner.

USA Digital Solutions, Inc. Closing Disclosure Form v10.0.172 Manual 4/10/2015 Page 20 of 80
Lender’s Policy Information
Clicking on the Add Policy icon, for the Lender’s Policy Information, brings up the screen below.
The Policy to Issue field can be manually typed into, with the policy to be issued, or the Search icon
can be clicked on to pull up the policy menu for the underwriter on the file, from which the policy can be
selected, as shown in the graphic above.
If an Income Code is selected, the Payee Information will default to the Company, and the Liability field
will fill with the value linked to the income code selected. If the policy is not being issued by the Company
(outside title situation), then no income code should be selected; the outside title company should be
identified in the Payee Information section at the bottom of the screen.
The Base Premium through Total Premium fields are for “rate schedule/manual” figures (historic pricing
method). The Surcharge amount will be added to the Base Premium. The Discount amount will be
subtracted from the Base Premium. Both the Surcharge and Discount figures are entered as positive
numbers.

USA Digital Solutions, Inc. Closing Disclosure Form v10.0.172 Manual 4/10/2015 Page 21 of 80
The Lender’s Policy Information screen has a “Simultaneous” checkbox. It is to be checked if the
pricing of the Lender’s Policy is based on the simultaneous issue discount. This will trigger the
appropriate Credit to Borrower for Seller Pay, on the Owner’s policy screen – if the seller is paying for
the Owner’s policy and the borrower is paying for the Lender’s policy. In this situation, the user would
enter the full Lender’s Policy Base Premium, in the field of that name, and enter the Discount that brings
the Total Premium to the rate schedule/manual simultaneous rate for the Lender’s Policy. Checking the
checkbox will pull the Base Premium to the CDF Amount field.
The Paid By field is used to identify if the Borrower, Seller or another party is paying for the policy. If
“Other” is selected, the Search tool can used to identify the party on the file that is paying for the
policy.
The CDF Amount field is used to present the value that is to appear on the CDF for the Lender’s Policy.
Again, as was discussed earlier, in a simultaneous issue situation, this will be a higher figure than the rate
schedule pricing would indicate. This amount will be calculated by the system.
The Description field will default to the mandated format for the Lender’s Policy charge (with “Title –“ in
front of the policy info) but the field will be editable.
The Send To field is used to identify which section of the CDF the policy premium information should be
presented. Sections B, C or H are the options. If no selection is made, a critical warning will be added to
the Warnings listing and the Critical Warning icon will appear in the upper right of the CDF screen
(once the Title Insurance Premiums screen is moved away from). The warning will be removed once the
“Send To” assignment is made, and the Title Insurance Premiums screen is moved away from.
The Loan Estimate and Tolerance fields are used to enter the amount from the Loan Estimate and the
tolerance category for the policy.

USA Digital Solutions, Inc. Closing Disclosure Form v10.0.172 Manual 4/10/2015 Page 22 of 80
The Endorsements section is used to detail any endorsements, and possible premiums, that are being
issued with the Lender’s Policy. Click on the New Endorsements button to bring up the screen on
which that information is entered. The behavior is similar to the Lender’s Policy screen’s top portion. The
CDF Amount is the rate manual amount.
The Payee Information section will be pre-filled and locked if an income code was selected above, or will
be open for entry of the outside title company’s information.
Once the data entry is completed, the user should click on OK to save the data. The policy and
endorsement information will be displayed on the main Title Insurance Premiums screen, with the policy
being listed first.

USA Digital Solutions, Inc. Closing Disclosure Form v10.0.172 Manual 4/10/2015 Page 23 of 80
Owner’s Policy Information
Clicking on the Add Policy icon, for the Owner’s Policy Information, brings up a screen identical to
the Lender’s Policy Information screen with two exceptions:
1) The Owner’s Policy Information screen does not have the “Simultaneous” checkbox.
2) There are a pair of fields under the label Credit to Borrower for Seller pay: that are used to
present the credit needed to correct the Borrower and Seller actual costs, in a simultaneous issue
situation with a seller-paid Owner’s policy and a borrower-paid Lender’s policy, due to the
regulation-mandated pricing presentation on the CDF (discussed further below).
The CDF Amount field is used to present the value that is to appear on the CDF for the Owner’s Policy.
Again, as was discussed earlier, in a simultaneous issue situation, this will be a lower figure than the rate
schedule pricing would indicate. This amount will be calculated by the system, in conjunction with
information on the Lender’s Policy screen. Both the Lender’s Policy and Owner’s Policy figures must be
entered before the calculation will be completed. Clicking on the Info icon will present an explanation
of the calculation.
Under the Credit to Borrower for Seller pay: label, there is a Description field that will default, but will
be editable, and an Amount field for the amount of the credit. The credit amount would be the amount
required to bring the cost to the borrower, for the simultaneous Lender’s Policy, down from the stated
CDF Amount (on the Lender’s Policy screen) to the rate schedule’s amount for the simultaneous issue, if
the Owner’s policy is being paid for by the seller. It is the same amount needed to bring the CDF
Amount, for the seller-paid Owner’s Policy, up to the rate schedule’s amount for the Owner’s Policy. The
credit will be calculated automatically if the “Simultaneous” flag is checked on the Loan Policy
Information screen and the Seller is paying for the Owner’s policy and the borrower is paying for the
Lender’s policy. Both the Lender’s Policy and Owner’s Policy figures must be entered before the
calculation will be completed.
In the sample below, a Lender’s Policy has been entered, to be paid by the borrower, and the
Simultaneous flag checked on that data entry screen. Then, on the Owner’s Policy screen, the Base
Premium has been entered and the Seller is identified in the Paid By field. Clicking on the Info icon
results in the presentation of the explanation of the calculation for the CDF Amount.
In this example, the $450 Credit to
Borrower for Seller Pay, when added to
the CDF Amount, brings the seller cost
back up to the true rate manual cost for the
Owner’s Policy, which the seller will be
paying, and reduces the borrowers true cost
for the Lender’s policy to $150.00. The
credits will appear in sections L & N of the
CDF (discussed later in this documentation).

USA Digital Solutions, Inc. Closing Disclosure Form v10.0.172 Manual 4/10/2015 Page 24 of 80
CDF Header Clicking on the CDF Header entry of the CDF tree-view will present the information that will be shown at
the top of page 1 of the Closing Disclosure Form. A sample of the screen is presented below.
The Borrower, Seller and Property labels are links that will take the user to the respective data entry
screens.
USA Digital Solutions, Inc. Closing Disclosure Form v10.0.172 Manual 4/10/2015 Page 25 of 80
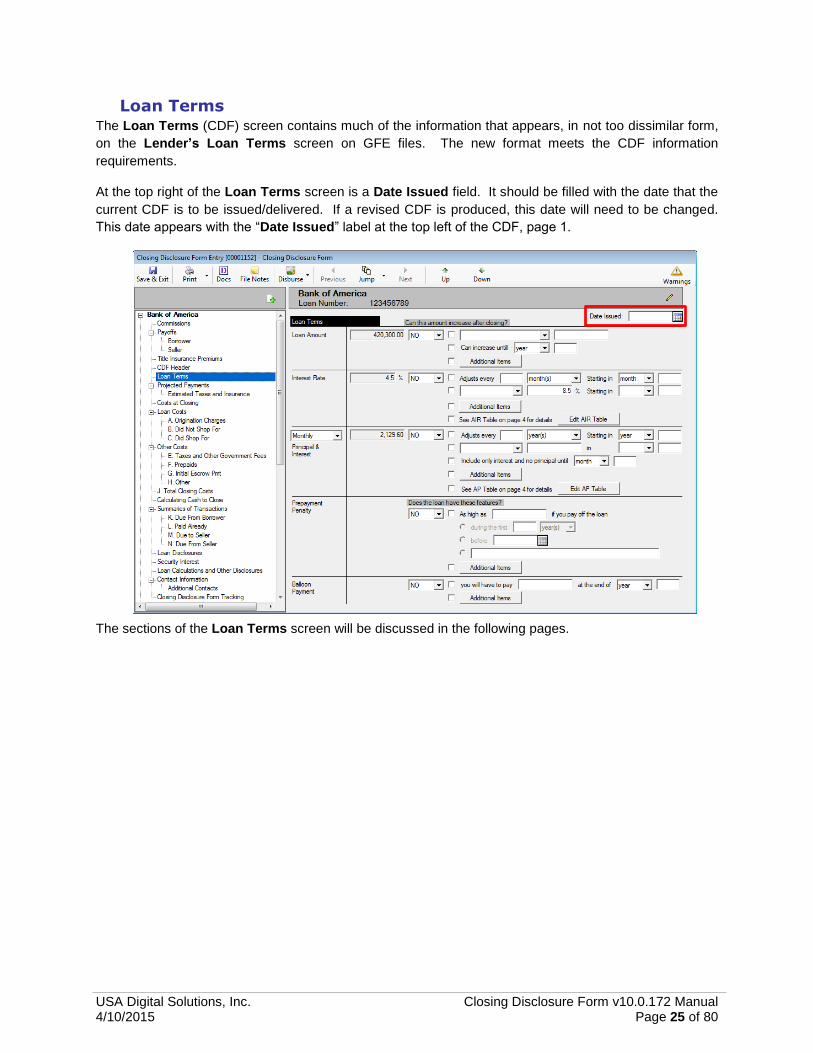
Loan Terms The Loan Terms (CDF) screen contains much of the information that appears, in not too dissimilar form,
on the Lender’s Loan Terms screen on GFE files. The new format meets the CDF information
requirements.
At the top right of the Loan Terms screen is a Date Issued field. It should be filled with the date that the
current CDF is to be issued/delivered. If a revised CDF is produced, this date will need to be changed.
This date appears with the “Date Issued” label at the top left of the CDF, page 1.
The sections of the Loan Terms screen will be discussed in the following pages.

USA Digital Solutions, Inc. Closing Disclosure Form v10.0.172 Manual 4/10/2015 Page 26 of 80
Loan Amount
The Loan Amount section is used to detail information on the principal balance of the loan. The initial
loan balance will default in the field just to the right of the Loan Amount label. The NO/YES dropdown is
used to answer the question “Can this amount increase after closing?” that is above the section.
There are three checkboxes used to indicate that the commentary built up in the fields next to them
should be used on the CDF (page 1, Loan Terms, Loan Amount section). They would only be used on
the CDF if YES is the selection, and the items are checked, but can be edited even if NO is the selection.
The first item indicates that the phrase “Can go as high as” or “Goes as high as” (selected from
the dropdown list), followed by the maximum principal balance (entered in the field after the
phrase selection), should be presented on the CDF.
The second option would place the phrase “Can increase until [year/month/payment] ##” on
the CDF. The user would select “year”, “month” or “payment” from the dropdown list and enter
the number of years, months or payments out that the balance could increase in the field after the
period selection.
The Additional Items checkbox is used to indicate that the phrase(s) entered via the Additional
Items - Loan Amount screen (shown below, accessed via the Additional Items button) should
appear on the CDF. This screen can be used to enter custom comments regarding how the loan
balance can increase after closing.
The New Item button will open the Add/Edit
Item data entry screen, as shown below.
The Add/Edit Item screen will let the user
enter text, with some basic formatting tools.
The B icon will bold selected text.
The I icon will italicize the selected text.
The U icon will underline the selected text.
Click OK when the entry is completed to
return to the Additional Items screen.
The Delete icon should be
used to remove an Item. Click on
OK to save the entry(ies) made, or
Cancel to close the window
without saving changes.

USA Digital Solutions, Inc. Closing Disclosure Form v10.0.172 Manual 4/10/2015 Page 27 of 80
Interest Rate
The Interest Rate section is used to detail information on the interest rate of the loan. The initial interest
rate will default in the field just to the right of the Interest Rate label. The NO/YES dropdown is used to
answer the question “Can this amount increase after closing?” There are four checkboxes used to
indicate that the commentary built up in the fields next to them should be used on the CDF (page 1, Loan
Terms, Interest Rate section). They would only be used on the CDF if YES is the selection, but can be
edited even if NO is the selection.
The first item indicates that the phrase “Adjusts every ## [year(s)/month(s)/payment(s)]
Starting in [year/month/payment] ##” should be presented on the CDF. The selections for the
bracketed items are done via the dropdown lists provided.
The second item indicates that the phrase “Can go as high as” or “Goes as high as” (selected
from the dropdown list), followed by the maximum interest rate (entered in the field after the
phrase selection), “Starting in [year/month/payment] ##” should be presented on the CDF.
The third item indicates that the phrase “See AIR Table on page 4 for details” should be
presented on the CDF. The Edit AIR Table button is used to open the Adjustable Interest Rate
Table screen (shown here).
The Adjustable Interest Rate (AIR) Table screen is used to build the AIR Table information
presented for adjustable rate loans, on page 4 of the CDF. The first line of the AIR Table is used
to identify the Index which the variable rate is tied to and the Margin over the index. The index
options are shown above, in the screen shot. If a custom description is required, the Text
checkbox should be checked and the text field next to it will open for editing.
The Initial Interest Rate will default from the Lender’s Loan Terms screen.
The Minimum/Maximum Rate data is entered in the two fields provided.
The Change Frequency section is used to detail when rate changes will occur. It will be “fed”
from information entered on the first two lines of the Interest Rate section of the Loan Terms
screen, but the text can be overwritten by clicking the Text checkbox and entering a description.
The Limits on Interest Rate Changes section is used to detail the maximum change allowed on
the first and any subsequent changes.
The Additional Items (fourth item) line is like that in the Loan Amount section discussed
previously.

USA Digital Solutions, Inc. Closing Disclosure Form v10.0.172 Manual 4/10/2015 Page 28 of 80
[Time Period] Principal & Interest
The [Time Period] Principal & Interest section details the periodic principal & interest amount – with the
period being selected from the dropdown list in the section label (left of the section). The period options
that can be selected are: Daily, Weekly, Bi-Weekly, Monthly, Semi-Monthly, Quarterly, Semi-Annual
and Annual. The amount for the payment goes in the field to the right of the period selection. The
NO/YES dropdown is used to answer the question “Can this amount increase after closing?” There
are five checkboxes used to indicate that the commentary built up in the fields next to them should be
used on the CDF (page 1, Loan Terms, Monthly Principal & Interest section). They would only be used
on the CDF if YES is the selection, but can be edited even if NO is the selection.
The first item indicates that the phrase “Adjusts every ## [year(s)/month(s)/payment(s)]
Starting in [year/month/payment] ##” should be presented on the CDF. The selections for the
bracketed items are done via the dropdown lists provided.
The second item indicates that the phrase “Can go as high as” or “Goes as high as” (selected
from the dropdown list), followed by the maximum payment (entered in the field after the phrase
selection), “Starting in [year/month/payment] ##” should be presented on the CDF.
The third item indicates that the phrase “Include only interest and no principal until
[year/month/payment] ##”.
The fourth item indicates that the phrase “See AP Table on page 4 for details” should be
presented on the CDF. The Edit AP Table button is used to open the Adjustable Payment
Table screen (shown here, and described on the next page).

USA Digital Solutions, Inc. Closing Disclosure Form v10.0.172 Manual 4/10/2015 Page 29 of 80
The Adjustable Payment (AP) Table screen is used to build the AP Table information presented
for loans with adjustable payments, on page 4 of the CDF. The first line, labeled Interest Only
Payments? will be filled with “YES for your first XXX payments” if the user has checked the
“Include only interest and no principal until” option, selected the period type
[year/month/payment] and entered the number of those periods before principal payments
begin, on the Loan Terms screen. In the sample below, the option is checked and the period
type of “month” has been selected and “12” has been entered for the number of periods; the
result on the AP table is shown below the Loan Terms screen excerpt below.
The Text checkbox should be checked if a custom description is required and the field to the right
of it will open for editing.
The Optional Payments? line is used to identify if any of the initial payments are optional. The
number of year(s), month(s) or payment(s) that are optional are entered and the time/item text
selected via the dropdown list. The Text checkbox can be used to open the field to its right for an
alternative description.
The Step Payments line is used to identify if there are step payments in X number of year(s),
month(s) or payment(s). The Text checkbox can be used to open the field to its right for an
alternative description.
The Seasonal Payments? line is used to indicate if the loan payments are to be over a range of
months. The month names are selected in the dropdown lists next to the “from” and “to” labels.
The type of payment amount is identified with the dropdown list next to the Principal Interest
Payments label – the options are ”year”, “month” and “payment”.
The balance of the screen is used to identify the First and Subsequent payment change
characteristics and the maximum payment. Alternative descriptions can be provided at each step
with the Text checkbox. The options on the First Change are at the X’th ”year”, “month” or
“payment”. Subsequent changes are identified to be at every X year(s), month(s) or
payment(s).
The Additional Items (fifth item) line is like that in the Loan Amount section discussed
previously.

USA Digital Solutions, Inc. Closing Disclosure Form v10.0.172 Manual 4/10/2015 Page 30 of 80
Prepayment Penalty
The Prepayment Penalty section is used to detail information on any prepayment penalty associated
with the loan. The NO/YES dropdown is used to answer the first question under the heading “Does the
loan have these features?” There are five checkboxes/radio buttons used to indicate that the
commentary built up in the fields next to them should be used on the CDF (page 1, Loan Terms,
Prepayment Penalty section). They would only be used on the CDF if YES is the selection, but can be
edited even if NO is the selection.
The first item will begin the response to the question with “As high as [amount] if you pay off
the loan”.
The second item is an option for finishing the response with “during the first [##]
[year(s)/month(s)/payment(s)]
The third item is an alternative option for finishing the response with “before [date]”.
The fourth item is an open text field that can be used to describe the prepayment penalty.
The Additional Items (fifth item) line is like that in the Loan Amount section discussed
previously.
Balloon Payment
The Balloon Payment section is used to detail information on any balloon payment associated with the
loan. The NO/YES dropdown is used to answer the second question under the heading “Does the loan
have these features?” There are two checkboxes used to indicate that the commentary built up in the
fields next to them should be used on the CDF (page 1, Loan Terms, Balloon Payment section). They
would only be used on the CDF if YES is the selection, but can be edited even if NO is the selection.
The first item will build the response to the question with “you will have to pay [amount] at the
end of [year/month/payment] ##”.
The Additional Items (second item) line is like that in the Loan Amount section discussed
previously.

USA Digital Solutions, Inc. Closing Disclosure Form v10.0.172 Manual 4/10/2015 Page 31 of 80
Projected Payments The Projected Payments screen is used to detail the expected payment of Principal & Interest,
Mortgage Insurance and Estimated Escrow amounts for fixed or variable loans. Up to four schedules
can be detailed, with indications on each as to which range of years the schedule applies. An additional
indicator on each schedule is used to indicate if the schedule involves Interest Only or Final Payment
information. The intent of these schedules is to detail, to the extent possible, the payment variability over
time for the loan. The data entered here is presented on page 1 of the CDF, in the Projected Payments
section.
The top of the first schedule contains a Years label and next to that label, and on each schedule, are
fields for the numbers of the first year in the range, through the last year in the range covered by the
schedule. For example, “Year 1-1” might be presented on the first schedule and then “2-10” on the
second, for a 10 year loan with annually variable P&I payments.
The dropdown list above the Principal & Interest field contains the options Interest Only or Final
Payment, which can be selected on any schedule.
The first schedule has a single field for the initial Principal & Interest payment amount, which will default
and be a link back to the Loan Terms page. The second through fourth schedules have amount fields for
the minimum and maximum Principal & Interest payments for the period range.
The first schedule’s Mortgage Insurance and Estimated Escrow amounts will also default and present
links to the G. Initial Escrow Pmt and Estimated Taxes and Insurance screens, respectively. If
Mortgage Insurance has not been detailed on G. Initial Escrow Pmt, the field will be open in column 1,
as shown above.
The Principal & Interest, Mortgage Insurance and Estimated Escrow figures entered by the user, on
schedules 2-4 will be automatically totaled in the Estimated Total Monthly Payment fields.

USA Digital Solutions, Inc. Closing Disclosure Form v10.0.172 Manual 4/10/2015 Page 32 of 80
Estimated Taxes and Insurance
The Estimated Taxes and Insurance entry, under the Projected Payments entry on the tree-view, is
used to view, and possibly enter, monthly payment data on estimated taxes, insurance and assessments.
This data is aggregated into a payment total for page 1 of the CDF, and the data is utilized to compute
first year figures for escrowed and non-escrowed property costs, and the initial period escrow payment,
on page 4 of the CDF. Data for the initial entries on this screen are originally entered in section G –
Initial Escrow Pmt. If there are payment items that are not part of the initial escrow deposit, they can be
added here. When first opened, the screen looks like the sample below (but without amounts). Default
entries for Property Taxes and Homeowner’s Insurance are in place, and cannot be removed. The
summary total field, at the top left of the screen, is used for an aggregate total of all items with the
Include checkbox checked, and will appear on page 1 of the CDF.
The Add New Entry icon/button is used to add an item to the listing. When clicked, a new entry line
will appear on the screen. Added items can be removed with the Delete icon, which will appear to the
right of each added item.
The Include checkbox is used to indicate the entry should be included in the aggregate total at the top
left of the screen, and on page 1 of the CDF.
The Description field is used to detail the cost item.
The Amount field is to be filled with a period cost figure.
The In Escrow checkbox is used to indicate that the cost will be paid through the escrow account on the
loan, not directly by the borrower. The presence of the check mark is used to drive first year annual totals
of Escrowed Property Costs, on page 4 of the CDF. The absence of the checkmark is used to drive first
year annual totals for Non-Escrowed Property Costs, also on page 4 of the CDF.
In the screen shot below, the figures for Homeowner’s Insurance and Property Taxes were derived
from section G data, and the Descriptions are links that will take the user to that screen. The third item
was entered on this screen, as it was not to be part of the initial escrow funding in this example.
The payment frequency from the Loan Terms screen will be reflected under the total amount on the left.

USA Digital Solutions, Inc. Closing Disclosure Form v10.0.172 Manual 4/10/2015 Page 33 of 80
Costs at Closing The Costs at Closing screen presents summary totals of various cost categories; it has no user data
entry on it. It is presented for reference only. The figures presented are used to build the Costs at
Closing section on page 1 of the CDF. The figures presented are links to other screens where the costs
are detailed. As data entry is done on the various screens, the values presented on this screen will be
updated.
The Costs at Closing figure is the sum of Loan Costs and Other Costs less Lender Credits. The link
will take the user to the J. Total Closing Costs screen.
The column on the right side presents summary totals of Loan Costs, Other Costs and Lender Credits.
The first two figures’ links take the user to the Loan Costs and Other Costs summary screens and the
Lender Credit figure’s link takes the user to the J. Total Closing Costs screen, where the Lender
Credit total is presented.
The Cash to Close figure links to the Calculating Cash to Close screen.

USA Digital Solutions, Inc. Closing Disclosure Form v10.0.172 Manual 4/10/2015 Page 34 of 80
Loan Costs The Loan Costs entry, on the tree-view, presents summary information of the loan costs, and is the
information presented in section D. Total Loan Costs (Borrower-Paid), on page 2, of the CDF.
The data that feeds this screen is entered via the three tree-view branches below this entry (A.
Origination Charges, B. Did Not Shop For and C. Did Shop For).
The A. Origination Charges, B. Did Not Shop For and C. Did Shop For screens provide the detail for
those sections of the Loan Costs table on page 2 of the CDF. Those three screens, and the Other
Costs screens, operate in a common manner and will be described in the following pages. There are
default line entries on some of the detail screens which serve the regulatory requirement for those lines to
appear on the CDF in their respective sections. Non-defaulted lines (those added by the user) will
present in alphabetic order after the required lines. The order of presentation will alter after the data entry
screens are saved and closed, so the entries may appear in a different order after re-opening, depending
on what lines were added and their descriptions.

USA Digital Solutions, Inc. Closing Disclosure Form v10.0.172 Manual 4/10/2015 Page 35 of 80
A. Origination Charges
The A. Origination Charges screen is where data is entered for the first section of the Closing Cost
Details portion of the CDF, A. Origination Costs (page 2, Loan Costs).
There is one default entry on this screen: % of Loan Amount (Points).
Additional detail lines can be added with the Add Line icon/button.
Roll up lines can be added with the Add Roll Up Line icon/button.
The Modify icon, on each entry, is used to open up the A. Origination Charges data entry screen (or
the Roll Up screen) for the charge.
The Clear icon is used to remove previously entered data on the Points line (only). It cannot be
deleted.
The Delete icon is used to delete entries (other than Points) from the schedule.
A.1 Points
The Points line is a default and cannot be removed. When first opened, the presentation is as is shown
here, with the Type field defaulted to Loan
Discount Points and it is locked. The
Description field is filled with “% of Loan
Amount (Points)”. When the user enters
the Percent figure, the Description field
automatically changes to reflect the
percentage being entered, and the
commentary to the right of the Percent field
will adjust to reflect the calculation of the
points. The Borrower Amount will reflect
the calculated amount initially. If the points
are to be paid, in full or in part, by the seller
or others, the Borrower Amount can be
altered and the Seller Amount and Paid by
Others fields used to reflect who will be
paying and how much. The Total Amount
field will add up the three amount fields. The
Loan Estimate field is completed by the user, and the Tolerance selection should be confirmed to be
Zero Percent.

USA Digital Solutions, Inc. Closing Disclosure Form v10.0.172 Manual 4/10/2015 Page 36 of 80
The full A. Origination Charges data entry screen is shown here, and the screen is nearly identical for all
of the individual cost entries in sections A, B & C. In the A. Origination Charges section, there is a
Percent field, used only on the Points line item – and the Type field is locked on that item only as well.
On the B. Did Not Shop For and C. Did Shop For sections, the Percent field is replaced with Income
Code and Liability fields, for Company charges.
When an amount is entered into the Paid by Others
field, and the user then tabs out of the field, the
system will bring up the Paid by Others (Payors)
screen, on which details of which party(ies) to the file
is(are) paying the charge, and whether it is POC’d.
The full amount must be detailed before leaving the
Paid by Others (Payors) screen. The ellipse button
after the Paid by Others field will bring up the Paid
by Other (Payors) screen for subsequent editing
after initial completion.
The Loan Estimate field is used to enter the value from the Loan Estimate. The entry here will not be
aggregated on the Calculating Cash to Close screen.
The Tolerance field has a dropdown list that is used to select the appropriate setting for the charge (Zero
Percent, 10 Percent and Not Applicable are the options). Section A charges are largely expected to be
zero tolerance items.
If there are Credits or Funding considerations, they are addressed in the middle section of the screen. If
the lender charge is to be withheld from the loan, the Withhold from Loan checkbox should be checked.
The amount of any seller credit is entered into the Seller to Borrower field.
If the charge is POC’d by the borrower or seller, details are entered in the POC section of this screen. If
the Borrower or Seller paid the charge outside of closing, the amount(s) they paid would go in their
respective fields. The user may enter a substitute Description in the field of that name, for use on the
Settlement Statement only.
The Payee Information section is used to identify the party receiving the funds. The NAF icon is
available to select from the NAF; alternatively, the Search icon is available to pull up a listing of
parties to the file to select from; and, the Clear icon is used to clear the Payee Information fields
completely, so the user can start over.
There is a Separate Check checkbox, if the payment is to be isolated from others to the same payee.
Notes can be added to any charge on the Notes tab. These will present on the Settlement Statement.
Once data entry is completed, the user should click on OK to save and exit the screen. Cancel can be
clicked to exit without saving changes.

USA Digital Solutions, Inc. Closing Disclosure Form v10.0.172 Manual 4/10/2015 Page 37 of 80
Add Line
Clicking on the Add Line icon/button, on the Loan Costs, A. Origination Charges screen, will bring
up the same A. Origination Charges data entry screen shown earlier in the Points discussion.
The Type and Description fields will be defaulted to Other and the dropdown list should be used to
select an alternative entry, if applicable. The dropdown listing presents the MISMO Uniform Closing
Dataset (UCD) charge types for this section of the CDF. The Type selected will default into the
Description field as well, but the Description can subsequently be edited.
The Percent field is inactive. It is only active when entering the Points.
The balance of the A. Origination Charges data entry screen is identical, in look and function, to the
Points screen discussed earlier except for the bottom of the screen, which is shown here.
The Add Another button is used to save the current charge entry and bring up a new, blank screen for
entry of another charge. NOTE: on charge screens other than the Origination Charges, there is a Switch
to Roll Up Line button presented next to the Add Another button, and it is used to save the current entry
as the first line within a new roll up line (roll up lines are discussed below) and put the user in the roll up
line entry screen.
Add Roll Up Line
Roll Up lines have two purposes. They can be used to detail a number of charges inside one entry if the
limit of entries for a section has been reached, per the regulations. They can also be used to break up a
charge amongst several payees. An addendum page will detail the charges in roll up lines.
Clicking on the Add Roll Up Line
icon/button, on the Loan Costs, A.
Origination Charges screen, will bring up the
Roll Up screen, as shown here. If it is a new
roll up line, no entries will be in the body of
the screen. The Description field will default
to “** See Attachment”.
Clicking on the Add Line button will bring
up the routine charge entry screen. Enter the
charge information there, and then use the
Add Another button, on the charge screen,
to continue to add charges within the rollup
line, or OK out of the charge screen and use
Add Line from this screen to add
another entry. Once populated, the screen
will look like this. OK out of the Roll Up
screen to save the changes.

USA Digital Solutions, Inc. Closing Disclosure Form v10.0.172 Manual 4/10/2015 Page 38 of 80
B. Did Not Shop For
The B. Did Not Shop For screen is where data is entered for the second section of the Closing Cost
Details portion of the CDF, B. Services Borrower Did Not Shop For (page 2, Loan Costs).
This screen looks and behaves very much like the A. Origination Charges section’s screen, except there
are no default lines in this section that must be preserved.
There will be a Title Charges icon active at the top of the screen, next to the Down icon, if the
enhanced Sub Escrow function is enabled and Title Charges have been entered via that functionality
and the charges have been set to “Final”. As with other file types, the user can use that icon to open the
screen of entered Title Charges to find data to be entered into their file, and enter them in the
appropriate manner.
The B. Services Borrower Did Not Shop For charge entry screen (reached with the Add Line
icon/button) is also very similar to the charge entry screen from section A, but the Types are different and
there are Income Code, Liability and Policy fields on the screen.
The Type and Description fields will be defaulted to Other and the dropdown list should be used to
select an alternative entry, if applicable. The dropdown listing presents the MISMO Uniform Closing
Dataset (UCD) charge types for this section of the CDF. The Type selected will default into the
Description field as well, but the Description can subsequently be edited.

USA Digital Solutions, Inc. Closing Disclosure Form v10.0.172 Manual 4/10/2015 Page 39 of 80
Some of the Types will trigger different actions depending on the Type selected, and on the configuration
of the income codes in the database.
Types that are associated with title and escrow charges will open up the Income Code field for an
income code selection; the others will not. Those that do call for an income code will insert “Title – “ in
front of the Description that is copied from the Type selected. The only exception to that is the “Other”
Type, which will allow an income code to be selected, but which will not insert “Title – “ at the start of the
Description. If, in fact, the user needs to select “Other” as the Type and will be assigning an income
code to the charge, they should edit the Description to begin with “Title – “ and end with the appropriate
description of the charge.
If the database’s income codes are NOT configured to be categorized, and the Liability From setting on
the selected income code is Optional, the Liability field and Policy fields come into play. If the Liability
From setting is “Optional”, the Policy field will let the user select if the liability amount should be pulled
from the Lender’s Policy or Owner’s Policy or neither (None). If Lender’s or Owner’s is selected, in
Policy, then the Liability field will be grayed out and, in the background, the amount will be linked to the
selected policy. If None is selected in the Policy field, the user will be able to enter an amount in the
Liability field.
If the database’s income codes ARE configured to be categorized AND the Liability From setting for a
particular income code identifies where the liability amount is to be assigned from (Sales Price or Loan
Amount) the Liability field will be grayed out and, in the background, the amount will be linked to the
selected policy.
If the database’s income codes ARE configured to be categorized AND the category does not support
pulling a Liability From setting (ie. Escrow, Sub Escrow & Recording categories), then the Liability and
Policy fields will be grayed out.
The Type “Title Lenders Coverage Premium”, in a system with income codes categorized and with
Liability From assigned to a Loan Policy, will only present the income codes that reflect that condition,
and the Liability field will be grayed out and, in the background, the amount will be linked to the specified
policy. The Policy field will fill with Lender’s and be grayed out.
The Type “Title Endorsement Fee”, in a system with income codes categorized and with the
Endorsement category being used, will only present income codes that are in that category. If the
income code is also tied to a specific Liability From source, the Liability and Policy fields will be grayed
out and, in the background, the amount will be linked to the specified policy. If the Liability From is
Optional, on the selected Endorsement income code, the Policy field will let the user select if the liability
amount should be pulled from the Lender’s Policy or Owner’s Policy or neither (None). If Lender’s or
Owner’s is selected, in Policy, then the Liability field will be grayed out and, in the background, the
amount will be linked to the selected policy. If None is selected in the Policy field, the user will be able to
enter an amount in the Liability field.
The Tolerance field, in section B, is defaulted to “Zero Percent”.

USA Digital Solutions, Inc. Closing Disclosure Form v10.0.172 Manual 4/10/2015 Page 40 of 80
C. Did Shop For
The C. Did Shop For screen is where data is entered for the third section of the Closing Cost Details
portion of the CDF, C. Services Borrower Did Shop For (page 2, Loan Costs).
This screen looks and behaves exactly like the B. Did Not Shop For section’s screen, except the
Tolerance field is defaulted to “Not Applicable”, and the MISMO Uniform Closing Dataset (UCD)
charge types for this section of the CDF are not identical to the section ”B” Types.
There will be a Title Charges icon active at the top of the screen, next to the Down icon, if the
enhanced Sub Escrow function is enabled and Title Charges have been entered via that functionality
and the charges have been set to “Final”. As with other file types, the user can use that icon to open the
screen of entered Title Charges to find data to be entered into their file, and enter them in the
appropriate manner.
Other Costs The Other Costs entry, on the tree-view, presents summary information of the other borrower-paid costs,
and is the information presented in section I. Total Other Costs (Borrower-Paid), on page 2, of the CDF.
The data that feeds this screen is entered via the four tree-view branches below the Other Costs entry:
E. Taxes and Other Government Fees, F. Prepaids, G. Initial Escrow Pmt, and H. Other. Those four
screens operate in a common manner to those in the Loan Costs section and so only differences will be
described in the following pages. There are default line entries on some of the detail screens which serve
the regulatory requirement for those lines to appear on the CDF in their respective sections.

USA Digital Solutions, Inc. Closing Disclosure Form v10.0.172 Manual 4/10/2015 Page 41 of 80
E. Taxes and Other Government Fees
The E. Taxes and Other Government Fees screen has one default entry, for Recording Fees. All
recording and other non-sales price based taxes should be included in this line, per the regulation. For
that reason, this is a roll up line.
Transfer taxes, which are based on sales price, are not included in the Recording Fees line, but are
entered on separate entries in this section.
There will be a Title Charges icon at the top of the screen, next to the Down icon, if the enhanced
Sub Escrow function is enabled and Title Charges have been entered via that functionality and the
charges have been set to “Final”. As with other file types, the user can use that icon to open the screen
of entered Title Charges to find data to be entered into their file, and enter them in the appropriate
manner.
The Modify and Clear icons are available on the default Recording Fees line.
The Recording Fees line is a roll up line (main screen shown below left), reached with the Modify
icon – multiple entries can, and normally would, be added through the charge details entry screen (below
right), using the Add Line or Add Another button, and will be consolidated into one set of totals on
the main screen. Each entry’s Type is selected (the Types are Recording Fee For Deed, Mortgage,
Release and Other) and a Description is entered by default, but can be edited by the user, as are the
amounts paid by which party.
The default Tolerance setting for Recording Fees is 10
Percent, set on the roll up line main screen, above left.

USA Digital Solutions, Inc. Closing Disclosure Form v10.0.172 Manual 4/10/2015 Page 42 of 80
A completed Other Costs – E.01 Recording Fees screen, might look like the sample shown here.
The Add Line icon/button, on the main E. Taxes and Other Government Fees screen, will bring up
the E. Taxes and Other Government Fees charge screen through which the user can enter transfer tax,
tax stamp and other government fees. The screen is the same as that brought up for entering Recording
Fee details, but the Deed Amount and Mortgage Amount fields are inaccessible, as they are not
relevant. The Type selections available are the MISMO Uniform Closing Dataset (UCD) charge types
for this section of the CDF. The Description field will default to the Type selection, but can be edited.
The Calculate icon, next to the Borrower Amount field, is used to bring up the tax stamp or transfer
tax calculator screen (based on the charge Type selected). If the background tables have not been
loaded for the City, County &/or State taxes to be calculated, a message to that affect will be presented.
If the data is available to calculate the tax, a screen like the one below will be presented. (Yes, the
screen below is fictitious – Maricopa County, AZ does not collect Tax Stamp revenue – it is just an
example.) The amount calculated will populate the Buyer &/or Seller fields, as defined in the tax setup
screens, but the user can move the charges as applicable. Click on OK to accept the figures. Click on
Remove to delete the computed entry.
The default Tolerance setting of the added lines is dependent on the Type selected. The Transfer Tax
and Tax Stamp items default to Zero Percent; Other type items default to Not Applicable.

USA Digital Solutions, Inc. Closing Disclosure Form v10.0.172 Manual 4/10/2015 Page 43 of 80
F. Prepaids
The F. Prepaids section has four defaulted lines for prepaid items:
Homeowner’s Insurance Premium
Mortgage Insurance Premium
Prepaid Interest
Property Taxes
The Modify and Clear icons are available on the four default Prepaids lines.
Homeowner’s Insurance Premium
The Homeowner’s prepaid insurance data entry screen is the same as the other charges screens with
one alteration: the number of months of coverage being prepaid is identified in the Months/Payments
field. The charge Type will be defaulted and locked. The Description will default to the Type text, but
can be edited. The top of the screen is shown here.
Mortgage Insurance Premium
The Mortgage Insurance Premium screen is like the Homeowner’s prepaid screen, with the
Months/Payments field.

USA Digital Solutions, Inc. Closing Disclosure Form v10.0.172 Manual 4/10/2015 Page 44 of 80
Prepaid Interest
The Prepaid Interest screen is similar to the above screens but has Start Date, End Date and Per Diem
fields, instead of the Months/Payments field, as shown below. The top of the screen is shown here.
The Calendar tool is available for use in entering the dates.
A Per Diem calculator is available for computing the Per Diem amount.
The Proration Type options are Interest and Per Diem,
and the field below will change its labelling depending on
the selection made. The user should enter the appropriate
value (either the per diem amount or the interest rate) in
the field provided. Either value can contain up to four (4)
decimal places.
The user should enter the Starting Date and Ending Date
and select the appropriate Proration Based On factor (360
or 365 Days).
Once all fields are addressed, the Calculate button will compute the Prorated Amount.
Property Taxes
The prepaid Property Taxes screen is like the Homeowner’s and Mortgage Insurance prepaid premium
screens, with the Months/Payments field.
The Type selections available are the MISMO Uniform Closing Dataset (UCD) charge types for this
section of the CDF.

USA Digital Solutions, Inc. Closing Disclosure Form v10.0.172 Manual 4/10/2015 Page 45 of 80
G. Initial Escrow Pmt
The G. Initial Escrow Payment at Closing section has four defaulted lines:
Homeowner’s Insurance
Mortgage Insurance
Property Taxes
Aggregate Adjustment
The data entered here will be used to present data on the Projected Payments, Estimated Taxes and
Insurance screen.
The Modify and Clear icons are available on the four default Initial Escrow Payment at Closing
lines.
Homeowner’s Insurance
The Homeowner’s Insurance data entry screen is very similar to the other charges screens with a
couple of alterations: the number of Months/Payments of coverage being deposited and the amount Per
Month/Payment are identified. The charge Type will be defaulted and locked. The Description will
default to the Type text, but can be edited. The Per Month/Payment figure will be calculated from the
data entered on the F. Prepaids Homeowner’s Insurance line, if present. The top of the screen is
shown here. The description of the entry, on the main G. Initial Escrow Payment at Closing screen will
reflect the payment amount and the number of payments, once entered on the data entry screen.

USA Digital Solutions, Inc. Closing Disclosure Form v10.0.172 Manual 4/10/2015 Page 46 of 80
Mortgage Insurance
The Mortgage Insurance screen is like the Homeowner’s escrow payment screen, with the
Months/Payments and Per Month/Payment fields.
The payment figure entered here is used on the Projected Payments screen.
Property Taxes
The Property Taxes screen is also like the Homeowner’s escrow payment screen, with the
Months/Payments and Per Month/Payment fields.
Aggregate Adjustment
The Aggregate Adjustment screen is similar to the other Initial Escrow Payment screens, but the
Months/Payments and Per Month/Payment fields are not accessible, as the amount to be entered is a
fixed, one-time figure.

USA Digital Solutions, Inc. Closing Disclosure Form v10.0.172 Manual 4/10/2015 Page 47 of 80
H. Other
There are no default lines on the H. Other section.
Commissions and, depending on assignment, Policy information that has been entered will present on
the H. Other Costs summary screen and information on them can be accessed with the Info icon to
the right of each entry. An Info Detail window will present, and on it there will be a “Go to Item” link, at
the bottom of the window, that will take the user to the Commissions (or Title Insurance Premiums)
tree-view entry.

USA Digital Solutions, Inc. Closing Disclosure Form v10.0.172 Manual 4/10/2015 Page 48 of 80
The Add Line icon/button brings up the H. Other charge entry detail screen, common in form to the
others above, but with the Income Code, Liability and Policy fields (as in sections B. Did Not Shop For
and C. Did Shop For) and a Proration calculator icon next to the Borrower Amount field.
The Type and Description fields will be defaulted to Other and the dropdown list should be used to
select an alternative entry, if applicable. The dropdown listing presents the MISMO Uniform Closing
Dataset (UCD) charge types for this section of the CDF. The Type selected will default into the
Description field as well, but the Description can subsequently be edited.
Some of the Types will trigger different actions depending on the Type selected, and on the configuration
of the income codes in the database.
Types that are associated with title and escrow charges will open up the Income Code field for an
income code selection; the others will not. Those that do call for an income code will insert “Title – “ in
front of the Description that is copied from the Type selected. The only exception to that is the “Other”
Type, which will allow an income code to be selected, but which will not insert “Title – “ at the start of the
Description. If, in fact, the user needs to select “Other” as the Type and will be assigning an income
code to the charge, they should edit the Description to begin with “Title – “ and end with the appropriate
description of the charge.
If the database’s income codes are NOT configured to be categorized, and the Liability From setting on
the selected income code is Optional, the Liability field and Policy fields come into play. If the Liability
From setting is “Optional”, the Policy field will let the user select if the liability amount should be pulled
from the Lender’s Policy or Owner’s Policy or neither (None). If Lender’s or Owner’s is selected, in
Policy, then the Liability field will be grayed out and, in the background, the amount will be linked to the
selected policy. If None is selected in the Policy field, the user will be able to enter an amount in the
Liability field.
If the database’s income codes ARE configured to be categorized AND the Liability From setting for a
particular income code identifies where the liability amount is to be assigned from (Sales Price or Loan
Amount) the Liability field will be grayed out and, in the background, the amount will be linked to the
selected policy.
If the database’s income codes ARE configured to be categorized AND the category does not support
pulling a Liability From setting (ie. Escrow, Sub Escrow & Recording categories), then the Liability and
Policy fields will be grayed out.
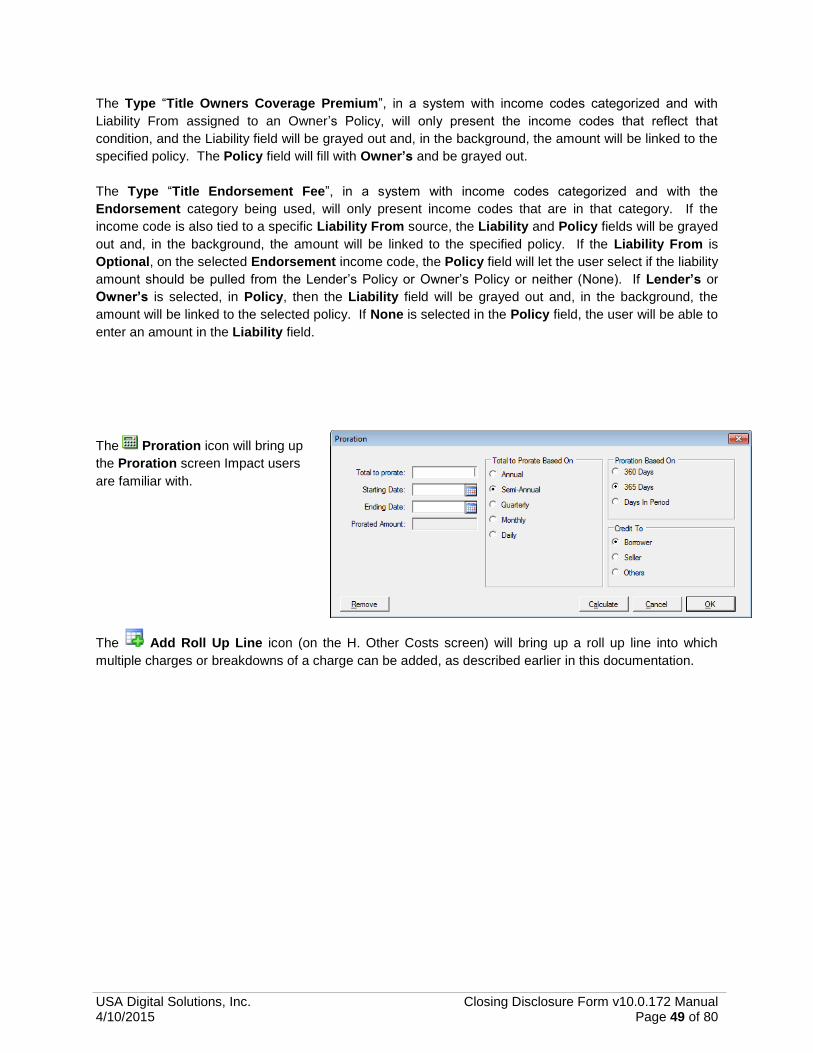
USA Digital Solutions, Inc. Closing Disclosure Form v10.0.172 Manual 4/10/2015 Page 49 of 80
The Type “Title Owners Coverage Premium”, in a system with income codes categorized and with
Liability From assigned to an Owner’s Policy, will only present the income codes that reflect that
condition, and the Liability field will be grayed out and, in the background, the amount will be linked to the
specified policy. The Policy field will fill with Owner’s and be grayed out.
The Type “Title Endorsement Fee”, in a system with income codes categorized and with the
Endorsement category being used, will only present income codes that are in that category. If the
income code is also tied to a specific Liability From source, the Liability and Policy fields will be grayed
out and, in the background, the amount will be linked to the specified policy. If the Liability From is
Optional, on the selected Endorsement income code, the Policy field will let the user select if the liability
amount should be pulled from the Lender’s Policy or Owner’s Policy or neither (None). If Lender’s or
Owner’s is selected, in Policy, then the Liability field will be grayed out and, in the background, the
amount will be linked to the selected policy. If None is selected in the Policy field, the user will be able to
enter an amount in the Liability field.
The Proration icon will bring up
the Proration screen Impact users
are familiar with.
The Add Roll Up Line icon (on the H. Other Costs screen) will bring up a roll up line into which
multiple charges or breakdowns of a charge can be added, as described earlier in this documentation.

USA Digital Solutions, Inc. Closing Disclosure Form v10.0.172 Manual 4/10/2015 Page 50 of 80
J. Total Closing Costs
The J. Total Closing Costs (Borrower-Paid) tree-view selection brings up a summary screen of the
figures shown at the end of the Closing Costs Details section of the CDF (bottom of page 2). It reflects
the sum of the Loan Costs and Other Costs sections. It also presents Lender Credits information.
At-large (non-specific) lender credits are entered in the Non-Specific Lender Credits field, at the bottom
of the screen.
The user should enter an explanation of any tolerance cure credits in the Description field of the Lender
Credits section at the bottom of the screen. That information will be included, within parentheses, after
the Lender Credits label in the upper portion of the screen.

USA Digital Solutions, Inc. Closing Disclosure Form v10.0.172 Manual 4/10/2015 Page 51 of 80
Calculating Cash to Close
The Calculating Cash to Close screen is used to build a table of that name on the CDF’s third page.
This table is used to identify if there were differences in the final costs versus those provided on the Loan
Estimate. If there are differences, explanations are provided &/or the recipient is directed to the
appropriate section of the CDF for details. There are two versions of this screen; one for sale/resale
transactions and one for refinance transactions using the “Optional Closing Disclosure forms” (driven
by the Transaction Type selected for the file and the “Use Optional Closing Disclosure forms for
transactions not involving a seller” option on the Lender’s Loan Terms screen). The first screen shot
below is the “Sale” version; the second is the “Refinance”, with Optional CDF forms, version.
The Loan Estimate column’s fields are editable, and the user would enter the summary totals for the
specified items therein. None are reflected in the screen shot below.
The Final column’s figures are summaries of the data entered in the other screens (non-editable), except
for the Closing Costs Financed (Paid from your Loan Amount) field, which is editable.
The Did this change? column contains a NO/YES dropdown for each category. If YES is selected, the
ellipse (…) to the right of the text box should be clicked on to open a window through which an
explanation of the difference, or direction to the appropriate section of the CDF, can be entered.
Sale/Resale Transaction
Calculating Cash to Close
screen.
Refinance Transaction w/
optional Calculating Cash to
Close Screen.

USA Digital Solutions, Inc. Closing Disclosure Form v10.0.172 Manual 4/10/2015 Page 52 of 80
When first clicked, the ellipse (…) button will open a blank
Cash to Close Changes screen, like that shown to the right.
The New Item button will open a data entry screen, as
shown below.
The Add/Edit Item screen will let the user enter text, with some basic formatting tools. It also provides
for the importation of some stock, pre-formatted, items that are appropriate for the line the user is on.
The stock items vary by line; not every line has importable items.
The B icon will bold selected text.
The I icon will italicize the selected text.
The U icon will underline the selected text.
The Import icon will open a window of stock, pre-formatted, items available for insertion to the list.
Some of the stock entries will require user editing after selection. Not every line has importable items.
As an example, the Closing Costs Paid
Before Closing line has the two pre-
formatted items shown to the left available
for importation. The user should highlight
the desired line to use and click on OK to
proceed.
The selected item will then appear on the
Add/Edit Item screen, and can be edited
there if need be; if sufficient, the OK button
should be hit there to return to the Cash to
Close Changes screen and another OK will
return the user to the Calculating Cash to
Close screen.
The screen shot to the right reflects a stock phrase
having been selected for use on the Closing
Costs Paid before Closing line.

USA Digital Solutions, Inc. Closing Disclosure Form v10.0.172 Manual 4/10/2015 Page 53 of 80
Summaries of Transactions – Not on Refinance Transaction Types
w/ Optional CDF Forms Option Selected
The Summaries of Transactions section of the tree-view is only applicable to Sale/Resale transactions
or Refinance transactions that do not have the “Use Optional Closing Disclosure forms for
transactions not involving a seller” option (on the Lender’s Loan Terms screen) checked.
If the Transaction Type utilized on the file is categorized as “Refinance”, and the “Use Optional…”
option is checked on the Lender’s Loan Terms screen, this section of the tree-view will not be available
– it is replaced with a Payoffs and Payments screen.
On Refinance transactions that do not use the Optional CDF forms, only the Borrower’s Transaction
side of the Summaries screen is presented.
Sections K, L, M & N of the CDF (on sales transactions) make up the Summaries of Transactions
section of the CDF, page 3. There are four “branches” of the tree-view that are available to enter the
information for this portion of the CDF. They are all similar in behavior, and will be discussed in the
following pages. Sections M & N (Seller-related) will not be shown on Refinance transactions that do
not have the “Use Optional Closing Disclosure forms for transactions not involving a seller” option
checked – just the Borrower-related screens K & L will be shown.
Note: There are Type fields at the top of most of the data entry screens in sections K-N. The Type
dropdown with present MISMO Uniform Closing Dataset (UCD) charge types applicable for the
particular section and line. The Type selected will default into the Description line, but the Description
will remain editable.

USA Digital Solutions, Inc. Closing Disclosure Form v10.0.172 Manual 4/10/2015 Page 54 of 80
K. Due From Borrower
The K. Due from Borrower at Closing section of the CDF’s Summaries of Transactions table is
accessed from this entry on the tree-view.
The screen shot above presents a different screen type than those in previous sections. This section’s
screen (and the next three) looks like the CDF form section as printed. There are icons in the two
columns to the right of each line entry that provide links to information or provide for data entry/edit. Lines
with Info icons have had their data entered via other screens. The lines with the pair of icons
Modify and Clear have their data entered on this screen. The total of all entries on the screen is
presented at the top of the amount column.
The Info icon will bring up a window with a reference to the contents of the line item. The Info Detail
window will present, and in most cases there will be a “Go to Item” link, at the bottom of the window, that
will take the user to the location where the data for the entry is made, in case it needs to be modified.

USA Digital Solutions, Inc. Closing Disclosure Form v10.0.172 Manual 4/10/2015 Page 55 of 80
The Modify icon will bring up a charge entry screen like that shown below. This screen is common to
the sections K. Due From Borrower and N. Due From Seller, but some fields may be inactive in some
instances, depending on the entry being worked on. In this instance, the screen was opened up for line 4
of the K. Due from Borrower at Closing section (as indicated in the screen heading).
Generically, on the detail screens (for sections K, L, M & N), some or all of the following icons and
buttons are available.
The Calendar icon is available to fill date fields.
The Proration icon is available to bring up the Proration calculation screen.
The Search icon is available to bring up the listing of the parties to the file, for selection of one to
deduct the charge from or to identify the payee for a charge.
The Clear icon is available to remove the Deduct From selection or the Payee Information
previously entered.
The NAF icon is available to select a payee.
The open (not pre-defined) lines have the Switch to Roll Up Line button, enabling a charge to be split
amongst payees &/or to be an aggregate of charges. This function would be used if there are more
charges to be entered in a section than there are available lines for them. The default Description for
such a roll up line is “** See Attachment”. An addendum of the rolled-up charges will be prepared by the
system. (Section K through N Roll Up lines are detailed below – 2nd
page after this one.)
Notes can be entered on that tab, and will appear on the Settlement Statement.
Cancel is used to exit the screen without saving changes.
OK is used to save and exit the screen.

USA Digital Solutions, Inc. Closing Disclosure Form v10.0.172 Manual 4/10/2015 Page 56 of 80
Section K, lines 1 and 2 are reserved and present the Sale Price of Property and the Sale Price of Any
Personal Property Included in Sale. These are mirrored in Section M, lines 1 & 2.
Line 2 will be filled with information from the
Properties screen’s Personal Property tab if
the “Show on Statements” checkbox there is
checked. Otherwise, data can be entered
directly on this screen for that line.
Line 3 is reserved and presents the Closing Costs Paid at Closing (J) total.
Again, to get details on reserved lines, use the Info icon.
Line 4 is an open line, available to identify another charge.
Line 5, 6 & 7 are open lines, under the Adjustments heading.
Lines 8, 9 & 10, under the Adjustments for Items Paid by Seller in Advance heading, are reserved for
the City/Town Taxes, County Taxes and Assessments being prorated. They are mirrored in Section
M, lines 9, 10 & 11. On these lines, the data entry screen, when opened with the Modify icon, has the
Description defaulted and locked, and only the From and To date fields, the Calendar icons, the
Borrower Amount field, and the Proration icons are available. The Credit Seller on Line field will
be filled and locked.
Lines 11 through 15 are open lines for other adjustments for items paid in advance by the seller.

USA Digital Solutions, Inc. Closing Disclosure Form v10.0.172 Manual 4/10/2015 Page 57 of 80
Sections K through N Roll Up Lines
The Switch to Roll Up Line button, at the bottom of the charge screen, in sections K through N, will bring
up a Line ## Roll Up screen like that shown here, with the default Description of “** See Attachment”
(which can be edited if needed).
The Credit Seller on Line: field may be filled with the
logical offset, but can be edited if needed.
The Add Line button is used to open a full charge screen
on which the details of the charge and payee are entered.
As many lines as are needed may be added. The Total
Amount field will reflect the sum of all of the charges
added.

USA Digital Solutions, Inc. Closing Disclosure Form v10.0.172 Manual 4/10/2015 Page 58 of 80
L. Paid Already
The selection of the L. Paid Already tree-view branch will bring up the L. Paid Already by or on Behalf
of Borrower at Closing screen.
The Modify icon brings up a line item detail screen that looks like the one below.
The icons have the same function on this screen as on the detail screen for section K discussed above.
The Tolerance field is present on open section L entries.

USA Digital Solutions, Inc. Closing Disclosure Form v10.0.172 Manual 4/10/2015 Page 59 of 80
Section L, lines 1, 2 & 3 are reserved and present the Deposit, Loan Amount and Existing Loan(s)
Assumed or Taken Subject to figures. Line 3 is mirrored in section N, line 3.
Again, to get details on reserved lines, use the Info icon.
Line 4 is an open line, available to identify another charge, if there is not a second loan. If there is a
second loan, it will be reflected on line 4.
Line 5 is reserved and presents the Seller Credit total. This item is mirrored on Section N, line 8. If one
or more specific seller credits have been entered on buyer charges, this line will reflect an Info icon,
and will not be able to be edited. If no specific credits have been entered, and a general seller credit is to
be entered, the user should use the Modify icon to open a screen into which a general seller credit
can be entered. If such an entry needs to be removed, the Clear icon should be used.
Lines 6 & 7 are open lines, under the Other Credits heading.
Lines 8, 9, 10 & 11 are open lines, under the Adjustments heading.
In a situation where there is a simultaneous policy issuance, with the seller paying for the Owner’s policy
and the borrower paying for the Lender’s policy, and a seller credit has been computed, it will appear on
available line, as shown on the preceding screen shot.
Lines 12, 13 & 14, under the Adjustments for Items Unpaid by Seller heading, are reserved for the
City/Town Taxes, County Taxes and Assessments being prorated. They are mirrored in Section N,
lines 14, 15 & 16. On these lines, the data entry screen, when opened with the Modify icon, has the
Description defaulted and locked, and only the From and To date fields, the Calendar icons, the
Borrower Amount field, and the Proration icons are available. The Credit Seller on Line field will
be filled and locked.
Lines 15, 16 & 17 are open lines for other adjustments for items unpaid by the seller.

USA Digital Solutions, Inc. Closing Disclosure Form v10.0.172 Manual 4/10/2015 Page 60 of 80
M. Due to Seller
The selection of the M. Due to Seller tree-view branch will bring up the M. Due to Seller at Closing
screen.
The Modify icon brings up a line item detail screen that looks like the one below.
The icons have the same function on this screen as on the detail screen for sections K & L discussed
above.

USA Digital Solutions, Inc. Closing Disclosure Form v10.0.172 Manual 4/10/2015 Page 61 of 80
Section M, lines 1 and 2 are reserved and present the Sale Price of Property and the Sale Price of
Any Personal Property Included in Sale. These are mirrored in Section K, lines 1 & 2.
Again, to get details on reserved lines, use the Info icon.
Lines 3 through 8 are open lines, available to identify other due to seller items.
Lines 9, 10 & 11, under the Adjustments for Items Paid by Seller in Advance heading, are reserved for
the City/Town Taxes, County Taxes and Assessments being prorated. They are mirrored in Section
K, lines 8, 9 & 10. On these lines, the data entry screen, when opened with the Modify icon, has the
Description defaulted and locked, and only the From and To date fields, the Calendar icons, the
Borrower Amount field, and the Proration icons are available. The Credit Borrower on Line field
will be filled and locked.
Lines 13 through 16 are open lines for other adjustments for items paid in advance by the seller.

USA Digital Solutions, Inc. Closing Disclosure Form v10.0.172 Manual 4/10/2015 Page 62 of 80
N. Due From Seller
The selection of the N. Due From Seller tree-view branch will bring up the N. Due from Seller at
Closing screen. This screen has the same characteristics, and detail screen, as section K.
The Excess Deposit, on line 1, is a reserved line that
can be edited with the Modify icon, and cleared with
the Clear icon.
Section N, lines 2, 3, 4 & 5 are reserved and present the Closing Costs Paid at Closing (J), Existing
Loan(s) Assumed or Taken Subject to, Payoff of First Mortgage Loan and Payoff of Second
Mortgage Loan figures. Line 3 is mirrored in section L, line 3.
Again, to get details on reserved lines, use the Info icon.
Lines 6 & 7 are open lines, available to identify other charges.
In a situation where there is a simultaneous policy issuance, with the seller paying for the Owner’s policy
and the borrower paying for the Lender’s policy, and a seller credit has been computed, it will appear on
an available line, as shown on the screen shot above.
Line 8 is reserved and presents the Seller Credit total. This item is mirrored on Section L, line 5. If one
or more specific seller credits have been entered on buyer charges, this line will reflect an Info icon,
and will not be able to be edited. If no specific credits have been entered, and a general seller credit is to
be entered, the user should use the Modify icon to open a screen into which a general seller credit
can be entered. If such an entry needs to be removed, the Clear icon should be used.
Lines 9 through 13 are open lines, available to identify other charges.

USA Digital Solutions, Inc. Closing Disclosure Form v10.0.172 Manual 4/10/2015 Page 63 of 80
Lines 14, 15 & 16, under the Adjustments for Items Unpaid by Seller heading, are reserved for the
City/Town Taxes, County Taxes and Assessments being prorated. They are mirrored in Section L,
lines 12, 13 & 14. On these lines, the data entry screen, when opened with the Modify icon, has the
Description defaulted and locked, and only the From and To date fields, the Calendar icons, the
Borrower Amount field, and the Proration icons are available. The Credit Borrower on Line field
will be filled and locked.
Lines 17, 18 & 19 are open lines for other adjustments for items unpaid by the seller.

USA Digital Solutions, Inc. Closing Disclosure Form v10.0.172 Manual 4/10/2015 Page 64 of 80
Payoffs and Payments – Only on Refinance Transaction Types with
Optional CDF Forms Option Selected The Payoffs and Payments tree-view entry will only be presented on files with a Transaction Type
assignment that has been categorized as a Refinance type, AND where the “Use Optional Closing
Disclosure forms for transactions not involving a seller” checkbox, on the Lender’s Loan Terms
screen (under Parties, not the CDF tree-view) is checked. This screen’s data feeds the Payoffs and
Payments schedule, totaled as K. TOTAL PAYOFFS AND PAYMENTS, on page 3, of the alternative
CDF for transactions not involving a seller.
Borrower Payoffs, that have been entered via the Payoffs > Borrower tree-view branch will present at
the top of the listing of Payoffs and Payments and the Info icon next to those items will lead back to
where the payoff information was entered. Additional payments can be entered in the unused lines, with
the Modify icon on each blank line. The Clear icon can be used to remove a payment.
The Payoffs and Payments detail entry
screen is shown here.
The user will enter a Description of the
payment due.
The From and To date fields can be used to
detail a date range covered by the payment, if
needed, and will feed the Proration
screen.
The same Funding and Payee Information
sections discussed earlier are also available.

USA Digital Solutions, Inc. Closing Disclosure Form v10.0.172 Manual 4/10/2015 Page 65 of 80
Loan Disclosures The Loan Disclosures entry on the tree-view brings up a screen used to detail the bulk of the Loan
Disclosures in the CDF section Additional Information About This Loan (CDF page 4).
The screen has radio buttons, check boxes and some data entry fields, that the user will use to address
the assorted disclosures required.
In the Escrow Account section (right hand column), if the checkbox under the “For now, your loan”
label is checked, the Escrowed Property Costs over year 1 will be computed and the text box filled with
the descriptions of the costs included in the calculated figure. The Initial Escrow Payments and
Monthly Escrow Payment figures will also be computed if that checkbox is checked, and the figures will
be links to the G. Initial Escrow Pmt and Projected Payments screens, respectively.
In addition, if the Calculated checkbox next to the Non-Escrowed Property Costs over 1 year label is
checked, the annual estimated amount of non-escrowed property costs (defined on the Estimated
Taxes, Insurance & Assessments screen, with the In Escrow checkbox not checked) will be presented.

USA Digital Solutions, Inc. Closing Disclosure Form v10.0.172 Manual 4/10/2015 Page 66 of 80
Security Interest The Security Interest entry, on the CDF tree-view, brings up the Security Interest screen, the contents
of which are used to populate the Security Interest section of the CDF’s Additional Information About
This Loan (CDF, page 4).
The screen will present the property address, including zip code, as the default information to be
presented on the form as the property a security interest is being taken in with the transaction. The word
“property” in the sentence below the address is a link that will take the user to the Edit Property screen
for the file, if edits are needed.
If there is an alternative description of the property (or personal property) in which a security interest is
being taken, the Additional Security Interest: checkbox can be checked and the Description field is
then opened up to allow user input. There are alternative presentation locations for this alternate
description, and the appropriate selection(s) can be made via the checkboxes at the bottom of the screen.
If the property address is to be replaced with the described property/personal property, and it fits in the
space on page 1 of the CDF, the Page 1 box would be checked. If the Description is too big for page 1,
the Page 1 Attachment box would be checked. For the disclosure on page 4, the same concept applies:
space permitting, check Page 4; check Page 4 Attachment if a longer description.

USA Digital Solutions, Inc. Closing Disclosure Form v10.0.172 Manual 4/10/2015 Page 67 of 80
Loan Calculations and Other Disclosures The Loan Calculations and Other Disclosures entry on the tree-view brings up a screen used to detail
the section of that name, part of the CDF section Additional Information About This Loan (CDF, page
5).
It also contains triggers to have the Confirm Receipt verbiage appear (optional) at the bottom of page 5
of the CDF, or not. The “Print Buyer/Borrower name” radio button can work in conjunction with the
“This order has a rescission period” checkbox (on the first screen of Initial Questions) to present all
buyer/borrower names, even if the “Show on CDF” checkbox (on the Parties screen) is unchecked on
some of them.
The screen has radio buttons, checkboxes and some data entry fields, that the user will use to address
the assorted material being presented.

USA Digital Solutions, Inc. Closing Disclosure Form v10.0.172 Manual 4/10/2015 Page 68 of 80
Contact Information The Contact Information tree-view entry will bring up the main Contact Information screen. This data
will appear on page 5 of the CDF. Most of the information will pull from the Party data already entered.
The column headers are links back to the respective party entry screens.
In the middle of the screen, the Contact row has dropdown arrows so the user can select the appropriate
contact for the party (as multiple contacts can be entered, it is up to the user to select the correct one).
The secondary licensing entity is identified in the blanks in the first column (AZ shown in sample above –
but can be edited by the user). In each column, on those rows, the entry would be the Property State
abbreviation and the License ID for applicable contacts.
Additional Contacts
The Additional Contacts branch of the tree-view, under Contact Information, will present a screen on
which the user can identify other parties to the file as additional contacts for inclusion with the CDF. This
information will be presented as an addendum to the CDF.
The Add Contact icon/button will pull up a listing of parties to
the file and the user should highlight the party to add and click on
OK to pull up the Add/Edit Contact screen on which the details on
the contact can be entered (if not already in place).

USA Digital Solutions, Inc. Closing Disclosure Form v10.0.172 Manual 4/10/2015 Page 69 of 80
Closing Disclosure Form Tracking The Closing Disclosure Form Tracking entry on the tree-view will bring up a screen that presents
tracking information on the transaction. The top half of the screen deals with tracking important dates for
the transaction. The bottom half of the screen tracks CDF Versions that have been produced. The full
screen, when empty, looks like the screen shot below.
The Status field has six options for detailing the current state of the
transaction, as shown here. The options are None, Amended,
Amended Estimated, Amended Final, Estimated and Final.
The Loan Estimate Delivered field provides for the entry of the date that the Loan Estimate was
delivered. The Calendar tool is available, or the date can be entered in “MMDD” or “MMDDYY”
format.
There are two checkboxes in the Waiting Period waiver received for box: CDF and Right of
rescission. They are used to track receipt of those documents.
There are five Event entries that are used to track the dates that the events are Scheduled, their
Earliest Available date and their Actual date. The events are the Borrower signing, Seller signing,
Consummation, Disbursement and Recording. The Calendar tool is available, once the user clicks
on a date field, or the date can be manually entered in “MMDD” or “MMDDYY” format.

USA Digital Solutions, Inc. Closing Disclosure Form v10.0.172 Manual 4/10/2015 Page 70 of 80
CDF Versions
The bottom half of the Closing Disclosure Form Tracking screen is used to track information on specific
Closing Disclosure forms. The Add button is used to open up the CDF Version screen on which the
tracking information is entered. The initial screen presented is shown below.
The Prepared by field is used to identify
the party that prepared the specific
Closing Disclosure being tracked by this
entry. The Search icon is used to
bring up the Party Selection screen, on
which the Lender, Mortgage Broker (if
any), Outside Title Company (if any) and
the Company are listed. The user should
select the party that prepared the CDF by
double-clicking on the entity’s entry. Once an entity has been selected, the Clear icon will be enabled,
which the user can use to remove the selected entry from the field.

USA Digital Solutions, Inc. Closing Disclosure Form v10.0.172 Manual 4/10/2015 Page 71 of 80
The Link to CDF Version field has a Search icon that will bring up a screen of previously printed
Borrower Only and Seller Only CDF’s (all printed versions are retained) that the user can use to select the
CDF for which additional tracking will be done. The version number of the selected CDF will be stored in
the Link to CDF Version field.
The Clear icon will be enabled, once a version number is in the Link to CDF Version field, which the
user can use to remove the selected entry from the field.
The Preview icon can be used to bring up the specific CDF in a PDF preview screen.
The Add icon can be used to go to the Print Closing Disclosure Form screen to generate a new
CDF (fully discussed in the Print – Closing Disclosure section later in this documentation), which can
then have tracking information attached to it.
Once a CDF is selected (or generated through this screen) the Type field (Borrower or Seller) will be
filled, as will the Prepared on date and time fields.
The Responsible for Delivery field has a Search icon which will present the same Party Selection
screen as the Prepared by field’s.

USA Digital Solutions, Inc. Closing Disclosure Form v10.0.172 Manual 4/10/2015 Page 72 of 80
Approved
The Add icon, under the Approved banner on the CDF Version screen, is used to create a new
record dealing with who has approved the specific CDF being tracked.
The CDF Approval screen will present as shown below.
The Sign Off field’s Search icon will bring up the Party Contact Selection screen, from which the
user would select the contact that has approved the specific CDF by highlighting the party and clicking on
the OK button.
The Date of the approval should be entered in the field of that name.
The Evidence of the approval should be identified by selecting the appropriate option from the dropdown
listing. The options are None, Verbal, Written and Email.
Any additional Notes that the user wishes to enter can be added to the field of that name.
If additional approvals are to be added, the Add Another button can be used on the CDF Approval
screen, or the Add icon on the CDF Version screen can be used.

USA Digital Solutions, Inc. Closing Disclosure Form v10.0.172 Manual 4/10/2015 Page 73 of 80
Delivery
The CDF Delivery screen is opened via the Add icon under the Delivery banner on the CDF Version
screen.
The Party Selection screen opened with the Search icon will bring up all the Borrowers and Sellers
on the transaction. The appropriate party should be highlighted, and OK clicked, to select that party
The Sent Date field should be filled with the appropriate date. The Calendar tool is available, or the
date can be entered in “MMDD” or “MMDDYY” format.
The Sent Method dropdown has the following options on it: None, Express delivery, US Mail, Certified
Mail, Email and In person. If Express delivery, US Mail or Certified Mail are selected, the party’s
address information will pre-populate the address fields, which will be left open for editing. If Email is
selected, the party’s email information will pre-populate that field, and it will be left open for editing. No
information will fill those fields if In person is selected.
The Received Date field should be filled with the appropriate date. The Calendar tool is available, or
the date can be entered in “MMDD” or “MMDDYY” format.
The Evidence field’s dropdown list has the following options on it: None, Express delivery tracking,
Certified Mail receipt, Email confirmation, In person signature and Waiting period expired. The
appropriate selection should be made.
Any additional Notes that the user wishes to enter can be added to the field of that name.
If additional deliveries are to be added, the Add Another button can be used on the CDF Delivery
screen, or the Add icon on the CDF Version screen can be used.
Please see the Print – Closing Disclosure Tracking section of this documentation for information on the
generation of the report of the data entered through these screens.
USA Digital Solutions, Inc. Closing Disclosure Form v10.0.172 Manual 4/10/2015 Page 74 of 80
Closing Disclosure Form – Additional Lender(s) As was indicated at the beginning of the discussion on the Closing Disclosure Form, if there are additional
loans being worked in the same file, another set of CDF section branches will appear in the tree-view,
under the heading of the second (or subsequent) lender, below that of the first lender.
There will not be Commission or Payoff branches – those only appear on the first lender’s tree-view.
The same behavior is followed to complete the data entry for the subsequent lenders as was followed for
the first. The second (and subsequent) loan(s) will be presented in section L. Paid Already by or on
Behalf of Borrower at Closing of the first loan’s CDF, with the principal balance appearing after the
“Second Loan” label, and the net funded amount appearing in the amount column.

USA Digital Solutions, Inc. Closing Disclosure Form v10.0.172 Manual 4/10/2015 Page 75 of 80
Print – Closing Disclosure
The generation of the Closing Disclosure is done through the Print icon at the top of the Closing
Disclosure Form Entry screen or from the Documents menu on the Impact Escrow desktop. The same
functionality is reached by either entry-point. When Print > Closing Disclosure is selected, the Print
Closing Disclosure Form screen will be presented.
The tool bar at the top of the screen contains the Change File icon Impact users are familiar with, that
can be used to change the file on the Print CDF screen; it does not open the new file for editing and, if
there is a file open for editing, its number will appear in the Escrow Number Entry screen. The
Previous Versions icon will be discussed on the next page.
When initially opened, the Print CDF screen will list the Escrow File #, Escrow Officer and Branch at
the top of the screen. Below that, on the left, is the Lender Selection pane, which presents the Lender
Name and Loan # of each loan on the file, in loan number order. By default, all lenders/loans are
selected via the checkbox in front of each entry. If the user wishes to generate a CDF for a specific loan,
the others should be unchecked. The Print Options pane is on the right side of the screen.
The first section of the Print Options is labeled Usage. It is used to identify whether the CDF to be
generated (and saved) is for Internal use (not to be given to the Borrower(s) &/or Seller(s)), or for
External use (to be given to the Borrower(s) &/or Seller(s)). The user should check that the Date Issued
(on the Loan Terms screen) is correct before generating an External CDF for delivery. The dropdown
options next to the Internal as label are Estimated, Amended Estimated and Draft. The selected label
will appear at the top of the CDF – clearly marking it as an internal use document that should not be
delivered to the Borrower(s) &/or Seller(s).
The Type section, of the Print Options, has one Selection to be made, on non-refinance transactions.
The options are Borrower Only, Combined and Seller Only. On refinance transactions, the Selection
will default to Borrower Only and will be locked.
The Breakdown Options section lets the user select which of the available addendums (Commission,
Lender Credits and Seller Credits) should be generated along with the requested CDF.
Once the user has selected the Lender/Loan and set the Print Options desired, they would click on OK
to bring up the Print dialog. Click on Cancel to get out of the Print Closing Disclosure Form screen.

USA Digital Solutions, Inc. Closing Disclosure Form v10.0.172 Manual 4/10/2015 Page 76 of 80
If more than one loan exists, and they have been asked to be previewed on the screen, there will be tabs
on the left side of the screen for each loan’s CDF – rather than both being presented one after the other.
The user should click on the tab of the CDF they would like to review. The item being displayed will have
its tab label highlighted by a surround of dots.
The other icon at the top of the Print Closing Disclosure Form screen is the Previous Versions
icon. Clicking on the icon will bring up the Previous Versions of the Closing Disclosure Form screen
for the file selected, as shown below. The system is designed to store a PDF version of each CDF that is
printed, emailed, published or generated to User Attachments, along with the underlying data used to
create it. Previewed CDF’s are not saved – unless they are printed, emailed, published or generated to
User Attachments from the Report Viewer screen. The saved versions cannot be deleted. Selection of
the loan to reprint a CDF for is done on the left side of the screen by clicking on the desired Lender
Name / Loan # entry. Once the Lender Name/Loan is selected (they are in alpha order on this screen), all
saved versions will then be listed on the right side of the screen. The saved CDFs can be reprinted,
utilizing the Print icon to the right of each entry.
Selected CDF

USA Digital Solutions, Inc. Closing Disclosure Form v10.0.172 Manual 4/10/2015 Page 77 of 80
Print – Closing Disclosure Tracking The Closing Disclosure Tracking report is generated from the CDF wizard’s Print menu. It presents all
of the tracking information for the lender/loan transaction(s) selected by the user. The Print Closing
Disclosure Delivery and Tracking screen is used to make the Lender Selection(s) via the checkboxes
under that heading.
A sample of the report for one
lender/loan is shown here.
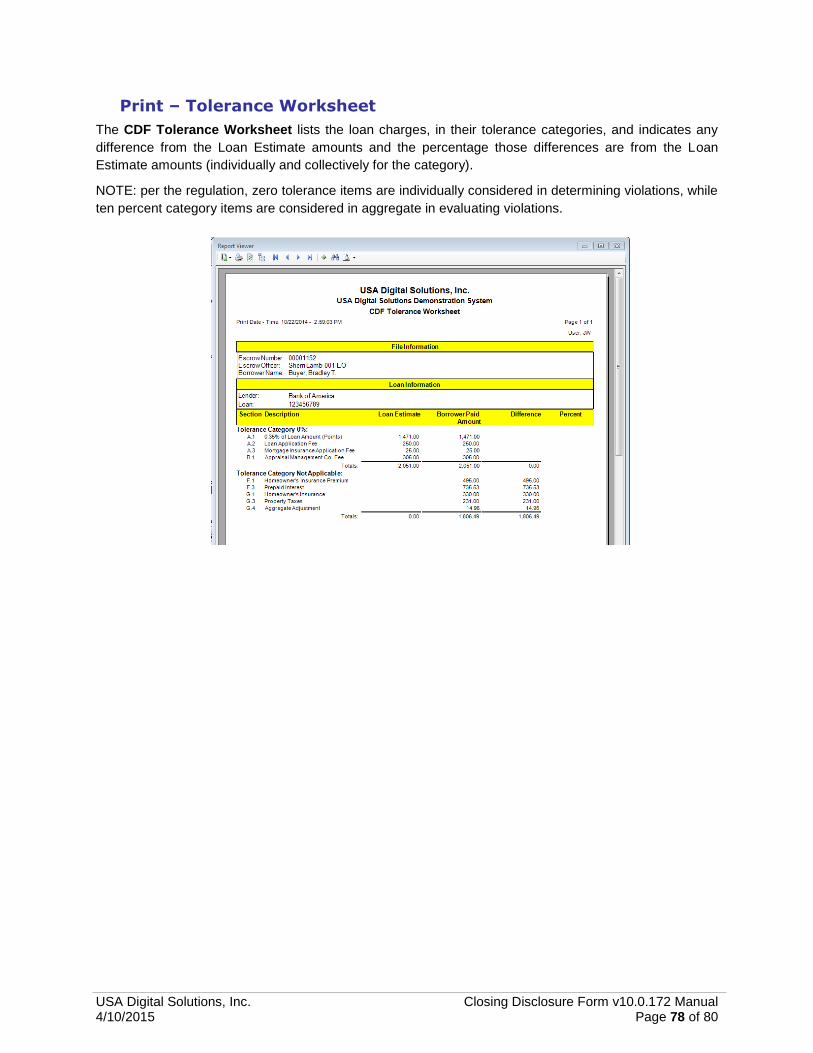
USA Digital Solutions, Inc. Closing Disclosure Form v10.0.172 Manual 4/10/2015 Page 78 of 80
Print – Tolerance Worksheet
The CDF Tolerance Worksheet lists the loan charges, in their tolerance categories, and indicates any
difference from the Loan Estimate amounts and the percentage those differences are from the Loan
Estimate amounts (individually and collectively for the category).
NOTE: per the regulation, zero tolerance items are individually considered in determining violations, while
ten percent category items are considered in aggregate in evaluating violations.

USA Digital Solutions, Inc. Closing Disclosure Form v10.0.172 Manual 4/10/2015 Page 79 of 80
Print – Settlement Statement, Title Instructions, Lender Summary
& Balance Statement
The Print icon, at the top of the Closing Disclosure Form Entry screen (the wizard), also provides
for the printing of a Settlement Statement based on the CDF data entered for the selected file. The
Settlement Statement will be a familiar presentation of the transaction data for the Escrow Officer.
The Print Settlement Statement print dialog is shown to the right.
The one new Option is “Show Actual Title Policy Premiums”.
This option is used, in a simultaneous issue situation, when the
Seller is paying for the Owner’s policy, to have the Settlement
Statement reflect the rate manual premiums, rather than the CFPB-
mandated method of pricing of the Lender’s and Owner’s policies –
and the then-required seller credit to bring the costs paid by each
party back to the traditional pricing.
The Title Instructions can also be generated through the Print function, as can the Lender Summary
and Balance Statement. These three documents will be familiar to Impact/SQL users, as they are
unchanged from those generated with non-CDF file types.
This concludes the documentation for the 2015 Closing Disclosure Form in Impact/SQL.

USA Digital Solutions, Inc. Closing Disclosure Form v10.0.172 Manual 4/10/2015 Page 80 of 80
Appendix A - Troubleshooting
In the rare event of an error being received in Impact/SQL, the user will usually have an opportunity, on
the error message screen, to email the contents of the error message to DSI Support. It is recommended
that this be done, when the opportunity arises, and that the user keep the error on the screen and call DSI
Support (602-866-8199 x 2) to discuss the matter.
It is also possible, under the Tools menu, to view the Error Log, and email logged errors to DSI Support.
USA Digital Solutions, Inc. support personnel may ask that you make a screen shot so that you can e-
mail Support a “picture” of the screen as it appears when an error occurs.
To create this screen shot, save it and send it to the Support personnel:
Press PRINT SCRN on the keyboard, which is usually located on the top row of the keyboard, and is
usually the third key from the right.
Open your e-mail client, start a new e-mail, to [email protected], and Paste the screen shot into
the body of the e-mail. This will work if the e-mail format is HTML. If the screen shot does NOT paste
properly, follow the instructions below.
Open MS Word ® and create a new document.
Go to the top left of the screen with the cursor and from the menu select Paste, or use CTRL-V.
After the screen shot has been pasted into the document, go to the top left of the screen with the cursor
and from the menu select File > Save As. Save this document in a location from where you can send it
as an e-mail attachment (navigate to wherever you put non-Impact Microsoft Word documents). You will
have to remember the path and the document name in order to locate this document later.
After the document is saved, go to the top left of the screen with the cursor and from the menu select File
> Close to close MS Word ®.
Now e-mail the saved document as an attachment, via your normal e-mail routine, to the email address
[email protected], or to a specific address if one is provided.
USA Digital Solutions, Inc. Support personnel can be reached at (602) 866-8199 extension 2.
