the chairman’s bit - hobbyvistaipmsauckland.hobbyvista.com/images/pdf/scalemail_june_2016.pdf ·...
TRANSCRIPT

11
EDITORLance Whitford e: [email protected]
WEBMASTERRobert Willis e: [email protected]
EMAIL: [email protected] WEB: ipmsauckland.hobbyvista.com
YAHOO: groups.yahoo.com/group/ipmsaucklandFACEBOOK: Link from the IPMS Auckland Website
IN THIS ISSUE
• Chairman’s Bit 1• Bulletin Board 2• Events 4• Heinkel He-70 In Box Review 5• Gallery 17• Somua S.35 Build 18• Last Words 23
NEXT MEETING
JUNE
7.30pmTuesday 21ST JuneLone Star Café Next to ModelairKent StreetNewmarket
T H E C H A I R M A N ’ S B I T
This month’s Venue
Private Room at The Lone Star Café (next to Modelair on Kent Street)
Regular Venue Update
I went in to the Leys Institute Library last week and spoke to the foreman in charge of the earthquake proofing. He said it had always been scheduled to be a 3-month job, and while it might be finished by 21 June he was not confident of such.
Accordingly, we are going to have a “Midwinter Christmas” meeting in the Private Room which is just to the left after you enter the main entrance of The Lone Star Café which is right next to Modelair in Kent Street.The lighting is not great but some of us will bring lamps to brighten up the model tables.
The club will put $200.00 on the bar and you can order a beer, a soft drink or a barista coffee on the tab, and pay for more yourself if we burn through that money.
Modelair will stay open till 7pm so you can have a browse and pick up those essential supplies and the latest kits before heading into the meeting.
The Modelair upstairs parking area will be open again, and of course street parking is free at that time.
We should be back in the Leys Institute in July for sure.
Subscriptions are Now Overdue!!!!!!
Please pay online or to Colin at the meeting. We don’t want to have a roll-call now do we??
COMMITTEEChairman - Mark RobsonSecretary - John SwarbrickTreasurer - Colin Smith
Craig SargentLance WhitfordHenry LudlamPeter Mossong
VISIT US AT - ipmsauckland.hobbyvista.com
The monthly newsletterof IPMS, New Zealand.Auckland Branch
MAY
2016

BULLETIN BOARDEVENTS THIS MONTH & MAY CLUB NIGHT NOTES
22
Meeting Theme – Track Time!
This month Lance Whitford our resident tankie has kindly consented to conduct a short tutorial on the various types of kit-supplied and aftermarket tank tracks that are available. As always everyone is welcome to chip in with their expertise and opinion, which would be all the more relevant if you could bring examples of your work.
Model X
Thanks to all those who helped at Model X. Once again I felt that our display and the kit build exercise was a highlight of the show. Many members helped with time and models, but I need to give a special mention to Brett Peacock who not only half-filled the tables with his models but spent all 3 days there modelling, supervising and helping the kids.
To be honest I am not sure how long the show can go on looking at the dwindling number of exhibitors but crowd numbers seemed quite good and the Model X committee will be having their usual debrief in a couple of weeks.
I have to give a particular mention to Mr Simon Holdsworth from Holdsons. As always they supplied large numbers of Airfix kits for the kit build, but due to courier error the majority of the kits did not arrive. I emailed Mr Holdsworth on Saturday morning and he not only called me, but went into the factory, searched out some replacement kits and personally delivered them to the show. Amazing service!
There are always interesting conversations to be had at the show. I had a chat with a very sprightly chap in his 80s who had started work in 1943 for a company making built-up aircraft models in England. They were made of wood and fabric, but were (for the time) extra detailed and designed to be desk-top or cabinet models rather than flying ones. Many were built on commission for RAF and industry heavyweights who could afford to have bespoke models created. Apparently the company was successful for several years after the war in an air-minded country and this man had a very good eye for detail. I assume that the company faded in the face of mass-production but it was fascinating to hear from someone who was doing something very similar to what the guys at Modelair are doing for a few customers today.
Air Scouts Event I am reliably informed that our secretary John along with Henry Ludlam were present for the Air Scouts event on the weekend just gone. This is very commendable, especially John as he spent some time at Model X the previous weekend too. Apologies if I have not named any other members that were there.
The Model LeagueHenry has advised me that he intends to resuscitate the Model League and will run the judging and points table. The committee has no problem with Henry running this, as long as everyone has a choice as to whether they want their model entered or not. It is voluntary, not compulsory.

Results from the Nationals and Model Expo
You can go the IPMS Wellington website for a full listing but here are the results for the Auckland members who went down.
Scale Models Expo
Class Aircraft A2 2nd Place Craig Sargent Spitfire IIb 1/72Class Aircraft A3 1st Place Alan Sannazaro F/A-18F Super Hornet 1/72 Class Aircraft A3 2nd Place Craig Sargent F16 A Israeli oppressor 1/72Class Aircraft A4 2nd Place Craig Sargent Hurricane IIc 1/48Class Aircraft A5 1st Place Brett Sharman Hs129 1/48Class Aircraft A6 and Best Aircraft Craig Sargent AV8B Harrier 1/48Class Helicopter A9 1st Place Craig Sargent AH-1F 1/72Class B Military B2 3rd Place Lance Whitford Panzerjager FerdinandClass B Military B3 3rd Place Lance Whitford M-10 1/35Class D Dioramas D1 2nd Place Lance Whitford France 1944Class G Sci Fi G1 1st Place Craig Sargent TIE Fighter
IPMS Nationals
Class A3 1st Place Craig Sargent Tornado IDS 1/72Class A3 2nd Place Mark Robson Meteor F3 1/72Class A4 1st Place Brett Sharman F-4F Wildcat 1/48Class A4 2nd Place Brett Sharman P-40 1/48Class A4 3rd Place Brett Sharman Hawker Typhoon 1/48Class A6 1st Place Brett Sharman F-84G 1/48Class A6 2nd Place Brett Sharman F-5F 1/48Class A6 3rd Place Mark Robson Viggen 1/48Class A7 2nd Place Brett Sharman Ki-84 1/32Class B2 2nd Place Lance Whitford KV-1 1/35Class E1 1st Place Peter Randell HMS Queen Mary 1/700Class E1 2nd Place Peter Randell HMS Milne 1/700Class E1 3rd Place Peter Randell USS Cushing 1/700Class E2 2nd Place Peter Randell LCT Mk 4 1/350Class E2 3rd Place John Darlington HMNZS Southland 1/350
As you can see our representatives came away with a swag of awards so Auckland was right up there in quality.
The overall Best in Show for the Nationals went to a 1/32 resin kit of the De Havilland DH 88 Comet. While beautifully built and painted the model was (to our eyes) terribly marred by a network of crazy-paving cracks all over the very large white upper wing registration letters.After it was announced as the winner, someone apparently asked the judges about the decals and the reply was along the lines of “we didn’t see that”! Nuff said about judging….you pays your money and you takes your chances.
Cheers Mark

BULLETIN BOARD
44
Avetek Limited
CLUB SUPPORTThe following retailers have kindly agreed to offer IPMS Auckland club members a discount on their purchases upon presentation of their current IPMS Auckland Membership card.
The discount only applies on selected product lines and remains at the discretion of the retailer.
ModelAir12 Kent St NewmarketAuckland p: 09 520 123610% on kits
Stoker ModelsCnr Market Rd & Gt South RdAuckland p: 09 520 173710% on kits and modelling supplies
Avetek LimitedGwyn and Christina Avenell28 Lauren Grove, RD 2, Papakura, Auckland 2582, New Zealand.p: +64 (09) 298 4819, m: +64 (0)27 343 2290e: [email protected] Zealand Master Agents for:Auszac ECO Balsa • Bob Smith Industries - Cyanoacrylates and Epoxies • Airsail International Kitsets
TOYWORLDToyworld Henderson 56 Railside Rd, HendersonToyworld Westgate 1 Fernhill Dve, Westgate
15% Off the normal retail price on: - All models and modeling accessories- All Hornby- All Siku- All Schleich & Collecta figures and accessories- All Meccano- Lego (Excludes Lego Mindstorm’s they will be 10% if available as most have already been preordered) (Note: not in conjunction with any other promotion)
Capital Books110 Featherston StreetWellingtonhttp://www.capitalbooks.co.nz
10% off most items on presentation of IPMS Auckland Membership Card. CB has a list of current IPMS Auckland members for internet purchases.
Merv Smith Hobbies27 Davis CrescentNewmarketAuckland
10% off most items on presentation of IPMS Auckland Membership Card.

55
EVENTS
NEW MEMBERS AND SUBS ****** 2016/17 DUE ******Subs for 2016/17 due soon - see below for club account details or see the club secretary at the next club meeting.
IPMS BANK ACCOUNT NUMBER
03 0162 0012960 00
Please add your details so we know who has paid.
BULLETIN BOARD
CLUB NIGHT EVENTS
June 21st 2016 - IPMS Auckland Club Night
July 19th 2016 - IPMS Auckland Club Night
MODELLING EVENTS
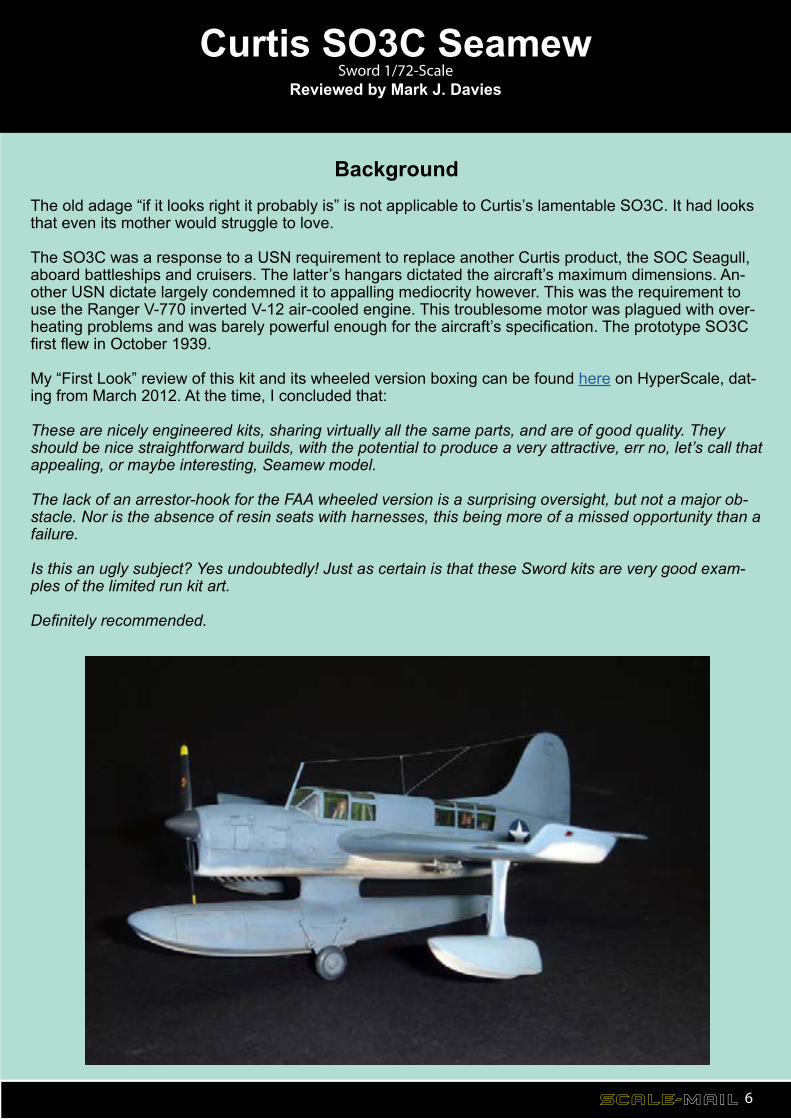
BackgroundThe old adage “if it looks right it probably is” is not applicable to Curtis’s lamentable SO3C. It had looks that even its mother would struggle to love.
The SO3C was a response to a USN requirement to replace another Curtis product, the SOC Seagull, aboard battleships and cruisers. The latter’s hangars dictated the aircraft’s maximum dimensions. An-other USN dictate largely condemned it to appalling mediocrity however. This was the requirement to use the Ranger V-770 inverted V-12 air-cooled engine. This troublesome motor was plagued with over-heating problems and was barely powerful enough for the aircraft’s specification. The prototype SO3C first flew in October 1939.
My “First Look” review of this kit and its wheeled version boxing can be found here on HyperScale, dat-ing from March 2012. At the time, I concluded that:
These are nicely engineered kits, sharing virtually all the same parts, and are of good quality. They should be nice straightforward builds, with the potential to produce a very attractive, err no, let’s call that appealing, or maybe interesting, Seamew model.
The lack of an arrestor-hook for the FAA wheeled version is a surprising oversight, but not a major ob-stacle. Nor is the absence of resin seats with harnesses, this being more of a missed opportunity than a failure.
Is this an ugly subject? Yes undoubtedly! Just as certain is that these Sword kits are very good exam-ples of the limited run kit art.
Definitely recommended.
Curtis SO3C
Curtis SO3C SeamewSword 1/72-Scale
Reviewed by Mark J. Davies
66

7
The BuildThe build was as I expected, fairly straightforward. There was predictably a little bit of flash to deal with, this being a limited-run kit; mainly found around the various openings in the cowl area. I found that most of the work effort with this build related to the fuselage.
There is fair amount to fit inside the fuselage; a resin engine, combined resin and styrene cockpit, and a combined resin and styrene radio operator/gunner’s station. The resin parts fit well inside the fuselage, although I took the precaution of thinning down the backs of the resin cockpit sidewalls. I added some cabling to the gubbins behind the pilot’s head armour and the radio, and added a small DF loop on top of the radio; all done as an approximate representation based on reference images. I left out the instrument panel to add later with its coaming, but did stick the rudder pedal bar to one fuselage side. I cheated with the gun-ring by fixing a rod between the gunner’s seat and the floor rather than try to “hang” it in position on one fuselage half first.
Whilst the resin inserts fit well, I found that both transparencies were a tad oversize in width and height, with the gunner’s canopy being a smidgeon long as well. The tiny bit of extra length was easily accommodated by trimming the edge of the rear cockpit opening. I hid the excess height by cementing a 0.010”strip of plasticard to the upper fuselage between the cockpits, and blending it in. I considered shimming the fuselage join to accommodate the extra canopy width, but I had already joined the fuselage when I realised the need. This would also have meant some shimming would be needed to ensure no gaps between the various resin detail inserts. However, I will shim the fuselage join if and when I build my wheeled version of this kit.
I also had to widen the cowl front a fraction by cutting the lower mouth and adding a shim. A better solution, that would also retain the exact air inlet shape, may be to trim the forward edges of the fuselage to cause the front to taper a little more; although the resin engine may then need to be trimmed down, or the fuselage halves ground out, to make the engine fit. I also fitted the wheeled version’s surplus tail-wheel to fill the slot it fits into; then I cut the tail-wheel off flush with the fuselage and sanded it smooth.

8
I found that the single piece horizontal stabilizer a single elevator running through to each side was hard to align horizontally and square to the tailfin. This was because the stabilizer roots moulded with each fuselage half were at different heights, making the stabilizer appear skewed when viewed end-on. My fuselage half alignment may not have been perfect, but I think the kit was also at fault. If the Seamew had had separate stabilizers, each with its own elevator, the difference could have been bal-anced out by individual adjustment. But this type of adjustment was impossible because of the single elevator joining the two stabilizer halves, so I had to remove one root and reposition it to get the stabi-lizer tail to sit level.
The wings are a butt-join, with about 75% of the lower wing-root aligning with a protruding rib moulded with the fuselage halves. I forced the upper and lower halves apart at the root using sprue scraps to achieve the correct wing root thickness in order to match the outline moulded with the fuselage. Care is needed when joining the wings to ensure they are even on both sides with matching dihedral. Some minor trimming and shimming was needed to achieve this. Once dry, the butt-join proved strong enough.
I chose to leave the main and stabilizing floats off until later in the build. I did however make a thick tab from 0.50”plasticard to insert into the main float’s pylon. I cemented this to the lower fuselage cen-treline in a position that would ensure the float fitted in the right place. This meant I could paint the float separately and fix in place using cement on the inside of the pylon, not around its base; thus ensuring a join a that would not damage finished paintwork with any oozing excess cement. The tab also proved to be handy clamping paint for a haemostat to hold the model during painting. Up to this point only a little filler had been required, mainly around the shimmed areas of the wing-roots, and a bit where I had relocated a stabilizer root. The soft limited-run styrene is easy to work with, whether sanding and polishing, or re-scribing lost detail.

9
I did the painting with the floats off, and then joined the main float afterwards, but left the stabilizer floats off until almost the build’s end. A few little jobs I attended to were to thin the prop blades a little, drill out the holes in the bomb racks and add sway-braces from fuse wire, drill the holes in the beach-ing gear, plus scratch-build a pitot and antenna mast as the kit items were a little clunky. The resin exhausts fit from the outside, and I found that I needed to trim down the blocks the exhaust stacks are attached to in order to have them sit inside the cowl slots enough. A word of advice here – Avoid snapping an exhaust stack off and loosing it to the carpet monster as I did; they are very fiddly items to carve from scrap plastic!
I suspect that I have made building this kit appear harder than it in fact was. Most of the issues are typical of limited-run kits, and none was difficult to overcome. The kit was completed in six evenings of building, two of these being taken up with painting and decaling.
Painting & Decaling
I chose one of the two out of the box schemes. A mate of mine is building the same kit and had already chosen to do the more colourful three-tone USN camo-scheme with red outlined stars and bars. This suited me, as I have always liked the simplicity of the scheme I finished mine in.I use several brands of paint, and am not fussy about using enamels, lacquers or acrylics on the same model. It just so happened that the colours I needed came from my stock of Model Master matt enam-els. This of course meant I needed a gloss coat for decaling and weathering. I normally either use car-painter’s clear lacquer or Future for this. I chose Future because Model Master is a delicate paint, and there would be no compatibility issues. I have brushed and sprayed Future, but tend now to spray at about 30-psi to get good atomization, and sometimes hurry things along with hairdryer between coats.The kit’s Techmod decals were great to use, and settled into a bed of fresh brushed Future. No wet-ting or solvent agents were needed. Weathering was with oil washes, some dry-brushing and a mix of

10
Conclusion
This was an enjoyable and, as limited-run kits go, a fairly straightforward build. I have to admit that a little more effort was needed than my “First Look” review foresaw, but in my defence, I think the issues I found can only be discovered by building. Besides, one of the most important ingredients needed to build limited-rum kits is optimism! So don’t let my account put you off building a Sword Seamew. After all, forewarned is forearmed, and it really is quite an easy kit to build.
The key conclusion from my “First Look” review still stands with regard to this kit – Definitely recom-mended.
Thanks to Sword Models for this review sample.
Review Text & Images Copyright © by Mark J Davies, 2014

CLUB NIGHT MODELS
GALLERY
11
This month we’re trying something a little different with the gallery.
Instead of trying to squeeze the photographs from Club Night onto these pages, we’ve decided to try a new gallery format on the clubs website. This means larger images with higher resolution - so you can see all those previously unnoticed finger-prints in hi-def.....
So, for your viewing pleasure, please visit the gallery pages for 2016 on the website or get there by following this link:
http://ipmsauckland.hobbyvista.com/galleries_2016.html

1212
Heller 1/72 Somua S.35Reviewed by Mark J. Davies
Background
The Somua S.35 equipped French cavalry divisions and was intended for the exploitation phase of the battle, as the French army believed in separate types of tank for breakthrough and exploitation roles.
The S.35 was in many respects a very well designed tank for its time; it’s armour and armament being superior to most of its contemporaries. It also featured self-sealing fuel tanks and a fire suppression system using Methyl Bromide (A good idea no doubt, but this fire suppressant is a poisonous gas that the crew would not want to be exposed to for too long!).
On paper at least the S.35 would appear to quite possibly be the best medium tank at the beginning of WW2. However it had several faults and weaknesses: It was mechanically unreliable, and the suspension needed considerable servicing and maintenance yet was hard to access. The single-man turret resulted in a severely overworked tank commander, which in turn limited tactical effectiveness. There was no hatch in the turret’s cupola, which gave the commander a choice of protection and severely restricted vision, or good visibility and considerable exposure to wounding as he sat on the open fold-down hatch at the rear of the turret. Radios were intended for all S.35’s, but the reality due to shortages was that below company HQ level only platoon commander’s vehicles generally had them. Again this imposed tactical limitations by comparison to their German adversaries.
The Germans used a number of S.35 following the fall of France. They modified the cupola by giving it a hatch, and some fought in Finland against the Russians.The Kit
I have a fondness for French tanks of WW2, and so was pleased to pick up the Heller kit of the Somua S.35 on an on-line auction.
This was my first Heller AFV kit, and at first I thought the parts looked pretty good, promising a simple build. The tan styrene seemed quite crisply moulded, it had nice engine deck detail, and the complex shape seemed to be well captured. However, the gun barrel looked a bit out of round and under-nourished in size. The worst feature by far was the horrible thick silver vinyl strips supposedly representing the tracks. They had a complete absence of detail on the inside surface; instead there were thick and smooth rail-like surfaces.
The Build
I thought I should consult some references as my initial enthusiasm was beginning to wane. I came across some build photos of a 1/35 scale Heller S.35 and began to realise just how much detail my kit was lacking. More checking of plans and photos only confirmed this.
Undaunted, I started to throw parts together only to find that the fit was not brilliant around the rear hull and that a bit of filler was needed here and there where the superstructure and hull joined.
It’s probably best to run through a list of additions I made from the ground up, and then direct the reader to photos of my model prior to painting.
The model is quite small, and I apologise for the rather poor photography…

1313
I added quite a few rivets and bolts to the suspension armour and hull front by drilling fine holes and inserting thin rod. Riveted strips fixed to this armour were made my impressing rivets in 0.005” plastic-card cut into thin strips.
The S.35 has what I assume could be fuel tanks or stowage lockers on the side of the superstructure. The 1/35 build I looked at showed these as being strapped on, so I made fuse-wire rails and straps form thin lead foil.
The engine deck hatches had numerous thin handles on long attachments. These were poorly moulded on the kit, so I made new ones from fuse wire. The moulded handrail above the left hull side-hatch was removed and replaced with one from fuse wire.
The real tank’s exhaust pipes had fluting along their length, whereas the kit’s are smooth. I tried to represent this by using stretched sprue.
The headlight was drilled out and made from clear plastic and I also drilled out whatever the inverted U-shaped object is on the front-left track guard.
Some vision blocks were missing or poorly represented. I used a combination of plastic card and adhesive aluminium tape to represent these. In several cases I razor-sawed the vision slit into the plastic, and then filled either side with plastic scrap.
The turret had various plastic and foil additions. Lifting hooks made from sections of plastic tube and added to the turret and hull. These additions are all better explained by looking at the photos of the unpainted model. Anything that is not light brown plastic is a scratch-built modification or filler.

1414
I decided to make a new gun barrel by turning a brass rod in an electric handyman drill, and used a file to get it to taper satisfactorily. I made the muzzle by drawing heated plastic tube over a piece of metal rod, and cut the resultant thin tube to length. The coaxial machine gun was replaced with a piece of hypodermic needle.
I made teeth for the rear drive sprocket from plastic card after trying a variety of ways to represent these.The tracks were a real disappointment. Mine was an old kit, and the track proved to be much too short to encompass the running gear. Having decided that they were also too thick I chose to thin them down, figuring that this would give me some extra useable length when curved around the running gear. I basically shaved the thick rail-like moulding from the inside of the tracks until they were about half their original thickness. I managed to slice right through each track once, which meant I now had a total of four track joins to make.
And so arose the next problem; even after thorough washing, no matter what glue I tried, nothing would stick the tracks together. In the end I welded them with a heated blade. It worked quite satisfactorily, and is hard to see when the model is mounted on a base.
Painting was a combination of some Gunze green (I can’t recall which) sprayed on and Humbrol Light Oak patches brushed on. The decals worked fine, despite not looking that smart on their backing paper.
ConclusionThe kit is rather lacking in detail, and the lack of drive sprocket teeth is almost unforgivable on a tank. The tracks are just plain dreadful. But it still looks like an S.35, and is redeemable.
My model is far from perfect. The challenges of adding detail and fixing things increased my enjoyment and sense of achievement, but it captures the look of an S.35 well enough for my satisfaction. So I guess it met most of the requirements you could hope for from a kit.

1515

1616

1717
Addendum:I first wrote this article in 2009, and have since found that Armory offers a set that fixes all and more of the issues I have covered:
And OKB Grigorov does asset of resin tracks and PE drive sprockets and idlers.
Copyright © Mark J Davies, 2016

1818
RESIN ROUND-UPAnother ‘Peek in the box’ by Pete M.
Vector 1:48 Norden bombsight VDS48097.Yet another in Vector’s WWII Correction Series, this small set supersedes all the previous attempts from kit makers to portray the main US bomb sight used during WWII.(pic vnorden)
The resin mouldings are as usual from Vector, sharp and clean, with an easily removed ‘runner’. Going by the photos of the Norden sight in my files, the two sights provided in this set are the closest to the real item I have ever seen.
A very necessary addition to one’s B-17s, B-24s, B-25s, A-20s, B-26’s et all!No more need to put a cover over most kit’s poorly represented (and very visible) items, unless you do want to portray them with the security cover as often used when parked!(pic vnordena)
Nice one Vector, and here’s hoping we will also see a few of the RAF’s common bomb sights coming from you as well?????

I am a bit of a tool collector and love finding new gizmos that will make my life easier. I have become a bit of a troll lately when it comes to internet shopping on sites such as Ali Express, EBay and TradeMe. I find that I frequently stumble on some really useful stuff and quite a few bargains as well. As I find things worth sharing I’ll post a review in this column.
My first post covers micro drill bit sets I sourced via AliExpress. These are drill bits, made in Japan that are milled from Tungsten steel. They come in packs of 10 and are available in various size ranges. You can also get packs containing 10 of a single size is useful for those heavily used tiny bits that have a higher casualty rate.
I got a set with 1.1 – 2.0 mm bits which worked out to around $6.50 including shipping and 2 sets with 0.1 mm to 1mm which worked out at around $4.30 per set. I ordered 2 sets of the smaller bits as I was not sure how robust they would be. So far I can report no casualties but its early days. The key to longevity with the finer bits is to not apply too much pressure when drilling. Each bit is colour coded with a ring of plastic which is permanently fixed to the shank. One thing that surprised me was that although each bit has a unique colour the colour combinations aren’t consistent from pack to pack.
I have done a little experimentation with them and am very happy so far. I am mostly concerned with drilling styrene and these bits perform well in this regard. That standard sized shank is good for doing quick bit changes. The shank is too large for standard modelling pin vices so you have to use one with a larger chuck. I have a ‘Pin tong’ from G & R Warburtons which is basically a type of pin vice with a larger chuck. These currently cost around $5 according to Warburton’s web site. I also tried some of the larger bits with my DIY electric screwdriver and cordless drill. I use the 18 volt cordless drill for big jobs like removing large sections of plastic where I drill series of holes and then finish the job with knife and files.
REQ0733329
19
Tool Time By Lance Whitford

From The EditorThis is my first official edition of Scale Mail. The philosophy is about continuity and sticking with a winning formula. I’d like to express my gratitude to Rob Willis for supporting me in getting up to speed with everything and for doing one last issue while I was swanning around Thailand last month.
I’d like to thank Mark Davies and Peter Mossong for their contribution of original content, without which the publication would be an uninspiring affair. I’d like to call on other members to see what they can do so that we can get good variety from as wide a cross section of the membership as possible.
LAST WORDS
And as usual - check out the IPMS Auckland website as we’re trying to keep the content a bit more dynamic. We won’t be regurgitating content found on other websites but will provide links to sites we
think are of interest to members.
I picked up a couple of other useful items in the same order as the drill bits,. Firstly a drill chuck adaptor that lets me use bits as small as 0.3 mm in my handyman cordless drill. In a similar vein as quick change hex shank drill chuck adaptor to use with my cordless screwdriver. There is a bit of play around the shank with this one but a layer or 2 of Tamiya tape around the shank will sort that out.This too will take bits as small as 0.3mm. Similar items can be sourced here but not for the $4 all up that I paid for each of them.
20
20